1
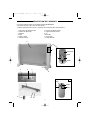
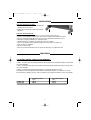
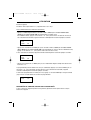
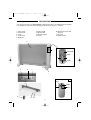
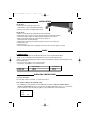
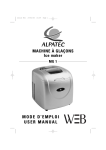
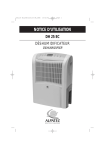
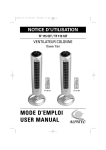
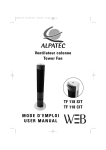
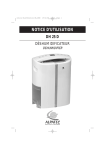
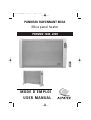
notice PR3MBE
28/03/07
15:58
Page 1
PANNEAU RAYONNANT MICA
Mica panel heater
PR3MBE 1500, 2000
MODE D’EMPLOI
USER MANUAL
notice PR3MBE
28/03/07
15:58
Page 2
F R A N Ç A I S
ALPATEC vous félicite d’avoir choisi ce produit et vous remercie de votre confiance.
Pour votre confort et votre sécurité, votre article a été vérifié à toutes les étapes
de sa fabrication et a passé avec succès tous nos tests de qualité.
Nos produits sont conçus pour vous plaire tant par leur design que par leur facilité
d’utilisation et dans l’objectif constant de vous apporter complète satisfaction.
CONSIGNES DE SÉCURITÉ
• LIRE ATTENTIVEMENT CETTE NOTICE AVANT LA PREMIÈRE UTILISATION DE L’APPAREIL.
• Vérifier que le voltage indiqué sur la plaque signalétique de l’appareil correspond bien à celui de votre
installation électrique. Si ce n’est pas le cas, adressez-vous à votre revendeur et ne branchez pas
l’appareil.
• Ne jamais laisser à la portée d’enfants et ne pas les laisser utiliser l’appareil.
• Cet appareil est destiné à un usage domestique et selon les instructions du manuel.
• Vérifier régulièrement l’état du cordon d’alimentation. Ne jamais utiliser l’appareil si le cordon
d’alimentation, la prise ou l’appareil sont endommagés.
• L’appareil ne doit pas être placé juste en dessous d’une prise de courant.
• Le cordon d’alimentation ne doit en aucun cas être en contact avec les parties chaudes de l’appareil.
• Garder l’appareil à une distance minimum d’un mètre d’objets inflammables tels que les rideaux,
textiles…
• Ne pas couvrir l’appareil.
• Ne jamais plonger l’appareil dans l’eau ou tout autre liquide. Ne pas utiliser trop près d’une baignoire,
d’une douche ou d’une piscine. Respecter une distance minimale de 60 cm.
• Ne jamais utiliser l’appareil à l’extérieur.
• Ne pas utiliser l’appareil avec les mains mouillées ou humides.
• Pour éviter tout risque de brûlures, ne pas déplacer l’appareil lorsqu’il est chaud.
• Ne jamais utiliser l’appareil sur ou près de surfaces chaudes.
• Ne jamais déplacer ou débrancher l’appareil en tirant sur le cordon d’alimentation.
• Avant de ranger l’appareil, s’assurer qu’il est bien débranché et complètement refroidi.
• Débrancher l’appareil avant de le nettoyer.
• Ne pas nettoyer l’appareil avec des produits chimiques abrasifs.
• Ne pas introduire d’objets métalliques pointus, ni vos doigts dans l’appareil pour ne pas l’endommager et
éviter tout risque de choc électrique.
• Ne jamais utiliser d’autres accessoires que ceux livrés et recommandés par le fabricant. Ceci peut être
dangereux et risque d’endommager l’appareil.
• Ne jamais réparer l’appareil vous-même. Vous perdriez le bénéfice de la garantie. Comme tout appareil
électrique, il doit être réparé par une personne qualifiée. De même, le changement du cordon
d’alimentation représente un réel danger et il est nécessaire de contacter un réparateur agréé.
LE FABRICANT NE SAURAIT ÊTRE TENU POUR RESPONSABLE DE LA MAUVAISE
UTILISATION DE L’APPAREIL.
CONSERVER SOIGNEUSEMENT CE MODE D’EMPLOI.
2
notice PR3MBE
28/03/07
15:58
Page 3
DESCRIPTION DE L’APP AREIL
• Ce nouveau radiateur utilise la technologie de pointe MICATHERMIC.
• Cet appareil peut être utilisé dans les salles de bain
(indice de protection IP24 et Classe I : protection contre des projections d’eau, Volume 2).
1- Interrupteur de fonctionnement
2- Tableau de commandes
3- Roulettes
4- Pieds
5- Grille en métal
6- Poignée intégrée
7- Encoches de fixation murale
8- Support de fixation murale
9- Vis
10- Chevilles
11- Cache pied
12- Télécommande
5
2
1
AFFICHAGE
MODE
+
ARRÊT
TEMPS
4
7
6
7
3
12
ARRÊT
8
+
MODE
TEMPS
11
9
10
3
notice PR3MBE
28/03/07
15:58
Page 4
INST ALLA TION
Pour une utilisation sur pieds :
• Clipser les pieds (4) de chaque côté de l’appareil
comme décrit sur le schéma.
• Vérifier le bon montage des pieds avant d’utiliser
l’appareil.
Pour une utilisation murale :
• Marquer l’emplacement de la première vis sur le mur. (environ 1 mètre du sol)
• Percer un trou de diamètre adapté à la vis puis insérer la cheville (12) à l’aide d’un marteau.
• Placer le support de fixation (10) en face du trou et visser légèrement la première vis (11).
• Remonter le support parallèlement au sol afin de trouver
l’emplacement de la seconde vis (à environ 15,8 cm) puis le marquer.
• Percer à cet endroit un trou de diamètre adapté à la vis puis insérer la cheville (12).
• Visser les deux vis fermement.
• Clipser les caches pieds.
• Placer les encoches de fixation (9) sur le support au niveau des vis. L’appareil est fixé.
FONCTIONS
• CET APPAREIL POSSÈDE 3 MODES DE FONCTIONNEMENT :
« LOW » : il chauffe à puissance réduite pendant la durée programmée (impossible d’utiliser cette fonction
sans programmation).
« HIGH » : il chauffe à pleine puissance pendant la durée programmée (impossible d’utiliser cette fonction
sans programmation).
« AUTO » : la température désirée peut-être réglée sur une plage allant de 7°C à 35°C.
Si la différence entre la température demandée et la température ambiante est supérieure à 6°C, l’appareil chauffera en pleine puissance, si elle est inférieure à 6°C l’appareil chauffera en puissance réduite.
PR3MBE 1500
PR3MBE 2000
PLEINE PUISSANCE
“High”
1500 W
2000 W
PUISSANCE RÉDUITE
“low”
1000 W
1300 W
4
notice PR3MBE
28/03/07
15:58
Page 5
UTILISA TION
Brancher l’appareil.
Positionner l’interrupteur latéral sur 1, l’appareil émet un son « bip ».
Avec la télécommande ou le tableau de commandes :
- Appuyer sur MODE l’appareil démarre en mode « LOW » (1000 W pour le modèle PR3MBE 1500 et
1300 W pour le modèle PR3MBE 2000), la programmation est réglée sur 4h.
Pour modifier la durée, appuyer sur les touches + et – (vous pouvez choisir une durée de 1h à 16h). Si
vous sélectionnez la durée 0h, l’appareil s’éteindra automatiquement au bout de quelques secondes.
LOW
22°C
TIME
4H
- Appuyer une seconde fois sur MODE pour passer en mode « HIGH » (1500 W pour le modèle PR3MBE
1500 et 2000 W pour le modèle PR3MBE 2000). La programmation se remet sur 4h. Pour modifier la durée,
appuyer sur les touches + et – (vous pouvez choisir une durée de 1h à 16h).
Si vous sélectionnez la durée 0h, l’appareil s’éteindra automatiquement au bout de quelques secondes.
HIGH
22°C
TIME
4H
- Appuyer une troisième fois sur MODE pour passer en mode AUTO. Régler la température désirée avec
les touches + et - .
La programmation peut être utilisée mais n’est pas automatique. Appuyer sur la touche TEMPS puis sur
les touches + et – pour sélectionner le temps désirée. Si vous sélectionnez la durée 0h, l’appareil
s’éteindra automatiquement au bout de quelques secondes.
Si la fonction programmation est activée par erreur, appuyer sur la touche MODE pour changer de mode
jusqu’à revenir au mode AUTO. Ceci annulera la programmation.
22°C
AUTO
7°C
POUR ARRÊTER LE CHAUFFAGE, APPUYER SUR LA TOUCHE ARRÊT.
Si vous n’utilisez pas l’appareil pendant un long moment, positionner l’interrupteur latéral sur 0 puis
débrancher l’appareil.
5
notice PR3MBE
28/03/07
15:58
Page 6
DÉP AR T DIFFÉRÉ
PROGRAMMATION DÉPART DIFFÉRÉ
• Pour programmer un départ différé, allumer le chauffage comme vu précédemment, et régler le mode de
fonctionnement.
• Appuyer simultanément pendant quelques secondes sur les touches MODE et TEMPS, l’appareil arrête
de fonctionner et sur l’écran apparaît « Timer 1H ».
• Appuyer sur les touches + ou – pour régler le temps souhaité. La plage horaire s’étend de 1h à 8h.
Lorsque le temps programmé se sera écoulé, l’appareil démarrera.
TIME
8H
POUR ANNULER LE DÉPART DIFFÉRÉ
Appuyer sur la touche MODE pour annuler le départ différé et choisir le mode de fonctionnement.
Ou appuyer sur l’interrupteur M/A (1) et l’appareil reste éteint.
NETTOY AGE
• Avant de procéder au nettoyage de l’appareil, assurez-vous qu’il est éteint, débranché et refroidi.
• Nettoyer l’extérieur de l’appareil avec un chiffon sec pour le débarrasser de la poussière.
• Ne pas utiliser de solvant ou de produits abrasifs.
6
notice PR3MBE
28/03/07
15:58
Page 7
E N G L I S H
ALPATEC thanks you for buying this product and hope you will be totally
satisfy with it. For your comfort and security all the steps of the manufacturing have
been checked and the product succeeded in all our quality tests.
ALPATEC’s products : their design and facility of use make you like them.
CAUTION
Read all these instructions carefully before using this product.
• Make sure that the voltage rating on the type plate corresponds to your main voltage. If not, see your
retailer and do not connect the appliance.
• Keep out of children or incompetent persons and do not allow them to operate this appliance.
• Only use the appliance for domestic purposes and in the way indicated in these instructions.
• From time to time, check the cord for damages. Never use the appliance if cord or appliance show any
sign of damage.
• Never place the appliance under any electrical connector.
• Make sure that the connection cord does not touch any hot surface.
• Keep combustible materials such as drapes, clothing, towels away from the appliance.
• Do not cover the appliance.
• Keep the appliance at least 1 meter away from walls and any other thing, to permit a good air circulation.
• Never immerse the product in water or any liquid for any reasons. Do not use it at less than 60 cm of a
shower, a bath-tub or a swimming-pool.
• Do not use the appliance outdoor.
• Do not use if you have wet hands.
• Never use the appliance on or near hot surfaces.
• Never move or range the appliance by pulling the cord.
• To avoid any risk of burn, never move the appliance when it is hot.
• Before tidying the appliance, make sure that it is unplugged from the power and that it is completely
cooled.
• Unplug the appliance before cleaning.
• Do not clean the appliance with abrasive chemicals.
• Do introduce neither metallic objects, nor fingers inside the appliance in order to protect you from electrical shock.
• Never use accessories that are not recommended or supplied by the manufacturer. It could constitute a
danger to the user and risk to damage the appliance.
• All interventions made by a non-qualified person can be dangerous; in this case guarantee conditions
would cancel. As all electrical products, a competent electrician must repair it.
THE MANUFACTURER WILL NOT ASSUME ANY RESPONSIBILITY IN CASE OF NON ADHERENCE TO
THIS RECOMMENDATION
SAVE THESE INSTRUCTIONS CAREFULLY
7
notice PR3MBE
28/03/07
15:58
Page 8
DESCRIPTION
• This new type of heater uses MICATHERMIC heating element which is the leading heating technology.
• This appliance can be used in bathroom (degres of protection IP 24, Class I : volume 2).
1- Power switch
2- Control panel
3- Caster
4- Caster frame
5- Metal grid
6- Built-in handle
7- Mounting hole
8- Mounting support
9- Screws
10- Mounting anchor for wall
mounting
11- Cover feet
12- Remote control
5
2
1
AFFICHAGE
MODE
+
ARRÊT
TEMPS
4
7
6
7
3
12
ARRÊT
8
+
MODE
TEMPS
11
9
10
8
notice PR3MBE
28/03/07
15:58
Page 9
INST ALLA TION
On the floor :
• Fix the two caster frames (6) at each side
of the heater as shown in the following diagram.
• Chek the caster frames installation before using.
On the wall :
• Mark first screw hole on the wall (about one meter from floor).
• Drill first hole, then insert first screw anchor (12) into the first hole with a hammer.
• Put mounting support (10) on the wall and tighten lightly the first screw (11).
• Mark second screw hole on the wall by raising the support in
parallel to the floor. (at about 158 mm)
• Drill second screw into the second hole and then insert the screw anchor (12).
• Tighten both screws.
• Fix the cover feet
• Place the mounting holes of the support (9) at level of screws. Then the appliance is fixed.
MODE
3 RUNNING MODES :
“LOW” : it runs in low power for the desired time (never use this function without timer)
“HIGH” : it runs in high power for desired time (never use this function without timer)
“AUTO” : set the desired temperature from 7°C to 35°C. If the difference between room temperature and
desired temperature is
- more than 6°C, the appliance runs in high fan heater
- less than 6°C, the appliance runs in low fan heater
HIGH POWER
1500 W
2000 W
PR3MBE 1500
PR3MBE 2000
LOW POWER
1000 W
1300 W
OPERA TING INSTRUCTION
PLUG THE APPLIANCE.
Turn the power switch to 1 position , as sound can be heard.
WITH REMOTE CONTROL OR CONTROL PANEL :
- Press MODE touch. The appliance starts in LOW mode (Its power is 1000 W for PR3MBE 1500 and
1300 W for PR3MBE 2000), the timer is set on 4 hours. To modify selected time, press + or – touch ( from
1 hour to 16 hours). If you select 0h, the appliance stops automatically a few seconds later.
LOW
22°C
TIME
4H
9
notice PR3MBE
28/03/07
15:58
Page 10
- To select HIGH mode, press again MODE touch. The timer is set on 4 hours. To modify selected time,
press + or – touch ( from 1 hour to 16 hours). If you select 0h, the appliance stops automatically a few
seconds later.
HIGH
22°C
TIME
4H
- To select AUTO mode, press again MODE touch. Set desired temperature by pressing + or – touch.
To use timer, press TIMER touch. Set desired time by pressing + or – touch. If you select 0h, the
appliance stops automatically a few seconds later.
To cancel timer function, press MODE touch until reselect AUTO mode.
22°C
AUTO
7°C
- To stop the appliance, press ARRET touch.
If you did not use the appliance for a long time, turn the power switch to 0 position and unplug the
appliance.
TIMER
SETTING OF THE TIME OF START
Press MODE button and choose the operating mode.
Press down buttons MODE and TIMER simultaneously for few seconds. Then the heater stops working and
displays the time of start.
Press + and – buttons to set the time: from 1h to 8h. When it reaches the set time of start, the heater will
automatically be restored to the operating mode set and starts to heat.
TIME
8H
TO CANCEL TIMER
Press MODE button, and the appliance starts immediately.
Press On/off button (1) and the appliance is off.
MAINTENANCE
• Before any cleaning or maintenance operation, switch off and unplug the appliance.
Ensure it is perfectly cooled.
• To remove the dust, wipe your appliance with a cloth.
• Never use abrasives or detergents.
10
notice PR3MBE
28/03/07
15:58
Page 11
NORME DES APPAREILS DE SALLE DE BAIN
VOLUME 0 : intérieur de la baignoire ou de la douche.
Aucun appareil de chauffage électrique.
VOLUME 1 : situé au dessus de la baignoire jusqu’à une hauteur de 2,25m.
Aucun appareil de chauffage électrique.
VOLUME 2 : largeur de 60cm après le volume 1 sur une hauteur de 3m.
Appareils de chauffages électriques IPX4 ou bien IPX3 et classe II.
VOLUME 3 : largeur de 2,40m après le volume 2 sur une hauteur de 2,25m.
Appareils IPX4, IPX3 et classe I, IPX1 et classe I ou II.
ON TROUVE PARFOIS LES SYMBOLES :
IPx1
IPx3 ou IPx4
11
notice PR3MBE
28/03/07
15:58
Page 12
Indications relatives à la protection de l’environnement
Au terme de sa durée de vie, ce produit ne doit pas être éliminé avec les ordures ménagères mais doit
être remis à un point de collecte destiné au recyclage des appareils électriques et électroniques. Le
symbole figurant sur le produit, la notice d’utilisation ou l’emballage vous indique cela. Les matériaux
sont reyclables conformément à leur marquage. Vous apporterez une large contribution à la protection
de l’environnement par le biais du recyclage, de la réutilisation matérielle ou par les autres formes de
réutilisation des appareils usagés. Veuillez vous adresser à votre municipalité pour connaître la déchetterie compétente.
Instructions on environment protection
Do not dispose of this product in the usual household garbage at the end of its life cycle ; hand it over a collection point
for the recycling of electrical and electronic appliances. The symbol on the product, the instructions for use or the
packing will inform about the methods of disposal. The materials are recyclable as mentioned in its marking. By recycling
or others forms of re-utilization of old appliances, you are making an important contribution to protect our environment.
Please inquire at the community administration for the authorized disposal location.
03-07
12