1
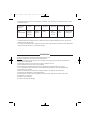
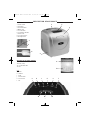
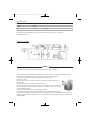
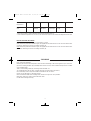
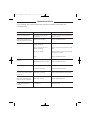
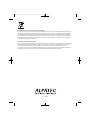
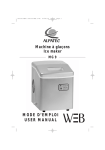
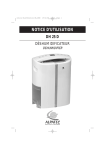
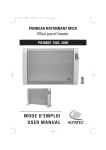
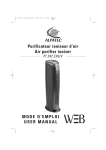
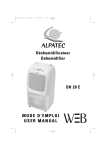
notice MG6: notice MG1
27/01/10
14:40
Page 1
MACHINE À GLAÇONS
Ice maker
MG 6
MODE D’EMPLOI
USER MANUAL
notice MG6: notice MG1
27/01/10
14:40
Page 2
F R A N Ç A I S
ALPATEC vous félicite d’avoir choisi ce produit et vous remercie de votre confiance.
Pour votre confort et votre sécurité, votre article a été vérifié à toutes les étapes
de sa fabrication et a passé avec succès tous nos tests de qualité.
Nos produits sont conçus pour vous plaire tant par leur design que par leur facilité
d’utilisation et dans l’objectif constant de vous apporter complète satisfaction.
CONSIGNES DE SECURITÉ
Dans toute utilisation d’appareils électriques, des précautions de base sont à respecter.
LIRE ATTENTIVEMENT CETTE NOTICE AVANT LA PREMIERE UTILISATION DE L’APPAREIL.
• Vérifier que le voltage indiqué sur la plaque signalétique de l’appareil correspond bien à celui de votre
installation électrique. Si ce n’est pas le cas, adressez-vous au revendeur et ne branchez pas
l’appareil. Toute erreur de branchement annule la garantie.
• Ne pas laisser l’appareil à la portée des enfants.
• Cet appareil est destiné à un usage domestique. Il doit être utilisé selon les instructions du manuel. Ne
jamais l’employer pour d’autres usages.
• Vérifier régulièrement l’état du cordon d’alimentation. Ne jamais utiliser l’appareil si le cordon
d’alimentation, la prise ou l’appareil sont endommagés.
• La longueur du cordon de cet appareil a été calculée pour réduire les risques d’accidents. Ne pas
utiliser une rallonge.
• Ne jamais utiliser l’appareil à l’extérieur.
• Prendre soin de brancher et débrancher la prise correctement pour éviter tout risque de rupture du
câble d’alimentation.
• Débrancher l’appareil avant de le nettoyer ou d’effectuer le remplacement d’un élément.
• Ne pas introduire d’objets dans l’appareil pour ne pas l’endommager et éviter tout risque de choc électrique.
• Ne jamais utiliser d’autres accessoires que ceux livrés et recommandés par le fabricant. Ceci peut être
dangereux et risque d’endommager l’appareil.
• Ne jamais réparer l’appareil vous-même. Vous perdriez le bénéfice de la garantie. Comme tout appareil
électrique, il doit être réparé par une personne qualifiée. De même, le changement du cordon
d’alimentation représente un réel danger et il est nécessaire de contacter un réparateur agréé.
PRECAUTIONS SPECIFIQUES
• Ne placer aucun objet devant le ventilateur (située à l’arrière de l’appareil).
• Par soucis d’efficacité, veiller à laisser un espace libre d’au moins 20 cm tout autour de l’appareil.
• Pour éviter tout risque de vibration ou de débordement, placer l’appareil sur un surface plane et stable
à même de supporter le poids de la machine (16 Kg).
• Veiller à positionner l’appareil de telle sorte que vous puissiez ouvrir facilement la trappe supérieure
sans avoir besoin de déplacer la machine.
• Veiller à toujours éteindre et débrancher l’appareil si celui-ci n’est pas utilisé pendant une longue période.
• Attention : ne pas toucher l’évaporateur pendant que l’appareil est en marche
(EVAPORATEUR = ELEMENT REFRIGERANT).
LE FABRICANT NE SAURAIT ÊTRE TENU POUR RESPONSABLE DE LA MAUVAISE UTILISATION DE L’APPAREIL.
CONSERVER SOIGNEUSEMENT CETTE NOTICE
2
notice MG6: notice MG1
27/01/10
14:40
Page 3
DESCRIPTION DE L’APPAREIL
1
1. Tableau de commandes
2. Couvercle
3. Fenêtre de contrôle
4. Réservoir à eau
5. Bac à glaçons
6. Unité de fabrication des glaçons
7. Cordon d’alimentation
8. Pelle à glaçons
9. Bouchon de vidange
3
2
7
9
8
4
DESCRIPTIF DU TABLEAU DE COMMANDES.
10. Départ / Arrêt
11. Sélecteur de taille
12. Haute température
Indicateur lumineux :
a. petits glaçons
b. glaçons moyens
c. gros glaçons
d. manque d’eau
e. bac à glaçons plein
f. haute température
6
5
a
b
c
d
11
10
3
e
12
f
notice MG6: notice MG1
27/01/10
14:40
Page 4
CARACTÉRISTIQUES TECHNIQUES
Capacité
15 à 18 kg de glaçons / jour
Puissance
160 W
Voltage
230 V
Gaz
R 134 a
0,065 Kg
Contient du gaz à effet de serre relevant du protocole de KYOTO. Hermétiquement fermé.
SCHÉMAS ÉLECTRIQUE
UTILISATION
Note : la machine ne doit pas fonctionner plus de 5h d’affilée. Toute les 5h arrêter la production de
glaçons pendant 1h.
- Avant la toute première utilisation, laisser la machine sur un plan horizontal pendant 5h.
- Procéder à un nettoyage avant la première utilisation ou si vous n’avez pas utilisé votre machine
pendant une longue période (voir paragraphe entretien page 5).
- Par soucis d’efficacité, veiller à laisser un espace libre d’au moins 20 cm tout autour de l’appareil.
- Brancher la machine
- Ouvrir la trappe d’accès (2). Si c’est la première utilisation, retirer la pelle à glaçons (8).
- Remplir le réservoir à eau (4) avec de l’eau potable dans la limite de 2,3 l.
- Utiliser la touche Mode (11) pour sélectionner la taille des glaçons. Chaque pression change la taille
suivant le principe petit -> moyen -> gros -> petit . La taille peut être modifiée à tout moment.
- Appuyer sur la touche M/A (10). Quelques instant après la production démarre.
- La machine fonctionne par cycle de 7 minutes pour les petits glaçons, 9 pour les moyens et 11 pour les
gros.
- Les premiers cycles peuvent être un peu plus longs et ne pas produire 12 glaçons.
4
notice MG6: notice MG1
27/01/10
14:40
Page 5
- La taille des glaçons est liée à la température ambiante, aussi nous vous conseillons de tenir compte
du tableau suivant :
Température
ambiante
<= 10°C
10 à 15°C
15 à 20°C
20 à 25°C
25 à 32°C
>= 32°C
Taille
recommandée
Ne pas
faire de
glaçons
Petits et
Moyens
Petits,
Petit
Moyens
et Gros
HT *
Gros
Ne pas faire
de glaçons
- Lorsque le bac à glaçons est plein, la machine s’arrête et l’indicateur (e) s’allume.
* si la température est supérieure à 25°C, utiliser la fonction HT (Haute Température) (12). La machine
adaptera son temps de cycle.
- Pour mettre fin à la fabrication de glaçons appuyer sur M/A (10) lorsque la production sera redémarrée
l’appareil commencera par un cycle de démoulage.
ENTRETIEN
- Avant toute opération d’entretien, débranchez votre machine.
Attention : prendre soin de ne pas toucher l’évaporateur.
- Retirez tous les glaçons de l’intérieur de la machine (bac à glaçons (5) et unité de fabrication des
glaçons (6) le cas échéant).
- Retirez le bac à glaçons en le tirant vers le haut, le nettoyer avec du
liquide vaisselle et le rincer avec de l'eau potable.
- Retirez le bouchon de vidange (9) à l’arrière de la machine, le surplus d’eau va s’écouler.
- Pour complètement vider la machine, l’incliner légèrement (attention à ne jamais dépasser 45°
d’inclinaison) vers l’arrière.
- Utilisez un chiffon doux et humide pour nettoyer l’intérieur et l’extérieur de la machine.
- N’utilisez pas de détergents ou de produit abrasif.
- Rincez plusieurs fois avec de l’eau potable pour éliminer tout résidu de poussière ou de savon.
- Séchez avec un chiffon sec.
- Remettre le bac à glaçons.
- Remettre le bouchon de vidange.
5
notice MG6: notice MG1
27/01/10
14:40
Page 6
DYSFONCTIONNEMENTS
SI L'APPAREIL PRESENTE DES ANOMALIES DE FONCTIONNEMENT, CONSULTER LE TABLEAU
CI-DESSOUS :
PROBLÈMES
CAUSES POSSIBLES
SUGGESTIONS DE SOLUTIONS
Il y a un bruit anormal
Le voltage est inférieur à celui
requis
Arrêter la machine et ne la redémarrer que
lorsque le voltage est redevenu normal
L’indicateur de manque d’eau
est activé bien que le niveau
d’eau soit suffisant
La pompe à eau est endommagée
Faite réparer par un réparateur qualifié
L’indicateur panne est activé
Il y a de la glace non éjectée dans
l’unité de fabrication des glaçons
Enlever les glaçons et redémarrer la
machine
Il y a des glaçons collés entre eux
dans l’unité de fabrication des
glaçons
Arrêter la machine, enlever les glaçons
bloquants et redémarrer la machine
Le bac de l’unité de fabrication
des glaçons est retourné
Arrêter la machine, replacer le bac en position
horizontale et redémarrer la machine
Autre
Contacter un réparateur qualifié
Il y a une fuite de réfrigérant
Contacter un réparateur qualifié
La valve électromagnétique fuit
Contacter un réparateur qualifié
La valve électromagnétique est
endommagée
Contacter un réparateur qualifié
Le cordon d’alimentation est
endommagé
Contacter un réparateur qualifié
La machine s’arrête en cours de
fabrication
La protection automatique s’est
activée car la température est
trop élevée
Arrêter la machine et la redémarrer une
heure après
La machine émet plusieurs bips
successifs et l’indicateur de
manque d’eau est activé
Le niveau d’eau est insuffisant
Remplir le bac à eau avec de l’eau potable
L’indicateur de bac à glaçons
est activé
Le bac à glaçons est plein
Enlever les glaçons
Le compresseur fonctionne mais
aucun glaçon n’est fabriqué
Les glaçons sont fabriqués mais
ne peuvent pas être éjectés
Après vérification des éléments ci-dessus et si l'appareil ne fonctionne toujours pas, contacter votre
distributeur ou un électricien qualifié.
6
notice MG6: notice MG1
27/01/10
14:40
Page 7
E N G L I S H
ALPATEC thanks you for buying this product and hope you will be totally
satisfy with it. For your comfort and security all the steps of the manufacturing
have been checked and the product succeeded in all our quality tests.
ALPATEC’s products : their design and facility of use make you like them.
CAUTIONS
When using an electrical domestic appliance, basic precautions are to be respected.
PLEASE, READ CAREFULLY THIS MANUAL BEFORE THE FIRST USE OF THE PRODUCT.
• Make sure that the voltage rating on the type plate corresponds to your main voltage. Any error in
connecting the appliance invalidates the guarantee.
• Keep out of reach of children.
• Only use this appliance for domestic purposes and in the way indicated in these instructions. Never use for
any other purposes.
• Never leave the appliance unsupervised when in use.
• If you have to go out unplug the appliance every time.
• From time to time, check the cord. Never use the appliance if cord plug or appliance show any sign of
damage.
• The cord length of this product has been selected to reduce the possibility of tangling in or tripping over a
longer cord. Necer use any extension cord.
• Do not place directly in front of heater or in direct sunlight as this could damage the appliance.
• Do not use the appliance outside.
• Never pull the cord to unplug or move the appliance.
• Unplug the appliance before cleaning or changing any pieces.
• Do never introduce metallic objects to avoid any risks of electrical shocks.
• Never use accessories that are not recommended or supplied by the manufacturer. It could constitute a
danger for the user and could damage the appliance.
• Never repair the appliance yourself. All interventions made by a non-qualified person can be dangerous ; in
this case guarantee conditions would cancel. As all electrical products, a qualified electrician must repair it,
as well as the power cord must be changed by an electrician.
SPECIAL RECOMMENDATIONS
• Do not place any object onto the air outlet (on the back side of appliance).
• The rear of the unit can go quite close to the wall but leave at least 20 cm gap.
• Do note place the appliance on soft or uneven ground in order to prevent it from leaking of making noise.
• Place the appliance in order to open easily the front door (without moving the appliance).
• Switch off and unplug the appliance when is not used for a long time.
• Do not the touch the evaporator.
THE MANUFACTURER WILL NOT ASSUME ANY RESPONSABILITY IN CASE OF
NON ADHERENCE TO THIS RECOMMENDATION. SAVE THESE INSTRUCTIONS CAREFULLY.
7
notice MG6: notice MG1
27/01/10
14:40
Page 8
DESCRIPTION OF APPLIANCE
1
1. Panel control
2. Front door
3. Control window
4. Water tank
5. Ice cube tank
6. Ice making chamber
7. Power cord
8. Ice cube’s spoon
9. Drainage knob
3
2
7
9
8
4
DESCRIPTION OF PANEL CONTROL
6
10. Start / Stop
11. Ice size selection
12. Hot
5
LED
g. small
h. medium
i. large
j. lack of water
k. ice tank full
l. hot
a
b
c
11
d
10
8
e
12
f
notice MG6: notice MG1
TECHNICAL DATA
Capacity
Power
Voltage
Gaz
27/01/10
14:40
Page 9
15 to 18 kg of ice cube / day
160 W
230 V
R 134 a
0,065 Kg
Contain gas with fluorinated greenhouse effect that depends on the protocol of KYOTO.
Hermetically sealed.
ELECTRICAL DIAGRAM
USING
Note: stop the ice maker for 1h after 5 h working then start again if needed.
Lay the machine on the horizontal line for 5hours before you first use it. Clean the machine before you
first use it or if you did not use it for a long time (how to clean it, see page 10).
To ensure good ventilation, leave a gap of 20cm around the product.
Plug the ice maker
Open the front door (2). If it is the first time you use the ice maker, take the ice
spoon (8) out.
Fill water tank (4) with clean water, not exceeding 2,3 l.
Use button Mode (11) to choose the ice cube size. Each time you press the button,
the size change according to the following: small -> medium -> large -> small. Size
can be adjusted any time.
Press button M / A (10). Production will start soon after.
The time for ice making is 7 minutes for small cubes, 9 for medium and 11 for large.
First rounds may be longer and with different ice cube size because the compressor need to warm up.
The size of the ice cubes is related to the room temperature, which is why we ask you to conform to the
following table:
9
notice MG6: notice MG1
27/01/10
14:40
Page 10
Room
temperature
<= 10°C
10 to 15°C
15 to 20°C
20 to 25°C
25 to 32°C
>= 32°C
Recommended
size
STOP
Small and
Medium
Small,
Medium
Medium
and Large
Hot *
large
STOP
- When the ice tank is full the machine stop and (g) indicator lights on.
* if the ambient temperature is over 25°C, use HT function (12). The ice maker will adapt the round time.
HOW TO STOP THE ICE MAKER?
If you want to stop ice production, Press button M / A (10).
Note: when the production will start again, the appliance will start with an ice off round in order to take
out all the remaining ice in the ice making chamber (6).
Note: when the production will start again, the appliance will start with an ice off round in order to take
out all the remaining ice in the ice making chamber (6).
CLEANING
First, unplug the appliance.
Warning: do not touch the evaporator. Take out all the remaining cubes in the appliance (ice cube tank
(5) and ice making chamber (6) if needed). Take out the ice tank, clean it with soft soap and rince it with
clear drinking water.
Take out the Drainage knob (9), remaining water will flow out.
To completely drain the machine, smoothly tilt it (do not exceed an angle of 45°).
Use a soft damp cloth to wipe the inside and outside of the ice maker.
Never use any abrasive or chemical product.
Rinse several time with clean drinking water to flush out any dirt or soap residue.
Wipe over with a dry cloth. Put back the water tank.
Put back the Drainage knob (9).
10
notice MG6: notice MG1
27/01/10
14:40
Page 11
TROUBLESHOOTING
IF YOU DISCOVER THAT YOUR APPLIANCE HAS UNUSUAL SYMPTOMS PLEASE CHECK THE
FOLLOWING FIRST :
PROBLÈMES
CAUSES POSSIBLES
SUGGESTIONS DE SOLUTIONS
There is a thundering noise
The voltage is lower than the
required one
Turn off the ice maker and restart when the
voltage is normal
Lack of water (h) indicator is
activated but water level is right
Water pump is damaged
Contact a qualified electrician
Failure (i) indicator is activated
There is remaining ice in ice
making chamber (6)
Remove the ice and start again the ice maker
There is stucked cubes in ice
making chamber (6)
Stop the ice maker and remove the stucked
cubes
the shovel is shifted
Stop the ice maker, re-place the shovel and
start again the ice maker
Other
Contact a qualified electrician
Refrigerant is leaked
Contact a qualified electrician
Electromagnetic valve is leaked
Contact a qualified electrician
Electromagnetic valve is damaged
Contact a qualified electrician
Power cord is damaged
Contact a qualified electrician
Ice maker stops during ice making process
Temperature is too high
Stop ice maker and restart one hour later
Bips can be heard and lack of
water (h) indicator is activated
Water level is too low
Fill with clean drinking water
Ice tank full (g) indicator is
activated
Ice tank is full
Remove ice cubes
Compressor works but no ice is
produced
Ice cannot be pulled off
11
notice MG6: notice MG1
27/01/10
14:40
Page 12
Indications relatives à la protection de l’environnement
Au terme de sa durée de vie, ce produit ne doit pas être éliminé avec les ordures ménagères mais doit être remis à un
point de collecte destiné au recyclage des appareils électriques et électroniques. Le symbole figurant sur le produit, la
notice d’utilisation ou l’emballage vous indique cela. Les matériaux sont reyclables conformément à leur marquage.
Vous apporterez une large contribution à la protection de l’environnement par le biais du recyclage, de la réutilisation
matérielle ou par les autres formes de réutilisation des appareils usagés. Veuillez vous adresser à votre municipalité
pour connaître la déchetterie compétente.
Instructions on environment protection
Do not dispose of this product in the usual household garbage at the end of its life cycle ; hand it over a collection point
for the recycling of electrical and electronic appliances. The symbol on the product, the instructions for use or the
packing will inform about the methods of disposal. The materials are recyclable as mentioned in its marking.
By recycling or others forms of re-utilization of old appliances, you are making an important contribution to protect our
environment. Please inquire at the community administration for the authorized disposal location.
V1 - 01/10