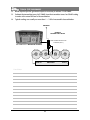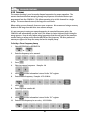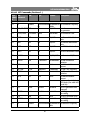
1
USER GUIDE
JANUARY, 2005
V1.20.18
COM3010 SERVICE MONITOR
Copyright Ramsey Electronics, Inc. 2005, All rights reserved
1
TABLE OF CONTENTS
1.00 Introduction .....................................................................................................................5
1.01 Opening the Box.......................................................................................................6
1.01.01 Checking Contents......................................................................................6
1.01.02 Plugging in the Battery ..............................................................................6
1.01.03 Important Battery Information ...............................................................6
1.02 COM3010 Overview ................................................................................................8
1.02.01 Front Panel Inputs, Outputs, and Controls..........................................8
1.02.02 Rear Panel Connections......................................................................... 10
1.02.03 Field Selection and Entry ....................................................................... 12
2.00 Basic Operation ........................................................................................................... 13
2.01 Generating a Frequency ...................................................................................... 14
2.02 Setting Frequency Steps/Increments .............................................................. 14
2.03 Setting Generator Level ....................................................................................... 15
2.04 Setting Generator Steps/Increments ............................................................... 15
2.05 Muting the Generator........................................................................................... 16
2.06 Modulating the Carrier......................................................................................... 17
2.06.01 Generating a Test Tone .......................................................................... 17
2.06.02 Generating Using External MOD IN .................................................... 19
2.06.03 Generating CTS ......................................................................................... 20
2.06.04 Generating DCS......................................................................................... 21
2.06.05 Modulation Steps ..................................................................................... 22
2.06.06 Generating Two-Tone Paging Signals ................................................ 23
2.07 Receiving a Frequency ......................................................................................... 25
2.08 Setting Receiver Step/Increments .................................................................... 25
2.09 Using the Frequency Counters .......................................................................... 26
2.10 Using the Frequency Meters .............................................................................. 27
2.10.01 ± 6 kHz FM Deviation Meter................................................................. 27
2.10.02 ± 4 kHz FM deviation Meter ................................................................. 27
2.10.03 Digital FM Deviation Meter.................................................................... 27
2.10.04 Percent AM Bargraph Meter.................................................................. 27
2.10.05 Digital Percent of AM Meter.................................................................. 27
2.10.06 Frequency Error Bargraph, Positive..................................................... 28
2.10.07 Frequency Error Bargraph, Negative................................................... 28
2.10.08 Digital Frequency Error Meter............................................................... 28
2.10.09 Audio Frequency Meter .......................................................................... 28
2.11 Using the Level Meters ........................................................................................ 29
2.11.01 RSSI Bargraph Meter ........................................................................ 29
2.11.02 RSSI Digital Meter ............................................................................. 29
2.11.03 Power Meter ....................................................................................... 29
2.11.04 Battery Meter ...................................................................................... 29
2.11.05 Serial Status Meter............................................................................ 29
2.12 Zooming the Frequency Meters ........................................................................ 30
2
TABLE OF CONTENTS
3.00 Typical Test Procedures............................................................................................ 32
3.10 Transmitter Tests
3.10.01 Transmit Power, Frequency, and Modulation Measurement............. 34
3.10.02 Power Measurements .................................................................................... 36
3.10.03 Frequency Counter Off-Air............................................................................ 38
3.10.04 Frequency Counter Direct Connection ..................................................... 38
3.10.05 CTS Tone Frequency and Deviation Measurement............................... 39
3.20 Receiver Tests
3.20.01 Receiver Sensitivity and Centering Frequency........................................ 40
3.20.02 SINAD Measurements .................................................................................... 41
3.20.03 Opening Receiver Squelch Using CTS....................................................... 43
3.20.04 Opening Receiver Squelch Using DCS...................................................... 44
3.20.05 Two-Tone Paging............................................................................................. 45
3.20.06 Sending External Modulation ...................................................................... 46
3.20.07 Testing Repeater Receiver Desensitization.............................................. 49
3.20.08 Tuning a Duplexer........................................................................................... 52
4.00 Advanced features ..................................................................................................... 57
4.10 Memories ................................................................................................................. 58
4.20 Smart Link................................................................................................................ 61
4.30 Scanner..................................................................................................................... 62
4.40 Sweep Generator................................................................................................... 64
4.50 User Options ........................................................................................................... 66
4.60 Battery Power Saver.............................................................................................. 69
5.00 Calibrations ................................................................................................................... 70
5.10 Calibrate the RSSI Meter ..................................................................................... 71
5.20 Calibrate the Master Time Base ........................................................................ 72
5.30 Calibrate the Modulation Meter........................................................................ 74
6.00 Detailed information................................................................................................. 75
6.10 Digital Modulation on the COM3010.............................................................. 76
6.20 Advanced Power Meter Information ............................................................... 77
6.30 30 dB Rear Panel Attenuator Output .............................................................. 78
6.40 Advanced SINAD Information ............................................................................ 79
6.50 RS232 Communications...................................................................................... 81
6.50.01 Connecting to Host.................................................................................. 81
6.50.02 SYS Commands......................................................................................... 84
6.50.03 SET Commands......................................................................................... 85
6.50.04 MEM Commands...................................................................................... 87
6.50.05 GET Commands ........................................................................................ 88
6.50.06 Various Meter Mode Options ............................................................... 91
3
TABLE OF CONTENTS
6.50.07 Various Mode Options............................................................................ 92
7.00 Appendix
APPENDIX A:
APPENDIX B:
APPENDIX C:
APPENDIX D:
APPENDIX E:
Button Reference Chart....................................................................... 94
CTS Tone Frequency List ..................................................................... 96
DCS Code List......................................................................................... 96
Two Tone Modes .................................................................................. 97
General Options Table ......................................................................... 97
Specifications .......................................................................................................................... 98
Warranty ..................................................................................................................................100
4
1.00 INTRODUCTION
5
INTRODUCTION
1.01 Opening the Box
1.01.01 Checking Contents
Included with the COM3010 Service Monitor:
1
1
1
1
AC Power cord
Pretested 3 foot BNC to BNC Cable
BNC Whip Antenna
Operator’s Manual
1.01.02 Plugging in the Battery
Before powering up the COM3010 the battery pack should be plugged into the unit so that it
can charge. The battery has been placed in the battery slot for shipment.
1.
Remove the rear panel Battery Compartment cover by unscrewing the two
thumbscrews.
2.
Take the 2.1 mm plug from the battery and plug it into the jack nearest the supplied
battery inside the battery compartment.
3.
If additional battery packs have been purchased slide each one into a battery slot and
plug them in.
4.
Replace the battery compartment cover and tighten the thumbscrews.
1.01.03 Important Battery Information
The COM3010 ships with a single, high capacity Lithium Ion battery. A single battery pack has
over 2AH of charge capacity allowing a run time of about 1 1/2 hours. Two additional
batteries can be added to increase the capacity to a total of 4 1/2 hours.
Lithium Ion batteries are temperature sensitive. For this reason the COM3010 is designed to
automatically shut down when the temperature reaches 45° C inside of the case. The heatsink
of the dummy load is adjacent to the power supply. If you are performing extended high
power testing the power on the COM3010 may shut off if the unit gets too hot. This is to
prevent significant problems with the batteries; the temperature circuit should not be
compromised.
Lithium Ion batteries will not deliver full current capacity at low temperatures. The COM3010
may not power up below –2° C. If you’re using it in very cold conditions It may be necessary
to warm the COM3010 inside a vehicle, for instance. Once powered up the battery will warm
itself during the discharge cycle.
6
INTRODUCTION
Adding Batteries
All three batteries are internally connected in parallel. If you are adding another battery pack
to an existing unit, discharge the already installed batteries fully by leaving the COM3010 on
until it powers itself off. Only then it is safe to add the new battery pack. Otherwise the new
battery arrival may be charged at too fast a rate by the battery already installed and possible
damage to the battery could occur.
Due to the very specific application, these batteries are specially designed for the COM3010.
Commonly available lithium batteries will not work in the COM3010. The batteries used in
this design have a special voltage per cell specification due to the needed extended
temperature operation. Using other lithium batteries in the COM3010 can result in
overcharging causing damage to the batteries and to the COM3010. ONLY the specified
batteries must be used!
For more information call Ramsey Electronics, Inc.
Batteries as Shipped
Your COM3010 includes one Li-Ion battery pack, with the option of adding two additional
battery packs.
Charging
A single battery pack will charge in approximately 2 hours per cell with the COM3010
powered off but plugged in, and 4 hours per cell with the power on. When you first receive
the COM3010, the batteries will arrive partially charged. These batteries do not exhibit the
“memory” problems typical of other types of battery packs. They do not need to be charged
fully before use, and do not need to be fully discharged before a recharge cycle.
7
INTRODUCTION
H
A
I
B
C
G
D
F
E
1.02 Overview
1.02.01 Front Panel Inputs, Outputs, and Controls
A. RECEIVE IN Jack
The RECEIVE IN jack is used to receive signals using a whip antenna, cable, or a probe. Typically a x1 probe is used since a x10 attenuator is not matched for 50 ohms. The RECEIVE IN is
also the frequency counter input; this input is split between the receiver and the frequency
counter inside the unit.
The frequency counter starts counting at approximately 10mV. The receiver is sensitive
enough to pick up and demodulate this signal level in FM mode, but the AM portion becomes
overloaded around 1mV due to the pre-amplification needed to make the frequency counter
sensitive.
If signals are too strong for the receiver to work reliably in AM you can use a small in-line attenuator to drop the level down to usable levels.
WARNING! The RECEIVE IN jack is fuse protected using “sacrificial” parts up to 2 watts for a
short period of time. This input is not designed to handle high powers! That is reserved for the
GENERATE OUT jack. If you accidentally key too much power into this input, the COM3010
will be damaged!
This input also has a 1.5dB attenuator in line to allow for a better antenna match to the first
stage of amplification. You will need a DC blocker if working with signals that contain DC over
5V to prevent damage to the COM3010.
B. MOD IN Jack
The modulation input jack is used when a modulating frequency other than the built in code
8
INTRODUCTION
and tone generation of the COM3010 is desired. This input can be set to a wide range of signal levels as the built-in AGC will change the gain to get a very specific level before modulating the RF out. This input range should be kept between 50mV pk/pk to 5V pk/pk.
When you are using this feature, and the EXT modulation is switched on, there are three different AGC modes you should be aware of. These are indicated as an icon next to the MOD IN
level field on the left-hand display. If you press [SHIFT][MOD] it will cycle through the various
modes. See the GENERATE DISPLAY-External Modulation section for more information.
C. MONITOR Jack
The output of the MONITOR jack is the received modulation. This is typically a 1V pk/pk signal
and can be used to display on an oscilloscope or routed to other test equipment for further
analysis. For example, you can view or decode received audio or digital signals.
This output is approximately 250mV/1 kHz of deviation.
D. RF OUT Jack
The RF out jack provides the output of the signal generator portion of the COM3010. It is also
used as the power meter input. The power meter is located on the signal generator output to
allow for simple radio checks without moving the cable.
Internal to the COM3010 is a log power detector which checks the signal present at the RF
out jack. With the unit powered down, the COM3010 will, by default, shunt any power transmitted into the generator output jack to the dummy load on the back of the unit. This prevents the COM3010 from being harmed by applying power to the RF out jack within the
power meter specifications even if the power fails or the battery runs out.
E. VOLUME
The volume control simply affects the speaker level. The COM3010 has 2 watts of audio
power which should be adequate for most environments.
F. SQUELCH
The squelch control determines when the signal from the receiver is allowed to be detected,
displayed, and fed to the speaker. This is usually set to a threshold using the RSSI bargraph
meter on the top of the right hand display. A small cursor indicates at what RSSI level the
squelch will open and allow audio through.
The squelch also blocks the audio to the modulation meters. To be able to measure the signals, the squelch must be open.
G. POWER Button
Use this button to turn the power of the COM3010 on and off.
H. GENERATE Function buttons
These buttons select fields to alter the generator functions.
I. RECEIVE Function buttons
These buttons select fields to alter the receiver functions.
9
INTRODUCTION
J
K
L
T
S
M
N
O
P
R
1.02.02 Rear Panel Connections
J. -30dB Output
The power meter portion of the COM3010 uses a 100W 30dB attenuator to dissipate power
on the heatsink on the back of the unit. The 30dB attenuated output is provided as a
convenience to allow safe connection of an external spectrum analyzer or other equipment.
For example if you transmitted 100W of power into the GEN OUT jack, 100W = +50dBm. The
output of the 30dB attenuator will now be +20dBm, which is within the range of what most
spectrum analyzers can safely handle.
K. Fuse
Fuse for AC line power. Replace with a standard 1A slow-blow fuse only.
L. AC Input
There is a 15VDC switching power supply internal to the COM3010 that can operate from a
wide range of AC voltages without having to set any jumpers. The power supply included can
handle a range from100 VAC to 240 VAC 50/60 Hz.
M. RS-232
The RS-232 jack is provided for remote control of the COM3010 and also firmware updates.
At one time the software was limited to 9600:8,n,1, as shown on the back panel, but now it
has the flexibility to choose a range of baud rates. See USER OPTIONS - Serial Port Options.
N,O. Battery Panel
Two thumbscrews are provided for easy removal and attachment of the rear battery panel to
access the Lithium Ion batteries.
P. Handle
10
INTRODUCTION
Allows unit to be placed upright and rest on the rear panel.
R. Battery Input Jacks
Receptacles for connecting battery packs. These can also be used to connect an external DC
supply. See the BATTERY INFORMATION section for more details.
S. Battery Pack Support Rails
T. High-power attenuator heat sink
The high-power attenuator is located on the back of this heat sink inside of the case. During
power meter testing, this will become quite warm. During use, allow for plenty of air
circulation around the heat sink to allow normal convection cooling to occur. If this gets too
hot, it may cause power supply of the COM3010 to shut down to protect the batteries from
overheating. If performing a lot of power testing, it wouldn’t hurt to direct air flow at the heat
sink to keep it cool, though under normal testing circumstances, this will never be a problem.
11
INTRODUCTION
1.02.03 Field Selection and Entry
With one exception the GENERATE and RECEIVE displays are laid out in the same four quadrant format with each field’s (quadrants) access key remaining the same.
GENERATE
TX Level
Modulation
Seq/Reg
GENERATE screen:
Field 1 is accessed through the GENERATE key.
Field 2 is accessed through the FM key.
Field 3 is accessed through the LEVEL key.
Field 4 is accessed through the COUNT key.
RECEIVE
Level Meters
Counter
Freq Meters
In the Receive screen:
Field 1 is accessed through the RECEIVE FM key.
Field 2 is accessed through the RECEIVE AM key.
Field 3 is accessed through the METER SELECT key.
Field 4 is accessed through the @COUNT key.
GENERATE
TX Level
Modulation
Seq/Reg
The exception to this is the standard GENERATE screen which contains five fields instead of
four. Two fields appear on the upper line and three fields on the lower line. In this case the
access keys are as follows.
Field 1 or Generate Frequency is accessed through the GENERATE key.
Field 2 or Modulation field is accessed through the FM or AM keys.
Field 3 or Level is always accessed through the LEVEL key.
Field 4 or memories are accessed through the SEQ or REG keys.
Field 5 or tone field is accessed through the MOD keys EXT, INT, CTS and DCS.
12
2.00 BASIC OPERATION
13
BASIC OPERATION
2.01
Generating a Frequency
GENERATE
TX Level
Modulation
Seq/Reg
The Frequency Range of the Generator is 100
kHz to 1 GHz in 1 Hz steps. To enter a new
generator frequency, press the GENERATE
key. The “Ft” Icon will flash.
Enter the frequency desired by using the numerical keypad. Use either the MHz/-dBm or
kHz/mV key to select your desired units. The COM3010 is now generating the frequency you
entered.
Example:
2.02
Setting Frequency Steps/Increments
GENERATE
TX Level
Modulation
Seq/Reg
At times you may want to step through fixed
increments of Generate Frequency, RF Level,
and Modulation. The Receiver function will
also work in this manner. To set the
INCREMENT for a given function press the
SHIFT key and then the proper FUNCTION key.
To Set Generator Frequency increment press the SHIFT key, then press the GENERATE key;
the “delta F” Icon will appear in the Generator Frequency field. It will also show the value that
is currently stored. Enter the new desired increment value using the numerical keypad. Press
the appropriate units button for step size desired. ( MHz/-dBm, kHz/mV, or Hz/uV ) You
may now use the UP or DOWN arrow keys to change the generate frequency by the desired
increment value.
Example:
If you want to escape in the middle of an entry, press
14
BASIC OPERATION
2.03 Setting Generator Level
GENERATE
TX Level
Modulation
Seq/Reg
RF Level can be entered in either the dBm or
Volts scale. The Range is 0 dBm (223 mV) to
-140 dBm (0.022uV) in 0.1 dB steps.
To enter the Level Press the LEVEL key. The
“L” Icon will flash. Enter the Level using the keypad, then press your desired units. The
COM3010 is now generating your desired level.
Example:
To cancel an entry, press
2.04
Setting Generator Steps/Increments
To enter a new level increment, press SHIFT
then LEVEL and the current increment value
will be displayed. To enter a step size of
0.1dB, enter 0.1 then -dBm/MHz. To cancel
Modulation
Seq/Reg
out press SHIFT then ENTER. To step the level
setting make sure the level field is selected (blinking icon) or press LEVEL, and use the UP
and DOWN arrow keys.
GENERATE
TX Level
Level can be entered in dBm or volts and can be stepped in dBm or volts. dBm can be
stepped in as little as 0.1 dB, and volts down to 0.1uV. Remember that the basis for dB is
logarithmic and volts are linear so any steps entered in volts when viewing dBm will not directly correlate, likewise with steps entered in dBm when volts are displayed.
It is simple to determine how many volts there are in the current setting. While still in the
Level field, press kHz/mV or Hz/uV. The display should now show 652.4uV. To switch back,
press MHz/dBm.
Example:
15
BASIC OPERATION
2.05
Muting the Generator
GENERATE
TX Level
Modulation
Seq/Reg
To mute the generator at any time, press
SHIFT then MHz/-dBm or end with any scaling key. This sets the generator level to –
140dBm as well as setting the generator to its
lowest possible level.
Example:
Your Notes:
16
BASIC OPERATION
2.06 Modulating the Carrier
The carrier frequency can be modulated with either amplitude modulation (AM) or frequency
modulation (FM). In AM mode it is possible to generate either a single tone or external
modulation; DCS and CTS are not enabled in AM modes. The following combinations are
possible in FM :
No modulation
External + CTS
Tone Only
Tone + CTS
External + DCS
Two Tone only
Tone + DCS
Two Tone + CTS
External
2.06.01 Generating a Test Tone
To generate an internal tone, press INT. The
LED next to the INT key will light and the
COM3010 will display the last deviation used
Modulation
Seq/Reg which is indicated by the FMi icon (stands for
FM internal), and the last tone used indicated
by the T icon. If the T icon is not already flashing, press the INT button to select the tone field.
GENERATE
TX Level
To enter a 1 kHz tone press 1, kHz/mV. You can enter between 0.1Hz to 3 kHz into this field.
Example:
To toggle the internal tone if you are already in the internal tone field, press INT once, or
twice, once to get there, and another to toggle it off.
Example:
or
To enter a new tone deviation, press FM. The selected field will become the FMi for entering
deviation. To enter +/-3 kHz of deviation, press 3, kHz/mV. You can enter between 0.1 Hz
and 75 kHz in this field.
Example:
17
BASIC OPERATION
2.06 Modulating the Carrier (Continued)
GENERATE
TX Level
Modulation
Seq/Reg
To generate AM tones press the AM key; the
FMi icon will be replaced with AM and %
modulation will be displayed.
To enter a new AM value of 50%, press AM, 5, 0, ENTER/%. The COM3010 will now be
generating AM with 50% modulation and a 1 kHz tone.
Example:
Your Notes:
18
BASIC OPERATION
2.06.02 Generating Using External MOD IN
GENERATE
TX Level
Modulation
Seq/Reg
The external modulation mode allows
modulation from an external source via the
MOD IN jack. The value you enter for
deviation or % AM is followed exactly, and is
automatically adjusted by the AGC (automatic
gain control).
Any level from an external generator between 100mV and 2V peak will be compensated with
the AGC circuit. Remember there are three types of AGC supported by the COM3010. These
three modes are cycled using SHIFT, EXT. To enter tone mode, press
until you see the SIN waveform icon for tone mode. The FM field will already be selected
since you cannot enter a tone frequency here, so then enter 3, kHz/mV.
To enter a tone mode with 50% of AM modulation, press
making sure the AGC icon still indicates tone mode.
AGC
Icon
Mode Name
Description
Voice AGC
Voice AGC: Attack and decay are both fast to track voice levels and
bring them to an acceptable level. Peaks will be limited to the set
modulation.
Tone AGC
Tone AGC: The AGC will attack (reduce the level) quickly, but decay
(increase the level) slowly. This allows tone signals to be as steady
as possible in level.
Digital AGC
Digital AGC allows attack only, no decay. This prevents
overmodulation at the start of a data stream when sending certain
paging formats. This special mode allows for 4-level paging without
“breathing” of the AGC. Breathing is a term used for AGC that is
adjusting too rapidly.
This mode must be “trained” for two seconds with the source to
stop the AGC from adjusting. Once trained, the AGC turns off.
19
BASIC OPERATION
2.06.03 Generating CTS
To generate a CTS tone, press CTS. Current
parameters are now shown on the display. To
enter a new CTS tone you will need to know
its frequency, not the tone #. Use the chart at
Modulation
Seq/Reg
the end of the manual for standard CTS tones.
This field will accept any selected frequency from 0.1Hz to 999Hz, so non-standard tones may
be used.
GENERATE
TX Level
Example: To enter a new CTS frequency of 78.5Hz, press
The tone may be toggled on and off by pressing
To enter a deviation value, press
to select the FM field; the icon will blink. To enter a deviation of 300.0Hz, press
Standard CTS deviation is typically 0.75 kHz. Deviation values range from 0.1Hz to 2.5 kHz.
You can set a step/increment value for deviation in the CTS deviation field by pressing the
arrow buttons to test tone decoder sensitivity. To cancel out of either entry press
20
BASIC OPERATION
2.06.04 Generating DCS
GENERATE
TX Level
Modulation
Seq/Reg
To activate DCS, press
The LED will light indicating it is on. The DCS code field is now active as indicated by the
blinking icon.
You must enter the DCS code with the UP / DOWN keys. You will be selecting from an
internal list stored in the COM3010. To select a code of 53, use the
keys to select the code.
For inverted digital code, press SHIFT, DCS; press them again to return to normal. Note the
“N” or “I” on the end of the code. To invert or de-invert the DCS code, press SHIFT, DCS to
toggle the code.
For example: If you had 53N selected for a code, pressing
will select 53I.
To enter a new deviation value for DCS code generation, press FM followed by the deviation
level desired, followed by Hz/uV.
Example: (For 500Hz deviation)
To turn off DCS, press
Your Notes:
21
2.06.05 Modulation Steps
You may enter a STEP/Increment value for FM deviation or AM modulation in any of the
modulation modes. This entry will also be used for all other format’s deviation steps.
For FM press SHIFT, FM and enter in a value from 0.1 Hz to 1 kHz followed by Hz/uV.
Example:
To enter a value of 50Hz
For AM press SHIFT, AM and enter a value from 1% to 50% followed by ENTER / %
Example:
To enter a value of 10%, press
To cancel out press SHIFT, ENTER / %
Your Notes:
22
BASIC OPERATION
2.06.06 Generating Two-Tone Paging Signals
The COM3010 can also generate two tone sequential paging signals. Because there are two
tones involved, both displays are used with their corresponding function keys. It is important
to remember that each of the display fields is controlled by a specific function key. The 2nd
tone parameters are displayed in the RECEIVE display, and controlled by the corresponding
RECEIVE function keys (RECEIVE FM, RECEIVE AM, METER SELECT, and @COUNT).
GENERATE
TX Level RECEIVE
Level Meters
Modulation
Seq/Reg Counter
Freq Meters
Eight display fields are ALWAYS controlled by these corresponding function keys
In two-tone signal generation, the function keys are re-assigned to their nearest field rather
than the specific function that does not have it’s own function key. The function keys associated with two-tone sequential paging are as follows:
T1 (Tone one)
GENERATE
T2 (Tone two)
FM
Tone Mode
RECEIVE FM
Send
RECEIVE AM
AFMi (FM Internal)
LEVEL
Abort
@COUNT
To encode a two-tone page, press SHIFT, INT to select internal generator. Then press GENERATE (selects T1) followed by the frequency of tone one and then HZ /uV. Then enter the second tone by pressing FM (selects T2) followed by the frequency of tone two and then HZ /
uV. The deviation level is then set by pressing LEVEL followed by the desired deviation level
and the kHz / mV key (Default level is factory set at 4 kHz). Your two-tone frequencies are
now setup.
Set the paging mode using the
function keys as follows:
PAGING MODE
T1 LENGTH
T2 LENGTH
SQUELCH WAIT TIME
Tone Only
0.4 seconds
0.8 seconds
1.3 seconds
Tone/Voice
1.0 second
3.0 seconds
1.3 seconds
Battery Save
2.7 seconds
0.8 second
1.3 seconds
Group Call
Not Sent
8.0 seconds
1.3 seconds
See two-tone paging examples on the following page.
23
BASIC OPERATION
2.06.06 Generating Two-Tone Paging Signals (Continued)
GENERATE
TX Level RECEIVE
Level Meters
Modulation
Seq/Reg Counter
Freq Meters
You wish to generate a typical two-tone, tone only paging signal. Tone one is 349.0 Hz, and
tone-two is 433.7 Hz.
Sets tone one to 349 Hz.
Sets tone two to 433.7 Hz.
Sets tone deviation level to 3.5 kHz. (Default level is 4 kHz and does not need to be entered
if default level is suitable)
Sets two-tone, tone only mode (third mode).
Sends the tone sequence.
It is not necessary to change all fields every time; typically you will only need to change the
two tones and send.
Two tone uses its own deviation setting. It will not affect the internal setting.
As an added feature, CTS tones can be generated at the same time as two-tone pages for radios that require a Two-Tone signal to open the squelch, and a CTS tone to keep the squelch
open. Simply turn on the CTS mode and select the required tone (see generating CTS tones)
before sending the Two-Tone page.
24
BASIC OPERATION
2.07 Receiving a Frequency
RECEIVE
Level Meters
Counter
Freq Meters
Setting the receive frequency is performed in
a similar manner to setting the generator.
To receive a frequency, press RECEIVE FM, or
RECEIVE AM, followed by the frequency, fol-
lowed by KHz /mV or MHz / -dBm.
Example, to receive 162.400 MHz FM:
You can toggle the receive mode simply by pressing:
toggles current frequency to receive the AM component and,
toggles to the FM to receive that portion of it.
The metering will reflect the mode you have selected. Information on that is reserved for the
next few sections.
2.08 Setting a Receiver Step/Increment
Rather than having to move the cursor to a
specific digit to increment frequency, the
COM3010 employs increments for important
fields. To access an increment for the field of
Counter
Freq Meters
interest, press SHIFT then the field such as
RECEIVE FM; the old increment value will appear
RECEIVE
Level Meters
To enter a new increment for the generate field, any frequency from 1Hz to 100 MHz can be
used. Typically you would choose your channel spacing as the step size.
Example: To set the step increment for receive FM to 10 kHz.
If you want to escape in the middle of an entry, press
25
BASIC OPERATION
2.09 Using the Frequency Counters
RECEIVE
Level Meters
Counter
Freq Meters
Your COM3010 contains three different RF
frequency counters. Each frequency counter
has two gate times. The value counted is the
signal presented at the RECEIVE IN jack.
COM3010 Frequency Counters
Counter
Icon
Mode
Gate
Receiver IF Counter
Receiver IF Counter
Counter, 100Hz-70
MHz
Counter, 100 Hz-70
MHz
Description
0.1s Used to calibrate received transmissions. As
sensitive as the receiver. (<5uV). Good for counting signals +/-7 kHz away from the receiver’s set
1.0s
frequency.
Used for measuring signals in the lower
0.1s frequency range of the COM3010. Does not use a
frequency prescaler so accuracy is 1Hz maximum.
Worst case sensitivity of 10mV. Only displays
1.0s strongest signal.
Used for measuring signals in the upper
frequency range of the COM3010. Uses a divide
by 10 prescaler, so the maximum accuracy is
1.0s 10Hz. Worst-case sensitivity of 10mV. Only
displays strongest signal.
Counter, 70 MHz1 GHz
0.1s
Counter, 70 MHz1 GHz
To select the different counters press:
… until the counter you want is selected.
This field is tied to the @ COUNT key on the receive side and COUNT on the generate side. By
pressing @ COUNT, the current frequency count is copied to the receive field. By pressing the
COUNT button the current frequency count is copied to the generator field.
Note: The count is rounded to the nearest set step size that has been set in the Receive or
Generate field. For example if the frequency count was 10.000123 MHz, and the step size set
for the Receive field is 5 kHz, the frequency copied into the Receive field will be rounded to
the 5 kHz step, so it will be set to 10.0000 MHz.
26
BASIC OPERATION
2.10 Using the Frequency Meters
RECEIVE
Level Meters
Counter
Freq Meters
The frequency meters are selected by pressing
METER SELECT multiple times. There are meters unique to both RECEIVE AM and RECEIVE
FM modes.
Any of these meters may be zoomed for a larger display for easy viewing. To zoom a display,
press SHIFT, . Function keys.
Example:
To select meter mode
To zoom a display for easy viewing
COM3010 Meter Displays
FM Mode: Meter Displayed
+/- 6 kHz FM Deviation
Bargraph Meter
+/- 4 kHz FM Deviation
Bargraph Meter
Description
2.10.01 This meter displays the instantaneous modulation
packet showing the minimum and maximum level. It displays
a maximum of +/- 6 kHz deviation whether or not the
received signal is on frequency. Each division represents
1kHz; this display is showing +3 kHz/-4.2 kHz.
2.10.02 This reduces the scale to +/- 4 kHz. This allows more
resolution for detecting smaller signals without having to
zoom.
2.10.03 This meter is a numeric version of the above meters.
Digital
FM Deviation Meter
FM Mode: Meter Displayed
Percent of AM
Bargraph Meter
Description
2.10.04 Displays a quickly updated percent of AM calibrated
demodulation. Every tick indicates 10%. This meter indicates
50% modulation, and the slow peak-hold point (larger
square) indicates a peak of 65% modulation.
2.10.05 Displays percent of demodulated AM. Accuracy is +/5%, but better than +/-1% using 1kHz tones.
Digital Percent of AM
Meter
27
BASIC OPERATION
COM3010 Meter Displays (Continued)
Common Meter Displays
Frequency Error Bargraph
Scale = 1, Error Positive
Frequency Error Bargraph
Scale = 2, Error Negative
Digital Frequency Error
Meter
Audio Frequency
Meter
Description
2.10.06 The frequency error bargraph allows visual calibration of a frequency reference to the internal reference of the
COM3010. This is scale-1, error positive. For a more precise
error value see the Digital Frequency Error meter below.
2.10.07 The frequency error bargraph allows visual calibration of a frequency reference to the internal reference of the
COM3010. This is scale-2, error negative. For a more precise
error value see the Digital Frequency Error meter below.
2.10.08 The Digital Frequency Error meter will measure the
difference between the COM3010’s receiver frequency and
counted signal. It will then display the difference digitally.
2.10.09 The audio frequency counter indicates the demodulated audio frequency. It is an average of counts over a period
of time, and the accuracy increases as time goes on. After 10
seconds it has an accuracy of 0.1Hz for proper discovery of
CTS tones. It has a count range from 60 Hz to 3 kHz.
Any of the meters can be zoomed by pressing
Your Notes:
28
BASIC OPERATION
2.11
Using the Level Meters
Level meters in the COM3010 are accessed by
pressing SHIFT, METER SELECT multiple times
to cycle through the available meters. Level
meters available include RSSI Bargraph, RSSI
Counter
Freq Meters
Digital Meter, Power Meter, Battery Meter, and
Serial Status. Each of the meters will be displayed in the Receive/Level Meter display.
RECEIVE
Level Meters
Example:
to cycle through the available meters shown below.
COM3010 Level Meter Displays
Common Meter Displays
Description
RSSI
Bargraph
2.11.01 Displays a relative RSSI meter of a received signal at
the set frequency. Meter ranges from –120dBm to -30dBm.
There is also a cursor indicating the current set squelch point
that moves with the control. When the bar surpasses this
point, the squelch opens.
RSSI Digital
Meter
Power
Meter
Battery
Meter
Serial
Status
2.11.02 Displays absolute RSSI level of a received signal from
approximately –120dBm to -30dBm. Accuracy of +/-1dBm
after loop-though RSSI calibration. (See user calibration
section).
2.11.03 Displays power as seen at the power detector.
Normally when a radio is not being keyed into the generate
output of the COM3010 this will display 0W. See Using the
Power Meter for more information. WARNING: Maximum
input to COM3010 is 100 Watts.
2.11.04 Displays the current battery state. Low end of battery
is at 10.0V and high end is at 12.6V. The COM3010 will
power itself off below 10.0V to preserve the battery.
2.11.05 Displays the status of the serial port while communicating. The “L” indicates logged in, A is an address match, Tx
is the COM3010 transmitting data, Rx is receiving data, and Er
is a communications error.
29
BASIC OPERATION
2.12 Zooming the Frequency Meters
Each Frequency meter has a corresponding display in the Zoom Meter Mode. The only exception is the +/-4 kHz Deviation Bargraph Meter. The +/-6 kHz Deviation Bargraph Meter is displayed twice in the Zoom Meter Mode list.
To Zoom the display, press METER SELECT, then SHIFT, . . Once zoomed, you can continue to
press METER SELECT to select other meters, or use the power meter by pressing SHIFT, 3.
Example:
GENERATE
TX Level RECEIVE
Level Meters
Modulation
Seq/Reg Counter
Freq Meters
In the modulation meter above, each large tick represents 1 kHz, so the meter is reading –
3.2/+3.5 kHz of deviation. If you want numbers instead switch to the text version of this meter by pressing METER SELECT a few times.
GENERATE
TX Level RECEIVE
Level Meters
Modulation
Seq/Reg Counter
Freq Meters
Example of the two meters displayed during zoom deviation text meter. The left meter is the
signal level RSSI bargraph (currently reading –92dBm), and the deviation meter on the right.
GENERATE
TX Level RECEIVE
Level Meters
Modulation
Seq/Reg Counter
Freq Meters
Example of the frequency error bargraph. This auto-scaling bargraph is for visual tuning, but
you can derive the actual error using the tick marks and the current scaler value on the left
display. The scaler is a 10X multiplier, so for example the above display is scaled as 102 or
100Hz for each tick.
Depending on how different the receive frequency is from the counter frequency will be how
large the scaler is and how far to either side. To quickly get the actual count value, use METER
SELECT to switch to the text version of the error meter.
30
BASIC OPERATION
2.12 Zooming the Frequency Meters (Continued)
GENERATE
TX Level RECEIVE
Level Meters
Modulation
Seq/Reg Counter
Freq Meters
Example of the text version of the frequency error meter. It gives quick, accurate readings, but
may be difficult to visualize while manually tuning an oscillator. Use the frequency error bargraph for tuning.
GENERATE
TX Level RECEIVE
Level Meters
Modulation
Seq/Reg Counter
Freq Meters
This is an example of the zoomed audio frequency counter and the RSSI meter.
Your Notes:
31
Your Notes:
32
3.00 TYPICAL TEST PROCEDURES
33
TYPICAL TEST PROCEDURES
3.00 Typical Test Procedures
This section outlines typical measurements that can be made with the COM3010. These test
procedures are basic ones designed to help you get familiar with the unit. Once familiar with
the COM3010 you will be able to combine and modify these procedures to fit your own operation, increasing its efficiency.
This section also assumes the user has a basic understanding of the operation of the
COM3010 Service Monitor. If the user is confused about operational matters, please refer
back to the appropriate section of the Owners Manual.
Your Notes:
34
TYPICAL TEST PROCEDURES
3.10 Transmitter Tests
3.10.01 Transmitter Power, Frequency, and Modulation Measurement
This procedure allows the technical service professional the ability to measure the Transmitter
Frequency Accuracy, RF Power, and FM Deviation or Percent of AM modulation. Frequency
Error, FM Deviation, and AM Percent of Modulation can all be measured in both an analog or
digital format. The Power measured can be displayed in Watts or dBm.
1.
Connect the transmitter output to the COM3010 RF OUT jack.
Warning - Do not under any circumstances connect a transmitter to the RECEIVE IN jack
of the COM3010, or damage will result!
Warning - Maximum RF power input to the RF OUT jack of the COM3010 is 100 W. Do
not exceed this level or damage will result!
2.
Connect a BNC to BNC cable from the –30dBm OUTPUT on the back panel to the
RECEIVE IN jack on the front panel.
This will take the attenuated output of the power meter circuit and return it to the
receiver for further analysis
3.
Select IF.1 (IF counter 0.1 second gate) by pressing the
4.
Enter a receive frequency into the COM3010 that matches the transmitter’s transmit
frequency.
button.
Example: 464.15 MHz.
The frequency entered into the COM3010 will be the center frequency of the bargraph meter.
The transmitter frequency is shown on the bargraph in relation to the center frequency.
5.
Select the Frequency Error Bargraph Meter or Digital Frequency Error Meter by pressing
Power Measurement
6.
Key the radio. The COM3010 will automatically switch to Power Meter mode and
display the transmitted power in the GENERATE screen. To toggle between Watts and
dBm press the
key.
35
TYPICAL TEST PROCEDURES
Frequency Error Measurement
7.
The COM3010 will also display the Counted Frequency (Lower left field) and The
Frequency Error (lower right field) in the RECEIVE screen.
8.
Press
9.
Adjust the transmitter’s frequency until the error displayed is zeroed to the center mark
of the Frequency Error Bargraph Meter or the Digital Frequency Error Meter reads zero.
to Zoom the Frequency Error meter to the entire RECEIVE screen.
Deviation Measurement
10.
Press the
key and select either the ± 6 kHz FM Deviation Bargraph Meter or the
Digital FM Deviation Meter.
11.
Inject appropriate audio signal into the transmitter under test.
12.
Key the transmitter
13.
Adjust the deviation on your transmitter under test as required to meet its specifications.
14.
If a CTS or DCS codes are being used with transmitter under test, it is important to
adjust the CTS or DCS signal levels first since these signals will be added to the voice
and will increase the overall deviation.
Note: For AM Transmitter Frequency Error, Power, and Percent of Modulation Measurements
use the same procedure but substitute:
Receive
for
function key
Percent AM Bargraph for ± 6 kHz FM Deviation Bargraph Meter.
Digital Percent of AM Meter for Digital FM Deviation Meter.
Your Notes:
36
TYPICAL TEST PROCEDURES
3.10.02 Power Measurements
As with many power meters, the frequency to be measured must be specified for accurate
power meter readings.
1.
Connect the radio to the RF OUT jack.
2.
Transmitter frequency can be entered into the COM3010 using one of two methods:
Manually using the IF Counter Method or automatically using the RF Counter Method.
IF Counter Method:
3.
Enter the frequency of the radio under test into the Receive Field by pressing RECEIVE
FM, the required Frequency, then press MHz/dBm.
4.
Select Count IF mode by pressing COUNTER until the IF.1 icon is displayed.
5.
The COM3010 will automatically switch to Power Meter mode when the radio is keyed,
or, to enter Power Meter mode manually, press SHIFT, 3.
6.
Key the radio; the power reading is displayed in the Generate screen.
7.
The reading can be toggled between dBm (helps with loss calculations), and watts by
pressing LEVEL.
RF Counter Method:
3.
If the frequency of the radio under test is unknown the RF Frequency Counter can be
used to measure frequency and automatically calibrate the Power Meter.
4.
Connect a cable from the -30dBm OUTPUT on the back of the unit to RECEIVE IN jack
on the front. This allows the frequency counter to count the transmitted RF through the
attenuator out jack.
5.
Select the frequency counter RFL (below 70 MHz) or RFH (above 70 MHz) by pressing
the COUNTER button until the correct icon appears.
37
TYPICAL TEST PROCEDURES
3.10.02 Power Measurements (Continued)
6.
Key the radio into the COM3010; the frequency counter will begin to count the RF
signal. The text to the right of the power meter will show “POWER GOOD” to indicate
that the count value and calibration are correct.
7.
If the counter is not registering you will see “POWER UNCAL”. To remedy this, either use
the COUNT IF method or make sure the radio is keyed long enough for the frequency
counter to register a valid count.
8.
The reading can be toggled between dBm (helps with loss calculations), and watts by
pressing LEVEL.
Your Notes:
38
TYPICAL TEST PROCEDURES
3.10.03 Frequency Counter Off-Air
This test allows the user to count the frequency of a transmitter off-air. This is especially useful
for identifying the frequency of unmarked radios.
1.
Connect the whip antenna to the COM3010’s RECEIVE IN jack.
2.
Turn off all FM modulation modes by pressing
3.
Press COUNTER multiple times to select RFL, RFL, RFH or RFH, depending on frequency
band and gate time desired. See “2.09 Using the Frequency Counters” for more information.)
4.
Key the transmitter; the count will appear in the lower left field of the RECEIVE screen.
5.
While still keying the radio the user can press
frequency.
6.
Pressing
(Mod Off).
to set the receiver to the counted
on the generator side will set the generator to the counted frequency.
Note: The counted frequency can be rounded to the nearest step size of each display. This
makes it easy to check for frequency alignment since you can set the step size to the channel
size.
Setting the step size to the channel size causes the COM3010 to set the Receiver or Generator
to the channel frequency, not the counted frequency, which is important if the radio being
tested is off frequency. The rounding function can be toggled on and off in the Options Menu.
To accomplish this press:
3.10.04 Frequency Counter Direct Connection
The COM3010 can be used as an RF frequency counter by connecting a Coaxial cable, 50
ohm probe, or “sniffer” loop to the RF input. The RF counter has many useful purposes including the frequency alignment of Transmitters, Receivers, and crystal oscillators.
1.
Connect a 50 ohm probe, cable, or sniffer loop to the RECEIVE IN jack.
Warning - Do not under any circumstances connect a transmitter to the RECEIVE IN jack
of the COM3010 or damage will result!
2.
Turn off all FM modulation by pressing
(Mod Off).
3.
Bring the loop close to the oscillator, or connect the probe to the appropriate test point.
4.
Press
multiple times to select RFL, RFL, RFH or RFH, depending on frequency
band and gate time desired. See “2.09 Using the Frequency Counters” for more information.)
39
TYPICAL TEST PROCEDURES
3.10.05 CTS Tone Frequency and Deviation Measurement
The COM3010 can accurately measure the frequency and deviation level of CTS sub-audible
tones. CTS tones are typically sent at ±0.75 kHz deviation while voice deviation is normally
set at ±5 kHz. Therefore it is important to mute the microphone or any other audio input
while measuring CTS frequency and deviation.
CTS Tone Measurement
1.
Connect a BNC to BNC cable from the –30dBm OUTPUT on the back panel to the RECEIVE IN jack on the front panel. Warning - Do not under any circumstances connect a
transmitter to the RECEIVE IN jack of the COM3010, or damage will result!
2.
Connect the transmitter to be tested to the RF OUT jack.
3.
Enter the Transmitter Frequency to be tested into the COM3010’s RECEIVE field.
Example Frequency : 464.15 MHz :
4.
Select the AF frequency counter on the Receive screen lower right field by pressing
5.
Key the radio while muting the microphone audio. The COM3010 will automatically
switch to Power Meter Mode and display the transmitted power in the GENERATE
screen.
6.
The CTS frequency information will be displayed in the RECEIVE screen’s AF meter
(lower right field) or the user may enter Zoom mode the by pressing
In Zoom mode the AF meter will use the entire Receive screen.
7.
Un-key the transmitter when testing is complete.
Note: The AF frequency counter provides an updated value every second with a resolution
accuracy of 1 Hz. After a period of 10 seconds the resolution accuracy will increase to 0.1Hz .
Example: A transmitter has a CTS tone of 123.4Hz. The user keys the radio into the COM3010
as above. The first count will read 123.0Hz, the second, 123.1Hz, the third, 123.2Hz… and
after ten counts, 123.4Hz. That count will remain for the duration of the transmission.
CTS Tone Deviation Measurement
8.
Cycle to one of the three Modulation meters (±4 kHz, ±6 kHz FM Deviation Bargraph
Meters, or Digital FM Deviation Meter) by pressing
These meters are in the
same field as the AF meter.
9.
Key the transmitter and read the deviation measurement.
10.
Adjust the transmitter’s CTS deviation as specified in the transmitters service manual.
11.
Un-key the transmitter when testing is complete.
40
TYPICAL TEST PROCEDURES
3.20 Receiver Tests
3.20.01 Receiver Sensitivity and Centering Frequency
This procedure will give the technician a general indication of receive sensitivity and frequency
accuracy. For more precise sensitivity measurements see “3.20.02 SINAD Measurements”.
Receiver Sensitivity
1.
Connect a test cable between the COM3010 RF OUT jack and the receiver to be tested.
2.
Set the receiver to be tested to the desired test frequency. See the receiver’s owners
manual. Example 464.550 MHz.
3.
Set the COM3010’s Generator to the desired test frequency.
4.
Set the COM3010’s RF Level to minimum, 0.025uV.
5.
Set the Level Step Size to 0.025 uV.
6.
With the Level Field selected use the UP Arrow to increase the level in 0.025uV steps.
7.
Increase the RF level until the squelch breaks or the receiver achieves full quieting.
8.
Read the sensitivity in microvolts in the RF Level field.
Centering Frequency
9.
Set the Generate Frequency Step Size to 500 Hz.
10.
With the Generate field selected use the UP Arrow and Down Arrow keys to increase
and decrease the Generator around the desired test frequency.
11.
Verify that the best quieting is achieved at the desired test frequency. If not, a receiver
frequency alignment will need to be done. See the radio’s service manual.
41
TYPICAL TEST PROCEDURES
3.20.02 SINAD Measurements
This test allows the user to accurately measure the sensitivity of a receiver with a built-in SINAD Test Set. The SINAD meter is accessed using the SHIFT, 8 buttons. The following is a
step-by-step SINAD test procedure for testing the sensitivity of a radio.
1.
Connect the radio’s antenna to the RF OUT jack.
2.
Connect the audio out of the radio to the MOD IN of the COM3010.
3.
Set the receiver’s volume control to approximately mid-point (a fine adjustment will be
made later).
4.
Set the COM3010’s Generate Frequency to the frequency of the receiver to be tested.
Example: 464.55 MHz.
5.
Set the output of the Generator to a level slightly greater than the expected sensitivity of
the receiver under test. In this example, 2.2 uV (-100 dBm).
6.
Enter the required step size for accurately finding the 12dB SINAD of the radio. In this
example we’ll use 0.1 uV steps.
7.
Set the FM Deviation to 60% of the maximum allowable signal for the band. Example:
For the 5 kHz band set the COM3010’s deviation for 3 kHz (5000 * 0.6 = 3000).
8.
Select SHIFT, 8 for the 1kHz SINAD test, or SHIFT, 9 for the 400Hz SINAD test.
or
42
TYPICAL TEST PROCEDURES
3.20.02 SINAD Measurements (Continued)
9.
The icon displayed on the RECEIVE screen indicates the audio level from the receiver.
This icon will indicate if the level is too high (straight up arrow), too low (straight down
arrow), adjusting (angled arrow), or correct (flat line). When the level is correct, the SINAD measurement is accurate. Adjust the receiver’s volume control for a flat line.
SINAD: Meter Displayed
Description
When icon indicates the dash (-) it means the AGC has fully
adjusted the audio level to the Sinad meter’s liking and is
giving accurate results.
When icon indicates an arrow pointing to the upper right it
means the AGC is adjusting the audio level and the reading
will not be accurate.
When icon indicates a downward arrow it means the audio
is too low or connected improperly. The AGC cannot bring
the level up high enough to compensate.
When the icon indicates the up arrow it means the audio
level is too great for the AGC to compensate. You will need
to turn down the audio control or reduce the modulation
used.
10.
RF level is shown in the Generate screen. To display the RF level in uV, select Hz/uV,
and MHz/-dBm to display the level in dBm.
or
11.
Zoom Meter mode can be toggled by pressing SHIFT,. for best presentation. If normal
mode is used the SINAD meter is displayed in the lower right corner of the Receive
screen.
12.
With the LEVEL field selected use the UP, DOWN buttons to increase or decrease the
amplitude of the generator until the SINAD meter reaches an average of 12 dB SINAD.
Read the current RF Level setting; this, combined with the SINAD measurement, is the
sensitivity of the receiver.
Note: The SINAD meter uses the AGC of the MOD IN jack to increase its dynamic range as
much as possible for an accurate reading. The AGC icon indicates the condition of the audio
under test.
43
TYPICAL TEST PROCEDURES
3.20.03 Opening Receiver Squelch Using CTS
The following procedure allows the technician to open a receiver’s CTS encoded squelch. The
Service Monitor uses “sub-audible” tones, usually under 300Hz at ±0.5 kHz of deviation.
1.
Connect a test cable between the COM3010’s RF OUT jack and the receiver under test’s
antenna jack.
2.
Set the RF Level equal to the receiver’s sensitivity: see receiver owner’s manual.
Example: 0.25 uV.
3.
Set the COM3010’s GENERATE Frequency to the frequency of the receiver under test.
Example: 464.55 MHz.
4.
Press
to select the CTS Mode.
FM Modulation is automatically selected. The default deviation is 500 Hz. The deviation
can be changed by pressing FM and entering a new value. Example: ±750 Hz.
The Tone field is automatically selected unless deviation was changed in the previous
step. To return to the tone field press
5.
This field will allow any tone from 0.1 Hz to 999.9 Hz to be entered. Enter the receiver’s
CTS tone. Example 82.5 Hz
6.
The Squelch will open.
7.
If internal or external modulation is desired with the CTS tone, Press either
or
Set up the modulation information as described in “2.06 Modulating the Carrier”.
44
TYPICAL TEST PROCEDURES
3.02.04 Opening Receiver Squelch Using DCS
Opening a receivers DCS encoded squelch can be achieved by using the following procedure.
The COM3010 supports all the commonly used codes, both non-inverted (N) and inverted (I).
1.
Connect a test cable between the COM3010’s RF OUT jack and the receiver under test’s
antenna jack.
2.
Set the RF Level equal to the receiver’s sensitivity: see receiver owner’s manual.
Example: 0.25 uV.
3.
Set the COM3010’s GENERATE Frequency to the frequency of the receiver under test.
Example: 464.55 MHz.
4.
Press
5.
FM Modulation is automatically selected
6.
The default deviation is 500 Hz. The deviation can be changed by pressing FM and
entering a new one value. Example: 250 Hz. Press
7.
The Code field is automatically selected unless deviation was changed in the previous
step. To return to the Code field press
8.
To select the required code use the
available codes.
9.
To select inverted codes use SHIFT, DCS then use the UP, DOWN arrows to scroll
through the list of codes.
10.
To return to Normal DCS codes press the SHIFT, DCS keys again.
to select the DCS Mode.
arrows to scroll through the list of
11. If the DCS code is unknown scroll through the list of codes until the squelch opens.
If internal or external modulation is desired with the CTS tone, Press either INT or EXT. Set up
the modulation information as described in “2.06 Modulating the Carrier”.
45
TYPICAL TEST PROCEDURES
3.20.05 Two-Tone Paging
This function allows the COM3010 user to open the squelch of a receiver using the Two-Tone
Paging format.
1.
Connect a whip antenna on the generator RF OUT of the COM3010.
2.
Set Generate frequency. Example
3.
Enter desired RF Level. Example: 4 V Press
4.
Press
5.
Use the
6.
Set Tone One, Example: 378.6 Hz
7.
Use the
8.
Set Tone Two, Example: 445.7 Hz Press
9.
The deviation is set to a default of 4 kHz. To change the deviation press the
button. Enter in a new deviation value. Example: 3.5 kHz, press
10.
Press
to access the tone type; select between the four types by using the
arrows. See the chart Below.
11.
Press
to access the Two Tone Paging Mode.
button to access Tone 1 frequency (0.1Hz to 3 kHz).
button to access Tone 2 frequency (0.1Hz to 3 kHz).
to send the test page.
PAGING MODE
T1 LENGTH
T2 LENGTH
SQUELCH WAIT TIME
Tone Only
0.4 seconds
0.8 seconds
1.3 seconds
Tone/Voice
1.0 second
3.0 seconds
1.3 seconds
Battery Save
2.7 seconds
0.8 second
1.3 seconds
Group Call
Not Sent
8.0 seconds
1.3 seconds
46
TYPICAL TEST PROCEDURES
3.20.06 Sending External Modulation
The COM3010 has several AGC modes available for different signaling methods. The MOD IN
jack is DC coupled to allow proper transmission of digital data as well as accurate reproduction of 4-level paging formats such as FLEX.
The COM3010’s AGC circuit takes whatever signal is seen on the MOD IN jack and amplifies it
to a specific value to produce the proper modulation output.
Voice (Random, Audio Symbol)
1.
Connect a microphone amplified to at least 50 mVpp to the MOD IN jack.
2.
Set the generator to the desired RF carrier frequency. Example: 464.15 MHz
3.
Turn on external deviation pressing
4.
Select the digital AGC mode by pressing
icon in the GENERATE screen lower center field.
until you see the Random Audio
5.
Set the desired modulation type by pressing
or
6.
Set the required FM deviation or AM percent of modulation. Examples: for FM 3 kHz
deviation, press
For 50% AM, press
7.
The AGC display (lower center of GENERATE screen) should show “Low”.
8.
Begin to speak into the microphone; the AGC will adjust trying to bring the level to a
point that the COM3010 can fulfill the deviation or percent AM specified.
Note: Voice AGC is constantly adjusting and does not stop until it is at maximum or minimum
gain. This mode should only be used for voice tests.
47
TYPICAL TEST PROCEDURES
Tone (sine wave symbol)
Tone AGC was designed for continuous tones. Once the AGC has set the gain the AGC circuit
will verify the output level and correct if necessary, approximately every two seconds.
1.
Connect an audio generator such as the Ramsey SG560 to the MOD IN jack. Set the
audio generator’s level to approximately 1 Vpp. (50 mVpp to 5 Vpp acceptable).
2.
Set the generator for desired RF frequency. Example: 464.15 MHz, Press
3.
Turn on external deviation by pressing
4.
Select the tone AGC mode by pressing
5.
Set the desired modulation type by pressing
6.
Set the required FM deviation or AM percent of modulation. Examples: for FM 3 kHz
deviation, press
until you see the sine wave icon .
or
For 50% AM, press
7.
The AGC display (lower center of GENERATE screen) should show “Good”. If it shows
“Low” increase the audio input level. If it displays “Adj” it is internally adjusting the audio level to give the proper output modulation.
8.
The COM3010 is now transmitting the tone at the requested frequency and modulation.
Your Notes:
48
TYPICAL TEST PROCEDURES
Digital (square wave symbol)
Digital AGC helps to get the desired deviation, and it is DC biased. This means that for an input signal of 0-5V, the deviation will only go to the plus side of zero. If the input signal is
–2.5V to +2.5V, it will be centered around zero. Also if a 4-level digital signal is used the step
size will be an accurately scaled modulation change in relation to the peak voltage of the generator.
1.
Connect a digital data source such as the Ramsey PE6400 to the MOD IN jack. Set its
output around 1 Vpp.
2.
Set the generator for desired RF frequency. Example: 464.15 MHz, Press
3.
Turn on external deviation by pressing
4.
Select the tone AGC mode by pressing
5.
Set the desired modulation type by pressing
6.
Set the required FM deviation or AM percent of modulation. Examples: for FM 3 kHz
deviation, press
until you see the square wave icon.
or
For 50% AM, press
7.
Train the AGC by sending a continuous data stream for about 2 seconds. When it is
trained the AGC display shows “Good”, if not, it must be trained again. Once trained,
the AGC will remain at this setting indefinitely or until External Mode has been exited
and re-entered or AGC mode has been changed.
Your Notes:
49
TYPICAL TEST PROCEDURES
3.20.07 Testing Repeater Receiver Desensitization
Repeaters operate commonly in 2 bands usually at UHF 450 – 470 MHz and 800 MHz.
They are occasionally found in the 150-160 MHz VHF bands as well.
The COM3010, with its high stability accurate signal source using a calibrated isolator T
connector allows you to accurately and quickly verify correct duplexer operation. It is also very
easy to check Receiver Desensitization or what’s often referred to as Receiver Desens. That
occurs when the transmitter in a full duplex system (such as a repeater) interferes with the
receiver, causing degraded sensitivity. A poorly tuned duplexer, or bad interconnect cables are
the primary causes of Receiver Desens.
This tuning procedure applies to any type of duplexer such as Band Pass, Band Pass-Band
Reject or Band Reject square or round cavity design.
Be sure to check the manufacturer’s specifications to verify insertion loss.
The use of the calibrated isolator T assures that the COM 3010 is isolated accurately from the
antenna line. This will prevent the 3010 from switching to the transmitter test mode thus
turning off the internal signal generator.
IMPORTANT NOTES:
Be sure the cables used for duplexer testing are of high quality double shielded type with
the proper connectors. BNC-N and BNC-BNC, RG 142 cables from Pasternack.com or other
communications distributors are a good solution.
You will need an adjustable isolator T such as the RF industries Unidapt T and a good
quality 50 Ohm load.
The Generator output should read -dbm.
The Receiver input should read RSSI –dbm.
Make sure the 3010 has been calibrated.
Set up the COM 3010 to generate and monitor the same frequency. The COM 3010 can be
linked for either the transmitter or receiver frequency.
50
TYPICAL TEST PROCEDURES
STEP-1 CALIBRATING AN ISOLATION TEE (ISO-T)
1.
You must calibrate the Iso-T to 40dB first in order to insure sufficient isolation and to
accurately measure the receiver sensitivity.
2.
The COM3010 is set up to generate at the repeater receiver frequency.
3.
Attach cables, 50 ohm load and Iso-T as shown in Figure-1 below.
4.
Set the generator to -60 dBm
5.
Loosen the locking nut on the Iso-T and slide the adjustable stub until the receiver
display is exactly at -100 dBm
FIGURE-1
ISO-T CALIBRATION
40 DB CALIBRATED ISOLATOR
T ADAPTER (ISO-T)
SET COM3010 TO REPEATER RX FREQ
50 OHM LOAD
STEP-2 RECEIVER DESENSITIZATION TEST
1.
Disable the repeater function.
2.
Attach a local microphone (or have a local PTT switch you can use)
3.
Monitor the received signal through the local speaker only.
4.
Set up the 3010 for SINAD test, attach to audio point as needed.
5.
Set up the COM 3010 to generate the repeater receiver frequency.
6.
Attach the already calibrated Isolator T into the transmission line as shown in Figure-2.
7.
Start by injecting a signal, set generator to achieve 12dB SINAD.
8.
This will be approximately -115dBm. Remember to calculate the actual value you are
setting the COM3010 to an output level that is 40 dB greater due to the insertion loss of
the T. Since you have already calibrated the isolator T for 40 dB of insertion loss you
simply add the loss to the generator output to arrive at the repeater’s true sensitivity.
9.
For example if the generator is set to -75 dBm, simply add 40dB to arrive at -115 dBm
actual output.
10.
Record the transmitter turned off 12 db SINAD value
11.
Key the transmitter with the local microphone or local PTT switch.
51
12.
TYPICAL TEST PROCEDURES
While keyed adjust the generator output as necessary to achieve 12 db SINAD.
13.
Subtract the transmitter turned off SINAD from the transmitter turned on SINAD setting
to arrive at the actual dB level of desensitization.
14.
Typical readings are usually no more than 1 – 3 dB of measurable desensitization.
ANTENNA
FIGURE-2
DESENS TEST SETUP
40 DB CALIBRATED ISOLATOR
T ADAPTER (ISO-T)
SET COM3010 TO REPEATER RX FREQ
TX PASS
TX PASS
XMTR OUT
RX PASS
REPEATER
Your Notes:
52
RX PASS
RCVR IN
TYPICAL TEST PROCEDURES
3.20.08 Tuning a duplexer
The three types of duplexers commonly used in VHF, UHF and 800 MHz communication
systems are:
1. Band Pass
2. Band Pass-Band Reject
3. Band Reject
The COM 3010, with its high stability accurate signal source and the associated RSSI receiver,
makes accurate duplexer testing and retuning fast and easy.
This tuning procedure deals specifically with the Band Reject type, square or round cavity
design. Check the manufacturer’s specifications to make sure that you are tuning a Band
Reject duplexer.
IMPORTANT NOTES:
Be sure the cables used for duplexer testing are of high quality double shielded type with
the proper connectors. BNC-N and BNC-BNC, RG 142 cables from Pasternack.com are a
good solution.
Before starting the tuning procedure make sure you calibrate the RSSI indicator to the
generator output.
You will be adjusting only the tuning rods or screws.
The lock nuts on the tuning knob adjustment shafts should be loosened to allow the
tuning shafts to be adjusted smoothly. Be aware that tuning is slightly affected as the lock
nuts are tightened down and it will likely be necessary to readjust each notch as the lock
is slowly tightened.
The Generator output should read -dbm
The Receiver input should read RSSI –dbm
Record the repeater Transmit and Receive frequencies and determine the high side, low
side and calculate the frequency separation. For Example, 466.500 MHz repeater receive
and 461.500 repeater transmit = 5 MHz separation.
The receiver side of the duplexer will be tuned to reject (notch) the transmitter frequency
and it will be the most critical adjustment to make. This adjustment makes sure there is
high isolation from the transmitter to the receiver.
The transmit side of the duplexer will be tuned to reject (notch) the receiver frequency.
This adjustment assures high isolation from the transmitter to the receiver.
53
TYPICAL TEST PROCEDURES
Set up the COM 3010 to generate and monitor the same frequency. The COM 3010 can
be linked for either the transmitter or receiver frequency.
STEP-1 TUNING THE RECEIVER SIDE OF THE DUPLEXER (RX PASS)
1.
The receive side of the duplexer is tuned to reject the transmitter noise at the transmit
frequency.
2.
Connect RF OUT to the duplexer antenna port as shown in FIGURE-1 below. This is
done in order to inject each signal for the test. -50 dbm output is a good starting point.
Do not disconnect this as it will remain connected this way for the entire procedure.
3.
Set the COM 3010 Generator for the repeater transmitter frequency and generate a -50
dbm signal.
4.
Attach the 50 Ohm load directly to the duplexer transmitter port.
5.
Connect the RECEIVE IN to the duplexer receiver port.
6.
The receiver in the RSSI mode is now connected. Adjust the cavity closest to the
RECEIVE IN connection for minimum signal or greatest notch. This will also be the
noisiest signal (maximum negative RSSI indication). Next, do the same for the other
cavities in line.
7.
You may need to increase the generator output level and readjust all in line cavities to
get the best tuning points as the rejection is increased. You can determine the rejection
in db by adding the generator db value to the RSSI value. Example Generator -40dbm
and Receiver RSSI -110 dbm =70 db rejection
8.
The locking nuts on the Cavity tuning shafts should be hand tightened and the rejection
tuning re-measured.
FIGURE-1
RX PASS – RECEIVER SIDE
TX PASS
TX PASS
TUNE TO NOTCH RX
RX PASS
RX PASS
TUNE TO NOTCH TX
50? LOAD
54
TYPICAL TEST PROCEDURES
STEP-2 TUNING THE TRANSMITTER SIDE OF THE DUPLEXER (TX PASS)
1.
The transmit side of the duplexer is tuned to reject noise at the receiver frequency.
2.
Set up the COM 3010 to generate and monitor the repeater receiver frequency.
3.
Attach the 50 Ohm load directly to the duplexer receiver port as shown in Figure-2.
4.
Connect RF OUT to the duplexer antenna port as shown. This is done in order to inject
each signal for the test. -50dbm output is a good starting point.
5.
Connect the RECEIVE IN to the duplexer transmitter port. The generator should be in the
RSSI mode.
6.
Start tuning the cavity closest to the RECEIVE IN connection for minimum signal or
greatest notch. This will also be the noisiest signal (maximum negative RSSI indication).
Next do the same for the other cavities in line.
7.
You may need to increase the Generator output level. Readjust all the in line cavities to
get the best tuning points as the rejection is increased.
8.
You can determine the rejection in db by adding the generator db value to the RSSI
value. Example Generator - 40 dbm and Receiver RSSI -110 dbm = 70 db rejection. It
should be close to the manufacturers specifications.
9.
The locking nuts on the Cavity tuning shafts should be hand tightened and the rejection
tuning re-measured.
IMPORTANT: REPEAT STEPS 1 AND 2 UNTIL NO FURTHER IMPROVEMENT IN DUPLEXER
ISOLATION CAN BE ACHIEVED.
FIGURE-2
TX PASS – TRANSMITTER SIDE
SET COM3010 TO REPEATER TX FREQ
TX PASS
TX PASS
TUNE TO NOTCH RX
50 OHM LOAD
55
RX PASS
RX PASS
TUNE TO NOTCH TX
TYPICAL TEST PROCEDURES
STEP-3 INSERTION LOSS FINAL TEST
1.
Leave the RF OUT cable connected to the duplexer antenna port. You can final test the
duplexer to make sure that it is operating correctly by an insertion loss test.
2.
While the RECEIVE IN is connected to the transmitter side of the duplexer, switch the
generator to the repeater transmit frequency. Make sure the 50 Ohm load is connected
to the repeater receiver port.
3.
You can now determine the insertion loss in db by adding the generator dbm value to
the RSSI value. Example Generator – 90 dbm and Receiver RSSI – 91.5 dbm = 1.5 db
insertion loss. It should be close to the manufacturer’s specifications.
4.
Likewise move the cable from the RECEIVE IN to the receiver side of the duplexer.
Switch the generator to the repeater receiver frequency. Make sure the 50 Ohm load is
connected to the repeater transmitter port.
5.
You can now determine the receiver insertion loss in db by adding the generator dbm
value to the RSSI value. Example Generator – 90 dbm and Receiver RSSI – 91.5 dbm =
1.5 db insertion loss. It should also be close to the manufacturer’s specifications.
Your Notes:
56
4.00 ADVANCED FEATURES
57
ADVANCED FEATURES
4.10 Memories
The time will probably come when you will want to store settings for repetitive testing of
equipment. The COM3010 memory is broken down into Sequences that contain Registers. A
Sequence can be assigned to each different piece of equipment you test. The registers in that
sequence can contain all the test set-ups needed for that specific piece of equipment. A
register will store most items on the display except for sweep setups.
The registers in a sequence can be used to store all test setups for a particular type of
equipment, and the UP/DOWN arrows can be used to move through each test in a series.
When the last saved register in a sequence has been reached, another push of the UP arrow
will loop the user back to the first register. This is useful when performing identical tests on
multiple units.
The COM3010 provides safeguards that allow for ease of use and prevent accidentally
overwriting another memory location. For example, when saving a register to a sequence that
has memories stored in it, the COM3010 will select the first empty register available. The
only exception occurs when the sequence contains the maximum 100 registers, or is full. In
this situation the COM3010 will select register 00 and give the operator the option of
overwriting this register.
100 Sequences are available, and 100 Registers can be stored in each Sequence. Sequences
and registers are displayed on the GENERATE screen in the lower right corner.
GENERATE
TX Level
Modulation
Seq/Reg
Saving to Memory
1.
Enter all the information into the COM3010 that you need. This should include:
Generate and Receive Frequencies, RF and Modulation levels, Increment sizes, and
Meter Set-ups.
2.
Press
3.
Select a two digit Sequence Number. Example: 02
4.
The COM3010 automatically jumps to the Register field and selects the first empty
register in that sequence.
5.
If this sequence is full it will loop back to “00” and overwrite that register.
6.
If you do not wish to overwrite, cancel by pressing
7.
Press
to save.
58
ADVANCED FEATURES
Memories (Continued)
Recalling Registers
1.
Press
2.
Enter the two digit number of the sequence you desire. Example: 02
3.
Use the Up/ Down arrows to scroll through different sequences
4.
Press
Enter the two digit register number or Use the Up/Down arrows to scroll
through different registers.
or
Copying Registers
1.
Recall the sequence and register to be moved, then the sequence and register to be
copied to. Example: Sequence 5, register 13 copied to sequence 7, register 13.
Deleting Registers
1.
Recall the register to be deleted. Example: Delete Sequence 5, register 13.
2.
Press to enable the Delete function.
3.
Press RECEIVE AM to select ‘yes’.
59
ADVANCED FEATURES
Memories (Continued)
Deleting Entire Sequences
1.
Press
2.
Enter Sequence Number. Example: Sequence 2
3.
Press
4.
Press
to enter Delete mode.
to select ‘yes’.
Default Sequence and Register
Sequence 99 Register 99 is reserved for power-up settings. This replaces the default start-up
setting when the unit is powered on. If a new power-up setting is desired, set the Generate
and Receive screens as required and save your new power-up default as normal using SEQ 99
REG 99. This can be overwritten at any time, or deleted it to return to the COM3010’s original
default power-up state.
Your Notes:
60
ADVANCED FEATURES
4.20 Smart Link
Smart link allows the Receiver and Generator to be linked together. If the Generator and Receiver are on the same frequency they will change to the same frequency if a new one is entered in either the Generate or Receive screen. If the Generate and Receive Frequencies are
different the spacing between them will remain the same when a new frequency is entered.
When the LINK button is pressed and the link light is on, either the Generate or Receive increment set may be used to increase or decrease both frequencies by the same increment.
For example you can set the Generator frequency to 464.55 MHz, using this sequence:
For a 25 kHz offset in the receiver, add 25 kHz to the Generate frequency to get 464.575 MHz.
Next press:
and the value of 25 kHz is entered as the offset. Press the UP/DOWN arrow keys while in the
Generate field.
The Generator and Receiver are locked together with this offset.
Alternately, the offset between the Generator and Receiver can be set by altering the offset
value directly by pressing
Example: 100 kHz offset
The next time the Generate or Receive fields are altered, the alternate field will update with
this offset. To try this press:
And the receiver should now display 464.4500 MHz.
The link button works under a variety of conditions and is especially useful when using the
sweep generator. It allows the sweeping of filters with the Generator while watching the RSSI
meter of the Receiver if they are locked with a 0Hz reference. This is covered in more detail in
“4.40 Sweep Generator”.
61
ADVANCED FEATURES
4.30 Scanner
The scanner function is used to monitor known frequencies for proper operation. The
scanner function will allow sweeping through any sequence of memories that are preprogrammed into the COM3010. This allows scanning of up to100 channels in a single
sweep. The more channels stored, the longer the scan times.
When setting up scan channels choose an open sequence. We recommend using a memory
location in the range from 80-98 to store scanner sweeps.
It is not necessary to enter your sweep frequencies in numerical frequency order; the
COM3010 will automatically sort the order. This allows for faster frequency locks during the
sweep process. Keep in mind when saving frequencies that the only parts of the memories
recalled during a sweep are the Receive AM/FM and the frequency. All other portions of
memory are ignored to keep the sweep fast and to simplify setup.
To Set Up a Three-Frequency Sweep
1.
Select RECEIVE AM or RECEIVE FM
or
2.
Enter the frequency to be scanned.
3.
Press
4.
Select an unused sequence. Example: 90
]
5.
Press
and the information is stored in the “00” register.
6.
Enter another frequency. Example: 475.45 MHz.
7.
Press
8.
Enter sequence number 90.
9.
Press
10.
Enter the last frequency in our series, 455.25 MHz.
and the information is stored in the “01” register.
62
ADVANCED FEATURES
4.30 Scanner (Continued)
11.
Press
12.
Enter sequence number
13.
Press
14.
Press SHIFT, 7 to enter the scanner mode.
15.
Enter the sequence number
16.
Press
17.
Turn the squelch knob until the squelch just closes. Press
scan approximately 5 seconds after the squelch closes.
and the information is stored in the “02” register.
The unit will start to
It is also possible to adjust the squelch to trigger and stop the sweep at a given RSSI level.
While the sweep is running, cycle through the various meters such as deviation, AF count, etc.
to listen to a part of the frequency being monitored. To stop scanning, begin to edit any
numerical field or press ENTER while the scanner is selected.
The scanner stops at a particular frequency with the opening of the squelch. It will then pause
at the frequency for 5 seconds after the squelch closes. During this period of time the active
channel’s bar will flash indicating that the squelch is closed but waiting to resume scanning.
Adjust the squelch setting as needed to reject false signals and noise.
Notes on scanning:
The COM3010 employs a wideband receiver. If there are channels that are close together in
sequence, the squelch may open on an adjacent channel. This is due to the broad channel
discrimination of the COM3010. To remedy this, set the squelch a bit tighter to reject the
adjacent channels and open only on the stronger RSSI signal.
The scanner also includes the ability to skip channels, progress to the next channel, and restore skipped channels.
Disables current channel. Channel is now indicated by slashes, and is skipped during the
scanning process.
Re-enables all disabled channels.
or
or
skips current channel.
Closes and exits the scanner when selected.
63
ADVANCED FEATURES
GENERATE
TX Level RECEIVE
Level Meters
Modulation
Seq/Reg Counter
Freq Meters
4.40 Sweep Generator
The sweep generator is used for testing frequency response of filters, flatness of cables, and
similar tests. This function can be used in conjunction with a spectrum analyzer or the selfcalibrated RSSI meter on the COM3010 with the LINK activated.
On the GENERATE screen:
The FB Field represents the Frequency at which the sweep begins. It is accessed through the
GENERATE key. Any frequency from 100 kHz to 1000 MHz can be entered.
The FE Field represents the Frequency at which the sweep is to end. This is accessed through
the FM key. Again any frequency from 100 kHz to 1000 MHz can be entered.
The L Field represents the RF Level to be used. It may be accessed through the LEVEL key.
Levels from 0 dBm to -140 dBm can be entered and the mV and uV scales may also be used.
The DLY Field represents the time between changes in frequency. Access is obtained through
the COUNT key and selected through the UP/DOWN arrow keys. The time between changes
in frequency will depend on whether internal or external modulation is turned on. Usually
sweeps will be performed with the modulation off. Slowing the sweep speed will allow the
slower response of the receiver RSSI to be indicated when you are sweeping filters.
On the RECEIVE screen:
The TYPE field contain three types of sweeps to choose from. Access to this field is gained
through the RECEIVE FM key. The Log methods will take increasingly larger steps as the
sweep goes up in frequency, so there will be more points at low frequencies than at high
frequencies; this is determined by the Log function selected. The types of sweeps available
are:
Linear- which produces a linear sweep with even frequency spacing.
Decade- produces a sweep where the frequency step sizes increase by a factor of 10.
Octave- produces a sweep where the step sizes increase by a factor of 2.
The NUM field selects the number of points or frequencies to be included in the sweep. It is
accessed through the RECEIVE AM key. The user can select from 1 to 10,000 points by direct
entry from the keypad or scrolling with the UP/DOWN arrows. For example, if there are 555
points for a sweep from 10 MHz to 1 GHz they will be stepped at 25mS intervals which will
be an entire sweep time of 0.025*555 = 13.8 seconds. The steps are rounded to the nearest
Generate Frequency step size unless you have rounding turned off in the Options menu. If
the step size is set to a large value and the number of points you wish to sweep makes for a
smaller step size, the COM3010 will display an error telling you that some of the points will
not be swept. The remedy is to reduce the Generate Frequency step size before sweeping.
This feature allows you to sweep directly on channel steps if desired.
64
ADVANCED FEATURES
4.40 Sweep Generator (Continued)
The START field is accessed with the METER SELECT key.
The EXIT field is accessed with the @COUNT key.
To set up a sweep from 10 MHz to 1GHz (1000 MHz) with a level of –120dBm, linear, with
100 steps, follow these keystrokes:
1.
To enter the sweep function, press SHIFT,1.
2.
Enter 10 MHz in the BE field.
3.
Enter 1000 MHz in the FB field.
4.
Set LEVEL to –120 dBm.
5.
Set TYPE to linear.
6.
Set the number of points to 100 in the NUM field.
7.
Press METER SELECT to start the sweep, or @COUNT to exit with the changes saved so
you can start the sweep later using the SHIFT, 2 function of Sweep Start.
or
8.
SHIFT, 1 will stop the sweep.
These sweep settings are saved to NVRAM memory each time you change them so the next
time you power the unit these values will be restored. They are not saved in the individual
memories.
65
ADVANCED FEATURES
GENERATE
TX Level RECEIVE
Level Meters
Modulation
Seq/Reg Counter
Freq Meters
4.50 User Options:
The user options for the COM3010 are available by pressing SHIFT, 6. This brings you to the
Main Options Menu. This menu is displayed on both the GENERATE and RECEIVE Screens.
The options listed that are available to the user are in brackets. The options between the ‘<‘
‘>‘ signs are password protected and only available to qualified COM3010 service technicians.
The reason for this is that modifying these options can change or erase unit calibrations that
only a qualified COM3010 technician with appropriate calibrated test equipment can properly
adjust.
On the GENERATE screen:
The [Options] field contains most of the available user options; see “General Options”. This
field is accessed using the GENERATE Key.
<Setup Mems> is not available to the COM3010 user.
The [Serial Port] field allows the user to configure the serial port and is accessed using the
LEVEL key.
The [Clear Mems] clears stored memories and is selected using the COUNT key.
On the RECEIVE screen:
[INFO] is accessed through the RECEIVE FM key and provides basic information about the
system. such as:
Software Version
Number of times the unit has been powered-up
Number of crashes
Hours of operation
A number of professionals at Ramsey Electronics who have worked on this product.
[Exit] allows you to exit this menu and save settings using the RECEIVE AM key.
Zoom SINAD, when selected, automatically uses the Zoom Meter Mode for the SINAD Meter
when one of the SINAD functions is selected. This is toggled using the METER SELECT key.
The 500Hz checkbox option, when selected, sets the Generate and Receive resolution to 500
Hz, rather than the standard Generate resolution of 1 Hz and the Receive resolution of 10 Hz.
This option is toggled by the @COUNT key.
66
ADVANCED FEATURES
GENERATE
TX Level RECEIVE
Level Meters
Modulation
Seq/Reg Counter
Freq Meters
General Options:
These are accessed by pressing SHIFT, 6, then the GENERATE key.
On the GENERATE screen:
The Buzzer is toggled on and off using the
key and turns all buzzer events on or off.
Cable Comp: adds 1 dB to the power reading at 1 GHz, linearly declining to 0 dB of added
power at 0 Hz. Use the
button to toggle this feature on and off.
The Round function turns the rounding feature of the COUNT buttons on or off. To select
press the
key until the circle is filled.
The Pass function will prevent the use of the COM3010 until the proper password is entered.
Pressing the
key allows the user to change the password. Password security on the
COM3010 is tight! If you forget your password the only way to unlock the COM3010 is to
send it in for repair! The standard repair fee applies for Ramsey to reset the password. As
soon as you change the password, WRITE IT DOWN IN THIS MANUAL!!! Many users will
change the password to see how it works and immediately forget their newly created
password. This password was designed to discourage equipment from being stolen since it
will render the COM3010 useless to anyone but the person with the password. The modem
password for serial access is separate from the user interface password.
By default, the password is set to 1234. If you wish to change it, the new password should be
something that is easily recalled. Please write it where it will not be lost. The password can
be from1 to 9 characters long.
To Enter a new password
1.
Press
2.
Enter the new password using the numerical keypad. Example: 5678.
3.
Press
4.
Re-enter the new password even though the old password appears in the display.
5.
Press
6.
Write the new password down!
twice.
twice.
67
ADVANCED FEATURES
General Options (Continued)
On the RECEIVE screen:
The Dim function allows the user to use the UP/DOWN arrows to select the display intensity.
Access this option using the
button.
[Exit&Save] exits this menu and saves all option settings using the
key.
Splash allows disabling of the start up splash screen and is toggled using the
key.
The Flt Cnt (Counter Filter) function allows disabling of the frequency counter filter. Press the
key to toggle this function.
GENERATE
TX Level RECEIVE
Level Meters
Modulation
Seq/Reg Counter
Freq Meters
Serial Port Options
will activate the Serial Port Menu and give you the following choices:
Serial
Port
Name:
Choices
Default
Description
Baud
300, 600, 1200,
2400,4800,
9600, 14400,
9200,28800,
57600, 115200
57600
Sets the Baud Rate of the COM3010 Serial Port,
always defaults in 8,n,1 communications.
Address
000 to 999
555
Allows user to view or change the Serial Port Address
Reset
Pwd
YES / NO
No
If set to ‘YES’ upon exiting menu it will reset the
Serial Password to 1234.
Exit &
Save
Saves settings
68
ADVANCED FEATURES
Clear Memories:
Clear Memories is an option that allows you to clear all registers and sequences including the
special 99.99 registers. This allows you to “clean up” the COM3010 if planning on setting it up
for a new test bench or other purpose.
To get to the Clear Mems function, press
The
button selects [YES] to delete all memory locations or the
[NO] and exits to the Main Options Menu.
button selects
4.60 Battery Power Saver
This function will blank both the displays. When operating from batteries Power Saver
extends the operating time by about 1/3. For a single battery, power-on time is extended by
approximately 20 minutes. Press any key to restore the display.
Your Notes:
69
Your Notes:
70
5.00 USER CALIBRATIONS
71
USER CALIBRATIONS
RECEIVE
Level Meters GENERATE
Counter
Freq Meters Modulation
TX Level
Seq/Reg
5.00 USER CALIBRATIONS
Several features of the COM3010 can be calibrated by the user: The RSSI Meter, the Master
Time Base, and the Modulation Bargraph Meter.
When displaying the calibration screens items surrounded by ‘[ ‘]’ indicate user functions,
where the ‘<‘ ‘>‘ indicate password functions. Password functions are reserved for
technicians with proper equipment only.
5.10 Calibrate the RSSI Meter
Calibrating the RSSI Meter allows the user to “Null-out” cabling losses. This ensures that the
interface cable’s response is not part of the RSSI measurement. When the unit is finished
calibrating it will perform numerous calculations and produce a table for reference. This table
will then be stored in the COM3010’s Flash Memory for later use. The RSSI meter can display
any level between –40dBm and -120dBm to an accuracy of 1 dB.
1.
Set the Squelch Control fully counterclockwise.
2.
Select a Cable or series of cables and connectors to be used for testing.
3.
Press
4.
Press
5.
Remove any cables from the RECEIVE IN jack. This allows the Meter to get a baseline
calibration with no signal.
6.
Press
7.
Connect your selected cable between the RECEIVE IN jack and the RF OUT jack.
8.
Press any key to start the automatic RSSI calibration. The COM3010 will now run
through a series of frequencies and levels taking measurements for each.
9.
When complete the unit will beep and display “Changes saved!” in the Receive screen.
This process will take approximately 2 ½ minutes.
10.
Press any key to return to the Main Calibration Screen.
11.
Press
to enter the Main Calibration Menu.
to select RSSI Meter Cal.
to continue.
to EXIT and return to normal operation mode.
72
USER CALIBRATIONS
GENERATE
TX Level RECEIVE
Level Meters
Modulation
Seq/Reg Counter
Freq Meters
5.20 Calibrate the Master Time Base
The COM3010’s Master Time Base is a voltage controlled TCXO with an accuracy of better
than 0.1ppm over a given time and temperature. The time base is easily adjusted to any
calibrated standard or reference available.
Any frequency within the receiver’s range can be used for calibration, however, it is
recommended that the highest frequency possible is used for best accuracy. A generator
locked to a 10MHz standard or a harmonic of the 10MHz standard makes an ideal reference
for calibration. If a generator is available use the highest frequency possible up to 1GHz. In
the example below we will use 955 MHz from a signal generator locked to a standard.
The layout of the Frequency Calibration Menu is as follows:
On the GENERATE screen:
The Cal: Field displays the DAC (digital to analog converter) value. This value can be any digit
from 0 to 4095.
The FR Field displays the Receiver Frequency. It should be set to the user’s reference
frequency. The default frequency is 999.15MHz. This is the frequency that is used at the
factory to calibrate the unit during final testing.
The IF.1 Field is the frequency counted by the IF counter.
The [Auto Cal] field selects the automatic calibration feature.
On the RECEIVE screen:
[Abort] allows the user to exit the Frequency Calibration Menu without making any changes to
the COM3010’s calibration.
[Exit&Save] allows the user to Exit the Frequency Calibration Menu and save all changes made
to the COM3010’s calibration.
The ppm Meter displays the difference in parts per million between the Receive Frequency
Setting and the actual received signal counted by the IF counter.
The RSSI Meter provides an indication of receive signal strength.
73
USER CALIBRATIONS
5.20 Calibrate the Master Time Base (Continued)
1.
Connect an accurate reference frequency source to the COM3010’s RECEIVE IN jack.
2.
Press
3.
Press
4.
to enter the Main Calibration Menu.
to select [Freq Ref]. Note the warning about having a good reference.
selects [YES] to continue and enters the Frequency Calibration menu.
5.
Press
and enter the source frequency. Example: 955 MHz.
6.
Verify reception of the desired reference frequency by checking the RSSI Meter in the
lower right of the RECEIVE screen. This signal must measure at least –85dBm, which is
represented by four divisions.
7.
Press
8.
Press any key to automatically calibrate the COM3010 using [AutoCal].
9.
When the GENERATE screen reads “Frequency calibrated Press any key”, press any key
to return to the Frequency Calibration screen.
10.
To manually calibrate or fine tune the Auto Cal, press
11.
The
can be used to zero the IF.1 or the PPM fields. Calibration values may
also be directly entered into the Cal: field via the keypad.
12.
Press either
old values.
13.
Press any key to exit to the Main Calibrations Menu.
14.
Press
The reference source was connected in Step 1.
to exit and save the calibration value or
to return to Operational Mode.
Your Notes:
74
to enter the Cal: field.
to abort and restore
USER CALIBRATIONS
5.30 Calibrate the Modulation Meter
Occasionally the quadrature detector of the COM3010 may need alignment to center the
modulation meters.
1.
Connect the RF OUT to the RECEIVER IN using a BNC to BNC cable.
2.
Press
3.
Press
4.
Press
to restore to system default of zero or press
calibration.
5.
Press any key to begin meter calibration.
6.
The COM3010 will go though a simple procedure of generating and receiving a
modulated carrier, finding the center of the meter, and re-centering it.
7.
When calibration is complete press any key to return to the Main Calibrations Menu.
8.
Press
to enter the Main Calibration Menu.
to enter Mod Meter calibration.
to return to Operational Mode.
Your Notes:
75
to continue with
Your Notes:
76
6.00 DETAILED INFORMATION
77
6.10 Digital Modulation on the COM3010
When connecting the COM3010 an external broad-band modulation analyzer, the analyzer
will typically see a larger deviation than expected. It may be as much as 5%. This is due to the
very fast frequency changes used to “emulate” FM by digitally switching frequencies in steps.
The upper line is the desired modulating waveform at 1 kHz, and the lower line is what is
needed digitally to re-create this same signal. As can be
seen the upper line is continuous and smooth while the
lower is in steps at regular intervals. This rate of level change
is called the sample rate. The small steps with sharp edges
create a high frequency component in the waveform at
multiples of the sampling frequency. If the sampling
frequency is 10 kHz you will have some spurs on the signal
10 kHz away from the carrier, as well as 20 kHz, 30 kHz…
determined by the modulating waveform.
The same rules of thumb which apply to digital to analog
converters apply to digital modulation. Typically the highest
frequency signal we can re-create is at ½ the sampling
frequency, or the Nyquist frequency. It is good practice to
stay below 1/3 the sampling frequency so the sampling
components can be filtered out with a simple low-pass filter.
Typically the radios that will be tested with the COM3010
are narrow-band. This means the total bandwidth they are
able to receive is +/- 5 kHz, depending on the model. This
translates to a 5 kHz low pass filter in the audio demodulated before any further processing.
The radios typically have more audio filtering to allow signals in the voice band of 300Hz to
3 kHz, and signals below 300 Hz are interpreted for squelch control signals like CTS and DCS.
This means that the artifacts of the digital signals are filtered off for us by the radios
themselves! The 10 kHz, 20 kHz etc. are well above the audio bandwidth that the radios can
receive.
Modulation analyzers, however, have extremely wide reception bandwidths of over 1 MHz.
They see the audio signals the COM3010 is creating, as well as the digitizing artifacts. The
modulation analyzer will record a wider than expected modulation unless the proper low pass
filter is selected on the analyzer. Typically, the 3 kHz filter switch should be IN to get proper
readings of the modulation waveform.
78
DETAILED INFORMATION
6.20 Advanced Power Meter Information
The COM3010 power meter is a voltage mode power meter.
The COM3010 power meter is not a true RMS type of power meter, meaning that it will
measure your primary carrier voltage accurately and convert it to a power in dBm. It is
possible for harmonics and other signals to cause error. Measurement is performed internally
using a broadband log detector IC with 70 dB of dynamic range. The incoming RF voltage
level is detected and converted to a log value on the output, digitized, and then converted to
a power value based on a calibration table and sent to the display. This method is used since
it offers the greatest flexibility and dynamic range.
The power meter is very accurate with a single carrier with harmonics at least 30dB down, but
when harmonics increase over this level, and especially if there are high levels of multiple
harmonics, the error factor will increase. The amount of error depends on the phase of the
harmonics in respect to one another, along with other factors, and is unpredictable.
Automatic Power Meter Switchover of the COM3010
The COM3010 power detector is set at a threshold of approximately 0.25 W of RF before a
relay trips and the power meter is activated. However, under 70 MHz this value increases,
and reaches roughly 2-3W around 10 MHz.
By default, if you are planning on testing the output power of radios in these frequency
ranges, manually switch in the power meter using SHIFT, 3 before keying the radio.
Your Notes:
79
DETAILED INFORMATION
6.30 30 dB Rear Panel Attenuator Output.
The 30dB attenuator output on the back of the COM3010 can be used for a variety of external
hookups such as spectrum analyzers, modulation analyzers, and other test gear. It can also be
used to loop back into the receiver input on the front to obtain good frequency counts during
power testing.
The Receiver Input on the COM3010 is a sensitive circuit which is sent not only to the
Receiver, but also the Frequency Counters. It is recommended that the input is never driven
with more than +20dBm (100 mW) of signal. When keying a 100W (+50 dBm) radio into
the COM3010 power meter the 30dB attenuator will have about +20dB of signal on the
output; this is right at the limit of the Receiver Input.
The 30dB power attenuator is nominally 30dB of attenuation over the 100kHz to 1GHz band
of the COM3010.
The RF signal from the RF OUT jack to the 30dB attenuator output passes through cables,
connectors, the main PCB, a relay, and the attenuator before it reaches the output jack on the
back. This chain of connections has a predictable amount of loss from front to back, and is in
part used during the power meter calibration in the lab. The following table will help if using
the 30dB output jack in another method of measuring power.
Take the dBm reading at the output of the 30dB attenuator and the frequency under test, and
look up the closest value in the attenuator table below. Add this value to the result to find
the level present on the RF OUT jack. This will allow measurement of power and signal levels
lower than the COM3010 will display, which is limited to 0.1W.
Attenuator Table
MHz
Atten
MHz
Atten
MHz
Atten
MHz
Atten
MHz
Atten
10
29.60
220
30.20
440
30.59
660
30.93
880
31.24
20
29.62
240
30.22
460
30.63
680
30.99
900
31.41
40
29.71
260
30.26
480
30.68
700
31.01
920
31.31
60
29.78
280
30.30
500
30.71
720
31.03
940
31.35
80
29.84
300
30.35
520
30.75
740
31.12
960
31.39
100
29.89
320
30.38
540
30.72
760
31.15
980
31.36
120
29.98
340
30.43
560
30.80
780
31.17
1000
31.54
140
30.03
360
30.46
580
30.79
800
31.23
160
30.09
380
30.48
600
30.85
820
31.21
180
30.12
400
30.51
620
30.89
840
31.30
200
30.17
420
30.57
640
30.90
860
31.29
80
DETAILED INFORMATION
6.40 Advanced SINAD Information
What is SINAD?
SINAD is a parameter which provides a convenient measurement of the quality of an audio
signal from a radio or other communications device. SINAD is a simple measurement of the
power ratio between signal + noise + distortion to just noise + distortion. To remove the
signal to calculate the SINAD, a narrow band-stop filter is employed. Then an RMS value is
found for the unaltered signal, and another RMS value for the filtered signal. Then these two
values are compared using the formula:
SINADdb := 20 * log10( RMS(S+N+D) / RMS(N + D))
In many applications, a standard 1kHz tone and band-stop filter is used for the SINAD test,
primarily since it is in the middle of most narrow-band audio transmissions and it happens to
be roughly the center of the standard voice band. In the COM3010 this is provided though FM
modulation at 1kHz, or AM modulation at 1kHz, when set in the modulation fields (using
SHIFT, 8 sets up the COM3010 automatically). On rare occasions other tones are used, such
as 400Hz on very narrow-band transmissions. The COM3010 allows the flexibility of any tone,
and the band-stop filter coefficients are calculated on-the-fly for the chosen generated tone
frequency.
When the 1kHz tone is generated by the COM3010, a fairly distortion-free modulated signal is
created due to the digital modulation methods used. This allows the COM3010 to accurately
measure the SINAD in a receiver under test, including the COM3010’s own receiver. If you
want to test the SINAD meter out, connect a cable between GEN OUT and RECEIVE IN, and
another between MONITOR and EXT IN. Set the generator and receiver to the same frequency,
say 146.52MHz (Hint: After setting receive and generate to the same value, you can LINK the
receive frequency to the generate frequency to test other frequencies). Now press SHIFT, 8
and SINAD mode will be activated. Now press [LEVEL] and step the level down until the
SINAD meter shows roughly 12dB. Note the value will go around a bit since that is the nature
of measuring a noisy signal. Some averaging is applied to the SINAD measurement, but in the
interest of speedy meter updates you will need to average the rest of the way by eye. Now
you can switch the level setting from dBm to uV by pressing either dBm or mV/uV. At the
point where the SINAD is reading 12dB, it is considered the SINAD rating of the radio under
test.
A widely accepted value of 12dB of SINAD is considered the useable threshold of sensitivity
for a radio, but that depends on the manufacturer specifications. Values less than 12dB of
SINAD are considered to be unintelligible for many people. Some manufactures like to use
20dB of SINAD instead, typically meaning their radios have very conservative sensitivity
specifications, and are typically very sensitive. Remember that the higher the dB of SINAD, the
better the quality of signal. You will need to review the radio’s specifications for sensitivity to
know what level of SINAD is acceptable.
The External modulation input used during the SINAD test has a digitally controlled gain with
customizable AGC which is controlled by the main microcontroller. The AGC makes sure to
81
DETAILED INFORMATION
bring up any incoming audio level used during test to a point that the sampling circuit can use
it to full advantage and best dynamic range. The COM3010 can amplify fairly low level signals
up to a usable level so that you don’t add distortion errors to your measurement by turning
up the volume of a radio so high that it ruins the SINAD test reading. Remember that
distortion is part of the measurement, and adding it by turning up the volume too loud will
make the receiver seem less sensitive than it really is.
Since the audio sampler is only 8 bits of resolution, this gives us a theoretical limit of 48.5dB
according to the device data sheet. This is directly related to the maximum dB of SINAD that
the meter will read. However with narrow-band radios and general background noise, 30dB
of SINAD is typically about the best you will see with this implementation, but more than
adequate for measuring between 12dB and 20dB.
The SINAD meter of the COM3010 is very accurate for the application of radio testing since
both the generator tone and the SINAD calculations are digitally realized. This means that the
generated tone accuracy is +/-0.1%, and the SINAD sampling frequency and filter are tied
directly to the generator frequency, canceling out error in the generated tone to 0%. This also
means that the notch filter is very deep, and has steep sides which are ideal. The bandwidth
of the filter is 150Hz, so it is very narrow as to allow much of the noise and distortion through
as possible while still removing the signal. Since it is digitally realized, the filter will never need
tuning and calibration, so you can always be assured the SINAD meter is accurate. The filtered
and unfiltered tones are also sampled with true RMS, another important part of measuring
accurate SINAD. Many SINAD meters do not use RMS detectors to find the ratio, and results in
substantial error. In all, the SINAD meter can be trusted for years of accurate measurements
on your COM3010.
Your Notes:
82
DETAILED INFORMATION
6.50 RS232 Communications
The serial remote control function of the COM3010 provides all the same operations that can
be accessed from the front panel except for the scanner and sweep functions. The serial port
on the back of the COM3010 is filtered to prevent RF leakage. This filtering may cause errors
at baud rates over 57.6K; therefore, it is best to use 57.6K baud and lower with the
COM3010. Since a limited amount of data must be transferred to operate serially a lower
baud rate is adequate. A terminal program is required and they are typically included in most
operating systems. A standard 9-pin serial cable is also required.
The COM3010 is addressable meaning that it is possible to change the address on each of
several different units and have them in series, but only the unit with the correct address will
respond to your commands. By default this address is 555 and this is entered via the SYS
OPEN command. By default the serial password is disabled. If the serial password has been
enabled, the factory default password is “1234”.
6.50.01 Connecting to Host
Example of how to log in.
1.
Connect a standard 9 pin non-null serial modem cable between PC and COM3010.
2.
Start terminal software with serial settings to 9600,8,N,1 with no hardware flow control
(as shown below). Be sure to select the correct serial port!
83
3.
DETAILED INFORMATION
To enter the Options Screen.
4.
Selects Serial Options.
5.
Use the
6.
buttons to select 9600 baud.
to exit, save changes, and return to Operational Mode.
7.
Press
several times until the serial status is displayed on the COM3010.
This meter will normally only be used to troubleshoot communications problems.
8.
Type “SYS OPEN 555” [ENTER] (No quotes) in the terminal software
9.
The COM3010 should respond with “Welcome from unit 555” and give you an access
prompt of “>>“.
Problems?
If the COM3010 does not respond but the Rx light flickers as you type, there can be two possible problems. The first is that you have the COM3010 set to an address other than 555 from
a previous session. You will have to use the previously set address instead of the default 555
address. The addresses are set up to run multiple COM3010s from the same serial lines so
only one addressed COM3010 will respond at a time.
The other issue is a problem with the HyperTerminal software in Windows when you use no
Flow Control. HyperTerminal will not turn off the Flow Control setting for the serial port
unless you go through the following procedure:
1.
Set the COM3010 baud rate for 9600:8,n,1 (See previous example)
2.
Disconnect HyperTerminal (Using the Off-Hook Phone Icon).
3.
Set the appropriate COM port in HyperTerminal, but a different baud rate than what you
plan to use. To access the properties screen go to File->Properties->Connect To and
select the COM port, then Configure... Press OK.
4.
Hit Enter three times; you should see the Rx icon twinkle and the Er icon may illuminate
on the COM3010.
5.
Disconnect again (Using the Off-Hook Phone icon).
6.
Go back to File->Properties->Connect To then Configure… and set baud rate back to
9600. Press OK.
7.
Type “SYS OPEN 555” [ENTER] (No quotes) in the terminal software
8.
The COM3010 should respond with “Welcome from unit 555” and give you an access
prompt of “>>“.
9.
Type “SYS CLOSE” [ENTER]
10.
The COM3010 will reply with “Disconnecting, Bye.”
11. Save the HyperTerminal session.
Using this saved session will allow you to bypass the above procedure in future communications. If you start a totally new HyperTerminal Session the above procedure will be required
84
DETAILED INFORMATION
again. Other terminal software should not exhibit this problem.
Testing with some legitimate commands:
Enter “SYS OPEN 555” [ENTER], and the COM3010 should connect.
Enter “SET GF 403.25M” [ENTER]; this will set the generator frequency to 403.25MHz.
Enter “SET GL –45dBm” [ENTER]; this will set the level to –45dBm
Now that you are finished, type “SYS CLOSE [ENTER]”
The COM3010 will reply with “Disconnecting, Bye.” and will not respond until you issue another “SYS OPEN 555” command.
All communications with the COM3010 are performed similarly using the commands listed.
You can also write up a text batch file and use the terminal software to send a batch file up to
4096 bytes in size which will allow for long scripts. There are delay functions to allow
measurements to settle or an automated test bench to get operations in place.
An example script used for automatic testing can be sent to the COM3010’s serial port as a
text file.
sys
sys
sys
set
set
set
set
set
set
set
set
set
sys
get
sys
get
sys
open 555
;Opens default addressed COM3010
prompt on
;Turns on system prompt
echo off
;Turns off character echo
level -35
;Set level to -35dBm
gf 985.56M ;Set generator frequency
rf 985.56M ;Set receiver frequency
gfm
;Set generator in FM mode
rfm
;Set receiver in FM mode
inttone 1.2k ;Set internal tone to 1.2kHz
intdev 5k
;Set internal deviation to 5kHz
mint on
;Set internal modulation on
countermode 6
;Set RF counter to RF High, 1.0S gate.
pause 20
;Wait 2 seconds for count to settle
rfcount
;Get the count
pause 10
;Wait 1 second
rfcount
;Get next count
close ;Done, close communications.
The COM3010 serial interface is well-suited to allow for creating programs to control the
COM3010 in remote locations. A good environment to use is Visual Basic since a program can
be “whipped up” in very short order that will provide an easy interface to perform multiple
tasks in an automated fashion.
85
DETAILED INFORMATION
6.50.02 SYS Commands
Major
SubCommand Command
Format
Low
High
Returns
Description
System Commands
###
OK/BAD
Opens serial
communications with
this COM3010 if
address matches
setting.
OK/BAD
Closes serial
communication. After
this, nothing is sent or
received.
999.999
OK/BAD
Once open, this
changes to a new
address, and leaves
session open. First
address must match old
address, second
address must be within
0->999
ON
OFF
OK/BAD
If echo is on, COM3010
sends back everything it
receives through the
RS232 port.
0
7200
OK/BAD
SYS
OPN/OPEN
0
SYS
CLS/CLOSE
SYS
ADR/
ADDRESS
###.###
0.0
SYS
ECH/ECHO
ON/OFF
SYS
TIMEOUT
#
SYS
HELP
AAA
SYS
PASSWORD
AAAAAAAA
AAAAAAAA
A
SYS
SECURE
ON/OFF
SYS
PAUSE
###
SYS
PROMPT
ON/OFF
999
Sets serial comm
timeout from 1 to 30
minutes. 0 = No
timeout, time in
seconds
Lists commands with
List of
commands associated Major
Command.
Confirnation, Changes the password
to that specified
OK/BAD
ON
ON
OFF
OFF
86
Confirmatio Secure Enables and
n,OK/BAD Disables the password.
OK/BAD
Pauses serial interpreter
for specified 10's of
milliseconds.
OK/BAD
Turns the command
prompt on and off.
Default ON
DETAILED INFORMATION
6.50.03 SET Commands
Maj
or
SubCommand
Format
Low
High
Returns
Description
Generator Side
SET GF
###.##### 0.100000M 1000.000000 OK/BAD
#MHz
Hz
MHz
SET GEN,GENSTAT ON/OFF
ON
OFF
OK/BAD
E
Set Generator
frequency
SET GL,LVL,LEVEL -###.#dBm -120
0
OK/BAD
Sets the Generator
State. By default
when entering the
serial mode, this is
set to ON.
Set Generator Level
SET MEXT
ON/OFF
ON
OFF
OK/BAD
Set Mod External
SET MINT
ON/OFF
ON
OFF
OK/BAD
Set Mod Internal
SET MCTS
ON/OFF
ON
OFF
OK/BAD
Set Mod CTS
SET MDCS
ON/OFF
ON
OFF
OK/BAD
Set Mod DCS
SET MALL
OFF
N/A
OFF
OK/BAD
Turn off all
modulations
Set Generator in FM
mode
Set generator in AM
mode
Set FM modulation
deviation
SET GFM
SET GAM
SET EXTDEV
##.####kHz 0Hz
75.0000kHz
OK/BAD
SET EXT%
##%
75%
OK/BAD
SET INTTONE
#.####kHz 0.1Hz
3.0000kHz
OK/BAD
SET INTDEV
##.####kHz 0Hz
75kHz
OK/BAD
SET INT%
##%
0%
75%
OK/BAD
SET AGC
#
1
4
OK/BAD
SET CTS
###.#Hz
0
999.9
OK/BAD
Set AM modulation
percent
Set Internal
Modulation AGC
Mode (See valid AGC
mode list)
Set CTS tone in Hz
SET CTSDEV
#.####kHz 0.1Hz
2.000kHz
OK/BAD
Set CTS Deviation
SET DCS
###
OK/BAD
Set DCS code
OK/BAD
Set DCS Deviation
SET DCSDEV
0%
See valid
lists.
#.####kHz 0.1Hz
2.000kHz
87
Set AM modulation
percent
Set FM Tone
frequency
Set FM modulation
deviation
DETAILED INFORMATION
6.50.03 SET Commands (Continued…)
SET GSTEP
###.##### 0.0MHz
#MHz
1000.000000 OK/BAD
MHz
OK/BAD
SET GUP
SET GDOWN
OK/BAD
Receiver Side
Major
SubCom- Command
mand
Format
Low
High
Returns
###.#### 0.100000 1000.00000 OK/BAD
#MHz
MHz
MHz
Get generator
frequency step
Generator up one
step
Generator down one
step
Description
Set Receiver frequency
SET
RF
SET
RAM
AM Receive mode
SET
RFM
FM Receive Mode
SET
1
6
OK/BAD
Set Counter Mode (see
counter mode lists)
SET
COUNTERM #
ODE
LMETER
#
1
8
OK/BAD
Set Lower Meter Mode
(See valid meter mode
lists) Except for Sinad
Mode (9)
SET
UMETER
1
4
OK/BAD
Set Upper Meter Mode
(See valid meter mode
list)
SET
POWERME- ON/OFF
TER
ON
OFF
OK/BAD
Sets the power meter display on or off (big meter).
You will need to turn it off
to regain generator control after testing power.
Returns BAD if power still
present and cannot be
turned off. ON forces meter on without power present.
SET
RSTEP
SET
FUP
SET
FDOWN
#
###.#### 0.0MHz
##MHz
1000.000000 OK/BAD
MHz
OK/BAD
OK/BAD
88
Set receiver step size
Receiver up one step
Receiver down one step
DETAILED INFORMATION
6.50.04 MEM Commands
Major
Command
Subcommand
Format
Low
High
Returns
Description
Memories
OK/BAD
Recall Memory
from
sequence.register
NXT
OK/BAD
Recall next
memory in the
sequence
MEM
PREV
OK/BAD
Recall previous
memory in the
sequence
MEM
SAVE
##.##
00.00
99.99
OK/BAD
Save memory in
specified
sequence.register
MEM
DEL
##.##
00.00
99.99
OK/BAD
Delete specified
sequence.register
MEM
GET
MEM
##.##
00.00
99.99
Your Notes:
89
DETAILED INFORMATION
6.50.05 GET Commands
Major Sub-command
Comma
nd
Low
High
Returns
Description
Bottom Meters
GET
RFCOUNT
0
1200.000000M ####.##### Get current RF frequency
count specified by the
Hz
#MHz
current counter mode
(see counter mode lists)
GET
AFCOUNT
0
6000
####.#kHz
Get current AF count, only
if AF counter is selected
as one of the meters
GET
FMDEV
0
+/-7kHz
+#.##kHz/#.##kHz
Get current FM deviation
(numerically)
GET
DELTAF
GET
DBSINAD,SINA 0dB
D,SIN
40dB
##.#dB
Get dB SINAD (see valid
meter mode lists)
GET
AM%
0
100%
###%
Get AM percent reading if
in AM receive mode and
proper meter is selected.
Get frequency error from
+/####.##### current receive frequency
(see counter mode lists)
#MHz
Top Meters
GET
POWER
0
100W
###W
Get Measured power
GET
BAT
10V
16V
##.#V
Get Battery Voltage
GET
RSSI
-100dBm
-30dBm
##dBm
Get receiver RSSI
GET
SQUELCH
O (OPEN)
C (CLOSED)
O/C
Get squelch state
90
DETAILED INFORMATION
6.50.05 GET Commands (Continued…)
Major SubComma Command
nd
Operating Values
GET
GF
Low
High
Returns
Description
GET
1000.000000M ####.##### Get Generator Frequency
Hz
#MHz
GEN,GENSTATE OFF
ON
ON/OFF
Gets the current state of
the generator.
GL,LVL,LEVEL -120.0dBm 0dBm
###.#dBm
Get Generator Level
GET
MEXT
OFF
ON
ON/OFF
GET
MINT
OFF
ON
ON/OFF
GET
MCTS
OFF
ON
ON/OFF
Get External Modulation
State
Get Internal Modulation
State
Get CTS Modulation State
GET
MDCS
OFF
ON
ON/OFF
Get DCS Modulation State
GET
GAMFM
FM
AM
AM/FM/OFF
Get Genrator AM/FM state
GET
EXTDEV
0Hz
75.0000kHz
GET
EXT%
0%
75%
GET
GET
INTTONE
INTDEV
0.1Hz
0Hz
3.0000kHz
75kHz
GET
INT%
0%
75%
SET
AGC
1
4
##.####kHz Get FM modulation
deviation
##%
Get AM modulation
percent
#.####kHz Get FM Tone frequency
##.####kHz Get FM modulation
deviation
##%
Get AM modulation
percent
#
Get Internal modulation
AGC Mode (See valid AGC
mode list)
GET
CTS
0.0Hz
999.9Hz
GET
CTSDEV
0.0Hz
GET
GET
DCS
DCSDEV
000
0.0Hz
GET
RF
100kHz
GET
100kHz
###.#Hz
Get CTS generator tone
frequency
2.000kHz
#.###kHz
Get CTS generator deviation setting
777
###
Get DCS generator code
2.000kHz
#.###kHz
Get DCS generator deviation setting
1000.00000MH ####.##### Get Receiver Frequency
z
MHz
91
DETAILED INFORMATION
6.50.05 GET Commands (Continued…)
GET
RAMFM
GET
AM
FM
AM/FM
Get Receiver AM/FM mode
COUNTERMODE 1
6
#
GET
LMETER
1
9
#
Get Counter Mode (see
counter mode lists)
Get Lower Meter Mode (See
valid meter mode lists)
GET
UMETER
1
4
#
Get Upper Meter Mode (See
valid meter mode lists)
GET
POWER
METER
OFF
ON
ON/OFF
Returns the large power
meter to the display
Your Notes:
92
DETAILED INFORMATION
6.50.06 Various Meter Mode Options
Lower Meter
Mode Table
Mode #
1
2
3
4
5
6
7
8
9
Upper Meter
Mode Table
1
2
3
4
Mode Name
Frequency Error Graphic
Frequency Error Text
FM Modulation Graphic +/-7kHz
FM Modulation Graphic +/-4kHz
FM Modulation Text
AM Percent Graphic
AM Percent Text
Audio Frequency Counter
Sinad Meter
RSSI Bargraph
RSSI Text
RF Power
Power Supply State/Voltage
Counter Mode
Table
Mode #
Mode Name
1
Direct RF counter, 0-100MHz, 0.1S
gate
2
Direct RF counter, 0-100MHz, 1S
gate
3
Direct RF counter, 50-1200MHz,
0.1S gate
4
Direct RF counter, 50-1200MHz, 1S
gate
5
IF Frequency Counter (based on
receiver frequency), 0.1S gate
6
IF Frequency Counter (based on
receiver frequency), 1S gate
93
Valid in AM
Yes
Yes
No
No
No
Yes
Yes
Yes
Yes
Valid in FM
Yes
Yes
Yes
Yes
Yes
No
No
Yes
Yes
DETAILED INFORMATION
6.50.07 Various Mode Options
Sweep Mode
Table
1
2
3
Decade
Octive
Linear
External AGC
Mode Table
1
2
3
4
Tone
Voice
Digital
Sinad
Sweep Speed
Mode Table
1
2
3
4
5
6
7
8
<10mS
10mS
25mS
50mS
100mS
250mS
500mS
1S
94
7.00 APPENDIX
95
APPENDIX
APPENDIX A
BUTTON REFERENCE CHART:
Button
Description
Shift
POWER
Turns power on and off.
None
EXT
Toggles external modulation
mode and selects deviation.
EXT AGC
Cycles the various AGC modes for
the external input.
INT
Toggles the internal modulation mode and selects tone.
PAGING
Accesses the various paging modes
that the COM3010 supports (Two
Tone)
CTS
Toggles CTS tone and selects
tone.
None
DCS
Toggles DCS mode and selects INVERT DCS
code.
Uses the current code, but inverts it
before sending.
GENERATE
Enters the generate frequency GEN STEP
field
Sets the generator step and rounding size.
FM
Sets generator in FM mode
None
AM
Sets generator in AM mode
None
COUNT
Sets generator to the current
counter reading
None
LINK
Locks receive and transmit at
the current difference.
SET OFFSET
Allows entry of an offset, valid at the
next step in frequency.
1
Enters a “1”
SWEEP SET
Allows setup of sweep generator
2
Enters a “2”
SWEEP
START
Starts the sweep generator.
3
Enters a “3”
POWER
Forces power meter mode.
4
Enters a “4”
None
5
Enters a “5”
CALIBRATE
Entry into calibration screens
6
Enters a “6”
OPTIONS
Entry into the options screens
7
Enters a “7”
SCANNER
Starts the scanner function
96
Description
APPENDIX
Button
Description
Shift
Description
8
Enters an “8”
SINAD1K
Macro for setting up SINAD testing.
9
Enters a “9”
SINAD400
Macro for setting up SINAD testing.
0
Enters a “0”
PWR SAVE
Turns off the displays to save
power.
.
Enters a “.”
ZOOM METER
Zooms the current Freq Meter.
-
Enters a “-”
DELETE
Deletes current memory
STO
Starts memory save
None
SEQ
Selects a sequence
None
REG
Selects a register
None
SHIFT
Selects the shift function
MHZ/-dBm
Enters units for active field
GEN ON/OFF Toggles the generator on and off.
kHz/mV
Enters units for active field
GEN ON/OFF Toggles the generator on and off.
Hz/uV
Enters units for active field
GEN ON/OFF Toggles the generator on and off.
ENTER
Enter on the current field
ESCAPE
RECEIVE FM
Sets receiver into receive
FM mode
RX STEP SIZE Allows entry of the frequency step
and rounding size.
RECEIVE AM
Sets receiver into AM mode RX STEP SIZE Allows entry of the frequency step
and rounding size.
COUNTER
Cycles through the available MOD OFF
frequency counters
Turns off all active modulation
modes.
METER
SELECT
Cycles through the bottom
measurement meters
ALT METER
Cycles through the top measurement meters
@COUNT
Sets receiver to the current
frequency count
None
Nav Buttons
Allows cycling through lists
and entering values
BKSPC/DEL
97
Aborts entering of the current
field.
Can delete characters during entry
APPENDIX
APPENDIX B
CTS TONE FREQUENCY LIST:
Standard EIA CTS Tones (Hz)
67.0
79.7
91.5
103.5
118.8
136.5
156.7
179.9
210.7
241.8
71.9
82.5
94.8
107.2
123.0
141.3
162.2
186.2
218.1
250.3
74.4
85.4
97.4
110.9
127.3
146.2
167.9
192.8
225.7
77.0
88.5
100.0
114.8
131.8
151.4
173.8
203.5
233.6
APPENDIX C
DCS CODE LIST:
023N
074N
165N
261N
364N
464N
631N
025N
114N
172N
263N
365N
465N
632N
026N
115N
174N
265N
371N
466N
654N
031N
116N
205N
266N
411N
503N
662N
032N
122N
212N
271N
412N
506N
664N
036N
125N
223N
274N
413N
516N
703N
043N
131N
225N
306N
423N
523N
712N
047N
132N
226N
311N
431N
526N
723N
051N
134N
243N
315N
432N
532N
731N
053N
143N
244N
325N
445N
546N
732N
054N
145N
245N
331N
446N
565N
734N
065N
152N
246N
332N
452N
606N
743N
071N
155N
251N
343N
454N
612N
754N
072N
156N
252N
346N
455N
624N
073N
162N
255N
351N
462N
627N
98
APPENDIX
APPENDIX D
TWO TONE MODES:
Paging Mode
Tone 1 length
Tone 2 length
Wait for squelch delay
Tone Only
0.4 Seconds
0.8 Seconds
1.3 Seconds
Voice
1 Second
3 Seconds
1.3 Seconds
Battery Save
2.7 Seconds
0.8 Seconds
1.3 Seconds
Group Call
0 Seconds (Not sent) 8 Seconds
1.3 Seconds
APPENDIX E
GENERAL OPTIONS TABLE
Option
Name:
Choices
Default
Description
Buzzer
ON / OFF
ON
Turns all buzzer sounds on or off.
Cable Comp ON / OFF
OFF
If on, adds 1dB to the power reading at 1GHz, linearly
declining to 0dB of added power at 0Hz.
Round
ON / OFF
ON
Turns the “rounding to nearest step size” feature of
the COUNT buttons and SWEEPS on and off.
Pass
ON / OFF
OFF
Turns the system password on and off. When selected
on, it will prompt for the new password twice.
Dim
12.5%100%
62.5%
Allows the selective dimming of the displays. Helps in
dark environments. Does not save on battery power.
Splash
ON / OFF
ON
Allows disabling of the startup splash screen
Flt Cnt
ON / OFF
ON
Allows disabling of the frequency counter filter.
Exit
Exits the menu.
99
COM3010 SPECIFICATIONS
Features:
Display: 2 Vacuum Fluorescent graphical displays, 16 x 140 pixels
Memories: 100 sequences of 100 registers, plus system memories
Sweep Features: Linear, octave, and decade of up to 1000 pts for sweeping generator
Scanner Mode: Allows scanning through a sequence of 100 stored settings
Sinad Meter: Display reading from –30 dB of SINAD to 0 dB. Loop-back audio for
tested equipment
Frequency Counter: Measures frequency error to 1Hz in three counter modes
Battery Meter: Displays charge left in batteries
Reverse Power Protection: Generate output protected, switches into 100 watts
internal load and automatically displays power in dBm or watts
Power Meter: Displays power when unit is keyed into the generator output. Reads
from 23 dBm to +50 dBm, 0.5 dB, selectable dBm or watts
Attenuator Output: -30 dB attenuator output from internal load for monitoring
Calibrated RSSI Meter: 80 dB of range on receiver side., -40 dBm to -120 dBm
Generate:
Frequency: 100 kHz to 1.0 GHz, 1 Hz steps
Frequency Accuracy: 0.1ppm standard
RF output Level: -140 dBm to 0 dBm, 0.1 dBm steps
Level Accuracy: 1 dB , 500 kHz to 1.0 GHz; 2 dB 100 kHz to 500 kHz
Units: dBm, uV ,mV
Leakage: Better than 1 uV, 2 turn loop, 1” dia. at 1”
Spurious:
Harmonics: -30 dBc typical above 1 MHz
Non-harmonics: -50 dBc typical
FM Modulation: 75 kHz max in 0.1 Hz steps
FM Bandwidth: 0.1 Hz to 75 kHz
Accuracy: 0.1ppm
AM Modulation: 0 to 75% in 1% steps to -100 dBm, 0-50% to -140 dBm
AM Bandwidth: 10 Hz to 10 kHz
Accuracy: 5%
Distortion: Less than 5%
Modulation Types
Internal: 0.1 Hz to 3000.0 Hz, 0.1 Hz steps
External: 0.1 Hz to 3000.0 Hz, 0.1 Hz steps, digital and analog selectable
CTS Encode: 0.1 Hz to 999.9 Hz at .75 Hz default deviation, variable from 0.1 Hz to
2 kHz deviation
DPL Encode: 750 Hz, variable from 0.1 Hz to 2 kHz, all supported codes
Two-Tone Paging Each tone, 0.1 Hz to 3000.0 Hz, Group, Voice, Tone, Battery Save
page modes.
100
COM3010 SPECIFICATIONS
Receiver:
Frequency: 100 kHz to 1.0 GHz
Step size: 10 Hz
Sensitivity: Less than 2 uV, 1 MHz to 512 MHz; less than 3 uV, 512 MHz to 1 GHz; unspecified, 100 kHz to 1 MHz
FM Demod: 0 to 7 kHz, 0 to 4 kHz
AM Demod: 0 to100%
CTS Decode: In AF frequency count
Frequency error: 0 to1 MHz, two methods of bargraph and count
AF Demod output: 1 Vp-p for 7 kHz deviation
Gates: 0.1 Sec, 1 Sec
Audio counter:
Frequency Range: 60 Hz to 3000 Hz
Gates: 10 Sec variable gate for 1 Sec quick updates
Sensitivity: 35 mV at demod audio, 750 Hz deviation
Frequency counter:
Frequency Range: 100 kHz to 1.0 GHz
Low Band Sensitivity: Less than 10 mV under 70 MHz, 1 Hz and 10 Hz resolutions
High Band Sensitivity: Less than 10 mV, 70 MHz to 1.0 GHz, 10 Hz and 100 Hz
resolutions with divide by ten pre-scaler
IF Frequency: Receiver sensitivity. Frequency range limited to bandwidth of current
set receive frequency, 10 kHz. 1 Hz and 10 Hz resolutions
General:
Receiver input has diode protection and fused parts
Battery life: 1 hour per battery pack, 3 battery packs maximum
Controls: Elastomeric
RS232 Control: Serial interface provides external function control and automated calibration
Dummy Load: 100W 30 dB attenuator included, 25% duty cycle for rated power,
30dB sample port on rear panel
Primary Power: 100-240 VAC, .6A, 50/60 Hz. Built-in 1 hour battery pack (holds 2
additional battery packs for 3 hour battery life
Stand: Bottom mounted tilt bail stand included
Supplied Accessories: 110 VAC EIA power cord, BNC-BNC test cable, whip antenna,
one BP3010 Li-Ion battery
Case color: Mist gray epoxy powder coat
Dimensions: 6” H x 11.9375” W x 14.75” D (152.4 mm H x 303.21 mm W x 374.65
mm D)
Weight: 14 lbs (6.5kg)
101
Accessories:
Battery Pack: BP3010 additional battery pack to extend battery life (1 pack supplied, 3
max)
Carrying Case: CC3010 custom Cordura® padded travel case w/ strap
102
Certification
Ramsey Electronics, Inc. certifies that this product meets its published specifications
at the time of manufacture, and that the calibration measurements are traceable to
the United States National Bureau of Standards.
Warranty
Ramsey Electronics, Inc. warrants this product against defects in materials and
workmanship for a period of one year from the original manufacture date. Ramsey
Electronics, Inc., at its option, will repair or replace this product at no cost to the
original owner during the warranty period, provided the product is proved to be
defective.
Warranty Service
To obtain warranty service, please contact Ramsey Electronics, Inc. technical support:
RAMSEY ELECTRONICS, INC.
Technical Support
590 Fishers Station Drive
Fishers, NY 14564
585-924-4560
[email protected]
Tech Support will help you diagnose your problem and, if necessary, issue an RMA
for the return of your COM3010. Equipment cannot be returned without a proper
RMA number.
With your return, please include specific descriptions of the problem encountered as
well as detailed contact information including daytime telephone number, E-Mail
address, and complete return shipping address information.
Limitations
This warranty shall not apply to products that have been improperly cared for,
abused, or used outside the operating specifications of the product. This warranty
shall not apply to products repaired or altered by persons not authorized by Ramsey
Electronics, Inc. This warranty is in lieu of all other warranties, expressed or implied,
and is solely for the use of the original product purchaser.
RAMSEY ELECTRONICS, INC.
590 Fishers Station Drive
Victor, NY 14564
(585) 924-4560
www.ramseytest.com
Copyright Ramsey Electronics, Inc. 2005, All rights reserved
COM3010
January 2005
V1.20.18