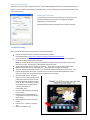
1
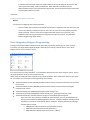
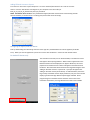
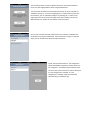
v. 20120510 ® ™ Table of Contents RTiPanel Overview and Requirements ..........................................................................................................................3 Software Requirements: ...........................................................................................................................................3 Hardware Requirements: ..........................................................................................................................................3 Network Requirements: ............................................................................................................................................3 Licensing Requirements: ...........................................................................................................................................4 Basic Integration Designer Programming ......................................................................................................................4 Adding an RTiPanel Device to System .......................................................................................................................5 Adding RTiPanel Licenses to System .........................................................................................................................5 Configuring Apple® iOS or Android™ Device .................................................................................................................6 Re-Configuring Device ...............................................................................................................................................7 Advanced Integration Designer Programming ..............................................................................................................7 Multiple Control Processors ......................................................................................................................................7 Gauge Drawing Tool ..................................................................................................................8 Slider Drawing Tool ............................................................................................................... 8 Toggle Button Drawing Tool .................................................................................................. 8 One-Way List Drawing Tool ...................................................................................................8 Two-Way List Drawing Tool ....................................................................................................9 RTiPanel Password ..................................................................................................................................................10 Locking Orientation .................................................................................................................................................10 Changing Orientation View .....................................................................................................................................10 Hiding Buttons for an Orientation ...........................................................................................................................11 Remote Access Setup ..................................................................................................................................................11 Dynamic Name Service ............................................................................................................................................11 Setting up DynDns Account ................................................................................................................................11 Setting up DnyDns on Router..............................................................................................................................11 Network Router Setup (Port Forwarding) ...............................................................................................................11 Integration Designer Setup .....................................................................................................................................11 Setting External Hostname .................................................................................................................................12 Setting External Gateway ....................................................................................................................................12 Troubleshooting ..........................................................................................................................................................12 RTiPanel Overview and Requirements RTiPanel is an application that is designed to run on Apple® iOS devices (such as iPad®, iPhone® and iPod Touch® devices) as well as Android™ devices. This application communicates with RTI’s XP series control processors to provide full control of your RTI system right from your Apple® or Android™ device. The RTiPanel application is designed to run on LAN and WAN networks giving full control and two-way feedback from anywhere in the world with Internet access. A license is required for every Apple® or Android™ device in order to communicate. Licenses may be purchased from the RTI online store, or by contacting your local distributor. Software Requirements: Integration Designer programming software version 8.2 or higher for Apple® iOS devices. Integration Designer version 8.3 or higher is required for Android™ devices. Any version of XP-3 processor firmware will work with Apple iOS devices. Firmware 1.2 or higher is required for Android™ support. Firmware 1.1 or higher for the XP-6 control processor for Apple® iOS devices (ALL XP-6 processors will need their firmware updated). Firmware 1.2 or higher for the XP-6 is required for Android™ support. Firmware 3.0 or higher for the XP-8 control processor is required for Apple® iOS devices. (ALL XP-8 processors will need their firmware updated). Firmware 3.2 or higher for the XP-8 is required for Android™ support. NOTE: To check the current version of firmware on your processor, hook up a USB cable, open Integration Designer and go to Communications>Get Firmware. Hardware Requirements: RTiPanel is programmed using Integration Designer® on a PC based computer running Windows XP or higher . Apple iPad, iPhone and iPod touch device or Android™-based tablet or phone. RTI XP3, XP6, or XP8 control processor. When using an XP8 processor, you must install an SD card into the front on the XP8. The SD card provides additional file space needed to store RTiPanel data files. NOTE: It must be an SD card no larger than 2GB and formatted as Fat or Fat32. Flash memory cards with more memory, are actually considered SDHC and will not work. Network Requirements: ® Apple iOS/Android™ devices used for local control must be connected to the same Ethernet network as the XP series control processor. ® Apple iOS/Android™ devices used for control from a remote location must have an Internet connection. Use of the RTiPanel from a remote location requires Internet access for the XP series processor with a static IP address from the Internet Service Provider (ISP). If a static IP address is not possible, then a dynamic DNS service will need to be used. (See the Remote Access section for details.) Licensing Requirements: A license is required for each Apple® iOS/Android™ touch device. Licenses may be purchased online at http://www.rticorp.com/dealers/rtipanel_dealer.html, or by contacting your local RTI distributor. RTiPanel licenses are generated for a specific XP processor MAC address. Every XP processor has a unique MAC address and therefore licenses are not transferable to another XP processor. No refunds, exchanges or license transfers to another XP processor are allowed. What if: Your client replaces/upgrades an Apple®/Android™ device: - In the event that a customer replaces an Apple®/Android™ device, rebooting the XP processor will “free” up the license being used by the old device. When RTiPanel is installed on the new Apple®/Android™ device and connected to the XP processor, the license will have been transferred to the new Apple®/Android™ product. Continued… Licensing Requirements (continued): What if: Your client has multiple XP series control processors: - Systems in which communication with multiple XP processors is required (in the same RTI system and on the same network), an RTiPanel license on the “main” XP processor for each Apple®/Android™ device is required. If there is more than one Apple®/Android™ device in the system file, every RTiPanel license must be generated for and assigned to the same XP processor. (See Advanced RTiPanel Programming section below). Basic Integration Designer Programming Creating a system that includes an RTiPanel device starts with a system file containing an XP series processor. From there, you simply add the Apple®/Android™ device like you would any other RTI device. Next, add an RTiPanel license and your ready to connect. Adding an RTiPanel Device to System From the ‘Device’ menu select ‘Add New’. In the ‘Add New’ dialog box, find the ‘Virtual Controls’ section. Choose the Apple®/Android™ device you wish to add to the file. NOTE: Verify the model and screen resolution of your Apple®/Android™ device matches the device in your system file. For example, you cannot put an iPad programming into an iPhone. The RTiPanel (iPhone) Color (320x240) should be used for iPhones and iPod Touches with lower resolution touch screens. The RTiPanel (iPhone4) Color (640x960) should be used for iPhones and iPod Touches with higher resolution touch screens. The RTiPanel (iPad) Color (768x1024) should be used for the iPad 1 or 2. rd The RTiPanel (new iPad) (1536x2048) should be used for the 3 generation iPad (“new” iPad) The RTiPanel (Android) is resizable based on the specs of the Android device being used. o Note: Due to the many resolutions available for Android devices, not every Android device will have pre-built templates available (Page Wizard Feature). Integration Designer includes pre-built templates for some of the most common display resolutions. Display types with pre-built page template options include: 480x800 with a 38 pixel status bar (many Android™ phones) 600x1024 with a 100 pixel status bar (Kindle Fire®) 800x1280 with a 48 pixel status bar (most 10.1” tablets) Adding RTiPanel Licenses to System From the ‘File’ menu select ‘System Properties’. Go to the “RTiPanel/Virtual Panel” tab. Find the ‘Licenses’ section. Press the ‘Add’ button and navigate on your computer to the license file (ex. iPad_00_15_26_XX_XX_XX.rtilicense) that you purchased. NOTE: The Remote Access section is only needed if the Apple®/Android™ device will be used remotely (outside the local network). If remote access is not being used, these fields can be left empty. Configuring the Apple®/Android™ Device Start by downloading the RTiPanel app from the iTunes app store, Android Market or Amazon Appstore (for Kindle Fire®). When you start the application you will see a screen with two buttons. Choose the ‘Get Started’ button. For Android™ Devices only: The screenshot to the left, from an Android Tablet, is the welcome screen that appears when opening RTiPanel. While similar in appearance to the RTiPanel welcome screen displayed on an Apple® iOS device, the screen properties and resolution for the device will appear in the bottom left of the device. This information will be entered into Integration Designer when adding an Android™ device to a system file. A prompt will appear after adding an Android™ device (shown below). As indicated above, due to the large variety of Android™ device display resolutions, only the most common display types will have Page Wizard template pages available. When programming for an Android™ device that does not have one of the resolutions stated above, the Page Wizard feature will not be available. The screenshots below are from an Apple® iOS device. Note that the RTiPanel menus may look slightly different when using Android devices. The next screen will show a list of RTI XP processors that are on the LAN and are available to connect to. If you are configuring from a remote location (not on the local network), you can “Manually Configure” by selecting the ‘+’ button in the upper-right corner of the screen and typing in the Server Address, which is the DNS hostname or IP address for the location of the XP Processor. Once a server has been selected, it will provide a list of devices compatible with the hardware running the RTiPanel app. If the RTiPanel is running on an iPhone4 device, the list will show both iPhone and iPhone4 devices. Finally, select the desired device. The configuration will be downloaded to the device and the device will be “configured”. The RTiPanel app will check-in with the server after each connection is made to determine if a new configuration is available. If a new configuration is available, it will be downloaded automatically by the RTiPanel app. Reconfiguring/Resetting RTiPanel App In the event that the RTiPanel needs to connect to a different server (XP Processor), the configuration can be reset. Resetting the configuration will cause the RTiPanel to return to the “Welcome” screen, allowing you to go through the configuration steps again. On Apple® iOS devices, the “Reconfigure” option (screenshot on left) automatically resets itself to “Off” when you go back to the RTiPanel app. A customer who has XP processors in multiple homes and wishes to switch the system being controlled would use the reconfigure setting to change the XP processor that is being communicated with. For Android™ devices go to Setting>Apps>Clear Data. Click “OK” to clear app data. The images below are from the settings menu of a Sony Tablet S. The menu may look different depending on the Android™ device being used. Advanced Integration Designer Programming There are several features that are unique to Apple® iOS/Android™ device programming such as multi-processor setup and using two-way buttons. There are programming tools located in the bottom left tool pallet within the Integration Designer programming software only when programming an Apple® device. Multi-Processor Programming in Integration Designer: • Specify the Default System: Go to the Device Properties of the Apple® iOS/Android™ device and select “Output” to specify the XP processor containing the RTiPanel licenses and Click OK. • Communication with an alternate XP processor can be achieved on individual buttons by adjusting which processor it is assigned to (Button Properties >> Output tab). In this case, the default or “main” XP processor will still receive the commands from the RTiPanel and will transfer communications via Ethernet to other XP processors on the network. • It is not possible to program a single button to communicate directly with two or more XP processors in Integration Designer. However, use of the “System Macro Triggers” Driver Utility can initiate a serial command to be sent from the main processor to a secondary XP processor to trigger a System Macro (extra cabling between the processors is required). Gauge Drawing Tool To add a gauge object to a page, select the gauge drawing tool in the lower-left corner of the Integration Designer window. Now select the ‘Draw Button’ tool. Draw the gauge on the page to the desired size. The orientation of the gauge will change depending on the size of the button. To make the gauge orientation bottom-to-top, simply draw the button tall and skinny. Gauge objects are for feedback only. You cannot place a command onto the gauge object. Apple® iOS Android™ Slider Drawing Tool To add a slider object to a page, select the slider drawing tool in the lower-left corner of the Integration Designer window. Now select the ‘Draw Button’ tool. Draw the slider on the page to the desired size. The orientation of the slider will change depending on the size of the button. To make the slider orientation bottom-to-top, simply draw the button tall and skinny. Once the slider has been created, driver commands and feedback variables can be assigned. Apple® iOS Android™ Toggle Button Drawing Tool To add a Toggle Button object to a page, select the switch object drawing tool in the lower-left corner of the Integration Designer window. Now select the ‘Draw Button’ tool. Note that while the actual button can be drawn to the desired size, the toggle button graphic itself is a fixed size. Once the toggle button has been created, driver commands and feedback variables can be assigned. Apple® iOS Android™ One-Way List Drawing Tool To add a One-Way List object to a page, select the static list object drawing tool in the lower-left corner of the Integration Designer window. Now select the ‘Draw Button’ tool. Draw the one-way list object on the page to the desired size. A one-way list can then be populated by right clicking on the scrolling list object and selecting “Edit Scrolling List”. A programming menu similar to the illustration below will appear and allow for the creation of macro commands to be executed when an item from the list is selected. Button Text and bitmap fields are also available for customization of the scrolling list. One-way scrolling lists can be an ideal interface for control requirements that would otherwise require many fixed buttons (ex: favorite music or tv stations, surround modes from an A/V receiver). Two-Way List Drawing Tool To add a Two Way List object to a page, select the static list object drawing tool in the lower-left corner of the Integration Designer window. Now select the ‘Scrolling List Object’ tool. Draw the two-way list object on the page to the desired size. Once created, driver commands and item list feedback variables can be assigned to the list for two-way communication with compatible desired equipment. Additionally, the button text properties (text size, font, alignment) can be adjusted by right clicking on the two-way list button, and selecting “Edit Properties”. Note: Two-way lists are programmed differently on Apple® iOS/Android™ devices compared to native RTI controllers. This is due to the fact that RTiPanel is exposing some of the native capabilities of the Apple® iOS/Android™ scrolling lists. There is no need to account for a progress bar, or Scroll/Page up or down commands on Apple® iOS/Android™ devices. The progress indicator is built into the Apple® iOS/Android™ list, and swiping allows for quick, intuitive navigation through the contents of the list. RTiPanel Password RTiPanel can provide secure access via the “Security” tab of the Device Properties for each Apple® iOS/Android™ device. When RTiPanel application is open and the password option has been enabled, a prompt will ask for the password entry before the user interface is presented. Note that the password prompt will only be initiated upon starting of the RTiPanel application. If the RTiPanel has been opened and is running in the background of Apple® iOS/Android™, a “new” prompt will not be required when the user chooses to use the RTiPanel application. In the event that secure access to the control interface is important, the user should completely close RTiPanel after each use (i.e. RTiPanel should not be still running in the background). Locking Orientation RTiPanel supports unique GUI layout for both Portrait and Landscape mode on Apple® devices. Both Portrait and Landscape mode are enabled by default on each Apple® iOS/Android™ device. The GUI for each orientations must be programmed when both modes are enabled, which in general will require additional programming time. If a fixed graphics orientation is preferred, right click on the Apple® iOS/Android™ device in the System Workspace of Integration Designer, and select “Edit Properties”. From the General tab, select the preferred orientation. Once selected, only the desired orientation needs to be customized in Integration Designer. Changing View of Orientation When using both orientations (landscape and portrait) on an Apple® iOS/Android™ device, the programmer can alternate easily between both views, either by selecting from the Device Menu in the upper left corner of Integration Designer, or by using the shortcut “Ctrl + Q”. Hiding Buttons for an Orientation When auto-rotation is enabled for the Apple® iOS/Android™ device, each button will be visible in both Portrait and Landscape mode by default. If a button should only be visible in one orientation, right click on the button, and select “Edit Properties”. From the General tab, uncheck the view in which the button should NOT appear. Video/ Dynamic Images RTiPanel version 1.0 supports streaming MJPEG images as well as Dynamic Images (ex: Cover Art) while on a LAN connection only. Streaming MJPEG video over a WAN or 3G connection is not currently supported. Remote Access Setup Dynamic Name Service The first step when setting up remote access is to create a Dynamic Name Service (DNS) account with a DNS server like Dyn.com. When setting up your DNS account you will receive a DNS hostname. This hostname is what you will use when setting up the RTiPanel in Integration Designer. Setting up DynDNS Account Go to the DynDNS website (http://dyn.com). Navigate to the account setup page and create a new account. Enter the IP address found on your router. This IP address is the external address given to the router by the ISP. This IP address will be updated automatically by your router. Setting up DnyDNS on Router Once you have setup a DynDNS account, you must provide your router with the new account information. In your router setup, navigate to the DNS setup page. You may see a list of supported DNS services. Choose ‘DynDNS’. Then enter the username and password information. The router will log into your DynDNS account whenever the IP address provided by your internet service provider changes. Network Router Setup (Port Forwarding) The next step is to setup the port forwarding entry in your router. Logon to your router using a web browser and look for the ‘port forwarding’ setup. The router must be configured to forward packets from port 4110 to the gateway XP processor. A typical port forward configuration entry would look like this: Application: RTiPanel Port: 4110 Destination: 192.168.1.200 (IP address of gateway XP processor) Integration Designer Setup The last step is to enter the DNS hostname into your Integration Designer system file. Setting External Hostname Under the ‘File’ menu choose ‘System Properties’. On the Android/iOS/Virtual Panel tab, find the ‘Remote Access’ section. Enter the hostname provided by your DNS account. You can also enter the IP address directly but we do not recommend that. Setting External Gateway If you have more than one XP series processor in your file, you can designate which processor will act as the gateway for Apple® iOS/Android™ communications. NOTE: All RTiPanel licenses should be on the same XP processor. Troubleshooting Here is a list of the top reasons the RTiPanel is not loading/functioning: 1. 2. 3. 4. 5. XP-6/XP-8 control processor needs the latest firmware installed. Download firmware: http://www.rticorp.com/dealers/downloads.html#firmware XP-8 Control Processor needs an SD Flash memory card installed. - The SD card provides additional file space needed to store RTiPanel data files. NOTE: It must be an SD card no larger than 2GB and formatted as Fat or Fat32. Flash memory cards with more memory, are actually considered SDHC and will not work. Apple® iOS/Android™ device needs to be rebooted. – Reset power on device using power switch. RTiPanel needs to be reset or “Reconfigured”. – See instructions on page 6 of this guide. Verify the Apple® iOS/Android™ device in your system file matches the actual device you have. - The programming for each device type is specific to that type and cannot be downloaded into another type. For example you cannot download iPad system file into an iPhone. iOS5 downloading issue – RTiPanel appears to load or loading progress bar jumps/hops across the screen and the RTiPanel app shows up either blank or not at all. This is corrected by “closing” the RTiPanel app in the Apple device “recently used apps” bar. Follow these steps: Press the iPad hard button to go back to main screen. Double tap the iPad hard button to bring up the list of apps in the bottom of the screen Hold the RTiPanel button till it shows the red “-“ Press the red “-“ button to close the app. Reopen the RTiPanel app.