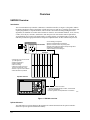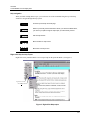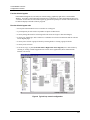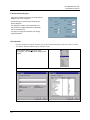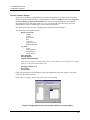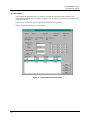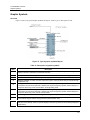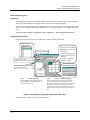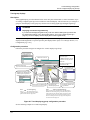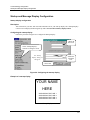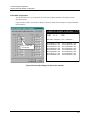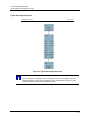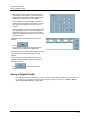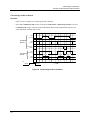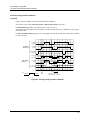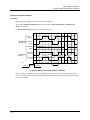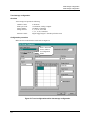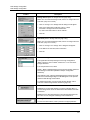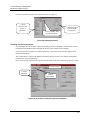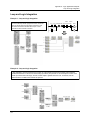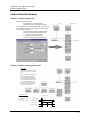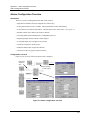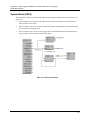
1
UMC800 Control Builder User’s Guide Sensing and Control Doc. No.: 51-52-25-63 Release: E Last Revision Date: 1/01 Notices and Trademarks Copyright 2001 by Honeywell Release E January, 2001 WARRANTY/REMEDY Honeywell warrants goods of its manufacture as being free of defective materials and faulty workmanship. Contact your local sales office for warranty information. If warranted goods are returned to Honeywell during the period of coverage, Honeywell will repair or replace without charge those items it finds defective. The foregoing is Buyer’s sole remedy and is in lieu of all other warranties, expressed or implied, including those of merchantability and fitness for a particular purpose. Specifications may change without notice. The information we supply is believed to be accurate and reliable as of this printing. However, we assume no responsibility for its use. While we provide application assistance personally, through our literature and the Honeywell web site, it is up to the customer to determine the suitability of the product in the application. Sensing and Control Honeywell 11 West Spring Street Freeport, Illinois 61032 UMC800 Universal Multi-loop Controller is a U.S. trademark of Honeywell Other brand or product names are trademarks of their respective owners. ii UMC800 Control Builder User’s Guide Release E 1/01 License Agreement Read this agreement before opening the software. Once you have removed the software from its envelope, you have accepted the agreement. USAGE RIGHTS Your rights, with respect to the Software, are non-exclusive. The software may only be used by one user, on one computer at a time. The software may be transferred to another computer, as long as it is only used by one user at a time. The Software and its documentation may not be copied or distributed to others. You may not create, modify, alter, adapt, merge, de-compile or reverse-engineer the Software, and you may not remove or obscure Honeywell or other included copyright or trademark notices. TERM OF LICENSE This agreement is effective unit terminated. Terminate the Agreement by destroying the Software, documentation and all backup copies. BACKUP COPIES You may make backup copies of the Software. The copyright notice(s) must be included on each backup copy. COPYRIGHTS The Software accompanying this manual is protected by United States copyright law. The Software documentation is copyrighted. You may only copy the Software and the Software documentation for backup or to load the Software onto your computer as part of program execution. TITLE TO SOFTWARE AND CONFIDENTIALITY The Software and all copies thereof are proprietary to Honeywell and title thereto remains in Honeywell. All applicable rights to patents, copyrights, trademarks and trade secrets in the Software are and shall remain in Honeywell. You may not sell, transfer, publish, or otherwise make available any software copies thereof to others. You acknowledge that the Software is a trade secret of Honeywell. You agree to secure and protect each program, software product and copies thereof in a manner consistent with the maintenance of Honeywell’s rights therein and to take appropriate action by instruction or agreement within your organization to satisfy your obligations hereunder. Violation of these provisions shall be a basis for immediate termination of this license. Termination of the license shall be in addition to and not in lieu of any other legal or equitable remedies available in Honeywell. Release E 1/01 UMC800 Control Builder User’s Guide iii About This Document Abstract The "Control Builder" configuration software program is used for UMC800 Controller and Operator Interface configuration and operates on a Windows '95™- or Windows NT-based PC. The software program uses graphic symbols and line drawing connections to create custom control strategies. Menus are provided in the software to allow selection of screens for the operator interface and to customize screen access methods and operator keys. Completed configurations are loaded into the control system using a dedicated communication port in the controller. References The following list identifies all documents that may be sources of reference for material discussed in this publication. Document Title Doc ID UMC800 Controller Technical Overview 51-52-03-24 UMC800 Controller Installation and User Guide 51-52-25-61 UMC800 Operator Interface User Guide 51-52-25-62 UMC800 Control Builder Function Block Reference Guide 51-52-25-64 UMC800 RS232 Communications Manual 51-52-25-76 UMC800 Modbus® Communications Manuals 51-52-25-87 Contacts World Wide Web The following lists Honeywell’s World Wide Web sites that will be of interest to our customers. Honeywell Organization WWW Address (URL) Corporate http://www.honeywell.com Sensing and Control http://www.honeywell.com/sensing International http://www.honeywell.com/Business/global.asp iv UMC800 Control Builder User’s Guide Release E 1/01 Telephone Contact us by telephone at the numbers listed below. Organization United States and Canada Honeywell Phone Number 1-800-423-9883 1-888-423-9883 1-800-525-7439 Asia Pacific Honeywell Asia Pacific Hong Kong (852) 2829-8298 Europe Honeywell PACE, Brussels, Belgium [32-2] 728-2111 Latin America Honeywell, Sunrise, Florida U.S.A. (954) 845-2600 Release E 1/01 UMC800 Control Builder User’s Guide Tech. Support Q&A Faxback (TACFACS) Service v Symbol Definitions The following table lists those symbols that may be used in this document to denote certain conditions. Symbol Definition This DANGER symbol indicates an imminently hazardous situation, which, if not avoided, will result in death or serious injury. This WARNING symbol indicates a potentially hazardous situation, which, if not avoided, could result in death or serious injury. This CAUTION symbol may be present on Control Product instrumentation and literature. If present on a product, the user must consult the appropriate part of the accompanying product literature for more information. This CAUTION symbol indicates a potentially hazardous situation, which, if not avoided, may result in property damage. WARNING PERSONAL INJURY: Risk of electrical shock. This symbol warns the user of a potential shock hazard where HAZARDOUS LIVE voltages greater than 30 Vrms, 42.4 Vpeak, or 60 Vdc may be accessible. Failure to comply with these instructions could result in death or serious injury. ATTENTION, Electrostatic Discharge (ESD) hazards. Observe precautions for handling electrostatic sensitive devices Protective Earth (PE) terminal. Provided for connection of the protective earth (green or green/yellow) supply system conductor. Functional earth terminal. Used for non-safety purposes such as noise immunity improvement. NOTE: This connection shall be bonded to protective earth at the source of supply in accordance with national local electrical code requirements. Earth Ground. Functional earth connection. NOTE: This connection shall be bonded to Protective earth at the source of supply in accordance with national and local electrical code requirements. Chassis Ground. Identifies a connection to the chassis or frame of the equipment shall be bonded to Protective Earth at the source of supply in accordance with national and local electrical code requirements. Earth Ground. Functional earth connection. NOTE: This connection shall be bonded to Protective earth at the source of supply in accordance with national and local electrical code requirements. Chassis Ground. Identifies a connection to the chassis or frame of the equipment shall be bonded to Protective Earth at the source of supply in accordance with national and local electrical code requirements. vi UMC800 Control Builder User’s Guide Release E 1/01 Contents Overview ................................................................................................. 1 UMC800 Overview ....................................................................................................... 1 Control Builder Software Overview .............................................................................. 7 Specifications - Hardware and Software Requirements .............................................. 8 Control Builder On-line Help System ........................................................................... 9 Installation............................................................................................. 11 Overview .................................................................................................................... 11 Installation Procedure ................................................................................................ 12 Starting the Control Builder Application ..................................................................... 13 Connecting the PC to the Controller .......................................................................... 14 Control Builder Main Window Menu System ......................................... 15 Overview .................................................................................................................... 15 Main Window.............................................................................................................. 18 Main Window Menus .................................................................................................. 20 Establishing Communications ............................................................... 27 Introduction................................................................................................................. 27 Set Up Communications Link..................................................................................... 28 Modbus Communications........................................................................................... 31 Loopback.................................................................................................................... 32 Remote Access .......................................................................................................... 33 Control Builder Overview ...................................................................... 37 Introduction................................................................................................................. 37 Overview .................................................................................................................... 38 Control Builder Item Library Tree ............................................................................... 40 Configuration Functions ............................................................................................. 41 Graphic Symbols ........................................................................................................ 50 Function Blocks..................................................................................... 51 Overview .................................................................................................................... 51 Function Block Definition............................................................................................ 52 Function Block Attributes ........................................................................................... 53 Release E 1/01 UMC800 Control Builder User’s Guide vii Function Block Categories and Types ....................................................................... 55 Control Strategy Configuration .............................................................. 85 Overview .................................................................................................................... 85 Before You Start......................................................................................................... 87 Stages of Control Strategy Configuration .................................................................. 88 How to Select Function Blocks/Variables/Constants ................................................. 89 Connecting/Disconnecting Function Blocks (Softwiring)............................................ 91 How to Enter Signal Tags .......................................................................................... 93 How to Enter a Text String ......................................................................................... 94 How to Configure Function Block Parameters ........................................................... 95 How to Configure the Execution Order of the Block .................................................. 98 Operator Interface Configuration Overview ............................................................... 99 How to Configure Display Tag Groups .................................................................... 100 Tag Order ................................................................................................................. 115 Startup and Message Display Configuration............................................................ 116 Setpoint Scheduler Display Configuration ............................................................... 119 Operator Pushbutton/Selector Switch/Data Entries Configuration .......................... 123 How to Configure Start Up Conditions for Controller Initialization ........................... 125 O/I Display Buttons (1-8) Configuration ................................................................... 126 O/I Security Settings ................................................................................................ 132 O/I File Names for Disk Storage .............................................................................. 136 How to Initiate a Configuration Print Out.................................................................. 137 How to Save a Function Block Diagram .................................................................. 140 How to Download a Control Strategy....................................................................... 141 Modifying an Existing Configuration......................................................................... 144 Setpoint Programming ........................................................................ 145 Overview .................................................................................................................. 145 What is a Setpoint Program (Profile) ....................................................................... 146 Setpoint Program Attributes ..................................................................................... 147 Setpoint Profile Configuration .................................................................................. 151 Setup/Edit Setpoint Profile ....................................................................................... 160 Saving a Setpoint Profile.......................................................................................... 164 Setpoint Scheduler.............................................................................. 165 Overview .................................................................................................................. 165 viii UMC800 Control Builder User’s Guide Release E 1/01 What is a Setpoint Schedule .................................................................................... 166 Setpoint Schedule Configuration.............................................................................. 168 Setup/Edit Setpoint Schedule .................................................................................. 171 Controller Recipes............................................................................... 175 Overview .................................................................................................................. 175 What is a Recipe ...................................................................................................... 176 Recipe Configuration................................................................................................ 178 Saving a Recipe ....................................................................................................... 181 Using Recipes to Download Setpoint Profiles.......................................................... 182 Creating a Momentary (One-Shot) Action in a Recipe Download ........................... 182 Data Storage Configuration................................................................. 183 Overview .................................................................................................................. 183 Storage Data Types ................................................................................................. 184 Storage Conventions................................................................................................ 185 Overview of Data Storage Enable Conditions.......................................................... 187 Data Storage Configuration...................................................................................... 192 Digital Event Configuration....................................................................................... 202 On-line Monitoring and Diagnostics .................................................... 203 Overview .................................................................................................................. 203 Putting the Controller into Run Mode ....................................................................... 204 Selecting a Block for Monitoring............................................................................... 205 Selecting a Parameter to Change ............................................................................ 206 Monitoring Loop Block Types................................................................................... 207 Forcing an Output..................................................................................................... 210 Controller Diagnostics .............................................................................................. 212 I/O Module Diagnostics ............................................................................................ 217 Uploading a Database from the Controller .......................................... 219 Overview .................................................................................................................. 219 Uploading the Database........................................................................................... 219 Configuration File Write Protection...................................................... 221 Adding and Removing Write Protection ................................................................... 221 Release E 1/01 UMC800 Control Builder User’s Guide ix Appendix A - Logic Application Examples........................................... 223 Overview .................................................................................................................. 223 Basic PLC Ladder Logic........................................................................................... 225 Basic Start/Stop Circuit Example ............................................................................. 229 Motor Starters with Permissives Example ............................................................... 230 On and Off Delay Timers ......................................................................................... 231 Retentive Timers/Counters Example ....................................................................... 233 Furnace Relay Ladder Logic Conversion Example.................................................. 234 Loop and Logic Integration....................................................................................... 235 Appendix B - Loop Application Examples ........................................... 237 Overview .................................................................................................................. 237 PID Block Examples................................................................................................. 239 PID Control Algorithms............................................................................................. 240 3 Position Step Control for Motor Positioning Example ........................................... 245 Carbon Potential Examples...................................................................................... 246 Setpoint Programmer Examples .............................................................................. 248 Setpoint Scheduler Examples .................................................................................. 254 Appendix C - Alarm Configuration Overview....................................... 255 Introduction............................................................................................................... 255 Alarms Configuration Overview................................................................................ 256 Assigning Alarms to Alarm Group Displays ............................................................. 257 Common Alarms ...................................................................................................... 258 Appendix D – Controller Initialization .................................................. 259 Introduction............................................................................................................... 259 Appendix E – Measuring pH with UMC800 Controller and Durafet II Cap Adapter ........................................................................ 261 Introduction............................................................................................................... 261 Equipment Needed .................................................................................................. 261 Recommended Wiring.............................................................................................. 261 Configuration ............................................................................................................ 262 Standardization Objective ........................................................................................ 263 System Block (ASYS) .............................................................................................. 264 Zero and Slope Standardization Operations............................................................ 265 x UMC800 Control Builder User’s Guide Release E 1/01 Math Calculation....................................................................................................... 266 Display Configuration ............................................................................................... 267 Sample Help Displays .............................................................................................. 269 Multilanguage Safety Sheets Release E 1/01 UMC800 Control Builder User’s Guide xi Tables Table 1 Control Builder hardware and software requirements .....................................................................................8 Table 2 Communication link connections from the PC to the controller....................................................................14 Table 3 File menu selections.......................................................................................................................................20 Table 4 Edit menu selections ......................................................................................................................................21 Table 5 View menu selections ....................................................................................................................................21 Table 6 Configure menu selections.............................................................................................................................22 Table 7 Communications menu selections..................................................................................................................24 Table 8 Window menu selections ...............................................................................................................................25 Table 9 Help menu selections .....................................................................................................................................25 Table 10 Communications parameters........................................................................................................................30 Table 11 Summary of Control Builder configuration procedures...............................................................................41 Table 12 Description of graphic symbols ...................................................................................................................50 Table 13 Function block attributes .............................................................................................................................54 Table 14 Categories of function block........................................................................................................................55 Table 15 Loops category function block types ...........................................................................................................57 Table 16 Setpoint program category function block types .........................................................................................60 Table 17 Setpoint program category function block types .........................................................................................62 Table 18 Logic category function block types............................................................................................................64 Table 19 Fast logic category function block types......................................................................................................68 Table 20 Counters/timers category function block types............................................................................................72 Table 21 Math category function block types.............................................................................................................73 Table 22 Calculations category function block types .................................................................................................75 Table 23 Alarm/monitor category function block types .............................................................................................77 Table 24 Signal selectors category function block types ............................................................................................78 Table 25 Auxiliary category function block types......................................................................................................79 Table 26 Communications category ...........................................................................................................................81 Table 27 Other items category....................................................................................................................................83 Table 28 Stages of configuration ................................................................................................................................88 Table 29 Display format examples ...........................................................................................................................129 Table 30 Set security details .....................................................................................................................................133 Table 31 Displays and functions that can be secured ...............................................................................................134 Table 32 Terms and definitions ................................................................................................................................146 Table 33 Description of setpoint program attributes.................................................................................................149 Table 34 Text properties ...........................................................................................................................................154 Table 35 General properties......................................................................................................................................155 Table 36 Loop/jog properties....................................................................................................................................157 Table 37 Start/restart properties................................................................................................................................158 Table 38 Display properties......................................................................................................................................159 Table 39 Setpoint profile setup/edit ..........................................................................................................................160 Table 40 Profile setup/edit configuration..................................................................................................................162 Table 41 Setpoint schedule properties ......................................................................................................................170 Table 42 Setpoint schedule setup/edit.......................................................................................................................171 Table 43 Setpoint schedule segment edit parameters ...............................................................................................173 Table 44 Auxiliary output values configuration .......................................................................................................174 Table 45 Description of the recipe attributes shown in Figure 47 ............................................................................177 Table 46 Recipe setup/edit........................................................................................................................................180 Table 47 Storage modes............................................................................................................................................185 Table 48 Trend configuration details ........................................................................................................................194 Table 49 Point log configuration details ...................................................................................................................197 Table 50 Alarm/event configuration details..............................................................................................................200 Table 51 Loop block parameters...............................................................................................................................209 Table 52 Details of controller diagnostic summary ..................................................................................................213 Table 53 Details of I/O module diagnostic summary ...............................................................................................218 xii UMC800 Control Builder User’s Guide Release E 1/01 Figures Figure 1 UMC800 overview .........................................................................................................................................1 Figure 2 Sample configuration......................................................................................................................................7 Figure 3 Control Builder main window ......................................................................................................................16 Figure 4 Main menu system overview........................................................................................................................18 Figure 5 Toolbar .........................................................................................................................................................19 Figure 6 Control Builder item library tree ..................................................................................................................40 Figure 7 Typical loop control configuration ...............................................................................................................42 Figure 8 Configuration form for the operator interface overview display ..................................................................44 Figure 9 Typical setpoint program setup ....................................................................................................................45 Figure 10 Typical setpoint schedule segment properties dialog box ..........................................................................46 Figure 11 Recipe setup form in recipe configuration..................................................................................................47 Figure 12 Tabs for data storage configuration ............................................................................................................48 Figure 13 Digital event configuration dialog box .......................................................................................................49 Figure 14 Typical graphic symbols/objects ................................................................................................................50 Figure 15 Typical function block attributes ................................................................................................................53 Figure 16 Accessing the display tag groups..............................................................................................................100 Figure 17 Alarms display tag group configuration procedure ..................................................................................101 Figure 18 Panel meter display tag group configuration procedure ...........................................................................103 Figure 19 Trend display tag group configuration procedure.....................................................................................105 Figure 20 Bar display tag group configuration procedure ........................................................................................107 Figure 21 Overview display tag group configuration procedure ..............................................................................109 Figure 22 Single point panel display tag group configuration procedure .................................................................111 Figure 23 Multi-point panel display tag group configuration procedure ..................................................................113 Figure 24 Configuring the loop display tag order.....................................................................................................115 Figure 25 Display button configuration example......................................................................................................115 Figure 26 Configuring the SPP display tag order .....................................................................................................115 Figure 27 SPP display button configuration example...............................................................................................115 Figure 28 Configuring the startup display ................................................................................................................116 Figure 29 Configuring the message display..............................................................................................................117 Figure 30 Configuring the setpoint scheduler display ..............................................................................................119 Figure 31 Main output label dialog box and screen example ...................................................................................120 Figure 32 Auxiliary output label dialog box and screen example.............................................................................121 Figure 33 Event label dialog box and screen example..............................................................................................122 Figure 34 Pushbutton function block and group screen............................................................................................123 Figure 35 Pushbutton function block diagram example............................................................................................123 Figure 36 Accessing the display button configuration tabs ......................................................................................126 Figure 37 Configuring display buttons .....................................................................................................................127 Figure 38 Configuring security.................................................................................................................................132 Figure 39 O/I file name configuration ......................................................................................................................136 Figure 40 Typical block diagram printout ................................................................................................................138 Figure 41 Typical control block parameters printout................................................................................................139 Figure 42 Typical tag properties printout .................................................................................................................139 Figure 43 Summary of setpoint program attributes ..................................................................................................148 Figure 44 Setpoint scheduler function block suite....................................................................................................167 Figure 45 Setpoint schedule properties dialog box ...................................................................................................170 Figure 46 Typical setpoint schedule segment edit dialog box ..................................................................................172 Figure 47 Summary of recipe attributes....................................................................................................................176 Figure 48 Initiating a one-shot action .......................................................................................................................182 Figure 49 Required enabled controls for storage ......................................................................................................187 Figure 50 Trend storage enable conditions ...............................................................................................................189 Figure 51 Point log storage enable conditions ..........................................................................................................190 Figure 52 Alarm/event storage enable conditions.....................................................................................................191 Figure 53 Accessing the data storage configuration dialog box ...............................................................................192 Release E 1/01 UMC800 Control Builder User’s Guide xiii Figure 54 Figure 55 Figure 56 Figure 57 Figure 58 Figure 59 Figure 60 Figure 61 Figure 62 Figure 63 Figure 64 Figure 65 Figure 66 Figure 67 Figure 68 Figure 69 Figure 70 Figure 71 Figure 72 Figure 73 Figure 74 Figure 75 Figure 76 Figure 77 Figure 78 Figure 79 xiv Trend configuration tab for data storage configuration ............................................................................193 Point log configuration tab for data storage configuration .......................................................................196 Alarm/event dialog tab for data storage configuration .............................................................................199 Accessing the configure event list dialog box ..........................................................................................202 Run mode .................................................................................................................................................204 Selecting a block for monitoring ..............................................................................................................205 Selecting a parameter ...............................................................................................................................206 Changing modes .......................................................................................................................................207 Initiating Accutune ...................................................................................................................................208 Procedure to change loop block parameters .............................................................................................208 Force an output.........................................................................................................................................210 Accessing the controller diagnostic summary list ....................................................................................212 Accessing I/O module diagnostics ...........................................................................................................217 Setpoint scheduler example ......................................................................................................................254 Alarms configuration overview ................................................................................................................256 Assigning alarms to group displays..........................................................................................................257 Alarm examples........................................................................................................................................258 Recipe selection blocks used in conjunction with a system monitor block ..............................................260 Recommended wiring for one pH sensor input ........................................................................................261 Configuring analog inputs and standardize function ................................................................................262 ASYS system block..................................................................................................................................264 Zero and slope standardization functions .................................................................................................265 Math calculation configuration.................................................................................................................266 Startup recipe............................................................................................................................................267 Overview display for standardization.......................................................................................................267 Overview display for monitoring .............................................................................................................268 UMC800 Control Builder User’s Guide Release E 1/01 Overview UMC800 Overview Introduction The Universal Multi-loop Controller (UMC800) is a modular controller (see Figure 1) designed to address the analog and digital control requirements of small unit processes. With up to 16 analog control loops, four setpoint programmers, a setpoint scheduler, and an extensive assortment of analog and digital control algorithms, the UMC800 is an ideal control solution for furnaces, environmental chambers, ovens, reactors, cookers, freeze dryers, extruders, small boilers, and other processes with similar control requirements. Accommodating up to 64 universal analog inputs, 16 analog outputs, or 96 digital inputs or outputs, the UMC800 provides the appropriate balance of input and output hardware for these smaller unit processes. Control Builder • Control Strategy Configuration • Operator Interface Display Configuration • Operator Interface Function Key Configuration • Setpoint Profile, Setpoint Scheduler, Recipe Configuration • Configuration Upload/Download • Test and Debug Control Strategies Controller POWER LoBAT FORCE Configuration RUN Batt. < PGM RUN TST > Display • Integrate 16-Loops of Control with up to 96 Digital I/O • Setpoint Programming • Setpoint Scheduler • Alarm Processing • PIDControl, Advanced Control, and Auto-Tuning/Fuzzy Logic • Boolean Logic via Function Blocks • Advanced Math Computations _ 100 - 240 V ~ 50 / 60 Hz 100 VA MAX. F 3,15 A T L1 L2 / N Operator Interface ? F1 F2 • Monitor and Control the Process • Load/Store/Run/Edit Recipes, Profiles, and Schedules • Load Unit Configuration • Provide organized, visual presentation of information F3 F4 1 2 3 4 ESC 5 24216 KB Figure 1 UMC800 overview Split architecture The UMC800 uses a split architecture that separates the control functions from the operator interface functions to provide greater installation flexibility. Release E 1/01 UMC800 Control Builder User’s Guide 1 Overview UMC800 Overview Controller The controller is composed of a CPU with two serial communication ports, power supply, and a backplane assembly. It incorporates a card rack that is capable of supporting up to 16 input and output modules that can be mixed to satisfy the hardware requirements of a specific application. Modules are available in ten different configurations to support both analog and digital inputs and outputs of various types and signal levels. Each module has a removable terminal block accepting #16 AWG wire. An optional RS485 serial communication card that supports both slave data exchanges with a host PC for centralized operation and data management and/or communications via a Modbus RTU master to other Honeywell or 3rd party compatible products. Operator interface The operator interface uses a color graphic LCD display to provide a variety of screen presentations for viewing control loops, setpoint programs, and other analog and digital status. Modification and customization of the operator interface are performed using UMC800 Control Builder software. With the software, data points can be identified (tagged) using eight character names. Once named, these data points may be accessed by the operator interface using a standard set of display formats and a predefined menu hierarchy. Customized display access and the assignment of selected display screens to keyboard buttons may be developed using Control Builder software. Selected screens such as bar graphs, trends, and overview displays will require the user to specify the individual data points to be represented on the screen. A menu selection allows the user to select from English, French, Italian, Spanish or German languages. Control Builder A separate “Control Builder” configuration software program is used for UMC800 Controller and Operator Interface configuration and operates on a Windows ’95, ‘98 or Windows NT-based PC. The software program uses graphic symbols and line drawing connections to create custom control strategies. All configuration is performed off-line (computer disconnected from the controller and operator interface). The configuration is downloaded in a separate operation as a complete file through a dedicated RS-232 communication port on the controller. Once a configuration is installed into the controller and operator interface, the Control Builder software may be used to monitor areas of the configuration to verify proper operation. Menus are provided in the software to allow selection of screens for the operator interface and to customize screen access methods and operator keys. Completed configurations are loaded into the control system using a dedicated communication port in the controller or, optionally, via floppy disk from the operator interface. Loop control The UMC800 supports up to sixteen control loops with PID, ON/OFF, Carbon Potential, or 3 Position Step control action. Control loops may be configured to operate independently or in cascade. Operator entered setpoints may be limited by independent high and low limit values and setpoint rate of change limits are available to protect critical products during process changes. When Feedforward operation is applied, a separate Feedforward gain adjustment is available to tune the loop for the appropriate Feedforward response. 2 UMC800 Control Builder User’s Guide Release E 1/01 Overview UMC800 Overview When Ratio control is applied, a ratio and bias adjustment are provided. When used with the supplementary loop control blocks, digital inputs may be used to set control mode, select the setpoint source, change control action, and perform other discrete actions. A status block provides digital outputs to facilitate integrating loop operation with other functions in the controller. When configured for dual output (heat/cool), each output may be directed to different output types, for example: current, time proportioning, etc. Two sets of tuning constants for heating and cooling are also provided. Accutune Honeywell’s Accutune IITM automatic tuning algorithm with Fuzzy Logic Overshoot Suppression is available for each loop of the controller. Initiated on command from the operator interface or through a digital input to the loop, this easy to operate feature optimizes control performance with a minimum of process disturbance. Logic The controller offers up to 96 digital inputs or outputs and uses digital function blocks to perform Boolean logic operations and sequences. The digital function blocks may be programmed to operate on a fixed 100millisecond update rate or on the slower analog measurement scan rate as determined during configuration. Alarms Alarm monitoring may be assigned to the digital status of analog alarm blocks, or other digital block status. Each PID loop also provides up to four alarms of various types. Alarm flexibility is also expanded using the analog alarm block, which allows selective set-up of alarm hysteresis, deviation alarms, on delay, selective latching, and a disable input to control when the alarm is active. Active alarm indication is provided on all operator displays and alarm group displays are provided to view and acknowledge active alarms. An alarm detail display is provided for each alarm point which indicates the time and data of last alarm occurrence and offers 40 characters of user specified text for alarm actions or notes. Up to 120 alarms may be configured and applied to loop alarms or digital tags. Function block configuration The UMC800 uses function block configuration architecture to develop control strategies for both analog and digital operations. A function block may represent a physical input or output, several physical inputs or outputs, an internal calculation, or an internal function such as a PID algorithm. All configuration is done using the "Control Builder" software. A summary of the assortment of greater than 75 standard UMC800 function block algorithm types follows. Typically, a function block algorithm type may be used any number of times up to the limit of 250 blocks. Some of those with specific limits are: • PID and ON/OFF control loops and associated support blocks— eight or sixteen maximum • Setpoint programmer blocks and associated support blocks—four maximum • Setpoint Scheduler blocks and associated support blocks—one maximum • Time proportioning output blocks—sixteen maximum • Pushbutton blocks—four maximum • 4 Selector Switch blocks—four maximum • Modbus Slave blocks—sixteen maximum Release E 1/01 UMC800 Control Builder User’s Guide 3 Overview UMC800 Overview Digital I/O and digital function blocks are scanned and executed every 100 milliseconds. Analog I/O and analog function blocks are processed at a rate based on the quantity of I/O and the number of function blocks contained in the controller. Operator interface displays configuration Modification and customization of the operator interface are performed using UMC800 Control Builder software. With the software, data points can be identified (tagged) using eight character names. Once named, these signal tags may be accessed by the operator interface using a standard set of display formats and a predefined menu hierarchy. Customized display access and the assignment of selected display screens to keyboard buttons may be developed using “Control Builder” software. Selected screens such as bar graphs, trends, pushbutton actions and overview displays will require the user to specify the individual signal tags to be represented on the screen. Setpoint programming Up to four independent, setpoint-programming blocks may be configured in the controller using the “Control Builder” software. A single program (profile) may be from 2 to 50 segments in length. Up to 70 programs are stored in the controller's memory. Each segment of the program may be a ramp or a soak except the last step that must be a soak. In addition to the main ramp and soak output value, a second analog value (Aux. Output) is available for each step of the program. This output is a fixed soak value that may be used to provide a setpoint value for a secondary control loop in the process. An example would be a ramp and soak temperature program combined with pressure setpoints for each step of the program. Setpoint scheduler A suite of Setpoint Scheduler blocks may be configured for multi-setpoint control. The suite is comprised of a Master block, Auxiliary Setpoint block, Auxiliary Event block, State Switch Block, and State Flags block. (See Figure 46.) The Master block supports up to 8 ramp or soak outputs operating on a common time base. It accepts one PV for each setpoint and is shown on the Operator Interface scheduler screen. Setpoint guarantee is provided for the master (SPS) block setpoints with a single symmetrical value for each setpoint output. You can assign a failsafe value for each setpoint. The Auxiliary block supports up to 8 soak only outputs. The Event block supports up to 16 event outputs. A single schedule may be up to 50 segments in length and includes auxiliary block data. Up to 10 schedules may be stored in the controller’s memory. Setpoint Schedules offer the same operating modes and digital controls as setpoint programs. On-line editing of a running schedule is supported through dedicated operator interface displays Variables A variable is a named diagram item, capable of holding a single analog or digital value. The value can be connected to function block inputs with a softwire. The value can be changed using operator interface displays or by recipe load. 4 UMC800 Control Builder User’s Guide Release E 1/01 Overview UMC800 Overview Recipes Recipe configuration lets you define up to 50 recipes each containing from 1 to 50. Each recipe carries its own unique recipe number and a name that identifies it. These sets of variable values can be loaded through the operator interface or automatically via the recipe load (RCP) function block. The recipe variable list is configured using the “Control Builder” software. An operator will be able to change individual item values through the Operator Interface, unless you prohibit access through configuration. For automatic loading of a setpoint profile in addition to other variables, a variable representing a profile number may be included in the recipe. Data storage The optional Data Storage feature in the operator interface provides background storage of process information on a 3.5-inch floppy disk for analysis by an off-line computer equipped with Honeywell Data Analysis Software (SDA). The instrument can support both continuous and discontinuous (batching) modes of storage for Trends, Point Logs (unit data samples), and Alarm/Events. Digital event recording Digital event recording is also available in the operator interface to store up to 150 off to on transitions of digital events from the controller. Event data includes the point tag, a 16-character point description, and the time and date of event occurrence. The 16 character point description is also displayed on the lower center of each display when the event turns on. Modbus communications An optional Serial communication card is available that provides 2 - RS 485 serial communication ports. Both ports support the Modbus RTU protocol, one functioning as a slave, the other as a Master. Slave Communications: The multi-drop slave communication port may be networked with up to 31 UMC800 controllers or other Modbus compatible devices to a single PC or host device. The communication protocol allows read and write operations to the data parameters of the controller, including analog and digital inputs and outputs, loop parameters, calculations setpoint programs and schedules. Master Communications: The Master communication port supports read and write operations for up to 16 Modbus compatible devices. The data transferred via this port is integrated into the users control strategy through read and write function blocks. A single function block supports reading and writing up to 4 parameters each to a slave device. Two additional blocks are available that each support reading up to 16 parameters or writing up to 8 parameters. Multiple function blocks may be assigned to a single external device. The data exchanged with external devices is limited to a 2 second maximum rate. An optional Ethernet communications card is also available. The selection of Modbus RTU via Ethernet implements the Modbus TCP communications driver. Remote controller access The Control Builder and User Utility software supports remote access to the controller via Dial-up Modem. An external modem is required at the controller and is connected to the standard RS 232 configuration port. Remote access functions include on-line monitoring, configuration upload and download. Honeywell has qualified four commercially available modems modems can be used with the UMC800 controller. Release E 1/01 UMC800 Control Builder User’s Guide 5 Overview UMC800 Overview User utility In addition to the Control Builder, a UMC800 User Utility Software accessory is available to allow the user to set up data storage files, ramp/soak setpoint profile files and recipe files on a PC. In addition to these off-line functions, when the computer running the User Utility Program is connected to the RS-232 configuration port of the controller, maintenance utilities such as analog input and output calibration sequences and diagnostic interrogation may be executed. The schedules, profile and recipe files created on the computer may be transferred to the operator interface via floppy disk or they may be loaded into the system through the RS-232 configuration port of the controller. In addition, configuration upload and download may be executed independent from the Control Builder Software program. User Utility software supports remote access to the controller via Dial-up Modem 6 UMC800 Control Builder User’s Guide Release E 1/01 Overview Control Builder Software Overview Control Builder Software Overview Introduction All controller and operator interface configurations are performed using UMC800 Control Builder software on a separate PC operating with Windows™ 95, 98 or Windows™ NT. All configuration is performed offline. With the computer disconnected from the controller and operator interface, configuration is downloaded in a separate operation as a complete file through a dedicated RS-232 communication port on the controller. Once a configuration is installed into the controller and operator interface, the “Control Builder” software may be used to monitor areas of the configuration to verify proper operation. Configuration development Controller configuration development is performed using "Drag and Drop” techniques for positioning graphic icons on a CRT display from a list of available functions. Signal flow connections from icon to icon complete the controller configuration. The “Control Builder” software will create a graphic diagram 1 page high by 20 pages wide. The completed diagram may be printed on 20 pages of 8.5" x 11" papers. Completed configurations may also be saved on a 3.5" floppy disk and loaded into the controller through an optional 3.5" floppy disk drive in the operator interface unit, thus eliminating the need for a direct connection of a PC to the controller. See Figure 2 for an example of a typical configuration. Figure 2 Sample configuration Release E 1/01 UMC800 Control Builder User’s Guide 7 Overview Specifications - Hardware and Software Requirements Signal tags Each Analog signal flow line of the configuration may be labeled with an 8-character name, 4-character engineering unit definition, and may have a decimal point location specified. Digital signal lines may be identified with an 8-character name and 6-character ON and OFF label. Line descriptions are used by the operator interface to present on-line status. All signal tags are available for selection to be applied to standard O/I screens. In addition, a 16-character description is available for digital data used in alarms and events for on-line monitoring and with the data storage feature. Existing configuration Control Builder software may also be used to reconstruct an existing controller configuration by uploading the configuration from the controller for maintenance or diagnostic purposes. Security may be applied to configurations to develop view only files. Specifications - Hardware and Software Requirements Introduction Table 1 contains the hardware and software specifications for the UMC800 Control Builder. Table 1 Control Builder hardware and software requirements Specification PC Requirements Description The Control Builder operates on any computer platform that meets the program’s minimum specification requirements CPU: Operating System: Display Color: Pointing Device: RAM: Disk Drive (optional): Ports: System Interconnection 80486, 66MHz Windows ’95, ‘98 or Windows NT VGA or greater screen resolution Mouse, Trackball or compatible device 16MB Minimum 3.5 inch, 1.44 megabytes Dedicated RS232 Connected to the controller through its dedicated RS232 Port. (COM1 COM4) Maximum Distance between Controller File and PC: 50 Feet Cable Type: Standard 9 Pin null modemRS232 Cable Termination: 9-pin “D” connector Configuration Off-line Configuration On-line Monitoring allows the user to test the developed configuration. Modem PC Interface: Supports Microsoft Windows Telephony API (TAPI) device independent modem communications. Baud rate = 9600. Controller Interface: Connects to the controller RS-232 configuration port. Some commercially available modems with equivalent specifications to those validated should function with the UMC800 controller. The following modems have been validated: 3COM US Robotics 56K Data/Fax External Modem, Zoom 56K Dualmode External Modem, Best Data 56SX Data Fax External Modem, Sixnet VT-MODEM Industrial External Modem. 8 UMC800 Control Builder User’s Guide Release E 1/01 Overview Control Builder On-line Help System Control Builder On-line Help System Introduction This section briefly describes the help system included with the UMC800 Control Builder, and gives instructions on how to use the different types of help offered with the program. The Control Builder On-line help system uses the same conventions as Help for Windows ’95 and “NT” regarding the following: • Help window • Accessing help from the help menu • Help system’s contents page • F1 key • Search Function Control Builder on-line help system The on-line help system offers a convenient and quick way to get information about the task that you are performing in the Control Builder program. The help system offers context-sensitive help which means that at any time you request help, a help topic appears that pertains specifically to where you are in the program. For example, if you are focused on a particular program window, dialog box, or entry field, you will get a help topic that describes that particular area. Requesting Help To request Help on any area of the Control Builder, use one of the following methods: • HELP MENU This is the last item on the menu bar. Choose a Help topic from the Help menu. Help Topics From the Help menu, click “Help Topics”. The Help Contents tab appears. This is a list of all Help topics available including Menus, Configuration Parameters, and Toolbar. Selecting a topic causes information about that topic to be displayed. If the information about a topic exceeds the height of the window, a vertical scroll bar will be displayed. About Honeywell Control Builder Copyright or version information about the UMC800 Control Builder. • PRESS F1 Press F1 to get help in any of this area: Configuration Dialog Boxes Get a definition of any Dialog Box Parameter selection on the applications window. • RIGHT-CLICK FOR HELP TOPICS See Figure 3. Release E 1/01 UMC800 Control Builder User’s Guide 9 Overview Control Builder On-line Help System Help navigation When you finish reading about a topic, you can choose one of the commands along the top of the help window to navigate through the help system. Contents View the top-level Help Contents page. Back Return to previously viewed information. When you choose the Back button, you retrace your path through the help topics you have already viewed. Exit Exit the Help window. >> Move forward one help screen. << Move back one help screen. Right-click Help for Help Topics Right-click on any Function Block to access topic help for that particular Block. (See Figure 3.) Right-click on block Select Help on menu Figure 3 Right-Click Help topics 10 UMC800 Control Builder User’s Guide Release E 1/01 Installation Overview Introduction To install the UMC800 Control Builder software, you must run the UMC800 Control Builder Setup program that is used to create all necessary directories, files, program groups and/or items. Setup also checks adequate resources, such as disk space and Windows version number. TIP We recommend that you close any other applications you have running in Windows since these can greatly increase the time for installing your Control Builder Program. What’s in this section? The following topics are covered in this section. Topic Release E 1/01 See Page Overview 11 Installation Procedure 12 Starting the Control Builder Application 13 Connecting the PC to the Controller 14 UMC800 Control Builder User’s Guide 11 Installation Installation Procedure Installation Procedure Installing and setting up the UMC800 Control Builder software You install the Control Builder program files from the CD-ROM. Step Action 1 Insert the Control Builder CD into your CD drive. 2 Click on the “Start” button and select “RUN." 3 At the “Run” dialog box, Click on the “Browse” button and locate your CD-ROM drive. Click “OPEN”. 4 Click on “Setup.exe and click “OPEN”. Click OK on the “RUN” dialog box. 5 At the “Welcome” dialog box,. • Click “Next” to continue with the Setup Program or • Click “Cancel” to quit Setup 6 At the “License Agreement” dialog box, read the agreement then click “NEXT” to continue the Setup program. 7 At the “Choose Destination Location” dialog box, Setup will install the UMC800 Control Builder in destination folder C:\Program Files\Control Builder 5.0, or you can install to a folder of your choosing. • Click “Next” if the destination directory is correct, or • Click “Browse” to open the “Choose Folder” dialog box and choose another folder, click OK, then click “Next". 8 At the “Select Program Folder” dialog box, you an type another folder name, or select one from the existing list. 9 The Program files will install and Setup will be complete. Click “Finish". 12 UMC800 Control Builder User’s Guide Release E 1/01 Installation Starting the Control Builder Application Starting the Control Builder Application Starting the Control Builder program Step Action 1 Click on “Start" button. 2 Click on “Programs”. 3 Click on “Control Builder 5.0". If this is the first time Control builder has been launched, a blank Function block diagram will appear (see Figure 4). If a previous instance of the program was started (the program appears on the windows task bar), launching it again will restore and activate the previous instance and diagrams. Release E 1/01 UMC800 Control Builder User’s Guide 13 Installation Connecting the PC to the Controller Connecting the PC to the Controller Wiring communication links Table 2 shows the communication link connections from the PC to the controller used for the control builder. Table 2 Communication link connections from the PC to the controller Communication Link to ... Link Type From Controller Port PC or laptop RS232 Configuration (9-pin “D” connector) Connect Cable Up to 50 ft cable lengths (Supplied by user) To Port Serial port of PC Reference Data Null Modem cable, 9-pin Male/Female Honeywell can provide this cable: Order Part Number 51404751-001. 14 UMC800 Control Builder User’s Guide Release E 1/01 Control Builder Main Window Menu System Overview Introduction After the installation procedure is run, the system opens to the Main Window. What’s in this section? The following topics are covered in this section. Topic See Page Overview 15 Main Window 18 Main Window Menus 20 Selecting Communications Parameters 27 Main window If this is the first time Control builder has been launched, a blank Function block diagram appears. If a previous instance of the program was started (the program appears on the windows task bar), launching it again will restore and activate the previous instance and diagrams. The Control Builder’s Main Menu is the top-level menu that allows access to drop-down menus that will navigate you through the application. A Toolbar at the top of the window offers shortcuts to some of the menu items. The toolbar can be displayed or not displayed in the “View” Menu. A Status bar at the bottom of the window indicates information about the current window, the time, the date, download, upload, monitoring, and network information. This status bar can be displayed or not displayed in the “View” Menu. Release E 1/01 UMC800 Control Builder User’s Guide 15 Control Builder Main Window Menu System Overview Figure 4 is a graphic of the Control Builder Main window. Select any main menu name to access the respective sub-menu and then select a desired menu item or command to access it. Figure 4 Control Builder main window Menu conventions The following menu conventions are used: Menu Convention Meaning Dimmed command You will not be able to use this command at the current time. (For example: You may need to select another item before using this command.) An ellipsis (...) following a command A dialog box will appear when you choose this command. The dialog box contains options you need to select before the command can be completed. A check mark next to a command The command is in effect. When you remove the check mark (by selecting the command), the command is no longer in effect. A key combination next to a command The key combination is a keyboard accelerator shortcut for this command. You can use this key combination to choose this command. A triangle ( QH[W to a command When you choose this command, a cascading menu appears, listing additional commands. Selecting a menu In this application, you select (highlight) a menu and then choose a command from that menu. Choosing the command carries out the action. To choose an item from a selected menu: 16 UMC800 Control Builder User’s Guide Release E 1/01 Control Builder Main Window Menu System Overview Mouse Using the mouse pointer, point to the name of the menu on the menu bar, and click the left mouse button. This opens the menu. To move directly to a menu item, drag the selection cursor down the menu until the desired item is highlighted, then release the button. While in a Function Block Diagram, click the right mouse button to allow access to Topic Help, Monitor functions, Properties Dialog Boxes, and Cut, Copy, and Paste functions. Up/down arrow keys Press the “ALT” key to highlight the menu bar then use the UP/Down arrow keys on the keyboard to select the item, then press “Enter”. Underlined letter If a name in the menu bar has an underlined letter you can press ALT and then type the letter that’s underlined to open the menu. For example: To open the FILE menu in the Control Builder main window, press ALT+F. Closing a menu To close a menu: • Click the menu name or anywhere outside the menu, or • Press ESC to close the menu but remain on the menu bar so that you can make another selection Other keyboard functions If necessary, you can use the standard keystroke conventions to move around in the Control Builder. ALT used together with the underlined letter in text labeling an object lets you select that object. TAB select next field or object in dialog boxes and configuration templates SHIFT+TAB select previous field or object in dialog boxes and configuration templates UP ARROW previous choice in the field DOWN ARROW next choice in the field ALT+DOWN ARROW opens a drop-down list box Release E 1/01 UMC800 Control Builder User’s Guide 17 Control Builder Main Window Menu System Main Window Main Window Overview Figure 5 is an overview of the main menu system. See Table 3 See Table 4 See Table 6 See Table 5 See Table 7 See Table 9 See Table 8 Figure 5 Main menu system overview 18 UMC800 Control Builder User’s Guide Release E 1/01 Control Builder Main Window Menu System Main Window The Toolbar, which is displayed across the top of the application window below the menu bar, provides quick mouse access to many of the items in the menus. Select Toolbar in the “VIEW” menu to display it. Figure 6 is a composite of the tool bar symbols and their definitions. New Open Save Cut Print Copy About Paste Figure 6 Toolbar Release E 1/01 UMC800 Control Builder User’s Guide 19 Control Builder Main Window Menu System Main Window Menus Main Window Menus File menu Table 3 lists all the FILE menu selections and their functions. Table 3 File menu selections Menu Selection New Functionality (The menu selection…) Displays a new Function Block Diagram in the main window. Toolbar: Open … Displays the “Open” dialog box. Select a Function Block Diagram file name at the prompt. Navigate to folder where the file is stored. Toolbar: Close Closes the active document window. It will also close a minimized window if active. [It will not close an active dialog box.] Save Saves the active configuration. First time save displays the “Save As” dialog box. Toolbar: Save As ... Displays the “Save As” dialog box. Prompts user to name the active configuration and select the file in which the file is to be stored. Properties ... Displays the “File Properties” dialog box. Allows user to fill in File Properties or view Statistics. Write Protection ... Displays the “Add Write Protection” dialog box. Allows user to set and confirm a password for the selected file. Unprotect ... Displays the “Unprotect” dialog box. Allows user to remove password protection from the selected file. Print ... Opens “Print What” dialog box. Allows user to select what is to be printed: - Block Diagram - Block Parameters - Tag Properties Toolbar: 20 Print Preview Displays each page as it will look when printed. Print Setup ... Displays “Print Setup” dialog box. Allows user to select printer, paper type, and orientation. Recent Files Lists the most recent files that were open. Exit Exits the Control Builder application. UMC800 Control Builder User’s Guide Release E 1/01 Control Builder Main Window Menu System Main Window Menus Edit menu Table 4 lists all the EDIT menu selections and their functions. Table 4 Edit menu selections Menu Selection Cut Toolbar: Copy Toolbar: Paste Functionality (The menu selection…) Removes the currently selected LCB diagram items from the current Function Block diagram and places them on the clipboard; this command is unavailable if there is nothing currently selected. Copies the currently selected LCB diagram items from the current Function Block diagram and places it on the clipboard. This command is unavailable if there is no item currently selected. Toolbar: Places the contents of the clipboard containing LCB diagram items onto the Function Block Diagram at the location determined by the blinking insertion point caret. This command is unavailable if the clipboard is empty. Delete Deletes the currently selected item on the function block diagram. Find Searches for a tag name and scroll the function block diagram to view the named item. Go To Displays the “Enter Page Number” dialog box and allows you to enter the page number to which you want to go. Warning Level Allows enable/disable of Open Input and Unassigned I/O warnings. View menu Table 5 lists all the VIEW menu selections and their functions. Table 5 View menu selections Menu Selection Functionality (The menu selection…) Toolbar Displays or hides the toolbar in the top of the Main window. Status Bar Displays or hides the status bar at the bottom of the Main window. Block List Displays or hides the Function Block Library Tree. Grid Lets you place a grid in the function block diagram. Normal Lets you zoom in to return items to normal size. Zoom Out Lets you Zoom in out to see more of a document. Release E 1/01 UMC800 Control Builder User’s Guide 21 Control Builder Main Window Menu System Main Window Menus Configure menu Table 6 lists all the CONFIGURE menu selections and their functions. Table 6 Configure menu selections Menu Selection Functionality (The menu selection…) Execution Order ... Displays the “Function Block Execution Order” dialog box. Allows modification of the execution order of the function blocks. Fast Logic Execution Order ... Displays the “Function Block Execution Order” dialog box. Allows modification of the execution order of the Fast Logic function blocks. Setpoint Profiles ... Displays the “Setpoint Profile Pool” dialog box. Allows you to add, delete, and edit programs and set their properties. Recipes ... Displays the “Recipe Pool” dialog box. Allows you to add, delete, and edit recipes and set their properties. Setpoint Schedules Displays the “Setpoint Schedule Pool” dialog box. Allows you to add, delete, and edit Setpoint Schedules and set their properties. Data Storage ... Displays the Data Storage Configuration Tabs to allow storage of Trends, Unit Data Samples (Point Log), and Alarm/Events. Data Storage Configuration Tabs Trend Contains the “Trend” data storage configuration fields. Two trend files of up to 12 points each are supported. Point Log Contains the “Point Log” data storage configuration fields. Samples of process data for up to 12 points can be scheduled to occur at a specified time or by a digital event in the controller. Alarm/Event Contains the “Alarm” data storage configuration fields. Alarm recording stores up to 150 On and Off alarm actions at a specified time and date. Events ... Displays the “Configure Digital Event List” dialog box. Allows you to configure up to 32 digital events signals in the controller. Display Tag Groups ... Displays the Display Tag Group Configuration Tabs to allow assignment of signal tags to groups of displays. Display Tag Group Tabs 22 Alarm tab Contains the “Alarm Display Tag Groups Configuration” entry fields. You can assign digital signal tags to up to 10 groups of displays. Panel Meter tab Contains the “Panel Meter Display Tag Groups Configuration” entry fields. You can assign signal tags and variables to up to 10 groups of Panel Meter displays. Trend tab Contains the “Trend Display Tag Groups Configuration” entry fields. You can assign analog or digital signal tags to up to 4 groups of Trend displays. Bar tab Contains the “Bar Display Tag Groups Configuration” entry fields. You can assign analog or digital signal tags to up to 4 groups of Bar displays. It allows High and Low scaling. UMC800 Control Builder User’s Guide Release E 1/01 Control Builder Main Window Menu System Main Window Menus Menu Selection Tag Order Functionality (The menu selection…) Overview tab Contains the “Overview Display Tag Groups Configuration” entry fields. You can assign signal tags or variables to up to 20 groups of Overview displays. Single Point Panel tab Contains the “Single Point Panel Display Tag Groups Configuration” entry fields. You can assign signal tags and variables to up to 2 groups of Single Point panel displays. Multi Point Panel tab Displays the “Multi Point Panel Groups Configuration” entry fields. You can assign signal tags and variables to up to 4 groups of Multi Point panel displays. Displays the “Tag Order” selection menu. Select from those listed below. Tag Order Groups Loops… Displays the “Loop Tag Order” dialog box. Allows you to arrange up to 16 Loop Tags that can be selected for display, in various formats, on the operator interface. The order in which they appear in this box can be changed to coincide with the order in which you want them to be displayed. SP Programmers Displays the “SPP Display Tag Order” dialog box. Allows you to assign SP Programmer block tags to 8 groups of Setpoint Program overview displays. HOA Switches Displays the “HOA Switches Display Tag Order” dialog box. Allows you to arrange up to 16 HOA tags that can be selected for display on the operator interface. The order in which they appear in this box can be changed to coincide with the order in which you want them to be displayed. Device Controls Displays the “Device Controls Display Tag Order” dialog box. Allows you to arrange up to 16 DC tags that can be selected for display on the operator interface. The order in which they appear in this box can be changed to coincide with the order in which you want them to be displayed. Start up Display Displays the “Start up Display Configurations” dialog box. Allows you to enter Title Text and Comment Text for your start up display. Message Display Displays the “Message Display Configuration” dialog box. You can assign up to 10 sets of Message displays. Setpoint Scheduler Display Displays the “Setpoint Scheduler Display Label Configuration” dialog box. Allows you to assign labels to 8 Main Output labels, 8 Auxiliary Output labels, and 16 Event output labels. Display Buttons [1–8] Displays the “Display Buttons Configuration” dialog box. You can select a display format and select a Group, Loop tags or SPP tags for each of 8 Display Buttons. OI Settings Displays the “Operator Interface Settings” dialog box. You can enable/disable Operator or Engineer security and assign security codes for each. OI File Names Displays the “OI File Names” dialog box. You can assign names to up to 25 OI files. Release E 1/01 UMC800 Control Builder User’s Guide 23 Control Builder Main Window Menu System Main Window Menus Communications menu Table 7 lists all the COMMUNICATIONS menu selections and their functions. Table 7 Communications menu selections Menu Selection 24 Functionality (The menu selection…) Setup Displays the “Communications Setup” dialog box. Sets Up the computer to match the controller communications settings. Set Controller Comm A Port Displays the “Set Up Controller Comm A Port” dialog box. Allows you to enable the 485 Modbus communications port if the CPU contains the optional communications board. Ethernet communications option also available. Set Controller Comm B Port Displays the “Set Up Controller Comm B Port” dialog box. Allows you to enable the 485 Modbus communications port Download Downloads the active configuration document to the controller. Upload Uploads a configuration from the controller to a new document or to a specified file and opens the file. Monitor Lets you monitor selected function blocks and variables in a connected controller with the current configuration. Controller Diagnostics Displays a “Controller Diagnostics Summary” dialog box that indicates how the controller is functioning. I/O Module Diagnostics Displays a “I/O Module Diagnostics Summary” dialog box that indicates how the 16 I/O Modules are functioning. Show Forces ... Displays the “Blocks With Forced Outputs” dialog box that indicates the blocks that have forced outputs. Remote Loopback Tests the communication connection to the controller. Error Statistics Displays a “Communication Error Summary” dialog box that indicates the types and number of communication errors. Dial Modem Displays a “ Select Numbers To Call “ dialog box to allow a remote connection. Hangup Modem Select to hang up. No dialog Box appears. After verification, call will be disconnected UMC800 Control Builder User’s Guide Release E 1/01 Control Builder Main Window Menu System Main Window Menus Window menu Table 8 lists all the WINDOW menu selections and their functions. Table 8 Window menu selections Menu Selection Functionality (The menu selection…) Cascade Arranges windows so that they overlap making it easy to select a window. Tile Horizontally Arranges windows side by side. Each window is visible and none overlap. Tile Vertically Arranges windows over and under each other. Each window is visible and none overlap. (Open window designations) Lists all Function Block Diagrams that are open and checks the one that is active. Allows the selection to become active. Help menu Table 9 lists all the HELP menu selections and their functions. Table 9 Help menu selections Menu Selection Functionality (The menu selection…) Help Topics Calls up the top level Helps Contents page. Selecting a topic displays information about that topic. If the information about a topic exceeds the height of the window, a vertical scrollbar will be displayed. About Help Displays copyright and software version information. Release E 1/01 UMC800 Control Builder User’s Guide 25 Control Builder Main Window Menu System Main Window Menus 26 UMC800 Control Builder User’s Guide Release E 1/01 Establishing Communications Introduction General You must set up the Control Builder by choosing a serial communications link and a computer port and by matching your controller communications settings. The Set Controller Comm A Port and B Port option allows you to enable the RS485 Modbus™ communications port if the CPU contains the optional communications board. Remote Loopback tests the connection between the PC and Controller file. Remote controller access via dial-up modem is available via the communication setup. An external modem is required at the controller and is connected to the standard RS 232 configuration port. Remote access functions include on-line monitoring, configuration upload and download. What’s in this section? The following topics are covered in this section. Topic Release E 1/01 See Page Introduction 27 Set Up Communications Link 28 Modbus Communications 31 Set Up Comm A Port 31 Set Up Comm B Port 31 Remote Loopback 32 Remote Controller Access via Dial-up Modem 33 UMC800 Control Builder User’s Guide 27 Establishing Communications Set Up Communications Link Set Up Communications Link Step Action Graphic/Result 1 From the Main Window Communications menu, select “ Setup”. The “Communications Setup” dialog box will appear. 2 Select a Protocol from the “Set Up” Dialog Box If you select “ELN DLE”, Comm Links allowed are: “SERIAL” or “MODEM” (Step 3) If you select “Modbus RTU”, Comm links allowed are: “SERIAL” or “ETHERNET” (Step 4) 3 ELN DLE If you select SERIAL • Select the Communications Port.. The Baud Rate of 9600 is automatically selected. If you select Modem, (See Remote Controller Access) • The Telephony setting become active − Select No Timeout (no timeout is performed and the application will stay connected until you manually hang up. − Select Connection Timeout (Enter, in minutes, how long the application will leave the line open before hanging up automatically) Attention: If there are no Modems installed, Windows ‘NT will notify you when you select “Modem”. Windows ’95 message will read “Unrecognized TAPI error has occurred” Verify that your modem driver is properly installed. NOTE: The modem timeout will not interrupt a communications operation in progress. 28 UMC800 Control Builder User’s Guide Release E 1/01 Establishing Communications Set Up Communications Link Step Action 4 Graphic/Result Modbus RTU If you select SERIAL • Select the Communications Port. The Baud Rate of 19200 is automatically selected. • Enter the Instrument address in the active field. If you select Ethernet • Enter the Instrument Modbus address in the active field. • Enter the IP Address configured for the Ethernet Bridge Module on the instrument in the active field. 5 Then click on “ADVANCED”. Caution: It is not recommended that you set the values lower than those shown in the dialog box, since it may cause some communications operations to fail. Press this button to reset these fields. 6 Release E 1/01 Refer to Table 10 for a list of available Communications parameters and selections, make the entries in the active fields of each dialog box, then press OK. UMC800 Control Builder User’s Guide 29 Establishing Communications Set Up Communications Link Table 10 Communications parameters Properties Group Parameter Parameter Description Value or Selection Protocol ELN DLE Modbus®RTU Proprietary RS232 Protocol Modbus® RTU Protocol Select from Drop down menu Comm Link SERIAL MODEM ETHERNET Standard Comm Link Remote Comm Link Ethernet Comm Link Click on radio button to select Comm Port COM 1 COM 2 COM 3 COM 4 Serial Communications Port 1 Serial Communications Port 2 Serial Communications Port 3 Serial Communications Port 4 Click on radio button to select Baud Rate 9600 19.2K 38.4K 9600 Baud (RS232 Protocol) 19,200 Baud (Modbus Protocol) 38400 Baud (selectable) Click on radio button to select Baud. Baud is automatically set for Protocol selection. Telephony Settings No Timeout No timeout is performed and the application will stay connected until you manually hang up Click on radio button to select Connection Timeout Enter in the active field, (in minutes) how long the application will leave the line open before hanging up automatically Click on radio button to select Instrument Modbus Address 1 to 247 Instrument Address for Modbus Protocol Enter a decimal value Instrument IP Address 0.0.0.0 Instrument IP Address configured for the Ethernet Bridge Module on the instrument Enter numbers separated by decimals Number of Retries 1* Number of retries before abort Enter a decimal value Delay between Retries (ms) 50* Delay in milliseconds between communications retries Enter a value in milliseconds Receive time-out (ms) 1000* Time value after transmission to wait for a response before retry or abort. Enter a value in milliseconds * Default Setup 30 UMC800 Control Builder User’s Guide Release E 1/01 Establishing Communications Modbus Communications Modbus Communications Overview An optional serial communication card is available that provides two RS485 serial communication ports. Both ports support the Modbus RTU protocol, one functioning as a Slave, the other as a Master. Slave Communications: The multi-drop Slave communication port may be networked with up to 31 UMC800 controllers or other Modbus compatible devices to a single PC or host device. The communication protocol allows read and write operations to the data parameters of the controller, including analog and digital inputs and outputs, loop parameters, calculations, setpoint programs and schedules. Master Communications: The Master communication port supports read and write operations for up to 16 Modbus compatible devices. The data transferred via this port is integrated into the user’s control strategy through read and write function blocks. A single function block supports reading and writing up to 4 parameters each to a slave device. Two additional blocks are available that support reading up to 16 parameters or writing up to 8 parameters. Multiple function blocks may be assigned to a single external device. The data exchanged with external devices is limited to a 2-second maximum rate. Set Controller Comm A Port • If you select “Set Controller Comm A Port” in the Communications menu, the Set Up Controller Comm A Port dialog box will appear. Click to enable Comm Port Click Radio Button to select Baud Rate Click to select Word/Byte order for Floating Point Communication Data Enter Comm ID number between 1 and 247 Set Controller Comm B Port • If you select “Set Controller Comm B Port” in the Communications menu, the Set Up Controller Comm B Port dialog box will appear. Click radio button to select Baud Rate. Release E 1/01 UMC800 Control Builder User’s Guide 31 Establishing Communications Loopback Loopback Running communications Remote Loopback test Remote Loopback tests the connection between the PC and Controller file. Follow the procedure below to run the Remote Loopback test. Step Action 1 From the “Configure” menu, select “Remote Loopback…” 2 Click on “SEND” to send signal once. Click “SEND FOREVER” to send signals continuously until the connection Is made. 3 Click “Close”. Graphic Result The communications echo dialog box will appear. The status window will read: “Instrument Responded”, or “Instrument did not respond” — Check connections 32 UMC800 Control Builder User’s Guide Release E 1/01 Establishing Communications Remote Access Remote Access Overview Remote controller access via dial-up modem is available via the communication setup. An external modem is required at the controller and is connected to the standard RS232 configuration port. Remote access functions include on-line monitoring, configuration upload and download. Modem requirements Some commercially available modems can be used with the UMC800 controller. Honeywell has identified four commercially available modems for use with the UMC800. The modem must have the following capabilities: • RS232 interface • Auto answer • Can operate at 9600 baud, 8 data bits, 1 stop bit, and no parity • Hardware handshaking can be disabled • Software handshaking can be disabled • Data Terminal Ready (DTR) input can be disabled • Result codes can be suppressed • Echo can be disabled • Must be equipped with non-volatile memory (NVRAM) so that settings that are configured using command strings can be retained during a power-outage • Must be able to load the NVRAM settings automatically on power-up REFER TO THE CONTROLLER INSTALLATION GUIDE # 51-52-25-61 FOR RECOMMENDED MODEMS. Cable requirements You will need an interface cable to connect the modem to the DB-9 female connector on the UMC800. If your modem has a 25-pin connector, be sure to use a DB-25 to DB-9 modem cable. If your modem requires command string configuration, you will need an interface cable to connect the modem to your PC. Refer to your modem and computer documentation to determine this cable’s requirements. Modem configuration Before connecting a modem to the UMC800 RS232 port, the modem must be configured with the following settings: Release E 1/01 • Baud Rate = 9600 • Parity = None • 1 stop bit • 8 data bits UMC800 Control Builder User’s Guide 33 Establishing Communications Remote Access • No handshaking • Ignore DTR • Suppress result codes • Suppress echo • Auto answer • Disable command recognition (only necessary if the modem has this capability) Some of these settings may be settable via switches. Others may require command strings to be written to the modem using a PC terminal program such as Hyperterminal. You will need to refer to your modem’s documentation to make this determination. Those settings that are configured using command strings must be saved to the modem’s non-volatile RAM (NVRAM), and the NVRAM must be configured as the profile that gets loaded when the modem is powered up. Most modems are equipped with auto-recognition to set the baud rate, parity, stop bits, and data bits. If your modem has no means of setting these using switches, then most likely it is equipped with autorecognition. To configure the port settings of a modem with auto recognition, do the following: Step Action 1 Connect the modem to a PC. 2 Power up the modem. 3 Start up a PC terminal program such as Hyperterminal. 4 Configure the port for 9600 baud, no parity, 1 stop bit, and 8 data bits. 5 Establish communications with the modem. A common way of doing this is simply entering the AT E1 Q0 command and seeing if the modem responds with OK Once you establish communication to the modem, its port settings are configured. 6 34 Save the port settings to the profile that gets loaded on power-up. UMC800 Control Builder User’s Guide Release E 1/01 Establishing Communications Remote Access Using remote access • From the Main Window Communications menu, select “ Setup”. The “Communications Setup” dialog box will appear. • Click on the “Modem” radio button in the Comm Link Port Settings on the “Communications Setup” dialog box. In communication setup, you cannot select Modbus RTU as a protocol plus a modem because Modbus RTU uses a 3-character dead-time to delimit packets of data and can cause a problem over the phone. Note also that the Modem/Comm Link selection is not persistent. This setting defaults to "Serial" every time the application is started. • The Telephony setting becomes active Select No Timeout (no timeout is performed and the application will stay connected until you manually hang up. Select Connection Timeout (Enter, in minutes, how long the application will leave the line open before hanging up automatically.) For example, if you have selected a 10 min. timeout, the application will check back in 10 minutes. If a communications operation is in progress, the application will try again in another 10 min. It will keep checking at 10-minute intervals forever, or until it finds that there is no communication operation in progress; then it will hang up. Application tip: If you want to do initiate a download and leave while the download is in progress, set the timeout to 1 min. That way, the application will keep checking at 1-minute intervals to see if the download is done. When it is, the application will disconnect the call. • Click “OK”. Release E 1/01 UMC800 Control Builder User’s Guide 35 Establishing Communications Remote Access From the Main Window Communications menu, select “ Dial Modem”. Note that the comm menu contains "Dial modem" and "hangup modem". This "global dialler" is the only place from which to make a phone call; if you have selected "modem" in communications setup but have not dialed, the global dialer will be activated for you when you try to perform a communications operation. The “Select the Number to Call” dialog box will appear. • To ADD a Phone Number Type In the Phone Number, Name, and Comments in their respective fields, then click on “ADD to List”. The information will appear in the Phone Number List below. The following pause characters can be added to the phone number in the phone list: , Pause for a fixed time, typically 2 seconds ! W @ Hookflash (½ sec. on-hook, ½ sec. off hook) $ ? Wait for one second of dial tone Wait for quiet answer (Ring back followed by five seconds of silence) Wait for calling-card prompt (“bong”) tone Ask for input before dialing continues • To DELETE a Phone Number Click on a name or number in the Phone Number List and click “Remove from List”. The line will be deleted and all the Phone numbers and names will move up one line. • To SELECT a number to call Click on a name or number in the Phone Number List and click “Dial Now”. • To Hang Up a call, select “Hangup Modem” from the Communications Menu in the main Window. A message will ask you to confirm that you want to hang up. Application tip: If you leave a live monitor window open, the application will never hang up on its own because the live monitor is a communications operation. Don't leave a live monitor window open over a long-distance call, it won’t hang up automatically. Status bar indication At Startup: When Dialing: When Connected: When Disconnected: 36 “Telephone Connection Status” “Call Connecting” “Call Connected” (name from ‘Select Number to Call’ dialog box) “Not Connected” UMC800 Control Builder User’s Guide Release E 1/01 Control Builder Overview Introduction General The Control Builder software will create a graphic diagram one page high by up to 20 pages wide. Scroll Bars at the right side and base of the diagram lets you navigate from top to bottom of the window and from one page to another. All configuration is done off-line (computer disconnected from the controller and operator interface) and is downloaded in a separate operation as a complete file through a dedicated RS-232 communication port on the controller. Once a configuration is installed into the controller and operator interface, the Control Builder software can be used to monitor areas of the configuration to verify proper operation. Controller configuration is done using “Drag and Drop” techniques for positioning graphic icons on the Function Block Diagram from a list of available functions. Signal flow connections from icon to icon complete the controller configuration. The completed diagram can be printed on up to 20 pages of 8.5” x 11 “paper. Completed configuration can also be saved on a 3.5” floppy disk and loaded into the controller and operator interface through an optional 3.5” floppy disk drive or the operator interface, eliminating the need for a direct connection of the PC to the controller. What’s in this section? The following topics are covered in this section. Topic Release E 1/01 See Page Introduction 37 Overview 38 Control Builder Item Library Tree 40 Configuration Functions 41 Graphic Symbols 50 UMC800 Control Builder User’s Guide 37 Control Builder Overview Overview Overview Control Builder function The Control Builder enables you to configure control strategies by: • • • • • • Creating Function Block Diagrams − Inserting Function Block symbols and other constants or variable symbols onto a Function Block Diagram − Functionally connecting the symbols − Invoking Function Block configuration forms − Loading the control strategy to the process controller − Monitoring the strategy by showing the states of inputs and outputs Configuring Operator Interface Displays − Define signals to be monitored − Assign signals to bar graphs, trends, overview, loops and other display groups − Assign operator pushbutton and selector switch display actions and labels − Assign selected display groups to keyboard buttons − Assign Security to the Operator Interface Creating Setpoint versus Time Profiles − Entering Ramp and Soak Segments − Entering Segment Event Information − Synchronizing Programs Creating Setpoint Schedules − Set up Operator Interface Display Labels − Configure a suite of Setpoint Scheduler blocks for multi-setpoint control. A single schedule may be up to 50 segments in length and includes auxiliary block data. Up to 10 schedules may be stored in the controller’s memory − Configure up to 8 ramp or soak outputs operating on a common time base. It accepts one PV for each setpoint. Setpoint guarantee is provided for the master (SPS) block setpoints with a single symmetrical value for each setpoint output. You can assign a failsafe value for each setpoint. Creating Controller Recipes − Selecting analog and digital variable names − Setting Analog values and Digital States to assign to those variables (when the recipe is loaded) Configuring Data Storage and Events − Configure storage of Trends, Unit Data samples, and Alarm/Events. − Configuring up to 32 digital event signals in the controller 38 UMC800 Control Builder User’s Guide Release E 1/01 Control Builder Overview Overview How Control Builder uses windows The Control Builder uses two program window types during the creation, editing, and saving of Function Block diagrams. These windows are: • Tree View — a window within the Control Builder application frame that displays a tree representation of function block types. • Function Block Diagram — Control Builder provides a workspace where the function block diagram will be created. A view window within the Control Builder application frame allows you to configure the details of the function blocks selected from the list of function blocks in the tree view. Multiple Function Block Diagrams can be opened at any given time within the control builder, but only one view of each diagram is allowed. Scroll Bars at the right side and bottom of the window lets you navigate from top to bottom of the window and from one page to another. Conventions Terminology Click — Click the left mouse button on an object or menu selection. Double Click — Click the left mouse button twice in quick succession. Drag and Drop — Using the left mouse button, click on an object and hold the button down while the mouse is moved to a new screen location. Once at the new location, release the mouse button. Right Click — Click on the right mouse button on an object or diagram for menu selections. Release E 1/01 UMC800 Control Builder User’s Guide 39 Control Builder Overview Control Builder Item Library Tree Control Builder Item Library Tree Introduction The Control Builder Item Library tree is located on the left side of the Control Builder Main Window. The library tree has groups of block types. The groups can be expanded (opened) or collapsed (closed) by clicking small squares having a “+” or “-“ symbol. Figure 7 shows the Control Builder Item Library tree expanded to show several lists of Function Block categories and types. The Function Block types and categories are listed in Function Blocks section. Use the left Mouse button to click on a function block symbol, hold the button down, drag the function block symbol to the function block Diagram and release the mouse button. The Function block will appear on the Function Block Diagram for configuration. Double clicking the mouse button while pointing to any function block will provide access to the details of that block. The figure shows “PID” selected under “Loop Blocks” on the tree and the function block dragged onto the Function Block Diagram. Figure 7 Control Builder item library tree 40 UMC800 Control Builder User’s Guide Release E 1/01 Control Builder Overview Configuration Functions Configuration Functions What is configuration Configuration is the process of creating and editing a Control Strategy, best suited for your application using Function Block Diagrams for control loops, Setpoint Programs, logic action and calculations, plus, Operator Interface Displays and assignments. Configuration procedures The Control Builder configuration software is a graphically oriented, configuration application program that lets you integrate the configuration procedures, listed in Table 11, into a single database. Table 11 Summary of Control Builder configuration procedures Configuration Procedures Emulated Control Function Program Attributes Loop and Logic Control using Function Block Diagrams Loop Control (For Loop application examples, refer to Appendix B – Loop Application Examples) Logic Control (For Logic application examples, refer to Appendix A – Logic Application Examples) Data acquisition, Continuous calculations, Operator Interaction, Tag name recognition • Function Blocks, variables, Operator Interface Display Tag Groups and Displays Display Tag Groups Alarm Panel Meter Trend Bar Overview Single Pt. Panel Multi-Point Panel Tag Order Loop Display, SPP Display, HOA Switches, Device Control Start up Display, Message Display, Setpoint Schedule Displays, O/I Display Buttons (1-8) O/I Settings, O/I File Names • Function Block Tag Setpoint Programs Setpoint versus Time Profile • • • • Ramp Segments Soak Segments Segment Events Program Synchronization Setpoint Schedules Configure up to 8 ramp or soak outputs operating on a common time base • • • • SP Values Segment Events Aux Out Values Guaranteed Hold Recipes Set Analog Variable Values Set Digital Variable States • Variable Tag Configuration • Adjustable Settings Data Storage and Events Configure Data Storage • Trends, Point logs, and constants • Soft wiring • Parameter Configuration • Annotation configuration Signal Tag configuration Variable Tag configuration Pre-formatted Design Multiple Pages Display Button configuration • O/I Security Settings • • • • • Alarm/Events Release E 1/01 UMC800 Control Builder User’s Guide 41 Control Builder Overview Configuration Functions Function block diagrams Function Block diagrams let you build your control strategy graphically right on the Control Builder Window. It provides a full complement of SAMA-style symbols that we call Function Blocks that can be “softwired” to each other. It also includes signal tag generation capability for resident control data that can be linked to displays and other software programs. Function block diagram rules • Do not place Function Block icons over another or overlap pins. • A pin output may be soft-wired to any number of inputs of other blocks. • You may change direction for soft-wiring with a left mouse click (up to 6 direction changes). • You may use “Signal tags” and “Connectors” to substitute for soft-wired connections and for reference across diagram pages. • You may move a block or group of blocks by selecting blocks or “boxing a group of blocks”. • You may cross soft-wires. • You can cut, copy, or paste (from File menu or Right-click on the diagram) one or more blocks by selecting or “boxing” within an application or between active applications (allows function block libraries to be stored). Figure 8 Typical loop control configuration 42 UMC800 Control Builder User’s Guide Release E 1/01 Control Builder Overview Configuration Functions Function block dialog box After function blocks are placed on the Function Block Diagram, they can be configured. Double clicking on a function block will reveal the block’s dialog box. This dialog box contains various parameters and options that are configured based on the particular nature of the dialog box. The figure to the right is an example of an Analog Output Dialog Box. File Properties Selecting “Properties” from the file menu, lets you fill in the title and author of the file as well as view the file statistics (Number of Blocks, Inputs, and other items). From the Main Window File menu, select “Properties”. The “File Properties” dialog box will appear. Select “File Properties” tab or “File Statistics” tab. Release E 1/01 UMC800 Control Builder User’s Guide 43 Control Builder Overview Configuration Functions Operator interface displays Operator Interface Display configuration lets you define the parameters to be monitored at the Operator Interface through a predetermined set of standard displays. Customized display access and the assignment of selected display groups to keyboard buttons may also be developed through the Control Builder. Selected groups such as bar graphs, trends, overview, loop groups will require the user to specify the individual block, signal or variable tags to be represented on the displays. Any displayed item must exist as a valid tagged item on the function block diagram. The Operator Interface displays include: Display Tag Groups Alarms Trends Panel Meters Bars Overviews Single Pt. Panels Multi-Point Panels Tag Order Loops SP Programmers HOA Switches Device Control Start up Display Message Displays Setpoint Scheduler Displays Note: You can configure pushbutton and 4 selector switch displays (actions applied to F1 through F4 keys) via the function block dialog boxes. O/I Display Buttons (1-8) O/I Settings O/I File Names Figure 9 is an example of a typical Display Tag Group Configuration dialog box with the Overview tab selected for the Operator Interface. Refer to How to Configure Display Tag Groups (page 100) for details. Figure 9 Configuration form for the operator interface overview display 44 UMC800 Control Builder User’s Guide Release E 1/01 Control Builder Overview Configuration Functions Set point profiles Setpoint Program configuration lets you define up to 4 Setpoint Programmer function blocks on the Function Block diagram. You can configure 70 profiles each having up to 50 segments for execution in the programmer blocks. Figure 10 is an example of a typical setpoint profile dialog box during editing. Refer to Setpoint Programming section for details. Figure 10 Typical setpoint program setup Release E 1/01 UMC800 Control Builder User’s Guide 45 Control Builder Overview Configuration Functions Set point scheduler A suite of Setpoint Scheduler blocks provides extensive control of multiple process setpoints using a common time base. A single schedule may be up to 50 segments in length and includes auxiliary block data. Up to 10 schedules may be stored in the controller’s memory. An operator can interact with the configured Setpoint Schedules through the Setpoint Program Operate display at the operator interface. Eight character labels and four character engineering units are provided for each process variable of the master and auxiliary setpoint blocks. Labels and on/off descriptions are also provided for the Digital Event block. Assigning these labels first [see Setpoint Scheduler Display Configuration (page 119)] will aid you in the schedule configuration process. These labels will appear in the configuration dialog boxes. Setpoint Schedule Setup or Edit consists of configuring each segment of the schedule and assigning values for all eight Setpoints of the segment and the Guaranteed Hold Type for each. You can also set up to 16 events for each segment. Time Units, Recycle Segment, and Recycle Counts selections are included on this dialog box. You can also assign values to all eight Auxiliary Outputs for each segment by clicking the “Edit Aux” button on the dialog box. Figure 11 is an example of a typical Setpoint Schedule segment dialog box during editing. Refer to Setpoint Scheduler section for configuration details. Figure 11 Typical setpoint schedule segment properties dialog box 46 UMC800 Control Builder User’s Guide Release E 1/01 Control Builder Overview Configuration Functions Recipes Controller recipe configuration lets you define up to 50 different recipes each containing from 1 to 50 variable values in each as shown in Figure 12. Each recipe carries its own unique recipe number and a name for identification. These sets of variable values can be loaded by either the operator interface or automatically via the Recipe (RCP) function blocks. Refer to Setpoint Scheduler section for configuration details. Figure 12 Recipe setup form in recipe configuration Release E 1/01 UMC800 Control Builder User’s Guide 47 Control Builder Overview Configuration Functions Data storage Data Storage Configuration lets you define the information associated with the optional Data Storage feature that provides background storage of process information on a 3.5-inch floppy disk for analysis by an off-line computer equipped with Honeywell Data Analysis Software (SDA). Data stored files may not be reviewed from the operator interface. The instrument can support both continuous and discontinuous (batching) modes of storage for trends, unit data samples (point logs), and alarms/events as shown in Figure 13. Refer to Data Storage Configuration section for configuration details. Figure 13 Tabs for data storage configuration 48 UMC800 Control Builder User’s Guide Release E 1/01 Control Builder Overview Configuration Functions Event list Digital Event descriptions appear in the lower center of operator displays when the event turns on. An event summary display allows a review of event time and date status. Digital event recording is also available to store up to 150 on and off transitions of up to 32 digital events in the Alarm/Events file provided by the data Storage function. Event data includes the point tag, a 16-character point description, and the time and date of event occurrence as shown in Figure 14. Refer to Data Storage Configuration section for details. Figure 14 Digital event configuration dialog box Release E 1/01 UMC800 Control Builder User’s Guide 49 Control Builder Overview Graphic Symbols Graphic Symbols Overview Figure 15 shows you typical Graphic Symbols and objects. Table 12 gives a description of each. Figure 15 Typical graphic symbols/objects Table 12 Description of graphic symbols Item Description 1 Signal Tag - User assigned names that can be associated with the output of any item and assigned to a display or used as a connection to a discontinuous wire. 2 Function Block - Emulates a given control function needed in the overall control strategy. 3 Softwire - Connects control functions together simply by double clicking on an Input and an Output pin. 4 Numeric Constant - Provides a numeric value as an input to a function block. May be changed through configuration only. 5 Analog Variable - A named diagram item capable of holding a single Analog value. The value can be connected to function block inputs with a softwire and may be changed by operator interface displays or recipe load. Select Tag name, Decimal Place, and Engineering Units. 6 Digital Variable - A named diagram item capable of holding a single Digital value. The value can be connected to function block inputs with a softwire and may be changed by operator interface displays or recipe load. Select Tag name, and ON and OFF labels. 7 Text String - Annotates the control strategy. Each string can be up to 80 characters long. 8 Input Connector - Combines with the signal tag to route a signal between points anywhere in the Function Block diagram without having to draw a softwire between them. 9 Tag Name - Some blocks have unique user-assigned tag names consisting of up to eight characters. They are used to identify values for operator displays. Note that tag names are automatically displayed in capital letters. 50 UMC800 Control Builder User’s Guide Release E 1/01 Function Blocks Overview Purpose This section provides an overview of what function blocks are and describes their major attributes. What’s in this section? The following topics are covered in this section. Topic Release E 1/01 See Page Overview 51 Function Block Definition 52 Function Block Attributes 53 Function Block Categories and Types 55 UMC800 Control Builder User’s Guide 51 Function Blocks Function Block Definition Function Block Definition Definition A Function Block is a unit of software that performs a set of operations on its Input Signals and Function Block parameters and produces Output Signals. These output signals can be configured as inputs to other blocks, whose output parameters can be configured as inputs to other function blocks, and so on. By configuring all the desired input signals and function block parameters, you develop control strategies for both analog and digital operations. A function block may represent a physical input or output, several inputs or outputs, an internal calculation or an internal function such as a PID algorithm. A single controller configuration may have up to 250 userdefined blocks. Block numbers 249 and 250 are reserved for specific status blocks. Types of blocks Each function block performs a set of operations that fulfills a unique purpose. For example, the Analog Input function blocks processes the analog input data, the Analog Output function block processes Analog outputs, and so on. Table 14 lists the categories of function blocks and Table 15 describes each function block. For additional Information on each Function Block, refer to the UMC800 Control Builder Function Block Reference Guide Document # 51-52-25-64). Function blocks such as Analog Input, Analog Output, Digital Input, and Digital Output interface with the hardware; that is, they are the link between the controller and the input or output modules. The Analog Input and Digital Input function blocks convert the incoming process data (like the process variable or any digital On/Off signals from a switch) into information usable by the controller. This incoming information is processed according to the entire function block configuration in the controller, and is ultimately passed on to the Output function blocks. The Analog output and Digital output function blocks convert this output information into a voltage or current, which is fed to the corresponding output hardware (like a current output or relay). Other function blocks are transparent to the hardware; they are purely software. They can be thought of as the middle of the process described in the previous paragraphs, such as PID, 2 Input AND, Square Root or Mass Flow calculations, and others. Signal flow The “FLOW” of information, from the input hardware to the input function blocks to the function block configuration to the output function blocks to the output hardware, can be thought of as a river flowing from upstream to downstream. For example, the Analog Input function block is typically upstream of the control loop function, which is typically upstream of the Analog Output function block. Of course, if the two function blocks are not directly or indirectly connected, there is no flow between the two. The procedure for assigning input and output connections is referred to as “Softwiring”. Most function blocks have input, do a set of operations, and produce an output. 52 UMC800 Control Builder User’s Guide Release E 1/01 Function Blocks Function Block Attributes Function Block Attributes Overview Function blocks are graphic representations of instrument-like functions. • They are accessible through the Item Library Tree on the Control Builder Main Window. • They have inputs and/or outputs for connections to other blocks or functions, as applicable. • Each function block is assigned a unique number from 1 to 250 Typical function block attributes Figure 16 shows the common graphic form and various attributes of function blocks. 2 3 1 4 5 9 HIGH TEMP 6 8 7 Figure 16 Typical function block attributes ATTENTION As a general rule, function block inputs enter on the top or left side of the graphic object and outputs exit from the bottom or right side of the graphic object. Table 13 describes the attributes shown in Figure 16. Release E 1/01 UMC800 Control Builder User’s Guide 53 Function Blocks Function Block Attributes Table 13 Function block attributes Item Description 1 Blocks have a rectangular graphic form which varies in size depending on number of inputs and outputs that the block possesses. The block type determines the type of operation or algorithm that the block performs. 2 Each block has type identification label of up to five characters. The label is an abbreviation for the operation or algorithm that the block performs. Each block has a number which is a reference that is assigned by the Control Builder to uniquely identify the function block. A few blocks have reserved block numbers. 3 Block numbers from 1 to 250 are assigned in the sequence that they are programmed. This number determines the order in which blocks are processed. The order can be changed through the “Configure” menu “Execution Order” selection. ATTENTION: During UMC800 Controller operation, control blocks are executed in numerical order; lowest numbered blocks are executed first. 4 Loop blocks and the Setpoint Programmer and Scheduler blocks have unique user-assigned tag names consisting of up to eight characters. They are used to identify blocks for operator displays. Note that tag names are automatically displayed in capital letters. 5 Pin labels consisting of up to five characters help identify block’s inputs and outputs. 6 Block outputs can be labeled with a “Signal Tag” consisting of up to eight characters. Signal tags are used to display value/state of block output signals on operator displays and for discontinuous wires. 7 Most blocks have configuration parameters to tailor operation to control requirements at hand and can only be set or changed through the function block parameters dialog box. 8 Outputs exit a block as lines from bottom or right-hand side and reflect the block’s execution.. Outputs can be connected to any number of control block inputs, but, they cannot be connected to: • an output of another block, • a named variable , or • a constant Note that unused outputs can be left unconnected. 9 The block’s input signals are variables that are used by the function in calculating the outputs. Inputs enter block from top or left-hand side. Inputs can be from: • an output of another block, • a named variable (values that can be changed from the operator interface — maximum 150) • A connector that references a signal tag. • A constant that references a signal tag. Note that unconnected inputs will default to 0 or OFF. 54 UMC800 Control Builder User’s Guide Release E 1/01 Function Blocks Function Block Categories and Types Function Block Categories and Types Introduction Grouped function blocks To simplify function block selection, the function block types are grouped into separate categories based on the general Control Builder operation they support. The given type of function block identifies the specific function to be performed. Categories of function blocks Table 14 lists the function block categories in the order they appear in the Function Block Library Tree on the Control Builder Main Window. Table 15 through Table 27 list the block type, description, and the graphic form. REFERENCE The reference data for each block can be found in the UMC800 Control Builder Function Block Reference Guide Document # 51-52-25-64. Table 14 Categories of function block Category Description Loops Includes function block types for building control loops. Multiple control algorithms are provided to minimize the number of prompts and complexity of control loop configurations. (For examples of Loop applications, refer to Appendix B – Loop Application Examples.) SP Program Includes function block types for adding Setpoint Programs including program synchronization and event outputs plus, Recipe selections. Setpoint Scheduler Includes a suite of setpoint scheduler blocks that can be configured for multi-setpoint control. Logic Includes function block types for initiating Boolean logic operations plus Frequency and Pulse Inputs, pushbutton and four selector blocks for operator indicated actions (For examples of Logic Applications, refer to Appendix A – Logic Application Examples.) Fast Logic Same as Logic except faster execution time. Counters/Timers Includes function block types for timers, and Up/Down counter. Math Includes function block types for Mathematical operations. Calculations Includes function block types for making special control Calculations. Alarm/Monitor Includes function block types for monitoring High, Low, or Deviation Alarm conditions. Signal Selectors Includes function block types for signal direction and monitoring Auxiliary Includes function block types for performing Auxiliary control functions, such as Lead-Lag, High-Low Limiter, Hand/Off/Auto switches, Device Control, etc. Communications Includes function blocks that will provide Modbus interface to the controller. Other Items Includes analog and digital variables, Text annotation, connectors, soft wires, and signal tag items. Release E 1/01 UMC800 Control Builder User’s Guide 55 Function Blocks Function Block Categories and Types Function block usage guidelines Except for the following types, a function block algorithm type may be used any number of times up to the limit of 250. Function Block Type Maximum Usage PID, ON/OFF, CARB, and TPSC control blocks and associated support blocks 8 or 16 maximum Setpoint Programs and associated support blocks 4 maximum Pushbutton 4 maximum Scheduler 1 maximum 4 Selector Switch 4 maximum Modbus Slave 16 maximum 56 UMC800 Control Builder User’s Guide Release E 1/01 Function Blocks Function Block Categories and Types Loops category For examples of Loop Block applications, refer to Appendix B – Loop Application Examples. Table 15 lists the function block types in the Loops category. Table 15 Loops category function block types Block Type Description AI Analog Input - Reads value of an Analog Input from a specified real I/O address. Converts an analog input value to corresponding output in engineering units based on the necessary scaling and conversions performed. AO Analog Output - Regulates Analog Output current. Input and output scaling is available. TPO Time Proportioning Output - Proportions the amount of ON time and OFF time of a digital output. Input scaling and cycle time available. Time proportioning outputs are commonly used for electrically heated applications where regulating the amount of ON time vs OFF time of a heater is used to control temperature. PID Proportional, Integral, Derivative - Control for 3-mode single-loop control application with: Graphic Form • Autotuning with Fuzzy Logic overshoot suppression • PID-A, PID-B, Duplex equations • 2 set of PID Constants • 2 Setpoint Values • 2 Alarms • Feedforward • Ratio Control • External Mode Switching • Cascade capability Release E 1/01 UMC800 Control Builder User’s Guide 57 Function Blocks Function Block Categories and Types Block Type Description ONOFF ON/OFF Output - Control for ON/OFF application. The output is either On (100%) or Off (0%) with deadband selection. CARB Carbon Potential - A combined Carbon Potential and PID algorithm calculation to control Carbon Potential of furnace atmospheres based on a Zirconia probe input. LPSW Loop Switch - Digital interface to control loops to initiate Autotuning, change control action, force bumpless transfer, select tuning set #1 or set#2. Connects to PID, ON/OFF, CARB, or TPSC block switch input. MDSW Mode Switch - Digital interface to control loops to select automatic or manual modes and/or local or remote setpoint. Connect to PID, ON/OFF, CARB, or TPSC mode block input. 58 UMC800 Control Builder User’s Guide Graphic Form Release E 1/01 Function Blocks Function Block Categories and Types Block Type MDFL Description Graphic Form Mode Flag - Turns on an output that corresponds to the current value of mode. Turns all other outputs off. One of each set (AUTO, MAN, IMAN, LO) and (LOCAL, REM) is ON. TPSC Three Position Step Control - Motor position control without position sensing. Allows the control of a valve or other actuator having an electric motor driven by two controller outputs; one to move the motor upscale, the other to move it downscale, without a feedback slidewire linked to the motor shaft. WTUN Write Tuning Constants - Writes the numerical value of Gain, Rate, and Reset to a Target PID, TPSC, or CARB block without any operator interaction. AMB Auto/Manual Bias - On transfer from Manual to Auto; Bias is calculated to make PV + Bias = Output. Release E 1/01 UMC800 Control Builder User’s Guide 59 Function Blocks Function Block Categories and Types Setpoint program category Table 16 lists the function block types in the Setpoint Program category. Table 16 Setpoint program category function block types Block Type SPP Description Graphic Form Setpoint Programmer - Each of the four possible SPP blocks can run one profile selected from a pool of 70. Its primary output (SP) is used as a remote setpoint input (RSP) for one or more PID function blocks. Provides various secondary inputs and outputs for selected interaction with other control blocks. RCP Recipe Selector - Loads numbered recipe (NUM) into the various blocks of the controller when digital signal (LD) is ON. SPEV Setpoint Program/Scheduler Events Decoder - Sets up to 16 digital status outputs that may be ON or OFF on a per segment basis. Inputs include Program Number, Segment Number, and Program State (Ready, Run, Ghold, and Stop) from a setpoint program/scheduler block. 60 UMC800 Control Builder User’s Guide Release E 1/01 Function Blocks Function Block Categories and Types Block Type SYNC Description Graphic Form Synchronize - Synchronizes changes in setpoint program state (Reset, Run, Hold, and Advance). Used to synchronize the operation of two or more setpoint programmer blocks - state change commands in any connected SPP blocks or at the input pins will affect all connected SPP blocks. Release E 1/01 UMC800 Control Builder User’s Guide 61 Function Blocks Function Block Categories and Types Setpoint scheduler category Table 17 lists the function block types in the Setpoint Scheduler category. Table 17 Setpoint program category function block types Block Type SPS Description Graphic Form Setpoint Scheduler - Provide a sequence of multiple setpoint outputs (both analog and digital) which are referenced to a common time base. A suite of Setpoint Scheduler blocks is comprised of one master Setpoint Block (SPS) (required) and optionally, one Digital Event (SPEV), one Auxiliary Setpoint (SPSA), one State Switch (STSW), and/or one State Flags (STFL) block. STSW Setpoint Scheduler State Switch - Accepts state request digital inputs and produces an encoded output for input to the master (SPS) block. STFL Setpoint Scheduler State Flags - Accepts the encoded master (SPS) block state as an input and produces digital outputs corresponding to the current value of STFL. 62 UMC800 Control Builder User’s Guide Release E 1/01 Function Blocks Function Block Categories and Types Block Type Description SPSA Setpoint Scheduler Auxiliary Setpoint - The eight setpoint outputs of the Auxiliary Setpoint block are set to the current step value. The current step is an input to the block and must be connected to the step output of a Master Scheduler block (SPS). SPEV Setpoint Scheduler Events Decoder - Sets up to 16 digital status outputs that may be ON or OFF on a per segment basis. Inputs include Program Number, Segment Number, and Program State (Ready, Run, Ghold, and Stop) from a Setpoint Scheduler block. Release E 1/01 UMC800 Control Builder User’s Guide Graphic Form 63 Function Blocks Function Block Categories and Types Logic category Logic notes • The UMC800 logic function blocks will replace from 40 to 60 rungs of ladder logic on the average (for straight combinations or Boolean functions, timing and counting) assuming an average of 6 logic functions per rung consuming 3-4 blocks. • Extensive PLC ladder logic used for analog functions, PID, setpoint programmer, alarms, interface with operator interface, pushbuttons, lamps is replaced by UMC800 function blocks and displays. (Extensive conditional alarming may expand logic requirements) • All logic blocks are executed in order according to sequence. • All fast-logic logic blocks are executed and outputs updated in 100ms - used to capture faster transitions such as a pushbutton depression on a panel. • All normal logic blocks are executed at analog update rate. • You can mix fast and analog scan time logic blocks. • If you wish Discrete Input function blocks to be scanned prior to execution of succeeding blocks, reorder their sequence order ahead of these blocks. • You can place any number of connections to the output of a block, or if using signal tags for this purpose, they may be used anywhere. For examples of Logic Block applications, refer to Appendix A – Logic Application Examples. Function block types Table 18 lists the function block types in the Logic category. (Also see Fast Logic category.) Table 18 Logic category function block types Block Type Description DI Digital Input - Provides the digital status of a digital input. The output states may be inverted. DO Digital Output - Directs a digital status to a physical logic output. The output status may be inverted. 8DI Eight Digital Inputs - Provides read access for up to 8 physical digital inputs. It minimizes the number of blocks required to configure all of the Digital I/O required in a system. The output states may be inverted. 64 UMC800 Control Builder User’s Guide Graphic Form Release E 1/01 Function Blocks Function Block Categories and Types Block Type Description 8DO Eight Digital Outputs - Provides write access to any physical digital output. Provides a digital status from the algorithms and functions to physical logic output hardware. Each block output requires a module and channel number during configuration. The output status may be inverted. FI Frequency Inputs - reads a single frequency channel from a pulse-frequency-input module. It scales inputs from the module to user-configured engineering units per unit time. The function is used for measuring speed and flow rate. The frequency high and low limits are sent to the module and the module will respond with FAIL or the frequency input value. PI Pulse Inputs - reads a single input channel from a pulsefrequency-input module. It scales inputs from the module to user-configured engineering units corresponding to accumulated pulses. The scaling typically represents a quantity. The preset values, reset, preset action, hold and clear flags are sent to the module and the module will respond with FAIL, counter overflow indicator (OVFL), preset indicator (PREI) and accumulated pulse counts. 2AND 2 Input AND - Boolean logic function turns digital output ON if both inputs are ON, otherwise output is OFF. Graphic Form Individual inputs may be inverted. 4AND 4 Input AND - Boolean logic function turns digital output ON if all inputs are ON, otherwise output is OFF. Individual inputs may be inverted. 8AND 8 Input AND - Boolean logic function turns digital output ON if all inputs are ON, otherwise output is OFF. Individual inputs may be inverted. Release E 1/01 UMC800 Control Builder User’s Guide 65 Function Blocks Function Block Categories and Types Block Type 2OR Description Graphic Form 2 Input OR - Boolean logic function turns digital output OFF if all inputs are OFF, otherwise output is ON. Individual inputs may be inverted. 4OR 4 Input OR - Boolean logic function turns digital output OFF if all inputs are OFF, otherwise output is ON. Individual inputs may be inverted. 8OR 8 Input OR - Boolean logic function turns digital output OFF if all inputs are OFF, otherwise output is ON. Individual inputs may be inverted. XOR Exclusive OR - Boolean logic function turns output ON if one of two inputs is ON, otherwise the output is OFF. NOT NOT - Boolean logic function is the reverse state of a digital input if input is ON then Output is OFF. DSW Digital Switch - Selects Input A for output when digital input signal (SA) is ON, otherwise output is B. TRIG Trigger - Turns a logic output ON for one logic scan cycle when the logic input goes from OFF to ON. 66 UMC800 Control Builder User’s Guide Release E 1/01 Function Blocks Function Block Categories and Types Block Type Description LTCH Latch - Turns a logic output ON when latch input (L) turns ON and unlatch input is OFF. Output turns OFF when unlatch input (U) turns ON. TGFF Toggle Flip Flop - Provides an ON state output when a digital input goes from OFF to ON and the previous state of the output was OFF, and an OFF state output when the digital input goes from OFF to ON and the previous state of the output was ON. Graphic Form RESET input when ON sets output to OFF. BOOL Freeform Logic - Reads digital inputs and calculates the output based on a specified Boolean logic function, such as: AND, OR, NOT, or XOR PB Push-button - Provides the interface from the operator interface to the logic functions of the controller. Provides a one-shot output based on an OFF to ON change of an operator interface F1 to F4 key action. Supports four pushbuttons per block. Up to 4 screens (16 digital signals) may be configured, assigned to any screen access key. FSS Four Selector Switch - Provides 16 digital outputs in groups of four. A dedicated display allows activating of only one output per group while other outputs in the group are turned off simulating 2, 3, or 4 position selector switches. Up to 4 screens (4x16 digital signals) may be configured and assigned to any screen. Release E 1/01 UMC800 Control Builder User’s Guide 67 Function Blocks Function Block Categories and Types Fast logic category Table 19 lists the function block types in the Fast Logic category. (Also see Logic category.) ATTENTION All fast-logic logic blocks are executed and outputs updated in 100ms - used to capture faster transitions such as a pushbutton depression on a panel. Table 19 Fast logic category function block types Block Type Description DI Digital Input - Provides the digital status of a digital input. The output states may be inverted. DO Digital Output - Directs a digital status to a physical logic output. The output status may be inverted. 8DI Eight Digital Inputs - Provides read access for up to 8 physical digital inputs. It minimizes the number of blocks required to configure all of the Digital I/O required in a system. The output states may be inverted. 8DO Eight Digital Outputs - Provides write access to any physical digital output. It minimizes the number of blocks required to configure all of the Digital I/O required in a system. It provides a digital status from the algorithms and functions to physical logic output hardware. Each block output requires a module and channel number during configuration. The output status may be inverted. 68 UMC800 Control Builder User’s Guide Graphic Form Release E 1/01 Function Blocks Function Block Categories and Types Block Type Description OFDT Off Delay Timer - Provides an OFF state logic output delayed by a user specified delay time after an ON to OFF transition of the RST input. (This block also appears in the Counters/Timers group.) ONDT On Delay Timer - Provides an On state logic output delayed by a user specified delay time after an OFF to ON transition of the RUN input. (This block also appears in the Counters/Timers group.) 2AND 2 Input AND - Boolean logic function turns digital output ON if both inputs are ON, otherwise output is OFF. Graphic Form Individual inputs may be inverted. 4AND 4 Input AND - Boolean logic function turns digital output ON if all inputs are ON, otherwise output is OFF. Individual inputs may be inverted. 8AND 8 Input AND - Boolean logic function turns digital output ON if all inputs are ON, otherwise output is OFF. Individual inputs may be inverted. 2OR 2 Input OR - Boolean logic function turns digital output OFF if all inputs are OFF, otherwise output is ON. Individual inputs may be inverted. 4OR 4 Input OR - Boolean logic function turns digital output OFF if all inputs are OFF, otherwise output is ON. Individual inputs may be inverted. Release E 1/01 UMC800 Control Builder User’s Guide 69 Function Blocks Function Block Categories and Types Block Type 8OR Description Graphic Form 8 Input OR - Boolean logic function turns digital output OFF if all inputs are OFF, otherwise output is ON. Individual inputs may be inverted. XOR Exclusive OR - Boolean logic function turns output ON if one of two inputs is ON, otherwise the output is OFF. NOT NOT - Boolean logic function is the reverse state of a digital input if input is ON then output is OFF. DSW Digital Switch - Selects Input A for output when digital input signal (SA) is ON, otherwise output is B. TRIG Trigger - Turns a logic output ON for one logic scan cycle when the logic input goes from OFF to ON. LTCH Latch - Turns a logic output ON when latch input (L) turns ON and unlatch input is OFF. Output turns OFF when unlatch input (U) turns ON. TGFF Toggle Flip Flop - Provides an ON state output when a digital input goes from OFF to ON and the previous state of the output was OFF, and an OFF state output when the digital input goes from OFF to ON and the previous state of the output was ON. RESET input when ON sets output to OFF. 70 UMC800 Control Builder User’s Guide Release E 1/01 Function Blocks Function Block Categories and Types Block Type FSYS Description Graphic Form Fast Logic System Monitor - The fast logic system status block provides read access to system values to be used as an input to a Fast Logic block or for monitoring purposes. NOTE: The block will be assigned Number 250. Release E 1/01 UMC800 Control Builder User’s Guide 71 Function Blocks Function Block Categories and Types Counters/timers group category Table 20 lists the function block types in the Counter/Timers category. Table 20 Counters/timers category function block types Block Type RTMR Description Graphic Form Resettable Timer - Provides increasing or decreasing timing base on an enable input. Increasing time from 0 or preload value. Provides digital output upon reaching Preset Decreasing time from preset or preload value. Provides digital output upon reaching zero. Preset range of 0–99999.9 seconds with output update dependent on analog scan rate. PTMR Periodic Timer - Provides a digital high (one) output for one controller scan cycle based on a specified time period. Or time of day referenced to real-time clock. UPDN Up/Down Counter - Count the number of raising edge logic transactions on the input to the block up to a preset value (RPRE or LPRE). When the preset value is reached, a logic output is enabled. A Reset input (RST) resets the block. Value may be set to increase to the preset value or decrease from the preset value of up to 99999 counts. OFDT Off Delay Timer - Provides an OFF state logic output delayed by a user specified delay time after an ON to OFF transition of the RST input. (This block also appears in the Fast Logic group.) Delay time is up to 9999.9 seconds ONDT On Delay Timer - Provides an On state logic output delayed by a user specified delay time after an OFF to ON transition of the RUN input. (This block also appears in the Fast Logic group.) Delay time is up to 9999.9 seconds 72 UMC800 Control Builder User’s Guide Release E 1/01 Function Blocks Function Block Categories and Types Math category Table 21 lists the function block types in the Math category. Table 21 Math category function block types Block Type Description SCB Scale and Bias - Use to multiply an input value by a constant (SCALE) and add BIAS to it. ADD Add - Use to Add two analog or numeric inputs to get an output. SUB Subtract - Use to Subtract one analog or numeric input from another to get an output. MUL Multiply - Use to multiply two analog or numeric inputs to get an output. DIV Divide - Use to divide one analog or numeric input into another to get an output. 4ADD Four Input Add - Use to add 4 analog or numeric inputs to get an output. Release E 1/01 UMC800 Control Builder User’s Guide Graphic Form 73 Function Blocks Function Block Categories and Types Block Type Description 4SUB Four Input Subtract - Subtracts 3 analog or numeric inputs from one input to get an output. 4MUL Four Input Multiply - Multiplies four analog or numeric inputs to get an output. MATH Free Form Math - Reads Inputs and calculates the Output based on a specified general purpose calculation, such as: Graphic Form ADD, SUBTRACT, MULTIPLY, DIVIDE, SQ ROOT, ABSOLUTE VALUE, LOG, etc. 74 UMC800 Control Builder User’s Guide Release E 1/01 Function Blocks Function Block Categories and Types Calculations category Table 22 lists the function block types in the Calculations Category. Table 22 Calculations category function block types Block Type Description CMPR Comparison Calculation - Compares the value of X input to the value of Y input and generates separate digital outputs to indicate greater than, equal, or less than status. DCMP Deviation Compare - Compares up to 6 analog inputs to a + and - deviation set around a 7th Input reference value and sets an output true or false based on the comparison result. ABS Absolute Value - The output is the absolute value for a single analog variable input. SQRT Square Root - The output is the square root value of a single analog variable input. MSF Mass Flow Calculation - Calculates gas mass flow (OUT) from differential pressure, temperature, and for pressure input values. Release E 1/01 UMC800 Control Builder User’s Guide Graphic Form 75 Function Blocks Function Block Categories and Types Block Type MMA Description Graphic Form Min-Max-Average-Sum - Accepts inputs from up to 6 analog variables and outputs analog variables representing the results of a specified operation: MAX = Maximum analog value MIN = Minimum analog value AVG = Average of analog values within a user-specified number of standard deviations SUM = Sum of all input values SDEV = Standard deviation of all analog values ALM = Alarm output for deviation of any variable outside user specified standard deviations. NEG Negate - Accepts a single analog variable input and negates the output. RH Relative Humidity - Calculates a relative humidity value based on a wet bulb, dry bulb, and atmospheric pressure analog inputs. DEWP Dewpoint - Monitors Dewpoint or carbon Potential, or to supply a Dewpoint PV to a PID function Block for Dewpoint control, based on a Zirconia O2 probe input. TOT Totalize - Integrates an Analog variable using a specified rate. Rate may be in units per minute, hour, or day. A preset is provided to indicate when a specific quantity has been accumulated. Separate enable and reset inputs are provided. CAVG 76 Continuous Average - Calculates the continuous average value of the configured input over a configured time period. When the averaging period elapses, the instantaneous average will maintain the last calculated average value, the internal accumulators and sample counters are cleared, and the time remaining is re-initialized to the full average period. UMC800 Control Builder User’s Guide Release E 1/01 Function Blocks Function Block Categories and Types Alarm/monitor category Table 23 lists the function block types in the Alarm/Monitor category. For an overview of Alarms Configuration, refer to Appendix C – Alarm Configuration Overview. Table 23 Alarm/monitor category function block types Block Type HMON Description Graphic Form High Monitor - Monitors two analog input values (X and Y) and turns ON a logic output if X exceeds Y. A hysteresis adjustment is provided to prevent output cycling. LMON Low Monitor - Monitors two analog input values (X and Y) and turns ON a logic output if X is less than Y. A hysteresis adjustment is provided to prevent output cycling. ASYS Analog System Monitor - The analog system status block provides read access to analog control system values to be used as an input to another block or for monitoring purposes. A dialog box allows you to set the controllers 50/60/Hz noise rejection selection. NOTE: The block will be assigned Number 249. ALM Release E 1/01 Analog Alarm - Provides the setpoint, PV compare attributes (for comparing against another input or a fixed value) to generate a logic status output for OFF-normal conditions that may be enunciated by the operator interface as an alarm. Provides a delay selection and latching functions. UMC800 Control Builder User’s Guide 77 Function Blocks Function Block Categories and Types Signal selectors category Table 24 lists the function block types in the Signal Selectors category. Table 24 Signal selectors category function block types Block Type Description HSEL High Selector - Selects the higher of two analog inputs (X or Y) for output. LSEL Low Selector - Selects the lower of two analog inputs (X or Y) for output. SW Switch - Selects input Y for output when digital input signal (SY) is ON. RSW Rotary Switch - A Single output can be selected from up to 8 analog inputs based on the analog value (1 - 8) applied to the selected input. XFR Transfer Switch - Provides “bumpless” switching between two analog input values (X and Y) that is triggered by a digital input signal (SY). Graphic Form When switched, the output ramps to new value at a specified rate. A rate is available for each status of the digital input. 78 UMC800 Control Builder User’s Guide Release E 1/01 Function Blocks Function Block Categories and Types Auxiliary category Table 25 lists the function block types in the Auxiliary category. Table 25 Auxiliary category function block types Block Type Description FGEN Function Generator - 10 segment - Generates output characteristic curve based on up to 11 configurable “breakpoints” for both input and output values. LDLG Lead Lag - Modifies an analog input value to include Lead (T2) and Lag (T1) time constants from 0 to 99 minutes when a digital input (EN) is ON. HLLM High Low Limiter - Provides High-Low limit for an analog value. Turns ON high or low logic output if input exceeds or falls below set limits. VLIM Velocity (Rate) Limiter - Limits the rate at which an analog input value can change when a digital input signal (EN) is ON. Provides independent increasing and decreasing rate of change limit values. Logic output indicates increasing or decreasing rate is active. ROC Rate of Change - Provides: Graphic Form • an analog output representing units per minute change of the analog input, • compare setpoints for high and low rate of change, • compare selections for increasing, decreasing or both directions of change, • a logic 1 (ON) output when input rate exceeds high rate setpoint, • a logic 1 (ON) output when input rate is less than the low rate setpoint. RCON Read Configuration Parameter Data - Reads the numerical value of selected configuration parameter in a given function block using the index number of the parameter. WCON Write Configuration Parameter Data - Writes the numerical value of selected configuration parameter to a given function block. Release E 1/01 UMC800 Control Builder User’s Guide 79 Function Blocks Function Block Categories and Types Block Type Description WVAR Write Variable – Allows the value of a selected variable to be changed when enabled. TAHD Track and Hold - Provides an output that tracks the value of the input (X) when a digital input signal (TC) is ON; or when (TC) is OFF, hold the output at the last value of (X). BCD Binary Coded Decimal Translator - Accepts up to 8 digital inputs in sequence and interprets the ON/OFF status of the first 4 inputs as a BCD value between 0 and 9 and the second 4 digits as a value between 10 and 90 for a total range of 0 to 99. DENC Digital Encoder - This block’s main function is to totalize the number of ON states from up to 16 digital signals. The block digitally encodes up to 16 digital inputs to a single floating point output value. HOA Hand/Off/Auto Switches - The Hand – Off – Auto (HOA) switch function block permits state change requests from a Local Operator Interface or a Remote source. The block states are: BYPASS (external manual operation of a device), HAND (manual operation from an operator interface), AUTO (default – requests are operated automatically), or OFF (relay to be switched to Bypass, Hand, or Auto). The HOA switch is also used with the Device Control (DC) function block to comprise a Pump Control algorithm. DC Device Control - The Device Control function block is normally used to control pumps. Based on certain events, the device will be held in one of six states: READY, PRESTART, STARTING, RUNNING, STOPPING, DISABLED, or FAILED. The READY (off state) is the initial state of the function block. 80 UMC800 Control Builder User’s Guide Graphic Form Release E 1/01 Function Blocks Function Block Categories and Types Communications category Table 26 lists the Function block types in the Communications category. Table 26 Communications category Block Type Description MBR Modbus Read - Provides the Modbus interface to the controller. A communication function block that expands the read capability of the Modbus Slave function block to 16 additional data points. Multiple blocks may be connected to the same Modbus Slave block. MBS Modbus Slave - A communication function block that is internally assigned to optional Communication Port B that allows the controller to communicate with slave devices using the Modbus protocol. Requires one block per slave device, up to 16 devices maximum. Supports 4 read and 4 write parameters plus provides digital indication of communication integrity. Only one block may be assigned to each slave device. Release E 1/01 UMC800 Control Builder User’s Guide Graphic Form 81 Function Blocks Function Block Categories and Types Block Type MBW 82 Description Graphic Form Modbus Write - Provides the Modbus interface to the controller. A communication function block that expands the write capability of the Modbus Slave function block to 8 additional data points. Multiple blocks may be connected to the same Modbus Slave block. UMC800 Control Builder User’s Guide Release E 1/01 Function Blocks Function Block Categories and Types Other Items category Table 27 lists the function block types in the Other Items category. Table 27 Other items category Block Type Analog Variable Description Graphic Form Named Analog Variable* that can be connected to function block inputs and can be changed from the operator interface or recipe load. Double click on the Icon to open the dialog box. Digital Variable Named Digital Variable* that can be connected to function block inputs and can be changed from the operator interface or recipe load. Double click on the Icon to open the dialog box. Numeric Constant Numeric Constant value that can be connected to function block inputs. Double click on the Icon to open the dialog box. ( T ) Text Descriptive data to annotate a specific area of the function block diagram. Drop and drag T to function block diagram and enter text in dialog box text field. 80 characters maximum. Connects Function Blocks/Objects together. Triggers a help message that explains how to add a softwire. Used to connect constants or signal tags to function block without a continuous wire. Connectors may only be connected to function block inputs. Signal tags supported may be analog or digital. Release E 1/01 UMC800 Control Builder User’s Guide 83 Function Blocks Function Block Categories and Types Block Type Description Graphic Form A Signal Tag* is used to assign name to a wire. Drag and drop signal tag icon to the function block diagram and attach to an output wire. Double click on icon to open dialog box. Example is an Analog Signal Tag dialog box. * Each Analog Output Signal and Analog Variable of a function block may be labeled with an 8-character name, 6-character engineering unit definition, and may have a decimal point location specified. Digital Output Signals and Digital Variables of a function block may be labeled with an 8-character name and a 6character ON and OFF label. Output descriptors are used by the operator interface to present On-line status. 84 UMC800 Control Builder User’s Guide Release E 1/01 Control Strategy Configuration Overview Introduction The UMC800 uses function block diagram configuration architecture to develop control strategies for both analog and digital control. A function block can represent a physical input or output, a group of physical inputs or outputs, an internal calculation, or an internal function such as a PID algorithm. A single controller configuration can have up to 250 user defined function blocks. Except for the types listed below, a function block algorithm type can be used any number of times up to the limit of 250 blocks: • PID, On/Off, CARB, and TPSC loops and associated support blocks 8 or 16 maximum • Setpoint Programming and associated support blocks 4 maximum • Setpoint Scheduler and associated support blocks 1 maximum • Selector Switch 4 maximum • Time Proportioning output blocks 16 maximum • Modbus Slave 16 maximum REFERENCE Reference material for all Function Blocks can be found in the UMC800 Control Builder Function Block Reference Guide Document #51-52-25-64. REFERENCE Examples of Loop and Logic Control can be found in Appendix A – Logic Application Examples and Appendix B – Loop Application Examples. What’s in this section? The following topics are covered in this section. Topic Release E 1/01 See Page Overview 85 Before You Start 87 Stages of Configuration 88 How to Select Function Blocks, Variables, and Constants 89 Connecting/Disconnecting Function Blocks (Softwiring) 91 How to Enter Signal Tags 93 How to Enter a Text String 94 UMC800 Control Builder User’s Guide 85 Control Strategy Configuration Overview Topic 86 See Page How to Configure Function Block Parameters 95 How to Change the Execution Order of a Block 98 Operator Interface Configuration Overview 99 How to Configure Display Tag Groups 100 How to Configure the Tag Order 115 How to Configure Start Up and Message Displays 116 How to Configure Setpoint Scheduler Displays 119 How to Configure Pushbutton, Selector Switch and Data Entries 123 How to Configure Start up Conditions for the Controller 125 How to Configure the Display Buttons 126 How to Configure O/I Security Settings 132 How to Configure O/I File Names for Disk Storage 136 How to Initiate a Print Out 137 How to Save a Function Block Diagram 140 How to Download a Control Strategy 141 How to Modify an Existing Configuration 144 UMC800 Control Builder User’s Guide Release E 1/01 Control Strategy Configuration Before You Start Before You Start Introduction The Control Builder software operates on a PC, independently from the controller hardware, until after the configuration is completed and downloaded. For this reason, you must identify the hardware that will be used in the controller so that the configuration constructed will match the intended I/O quantity and location in the controller. A configuration approach Before starting, determine the I/O content of the controller rack. Although configurations can be constructed using default I/O locations, the recommended configuration approach is to first verify that the proper I/O is available to execute the desired configuration and to record the location of each I/O module so that it may be properly entered during configuration file development. Controller architecture The controller rack I/O content can be verified by the model number of the controller or by viewing the physical hardware. Before using either method, you should understand the controller architecture. The controller contains 16 card locations that accept I/O modules. Each module will have either 4 or 6 channels based on the I/O type. During configuration development you will be required to specify the module number (1 to 16) and the channel number (1 to 4, or 6) that identifies the specific physical I/O point that will be represented in the Function Block (graphical) configuration diagram. Using the model number Locate the controller model number on the nameplate of the controller. Locate the two groups of 8 numbers in sequence. From left to right, these numbers represent the I/O module locations from 1 to 8 and from 9 to 16. Example: 8001 - 000 - 0E - 11202000 - 36000000 0 - 0 Once the modules are installed, the location from 1 to 16 becomes the module number. You can identify the module types and number of channels as follows: 0 = NO Module present 1 = Analog Inputs (4 channels) 2 = Analog Outputs (4 channels) 3 = Contact Closure Digital Inputs (6 channels) 4 = 24 Vdc Digital Inputs (6 channels) 5 = 120/240 Vac Digital Inputs (6 channels) 6 = Relay Outputs (6 channels) 7 = 24 Vdc Digital Outputs (6 channels) 8 = 120/240 Vac Digital Outputs (6 channels) A= 120/240 Vac Digital Outputs, 2 @ 2A (6 channels) Viewing the hardware To determine the I/O content by examining the controller hardware, remove the terminal board cover and view the terminal boards of each module. Each terminal board contains a number representing the module type from the list shown above. A terminal board drawing located on the inside of the cover identifies the module locations from 1 to 16. Another configuration approach You can also use the Control Builder to build your control strategy and then determine the I/O content required for the controller rack to suit your strategy. Release E 1/01 UMC800 Control Builder User’s Guide 87 Control Strategy Configuration Stages of Control Strategy Configuration Stages of Control Strategy Configuration What are the stages? Configuration is the process of creating/editing a Control Strategy, best suited for your application, using Function Block Diagrams, variables, and constants, Operator Interface Display assignments, Setpoint Programs and Recipes, Data Storage and Event configuration. The configuration is essential to the controller, since it defines your control strategies and operational displays. Table 28 lists the stages of the configuration process as determined by the tasks required. Table 28 Stages of configuration Stage 1 Task Select the Function Blocks, Variables, and Constants needed to meet the control strategy requirements. (Refer to Appendix A – Logic Application Examples and Appendix B – Loop Application Examples.) (Refer to the Function Block Reference Guide #51-52-25-64 for detailed information on any function block.) 2 Softwire the outputs to the inputs. 3 Assign signal tags to block outputs needed on displays. 4 Enter Text Strings. 5 Configure the function block parameters needed to define the operating characteristics. 6 Configure the Execution Order. 7 Configure the Display Tag Groups. 8 Configure the Tag Order. 9 Configure Pushbutton, Four Selector Switch displays and operator entry overview displays. 10 Configure the Start Up and Message Displays. 11 Configure the Display Buttons. 12 Configure Operator Interface Security. 13 Configure Setpoint Profiles, Setpoint Schedules, Recipes, and Data Storage and Events if needed. [Refer to the following sections: Setpoint Programming, Setpoint scheduler, Controller Recipes, and Data Storage Configuration.] NOTE: Any Setpoint Profile, Setpoint Schedules, Recipe, and Data Storage or Event Configuration will be saved when the Function Block Diagram is saved. [Refer to How to Save a Function Block Diagram (page 140).] 88 14 Save a Function Block Diagram. 15 Initiate a Printout of the Block Diagram, Block Parameters, and Tag Parameters. 16 Download a Control Strategy. UMC800 Control Builder User’s Guide Release E 1/01 Control Strategy Configuration How to Select Function Blocks/Variables/Constants How to Select Function Blocks/Variables/Constants Selecting a function block Use the left Mouse button to click on a function block symbol in the item library tree, hold the button down, drag the function block symbol to the function block diagram and release the mouse button. The Function block will appear on the Function Block Diagram for configuration. Selecting a drawing item To select a drawing item, either click on it (Shift-Click to add an existing selection) or capture it in a selection net. Manipulating a drawing item • To form a selection net, press the left mouse button on an empty area of the drawing and drag the mouse to form a visible dotted rectangle. • Release the mouse button. Everything entirely within the rectangle is selected and highlighted. Drawing conventions • To delete a selected item, press the DELETE key or right-click on the item and select DELETE. • To move a selected item, press the left mouse button on an already selected item and drag the selection to the desired location on the function block diagram. • To copy a selected item, use the CUT, COPY, and PASTE functions on the EDIT menu or Toolbar or right-click on the item and select the desired menu item. • To abort a move operation, press the ESCAPE key before releasing the mouse. Release E 1/01 UMC800 Control Builder User’s Guide 89 Control Strategy Configuration How to Select Function Blocks/Variables/Constants Adding a variable There are two types of variables; Analog and Digital. From the Item Library Tree group “Other Items”, use the left Mouse button to click on a Variable symbol in the block library tree, hold the button down, drag the Variable symbol to the function block diagram and release the mouse button. The Variable symbol will appear on the Function Block Diagram for configuration. • Analog Variable symbol • Digital Variable symbol • Double click on the symbol to open its dialog box. • Double click on the symbol to open its dialog Enter: box. Enter: − Tag Name and Descriptor − Decimal Places (1-5) − Engineering Units − Tag Name and Descriptor − Off Label − On Label Adding a numeric constant From the Library Tree group “Other Items”, use the left Mouse button to click on the Numeric Constant symbol in the block library tree, hold the button down, drag the Constant symbol to the function block diagram and release the mouse button. The Constant symbol will appear on the Function Block Diagram for configuration. • Numeric Constant symbol • Double click on the symbol to open its dialog box. Enter: − Numeric Constant value 90 UMC800 Control Builder User’s Guide Release E 1/01 Control Strategy Configuration Connecting/Disconnecting Function Blocks (Softwiring) Connecting/Disconnecting Function Blocks (Softwiring) Introduction A control strategy is created by connecting function blocks to each other (Softwiring). Connecting To connect two blocks, you must softwire a block’s output pin to the other block’s input pin (or vice versa). CAUTION If a function block is (inadvertently) placed on top of another block with pins touching, wires connected to the touching pins may follow the wrong block, when the block again moves. Solution: Place drawing items so their boundaries do not touch or overlap. When moving drawing items groups, release the group over empty diagram space. The outputs are always on the right or bottom of blocks; inputs are always on the top or left of the blocks. • Double click at the end of a block’s output (or • You can click anywhere on the drawing to make input) pin. A single segment wire will adopt a straight or “L” shaped route. a wire vertex and continue to either another vertex or a block pin. A wire can have up to eight vertices including endpoints. You can connect two or more wires to the same output pin. Release E 1/01 UMC800 Control Builder User’s Guide 91 Control Strategy Configuration Connecting/Disconnecting Function Blocks (Softwiring) Repositioning To reposition an existing wire: • Click on the end point of the wire to be repositioned. It will be highlighted in a dotted line showing each vertex. • Click on a vertex and drag into the new position and release. TIP A single “L” shaped wire cannot be repositioned. If you must alter the routing, delete the wire and add one with a vertex. Disconnecting an existing wire Step 92 Action 1 Click on the end point of the wire to be deleted. The wire is highlighted. 2 Right-click on the item and select “Delete” from the menu, pull down the “EDIT” menu and select “Delete”, or press the DELETE key. UMC800 Control Builder User’s Guide Release E 1/01 Control Strategy Configuration How to Enter Signal Tags How to Enter Signal Tags Introduction Signal tags are user assigned names that can be associated with the output of any item. They can be: • Assigned to displays • Used to connect discontinuous wires to other block inputs using connectors. Entering signal tags Step 1 Action From the Library Tree group “Other Items”, use the left Mouse button to click on the Signal Tag symbol in the block library tree, hold the button down, drag the Signal Tag symbol to the function block diagram and release the mouse button. The Signal Tag symbol will appear on the Function Block Diagram and the cursor will change to the softwire cursor. ATTENTION: You cannot drop a signal tag directly onto an output pin. Drop it away from the pin, then soft wire it to the pin. Once it is connected, you can move the signal tag to any desired location. 2 Place the crosshairs on the output pin and click to connect the tag to the output (dotted Line). You can add vertices like a softwire. 3 Double click on the tag name area to display the signal properties dialog box. • Analog Signal Tag Enter: − Tag Name − Descriptor − Select Decimal Place [0-5] Type in 127 to indicate exponential notation (i.e. display Trend Points Logarithmically) − Engineering Units • Digital Signal Tag Enter: − Tag Name − Descriptor − Off Label − On Label Release E 1/01 UMC800 Control Builder User’s Guide 93 Control Strategy Configuration How to Enter a Text String How to Enter a Text String Introduction You have the option to enter descriptive data on the Function Block Diagram. Any entered data has no effect on the operation of the Controller. Entering a text string Follow the procedure below to annotate the Function Block Diagram. Step Action 1 From the Library Tree group “Other Items”, use the left Mouse button to click on the T (text) symbol, hold the button down, drag the symbol to the function block diagram and release the mouse button. The “Modify Text” dialog box will appear on the Function Block Diagram. 2 Key in the desired text in the field, then click O.K. The text will appear on the diagram in a dotted-line box. NOTE: The text string is limited to 80 characters. Multiple text strings may be positioned one below the other for complete user description. 3 Click and hold the cursor in the box and move the text string to the desired location. 4 To enter another text string, repeat the above steps. Editing text To edit existing text, double click the text. The “Modify Text” dialog box will reopen. You can cut and paste text from one “Modify Text” dialog box to another. Use the ‘right’ mouse button menu while the mouse cursor is in the edit box. 94 UMC800 Control Builder User’s Guide Release E 1/01 Control Strategy Configuration How to Configure Function Block Parameters How to Configure Function Block Parameters Introduction After function blocks are placed on the Function Block Diagram, they can be configured. To configure a block on the Function Block Diagram, double click on it to open its property dialog box which contains parameters of the block. • Most dialog boxes are simple dialog boxes that contain the assigned block number and execution order of the block. To change the function block execution order, refer to How to Configure the Execution Order of the Block (page 98). • Some dialog boxes contain various parameters and options that are configured based on the particular type of the function block. • For example; Module and Channel addresses and Function Block configuration parameters. The figure to the right is an example of an Analog Output Dialog Box. • Tabbed dialog boxes will be used for the most complicated blocks to organize the data for you. The figure to the right shows an example of a PID function block dialog box. Release E 1/01 UMC800 Control Builder User’s Guide 95 Control Strategy Configuration How to Configure Function Block Parameters Function block identification Each block has a type identification label of up to five characters assigned. The label is an abbreviation for the operation or algorithm that block performs and indicates the block number assigned. Identification label The figure shown is an AI (Analog Input) block. Function block address - input/output blocks Addresses identify physical connection points for field wiring to I/O modules. Assign a unique address to each I/O block. Enter the addresses in the appropriate fields in the dialog box. Block Address See the UMC800 controller file for the physical location of modules and channels. [Refer to Before You Start (page 87).] • Module Address - The first two numbers in the block address. i.e. module 05 • Channel Address - The last two numbers in the block address. i.e. channel 02 Function block tag names Some blocks have unique user-assigned Tag names consisting of up to eight characters. They are used to identify the block for operator displays. Note that tag names are automatically displayed in capital letters Function Block Tag Name They are used specifically for the following Function Blocks: • PID • ON/OFF • Carbon Potential • 3 Position Step • Setpoint Programmer • Setpoint Scheduler • Auto/Manual Bias • Hand/Off/Auto Switches • Device Control When configuring displays you will be able to select from a list of tag name groups that you have assigned. (See Configure Tag Order.) 96 UMC800 Control Builder User’s Guide Release E 1/01 Control Strategy Configuration How to Configure Function Block Parameters Function block inputs • All Function Block Inputs must be connected to a signal source. Inputs • The inputs may be connected to the output of another function block, to a variable, or a constant. Variables are named values that can be connected to function block inputs and can be changed from the operator interface. Variable is a type of drawing item. The variable holds one value. The value is entered from the operator interface or a recipe during operation. The Control Builder cannot set it. Constants are unnamed objects, external to any function block that may hold a single value. The Control Builder sets the value and the operator interface cannot alter the value. Constants provide a means to drive unused or invariant function block inputs. ATTENTION: Variables and constants do not consume a function block number. Function block outputs • Function Block Outputs are signals that reflect the results of a function block’s execution. • A function block may have 0, 1, or more outputs. • An unused output need not be connected. Outputs • An output can be connected to any number of function block inputs including inputs on the same block. • An output may NOT be connected to another output, a named variable, or a constant. Function block parameters • All Function Block Parameters are values that influence the function block’s execution. • Click the cursor on the desired parameter to highlight it. • Key in the desired value, use the scroll buttons at the edge of the box or make a selection from the drop down menu. • Press F1 for help on any active field. • Press OK when configuration is complete to close the box and save the entries. Release E 1/01 UMC800 Control Builder User’s Guide 97 Control Strategy Configuration How to Configure the Execution Order of the Block How to Configure the Execution Order of the Block Introduction User-assigned block order from 1 to 250 determines the order in which blocks are processed. Execution Order You can change the execution order of the block and arrange the block execution order to suit your control strategy. ATTENTION During UMC800 Controller operation, function blocks are executed in numerical order; lowest numbered blocks are executed first. The “Fast” logic order is numbered independently from analog and other logic blocks. Changing the execution order of a function block Step 1 Action Graphic From the “Configure” menu, select “Execution Order” or “Fast Logic Execution Order”. The “Function Block Execution Order” dialog box will appear with a list of Function blocks that you are using in your Function Block diagram. 2 98 Click and hold on any function block on the list and move it ahead or back in the order. You can re-arrange the function block execution order to suit your control strategy. UMC800 Control Builder User’s Guide Release E 1/01 Control Strategy Configuration Operator Interface Configuration Overview Operator Interface Configuration Overview Overview Modification and customization of the operator interface displays and buttons is done using UMC800 Control Builder software. With the software, data points can be identified (tagged) using eight character names. Once named, the operator interface using a standard set of display formats and a predefined menu hierarchy may access these tags. Selected screens such as bar graphs, trends, and overview displays will require the user to specify the individual tags to be represented on the screen. There are several steps in this configuration: • Selecting which Tags or Groups to display • Selecting the format and the button for displaying the Tags or Groups The configurable Operator Interface Display Tag Groups, Displays, Buttons and O/I Security settings are as follows: Display Tag Groups Overview ...... Alarm ...... Panel Meter ...... Trend ...... Bar ...... Overview ...... Single Point Panel ...... Multi-Point Panel Tag Order ...... Loops ...... SP Programmer ...... Hand/Off/Auto ...... Device Control Startup and Message Displays Setpoint Scheduler Display Operator Pushbutton, Selector Switch and Data Entries Configuration How to Configure Start Up Conditions for Controller Initialization Display Buttons (1-8) Making a configuration selection • The “Configure” menu in the Main window lists the configurable Display Tag Groups, Displays, and Buttons. • Refer to the individual subsections on the following pages for configuration instructions. ATTENTION Pushbuttons F1-F4 groups are configured at the function block level. You can configure up to four groups (total of 16 pushbuttons) to display on the operator interface. Refer to the Function Block Reference Guide. Release E 1/01 UMC800 Control Builder User’s Guide 99 Control Strategy Configuration How to Configure Display Tag Groups How to Configure Display Tag Groups Overview Introduction The “Display Tag Groups” let you configure groups of tags that can be accessed by the operator interface using a standard set of display formats and a predefined menu hierarchy. These groups are configured using tabs that appear on the “Display Tag Groups Configuration” dialog box. The groups are: • Alarm • Panel Meter • Trend • Bar • Overview • Single-Point • Multi-Point Accessing the display tag groups Follow the procedure in Figure 17 to access the “Display Tag Group Configuration” dialog box. Select “Display Tag Groups” from the “Configure” menu. The “Display Tag Group Configuration” dialog box will appear. Select a Tab for Configuration. Figure 17 Accessing the display tag groups 100 UMC800 Control Builder User’s Guide Release E 1/01 Control Strategy Configuration How to Configure Display Tag Groups Alarm display tag group Description The Alarm Display Tag Group configuration tab provides a drop list of Alarm groups. You can configure 10 groups of Alarm Displays. Each group contains a set of selected digital signal tags. After you have completed all the group configurations you can select the groups to be displayed and assign them to a specific operator panel display button. [Refer to O/I Display Buttons (1-8) Configuration (page 126).] For an Overview of Alarms Configuration, refer to Appendix C – Alarm Configuration Overview. Configuration procedure Follow the procedure in Figure 18 to configure the “Alarms” Display Tags Group. 2. Select a group from the drop-down menu. 6. The selected Signal Tag will be placed in the “Selected Tag” field 1. Select the “ALARM” tab Repeat selection for up to 12 tags for each group To delete a selected tag, click on the position of the tag, then click “Delete” bar. After all tags are selected and positioned, click “OK”. 3. Enter the Group Title. (any mix of numbers letters and spaces) 7.Click to enter detail text 4. Digital signals will be displayed in the “Selected Tags” field 5. To ADD a tag, see Note 1 To INSERT a tag, see Note 2 Note 1 To Add a signal tag: Click on ADD. The selected Signal tag will be placed in the next available position in the “Selected Tags” field. Note 2 To Insert a signal/variable tag: Select a position in the “Selected Tags” field, then click on INSERT. The selected Signal tag will be placed in the position chosen, and other signal tags will move down as required. You may only insert to the occupied portion of the list. An attempt to insert to any empty box will place the new item in the first empty box. Figure 18 Alarms display tag group configuration procedure See the following example of an Alarms Group Display. Release E 1/01 UMC800 Control Builder User’s Guide 101 Control Strategy Configuration How to Configure Display Tag Groups Example of alarm group display The position reference on the “Selected Tags" field of the dialog box shows how the tags map to positions on the operator interface display. ALARM GROUP 1 11:30 TAG5678 STATE1 TAG5678 STATE2 TAG5678 STATE2 TAG5678 STATE1 TAG5678 STATE1 C TAG5678 STATE1 TAG5678 STATE1 TAG5678 STATE1 TAG5678 STATE1 TAG5678 STATE1 TAG5678 STATE1 TAG5678 STATE1 Alarm Group Display 102 UMC800 Control Builder User’s Guide Release E 1/01 Control Strategy Configuration How to Configure Display Tag Groups Panel meter display tag groups Description This selection lets you configure 10 groups of Panel Meter Displays. Each group may contain a mix of analog signal tags, digital signal tags, analog variables, and digital variables. After you have completed all the group configurations you can select the groups and formats to be displayed and assign them to a specific operator panel display button. [Refer to O/I Display Buttons (1-8) Configuration (page 126).] Configuration procedure Follow the procedure in Figure 19 configure the “Panel Meter” Display Tags Group. 2. Select a group from the drop-down menu 1. Select the “Panel Meter” tab 7. The selected Tag Name will be placed in the “Selected Tag” field 3. Enter the Group Title. (any mix of numbers letters and spaces) Repeat selection for up to 12 tags for each group To delete a selected tag, click on the position of the tag, then click “Delete” bar. 6. 4. Select which tags you want displayed in the “Selected Tags” list Select the types of signals to be displayed from the drop-down menu. To ADD a tag, see Note 1 After all tags are selected and positioned, click “OK”. To INSERT a tag, see Note 2 5.Select a signal in the signal tag list Note 1 To Add a signal tag: Click on ADD. The selected Signal tag or variable will be placed in the next available position in the “Selected Tags” field. Note 2 To Insert a signal/variable tag: Select a position in the “Selected Tags” field, then click on INSERT. The selected Signal tag or variable will be placed in the position chosen, and other signal tags will move down as required. You may only insert to the occupied portion of the list. An attempt to insert to any empty box will place the new item in the first empty box. Figure 19 Panel meter display tag group configuration procedure See the following example of a Panel Meter Group Display. Release E 1/01 UMC800 Control Builder User’s Guide 103 Control Strategy Configuration How to Configure Display Tag Groups Example of panel meter group display The position reference on the “Selected Tags" field of the dialog box shows how the tag positions map to positions on the display. PANEL METER TITLE TAG45678 STATE1 TAG45678 1234.56 TAG45678 STATE2 TAG45678 TAG45678 1234.56 STATE2 TAG45678 1234.56 TAG45678 STATE2 TAG45678 STATE1 TAG45678 1234.56 TAG45678 STATE1 TAG45678 1234.56 TAG45678 1234.56 Panel Meter Group Display 104 UMC800 Control Builder User’s Guide Release E 1/01 Control Strategy Configuration How to Configure Display Tag Groups Trend group displays Description Trend graph displays provide traditional value versus time plots in horizontal or vertical orientation. Up to six Analog or Digital signal tags can be included on each trend display. This selection lets you configure 4 groups of Trend Displays. Each group may contain a mix of analog signal tags and digital signal tags. ATTENTION Displaying Trend Points Logarithmically If you want trends displayed logarithmically, make sure that the first signal tag selected has the decimal place setting of 127 (Exponential notation – See “How to Enter Signal Tags” – page 93). The Trend display will then display all the trends logarithmically. After you have completed all the group configurations you can select the groups and formats to be displayed and assign them to a specific operator panel display button. [Refer to O/I Display Buttons (1-8) Configuration (page 126).] Configuration procedure Follow the procedure in Figure 20 configure the “Trend” Display Tags Group. 2. Select a group from the drop-down menu 10.Repeat selection for up to 6 tags for each group 1. Select the “Trend” tab To delete a selected tag, click on the position of the tag, then click “Delete” bar. After all tags are selected and positioned, click “ OK”. 3. Enter the Group Title. (any mix of numbers letters and spaces) 9. Select a Time Base for the Trend Display from the drop-down menu. 4. Select which signals you want displayed in the “Selected Tags” list Select the types of signals to be displayed from the drop-down menu. 6. To ADD a tag, see Note 1 To INSERT a tag, see Note 2 7. The selected Signal Tag will be placed in the “Selected Tag Signal” field 5.Select a signal in the signal tag list Note 1 To Add a signal tag: Click on ADD. The selected Signal tag or variable will be placed in the next available position in the “Selected Tags” field. 8. Enter the “Scale Low” and “Scale High” values for each signal selected. Note 2 To Insert a signal/variable tag: Select a position in the “Selected Tags” field, then click on INSERT. The selected Signal tag or variable will be placed in the position chosen, and other signal tags will move down as required. You may only insert to the occupied portion of the list. An attempt to insert to any empty box will place the new item in the first empty box. Figure 20 Trend display tag group configuration procedure See the following example of a Trend Group Display. Release E 1/01 UMC800 Control Builder User’s Guide 105 Control Strategy Configuration How to Configure Display Tag Groups Example of trend group display The order on the “Selected Tag List” is not significant because the display banner rotates through all selected tags in the group. AI2 2200.00 DEGF 1500.0 2500.0 10:30 10:20 10:10 10:00 09:50 09:40 Vertical Trend Screen OR 2500.0 DEGF 07:35 07:55 08:15 POINT1 123456.7 POINT2 123456.7 POINT3 123456.7 POINT4 123456.7 POINT5 123456.7 POINT6 123456.7 TEMP 7 2261.50 DEGF 1500.0 Trend w/Digital Display OR AI2 2200.00 DEGF 2500.0 07:35 07:55 08:15 A TEMP 1 HIGH Vertical Trend with Horizontal bars OR AI2 2200.00 DEGF 1500.0 2500.0 07:35 07:55 08:15 08:35 Trend w/Bar Graphs Display 1500.0 Horizontal Trend Screen OR 106 UMC800 Control Builder User’s Guide Release E 1/01 Control Strategy Configuration How to Configure Display Tag Groups Bar display tag groups Description Bar Graph displays provide graphic representation of multiple analog or digital signal tags using horizontal or vertical orientation. Bar Graph displays are available in 3-point or 6-point vertical or horizontal format. This selection lets you configure 4 groups of Bar Displays. Each group may contain a mix of analog signal tags and digital signal tags. After you have completed all the group configurations you can select the groups to be displayed and assign them to a specific operator panel display button. [Refer to O/I Display Buttons (1-8) Configuration (page 126).] Configuration procedure Follow the procedure in Figure 21 configure the “Bar” Display Tags Group. 2. Select a group from the drop-down menu 1. Select the “Bar” tab 9.Repeat selection for up to 6 tags for each group 3. Enter the Group Title. (any mix of numbers letters and spaces) To delete a selected tag, click on the position of the tag, then click “Delete” bar. After all tags are selected and positioned, click “OK”. 4. Select which signals you want displayed in the “Selected Tags” list Select the types of signals to be displayed from the drop-down menu. 6. To ADD a tag, see Note 1 To INSERT a tag, see Note 2 5.Select a signal in the signal tag list Note 1 To Add a signal tag: Click on ADD. The selected Signal tag or variable will be placed in the next available position in the “Selected Tags” field. 7. The selected Signal Tag will be placed in the “Selected Tag Signal” field 8. Enter the “Scale Low” and “Scale High” values for each signal selected. Note 2 To Insert a signal/variable tag: Select a position in the “Selected Tags” field, then click on INSERT. The selected Signal tag or variable will be placed in the position chosen, and other signal tags will move down as required. You may only insert to the occupied portion of the list. An attempt to insert to any empty box will place the new item in the first empty box. Figure 21 Bar display tag group configuration procedure See the following example of a Bar Group Display. Release E 1/01 UMC800 Control Builder User’s Guide 107 Control Strategy Configuration How to Configure Display Tag Groups Example of bar group display The position reference on the “Selected Tags" field of the dialog box shows how the tags map to positions on the display. TEMP 1 2205.00 DEGF 1500.0 MAY06 11:30 2500.0 2205.00 2205.00 2205.00 2205.00 2205.00 2205.00 6-Point Horizontal Bar Screen OR TEMP 1 TEMP 2 TEMP 3 2500.0 2500.0 2500.0 1500.0 1500.0 1500.0 2205.00 DEGF 2205.00 DEGF 2205.00 DEGF 3-Point Vertical Bar Screen 108 UMC800 Control Builder User’s Guide Release E 1/01 Control Strategy Configuration How to Configure Display Tag Groups Overview display tag groups Description An Overview display will present the current status/state for up to 12 analog or digital tagged points. The display allows operator entry of values via assigned analog and digital variables. This selection lets you configure 20 groups of Overview Displays. Each group may contain a mix of analog signal tags, digital signal tags, analog variables, and digital variables for monitor only and/or operator entries. Analog entries for variables have range limits and digital variables may be turned on or off (via corresponding label).. Analog and digital variables listed on overview displays may be adjusted by the user while in operation. Configure entry limits for analog variables. Use entry limits for analog variables. Use entry limits of 0 (low) and 1 (high) for digital limits. After you have completed all the group configurations you can select the groups and formats to be displayed and assign them to a specific operator panel display button. [Refer to O/I Display Buttons (1-8) Configuration (page 126).] Configuration procedure Follow the procedure in Figure 22 to configure the “Overview” Display Tags Group. 2. Select a group from the drop-down menu (20 Groups maximum) 1. Select the “Overview” tab 8.Repeat selection for up to 12 tag names for each group To delete a selected tag name, click on the position of the tag name, then click “Delete” bar. 3. Enter the Group Title. (any mix of numbers letters and spaces) After all tag names are selected and positioned, click “OK”. 4. Select which signals you want displayed in the “Selected Tags” field Select the types of signals to be displayed from the Pull-down menu. 6. To ADD a tag, see Note 1 To INSERT a tag, see Note 2 7. The selected Tag name will be placed in the “Selected Tag” field. Enter min and max display limits in the appropriate column. 5.Select a signal in the signal tag list Note 1 To Add a signal tag: Click on ADD. The selected Signal tag or variable will be placed in the next available position in the “Selected Tags” field. Note 2 To Insert a signal/variable tag: Select a position in the “Selected Tags” field, then click on INSERT. The selected Signal tag or variable will be placed in the position chosen, and other signal tags will move down as required. You may only insert to the occupied portion of the list. An attempt to insert to any empty box will place the new item in the first empty box. Figure 22 Overview display tag group configuration procedure See the following example of an Overview Group Display. Release E 1/01 UMC800 Control Builder User’s Guide 109 Control Strategy Configuration How to Configure Display Tag Groups Example of overview group display The position reference on the “Selected Tags" field of the dialog box shows how the tags map to positions on the display. OVERVIEW GROUP 1 TAGNAME1 TAGNAME2 TAGNAME3 TAGNAME4 TAGNAME5 TAGNAME6 TAGNAME7 TAGNAME8 TAGNAME9 TAGNAME10 TAGNAME11 TAGNAME12 0.00 DEGF 1000.00 DEGF 0.00 DEGF ON OFF 0.00 DEGF 0.00 DEGF 0.00 DEGF 0.00 DEGF 0.00 DEGF 0.00 DEGF 0.00 DEGF Overview Group Display 110 UMC800 Control Builder User’s Guide Release E 1/01 Control Strategy Configuration How to Configure Display Tag Groups Single point (rotating) panel displays Description Single Point Panel displays provide a single point alphanumeric readout that consists of the tag and current value. The display sequences through a list of up to 12 analog or digital signals. This selection lets you configure 2 groups of Single Point (Rotating) Panel Displays. Each group may contain a mix of analog signal tags, digital signal tags, analog variables, and digital variables. After you have completed all the group configurations you can select the groups to be displayed and assign them to a specific operator panel display button. [Refer to O/I Display Buttons (1-8) Configuration (page 126).] Configuration procedure Follow the procedure in Figure 23 to configure the “Single Point Panel” Display Tags Group. 2. Select a group from the pull-down menu 1. Select the “Single Point” tab 8.Repeat selection for up to 12 tag names for each group To delete a selected tag name, click on the position of the tag name, then click “Delete” bar. 3. Enter the Group Title. (any mix of numbers letters and spaces) After all tag names are selected and positioned, click “OK”. 4. Select which signals you want displayed in the “Selected Tags” field Select the types of signals to be displayed from the Pull-down menu. 6. 7. The selected Tag name will be placed in the “Selected Tag” field. To ADD a tag, see Note 1 To INSERT a tag, see Note 2 5.Select a signal in the signal tag list Note 1 To Add a signal tag: Click on ADD. The selected Signal tag or variable will be placed in the next available position in the “Selected Tags” field. Note 2 To Insert a signal/variable tag: Select a position in the “Selected Tags” field, then click on INSERT. The selected Signal tag or variable will be placed in the position chosen, and other signal tags will move down as required. You may only insert to the occupied portion of the list. An attempt to insert to any empty box will place the new item in the first empty box. Figure 23 Single point panel display tag group configuration procedure See the following example of a Single Point Panel Group Display. Release E 1/01 UMC800 Control Builder User’s Guide 111 Control Strategy Configuration How to Configure Display Tag Groups Example of single point panel group display The order on the “Selected Tag List” is not significant because the display banner rotates through all selected tags in the group. TIC101 TIC101 1500.0 DEGF Single Point (Rotating) Panel Display 112 UMC800 Control Builder User’s Guide Release E 1/01 Control Strategy Configuration How to Configure Display Tag Groups Multi-point panel display tag groups Description Multi-Point Panel displays present the current value/state for up to seven Analog or Digital signal tags in the controller. This selection lets you configure 4 groups of Multi-Point Panel Displays. Each group may contain a mix of analog signal tags, digital signal tags, analog variables, and digital variables. After you have completed all the group configurations you can select the groups and formats to be displayed and assign them to a specific operator panel display button. [Refer to O/I Display Buttons (1-8) Configuration (page 126).] Configuration procedure Follow the procedure in Figure 24 to configure the “Multi-Point Panel” Display Tags Group. 2. Select a group from the drop-down menu 1. Select the “Multi-Point” tab 8.Repeat selection for up to 7 tag names for each group To delete a selected tag name, click on the position of the tag name, then click “Delete” bar. 3. Enter the Group Title. (any mix of numbers letters and spaces) After all tag names are selected and positioned, click “OK”. 4. Select which signals you want displayed in the “Selected Tags” field. Select the types of signals to be displayed from the drop down menu. 6. 7. The selected Signal Tag name will be placed in the “Selected Tag” field. To ADD a tag, see Note 1 To INSERT a tag, see Note 2 5.Select a signal in the signal tag list Note 1 To Add a signal tag: Click on ADD. The selected Signal tag or variable will be placed in the next available position in the “Selected Tags” field. Note 2 To Insert a signal/variable tag: Select a position in the “Selected Tags” field, then click on INSERT. The selected Signal tag or variable will be placed in the position chosen, and other signal tags will move down as required. You may only insert to the occupied portion of the list. An attempt to insert to any empty box will place the new item in the first empty box. Figure 24 Multi-point panel display tag group configuration procedure See the following example of a Multi-Point Panel Group Display. Release E 1/01 UMC800 Control Builder User’s Guide 113 Control Strategy Configuration How to Configure Display Tag Groups Example of multi-point panel group display The position reference on the “Selected Tags" field of the dialog box shows how the tags map to positions on the display. PANEL GROUP 1 TAGNAME1 TAGNAME2 TAGNAME3 TAGNAME4 TAGNAME5 TAGNAME6 TAGNAME7 2205.0 2000.0 ON 11:30 DEGF DEGF 205.0 DEGF OFF 83.5 DEGF ON Multi-Point Panel Screen 4-POINT PANEL TITLE INTRUSN ON ZONE 1 205.00 DEGF TEMP 2 134.4 DEGC ZONE 2 456.2 DEGF 4-Point panel display 114 UMC800 Control Builder User’s Guide Release E 1/01 Control Strategy Configuration Tag Order Tag Order Introduction Each time you configure a Loop (PID, CARB, ONOFF, TPSC, or AMB), SP Programmer (SPP), SP Scheduler (SPS), Hands/Off/Auto Switch (HOA), or a Device Control (DC) function block, you will have assigned a unique Tag Name to the block. The example shows a PID Function block. Loop Tag Name Assigned This selection lets you arrange up to 16 Tags to determine the tag order in various displays on the operator interface. The order in which they appear in this box can be changed to coincide with the order in which you want them to be displayed. Configuring the display tag order Follow the procedure in Figure 25 to access a particular tag order group and arrange the order, in which you want them displayed, in the “Tag Order” dialog box. From the “Configure” menu, select “Tag Order” Click and hold on any Tag on the list and move it (e.g., drag it) ahead or back in the order. You can re-arrange the tag order to suit your display requirements. The “Tag Order” dialog box will appear. From the “Tag Order” submenu, make selection Figure 25 Configuring the tag order To assign Tags to Display Buttons, refer to OI Display Buttons (1-8) Configuration (page 126). Release E 1/01 UMC800 Control Builder User’s Guide 115 Control Strategy Configuration Startup and Message Display Configuration Startup and Message Display Configuration Startup display configuration Description This selection lets you enter Title Text and Comment Text for your start up display. The “Startup Display” is the first screen displayed following start up and is not associated with any display button. Configuring the startup display Follow the procedure in Figure 29 to configure the Startup Display. 1.Enter the Title Text. Select “Startup Display” from the “Configure” menu. The “Startup Display” dialog box will appear. 2.Enter the Comment Text. 3. Press OK. Figure 29 Configuring the startup display Example of a startup display YOUR NAME HERE SUPPORTING TEXT LINE 1 SUPPORTING TEXT LINE 2 SUPPORTING TEXT LINE 3 SUPPORTING TEXT LINE 4 Startup Display 116 UMC800 Control Builder User’s Guide Release E 1/01 Control Strategy Configuration Startup and Message Display Configuration Message display configuration Description This selection lets you configure 10 pages of Message Displays. Configuring the message display Follow the procedure in Figure 30 to configure the Startup Display. 1. Select a page from 1 to 10. Select “Message Display” from the “Configure” menu. The “Page Configuration Selection” dialog box will appear. 2. Click “Configure Page”. Page 4 selected 1.Enter the Title Text. The Main “Message Display Configuration” dialog box will open and show the page selected at the top of the dialog box. 2.Enter the Message Text. 3. Press OK. Figure 30 Configuring the message display Release E 1/01 UMC800 Control Builder User’s Guide 117 Control Strategy Configuration Startup and Message Display Configuration Example of a message display MESSAGES PAGE 1 Title Text Message Text Start-up Notes: Use recipe #1 after shutdown. Change set point to 450. Shut off pump #1. Turn on water valve. Reset limit control. Verify water level on tank #1. Text Messages Screen To assign Message Pages to Display Buttons, refer to O/I Display Buttons (1-8) Configuration (page 126). 118 UMC800 Control Builder User’s Guide Release E 1/01 Control Strategy Configuration Setpoint Scheduler Display Configuration Setpoint Scheduler Display Configuration Description An operator can interact with the configured Setpoint Schedules through the Setpoint Program Operate display at the operator interface. Eight character labels and four character engineering units are provided for each process variable of the master and auxiliary setpoint blocks. Labels and on/off descriptions are also provided for the Digital Event block. Assigning these labels first will aid you in the schedule configuration process. These labels will appear in the configuration dialog boxes. Accessing the setpoint scheduler display configuration tabs Follow the procedure in Figure 31 to access and arrange the “Setpoint Scheduler Display” configuration dialog box. Select “Setpoint Scheduler Display” from the “Configure” menu. There are 3 tabs at the top of the dialog box. Each tab represents setpoint scheduler display label ‘set up’ starting with the Main Output Labels. The “Setpoint Scheduler Display Configuration” dialog box will appear. Select a tab for configuring the Setpoint Scheduler Displays. Figure 31 Configuring the setpoint scheduler display Release E 1/01 UMC800 Control Builder User’s Guide 119 Control Strategy Configuration Setpoint Scheduler Display Configuration Main output label configuration The “Main Output Labels” lets you set up labels for Main Outputs in the Setpoint Schedule to be displayed on the Operator Interface. Figure 32 shows you the “Main Output Label” dialog box and entry fields and an example of a Setpoint Schedule Operate Display. Enter Label title. LABEL123 SCHED 10 SPTAG1 STATE SEG RUN # 2 11:30 RECYCLES REMAIN 100 F1 RUN SEG REM 0000:00:00 TOTL 0000:00:00 Enter Decimal Places. Enter Engineering Units for the setpoint. SP SP1 SPLABEL1 1234567.8 SP2 SPLABEL2 1234567.8 SP3 SPLABEL3 1234567.8 SP4 SPLABEL4 1234567.8 SP5 SPLABEL5 1234567.8 SP6 SPLABEL6 1234567.8 SP7 SPLABEL7 1234567.8 SP8 SPLABEL8 1234567.8 PV 1234567.8 1234567.8 1234567.8 1234567.8 1234567.8 1234567.8 1234567.8 1234567.8 F2 HOLD ENGU ENGU ENGU F3 ENGU RESET ENGU ENGU F4 ENGU ENGU ADV LOAD MORE COMMANDS Figure 32 Main output label dialog box and screen example 120 UMC800 Control Builder User’s Guide Release E 1/01 Control Strategy Configuration Setpoint Scheduler Display Configuration Auxiliary output label configuration The “Auxiliary Output Labels” lets you set up labels for Auxiliary Outputs in the Setpoint Schedule to be displayed on the Operator Interface. Figure 33 shows you the “Auxiliary Output Label” dialog box and entry fields and an example of a Setpoint Schedule View Aux. Display. LABEL123 SCHED 10 SPTAG1 Enter Label title. STATE SEG RUN # 2 11:30 RECYCLES REMAIN 100 F1 RUN SEG REM 0000:00:00 TOTL 0000:00:00 Enter Decimal Places. Enter Engineering Units for the Aux setpoint. SP AX1 AXLABEL1 1234567.8 AX2 AXLABEL2 1234567.8 AX3 AXLABEL3 1234567.8 AX4 AXLABEL4 1234567.8 AX5 AXLABEL5 1234567.8 AX6 AXLABEL6 1234567.8 AX7 AXLABEL7 1234567.8 AX8 AXLABEL8 1234567.8 PV 1234567.8 1234567.8 1234567.8 1234567.8 1234567.8 1234567.8 1234567.8 1234567.8 F2 HOLD ENGU ENGU ENGU F3 ENGU RESET ENGU ENGU F4 ENGU ENGU ADV LOAD MORE COMMANDS Figure 33 Auxiliary output label dialog box and screen example Release E 1/01 UMC800 Control Builder User’s Guide 121 Control Strategy Configuration Setpoint Scheduler Display Configuration Event label configuration The “Event Labels” lets you set up labels for Events in the Setpoint Schedule to be displayed on the Operator Interface. Figure 34 shows you the “Event Label” dialog box and entry fields and an example of a Setpoint Schedule Operate Display. LABEL123 SCHED 10 SPTAG1 STATE SEG RUN # 2 11:30 RECYCLES REMAIN 100 SEG REM 0000:00:00 TOTL 0000:00:00 Enter a Label title in each field. EV1 EVENT111 EV2 EVENT222 EV3 EVENT333 EV4 EVENT444 EV5 EVENT555 EV6 EVENT666 EV7 EVENT777 EV8 EVENT888 OFF OFF OFF OFF OFF OFF OFF OFF EV9 EVENT999 EV10 EVENT123 EV11 EVENT456 EV12 EVENT789 EV13 EVENT234 EV14 EVENT567 EV15 EVENT890 EV16 EVENT345 OFF OFF OFF OFF OFF OFF OFF OFF Figure 34 Event label dialog box and screen example 122 UMC800 Control Builder User’s Guide Release E 1/01 Control Strategy Configuration Operator Pushbutton/Selector Switch/Data Entries Configuration Operator Pushbutton/Selector Switch/Data Entries Configuration Introduction There are two types of displays that may be used for operator actions to replace panel pushbuttons or selector switches: • • the single action Push button switch display, and the Four Selector switch display. Each have corresponding function blocks for setup and interface to other blocks for creating the proper action. Pushbutton switch display setup Each Pushbutton display has 4 momentary (one-shot) pushbutton actions that can be applied to the F1 through F4 operator interface keys and each has the option for switch confirmation through an external input or internal status. You can use up to 4 of these display types for a total of 16 pushbutton actions to replace or augment normal panel pushbuttons and confirming status lamps or indicators. The single action Pushbutton switch display is for applications such as turning on/off pumps, aux heaters, or bypass solenoids, starting/stopping a particular process cycle or phase, selecting atmosphere, selecting an override condition, an auto/manual process action, etc. The setup of the Pushbutton display is associated with the Pushbutton function block and is not part of the Configure menu. Please refer to the Control Builder Function Block Reference Guide (51-52-25-64) for the procedure and examples of use. PUSHBUTTON TITLE TAG45678 FUNCTION DESCRIP F1 STATE1 TAG45678 FUNCTION DESCRIP F2 1234567 TAG45678 FUNCTION DESCRIP F3 STATE1 TAG45678 FUNCTION DESCRIP F4 STATE1 Pushbutton Function Block Pushbutton Function Group Screen Figure 35 Pushbutton function block and group screen Figure 36 Pushbutton function block diagram example Release E 1/01 UMC800 Control Builder User’s Guide 123 Control Strategy Configuration Operator Pushbutton/Selector Switch/Data Entries Configuration Four selector switch display setup The Four Selector display emulates a multi-position selector or multiple-pushbutton switch action for up to 4 separate switches. Pressing any of the F1 through F4 keys while the display is active will call up a pop-up window showing an associated group of four digital outputs, any one of which can be turned ON continuously while all others are turned OFF. The label of the selected operator action will be displayed on the operator screen for the associated switch position status. This will allow operator selection of only one of multiple states for a process (any of up to 4 states per button). Examples include (RUN, IDLE, STOP), (AUTO, MAN, OVERRIDE), (OFF, FILL, HEAT, EMPTY), (NORMAL, BYPASS), etc. The setup of the Four Position display is associated with the Four Selector function block and is not part of the Configure menu. You may use 4 of these display types for a total of 16 selector switch actions. Please refer to the Control Builder Function Block Reference Guide (51-52-25-64) for the procedure and examples of use. DIGITAL GROUP TITLE Four Selector Switch Function Block 124 FUNCTION DESCRIP STATE3 FUNCTION DESCRIP STATE1 FUNCTION DESCRIP STATE4 FUNCTION DESCRIP STATE2 F1 F2 F3 F4 4-Selector Switch Display UMC800 Control Builder User’s Guide Release E 1/01 Control Strategy Configuration How to Configure Start Up Conditions for Controller Initialization Overview displays for read/write actions setup The Overview displays may have a combination of up to 12 Signal Tags (for monitoring or read-only) and Analog or Digital Variables on each display (up to 20 displays can be configured), in any combination. The assignment of Variables to these screens allows the operator to directly enter on-line changes for the analog Variables or selection of an ON or OFF status for Digital Variables. These overview displays allow the user to customize the operator interface for monitoring only, or for operator entries. They may also supplement the push button screens for digital actions although an ON or OFF selection is continuous, not momentary. For example: • Recipe variables may be listed (changed on-line at this display for the current process only or with security applied) and can be loaded through recipe selection [via the Recipe display assigned to one of the Display Buttons (1-8)] but shown on an Overview display • A list of only alarm setpoints may be created • An operator parameter entry display for biases, auxiliary setpoints or controller setpoints, etc. may be set up as a list • A series of process on-off digital actions, such as turning on auxiliary pumps or heaters, may be on one screen, etc. Any of the above may be combined with read-only Signal Tags (analog or digital values) on the display. For the setup of the Overview display, refer to Overview display tag groups (page 109). How to Configure Start Up Conditions for Controller Initialization See Appendix D – Controller Initialization for a description of default conditions for Variables, function block outputs, recipes, profiles after a configuration download. This section describes methods of automatically loading values into analog or digital Variables plus an example of creating a momentary oneshot digital status after a download. Release E 1/01 UMC800 Control Builder User’s Guide 125 Control Strategy Configuration O/I Display Buttons (1-8) Configuration O/I Display Buttons (1-8) Configuration Description This function lets you customize display access by assigning specific display screens to the operator interface keyboard keys (1-8). Each of the eight screen-access buttons on the operator interface supports a sequence of up to ten screens. Screens assigned to these buttons may be Monitor screens (view data only) or Operate screens (take actions). The type of screen and the data presented on the screen is defined during configuration. 1 2 3 4 5 Screen 1 Screen 1 Screen 1 Screen 1 Screen 1 Screen 2 Screen 2 Screen 2 Screen 2 Screen 10 Screen 10 Screen 10 Screen 10 6 7 8 Screen 1 Screen 1 Screen 1 Screen 2 Screen 2 Screen 2 Screen 2 Screen 10 Screen 10 Screen 10 Screen 10 Each screen display format is selected from a list of available formats and applied to a display group that has been set up for any of the display configuration selections in the “Configure” menu, “Display Tag Groups”. You can also assign “Message Displays” on the “Configure” menu to a Display Screen Button. NOTE: Not all models have 8 Operator Interface keyboard keys. Accessing the display button configuration tabs Follow the procedure in Figure 37 to access the “Display Button Configuration” dialog box. There are 8 button tabs at the top of the dialog box. Each tab represents one Screen Button Display ‘set up’ starting with Display Button #1 as noted in the box at the top of the dialog box. Select “OI Display Buttons” from the “Configure” menu. The “Display Button Configuration” dialog box will appear. Select a Button Tab for Configuration. Figure 37 Accessing the display button configuration tabs 126 UMC800 Control Builder User’s Guide Release E 1/01 Control Strategy Configuration O/I Display Buttons (1-8) Configuration Configuration procedure Follow the procedure in Figure 38 to configure the “Display Buttons”. For examples of display format types, refer to Table 29. 1. Select a BUTTON tab at the top of the page 6. Select the next BUTTON tab at the top of the page to configure another button and repeat the procedure 2. Select a display format type. The format selected will determine what will be shown in the "Group/Tags" field below the Display Format Selection box. 5. To DELETE a page, click on position (#) in the "Selected Display Formats" list and click on the "Delete" button 3. A list of configured groups/tags and their titles will appear in the "Group/Tags" selection window on the tab card. (See Note 1) 4. To ADD a Group/Tag See Note 2. To INSERT a Group/Tag See Note 3. NOTE 1 : The MULTI-LOOP FACEPLATE and MULTI-PROG OPERATE selections give you several format choices based on the TAG ORDER that was set up during configuration. NOTE 2 : To ADD - click on a group/tag number from the " Gr/Tag" list and click "ADD". The selection will be added to the "Selected Display Formats” list in the next available Screen location # (1 to 10). The "Selected Screen Formats" list identifies: - the position (#) of the display screen (from 1 to 10) - The display format selected for that position - the group/tag selected for display NOTE 3 : To INSERT - Click on a page in the "Group Page" list and then select a screen position (# in the first column) from the "Selected Screen Formats" list. That Page will be inserted into the screen position that was selected and indicate the format selected. Other entries will shift down as required. Figure 38 Configuring display buttons Release E 1/01 UMC800 Control Builder User’s Guide 127 Control Strategy Configuration O/I Display Buttons (1-8) Configuration Display button configuration and tag order example During “Display Button Configuration”, when you select a format, for example: “Multi-Loop Faceplate”, there will be many format selections from which to choose. The example in is a “Display Button Configuration” dialog box for LOOPS. Choose Multiloop faceplate Only first 3 tags listed in the “Tag Order” list box will appear in the display Choose 3Loop Faceplate(1-3). Click “ADD” to enter in “Selected Display Formats” field LOOPTAG1 2500.0 LOOPTAG2 2500.0 LOOPTAG3 2500.0 1500.0 1500.0 1500.0 PV 2205.0 SP 2000.0 OUT 83.5 PV 2205.0 SP 2000.0 OUT 83.5 PV 2205.0 SP 2000.0 OUT 83.5 AUTO LSP AUTO RSP MAN LSP 3-Loop Faceplate Screen Figure 39 Display button configuration example for Loops Each Tag Order “Type” will have its own display format types. For examples of display format types, refer to Table 29. 128 UMC800 Control Builder User’s Guide Release E 1/01 Control Strategy Configuration O/I Display Buttons (1-8) Configuration Display format types Table 29 gives examples of Displays accessible by the OI Display buttons (1-8). Table 29 Displays accessible by the OI Display buttons (1-8) LOOP SUMMARY MODE LOOPTAG1 LOOPTAG2 LOOPTAG3 LOOPTAG4 LOOPTAG5 LOOPTAG6 LOOPTAG7 LOOPTAG8 PV MAN LSP 1234567 AUTO RSP 2000. AUTO LSP 2000. 2000. AUTO RSP AUTO RSP 2000. AUTO LSP 2000. MAN LSP 2000. MAN L SP 2000. 11:30 SP OUT 1234567 100. 2000. 50. 2000. 50. 2000. 50. 2000. 50. 2000. 50. 2000. 50. 2000. 50. LOOPTAG1 LOOPTAG2 LOOPTAG3 LOOPTAG4 PV SP OUT 2500.0 2500.0 2500.0 2500.0 1500.0 1500.0 1500.0 1500.0 2205.0 2000.0 83.5 2205.0 2000.0 83.5 2205.0 2000.0 83.5 2205.0 2000.0 83.5 MAN LSP MAN LSP MAN LSP MAN LSP LOOPTAG2 2500.0 LOOPTAG2 LOOPTAG3 2500.0 2500.0 2500.0 1500.0 1500.0 1500.0 PV 2205.0 SP 2000.0 OUT 83.5 PV 2205.0 SP 2000.0 OUT 83.5 PV 2205.0 SP 2000.0 OUT 83.5 AUTO LSP AUTO RSP MAN LSP 4-Loop Faceplate Screen 8-Loop Summary Screen LOOPTAG1 LOOPTAG1 2500.0 2500.0 3-Loop Faceplate Screen LOOPTAG1 AUTO LSP TUNE LOOPTAG1 AUTO RSP TUNE ENGU MAY06 11:30 2500.0 07:35 AL1 AL2 07:55 08:15 PV 2205.0 ENGU 1500.0 1500.0 PV 2205.0 SP 2000.0 OUT 83.5 PV 2205.0 SP 2000.0 OUT 83.5 AUTO RSP MAN LSP SP OUT STATE PROF SEG RAMP RUN # 3 # 2 PV SP PRIMARY AUXLABEL ENGU ENGU 1450.0 1449.0 31.0 31.1 SEG TIME REM 01:30:00 PGM ELAPSED TIME 00:00:00 83.5 1500.0 % PV OUT 1500.0 2-Loop Faceplate Screen SP PROGRAMMER SPTAG1 LABEL678 2000.0 Single Loop Numeric Display 11:30 F1 RUN F2 HOLD F3 RESET F4 ADV LOAD MORE COMMANDS SPP Operate Display (1 Prog’r) LABEL123 SCHED 10 SPTAG1 STATE SEG RUN # 2 PV 1234567.8 1234567.8 1234567.8 1234567.8 1234567.8 1234567.8 1234567.8 1234567.8 2000.0 205.0 RECIPE LOAD PAGE 1 F1 RUN SEG REM 0000:00:00 TOTL 0000:00:00 SP SP1 SPLABEL1 1234567.8 SP2 SPLABEL2 1234567.8 SP3 SPLABEL3 1234567.8 SP4 SPLABEL4 1234567.8 SP5 SPLABEL5 1234567.8 SP6 SPLABEL6 1234567.8 SP7 SPLABEL7 1234567.8 SP8 SPLABEL8 1234567.8 SP DEV Single Loop Faceplate w/Loop Trend Screen 11:30 RECYCLES REMAIN 100 2205.0 83.5 F2 ENGU HOLD ENGU ENGU F3 ENGU RESET ENGU ENGU F4 ENGU ENGU ADV LOAD MORE COMMANDS RECIPE 1 RECIPE 2 RECIPE 3 RECIPE 4 LOAD RECIPE 5 CANCEL RECIPE 6 RECIPE 7 RECIPE 8 RECIPE 9 RECIPE 10 RECIPE 11 RECNAM01 RECNAM02 RECNAM03 RECNAM04 RECNAM05 RECNAM06 RECNAM07 RECNAM08 RECNAM09 RECNAM10 RECNAM11 Recipe Load Screen SPS Operate Display Release E 1/01 UMC800 Control Builder User’s Guide 129 Control Strategy Configuration O/I Display Buttons (1-8) Configuration AI2 2200.00 DEGF 1500.0 AI2 2200.00 10:30 2500.0 DEGF DEGF 2500.0 07:35 2500.0 07:35 07:55 08:15 07:55 08:15 POINT1 123456.7 POINT2 123456.7 POINT3 123456.7 POINT4 123456.7 POINT5 123456.7 POINT6 123456.7 08:35 10:20 10:10 10:00 09:50 09:40 1500.0 Vertical Trend Screen TEMP 1 2205.00 DEGF MAY06 11:30 1500.0 2500.0 2500.0 2500.0 Trend w/Digital Display Horizontal Trend Screen TEMP 1 2205.00 DEGF 2500.0 1500.0 2500.0 MAY06 11:30 TEMP 1 TEMP 2 TEMP 3 2500.0 2205.00 2500.0 2500.0 2500.0 2500.0 1500.0 1500.0 1500.0 2205.00 2205.00 2205.00 1500.0 1500.0 1500.0 1500.0 1500.0 2205.00 1500.0 2205.00 6-Point Horizontal Bar Screen 6-Point Vertical Bar Screen MAY06 11:30 TEMP 7 2261.50 DEGF TEMP 1 2205.00 DEGF 1500.0 2205.00 DEGF 2205.00 DEGF 2205.00 DEGF 3-Point Vertical Bar Screen AI2 2200.00 DEGF 2500.0 07:35 07:55 08:15 2500.0 TEMP 1 2205.00 DEGF 1500.0 2500.0 TEMP 1 2205.00 DEGF 1500.0 1500.0 3-Point Horizontal Trend Screen PANEL GROUP 1 TAGNAME1 TAGNAME2 TAGNAME3 TAGNAME4 TAGNAME5 TAGNAME6 TAGNAME7 2205.0 2000.0 ON Vertical Trend with Horizontal bars PANEL METER TITLE DEGF TAG45678 STATE1 DEGF TAG45678 TAG45678 1234.56 STATE2 TAG45678 1234.56 TAG45678 STATE2 TAG45678 STATE1 205.0 DEGF OFF 83.5 DEGF ON Multi-Point Panel Screen 130 A TEMP 1 HIGH 2500.0 TAG45678 1234.56 TAG45678 1234.56 TAG45678 STATE1 TAG45678 1234.56 TAG45678 STATE2 TAG45678 1234.56 Panel Meter Group Display UMC800 Control Builder User’s Guide Trend w/Bar Graphs Display 4-POINT PANEL TITLE INTRUSN ON ZONE 1 205.00 DEGF TEMP 2 134.4 DEGC ZONE 2 456.2 DEGF 4-Point panel display Release E 1/01 Control Strategy Configuration O/I Display Buttons (1-8) Configuration ALARM GROUP 1 TAGNAME TAGNAME 1500.0 DEGF TAG5678 STATE1 TAG5678 STATE2 TAG5678 STATE2 TAG45678 FUNCTION DESCRIP F1 STATE1 TAG5678 STATE1 TAG5678 STATE1 TAG5678 STATE1 TAG5678 STATE1 TAG45678 FUNCTION DESCRIP F3 STATE1 TAG5678 STATE1 TAG5678 STATE1 TAG5678 STATE1 FUNCTION DESCRIP STATE1 FUNCTION DESCRIP STATE4 FUNCTION DESCRIP STATE2 TAG45678 FUNCTION DESCRIP F2 1234567 TAG45678 FUNCTION DESCRIP F4 STATE1 Pushbutton Function Group Screen Alarm Group Display AUTO/MANUAL BIAS LOOPTAG1 AUTO DIGITAL GROUP TITLE STATE3 PUSHBUTTON TITLE TAG5678 STATE1 C TAG5678 STATE1 Single Point (Rotating) Panel Screen FUNCTION DESCRIP 11:30 F1 AL1 AL2 100.0 DEVICE CONTROL 100.0 DEVTAG1 READY 99999 SECS F1 F2 OUT 60.1 % DEVTAG2 DISABLED 99999 SECS F2 F3 PV 80.3 % DEVTAG3 RUNNING 99999 SECS F3 F4 BIAS 11.2 DEVTAG4 READY 99999 SECS F4 0.0 4-Selector Switch Display Auto/Manual Bias Display HAND/OFF/AUTO SWITCH DATA STORAGE SIGTAG_A STATE1 HOATAG1 AUTO F1 SIGTAG_B STATE8 HOATAG2 AUTO F2 SIGTAG_C STATE2 HOATAG3 HAND F3 SIGTAG_D STATE7 HOATAG4 OFF F4 0.0 VIEW STORAGE STATUS STORAGE CONTROLS INITIALIZE STORAGE DISK LOAD STORAGE SETTINGS VIEW STORAGE SETTINGS START NEW STORAGE SETTINGS STORE STORAGE SETTINGS Hand/Off/Auto switch display Device Control display OVERVIEW GROUP 1 TAGNAME1 TAGNAME2 TAGNAME3 TAGNAME4 TAGNAME5 TAGNAME6 TAGNAME7 TAGNAME8 TAGNAME9 TAGNAME10 TAGNAME11 TAGNAME12 11:30 0.00 DEGF 1000.00 DEGF 0.00 DEGF ON OFF 0.00 DEGF 0.00 DEGF 0.00 DEGF 0.00 DEGF 0.00 DEGF 0.00 DEGF 0.00 DEGF Overview Group Screen Data Storage Display MESSAGES PAGE 1 Start-up Notes: Use recipe #1 after shutdown. Change set point to 450. Shut off pump #1. Turn on water valve. Reset limit control. Verify water level on tank #1. Text Messages Screen Release E 1/01 UMC800 Control Builder User’s Guide 131 Control Strategy Configuration O/I Security Settings O/I Security Settings Introduction The Control Builder lets you configure, download, and upload security settings for the operator interface. The security configuration is divided into two areas: Operator Security and Engineer Security. Configuring security Follow the procedure in Figure 40 to configure the “OI Security Settings”. 2. Click here to enable the security settings selected. Each of the security features shown in the dialog box offers a different level of security. 1. Select “OI Settings”.from the “Configure” menu. The “Operator Interface Settings” dialog box will appear. 4. Set each security code. From 0 to 999 3. Click on a box to activate a selected security level. Figure 40 Configuring security Table 31 lists the displays and functions that are secured for each security level. 132 UMC800 Control Builder User’s Guide Release E 1/01 Control Strategy Configuration O/I Security Settings Set security details Table 30 lists all the features that appear on the “Operator Interface Settings" dialog box with a description of the security detail when the feature is selected. Table 30 Set security details Feature Description This is a master enabling switch. Click on box to enable security on any of the engineer or operator secured items that are also selected. If this is not selected, no engineer or operator secured items will be secured, even if they are selected. Enter a 3-digit NUMERIC code which will be used to secure items 3 through 8. 0 disables Operator Security. Click to secure access to setup items. Click off to allow unrestricted access. See Table 31 for affected items. Click to secure loop mode AUTO/MANUAL operation Click off to allow unrestricted access. See Table 31 for affected items. Click to secure changing between Local and Remote Setpoints. Click off to allow unrestricted access. See Table 31 for affected items. Click to secure access to disk utilities, data storage controls, and load data storage settings. Click off to allow unrestricted access. See Table 31 for affected items. Click to secure setpoint program operation. Click off to allow unrestricted access. See Table 31 for affected items. Click to secure recipe and variable operation. Click off to allow unrestricted access. See Table 31 for affected items Click to secure Log On/Off operation. Click off to allow unrestricted access. This is a higher level of security than the operator security code because it secures access to “off-line” functions such as calibration. Choose a 3-digit code which will be used to secure the item 10. 0 disables Engineering Security Click to secure the displays and menu items in Table 31 under SET UNIT. Click off to allow unrestricted access. Click to secure Edit Device Control and HOA EDIT displays. Click off to allow unrestricted access. Click to secure Edit Device Control and HOA operate display Edit menus. Click off to allow unrestricted access Release E 1/01 UMC800 Control Builder User’s Guide 133 Control Strategy Configuration O/I Security Settings Secured displays and functions Table 31 lists the displays and functions that are secured for each selection made on the “Operator Interface Settings” dialog box. Table 31 Displays and functions that can be secured ENG SEC CODE SET UNIT FB EDIT EDIT MENUS OPERATOR SECURITY CODE AUTO / MAN LSP / RSP SETUP SPP OPERATION RECIPE / VAR EDIT DISK UTIL/ DATA STORAGE LOG ON/ OFF UNIT SETUP* SET MODE X SET TIME & DATE X SET SECURITY X SET COMM A PORT X SET COMM B PORT X X FILE NAME SELECTION SELF-TESTS X CALIBRATE AI X CALIBRATE AO X SINGLE LOOP TREND DISPLAY X LOOP TUNING DISPLAY X LOOP TUNE CONSTANTS DISPLAY X LOOP CONTROL SETUP DISPLAY X SWITCH SP X CARBON LOOP SETUP DISPLAY X LOOP ALARM SETPTS DISPLAY X LOOP LIMITS DISPLAY X 8-LOOP SUMMARY DISPLAY X 4-LOOP FACEPLATE DISPLAY X 3-LOOP FACEPLATE DISPLAY X 2-LOOP FACEPLATE DISPLAY X SINGLE LOOP NUMERIC DISPLAY X A/M BIAS DISPLAY X 134 UMC800 Control Builder User’s Guide Release E 1/01 Control Strategy Configuration O/I Security Settings ENG SEC CODE SET UNIT FB EDIT EDIT MENUS OPERATOR SECURITY CODE AUTO / MAN LSP / RSP SETUP SPP OPERATION RECIPE / VAR EDIT DISK UTIL/ DATA STORAGE LOG ON/ OFF X LOOP CONTROL DISPLAY SWITCH SP X RECIPES* EDIT X LOAD X MAIN MENU LOOPS X SP PROGRAMMERS X SP SCHEDULER X DISK UTILITIES X DATA STORAGE* STORAGE CONTROLS X LOAD STORAGE SETTINGS X SINGLE SPP OPERATE DISPLAY OPERATE X X SETPOINT SCHEDULER OPERATE RECIPE LOAD DISPLAY X DEVICE CONTROL OPERATE DISPLAY X DEVICE CONTROL EDIT DISPLAY EDIT TIMERS X RESET FAILURE X HOA OPERATE DISPLAY X HOA EDIT DISPLAY HOA SOURCE SET STATE X X OVERVIEW DISPLAY X LOG ON/OFF Release E 1/01 UMC800 Control Builder User’s Guide 135 Control Strategy Configuration O/I File Names for Disk Storage O/I File Names for Disk Storage Introduction You can configure up to 25 file name roots (6-characters) for use by the operator interface in disk storage. The Operator Interface lets you choose a name root and append it with a 2-digit number. Then a 3-character extension is automatically added to create a filename for the disk storage functions. Please use DOS format File Names. Follow the procedure in Figure 41 to configure O/I File Names. The first four names listed in the dialog box are defaults and can be changed. Select “OI File Names” from the “Configure” menu. The “OI File Names” dialog box will appear. Click on a box and enter a file name. Figure 41 O/I file name configuration 136 UMC800 Control Builder User’s Guide Release E 1/01 Control Strategy Configuration How to Initiate a Configuration Print Out How to Initiate a Configuration Print Out Introduction You can initiate printouts of the configuration data for your hard copy records. The Control Builder lets you select the following information to be printed: • Block Diagram (Figure 42) • Block Parameters (Figure 43) • Tag Properties (Figure 44) Initiating a print out Step Action 1 Pull down the “File” menu and select “Print”. The “Print What” dialog box will appear. 2 Click on the radio button for the type of print out you want. See the examples in Figure 42, Figure 43, and Figure 44 for each type. 3 Release E 1/01 Click “OK”. This will launch the common Windows “Print” dialog box for printing. UMC800 Control Builder User’s Guide 137 Control Strategy Configuration How to Initiate a Configuration Print Out Typical block diagram printout Configuration Name Page 1 of 1 Figure 42 Typical block diagram printout ATTENTION You can change the configuration name in the upper left corner of each page by way of the description field of the “File Properties” dialog box. If the file description is blank, the control builder will use the file name for the configuration name. 138 UMC800 Control Builder User’s Guide Release E 1/01 Control Strategy Configuration How to Initiate a Configuration Print Out Typical control block configuration printout Block 1 Type Order I/O Module Channel Input Type Bias Filter Time (sec) Burnout Check Failsafe Type AI 1 1 1 J –50 150 C 2.00 2.00 ON Downscale Figure 43 Typical control block parameters printout Typical tag properties printout TAG NAME Block Number Type Description Engineering Units Decimal Places 3 PID Your Description NONE 0 Figure 44 Typical tag properties printout Release E 1/01 UMC800 Control Builder User’s Guide 139 Control Strategy Configuration How to Save a Function Block Diagram How to Save a Function Block Diagram Introduction One of the last stages of configuration is to save the entered configuration data. This includes Function Block configuration, Setpoint Program configuration (Setpoint Programming section), and Recipe configuration (Setpoint Scheduler section). Saving the configuration data Follow the procedure below to save the Function Block Diagram. Step 1 Action Select “SAVE” from the “FILE” menu. First time “SAVE” will invoke the standard “Save As” dialog box. Choose a file name and use file extension (.FBD), then click “OK”. 2 If there is no ASYS function block assigned to the diagram, the “Controller System Parameters” dialog box will appear. • Select 50 or 60 HZ, then click “OK”. 3 If there are no unconnected inputs that need to be set to OFF or 0, the data is saved automatically. If there are unconnected inputs that have not been previously set to OFF or 0, The Control Builder will notify you that there are unconnected inputs and ask if you want to see a list of unconnected inputs. Click “Yes” to view the error list Click “Log Errors” if you want to save the list to a text file. 140 UMC800 Control Builder User’s Guide Release E 1/01 Control Strategy Configuration How to Download a Control Strategy How to Download a Control Strategy Introduction Once a Control Strategy is stored on the computers Hard Drive, the configuration data can then be called up and downloaded to the controller. Downloading a control strategy REFERENCE Configuration data can also be downloaded from the operator interface. Refer to the UMC800 Operator Interface User Guide, Document 51-52-25-62, for procedures. ATTENTION The controller does not need to be in PROGRAM mode to download a control strategy. The Control Builder will do this automatically (with permission) at the time of download. Step Action Result/Graphic 1 The Download will use the file shown in the active view window. If necessary: • From the “FILE” menu, select “OPEN”. The “OPEN” dialog box will appear. • Select the File (.FBD) that is to be downloaded. • Click “OPEN”. The selected Function Block Diagram will appear in the Active View window. (Only the active document window can be downloaded.) Release E 1/01 UMC800 Control Builder User’s Guide 141 Control Strategy Configuration How to Download a Control Strategy Step 2 Action Result/Graphic From the “Communication” menu, select “Download”. The active document will be downloaded to the controller file and operator interface. The “Download File” dialog box will appear. It will state the file name and path. It will state the “Status” as READY. 3 Click “START”. A message box will open and advise that if the controller is in the RUN mode, proceeding will halt control and force a cold start. NOTE: Proceeding will also clear the existing database in the controller, even if the download fails. To revert to the previous configuration, you should first upload it. You can then download it if the new configuration download is unsatisfactory. 142 UMC800 Control Builder User’s Guide Release E 1/01 Control Strategy Configuration How to Download a Control Strategy Step 4 Action Result/Graphic Click “OK”. The “Status” will change to “current action” and will show a “Percentage Complete” in that field. When the download is complete, the Control Builder will attempt to put the controller into ‘RUN” mode. If it succeeds, the “Status” will show “Controller is successfully Downloaded and Running”. If the mode toggle switch on the controller is in the PROGRAM position, a message box will open and the “Status” will show “Download Complete”. 5 Click “Close”. 6 If there is a problem with the download, a failure message will appear. The file has been downloaded. • Check your communication Set Up for correct settings. NOTE: If the Control Builder uploads or downloads while the Operator Interface is doing one or the other, the following error message will appear: BAD SEQUENCE NUMBER Release E 1/01 UMC800 Control Builder User’s Guide 143 Control Strategy Configuration Modifying an Existing Configuration Modifying an Existing Configuration Introduction To modify an existing configuration , the configuration file (.FBD) must be open in the active window. The file can be opened from the PC hard drive or can be uploaded from the controller and edited. Modifying a file stored on the PC Step 1 Action Result/Graphic OPEN AN EXISTING FILE. The “OPEN” dialog box will appear. Select “OPEN” from the “FILE” menu. 2 Click on a file name, then click “OPEN”. 3 Edit the Function Block Diagram, then SAVE it to the file [see How to Save a Function Block Diagram (page 140)] or you can Download the file to the controller [see How to Download a Control Strategy (page 141)]. The Function Block Diagram will appear in the window. Uploading from the controller Refer to Uploading a Database from the Controller section for instructions to upload a database from the controller. Edit the file, then store the database in the PC [refer to How to Save a Function Block Diagram (page 140)], or download the file database to the controller. [Refer to How to Download a Control Strategy (page 141) to download.] 144 UMC800 Control Builder User’s Guide Release E 1/01 Setpoint Programming Overview Introduction Up to four independent setpoint programming blocks may be configured in the controller using the “Control Builder” software. A single program (profile) may be from 2 to 50 segments in length. Up to 70 profiles are stored in the controller's memory. Each segment of the profile may be a ramp or a soak except the last step that must be a soak. In addition to the main ramp and soak output value, a second analog value (Aux. Output) is available for each step of the program. This output is a fixed soak value that may be used to provide a setpoint value for a secondary control loop in the process. An example would be a ramp and soak temperature program combined with pressure setpoints for each step of the program. An operator can interact with the configured programs through the Setpoint Programming operator displays at the operator interface; or operation can be directed through integral actions connected by Softwiring functions in the Control Builder. What’s in this section? The following topics are covered in this section. Topic Release E 1/01 See Page Overview 145 What is a Setpoint Program 146 Setpoint Program Attributes 147 Setpoint Profile Configuration Overview Setpoint Profile Pool Setpoint Profile Properties 151 151 152 153 Setup/Edit Setpoint Profile Introduction Profile Setup/Edit Procedure 160 160 162 Saving a Profile 164 UMC800 Control Builder User’s Guide 145 Setpoint Programming What is a Setpoint Program (Profile) What is a Setpoint Program (Profile) Introduction Each setpoint profile consists of up to 50 ramp and soak segments, and carries its own unique number and a name for identification. (The names are descriptive references [aliases] and uniqueness is not enforced.) Unique names are recommended to avoid operator confusion). In turn, each segment can turn on 1 to 16 segment events to provide ON/OFF signals through a Setpoint Program Events (SPEV) control block that is used in conjunction with an SPP block in the UMC800 Control Builder. You can set the setpoint values, soak times, guaranteed soak band, ramp rates, and event action for individual setpoint profiles in configuration and access the information through the Setpoint profile display in the operator interface. This means that an operator can adjust individual ramp and soak segment settings during operation, but the general profile configuration, including number and name, is under configuration control. However, any changes made through the SPP Operate display to a program that is running in an SPP block will not be written as changes in the program configuration. Table 32 has a list of terms and definitions for Setpoint Programming. Table 32 Terms and definitions Term Definition Program The term “Program” is used to identify the process for selecting and entering the individual ramp and soak segment data for a Setpoint Program function block (SPP) needed to generate a required setpoint versus time profile (also called a program). Segment A segment is a ramp or soak function which together make up a Setpoint Profile. Length A single setpoint profile may be up to 50 ramp and soak segments in length and up to 70 ramp/soak profiles may be stored in the controller memory. Auxiliary Analog Value In addition to the main ramp and soak output value, a second analog value is available for each step of the profile. This output is a fixed soak value, which may be used to provide a setpoint value for a secondary control loop in the process. An example would be a ramp and soak temperature program combined with pressure setpoints for each step of the profile. Setpoint Guarantee There is a setpoint guarantee function provided that holds the program if a PV exceeds a predefined deviation from setpoint. Selections allow setpoint guarantee to be active for all segments, soak segments only, or for specified segments. Up to four Process Variables may be configured as inputs to the block for setpoint guarantee. Running a Profile Setpoint profiles may be started, held, advanced, jogged to a predefined segment or reset from the operator interface or by digital inputs to the block. Programs may be started from a preselected segment number. Repeats A portion of a profile or the entire program may be repeated up to 10 times or indefinitely (maximum 100) as specified in the program Repeats count value. Setpoint Events A companion setpoint programmer event function block (SPEV) that provides up to 16 event outputs based on the segment number. An event may be turned ON or OFF any number of times in a profile based on the segment number. Synchronizing Programs Two setpoint programs operating on the same time base can be synchronized using the Synchronize (SYNC) function block. This block automatically starts the second program when the first program is started and maintains synchronization when either program is place in hold. Power Loss A recovery ramp rate value is provided in the event of a power loss while a program is running. The ramp rate value is used to return the process to the last operating setpoint prior to power loss. A power OFF digital input and separate timing block will abort the running program if power loss has been OFF for more than a specified time period. 146 UMC800 Control Builder User’s Guide Release E 1/01 Setpoint Programming Setpoint Program Attributes Setpoint Program Attributes Basic attributes A setpoint program is really a setpoint versus time profile that establishes the setpoint values and how they are to vary with time. As such, setpoint programs have these basic attributes: • Program Number • Program Name • Engineering Units • Number of Segments • Soak Setpoints • Ramp Rates/Soak Times • Guaranteed Soak Band • Events • Auxiliary Output Figure 45 is a summary of setpoint program attributes. Table 33 is a description of setpoint program attributes. Release E 1/01 UMC800 Control Builder User’s Guide 147 Setpoint Programming Setpoint Program Attributes 16 15 14 13 12 11 8 Events ON OFF 10 9 8 7 6 5 4 3 2 1 1000 5 900 6(* 62$. 800 6(* 700 5$03 600 6 500 4 6(*62$. 400 6(* 6(* 5$03 300 5$03 200 6(*62$. 100 7 9 0 Time - Hours 1 Program Number, Example “Prog 1” 2 Program Name, 8 characters 3 Engineering Units, Example DegF Control blocks needed to link program with loop control and events with ON/OFF functions in the function block diagram. Figure 45 Summary of setpoint program attributes 148 UMC800 Control Builder User’s Guide Release E 1/01 Setpoint Programming Setpoint Program Attributes Table 33 Description of setpoint program attributes Item 1 Description Program Number—This number is assigned when the control builder or the Operator Interface creates the profile. The program number is assigned in the “Setpoint Profile Pool” and is shown on the “Edit Setpoint Profile” dialog box. Program Number 2 Program Name—During configuration you must assign a name (descriptive reference) consisting of from 1 to 8 letters or numbers without spaces. Thus, a name can be a combination of letters and numbers. Note that lowercase letters are automatically converted to uppercase. 3 Engineering Units—You must assign a descriptor consisting of up to 4 keyboard characters for the engineering units that the setpoint value represents. For example, GPM for gallons per minute, NPS for number per second, RPM for revolutions per minute, and DEGF for degrees Fahrenheit. 4 Ramp Segments—A ramp segment is a starting setpoint and the time or rate to reach the setpoint of the following segment. Typically, segment #1 will be a ramp. Ramp time is determined in either: TIME*—Hours or Minutes Range = 0.00 hr. to 999.99 hr. / 0.00 min. to 999.99 min. OR RATE*—EU/MIN or EU/HR Range = 0 to 999.99 *This selection of time or rate is made when you configure properties. Make this selection before entering any Ramp during Profile Edit. NOTE: When Ramp unit is configured for TIME, entering “0” will imply an immediate step change in setpoint to the next soak. Release E 1/01 UMC800 Control Builder User’s Guide 149 Setpoint Programming Setpoint Program Attributes Item 5 Description Soak Segments—A soak segment is a combination of soak setpoint (value) and soak duration (time). The last segment must be a Soak. The soak setpoint range value must be within the setpoint high and low range limits in engineering units. SOAK TIME is the duration of the soak and is determined in: TIME*—Hours or Minutes Range = 0.00 hr. to 999.99 hr. / 0.00 min. to 999.99 min. *This selection is made when you configure properties. 150 6 Guaranteed Hold - Soak Limits—Limits High and Low (above and below the Setpoint value) can be configured in selected engineering units. If the PV is outside of configured limits just prior to entering the Soak segment, the soak timer will not be permitted to start. It will start when the PV is within the High and Low limits. Once the soak timer has started and then the PV goes out side of configured limits, the soak timer will halt. It will remain halted until the PV is again within the configured limits. A Guaranteed Hold High or Low limit setting of 0.00 is equal to no limit at all. 7 Number of Segments—Segments are timed ramp and soak subdivisions of a setpoint program. Consecutive ramps and soaks are allowed. The last segment must be a soak. There can be up to 70 programs of 50 segments each. 8 Segment Events—You can configure 1 to 16 segment events to turn ON or OFF at the beginning of each segment. Segment events are digital switches that provide ON/OFF outputs through an SPEV control block in the Control Builder. When a segment event is turned ON, it remains ON until the end of the segment at which time it is turned OFF unless it is configured to turn ON in the next segment. Note that segment events are not interrupted by soak time delays when the process variable is outside the guaranteed soak band. Events turn ON as soon as the previous segment is completed even if the process variable has not reached the soak setpoint. When the program completes, the events are held at current value until the programmer is returned to the ready state. 9 Aux. Out—A second analog value is available for each step of the program. It is a fixed soak value and can be used to provide a setpoint value for a secondary control loop in the process. UMC800 Control Builder User’s Guide Release E 1/01 Setpoint Programming Setpoint Profile Configuration Setpoint Profile Configuration Overview Introduction Setpoint Program (Profile) configuration provides a quick and easy way to create, edit, and save up to 70 different ramp/soak (setpoint) profiles for the Setpoint Programmer (SPP) control blocks in the configuration. An operator can interact with the configured profiles through the Setpoint Program Operate display at the operator interface or operation can be directed through integral actions connected by Softwiring functions in the Control Builder. Configuration functions There are three basic functions that you will use to configure a Setpoint Profile. • Setpoint Profile Pool The SP Profile Pool lets you add or delete a profile on a list of configured profiles. Through this dialog box you will set the properties for each profile and set up or edit the information for each segment that make up a profile. • Setpoint Profile Properties Setpoint Profile Properties is information for the profile that is entered on five specific tabs. It includes Text, General, Loop/Jog, Start/Restart, and Display. • Setpoint Profile Setup (EDIT) Setpoint Profile Setup or Edit consists of configuring each segment of the profile and assigning the ramps and soaks in the order required to complete your SP program. Release E 1/01 UMC800 Control Builder User’s Guide 151 Setpoint Programming Setpoint Profile Configuration Setpoint profile pool Introduction The SP Profile Pool lets you add or delete a profile on a list of configured profiles. Through this dialog box you will set the properties for each profile and set up or edit the information for each segment that make up a profile. When you select “Setpoint Profiles” from the Configure menu, the “Setpoint Profile Pool” dialog box will be displayed. Through this display, you will add a new profile or delete an existing one and also enter the set properties function and the “Edit Program” function to set up each profile. • To ADD a Profile: Select ADD on the dialog box. The “Setpoint Profile Properties” dialog box will open. See Setpoint profile properties (page 153) for instructions. • To EDIT a Profile: Select a profile then click on “Edit Program”. The “Edit Setpoint Profile” dialog box will appear. See Profile setup/edit procedure (page 162) for instructions. • To EDIT the Properties of an Existing Profile: Select a profile name then click on “Properties”. The “Setpoint Profile Properties” dialog box will open. See Profile setup/edit procedure (page 162) for instructions. • To DELETE a Program: Click on a profile name and then click “Delete”. 152 UMC800 Control Builder User’s Guide Release E 1/01 Setpoint Programming Setpoint Profile Configuration Setpoint profile properties Introduction This function lets you set the properties for the program selected in the Setpoint Profile Pool. If you are adding a program, this dialog box will automatically appear. The information configured here will appear in the “Edit SP Profile” dialog box. Dialog box structure The SPP Profile Properties dialog box is divided into five tab cards, each containing specific properties information. Tab Card Properties Information TEXT Label, Engineering Units, Aux. Out Description, Aux Out EU Label GENERAL Ramp Type (time or rate). Guaranteed Hold Type, Time units, Guaranteed Hold Hi/Lo. LOOP/JOG Jog segment, Loop start segment, Loop end segment, Repeats START/RESTART Restart Rate DISPLAY Display High Limit, Display Low Limit • Click on the tab to access the properties for that tab. • Enter the information required for each tab then click “OK”. • Click on the profile name in the Setpoint Profile Pool and select “Edit Program” to set up the Profile. See Profile setup/edit procedure (page 162). Release E 1/01 UMC800 Control Builder User’s Guide 153 Setpoint Programming Setpoint Profile Configuration Properties text tab On this tab, the information that you will configure relates to: • giving the SP program a name, • selecting an Engineering Units Descriptor for the program, • describing the Aux. Out (name), • selecting an Engineering Units Descriptor for the auxiliary output. It looks like this graphically on the Control Builder. Table 34 describes the parameters and the entry information for each parameter. Enter the information in the appropriate fields. Table 34 Text properties Parameter Parameter Description Entry Information Label Program Name Up to 8 characters Engineering Units Engineering Units Descriptor Up to 4 characters Aux. Out Description Auxiliary Output Descriptor Up to 8 characters Aux. Out EU Label Auxiliary Output Engineering Units Descriptor Up to 4 characters 154 UMC800 Control Builder User’s Guide Release E 1/01 Setpoint Programming Setpoint Profile Configuration Properties general tab On this tab, the information that you will configure relates to: • selecting a Ramp type and the assignment of time units to the ramp, • selecting a Guaranteed Hold type and the entry of the high and low Guaranteed hold values. It looks like this graphically on the Control Builder. Table 35 describes the parameters and the entry information for each parameter. Table 35 General properties Parameter Ramp Type Parameter Description Entry Information There are two types of Ramps from which to choose: Rate Each ramp segment’s time specifies the RATE at which that profile’s output will reach the next segment, where the rate is specified in EU/hour or EU/minute. Click on Radio Button Time Each ramp segment’s time is the TIME allotted to the profile’s output to reach the next segment’s value in hours or minutes. Click on Radio Button Time Units This selection assigns the time units (hours or minutes) for all segments. Hours For Time ramp type: Time = Hours For Rate ramp type: Rate = EU/Hour For Soaks: Time = Hours 0.00 to 999.99 Minutes For Time ramp type: Time = Minutes For Rate ramp type: Rate = EU/Minutes For Soaks: Time = Minutes 0.00 to 999.99 Release E 1/01 UMC800 Control Builder User’s Guide 155 Setpoint Programming Setpoint Profile Configuration Parameter Guar. Hold Type Parameter Description Entry Information Guaranteed Hold will hold the profile value if a PV to the profile (typically a control loop’s PV) deviates specified amounts above or below the profile output. None No Guaranteed Hold Click on Radio Button Per Segment Lets you select specific segments for guaranteed soak where you set up the profile ramps and soaks. Click on Radio Button All Soaks All soaks will have guaranteed soak. No selection during program editing. Click on Radio Button All Segments All segments will have guaranteed soak. No selection during program editing. Click on Radio Button Guar. Hold Hi The profile will hold if a PV deviates more than the value set here above the profile output. During ramps, the SPP output is also held. Number in Engineering Units above the setpoint outside of which the timer halts Guar. Hold Lo The profile will hold if a PV deviates more than the value set here below the profile output. During ramps, the SPP output is also held. Number in Engineering Units below the setpoint outside of which the timer halts 156 UMC800 Control Builder User’s Guide Release E 1/01 Setpoint Programming Setpoint Profile Configuration Properties loop/jog tab On this tab, the information that you will configure relates to: • setting a program or loop with start and end segments, • how many times the Program/loop will be recycled, and • if you require a Jog segment, the segment number to which the program will jump when activated. It looks like this graphically on the Control Builder. Table 36 describes the parameters and the entry information for each parameter. Table 36 Loop/jog properties Parameter Parameter Description Jog Segment Logic input (JOG) will cause the profile to jump to the start of the step designated then continue. Loop A loop causes a specific set of segments with a start number and an end number to repeat a specific number of times. Entry Information Segment number jog will go to Start Segment This designates the number of the first segment of the loop. 1–49 End Segment This designates the number of the last segment of the loop. The last segment of a program must be a soak segment. Last segment of a loop can be ramp or soak. 2–50 Cycles This number lets the program repeat (loop) a specified number of times from beginning to end. 0–100 Release E 1/01 UMC800 Control Builder User’s Guide 0 = Loop indefinitely Maximum 100 157 Setpoint Programming Setpoint Profile Configuration Properties start/restart tab On this tab, the information that you will configure relates to: • entering a restart rate value that will be used in the event of a power loss while a program is running. It looks like this graphically on the Control Builder. Table 37 describes the parameters and the entry information for each parameter. Table 37 Start/restart properties Parameter Restart Rate 158 Parameter Description This recovery ramp rate is provided in the event of a power loss while a program is running. The Restart Rate value is used to return the process to the last operating setpoint prior to power loss when restart input is connected to power off timing block. UMC800 Control Builder User’s Guide Entry Information Value in Engineering Units Release E 1/01 Setpoint Programming Setpoint Profile Configuration Properties display tab On this tab, the information that you will configure relates to: • Setting upper and lower limits for the SP Trend display. It looks like this graphically on the Control Builder. Table 38 describes the parameters and the entry information for each parameter. Table 38 Display properties Parameter Parameter Description Entry Information Display High Limit This is the upper limit for the SP Trend display. Allow for the maximum and minimum profile and PV values. Display Low Limit This is the lower limit for the SP Trend display. Allow for the maximum and minimum profile and PV values. Release E 1/01 UMC800 Control Builder User’s Guide 159 Setpoint Programming Setup/Edit Setpoint Profile Setup/Edit Setpoint Profile Introduction The “Edit Setpoint Profile” dialog box lets you set up or edit a profile for the programs listed in the “Setpoint Profile Pool”. Table 39 Setpoint profile setup/edit • Make sure you have clicked on “Properties” and have configured the properties for that specific program. See Setpoint profile properties (page 153) before proceeding. • Click on a profile name in the active field and select “Edit Program” or double click on the profile name. The “Edit Setpoint Profile” dialog box will appear. It looks like this graphically on the Control Builder. It contains the following Segment attributes: • Segment Type (Ramp or Soak) • Guaranteed Soak enable (yes/no) • Value • Time/Rate • Aux. Out Value • Event Selection (1 through 16) 160 UMC800 Control Builder User’s Guide Release E 1/01 Setpoint Programming Setup/Edit Setpoint Profile The three main areas on the “Edit Setpoint Profile” dialog box are: Properties Information Block This block of information was developed during “Properties” configuration. It lists the selection and values that were made on the “Setpoint Profile Properties” tab cards. These fields are read only; they are for reference only. If you want to edit these properties, refer to Setpoint profile properties (page 153). Profile Data Entry area This data entry area lets you make selections and enter values for each specific segment in the Profile Segment Setup Field. Click “Apply” to enter these choices to the segment, which is highlighted in the segment set up field shown below. Profile Segment Setup Field You can add, insert, or delete segments in your program. Release E 1/01 UMC800 Control Builder User’s Guide 161 Setpoint Programming Setup/Edit Setpoint Profile Profile setup/edit procedure Introduction The Profile Setup/Edit Procedure consists of building a ramp/soak profile by: • adding or inserting segments to a list of segment • selecting the type of segment—Ramp or Soak • selecting Guaranteed Soak for soak segments, if desired • entering the value for the ramp or soak • entering the value of the time or rate for the segment • selecting an Aux. Out value (if required) for the segment • selecting the events you want turned on or off at the beginning of the segment • applying these selections to the segment • repeating the procedure for all the segments in the program Follow the procedure in Table 40 to configure the profile. Table 40 Profile setup/edit configuration • To ADD a Segment Click on ADD. If it is the first segment, all the fields in the “Profile Data Entry Area” will become active. The default is a ramp. • To INSERT a Segment Click on the Ramp/Soak number in the field and click “Insert”. A segment will be inserted after the segment selected. This will change all the segment numbers following the insertion. • To DELETE a Segment Click on the Ramp/Soak number in the field and click “Delete”. The segment will be deleted and all the segment numbers following the deletion will be changed. • Select (click on) a segment number and configure the segment information in data entry area. 162 UMC800 Control Builder User’s Guide Release E 1/01 Setpoint Programming Setup/Edit Setpoint Profile • Select the segment type you want the segment selected to be: Soak or Ramp. The default when you selected a segment number is Ramp. • Click on radio button to select the segment type. NOTE: You can configure consecutive ramps or soaks. When the first segment of a profile is a ramp, the profile start value will be set to the correct value of PV input # (ignores starting SP value). To start the profile with the st setpoint value, make the 1 segment a soak. If “Guar. Soak Type”, listed in the properties information block at the top of the dialog box, is “Per Segment”, you can select “Guaranteed Soak ON” for the segment. • Click on the box to turn Guaranteed Soak ON. NOTE: If “Guar. Soak Type” listed is • None, • All Soak, or • All Segments, no selection is necessary. • Enter the value for the ramp or soak selected. NOTE: The first ramp will always default to the PV value. Ramp—The value from which the ramp will start. Soak—The Soak Segment Setpoint value is the desired value of the PV during soak segments. NOTE: The Ramp type and Time units are shown in the properties information area at the top of the dialog box. • Enter the value of the Time or Rate for the segment. Ramp—Time: 0.00 to 999.99 hours or minutes Rate: 0.00 to 999.99 EU/hour or EU/minute Soak—Segment soak duration • Enter the Aux. Out value (if required) for the segment selected. Aux. Out is a fixed soak value that is available for each step of the program. Release E 1/01 UMC800 Control Builder User’s Guide 163 Setpoint Programming Saving a Setpoint Profile • Select which events you want to turn ON or OFF at the beginning of each segment. Segment events are digital switches that provide ON/OFF output through an SPEV function block in the Control Builder. When a segment event is turned ON, it remains on until the end of the segment at which time it is turned OFF unless it is configured to turn ON in the next segment. Note that segment events are not interrupted by soak time delays when the PV is outside the guaranteed soak band. Events turn on as soon as the previous segment is completed even if the PV has not reached the soak setpoint. After all the selections and entries are made for the segment: • Click on . The information configured for the segment will be reflected in the “Profile Segment Setup” field. ATTENTION: If you are setting up the profile for the first time, repeat the procedure for all segments in the program. If you want to edit a particular segment, click on the segment number and edit the segment information in the “Data Entry Area”. • Click to return to the “Setpoint Profile Pool” dialog box. Saving a Setpoint Profile Since Setpoint Program Configuration is a part of creating a Function Block Diagram, this information will be saved when you complete the Function Block Diagram Configuration and save it. [Refer to How to Save a Function Block Diagram (page 140).] 164 UMC800 Control Builder User’s Guide Release E 1/01 Setpoint Scheduler Overview Introduction The objective of the Setpoint scheduler is to provide a sequence of multiple setpoint outputs (both analog and digital) which are referenced to a common time base. A suite of Setpoint Scheduler blocks is comprised of one Master Setpoint Block (required) and optionally, one Digital Event, one Auxiliary Setpoint, one State Switch, and/or one State Flags block. The Master block supports up to 8 ramp or soak outputs operating on a common time base. It accepts one PV for each setpoint. Setpoint guarantee is provided for the setpoints with a single symmetrical value for each setpoint output. See Figure 46. What’s in this section? The following topics are covered in this section. Topic Release E 1/01 See Page Overview 165 What is a Setpoint Schedule 166 Setpoint Schedule Configuration Overview Setpoint schedule pool Setpoint schedule properties 168 168 169 170 Setup/Edit Setpoint Schedule Editing a schedule Edit the schedule segments Edit the Aux Out values 171 171 172 174 UMC800 Control Builder User’s Guide 165 Setpoint Scheduler What is a Setpoint Schedule What is a Setpoint Schedule Introduction A suite of Setpoint Scheduler blocks may be configured for multi-setpoint control. The suite is comprised of a Master block, Auxiliary Setpoint block, Auxiliary Event block, State Switch Block, and State Flags block. (See Figure 46.) The Master block supports up to 8 ramp or soak outputs operating on a common time base. It accepts one PV for each setpoint. Setpoint guarantee is provided for the master (SPS) block setpoints with a single symmetrical value for each setpoint output. You can assign a failsafe value for each setpoint. The Auxiliary block supports up to 8 soak only outputs. The Event block supports up to 16 event outputs. A single schedule may be up to 50 segments in length and includes auxiliary block data. Up to 10 schedules may be stored in the controller’s memory. Setpoint Schedules offer the same operating modes and digital controls as setpoint programs. On-line editing of a running schedule is supported through dedicated operator interface displays Setpoint guarantee Setpoint guarantee is provided for the master block setpoints with a single symmetrical value for each setpoint output. Actions for the guarantee soak may be set on a per segment basis for OFF, high setpoint deviation, low setpoint deviation or both high and low setpoint deviations. Segments Each segment of the Setpoint Scheduler allows entry of a next segment recycle location and a number of recycles up to 998, or infinite. This function allows unlimited recycle nesting and continuous recycle operation. A jog function allows a single jump to a designated segment number through a digital input to the State Switch block. Labels Eight character labels and four character engineering units are provided for each process variable of the master and auxiliary setpoint blocks. Labels and on/off descriptions are also provided for the Digital Event block. [See Setpoint Scheduler Display Configuration (page 119).] Assigning these labels first will aid you in the setpoint schedule configuration process. These labels will appear in the configuration dialog boxes. 166 UMC800 Control Builder User’s Guide Release E 1/01 Setpoint Scheduler What is a Setpoint Schedule Setpoint scheduler function block suite Master Setpoint Scheduler Block State Flag Block State Switch Block Auxiliary Setpoint Block Digital Event Block Figure 46 Setpoint scheduler function block suite Release E 1/01 UMC800 Control Builder User’s Guide 167 Setpoint Scheduler Setpoint Schedule Configuration Setpoint Schedule Configuration Overview Introduction Setpoint Schedule configuration provides a quick and easy way to create, edit, and save up to 10 different Setpoint Schedules for the Setpoint Scheduler (SPS) control blocks in the configuration. An operator can interact with the configured schedules through the Setpoint Program Operate display at the operator interface or operation can be directed through integral actions connected by softwiring functions in the Control Builder. Setpoint scheduler display configuration ATTENTION Before you proceed with the Setpoint Schedule configuration, refer to Setpoint Scheduler Display Configuration (page 119) and assign the appropriate labels for the Setpoint Scheduler displays. Assigning these labels first will aid you in the schedule configuration process. These labels will appear in the configuration dialog boxes. Configuration functions There are three basic functions that you will use to configure a Setpoint Schedule. • Setpoint Schedule Pool The SP Schedule Pool lets you add or delete a schedule on a list of configured schedules. Through this dialog box you will set the properties for each schedule and set up or edit the information for each segment that make up a schedule. • Setpoint Schedule Properties Setpoint Schedule Properties is information for the schedule that a Label, a Jog Segment, Time Units, and Guaranteed Hold Limits for Each of the eight setpoints. • Setpoint Schedule Setup (EDIT) Setpoint Schedule Setup or Edit consists of configuring each segment of the schedule and assigning values for all eight Setpoints of the segment and the Guaranteed Hold Type for each. You can also set up to 16 events for each segment. Time Units, Recycle Segment, and Recycle Counts selections are included on this dialog box. You can also assign values to all eight Auxiliary Outputs for each segment by clicking the “Edit Aux” button on the dialog box. 168 UMC800 Control Builder User’s Guide Release E 1/01 Setpoint Scheduler Setpoint Schedule Configuration Setpoint schedule pool Introduction The SP Schedule Pool lets you add or delete a schedule on a list of configured schedules. Through this dialog box you will set the properties for each schedule and then set up or edit the information for each segment that make up a schedule. When you select “Setpoint Schedules” from the Configure menu, the “Setpoint Schedule Pool” dialog box will be displayed. Through this display, you will add a new schedule or delete an existing one and also enter the set properties function and the “Edit Schedule” function to set up each schedule. • To ADD a Schedule: Select ADD on the dialog box. The “Setpoint Schedule Properties” dialog box will open. See Setpoint schedule properties (page 170) for instructions. • To EDIT a Schedule: Select a Schedule then click on “Edit Schedule”. The “Edit Setpoint Schedule” dialog box will appear. See Editing a schedule (page 171) for instructions. • To EDIT the Properties of an Existing Schedule: Select a Schedule name then click on “Properties”. The “Setpoint Schedule Properties” dialog box will open. See Setpoint schedule properties (page 170) for instructions. • To ASSIGN LABELS to the Setpoint Schedule Display: Select a Schedule name then click on “SPS Display”. The “Setpoint Schedule Display Configuration” dialog box will open. See Setpoint Scheduler Display Configuration (page 119) for instructions. • To DELETE a Schedule: Click on a schedule name and then click “Delete”. Release E 1/01 UMC800 Control Builder User’s Guide 169 Setpoint Scheduler Setpoint Schedule Configuration Setpoint schedule properties Introduction This function lets you set the properties for the schedule selected in the Setpoint Schedule Pool. If you are adding a schedule, this dialog box will automatically appear. It will also appear if you click on the “Properties” button. The Label and Engineering Units will indicate the selections made when you configured the Setpoint Schedule Displays [refer to Setpoint Scheduler Display Configuration (page 119)]. The information configured here will appear in the “Edit Schedule Segment” dialog box. Dialog box structure Figure 47 is an example of a Setpoint Schedule Properties dialog box. Refer to Table 41 and enter the properties information in the appropriate fields, then click “OK”. The LCB will return you to the “Setpoint Schedule Pool” dialog box. Figure 47 Setpoint schedule properties dialog box Table 41 Setpoint schedule properties Parameter Parameter Description Entry Information General Label Schedule Name 6 characters Jog Seg Logic input (JOG) on state switch block will cause the schedule to jump to the start of the segment designated then continue. Segment number jog will go to Time Units Hours Time unit in Hours Click on Radio button Minutes Time unit in Minutes Click on Radio button The schedule will hold if a PV deviates above or below (or both) the Setpoint value set here. Select Guaranteed Hold Type on the “Setpoint Edit Schedule” dialog box. Enter a setpoint value Guaranteed Hold Limit 170 This selection assigns the time units (hours or minutes) for all segments. UMC800 Control Builder User’s Guide Release E 1/01 Setpoint Scheduler Setup/Edit Setpoint Schedule Setup/Edit Setpoint Schedule Editing a schedule The “Edit Setpoint Schedule” dialog box lets you set up or edit a schedule from the schedules listed in the “Setpoint Schedule Pool.” Table 42 Setpoint schedule setup/edit SELECT A SCHEDULE • Make sure you have clicked on “Properties” and have configured the properties for that specific Schedule. See Setpoint schedule properties (page 170) before proceeding. • Click on a schedule name in the active field and select “Edit” or double click on the Schedule name. The “Schedule Edit” dialog box will appear with the selected Schedule indicated on the top banner. See next view. • To ADD a Segment Click on ADD. A new Segment number will appear at the bottom of the segment list. • To INSERT a Segment Click on a segment number in the field and click “Insert”. A segment will be inserted after the segment selected. This will change all the segment numbers following the insertion. • To DELETE a Segment Click on a segment number in the field and click “Delete”. The segment will be deleted and all the segment numbers following the deletion will be changed. • To EDIT a Segment Click on a segment number in the field and click “Edit”. Then refer to Edit the schedule segments (page 172) for Edit Segment Data Entry information. • To EDIT the Auxiliary Outputs for the Segment Click on a segment number in the field and click on the “Edit Aux” button. Then refer to Edit the Aux Out values (page 174) for Edit Auxiliary Output Data Entry information. Release E 1/01 UMC800 Control Builder User’s Guide 171 Setpoint Scheduler Setup/Edit Setpoint Schedule Edit the schedule segments For each segment selected in the “Setpoint Schedule Edit” dialog box, an “Edit Schedule Segment” dialog box will appear when you click on the “Edit” button. The segment number is shown at the top. Each segment of the Setpoint Scheduler allows entry of a next segment recycle location and a number of recycles up to 998, or infinite. This function allows unlimited recycle nesting and continuous recycle operation. A jog function (Table 41) allows a single jump to a designated segment number through a digital input to the State Switch block. Figure 48 is an example of a Setpoint Schedule Segment dialog box. Refer to Table 43 and enter the Segment information in the appropriate fields, the click “OK”. The LCB will return you to the “Setpoint Schedule Edit” dialog box. Refer to Edit the Aux Out values (page 174) for Edit Auxiliary Output Data Entry information. Figure 48 Typical setpoint schedule segment edit dialog box 172 UMC800 Control Builder User’s Guide Release E 1/01 Setpoint Scheduler Setup/Edit Setpoint Schedule Table 43 Setpoint schedule segment edit parameters Parameter Parameter Description Entry Information General Time Length of time for the segment Time Units were selected in the “Setpoint Schedule Properties” Dialog Box Value in Minutes or Hours, whichever has been selected. Recycle Seg Recycle segment – The segment number at which a recycle will start. Enter a value 0 to 50 Recycle Count Recycle count – This number lets the schedule repeat (loop) a specified number of times. Enter a value 1-999 or 0 for infinite Segment events are digital switches that provide ON/OFF output through an SPS function block in the Control Builder. Select which events you want to turn ON or OFF at the beginning of each segment. Events When a segment event is turned ON, it remains on until the end of the segment at which time it is turned OFF unless it is configured to turn ON in the next segment. Setpoints Values Ghold Type Setpoint values for SP1 through SP8 Enter Setpoint Value Setpoint guarantee is provided for the master block setpoints with a single symmetrical value for each setpoint output. Actions for the guarantee soak may be set on a per segment basis for OFF, high setpoint deviation, low setpoint deviation or both high and low setpoint deviations. OFF No Guaranteed Hold No Entry Guar. Hold Hi High setpoint deviation Select from Drop-down menu The schedule will hold if a PV deviates above the Setpoint value set. on the “Setpoint Schedule Properties” dialog box. Guar. Hold Lo Low setpoint deviation The schedule will hold if a PV deviates below the Setpoint value set on the “Setpoint Schedule Properties” dialog box. Guar. Hold Hi/Lo High and low setpoint deviations The schedule will hold if a PV deviates above or below the Setpoint value set on the “Setpoint Schedule Properties” dialog box. Release E 1/01 UMC800 Control Builder User’s Guide Select from Drop-down menu Select from Drop-down menu 173 Setpoint Scheduler Setup/Edit Setpoint Schedule Edit the Aux Out values Introduction The auxiliary block supports up to 8 soak only outputs. You can assign values to all eight Auxiliary Outputs for each segment by clicking the “Edit Aux” button on the dialog box. Follow the procedure in Table 44 to select the Auxiliary Output values. Table 44 Auxiliary output values configuration • To EDIT the Auxiliary Outputs for the Segment Click on a segment number in the field and click on the “Edit Aux” button. • Enter values for all Auxiliary Outputs in the appropriate fields. 174 UMC800 Control Builder User’s Guide Release E 1/01 Controller Recipes Overview Introduction Recipe Configuration provides a quick and easy method to create, edit, and save up to 50 different recipes. An operator can select and either verify or load a recipe through the Recipe Setup display at the operator interface that can be assigned to one of the display buttons (1-8). A recipe can also be loaded automatically through a digital input signal to a Recipe (RCP) function block in the Control Builder Function Block diagram. What’s in this section? The following topics are covered in this section. Topic Release E 1/01 See Page Overview 175 What is a Recipe 176 Recipe Configuration Overview Recipe Pool Setup/Edit Recipe 178 178 179 180 Saving a Recipe 181 Using Recipes to Download Setpoint Profiles 182 Creating a Momentary (One-Shot) Action in a Recipe Download 182 UMC800 Control Builder User’s Guide 175 Controller Recipes What is a Recipe What is a Recipe Introduction Each recipe consists of 1 to 50 Variables and carries its own unique recipe number and a descriptive name for identification. The selected Operator Variable Names were assigned during the Function Block Diagram Configuration. It is possible to edit the setting of any recipe Variable through the Recipe Setup display at the operator interface. This means that an operator can adjust individual ingredient amounts in the recipe; but the ingredients (item’s Variable Name), the order of the ingredients, and the recipe’s number and name are under configuration control. Recipe attributes A recipe is a list of Variables with settings that define the ingredients needed to make a product or run a particular batch. This can include stored setpoint profiles selected by a variable number 1 through 70 [see Using Recipes to Download Setpoint Profiles (page 182)]. The items represent Analog and/or Digital Operator Points that were assigned in the Function Block Configuration and are identified by their Variable Names. Recipes have these basic attributes: • • • • Recipe Number Recipe Name Recipe Variables Adjustable Settings Figure 49 is a summary of Recipe attributes. Table 45 is a description of Recipe attributes. 3 2 Related Function Block Diagram Components Analog 5 Digital 1 4 5 5 A variable name is only valid if an analog or digital variable exists in the Function Block Diagram. A function block can be used to automatically load a recipe. Figure 49 Summary of recipe attributes 176 UMC800 Control Builder User’s Guide Release E 1/01 Controller Recipes What is a Recipe Table 45 Description of the recipe attributes shown in Figure 49 Item Description 1 Recipe Variables—A list of up to 50 Variables can be compiled for each recipe. A valid Operator Variable and desired setting must be specified for each recipe item. 2 Recipe Name—A descriptive name must be assigned consisting of from 1 to 8 letters or numbers with no spaces. Thus, a name can be any combination of letters and numbers without spaces. Note that lowercase letters are automatically converted to uppercase letters. 3 Recipe Number—A unique number from 1 to 50 must be assigned for each recipe that is configured. Numbers can be assigned in any sequence with gaps between numbers, but no two recipes can be given the same number. 4 Recipe Variable Name—A valid variable name is any Analog or Digital Operator Point that exists in the Function Block Diagram Configuration. 5 Adjustable Settings—The setting for an analog point can be any appropriate value from –99999 to 99999, and a digital point can be set in its ON or OFF state. It is possible to edit/change any recipe item/Variable Name setting through the Recipe Setup display during configuration. Release E 1/01 UMC800 Control Builder User’s Guide 177 Controller Recipes Recipe Configuration Recipe Configuration Overview Introduction Each recipe consists of 1 to 50 Variables, and carries its own unique recipe number and name for identification. (The names are descriptive references [aliases] and uniqueness is not enforced. Unique names are recommended to avoid operator confusion.) The selected Operator Variables were assigned during the Function Block Diagram Configuration. It is possible to edit the setting of any recipe Variables through the Recipe Setup display at the operator interface. This means that an operator can adjust individual ingredient amounts in the recipe; but the ingredients (item’s Variable Name), the order of the ingredients, and the recipe’s number and name are under configuration control. Configuration functions There are three basic functions that you will use to configure a Recipe. 178 • Recipe Pool The Recipe Pool lets you add or delete a recipe on a list of configured recipes. Through this dialog box you will set the properties for each recipe and set up or edit the information for each recipe. • Recipe Properties The Recipe Properties is merely a name to be assigned to the recipe, which will be added to the pool. • Recipe Setup (EDIT) Recipe Setup or Edit consists of selecting variable names, assigning an analog value or digital state, and adding them to a list of Recipe items. UMC800 Control Builder User’s Guide Release E 1/01 Controller Recipes Recipe Configuration Recipe pool Introduction When you select “Recipes” from the Configure menu, the “Recipe Pool” dialog box will be displayed. Through this display, you will add a new recipe or delete an existing one and also enter the properties function and the “Edit Recipe” function to set up each recipe. • To ADD a Recipe: 1. Select ADD on the dialog box. The “Recipe Properties” dialog box will open. 2. Enter a name in the “Name” field. Click OK. • To Change the Name of a Recipe: Click on “Properties” and type in the new name in the field. • To EDIT a Recipe: Select a recipe then click on “Edit Recipe” or double click on the recipe name. The “Edit Recipe” dialog box will appear. See Setup/edit recipe (page 180) for instructions. • To DELETE a Recipe: Click on a recipe name and then click “Delete”. Release E 1/01 UMC800 Control Builder User’s Guide 179 Controller Recipes Recipe Configuration Setup/edit recipe The “Edit Recipes” dialog box lets you set up or edit a recipe listed in the “Recipe Pool.” Table 46 Recipe setup/edit • Make sure you have clicked on “Properties” and have given that specific recipe a name. See Recipe pool (page 179) before proceeding. • Click on a recipe name in the active field and select “Edit Program” or double click on the recipe name. The “Edit Recipe” dialog box will appear. It looks like this graphically on the Control Builder. • To ADD Variable to a Recipe: Select a variable and click on ADD. A variable number will appear under “Recipe Items” as shown in the figure. • To DELETE a Variable from a Recipe: Select a variable number from the “Recipe Items” field, then click “Delete Item”. • From the “Recipe Item Edit” list, select a variable name from the list of variables and click on “ADD”. • If it is an analog variable, the “Analog Value” field will become active. Enter a value and press “ENTER” on the keyboard. • If it is a digital variable, the “Digital State” radio buttons become active. Select ON or OFF as a digital state for the variable. You can assign a label to the variable when you are adding a variable to the Function Block diagram and the label name will appear next to the radio buttons. 180 UMC800 Control Builder User’s Guide Release E 1/01 Controller Recipes Saving a Recipe The variable name and value or Digital state will appear next to the variable number selected in the “Recipe Items” field. • Repeat this procedure for each recipe variable desired for the recipe you are configuring. • Click . The length of the Recipe (number of variables) will appear in the “Recipe Pool”. • Click to complete the configuration. Saving a Recipe Since Recipe Configuration is a part of creating a Function Block Diagram, this information will be saved when you complete the Function Block Diagram Configuration and save it. [Refer to How to Save a Function Block Diagram (page 140).] Release E 1/01 UMC800 Control Builder User’s Guide 181 Controller Recipes Using Recipes to Download Setpoint Profiles Using Recipes to Download Setpoint Profiles Recipes can be given an 8-character name and shown on the Recipe Menu display for user selection (accessed through the Main Menu selections of the Operator Interface). A Recipe can also automatically load a stored profile number for use by a specific Set Point Programmer. To do this connect an Analog Variable to the NPGM pin of the Set Point Programmer block given a name such as PROFNUM (see figure below). This Variable is added to the variable list for a recipe and given a number corresponding to the profile number to be loaded. Upon selection and loading of the recipe at the Operator Interface, the programmer will also load the profile number listed in the recipe. The operation of the programmer to run this profile is from the standard Set Point Programmer display. As an example, for a selection of a SP Profile number 2, the entries into the Edit Recipe dialog box would be: VARIABLE NAME = PROFNUM VALUE = 2 Up to 50 Analog/Digital Variables PROFNUM GAIN-LP2 SP-OUT2 SP-OUT3 SP-OUT4 Recipe Table Creating a Momentary (One-Shot) Action in a Recipe Download Figure 50 Initiating a one-shot action 182 UMC800 Control Builder User’s Guide Release E 1/01 Data Storage Configuration Overview General The optional Data Storage feature provides background storage of process information on a 3.5-inch floppy disk for analysis by an off-line computer equipped with Honeywell Data Analysis Software (SDA). Data stored files can not be reviewed from the operator interface. The instrument can support both continuous and discontinuous (batching) modes of the following storage types: • Trends, • Point Log (unit data samples), • Alarms/Events This section covers the information required to configure these data storage types through the LeaderLine Control Builder. What’s in this section? The following topics are covered in this section. Topic Release E 1/01 See Page Overview 183 Storage Data Types 184 Storage Conventions Storage Modes Storage Intervals How Storage is Enabled Disk Capacity File Extensions 185 185 185 185 186 186 Overview of Data Storage Enable How Storage is Enabled Three Levels of Enabling Trend Storage Enable Conditions Point Log Storage Enable Conditions Alarm/Event Storage Enable Conditions 187 187 188 189 190 191 Data Storage Configuration Introduction Accessing Data Storage Configuration Tabs Trend Configuration Point Log Configuration Alarm/Event Configuration 192 192 192 193 196 199 Event List Configuration 202 UMC800 Control Builder User’s Guide 183 Data Storage Configuration Storage Data Types Storage Data Types Trends Two Trend groups of up to 12 points each can be stored. Floppy disk capacity for trends is inversely proportional to the number of trend points and the storage time interval (that is, the time between trend samples). For example, when storing 2 trend groups of 12 points each at a storage interval of 2 seconds, the floppy disk will be filled in a few hours. Conversely, when storing 1 trend group of 3 points at a storage interval of 30 minutes, the floppy disk could take several months to be filled. Point log (unit data samples) A point log file to take a “snapshot” of process data for up to 12 points is also provided. Point log samples can be scheduled to occur at a user-specified time synchronized to the controller’s Real Time Clock (RTC) or by a digital event in the controller. The maximum sample rate for point log data is 60 seconds per sample. The Point log file has a maximum capacity of 2000 records per file. Alarms Alarm recording is available to store up to 150 on and off alarm actions. Alarm data includes the point tag, a 16-character point description, and the time and date of alarm occurrence. Digital events Digital event recording is also available to store up to 150 on and off transitions of digital events in the controller. Event data includes the point tag, a 16-character point description, and the time and date of event occurrence. What cannot be stored Setpoint Programs/Schedules, instrument configurations, recipes, variables, diagnostics, and calibrations are not part of the Data Storage feature. 184 UMC800 Control Builder User’s Guide Release E 1/01 Data Storage Configuration Storage Conventions Storage Conventions Storage modes Trends, Point Log, and Alarms/Events can be stored in Continuous or Batch modes. In addition, Point Log can be stored in On Command mode. See Table 47 for Storage Modes descriptions. Table 47 Storage modes Mode Description Off No data will be collected Continuous Data is sampled at the storage interval Batch Data is sampled at the storage interval, but also a Batch Enable Signal separates the sampled data into numbered batches. Batch #1 begins when the Batch Enable Signal turns on, and ends when the signal turns off. Batch #2 begins when the Batch Enable Signal turns on, and ends when the signal turns off, etc. No batch mode data is collected while the Batch Enable Signal is off. The Batch Enable Signal does not affect data being stored as Continuous or On Command. On Command Point Log data is sampled on each off-to-on transition of the Point Log Enable Signal. Storage intervals When data storage is enabled, samples are taken at regular intervals known as the storage intervals. These intervals can be from a few seconds to 30 minutes. Each data type has its own storage interval. For example: Trends can be stored using one interval (like 5 seconds), Point Log using another interval (like 10 per day), and Alarms/Events (stored as they occur). Or, they can all use the same interval. It depends on how data storage has been configured. In Continuous and Batch modes, the storage interval determines how often data is sampled and stored: • For trends and alarms/events, data is first sampled when storage is enabled and again at equally spaced intervals thereafter. For example, if trend storage is enabled at 2:03 p.m. and the interval is 10 minutes, trend storage occurs at 2:03, 2:13, 2:23, etc. until storage is disabled. • For Point Log, data is first sampled after storage is enabled but not until the programmed Start Time. Data is sampled at equally spaced intervals after the Start Time. For example, suppose the Start Time is 3:00 p.m. and the storage interval is 10 minutes. If storage is enabled at 2:03 p.m., the first sample will occur at 3:00 and every 10 minutes thereafter. If storage is disabled at 3:35 and enabled at 3:42, storage will resume at 3:50. Notice that the interval is synchonized to the Start Time. • Alarm/Events are logged on occurrence with time and date (No interval) In On Command mode for Point Log, there is no storage interval or Start Time. A single sample of Point Log data is taken when the Point Log Enable changes from off (disable) to on (enable). How storage is enabled Data collection may be started through key actions from the operator interface keyboard or from digital status signals from the controller. An “S” in the status line of the operator interface display indicates active storage. [For detailed information concerning Data Storage Enable, refer to Overview of Data Storage Enable Conditions (page 187).] Release E 1/01 UMC800 Control Builder User’s Guide 185 Data Storage Configuration Storage Conventions Disk capacity The disk capacity (in time) is calculated and displayed once all storage initialization is complete. This eliminates the need for manual calculations and gives the operator the exact duration of the disk. All file types in the data storage feature may be configured to stop collecting data when the file is full or to continue in a circular storage mode (roll-over) where the oldest data is discarded as new data is collected. When roll-over is not selected, a disk full warning indication is provided in the status line of the display. The configurer as required may change the percent full limit. A storage buffer in the operator interface allows changing the disk media without the loss of process data. Calculation for Data Storage Capacity Trend Capacity (In Hours) = Disk factor * (R1) F1 + (F2 * (R1/R2) Where: R1 and R2 are the storage rates (in seconds) for Trend 1 and Trend 2, respectively. F1 and F2 are the point factors associated with the number of points per trend file. Disk Factors: 398 Trends files only active 394 Trends files + Alarms and Events 347 Trend files, + alarms and Events + Point Log Files Number of points in trend 1 2 3 4 5 6 7 8 9 10 11 12 14.00 20.16 26.53 33.60 38.77 45.82 50.40 56.00 63.00 72.00 84.00 84.00 Point Factor (F1 and F2) File extensions The following File Extensions are used for the UMC800 Controller’s Data Storage output files: 186 • LNT for Trend Files • LNP for Point Log Files • LNA for Alarm Files • LNE for Event Files UMC800 Control Builder User’s Guide Release E 1/01 Data Storage Configuration Overview of Data Storage Enable Conditions Overview of Data Storage Enable Conditions How storage is enabled Introduction Data Storage enable/disable is an operator interface function. If a schedule is developed in the Control Builder, all storage is automatically enabled. Enable controls Figure 51 shows the controls that must be enabled for each storage mode and data type. The left side shows the three data types and their possible storage modes (only one storage mode is in effect for any data type). The arrows show the conditions required for that storage to take place. For example, trend batch storage requires: 1. the Trend Storage Control to be on (enabled at configuration – if any signal is selected for storage i.e. Signal Enable = NONE), 2. the Batch Command Control to be on (enabled at configuration), and 3. the Data Storage Control to be enabled (enabled at Operator Interface). Notice that the Batch Command Control applies only to batch storage mode. S T O R A G E Trends Storage Mode = Batch Trends Storage Mode = Continuous Trend Storage = Enable (with digital signal or Storage Control menu) Point Log Storage Mode = Batch Point Log Storage Mode = Continuous Point Log Storage Mode = On Command I N Point Log Storage = Enable (with digital signal or Storage Control menu) Alarms/Events Storage Mode = Batch Alarms/Events Storage Mode = Continuous Alarms/Events Storage = Enable (with digital signal or Storage Control menu) Batch Command = Enable (with digital signal or Storage Control menu) Data Storage = Enable (with Storage Control menu) E F F E C T Figure 51 Required enabled controls for storage Release E 1/01 UMC800 Control Builder User’s Guide 187 Data Storage Configuration Overview of Data Storage Enable Conditions Three levels of enabling Introduction There are three levels of Data Storage Enable: Data Storage Disable Signal (Operator Interface) – See Note 1. Data Type Enable Signals Batch Command Enable Signal Note 1. Since any storage schedules loaded into the system automatically enables storage, the operator interface can disable storage. Data type enable signals This level of control is the Data Type Enable Signal. Each data type (trends, point log, and alarms/events) has its own Enable Signal that can either be configured as a digital signal on the LCB, or if not configured as a digital signal (NONE selected on LCB Data Storage Configuration), it will appear on the Storage Control menu on the operator interface For example, if the Trend Enable Signal is configured as a digital signal in the LCB Data Storage Configuration, it will not appear on the Storage Control menu on the operator interface. This is done to avoid having two conflicting sources for the enable signal. When a digital signal is not used, the Trend enable signal is set to enable when the configuration is loaded. The Trends can then be disabled from the Operator Interface. The Enable Signal has two functions for Point Log storage. In Continuous and Batch modes, it enables Point Log storage to begin at the Start Time and at every storage interval thereafter. In On Command mode, when it changes from off (disable) to on (enable), it causes a single sample of Point Log data to be stored at that moment (Figure 53). Batch command enable signal This level of control is the Batch Command. It is a single control signal that starts and stops storage for all data types configured for batch storage. It does not affect Continuous or On Command storage. If the Batch Signal is configured as a digital signal in the LCB Data Storage Configuration, it will not appear on the Storage Control menu on the Operator Interface. This is done to avoid having two conflicting sources for the signal. When a digital signal is not used and Batch storage has been selected, the Batch command signal is set to Stop. Batches can be started from the Operator Interface. 188 UMC800 Control Builder User’s Guide Release E 1/01 Data Storage Configuration Overview of Data Storage Enable Conditions Trend storage enable conditions Overview Figure 52 shows examples of Trend Storage Enable Conditions. Notice that Continuous Trend storage occurs unless Trend Disable or Data Storage Disable is selected. For Batch Trend storage, notice that Trend enable/disable, Data Storage enable/disable must be set to enable and Batch command must be Start. Batch Command If enabled like this: Trend Enable Data Storage Enable hen stored ike this: Trend Continuous Batch #1 Batch #2 Batch #2 Trend Batch Key: Time Disabled Enabled Disabled Figure 52 Trend storage enable conditions Release E 1/01 UMC800 Control Builder User’s Guide 189 Data Storage Configuration Overview of Data Storage Enable Conditions Point log storage enable conditions Overview Figure 53 shows examples of Point Log Storage Enable conditions. Notice that it occurs unless Point Log Disable or Data Storage Disable is selected. For Batch Point Log storage, notice that all three enables must be on. The figure shows that storage does not actually occur until the Start Time occurs, and then at every Storage Interval thereafter. For On Command Point Log storage, notice the samples are taken the instant Point Log Enable is enabled but not at intervals. Batch Command If enabled like this: Point Log Enable Data Storage Enable Point Log Continuous Then stored like this: Storage starts here Batch #1 Point Log Batch Point Log On Command Disabled Enabled Disabled Batch #2 Single samples 12:00 12:30 1:00 1:30 2:00 Key: Batch #2 Storage starts here Start Time 2:30 3:00 3:30 4:00 Time 4:30 5:00 5:30 6:00 6:30 7:00 Start Time = 1:15 p.m. Storage Interval = 30 minutes Figure 53 Point log storage enable conditions 190 UMC800 Control Builder User’s Guide Release E 1/01 Data Storage Configuration Overview of Data Storage Enable Conditions Alarm/event enable conditions Overview Figure 54 shows examples of Alarm/Event Enable conditions. Notice that Continuous Alarm/Event storage occurs unless Alarm/Event Disable and Data Storage Disable are selected. For Batch Alarm/Event storage, all three enables must be on. Batch Command If enabled like this: Alarm/Event Enable Data Storage Enable Then stored like this: Alarm/Event Continuous Batch #1 Batch #2 Batch #2 Alarm/Event Batch Key: Time Disabled Enabled Disabled Figure 54 Alarm/event storage enable conditions Note 1: Although Alarm Storage is active during the specified time periods, Alarm records will only be saved on active transitions of the alarm status. If no alarm occurs during the active period, the data for that period will be blank. Release E 1/01 UMC800 Control Builder User’s Guide 191 Data Storage Configuration Data Storage Configuration Data Storage Configuration Introduction The data to be collected, along with storage rates and start/stop controls are contained in a data storage file that is loaded through the controller configuration serial port or through the disk drive of the operator Interface. Data storage parameters may be defined using the Control Builder Configuration Software or through a separate User Utility Software program for a PC. Storage parameters may not be established through the operator interface, thereby simplifying operator actions and reducing the potential for accidental entry errors. Accessing the data storage configuration tabs Follow the procedure in Figure 55 to access the “Data Storage Configuration” dialog box. Select “Data Storage” from the “Configure” menu. The “Data Storage Configurations” dialog box will appear. Select a Tab for Configuration Trend Point Log Alarm/Event Figure 55 Accessing the data storage configuration dialog box 192 UMC800 Control Builder User’s Guide Release E 1/01 Data Storage Configuration Data Storage Configuration Trend storage configuration Overview Trend storage will provide the following: Number of Files: Points per Trend: Storage Modes: Storage Interval: External Control: 2 maximum 12 maximum, Analog or Digital Off, Batch, Continuous 2, 5, 10, 20, 50 seconds 1, 2, 5, 10, 20, 30 minutes Digital Tagged Signal – Start/Stop of both Trends Configuration procedure Make sure the Trend tab has been selected. See Figure 56. Select “Trend” tab and see Table 47 for configuration details. Figure 56 Trend configuration tab for data storage configuration Release E 1/01 UMC800 Control Builder User’s Guide 193 Data Storage Configuration Data Storage Configuration Trend configuration details Table 48 lists all the entry fields that appear on the “Trend’ configuration tab with a description of the feature when the field is selected. Table 48 Trend configuration details Feature Description Group Selection Use the pull-down menu and select a Trend Group for configuration. Group Title (Note: This is not displayed on the Operator Interface. It only serves as a reminder for the Control Builder user.) Enter a Group Title. There is a maximum of 24 characters File Name Enter a File Name. There is a maximum of 8 Alpha Numeric characters. (DOS File Name restrictions) Tag List • From the Tag List drop-down menu, select the type of signals you want the tag list to display. • Click on a Tag Name and click ADD>>. The tag name will be added to the “Selected Tags” list. Scaling Signals Scale each tag selected for High and Low values for the Trend Display. Click on the “Scale High” and “Scale Low” fields and enter the value. To delete a signal tag, click on a tag and click Delete. Storage Interval From the Storage Interval drop-down menu, select a storage interval of from 2 seconds to 30 minutes. When Data Storage is enabled, samples will be taken at the interval selected here. Refer to Storage intervals (page 185). 194 UMC800 Control Builder User’s Guide Release E 1/01 Data Storage Configuration Data Storage Configuration Feature Description Data Type Enable Signal This enable signal turns storage on and off for trends. From the pull-down menu, select: NONE – Trend Storage Enable is started/stopped only through the operator interface’s Data Storage Control Menu (defaults to Enable on configuration download), or, ANY DIGITAL TAG – Trend Storage is started/stopped only through the on/off state of the selected Digital Signal. It will not appear on the operator interface’s data Storage Control Menu For detailed information concerning Trend Storage Enable, refer to Trend storage enable conditions (page 189). Storage Mode From the pull-down menu, select a storage mode. Refer to Table 47 for mode definitions. Batch Enable Signal This signal starts and stops storage for Trends configured for “Batch” storage. It does not affect “Continuous” or “On Command” storage selections. From the pull-down menu, select: NONE – Batch is started/stopped only through the operator interface’s Data Storage Control Menu (defaults to Stop on configuration download) ANY DIGITAL TAG – Batch is started/stopped only through the on/off state of the selected Digital Signal. It will not appear on the operator interface’s data Storage Control Menu For detailed information concerning Data Storage Enable, refer to Overview of Data Storage Enable Conditions (page 187). Rollover Click this box to allow data storage to continue collecting data in a circular storage mode where the oldest data is discarded as new data is collected. Clear this box to allow data storage to stop collecting data when the file is full. You can configure a Warning Level for Disk Full %. Warning Level If you do not select rollover, enter a percent in the appropriate box. Release E 1/01 UMC800 Control Builder User’s Guide 195 Data Storage Configuration Data Storage Configuration Point Log storage configuration Overview Point Log storage will provide the following: Number of Files: Points per File: Storage Modes: Storage Interval: (all relative to start time) External Control: One 12 maximum, Analog or Digital Off, Batch, Continuous, On Command 1 to 60 minutes, one minute increments 1 to 24 hours, one hour increments 1 to 30 days, one day increments One month, same day of each month Digital Tagged signal - start/stop storage to file - On Demand sampling Configuration procedure Make sure the Point Log tab has been selected. See Figure 57. Select “Point Log” tab and see Table 48 for configuration details. Figure 57 Point log configuration tab for data storage configuration 196 UMC800 Control Builder User’s Guide Release E 1/01 Data Storage Configuration Data Storage Configuration Point log configuration details Table 49 lists all the entry fields that appear on the “Point Log’ configuration tab with a description of the feature when the field is selected. Table 49 Point log configuration details Feature Description File Name Enter a File Name. There is a maximum of 8 Alpha Numeric characters. (DOS File Name restrictions) Tag List • From the Tag List pull-down menu, select the type of signals you want the tag list to display. • Click on a Tag Name and click ADD>>. The tag name will be added to the “Selected Tags” list. Scaling Signals Scale each tag selected for High and Low. Click on the “Scale High” and “Scale Low” fields and enter the value. To delete a signal tag, click on a tag and click Delete. Data Type Enable Signal This enable signal turns storage on and off for Point Logs. From the drop-down menu, select: NONE – Point Log Storage Enable is started/stopped only through the operator interface’s Data Storage Control Menu (defaults to Enable on configuration download), or ANY DIGITAL TAG – Enable is started/stopped only through the on/off state of the selected Digital Signal. It will not appear on the operator interface’s data Storage Control Menu For detailed information concerning Data Storage Enable, refer to Overview of Data Storage Enable Conditions (page 187). Storage Mode From the drop-down menu, select a storage mode. Refer to Table 47 for mode definitions. Release E 1/01 UMC800 Control Builder User’s Guide 197 Data Storage Configuration Data Storage Configuration Feature Description Storage Interval [Refer to Storage intervals (page 185).] NOTE: For On Command storage mode, there is no storage interval or start time. (They are not used.) • Click on “Change”. The “Storage Interval” dialog box will appear. • Click on the radio button for Minutes, Hours, or Days and select a storage interval from the Edit box. Or, click on the radio button for “Once a Month”. • Click OK. Start Time [Refer to Storage intervals (page 185).] NOTE: For On Command storage mode, there is no storage interval or start time. (They are not used.) • Click on “Change”. The “Change Time” dialog box will appear. • In the Edit box in each field, select a start time. • Click OK. Batch Enable Signal This signal starts and stops storage for Point logs configured for “Batch” storage. It does not affect “Continuous” or “On Command” storage selections. From the pull-down menu, select: NONE – Batch is started/stopped only through the operator interface’s Data Storage Control Menu (defaults to Stop on configuration download) ANY DIGITAL TAG – Batch is started/stopped only through the on/off state of the selected Digital Signal. It will not appear on the operator interface’s data Storage Control Menu For detailed information concerning Data Storage Enable, refer to Overview of Data Storage Enable Conditions (page 187). Rollover Click this box to allow data storage to continue collecting data in a circular storage mode where the oldest data is discarded as new data is collected. Clear this box to allow data storage to stop collecting data when the file is full. You can configure a Warning Level for Disk Full %. Warning Level If you do not select rollover, enter a percent in the appropriate box. 198 UMC800 Control Builder User’s Guide Release E 1/01 Data Storage Configuration Data Storage Configuration Alarm/event storage configuration Overview Alarm/Event storage will provide the following: Number of Files: Records per File: Data Types: Storage Modes: External Control: One each 150 maximum All Alarms – 120 maximum, Time/Date, On/Off All Events – 32 maximum, Time/Date, On/Off Off, Batch, Continuous Digital Tagged Signal – Start/Stop storage to file Configuration procedure Make sure the Alarm/Event tab has been selected. See Figure 58. Select “Alarm/Event” tab and see Table 49 for configuration details. Figure 58 Alarm/event dialog tab for data storage configuration Release E 1/01 UMC800 Control Builder User’s Guide 199 Data Storage Configuration Data Storage Configuration Alarm/event configuration details Table 50 lists all the entry fields that appear on the “Alarm/Event’ configuration tab with a description of the feature when the field is selected. Table 50 Alarm/event configuration details Feature Description Alarm File Name Enter a File Name. There is a maximum of 8 Alpha Numeric characters. (DOS File Name restrictions) Event File Name Enter a File Name. There is a maximum of 8 characters Data Type Enable Signal This enable signal turns storage on and off for Alarm/Events. From the drop-down menu, select: NONE – Alarm/Event Storage Enable is started/stopped only through the operator interface’s Data Storage Control Menu (defaults to Enable on configuration download), or ANY DIGITAL TAG – Enable is started/stopped only through the on/off state of the selected Digital Signal. It will not appear on the operator interface’s data Storage Control Menu For detailed information concerning Data Storage Enable, refer to Overview of Data Storage Enable Conditions (page 187). Storage Mode From the drop-down menu, select a storage mode. Refer to Table 47 for mode definitions. Batch Enable Signal This signal starts and stops storage for Alarm/Events configured for “Batch” storage. It does not affect the “Continuous” storage selection. From the drop-down menu, select: NONE – Batch is started/stopped only through the operator interface’s Data Storage Control Menu (defaults to Stop on configuration download), or ANY DIGITAL TAG – Batch is started/stopped only through the on/off state of the selected Digital Signal. It will not appear on the operator interface’s Data Storage Control Menu For detailed information concerning Data Storage Enable, refer to Overview of Data Storage Enable Conditions (page 187). 200 UMC800 Control Builder User’s Guide Release E 1/01 Data Storage Configuration Data Storage Configuration Feature Description Rollover Click this box to allow data storage to continue collecting data in a circular storage mode where the oldest data is discarded as new data is collected. Clear this box to allow data storage to stop collecting data when the file is full. You can configure a Warning Level for Disk Full %. Warning Level If you do not select rollover, enter a percent in the appropriate box. Release E 1/01 UMC800 Control Builder User’s Guide 201 Data Storage Configuration Digital Event Configuration Digital Event Configuration Overview Digital event recording is available to store up to 150 on and off transitions of up to 32 digital events in the alarm event file provided by the Data Storage function. Event List configuration lets you set up a list of digital events that can be archived during data storage. You can select the events from a list of all digital tags or from a list of only digital signals or only digital variables. Event list configuration (digital) Follow the procedure in Figure 59 to access the “Configure Event List” dialog box. 1. Enter a title for the event list. Select “Events” from the “Configure” menu. The “Configure Event List” dialog box will appear. 3. Click on each tag name you want included in the list. Click OK. 2. Select the type of tags you want displayed. 4. Click on ADD. The selected tag or variable will be placed in the next available position in 6. The selected tags will appear on the event list. 5. To delete a selected tag name, click on the position of the tag name, then click Figure 59 Accessing the configure event list dialog box 202 UMC800 Control Builder User’s Guide Release E 1/01 On-line Monitoring and Diagnostics Overview On-line Monitoring and Diagnostics Overview On-line monitoring On-line monitoring lets you test and debug the developed control strategy. It is not intended as an operator interface. It allows a dynamic view of Function Block parameters in the controller using the Function Block Diagram as a block selection aid. The changes do not affect the database file on the PC hard disk. Additional controls on the live monitoring dialog box of Loop Control Function Blocks, such as PID, ON/Off, TPSC, and Carbon, will handle Mode changes and Accutune initiation. Diagnostics The LCB provides live monitoring of Controller and I/O Module diagnostics. The instrument executes diagnostic routines during instrument start-up and during on-line operation. This section includes tables of status indications, possible cause, and actions to correct the problem. What’s in this section? The following topics are covered in this section. Topic Release E 1/01 See Page Overview 203 Putting the Controller into Run Mode 204 Selecting a Block for Monitoring 205 Selecting a Parameter 206 Monitoring Loop Block Types 207 Forcing an Output 210 Controller Diagnostics 212 I/O Module Diagnostics 217 UMC800 Control Builder User’s Guide 203 On-line Monitoring and Diagnostics Putting the Controller into Run Mode Putting the Controller into Run Mode Introduction Before you can monitor a Function Block: • the Function Block Diagram must be downloaded [refer to How to Download a Control Strategy (page 141)], and the switch on the controller file must be placed in RUN mode. See Figure 60. OFFLINE RUN PROGRAM CONFIGURATION Controller Mode Switch POWER LoBAT FORCE BAT DISPLAY CPU Module h Tadiran TL5101/S Replac e battery wit only . Us e of another battery may present a ris k offire or ex plos ion. See us ers guide for ins truc tions . RUN _ 100 - 240 V ~ 50 / 60 Hz 100 VA MAX. Figure 60 Run mode 204 UMC800 Control Builder User’s Guide Release E 1/01 On-line Monitoring and Diagnostics Selecting a Block for Monitoring Selecting a Block for Monitoring Introduction The procedure for selecting a function block and monitoring it is given in Figure 61. 1. Select a block on the function block diagram. (Click on it.) A dotted line will appear around it. 2a. Select “Monitor’ from the Communications menu OR 2b. Right click on the function block and select “Monitor”. The “Live Monitor” Dialog box will open and display the various parameters that can be monitored and/or that can be changed for testing and debugging purposes. The example below shows a Live Monitor dialog box for a PID Function Block. Figure 61 Selecting a block for monitoring Release E 1/01 UMC800 Control Builder User’s Guide 205 On-line Monitoring and Diagnostics Selecting a Parameter to Change Selecting a Parameter to Change Introduction To select a parameter in the “Live Monitor” dialog box, click on the name of the parameter or use the Up/Down keys to select a parameter. Read only If you click on a parameter that is “Read Only” the WRITE button will be grayed out. Write to a contained parameter Some blocks allow you to change contained parameters [for example: Bias and Failsafe values of an AI (Analog Input) block] through the “Live Monitor” dialog box. When a contained parameter can be written to, the write button will be enabled. Enter the value in the entry field and click “WRITE”. The value for the parameter selected will change to the value entered. See Figure 62. Note that the same procedure applies for all monitored function blocks. 2. Enter a value. 3. Click on Write button. 1. Select a Parameter. Figure 62 Selecting a parameter 206 UMC800 Control Builder User’s Guide Release E 1/01 On-line Monitoring and Diagnostics Monitoring Loop Block Types Monitoring Loop Block Types Introduction The Loop Block Types are PID, On/Off, TPSC, and Carbon. In addition to changing contained parameters, controls on the live monitoring dialog box of Loop Control Function Blocks will handle Mode changes and Accutune initiation. Mode settings The radio button groups on the Loop block dialog boxes let you select Setpoint mode and Output mode. The Mode change will also be reflected in the Live Monitor dialog box under “MODE”. See Figure 63. Choose the Mode for use in the next change request. Click on “Change Mode”. Current Mode will show in this field. Figure 63 Changing modes Accutune The PID, TPSC, and Carbon function blocks support Accutune. The On/Off function block does not. You can initiate Accutune by selecting Accutune from the list of parameters and enabling it and activating the “Accutune” button on the live monitor dialog box. The Accutune button will remain depressed and disabled until the controller completes the operation. To abort Accutune in the UMC800 put the loop in manual mode. Release E 1/01 UMC800 Control Builder User’s Guide 207 On-line Monitoring and Diagnostics Monitoring Loop Block Types Follow the procedure in Figure 64 to initiate Accutune. See Figure 63. 2. Select Accutune from the list of parameters. 3. Select “Enable” from the pull down menu. 1. Place the Output in AUTO mode. See Figure 61. Figure 64 Initiating Accutune Changing loop block parameters You can change the local Setpoints, Output, and Tuning constants in the dialog’s main list control. Select the parameter and the Write button and adjacent edit box will be enabled to allow changes. Follow the procedure in Figure 65 to change a parameter. Note that the same procedure applies for all monitored Loop blocks. The example shows a subset of the PID block parameters. Refer to Table 51 for a full list of Read/Write parameters for each Loop Block type. Note: A write to local setpoint 2 will only succeed if the block’s “SP Units” parameter is set to use “LSP2”. 2. Enter a value. 1. Select a Parameter. 3. Click on Write button. Figure 65 Procedure to change loop block parameters 208 UMC800 Control Builder User’s Guide Release E 1/01 On-line Monitoring and Diagnostics Monitoring Loop Block Types Table 51 Loop block parameters Parameter R/W (Read/Write) Loop Block Type PID OnOff TPSC Carbon Block Status X X X X R Mode X X X X R/W Process Variable X X X Note 1 R Working Setpoint X X X X R Local Setpoint 1 X X X X R/W Local Setpoint 2 X X X X R/W Manual Output Value X X X X R Out X X X X R/W (Man) Alarm 1 X X X X R Alarm 2 X X X X R Accutune X X X R/W Accutune in Progress X X X R Gain X X X R/W (Note 2) Rate (minutes) X X X R/W (Note 2) Reset (minutes) X X X R/W (Note 2) Use Tune Set 2 X X X R/W Gain2 X X X R/W (Note 2) Rate2 X X X R/W (Note 2) Reset2 X X X R/W (Note 2) Ratio/Bias type X X X R Ratio X X X R/W Note 1: The Carbon monitoring dialog also shows the following parameters: Local %CO, Furnace Factor, Anti-soot enable, Low Temp Trip, and Percent Hydrogen. Note 2: Tuning Constants will be Read-Only when Autotune is in progress. Release E 1/01 UMC800 Control Builder User’s Guide 209 On-line Monitoring and Diagnostics Forcing an Output Forcing an Output Overview The ability to force the output [pin] of function blocks and variables from the Control Builder is provided as an aid to startup and configuration troubleshooting. The feature is limited to single output per block. The majority of blocks have a single output, and most of the multiple output blocks have an obvious primary (i.e. most important) output. This may apply to the block’s primary analog output (such as for an AI block) or digital output of a logic block (such as for a DI or DO block). Some blocks (i.e. Loop Blocks) do not have a forcible output. It is not possible to force function block outputs from the Operator Interface. Variables, which are normally set to 0 on download of a new configuration or a change in configuration can have their output value changed on-line. You can also preset value of a variable using an initialization procedure via function blocks. Refer to Appendix D – Controller Initialization which shows the use of a recipe block or write variable block for this purpose. You can also display a list of blocks that are presently being forced. All forced outputs are cleared by a CONTROLLER COLD START. CAUTION During Live-Monitoring (especially fast logic), it is possible to see transient states where the block output is inconsistent with its input values. This occurs because it is possible for the input values and outputs values to be taken from different controller execution cycles. Therefore either the viewed inputs or outputs may be "older". Solution: Recognize this possibility when interpreting results. Use forcing if necessary to create and assess static conditions. Forcing an output Follow the procedure in Figure 66 to force an output. 3. Click “WRITE”. The output value will change to the value entered for forcing. 4. To remove forcing, click on “ Remove Force”. The original selection for the parameter will return. . 1. Select OUT in the dialog box. 2. Enter the output value in the entry field. . Figure 66 Force an output 210 UMC800 Control Builder User’s Guide Release E 1/01 On-line Monitoring and Diagnostics Forcing an Output Changing (forcing) a digital value from ON to OFF • Select “ON” or “OFF” from the drop down list box and click “WRITE”. The selection for the parameter selected will change to the selection entered for forcing. If there is a problem with the forcing • Check the Controller Diagnostic summary (Controller Diagnostics) status indications to see if there is a problem. Make sure the controller is in “RUN “ mode. Displaying forced outputs Follow the procedure shown below to display a list of forced outputs. Select “Show Forces” from the “Communications” menu. A list of function blocks with forced outputs will appear here. The “Blocks with Forced Outputs” dialog box will appear. Release E 1/01 UMC800 Control Builder User’s Guide 211 On-line Monitoring and Diagnostics Controller Diagnostics Controller Diagnostics Introduction The LCB provides live monitoring of Controller diagnostics. The instrument executes diagnostic routines during instrument start-up and during on-line operation. Follow the procedure in Figure 67 to access the Controller Diagnostic Summary dialog box. Refer to Table 52 for status indications, possible cause, and actions to correct the problem. Select “Controller Diagnostics” from the “Communication” menu. The “Controller Diagnostic Summary” dialog box will appear. The summary will provide status of the parameters shown in the list. See Table 51 for Status list. Figure 67 Accessing the controller diagnostic summary list ATTENTION If the Real Time Clock (RTC) status is “NOT GOOD” then the controller time value will be incorrect. 212 UMC800 Control Builder User’s Guide Release E 1/01 On-line Monitoring and Diagnostics Controller Diagnostics Details of controller diagnostics Table 52 lists the status indications, possible cause, and actions to correct the problem Table 52 Details of controller diagnostic summary Class Status Possible Cause Controller Action User Action SYSTEM GOOD Controller is in RUN mode. Executes the run mode. Outputs are updated. None SYSTEM OFF-LINE MODE Controller is in OFFLINE mode. Allows calibration. Outputs are updated. Return to RUN mode as appropriate. SYSTEM PROGRAM MODE Controller is in PROGRAM mode. Controller outputs are disabled. Return to RUN mode as appropriate. SYSTEM INVALID CONFIG A configuration of more than 8 loops was downloaded to an 8 loop controller. Empty database created. Download previous valid configuration. SYSTEM SWITCH FAULT Bad switch Controller outputs are disabled. 1. Toggle controller switch between RUN and PROGRAM. 2. Replace CPU board. SYSTEM TASK FAULT Software failure Controller outputs are disabled. 1. Force a cold start by toggling controller switch between PROGRAM and RUN. 2. Upgrade Controller software. 3. Replace CPU board. 4. Contact Honeywell service. CPU GOOD N/A N/A CPU WATCHDOG Watchdog reset resulting from software failure. Executes normally. N/A 1. Force a cold start by toggling switch between PROGRAM and RUN. 2. Upgrade Controller software. 3. Replace CPU board. 4. Contact Honeywell Personnel. Release E 1/01 UMC800 Control Builder User’s Guide 213 On-line Monitoring and Diagnostics Controller Diagnostics Class CPU Status BUS ERROR Possible Cause Bus Error detected Controller Action Executes normally. User Action 1. Force a cold start by toggling switch between PROGRAM and RUN. 2. Isolate system from noise and force a cold start. 3. Replace CPU board. CPU ADDRESS ERROR Address Error detected Executes normally. 1. Force a cold start by toggling switch between PROGRAM and RUN. 2. Isolate system from noise and force a cold start. 3. Replace CPU board. CPU INSTRUCTION ERROR Bad Instruction detected Executes normally. 1. Force a cold start by toggling switch between PROGRAM and RUN. 2. Isolate system from noise and force a cold start. 3. Replace CPU board. CPU VECTOR ERROR Bad Vector Interrupt Executes normally. 1. Force a cold start by toggling switch between PROGRAM and RUN. 2. Isolate system from noise and force a cold start. 3. Replace CPU board. CPU SPURIOUS INTERRUPT Spurious Interrupt Executes normally. 1. Force a cold start by toggling switch between PROGRAM and RUN. 2. Isolate system from noise and force a cold start. 3. Replace CPU board. MEMORY GOOD N/A N/A N/A MEMORY LOW BATTERY Battery voltage is low. Executes normally. Replace battery. MEMORY FLASH ERROR Flash failed to burn. Executes normally. 1. Force a cold start by toggling switch between PROGRAM and RUN. 2. Replace CPU board. RTC 214 GOOD N/A N/A UMC800 Control Builder User’s Guide N/A Release E 1/01 On-line Monitoring and Diagnostics Controller Diagnostics Class Status Possible Cause Controller Action RTC NOT PROGRAMMED RTC not programmed Time and date is set to 00:00:00, January 1, 1970. RTC BAD DATA Bad date and time Time and date is to 00:00:00, January 1, 1970. User Action Program Real Time Clock (RTC) 1. Program RTC. 2. Disconnect then reconnect power. 3. Replace CPU. 4. Replace boards in backplane. 5. Replace backplane. RTC BATTERY FAILURE RTC battery failed on power-up. Time and date is set to 00:00:00, January 1, 1970. 1. If LO BAT LED is OFF, cycle power. 2. If LO BAT LED is ON, replace battery and cycle power. RTC PROGRAMMING FAILURE RTC failed to program. Time and date is set to 00:00:00, January 1, 1970. 1. Program RTC. 2. Disconnect then reconnect power. 3. Replace CPU. 4. Replace boards in backplane. 5. Replace backplane. RTC READ FAILURE Unable to read RTC. Time and date is set to 00:00:00, January 1, 1970. 1. Program RTC. 2. Disconnect then reconnect power. 3. Replace CPU. 4. Replace boards in backplane. 5. Replace backplane. I/O GOOD N/A N/A N/A I/O MODULE ERROR One of the I/O board diagnostics failed. N/A Access the I/O Module diagnostics display. I/O BAD BACKPAN Bad backplane EEPROM Analog inputs use default coefficients. 1. Disconnect then reconnect power. 2. Replace backplane board. Release E 1/01 UMC800 Control Builder User’s Guide 215 On-line Monitoring and Diagnostics Controller Diagnostics Class I/O Status BAD BACKPAN ID Possible Cause Incompatible backplane board Controller Action Analog inputs use default coefficients. User Action 1. Disconnect then reconnect power. 2. Replace backplane board. COMM A Port Status COMM B Port Status 216 GOOD N/A N/A N/A REQUIRES SETUP Both the Comm Port and the main CPU board have a default address (255). PORT setting is set to disabled. Initialize the Modbus address. FORCED OFFLINE The main CPU and Comm Port had a configuration mismatch. If the Comm Port had a default address, the main CPU settings are used. If the main CPU had a default address, the Comm Port settings are used. If the main CPU and the Comm Port both had valid addresses, the Comm Port settings are used. In all cases, the PORT setting is set to disabled. Check Modbus settings and set PORT to enabled. BOARD FAILURE The Comm Port hardware has a serious failure. Executes normally. Replace Comm Port. BOARD NOT FOUND The control file has a non-default address and no Comm Port is installed. Executes normally. Install Comm Port or set address to 255. GOOD N/A N/A N/A BOARD FAILURE The Comm Port hardware has a serious failure. BOARD NOT FOUND The control file configuration requires a master Port and no Comm Port is installed. Executes normally. All Modbus Read block outputs are frozen at their last values. Executes normally. UMC800 Control Builder User’s Guide Replace Comm Port. Install Comm Port or download a configuration that has no Modbus Slave blocks. Release E 1/01 On-line Monitoring and Diagnostics I/O Module Diagnostics I/O Module Diagnostics Introduction The LCB provides live monitoring I/O Module diagnostics. The instrument executes diagnostic routines during instrument start-up and during on-line operation. Follow the procedure in Figure 68 to access the I/O Module Diagnostic Summary dialog box. Refer to Table 53 for status indications, possible cause, and actions to correct the problem. Select “I/O Module Diagnostics” from the “Communication” menu. The “I/O Module Diagnostic Summary” dialog box will appear. The summary will provide status of the Modules shown in the list. See Table 52 for Status list. Figure 68 Accessing I/O module diagnostics Release E 1/01 UMC800 Control Builder User’s Guide 217 On-line Monitoring and Diagnostics I/O Module Diagnostics Details of I/O module diagnostics Table 53 lists the status indications, possible cause, and actions to correct the problem. Table 53 Details of I/O module diagnostic summary Class MODULE 1 through MODULE 16 Status Possible Cause Controller Action GOOD Module matches the configuration OR the module is not present in the control configuration. N/A HI CJ TEMPERATURE High cold junction temperature on AI module. Executes normally. User Action N/A 1. Improve ventilation to rack. 2. Replace AI module. WRONG MODULE The module does not agree with the module required for the control configuration. These block types do the following: Replace module or check configuration. AI - sets its output to failsafe DI - sets its output to OFF NO MODULE No module found in the slot that requires a module for the control configuration. These block types do the following: Install the module. AI - sets its output to failsafe DI - sets its output to OFF BAD MODULE Analog input or analog output board does not have factory coefficients, or the I/O board is not a supported type. If the error is an analog input board with no factory coefficients, default coefficients will be used for the cold-junction calculations. Replace module. If the error is an analog output board with no factory coefficients, default coefficients will be used for the outputs. If the board is an unsupported type, these block types do the following: AI - sets its output to failsafe DI - sets its output to OFF 218 UMC800 Control Builder User’s Guide Release E 1/01 Uploading a Database from the Controller Overview The UMC800 Control Builder provides the ability to upload the present database from the controller file and back build the original function block diagram. You can also upload the present database into a new function block diagram file (.FBD) that you have created on the control builder. REFERENCE Configuration can also be uploaded to the operator interface using a floppy disk. Refer to the UMC800 Operator Interface User Guide, Document 51-52-25-62, for procedures. What’s in this section? The following topics are covered in this section. Topic See Page Overview 219 Uploading the Database 219 Uploading the Database Introduction Before you can upload a database from the controller file, you need to create a file into which the existing database will upload. The database is stored in the controller without a file name. Open a new file into which to do the database upload. After you have uploaded the existing database in the controller into the file, assign a new name (.FBD) to the file that is open or replace an existing .FBD file from the PC hard drive. Uploading current database from the controller Step Action 1 Select “NEW” from the “FILE” menu. A new Function Block Diagram screen will appear in the control builder window. Graphic/Result If the “Communication” menu is not present on the menu bar, the full menu bar will appear. Release E 1/01 UMC800 Control Builder User’s Guide 219 Uploading a Database from the Controller Uploading the Database Step 2 Action Graphic/Result From the “Communications” menu, select “Upload”. The “Upload File” dialog box will appear. It will state the file name and path. It will state the “Status” as READY. 3 Click “START”. A message box may open and advise that if the controller is in the RUN mode, changes made during upload may not be captured. Click “OK”. The “Status” will report the current action and will show a “Percentage Complete” in that field. When the upload is complete the “Status” will show “Upload Complete”. 4 Click “Close”. The database will appear in the active window. 5 Select “SAVE” from the “FILE” menu. The “SAVE AS” dialog box will appear. • Click on a file name or assign a new file name to the file in the “File Name” field. • Click “SAVE”. If there is a problem with the upload, a failure message will appear. Check your comm Set Up for correct settings. NOTE: If the Control Builder uploads or downloads while the Operator Interface is doing one or the other, the following error message will appear: BAD SEQUENCE NUMBER 220 UMC800 Control Builder User’s Guide Release E 1/01 Configuration File Write Protection Adding and Removing Write Protection Introduction The UMC800 Control Builder provides an optional configuration file Write protection. All the files default to “No Protection”. Through the FILE menu, you can enter a password to write protect each file. You can also remove Write protection using the same password. Adding write protection to a file Step Action Graphic/Result 1 From the “File” menu, select “Write Protect”. 2 When the "Configuration File Write Protection" dialog box appears, enter a password for the file in the “New Password” field (up to 14 characters). 3 Re-enter the password in the “Confirm New Password” field. 4 Click “OK”. The file will be WRITE protected when saved. You may continue to edit the document. The next time it is opened, the password is needed to open it for editing and saving. To remove Write Protection, refer to Removing write protection from a file (page 222). Release E 1/01 UMC800 Control Builder User’s Guide 221 Configuration File Write Protection Adding and Removing Write Protection Opening a write protected file Step Action Graphic 1 From the “File” menu, select “Open”. 2 Select the file you want to open from the list of files in the dialog box. 3 Enter the password for that file, then press “OK” or “Cancel Open”. Removing write protection from a file Step 1 Action Result From the “File” menu, select “Unprotect”. NOTE: If the file is not “Write Protected”, this word will be grayed out. 2 When the "Remote Write Protection" dialog box appears, enter the password for the file in the “Password” field, then click “OK”. 3 When the question box appears, click "Yes" to confirm that you want to remove file password protection. Write protection is removed from the file. (“Unprotect” will be grayed out on the file menu.) If you want to Write Protect the file again, refer to Adding write protection to a file (page 221). 222 UMC800 Control Builder User’s Guide Release E 1/01 Appendix A - Logic Application Examples Overview Introduction The controller offers up to 66 digital inputs or outputs and uses digital function blocks to perform logic operations and sequences. • The UMC800 logic function blocks will replace from 40 to 60 rungs of ladder logic on the average (for straight combinations or Boolean functions, timing and counting) assuming an average of 6 logic functions per rung consuming 3-4 blocks. • Extensive PLC ladder logic used for analog functions, PID, setpoint programmer, alarms, interface with operator interface, pushbuttons, lamps is replaced by UMC800 function blocks and displays. (Extensive conditional alarming may expand logic requirements) • All logic blocks are executed in order according to sequence. • All fast logic, logic blocks are executed and outputs updated in 100ms - used to capture faster transitions such as a pushbutton depression on a panel. • All normal logic blocks are executed at analog update rate. • You can mix fast and analog scan time logic blocks. • If you wish Discrete Input function blocks to be scanned prior to execution of succeeding blocks, renumber their sequence order ahead of these blocks. • You can place any number of connections to the output of a block, or if using signal tags for this purpose, they may be used anywhere. • Internal signal tags used to transfer statuses to other logic circuits do not consume blocks. Release E 1/01 UMC800 Control Builder User’s Guide 223 Appendix A - Logic Application Examples Overview What’s in this section? The following Examples are covered in this section. Topic • Basic PLC Ladder Logic 224 See Page 225 − Example 1 Basic Series Circuit 225 − Example 2 Basic Series-Parallel Circuit 226 − Example 3 Series-Parallel Circuit expanded to include a Normally Closed Contact in series with the series-parallel circuit 226 − Example 4 Extension of Example 3 to include more permissive limit switch and pressure switch contacts, plus a second output to turn on a panel lamp 227 − Example 5 Free Form Logic-Boolean Expressions 228 • Basic Start/Stop Circuit Example 229 • Motor Starters with Permissives 230 • On and Off Delay Timers 231 − Example 1 Basic Start/Stop circuit with On Delay Timer 231 − Example 2 Using On Delay Timers for Time Duration 232 − Example 3 Using Off Delay Timers for Time Duration 232 • Retentive Timers/Counters 233 • Furnace Relay Ladder Logic Conversion Example 234 • Loop and Logic Integration 235 − Example 1 Series-Parallel Circuit expanded to include a Normally Closed Contact in series with the series-parallel circuit and includes interaction with statuses from the control loop and SP Programmer events 235 − Example 2 Control OFF of the Lowest of 3 Thermocouples 235 UMC800 Control Builder User’s Guide Release E 1/01 Appendix A - Logic Application Examples Basic PLC Ladder Logic Basic PLC Ladder Logic Example 1 - Basic PLC ladder logic “120 VAC Power Rails” This is a basic series circuit. If Limit Switch 1(LS1) is ON and Limit Switch 2 (LS2) is ON, Solenoid 1 is turned ON. Note LS1 and LS2 are shown in their normal state, wired as Normally Open. When LS1 and LS2 are ON that is their “logic true” state, allowing “power flow” through to the solenoid. Equivalent Boolean Logic Expression A A = LS1 C AND B = LS2 B C = Output LS 1 LS 2 (NO (NO Contact) Contact) SOL 1 Coil AND Symbol A*B=C UMC 800 Logic This uses a basic 2 Input AND block connected to a single output. 4 Function blocks are used. Release E 1/01 UMC800 Control Builder User’s Guide 225 Appendix A - Logic Application Examples Basic PLC Ladder Logic Example 2 - Basic PLC ladder logic This is a basic series-parallel circuit. If Limit Switch 1 (LS1) is ON and Limit Switch 2 (LS2) is ON, or if pushbutton PB1 is ON, then Solenoid 1 is turned ON, otherwise it is OFF. Note “power flow” can be delivered in either of two paths to the solenoid. LS 1 A C = PB1, D = Output B AND OR SOL 1 Coil PB1 Equivalent Boolean Logic Expression A = LS1, B = LS2 LS 2 AND Symbol D OR Symbol (A * B) + C = D C UMC 800 Logic This uses a basic 2 Input AND block and a 2 Input OR block. 6 Function blocks are used. Example 3 - Basic PLC ladder logic Example 2 is expanded by adding a Normally Closed (NC) Contact in series with the series-parallel circuit. In PLC logic, if Pump B is OFF (the logic true state for an NC contact), then “power flow” will be allowed through to SOL 1. This is equivalent to a Boolean NOT. LS 1 PB1 LS 2 PumpB SOL 1 Coil (NC Contact) Equivalent Boolean Logic and Expression A = LS1, B = LS2 C = PB1, D = Pump B E = Output A B Boolean NOT Symbol AND C OR D AND ((A * B) + C)*D = E NOT Symbol UMC 800 Logic Another discrete input is added plus a 2-In AND block. Note that the DI6 block (PUMP B) is inverted (DI dialog box selection) without adding an Inverter block. 8 Function blocks are used. 226 UMC800 Control Builder User’s Guide Release E 1/01 Appendix A - Logic Application Examples Basic PLC Ladder Logic Example 4 - Basic PLC ladder logic This expands the Example 3 to include more permissive limit switch and pressure switch contacts. In addition, a second output is activated to turn on a panel lamp. LS 1 LS 2 PB1 PumpB PS1 PS2 (NC Contact) LS4 SOL1 Pump A On Equivalent Boolean Logic Expression Boolean NOT symbol (negative logic) ((A * B) + C)*D*E*F*G = Output to this point UMC 800 Logic This uses a basic 2 Input AND block, a 2 Input OR block, and an 8 Input AND block. UMC logic blocks allow any input to be Negated, removing the need for Inverter blocks. This is done for the Pump B input. Note that Negated inputs (Logic NOT) are specified for pins 6, 7 and 8 for unused inputs (which are normally set to 0) to make them “logic 1” so only the used pin inputs 1 thru 5 affect the AND function). Also, multiple DO outputs may be connected to any logic block as shown. 12 Function blocks are used. Release E 1/01 UMC800 Control Builder User’s Guide 227 Appendix A - Logic Application Examples Basic PLC Ladder Logic Example 5 - Basic PLC ladder logic Free Form Logic- Boolean Expressions - Example 5 Rather than using individual logic function blocks, a boolean expression may be entered directly using the Free Form Logic block which accepts up to 8 inputs. This can save function blocks. The inputs may come from other blocks with discrete outputs, DI’s, or digital signal tags. The example below is a direct entry of the Example 4 boolean expression, with the ouput connected to two DO’s. The Free Form Logic popup dialog box is also shown indicating format for expression entry. Note that Input H is unused. You may use multiple levels of parenthesis to generate the boolean expression. There is no limit to the number of these blocks. This implementation uses 10 function blocks, saving 2 blocks vs. Example 4. 228 UMC800 Control Builder User’s Guide Release E 1/01 Appendix A - Logic Application Examples Basic Start/Stop Circuit Example Basic Start/Stop Circuit Example Basic Start/Stop Circuit Start PB1 The basic PLC start/stop circuit may be used to start a process, turn on motors, etc. With PB2 normally wired as a normally closed STOP pushbutton (but shown as a normally open contact in PLC ladder logic), an activation of the PB1 pushbutton turns on 1M (Motor 1). The motor starter switch 1M contact is detected ON in the next scan cycle, latching the startup circuit. Depression of PB2 opens circuit, causing Stop. 1M PLC Ladder logic Stop PB 2 1M Motor Equivalent Boolean Logic and Expression A = PB1, B = 1M C = PB2, D = Output UMC 800 Logic A B OR AND D (A + B) * C = D C The UMC solution could use a latch block (4 blocks total) with no motor switch contact feedback or logic blocks as shown incorporating motor switch contact (6 blocks total). Release E 1/01 UMC800 Control Builder User’s Guide 229 Appendix A - Logic Application Examples Motor Starters with Permissives Example Motor Starters with Permissives Example Motor Starters with Permissives - Relay Logic Conversion This relay logic is part of a furnace startup involving a series of motor starters. Each starter switch 1M thru 5M must be confirmed closed for continued operation and latchin after the Start switch is pressed. The Stop switch is again shown normally closed. Internal motor overload contacts are in series with the starter switches, any one of which will cause shutdown or prevent startup. Internal motor overload contacts Motor Starters with Permissives - UMC 800 Logic This is the conversion from the relay ladder logic (the internal motor overload contacts are assumed to be wired in series at the motor, then to the starter switches). The multiple AND for the motor starter switch permissives, (IM, 2M, 4M, 5M) converted first, with that output ORed with the Start pusbutton switch, which is ANDed with the Stop pushbutton. The Stop pushbutton is wired as normally closed (push to opencircuit), therefore, is not negated. All outputs to the motors can be connected in common to the AND9 output. 14 function blocks 230 UMC800 Control Builder User’s Guide Release E 1/01 Appendix A - Logic Application Examples On and Off Delay Timers On and Off Delay Timers Example 1 - Basic start/stop circuit with On delay timer Start Stop On Lamp PLC Ladder Logic An ON Delay timer is added to a basic Start/Stop circuit which activates the ON Lamp. In ladder logic, the DO1 contact status is used to activate the timer and latch in the start pushbutton action. After 20 sec., SOL4 (DO2) is turned ON which is held as long as DO1 is ON. DO 1 Start/Stop Circuit DO 1 SOL 4 DO1 On Timer 1 20 SEC PUMP 1 DO 2 UMC 800 Logic The Start/Stop latch circuit is used since no external confirmation is needed. In this example, the Operator Panel pushbutton switches (F1 and F2) are used to substitute for panel switches. The Push Button function block is used to assign Start to F1 and Stop to F2. The latch output turns on the ON Lamp and starts the timer. After 20 sec., Solenoid 4 is activated. Note: the ON and OFF Delay timers are reset after timeout or if the logic state to the input goes to logic 0 (or low). 5 Function Blocks Release E 1/01 UMC800 Control Builder User’s Guide 231 Appendix A - Logic Application Examples On and Off Delay Timers Example 2 - Using On delay timers for time duration Start Stop On Lamp DO 1 PLC Ladder Logic DO 1 The application requirement is to turn on a pump, a compressor, etc. for a fixed period of time - a common use for timers. This application, the turn on of Pump2 for 300 sec., requires two additional rungs of ladder logic. After SOL4 is turned ON, SOL 5 (Pump 2) is also turned ON since CR1 (NC) is OFF (logic true). When ON Delay Timer 2 times out after 300 sec., the CR1 coil is turned ON which turns off SOL 5. SOL 4 ON Timer 1 DO 1 20 SEC PUMP 1 DO 2 SOL 5 PUMP 2 CR1 DO 2 ON Timer 2 DO 2 300 SEC UMC 800 Logic DO 3 CR1 In UMC logic, the output of ONDT4 timer activates the ONDT1 timer directly and is also an input for a 2-IN AND gate, whose output activates the DO for SOL5. After ONDT1 times for 300 sec., its output turns ON, disabling the AND gate output which de-energizes the DO. Three (3) additional function blocks are used. Example 3 - Using Off delay timers for time duration An OFF delay timer block output is ON as long as the RST input is logic HI (ON). It can be used for time duration but must be triggered by an ON to OFF transition on the Reset input. This can be accomplished using Trigger blocks to create one-shot pulses which last one scan cycle. The fast logic trigger pulse will last 100 ms. while the normal logic trigger pulse will last the complete scan cycle for analog blocks. Use according to application need. A Periodic timer output pulse may also be used to start the timer for the OFF delay. Timing Diagram AND4 output TRIG1 output OFDT2 output 232 UMC800 Control Builder User’s Guide Off delay Release E 1/01 Appendix A - Logic Application Examples Retentive Timers/Counters Example Retentive Timers/Counters Example In UMC ON Delay timers are not retentive - if the RUN input is logic 0, the timer is reset. A retentive timer has an Enable and a Reset input. As long as the timer is not reset, time will be accumulated when the Enable Input is logic 1 (ON). This permits recording the time a device such as a pump has been on. This example uses a Totalizer function block as a retentive timer. If a fixed input of 1 is provided to the block using a Numeric Constant, the totalizer will time up to 1 at the input rate selected (per sec, per min., per hr, or per day). For example, if the “per hr” rate were selected, the output would be 1.0 after 1 hour, 2.0 after 2 hours, etc, up to the Preset value. A counter is shown to count the number of pump cycles (On to OFF transitions). The P4-RESET Digital Variable is used to reset the timer and counter Release E 1/01 UMC800 Control Builder User’s Guide 233 Appendix A - Logic Application Examples Furnace Relay Ladder Logic Conversion Example Furnace Relay Ladder Logic Conversion Example Furnace Relay Ladder Logic Diagram - Part A L1 L2 115 VAC Power ON Lamp ON OFF R 1-PB Relay Logic requiring UMC800 conversion 2-PB 1-CR 1-CR 5-LSCR 1-LS Load Front Chamber 2-LT 6-LSCR 3-LSCR G SOL-A Front Chamber Door Solenoid (Close) 1-TR 2-CR 2-CR 3-LS SOL-C 3-CR 5-LS 5-CR 6-LS 6-CR Furnace ON Lamp Front Chamber Door Solenoid (Open) SOL-B 1-CR This is a portion of a batch furnace relay logic diagram. Contacts 6-LSCR, 3-LSCR, and 5-LSCR are from external control relays which are turned on by limit switches 6-LS, 3-LS, and 5-LS for powering the solenoids. Purge Timer (10 Min.) Inner Furnace Door Solenoid (Open) A Latch block is used for the Start/Stop circuit replacing the external control relay for latch-in. This latch output connects directly to the 2-LT lamp output block plus the 4-In AND block which has two permissive limit switch inputs (6-LS and 3-LS) rather than the control relay contacts which are no longer required. The output of the AND block allows the SOL-A solenoid to be driven ON directly via the UMC 800 discrete output card, provided power requirements are met. The Latch output is also ANDed with the 1-LS limit switch input to activate an ON delay timer whose output directly drives the SOL-C solenoid. SOL-B is driven directly based on the 5-LS limit switch status. 14 Function Blocks 234 UMC800 Control Builder User’s Guide Release E 1/01 Appendix A - Logic Application Examples Loop and Logic Integration Loop and Logic Integration Example 1 - Loop and logic integration This alters Logic Example 3 to include interaction with statuses from the control loop and SP programmer events. These are shown as Signal Tags (loop auto status and event 2) with associated connectors to the AND block inputs. This is equivalent to direct soft wire connection. LS 1 SPP1 ZN1 in LS 2 Pump B PS1 PS2 EV2 On Auto SOL1 PB1 LAMP 2 Example 2 - Loop and logic integration In this application, the base requirement is control off of the lowest of three thermocouples (a high fail-safe would be selected for T/C burnout for each analog input block) and provide a 4-20 mA output to a valve. If the lowest input is less than 125 Deg F, and the control output is greater than 100 % for 10 minutes, turn On Solenoid valve 4 to obtain more heat for the process. Release E 1/01 UMC800 Control Builder User’s Guide 235 Appendix A - Logic Application Examples Loop and Logic Integration 236 UMC800 Control Builder User’s Guide Release E 1/01 Appendix B - Loop Application Examples Overview Introduction The UMC800 supports up to eight control loops with PID or ON/OFF control action. Control loops may be configured to operate independently or in cascade. When Ratio control is applied, a ratio and bias adjustment are provided. When used with the supplementary loop control blocks, digital inputs may be used to set control mode, select the setpoint source, change control action, and perform other discrete actions. A mode indication block provides digital outputs to facilitate integrating loop operation with other functions in the controller. When configured for dual output (Heat/Cool), each output may be directed to different output types, for example: Current, Time Proportioning, etc. Two sets of tuning constants for heating and cooling are also provided. This section provides examples of Loop Control Applications. What’s in this section? The following examples are covered in this section. Topic • PID Block Examples See Page 239 − Example 1 Simplified PID Configuration 239 − Example 2 PID Block Configuration – Basic 239 • PID Control Algorithms Examples 240 − Example 1 Duplex Control 240 − Example 2 Cascade Control 240 − Example 3 Ratio Control 241 − Example 4 Assigning Alarm Relays to Loop Alarms 241 − Example 5 HI or LO Input Selection for PID Control 242 − Example 6 Transferring PID Loop Manual/Auto Status 242 − Example 7 External Selection Of Controller Auto/Manual Mode 243 − Example 8 Remote Switching of Control Action and Tuning Constants 243 − Example 9 Cascade Control of a Boiler Drum Level - Basic 244 − Example 10 Cascade Control of a Boiler Drum Level - 3 Element Feedwater 244 Control • 3 Position Step Control for Motor Positioning Example Release E 1/01 UMC800 Control Builder User’s Guide 245 237 Appendix B - Loop Application Examples Overview Topic • Carbon Potential Examples 246 − Example 1 Carbon Potential Loop 246 − Example 2 Carbon Potential Probe Burnoff 246 − Example 3 Setpoint Programmer Application - Carburizing Cycle 247 • Setpoint Programmer Examples 248 − Example 1 PID with Setpoint Programmer and Guaranteed Soak 248 − Example 2 PID with Setpoint Programmer and Event Outputs 249 − Example 3 Alternate Methods for Actuating SP Programmer START, HOLD, and RESET Functions 249 − Example 4 Using the Setpoint Programmer Synchronize Block 250 − Example 5 Using the Setpoint Programmer’s AUX Output 251 − Example 6 Controlled Restart after Power Loss 252 − Example 7 Setpoint Programmer with Recipe Selection 253 • Setpoint Scheduler Example 238 See Page UMC800 Control Builder User’s Guide 254 Release E 1/01 Appendix B - Loop Application Examples PID Block Examples PID Block Examples Example 1 - Simplified PID configuration (reference only) FAIL Analog Input block (or other function block) Process Variable PID Block (Simplified) Alarm Outputs (Digital Signal) Remote Setpoint Input: • Analog Variable- used to provide an operator-entered remote setpoint value. Or, • Output from other function block (setpoint programmer) • Output from other PID block (cascade) • Enable Ratio/Bias (ratio control) Output Block (Different types) • Current • Time Proportioning • Three Position Step • Dual output (2 Output blocks) Example 2 - PID block configuration - basic Release E 1/01 UMC800 Control Builder User’s Guide 239 Appendix B - Loop Application Examples PID Control Algorithms PID Control Algorithms Example 1 - Duplex control - PID with heat/cool (duplex) output Use standard PID Function Block • Select PID A Duplex or PID B Duplex • Set to Reverse acting • Use Tuning Constant Set #1 from 50% to 100% Heat Output • Use Tuning Constant Set #2 from 50 % to 0% Cool Output Choose Output Types for Heat and Cool (Current/Current, Current/Time Proportioning, Time Prop./ Time Prop., etc.), connect each to PID block output. Use output block scaling to set duplex output spans. Set output scaling Range Lo and Hi to 50 - 100 % for heat output and 50% to 0% for cooling output, respectively. You may need to adjust range limits for overlap or deadband as required. (4 mA) 0% 100% Output 1 HEAT Reverse acting control Output 50% ( %) 0% Direct acting control Cool Output Heat Output (20 mA) 100% Hi - 100% Hi - 0 % Lo - 50% Lo - 50% Output 2 COOL Or, Time Proportioning 0% 100% Example 2 - Cascade control The Cascade Loop uses 2 PID blocks with the back calculation pin of the secondary connected to the primary loop. This transfers values back to the primary loop to adjust the PID for changes due to Manual control. : 240 UMC800 Control Builder User’s Guide Release E 1/01 Appendix B - Loop Application Examples PID Control Algorithms Example 3 - Ratio control The RATIO control loop requires selection of the remote SP of the PID for ratio control. The Ratio and Bias values are available for adjustment from the Control Setup screen of the Operator Interface. The Bias may be a local value or come from an external source such as an O2 analyzer trim arrangement. You may elect to use % for the ratioed inputs (typically for boiler applications) or Eng. Units (EU) (for feed flows to a reactor, for example). Air (controlled variable)= Ratio x Fuel (RSP, or wild variable) + BIAS External Bias Input Example 4 - Assigning alarm relays to loop alarms Digital output signal from PID block AL1 will turn the Digital Output block ON & OFF for remote alarming. This output could be Ored with other alarm outputs if going to a common alarm relay. Release E 1/01 UMC800 Control Builder User’s Guide FAIL 241 Appendix B - Loop Application Examples PID Control Algorithms Example 5 - Hi or Lo input selection for PID control In this application, control is determined by automatic selection of the lowest or highest sensor, such as a thermocouple. As shown, the MMA block is configured for highest (MAX). Configure the analog input failsafe value (for T/C’s), for proper selection if an open (FAIL) condition occurs. Configuration of the MMA Block, (Minimum, Maximum, Average, Sum, or Std Dev) will require setting the number of inputs to be used. Example 6 - Transferring PID loop manual/auto status The mode output of the PID Block is used exclusively with the MDFL (Mode Flags) Block. Any of the status outputs may be referenced by a Signal Tag or may be transferred externally using a DO. The output shown is ON when in Manual and OFF when in Automatic. 242 UMC800 Control Builder User’s Guide Release E 1/01 Appendix B - Loop Application Examples PID Control Algorithms Example 7 - External selection of controller auto/manual mode Application: External mode switching of the PID Block - changing a loop to MAN, to AUTO, to LOCAL SP, or REMOTE SP. FAIL Note: Mode switching is also provided as a integral part of the Operator Panel, Loop Displays The MDSW (Mode Switch) Function Block is used exclusively with the MDRQI (Mode Request Input) of the PID or ON/OFF Function Block. Its output provides encoded switch commands to the PID Block All inputs are OFF to ON edge-triggered, requiring a separate input for each action. The example shows digital inputs as the transfer inputs but any digital status could be used. Use a single input to place a loop in manual when the input is ON(1) and return to Auto when OFF(0). Example 8 - Remote switching of control action and tuning constants Loop Switch Function block Function: Digital interface to initiate: • Autotuning • Change Control Action: Direct/Reverse Action • Force Bumpless Transfer algorithm) (rebalance the • Select Tuning Set #1 FAIL • Select Tuning Set #2 Release E 1/01 UMC800 Control Builder User’s Guide 243 Appendix B - Loop Application Examples PID Control Algorithms Example 9 - Cascade control of a boiler drum level - basic Note: All physical connections are by I/O cards Steam FAIL FAIL Steam Drum LT 1 M FT 2 Feedwater Flow Example 10 - Cascade control of a boiler drum level - 3 element feedwater control Steam Note: All physical connections are by I/O cards LT 2 Steam Drum LT 1 M FT 2 Feedwater Flow 244 UMC800 Control Builder User’s Guide Release E 1/01 Appendix B - Loop Application Examples 3 Position Step Control for Motor Positioning Example 3 Position Step Control for Motor Positioning Example 3 position step control(without slidewire feedback) is accomplished by assigning the motor control relays physical address under the Motor tab section of the block configuration. See example below: INC DEC Note Motor-Relay Output Module & Channel # assignment: 0601- Forward motor direction 0602 - Reverse motor direction Release E 1/01 UMC800 Control Builder User’s Guide 245 Appendix B - Loop Application Examples Carbon Potential Examples Carbon Potential Examples Example 1 - Carbon potential loop Supports Zirconia Probes from: Super Systems Inc., Marithon Monitors Furnace Control Corp., Advanced Atmosphere DegC or F 0-2000 mV Range Uses a single block for %C calculation and PID control Supports CO Compensation from an Analyzer input or a fixed value (use 20% as default for Methane) Calculates Dewpoint applied to separate output Provides a Furnace Factor Bias adjustment (to adjust %C to match lab samples) Provides Anti-sooting setpoint limiting Probe burn-off using standard logic functions %CO, 0-100% Example 2 - Carbon potential probe burnoff Application: To clean a carbon probe periodically by blowing air across it for a specific time. In this configuration, a periodic timer generates a pulse a designated time interval which suspends automatic control and energizes a relay output to cause air flow for a probe burn off cycle. Timers determine the probe burn-off period and allow time for the probe recovery before returning the loop to automatic control. Configuration Notes: Timing Diagram Select probe Mfg.. type O2 probe input: 0 to 2 V. (0 to 2000 range) PTMR Output Select T/C type J or K etc.. MDSW Output Burnoff Time Time Delay to AUTO 246 Auto Auto Manual Off delay #1 Off delay #2 UMC800 Control Builder User’s Guide Release E 1/01 Appendix B - Loop Application Examples Carbon Potential Examples Example 3 - Setpoint programmer application - carburizing cycle The Auxiliary output of the Set Point Programmer (SPP) block can be used to drive the RSP of a % carbon control loop for a boost/diffuse carburizing cycle in an enclosed quench furnace. Using consequetive Ramp and Soak segments, idle, boost, and diffuse %C setpoints can be programmed. The carbon algorithm can be set to only start after reaching 1400F. 1650F 1400F Temp 1.1% 0.9% %C Release E 1/01 Boost Diffuse %Ccontrol active UMC800 Control Builder User’s Guide 247 Appendix B - Loop Application Examples Setpoint Programmer Examples Setpoint Programmer Examples Example 1 - PID with setpoint programmer and guaranteed soak PID with Set Point Programmer & Guaranteed Soak Guaranteed Soak is configured as part of the SET POINT PROFILE configuration using the Control Builder Software or from the UDC 800 Operator Interface, Set Point profile EDIT /DETAIL display. This can be applied to all soaks, selected soaks or all segments. This example uses the loop PV as the deviation check input vs. the SP output. The user has the option of using 2 more PV’s for expanding the deviation check requiring all inputs to be within the band before the Hold is released. Guar. Soak Hi Deviation Soak Band SP Guar Soak Lo Up to 3 Deviation Check Inputs PV1 PV2 PV3 AuxPV 248 UMC800 Control Builder User’s Guide Release E 1/01 Appendix B - Loop Application Examples Setpoint Programmer Examples Example 2 - PID with setpoint programmer and event outputs The SP programmer event output status may be directed to digital outputs, part of control logic, or be directed to signal tags for use anywhere within the control configuration. Example 3 - Alternate methods for actuating SP programmer START/HOLD/RESET functions FAIL Two methods are shown The pushbutton block will tie this function to the Pushbutton screen display. Pushbuttons will provide a one-shot output each time they are pressed. Using the Digital variable block this function can be displayed on the OVERVIEW display. Note: Since Digital variables are turned ON and OFF from the overview display, once turned ON they must be manually turned OFF, to be used a second time. Note: Control Builder Software will not allow the output of two block to be tied together. Connections are shown for DEMO only of an alternative connection. Release E 1/01 UMC800 Control Builder User’s Guide 249 Appendix B - Loop Application Examples Setpoint Programmer Examples Example 4 - Using the setpoint programmer synchronize block Function: Synchronizes changes in setpoint program state for multiple SPP function blocks when the state of any connected SPP is changed from the Operators panel or via a remote connection. (analog and digital I/O blocks required to complete this function are not shown) 250 UMC800 Control Builder User’s Guide Release E 1/01 Appendix B - Loop Application Examples Setpoint Programmer Examples Example 5 - Using the setpoint programmer AUX output The Auxiliary output of the Set Point Programmer (SPP) block can be used to drive the RSP of a secondary PID control block on a level basis. This precludes the use of another SPP block. A different (or same) set point can be configured for each programmer step. This can be used to program pressure, %C, etc. for a second control loop. Both PID loops can be shown on the same SP Programmer display. The PV for the secondary PID block is connected to the top right pin of the SPP block to allow view of the PV on the SP Programmer display. Aux PV FAIL FAIL 1800 TEMP Deg. F 0 Time 10 Pressure Atm 5.0 3.75 2.6 1 Time Release E 1/01 UMC800 Control Builder User’s Guide 251 Appendix B - Loop Application Examples Setpoint Programmer Examples Example 6 - Controlled restart after power loss SCENARIO A To prevent stress to the work in a furnace on power up after a power loss, you may use the Restart feature of the SP programmer. This feature will use the PV (connected to PV1) as the initial starting point for the Setpoint and will use a configurable ramp rate for the profile. When the temperature gets to the original Setpoint prior to power down, the program will continue. You may gate this Restart input to the programmer to only apply after a certain time off and/or a certain segment if desired using Compare function blocks. This example uses the System Monitor block to provide a restart pulse to the programmer Restart input after power restore. This will initiate the restart procedure. power loss Initial PV value on power restore program continues restore ramp rate SCENARIO B A System Monitor block output (RESTART) is on for the first scan cycle after a power loss plus TIME_OFF output indicates the time the power has been off. A Compare block can be used to evaluate the time off and cause an output to initiate the restart if greater than a set amount. Time OFF is in seconds. If Time OFF is greater than SET_TOFF, execute restart NOTE: Execution sequence relative to SPP block 252 UMC800 Control Builder User’s Guide Release E 1/01 Appendix B - Loop Application Examples Setpoint Programmer Examples Example 7 - Setpoint programmer with recipe selection Up to 50 Analog/Digital Variables PROFNUM Number Selects StoredSP Profile GAIN-LP2 Setpoints for internal or external controller based on stepnumber SP-OUT2 SP-OUT3 SP-OUT4 Recipe Table Release E 1/01 Writes into indexed “contained-within” parameter UMC800 Control Builder User’s Guide 253 Appendix B - Loop Application Examples Setpoint Scheduler Examples Setpoint Scheduler Examples PGM STA SEG Example 1 Figure 69 Setpoint scheduler example 254 UMC800 Control Builder User’s Guide Release E 1/01 Appendix C - Alarm Configuration Overview Introduction Alarm monitoring may be assigned to any analog signal, digital status, or calculation. Each PID loop also provides up to four alarms of various types. Alarm flexibility is also expanded using the alarm block, which allows selective set-up of alarm hysteresis, deviation alarms, on delay, selective latching, and a disable input to control when the alarm is active. Active alarm indication is provided on all operator displays and alarm group displays are provided to view and acknowledge active alarms. Up to 120 alarms may be configured, applied to analog, loop, or digital tags. What’s in this section? The following topics are covered in this section. Topic Release E 1/01 See Page Introduction 255 Alarms Configuration Overview 256 Assigning Alarms to Alarm Group Displays 257 Common Alarms 258 UMC800 Control Builder User’s Guide 255 Appendix C - Alarm Configuration Overview Alarms Configuration Overview Alarms Configuration Overview Introduction There are a variety of analog alarm blocks that can be selected: • High and Low Monitor blocks (for High and Low alarms only) • Analog Alarm block (for Hi, Lo and Dev with programmable On time and latching) • System Alarm (for common alarm output - Unack’d alarms active, alarm active)—See Figure 72. • PID has 2 alarms with 2 limits each for Hi/Lo and Dev • All analog alarm blocks PID alarms have configurable hysteresis • Digital signal tags reference alarms to alarm displays • Any digital output may be assigned to be an alarm • Alarms are assigned to “alarm groups” • Dedicated Alarm button on Operator Interface • Alarms are ACK’d by group at operator interface Configuration overview Figure 70 is an overview of how the alarms can be configured. Digital status assigned to alarm Analog varaiable for alarm setpoint Figure 70 Alarms configuration overview 256 UMC800 Control Builder User’s Guide Release E 1/01 Appendix C - Alarm Configuration Overview Assigning Alarms to Alarm Group Displays Assigning Alarms to Alarm Group Displays Introduction After the alarms have been configured, you can assign the alarms to Alarm group displays. Figure 71 is an overview of how this is accomplished. For specific instructions about assigning alarms to alarm group displays, refer to Alarm display tag group (page 101). Select “Display Tag Groups” from the Configure menu. Select the “Alarm” Tab for configuration. Figure 71 Assigning alarms to group displays Release E 1/01 UMC800 Control Builder User’s Guide 257 Appendix C - Alarm Configuration Overview Common Alarms Common Alarms Introduction Use the System Alarm block for common alarms (for common alarm output - Unack’d alarms active, alarm active). Turns on and stays on until all alarms have cleared Turns on when any new alarm occurs, off when all alarms are ack’d Figure 72 Alarm examples 258 UMC800 Control Builder User’s Guide Release E 1/01 Appendix D – Controller Initialization Introduction Cold start execution After any change from the Program to the Run mode, such as after a new configuration download, a Cold Start is executed whereby: • All function blocks are set to zero output • All Variables are set to zero • A previous selected set point profile is cleared • A previous selected recipe is cleared • All control loops will have their initial set point loaded to match the current PV. All block entries and all values entered as Constants to external input pins of a block will be retained as configured in Control Builder on download. Initializing variables using a start-up recipe Variables are used as inputs to certain blocks to allow an operator to change settings from the Operator Interface using the Overview display listing, with variables assigned to this display format. Typical usage is for biases, offsets as part of calculation blocks, alarm set points for Analog Alarm blocks, timer remote presets for resettable timer blocks, inputs for the variety of Signal Selector blocks, etc. It is not always desirable to have these initialize to zero on a configuration download. To initialize these analog or digital variables to a desired value or state, a Recipe Selection Block can be used [see Recipe Configuration (page 178)] for recipe setup procedures) in conjunction with a System Monitor block as shown in Figure 73. The contents of this recipe (shown as number 1 but can be any number up to 50), containing up to 50 values or statuses, is loaded after any configuration download. The System Monitor block Newstart output delivers a pulse for one complete scan cycle after the download. A latch is used to retain this status for 2 scan cycles to assure proper loading. Note the execution sequence of the 3 blocks (latch is executed after recipe selection block). Release E 1/01 UMC800 Control Builder User’s Guide 259 Appendix D – Controller Initialization Introduction Figure 73 Recipe selection blocks used in conjunction with a system monitor block 260 UMC800 Control Builder User’s Guide Release E 1/01 Appendix E – Measuring pH with UMC800 Controller and Durafet II Cap Adapter Introduction The tradition approach to bringing pH measurements into a control system incorporated the use of a pH transmitter or monitor/analyzer to condition the electrical signal, provide temperature compensation and to provide the necessary zero and slope adjustments needed to properly range the pH sensor. With the introduction of the Durafet II cap adapter (signal conditioner), a millivolt measurement representing pH can now be directly connected to the analog inputs of a UMC800 controller. When combined with a new 100 ohm RTD temperature sensor built into the Durafet II electrode assembly, the two measurements needed to calculate pH could now be directly connected to the inputs of the controller. To facilitate the implementation of this application, a ± 15 volt power module is available for the controller to power up to 4 Durafet II cap adapters. Equipment Needed To perform a pH measurement with a UMC800 controller, the following controller and sensor hardware is needed: • 1 Durafet II pH sensor with 100 ohm RTD temperature sensor • 1 Durafet II electrode cap adapter • 1 UMC800 Power module (supports up to 4 sensors) • 1 UMC800 Universal analog input module Recommended Wiring Figure 74 indicates the recommended wiring for one pH sensor input. Note that two analog input channels are required, one for the pH sensor and one for temperature. Similar wiring may be used for additional sensors. A UMC800 controller can accommodate 2 power modules for a total of up to 8 pH inputs. UMC800 Controller Analog Input Module Mod 1 Mod 4 12 12 C 1 Power Supply Module + - - C + Red/Black pH 1 Sensor Temp - Red C White + Orange pH 1 Sensor MV Black COM + - - C 1 + 1 White/Black (Unused) - Green Jumper + UMC800 Shield Connector Kit Part No. 51309814-501 Blue Figure 74 Recommended wiring for one pH sensor input Release E 1/01 UMC800 Control Builder User’s Guide 261 Appendix E – Measuring pH with UMC800 Controller and Durafet II Cap Adapter Configuration Configuration Once all electrical connections are made, a very specific function block and display interface configuration is needed to properly standardize and view the pH measurements. The specific elements of the configuration for a single measurement are described in Figure 75. Additional measurements would require duplicating the elements for each sensor to be measured. The copy and paste feature of the Control Builder software provides a convenient method for this duplication. Figure 75 Configuring analog inputs and standardize function pH Input: Configure the analog input range to ± 500 mV Configure the high range limit to 500 and the low range limit to –500 Temperature Input: Configure the analog input range to Pt100, 0 to 100 degC 262 UMC800 Control Builder User’s Guide Release E 1/01 Appendix E – Measuring pH with UMC800 Controller and Durafet II Cap Adapter Standardization Objective Standardization Objective Purpose The purpose of the function blocks attached to the pH analog input block (Figure 75) are to capture the millivolt values of the pH probe output during the zero and slope standardization operations, a time when the probe is placed in a known buffer solution. The temperature of the buffer solution is also captured, but only during the zero standardization operation. These values are then input into the pH math calculation, along with the on-line probe millivolt and temperature measurements to determine the actual pH value. Newstart In addition to capturing the standardization values, NEWSTART digital signals are used on selected blocks to pre-load default values for the input measurements. A startup recipe will be used to define these startup values through Variable entries. A secondary operation after standardization to transfer the values captured during standardization to the startup recipe variable values will insure the standardization values will not be lost during configuration changes. Analog switch blocks The Analog Switch (SW) blocks that are connected to the MV Input block and Temperature Input block are used to replace the MV input and temperature input with default values (Variables) for two seconds on a controller NEWSTART. Track and Hold functions TAHD (Track and Hold) functions capture these values during this time period and retain the values on their outputs. The Track and Hold block is active for one second during this 2-second period from a one second pulse from the OR block connected to its track command pin input. This operation pre-loads default zero, slope and temperature values into the Track and Hold function blocks on a NEWSTART. The Track and Hold function blocks are also used to capture the values of the buffer solutions used during the NEWSTART and standardization procedure. These blocks are located directly below ZERO and SLOPE CAPTURE functions in Figure 75. Release E 1/01 UMC800 Control Builder User’s Guide 263 Appendix E – Measuring pH with UMC800 Controller and Durafet II Cap Adapter System Block (ASYS) System Block (ASYS) The system block (ASYS) is used to initiate three functions during a NEWSTART of the controller. (See Figure 76.) 1. Load a startup recipe (recipe #1) with default variable values for the inputs to the track and hold blocks in the previous section. 2. Start an off-delay timer for 2 seconds to switches the inputs of the algorithms from the analog inputs to the variables of the startup recipe. 3. Start an off-delay timer for one second to toggle the track and hold function blocks and capture the start-up variable values into the track and hold outputs. Figure 76 ASYS system block 264 UMC800 Control Builder User’s Guide Release E 1/01 Appendix E – Measuring pH with UMC800 Controller and Durafet II Cap Adapter Zero and Slope Standardization Operations Zero and Slope Standardization Operations The standardization process requires the Track and Hold blocks to be activated for a short period while the electrode is placed in a buffer solution of known pH. This is a two step operation where the zero and temperature track and holds are activated for the zero buffer, then the slope track and hold is activated for the slope buffer. To accomplish this, the block configuration in Figure 77 is used. This configuration allows a digital variable to be turned ON for a specified time period (3 seconds), and then uses a write variable block to reset the digital variable to OFF. Two of these sequences are used, one for the zero standardization time, the other for the slope standardization time. ON/OFF labels for the ZERO variable = Z CAL for ON and READY for OFF. The ON/OFF labels for the SLOPE variable = S CAL for ON and READY for OFF. Figure 77 Zero and slope standardization functions Release E 1/01 UMC800 Control Builder User’s Guide 265 Appendix E – Measuring pH with UMC800 Controller and Durafet II Cap Adapter Math Calculation Math Calculation Once the inputs are measured and standardization performed, the accumulated values are used in the math calculation to determine a pH value. The calculation to be entered is: 7 – (273.16 + T1) / (273.16 + T) * (7 – (Bz + (MV – MVz) / ((MVs – MNz) / (Bs – Bz)))) Where: T = Temperature measurement T1 = Temperature during standardization MV = Measures MV value MVz = Millivolt value during Zero standardization MVs = Millivolt value during Slope standardization Bz = Buffer for Zero Standardization Bs = Buffer for Slope standardization See function blocks in Figure 78 for the math calculation configuration. Figure 78 Math calculation configuration 266 UMC800 Control Builder User’s Guide Release E 1/01 Appendix E – Measuring pH with UMC800 Controller and Durafet II Cap Adapter Display Configuration Display Configuration This completes the function block configuration for a single pH input measurement. The next operation is to build appropriate displays to interface with these blocks and provide the necessary instructions and entry parameters to operate the function. The choice of operator displays and location on the display keys will ultimately be the choice of the user, but an Overview display with the standardization entry parameters will be needed as a minimum. The following displays and recipe are needed to support the application: Enter a Startup Recipe with the following variables and values: 1 BUFFER Z 7.0 pH 1 BUFFER S 4.0 pH 1 TEMP 25.0 DEG C 1 MV ZERO 0.00 MV 1 MV SPAN -177.48 MV Figure 79 Startup recipe Develop an Overview display with the following variables and values for standardization: pH STANDARDIZE 1 BUFFER Z 7.00 pH 1 BUFFER S 4.00 pH ZERO READY SLOPE READY PH VALUE TEMP Figure 80 Overview display for standardization Release E 1/01 UMC800 Control Builder User’s Guide 267 Appendix E – Measuring pH with UMC800 Controller and Durafet II Cap Adapter Display Configuration Develop an Overview display to monitor standardization parameters. STANDARDIZE PARAMETERS 1 BUFFER Z 7.0 pH 1 BUFFER S 4.0 pH 1 TEMP 25.0 DEG C 1 MV ZERO 0.00 MV 1 MV SPAN -177.48 MV Figure 81 Overview display for monitoring 268 UMC800 Control Builder User’s Guide Release E 1/01 Appendix E – Measuring pH with UMC800 Controller and Durafet II Cap Adapter Sample Help Displays Sample Help Displays The following are sample displays of what may typically be used in this application. Develop HELP displays with the following information: STANDARDIZATION PROCEDURE 1) REMOVE ELECTRODE FROM PROCESS 2) INSERT ZERO BUFFER 3) SELECT PH STANDARDIZE DISP 4) ALLOW PH & TEMP TO STABALIZE 5) USING TEMP VALUE OF BUFFER ENTER CORRECT BUFFER VALUE AS BUFFR Z NEXT PAGE ------------ STANDARDIZATION PROC PG 2 6) WITH STABLE PH, TEMP AND BUFFER VALUE, SELECT “ZERO” 7 ENTER THEN CHOOSE “Z CAL TO ZERO” CALIBRATE 7) REMOVE THE ELECTRODE FROM THE BUFFER AND RINSE WITH DISTILLED WATER 8) PLACE ELECTRODE IN SLOPE BUFFER 9) WAIT FOR STABLE PH AND TEMP NEXT PAGE ------------ STANDARDIZATION PROC PG 3 10) USING TEMP VALUE, ENTER THE CORRECT PH IN “BUFFRS” VALUE 11) WITH STABLE PH AND TEMP, SELECT “SLOPE” & ENTER THEN CHOOSE “S CAL” TO SLOPE CALIBRATE 12) STANDARDIZATION PROCEDURE IS NOW COMPLETE TO INCLUDE STANDARDIZATION SET INTO UNIT PROGRAM, PROCEED TO NEXT PAGE Release E 1/01 UMC800 Control Builder User’s Guide 269 Appendix E – Measuring pH with UMC800 Controller and Durafet II Cap Adapter Sample Help Displays STANDARDIZATION SAVE 1) ACCESS THE STANDARDIZE PARAMETERS DISPLAY 2) NOTE THE VALUE OF EACH PARAMETER FOR PH, MV, AND TEMP IN SEQUENCE 3) PRESS THE MENU BUTTON AND SELECT RECIPES 4) ENTER RECIPE 1 STARTUP, EDIT 5) TRANSFER VALUES FROM STEP 2 TO THE RECIPE 1 6) PRESS ESC. TO EXIT When operating the UMC800 controller for pH measurements, follow the help displays above to standardize the electrode before making pH measurements. ATTENTION The displays and function blocks described here deal only with the pH measurements. To configure PID control or other control parameters and displays, refer to the UMC800 function block reference guide. 270 UMC800 Control Builder User’s Guide Release E 1/01 Index 2 B 2 Input AND, 65, 69 2 Input OR, 66, 69 8 Bar Displays, 107 Bars, 22 Batch Command Enable Signal, 188 Batch Enable Signal, 195, 198, 200 Baud Rate, 30 Binary Coded Decimal Translator, 80 Block Configuration Printout, 139 Block Diagram Printout, 138 Block outputs, 54 block type, 54 8 Input AND, 65, 69 8 Input OR, 66, 70 C 4 4 Input AND, 65, 69 4 Input OR, 66, 69 A Absolute Value, 75 Accutune, 3, 207 Add, 73 ADD a Profile, 152 ADD a Recipe, 179 ADD a Segment, 36, 162, 171 ADD Variable to a Recipe, 180 Alarm Display Tag Group, 101 Alarm Displays, 101 Alarm/Event Enable Conditions, 191 Alarm/Event Storage Configuration, 199 Alarm/Monitor, 55 Alarm/Monitor category, 77 Alarms, 3, 22, 184 Analog Alarm, 77 Analog Input, 57 Analog Output, 57 Analog Signal Tag, 93 Analog switch blocks, 263 Analog System Monitor, 77 analog variable, 180 Analog Variable, 50, 83 Analog Variable symbol, 90 annotate, 83 annotate the Function Block Diagram, 94 Auto/Manual Bias, 59 Aux. Out, 150 Aux. Out Description, 154 Aux. Out EU Label, 154 Aux. Out value, 163 Auxiliary, 55 Auxiliary category, 79 Auxiliary Output Descriptor, 154 Auxiliary output values configuration, 174 Release E 1/01 Cable requirements, 33 Calculations, 55 Calculations Category, 75 Carbon Potential, 58 Change the Name of a Recipe, 179 Changing (Force) a Digital Value from ON to OFF, 211 Changing Loop Block Parameters, 208 check mark next to a command, 16 Comm A Port, 24, 31 Comm B Port, 24, 31 Communications, 55 Communications Link, 28 Communications Menu, 24 Communications Port, 28, 29 Communications Setup, 28, 35 Comparison Calculation, 75 Configuration, 8 Configuration Development, 7 Configuration Functions, 41, 151, 168, 178 Configuration Print Out, 137 Configure Menu, 22 connect two blocks, 91 Connection Timeout, 28, 35 Connections from the PC to the Controller, 14 Connectors, 83 Constants, 97 Continuous Average, 76 Control Builder, 2 Control Builder function, 38 Control Builder Overview, 37 Control Builder software Installation, 11 Overview, 7 Control Strategy Configuration, 85 Controller, 2 Controller Architecture, 87 controller diagnostics, 213 Controller Diagnostics, 24 controller hardware, 87 UMC800 Control Builder User’s Guide 271 Conventions, 39 Counter/Timers category, 72 Eight Digital Outputs, 65, 68 ellipsis, 16 ELN DLE, 28 Enable Controls, 187 End Segment, 157 Engineer Security, 132 Engineering Units, 149, 154 Engineering Units Descriptor, 154 Error Statistics, 24 Establishing Communications, 27 Ethernet, 29 Ethernet Comm Link, 30 Ethernet communications, 5 ETHERNET” (, 28 Event List Configuration (Digital, 202 Events, 22 Exclusive OR, 66, 70 execution order, 54 Execution Order, 22 external modem, 33 D Data storage, 5, 48 Data Storage, 22, 183 Data Storage and Events, 41 Data Storage Configuration Tabs, 192 Data Storage Enable, 188 Data Type Enable Signal, 195, 197, 200 Data Type Enable Signals, 188 DELETE a Program, 152 DELETE a Recipe, 179 DELETE a Segment, 36, 162, 171 DELETE a Variable from a Recipe, 180 Deviation Compare, 75 Device Control, 80 Device Controls Display Tag Order, 23 Dewpoint, 76 Diagnostics, 203 Dial Modem, 24, 36 dial-up modem, 33 Digital Encoder, 80 Digital Event, 49 Digital event recording, 5 Digital Events, 184 Digital Input, 64, 68 Digital Output, 64, 68 Digital Signal Tag, 93 Digital Switch, 66, 70 digital variable, 180 Digital Variable, 50, 83 Digital Variable symbol, 90 Dimmed command, 16 Disk Capacity, 186 Display Buttons, 23 Display Examples, 129 Display High Limit, 159 Display Low Limit, 159 Display Properties, 159 Display Screen Button, 126 Display Tag Groups, 22, 44, 100 Displays, 41 Divide, 73 Download, 24 Download a Control Strategy, 141 Drag and Drop, 39 Drawing conventions, 89 F E EDIT a Program, 152 EDIT a Recipe, 179 Edit Menu, 21 Edit Schedule, 169 Edit Setpoint Schedule, 171 EDIT the Properties of an Existing Program, 152 Editing Text, 94 Eight Digital Inputs, 64, 68 272 Fast Execution Order, 22 Fast Logic, 55 Fast Logic category, 68 Fast Logic System Monitor, 71 File Extensions, 186 File menu, 20 File Names, 136 File Properties, 43 File Statistics, 43 force the output of function blocks, 210 Four Input Add, 73 Four Input Multiply, 74 Four Input Subtract, 74 Four Selector Switch, 67 Four selector switch display, 124 Free Form Math, 74 Freeform Logic, 67 Frequency Inputs, 65 Function Block, 50 Function Block Address - Input/Output Blocks, 96 Function Block Attributes, 53 Function Block Category, 55 Function Block Configuration, 3 Function Block configuration parameters, 95 Function Block Definition, 52 function block diagram, 89 Function Block Diagram, 39, 95 Function Block Diagrams, 42 Function Block Execution Order, 98 Function Block Identification, 96 Function Block Inputs, 97 Function Block Parameters, 97 Function Block Reference Guide, 85 function block symbol, 89 Function Block Tag Names, 96 function block types, 55 Function Block Types, 52 UMC800 Control Builder User’s Guide Release E 1/01 Function Block Usage Guidelines, 56 function blocks, 51, 95 Function Generator, 79 Fuzzy Logic Overshoot Suppression, 3 G General Properties, 155 Graphic Symbols, 50 Guar Soak Lo, 156, 173 Guar. Soak Hi, 156, 173 Guaranteed Hold Limit, 170 Guaranteed Soak, 156, 163 Guaranteed Soak Band, 150 H Hand/Off/Auto Switches, 80 hangup modem, 36 Hangup Modem, 24, 36 hardware, 87 Hardware and Software Requirements, 8 Help Displays, 269 Help Menu, 25 Help Topics, 10 High Low Limiter, 79 High Monitor, 77 High Selector, 78 HOA Switches Display Tag Order, 23 Hours, 155, 170 Length, 146 library tree, 40 Live Monitor, 206 Logic, 3, 55 Logic Application Examples, 223 Logic category, 64 Loop and Logic Control, 41 Loop Application Examples, 237 Loop Control, 2 Loop Switch, 58 Loop Tag Order, 23 Loop Tags, 115 Loop/Jog Properties, 157 Loopback, 27, 32 Loops, 55 Loops category, 57 Low Monitor, 77 Low Selector, 78 M key combination next to a command, 16 keyboard functions, 17 keystroke conventions, 17 Main Menu, 15 main menu system, 18 Main Window, 15 Menu System, 15 Manipulating a drawing item, 89 Mass Flow Calculation, 75 Math, 55 Math Calculation, 266 Math category, 73 Menu conventions, 16 Message Displays, 23, 44, 117 Min-Max-Average-Sum, 76 Minutes, 155, 170 Modbus, 55 Modbus communications, 5 Modbus Communications, 31 Modbus Read, 81 Modbus RTU, 29 Modbus Slave, 81 Modbus Write, 82 Mode Flag, 59 Mode Settings, 207 Mode Switch, 58 model number, 87 Modem, 8, 28, 35 MODEM, 28 Modem configuration, 33 Modem requirements, 33 modify an existing configuration, 144 Monitor, 24 Multi Point Panel, 23 Multiply, 73 Multi-Point Panel Displays, 113 L N Label, 154 Latch, 67, 70 Lead Lag, 79 Negate, 76 Newstart, 263 NOT, 66, 70 I I/O locations, 87 I/O Module diagnostics, 217 I/O Module Diagnostics, 24 identification label, 54, 96 Input Connector, 50 Inputs, 54 INSERT a Segment, 162, 171 Instrument Address for Modbus Protocol, 30 item library tree, 89 Item Library tree, 40 J Jog Segment, 157 K Release E 1/01 UMC800 Control Builder User’s Guide 273 Number of Segments, 150 Numeric Constant, 50, 83, 90 Numeric Constant symbol, 90 Proportional, Integral, Derivative, 57 Protocol, 30 Pulse Inputs, 65 Push-button, 67 Pushbutton display, 123 O O/I Display Buttons (1-5), 44 O/I file name configuration, 136 O/I File Names, 44 O/I Settings, 44 Off Delay Timer, 69, 72 OI File Names, 23 OI Settings, 23 On Delay Timer, 69, 72 ON/OFF Output, 58 On-line monitoring, 203 operating the UMC800 controller for pH measurements, 270 Operator Interface, 2 Operator Interface Display Tag Groups, 41 Operator Interface Displays, 44 Operator Interface Displays Configuration, 4 Operator Security, 132 Operator Variable Names, 176 Other Items, 55, 93 Other Items category, 83 Output mode, 207 Outputs, 54 Overview, 1 Overview display for standardization, 267 Overview display to monitor standardization, 268 Overview displays, 125 Overview Displays, 109 Overviews, 23 P, Q Panel Meter Displays, 103 Panel Meters, 22 PC Requirements, 8 Periodic Timer, 72 pH measurements, 261 Phone Number, 36 Point Log, 184 Point Log Storage Configuration, 196 Point Log Storage Enable Conditions, 190 Power Loss, 146 Profile Data Entry area, 161 Profile Segment Setup, 164 Profile Segment Setup Field, 161 Profile Setup/Edit Procedure, 162 Program, 146 Program Name, 149, 154 Program Number, 149 Properties Display Tab, 159 Properties General Tab, 155 Properties Information Block, 161 Properties Loop/Jog Tab, 157 Properties Start/Restart Tab, 158 Properties Text Tab, 154 274 R Ramp Segments, 149 ramp time, 149 Ramp type, 163 Ramp Type, 155, 170, 173 Rate, 155 Rate of Change, 79 Read Configuration Parameter Data, 79 Recipe Attributes, 176 Recipe configuration, 178 Recipe Configuration, 175 Recipe Items/Variable Names, 177 Recipe Name, 177 Recipe Number, 177 Recipe Pool, 179 Recipe Selector, 60 Recipe Setup/Edit, 180 recipe variable, 181 Recipe Variable Name, 177 Recipes, 5, 22, 41, 47 recovery ramp rate, 146, 158 Recycle, 146 Relative Humidity, 76 remote access, 35 Remote controller access, 5, 33 Remote Loopback, 24 Repeats, 157 reposition an existing wire, 92 Resettable Timer, 72 Restart Rate, 158 Right Click, 39 Right-click Help, 10 Rollover, 195, 198, 201 Rotary Switch, 78 RUN mode, 204 Running a Program, 146 S Save a Function Block, 88, 140, 144, 164, 181 Scale and Bias, 73 Scaling Signals, 194, 197 Screen Display Types, 129 Scroll Bars, 39 Second Analog Value, 146 Secured displays and functions, 134 security, 132 security details, 133 Segment, 146 Segment Events, 150 segment of the Setpoint Scheduler, 166 Select the Number to Call, 36 Selecting a function block, 89 UMC800 Control Builder User’s Guide Release E 1/01 Selecting a Numeric Constant, 90 Selecting a Variable, 90 SERIAL, 28 Set Point Profiles, 45 Set point scheduler, 46 Setpoint Events, 146 Setpoint guarantee, 166 Setpoint Guarantee, 146 Setpoint mode, 207 Setpoint Profile Pool, 151, 152 Setpoint Profile Properties, 151 Setpoint Profile Setup (EDIT), 151 Setpoint Profile Setup/Edit, 160 Setpoint Profiles, 22 setpoint program, 146 Setpoint Program (Profile), 151 setpoint program attributes, 147 Setpoint Program category., 60 Setpoint Program Events (SPEV) control block, 146 Setpoint Program Events Decoder, 60, 63, 115 Setpoint Programmer, 60 Setpoint Programming, 4, 145 Setpoint Programs, 41 Setpoint Schedule configuration, 168 Setpoint Schedule Edit, 172 Setpoint Schedule Pool, 168, 169 Setpoint schedule properties, 170 Setpoint Schedule Properties, 168 Setpoint Schedule Setup, 168 Setpoint scheduler, 4, 165 Setpoint Scheduler, 55, 62 Setpoint Scheduler Auxiliary Setpoint, 63 Setpoint Scheduler Display, 23 Setpoint scheduler display configuration, 168 setpoint scheduler display configuration tabs, 119 Setpoint Scheduler Displays, 44 Setpoint scheduler function block suite, 167 Setpoint Scheduler State Switch, 62 Setpoint Schedules, 22, 41, 119 Setup, 24 Show Forces, 24 Signal Flow, 52 Signal labels, 54 Signal Selectors, 55 Signal Selectors category, 78 signal tag, 84 Signal Tag, 50 Signal Tag symbol, 93 Signal tags, 93 Signal Tags, 8 Single Point (Rotating) Panel Displays, 111 Single Point Panels, 23 soak duration, 150 soak segment, 150 Soak Segments, 150 softwire, 83 Softwire, 50 Softwiring, 91 SP Program, 55 Split Architecture, 1 SPP Display Tag Order, 23 Release E 1/01 SPP Profile Properties, 153 Square Root, 75 stages of the configuration process, 88 Standardization Objective, 263 standardize function, 262 Start Segment, 157 Start Time, 198 Start up Display, 23, 44 Start/Restart Properties, 158 Startup display, 116 Status bar, 15 Status Bar Indication, 36 Storage Interval, 194, 198 Storage Intervals, 185 Storage Mode, 197, 200 Storage modes, 185 Subtract, 73 Switch, 78 Synchronize, 61 Synchronizing Programs, 146 System Interconnection, 8 T Tag Name, 50 tag names, 54 Tag names, 96 Tag Order, 23, 41, 44, 115, 128 Telephony, 8, 30 Telephony setting, 28, 35 Text, 83 Text Properties, 154 text string, 94 Text String, 50 Three Position Step Control, 59 Time, 155, 170 Time Proportioning Output, 57 Time units, 163 Time Units, 155, 170, 173 Timeout, 28, 35 Toggle Flip Flop, 67, 70 Toolbar, 15, 19 Totalize, 76 Track and Hold, 80 Track and Hold functions, 263 Transfer Switch, 78 Tree View, 39 Trend Displays, 105 Trend Storage Configuration, 193 Trend Storage Enable Conditions, 189 Trends, 22, 184 triangle, 16 Trigger, 66, 70 U Up/Down Counter, 72 Upload, 24 upload a database, 219 User utility, 6 UMC800 Control Builder User’s Guide 275 V variables, 90 Variables, 4, 97 Velocity (Rate) Limiter, 79 View Menu, 21 W, X, Y Warning Level, 195, 198, 201 Window Menu, 25 276 wiring for one pH sensor input, 261 Write Configuration Parameter Data, 79 Write protection, 221 Write Protection, 221, 222 Write to a Contained Parameter, 206 Write Tuning Constants, 59 Write Variable, 80 Z Zero and Slope Standardization Operations, 265 UMC800 Control Builder User’s Guide Release E 1/01 SIKKERHESKRAV ! DA2I-6048 For at undgå elektrisk stød med mulighed for personskade, skal alle sikkerhedsbestemmelser i denne manual følges nøje. Dette symbol advarer brugeren om en potentiel berøringsfare, såfremt der kan være adgang til den livsfarlige netspænding. Beskyttende jordterminal. Terminalen er forberedt for og skal forbindes til beskyttelsesjordledning i henhold til stærkstrømsberkendtgørelsen (DK). • • • • • Hvis udstyret ikke bruges som specificeret i manualen, kan den beskyttelse udstyret yder blive nedsat eller forsvinde. Eerstat kun komponenter som udtrykkeligt er specificeret som udskiftelige i manualen. Alle ledningsforbindelser skal følge stærkstrømsberkendtgørelsen (DK) og udføres af autoriseret erfarent personel. Den beskyttende jordterminal skal forbindes først af alle forbindelser (og fjernes som den sidste). Det anbefales jvf. stærkstrømsberkendtgørelsen, at der installeres en afbryder til frosyningsspændingen nær udstyret. UDSTYRS SPECIFIKATIONER Strømforsyning 100 til 240 V Frekvens 50 – 60 Hz Nominel effekt 100 VA OMGIVELSES SPECIFIKATIONER Placer ikke udstyret i nærheden af brandbare væsker eller dampe. Temperatur Rumtemperatur : 15 til 55°C Fugtighed 10 til 90% RH - 40°C Vibration 14 til 250 Hz acceleration 1 g UDSTYRS INSTALLATION Skriveren skal monteres i en tavle for at forhindre adgang til bagterminaler. VEILIGHEIDSVEREISTEN ! DU2I-6048 Ter vermindering van het gevaar van elektrische schokken die lichamelijk letsel kunnen veroorzaken, dient u alle veiligheidsaanwijzingen in dit dokument te volgen. Dit symbool waarschuwt de gebruiker voor een potentieel schokgevaar wanneer toegang bestaat tot onderdelen die onder gevaarlijke spanning staan. Beschermende aarde-aansluiting. Bestemd voor aansluiting van de aardingsdraad van de voeding. • • • • • Indien de apparatuur wordt gebruikt anders dan door de fabrikant gespecificeerd, kan de bescherming, die de apparatuur biedt ongedaan worden gemaakt. Alleen die onderdelen mogen worden vervangen die door de fabrikant als uitwisselbaar zijn aangemerkt. Alle bedrading moet in overeenstemming zijn met de lokale elektriciteiseisen en moet aangelegd worden door geauthoriseerd, ervaren personeel. De aardingsdraad moet worden aangesloten vóórdat alle andere bedrading wordt aangesloten (en als laatste worden verbroken). Het verdient aanbeveling een netschakelaar aan te brengen vlakbij het instrument. APPARATUUR VOORWAARDEN Voedingsspanning 100 tot 240 V Frequentie 50 – 60 Hz Vermogen of stroomvermogen 100 VA OMGEVINGSCONDITIES Gebruik het instrument niet in de aanwezigheid van ontvlambare vloeistoffen of dampen. Het gebruik van elk elektrisch instrument in een dergelijke omgeving vormt een gevaar voor uw veiligheid. Temperatuur In bedrijf : 15 tot 55°C Vochtigheid 10 tot 90% RH - 40°C Trilling 14 tot 250 Hz versnelling 1 g MONTAGE VAN DE APPARATUUR De recorder moet worden gemonteerd in een paneel om de toegankelijkheid tot de achterste aansluitpunten te beperken. TURVALLISUUSMÄÄRÄYKSET FI2I-6048 Noudata tämän ohjeen kaikkia turvaohjeita välttääksesi sähkötapaturman vaaraa. ! Tämä merkki varoittaa käyttäjää sähköiskun vaarasta paikassa, missä voi koskettaa vaarallisia jännitteitä. Suojamaaliitin. Kytke maadoitsjohdin tähän liittimeen. • • • • • Jos laitetta käytetään olosuhteissa, joihin sitä ei ole suunniteltu, käyttöturvallisuus voi heikentyä. Älä vaihda mitään komponettia tai osaa, jota valmistaja ei ole määritellyt käyttäjän vaihdettavaksi. Asennus ja johdotus on tehtävä paikallisten varmuusmääräysten mukaisesti valtuutetun sähköasentajan toimesta. Ensimmäiseksi on kytkettävä suojamaa-liitin (ja viimeiseksi irroittettava). Laitteen läheisyyteen suositellaan asennettavaksi verkkokytkin. LAITTEEN VAATIMUKSET Syöttöjännite 100 - 240 V Taajuus 50 – 60 Hz Teho 100 VA KÄYTTÖOLOSUHTEET Älä käytä laitetta paikassa jossa on syttyviä nesteitä tai kaasuja, koska laitteen käyttö aiheuttaa räjähdysvaaran. Lämpötila ympäröivä : 15 ... 55°C Kosteus 10 ... 90% RH - 40°C Tärinä 14 ... 250 Hz Kiihtyvyys 1 g LAITTEEN ASENNUS Piirturi on asennettava paneeliin siten, että peräliitimille jää riittävästi tilaa. CONSIGNES DE SECURITE ! FR2I-6048 Pour réduire tout risque de décharge électrique qui pourrait provoquer une lésion corporelle, respectez toutes les consignes de sécurité de cette documentation. Ce symbole avertit l'utilisateur d'un risque électrique potentiel lorsqu'il peut avoir accès à des éléments sous tension. Borne de mise à la terre. Destinée au raccordement du conducteur de mise à la terre de l'alimentation. • • • • • Si l'équipement est utilisé dans un but non spécifié par le constructeur, la protection fournie avec cet équipement peut être affectée. Aucun composant (ou pièce) ne doit être remplacé s'il n'est pas explicitement spécifié comme tel par le constructeur. Tous les câblages doivent être conformes aux normes locales et doivent être réalisés par un personnel autorisé et expérimenté. La borne de masse doit être raccordée avant tout autre câblage (et débranchée en dernier). Il est obligatoire de connecter cet appareil sur une ligne possédant un moyen de coupure près de l'appareil. CARACTERISTIQUES DE L’EQUIPEMENT Tension d'alimentation 100 à 240 V Fréquence 50 – 60 Hz Puissance ou courant 100 VA CONDITIONS AMBIANTES Ne jamais utiliser cet équipement en présence de liquides ou vapeurs inflammables. L'utilisation de tout instrument électrique dans un tel environnement pourrait présenter un risque pour la sécurité. Température Ambiante : 15 à 55°C Humidité 10 à 90 % HR à 40°C Vibration Fréquence : 14 à 250 Hz Accélération 1 g INSTALLATION DE L’EQUIPEMENT Cet appareil doit être monté dans un panneau pour limiter l'accès aux bornes arrières par l'opérateur. SICHERHEITSHINWEISE GE2I-6048 Befolgen Sie alle Sicherheitshinweise in diesen Unterlagen, um das Risiko eines Stromschlags zu verringern, der zu Körperverletzung führen kann. Dieses Symbol warnt den Benutzer vor eventueller Berührungsgefahr, wo lebensgefährliche Spannungen zugänglich sein können. Schützende Erdung. Für den Anschluß der schützenden Erdung der Versorgungssystemleitung. • • • • • Bei Benutzung der Ausrüstungen auf nicht vom Hersteller angegebene Art und Weise kann der von der Ausrüstung gewährleistete Schutz beeinträchtigt werden. Ersetzen Sie keine Komponente (oder Teil), die/das nicht ausdrücklich vom Lieferanten als ersetzbar angegeben ist. Die gesamte Verkabelung muß den örtlichen Normen entsprechen und von zugelassenem, erfahrenem Personal durchgeführt werden. Die Erde muß vor allen anderen Kabeln angeschlossen (und zuletzt abgeklemmt) werden. In der Nähe der Ausrüstung muß ein Schalter in der Hauptstromversorgung vorhanden sein. AUSRÜSTUNGSDATEN Netzspannung 100 bis 240 V Frequenz 50 – 60 Hz Nennleistung 100 VA UMGEBUNGSBEDINGUNGEN Betreiben Sie das Gerät nicht in Gegenwart entflammbarer Flüssigkeiten oder Dämpfe. Der Betrieb elektrischer Geräte in solchen Umgebungen stellt ein Sicherheitsrisiko dar. Temperatur Umgebung : 15 bis 55°C Feuchtigkeit 10 bis 90% RH - 40°C Vibration 14 bis 250 Hz Beschleunigung 1 g ANBRINGUNG DER AUSRÜSTUNGEN Der Regler muß in ein Pult eingebaut sein, damit der Bediener nicht zu oft auf die hinteren Anschlüsse zugreifen muß. ¦µ¦®¹¬¸ª®¸ ¦¸»¦°ª®¦¸ ! . • • • • • . . . . . . GR2I-6048 ¼¦¶¦¯¹¬¶®¸¹®¯¦ ª³´®®°®¸±´º 100 240 V 50 ï 60 Hz 100 VA ¸º²Í¬¯ª¸ µª¶®§¦°°´²¹´¸ : 15 10 90 % 5+ 14 – 250 Hz 1 ª¨¯¦¹¦¸¹¦¸¬ ª³´µ°®¸±´º . . 55°C / 40C NORME DI SICUREZZA ! IT2I-6048 Per ridurre i rischi di scariche elettriche che potrebbero causare alle persone, seguire tutte le precauzioni circa la sicurezza indicate in questa documentazione. Questo simbolo avverte del pericolo di scossa elettrica nelle aree in cui sono accessibili conduttori sotto tensione. Terminale di protezione verso terra. Previsto per il collegamento del conduttore di protezione verso terra del sistema di alimentazione. • • • • • Se lo strumento viene utilizzato in modo diverso dalla specifica del costruttore, la protezione fornita dallo strumento puó essere diversa. Non sostituire alcun componente (o parte) non specificato esplicitamente come ricambio dal vostro fornitore. Tutti i cablaggi devono essere in accordo con i regolamenti locali e devono essere eseguiti da personale esperto ed autorizzato. Il terminale di massa deve essere collegato prima di ogni altro filo (e scollegato per ultimo). E necessario che sia presente un interruttore nell’alimentazione principale accanto all’apparecchio. ALIMENTAZIONE APPARECCHIATURA Tensione di alimentazione Da 100 a 240 V Frequenza 50 – 60 Hz Potenza o corrente 100 VA CONDIZIONI AMBIENTALI Non far funzionare l’apparecchio in presenza di liquidi o gas infiammabili, in quanto questo potrebbe essere estremamente pericoloso. Temperatura Ambiente : da 15 a 55°C Umidità relativa Da 10 a 90% UR a 40°C Vibrazioni Da 14 a 250 Hz Accelerazione 1 g INSTALLAZIONE DELL’APPARECCHIO Il apparecchio deve essere montato su un pannello per limitare l’accesso ai terminali posteriori. SIKKERHETSKRAV ! NO2I-6048 Følg alle retningslinjene i dette dokumentet, slik at du reduserer risikoen for elektrisk støt og mulige personskader. Dette symbolet advarer brukeren om tilgjengelige terminaler med farlige spenninger og en potensiell fare for elektrisk støt. Jordingsterminal. kabelen for jording av systemet skal tilknyttes til denne terminalen. • Dersom utstyret benyttes på en måte annerledes enn spesifisert av produsent, kan utstyrets beskyttelsesgrad forringes. • Ingen komponenter eller deler skal skiftes ut dersom de ikke er uttrykkelig spesifisert som utskiftbare av din forhandler. • Det er påkrevet med en hovedstrømsbryter i nærheten av utstyret. • All kabling må utføres i henhold til gjeldende forskrifter og installeres av autoriser og erfaren installatør. • Jord må tilknyttes før all annen kabling (og frakobles sist). UTSTYRSPESIFIKASJONER Strømtilførsel 100 til 240 V Nettfrekvens 50 – 60 Hz Kraftforbruk 100 VA OMGIVELSER Instrumentet må ikke opereres i nærheten av lettantennelige væsker eller gasser. Bruk av elektriske instrumenter i slike omgivelser utgjør en sikkerhetsrisiko. Temperatur omgivelse : 15 til 55°C Fuktighet 10 til 90% HR - 40°C Vibrasjon 14 til 250 Hz akselerasjon 1 g UTSTYRSINSTALLASJON Pass på å montere panelene på regulatoren, slik at berøring av terminalene på baksiden forhindres. INSTRUÇÕES DE SEGURANÇA ! PO2I-6048 Para reduzir o risco de choque eléctrico que pode causar danos corporais, seguir todas as normas de segurança contidas nesta documentação. Este símbolo avisa o utilizador sobre um eventual perigo de choque quando são acessíveis voltagens sob tensão perigosas. Terminal de protecção de terra. Fornecido para ligação do condutor do sistema da protecção de terra. • • • • • Se este equipamento for usado de modo não especificado pelo fabricante, a protecção fornecida pelo equipamento pode não ser adequada. Não se deve substituir qualquer componente (ou peça) que não seja explicitamente especificado como substituível pelo nosso revendedor. Toda a cablagem deve estar de acordo com os códigos eléctricos locais e deve ser realizada por pessoal experiente devidamente autorizado. O terminal de terra deve ser ligado antes de ser feita qualquer outra cabelagem (e desligado em último lugar). Recomenda-se um comutador na fonte de alimentação principal próximo do equipamento. ESPECIFICAÇÕES DO EQUIPAMENTO Voltagem 100 a 240 V Frequência 50 – 60 Hz Potência ou consumo de corrente 100 VA CONDIÇÕES AMBIENTAIS Não operar o instrumento na presença de líquidos ou vapores inflamáveis. A operação de qualquer instrumento eléctrico em tal ambiente constitui um perigo para a segurança. Temperatura Ambiente : 15 a 55°C Humidade 10 a 90% RH a 40°C Vibração 14 a 250 Hz aceleração 1 g INSTALAÇÃO DO EQUIPAMENTO O Registrador deve ser montado num painel para limitar o acesso do operador aos terminais traseiros. NORMAS DE SEGURIDAD ! SP2I-6048 Para reducir el riesgo de choque eléctrico el cual podría causar lesiones personales, seguir todas las indicaciones de este documento. Este símbolo previene al usuario de un riesgo potencial de descarga cuando se puede acceder a corrientes de tensión peligrosas. Terminal de tierra de protección. Proporcionado para la conexión de la tierra de protección del conductor del sistema de alimentación. • • • • • Si el equipo es utilizado de forma no especificada por el fabricante, la protección suministrada con el mismo podría resultar dañada. No reemplazar ningún componente (o parte) no explicitamente especificado por el suministrador. Todo el cableado debe realizarse de acuerdo con las normas eléctricas locales y debe ser realizado por personal experimentado. El terminal de tierra debe ser conectado antes que cualquier otro cable y desconectado el último. Se recomienda la instalación de un interruptor de la alimentación principal, cerca del equipo. DATOS ELECTRICOS DEL EQUIPO Tensión de alimentación 100 a 240 V Frecuencia 50 – 60 Hz Potencia o corriente 100 VA CONDICIONES AMBIENTALES No operar con el instrumento en presencia de liquidos o gases inflamables. La operación de cualquier equipo eléctrico en tal ambiente constituye un riesgo contra la seguridad. Temperatura Ambiente : 15 a 55°C Humedad 10 a 90% RH a 40°C Vibración 14 a 250 Hz acceleración 1 g INSTALACION DEL EQUIPO Este equipo debe ser montado en un panel para limitar al operador el acceso a los terminales traseros. SÄKERHETSFÖRESKRIFTER ! SW2I-6048 För att reducera riskerna av elektriska chocker som kan orsaka personskador, följ alla säkerhetsföreskrifter i denna dokumentation. Denna symbol varnar användaren för risk för elchock vid tillfällig åtkomst av spänningsförande del. Anslutning av skyddsjord. Avsedd för anslutning av elsysternets skyddsjordsledare. • • • • • Om utrustningen används på ett sådant sätt, att det inte innefattas av tillverkarens specifikation, kan de inbyggda säkerhetsfunktionerna äventyras. Ersätt aldrig någon komponent (eller del) som inte är specificerad som ersättningsbar av tillverkaren. All ledningsdragning måste utföras i enlighet med lokala bestämmelser och skall utföras av behörig personal med erfarenhet av sådant arbete. Skyddsjordsanslutningen skall anslutas före alla andra anslutningar (och losskopplas sist). En strömbrytare för näströmmen rekommenderas. STRÖMFÖRSÖRJNING Spänning 100 a 240 V Frekvens 50 – 60 Hz Effekt eller märkström 100 VA OMGIVNINGSVILLKOR Använd ej instrumentet i närhet av brännbara vätskor eller gaser. Användandet av instrumentet i sådant miljö är en direkt säkerhetsrisk. Temperatur Omgivande : 15 till 55°C Fuktighet 10 till 90% RH - 40°C Vibration 14 till 250 Hz acceleration 1 g INSTALLATION Instrumentet skall monteras i en panel eller i en låda för att undvika att personalen kommer i beröring med bakre inkopplingsplintar. HSM8 HONEYWELL SERVICE CENTERS ARGENTINA BULGARIA GERMANY HONEYWELL EOOD 14, Iskarsko Chausse POB 79 BG- 1592 Sofia BULGARIA Tel : 359-791512/ 794027/ 792198 HONEYWELL AG Kaiserleistrasse 39 D-63067 OFFENBACH GERMANY Tel. : 49 69 80 640 CANADA HUNGARY HONEYWELL LIMITED THE HONEYWELL CENTRE 529 Mc Nicoll Avenue M2H 2C9 NORTH YORK, ONTARIO CANADA Tel. : 416 502 5200 HONEYWELL Kft Gogol u 13 H-1133 BUDAPEST HUNGARY Tel. : 36 1 451 43 00 AUSTRALIA CZECH REPUBLIC ICELAND HONEYWELL LIMITED 5 Thomas Holt Drive North Ryde Sydney NSW AUSTRALIA 2113 Tel. : 61 2 353 7000 HONEYWELL, Spol.s.r.o. Budejovicka 1 140 21 Prague 4 Czech Republic Tel. : 42 2 6112 3434 HONEYWELL Hataekni .hf Armuli 26 PO Box 8336 128 reykjavik Iceland Tel : 354 588 5000 AUSTRIA DENMARK ITALY HONEYWELL AUSTRIA G.m.b.H. Handelskai 388 A1020 VIENNA AUSTRIA Tel. : 43 1 727 800 HONEYWELL A/S Automatikvej 1 DK 2860 Soeborg DENMARK Tel. : 45 39 55 56 58 HONEYWELL S.p.A. Via P. Gobetti, 2/b 20063 Cernusco Sul Naviglio ITALY Tel. : 39 02 92146 1 BELGIUM FINLAND MEXICO HONEYWELL S.A. 3 Avenue de Bourget B-1140 BRUSSELS BELGIUM Tel. : 32 2 728 27 11 HONEYWELL OY Ruukintie 8 FIN-02320 ESPOO 32 FINLAND Tel. : 358 0 3480101 HONEYWELL S.A. DE CV AV. CONSTITUYENTES 900 COL. LOMAS ALTAS 11950 MEXICO CITY MEXICO Tel : 52 5 259 1966 BRAZIL FRANCE THE NETHERLANDS HONEYWELL DO BRAZIL AND CIA Rua Jose Alves Da Chunha Lima 172 BUTANTA 05360.050 SAO PAULO SP BRAZIL Tel. : 55 11 819 3755 HONEYWELL S.A. Bâtiment « le Mercury » Parc Technologique de St Aubin Route de l’Orme (CD 128) 91190 SAINT-AUBIN FRANCE Tel. from France: 01 60 19 80 00 From other countries: 33 1 60 19 80 00 HONEYWELL S.A.I.C. BELGRANO 1156 BUENOS AIRES ARGENTINA Tel. : 54 1 383 9290 ASIA PACIFIC HONEYWELL ASIA PACIFIC Inc. Room 3213-3225 Sun Kung Kai Centre N° 30 Harbour Road WANCHAI HONG KONG Tel. : 852 829 82 98 HONEYWELL BV Laaderhoogtweg 18 1101 EA AMSTERDAM ZO THE NETHERLANDS Tel : 31 20 56 56 911 HSM8 HONEYWELL SERVICE CENTERS NORWAY HONEYWELL A/S Askerveien 61 PO Box 263 N-1371 ASKER NORWAY Tel. : 47 66 76 20 00 POLAND HONEYWELL Sp.z.o.o UI Domainewksa 41 02-672 WARSAW POLAND Tel. : 48 22 606 09 00 PORTUGAL HONEYWELL PORTUGAL LDA Edificio Suecia II Av. do Forte nr 3 - Piso 3 2795 CARNAXIDE PORTUGAL Tel. : 351 1 424 50 00 REPUBLIC OF IRELAND HONEYWELL Unit 1 Robinhood Business Park Robinhood Road DUBLIN 22 Republic of Ireland Tel. : 353 1 4565944 REP. OF SINGAPORE HONEYWELL PTE LTD BLOCK 750E CHAI CHEE ROAD 06-01 CHAI CHEE IND. PARK 1646 SINGAPORE REP. OF SINGAPORE Tel. : 65 2490 100 REPUBLIC OF SOUTH AFRICA HONEYWELL Southern Africa PO BOX 138 Milnerton 7435 REPUBLIC OF SOUTH AFRICA Tel. : 27 11 805 12 01 ROMANIA HONEYWELL Office Bucharest 147 Aurel Vlaicu Str., Sc.Z., Apt 61/62 R-72921 Bucharest ROMANIA Tel : 40-1 211 00 76/ 211 79 43 RUSSIA HONEYWELL INC th 4 Floor Administrative Builiding of AO "Luzhniki" Management 24 Luzhniki 119048 Moscow RUSSIA Tel : 7 095 796 98 00/01 SLOVAKIA HONEYWELL Ltd Mlynske nivy 73 PO Box 75 820 07 BRATISLAVA 27 SLOVAKIA Tel. : 421 7 52 47 400/425 SPAIN HONEYWELL S.A Factory Josefa Valcarcel, 24 28027 MADRID SPAIN Tel. : 34 91 31 3 61 00 SWEDEN HONEYWELL A.B. S-127 86 Skarholmen STOCKHOLM SWEDEN Tel. : 46 8 775 55 00 SWITZERLAND HONEYWELL A.G. Hertistrasse 2 8304 WALLISELLEN SWITZERLAND Tel. : 41 1 831 02 71 TURKEY HONEYWELL Otomasyon ve Kontrol Sistemlen San ve Tic A.S. (Honeywell Turkey A.S.) Emirhan Cad No 144 Barbaros Plaza C. Blok Kat 18 Dikilitas 80700 Istanbul TURKEY Tel : 90-212 258 18 30 UNITED KINGDOM HONEYWELL Unit 1,2 &4 Zodiac House Calleva Park Aldermaston Berkshire RG7 8HW UNITED KINGDOM Tel : 44 11 89 81 95 11 U.S.A. HONEYWELL INC. INDUSTRIAL CONTROLS DIV. 1100 VIRGINIA DRIVE PA 19034-3260 FT. WASHINGTON U.S.A. Tel. : 215 641 3000 VENEZUELA HONEYWELL CA APARTADO 61314 1060 CARACAS VENEZUELA Tel. : 58 2 239 0211 Sensing and Control Honeywell 11 West Spring Street Freeport, IL 61032 51-52-25-63 Rev. E 0101 Printed in USA www.honeywell.com/sensing