1
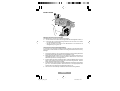
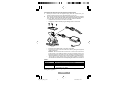
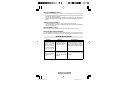
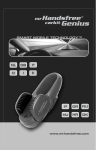
M_Genius_GB_2.pmd
10
21.03.2005, 11:53
TABLE OF CONTENTS
WHAT DOES MR HANDSFREE GENIUS INCLUDE?..........2
INSTALLATION.........................................................................2
OPERATION OF MR HANDSFREE GENIUS............................6
TROUBLE-SHOOTING ............................................................7
MAINTENANCE........................................................................9
M_Genius_GB_2.pmd
1
21.03.2005, 11:53
Dear mr Handsfree Genius owner,
Congratulations on your purchase of one of the most sophisticated and
easy to use car kits! This model provides you with the highest quality fullduplex voice communication. Now you can enjoy the safest telephone
conversations in your car without any inconveniences.
WHAT DOES MR HANDSFREE GENIUS INCLUDE?
1.
2.
3.
4.
5.
6.
7.
8.
9.
10.
11.
12.
13.
14.
15.
16.
17.
18.
Main Unit with built-in speaker.
TALK mode LED indicators.
Buttons for releasing the Main Unit from the Main unit holder.
Holder for Mobile phone.
Button to release the cramps of the Holder.
Main unit holder.
Microphone jack.
Power adapter for cigarette plug:
8.1. Curled cord.
8.2. Removable fuse.
LED indicator of Power Adapter.
Mounting bracket.
Long screws (15mm) for fastening the Mounting Unit to the dashboard of
your car.
Microphone.
Button for microphone sensitivity.
Clips for guiding the microphone cord.
Adapter for connection to car power supply and Mute cord of Car Radio (CRM).
Contact clips for connecting the cords.
Connector for connecting Mobile Phone to the Main Unit (not included).
Screw driver.
INSTALLATION
MOUNTING MR HANDSFREE GENIUS
•
•
Select the place where you want to install the Genius main unit. The place
for the main unit has to be easily accessible for your hands, clearly visible
for the phone’s display and safe enough in case of accidents and for the
operation of Airbags. Under no circumstances should the appliance prevent
the driver from controlling or operating the car in any way.
The mounting for the Genius main unit (this is also the phone holder) has to
be done by using a mounting bracket. The Genius main unit has to be
removed from the main unit holder. This holder is already screwed to the
universal mounting bracket.
English
M_Genius_GB_2.pmd
2
2
21.03.2005, 11:53
2 3
INSTALLATION
2 3
Mounting the Genius main unit holder
The Genius main unit can be mounted in two ways:
A. You can mount the universal mounting bracket with the supplied screws, or:
B. • Remove the universal mounting bracket from the main unit holder
by unscrewing the 6 screws.
• Screw the main unit holder to the dashboard or a bracket that is
designed for your type of car.
How to fix the universal mounting bracket?
In most cars, the universal mounting bracket is placed on the right side of the
gear-control console. Make sure that the mounting bracket does not block any
airbags!
1.
2.
3.
4.
5.
Check for a location in your car (close to the gear-control console) where the
mounting bracket fits and where it is comfortable for use.
Make sure that the location in your car where you want to install your mr
Handsfree Genius is free from dust and dirt. Remove the cover of the
adhesive tape on the mounting bracket.
Put the upper part of the mounting bracket , with the adhesive tape, over the
edge of the console. Put the lower part of the mounting bracket , with the
angle, under the edge of the console.
Press both parts of the mounting bracket together until the face of the upper
part is in a horizontal position. Insert the screw in the appropriate hole.
Tighten the screw. Place the enclosed cap over the nut.
You have now successfully installed the universal mounting bracket.
English
M_Genius_GB_2.pmd
3
3
21.03.2005, 11:53
Connecting the electrical wires for power and mute function
A. When you want to use the cigarette plug with the curled cord, you
have to insert this plug in the cigarette lighter of your car.
B. You can also change the curled cord of the cigarette plug into the straight
cord. This way you can hide the cables easily and use the mute functions for
your car radio. This mute function has to comply with the standard.
• Unscrew the 4 screws on the main unit holder.
• Unplug the curled cord and plug the straight cord in the socket.
•
•
•
Screw the cover plate back on the main unit holder.
Connect the wires of the cord with the radio by using the supplied
cable connectors.
Remark: We recommend to connect the + wire to the continuous
power supply. This makes it able to use the car kit also when your
engine is turned off. To prevent your car’s battery from getting low, we
recommend taking your phone out of the car kit when you leave the car.
The wires are color coded. They are listed in Table 1 and each
wire should be connected to the corresponding item listed in the column B.
Table 1.
A
Red wire
Black wire
Brown wire
B
The + voltage of the car’s power supply
The negative GND connection
Used for Car Radio muting (CRM) and is
connected to Car Radio.
Warning: Connect only to a negative ground electrical system and a +12
Volts power system.
English
M_Genius_GB_2.pmd
4
4
21.03.2005, 11:53
MICROPHONE CONNECTION
•
•
•
•
•
For optimum performance, the microphone should be located at least 75
cm from the Genius main unit and 40-50 cm from the driver’s mouth. Make
sure that the holes of the microphone are directed towards the driver and
not towards the Genius main unit.
Place the microphone on its location using Velcro.
Use the supplied clips to guide the microphone cord.
Insert the microphone plug into the socket of the Genius main unit holder.
By default, the button on the microphone is in OUT-position (unpressed
position). Only for some telephones it is necessary to put the button in the
ON-position.
ADJUSTMENT OF THE PHONE HOLDER
•
•
•
Turn the big screw in the centre of the main unit holder to the left to make
movements possible.
Put the main unit holder in the preferred position.
Fasten the big screw to the right to fix the main unit holder in the preferred
position.
Warning: Do not move the main unit holder without unfastening the big screw.
This will damage the fixation rubber inside!
CONNECTING A CONNECTOR TO THE GENIUS MAIN UNIT
•
•
•
Take the Genius main unit of the Genius main unit holder.
Connect the Genius connector to the Genius main unit.
Place the Genius main unit back on the main unit holder.
English
M_Genius_GB_2.pmd
5
5
21.03.2005, 11:53
HOW TO USE THE UNIVERSAL HOLDER?
•
•
•
•
•
•
Release the cramps of the Genius main unit by pushing the button between
the cramps.
Put your telephone between the cramps.
Close the cramps in a way that they hold the telephone and it therefore
cannot fall.
Take the telephone out of the holder without releasing the cramps by sliding
the telephone to the top side.
To insert the telephone, you slide it from the top side between the cramps of
the Genius.
You only have to adjust the cramps to the size of your telephone once.
CONNECTING THE PHONE TO THE CONNECTOR CABLE
•
•
•
Activate the power supply to the Genius by starting the engine and connecting
the cigarette plug (if applicable).
Connect the Genius connector to the mobile phone after the power supply
is activated.
Charging function is activated now (if applicable).
Important:
During installation always make sure that the power cord is inserted into
the cigarette lighter and power provided before connecting your mobile
phone. The connection of your mobile phone should ALWAYS be the LAST
step of complete mr Handsfree installation.
HOW TO USE THE ANTI-THEFT SYSTEM
The Genius main unit can be released from the holder. When the two buttons
are pressed together, the main unit can be taken of the Genius main unit
holder. This way you can remove all important electronics and avoid being robbed.
IMPORTANT!
•
Always read the ‘TROUBLE-SHOOTING’ chapter carefully.
•
The mr Handsfree ‘Special Brand’ mobile phone connector can be
obtained by mail or directly from your local supplier.
•
Due to the ‘Special Brand’ mobile phone connector which can be ordered
separately for each mobile phone model (Nokia, Ericsson etc.), your mr
Handsfree Genius is suitable for any type of mobile phone.
OPERATION OF MR HANDSFREE GENIUS
HOW TO SWITCH ON YOUR GENIUS WHILE USING THE CIGARETTE
PLUG?
•
•
•
Insert your mr Handsfree power cord into the cigarette lighter of your car to
switch mr Handsfree in ON-position. Please note that for several brands of
cars the engine has to be turned on before the cigarette plug is activated.
LED indicator lights on the cigarette plug.
To switch off, you simply plug out your power cord from the cigarette lighter.
When the Built-in cable is used, and connected to the continuous power, the
Genius is always switched on.
English
M_Genius_GB_2.pmd
6
6
21.03.2005, 11:53
6
HOW TO ANSWER A CALL?
•
•
•
Answer incoming calls as normal on your mobile phone. For most phones
it is possible to enable the ‘auto answer’ function. In this case the phone will
answer the call automatically.
You can start the conversation immediately by speaking into the microphone.
Adapt to the appropriate speaker-volume by using your mobile phone control
panel.
HOW TO PLACE A CALL?
•
•
Dial the telephone number on your mobile phone as normal.
You can start the conversation immediately after being connected by speaking
into the microphone.
HOW TO END A CALL?
At the end of your conversation hang up your mobile phone as normal.
HOW TO USE VOICE DIALING?
If your telephone supports the voice dialing function, you can pronounce the
name of the person you want to call after activating the voice dialing function.
TROUBLE-SHOOTING
6
Problem
Reason
The device does not There is a bad conneccharge, you don’t tion between the main
hear the caller, the unit and the holder.
caller does not hear
you, and the MUTE
function does not
work.
Sometimes a highfrequency noise can
be heard in the car
radio.
You should remove main unit
from the holder and connect it
again. If you made the connection correctly, you will hear a click.
It is possible that your Please place the mr Handsfree
car radio does not have Genius at least 20 cm from the
enough RF distortions car radio.
protection.
English
M_Genius_GB_2.pmd
Elimination
7
7
21.03.2005, 11:53
Problem
Reason
Elimination
Mr Handsfree does • Cigarette lighter jack is • Check the contact in the connection points.
not work. Green LED damaged.
of Cigar Adapter is off. • No contact between • Use for connection contact
Power Adapter and clips which correspond to the
Cigarette lighter jack. standard of your car or another
suitable type of connection.
• 1.5A fuse in the Power
Adapter is burned. • Replace the fuse.
• Power Adapter is
damaged.
Mr Handsfree Genius • No contact between • C h e c k i f t h e C i g a r e t t e
lighter functions normally.
the wires.
does not work.
It is connected to Car • Car Radio wires have • Clean the contact of the
Cigarette lighter jack and
smaller diameter than
Radio through
Additional Adapter. necessary (with cross the Power Adapter.
section area less than • Remove the Fuse.
Car Radio works.
Unscrew the nut from the
0.75mm2).
Power Adapter, open the
• 1.5A fuse in the
housing and take out the Fuse
Additional Adapter is
(Illustration p.9.)
burned.
Insert new 1.5A fuse.
Assemble the Power Adapter.
• If items 1-3 did not help apply
to a service center.
A caller does not hear
you.
• The microphone is
disconnected.
• Microphone’s cord is
damaged.
• Check the connection of the
microphone and the microphone jack of the Mounting unit.
• Apply to a service center.
Your Mobile phone is Telephone or connector
contacts are dirty.
connected to Mr
Handsfree Genius but
it does not work.
Clean the contacts of the
telephone and connector.
Mr Handsfree Genius Car Radio Mute function
is connected to Car needs additional settings
Radio but does not to be activated.
mute it during a call.
Check your Car Radio User’s
Guide and make necessary
settings.
English
M_Genius_GB_2.pmd
8
8
21.03.2005, 11:53
MAINTENANCE
Please check following mr Handsfree maintenance TIPS to keep your kit in top
condition:
•
Do not expose the appliance to moisture.
•
Always unplug the power cable when not in use.
mr Handsfree wishes you a nice and safe journey!
English
M_Genius_GB_2.pmd
9
9
21.03.2005, 11:53
GUARANTEE
Mr Handsfree is a registered trademark of TE-Group NV.
The mr Handsfree brand stands for superior product quality and outstanding customer service. That is why mr Handsfree
warrants this product against all defects in material and workmanship for a period of three (3) years from the date of
original purchase of the product.
The conditions of this guarantee and the extent of responsibility of mr Handsfree under this guarantee are as follows:
• This guarantee is limited to the original purchaser of the product and is not transferable to any subsequent purchaser/
end user.
• During the guarantee period, the sole responsibility of mr Handsfree will be limited to repair or replace, at its option,
any defective parts of the product if this is needed because of malfunction or failure under normal use and conditions.
No charge shall be made to the customer for parts and/or repair labor.
• The product must be shipped to an authorized service center in its original and complete packaging, with transportation
charges prepaid. Mr Handsfree will not assume responsibility for any losses or damages during transportation.
• To obtain repair or replacement within the terms of this guarantee, the customer must provide (a) a proof of purchase
(e.g. dated bill of sale); (b) a written specification of the defect(s); (c) a return address and phone number.
• This guarantee does not cover and is void with respect to the following:
(a) Products which have been subjected to improper installation, unauthorized repair, improper maintenance,
unauthorized modifications or other acts which are not the fault of mr Handsfree; (b) Products which have been
subjected to misuse, abuse, neglect, improper handling and storage, an accident or physical damage; (c) Products
which have been subjected to fire, water, excessive humidity, sand, dirt, extreme changes in temperature or other
conditions which are beyond the control of mr Handsfree; (d) Products which have been used with non-mr Handsfree
approved accessories; (e) Products which have the serial number altered, defaced or removed; (f) Products which have
been opened, altered, repaired or modified by any unauthorized service center.
• Excluded from any guarantee are consumable items which may need replacing due to normal wear and tear, such as
batteries, ear cushions, decorative parts and other accessories.
This guarantee gives you specific legal rights, and you may also have other rights which vary from country to country.
If there are any problems or uncertainties, you can ask your questions through [email protected].
mr Handsfree wishes you a nice and safe trip!