1
FITTING THE D3250FI
AND D3530FI
The D3250FI and D3530FI can only be installed with
a fully-integrated custom door panel that extends from
the toe kick to the counter top. The unit comes with
everything needed to make installing the door panel
easy. The door is predrilled for the panel’s mounting
screws.
The custom panel can be a minimum of 1/4” (6 mm)
thickness to a maximum of 3/4” (19 mm) thickness.
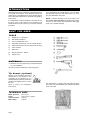
ITEMS PROVIDED WITH THE UNIT
♦ Two 3/8” screws
♦ Four 1-3/4” screws
CUSTOM DOOR PANEL
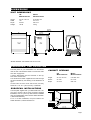
CUSTOM PANEL DIMENSIONS
Width:
Height:
Thickness:
Weight:
23-1/2” (597 mm)
28-1/8”–30-1/8” (714 mm–765 mm)
(Measured from the top of the panel to
the lower edge of the kitchen cabinet.)
1/4” (6 mm) to 3/4” (19 mm) max
Up to 22 lb.
NOTE: Specifications subject to change without
notice.
NOTE: Heavy-duty door springs can be purchased for
wooden door panels weighing over twelve
pounds. (P/N 8071323-77).
INSTALLING THE CUSTOM PANEL
Before fitting the custom panel, the dishwasher must
be installed underneath the cabinet. After you’ve made
the required measurements, pull the machine out again
to install the panel.
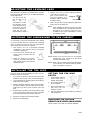
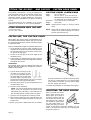
Refer to the illustration at right for instruction references.
1. Fit the handle (A) onto the panel according to the
manufacturer’s instructions. (NOTE: A handle should
be used rather than a knob, because a knob does
not provide enough grip.)
2. Loosen the screws (D) on the outer edges of the
dishwasher door.
3. Pull the turbo fan exhaust frame (E) down until the
lower edge aligns with the lower edge of the cabinets
and tighten the screws.
WARNING!
The custom panel must not obstruct the turbo fan
exhaust. See step 4 above for instructions on how to
adjust the fan exhaust.
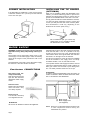
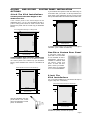
4. The two short screws (B) go into
the back of the panel, 16-3/16”
(411 mm) from the upper edge of
the panel and 5/8” (16 mm) from
the outer edges. Insert the short
screws into the panel, leaving 1/8” (3 mm) of space
between the screw head and the panel.
5. Hook the panel screws (F) into the keyholes (C) on
the dishwasher door.
6. Push the panel sidewards.
NOTE: The custom panel should not extend more
than 2-15/16” (75 mm) below the bottom of the
dishwasher door. Otherwise, it will strike the toe
kick and damage the machine and/or the panel.
7. Open the door and tighten the screws (F) inside.
8. Remove the backing from the protective tape and
affix it on the bottom edge of the panel, in front of the
exhaust vent.
9. Before you push the dishwasher into the cabinet
Page 10
opening, test the door to make sure it opens properly.
The door is counter-balanced, so it should remain
in any position. If it doesn’t, you may need to adjust
the door springs (see above).
10. Fasten the diswasher to the cabinet (see page 9).
ADJUSTING THE DOOR SPRINGS
After you install the custom
panel, make sure the door
stays in place at any angle. If
it tends to fall down, pull out
the machine and tension the
door springs on the sides of
the machine by moving them
one hole farther back or by
twisting the spring to make it
shorter. If that doesn’t resolve the problem, you may
need to purchase the heavy-duty door springs (part
number 8071323-77).