1
KH2025_IB_Receiver_UK
01.04.2004
11:39 Uhr
Seite 2
Kompernaß Handelsgesellschaft mbH
Burgstraße 21 · D-44867 Bochum
www.kompernass.com
ID-Nr.: KH 2025/2026-03/04
KH2025_IB_Receiver_UK
01.04.2004
11:40 Uhr
Seite 3
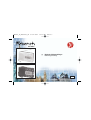
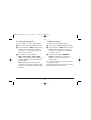
KH 2025
Digitaler Weltempfänger
Bedienungsanleitung
UK
KH2025_IB_Receiver_UK
01.04.2004
11:40 Uhr
Seite 4
KH 2025
KH2025_IB_Receiver_UK
01.04.2004
11:40 Uhr
Seite 5
KH2025-2026_IB_UK
01.04.2004
11:29 Uhr
Seite 3
Digital World Receiver
e-bench KH 2025 / KH 2026
Keep this manual for future reference –
and also pass it on with the device to any future owners.
Contents
1. Intended Use
1.
Intended Use .................................... 3
2.
Technical Data ................................ 5
3.
Safety Instructions .......................... 6
This device is intended for the reception of
generally approved radio transmissions in
all countries (world receiver) and only for
household use.
4.
Power Supply .................................. 7
5.
Switching On / Off .......................... 8
6.
Reception ..........................................9
7.
Memory .......................................... 10
8.
Time and Timer ..............................13
9.
Miscellaneous ................................ 18
It is not intended for the reception of stations that are not generally approved, for
use as part of safety radio systems, such
as on board sport boats, or for use in commercial or industrial environments. It is also
not intended for climate zones outside of
the ranges specified under Technical Data.
10. Self-Help ........................................ 19
11. Disposal ........................................ 20
3
KH2025-2026_IB_UK
01.04.2004
11:29 Uhr
Seite 4
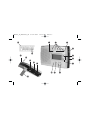
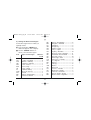
The information in parantheses refers to the sections of this manual.
Starting the Memory Scan (7c)
External Power Supply, 4b
Saving Memory Positions (7a)
Loading Memory Positions (7b)
Connecting Headphones
Saving Stations (7a)
Locking the Buttons (9)
Setting the Device at an Incline (9)
Switching the Medium Wave Range (6c)
Searching for Stations (6d)
Setting Times, Dates (8a, 8b, 8g)
Switching Off the Device (5b)
Activating/Deactivationg Daylight
Savings Time (8f)
Resetting the Alarm by 9 Minutes (8h)
Selecting the Reception Band (6b)
Selecting a Memory Block (7a, 7b)
Changing the Type of Time Display (9)
Daylight Savings Time (8f)
Setting the Volume (6b)
Setting Alarm Times 1/2 (8g)
Resetting the Alarm Time (8h)
The batteries are almost empty –
replace!
Short Wave Sensitivity (6e)
Station Memory: Block PAGE and
memory position MEM (7a)
Switching On the Device (5a)
Switching Off With a Time Delay (5c)
Setting the Time + Date (8a, 8b)
4
KH2025-2026_IB_UK
01.04.2004
11:29 Uhr
Seite 5
2. Technical Data
Relative humidity: 20 – 80% RMH
Tuning range ......: USW 50 KHz
MW Europe 9 KHz
MW USA 10 KHz
SW 5 KHz / 1 KHz
LW 1 KHz
b) Reception ranges
Sensitivity ..........: SW 2 levels selectable
USW (FM) ..........: 87.5 – 108.5 MHz
c) Other
MW Europe........: 522 – 1656 KHz
Memory positions: 160 stations
MW USA ............: 520 – 1710 KHz
Timer..................: 2 alarm times
9 min. snooze timer
Date-specific Timer
90 min. Sleep timer
a) Environmental limits
Temperatures ....: -5 – +40 °C
SW ....................: 5.85 – 15.6 MHz
LW ....................: 144 – 281 KHz
This information only describes the technical capabilities of the device.
Different contries can have deviating legal
regulations regarding the freely receivable
frequency range. Please note that reception
outside of these regulations can therefore
be illegal and punishable.
Output................: Connection for stereo
headphones 3.5 mm
Power supply ....: Connection for
external power supply
DC 6 V – 7.5 V
Batteries ............: 4 x 1.5 V type "AA"
5
KH2025-2026_IB_UK
01.04.2004
11:29 Uhr
Seite 6
Transportable devices are particularly at
risk to accidental damage. You can reduce
this risk by observing the following:
3. Safety Instructions
Transportable world receivers are used in a
wide range of climate zones. Particularly
when outdoors, make certain that ...
•
the environmental limits are not exceeded (see Section 2).
•
Electronic devices can be damaged by
moisture.
•
Extremely dry air can cause static charges that can lead to faulty functions.
•
Excessive temperatures (e.g. direct sunlight) or very low temperatures (e.g. outdoors in winter) can permanently darken
the liquid crystal display.
6
•
Protect the device against heavy stresses, such as impacts and falls.
•
Select a location in your travel luggage
where it cannot be damaged or switched on by other hard objects.
•
When in areas with elevated security
requirements (e.g. airplanes), it is best
to transport the device without the batteries inserted because it cannot be
completely switched off (clock, timer
functions, ...).
KH2025-2026_IB_UK
01.04.2004
11:29 Uhr
Seite 7
4. Power Supply
b) External Power Supply
Connect an external power supply of
DC 6...7.5V / 300 mA to the power supply jack, as seen in the picture.
Important: Make certain that the polarity is
correct – both for the batteries as well as
for the external power supply. If the polarity
is reversed, the device will be damaged.
Note: The station memory described in
Section 7 will be deleted if the device is
without power for longer than about 30
seconds.
a) About the Batteries
•
Open the battery compartment on the
back side of the device and insert four
batteries of type "1.5V AA" according to
the labels in the battery compartment.
You should therefore leave an external
power supply connected while you change
the batteries – or finish changing them within 30 seconds!
Note: Used batteries may not be disposed of in household waste. Return these
to your retailer or to an appropriate collection site for disposal.
7
KH2025-2026_IB_UK
01.04.2004
11:29 Uhr
Seite 8
5. Switching On / Off
c) Switching Off with Time Delay
With this device, you can only switch the
reception operation on and off. The clock
for time and date as well as the timer continue to function as long as the device is
supplied with power.
If you would like to listen to the radio for a
while longer, for instance before falling
asleep, but would like the device to switch
off automatically after a certain amount of
time (10...90 minutes), ...
press the button RADIO ON / SLEEP
only enough times until the desired
number of minutes is shown in the
display ("10 ... 90").
a) Switching On
To switch on the device, briefly press
the button RADIO ON / SLEEP once.
"ON" appears initially in the display, followed by the tuned frequency.
The countdown begins immediately with
the first press of this button. If you do not
alter the remaining time, the display will
switch back to the tuned frequency. You
can check the remaining time or reduce it
by pressing the ...
b) Switching Off Immediately
To switch the the device off, press the
button SNOOZE / Radio off , or ...
the button RADIO ON / SLEEP repeatedly until "OFF" appears in the display.
button RADIO ON / SLEEP again.
8
KH2025-2026_IB_UK
01.04.2004
11:29 Uhr
Seite 9
6. Receive Mode
c) Changing the Medium Wave Rage
As soon as the device is switched on as
described under 5., it is already in receive
mode.
The frequency range and tuning intervals of
MW vary by region:
Set the sliding switch to
a) Setting the Volume
- up in the region "USA"
Press the buttons ▼ VOLUME ▲ to
adjust the volume.
- down in the region "Europe".
d) Searching for Stations
Press briefly on one of the two TUNING
buttons to search upward or downward
in steps.
b) Selecting the Reception Range (Band)
Select the desired reception range with
the sliding switch:
Hold one of the TUNING buttons pressed to start a scan. The device stops as
soon as a sufficiently strong station is
found. Pressing the button again will
continue the scan.
- USW = Ultra Short Wave
- MW = Medium Wave
- SW = Short Wave
- LW = Long Wave
9
KH2025-2026_IB_UK
01.04.2004
11:29 Uhr
Seite 10
e) Short Wave (SW) Sensitivity
7. Memory
If the the scan process frequently lasts too
long, for instance because too many signals are received in the evening, the sensitivity can be reduced to short wave (local
reception).
A total of 160 memory positions are available – specifically ...
-
5 blocks of 10 positions each for USW
-
5 blocks of 10 positions each for MW
Set the sensitiviy switch to
-
5 blocks of 10 positions each for SW
- RX for local reception
-
1 block with 10 positions for LW.
- LX for long-range reception.
The blocks are also designated as "pages".
This division into blocks is useful to allow
the stations to be saved according to a
meaningful organisation principle. For
instance ...
f) Sensitivity and Antennas
The telescoping antenna is responsible for
USW and short wave (SW). You can alter
the reception strength by adjusting the
length, inclination and direction of the
antenna.
A ferrite antenna is built into the device for
medium wave (MW) and long wave (LW)
reception. Turn the entire device to alter the
reception strength.
10
-
by type: music, news, sports
-
by location: local stations or frequently
visited travel destinations
-
by person: if multiple family members
use the device
KH2025-2026_IB_UK
01.04.2004
11:29 Uhr
Seite 11
Once you have selected the desired block
(page), ...
a) Saving Stations
When you have found a station that you
would like to save:
then press one of the buttons
M0/5 M1/6 M2/7 M3/8 M4/9
to select the memory position 0...9.
Press the button MEMORY.
Two small windows then appear in the
display:
The number associated with the memory position then appears in the small
window MEM.
- PAGE containing the numbers 1...5
- MEM containing an empty field.
Note: These buttons each have two
assignments. Each press switches between the two assignments (e.g between
0 and 5).
Make your selection within the next 10
seconds, otherwise this display disappears
and you must start this step again.
Press the button PAGE until the small
window PAGE contains the number for
the block 1...5 to which you would like
to save the station.
When you have selected the desired
memory position, ...
press the button MEMORY again. The
station is now saved.
11
KH2025-2026_IB_UK
01.04.2004
11:29 Uhr
Seite 12
b) Loading Saved Stations
c) Memory Scanning
If you would like to load a saved station:
If you have saved multiple stations:
First select the band (reception range).
First select the band (reception range).
Press the button PAGE until the small
window PAGE contains the number for
the block 1...5 from which you would
like to load the station.
Press the button PAGE until the small
window PAGE contains the number for
the block 1...5 in which you would like
to start the scan.
Then press one of the buttons
M0/5 M1/6 M2/7 M3/8 M4/9
until the number of the desired memory
position appears in the second small
window MEM.
Then press the button MEMORY
SCAN once briefly. Now all memory
positions are accessed in about 5
second steps.
If no station is saved at a memory position,
only static is heard.
Pressing any button (except for the volume
buttons) ends the memory scan.
Note: These buttons each have two
assignments. Each press switches between the two assignments (e.g between
0 and 5).
12
KH2025-2026_IB_UK
01.04.2004
11:29 Uhr
Seite 13
b) Setting the Date
8. Clock and Timer
Press the button MODE until the
date blinks in the display.
The device can be used as a radio alarm
with two alarm times and one date alarm.
An alarm tone is also available in place of
the radio alarm function.
Press one of the TUNING buttons
briefly to set the date by day.
Hold one of the TUNING buttons
pressed to change the date in 10-day
steps.
a) Setting the Time
When the device is switched off, and the
date and time appear in the display in alternation:
c) Accepting the Time / Date
Press the button MODE .
The time now blinks in the display.
You do not have to do anything to accept
the time and date – the newly set time or
date is accepted immediately after making
the setting.
Press one of the TUNING buttons
briefly to set the time by minute.
Hold one of the TUNING buttons
pressed to change the time in
10-minute steps.
13
KH2025-2026_IB_UK
01.04.2004
11:29 Uhr
Seite 14
d) Setting the Home Time Region
DAC
BKK
SIN
HKG
PEK
TYO
SYD
NOU
AKL
HNL
ANC
YVR
LAX
DEN
CHI
MEX
NYC
YYZ
YUL
CCS
RIO
BUE
Set the time region here in which you
typically reside:
Press the button MODE until
LOCAL CITY appears in the display.
Use the TUNING buttons to
select your home time region:
Code
Applies to Time Region
Difference
to UTC
UTC
LON
MUN
FRA
PAR
ROM
CAI
IST
MOW
KWI
DXB
KHI
Universal Coordinated Time ......
London / England ......................
Munich / Germany ....................
Frankfurt / Germany ..................
Paris / France ............................
Rome / Italy ................................
Cairo / Egypt ..............................
Istanbul / Turkey ........................
Moscow / Russia ......................
Kuwait ........................................
Dubai / Saudi Arabia ..................
Karachi / Pakistan ......................
0
0
1
1
1
1
2
2
3
3
4
5
14
Dacca / Bangladesh .................. 6
Bangkok / Thailand .................... 7
Singapore .................................. 8
Hongkong .................................. 8
Peking / China ............................ 8
Tokyo / Japan ............................ 9
Sydney / Australia .................... 10
Noumea / New Caledonia ........ 11
Auckland / New Zealand .......... 12
Honolulu / USA ...................... - 10
Anchorage / USA .................... - 9
Vancouver / Canada ................ - 8
Los Angeles ............................ - 8
Denver ...................................... - 7
Chicago .................................... - 6
Mexico .................................... - 6
New York ................................ - 5
Toronto / Canada .................... - 5
Montreal / Canada .................. - 5
Caracas / Venezuela ................ - 4
Rio De Janeiro / Brazil ............ - 3
Buenos Aires / Argentina ..........- 3
KH2025-2026_IB_UK
01.04.2004
11:29 Uhr
Seite 15
e) Setting Travel Destination Time
Regions
f) Setting Daylight Savings Time
Once you have selected a home time
region as described under d):
Press the button MODE until only
CITY appears in the display.
Press the button MODE until LOCAL CITY
appears in the display along with the
code for your home time region, as set
under d).
Use the TUNING buttons to select the
travel destination from the same table,
as used previously under d).
Then press the SNOOZE button to
activate daylight savings time and press
it again to deactivate it.
The device now shows the time difference
between the travel destination region and
your home time region.
When the symbol for daylight savings
time appears in the display, the time is
shown minus one hour.
After approx. 15 seconds, the device
returns to the normal time display.
Simply repeat this step for the configured
travel destination regions if you want to
apply the daylight savings time to those as
well.
Set this first for the normal clock display:
Note: Section 9 describes how you can
have the time difference configured here
displayed in alternation with your home
time region.
15
KH2025-2026_IB_UK
01.04.2004
11:29 Uhr
Seite 16
Now specify whether the alarm function
should function every day or whether the
weekend should be excluded:
g) Setting Alarm Times 1 / 2
When the device is switched off, and the
date and time appear in the display in alternation:
Press the SNOOZE button if you want
to exclude weekends from the alarm
function.
First select which of the two alarm times
should be set. Press the button ...
With every press of this button, the
display will switch between:
- ALARM 1 for alarm time 1
- ALARM 2 for alarm time 2
- all days of the week or
Once the respectively selected alarm time
blinks in the display:
- only work days, in other words without
Saturday and Sunday.
Press one of the TUNING buttons
briefly to set the alarm time by minute.
This is useful for working people who do
not want to reset the alarm times after
every weekend.
Hold one of the TUNING buttons
pressed to change the alarm time in
10-minute steps.
16
KH2025-2026_IB_UK
01.04.2004
11:29 Uhr
Seite 17
In conclusion, select the type of alarm:
h) When the Alarm Goes Off
Press the ALARM button for the selected alarm time until the display indicates
...
When the alarm tone or the activation of
the radio function is triggered at the alarm
time, you can ...
- ALM: This means that an alarm tone
(beep) will sound for approx. 10
minutes.
reset the alarm by 9 minutes (snooze
function) by pressing the SNOOZE
button,
- RAD: This means that the radio will
be switched on at the alarm time for
about 60 minutes.
or press the respective ALARM button
to reset the alarm to the next day.
If you would like to completely deactivate
the alarm function, this can only be done
as follows.
- Both codes disappear: This means
that the alarm function is deactivated.
If you would like to be woken by the radio,
you should select the desired station and
volume level before going to sleep.
You can then simply switch off the device.
Note: The configured alarm and clock
times are lost if the device is without power
for longer than 30 seconds, for instance
while changing the batteries. Be sure to
check all configured times afterward!
17
KH2025-2026_IB_UK
01.04.2004
11:29 Uhr
Seite 18
i)
Once an SDA alarm has been programmed,
you can only deactivate it by repeating the
configuration steps and programming in a
date that is long past.
Date Alarm (SDA)
You can program a reminder alarm to go off
on a specific date. On this day, an alarm
will go off for about 10 minutes on every
hour starting at 8:00 a.m. until you press
any button.
9. Miscellaneous
To lock the buttons against accidental
operation, hold the button KEY-LOCK
pressed for 5 seconds until KEY LOCK
appears in the display.
When the device is switched off and the
date and time appear in the display in alternation:
Press the button MODE until the date
blinks in alternation with SDA in the
display.
If you hold down the button again, the
lock is removed.
Fold out the prop to set the device at
an incline.
Press one of the TUNING buttons briefly to set the SDA date by day.
Hold one of the TUNING buttons pressed to change the SDA date in 10-day
steps.
18
KH2025-2026_IB_UK
01.04.2004
11:29 Uhr
Seite 19
10. Self-Help
When the device is switched off, and the
date and time appear in the display in alternation:
Do not open the housing of the device –
there are no operating elements contained
inside.
Press the button Alt. Display until the
display shows ...
a) Cleaning
- the symbol :
When the device is switched off, only
the time will be displayed.
Only clean the device with a soft, dry cloth.
Do not use any cleansers or abrasive
agents, these could scratch the housing
and in particular the display window.
- DATE and
:
When the device is switched off, the
time and date will be displayed in
alternation.
b) If Something Does Not Function
Remove all batteries for 2-3 minutes and
unplug any external power supply connected to the device if it does not react as described in this manual. Now it should function properly again.
- CITY and DATE and :
When the device is switched off, the
time and date as well as the travel
destination time region will be displayed in alternation.
19
KH2025-2026_IB_UK
01.04.2004
11:29 Uhr
Seite 20
c) Additional Problems?
If the device still does not function as described above, a defect may be present. In
this case, contact the customer service.
11. Disposal
If you want to dispose of the device, first
remove the batteries. Used batteries may
not be disposed of in household waste.
Return these to your retailer or to an appropriate collection site for disposal.
Tip: Care for the environment. If you want
to dispose of the device, return it to a collection site for recycling of electronics.
20