1
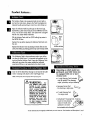
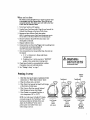
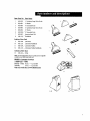
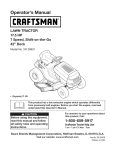
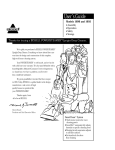
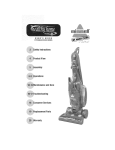
Series 1720 & 1725
Little Green*
Portable Deep Cleaner
•
•
•
•
Assembly
Operation
Safety
Storage
We're glad you purchased a BISSELLLittle Green*
Portable Deep Cleaner. Everything we know about floor care
went into the design and construction of this handy, high-tech
home cleaning system.
Your Little Green is well made. and we back it with a
full one-year warranty. We also stand behind it with a
knowledgeable, dedicated Customer Service department, so,
should you ever have a problem, you'll receive fast,
considerate assistance.
Mygreat-grandfatherinventedthe floorsweeperin 1876.
Today.BISSELLis a globalleader in the design,manufacture,
and serviceof higil quails' homecareproducts like your
LittleGreen.
Thanks again, from all ofus at BISSELL.
MarkJ. Bissell
Presidentand ChiefExecutiveOfficer
• Easyto fill and empty
• Storeready-to use with cleaning
formula
Ak WARNING: DO not use an
this product while on any type of a
extension cord with this product.
The use of an extension cord may
result in a severe electrical shock,
particularly ff the extension cord
does not have an electrical rating
higher than that of the product, if
the extension cord does not have a
three prong grounding plug and
connector and if the extension
cord is not plugged into a circuit
box with a ground fault circuit
interrupter. Safety precautions
such as keeping all connections
off the ground and dry will not
eliminate the danger.
ladder. Do not place the product in
a place where it will be stepped on
or kicked while in use. Do not
place the product on an elevated
surface where it may be pulled off
the surface while in use.
Vacuum
FlexHose
Trigger
Heater
Heater Switch
Trigger
Tool
Heat
Indicator
Light
Solution/Clean Tank
On Boar(
Cord Storage
Collection/Dirty Tank
Power Cord
I!l
Product features...
TheSolutionTankis
the trauslueent
ankat yourfightas
youfacetheLittleGreen.Remove
thetTankbygraspingthe
indentedhandleand pullingit towardyou,thentiltingout.
U
Open the Solution
Tank byFormula
pulling to
upthe
on FORMULA
the round fill
cap.line
AddBISSELL
LittleGreen
(8-oz.)on SolutionTank.NOTE:YourLittleGreenisshipped
withan 8 oz.starterbottleof formula.
Fill the Solution Tank with hot (NOTboiling) tap water to
the WATERfill line.
_Li
Replace the cap before placing the Solution Tankback into
the unit.
ne
Formula Fill Line
Replacethe SolutionTankbyplacingit bottomfirstintothe
cavity,thentiltingit,pressinggentlyat topuntilitsnapsclosed.
E
/ Water
/ Fill
The
CollectionTank
is theIttranslucent
at your left
you face
the LittleGreen.
is removedtank
and replaced
on as
the
unit just like the Solution Tank. Empty the Collection Tank
after each use, when dirty water reaches the indicated
maximum fill line, or as instructed in this User's Guide.
_2]]
Storein
the On Board
HoseStorage
on the back of the Little
Green. Cleaning
tools attach
to the Grip/TriggerUnit.
NOTE: Unwrap FlexHosecompletely before operating unit.
WARNING:
Use
only BISSELLLittle Green
formula in your cleaner.
Use of cleaning formulas
which contain lemon or
pine oil may damage this
appliance and void win'rarity.
Chemical spot cleaners or
solvent-based soil removers
should not be used. These
t_roducts may react with
e plastic materials used
in your cleaner, causing
cracking or pitting.
Depending
which
purchased, on
your
Ltttlemodel
Green you
may
be equipped with one or more
of these tools:
_.
• 4" wide Cleaning Tool (included
with all models)- Forcleaning
carpet, upholstery and spot cleaning
• Spraying CreviceTool
- For cleaning in tight areas
• 6" wide Cleaning Tool
- For larger areas
• TurboBrush_ Cleaning Tool - Rotating
brush for extra cleaning
action for small areas,
upholstery and stairs
Not included
with all models.
To orderoptional too s not originally included with your LittleGreen see "'Part Numbers and Descriptions," page 9.
tit
The Cord, with a three-prong grounded plug, stores in the On
Board Cord Storage at the bottom of the Little Green.
Safetyinstructions ..........
2
NOTE:tnwrap PowerCordcompletelybefore
operatingunit
Productview ..............
3
Productfeatures ..........
4-5
Assembly
for wet cleaning
Not included
is now complete.
with all models.
Withthe
LittleGreenProHeat'"youhavetile abiliD'to turn on,
or leaveoff,tilebuilt-inheater,basedonyourcleaningneeds.
The LittleGreen ProHeats'' built-in heater will raise the water
temperature for improvedcleaning perfomaance. Touse Little
Greens' built-in heater, first turn the PowerSwitch ON and
then turn the Heater SwitchON,Within 30 seconds, the Heat
Indicator Light will illuminate,
HeaterSwitch indicating the heater has reached
the correct temperature.
Power Sv,itch
Heat Indicator
J
Beginusing bydepressingthe
SprayTrigger.Wait5-10seconds
fornon-heatedwaterand
solutionmixtureto travel
throughthe FlexHose.After
5-10seconds,the heatedwater
and solutionmixture isreadyto
beappliedto carpetor upholstery.
Seepage 6 for cleaning instructions.
How to begin...
1. In tilecaseofspills,removeas much surfacematerialas
possiblebeforeusing yourLittleGreen.
1. Check manufacturers tag beforecleaning. *W or 'WS" on
the tag means you can use your LittleGreen. If tag is coded
with an "S" (with diagonal strike-through), or says "Dry
Clean Only/' do not proceed
2. If manufacturer's lag is m*ssing or not coded, check with
your furniture deale_:
3. If possible,check upholsterystuffing. Coloredstuffing may
bleed through fabric when wet.
Index ....................
5
Howto begi[_ ..............
5
Howto deep clean
carpet or upholstery .......
6-7
Putting it away ............
7
Troubleshooting ...........
8
Parts .....................
9
Warranty, ................
10
Customer Service ..........
10
Gettingready
1. RemoveVacuum Flex Hosecompletely from On Board
HoseStorage.
2. Attach 4" Tool, 6" Tool,*"IhrboBrush*or CreviceTool* to
Grip Trigger Unit by pressingTool onto Grip/TriggerUnit
firmly,until button snaps into hole. Make certain _
Tool is securely attached.
3. UnwrapPowerCordcompletely from On Board
CordStorage and plug into 120Volt,60 Hz grounded
outlet as describedin Important Safety Instructions, page 2.
4. If cleaner starts when first plugged in, switchcleaner off
until ready for use.
5. MovePowerswitch to ONposition.
6. If your Httle Green has a built-in heater, refer to instructions
on page 5.
7. press and hold SprayTriggeron Grip/Triggerunit. Spray
willstart in a fewseconds.
8. Raise the tool slightly to check for spray.If spray doesnot
start, press firmlyon the front of the Solution Tank while
depressing
SprayTrigger.
*OptionalonsomeLiMeGreenmodels.Toorderoptionalpartsnotoriginally
includedin yourLittleGreenmodel,call BISSELL
ConsumerServicmat
the telephonenumber listedon page 9.
Pre-treating
1. Pre-treat stained or highly soiled areas: Hold the tool
4"- 6" above carpet or upholstery,,and pull trigger to
spray cleaning solution.
2. Wait 3-5 minutes before cleaning.
Deep cleaning
1. Place the tool directly on soiled surface at arms length.
Applydownward pressure on the tool and pull toward you,
whilepulling trigger to spray cleaning solution.
NOTE:If using the TurboBrush. tile s_itch should be in the "'BRUSH"
position. Thisac'tiva_ the brush onl,v
2. Repeat, keeping the tool firmly against the surface.
Continue until no more dirt can be removed.
Do not overwet.
NOTE:If using the TurboBrush, move the switch to the "SUCTION"
position. This activates the stiction to remo_ethe dirt and cleaning
solution. Movethe _itch back to the "BRUSH"position for additional
brushing action.
DO not overwet.
3. Releasespray trigge_Vacuum area until no more
cleaning solution can be removed.
NOTE:If using the TurboBrush. move the switch to the "SUCTION"
position.Thisactivat_the suctionto removethedirtandcleaningsolution.
4. If the tool stops spraying, tuna OFFPowerSwitch and check
cleaning solutionlevel.Refillffneeded. Neverrun dry.
-'-"_.
_W'v'"_
_"=
When you're done
TIP: Before turning off Little Green, vacuum up clean water
to thoroughly rinse the VacuumHose. Then, lift the tool
and point upwards. This allows any water still in the Hose
to flow into the Collection Tank.
1. Tom Power Switch to OFF position.
2. Unplug Power Cord from outlet. Wrap the cord around the
Onboard Cord Storage at the base of Little Green.
3. Remove and rinse Solution Tank, then replace.
NOTE:If a significant amount of Little Green formula/water remains,
you may leaveit in the Solution Tank for your next cleaning task.
4. Remove Collection Tank, fill with clean water, rinse
thomughly and discard.
5. Replace Collection Tank.
6. Disconnect the tool from Grip/Trigger unit by pushing down
on button lock and pulling straight off.
(Do NOT twist tools to remove them).
7. Once removed from the Vacuum/Flex Hose, the tools can
be cleaned:
a. 4", 6", or Crevice tool - Rinse under clean
running water.
b. 'rurboBrush tool - Switch must be in "SUCTION"
position. Rinse under clean running water.
8. Check Spray Nozzle for accumulated dirt or debris.
If necessary, clean with soft bristle brush.
9. See "Putting It Away" on page 7.
Putting it away
Built-in
Heater
I. Afterdeep cleaning of carpet or upholstery,follow
instructions in "When You're Done:' above.
2. Wipe all surfaces with a softcloth.
3. WrapPower Cordaround On Board CordStorage
at the bottom of LittleGreen.
4. WrapVacut:mFlex Hosearound Onboard
HoseStorage and secure Grip/Trigger.
5. StoreCleaner in a protected,dry area, at
room temperature (40° to ll0°F).
NOTE: For Little Green TurboBrush* Models,
on-board storage for the TurboBmsh ®Tool
has been provided on the back of the unit.
Attach the TurboBrush ®to the unit by
pressing tool onto holder firmly until
button snaps into hole.
TurboBrush
Cord S_rage
1720-1
1720-2
_e Green
Cord Storagei
1720-5
1720-6
_tfle Green
TarboBrush
TurboBmsh
Cord Storage i
1725
1725-1
Little Green
ProHeat
TarboBrush
Cleaner won't run.
Possible Causes
Reduced
spray
Remedies
PowerUnitnotpluggedin
Checkelectrical plug
Blown fuse/tripped breaker
Replacehousehold fuse or
Resetbreaker
Call BISSELLConsumer Services
or no spray.
Remedies
Possible Causes
Vacuum
won't pick
SprayNozzleclogged
Clean Spray Nozzle
Solution Tank empty
Check/RefillTank
Solution Tank outlet clogged
Clean outlet at bottom of Solution Tank
Pump needs priming
Push firmly on Solution Tank front
while depressing SprayTrigger
up cleaning
solution.
Remedies
Possible Causes
Poor Upholstery/Carpet Tool
position
Reposition Upholstery/CarpetTool on
surface, followrecommended cleaning
procedures
Collection Tank is full
Empty Collection Tank
Upholstery/CarpetTool Brush
Replacewith new Brush
worn
Excessive
Excesssolution in Vacuum
Flex Hose
Lift Tool and point upwards to allow
water in Hose to flow into the
Collection Tank
Incorrect switch position
on 'l_rboBrush
Reposition switch to "Suction" position
Foam in the Collection
Tank.
Remedies
Possible Causes
Residueleft in carpet or fabric
from prior cleaning
Incorrect cleaning formula
TurboBrusb
attachment
o Brush
Flush carpet by using clear water in
Solution Tank
CheckTank often and empty
as necessary,
UseBISSELL
LittleGreen formula only
will not turn.
Possible Causes
Incorrect switch position
on _rboBrush
Remedies
Reposition switchto "Brush" position
Item Part No.
Part Name
1
2
603-0983
603-0961
4" Upholstery/CarpetI'oolw/Brush
4" Window
3
603-0984
4" RemovableBrush
4
5
603-0985 , 6" Upholstery/CarpetToolw/Brush
603-0962
6" Window
6
603-0986/6"
7
8
603-0987
010-1183/
Solution/Clean
RemovableBrush
SprayingCreviceToo[
TurboBrush
Tank
9
603-1200
LittleGreen
10
603-1224
LittleGreen'lhrboBrush
11
603-1209./- LittleGreen ProHeat
12
603-1210/Little
G_en ProHeatTurboBrush
Collection/Dirty Tank
13
603-120l/
White
NOTE:Toorderreplacement
parts or to orderpartsnotoriginally
inc udedin yourLittleGreenmodel,call
B1SSELL Consumer
Services
1-800-237-7691
Monday - Friday 8 a.m. -- 7 p.m. EST
Saturday
9 a.m. -- 2 p.m. EST
Visit our web site at www.bissell.com
9-12
About your warranty
Thiswarrantygivesyouspecificlegalrights,and youmayalso haveotherrightswhich
mayvaryfromstateto state.Ifyouneedadditionalinstructionregardingthis warrang,
or havequestionsregardingwhat it maycover,call BISSELL
ConsumerServices.
OneYearWarranty
BISSELL
Inc.,uponreceiptofthe product,will repairor replace,freeofcharge,any
partwhichis defectiveor malfunctioningwithinone yearofpurchasetothe original
purchaser,providedthe productis usedfor personal,and not commercialor
rentalservice.
Damagesor malfunctionscausedbynegligence,abuse,oruse not in accordancewith
the User'sGuidewillnot becovered.Thiswarranty,doesnot coverpartsofthe unit that
requirereplacementundernormal use.
Underthiswarranty,if it is BISSELL's
conclusionthat yourunit cannotberepaired,
BISSELL
willreplacethe product.
If your BISSELLproduct should require service:
Call BISSELLConsumer Services at 1-800-237-7691 and we will give
you the name and address of an authorized B1SSELLService Center in
your area. If there is not an authorized BISSELLService Center in
your area, one of our Service Representatives
will be happy to assist
you. You can also visit the BISSELLwebsite - www.bisselLcom
to locate
a Service Center near you.
For information about repairs or replacement parts, or questions
about your warranty,call:
BISSELLConsumer Services
1-800-237-7691
Monday- Friday 8 a.m. -- 7 p.m. EST
Saturday
9 a.m -- 2p.m. EST
www.bissell.com
Or write:
BISSELLINC
PO Box 3606
Grand Rapids MI 49501
ATTN: Consumer Services
WhencontactingBISSELL,
have modelnumberof unit available.
PleaserecordyourModelNumber:
PleaserecordyourPurchaseDate:
NOTE:Please keep your original sales receipt. It is your warranty.
It is suggested you staple your original sales receipt to the
front of this guide.
10
©2000 BI_ELLlnc
GrandRapids,Michigan
,_1rights re_erved.
Printedin USA
Part Number603-5842
Visitourwebsiteat:
wwwbisseii.com
Rev 3/00