1
Under Cabinet CD Radio
OWNER'S fI/IAA/UAL
CKD| 612
Visitourwebsiteat www.emersonradio.com
T O P B E V E N TF I R E O R S H O C KH A Z A R D ,D O N O T U S E T H I S P L U G W I T HA N E X T E N .
S I O N C O R D , R E C E P T A C L EO R O T H E R O U T L E T U N L E S S T H E B L A D E S C A N B E
F U L L YI N S E R T E DT O P R E V E N TB L A D EE X P O S U R ET, O P R E V E N TF I R EO R S H O C K
HAZARD, DO NOT EXPOSE THIS APPLIANCE TO RAIN OR MOISTURE.
The lightningflash with arrowhead
symbol, within an equilateral
triangleis intendedto alertthe user
to the presenceof uninsulated
'dangerousvoltage' within
the
p r o d u c t ' se n c l o s u r et h a t m a y b e o f
s u f f i c i e n tm a g n i t u d et o c o n s t i t u t e
a r i s k o f e l e c t r i cs h o c k t o p e r s o n s .
W A R N I N GT
: o R E D U C ET H E B I S K T h e e x c l a m a t i o np o i n t w i t h i n a n
O F E L E C T R I CS H O C K D O N O T e q u i l a t e r a lt r i a n g l e i s pi nr et es ne dn ec ed
to alertthe user to the
R E M O V EC O V E B ( O F B A C K ) ,N O o f i m p o r t a n t o p e r a t i n g a n d
USEB SERVICEABLE PARTS m a in t e n a n c e (se rv ic in g )
I N S I D E R E F E H S E R V I C I N GT O i n s t r u c t i o n s i n t h e l i t e r a t u r e
accompanyingthe appliance.
OU AL IF IE DSE R V IC EP E FS ON N E L.
of the apparatus.
The CautionMarkingmaybelocatedat the top enclosure
IMPORTANTSAFETYINSTRUCTIONS
s "e e d
1 . ) R e a dt h e s ei n s t r u c t i o nKs e
. e pt h e s ei n s t r u c t i o nFso. l l o wa l l i n s t r u c t i o nH
all warnings.
2 . ) B e f o r eo p e r a t i n gm, a k es u r et h e v o l t a g er e q u i r e m eonft t h e u n i tm a t c h e ys o u r
localvoltage.
3.) Do notusethisapparatus
nearwater.
4.) Cleanonlywithdrycloth.
instructions.
5.) Installin accordance
withthe manufacturer's
stoves,or
heatregisters,
6.) Do notinstallnearanyheatsourcessuchas radiators,
(including
heat.
amplifiers)
thatproduce
otherapparatus
plug
plug.A polarized
or grounding-type
7.) Donotdefeatthesafetypurpose
clfthepolarized
typeplughastwobladesanda
hastwobladeswithonewiderthantheother.A grounding
lf the
foryoursafety.
prong.Thewidebladeor thethirdprongis provided
thirdgrounding
p r o v i d e dp l u g d o e s n o t f i t i n t o y o u r o u t l e t , c o n s u l t a n e l e c t r i c i a nf o r
reolacement
of theobsolete
outlet.
8 . ) P r o t e ctth e p o w e rc o r df r o mb e i n gw a l k e do n o r p i n c h e dp a r t i c u l a ral yt p l u g s ,
c o n v e n i e n cree c e p t a c l e sa ,n d t h e p o i n tw h e r et h e y e x i tf r o mt h e a p p a r a t u s .
bythe manufacturer.
9.) Onlyuseattachments
/ accessories
specified
1 0 . )U n p l u gt h i sa p p a r a t udsu r i n gl i g h t n i nsgt o r m so r w h e nu n u s e df o r l o n gp e r i o d s
of time.
t h e u n i ti f l i q u i ds p i l l si n t oo r
1 1 . )D i s c o n n etcht e p l u ga s s o o na s i m m e d i a t eul yn p l u g
o n t ot h e u n i to r i t a n o b j e c te n t e r st h e u n i t .T h e u n i ts h o u l dn o t b e u s e du n t i l
beingcheckedby experts.
by the unitmaydamage
12.) Do notopenthecabin6t.
Lasersusedin raysemployed
youreyes.Anyservicing
servicepersonnel.
shouldbe doneby qualified
d h e nt h e
1 3 . )B e f e ra l l s e r v i c i ntgo q u a l i f i esde r v i c ep e r s o n n eSl .e r v i c i nigs r e q u i r e w
cordor plugis
apparatushas beendamagedin any way,suchas power-supply
the
damaged,liquidhas beenspilledor objectshavefallenintothe apparatus,
doesnotoperatenormally,
or
apparatushas beenexposedto rainor moisture,
hasbeendropped.
w a t e rand no object
1 4 . )T h i sa p p l i a n c es h a l ln o t b e e x p o s e dt o d r i p p i n go r s p l a s h i n g
filledwithliquidssuchas vasesshallbe placedon the apparatus.
by
15.) Use onlywiththe cart,stand,tripod,bracket,or tablespecified
or soldwiththe apparatus.
the manufacturer,
Whena cart is used,use cautionwhen movingthe cart/apparatus
combination
to avoidinjuryfromtip-over.
1 6 . ) Do not overloadwalloutlet.Use onlypowersourceas indicated.
partsas specifiedby the manufacturer.
1 7 . ) Use replacement
1 8 . ) The productmay be mountedto a wallonly if recommended
by the manufacturer.
1e.)Uponcompletionof any serviceor repairsto this product,ask the servicetechnician
to performsafetychecks.
20.) PowerSources- Thisproductshouldbe operated
onlyf romthetypeof powersource
indicated
on the markinglabel.lf youare notsureof thetypeof powersupplyto your
home,consultyourproductdealeror localpowercompany.
to
Forproductsintended
operatefrom batterpower,or othersources,referto the operatinginstruction.
21.) Objectand LiquidEntry- Neverpushobjectsof anykindintothisproductthrough
partsthatcould
openings
astheymaytouchdangerous
voltagepointsor short-out
resultin a fireor electricshock.Neverspillliquidof any kindon the product.
2 2 . )D a m a g eR e q u i r i nS
g e r v i c e- U n p l u gt h i sp r o d u cftr o mt h e w a l lo u t l e ta n d r e f e r
servicing
to qualified
servicepersonnel
underthefollowing
conditions.
a) Whenthe power-supply
cordor plugis damaged,
b) lf liquidhasbeenspilled,
or objectshavefallenintotheproduct,
c) lf the producthasbeenexposedto rainor water,
doesnotoperatenormally
d) lf theproduct
bytollowing
theoperating
instructions.
Adjust
onlythosecontrolsthatarecoveredby the operatinginstructions
as an improper
adjustment
of othercontrolsmayresultin damageandwilloftenrequireextensive
workby a qualifiedtechnician
to restorethe productto its normaloperation.
e) lf theproducthasbeendroppedor damagedin anyway,and
f ) W h e nt h e p r o d u cet x h i b i tas d i s t i n cct h a n g ei n p e r f o r m a n c- et h i sr n d i c a t eas
needfor service.
2
WE BEGIN
BEFORE
this Emersonaudioproduct,The Emersonbrand
Thankyou for purchasing
of quality,performance
andvalue.
is yourassurance
featuresin this
haveincludedmanyusefuland convenient
Our engineers
product. Pleasebe sureto readthis Owner'sManualcompletely
to make
sureyou aregettingthe maximumbenefitfromeachfeature.
and
This productwas manufactured
usingthe highestqualitycomponents
andfoundto
lt wastestedby Emersoninspectors
standardsof workmanship.
be in perfectworkingorderbeforeit leftour factory.However,thereis always
thechancethatsomeproblemmayoccurbecauseof roughhandlingduring
shipmentto the retailstoreor to the finalconsumer.
youexperience
withtheoperation
of this
lf,afterreading
thisManual,
anyproblems
product,pleasereferto the instructions
for obtainingserviceat the end of this
to yoursatisfaction.
Manual.Emersonand Emersonretailersare committed
Onceagain,thanksfor purchasing
thisEmersonaudioproduct.
3
CLASS1 LASERPRODUCT
CLASS1 LASERPRODUCT
APPAREIL
A LASERDE CLASSE1
PRODUCTO
LASERDE CLASE1
CAUTION
INVISIBLE
LASERRADIATION
WHENOPENAND INTERLOCKS
DEFEATED.
AVOIDEXPOSURE
TO BEAM
This productcontainsa low power Laser Device.
Avoidinstalling
this unit in places
exposedto directsunlightor closeto
heat radiatingappliances
suchas
electricheaters,
ofi topof otherstereo
equipment
thatradiates
toomuchheat,
placeslackingventilation
or dusty
places
areas,
subjectto constant
vibration
ancl/or
humidor moistareas.
Operatecontrolsand switchesas
described
in the manual.
Beforeturningon the power,make
certainthat the AC powercord is
properlyinstalled.
Whenmovingthe set,be sureto first
disconnect
thepowercordandremove
cordsconnected
to otherequipment.
Do not leave,mountor usethe unit
in placeswhichare extremelyhot,
cold,dusty,o[ humid.
4
Allowadequateair circulation
to
preventinternalheatbuild-up.
Do
not placethe uriiton a surfaceor
(a curtainex. rugs,
nearmaterials
blankets,
curtains,
etc.)whichmight
blocktheventilation
holes.
Whenleftin a heatedroomwhereit
is warmand damp,waterdroplets
mayforminsidethe
or condensation
CD player. When there is
insidetheunit,theunit
condensation
may not functionnormally.Let it
standfor 1 ta 2 hoursbeforeturning
the poweron,or gradually
heatthe
roomup anddrytheunitbeforeuse.
Whenyou arenotgoingto usethe
unit for a long period of time,
disconnect
the powercord.
FCCINFORMATION
Thisequipment
hasbeentestedandfoundto complywiththe limitsfor a classB
digitalDevice,pursuantto part'15of the FCC Rules.Theselimitsare designedto
providereasonableprotectionagainstharmfulinterference
in a residential
generates,
Thisequipment
installation.
uses,andcanradiateradiofrequency
energy
and,if notinstalled
andusedin accordance
withtheinstructions,
maycauseharmful
interferenceto radio communications.
However,there is no guaranteethat
interference
will notoccurin a particularinstallation.
lf thisequipmentdoescause
harmfulinterference
to radioor televisionreception,whichcan be determinedby
turningthe equipmentoff and on, the user is encouraged
to try to correctthe
interference
by one or moreof the followingmeasures:
I
o
a
Reorientor relocatethd receivingantenna.
Increasethe separationbetweenthe equipmentand receiver.
Connectthe equipmentintoan outleton a circuitdifferentfromthatto whichthe
receiveris connected.
Consultthe dealeror an experienced
radioiTVtechnicianfor help.
Thisdevicecomplieswithpart15 of the FCC Rules.Operationis subjectto the
following
twoconditions:
(1) Thisdevicemaynotcauseharmfulinterference,
and
(2) Thisdevicemustacceptany interference
received,includinginterference
that may causeundesiredoperation.
Changesor modifications
not expresslyapprovedby the partyresponsible
for
compliancecould void the user's authorityto operate the equipment.
UNPACKING
ANDSETUP
. Remove
theunitfromthecarton,andremoveall packingmaterials
fromthe
unit.
Savethecartonandpackingmaterials
in casetheuniteverneedsto be returned
for service.Usingthe originalcartonandpackingmaterials
is theonlywayto
safelyrepackthe unitfor shipment.
Removeanydescriptive
labelsor stickers
fromthetop or frontof the unit.Do
not removeany labelsfromthe backor bottomof the cabinet.
Removeanysmallstripsof tapethatmayhavebeenusedto preventthe CD
doorfromopeningin transit.
5
Notethe SerialNumberon the bottomof yourradioandwritethisnumberin
the spaceprovidedon the warrantypage of thismanual.
UnwindtheAC powercordandextendit to itsfulllength.
Placetheuniton a placewithineasyreachof anAC outlet,outof directsunlight,
and away from sourcesof excessiveheat,dust, moistureor humidity.
POWERSOURCE
This systemis designedto operateon 120VAC - 60Hzhousecurrentonly.
thissystemto anyotherpowersourcemaycausedamageto thesystem
Connecting
and suchdamageis not coveredby yourwarranty.
Nofe;The systemhas polarizedAC plugwith one widebladeand one narrow
AC outlets.
blade.The plugwillonlyfit intomatchingpolarized
Thisis a safetyfeatureto reducethe possibility
of electricshock.lf the plugwillnot
fit in yourACoutlet,youprobablyhavean outdatednon-polarized
outlet.Youshould
licensedelectrician.
Do notfile
haveyouroutdatedoutletchangedby a qualified,
thewidebladeon the plug,or usean adapterto maketheplugfit intoyouroutlet.
This defeatsthe safetyfeatureand could exposeyou to electricshock.
Outlet
b
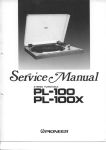
A. (1)-Main
%oo"cto"oooto"q
Template
(1)-Mounting
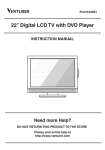
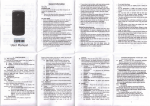
CKDl 612 MOUNTINGTEMPLATE
rouxTll{o
aulcx
tl{aTtucTlottt
[ililil0ilil00[il
M.
r €rdlc
orl irr
.12PhIFGSlddffi*
.
.ff
b h*d&
hd
d
hdb
qtjlr'
d
.*
nY*_'tMti4
hd
1/a' il
Srt tkr
! F I
. c{ d h fad*E
. pro
rb.rtri.n
n
m
- W-tt-lt
@
F{
t ddab
n h
i-gfi
-..oli
(ffi
h dlfi
hdb
d.rtd
l)
I o' Flgm
ffi
tbp t
ffir
l dm
h tftDt
. onr ur,r'
not- wo4h
<h
Figm D
1/4'FloL tm'.
y4s
m s fi*. i fr{
M
wo'wwdrd
|s:
yd bgtl
b'b"
* tr { ldfoata
.mt
rnt in ca
rff
Y'dtd*hgi
td to.g tt nd h h (;d
' Rffihitnpf
''?
-ro *"nn, u",*e
pow.a"w*.
sc?vd/iw
cd
ttp'
h
etiln
tffi
b to h
dF*d@
dndog f Hr wil qtml
I)
A d Fhu'
ltnd&
t
lDrlll1/4'
lHoleHerc
ff
ndd
Fm
r nd
6bt9t
lt@Oh
r*n
ffi
h.9.6,
F'*R
ff
r ml
il ffi
b trut'
h d
)er
dMd
bh
hEt obst&kfrt
@o
ntklo
d
Pdvs
m
o' tt c'dd
Firo
hdt itm tr h*t'
<sFi€uc
pM
h uod drlo tm ss
luFt
ol h un( ts btu
d oPF 'b m
t'o'* o'n t '
utt *o
to vout *l do d
usa d "tevc
b l4)hbn lh. *tu6
dKt haad.light.n
oat the cgnospotutg
6@gn
wrl go orqlrlcrt
whd
fogt
tl
tffi
rddJtrdwdbtqthbhllrdrL
. ln*i
s*|
dr tq
d-trd
et,$ tt" toua na". a Uta s(
' rqllh
MNii
ffi
t
",,
- ll yos
@
ffFrHri*tig
3b9l
- ScX
Il
h
'dblYt
Us
'l
3>
l"n!'
: '/''1i
@L^f
il wM
on lhc lafrplsb.
pnwol
blt h
uring N Ion'PtaF
lou ltm
hF
NOT cul dl d lhreo|]'
OF
IF YOUR CABTNEI IS wlTH OVERHA}IG.OR FOR TORE TNFORMATION
MOUNTII{G.PLEASE REFER TO USER MANUAL "MOUIiTING INSTNUCNON'-
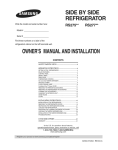
F i g u r e3
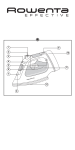
Control
C. (1)-Remote
iV::---::::-',1
ii ,,'s
i, ts,S'
I O ,.jil ifi
$
I
l
,S|-'&
.$
i0
r$ "'A
.$
ii
.
-:>----.==/
,l
,4)
7
(27mm)spacers
D. (4)-1.06"
i"'l
''-'
(14mm)spacers
E. (4)-.56"
i''l
F . ( 4 ) - . 3 1 (" S m m )s p a c e r s
:'.c)
G . ( 4 ) - #M 5X70mmscrews
Y
il
I
H . ( 4 ) - #M 5 X 40mmscrews
T
I
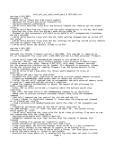
l . U s e rM anual
J . C o l o rl nsertSheet
CAUTION
To reducethe riskof fire, do notplaceanyheatingor cookingproductbeneaththis
unit.
Ask a friendto h e l pout.An extrahandto holdthe unitmakesmounting
easier
andquicker.
ToolsRequired
. ElectricDrillwith 114"B,t
. #2 Philipsor SlottedScrewdriver
. SafetyGlasses
Step 1
- Cut out the Mounting
Template
alongthe cut-line.
- Placethe Mounting
Template
in the desiredlocation
of thecabinet(location
A or B of Figure"l), flushwith
thefrontedgeof the cabinet.Useadhesive
tapeto
fix thetemplate.
{Note:lf your cabinetis with overhang,fold the
templatealongthe guideline
thatis closestto the
thickness
of yourcabinetoverhang,
tapethetemplate
'ruithfoldedportionflush up againstthe cabinet.
<SeeFigure1>)
Step2
- Drillfour 114"holesthroughthe templateand the
bottomcabinetin thelocations
marked"Drill1l4"Hole
Here".<SeeFigure 2>
Note:We recommend
thatyou use an ice pick,an
awl,a nail,or similardeviceto makea smallstarter
hole in eachof the 4 locationsbeforeyou begin
drilling.
Thiswillpreventthedrillbitfrom'wandering'
andkeepthe holein thecorrectlocation.
- Removethe templatewhen you finish drilling.
I
i:it.;r:fe I
Step3
- Selectthe screwlengthwhichwillgo completely
throughyourcabinetbottom,andprovideat least
3lB" of thread to screw into the main unit.
puttogether
(Note:lf yourcabinetis withoverhang,
the providedspacersto form longerspacersto
variouscabinetoverhang
thickness.)
accommodate
- Insertthe fourselectedscrewsthrougheachhole
fromthe insideof thecabinetgoingdown.Alignthe
fourholesof the unitwiththe screws,pushthe unit
(andspacersif yourcabinetis withoverhang)
onto
thescrews.<SeeFigure3>
- Partially
tighteneachscrewmanually,
startscrewing
at oppositecornersof the unitfor bettersupport
<Seefigure4>.
Do notfullytightenthe screwuntilall of themhave
beenstarted.Gentlytighteneachscrewuntilthey
arefirmlyholdingthe unitin place.
F i g u r e4
TIP
- Topreventdamageto yoursetdo notuseyourelectricdrillor a powerscrewdriver
to tightenthe screws.Use a manualscrewdriver
and hand-tighten
only.
- lf yourcabinethasobstructions
insideit whichpreventyoufromusingthetemplate,
cut out the corresponding
areaon the template,butdo NOTcut out or through
the screwholes.
- 3 setsof spacers(4 pcs/set)and 2 setsof screws(4 pcs/set)of variouslengths
are providedtogetherwiththe unit.
- Cleanthe bottomof the cabinetsurfaceand alsoemptyyour cabinetbefore
mounting.
- Placethe unitin a clean,safeplacewhendrillingto avoidwoodshavingsdropping
intothe ventilation
slots.
- -roreducesplintering,please
a smallpieceof maskingtapeovereachholelocation
Seforedrilling.
- Beforeyoudecidewhereandhowto placeyourunit,trythefollowing
connections.
- Drillfromthe bottomupwardsif youdo nothaveenoughroominsidethe cabinet.
- Holdyourdrillfirmlyat 90" withthe cabinetbottomanddrillholesat lowspeed.
- Clearwoodshavings.
ConnecttheAC powercordto the wall socket.
Tip:Topreventobstruction
or danger,usethe powercordpoststo wrapthe power
cordso that excesscorddoesnot hanodown.
10
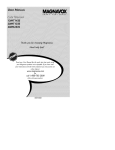
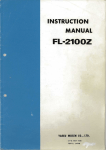
MAINUNIT
1. ONI OFFbutton
2. LCDdisplay
3. CD compartment
4. RemoteSensor
5. CookingTimer+10(min)/ CookingTimerOff button
6. CookingTirner+1 (min)button
7. Preset-button
B. Preset+ button
9. M (Memory)
I Set button
10.Open/ Closebutton
11.Stereo/ Mono/ Repeatbutton
12 Randombutton
13 Function(CD/ Tuner)switch
1,LStop n button
15.PlayI Pause>il buttonI Eandswitch
1A i,l<Tuning-I CD SkipReverseSearchbutton
17.>>lTuning+I CD SkipForwardSearchbutton
13.XBASSbutton
19.Volume-l+ button
$. PowerAC cord
,l'1.
$peaker
2 Oounter
TopLighting
.3 CounterTopLightingON/OFFswitch
11
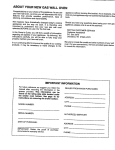
R E M O T EC O N T R O L
H11
H3
H12
H13
H14-
'h
'3__
'p
,s
t'1
-Ef
\ .r'
b
H2
H5
-H4
'Y
{s--
H6
-HB
H7
he
H15
/r'
a
q-
H16
f
H9
H10
H17
H1B
lJ1. PowerON/OFFbutton
A2.Randombutton
ll3. RepeatI Stereo/ Monobutton
ll4. L)l Tuning+I CD SkipForward
Searchbutton
It5. ifi Tuning-I CD SkipReverse
Searchbutton
+ button
H6.Volurne
A7.M-UP(memoryup)button
iiB.Function(CD/Tuner)
switch
i i9.OpenI Closebutton
Timer+1 (min)button
H10.Cooking
H11.Mutebutton
/ Setbutton
H12.MEMO(lVlemory)
H13.PlayI Pause >tlbuttonI Ban d
switch
H14. Stop i button
down)button
H15.M-DN(memory
H16. Volurne- button
H17.XBASSbutton
+10(min)Cooking
Tirner
H1B.Cooking
TimerOff button
12
USINGTHE REMOTECONTROLCORRECTLY
. Pointthe RemoteControlat the REMOTESENSORlocatedon the unit.
' when thereis a strongambientlightsource,the performance
of the infrared
REMOTEmay be degraded,
causingunreliable
operation.
' The recommended
effectivedistancefor remoteoperationis about13feet(4m).
ATTENTION
A MAGNETIS BUILTINTOTHE REMOTECONTROL
SO
THATIT CANBEATTACHED
TO YOURREFRIGERATOR.
' Removethe batteryinsulation
tab beforeoperating
the
remotecontrol.
' when the batterybecomesweak,the operating
distance
of the RemoteControlis greatlyreducedandyouwillneed
to replaceit as follow:
1.Turnoverthe remoteandopenthe batterydoor.
2. lnsertone CR2025(3V)sizelithiumbattery.
' Disposeof usedbatteriesin accordance
withlocallaws
andregulations.
.\--.---/-'.tt
lij
:' ! '1-*A
v
r
WARNING:DANAGEROF EXPLOSIONlF BATTERYlS TNCORRECTLY
REPLACED,
REPLACEONLYWITHTHE SAMEOR EQUIVALENT
TYPE.
DISPLAY
D1. Stereoindicator
D2. TUNERindicator
D3. CD indicator
(repeat)
D4. RPTindicator
D5. XBASSindicator
D6. RDMindicator
(random)
D;'. MEMORY
indicator
D8. FM indicator
D9. AM indicator
D10.PM indicator
D11. Frequency
/ ClockI Track
indicator
D12 Playindicator
D1;3.
MUTEindicator
D14.Volumeindicator
D15.Cooking
Timerindicator
i' rD (o
iil
-;\ .,;\ r;\
A
rJ/ rg7 \g L,
itl!
-
I
_
i_
|
_
-1
RPT I
ROII I
X B A S S i .| E ItIOR Y
lrI
-j-@
u!!J
13
TOPLIGHT
COUNTER
lightandits ON/OFFswitchare locatedon the bottomof the unit
fhe countertop
PressON/OFFswitchto turnthe LIGHTon and off.
THECLOCK
SETTING
To settheclocktime,makesurethe unitis pluggedin andin standbymode.
\/
1.) Pressthe M / Set buttonuntil"12H"or "24H"blinks.
2.) Press K{ or }H to set yourdesiredclockformatand
pressM / Setto confirm.Hourposition
blinksfor setting.
t\
-tallil
example
3.) Pressthe ifi or >H to setthecurrenthour(for
to set 2:00 PM), pressM / Set to confirm.Minute
position
blinksfor setting.
\.,
Pi,,l[]il
4.) Pressthe K< or >, to set the currentminute,pressM / Set to confirm.And
the clockstart.
if no buttonis pressedwithin10
Note:The clockwill be startedautomatically
secondsduringsetting.
TO THE RADIO
LISTENING
Tuningto a stationmanually
q"ilnnril
1.) Pressthe POWERbuttonto turnon theunit.
i{sT))
(CD/Tuner)
? ) Pressthe FUNCTION
switchuntil
fUNERis displayed.
3.) Pressthe tsANDswitchto selectAM or FM.
+ ) Pressthe i{{ / >Hbuttonsto tuneto a desiredstation.
i'. 13l5 ,l,.i
..r quicklysearchfor a station
Pressand holdthe K</ >Nbuttonuntilthetunerstartssearching
for a station,then
release.Thetunerwillstooon the nextwellreceived
station.
Io turn off the radio
?r'essthe FUNCTION(CD/Tuner)switchto CD or pressthe POWERbuttonto
iurnthe unitoff.
i: improve radio reception
1;r FM. extendand adiusttheAC oowercord.
14
SETTINGA PRESETRADIOSTATION
The unitcan sloretotally40 stationsin memory(20 FM, 20 AM). Presetting
allowsyou to tune in to a stationdirectly.
1.) Tuneto yourdesiredradiostation(seeTuningto a stationmanually).
2.) Pressthe M/Setbuttonuntilthe "MEMORY" filrn:n|
-t*rrorr'blinksand "01"appearsin the display.
The
_'n ,"01"is the orderof the presetstation(1-20).
nHr LJ I
3.) Or you maypressthe Presetv or r(+ or -)
buttonon FrontPanelor M-UPor M-DNon
iflIrrdil
remotecontrolto selectyourdesirepreset
UEXORY
stationnumber.
sHrffs
4.) Pressthe M/Setbuttonto storethe station.
5.) Repeatstep1.)to 4.) for the presetstations.
Helpfulhints:lt you storemorethan20 FM stations,the newstationswill replace
the 1stpresetstations.
TO LISTENTO A PRESETRADIOSTATION
'1. Pressthe FUNCTION
(CD/Tuner)
switchuntilTUNERis displayed.
)
2.) Pressthe BANDbuttonto selectAM/FM.
3.) Pressthe PRESET+ or - buttonon FrontPanelor M-DN/ M-UPon remote
controlunitto selectthe presetstation.
PLAYINGCOMPACTDISCS
1.) Pressthe ON/OFFbuttonto turnON the unit.
2.) Pressthe Function(CD/ Tuner)switchto selectplayingin CD mode.
3.) Pressthe l OPEN/CLOSE
buttonto openthe CD drawer.Placea CD onto
theCD tray withthe labelsideup andthenpressthe a OPEN/CLOSE
button
to closeit. The CD will be scannedand the totalnumberof trackswill be
displayed.
4.) Pressthe ,l PLAY/PAUSE
buttonto startplayingthe CD. Thecurrenttrack
appearsin the display.
5.)Adjustvolumeby pressingtheVOLUME+/- buttons.
l/ote: Do not pushthe CD drawerto closeit.
Fil
F"
fl15
3P.',{
Io pause playback
l.) Pressthe X PLAY/PAUSE
button,> indicator
blinks,andplayback
is paused.
pressthe >llPLAY/PAUSE
2.)Toresumeplayback,
buttonagain.
To stop playback
Press I STOPbutton,totaltracknumberappears,and playbackstops.
To skip to differenttrack
1.)ToSKIPto the beginning
of the currenttrack,pressthe i{< buttononce.
2.) To SKIPto any earliertrack,pressthe i( buttoncertaintimesto reach.
3.) To SKIPto any latertrack,pressthe >, buttoncertaintimesto reach.
15
To fast forward or fast reverseto particularpoint
at highspeed,pressand holdthe >N buttonand releaseit at
1.)To scanforuvard
thedesiredpoint.
and releaseit at
2.) To scanbackwardat highspeed,pressand holdthe i<<button
the desiredpoint.
Repeatplayback
Thisfunctionwillallowa singletrackor the entireCD to be playedrepeatedly.
1) To repeatingthe currenttrack
_RPT' Pressthe REPEATbuttonuntil"RPT"blinks,the current Fr;l
trackwillbe playedrepeatedly.
. Selecta desireddifferent
trackto be repeatedby pressing
the >N / t{< button.
2l To repeatthe entire CD
' Pressthe REPEATbuttonuntil"RPT"alight.Alltrackswill
EDI
RPT
be playedrepeatedly.
3) To cancelrepeatplay
' Pressthe REPEATbuttonuntil"RPT"disappears.
CD randomplayback
order.
Thisfunctionwillallowto playthe CD in randomly
playbackcan onlybe selectedwhilethe playeris in the stopmode.
lVote.'Random
'F
IF
1) Pressthe RANDOMbuttonto playthe tracksin random m
RDr
order, "RDM" indicator appears in the display,
press >tlbutton,randomplaybackstarts.Whenall tracks
have been played,the playerstopsand the display
showsthe totaltracks.
2) Io cancelRandomplayback,pressSTOP il button,the displayshowstotal
fromthedisplay.
disappears
tracks,"RDM"indicator
CD programmableplayback
; ) To programas desired
to playin a presetorder.
A programof up to 20 trackscan be programmed
a. Whentheunitis ON andin theCD MODE,makesurethe
CD is STOP PED.
willblinkin
Pressthe M/Setbutton."0"and"MEMORY"
thedisplay.
Pressthe ;{< I * buttonsto selectthe desiredtrack.
to playtrackNO.2 first,the displaywould
Forexample,
looklikethis:
i0
n'
.,, /
n
-u;t
-,1\/
- {ETORY
\./
/\
- HETORY
c. Pressthe M/Setbuttonto storethe trackin memory.
d. To add additional
tracks,repeatstepsb&c (upto 20
tracks).
pressthe >t PLAY/PAUSE
e. To startplayback,
button.
','o\/
n
-u-
\,/
/\
- UEHORY
2) To check the program
. Aftersetting,pressthe >itPLAY/PAUSE
buttonto startptaying,thenpressthe
K</ >lbuttonsto checkthe programmed
tracks;or in STOPmode,pressM/Set
buttonrepeatedlyto checkthe programmed
tracks.
3) To add additionaltracksduring programmode:
. Pressthe M/Setbuttonrepeatedly
untilthe numberof the lastprogrammed
trackappearsand repeatstepsb to d above.
4) To changethe programmedtracks during programmode:
. Pressthe M/Setbuttonrepeatedlyto selectthe numberof the program,then
pressthe l( / >>|buttonsto alterthe track.Pressthe M/Setbuttonto register
the newlyprogrammed
trackinto memory.
5) To erasethe whole program,do one of the following:
. Pressthe STOP t button,or
. Openthe CD compartment
by pressingthe l OPEN/CLOSE
button.
iVote.'Youcan use REPEATfunctionduringPROGRAMPLAY.
XBASSFUNCTION
PressXBASS to activateXBASSfunctionduringplaying."XBASS"indicator
appearson the display.
SETTING
THECOOKINGTIMER
l.) PresstheTIMER(+10or +1) buttonsto select
yourdesired
timefrom1-99minutes.CooKlNGl . W
i'.
TIMERindicator
blinks.
I
B 1.5 uHrlD#,i
2.)Wtrenthepresettimeelapses,
theALARMwill
sound.
CANCELLATION
OF COOKINGTIMER
if youwantto cancelthe presetCOOKINGTIMER:
- Whenit's countingdown,pressand holdTimer Off buttonfor 2 seconds.
- Whenthe presettime elapses,and theAlarmis ringing,just pressTimer Off
button.Otherwise
theALARMwillautomaticallv
turnoff after60 minutesif no
buttonis pressed.
17
MUTEFUNTION
pressthe MUTEbutton,MUTE
To cut off the soundfrom speakertemporarily,
indicatorappearson thedisplay.PressMUTEbuttonagainto cancelmutefunction
and restorethe soundfrom speaker.
COMPACTDISCCARE
. To removea discfrom its storagecase,pressdownon the centerof the case
by the edges.
and liftthe discout,holdingit carefully
surface
wipedoffthedisc'srecorded
anddustshouldbe carefully
Fingerprints
compactdiscshaveno grooves
records,
witha softcloth.Unlikeconventional
debris,so gentlywipingwitha softclothshould
to collectdustandmicroscopic
Wipein a straightlinefromtheinsideto the outsideof
removemostparticles.
no effecton
and lightstainswillhaveabsolutely
the disc.Srnalldustparticles
quality.
reproduction
'
witha soft,lint-free,dry cloth.Neverusedetergents
Cleanthediscperiodically
use a CD cleaningkit.
or abrasivecleanersto cleanthe disc.lf necessary,
. Neverwriteon or affixlabelsto the surfaceof compactdiscs.
CAUTION
Neverallowanywateror otherliquidsto get insidethe unitwhilecleaning.
To reducethe riskof fire,do notplaceany heatingor cookingproductbeneaththis
unit.
CLEANINGTHE UNIT
. Do notusevolatilechemicals
on thisunit.Cleanby lightlywipingwitha drysoft
cloth.
. Keepthe CD Drawerclosedto keepdustout of the unit.
18
HANDLING
THECD
. Onlytouchthe CD on the edgeto avoidfingerprintson theunderside
of the CD.
. Do not stickpaperor tapeon the undersideof the CD,and do not write
anything
on the underside
of thedisc.
CD LENSCARE
. WhenyourCD lensgetsdirtyit can alsocausethe unitto outputpoorsound
quality.To cleanthe lensyou will needto purchasea CD lenscleaner.For
instructions
on cleaningthe CD lens,referto the instructions
accompanying
the CD lenscleaner.
Shouldthis unitexhibita problem,checkthe followingbeforeseekingservice.
" appearson the display.
No disc inserted.Inserta suitabledisc.
Replace/clean
CD.
CD-R(W)is blankor discis not finalized.
Moisturehas condensedin the player.Removethe
disc and leavethe playerpower-onuntilthe moisture
evaporates.
NO SOUND.
Checkwhetherthe set is connectedsecurely.
Makesurethe set is not in the MUTEmode.lf it is,
pressMUTEto turn on the speaker.
Checkwhetherthe volumeon the set has been set
to the lowestlevel.lf it has,turn up the volume.
CD-ROMdisc inserted/CD
containsnon-audio
files.
Use CD Audiodiscsonly.
The systemdoes not reactwhen
buttonsare pressed.
Removeand reconnecttheAC powerplugand switch
on the systemagain.
Remotecontroldoes not work.
Removethe protectiveplastictab beforeusingthe
remotecontrol.
Reducethe distancebetweenthe remotecontroland
the set.
Replacethe battery.
Pointthe remotecontroldirectlytowardsthe remote
sensor.
fladio receptionis poor.
The FM antennais builtin to the AC powercord .lf
FM receptionis weak try varyingthe positionand
directionof the powercorduntilyou findthe strongest
signal.
Ihe Clocksettingis erased.
Powerhas been interruptedor the powercord has
beendisconnected.
Resetthe clock.
19
partsinsidethis radio.
Thereare no user serviceable
pleasereferall serviceproblemsto a qualifiedservicefacility.
CareOf Cabinets
lf the cabinetbecomesdustythe exteriorwitha softdustclothonly.
Neverusedustingspraysor polisheson thecabinet.
it maybe wipedwith
withfingerprints
lf thecabinetbecomesdirtyor smudged
witha mildsoapandwatersolution.
a softcloththathasbeenslightlydampened
theAC powercordfromtheAC outletbeforecleaning,and
Alwaysdisconnect
neverallowany liquidto get insidethecabinet.
T O F I N D T H E L O C A T I O NA N D P H O N E
N U M B E RO F Y O U R N E A R E S TS E R V I C E
CENTER PERMITTED TO PERFORM
WARRANTY...
m Ymer,ron,
SERVICE
CALLTOLLFREE:1-800-695-0098
ASSISTANCE
SET.UPOR OPERATING
FORADDITIONAL
PLEASECALL:
1-800-B9B-9020
S E R V I C EP, L E A S EW R I T ET O :
F O RC U S T O M E R
EmersonRadioCorp.,
ConsumerAffairsDept.,
n rive,
5 1 0 1S t a t e s m aD
lrving,TX 75063.
20
LIVttTET}WARRAN{TY
EmersonRadioCotp. warrantsmatufbcturingdefbctsin originalmaterial.inclucling
originalpartsmd workmznship,
undernormaluseandconditions,fbr a periodof
ninety(90) daysfiorn the dateof originalpurchasein the U.S. With yolrrdated
proof of purchase.
rvewill providerepairserviceat no chargefbr laborandparts
at an authorizedDepot RepairFacility,or replacethe productin our discretion.
For repairor replacement,
packyour unit in a paddedbox, encloseyour checkor
moneyorderpayable
to E,rnerson
RadioCo.p.in theamountof $9.00(notrequired
by Califbrniaresidents)
to covershippingandhandlingcosts,,
iurdcnclosea copy
of your proof of purchase.Sendyour unit to:
f:mersonRadioCorp.,
5 l0l Statesffran
Drive,
lrving,TX 75063.
Tlris warrantydoesnot coverdamagefiom negligence,
misuse,abuse,accident,
l-ailureto fbllow operatinginstructions,Lrofflmercial
Llse,rental,repairsby an
unauthorizedfacility,or productspurchased,
used,servicedor damagedoutside
of the united States.
"TT{IS
Wz\RRANTYCIVES
YOU SPECIFIC
LECAL RIGHTS"
ANDYOU NIAY
..\LSOL{,{VEO'IIIER RIGHTSWFIIC:HVARY I]RON{STATETO S'IATE.
,\ U 898NI
The SerialNumberof thisunitis locatedon the labelon the backof the cabinet.
Please
takea moment
nowto writethisSerialNumber
in thespaceprovided
below.
Youmaybe askedforthisnumberwhencalling
forservice
assistance.
M o d e lN o :C K D 1 6 1 2
SeriaN
l umber:
21
@Wer,ton,
c K D 1 6 1 82 0 1 - 0 2
P r i n t e di n C h i n a