1
Top-Freezer
Refn,,
Safety Information
Connecting Electricib_ . ............
Extension Cords ..................
3
3
Safeb_ Precautions
'2
................
Operating Instructions
Automatic Icemaker
...............
5
Care and Cleaning ................
Shelves ..........................
6
4
Storage Drawers ................
Temperature Controls ..............
4, 5
4
InstaJJadon Instructions
Write the model and serial
numbers here:
Model #
Preparing to InstaU
the Refrigerator ..................
Reversing the Door Swing .....
Water Line Installation .........
7
11 14
8 10
Serial #
You can find them on a label on
Troubleshooting
Before kLu Call
tile upper left side of tile fresh food
For Service ...................
compartment.
Normal Operating
Tips
15, 16
Sounds .........
15
Consumer Support
(1onsumer Support ..............
Product Registration ..........
"_\SrranD_. ......................
vwwv.AmericanaAppliances.com
**t'_' Printed
intheUnited
States
_
Printedon RecycledPaper
20
17, 18
19
Modds 16, 17, 18
197D8622PO04
49-60658
03-11 GE
iMPORTANTSAFETYiNFORMATiON.
READALLiNSTRUCTiONSBEFOREUSING.
A
!
m
Use this appliance only for its intended purpose as described in this Owner's Manual.
SAFETYPRECAUTIONS
When using electrical appliances, basic safety precautions should be followed, including the following:
This refrigerator
must be properly
installed
and located
in accordance
with tile Installation
Keep fingers out of tile "pinch point" areas;
clearances between tile doors and between
Instructions
tile doors and cabinet are necessarily small.
Be careful closing doors when children are
in tile area.
Do not
allow
oil tile shelves
damage
tile
themselves.
}}Do not touch
be%re
it is used.
children
to climb,
in tile refrigerator.
refrigerator
and
stand
or hang
They
seriously
could
injure
tlLe cold surtCaces in the freezer
compartment
when hands are damp or wet.
Skin may stick to these extremely cokl suriCaces.
}}Do not store or use gasoline or other flammable
vapors and liquids in tile vicini_ _of this or any
other appliance.
l_ nplug tile refrigerator be%re cleaning and
making repairs.
NOTE:We stronglyrecommendthat any servicingbe
performedby a qualified individual.
}}Turning the control to the 0 position does
slot remove power to the light circuit.
Do not refreeze frozen foods which have
thawed completely.
In refrigerators with automatic icelnakers,
avoid contact with the moving parts of the
ejector mechanism, or with tile heating elelnent
that releases tile cubes. Do not place fingers or
hands on tile automatic icemaking mechanism
while tile refrigerator is plugged in.
r
A
PROPER
DISPOSAL
OFTHEREFRI
6ERATOR
Child entrapment and suftbcation are slot problelns
of the past. Junked or abandoned refrigerators are
still dangerous...even if they
will sit for "just a few days." If you are getting
rid of your old refrigerator, please follow tile
instructions below to help prevent accidents.
Before You Throw Away Your Old
Refrigerator or Freezer:
Take off the doors.
Leave the shelves in place so that children
may not easily climb inside.
Refrigerants
All refrigeration products contain refrigerants, which
under federal law must be relnoved prior to product
disposal. If you are getting rid of an old refrigeration
product, check with tile colnpany handling tile
disposal about what
to do.
iMPORTANTSAFETYiNFORMATiON.
READALLiNSTRUCTiONSBEFOREUSING.
A
I
www.AmericanaAppliances.com
!
B
HOWTOCONNECT
ELECTRICITY
Do not, under any circumstances, cut or remove the third (ground) prong from the power cord.
For personal safety, this appliance must be properly grounded.
The power cord of this appliance is equipped with a
3-prong {grounding] plug which mates with a
standard 3-prong (grounding) wall oudet to minimize
the possibiliff of electric shock hazard froln this
appliance.
Have the wall outlet and circuit checked by a
qualified electrician to make sure the outlet is
properly grounded.
Where a standard 2-prong wall oudet is encountered,
it is your personal responsibilio _and obligation to
have it replaced with a properly grounded 3-prong
wall outlet.
The refrigerator
should always be plugged into its
own individual electrical outlet which has a voltage
rating that matches the rating plate.
This provides the best perfl)rmance
and also prevents
overloading house wiring circuits which could cause a
fire hazard from overheated wires.
Never unplug your refrigerator by pulling on the
power cord. Always grip plug firmly and pull straight
out from the outlet.
Repair or replace immediately
all power cords that
have becolne frayed or otherwise dalnaged. Do not
use a cord that shows cracks or abrasion damage
along its length or at either end.
1\;hen moving the refrigerator
away from the
wall, be careful not to roll over or damage the
power cord.
USEOFEXTENSION
CORDS
Because of potential safety hazards under certain conditions, we strongly recommend against
the use of an extension cord.
However, if you must use an extension cord, it is absolutely necessary that it be a UL-listed (in the United
States_. or a C_ A-hsted (m Canada,,, 3-wire grounding _,_pe appliance extension cord having a grounding t_pe
plug and outlet and that the electrical rating of the cord be 15 amperes (minimum) and 120 volts.
READAND FOLLOW
THISSAFETYINFORMATION
CAREFULLY.
SAVETHESEINSTRUCTIONS
3
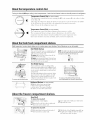
Aboutthe temperaturecontroldial.
Turning the dial to 8/Off stops cooling in both compartments--fresh food and freezer, it does not shut off power to the refrigerator.
Temperature Control Dial (on somemodels)
The temperature
set the dial at 5.
control
dial has nine setdngs plus 0. 1 is the warmest.
9 is the coldest. At first,
After using the refrigeratol;
adjust the dial if necessary. Insert a coin into the slot in the mid(He
of tile dial and you can turn tile dial to tile setting that is best suited to your needs.
Allow 24 hours for the refrigerator
to get cold.
Temperature Control Dial ion somemodels)
<
Tile temperature
control dial adjust refrigerator
from warmest to coldest.
The recommended
fitcto W setting is shown in illustration to the left. For colder
temperature
dial counter
turn dial clockwise toward snowflake. For warmer temperature
clockwise away froln snowflake, allow 24 hours for adjustlnent.
turn
Aboutthe fresh food compartmentshelves.
Shelf supports
at various levels allow VOUto custom-space
vour shelves.
Not all features
are on all models.
Half-Width Shelves
rTTTilt up
One end of file shelf rests on a molded side-wall
support; a })racket on tile other end hooks into a
track on tile rear cabinet waU.
To remove, lift tile shelf up at front, then off tile
SUl)port mid out of tile track.
To replace,selectdesired shelf height, l\]th shelf fl'ont
raised slightl):hook tile bracket's top lug into tile track,
then lowrr the shelf onto the support.
NOTE:Theshelfto therightof thetrackis designed
to hookintotheright-handslot;theshelfto theleft
isdesignedto hookintotheleft-handslot.
Full-Width Shelves
//b
Some models have a steel wire sliding shelf! a
stationa W tempered glass shelf, a spillproof shelf
or two steel wire stationa W shelves. These shelves
can be moved to mlother place in tile fresh fbod
COIilt)
Pullforward
To removethe fulPwidth shelves
lift rearJ'X
....:M
artIileIlt.
Tile fidl-width sliding shelf has stop-locks. When
placed correctly on tile shelf supports, the shelf
wi]l stop befbre coming completely out of the
refrigerator and will not tilt when you place fi)od
on it or remove food from it.
To remove a full-width shelf when the fresh
food compartment door cannot be opened fully
Spillproof Shelves
{on some models)
Spillproof shelves have special edges
to help prevent spills from dripping
to lower sheh'es. To remove or replace
the sheh'es, see the above instructions.
About the freezer compartment shelves.
Step Shelf
To remove the step shelf:
Z] Lift left side of shelf slightly
[]
[-7] Move shelf to the left to free its right ends
from holes in the cabinet wall
[_]
ower right side of shelf, move shelf to the
right and take it out.
To replace the step shelf:
[-_ With shelf tihed as shown, fit left ends of
shelf into holes in cabinet w_ffl.
[2--]Lift left side of shelf slightly; swing shelf up,
fit right ends of shelf into holes in cabinet
wzdl, and lower shelf into place.
Aboutthe storagedrawers.
www.AmericanaAppliances.com
Not all features are on all models.
Snacks Drawer
The
snacks
drawer
can
/_
......,
_
accumulate in tile bottom of
tlle drawers should be emptied
and tile drawers wiped dry.
be
mo,
edtothe
most
useful
_ocatio,1
for
rout
fami]y's
Fruit and Vegetable Drawers
needs.
Aboutstorage drawer and cover removal.
Not all features are on all models.
Adjustable Humidity Drawer {onsome models)
HumiOiO.co,,.'ox
H_aH
Slide the control all the way to the
HIGHsetting to provide hig:h humidib_
etables,
to:
Slide the control all the way to the LOW
setting to provide lower humidib_ levels
recommended fbr most fruits.
Drawer and Cover Removal
iiiii_I
_ii_
iii_
Drawers can be removed
i: _i!ii_ill
past the stop location.
i_ii
_!iI_I
i _!i_
easily by grasping the sides and lifting up slightly while pulling drawers
To remove the cover, lift it off its supports, pull it forward, tilt it and take it out.
Twin Drawer Shelf
!
!
To remove:
To replace:
[_ Remove the drawers.
[_-] Reach in, push the front of glass cover up,
alld at tile same time, pull it tiorward as far
as it will come.
Tilt it alld take it OUt. Avoidcleaning the cold glass
cover with hot water because the extreme
temperature diftbrencemay cause it to break.
[_] Remove the drawer frame. (Nwavs remove
the glass cover befioreyou take ot{t the
drawer frame.)
Lift the _rmneoff the supports at each sideand
back, pull it forward, tilt it mid take it out.
[-_ Lower the frame until it rests on the
supports at each side and back.
[2--]Replace the glass cove1;pushing its rear
edge firmly into the rear frame channel and
gendy lowering the front into place.
[_] Replace the drawers.
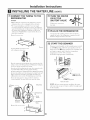
About the automatic icemaker (onsome models).
A newly-installed
refrigerator maytake 12-24 hours to begin making ice.
PowerSwitch
j"
\ op..o_
=.....
]
/
.... :a-
lerArm in
the STOP
FederArm in(up ) position
the ON(down)
position
Throw away the first few batches of ice to allow
the water line to clear.
When die bin fills to the level of the feeler arm,
die icemaker will stop producing ice.
It is normal fbr several cubes to be joined
togedler.
If ice is not used frequent13,;old ice olbes will
become cloud?; taste stale, shrink or fuse
togedler.
On power switdl models, die green power light
will blink if ice olbes get stuck in die icemaker.
To correct dlis, set die power switch to 0 {0If)
and remove die cubes. Set die power switch to I
{0n)to restart die icemaker. _M'terdie icelnaker
has been turned on again, dlere will be a de]W
of about 45 minutes befbre die icelnaker
reslnnes operation.
NOTE:Inhomeswith lower-than-average
water
pressure,
youmayhearthe icemakercyclemultiple
timeswhenmakingonebatchof ice.
Icemaker accessory kit:
If your rel:cigeratordid not already come equipped
with an automatic icemaker,an icem&er
accessop,-ldt is availableat extra cost.
Be so_renothing interferes with the sweep of the
feeler arm.
Check the back of the refrigerator tbr the
specific icemaker ldt needed t})ryour model.
Tile icemaker will produce al)proximately
3 to 3 1/2 lbs. of ice in a 24-hour period,
depending on tile freezer comt)artment
temperature, room temperature, number
of door openings and other use conditions.
If tile refrigerator is operated before tile water
connection is made to tile icemakeg move the
feeler arm to the STOP 'up) position.
"_\;hen the refrigerator has been connecmd to
the water suppl?_ move die feeler arm to the ON
{down) position.
The icemaker will fillwith water when it cools to
15°E A newly-installed reiiqgerator may take 12 to
24 hours to t)eg_n maldng ice cubes.
Once the icemaker starts to make ice, it may take
up to 48 hours to fill the bin, depending on'the
temperature settings and number of (bor
openiIgs.
x.}m will hear a buzzing sound eadl time the
icelnaker fills with wamr.
5
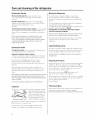
Care and cleaning ot the refrigerator.
Cleaning the Outside
Moving the Refrigerator
The door handlesand trim >n some models). Clean
with a cloth dampened with soapy water. Dry with a
soft cloth.
Be carefifl when moving tile refrigerator away from
tile wall. All b_pes of floor coverings can be damaged,
particularly cushioned coverings and those wittl elnbossed
Keepthe outsideclean. Wipe with a clean cloth lightly
dalnpened with kitchen appliance wax or mild liquid dish
detergent. Dry and polish with a clean,
soft cloth.
The stainlesssteel panelsand doorhandles (on some models)
can be cleaned with a commercially available stainless steel
cleaner. Do not use appliance wax or polish on the stainless
steel.
Donot wipe the refrigeratorwith a soiled dishcloth or wet
towel. Thesemay leavea residuethat canerodethe paint.
Donot usescouringpads,powderedcleaners,bleachor cleaners
containingbleachbecausethese productscanscratchand
weakenthe paintfinish.
SUF_h_I Ce S.
Turn die leveling legs at each front corner of tile refrigerator
counterclocl_vise until the rollers support
the refrigerator. Pull the refrigerator straight out and return it to
position by pushing it straight in. Moving
the refrigerator in a side direction may result in damage
to the floor covering or refrigerator.
When pushingthe refrigeratorback,makesureyoudon't roll over
the powercordor icemakersupplyline (on somemodels).
After rolling tile refrigerator back into place, turn tile legs
clockwise until the legs again bear the weight of the
refrigerator.
Light Bulb Replacement
Cleaning
the inside
To help prevent odors, legate an open box of baking soda in
tile fresh flood and freezer compartlnents.
Unplugthe refrigerator before cleaning.
If this is not practical, wring excessmoisture out of sponge
or cloth when cleaning around switches, lights or controls.
[se warm water and baldng soda solution about a
tablespoon (15 ml) of baking soda to a quart (1 liter)
of water. This both cleans and neutralizes odors. Rinse and
wipe dr?:
After cleaning tile door gaskets, apply a thin layer of
petroleum jelly to the door gaskets at the hinge side. This
helps keep the gaskets froln sticking and bending out of
shape.
Avoidcleaningcold glassshelves(onsomemodels)with hotwater
becausethe extremetemperaturedifferencemaycausethemto
break.Handleglassshelvescarefully.Bumpingtemperedglass can
causeit to shatter.
Donot wash anyplastic refrigeratorparts in the dishwasher.
is no need %r routine
\
Cleaning the condenser coils.
Turningthe control to the 0 positiondoesnot removepowerto
the light circuit.
Preparing for Vacation
For long vacations or absences, relnove %od and unplug the
refrigerator. Move the telnperature
control dial to the {1
position, and clean the interior with a baking soda solution
of one tablespoon (15 ml) of baking soda to one quart (l
liter) of water. Leave the doors open.
Move the feeler arm to tile STOP(up) position and
shut off the water supply to tile refrigerator.
If tile teinperature
can drop below freezing, have a qualified
servicer drain tile water supply system (on SOllle models) to
prevent serious properD _ dalnage
due to flooding
Preparing to Move
Condenser
There
To replace a burned-out bulb, unplug the refrigerator from
its electrical outlet, unscrew tile bulb when cool and replace
it with an appliance bulb of the same or lower wattage.
condenser cleaning in normal
home operating environments.
However, in environlnents that
may be particularly dus b or
greas> the condenser should
be cleaned periodically for
efficient refrigerator operation.
To clean tile condenser, turn tile temperature
0. Sweep away or vacuum up dust.
control dial to
For best results, use a brusil specially designed for tills
purpose. It is available at most appliance parts stores.
Secure all loose iteins such as grille, shehes and drawers by
taping them securely in place to prevent damage.
Be surethe refrigeratorstays in an uprightpositionduring moving.
I stall ti
st
cti
,,,,1,,,
ff you have questions,carl 1.800.432.2737
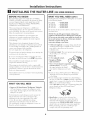
BEFORE YOU BEGIN
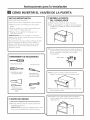
CLEARANCES
Read
Allow the fi)llowing clearances fi)r ease of installation,
proper air circulation and plumbing and electrical
comaections.
these
instructions
completely
• IMPORTANT
for local
inspector's
and
- Save
these
i structio s
instructions
with
the Consumer.
- Keep these
Installation
skills.
• Completion
time
Refrigerator
15 minutes
installation
is the
failure
due to improper
covered
under
the _\"arranty.
If the refrigerator
connected
copper
instructions)
our lVebsite
line.
• Install
60°F
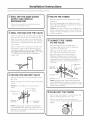
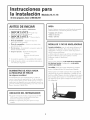
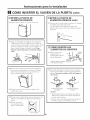
Turn the leveling legs clockwise to raise the refrigerator;
counterclockwiseto lower it.
is not
it will have
supply
valve,
Turn the legs counterclockwise until the weight of the
refrigerator is transferred from them to the rollers. After
rolling the refrigerator back into place, turn the legs
clockwise until the legs again bear the weight of the
refrigerator.
Parts
and
to be
kit
fittings
cost from
your
(in Canada
or from
and
dealer,
by
at
Accessories,
LOCATION
d_e refrigerator
proper
_of the installer.
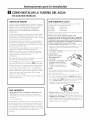
A water
shutoff
at ge.com
(16°C)
Leveling legs near each front corner of the refrigerator
are
adjustable. They firmly posidon the refrigerator
and prevent
it from moving when the doors are opened. Leveling legs
should be set so the front of the refrigerator
is raised just
enough that the doors close easily when opened about
halfway.
RoJJersnext to the leveling legs allow you to move the
refrigerator away from the wall for cleaning:
at extra
REFRIGERATOR
• Do not install
basic
TO THE ICEMAKER
robing,
is available
www.geappliances.ca}
1.800.661.1616.
maintain
ROLLERS AND LEVELING LEGS
Swing
installation
has an icemaker,
to a cold water
(containing
below
for
Installation
responsibili_
WATER SUPPLY
{on some models)
requires
the Door
• Product
visiting
instructions
of this appliance
Reversing
1 hour
• Proper
because
where
d_e temperature
it will not run often
enough
will go
to
temperatures.
it on a floor
• Top 1" (25 mm)
these
reference.
Skill level
mechanical
• Sides 3/4" (19 mm)
• Back 2" (50 mm)
Be sureto leave
-
• Note to Consumer
•
- Observe
allgovemi g
ordinances.
• Note to Installer
furore
carefully.
use.
• IMPORTANT
codes
and
strong
enough
to support
it fully loaded.
7
Installation instructions
iNSTALLiNG THE WATER LiNE (ONSOMEMODELS)
BEFORE YOU BEGIN
WHAT
Recommended
copper water supply kits are _\_48X2,
WX8X3 or 1\'LX8X4, depending on tile amount of robing
you need. Approved plastic water supply lines are GE
SmartComlect
Refrigerator
Tubing (1\'_208X10006
WX08X 10015 and WX08X 10025).
GE SmartConnect
_" Refrigerator
in the following lengths:
YOU WiLL NEED (CONT.)
Kits are available
-WX08X10005
6' (z.8 m)
15' (4.6 m)
25' (7.6 m)
TM
Tubing
-WX08X10015
-WX08X10025
When connecting your refrigerator to a GE Reverse
Osmosis Water System, the only approved installation is
with a GE R\TI_t. For other reverse osmosis water systems,
follow the manufacturer's
recolnmendations.
Be sure that the kit you select allows at least 8' (2.4 m) as
described above.
This water line installation is not warranted
by the
refrigerator or icelnaker manufacturer.
Follow these
instructions carefully to minimize the risk of expensive
water dalnage.
NOTE: The only GE approved plastic tubing is that
supplied in GE SmartConnect
Refrigerator
Tubing kits.
Do not use any other plastic water supply line because the
line is under pressure at all times. Certain types of plastic
will crack or rupture with age and
cause water damage to your home.
TM
Water hammer ;_vater banging in tile pipes) in house
plumbing can cause damage to refrigerator parts and lead
to water leakage or flooding. Call a qualified plumber to
correct water hammer before installing
the water supply line to the refrigerator.
To prevent burns and product damage,
water line to the hot water line.
• A GE water supply kit (containing tubing, shutoff valve
and fittings listed below) is available at extra cost froln
your dealer or from Parts and Accessories,
1.800.661.1616.
• A cold water
do not hook up tile
supply.
water
pressure
must
be between
• Power dr:dl.
If you use your refrigerator before coimecting tile water
line, make sure tile feeler arm is in the STOP (up) position.
• 1/2"or
adjustable
• Two 1/4"outer
When using any electrical device (such as a power drill)
during installation, be sure the device is double insulated
grounded in a manner to prevent the hazard of electric
shock, or is battery powered.
wrench.
• Straight and Phillips
blade screwdriver.
Do not install tile icemaker robing in areas where
temperatures
fall below freezing
All installations must be in accordance
code requirements.
Tile
20 and 120 p.s.i. (1.4 8.1 bar).
or
diameter compression nuts and
the copper tubing to the shutof["
2 ferrules
to connect
valve
alld (sleeves)
tile refrigerator
water valve. __
OR
with local plumbing
• If you are using a GE SmartConnect
_'_Refrigerator
Tubing kit, tile necessary fittings are preasselnbled
to the tubing.
• If your existing copper water line has a flared fitting at
the end, you will need an adapter (available at plumbing
supply stores) to connect the water line to the refrigerator
OR you can cut of[" the flared fitting
with a tube cutter and then use a compression fitting. Do
not cut formed end from GE SmartConnect
WHAT YOU WiLL NEED
TM
• Copper or GE SmartConnect
Refrigerator
Tubing kit,
1/4"outer
diameter to connect the refrigerator to the
water supply If using copper, be sure both ends of the
robing are cut square.
TM
Refrigerator
To determine how much tubing you need: measure tile
distance froln the water valve on the back of the
refrigerator to tile water supply pipe. Then add 8'
(2.4 m). Be sure there is sufficient extra tubing
(about 8' [2.4 m] coiled into 3 turns of about 10"
[25 cm] diameter) to allow the refrigerator to move out
froln the wall after installation.
• Shutoffvalve
The shutoff
tubing.
to connect to the cold water line.
valve should have a water inlet with a
- -,_
))1, at the point
minimum inskte diameter of .)/_2
of
co,mection to the COLD WATER LINE. Saddle-_pe
shutoff valves are included in many water supply kits.
Befi)re purchasing, make sure a saddle-%_pe valve
colnplies with your local plumbing codes.
8
Installation instructions
Install
the
shutoff
valve
on the
nearest
frequently
used
drinking
water
N1 ROUTE THE TUBING
m SHUT OFF THE MAIN WATER
SUPPLY AND UNPLUG
REFRIGERATOR
Turn on tile nearest faucet (counterclockwise)
enough to clear the line of water.
[]
Route the tubing between the cold water line and the
refrigerator.
Route the tubing through a hole drilled in the wall or
floor (behind the refrigerator or adjacent base cabinet) as
close to the wall as possible.
long
NOTE: Be sure there is sufficient extra tubing (about 8
feet [244 cm] coiled into 3 turns of about 10"[25 cm]
diameter) to allow the refrigerator to move out from the
wall after installation.
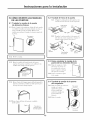
DRILL THE HOLE FOR THE VALVE
Choose
a location
is best
to compeer
When
pipe,
it is necessary
make
the
at the bottom,
the water
Drill
for the valve
into
the
that
to connect
com_ection
to avoid
is easily
accessible.
side of a vertical
to
drawing
into
the
water
a horizontal
top
or
side,
off any
line.
It
pipe.
water
rather
CONNECT THE TUBING
TO THE VALVE
than
sediment
from
if using
a self-
pipe.
a 1/4"hole
in tile water
piercing
wdve),
using
resulting
from
drilling
a sharp
pipe
ieven
bit. Remove
Place the compression
nut and ferrule (sleeve)
fi_r copper tubing onto the end of the tubing and
compeer it to the shutoff valve.
any burrs
the hole in the pipe.
Take
care
Make sure the tubing is fully inserted into the
valve. Tighten the COlnpression nut securel>
not to allow water to drain into the drill. Failure to drill
a 1/4"hole may result in reduced ice production or
smaller cubes.
For plastic tubing from a GE SmartConnect
,M
Refrigerator Tubing kit, insert the molded end
of the tubing into the shutoff valve and tighten
compression
mlt until it is hand tight, then tighten one
additional turn with a wrench. Overtightening
may
cause leaks.
?ression
Nut
Saddle-Type
ShutoffValve_
m
FASTEN THE SHUTOFF
VALVE
PackingNut
Fastenthe shutoff valve to the cold water pipe with the
pipe clamp.
Tighten the clamp screws until the sealing washer
to swell.
NOTE:
Do not
overtighten
or you may
crush
SmartConnect
_
Tubing
OutletValve
Ferrule
(sleeve)
NOTE: Commonwealth of Massachusetts Plumbing
Codes 248CMR shall be adhered to. Saddle valves are
illegal and use is not permitted in Massachusetts. Consult
with your licensed plumber.
begins
the
mbing.
Washer
PipeClaml--
End
FLUSH OUT THE TUBING
Claml
Turn the main water supply on (counterclockwise) and
flush out the tubing until the water is clear.
Shut the water off at the water valve after about
Saddle-Type
ShutoffValve
.VerticalCold
Water Pipe
one quart (1 liter) of water has been flushed through the
NOTE: Commomsealth of Massachusetts Plumbing
9
Codes _48CMR
shall be adhered to. Saddle valves are
illegal and use is not permitted in Massachusetts. Consult
with your licensed plumber.
9
@
Installation instructions
iNSTALLiNG THE WATER LiNE
[] CONNECT THE TUBING
REFRIGERATOR
TO THE
[_ TURN THE WATER
ON AT THE
SHUTOFF VALVE
NOTES:
= Before makhlg the connecdon to the refi-ig'erato_; be sure the
refi'igerator power cord is not i_lugged into the wall outlet.
•
Tighten
any connections
that leak.
recommend installing a water filter if your water suppl)
has sand or particles that could clog the screen of tlle refi'igerator's
water vah'e. Install it in file water line near file refi_gerator If using
GE SmartConnect"
Refiqgerator Tubing ldt, }ou will need an
adctitionad
tube
_\_08X
10002
to connect tile _llteI l Do not cut
plastic rathe to install ffltei:
P,_elnove
tile
access
(CONT.)
I-_ PLUG IN THE REFRIGERATOR
Arrange
the coil of robing so that it does not vibrate
against the back of the refl_igerator
or against the wall.
Push the refligerator
back to the wall.
covei:
[_
START THE ICEMAKER
On
Relnove
power
the plasdc fle_ble cap fi'om the water
valve (refi_ig'erator connecdonl.
feeler
not
©
arm
begin
telnperamre
It will then
Place die compression nut and fe*Ttfle (sleeve/ onto die end of die
robing as shown. On GE SmartConnect
Refiig'eramr Tubing ldt,
the nuts are alrea@ assembled m the robing
TM
Insert the end of the mbhlg into the water valve connection
as possible. While holding the utbing, dghten the fitdng
switch
models,
to the I (on} position.
set the icemaker
On
feeler
to the ON (down)
to operate
undl
arm
models,
position.
it reaches
The
power
move
icelnaker
switch
the
will
its operating
of
] 5°F 19°C)
or belo_x:
begin
operation
autolnadcally.
Power switch model
as fi_r
For plastic mbhlg fi'om a GE SmartConnect"
Refiig'eramr Tubing
ld% insert the molded end of the robing into the shutoff valve and
dghten compression nm mldl it is hand dght, then dghten one
additional Un'n with a wrench. Overdghtenhlg
may cause leaks.
Fasten die robing into die clamp provided to hold k in
a verdcal position. _bu may need to p1%"open die clamp.
FeelerArm in
the ON (down) position
Feeler arm model
NOTE: In lower water pressure conditions, the water
valve may turn on up to 3 dines to deliver enough water
to the icemaker.
TubingClamp
1/4"Copper
Tubing
(
Refrigerator
Connection
1/4"Compression
Nut
--
Ferrule
(sleeve)
SmartConnect
_
Tubing
Rea_ach_heacce_coverall
s"
10
Installation instructions
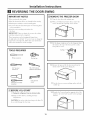
El REVERSING THE DOOR SWING
iMPORTANT
When reversing
NOTES
the door swing:
• Read the instructions
Handle
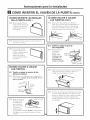
_] REMOVE THE FREEZER DOOR
2.1 Tape
all the way through
bet})re starting
parts carefully to avoid scratching
Set screws down by their related
in tile _xTong places.
• Provide a non-scramhing
tile doors.
the door shut with masking
tape.
2.2 With a 5/16"hex-head
socket driver, remove the
screws that hokl tile top hinge to tile cabinet.
paint.
parts to avoid using theln
work surt_ace for
IMPORTANT: Once you begin, do not move tile cabinet
until door-swing reversal is completed.
These instructions are fi_rchanging dLe hinges from
tile right side to tile left side_f you ever want to change rile
hinges back to tile right side, follow these same instructions
and reverse all references to left and right.
2.3 Lift the hinge straight up to free the hinge pin from
tile socket in tile top of the door and set it aside,
along with its screws.
TOOLS REQUIRED
Top
Phillipsscrewdriver
5/16" hex-head
socket driver
l
Masldngtape
2.4 Remove
cabinet.
T20or T25Torxdriver
(neededfor somemodels)
the tape and tilt the door away from the
Lift it off tile center hinge pin.
5/16" open-end
wrench
Puttyknife or thin-blade
screwdriver
2.5 Set the door on a non-scratching
outside up.
surface with the
m BEFORE YOU START
l. l Unplug
the refrigerator
from its electrical
1.2 Empb_ all door shelves, including
compartlnent.
2.6 Transfer the 2 screws from the opposite side of the
cabinet to tile screw holes vacated by the top hinge
outlet.
rei1Loval.
tile dairy
CAUTION:
Do not let either door drop to tile floor. To
do so could damage tile door stop.
11
Installation instructions
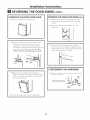
REVERSING THE DOOR SWING (CONT.)
i-_ REMOVE
3.1 Tape
_-l REMOVE THE FRESH FOOD DOOR (CONT.}
THE FRESH FOOD DOOR
the door shut with masking
tape.
3.5 Transfer the two screws from the opposite skle of the
cabinet to the screw holes vacated by the center hinge
renloval.
3.6 Transfer the washer (if your model has one) to the
opposite side.
J
3.2
[sing
a 5/16"hex-head
5/]6"open-end
holding
center
the
hinge
of the door,
careful
socket
wrench,
center
hinge
to free
and
screwdriver
and
the two
screws
remove
to the cabinet.
its pin
set hinge
not to lose the center
from
and
the
hinge
spacer
3.7 Take one of the screws removed in step 2 and start
it in the outermost screw hole on the opposite side. Do not
ckive it all die way down leave enough space trader file
screw head fior thicl,_]essof the bracket.
Lift the
socket
screws
a
aside.
in the
top
Be
and washer.
IJ
REVERSING
3.3 Remove d_e tape and flit d_e door away from d_e
cabinet. Lift the door from the pin in the bottom hinge
bracket. {If the plastic washer sticks to the door bottom,
put it ba& on the hinge.)
THE HARDWARE
4.1 Move the bottom hinge bracket and plastic washer fi'om the
right side to the left side.
Washer
Switchthe hingepin to the
oppositesideof the bracl<et_;
¢---
_,
Bracket
3.4 Set the door outskle-up on a non-scratching surface.
12
¢_.i-
"-- -_
Installation instructions
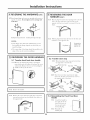
[-47REVERSING THE HARDWARE (CONT.I
[-5] REVERSING THE DOOR
HANDLES {CONT.!
4.2 Interchange
hinge and screws at top right with screws at
top left of cabinet. Do not tighten screws on hinge side
at tiffs time.
5.1.4 Remove plug button from tile top hinge hole oil tile left
side of tile door and insert it into tile hole oil tile
opposite side that was vacated by removal of tile top
hinge.
7I?
??
I
PlugB_
Installingthe hingeon the left.
Installingthe hinge on the right.
5.1.5 Pull tile plug button from the front of the door and
transfer it to the opposite side.
NOTES:
Solne hinges have %ur holes. Which holes you use
for installing tile hinge depends on which side you
install the hinge.
• The outer edge of the hinge should be parallel
edge of the case for correct installation.
_-l REVERSING
5.1 Transfer
PlugButton
to the
THE DOOR HANDLES
fresh food
door
5.2
handle
Transfer
5.2.1
5.1.1 Rclnove tile handle plug using a tape-tipped
put_ _knife under the edge, and relnove the screw
underneath.
Rclnove tile two screws holding tile
f_ handle to the top of the door.
door
Move the plastic door stop and screws from
the right side to the left side.
RightSide
Move the metal door stop from the right
side to the lel't side and transfer the scrmx to
side of the doon
the opposite
Plug,_
5.1.2
Remove
the handle.
5.1.3
Remove the screws from the right edge of the door
top and insert them into the handle screw holes on
the opposite side.
stop
DoorStop
5.2.2
I
Toreattachthe
handleon the
oppositeside.
LeftSide
1
Metal DoorStop
5.3 Reinstalling
Handle
5.3.1
Attach
the Fresh Food Door
tile handle
to
the right side of the
door with screws at
the top and under
tile handle plug
5.3.2
Reinstall
handle
13
the
plug
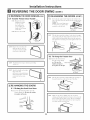
Installation instructions
REVERSING THE DOOR SWING
[-51REVERSING THE DOOR HANDLES (CONT.)
5.4
Transfer
5.4.1
Freezer
Door
Handle
Igl RE-HANGING
6.1.2
Remove the screw
holding the handle
to the top of the
door and the two
screws holding the
hand]e to the bottom
of the doon
5.4.2
(CONT.)
THE DOORS (CONT.)
Insert the pin o,ithe center hinge into the socket in the
mp of the doon Place the space*; then the washe*; o,1 the
hinge pin.
HingePin
NOTE: The center hinge must
be turned over as shown when
mounted o,1 the left side.
PlasticWasher
andSpacer
Remove the handle.
6.1.3
Tilt the door toward the cabinet. As the door is brought
into position, slide the hinge under the head of the screw
which earlier had been partly driven into the outermost
hole. Insert the remaining screxx_dlen tighten both screws
securel};
5.4.3
Remove
the screw from the
right top edge of the door
and insert it into the handle
screw hole o,1 the left side.
6.2
Re-hang
the
freezer
door
6.2.1 Lower the freezer door
onto the center hinge
pin. Be sure the
washer and spacer
section 5.2.
Attach the handle to die right
edge of the door
with screws at mp and t)otmm,
using bottom holes vacated by
removal of the door stop
_._'-_
and Spacer
SCreWS.
[_] RE-HANGING
/
CenterHing_
are in place on the pin.
5.4.5
_
6.2.2
Tilt the door toward the cabinet, lifting the top hinge so
the pin fits into the socket o,1 the top of the doon
6.2.3.
Make sure the door is slightly above the top of the
cabinet and the gap between the doors is even across the
front. Tighten the top hinge screws. Do not overtighten
dlese screws tighten them until they are just snug, then
mrn them another one-half
turn.
THE DOORS
6.1
Re-hang the fresh
6.1.1
Lower
food
door
the fresh food door onto the
bottom hinge pin. Be sure the washer
is in place on the pin.
Plastic
Washer
Hinge__
Bracket
14
Normal operating sounds,
Newer refrigerators
and use newer
vwvw.amerieanaappiianees.eom
sound different from older refrigerators.
Modern refrigerators
have more features
technology.
Doyou hear what I hear? These soundsare normal.
[] The.ewhigh
efficie,,cr
co.lpressor.lar
faster and longer ru.
than
-your old refrigerator and
you inay hear a high-pitched
while it is operating
HUIVIMM,,,
WHOOSH===
hum or pulsating
[]
sound
[] _}m may hear a whooshing sound when the doors close. This
is &le to pressure equalizing within the refrigerator.
CLICKS,
POPS,
CRACKS
and CHIRPS
[] _}m may hear cracldng or popping sounds when die refrigerator
is first plugged in. This happens as the refrigerator cools to the
correct temperature.
[] The compressor may cause a clicldl N or d_irpi_ N sound when
attempting to restart (tllis could take
up to 5 minutes).
[] Expansion mid contraction of coolhlg coils &rang and after
defrost can cause a cracldng or poppi, N sotmd.
You may hear tile fans spinning at high
speeds.
This happens when the refrigerator is
first plugged in, when the doors are
opened frequendy or when
a large amount of food is added to tlle refrigerator
or
freezer compartments.
The fans are helping to maintain
correct
the
telllperatures.
6
WATER
SOUNDS
[] The flow of refrigerant dlrot@l die freezer cooling coils may
make a gl@_ N noise like boili, N ware1:
[] Water dropping on the def_ost hearer can cause a sizzling,
popping or Nlzzing sotmd &Mng the defrost cycle.
[] A _ter dripping noise may ocotr (hiring die de_ost ©vle =tsice
meM _)m d_eexvtporator mM flows into fl_edrain pml.
[] ClosiI g die door may cause a gl@ilg
equ_zation.
soulld due to pressure
[] On models with an icemaker, after an icemaldng cycle, you may
hear the ice cubes dropping into the ice bucket.
Beforeyou call for service...
Troubleshooting Tips
Save time and money! Review the charts on the following
pages first and you may not need to call for service.
PossibleCauses
What To Do
Refrigerator does not
Refrigerator in defrost cyde.
* 1 \;air about 30 minutes t})r defrost cyvle to end.
operate
Temperature
in 0position.
* Move the temperature control c[l_ to a temperature
setting:
Refrigerator is unplugged.
• Push die ph g completely into die oudet.
The fuse is blown/caa'cuit
breaker is tripped.
• Replace fuse or reset the breaker.
Vibrationor rattling (slight
vibrationis normal)
Ro!ler screws or leveling legs
need adjusting.
* See Rollers and Leveling Legs.
Freshfood orfreezer
compartmenttoo warm
Temperature control
not set cold enough.
• See About the temperature control dial.
Warm weather or frequent
door openings.
• Set the temperature control dial one step colder.
See About the temperature control dial.
Door left open.
• Check to see if pacLage is holding door open.
Package blocking air duct in
freezer comparlment.
• Check to see if paclcage is 1)locldng air duct in freezer
compm_unent.
control
15
Beforeyou call for service...
Troubleshooting Tips
PossibleCauses
What To Do
Motor operates for long
periods or cycles on and
Normal when refrigerator
is first plugged in.
* _\hit 24 hours _r rile refrigerator to completely
cool down.
off frequently. {Modern
refrigerators with more
storage space and a larger
space and a larger freezer
require more operating
time. They start and stop
often to maintain even
Often occurs when large
amounts of food are
placed in refrigerator.
• This is normal.
Door left ope_
Hot weather or frequent
door openings.
* Check to seeif pa&age is holding door open.
* This is normS.
temperatures.}
Temperature control dM
set at the coldest setting.
* SeeAbout the temperature control dial.
Grille and condenser
need deaning.
* See Care and cleaning.
Door left open.
* Check to see if peel<age is holding door open.
-_rost or ice-crystals
on frozen food
{frost within package
is normal)
Too frequent or too long
door openings.
Automatic icemaker
Icemaker is not on.
• Move the feeler arm to the ON ;down) position.
does notwork
{on some models)
Water supply mined offor
not connected.
* See Installing the water line.
Freezer compartment
too warm.
* Wait 24 hours tbr tile refrigerator to completely
cool down.
Pried up cubes in the storage
bin cause the icemaker
to shut off.
* Lrvel cubes 1) _hmLd.
Frequent"buzzing" sound
Icemaker is on but the water
supply to the r_r:Nerator has
not been connected.
* Move tile feeler arm to the STOP (up)position. Keeping it
on will damage the water v_flve.
Cubestoo small
Water shutoffvalve conneding
refi:_gerator to water line may
be clogged.
* Call the phunl)er to clear the vzflve.
Slow ice cube freezing
Door left open.
* Check m see if package is holding door open.
Temperature control _
not set cold enough.
* SeeAbout the temperature control dial.
Ice cubes have
Ice storage bin needs cleaning.
* Empb' and wash bin. Discard old cubes.
odor/taste
Food traamailfing odor/taste
to ice cubes.
* _\Yap tbods well.
Interior ofrefr:Nerator
needs deardng.
* See Care and cleaning.
Moisture forms on
cabinet surface
between the doors
Not unusual during
periods of high humidity,
= _\Tipe surface dry and reset temperaatre
one serdng colder.
Moisture collects inside
(in humidweather, air
carries moisture into
refrigerator when doors
are opened)
Too frequent or too
long door openings.
Refrigerator has odor
Foods tranmaitting
* t_)cxh with strong odors shotfld be fighdy wrapped.
odor to refrigerator.
* Keep an open box of baldng soda in tile refrigerator;
replace eve_ three months.
Interior needs cleaning.
= See Care and cleaning.
16
control (li_
GE Service
Protection
Plus
TM
GE, a name recognized worldx_ide for quality and dei)endability
together
Service Protection Plus"
comprehensive
protection
on your appliances.*
with Assurant
Solutions,
offers you
Benefits Include:
• Prompt, reliable service from GE Authorized
Servicers
• Convenient
hours designed to suit your busy schedule
• Quality replacement
parts
• The dependability
of GE, a name recognized
• Ask about our interest-free payment plans
With Service
•
•
•
•
Protection
and trusted
worldwide
Plus you can expect:
An extended service plan tt_at limits unexpected
repair bills
Service coverage for most major brands
Unlimited service calls for tile length of your contract, or credit toward a replacement
product
Service coverage for covered operating parts and labor on appliances and home electronics that fail during
household use
• Your satisfaction
is our goal. We strive to provide
Place your confidence
*Most
brands
covered
SPP is a trademark
in GE and call us in the U.S. toll-free
up to 15 years
of General
you with excellent
Electric
old in the continental
service in a professional
at 1.800.626.2224
normal
single family
and timely manner.
for more information.
U.S.
Company.
Cut here
Please place in envelopeand mail to:
General ElectricCompany
Warranty Registration Department
P.O. Box 34980
Louisville, KY 40232-4980
17
Consumer
Product Ownership
Registration
Dear Custon_er:
Thank
you for purchasing
our product.
for placing your confidence
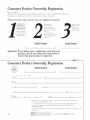
Follow these three
Complete
your
Registration
in us. "_\_ are proud
steps to protect
for Americana
your new appliance
and mail
Have
today.
the peace
of
rnirid of knowing
can contact
unlikely
you
we
the
Read
Manual
in a safe place.
operate
safety rnodJfication.
USA
you will need
is: 800 GE
Owner's
carefull?:
It will help ?_u
It contains
you require sei_-ice.
Our sel_-ice mlmber
of a
your
registration
beloxx;
store this document
inforrnation
should
you in the
event
by GE. Thank
investment:
After mailing
Ownership
Registration
is provkted
to have you as a customer!
Consumer
Product
TM
your
appliance
new
pi_perl?:
in the
(;ARES
(800.432.2737).
Model
I
Important:
!
I
[
Number
I
I
I
Serial Number
[
I
!
!
!
!
,
!
If you did not get a registration card with your
product, detach and return the form below to
ensure that your product is registered.
ut here
Consumer
Product Ownership
Model
Registration
Number
Serial Number
,,,,,,,,,[
MI: [;i
First[
Name
Mrs.
Miss
[
[
[
[
[
I
[
[
I
[
[
[
!
[
[
[
[
[
[
[
#
I
[
I
I
I
!
I
I
I
Ci_'
[
Apt.
!
!
!
!
!
!
[;i
[
Street
Ad&'ess
Date
Ms.
I,
Last
Name
[
I
[
[
I
[
I
[
I
[
I
[
[
[
[
[
[
[
[
[
E-mailAddress*
Placed
InUse [__
_{onth
* Please pi_vide
cornmunications
Check
FAILURE
WARRANTY
?bur
e-mail
frorn
address
GE Appliances
here if you do not want
TO
GOMPLETE
AND
to receive,
via e-mail,
discounts,
special
offers
and other
important
(GEA).
to receive
RETURN
cornmunications
THIS
CARD
frorn GLXs
DOES
NOT
carefully
DIMINISH
selected
partners.
Y()UR
RIGHTS.
For illforlllation about GLXs prix acy and data usage polic,% go to ge.coli1 and click oil 'Privacy Policy" or call
800.626.2224.
18
u,_,,_v.AmeHcanaAppliances,
corn
I
Refrigerator Warranty.
All warranty services for Americana 'Mare provided by GE Factory
Service Centers, or an authorized Customer Care® technician.
To schedule service, call 800.432.2737. Please have serial number
and model number available when calling for service.
Staple your receipt here.
Proof of the original purchase
date is needed to obtain service
under the warranty.
We Will Replace:
i
L
¸7¸¸¸¸
OneYear
Fromthe date of the
original purchase
Any part of d_e refrigerator witch flails due to a defect in materials or worMnanship.
During d_is limited one-year warranty, we will also provide, free of charge, ;d]labor
and rela[ed self'ice [o replace [l_e defcc[ive parL
Service trips to your home to teach you how to use the
product.
Improper
installation,
delivery or maintenance.
Failure of the product Kit is abused, misused, or used for other
than the intended purpose or used commercially.
Replacement
of house fuses or resetting of circuit breakers.
Replacement
of light bulbs.
Damage to the product caused by accident, fire, floods
or acts of God.
Loss of food due to spoilage.
Incidental or consequential
with this appliance.
Damage
Product not accessible to provide required service.
caused after delivery.
damage
caused by possible defects
Products which are not defective, broken, or which are
working as described in the Owner's Manual.
EXCLUSION OF IMPLIED WARRANTIES--Your sole and exclusive remedy is product repair as provided in this
Limited Warranty. Any implied warranties, including the implied warranties of merchantability or fitness for a
particular purpose, are limited to one year or the shortest period allowed by law.
This warranty is extended to the original purchaser and any succeeding owner for products purchased for home
use within the USA. If the product is located in an area where service by a GE Authorized Servicer is not available,
you may be responsible for a trip charge or you may be required to bring the product to an Authorized GE Service
location for service. In Alaska, the warranty excludes the cost of shipping or service calls to your home.
Some states do not allow the exclusion or limitation of incidental or consequential damages. This warranty gives
you specific legal rights, and you may also have other rights which vary from state to state. To know what your
legal rights are, consult your local or state consumer affairs office or your state's Attorney General.
Warrantor:
General Electric Company. Louisville, KY 40225
19
ConsumerSupport.
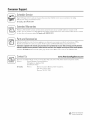
ScheduleService
Expert GE repair service is ol_ly one step away from your door. Schedule service at your convenience
800.432.2737 during normal 1)usiness hours.
In Canada,
by c_dling
call 1.800.561.3344
Extended
Warranties
Purchase a GE extended warranb_ and learn about special discounts dmt are available while your warranb_ is still
in effect. _}m can purchase it by calling 800.626.2224 during normal business hours. GE Consumer Home Self'ices will still
be there after your warranb_ expires. In Canada, call 1.888.261.2133
PartsandAccessories
IndividuNs qualified to sela_ice fl_eir own appliances can have parts or accessories sent direc@ to their homes (X7ISA,
MasterCard m_d Discover cards are accepted). Order by phone at 800.626.2002 during normal business hours.
Instructions contained in this manual cover procedures to be performed by any user. Other servicing generally should be
referred to qualified service personnel. Caution must be exercised, since improper servicing may cause unsafe operation.
Customers
in Canada
should consult the yellow pages fi)r the nearest _[al)e sela_ice centeg or call 1.888.261.3055.
ContactUs
www.AmericanaAppliances.corn
If you are not sadsfied wid_ d_e service you receive from GE, send a letter to GE. Please include your phone nmnber.
Write to:
General Manager, Customer Relations
GE Appliances, Appliance Park
Louisville, KY 40225
In Canada:
Write to:
Director, Consmner Relations, Mabe Canada
Suite 310, 1 Facto W Lane
Moncton, N.B. E1C 9M3
Inc.
•_'
_
Printedinthe UnitedStates
Printedon RecycledPaper
Congelador superior
Refrigeradores
In£ormaci6n
de seguridad
Cables de extensi6n ...................
C6mo conectar la electricidad ...........
3
3
Precauciones
2
de segxlridad ..............
Instrucciones
de operaci6n
Control ...........................
4
(]uidado y limpieza
.................
Estantes
..........................
Gavetas de almacenamiento
........
NISquina de hielos automStica .........
Escribaaqui el modelo y el numero
de serie:
Instrucciones
para la instalaci6n
C6mo invertir el vaiv4n de
la puerta ......................
Instalaci6n de la tuberla
Modelo #
del agua
Sede #
Preparaci6n
Consejos
para
8 10
instalar
......................
7
para la soluci6n
de problemas
Antes de solicitar un servicio ......
15, 16
Sonidos normales de operacidn .......
15
Soporte
Garantla
Soporte
vwwv.Am e rh:anaApplian
11 14
.......................
el refrigerador
Encuentre estos nfimeros en la etiqueta
en el lado izquierdo de la parte superior
del compartimiento
del refrigerador.
6
4
4, 5
5
al consumidor
........................
al consumidor
19
..............
90
_Viodelos 16, 17, 18
ces. corn
,,_e, Impresoen los EstadosUnidos
h_p_e_o
enpapel_e_iclado
197D8622P004
49-60658
03-11 6E
IMPORTANTEINFORMACIONDESEGURIDAD.
LEATODASLASINSTRUCCIONES
ANTESDESUUS0.
A iADVERTENCIA!
Use este aparato s61ocon el fin para el cual fue disefiado como se describe en este Manual del propietario.
PRECAUCIONES
DESEGURIDAD
A! usar aparatos el6ctricos, se deben seguir precauciones b_sicas de seguridad, incluyendo las siguientes:
Este refrig'erador
debe instalarse y ubicarse
correctamente
segim las Instrucciones
de instalacidn
antes de su uso.
No permita
que los nifios se suban,
se paten
o se ctmlgtmn de los estantes en el refiigeradot:
dafiar el refiigerador
y sufi@ graves dafios.
Podrlan
_{antenga
los dedos alejados de ]as _ueas estrechas;
espacios entre las puertas y entre las puertas
y los gabinetes
Tenga ctfldado
en el firea.
Desconecte
son necesariamente
t)equefios.
al cerrar las puertas cuando haya nifios
el refiigerador
antes de limpiar
No toque las superficies fiias en el compartimiento
del
congelador
con las manos h@nedas o mojadas. La piel se
reparaciones.
puede
sea realizado por un individuo calificado.
pegar
a estas superficies
extremadamente
No almacene
o use gasolina u otros vapores
i_Namables
en las fireas cercanas a este
o a cualquier
fiias.
y liqtfldos
otto aparato.
mecanismo
localizado
y hacer
NOTA: Recomendamos enf_ticamente que cualquier servicio
Fijar el conu'ol en la posici6n 0 (apagad0)
corriente hacia el circtflto de luces.
No vuelva
En los refiigeradores
con mfiquinas de hielo automfiticas,
evite el contacto con las partes en movimiento
del
los
a congelar
alimentos
no elimina
la
que se hart descongelado
por completo.
eyectot; o con el elemento calei_ctor
en la prore inferior del diN)ositivo para hacer
hielo. No coloque los dedos o las manos en el mecanismo
de la mfiquina de hielos mientras el refiigerador
est6
conectado.
A i
I
IE:
AI
ELIMINACION
APROPIADA
DELREFRIGERADOR
Los probleinas de que los nifios se queden atrapados y
se sofl)quen no son cosas del pasado. Los refrigeradores
desechados o abandonados sigllen siendo peligrosos,
afro si s61o estfin por "unos pocos dlas". Si est(t
desechando su refrigerador viejo, por favor siga las
instrucciones
a continuacidn
para a?_ldarle a evitar accidentes.
Antes de desechar su viejo refrigerador
o congelador:
; O uftele
]as puertas.
; Deje los estantes en su ]ugar, de manera que los nifios
no puedan subirse facihnente al interior.
Refrigerantes
Todos los aparatos de refrigeracidn
contienen
refrigerantes,
los cuales se deben retirar antes de la
eliminacidn
del producto de acuerdo con la ley
federal. Si va a desechar algfm aparato antiguo de
refrigeracidn,
consulte con la colnpafifa a cargo de
desechar el aparato
para saber qud hacer.
wwvv.AmericanaAppliances.com
!
B
COMOCONECTAR
LAELECTRICIDAD
Bajo ninguna circunstancia, no corte ni retire la tercera pata (conexi6n a tierra) del cable de electricidad.
Por seguridad personal, este aparato debe estar correctamente conectado a tierra.
E1 cable eldctrico de este aparato ester provisto de
un enctmt'c de tres patas (conexidn a tierra) que encaja
en un tomacorriente estfindar de 3 orificios (conexidn a
tierra) para minimizar la posibilidad
de peligro de tm d_oque el_ctrico de este aparato.
Haga que el tomacorriente de la pared y el circuito sean
revisados por un electricista calificado para asegurar que
el tomacorriente tiene la conexidn a tierra apropiada.
Cuando haya un tomacorriente est5ndar de dos paras, es
su responsabilidad y obligacidn personal reemplazarlo
con un tomacorriente adecuado de tres orificios
correctamente conectado a tierra.
sobrecargar los circtfitos eldctricos de la casa que podrlan
causar un incendio a partir de los cables recalentados.
Nunca desconecte su refrigerador hNando del cable
eldctrico. Siempre tome el enchufc firmemente y h(delo
directmnente del tomacorriente.
Repare o reen@lace de inmediato todos los cables
el_ctricos que se hayan desgastado o daflado. No use un
cable que tenga grietas o dafios de abrasidn en su
longimd o en cualquier extrclnO.
_4dretirar el refrigerador de la pared, tenga ctfidado de
no enrollar o dafiar el cable eldctrico.
E1 refrigerador deber_ siempre estar conectado en su
propio tomacorriente
eldctrico individu_ que tenga un
nivel de vohaje que se ajuste a la placa de potencia.
Esto ofrece el mejor desempefio
y tambidn evita
USODECABLES
DEEXTENSION
Debido a peligros potenciales de seguridad bajo ciertas condiciones, nos oponemos al uso de cables de
extensi6n.
Sin einbargo, si debe usar tm cable de extensidn, es absolutainente necesario que sea un tipo de cable
de extensidn para aparatos con conexidn a tierra de tres cables, que estd en la lista de [L (en los Estados [ nidos) o
en la lista CSA (en Canadfi), que tenga un endmfc de tipo conexidn a tierra y salida y que
el grado eldctrico del cable sea de 15 amperios ;n/nimo) y 120 voltios.
LEAY SIGACUIDADOSAMENTE
ESTAINFORMACION
DESEGURiDAD.
CONSERVE
ESTASINSTRUCCIONES
3
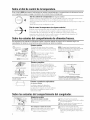
Sobre el dial de controlde la temperatura.
Girar e! dial a O/Off interrumpe el enfriamiento en ambos compartimientos: el compartimiento
y el congelador, aunque no apaga el suministro de corriente hacia el refrigerador.
El
@
!
dial
de
conQ'ol
de
la
temperattlra
[lone
nueve
niveles
in{is
1 es
O.
el nivel
mils
de alimentos frescos
caliente
y 9 es el nivel
tma control
moneda
en la ranura
en el cenu'o del {enalgunos
dial y podr{t g_rar el dial hacia el nivel que mejor
Dial
de
temperatura
necesidades.lniciahnente'
flje el dialde
en la
5. Despu&
de usar el refiigerado_;amodelos)
justeel dial de set necesaz";o.
Inserte
Pern_ta
24 horas
para
que
el refdgerador
m{ts
il-lO.
se adapte
a sus
se enfi-te.
Dial de control de temperatura (en algunos modelos)
E1 dial
de conu'ol
de temperamra
ajusta
la temperamra
del refi'igerador
desde
la mils
elevada
hasta la mils baja. En la ilusu'aci6n de la izquierda
se indica la configm'aci6n
de fdbrica
recomendada. Para una temperatura mils baja, gire el dial hacia el copo de nieve. Para una
temperatura mils elevada, gire el dial en sentido contrario alas agujas del reloj, alejfindose del
copo de nieve. Deje transcurrir 24 horas para su ajuste.
Sobre losestantes del compartimientode alimentos frescos.
Los soportes
necesidades.
de los estantes en diferentes
No todas las caracteristicas
niveles le permiten adaptar el espacio
est_n presentes en todos los modelos.
de los estantes
segdn sus
Estantes medios
[]
Levantehacia
[_
nclinehada arrlua
Un exn'emo del estante descansa sobre un soporte
moldeado en el costado; el sq)orte en el on'o extiemo se
engandm en un iiel en la parte posterior de la paIed del
gabinete.
Para retirar, levante el estante en la parte delantera,
luego saque del soporte y filera del Iiel.
Para reemplazar, seleccionela almra deseada para
el estante. Con el estante delantero levantado
ligeramente, engan&e la oreja supeiior del sq)orte en el
Iiel, luego baje el estante hasta el soporte.
NOTA:El estantehacia la derechadel rbl est_
dise_adopara engancharseen la ranurade laderecha;
el estantehacia la izqubrdaest5 dise_adopara
engancharseen la ranuraizquierda.
Estantes completos
Levante la oarte D0s-[eri0r
Para retirar los estantes de
tamafio completo
Algunos modelos tienen un estante deslizante en
alambre de acero, un estante de vidi_o temperado
esmcionario, un estante a prueba de salpicaduras o dos
esmntes estacionaiios en alambre de acero. Estos
esmntes se pueden mover hacia otto lugar en el
compartimiento de alimentos fi'escos.
E1estante deslizante de tamaflo completo tiene fi'enos.
Cuando se coloca correctamente en los sq)oi'tes del
esmnte, el estante fi'ena antes de salirse completamente
del refi'igerador y no se inclinarfi omncto coloque o
retire
alimentos
del mismo.
Para retirar un estante de tamafio completo
cuando la puerta del compartimiento de alimentos
frescos no se pueda abrir completamente
Estantes a prueba de salpicaduras
II
II
{en algunos modelos)
Los estantes a prueba de salpicaduras
tienen hordes especiales para evkar que
las salpicaduras se rieguen a los estantes inferiores.
Pm'a retirar o reemplazar los estantes, yea las
insmmciones arribas
Sobre los estantes del compartimientodel congelador.
Para retkar el estante de escal6n:
Estante
escal6n
['7] Levantede
el lado
izquierdo
't.z_alig'eramente.
del escaldn
Para reemplazarel estante de escal6n:
-_Con el estanteinclhmdocomo apm'ece,@]ste los
exu'emos del lado izquierdodel estanteen los
oiNcios de la pared del gabhlete.
['_---]
Mueva el estante hacia la izquierda
para liberar los extzemos derechos de los odficios
en la pazed del gabinete.
[_]
']
aje el costado derecho del estante, mueva el
estante hacia la derecha y sfiquelo.
evante el costado izquierdo del estante
ligeramente, mueva el estante hacia ariiba, ajuste
los extremos del lado derecho del estante en los
oIificios de la pared del gabinete y baje el estante a
su hlgaI:
Sobre Jas gavetas de aJmacenamiento.
No todas las caracteristicas
est_n presentes en todos los modelos.
Gavetas para frutas y vegetales
Se debe redrar el exceso
La gaveta de refi'igerios se puede
de
agua
que
se pueda
acumular
al fimdo de las gavems
las Gaveta
necesidadesdederefrigerios
su fiunilia.
y se deben
secar
las gavetas.
Sobre la remoci6nde la gavetade almacenamientoy cubierta.
No todas
las caracteristicas
est_n presentes
en todos
Gaveta preservadora
)
tow
H,G.
los modelos.
de humedad
ajustable
Deslice el control complemmeme hasm
la posicidn HIGH ,:'alto)para ofiecer la alta
humedad recomendada para la mayoria
de los vegetales,
ten algunosmodelos)
Lleve el conuv,1 pot completo hasm la posicidn
LOW ,:'bajo)para ofrecer los niveles bajos de
humedad recomendados para la mayorla de las
fiutas.
Gaveta de tama_o completo con cubierta plastica
Para retirar la cubierta, levante de los soportes,
hale hacia delante, incllnela
y sfiquela.
Estante para las gavetas gemelas
Para retirar:
¸
i: i
iI
[-_ Retire las gavetas.
['_ Empuje el fiente de la cubierta de vkh_iohacia
azTiba,y al mismo tiempo, hale hacia delante
tanto como se pueda.
Incllnela y sSquela. Evite limpiar la cubierta de
vickio fi{acon agua caliente ya que la difezencia de
temperauu'as exu'emas podr_a causar que se quiebre.
[-_ Retire el mazvo de la gaveta. (Siempre reti*e la
cubierta de vich'ioantes de sacar el mazvo de la
gaveta.)
Levante el marco de los soportes en cada costado y
atrfis,hale hacia delante, incline y saque.
Para reemplazar:
[-_ Baje el marco hasta que descanse sobre los
soportes en carla costado y atrfis.
'_--] eemplace la cubierta de vidrio, empujando
su horde posterior firmemente en el canal del
marco posterior y suavemente baje el fi'ente
hacia su lugaz:
[_] Reemplace las gavetas.
Sobre la ma ulnade hielosautomatica.
Un refrigerador
recientemente
Interruptor
decorriente
Ma,_.n_
72
L
c0mente
Braz0indicad0r
Brazode
Ilenadohacia
BrazodeIlenado laposici6n
hacialaposid6n STOP(hacia
ON(haciaabajo) arriba)
instalado puede tomar
entre 12y 24 horas para empezar
La m_iquhmde hidos produdr(_apm_madamente entre 3
y 3,5 libras de hido en un pe*iodode
24 horas, dq)endiendo de la temperamra dd
compartimiel_mdel congdado*;la temperattn'adel cuarm.
d nfm_erode vecesque se abre la puerta
v ou'as condk'ionesde uso.
Sid *efligeradorse opera antesde hacer la cone_6n dd
agsmhacia la mSquinade hido, muevael brazo de llenado
hacia la posk'i6n ST0P (hada arriba.
Ctmndo sehava conectado d refi'igera&)ral suminisuwde
agsm,muevael brazo de llenado hada la posid6n 0N
0mcia ab@).
La m_iquh_ade hidos se llenm{ de agsmctmndo se enflle
hasta 15°EUn refligerador *eci&_h_staladosepuede
mmar enue 12y 24 horaspara empezar ahacer cubos de
hido.
Una vez que la mkquina de hidos empieza ahacer hido,
puede mmar basra 48 horaspara llenar d compartimienm,
dq)endiendo de losnivelmde temperamray del nfllnero
de vecesque se abra la puerta.
Escudmrk un zumbMo cada vez que la mkquina de hidos
se llene de agsm.
Desedle lospfimeros cubosde hido para permith"que la
linea del agsmse limpie.
Aseos'l,esede que nada interfieracon el movimienm&l
brazo indica&n
Cuan& d conrene&rselleneal nivd dd brazoindication]a
a hacer hielo.
m_iquinade hielosdejarlldepm&lcirldelos.
Es normal que va*ioscubos de hielo sejtmten.
Si el hielo no se usa con fi'ecuencia,loscubos de hielo viejo
sevolver(mmrl)k)s,con sabot mnck) y se encoger_in.
En los moddos de interrupmrde energla,la luz verde se
volver(_intermitentesilos cubosde hido se amscanen ]a
mfiquhmde hidos. Pan*cor*egh"esm,ponga d h_terrupmr
de corfienteen la podci6n de 0 (apagad0)y zethe los
cubos.Regzesed intermpmr de corrientea la posk'i6nde I
(e.ce.did0} para *einiciarla m_iquinade hielos.Despu&
de haber encendido de nuevola mkquina de hielos,habr(_
una demora de
45 mhmms antes de que la mkquina de hielos*einicielas
operacbnes.
NOTA:Enhogares
conpresi6n
deaguainferioralpromedio,
es
pesible
queescuche
elcicledelam_quina
dehidesvariasveces
alhacerunletedehide,
Kitdeacceseriosdelamaquinade hielos
Si su refligeraclorno viene ya %uipado con tma m_iqah_a
de hielosaummktica, e_ste un ldtaccesofiopara la
mkquh_ade hidos que tutti disponiblepot un costa
adk'ional.
Reviseen ]aparte posteriordd *efi'igeradoren busca dd
ldtpara la mkquhm de hielos espedficaque necesitapara
su modelo.
5
Cuidadoy limpiezadel refrigerador.
Limpieza exterior
Mover el refrigerador
Las manijas de la puerta y accesorio
con un patio
humedecido
en algunos
con agua jabonosa.
modelosl;.
Limpie
Seque con un patio
Tonga
ctfidado
cubiertas
relieve.
seco.
Mantenga
e[ exterior [impio. Limpielo
humedecido
liquido
con cera de cocina para
suave para platos.
o detergente
Seque y blqJle con un patio limpio y seco.
modelosl; pueden
ser limpiados
con un limpiador
para acero
No limpie el refrigerador con un patio sucio para platos o con una
toalla mojada. Estospueden dew residuosy pueden erosionarla
pintura. No use almohadillas de restregar,limpiadores en polvo,
blanqueadoreso limpiadores que contenganblanqueadoresya que
estos productos pueden raspar debilitar el acabadode pintura.
Despu&
de rodar
las paras
del refrigerador
que las paras
Para
refrigerador
de alimentos
excesiva con una esponja
de los interruptores,
para un cuarto
de limpiar
delgada
costado
de la bisagra.
peguen
y se doblen
(1 litro) de agua.
ctmharada
(15
Esto limpia
y
de la puerta,
Esto ayuda
perder
aplique
una
de la puerta
a evitar
en el
que los empaques
se
su forma.
Evite limpiar los estantes de vidrio fr[os (on algunos modelos) con agua
caliente ya que la diferencia de las temperaturas extremas puede
causar que se quiebren. Manipule los estantes de vidrio con cuidado.
Golpearel vidrio templado puedecausar que se quiebre.
No lave ningunapartepl_stica del refrigeradoren la lavadorade platos.
Condensador
No hay necesidad
ambientes
de una limpieza
de operacidn
de rutina
de hogares
del condensador
normales.
mpi a delos
Serpentines del CondenSador
limpiar
el condensadcn;
temperamra
a 0. Barra
Para mejores
resultados
este fin. Estfi disponible
electrodom_sticos.
a su posicidn,
en el sentido
sostengan
gire
de las manecillas
nuevamente
el peso
del reloj
del
desconecte
el
el_ctrico,
desenrosque
la
est_ fria y reemplficela
de similar
o inferior
con una bombilla
para
w_ltaje.
Girar el control a la posiciOn0 no desconecta la corriente del
circuito de la luz.
el condensador
debe
limpiarse
periddicamente
para tma
gire el dial de control
de la
el polvo.
use un cepillo especiahnente
de tiendas
disefiado
de partes
Para una largas vacaciones o ausendas, retire los alimentos y
desconecte el refrigerador. Gire el dial de control de
la temperamra hacia la posicidn 0 {apagad0), y limpie el interior
con una solucidn de tma cudmrada de bicarbonato (15 ml) y tm
cuarto (1 litro) dc agua.
Deje las puertas abiertas.
Mueva el brazo de llenado a la posicidn STOPJmcia arrib£ y
cierre el smninistro del aglm hada el refrigerador.
Si la temperamra puede caer por debajo del punto de
congelamiento, haga que una persona calificada drene el sistema
del suministro dc agua (en alglmos modelos) para evitar serios
daflos a la propiedad causados por inundaciones.
C6mo prepararse para trasladarse
grasosos
en la mayo,{a
cuando
quemada,
en
operacidn
eficiente del
refiigerador
o aspire
una bombilla
en
Sin embargo,
ambiente
quepuedan
Para
en
C6mo prepararse para las vacaciones
en los empaques
hasta
al
y seque.
los empaques
de vaselina
o patio
luces o controles.
de agua dbia y bicarbonato_ma
los olores. Enjuague
Despu&
el refrigerador
del tomacorriente
refrigeradores
antes de limpiarlo. Si esto no es
la humedad
nfll; de bicafl)onato
neutraliza
reemplazar
bombilla
Desconecte el refrigerador
capa
fiescos
el congelador
Use una sohmidn
las
con disefios
Reposici6n de la bombilla
en los compmtimientos
ahededor
con superficies
refligerado,:
Para ayudar a evRar olores, deje una caja abierta de bicarbonato
limpiar
y aquellas
Todos los
Hale el reffigerador en linea recta y reg%sdo a su t)osicidn
empuj_mdolo de la misma forma. Mover el refrigerador en una
direction lateral puede resultar en da_os a la super[icie del piso
o al refrigerador.
hasta
Limpieza interior
pr{_ctico, escurra
acojinadas
lejos de la pared.
dafim; pmdcularmente
Cuandoempuje de nuevo el refrigerador, asegOresede no pisar el
cable el_ctrico o la I[neade suministroa la m_quinade hielos
(on algunos modelos).
ino_dable para usos comerciales. No ut_ice cera para
electrodom6sticos
sobre el acero ino_dable.
yen
el reffigerador
de piso se pueden
con tm patio ligeramente
electrodom_sticos
Los paneles y las rnanijas de las puertas de acero ino×idable (en
algunos
al mover
tipos de cubiertas
de
para
Asegure todos los artlculos sueltos como la rejilla, los estm_tcsy
calories pegfindolos con cinta en su lugar para evitar daflos.
AsegOresede que el refrigeradorpermanezcaen unaposici6n
verticalduranteel traslado.
m
stru
"nstal
""
Si tiene preguntas,llame al 800.432.2737
ANTES DE INICIAR
AREA
Lea estas instrucciones
Permka el siguiente espacio para una ff_cil instalacidn,
apropiada
circulacidn del aire y conexiones
de plomerla y el&cu'icas.
completa
y cuidadosamente.
• IMPORTANTE
hlstrucciones
- G,a, l
para uso del inspector
• IMPORTANTE
cddigos
y 6rdenes
-
- A_,a;_r_ d_d_jar_a_
con el consumidon
• Nota al consumidor
para referencia
RODILLOS Y PATAS NIVELADORAS
- Con_,,_ _a_ instrucc'iones
fimn'a.
• Nivel de des_eza
La instalacidn
destrezas mecfinicas bfisicas.
" Tiempo
los
de le)_
• Nota al instalador
instrucciones
• Costados 3/4" (19 ram)
• Arriba 1" (25 ram)
• Arras 2" (50 ram)
local.
de ejecuci6n
de este aparato
requiere
[as paras niveladoras cerca de cada esquina delamera del
refrigerador
son ajustables, t_stas colocan firmelnente
el
refrigerador
y evitan que se mueva cuando las puertas se
abran. Las paros niveladoras
se deben colocar de manera que el frente del refrigerador
se
levante lo suficiente para que las puertas se cierren
ffcillnente
cuando se abran hasta
la mired.
de
Instalacidn
del refi'igerador
15 mhmtos
Inverth" el vaiv_n de la puerta
1 hora
* La instalacidn
apropiada
" La falla del producto
estfi cubierta
es la responsabilidad
debido
a una instalacidn
del instaladon
inadecuada
no
Gire las paras niveladoras en el sentido de las manecillas
del reloj para levantar el refrigeradol; y ell el sentido
contrario para bajarlo.
pot la garantla.
SUMINISTRO
DE AGUA
LA NIAQUINA
DE HIELOS
(en algunos
Si el refl'igerador
Los rodillos al lado de las paras niveladoras le permiten
mover el refrigerador lejos de la pared para limpiarlo.
HACIA
Gire las paras en el senddo comrario de las manecillas del
reloj hasta que el peso del refrigerador
se traslade de 4stas
hacia los rodillos. Despu4s de rodar el refrigerador
de nuevo
hacia su lugm; gire las paras en el senddo de las manecillas
del reloj hasta que las paras sostengan nuevalnente
el peso
del refrigerador.
modelos)
tiene una m//cluina
de hielos,
se tenclr(/que
conectar a una tuberla de agua potable fi'ia. Un kit de suminisu'o
de agua (contiene tuberla cte col)re, vfilvula de cierre, accesorios e
instmccionesi
estfi disponible
con un costo adicional a tray, s de su
proveedox;
visitando
Partes y Accesorios,
UBICACION
nuestra
pfigina
_Veb ge.com
o bien a tray, s de
1.800.661.1(516.
DEL REFRIGERADOR
= No instale el reffigerador
donde la temperamra
baje de 60°F
(16°C) ya que no correrfi con suficiente frecuencia
para
mantener
las temperamras
apropiadas.
Instfilela en un piso filerte
completa.
para que Io soporte
con ca_ga
7
Instrucciones para la instalaci6n
COMO INSTALAR LA TUBERiA DEL AGUA
(EN ALGUNOS
MODELOS)
ANTES DE INlClAR
QUE NECESITA
Los idts de cobre recomendados para el smninistro de agua son
1\'LXSX2,1\'LXSX3o 1\'LXSX4,dependiendo de la cantidad de
ulbel_a necesaria. Las utberlas plfisticas aprobadas para el
sunfinistro de agua son las mberlas para el refrigerador
SmartConnect de GE (1\'LX08X10006, 1\'LX08X10015 y
1\'_1208X10025).
Los kits de tubeda para el refligerador SmartConnect de GE
estSndisponibles en las siguientes longitudes:
6' (1,8 m)
_\_08X10006
15' (4,6 m)
1\LX08X10015
25' (7,6 m)
1\LX08X10025
)>egdrese de que el kit que haya seleccionado permita al menos 8
pies (2,4 mi como se describe arriba.
NOTA: La finiea tuberia de plgstico aprobada de GE
es la que viene provista con los kits de mberia para el reffigerador
SmartConnecff = de GE. No use ninguna otra mberia plkstica para
el suministro del agua ya que la mberla est5 bajo presi6n redo el
tiempo. Cierms tipos de plgstieo se fracmrarfin o se romper&n con
d tiempo y causarfin dafios en su casa debido al agua.
• Un kit de suministro de agua de GE (contiene tuberia, vfilvula de
cierre y accesorios enumerados abajo) estfi disponible a un costo
adicional en su tienda o pot medio de Partes y Accesorios,
1.800.661.1616.
(CONT.)
TM
TM
.4dconectar su refrigerador a un Sistcma de Aglm de ()smosis
Inversa de GE, la flnica instalacidn aprobada es con un ldt de
()smosis Inversa de GE. Para otros sistclnas de aglm de 6smosis
inversa, siga las instrucciones del fiabricante.
Esta instalacidn de la mberla del aglm no estfigarantizada por
el fiabricm_tedel refrigerador o de la mfiquina de hielos. Siga
estas instrucciones ofidadosamente para nfinimizar el riesgo de
un daflo costoso debido al agua.
E1martilleo de] agua (aglm g'olpealldo
COlltra
la ulberla) en la
mberla de la casa puede causar daflos alas partes del
refrigerador y con&mir a un goteo o immdaddn por el agua.
Elaine atm plomero calificado para corregir el martilleo del
agxmantes de instalar la rubella del aglm
al refrigerador.
• Un suministro de agua Dia. La presidn del agua debe estar entre
20 y 120 p.s.i. (1,4-8,1
• Taladro el_ctrico.
bari.
• Llave de 1/2N o ajustable.
• Destornillador
Para evitar quemaduras y daflos con el producto, no conecte la
rubella del agua a la mberla del aglm caliente.
piano
y de estrella.
• Dos mercas de compresi6n
de 1/4N
de diSmetro exterior y 2 ffinflas
(mangas) - para conectar la tuberla
de cobre a la vSlvula de cierre y 1
a vfilvula del agua del refrigeradon
Si usa el refrigerador antes de conectar la mberla, asegllrese de
que el brazo de llenado est_ en la posiddn STOP(hada arriba).
No instale la mberla de la mfiquina de hielos en hgares donde
la temperamra caiga por debajo del nivel de congelamiento.
_Musar cu_quier aparato eldctrico (como un taladro eldctrico)
durante la instalacidn, aseg_'lresede que el aparato estd aislado o
conectado de manera que evitc el peligro de tma descarga
eldctrica, o se opere por batel_as.
Todas las instalaciones se deben realizar segQn los requisitos del
cddigo bcal de plome6a.
O BIEN
• Si est5 usando un kit de tuberla para el refi'igerador
SmartConnect
de GE, los accesorios necesarios ya vienen
preinstalados en la tuberla.
• Si su tubella existente de cobre para el agua tiene un accesorio
con vuelo en el exU'emo, necesitarfi un adaptador (disponible en
las tiendas de suministros de plomerla) para coneetar la llnea del
agua al refrigerador O BIEN, podrfi cortar el accesorio con vuelo
con un cortador de mbos y luego usar un accesorio de
compresidn. No corte el extremo formado de la tubefia para el
refrigerador SmartConnect
de GE.
TM
TM
QUa: NECESITA
• Vfilvula de cierre para conectar a la llnea del agua fi'ia. La
vSlwfla de cierre deber5 tenet una entrada de agua con un
difimetro interno mflfimo de 5/32N en el punto de conexidn a la
TUBER.[A
DEL AGUA FP_A. Las vfilvulas de apagado
tipo silla
vienen inchfidas en muchos kits de suministro de agua. Antes de
compraz; aseg_'u'ese de que una vfilvula fipo silla cumple con los
cddig'os de plomefia en su localidad.
" Kit de mbefia de cobre para e! refrigemdor o SmartCormect de
C-E, 1/4N de difimetro externo para conectar el refiigerador al
suminisu'o de agua. Si usa cobre, asegfu'ese de que ambos extremos
de la mbefia
se corten mfiformemente.
TM
Para determinar la cantidad de mbefia que necesita: mida la distancia
desde la vfiMfla del aglm en la parte posterior del reffigerador hasta el
utbo de suministro de aglm. Luego agTeglle 8 pies (2,4 m). Asegfuese
de que haya smqciente mbefia adicional ismos 8 pies [2,4 m] em'ollado
en tres vueltas de rams 10 pulgadas [25 cm] de diSmetro) para permitir
que el reffigerador se pueda mover de la pazed despu& de la
instalacidn.
8
Instrucciones para la instalacion
Instale la vldvula de cierre en la mberfa
del agua de consumo
m{ts frecuentemente
[i] CIERRE EL SUMINISTRO
PRiNCiPAL DE AGUA Y
DESENCHUFE EL REFRIGERADOR
Abra
el grifo
m{_s cercano
agujas del reloj pot
mberia del agua.
en contra
suficiente
tiempo
del sentido
para
[--4]DIRIJA LA TUBER[A
Dirija la tuberla
entre la llnea del agua fiia y el refiigerado,:
Dirija la tuberla a tray, s de un orificio perforado
en el piso _detrfis del refrigerador
o del gabinete
a@acente)
lo mils cerca posible a la pared.
de las
limpiar
udlizada.
la
en la pared
de la base
o
NOTA: Asegjuese de que haya suficiente mberla adicional
(unos 8 pies [2,4 m] enroUada en tres vueltas de alrededor
de
10N [25 cnq de difimetro) para permitir que el refrigerador
se
pueda mover de la pared despu_s de la instalacidn.
[-2=]
SELECCIONE LA UBICACION
DE LA VALVULA
[-5]CONECTE LA TUBERiA
A LA VALVULA
Seleccione
una ubicacidn
para la vfilvula que sea
filcilmente
accesible.
Es mejor conectarla
en el costado de
una mberia
vertical de agua. (luado sea necesario
conectarla
en una mberia
horizontal
de agua, haga la
conexidn
en la parte superior
o al lado, en vez de hacerlo
en la parte de abajo, para evitar retirar cualquier
sedimento
de la mberia del agua.
Coloque
la merca de comt)residn
y f6rula
la mberia de cobre ,manga)
en el extremo
con_ctela
a la vfilvula de cierre.
Aseg(uese
la vfilvula.
Perfbre un orificio de 1/4N en la mberia del agua (incluso
si estfi usando una vfilvula auto perforadora),
usando una
broca afilada. Retire cualquier
sobrante
que resulte de
perforar
el orificio en la mberia. Tenga
cuidado
de no
permitir
que se filtre agua hacia el taladro. No perfbrar un
orificio de 1/4N puede resultar en menor produccidn
de
hielo o cubos mils pequefios.
de que la mberia
Apriete
la merca
para
de la mberia
y
est_ complemente
insertada
de compresidn
firmemente.
en
Para mberia
de plfistico de un kit de mberia para
el refrigerador
SmartConnect
_" de GE, inserte el extremo
moldeado
de la mberia
en la vfilvula de cierre y apriete la
merca de compresidn
hasta que est_ firmemente
apretada
a
mano, luego apriete otto gjro con una llave. At)retar
demasiado
puede causar fugas.
Tuercade
compresi6n
Wlvula de "
ripe silla
Tuber[a
Tuerca de empaque
Wlvula de salida_
[] INSTALE
LA VALVULA
Una la v_lvula de cierre a la tuberfa
abrazadera
para el mbo.
DE CIERRE
No apriete
demasiado
la mberfa
Foi1]perse.
ya que podrfa
Arandela
[_ LAVE LA TUBERiA
Abrazadera
del tubo
_Extremo
entrada
de
Abra el suministro
principal
de agua en contra del sentido
de las agujas del reloj y lave la mberia hasta que el agua
est6 limpia.
Tornillo de la
abrazadera
V_lvula de
cierre tipo silla
(manga)
NOTA:
Se deberfin
seguir los Cddigos
248CMR
de Plomeria
para el Estado de Massachusetts.
Las vfilvulas tipo silla son ilegales y su uso no estfi
t)ermitido
en Massachusetts.
(]onsulte
con un t)lomero
licenciado.
de agua frfa con la
Apriete los tornillos de la abrazadera
hasta que la
arandela sellante empiece a hincharse.
NOTA:
--F6rula
Cierre el agua en la vfilvula despu_s
litro) de agua se haya eliminado
pot
Tuberia vertical
de agua fr[a
NOTA: Se debeffm seguir los Cddigos 248CMR
de Plomerfa para el Estado de Massachusetts. Las
vfdvulas tipo silla son ilegales y su uso no est_
permitido en Massachusetts. Consulte con un plolnero
licenciado.
9
de que un cuarto
la mberia.
(1
Instrucciones para la instalacion
COMO INSTALAR LA TUBERiA DEL AGUA
r-_ CONECTE LA TUBERIA AL
REFRIGERADOR
(CONT.)
Fffl ABRA LA LLAVE DEL AGUA
EN LA VALVULA DE CIERRE
Apriete cualquier conexidn que pueda presentar figas.
NOTAS:
• Antes de hacer la conexidn al rei)igerador, aseg_'tresede que
el cable de corriente del rei)igerador no estdconectado en el
tomacorriente de la pared.
" Recomendamos instalar un fihro de agua si su suministro de
agua tiene arena o partfculas que podrfan obstruir la malla
de la vitlvulade agua del refiqgeradon Insdtlelo en la tuberfa
del agua cerca
al ref)igerador. Si usa un ldt de tuber_a para el ref)igerador
SmartConnecP' de GE, necesitar(_un mbo adicional
IWX08X10002) para conectar el filtro. No corte la mberfa
plitstica para instalar el filtro.
,_-----__.
I
Retire la cubierta del acceso.
"
CONECTE
Organice el cable de la mberfa de manera que no vibre contra
la parte trasera del refrigerador o contra la pared. Empuje el
ret)igerador hacia la pared.
Retire la tapa flexiblede plitstico de _'
la v/tlvuladel agua (conexidn
del
ref)igerador).
Coloque
la merca de compresidn y la
t}rula (manga) en el extremo de la
tuberfa como se muestra. En el
[_ INICIE LA MAQUINA
O
DE HIELO
En los modelos de interruptor de energla, fije el interruptor de
la m&tuina de hielos en la posicidn de
J(encendido).
En losmodelosde brazo de llenadomueva
el brazo de llenado a la posicidn0N (haciaabajo).
La m&tuina de hielos no empezar(t a operar hasta que alcance
su temperamra de operacidn de 15°F@9°C)o menor. Luego,
empezar(t a operar autom/tticamente.
ldt de mberfa para el refrigerador
SmartConnec£_'de GE, las tuercas va
vienen armadas con la mberfa.
Inserte el extremo de la tuber_a en la
conexidn de la v/dvula del agua lo mits que se pueda. Mientras
sostiene
la mberfa, apriete el accesorio.
:u
Para tuber_a de pl/tsdco de un ldt de mberfa para el
refrigerador SmartConnecP' de GE, inserte el extremo
moldeado de la mberfa en la v/dvula de cierre y apriete
la merca de compresidn hasta que est(• firmemente apretada a
mano, luego apriete otra vueha con una llave. Apretar
demasiado puede causar thgas.
ModelodelInterruptor
deenerg[a
,,
Una la mberfa a la abrazadera provista para sostenerla
en una posicidn vertical. Quiz/ts necesite apalancar
la abrazadera.
Abrazadera
_%_.._,.
H_
_."d ! _
_ _-</"/
de la
Tuber[a de 1/4N
EL REFRIGERADOR
tuber[a
"_-_
_
/
........
......
_ Brazo
de
ilenad0haciala
/'
Ilenado hacia
posici6n
la
STOP(hacia
arriba)
p0sici6n ON
(hacia abajo)
Modelo del Brazode llenado
Tuercade
compresidn
NOTA: En condiciones de menor presidn del agua, la
v(tlvula de agua puede encenderse
hasta 3 veces para
suministrar
suficiente agua a la m(tquina de hielos.
F6rula
Tubode
SmartConnecU
Conexi6ndel
refrigerador
Reemplace la cubierta de acceso.
10
Instrucciones para la instalacion
COMO INVERTIR EL VAIVEN DE LA PUERTA
NOTAS
A] invertir
el vaiv_n de la puerta:
• Lea las instrucciones
• Maneje
pinmra.
[_ RETIRE LA PUERTA
DEL CONGELADOR
IMPORTANTES
completamente
las partes con cuidado
antes de empezar.
• Ponga los tornillos con su parte correspondiente
evitar usarlas en el lugar equivocado.
• Disponga de una superficie
raspe para las puertas.
2.1 Pegue la puerta
para evitar raspar la
de trabajo
cerrada con cinta de enmascarar.
2.2 Con un destornillador de casqttillo de cabeza hexagonal de
5/16,N retire los tornillos que sostienen la bisagra superior
del gabinete.
para
que no se
IMPORTANTE:
[na vez que empiece, no mueva el
gabinete hasta que haya completado
el proceso de invertir
el vaiv_n de la puerta.
Estas instrucciones
son para cambiar las bisagras del lado
derecho al izquierdo, si algmm vez desea cambiar las
bisagras al lado derecho nuevamente,
siga las mismas
instrucciones
e invierta toda las referencias hacia la
izquierda
y derecha.
2.3 Levante la bisagra direcmmente hacia arriba para liberar el
pasador de la bisagra del casquillo en la parte superior de la
puerto y coldquela a un lado, junto con los tornillos
correspondientes.
HERRAMIENTAS
REQUERIDAS
Bisagrasuperior_
Destornilladorde estrella
Cintade enmascarar
Destornilladorde casquillo
concabezade 5/16N
1.1 Desconecte
2.4 Retire la cinta y levante la puerta hacia filera del
gabinete. Levlmtela del pasador de la bisagra central.
DestornilladorTorx®
T20 6 T25,(necesitado
paraalgunosmodela)
Llaveabierta
de 5/16N
Cuchilloparamasilla
(esp_tula)o destornillador
delgado
[_ANTES
2.5 Coloque la puerto sobre una superficie que no raye con la
parte exterior hacia arriba.
2.6 Traslade los dos tornil]os del lado opuesto del gabinete
hacia los orificios de los tornillos desocupados al retirar la
bisagra supel_ior.
DE INiCIAR
el refrigerador
del tomacorriente
el6ctrico.
1.2 Desoct@e todos los esmntes de la puerto, induyendo
compartimiento
de llmteos.
PRECAUCION:
I
No permim
que ninguna
el
puerto se caiga
al piso, ya que esto podrla dafiar el frcno de la puerto.
11
Instrucciones para la instalacion
COMO INVERTIR EL VAIVEN DE LA PUERTA (CONT.I
[_] RETIRE LA PUERTA DE
ALIMENTOS FRESCOS
3. l Pegue la puerta
cerrada
I-If]RETIRE LA PUERTA DE
ALIMENTOS FRESCOS (CONT.)
con cinta de emnascarar.
3.7 Tome uno de los tornillos redrados en el paso 2 y coldquelo
en el orifido para tornillo rafts exterior
en el lado opuesto. No atornille por completo, deje
sufidente espacio bajo la cabeza del tornillo para el grosor
del soporte.
3,2 Usando un destornillador de casquillode cabeza hexagonal de
5/16N v una Uaveabierta de 5/16,N retire los dos mrnillosque
sosdenen la bisagra central al gabinete. Levante la bisagra central
para liberar el pasador del casquiUoen la parte superiorde la
puerta ,_coloque la bisagra ,_los tornillosa un lado. Tenga
cuidado de no perder d espaciadory la arandela de la bisagra
central
[4-1COMO INVERTIR LOS
ELEMENTOS DE SOPORTES
4.1 Mueva el soporte de la
bisagra
arandela inferior
pl{tsticay la
del lado
derecho al izquierdo.
--71
|1
-1tl
!
®-".@----'!!
I
"'--W_.-_.j-_
" -"""_
Soportede_
Cambieel pasadorde la bisagra labisagra-'/"
al lado opuestodel soporte.
3.3 Retire la dnta e incline la puerta hacia filera del gabinete.
Lewmte la puerta del pasador en el soporte de la bisagra
inferior. (Si la arandela pl(tstica se pega al tbndo de la
puerta, coldquela de nuevo en la bisagra.)
I
Arandela
Pl_stica
'"
....
"_
4.2 Intercambie la bisagra } los tornillos en la parte superior
derecha con los tori_os en la parte superior izquierda del
gabinete. No apriete los torniUos en d lado de la bisagra en
este momento.
Instalaci6nde la bisagra
a la izquierda,
3.4 Coloque la puerta con el extelqor hacia arriba en una
superficie que no raye.
Instalaci6nde la bisagra
a la derecha.
NOTAS:
• Alglmas bisagras tienen cuatro orificios. Los orifidos a
utilizar para la instaladdn de la bisagra dependen del
lado que instale la bisagra.
3.5 Traslade los (los tornillos del lado opuesto del gabinete a los
orificios de los tornillos desocupados al retirar la bisagra
central.
• E1 borde externo de la bisagra deber_ estar paralelo al
borde de la caja para una instalacidn correcta.
3.6 Traslade la arandela
(si su modelo la incluye)
hada el costado opuesto.
/
12
Instrucciones para la instalaci6n
[]
C0MO INVERTIR LAS MANIJAS
DE LAS PUERTAS
5.2 Traslade
5.2.1
el freno
Desplace la traba pkfstica de la puerta y los
tornillos del lado derecho al lado izquierdo.
5.1 Traslade la manija de la puerta
de alimentos frescos
_-.._
5.1.1 Retire el tap6n de la inanija por debajo dcl horde usmldo
un cudlillo de inasilla con la punta t})rrada coil dnta, y
retire el tornillo que est_i por debajo. Retire los dos
tornillos que sostienen la nmnija coil la parte superior de
la xierta.
de la puerta
Trabapl_sfica
de la puerta
_
Lado
5.2.2 Desplacc
la traba mct;Uica de la pucrta dcl
lado derccho al lado izquierdo y dcsplacc el
tornillo al lado opucsto de la puerta.
Parte superior
Tap6n,_
Lad0
izquierdo
5.1.3
Trabamet_lica
de la puerta
5.3 Como reinstalar
la manija de la
puerta de los alimentos
frescos
Retire los tornillos del horde derecho de la parte
superior de la puerta e insdrtelos en los orificios de los
tornillos de la manija en el lado opuesto.
5.3.1 Pegue la manija en el lado
derecho de la puerta coil
los tornillos que est_n en
la parte superior y debajo
del tapdn de la manija.
5.3.2 Vuelva a instalar
de la manija.
5.1.4
derecho
5.4 Traslade
Retire el botdn de la bisagra sut)erior del lado izqttierdo de
la puerta e ins@telo en el orificio en el lado opuesto que se
desocupd al refirar la bisagra superior.
_
el tapdn
la manija
de la puerta
del congelador
5.4.1 Retire el tornillo que sostiene la
manija coil la parte
superior de la puerta y
los dos tornillos que
sostienen la manija con
la parte inferior de
la puerta.
Partesuperior
5.4.2 Retire la manija.
5.1.5 Retire el tap6n del frente de la puerta y trasl_delo
aJ lado opuesto.
Tap6n
Para volver a
instalar la manija
en el lado opuesto.
Parteinferior
13
Instrucciones para la instalacion
C0MO INVERTIR EL VAIVEN DE LA PUERTA (CONT.I
_-lC0MO INVERTIR LAS MANIJAS
DE LA PUERTA (CONT.)
[] C0MO VOLVER A COLGAR
LAS PUERTAS (CONT.)
5.4.3
6.1.3
Rcdre el tornillo del horde
superior dered_o dc la puerta
e insdrtclo en el orificio del
tornillo de la manija en el
lado izquierdo.
Indine la puerta hada el gabine_c.A medkla que la
puerto xa_elvca su posicidn, drstice la bisagra drbajo dr la
cabeza clcl[ornillo que anteriornmnte se habfa insertacb
paaialmente en el orificio raftsextcrno. Inserte el [ornillo
restante, luego apriete ambos ronfillos firmemente.
I
5.4.4
la
seccidn el5.2
anterior.
Traslade
freno
de la puerta,
como se muestra
en
1
|
Vuelva a colgar la puerta
del congelador
5.4.5
[na la manija al horde
derecho de la puerta con
tornillos en la partc supel_ior
e inferior, usando los
olqficios que quedan =d
retirar los tornillos del freno
Baje la puerto del
congelador aJ
pasador de la
bisagra central.
Cercidrese de que
la arandela y el e
spaciador estfin en
_iasSaagdr_
rcdee
_
su lugar en el pasador.
de la puerta.
pl_stica y espaciador
[]C0MO
VOLVER
LAS PUERTAS
A COLGAR
6.1
Vueiva a colgar la puerta
alimentos
frescos
6.1.1
Baje la puerta de los aJimentos frescos al pasador de la
bisagra inferior. Aseg_rese de que la arandela estfi en su
lugar en el pasador.
6.2.2
Incline la puerto hacia el gabinete, levanmndo la bisagra
superior de manera que el pasador se ajuste en el
casquillo en la parte superior de la puerto.
6.2.3
Cercidrese de que la puerto estd ligerameme por encima
de la parte superior del gabinete y el espacio entre las
puertas estd tmif})rme por el freme. Apriete los tornillos
de la bisagra superior. No apriete demasiado estos
tornillos, apri&elos hasta que estdn ajusmdos, ]uegr) dd
otro medio giro.
de los
Arandela
I pl_sdca
Soportede
_*_'_
la bisagra_
6.1.2
Inserte el pasador en
la bisagra central en
el casqui_o de la
parte st@erior de
la puerta. Coloque
el espaciador,
luego la arandela
en el pasador de la bisagra. NOTA: La bisagra central
debe girarse como se muestra al insmlarse en el lado
izquierdo.
14
Sonidos normalesde operacion.
_w.Amo,oo.aApp,o.oos.oom
Los refrigeradores
m_s nuevos producen sonidos diferentes a los modelos m_s antiguos. Los refrigeradores
modernos tienen m_s funciones y usan tecnologia m_s reciente.
i,Usted escucha Io que yo escucho?Estossonidosson normales.
[] E_,_.e,,o
coi.presor
dea_.,
eflciencia puede fimcionar
m(ts r_q, ido y durar
m(ts
HMIVlMM...
WHIR!
[] Puede
-=
a gran
escuchar los ventiladores movi_ndose
velocidad. Esto pasa cuando el
--WHOOSH,,,
que el de su refrigerador
anterior y puede escuchar un zumbido
sonido pulsante mientras opera.
t_,
de tono alto o un
[] Puede escudmr un sonido de soplido cuando ]as
puertas se cierran. Esto se debe a que la presidn se
estlt estabilizando dentro del refrigerador.
CHASQUIDOS,
ESTALLIDOS,
CRUJID
refrigerador
se conecta
por primera
vez,
cuando ]as puertas
se abren
frecuentemente
o cuando se guarda
gran cantidad de alimentos en el refrigerador
o en los
compartimientos
del congelador. Los ventiladores est_n
ayudando a mantener
los temperaturas
correctas.
6
O,
GORJEOS
[] Puede escuchar sonidos como de crujido o estallidos cuando
el refrigerador se conecta por primera vez. Esto pasa a
medida que el refrigerador se enfrla hasta la telnperamra
correcta.
[] E1 compresor puedc cmlsar un dmsquido o un gorjeo cuando
intenta voh'er a arrancar (esto puede tomar hasta 5 nfinutos).
[] Expansidn y contraccidn de los bobinas durante o despu& del
ciclo de descongelacidn puede cmlsar sonidos como de
crujido o estzfllidos.
SONII}OS
I}EAGUA
[] E1 fluido del refrigerante a tray& de los bobinas puede
pro&mir un sonido de borbotco como de ag_m hirviendo.
[] E1 aglm que cae en el calentador de descongelacidn puede
causar un dflsporroteo, estallido o zmnbido &lrante el ciclo
de descongelacidn.
[] In rttido de agua cayendo se puede escudmr &lrante el ciclo
de descongelacidn a medida que el hieb se derrite del
evaporador y fluye hacia la bandeja de drenaje.
[] E1 cierre de los puertas puede producir un sonido de goNoteo
debido a la estabilizacidn de la presidn.
[] En modems con m&tuina de hielos, despu& de completar un
ciclo de hacer hielo, se pueden escudmr los cubos de hielo
cuando caen a la bandeja de hielos.
Antesde Ilamar a solicitorservicio...
Consejos para la soluci6n de problemas
iAhorre tiempo y dinero! Revise las tablas en las siguientes p_ginas
primero y quiz_s no necesite Ilamar a solicitar el servicio.
iili:
El refrigeradorno opera
Vibracion
o traqueteo{una
vibra_era
es normal)
Nieloo cristales
dehieIoen
10salimentoscongelados
{El
hielodentrode unpaquete
es normal)
Loscubosson
muy pequedos
Posibles causas
flue hacer
E1 refrigerador est5 en
el ciclo de descongelado.
E1 dial de control de la tempemtura
est_ en posiddn 0 (apagado}.
E1 refrigerador est5 desconectado.
E1 fusible est_i quemado / el
interruptor
autom_tico
se salt6.
Los rodillos o paras
niveladoras necesitan ajuste.
La puerto se d_a abierta.
Abrir la puerta con mucha
frecuencia o por mucho tiempo.
* Espere tmos 30 minutos hasta que el ciclo
dc descongelado tcrmine.
* Mueva el (ti_ de control de ]a telnperatura
atm nivel de temperamra.
® Emptl]e el enctmt'e completamente
en el tomacorrientc.
* Rcemplace el fusible o flje el interruptor.
La vfilxmla de cierre del agua que
coneda el refrigerador a la linea
del agua puede estar obstruida.
* Llame al plomero para que limpie la vltlvttla.
* Consuhe la secci6n Rodillos Y patas niveladoras.
• Revise si un paquete
est_ reteniendo
la puerto abierta.
15
Antesde llamara solicitarservicio...
Posibles causas
Que hacer
EImotor operacon
frecuencia potlargos
periodoso cicIosde
forrna interrnitente{Los
refrigeradoresrnodernos
con mas espaciode
aJmacenarniento
y un
congeladorrn_sgrande
requierende rnastiernpo
deoperaci6n.Arrancany
paranconfrecuencia para
rnantenerternperaturas
uniforrnes.)
Normal cuando el refrigerador
se conecta inicialmente.
• Espere 24 horas hasta que el refrigerador
por completo.
• Esto es normal.
Eicornpartirniento
de
a[irnentosfrescoso eJ
conge|adornoentanrnuy
frios
Con frecuencia ocurre cuando
grandes cantidades de alimentos
se almacenan en el refrigerador.
La puerta se deja abierta.
E1 clima caliente o abrir
la puerta frecuentemente.
• Revise si tm paquete
• Esto es normal.
E1dial de control de la tempemmra
estSn en en el nivel mils fifo.
• Consultc la seccidn Sobre el dial de control de la temperatura.
Ia rejilla y el condensador
necesitan limpieza.
• Consu]te ]a seccidn Cuidado y limpieza.
E1control de la temperatura no es_
en un nivd suficientemente fifo.
• Consultc ]a seccidn Sobre el dial de control de la temperatura.
El clima caliente o abrir
la puerta frecuentemente.
• Fije el control de ]a tcmperamra a un nivel ross frlo.
Consult_ ]a secddn Sobre el dial de control de latemperatura.
La puerta se deja abierta.
• Revise si un paquete
Un paquete est5 obstmyendo
el conducto del aim en el
compart;,miento del congelador.
• Revise si hay un paquete bloqueando el conducto
del aire en el compartimiento
del congelador.
La maquina de hieios
autornatica no funciona
La m_quina de hielos no
est5 encendido.
• Mueva el brazo de llenado a la posicidn ON (hacia abzg3o).
{en alganosrnodelos)
El suministro del agua est_
apagado o no est_ conectado.
• Consulte la seccidn C6rn0 insta[ar [a tuberia de[ agua.
El compar6aniento del
congelador no es muv frio.
• Espere 24 horas para que el refrigerador
completamente.
• Nivele los cubos con la mano.
Hay cubos amontonados en
el recipiente de almacenamiento
que causan que la mfiquina de
hielos se apague.
est_ retcniendo
se enfrle
est_ reteniendo
la puerta abierta.
la puerta abierta.
se enfrle
Zumbido
frecuente
Ia n_quina de hielos est_ en
la posid6n de encendido, peru
el suministm de agua hac:ua el
refrigerador no esfft conectado.
• Mueva el brazo de llenado a la posicidn STOP (hacia
arriba). Mantener el brazo en la posicidn ON (hacia
abajo) dafiar(t la v(dxafla del agua.
CongeJarniento
Jentode
loscubosde hieJo
l_a puerta se deja abierta.
* Revise si un paquete est_ reteniendo la puerta abierta.
* Constfltc la seccidn Sobreei dial de control de ia temperatura.
Loscubosdehielo fienen
oJor/ sabot
E1 recipiente de almacenamiento
de hidos necesita limpieza.
• Desocupe el recipiente y 15velo.Deseche los cubos viejos.
Hay alimentos clue trasmiten
olor / sabor a los cubos de hielo.
• Enx_lelva bien losalimentos.
E1 interior del refrigerador
necesita limpieza.
No es taro durante
periodos de alta humedad.
• Consulte la seccidn de Cuidado y limpieza.
E1dial de control de la temperamra no
esel en un hive! suficientemente frio.
Se forrna hurnedaden
Jasupefficie deI gabinete
entre las puertas
Humeflad se fonna aI
interior (en clirna hurnedo,
el aire Reva la humedad
a] refrigerador cuando
las puertas se abren}
Abrir la puerta con mucha
frecuencia o por mucho tiempo.
E! refrigerador tiene oior
Hay alimentos clue trasmiten
• Los alimentoscon oloresfilertcsdeben envolvcrsefirmenlentc.
olor / sabor al refrigerador.
• Mantenga una caja abierta de bicarbonato
en el refrigerador, reempl&:ela cada tres meses.
• Consuhe ]a seccidn de Cuidadoy limpieza.
El interior necesita limpieza.
16
• Seque ]a superficie, ]uego fije el control de ]a
temperatura a un nivel ross frlo.
No_8.
wvvvv.AmericanaAppliances.com
17
Notes.
18
Garantiadel reffigerador.
Grape aqui su recibo.
Se requiere facilitar prueba de
la fecha de compra original para
obtener un servicio bajo
la garanda.
Todos los servicios de la garantia para Americana _M
son
proporcionados per GE centros de f_brica o nuestros
prestadores Customer Care® autorizados. Para concertar
una cita de servicio, Ilame a! 1.800.432.2737. Cuando Ilame
para solicitar servicio, per favor tenga a mane el n_mero
de serie y el nt_mero de modelo.
GE reemplazara:
Una_o
partir de la feCha
de compra original
Cualquier parte dcl refrigerador que falle debido a un defccto en matefiaJes o en la fabricaddn.
Durante esta garantia limitada de un a_o, (;E tambidn proporcionafft, sin c0sto, mane de obra y
servicio relacionado
para reelnplazar las partes defcculosas.
Viajes de servicio a su hogar para ensefiarle c6mo usar
el producto.
Instalacidn
o entrega inapropiada,
o mantenimiento
impropio.
Fallas del producto si hay abuse, mal use, o use para
otros propdsitos que los propuestos, o use para fines
comerc:mles.
Reemplazo
de las bombillas.
Dafio al producto
o actos de Dies.
causado per accidente, fuego, inundaciones,
Dafio incidental o consecuenc:ml causado per posibles defectos
con el aparato.
Producto
no accesible para fadlitar el servicio requerido.
P_rdida de alimentos per avefias.
Causar dafios despufis de la entrega.
Productos que no estfin defectuosos, rotes, o que
no fimcionen segfin lo prescrito en el Manual del Propietario.
Reemplazo
de ciroaito.
de fusibles de su hogar o reajuste de interruptores
EXCLUSION DE GARANTiAS IIVIPLiCITAS--Su unico y exclusive derecbo es la reparaci6n del producto, tal y
come se indica en esta Garantia limitada. Cualquier garantia implicita, incluyendo las garantias implicitas de
comerciabilidad o adecuacion para un fin determinado, estan limitadas a un a_o o el periodo de tiempo mas
breve permitido per la icy.
Esta garantia se extiende al comprador original y cualquier comprador posterior de productos comprados para use
residencia! dentro de Estados Unidos. Si el producto est_ situado en un _rea que no dispone de servicio per parte
de un proveedor de servicio autorizado de GE, podria tener que hacerse cargo de los costes de envio o bien podfia
solicit_rsele que Ileve el producto a una centre de servicio de GE autorizado para realizar la reparaci6n. En Alaska,
la garantia excluye el costo de envio o las visitas de servicio a su casa.
Algunos estados no permiten la exclusi6n o las limitaciones de da_os incidentales o consecuenciales. Esta garantia
da derechos legales especificos, y usted podria tenet otros derechos que variar_n de estado a estado. Para saber curies
son sus derechos legales, consulte a la oficina de asuntos del consumidor local o la oficina del Attorney General en
su Iocalidad.
Garante: General Electric Company. Louisville, KY 40225
19
Soporte al consumidor.
Soliciteuna reparaciOn
E1 servicio de expertos (-}E est_ a tm_ sdlo un paso de su puerta. Programe
800.432.2737 durante horas normales de oficina.
el sel_'icio a su conveniencia
llamando
al
Garantiasampliadas
Compre una garanda ampliada y obtenga detalles sobre descuentos especiNes disponibles mientras su garanda
afro acdva. Puede comprarla llamando N 800.626.2224 durante horas normales de oficina.
(-}E Consumer Home Sela_ices esmff_ afro ahf cuando su garanda termine.
esdt
Piezasy accesorios
Aquellos individuos con la calificacidn necesaria para reparar sus propios electrodomdsdcos pueden
pedir que se les manden las piezas o accesorios direcmmente a sus hogares (acepmmos las mrjems
VISA, MasterCard y Discover,. Haga su pedido llamando al 800.626.2002 durante horas normales
de oficina.
Lasinstrucciones
descritasen este manualcubrenlosprocedimientosa seguirporcualquierusuario.Cualquier
otra reparaci6n deberia,potregla general,referirse a personalcalificadoautorizado.Debeejercerse precauci6n
ya que las reparacionesincorrectaspuedencausarcondicionesdefuncionamiento inseguras.
POngaseen contactoconnosotros
www.AmericanaAppliances.com
Si no estit sadsfccho con el servicio que redbe de GE, envle una carta a GE. Por t_avor,incluya su nfnnero de teldfimo.
Escrlbanos a:
GenerN Managel; Customer Relations
GE Appliances, Appliance Park
Louisville, KY 40225
_
_
Impresoen los EstadosUnidos
Impresoen papelreciclado