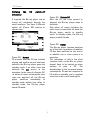
1
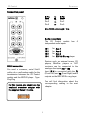
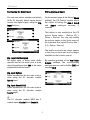
as82 of CD Control Module E 2.02 1 Contents CD Control Module Installation Connection panel 2 3 4 Cabling & Setup Blu-ray Player Cabling Volume control Setup 5 5 5 6 7-9 Analogue inputs IN1 – IN3 Cabling Setup: Edit Name 10 10 11 General operation 12-13 Multiroom operation 14 Technical data Warranty 15 15 1 CD Control Re:source CD Control Module The CD Control module is a universal audio interface with a serial communication port. Blu-ray player specifications Company: Oppo / USA Model: BDP-93xx xx = Country code; e.g. EU, CH ... http://www.oppodigital.com/ Unlike the Re:system M51 and M100, the Re:system M10 device does not have an internal CD player. Working together with the BDP-93 Blu-ray player from the Oppo Company, it is now possible to integrate a CD player into a Multiroom system, which can be controlled from all side rooms. Of course, the BDP-93 can also be deployed as an excellent Blu-ray player in a Home Cinema setup. The Multiroom control using the CD Control module is however, principally designed for playing audio CDs. Control through the CD Control module is limited while video content is being played, e.g. Bluray, video, etc. A further feature of the CD Control module is that it has 3 additional analogue inputs that can be renamed or if they are not required, they can be hidden. 2 CD Control Re:source INSTALLATION The CD-Control Module is equipped with the latest electronics and should be handled with care. Loosen the two screws with the TORX screwdriver supplied and remove the blanking plate. Before you install the card, the M51/M10 must be switched off and separated from the power supply, by plugging the unit out. Before removing the module from its packaging, you should make sure that you do not have any static electricity. This could cause a damaging discharge of voltage when you touch the module. You should get rid of any static charge by touching an earthed metal object like a radiator, for example. M51 Installation,,,,,,,,,,,,, The CD-Control module can be operated in slots 1 – 6. The only exception is Slot 7, next to the speaker connections, as this is reserved for the 5.1 Decoder module. Remove the module from its packaging and feed it into its plug-in position. The two bars inside the M51/M10 are the mechanical guides for you to use. M10 Installation,,,,,,,,,,,,, The lettering on the plug-in card must be on top. Shortly before the plug-in card is fully locked into position in its slot, you will feel a mechanical resistance, caused by the bus board contact strip. Push the module fully in by applying pressure in the area of the two screw holes and fix the card in place with both screws. The CD-Control module can be operated in slots 1 – 6. Slots A1 and A2 should only be fitted with second generation modules, like the MMM, that have the following symbol on them: G² All further steps for registering the new module are carried out automatically the next time you switch on. 3 CD Control Re:source Connection panel 9-Pin Pin 2 Pin 3 Pin 5 ⇒ ⇒ ⇒ ⇒ 9-Pin Pin 3 Pin 2 Pin 5 Max. RS232 cable length: 10 m Audio connections The CD Control module independent audio inputs: IN 1 IN 2 IN 3 IN 4 for for for for has 4 Aux-1 Aux-2 Aux-3 BDP-93 Blu-ray player Devices such as external tuners, CD players, MiniDisc players or SAT receivers can be connected to the analogue line inputs IN1 to IN3. Input IN 4 is connected with the FL (Front Left) and FR (Front Right) audio outputs on the BDP-93 Blu-ray player. RS232 connection You need a crossover, serial Sub-D cable, a.k.a. a null modem cable, for the transmission between the CD Control module and the BDP-93 player. Type: Plug-Plug You will find information about the corresponding cabling in the next chapter. For this reason, you should use the enclosed crossover adapter with the supplied Revox 1:1 cable. 4 CD Control Re:source Cabling & Setup Blu-ray Player: Input IN 4 + RS232 Two connections have to be made between the BDP-93 Blu-ray player and the CD Control module. 1.) Audio connection input IN 4 (CD Control module) with the audio output FLFR (BDP-93) using a stereo cinch cable. If a 5.1 Decoder module is available in the Re:system M51/M10, a digital audio connection can be established in addition - see "Configuring the digital input". 2.) RS232 control connection with a serial null modem cable. The supplied crossover adapter must be used with the 1:1 cable from Revox. The cable length between the CD Control module and the receiver should not be more than 10 metres as otherwise you can expect to experience disturbances and reduced audio quality. All further connections between the Blu-ray player and other external devices, e.g. TV are made in line with your own needs and the system requirements. You will find the relevant documentation in the Blu-ray player Operating manual. 5 CD Control Re:source Volume control Compared with the internal Multiroom sources from the M series, the signal level on the audio output (cinch socket FL/FR) on the BDP-93 Blu-ray player, is too high. The output level of the Blu-ray player has to be reduced, in order to achieve a uniform volume for all sources. The level adjustment is done through the Vol +/- buttons on the remote control and the correct output level setting is 85 (from 100). The setting of 85 is however only correct if the following conditions apply, which can be set on the Oppo player Setup: Setup: (through Oppo remote control) Audio processing: Output volume: Separation frequency: Matching: Downmix: Variable 40 Hz 0.0 dB (for FL/FR) Stereo (if possible) Volume setting: 85 of 100, using the Vol +/- buttons on the remote control 6 CD Control Re:source Setup CD Control Configuring the digital input The basic settings for the CD Control module are made in Setup. When installing the CD Control module in a Re:system M51 or M10 with an installed 5.1 Decoder module, you have the option to use the digital audio signal from the Blu-ray player in the main room. In this case, the digital output (Coaxial/Optical) is connected to the digital input on the 5.1 decoder module at the M51. Select the source CD from the Source menu and press and hold the Setup key for approx. 2 seconds. Then select the Source softkey. The following display appears: This has the advantage that digital multi-channel formats such as Dolby Digital or DTS can significantly improve the reproduction quality with the Home cinema. The side rooms continue to be supplied with the analogue audio signal through the IN4 input. Main room cabling: 5.1 Decoder module with Blu-ray player 7 CD Control Re:source Configuring the digital input Hiding analogue inputs You can now select whether and which of the 5.1 decoder digital inputs should receive the digital signal, using the Dig. Input function. On the second page of the Setup (Menu softkey), the CD Control module offers the option of hiding the Aux-1, Aux-2 and Aux-3 analogue sources, if required. This option is only available in the CD source Setup menu - [Source CD > Setup > Source]. You can only modify the source names in the Setup menu of the individual Aux inputs [Source Aux 1, 2, 3 > Setup > Source]. The hidden source(s) no longer appear in the Source menu and are no longer available on the remote control. Dig. Input: Not Assigned No digital input is being used. Audio reproduction for the main room is done using the analogue input IN4, in the same way as with the side rooms. By repeated pressing of the Aux-1/Aux2/Aux-3 softkeys, the corresponding analogue sources can be hidden [Off] and revealed [On]. Dig. Input: Optical Audio reproduction for the main room is done using the 5.1 decoder module Optical input. Dig. Input: Coaxial (1/2) Audio reproduction for the main room is done using the 5.1 decoder module Coaxial input. The 5.1 decoder module MK3 has 2 coaxial inputs, Coaxial 1 and Coaxial 2. 8 CD Control Defining the behaviour Re:source CD switch-off Power Off: System Off After the CD has been paused or stopped, the Blu-ray player stays in this state. Only when all rooms including the main room are switched off, does the Blu-ray player switch to standby mode. In standby mode, the Blu-ray player needs 0.5 watts. If required, the Blu-ray player can be turned off completely through the serial interface. You have 3 different switch off [Power Off] options to choose from. Power Off: Never The Blu-ray player remains switched on all the time, regardless of whether CD has been selected as the source or whether one or more rooms is in operation. The advantage of this is the short response time, as the Blu-ray player doesn't have to be booted up when starting to play a CD. The disadvantage is the increased power consumption, 35 watt as compared to 0.5 watts on standby, and a resultant reduction in the overall working life. Power Off: Normal 25 seconds after the CD has finished playing and another source has been selected, the Blu-ray player goes into standby mode, if no other room has selected the CD source in the meantime. In the case of a System Off, i.e. when all rooms including the main room are switched off, the Blu-ray player switches immediately to standby mode, without any delay. In standby mode, the Blu-ray player needs 0.5 watts. 9 CD Control Re:source Analogue input IN1 IN2 IN3 Connect the three analogue inputs IN1 – IN3 using a cinch stereo cable with your external device. The inputs are shown in the source menu as Aux-1 – Aux-3. The analogue inputs IN1 – IN3 are not suitable for connecting a record deck. In this case, you should use the I/O module, which supports both MM and MC sound systems. Both modules, the CD Control module and the I/O module, can be used together in the M51/ M10. Alternatively, an external Phono pre-amp can be used that transmits its Line signal to one of the three auxiliary inputs on the CD Control module. 10 CD Control Re:source Setup Aux-1 / 2 / 3 Edit source name The display names of the three inputs and the CD source can be freely defined. Simply give a name that you can assign clearly. The Cursor softkeys move the [ ] cursor left and right respectively. The Delete softkey deletes a character where the [ ] cursor is positioned. Select the input from the SOURCE menu whose name you want to edit. CD, Aux-1, Aux-2, Aux-3 The Insert softkey inserts a character to the left of the [ ] cursor. The edit function is called by pressing the Setup key for about 2 seconds and then selecting the softkey Source. The Store softkey saves the currently displayed name and returns you to the Main menu. The following display appears in the case of the analogue inputs: The Cancel softkey returns you to the Main menu without saving the changes you have made. Restore standard names The standard name can be restored by deleting the self-defined name with Delete and then the standard name is saved again with Store. The factoryset name is now restored. Character sequence The source CD also offers the option of editing the name on the fist page of its setup. 11 CD Control Re:source General operation CD Menu If a CD Control module is installed, the sources Aux-1, Aux-2, Aux-3 and CD appear in the Source menu of the Re:system M51 and M10 devices. In a Multiroom system, the new sources have to be assigned to the corresponding remote buttons in the Remote menu, so that they can be called up in the side room. You will find a description of the Remote menu in the Re:system Device Startup Guide. After the CD source has been selected, Loading appears in the display, assuming that the Blu-ray player was not already switched on. The Blu-ray player reads the CD in during this phase. Play starts after this. With a newly inserted CD, play starts from Track 01. If the CD had already been played, play restarts from the position where it was last stopped - Resume function. If you want play to start from Track 1 and not use the Resume function, call the Stop function twice. The picture below shows the M51 Source menu. The display is designed in a similar way for the various Revox Apps. The display and control options in the side room through the M217/M218 display/keypad combination are described in a later chapter on Page 14. The display headline shows whether it is an audio CD [CD] or a video disc [Video]. The corresponding source is called up by pressing the Aux-1, Aux-2 Aux-3 or CD softkeys. 12 CD Control Re:source CD Control A) Display operation The following control functions are available at the device or through the Revox App through the display operation: • Play • Pause • Stop • Track (forwards/back) • Search 1-5 (fast search with 5 speeds) • Shuffle • Repeat: Repeat Track/ Disc • Open/close CD drawer C) M208 Remote control IR control through the CD Control module The M208 Project Manager offers the device control "Revox CD Oppo" in the [Revox] database, which makes the following CD play control commands available via infrared: • Play • Pause • Stop • Track (forwards/back) All Revox system IR receivers transfer these commands to the CD Control module. There, they are converted to RS232 commands. They cannot be used for the direct control of the BDP-93 Bluray player. B) Wall operating panel with M217/ M218 The following control functions can be carried out through the wall operating panel, consisting of a combination of the M217 Display and the M218 Keypad. • Play (start playing if CD is selected as source) • Track (forwards/back) IR control of Blu-ray players The M208 Project Manager database offers the device control "Oppo Blu-ray Player" in the [OPPO] section, for the direct control of the BDP-93 Blu-ray player though its IR receiver. This command set contains all the IR commands of the original Oppo remote control. With an activated IR receiver in the wall operating panel, all control commands that the M208 Remote control makes available with the "Revox CD Oppo" configuration can be used - see M208 Remote control in the next column. These IR commands cannot be used for the control of the CD Control module. 13 CD Control Re:source Multiroom operation Change/display track You can operate the CD function of the Blu-ray player from each side room, with the Revox Multiroom System. If the M217 wall-mounted display is installed, the track number and the status are displayed. Using the two buttons (shown with black/white squares) on the wallmounted operating panel, you can switch within the CD to the previous or the next track. Multiroom configuration The wall-mounted display shown below is showing the CD menu. The user can chose which button is used to call the CD menu. The choice is made between the wall-mounted display source buttons: TUNER, CD, SERVER, AUX2. The Local button can also call Multiroom sources directly, from software version 2.02 of the M218 wall-mounted keypad. With an activated IR receiver (shown as dark) in the wall operating panel, all control commands that the M208 Remote control makes available with the "Revox CD Oppo" configuration can be used - see CD Control/M208 Remote control. The button assignment is made through the Remote menu. See Chapter: M51/M10 Introduction 14 CD Control Re:source Technical data Audio connections: IN1 Cinch stereo input Cinch stereo input IN2 Cinch stereo input IN3 IN4 Cinch stereo input Max. cable length 10 m * Digital data connections: RS 232 Sub-D 9-pin - crossover cabling Plug-Plug * Dependent on cable environment and quality E&OE Warranty Scope of delivery Warranty covers a period of 24 months from the purchasing date. Your specialist dealer is your first contact if you need service help. CD Control module Serial Sub-D 9cable (1:1 – Plug/Plug) If he can't give you the help you need, send the CD Control module carriage free and without any accessories to your national Sales Office. Crossover adapter Operating manual Please supply a complete description of the fault together with your address. 15 CD Control Re:source CD-Control module Operating manual / Part no.: 10.30.3126 16