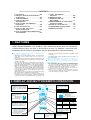
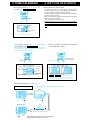
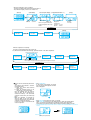
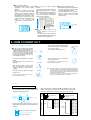
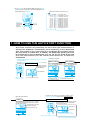
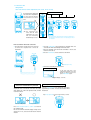
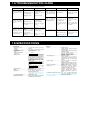
1
セイコーシステム
ストップウオッチ
S149
取扱説明書
INSTRUCTION
−−−−−−−−−−−−−−−−−−−− CONTENTS −−−−−−−−−−−−−−−−−−−−−−−
1.FEATURES ……………………………38
2.DISPLAY AND BUTTON/SWITCH
OPERATION ……………………………39
3.TIME/CALENDAR ……………………40
4.HOW TO USE THE
STOPWATCH …………………………40
5.HOW TO USE THE MEMORY
FUNCTION………………………………48
6.HOW TO PRINT OUT ………………53
7.HOW TO USE THE AUTO
START FUNCTION …………………59
8.HOW TO INSERT BATTERIES INTO
THE PRINTER …………………………64
9.TIME・CALENDAR
SETTING ………………………………65
10.PRECAUTIONS ………………………68
11.REMARKS ON THE
BATTERIES……………………………71
12.REPLACEMENT OF THE LIQUID
CRYSTAL PANEL …………………72
13.CARE OF YOUR WATCH …………72
14.TROUBLESHOOTING GUIDE ……73
15.SPECIFICATIONS …………………74
1.FEATURES
SEIKO Digital Stopwatch Cal. S149 is a time measuring device that can record the
measurements with the use of the built-in printer. In addition, used with the
stopwatch Cal. S143 or a grip switch, Cal. S149 can perform various functions.
memory capacity indicator and fastest lap time recall
functions.
⑥An antibacterial agent is applied to the case surface of
the stopwatches.
● Cal. S149 is suitable for measuring massive time date
in a road race, marathon race, etc.
① With the use of the built-in printer, the measured
time data can be printed out as soon as they are
obtained.
② Year, month, date and time when the measurement is
started can be printed out, and therefore, it is easy to file
and keep the data.
③ An auto start function is provided. By presetting the
time when the measurement is started, the stopwatch
starts measuring automatically at the designated time.
④ Memory recall function……Up to 300 measurement
data can be stored in memory. Measurement data
obtained from the start to finish of the measurement
is recorded as a block without erasing the data in the
previous block, and up to 100 blocks of data can be
stored in memory.
This function is very useful for separately keeping
the data measured at different time and date.
⑤ Besides, the stopwatch is equipped with such
convenient functions as ID No. function useful for
keeping the data of individual users separately, and
*It loses its antibacterial effect gradually over time and the
effective period differs depending on the conditions of
use.
● Used with optional devices, the stopwatch can perform
various functions.
① By connecting the stopwatch to SEIKO Digital
Stopwatch Cal. S143, etc., more than two stopwatches
can start measuring simultaneously at a fixed time.
Therefore, it is possible to measure the time in a road race
or marathon at different checkpoints more accurately.
② Connected with a grip switch (optional accessory), the
stopwatch can be operated more easily.
③ With the use of a paper extension holder (optional
accessory), massive time data (approximately 2,500 data)
can be measured successively at a time.
2.DISPLAY AND BUTTON/SWITCH OPERATION
Roll paper cover:
Paper advancing switch:
With each press of the switch, one line
is advanced. The paper is advanced
continuously by keeping the switch
pressed.
POWER
ON
Set the roll paper inside the
cover.
Power switch for printer
SYSTEM STOPWATCH
300LAP/SPLIT MEMORY
Grip switch selector
F
Print mode selection switch:
Split time and lap time are
printed out.
cUpper position
dLower position
Split time is printed out.
BLOCK
LAP
SPLIT
E
STOP-W. A/S SET TIME
LOCK
CLEAR
LAP/SPLIT
RESET
1/100
STOP.W A/S SET
SPLIT
START
STOP
EXT
When the grip switch is used.
▲
cUpper position
dLower position
When the grip switch is not used.
TIME
RECALL
Lock lever: The lever locks button A
○
Readout selection button:
Button ○
A
With each press of the button, the
measurement is displayed in 1/100
seconds and one second alternately.
B
Button ○
Split/lap reset
Memory recall button:
Mode selection button:
① Stopwatch mode (accumulated
elapsed time or lap time measurement in progress display)
② Auto start setting mode
③ Time/calendar mode
Auto start setting
Stopwatch mode and Time/Calendar
mode
Start/stop
Setting the digits
With each press of the button,
the times stored in the memory
can be recalled.
The device for data
transfer is not available now
Jack for grip switch:
The jack connects the
grip switch with the
stopwatch.
Jack for auto start
The jack is used for transferring
the auto start time.
Selection of the digits
to be adjusted
3.TIME/CALENDAR
4.HOW TO USE THE STOPWATCH
1 Press mode selection button ③ (TIME) to set
□
Notes on the block of data in memory
・The SEIKO Stopwatch Cal. S149 features a "Block Memory"
stopwatch operation system. The data obtained from start till finish
of a race is recorded as a block and stored in memory.
・The time and date of starting the measurement of a block of data are
automatically stored in memory.
・Before the measurement is started, the block number is assigned to
the time to the Time/calendar mode .
300LAP/SPLIT MEMORY
F
BLOCK
STOP
BATT.
LAP
E
RECALL
STOP-W. A/S SET TIME
LOCK
CLEAR
LAP/SPLIT
RESET
1/100
START
STOP
STOP.W A/S SET
TIME
the block of data to be measured.
・Up to 300 data can be stored in memory.
・A block of data includes at least three data. If more than one block is
used to store the data, the memory become full even before the
number of lap time/split time measurements in memory amounts to
300.
Button ③
(TIME)
RECALL
Display in the time/calendar mode
Year
Month
ID
BLPOK
Date
STOP
BATT.
LAP
Time (10'8''56)
RECALL
Time/calendar mode mark
*Time displayed in the 24-hour indication
1 Press mode selection button ① (STOP. W) to set
□
the stopwatch to the Stopwatch mode .
*With each press of button① the third line display changes
over between accumlated elapsed time and lap time
measurement in progress alternately.
2 Select the readout of the measurement between
□
1/100 seconds and 1 second.
300LAP/SPLIT MEMORY
300LAP/SPLIT MEMORY
F
F
BLOCK
BLOCK
STOP
BATT.
LAP
STOP
BATT.
LAP
E
E
RECALL
RECALL
STOP-W. A/S SET TIME
STOP-W. A/S SET TIME
LOCK
LOCK
CLEAR
CLEAR
LAP/SPLIT
RESET
1/100
STOP.W A/S SET
LAP/SPLIT
RESET
START
STOP
1/100
TIME
TIME
Press the readout selection
button to select the display.
Readout selection button
1 second
display
Display in the stopwatch mode
(The third line display is accumlated elapsed time, for example)
SPLIT
No. of split
time/lap
START
STOP
RECALL
RECALL
Button ①
(STOP. W)
STOP.W A/S SET
1/100 seconds
display
SPLIT
SPLIT
Split time
BLOCK
LAP
BLOCK
LAP
STOP
BATT.
LAP
Lap time
STOP
BATT.
LAP
RECALL
BLOCK
LAP
STOP
BATT.
LAP
RECALL
RECALL
Accumulated
elapsed time
Stopwatch mode mark
(The mark indicated the stopwatch function is activated.)
With each press of the button, the display changes over between
1 second and 1/100 second alternately.
*Before selecting the readout of the measurement, be sure to reset
the digits to "00".
*If the digits are reset to "00" after the measurement is made in one
second readout the display automatically returns to 1/100 seconds.
3 Now measurement starts.(Use the buttons ○
A,○
B)
□
Standard measurement
A→○
A→○
B
Press the buttons in the following order: ○
(Start)
(Stop)
SPLIT
SPLIT
F
F
BLOCK
LAP
BLOCK
LAP
STOP
BATT.
LAP
E
STOP
BATT.
LAP
RECALL
E
RECALL
LAP/SPLIT
RESET
START
STOP
\
START
STOP
\
LAP/SPLIT
RESET
A
○
A
○
(Reset to "00")
SPLIT
F
Start
Finish
BLOCK
LAP
STOP
BATT.
LAP
E
RECALL
\
LAP/SPLIT
RESET
B
○
START
STOP
The new block number for the next measurement
is displayed with the digits reset to "00".
Accumulated elapsed time measurement
(Start)
A→○
A→○
A…→○
A→○
B
Press the buttons in the following order: ○
(Restart)
(Stop)
SPLIT
SPLIT
SPLIT
F
F
BLOCK
LAP
F
BLOCK
LAP
STOP
BATT.
LAP
BLOCK
LAP
STOP
BATT.
LAP
E
STOP
BATT.
LAP
E
RECALL
LAP/SPLIT
RESET
START
STOP
\
START
STOP
\
LAP/SPLIT
RESET
E
RECALL
A
○
A
○
LAP/SPLIT
RESET
START
STOP
\
RECALL
A
○
(Stop)
(Reset to "00")
Restart and stop of the stopwatch
A.
can be repeated by pressing ○
SPLIT
SPLIT
F
F
BLOCK
LAP
BLOCK
LAP
STOP
BATT.
LAP
STOP
BATT.
LAP
E
LAP/SPLIT
RESET
START
STOP
START
STOP
\
\
LAP/SPLIT
RESET
E
RECALL
RECALL
A
○
B
○
The new block number for the next measurement
is displayed with the digits reset to "00".
Press the buttons in the following
A→○
B→○
B …○
B→○
A→○
B
order: ○
How to measure lap time/split time (When the accumlated elapsed time
display of the stopwatch mode is used, for example, in a marathon race)
(Start)
(5km point)
(10 km point)
No. of split / lap time
SPLIT
Split time
SPLIT
F
Lap time
F
BLOCK
LAP
SPLIT
F
BLOCK
LAP
STOP
BATT.
LAP
BLOCK
LAP
STOP
BATT.
LAP
E
RECALL
E
RECALL
START
STOP
\
LAP/SPLIT
RESET
STOP
BATT.
LAP
Accumulated
elapsed time
E
RECALL
B\
○
A
○
LAP/SPLIT
RESET
B\
○
START
STOP
Section 1: Split time 14'56''08
Lap time 14'56''08
(Reset)
LAP/SPLIT
RESET
START
STOP
Section 2: Split time 29'57"21
Lap time 15'01"13
(Stop)
(40 km point)
SPLIT
SPLIT
F
F
F
BLOCK
LAP
BATT.
LAP
STOP
BATT.
LAP
E
RECALL
B\
○
LAP
STOP
BATT.
LAP
E
RECALL
LAP/SPLIT
RESET
START
STOP
LAP/SPLIT
RESET
The new block number for the next measurement
is displayed with the digits reset to "00".
E
RECALL
START
STOP
A
\○
B\
○
How to measure lap time/split time
LAP/SPLIT
RESET
START
STOP
Section 8: Split time 2:01'14''12
Lap time 16'42''33
Finish time 2:11'17"99
(When the lap time measurement in progress mode is used)
The lap time can be measurB.
ed repeatedly by pressing ○
Press the bottons in the following order:
A→○
B→○
B…→○
B→○
A→○
B
○
Lap time measurement in progress display… While a lap time is
being measured, the measurement in progress is displayed.
LAP1
LAP2
LAP3
LAP n
Start
Finish
Press mode selection button ① (STOP.W) to show the lap time measurement in progress display of the stopwatch mode.
(Start)
(Lap/Split measurement)
SPLIT
SPLIT
F
BLOCK
LAP
BLOCK
LAP
STOP
BATT.
LAP
F
BLOCK
LAP
STOP
BATT.
LAP
E
RECALL
E
RECALL
STOP
BATT.
LAP
E
RECALL
START
STOP
\
LAP/SPLIT
RESET
(10 km point)
SPLIT
F
A
○
It indicates that the lap time measurement
in progress display is shown.
B\
○
LAP/SPLIT
RESET
START
STOP
The lap time measurement in progress is displayed.
B is pressed to measure the lap
Each time button ○
time/split time, the digits are reset to "00" and the
stopwatch starts counting from "00".
LAP/SPLIT
RESET
START
STOP
When the lap time measurement in progress exceeds
1 hour, the hour digit appears in place of the mark for
lap time in progress mark.
When the grip switch is used:
① Changeover to the grip switch
② Time measurement
● Connect the grip switch to the stopwatch.
● The measurement is started by pressing the grip switch
once. Split time and lap time can be measured repeatedly
with each press of the grip switch.
(Start)→(With each press of the grip
switch, split time and lap time
are measured repeatedly.)
Grip switch
● Slide up the grip switch selector located on the right side of the
stopwatch.
EXT
▲
c
Upper position
*While the grip switch selector is set at the
A and ○
B will not work,
upper position, button ○
and the stopwatch is operated solely by the
grip switch.
*By pressing the grip switch, split time and lap time can be measured, but the
measurement cannot be stopped. After the final split or lap time is measured,
follow the stops in ④ End of measurement" to stop the measurement.
③Printout of lapse of time (Only when in the
time/calendar mode and the power switch of the
printer is on)
●The stopwatch can printout the time a lap time is measured
in the same manner as you press the grip switch in the
stopwatch mode.
④End of measurement
● After the measurement is over, slide down the grip switch
selector.
EXT
▲
d
Lower position
How to use the lock lever
A (start/stop
To prevent any mistaken operation of button ○
of the stopwatch) during the measurement, it is
A be locked with the lock lever
recommended that button ○
after the measurement is started.
A to stop the
●After sliding down the selector, press button ○
B to reset the
measurement and then press button ○
stopwatch.
(Stop)
SYSTEM STOPWATCH
300LAP/SPLIT MEMORY
(Reset to "00")
F
BLOCK
SPLIT
SPLIT
F
F
BLOCK
LAP
E
BLOCK
LAP
STOP-W. A/S SET TIME
STOP
BATT.
LAP
STOP
BATT.
LAP
E
RECALL
LOCK
CLEAR
E
RECALL
LAP/SPLIT
RESET
LAP/SPLIT
RESET
\
START
STOP
\
LAP/SPLIT
RESET
A
○
B
○
START
STOP
1/100
START
STOP
STOP.W A/S SET
TIME
RECALL
Lock lever
After the measurement is started,
slide down the lock lever.
*While the lock lever is slid down,
A (START/STOP) is locked
button ○
and cannot be pressed.
5.HOW TO USE THE MEMORY FUNCTION
300LAP/SPLIT MEMORY
F
BLOCK
STOP
BATT.
LAP
E
RECALL
STOP-W. A/S SET TIME
LOCK
CLEAR
B
Button ○
LAP/SPLIT
RESET
1/100
STOP.W A/S SET
START
STOP
A
Button ○
TIME
RECALL
Recall button(Memory recall button)
■The memory recall function
・The data obtained in the measurement can be recalled and displayed.
・Up to 100 blocks of data or 300 data can be stored and recalled.
・Besides being recalled and displayed, the data in memory can also be printed out.
(Refer to "6. HOW TO PRINT OUT")
・The stored data is recalled by pressing recall button. The data is recalled successively
if the button is kept pressed.
・The stored data can be recalled while the stopwatch is measuring.
・The data can be stored in memory even while printing out the data during the
measurement.
・Order of recalling the stored data
With each press of recall button
When the stopwatch is stopped
The data is recalled starting from the oldest one.
When the stopwatch is in use
The data is recalled starting from the newest one.
・Button operation while the stored data is recalled
A
Display before recall Button ○
Reset
Stopped
Measuring
Returning to the
display before recall
Returning to the
display before recall
Stopping the
measurement
B
Button ○
mode selection
button ① (STOP.W)
Clearing the data in Returning to the
memory
display before recall
Returning to the display
Returning to the
before recall
display before recall
Measuring lap/split time Returning to the
display before recall
When the stopwatch is reset or stopped:
The data is recalled starting from the first data in block "1".
<Ex.) When the display is reset to "00" in block "4">
(Reset)
(Start data)
SPLIT
(Fastest lap time display) (Lap/split data in block "1")
SPLIT
SPLIT
F
F
BLOCK
LAP
STOP
BATT.
LAP
E
Recall
button
RECALL
F
BLOCK
LAP
STOP
BATT.
LAP
E
Recall
button
RECALL
STOP
BATT.
LAP
E
Recall
button
BLOCK
LAP
STOP
BATT.
LAP
E
Recall
button
STOP
BATT.
LAP
RECALL
Fastest lap no.
Fastest LAP
The fastest lap time in this block
is displayed together with the lap
number.
Start time
F
BLOCK
LAP
RECALL
Start date
SPLIT
F
BLOCK
LAP
(Stop)
SPLIT
E
RECALL
split time
Lap/split no.
Lap/split no.8
split time 2:1'14"12
lap time 16'42"33
Stop time
Stop time 2:11'17"99
Data in block "1"
Recall button
(Reset)
BLOCK2
Start data
BLOCK3
Start data
Recall button
Recall button
BLOCK3
Stop time
SPLIT
F
Recall button
BLOCK
LAP
STOP
BATT.
LAP
E
RECALL
When the stopwatch is measuring:
The data is recalled starting from the newest one.
〈ex.) When the measurement of the third lap / split time in block "4" has been completed.〉
(Display of the fastest lap time in block "4")
SPLIT
F
BLOCK4
Lap/split time 3
BLOCK
LAP
Recall
button
Lap/split time 3
STOP
BATT.
LAP
E
Recall
button
Lap/split time 2
Recall button
Lap/split time 1
Recall button
RECALL
Fastest lap no. The colon (:) starts flashing.
When the stopwatch is mesuring, the measurement in progress is shown in the bottom row of the display.
Data in block "4"
BLOCK3
Start data
BLOCK3
Fastest lap
Recall button
■How to clear the stored data (All clear of
data)
・The memory clear function is useful in
the following cases.
a)When the stored data becomes
unnecessary.
b)When the residual memory is not
sufficient for a new measurement.
・Once the following steps are taken to
clear the data, all the stored data is
erased from memory. The stored data
cannot be erased one by one or block by
block.
①While the stopwatch is measuring or
when the digits are not reset after the
end of the measurement, the stored data
cannot be erased from memory.
In that case, end the measurement and
reset the stopwatch.
Recall button
BLOCK3
Stop time
Recall button
Recall button
BLOCK1
Lap/split time 1
Recall button
BLOCK4
Lap/split time 3
②Press recall button
In the memory recall display, the stored
data can be erased irrespective of which
data is displayed.
SPLIT
F
BLOCK
LAP
STOP
BATT.
LAP
E
RECALL
(Start data)
Recall button
B pressed for more than 1.5 seconds.
③Keep button ○
B is kept pressed, the display below is shown with warning beeps.
While button ○
After 1.5 seconds, the stored data is erased from memory with a long beep.
All the data is erased from memory and the initial measurement display is shown.
B is kept pressed for more than 1.5 seconds, the stored data will not be erased from
*Unless button ○
memory.
SPLIT
F
STOP
BATT.
LAP
SPLIT
SPLIT
BLOCK
LAP
F
F
BLOCK
LAP
BLOCK
LAP
E
STOP
BATT.
LAP
RECALL
(Digits reset to "00")
E
RECALL
B
Button ○
(Memory clear procedure)
STOP
BATT.
LAP
RECALL
(Digits reset to "00")
E
■Notes on memory capacity
・The number of data in memory is shown
graphically by the memory capacity
indicator.
・Besides the measured lap times/split
times, the start time data and block
number are also retained in memory as
two separate data. Therefore, a block of
data includes at least three data. If more
than one block is used to store the data,
the memory become full even before the
number
of
lap
time/split
time
measurements in memory amounts to
300.
●How to read the memory capacity
indicator
The number of data stored in memory is
displayed graphically with a 10-segment
bar.
Each segment of the bar corresponds to 30
data. The segments are displayed one
by one from the bottom to indicate the
number of data in memory.
Number of data in memory
F 290∼300
SPLIT
F
E
BLOCK
LAP
STOP
BATT.
LAP
●Memory data guide during recall
While the data is recalled, a segment of the
bar flashes to indicate the measurement
order of the data being recalled.
In the illustration below, 210 to 239 data is
stored in memory and the data being
recalled is between 120th and 149th
data in memory.
270∼290
240∼269
210∼239
180∼209
150∼179
120∼149
90∼119
60∼ 89
30∼ 59
When 10 or less data of
memory capacity is
available, the top segment
starts flashing. When the
memory is at its full
capacity, it stops flashing
and remains displayed.
30 to 59 data is stored in
memory. When no segment
is displayed, 0 to 29 data is
stored in memory.
SPLIT
F
It flashes.
BLOCK
LAP
STOP
BATT.
LAP
E
RECALL
●When the memory reaches its full
capacity:
・All the segments of the bar are
displayed.
・The 301st data and those measured
thereafter will be displayed but will not be
stored in memory for later recall.
E
RECALL
6.HOW TO PRINT OUT
5 Keep the paper advancing switch pressed
□
until the end of the paper is advanced out 2
to 3 cm from the printer.
(Do not pull out the paper by force.)
1.How to set the paper in the printer
●Besides the thermal paper S950 included
with this model, the thermal paper S951 is
available for printing out the stored data. It is
a long-type thermal paper that can print
out up to 2,800 lines, and sold for ¥578.
To use S951, the paper holder SVAZ007
for exclusive use with it is necessary. It is
sold separately for ¥3,990.
6
□ Put the roll paper into the holder and
1
□ Cut the first pasted position of the paper
straight.
2
□ Open the paper cover as shown in the
illustration.
Paper advancing
switch
close the paper cover.
Power switch
(
If the roll paper gets out of shape, make it round
before inserting it into the holder.
)
3
□ Slide the power switch to "ON". At this
time, the motor runs for approximately 1
second to indicate that the power is
supplied.
4
□ Inset the end of the paper into the paper
Roll paper
insertion slot.
(
Be sure to set the paper with the right side up. It
can only be printed on one side.
)
Notes 1 Do not pull the paper in the reverse direction (opposite to the direction of
advancing the paper), as this will damage the printer. When replacing the
remaining roll paper with a new one, first cut the paper in the holder, then
remove the rest of it by pressing the paper advancing switch, or pull it out
in the direction of advancing the paper.
Notes 2 Be sure to use the roll paper S-950 for exclusive use with this model.
Otherwise, poor printing or malfunction will be caused.
2.Printout
Printout during the measurement
Print mode
selection
switch
POWER
ON
Power switch
3 After the measurement is started, the identification number (if it is set), block
□
number, starting time, date, month and year are printed out, and then the
time data are printed out successively as soon as they are measured.
Print mode
selection
switch
1 Turn on the power switch for printer before starting
□
the measurement. When the switch is turned on, the
roll paper is advanced by one line.
2 Operate print mode selection switch to select the
□
printout from "lap time only" and "both split time and
lap time".
LAP
SPLIT
Both split time and lap time are printed out.
c
(print mode selection switch)
c
SPLIT
Only split time is printed out.
Example of printout
SYSTEM STOPWATCH
LAP
SPLIT
LAP
SPLIT
split time and
c Both
lap time
d Split time only
SPLIT
Block number
BLOCK:1 Year・Month・Date 1999 10 10
Start time START 10:19
SPLIT 1-0:05′03 76
2-0:05′12 33
3-0:05′41 13
Split time
4-0:05′59 06
5-0:06′17 88
6-0:06′43 56
7-0:07′21 47
8-0:07′36 48
Finish time /S/0:08′02 58
SPLIT
Block number
BLOCK:1 Year・Month・Date 1999 10 10
Start time START 10:19
SPLIT/LAP 1-0:18′05 33
0:18′05 33
2-0:36′37 78
0:18′32 45
3-0:55′13 11
0:18′35 33
4-1:13′25 31
Split time
0:18′12 23
Lap time
5-1:31′57 55
0:18′32 21
6-1:49′32 78
0:17′35 23
7-2:01′31 04
0:17′58 26
8-2:25′43 62
0:18′12 58
Finish time /S/2:54′02 77
*When the power switch of the printer is turned on after the measurement is started, the data is printed
out starting from the next measurement data.
Printout after the measurement
"Printout of the desired block of data"
POWER
ON
(1)Turn on the power switch.
(2)Press memory recall
button (RECALL).
The time data stored in
memory are printed out.
SPLIT
F
BLOCK
LAP
STOP
BATT.
LAP
E
RECALL
*When all the stored data are
printed out, the printer
automatically stops.
STOP-W. A/S SET TIME
LOCK
CLEAR
1/100
START
STOP
STOP.W A/S SET
TIME
②Turn on the power switch of the printer.
③Keep recall button pressed.
When the stopwatch confirms the
"Power on" of the printer, flashing
"Print" is displayed.
SPLIT
F
g
SYSTEM STOPWATCH
300LAP/SPLIT MEMORY
LAP/SPLIT
RESET
① Memory recall
Show the memory recall display, and
select the block of data you wish to
print out.
Block No. for the block of data to be printed
BLOCK
LAP
SPLIT
F
STOP
BATT.
LAP
BLOCK
LAP
E
RECALL
STOP
BATT.
LAP
(Start data)
E
RECALL
Recall button
(Printout display for desired block of data)
RECALL
Recall button
・The stored data can be printed out as many
times as necessary.
・Printout can be selected from only the desired
block of data and all the blocks of data.
・If recall button is released immediately after flashing "Print" is displayed, the printout
will be canceled and the display returns to the memory recall display.
④ Keep recall button pressed for 1 second, and then release it as "Print" stops flashing and remains displayed.
The data in the selected block is displayed quickly one after another, and then printout is started.
(While the data in the block is displayed quickly one after another, the
stopwatch checks for the fastest lap time in the selected block.)
F
STOP
BATT.
LAP
E
RECALL
The total elapsed time of the block is displayed.
"To print out the data in all the blocks in memory"
①Turn on the power switch of the printer.
②Show the memory recall display, and keep recall button pressed. Flashing "Print" is displayed.
③Printout of all the blocks of data
・Keep recall button pressed further until "Print All" is displayed.
F
④Then, release recall button. The data in all the blocks is displayed
quickly one after another starting from Block "1", and will be
printed out at a stretch.
E
(While the data is displayed quickly one after another, the
(Printout of all the blocks of data)
stopwatch checks for the fastest lap time in each block.)
SPLIT
BLOCK
LAP
STOP
BATT.
LAP
RECALL
Notes:
Recall button
*While the printout is under way, none of the stopwatch buttons will work.
・Once started, the printout cannot be canceled halfway.
・Even if the power switch of the printer is turned off while the printout is in progress, the button operation of the stopwatch is nullified until entire
data to be printed is shown on the display.
Printout of lapse of time
・In addition to the elapsed time, the stopwatch can print out the
time when the lap time is measured.
・The time a lap time is measured is not stored in memory.
1 Turn on the power switch for printer and then press mode
□
selection button②(TIME) to set the stopwatch to the
time/calendar mode.
*Please note that the time of measurement cannot be printed out
unless the stopwatch is reset to "00".
POWER
ON
(1)Turn on the power switch.
(2)Press mode selection button ③
(TIME) to set the stopwatch to
the time/calendar mode.
SYSTEM STOPWATCH
Stopwatch
mode
Time/calendar
mode
SPLIT
300LAP/SPLIT MEMORY
ID
F
F
SPLIT
F
BLOCK
LAP
STOP
BATT.
LAP
E
BLOCK
LAP
BLOCK
LAP
RECALL
STOP-W. A/S SET TIME
LOCK
CLEAR
LAP/SPLIT
RESET
1/100
STOP.W A/S SET
START
STOP
TIME
RECALL
STOP
BATT.
LAP
RECALL
E
STOP
BATT.
LAP
RECALL
E
2 Press button A
□
○ to start the printout. With each press of button
B
○, the time when the lap time is measured is printed out. To
stop the printout, press button A
○
Identification number is printed when it is set
ID:1
1999
10 10−−−−Year, Month, Date
ST-10:10′00−−−−Starting time (10:10'10'')
1-10:10′21−−−−1st lap time (10:10'21'')
2-10:10′25−−−−2nd lap time (10:10'25'')
3-10:10′26−−−−3rd lap time (10:10'26'')
4-10:10′28−−−−4th lap time (10:10'28'')
5-10:10′33−−−−5th lap time (10:10'33'')
6-10:10′36−−−−6th lap time (10:10'36'')
7-10:10′39−−−−7th lap time (10:10'39'')
8-10:10′50−−−−8th lap time (10:10'50'')
9-10:10′59−−−−9th lap time (10:10'59'')
10-10:11′03−−−−10th lap time (10:11'03'')
/S/10:11′06−−−−Finish time (10:11'6'')
SYSTEM STOPWATCH
300LAP/SPLIT MEMORY
SPLIT
F
BLOCK
LAP
STOP
BATT.
LAP
E
RECALL
STOP-W. A/S SET TIME
LOCK
B
Button ○
Printout of the
time when the
lap time is
measured.
CLEAR
LAP/SPLIT
RESET
1/100
START
STOP
STOP.W A/S SET
TIME
A
Button ○
Start/stop
RECALL
*The time is printed out in the 24-hour indication.
7.HOW TO USE THE AUTO START FUNCTION
Auto start function: By presetting the time when the measurement is
started, the stopwatch automatically starts measuring at the designated
time. This function is very convenient for a competition like marathon, where
the race starts at a fixed time. In addition, the designated starting time can
be transferred to other stopwatches such as Cal. S143, S123, S124 and
thus the measurement can be started simultaneously at different
checkpoints.
2 Set the auto start time.
1.Auto start time setting (how to set the □
starting time)
Minute setting
Hour setting
1 Press the mode selection button ② (A/S SET) to set the
□
stopwatch to the auto start setting mode .
Indicates that the
auto start function
is deactivated.
SYSTEM STOPWATCH
300LAP/SPLIT MEMORY
SPLIT
F
BLOCK
LAP
STOP
BATT.
LAP
E
RECALL
B, and the minute digits start flashing.
Press button ○
A to set the digits. With each press of
Press button ○
the button, one minute is advanced.
SPLIT
B, and the hour digits start flashing.
Press button ○
A to set the digits. With each press
Press button ○
of the button, one hour is advanced.
SPLIT
BLOCK
LAP
BLOCK
LAP
STOP-W. A/S SET TIME
LOCK
LAP/SPLIT
RESET
1/100
STOP.W A/S SET
STOP
BATT.
LAP
SPLIT
CLEAR
START
STOP
BLOCK
LAP
TIME
Auto start time
RECALL
STOP
BATT.
LAP
RECALL
RECALL
Mode selection
button ② (A/S
Auto start setting mode mark
3 Enter the auto start time.
□
Setting
STOP
BATT.
LAP
RECALL
LAP/SPLIT
RESET
START
STOP
LAP/SPLIT
RESET
START
STOP
B
○
A
○
B
○
A
○
*The digits move quickly if the button is kept pressed.
B to start setting the auto start time,
NOTES:When you press button ○
all the stored data is cleared.
4 After the auto start time is entered in memory, press
□
button ① (STOP. W) to return to the stopwatch mode .
Return to the stopwatch mode.
B again.
After setting the auto start time, press button ○
The digits stop flashing and the auto start time set has
been entered in memory.
Indicated that the auto start
function is activated.
SPLIT
BLOCK
LAP
Auto start time (10:05)
STOP
BATT.
LAP
Be sure to confirm the third line display changes
to the current time. If not, auto start function
doesn't become effective.
SYSTEM STOPWATCH
300LAP/SPLIT MEMORY
SPLIT
F
BLOCK
LAP
STOP
BATT.
LAP
E
LOCK
LAP/SPLIT
RESET
1/100
LAP/SPLIT
RESET
c
B
○
START
STOP
Auto start time
STOP-W. A/S SET TIME
CLEAR
RECALL
SPLIT
RECALL
STOP.W A/S SET
START
STOP
TIME
RECALL
BLOCK
LAP
STOP
BATT.
LAP
Current time
RECALL
*The stopwatch starts measuring at the
designated auto start time with three beeps.
mode selection button ① (STOP.W)
*To cancel the auto start time set in the procedure
above, press mode selection button ② (A/S SET).
2.Transfer of the
designated
auto start time to other stopwatch (Cal. S143, S123, S124)
POWER
ON
SYSTEM STOPWATCH
(EX.) Marathon race
By transferring the designated
auto start time to stopwatches
Cal. S143, they can start the
measurement at the same
time.
RECALL
LAP/SPLIT RESET
SELECT CLEAR
START STOP
SYSTEM
STOPWATCH
SET
SPLIT
F
BLOCK
LAP
STOP
BATT.
LAP
E
Starting point
First checkpoint Second checkpoint
Finish
RECALL
STOP-W.
300 LAP/SPLIT MEMORY
WATER RESISTANT
TIME
MODE
PRINTER
300LAP/SPLIT MEMORY
RECALL
F
POWER
ON
LAP/SPLIT RESET
RECALL
START STOP
LAP/SPLIT RESET
RECALL
START STOP
LAP/SPLIT RESET
START STOP
BLOCK
STOP
BATT.
LAP
LAP/SPLIT RESET
STOP-W. A/S SET TIME
SELECT CLEAR
LOCK
BLOCK
LAP
LAP/SPLIT
RESET
START
STOP
STOP.W A/S SET
SYSTEM
STOPWATCH
SET
F
BLOCK
LAP
SELECT CLEAR
SYSTEM
STOPWATCH
SET
SPLIT
F
SELECT CLEAR
F
BLOCK
LAP
STOP
BATT.
LAP
STOP
BATT.
LAP
STOP
BATT.
LAP
E
RECALL
E
RECALL
STOP-W.
300 LAP/SPLIT MEMORY
WATER RESISTANT
TIME
SYSTEM
STOPWATCH
SET
SPLIT
BLOCK
LAP
E
RECALL
F
E
RECALL
STOP-W.
300 LAP/SPLIT MEMORY
WATER RESISTANT
TIME
STOP-W.
300 LAP/SPLIT MEMORY
WATER RESISTANT
TIME
300LAP/SPLIT MEMORY
STOP-W.
300 LAP/SPLIT MEMORY
WATER RESISTANT
TIME
SPLIT
F
MODE
BLOCK
LAP
STOP
BATT.
LAP
PRINTER
MODE
PRINTER
MODE
RECALL
RECALL
SET
BLOCK
LAP
SYSTEM STOPWATCH
STOP
BATT.
LAP
STOP
BATT.
LAP
TIME
SYSTEM
STOPWATCH
SPLIT
START STOP
SPLIT
CLEAR
1/100
SELECT CLEAR
RECALL
SPLIT
E
RECALL
PRINTER
MODE
PRINTER
E
RECALL
STOP-W. A/S SET TIME
LOCK
CLEAR
LAP/SPLIT
RESET
RECALL
LAP/SPLIT RESET
SELECT CLEAR
(Ex.) The stopwatch Cal.
START STOP
SYSTEM
STOPWATCH
1/100
STOP.W A/S SET
START
STOP
TIME
SET
SPLIT
F
RECALL
BLOCK
LAP
STOP
BATT.
LAP
S149 and the three
stopwatches Cal. S143
will start measuring
simultaneously at 10:05.
E
RECALL
STOP-W.
300 LAP/SPLIT MEMORY
WATER RESISTANT
TIME
MODE
PRINTER
*The four stopwatches automatically start measuring simultaneously at
a designated time, and therefore, there is no need to adjust the time of
each stopwatch.
How to transfer the auto start time
□
1 Inset the transfer cord into the jack for auto start
to connect the stopwatch Cal. S149 to the
stopwatches.
□
2 Press the mode buttons of the stopwatches in stopwatch mode. The
auto start time will be automatically transferred to them.
①Reset the stopwatch, and clear all the stored data. If not the auto
start time can not be set.
②Press the mode button, the auto start time is transferred.
LOCK
CLEAR
LAP/SPLIT
RESET
1/100
(ex:S143)
START
STOP
STOP.W A/S SET
TIME
RECALL
LAP/SPLIT RESET
RECALL
SELECT CLEAR
START STOP
SYSTEM
STOPWATCH
RECALL
SET
LAP/SPLIT RESET
SPLIT
START STOP
F
SELECT CLEAR
BLOCK
LAP
SYSTEM
STOPWATCH
SET
SPLIT
STOP
BATT.
LAP
E
STOP-W.
300 LAP/SPLIT MEMORY
WATER RESISTANT
F
BLOCK
LAP
RECALL
TIME
STOP
BATT.
LAP
E
RECALL
STOP-W.
300 LAP/SPLIT MEMORY
WATER RESISTANT
MODE
TIME
PRINTER
MODE
PRINTER
c
Mode button(ex:S143)
c
□
3 Remarks in transferring the auto start time.
The error display is shown.
If the auto start time is not
transferred properly, the error
display is shown. In that case,
press mode button again.
SPLIT
F
BLOCK
LAP
STOP
BATT.
LAP
E
RECALL
Error display(ex:S143)
The auto start time cannot be transferred
even if the mode button is pressed.
The designated auto start time will not be transferred to
stopwatches if Cal. S149 remains in the auto start setting
mode. Return Cal. S149 to the stopwatch mode, and then
resume the transfer.
○
SPLIT
deactivated.
Keep the lap/split button pressed for approximately 2 seconds.
RECALL
LAP/SPLIT RESET
SPLIT
F
Keep the lap/split button of the stopwatches pressed for
approximately 2 seconds. The auto start function will be
c
×
To stop and resume the auto start
F
SELECT CLEAR
BLOCK
LAP
START STOP
SYSTEM
STOPWATCH
SET
SPLIT
BLOCK
LAP
F
BLOCK
LAP
STOP
BATT.
LAP
RECALL
Auto start setting mode
E
STOP
BATT.
LAP
STOP
BATT.
LAP
E
RECALL
E
RECALL
STOP-W.
300 LAP/SPLIT MEMORY
WATER RESISTANT
Stopwatch mode
TIME
MODE
PRINTER
Press mode selection button ① (STOP. W) to return to
the stopwatch mode.
Be sure to confirm the third line display changes to the
current time. If not, auto start function doesn't become
effective.
(ex:S143)
8.HOW TO INSERT BATTERIES INTO THE PRINTER
Use four SUM-3 (R6P) dry batteries.
□
1 Slide the power switch to "OFF" and
then remove the battery hatch.
□
2 Inset the batteries into the battery
compartment as shown in the
illustration below, checking that the (+)
and (-) terminals are properly set.
3 Close the battery hatch.
□
Put the hatch toward
you while pushing
the portion indicated
by the arrow.
battery hatch
Slide the battery hatch along the
grooves of the battery compartment.
9.TIME・CALENDAR SETTING
Caution ! Time/calendar setting and identification number setting can be
2.
Seconds setting
made only when the stopwatch is reset.
ID
1.Press mode selection button ③ (TIME) to set the time to the
Time/calendar mode.
BLOCK
LAP
STOP
BATT.
LAP
RECALL
1
B and the second
□ Press ○
digits will flash.
Button ○
B
Selection of the
digits to be
adjusted.
A in accordance
2
□ Press ○
300LAP/SPLIT MEMORY
A
Button ○
Setting the digits to be
adjusted.
(The digits can be advanced
quickly by keeping the
button pressed.)
ID
F
BLOCK
LAP
STOP
BATT.
LAP
E
RECALL
STOP-W. A/S SET TIME
LOCK
CLEAR
LAP/SPLIT
RESET
1/100
START
STOP
STOP.W A/S SET
TIME
RECALL
with a time signal to reset
the second digits to "00".
*When the second digits count
any number from "30" to "59"
and A
○ is pressed, one minute
is added and the second digits
are reset to "00".
Mode select ion button ③ (TIME)
Minutes setting
Hour setting
Year setting
SPLIT
ID
SPLIT
ID
SPLIT
ID
BLOCK
LAP
BLOCK
LAP
STOP
BATT.
LAP
BLOCK
LAP
STOP
BATT.
LAP
RECALL
STOP
BATT.
LAP
RECALL
1
B and the minute
□ Press ○
RECALL
1
B and the hour
□ Press ○
digits will flash.
digits will flash.
2
A, one
□ With each press of ○
will flash.
2
A, one
□ With each press of ○
minute is advanced.
hour is advanced.
Finish of time/calendar
setting
ID setting
Date setting
SPLIT
ID
SPLIT
ID
BLOCK
LAP
BLOCK
LAP
BLOCK
LAP
RECALL
STOP
BATT.
LAP
RECALL
2
A, one
□ With each press of ○
year is advanced.
ID
SPLIT
STOP
BATT.
LAP
1
B and the year digits
□ Press○
STOP
BATT.
LAP
RECALL
Month setting
SPLIT
ID
BLOCK
LAP
STOP
BATT.
LAP
RECALL
1
B and the date digits 1
B and the month
□When button ○B is pressed, the 1
□ After all the adjustment are 1
□ Press ○
□ Press ○
identification number digits start flashing.
B.
completed, press ○
will flash.
digits will flash.
A , one digit is 2 With each press of ○
2
□With each press of button ○
A, one 2
A, one
□
□ With each press of ○
advanced. "OFF" means that no
day is advanced.
month is advanced.
identification number is set.
3.Adjustment of the contrast on the display
・The contrast of the display can be adjusted.
②Press recall button to show the contrast adjustment display.
The contrast can be adjusted for 10 levels from level "1" to "10".
The display is the lightest at level "1" and the darkest at level "10".
①Show the time/calendar mode.
ID
BLOCK
LAP
STOP
BATT.
LAP
RECALL
SPLIT
BLOCK
LAP
Contrast adjustment display
A : Increasing the level (darker)
Button ○
Button ○
B : Decreasing the level (lighter)
STOP
BATT.
LAP
RECALL
③Press recall button again to return to the time/calendar mode.
10.PRECAUTIONS
(1)When the power switch of the printer is turned on during the measurement, the data measured thereafter will be printed out.
(2)While the printer is printing out, do not pull out the roll paper or do not pull it back. Also, do not operate the stopwatch without
installing the roll paper on the printer, as this will cause a malfunction of the printer.
(3)When the printer is not used, be sure to turn the power switch of the printer "OFF".
(4)The optional parts (such as grip switch) is not used, besure to put the cap on the jack.
Remarks on roll paper (thermal paper)
Since this model is a thermal printer, which prints on thermal paper by heating it, it is not necessary to replace the ink. Be sure to observe
the following.
●To preserve new thermal paper, put it in a box to avoid direct light and keep it in a dry cool place.
●Do not touch the printing surface of the thermal paper, as the sweat or oil on the palm will cause poor printing.
●Besides the thermal paper S950 included with the printer, the thermal paper S951 is available for printing out the stored data. It is a
long-type thermal paper that can print out up to 2,800 lines, and sold for ¥578 (include Tax). To use S951, the paper holder SVAZ007
for exclusive use with it is necessary. It is sold separately for ¥3,990 (include Tax).
●To preserve the printed thermal paper, be sure to observe the following.
[1] Do not expose thermal paper to bright light for a long time. Printed digits or letters may be faded.
*Be sure to use the roll paper S-950 or S-951 for exclusive use with this model. Otherwise, detective printing or damage of the printer will be caused.
[2] Keep the thermal paper away from high temperature, high humidity, or direct sunlight. The roll paper may be discolored.
[3] In case the printed paper are kept attached on a pasteboard, etc., do not use the paste or adhesives containing volatile organic solvent.
Also, do not use cellophane adhesive tape. The thermal paper may be discolored. It is recommended that the starch or synthetic paste
be used.
[4] Do not place the thermal paper near the copies reproduced by the copier using ammonia. The thermal paper may be discolored.
[5] Do not leave the thermal paper in contact with vinyl chloride films for a long time. It may be discolored, or the printed digits or letters
may be faded.
CAUTION
・Your watch is not water-resistant, be
careful not to get it wet with water.
CAUTION
・If your watch is of the fob or pendant type, the strap or chain attached to the watch
may damage your clothes, or injure the hand, neck, or other parts of your body.
PLACES TO KEEP YOUR WATCH
×
×
・If the watch is left in a
temperature below -10℃ or
above +60℃ for a long time it
may function improperly or
stop operating.
*This watch is so adjusted that it will
maintain stable time accuracy in
normal temperatures.(5℃∼35℃)
It will lose or gain slightly, but it will
regain high time accuracy when it
returns to normal temperature.
×
・Do not leave
the watch in a
place where it
is subjected to
strong magnetism or static electricity.
・Do not leave
the
watch
where there
is
strong
vibration.
・Do not leave
the watch in a
dusty place.
・Do not expose the watch to gases
or chemicals.
(Ex.: Organic solvents such as
benzine and thinner, gasoline, nail polish, cosmetic
spray, detergent, adhesives,
mercury, and iodine antiseptic solution.)
・Do not leave the watch in a hot
spring, or do not keep it in a
drawer having insecticides inside.
11.REMARKS ON THE BATTERIES
(1)Battery life
When a new normal battery is installed, the stopwatch will
operate approximately 3 years.
*If the stopwatch is used for more than 3 hours a day, the battery life may be
less than 3 years.
●When four new and normal SUM-3 manganese dry batteries
are installed, the printer can print approximately 10,000 lines
(approx. 14 rolls of paper) if it continuously operates at 24℃.
When alkaline manganese batteries are used, it can print
approximately 20,000 lines (approx. 28 rolls).
*It the printer is used at extremely low temperatures, the battery power
becomes weak, and it cannot print as many lines as it prints at normal
temperature range. It is recommended, therefore, that alkaline manganese
batteries be used at such low temperatures.
●When the following conditions occur with the power switch
set at "ON", replace the batteries with new ones.
(1)Printing speed has reduced.
(2)Printed digits or letters are uneven or incomplete.
(3)The digits or letters are too lightly printed.
(4)The paper is not advanced at all or advanced irregularly.
(5)The printer will not print at all.
If the above conditions occur, replace the batteries with new
ones as soon as possible foltowing the procedure in "8 How
to insert the batteries into the printer"
(2)Monitor battery
The battery in your watch may run down in less than the
specified period after the date of purchase, as it is a monitor
battery which is inserted at the factory to check the function
and performance of the watch.
(3)Battery change
①For battery replacement, be sure to have the battery
replaced with a new one at the retailer from whom the watch
was purchased or at an authorized SEIKO DEALER, and
request the battery for exclusive use with the SEIKO
watches.
②If the old battery is left in the watch for a long time, a
malfunction may be caused due to battery leakage, etc.
Have it replaced with a new one as soon as possible.
③Battery replacement is charged even if it runs down within
the guarantee period.
④Once the case back is opened for battery replacement or
other purposes, the original water resistant quality designed
for the watch may deteriorate when it is closed. When you
have the battery replaced with a new one, also request the
water resistance test pertaining to the water resistant quality
of your wtach. If your watch has 10-bar or higher water
resistant quality, be sure to have such test performed on the
watch every time the battery is replaced.
(4)Battery life indicator (stopwatch)
When the battery nears its end, flashing battery mark "BATT" is
displayed. In that case, have the battery replaced with a new
one as soon as possible by the retailer from whom your
stopwatch was purchased or an AUTHORIZED SEIKO
DEALER. When the battery is replaced with a new one, all the
stored data will be erased from memory. Before battery
replacement, therefore, print out the data you wish to keep.
WARNING
1.Do not remove the battery from the watch.
2.If it is necessary to take out the battery, keep it out of the reach of children.
3.If the child swallows it, consult a doctor immediately as it will adversely affect the
health of the child.
CAUTION
1.Never short-circuit, tamper with or heat the battery, or never expose it to fire as it
may explode, generate and intense heat or catch fire.
2.The battery in your watch is not rechargeable. Never attempt to recharge it, as
this may cause battery leakage or damage to the battery.
3.If the watch is left in a temperature below +5℃ or above +35℃ for a long time,
the battery leakage may result, causing the battery life to be shortened.
12.REPLACEMENT OF THE LIQUID CRYSTAL PANEL
The normal life expectancy for the luquid crystal panel of the watch is approximately 7 years. After that, it may decrease in contrast,
becoming difficult to read. Please contact the retailer from whom the watch was purchased to have the liquid crystal panel replaced with
a new one.
It will be made at cost.
13.CARE OF YOUR WATCH
●PERIODIC CHECK
・We suggest that you have your watch checked by the retailer from whom the watch was purchased every 2 or 3 years or when the battery is
replaced for oil condition, battery electtolyte leakage or damage due to water or sweat. After checking the watch adjustment and repair may be
required.
■REMARKS ON REPLACEMENT
PARTS
・SEIKO makes it policy to usually keep a stock of spare parts for its
watches for 7 years. In princlple, your watch can be reconditioned
within this period if used normally. (Replacement parts are those
which are essential to maintaining the functional integrity of the
watch.)
・The number of years that a watch is considered repairable may vary
greatly depending on the conditions under which it was used, and
normal accuracy may not be achieved in some cases. We
recommend, therefore, that you consult the retailer from whom the
watch was purchased when having them repair your watch.
・The case, dial, hands glass and bracelet, or parts there of may be
replaced with substitutes if the orginals are not available.
■REMARKS ON AFTER-SALES
SERVICING
・If the watch requires service, take it to the retailer from whom the
watch was purchased, if the trouble occurs within the guarantee
perlod, submit the cerificate of guarantee together with the watch.
・For repair after the guarantee period or for any other information
regarding the watch, contact the retaller from whom the watch was
purchased or the "CUSTOMER SERVICE DEPARTMENT"of SEIKO
CORPORATION or the "SEIKO SERVICE CENTER CO. LTD."
・Guarantee coverage is spelled out in certificate of guarantee. Please read
it carefully and keep the certificate for ready reference.
14.TROUBLESHOOTING GUIDE
Before requesting service, please check your stopwatch following the table below.
Problem
The motor does not run
even if the power switch
of the printer is turned
"ON".
The
paper
is
not
advanced by pressing
the paper advancing
switch.
By pressing the start
button, the paper is
advanced,
but
the
printed digits or letters
are detective or the data
are not printed at all.
Possible cause
Solution
Problem
By pressing the start
button, the data are
printed out, but the paper
is not advanced irregularly.
●The paper is stuck.
●Remove the paper.
●The batteries are not
installed properly.
●Replace the batteries
with new ones.
●Install the batteries
properly.
●Weak batteries.
●Replace the batteries
with new ones.
●The paper is stuck.
●Remove the paper.
●The paper is stuck.
●Replace the batteries
with new ones.
●Remove the paper.
By pressing the start
button, no data are
printed out and the paper
is not advanced at all.
●Weak batteries.
●Weak batteries.
●The batteries are not
installed properly.
●Replace the batteries
with new ones.
●Insert the batteries
correctly.
●The roll paper gets out
of shape.
●Make the roll paper
round.
●The power switch of
the printer is not set to
"ON".
●Turn the power switch
"ON", and then press the
start button.
●The cord is not connected properly.
●Water
or
foreign
matters are sticking to
the cord plug.
●The paper is not set
properly.
●Connect
the
cord
correctly.
●Wipe off the water or
foreign matters.
●The cord is not connect ed properly.
●Connect the cord prop erly.
●Water or foreign matters
are sticking to the cord
plug.
●Wipe off water or for eign matters.
●Weak batteries.
●Inset
the
properly.
Auto start time is not
transferred.
paper
Possible cause
Solution
*For the solution of trouble other than the above, contact the retailer from whom the watch was purchased.
15.SPECIFICATIONS
(Stopwatch)
(Printer)
1.Frequency of crystal …………………32,768Hz (Hz=Hertz…Cycles per
oscillator
second)
2.Loss/gain ………………………………Less than 15 seconds at normal
(monthly rate)
temperature range (5℃∼35℃)
3.Operational temperature ……………−10℃∼+60℃
range.
Desirable temperature ………………0℃∼+50℃
range of use
4.Display system ……………………… Stopwatch display Measures up to
10 hours. Hour, minutes, seconds,
1/100 seconds, tnree-row display of
split time/lap time/total elapsed time or
lap time in prooress. No. of blocks, no.
of split times (0∼999), 300 memory
recall, BLOCK, SPLIT, LAP, STOP,
RECALL, stopwatch marks, memory
indicator, BATT.
Time/calendar display Hour (24hour
indication), minutes, seconds, year,
month, date and calendar mark, ID no.
(OFF/01∼99), contrast adjustment
display.
Auto start set display AS, OFF, ON,
hour, minutes, seconds, 1/100
seconds, auto start set mark.
5.Display medium ………………………Nematic Liquid Crystal, FEM (Field
Effect Mode)
6.Battery …………………………………Lithium battery SB-T74, 1 piece
7.Battery Life ……………………………A new normal battery will last
approximately three years.
1.Printer ……………………………Model: MTP102
Printing system: Thermal serial dot
printing system
Printing method: One-way printing
(from left to right)
Printing speed: Approx. 1.5
lines/sec. (DC 5 0V. at 25℃)
Number of digits printed: 13
digits/line (including space)
2.Recording paper …………………Roll paper S-950
38mm (width) (+ 0∼ 0.5mm),
overall length 2,400 mm or more
(approx. 700 lines can be printed
per roll.)
3.Power supply ……………………DC 6.0V (SUM-3 or AM3 dry
battery, 4 pieces)
With power switch turned "ON" (No
printing) : Approx. 0.02W (DC 6.0V)
4.Power consumption ……………During printing: Approx. 1.5W (DC
6.0V)
5.Battery life ………………………Manganese battery: Approx.
10,000 lines can be printed.
(Equivalent to approx. 14 rolls)
Alkaline manganese battery:
Approx. 20,000 lines can be
printed. (Equivalent to approx. 28
rolls)
6.Operational temperature range…0℃∼40℃ (The depth of printout
does not change even if the
temperature changes.)
*If the stopwatch is used for more than 3
hours a day, the battery life may be less
than 3 years.
8.IC (Integrated Circuit) ……………C-MOS-LSI, 1 piece
9.Battery life indicator ……………"BATT" mark start flashing when
the battery life nears its end.
*The above specifications are subject to change without prior notice, for
product improvement.