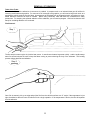
1
INSTALLER
HANDBOOK
Arlon’s Recommended Installation Techniques
Technical Service
July 2008
INSTALLER HANDBOOK
Table of Contents
Subject
Page
Storage and Shipment of Vinyl
3
Installation Tools
3
Selection of Application Paper
4
Sign Substrates
Substrate Preparation
Installation Considerations for Special Substrates
5-6
Application Procedures
Overlaps
Corrugated Sections
Cold Weather Installation
7-9
Thermoforming Steps
10-12
Removal of Film and Adhesive
13-14
Special Cases
87V/DPF8000
Usage and Application of 4560GT and 4560GTX
Metallized Polyester and Reflective Film
15-16
2
STORAGE OF ARLON® VINYL
Vinyl on Rolls: Vinyl product stored at controlled conditions will remain flexible and retain high tack for at least a year
after purchase. Arlon’s factory warehouse is kept cool and dry to preserve vinyl product on the shelf. No matter what
storage conditions are used it is important to consume materials promptly, avoid mixing old and new lots, protect film from
excessive ambient moisture and ensure roll edges remain flat and unwrinkled. If product is certain to be on the shelf for
an extended period store it in the coolest part of the facility and control relative humidity near 50%.
Storage position and location in the warehouse or rack is important as well. As most vinyl materials are laminated to
paper based release liner care must be taken to keep them from direct contact with concrete floors or unsealed, exterior
concrete or masonry walls. If rolls are stored out of their protective box, it is important to store them upright with space
between rolls. This prevents the development of mottling (dulling) at points of contact with either the floor or adjacent rolls.
If excessive direct moisture contact occurs with any graphic film, the following damage may follow:
• The liner will expand at the location of moisture contact, causing surface mottling.
• The silicone release coating on the liner will become inconsistent and cause difficult character weeding.
• The paper will tend to curl or become “wavy” when it is unwound. Curled product edges make automatic sheet
feeding, screen printing, die cutting, weeding, overlaying with application tape and back slitting and very difficult.
Finished Graphics: Store cut and masked graphics flat, in a clean, dry, cool place. Never subject fabricated graphics to
moisture, excessive humidity, direct sunlight or temperatures above 100°F (38°C). Finished graphics should be stored
flat when possible, to prevent the layers from separating and creating wrinkles in the finished product. If rolling is needed
for transport then loosely roll with the graphics facing outward and liner inward.
Vinyl Graphics with 3320 Antigraffiti Overlaminate: Store and ship any graphics produced on flexible fabric with the
semirigid Arlon #3320 overlaminate as the protective film on cores greater than 5 inches at inside diameter with the
Arlon #3320 facing outward. Tighter winding of these graphics will result in eventual tunneling and lifting away of the
overlaminate and base film. Should the #3320 tunnel it will resist efforts to flatten during installation and tensioning.
INSTALLATION TOOLS
Before starting an installation it is best to have the appropriate tools handy to avoid interruptions during the application.
Starting and stopping midway through sign fabrication can be costly due to inadvertent material damage and loss.
•
Plastic Squeegee (nylon with uniform edge
•
Utility or craft knife
•
Felt or Felt wrapped squeegee
•
1.5 inch (3.8 cm) rolls of masking tape
•
Low friction sleeves for squeegees
•
Marking pencils
•
Lint-free rags
•
Spray bottle of Isopropyl alcohol and water @ 1:1
•
•
Heat gun or propane torch
Rivet Brush (1 inch / 3 inch)
•
Air release tool (punch wheel or needle)
3
SELECTION OF APPLICATION PAPER
Once vinyl is die cut and weeded, application paper (also called transfer tape, premask or prespacing tape) is applied
over the remaining film. This application paper serves many purposes. First, it protects the surface of the vinyl from
damage during storage and installation. Secondly, it serves as a stable medium with which to transfer very flexible, easily
distorted vinyl from the liner paper to the substrate.
Application Tape is most popularly made of thin paper tissue for both cost and performance reasons.
•
Paper has some obvious advantages in that it is compatible with many stages of sign fabrication. One can write on it
easily for registration marks and it is more compatible with wet application techniques than film based types due to
the papers ability to absorb and transmit water to the graphic face. This is needed to reduce adhesion between the
vinyl film and application tape, making it easier to strip the application tape away from the applied graphics.
•
Plastic film as transfer tape proves its greatest advantage when registration of multicolor overlays is needed. A
weakness of plastic film is that it doesn’t have water absorption capability so does not work well for wet applications.
In the mid-nineties clear plastic film gained in popularity as cost was reduced, lamination performance improved and
finishing steps in the manufacturing process allowed the plastic to be torn cleanly from the roll rather than requiring a
knife or scissors cut.
Proper lamination of application paper or film is a relatively simple procedure. Although this seems to be a minor step in
the production process, adherence to a few basic rules can help avoid major installation disasters.
1. Take the time to select the right application paper for your shop. This will require some simple comparative
tests. For example, application paper comes with either low, medium or high tack adhesive. Choose a tape
that bonds sufficiently to lift the graphics off the liner paper. After the graphics are applied, the application
paper should remove easily without tearing. In short, select an application paper that is easy to use over a
wide range of films and substrates.
2. Use a single sheet of application tape to cover a vinyl graphic rather than trying to get by with overlapped
pieces of tape. Overlapped application tape results in a line of small bubbles at the overlap during final
installation.
3. Take care in applying application tape to a vinyl graphic. Wrinkles and bubbles caught in the application tape
result in wrinkles and bubbles in the installed vinyl. Also, avoid stretching the application paper, this helps
prevent poor graphic registration and wrinkles and curl.
When removing graphics from liner lift away slowly, be sure that the tips and leading edges of the graphic film do not
remain with the liner. If the vinyl has trouble separating from the liner a method for easier removal is to turn the graphic
upside down (so the graphics are face down) and strip the liner away from the graphic on the workbench.
4
SUBSTRATE PREPARATION
Before installing any graphics a clean substrate is critical. Although many cleaners will do an adequate job, some
outperform others for specific applications. Based on our experience, recommendations for final cleaning are the
following:
Substrate
Painted metals & wood
Cleaner
Isopropyl Alcohol a.k.a. 70% Rubbing Alcohol
@ 1 to 1 mix with water.
Large Panels on Vehicles
Degreaser, if needed, then IPA and water mix to finish.
See Riveted Application for details.
Cautionary Note: It is common to think that a strong solvent will be the best cleaner for banner and other surfaces that are hard to stick
film to. In the case of many plastics and paints this is wrong. Cleaning with a strong solvent such as MEK and acetone or paint thinner
can lead to premature sign failure via embrittlement, cracking and crazing or loss of gloss.
•
Use the mildest solvents possible - only clean until the surface dirt is gone.
1. A quick test for plastics - a sample of the substrate with applied vinyl is placed in an oven at 150°F (78°C) for as
long as 24 hours or in the sun on a vehicle for a couple of days. If bubbling occurs during the test, it will likely occur in
the sign.
Polycarbonate sheets absorb and outgas moisture. These materials should be dried prior to and after vinyl
application. (Consult the polycarbonate manufacturer’s recommendations for drying). Vinyl applied over undried
polycarbonate can trap outgassing moisture, resulting in bubbles. All vinyl breathes to some extent allowing a certain
amount of outgassing to dissipate after after a few heat/cold cycles at the intended application site. Overlaminate
#3320 is not vinyl and will not allow any outgassing to dissipate when installed over incompletely dried substrates:
fresh prints, fresh paint, saturated polycarbonate etc. (See Thermoforming Section for more detail regarding
polycarbonate, beginning on pg. 13.)
2. Banner Applications – One can choose many banner substrates that are designed for paint and vinyl receptivity.
However, there are also a number of products that are unsuitable. If you have a question regarding a sign substrate,
do not hesitate to ask your Calon® distributor or call Arlon direct. Banner compatibility has been tested for the many
U.S. and many internationally produced banners.
For non-vinyl receptive banners, primer coats will aid vinyl adhesion and act as a plasticizer barrier. These coatings
must be applied properly in order to achieve success. As a general rule, first clean the banner with either a mild
solvent such as IPA. Never use lacquer thinner or harsh solvents they will draw the banner’s plasticizer to the
surface, adversely affecting the prep coat and ultimately the vinyl adhesion. After cleaning, coat the banner and allow
it to dry at least 24 hours prior to vinyl application.
Vinyl installation on banner is easy if you remember that these materials are essentially “textured” surfaces.
The following techniques will ensure a quality finished product:
• When applying pressure during lamination it is important to achieve good contact regardless of whether wet or
dry application is used. A rivet brush or soft squeegee is recommended for attaining the best surface
conformability. This is especially important with vinyl-impregnated fabrics that have rough texture.
• Using heat with the rivet brush or soft squeegee increases conformability of the vinyl to “textured” surfaces. Heat
softens the adhesive, making it more pliable and a bit tackier. Heat also melts the film slightly, reducing memory
and allowing the vinyl to conform more readily to the new shape. The warmed vinyl “sets” in its new shape as it
cools and thus exerts less delaminating force on the bond.
5
3. Coated Fiberglass – Fresh molded and gel-coated fiberglass typically retains a waxy film caused by the mold
release agent used in the manufacturing process. This waxy film must be removed with an appropriate mold release
solvent before graphics installation.
4. Varnish – Arlon does not recommend a varnish coat to be applied to vinyl graphics. Varnishes contain solvents that
will attack the vinyl facestock and the adhesive system. Varnished graphics will typically peel away from the sign
substrate. If an overcoat is demanded use acrylic, water-based types where possible.
5. Application Fluid – Application of pressure-sensitive material to flexible signface material, plastic sign faces and
glass often requires the use of application fluid. Use the least amount of fluid needed to achieve repositionability. Be
absolutely sure that all the wetting agent is removed from between the vinyl and the signage substrate. If any
application fluid remains, bubbling will likely occur later. Also, be sure to allow enough time for good adhesion to build
before removing the application tape.
3 tsp (3 ml) clear, liquid detergent
1 gallon (4.54 litre) water
3
tsp (3 ml) IPA
Application Fluid may be modified with more
and less alcohol to speed or retard
subsequent drying time and thus adhesive
bond.
Using as much as 10% IPA in the mix will all
for initial wet installation but will give the
advantage of drying rapidly – thus allowing
the removal of masking and subsequent
trimming or additional overlaminating with
other color.
NOTE: Not all application fluids (even commercial brands) result in optimal adhesive bond. The user assumes the responsibility to
test all application fluids prior to installation to ensure successful film performance.
6. Paints – All paints should be dried and cured before installation of signage. When painting sign faces to be
decorated with film, use two lighter coats rather than one heavier; drying and curing will be faster and more complete.
Low gloss and latex paints are harder to stick vinyl to than others. Although wiped with alcohol before installing
graphics, a latex surface may still be incompatible with pressure sensitive graphics; therefore, the surface will have to
be primed before installation. Arlon has tested and recommends Sherwin-Williams 600-6241 and ICI LM 9116. All
gelcoats and urethane paints require cure time before vinyl may be applied. The curing period varies depending on
product type, temperature, humidity and amount of catalyst or hardener. During curing, the paint or gelcoat will
outgas. This outgassing must be completed prior to vinyl application or bubbling can occur.
7. Windows – If designing for large plate glass applications which experience high sun exposure, be sure to avoid large
areas of very dark color next to a very light and reflective color. The difference in heat gain and glass expansion
under extreme gray scale differences will cause fatigue and early failure of the glass. It is best to break up the design
and use hue, rather than gray scale to achieve contrasting sign elements.
For glass and many other smooth substrates when the sign face temperature reaches over 100°F (37°C) the tack of
the adhesive can become unmanageable, especially if repositioning is going to be required. Before beginning an
application on hot surfaces a clean water mist will achieve "evaporative cooling" on sign faces. This technique can
bring the temperature down 5 to 25 degrees depending on the starting surface temperature, relative humidity and
amount of water used.
8. Application Temperature – Though recommended application temperature varies from product to product, optimum
application temperature range on the substrate is typically between 60°F (16°C) and 90°F (32°C). Successful
installation can be accomplished at temperatures as low as 40°F (5°C) and as high as 120°F (49°C). At these
temperature extremes, one can expect additional difficulty.
6
APPLICATION PROCEDURES
Rule of Thumb:
Only lay down and make substrate contact with the area of film to which you can apply high-squeegee pressure. While
squeegeeing work from the center, outwards, toward the edge and from the top, down, in overlapping strokes.
Air is easily trapped between the surface of the adhesive and sign. A sign installer who squeegees toward the nearest
edge will find that the possibility of air entrapment is minimized.
Wet Application Method:
1. Position the vinyl with the film face down against a clean surface. Starting at a corner, remove the liner. If the liner is
a standard kraft type, do not get it wet prior to removal; the coatings on the paper could split off causing unsightly
adhesive contamination. Plastic liners are unaffected.
2. Spray application fluid on both the adhesive side of the film and the sign substrate.
3. Position the film (sticky side down) on the sign substrate. Initially use light strokes squeegeeing the film into position.
Starting at the center of the marking, re-squeegee the film using firm strokes. Firm strokes and a stiff squeegee will
force the application fluid from underneath the film.
4. After application, spray the paper application tape with application fluid; allow to soak into application paper and
remove after no more than 30 seconds. Remove the application tape by pulling it 180° against itself. This step
prevents the formation of small bubbles that can develop during application tape removal. Re-squeegee all edges
after application tape removal to ensure good adhesion and prevent edge lifting. A rivet brush may also be used in
this part of the installation sequence to achieve a good film/substrate bond on textured surfaces.
5. To eliminate air bubbles or trapped application fluid puncture the bubble at one end and press it flat with a thumb or
rivet brush starting at the other end. Large blister sized bubbles will need to be popped in the center and flattened
from either edge towards the middle. (Always use a pin; never use a knife. A round pinhole will close around itself
while a knife cut will open up over time.)
NOTES:
Vinyl film may be applied to flexible sign face material either prior to, or, after tensioning. In either case, apply adequate
squeegee pressure to achieve maximum ultimate adhesion. If application tape is not used, spray the film face with
application fluid to facilitate the squeegeeing procedure. It is advisable, in these instances, to use a low friction sleeve on
the squeegee to prevent scratches on the film. Low friction sleeves are available through sign supply distributors. In this
latter technique, it is recommended application be performed prior to installation
7
Overlaps:
A Common Method
Joined sections of film should overlap at least 1/16 –
preferably 1/8””.
1. To create a uniform overlap, first tape a cutting strip onto
the substrate.
A two-inch (5 cm) piece of thin steel at 1/16th inch
(1.6 mm) thickness is a good dimension for a cutting
strip.
2. Lay both pieces of vinyl over the cutting strip.
3. Place a metal straight edge where the two pieces of film
cover the cutting strip. With a sharp utility knife, cut
through all layers of film.
4. Remove the straight edge, excess film and the cutting
strip.
5. Complete the squeegeeing procedure to create a proper
overlap with uniform and straight edges.
Textured Surfaces:
Certain Cast and Calendared film may be applied to heavily textured surfaces. These include architectural panels,
banner material with a dense scrim, and masonry block. For substrates such as masonry block, trouble-free installations
begin with good surface preparation. Masonry is porous and absorbs moisture as well as releases dust from its surface,
which adversely affect adhesion. To avoid failures the substrate must be sealed. Non-latex masonry paint will generally
serve this purpose. As always, before vinyl can be applied to a painted surface, the paint must be completely cured.
Some banner materials are not vinyl receptive and must be primed prior to film application. Commercial primer is
available from sign supply distributors. Never clean the banner with a strong solvent such as lacquer thinner to get it to
accept vinyl or screenprinting. Strong solvents will draw the plasticizers to the surface, making the prime coat ineffective
and potentially contaminating the adhesive.
1. Begin the application to a textured surface by first
squeegeeing graphics into position.
2. Remove the application tape from the graphic.
Starting at one edge of the graphic, heat the vinyl
with your heat gun. Burnish the vinyl with a rivet
brush, using a circular motion to work the film into
the texture. The finished product should look as if
the graphic had been painted.
3. To avoid potential lifting and peeling at the edges for
masonry applications, seal the edges with a
commercial edge sealer.
8
Riveted and Corrugated Trailers:
General Installations:
Install vinyl after registering the lowest rearward panel (if a series of panels are to be applied) so that all panels afterward
overlap to shed oncoming wind and dripping water. Starting from the top of each element squeegee from the center
outward with each stroke overlapping the last in the downward direction. The vinyl should be draped up and over each
corrugation rather than stretched from ridge to ridge then pressed into the valleys. Vinyl installed by exaggerated
stretching will inevitably pop back off the surface and the graphic will quickly fail. Complete each corrugation row before
moving to the next in order to retain proper material registration along the direction of the corrugations.
• Sweep over rivet heads with the squeegee at a low angle while applying. Make sure the squeegee covers the entire
head of the rivet or wrinkles will develop at the edge of the rivet.
• Once all film is applied, any sections that cover a seam in trailer panels or other metal to metal joins must be slit and
separately tucked into the seam.
• Minor air bubbles are then worked out or popped with a pinhead, dart or other pointed tool.
At this point the rivets will be covered with a loose dome of application paper laminated to vinyl and must be fixed
securely to the whole surface of the rivet and surrounding panel.
• Remove application paper by slowly pulling away from graphics at a low angle.
• Punch holes (3 to 5) around the rivet heat with a pointed tool.
• Press vinyl in place at ambient temperature with a rivet brush.
• Secure the vinyl around the rivet with heat 300°F (150°C) and rivet brush using a circular motion.
• Be sure the film is secure around all rivet heads and all panel to panel seams.
Cold Weather Installation:
The optimal installation range of a substrate is between 60° and 90°F (15° and 32°C). Substrate temperature may drop
as low as 39°F or rise as high as 118°F (4° to 48°C) but expect more difficulty at the extremes.
• Commercial shipping units such as piggyback containers and over the road trailers should be cleaned at least a day
ahead of installation time.
• To quickly warm trailers in cold environments, use portable blower type heaters to heat the inside of unit. Fifteen
minutes of warm temperatures inside the trailers will help reduce the massive heat sink that has developed both
inside the trailer and on the aluminum skin while sitting in a truck staging lot. To expedite heating in a warmed shop,
open all trailer doors.
Cold Weather Finishing Steps for Series 6000: Due to the repositionable nature of the ProFleet™ 6000 adhesive, the
bond between substrate and graphic builds slower than with standard high tack “sign-vinyl.” While repositionability is a
great advantage during installation, in cold weather it relies on proper technique during the final steps to maintain the
bond created during earlier installation steps.
Key points to remember when finishing cold weather installations:
• The installer must be careful not to strip application paper before strong squeegee pressure has been applied.
• If installing in cold environments use a heat gun or propane torch to soften the adhesive while using a squeegee.
This ensures faster and more complete contact – doubling the adhesion bond.
• Let as much time as possible elapse before removing application tape - up to three or four hours.
• Remove application tape from the center of the graphics, working toward outer edges to avoid lifting.
Pull the application tape parallel to the surface of the graphic.
Remove tape in a smooth, slow manner rather than quickly or forcefully.
• Go over the graphic with a heat source and squeegee or rivet brush after removing application tape. This ensures
that all segments of the graphic during the application tape removal form a secure bond.
9
THERMOFORMING OF TRANSLUCENT FILM: SERIES 2500
Whether thermoforming prelaminated vinyl/plastic sheeting into simple pan faces or raised letters each aspect of
fabrication: from material dehydration and lamination to releasing the formed piece is critical to the success of the finished
sign.
For successful thermoforming, the following factors must be considered:
•
•
•
•
•
Drying of sheet before and after lamination of film
Lamination step
Temperature of sheets and molds
Rate of application and level of vacuum
Sharpness of corners and edges
1. Pre-dry:
Remove protective masking from the surface which is to receive vinyl and predry all acrylic and polycarbonate
sheets prior to lamination of film. Predrying prevents bubbling during the forming cycle. Predrying is more critical
to forming success when working with vinyl laminated plastic sheet than with sheet alone – especially for
polycarbonate signfaces.
Preferred method:
Oven drying of suspended and separated sheets at approximately 200°F (93°C) for six hours. The simplest
method is to load the drying ovens at the end of the workday for the following days fabrication. This allows the
use of lower temperatures, down to 180°F (82°C) and more than enough time for adequate ventilation. For
example, 6 hrs @ 200° F is minimum drying time for .080 in. thickness, according to a major polycarbonate
fabrication guideline.
Alternate method: (adequate for thin gauge acrylic sheeting)
1.2
Quick dry suspended and separated sheets at 230°F (109°C) for 30 minutes.
1.3
Slow dry sheets by removing masking and putting in a warm/dry area of the shop for 24 hours.
Note: Once the sheet has been dried it should be further processed within 12 hours of being removed from dryer.
2. Lamination:
Although lamination may be wet or dry, wet lamination can lead to problems with bubbles and cracking of film if all
the surface water is not squeegeed away and dried before heating and forming.
2.1 Dry Application:
When applying full sheets of uncut film with a mechanical laminator use the highest practical laminating pressure
at throughput speed of about 30’/min. (10m/min).
• Vinyl is best applied as free film immediately after being stripped away from the release liner. The point of
stripping should be where the film and liner are in tight contact with a rubber lamination roller. This eliminates
stretching and unevenness as the film travels toward the laminating nip.
• The shorter the distance between stripping station and lamination nip the better. The combination of tacky
adhesive surface and the static generated by stripping the liner away creates an environment highly
susceptible to dust contamination.
2.2 Wet Application:
This method is used when lamination is done by hand, either as background color or at the point of multicolor
registration of cut graphics.
Use only proven application fluids, or an appropriate mix of water, clear unscented liquid detergent and alcohol.
(A common recipe is 20 oz., ½ tsp., and ½ tsp. respectively.)
10
•
Lay film upside down, strip paper release liner and discard. Avoid getting the paper liner wet before it is
removed from vinyl. Water damages the paper liner and leaves small pieces of paper on the adhesive.
Synthetic linered product is less sensitive to wetness and may be splashed or sprayed with no effect. Wet the
whole film and substrate. It is advisable to use more liquid at the location where squeegeeing will begin and
let this wave of water travel ahead of the squeegee rather than saturating the entire sheet and ending up with
excess water on the work table, floor and installer.
•
Spray a fine mist on the adhesive surface of the film, turn it adhesive side down and position the graphics
until registration marks are aligned. Squeegee the top couple of inches of material or application paper in
place to establish a straight line.
•
Lift the remaining graphic (up to the squeegee line) and allow it to drape loose but square. Squeegee in
overlapping strokes from center to edge and towards the lifted end.
The squeegee should be dragged at a shallow angle for effective and stretch free work. Keep the vinyl
unattached to the sheet surface for as long as practical by lifting it; this keeps trapped fluid to a minimum and
helps avoid wrinkling along the edges.
•
Once all water has been squeegeed from underneath the vinyl and a secure bond has been established
remove the application tape by spraying it with a light mist of water, allowing 30 seconds for the water to
loosen the adhesive and immediately peeling it from the graphic. Use even pressure and a low angle of
removal to prevent graphic edges lifting.
•
After application paper has been removed and discarded, resqueegee the edge of any graphics that may
have lifted or come lose while the application tape was being lifted.
•
If the application is being done without application paper, it is advisable to mist the vinyl surface with the
same application fluid to avoid scratching or stretching the vinyl while it is being laminated.
•
Wipe off the face of the sign with clear water to remove any soap residue from the application fluid. If soap
remains, it can leave streaks of discoloration on the vinyl. This is particularly true for films to be
thermoformed.
3. Post Lamination Conditioning:
If the vinyl has been dry laminated no dwell time or additional dehydration is needed prior to forming.
If wet laminated, all residual surface moisture must be removed prior to the thermoforming process. Temperature
and time needed to dry the laminate vary according to facility and can range from as much as 24 hours at room
temperature to as little as 2 hours at 200°F (93°C). As with the initial dehydration step it is important to separate
the sheets for best ventilation and fastest drying.
4. Preforming Conditioning:
Prior to forming it is important to store the sheets in such a way that they are uniformly warm and dry. Warm
sheets going to the thermoformer will process faster and more consistently than if taken from cold or moist
environments. The best possible practice is to store sheets in drying ovens. Other options include racks along
walls free from direct contact with the ground moisture.
•
Sheets may not remain in an uncontrolled shop for more than 12 hours between dehydration and forming. If
more time elapses return sheet to dehydration conditions for a minimum of three hours.
5. Forming:
Many types and thicknesses of plastic sheet with vinyl laminated to it can be formed in exactly the same manner
as when forming unlaminated materials. For extremely thick polycarbonate materials that demand high forming
temperature, a modification of standard technique is needed. Rather than bring a bare sheet immediately to its
closest position relative to heating elements it is better to bring the laminated construction toward the heat source
in two stages. For example; if the distance for successfully forming unlaminated sheet is 6.5 inches (17cm) from
the heat elements and the dwell is 7 minutes but excessive staining or bubbling is observed in a finished sign
made from a laminated construction then a good solution is to lengthen the distance and time, i.e. 12 inches (30
cm) from elements for 3 minutes, 6.5 inches (17cm) inches for 5 minutes.
11
6. Molds:
The tooling and design used for forming a laminated piece is most successful where the vinyl does not come in
contact with the mold.
Mold depth and consequent distortion and stretching of translucent film should be kept in mind while designing
draw distance, corner radius, wall relief and draft angle.
The film may be drawn over mold depths of 4 inches (10 cm) providing the sheeting stretches uniformly. Corners
should be radiussed generously to avoid “bright spots” at the outer corners and angles.
If one tries to mold vinyl against the mold face a variety of problems develop.
• At high temperature the adhesive softens and vinyl is pulled away from the sheet as the vacuum is created
• At high temperature the vinyl becomes molten seeks to take the shape of all minor seams, joints and surface
discontinuities of the mold when a vacuum is created.
• As the surface of vinyl is slightly tacky until cool it does not release easily from the mold shape.
CARE AND CLEANING of Arlon Cut Graphic Vinyl
Graphics manufactured using Arlon Cut Graphic vinyl provide the maximum durability available today. Proper care of
these graphics is critical to achieving the ultimate life and appearance of the overall sign.
When cleaning vinyl graphics, always use a liquid detergent and water mix. The cleaner selected should be free of strong
solvents such as MEK and acetone as well as highly acidic or alkaline pH.
When preparing cleaning solutions always follow the manufacturer’s instructions for proper dilution and safe use.
Cleaning Procedures:
Manual Cleaning:
• Using clean water, spray the graphics to remove loose dirt.
• Using a mild detergent, wash the graphic with a soft brush, rag or sponge. Never use a hard bristle brush.
• If tar or oil remains on the graphic, clean with a rag moistened with mineral spirits or a household cleaner such as
“Formula 409”. Wash again with detergent and water.
• To remove mold and fungus, use a solution of one part “Clorox”’® and 30 parts water.
• Finish all cleaning processes with a rinse using clean water.
Note:
When reconditioning flexible sign faces it is important to recognize that many sign faces are topcoated to prevent UV or
other environmental damage. Whenever vinyl graphics are removed, the chance of stripping these coatings is high.
Please read and follow the flexible substrate manufacturer’s reconditioning or reuse recommendations. Arlon suggests
reconditioned flexface not be intended for long-term applications. If reconditioned, carefully check to see that all shadows
of prior graphics (if present) do not detract from the new image.
Pressure Washing:
Vinyl is easily cleaned using pressure washing – but it can just as easily be damaged by improperly handling the water
spray or incorrectly blending the cleaning solutions. In order to keep from degrading the vinyl or lifting the edges of the
film during pressure washing, it is important to remember the following rules of thumb:
• Nozzle pressure should never exceed 1,300 psi (91 kg/cm2).
• Water temperature should not exceed approximately 140°F (60°C).
• Nozzle tip should never be closer than five feet (1.5m) from the graphics.
• Angle of water spray should be no shallower than 60 degrees from perpendicular.
• The detergent solution should always be blended with water at the correct ratio – a more concentrated solution can
damage both the adhesive and the vinyl.
•
Fresh-water rinsing of the cleaned area will prevent streaks and bleach stains from developing later.
12
REMOVAL OF GRAPHICS
Tools of the Trade:
To soften the film and the adhesive a heat source is needed. A propane torch or an industrial heat gun will suffice for
removing small letters and graphics. For removal of full coverage truck graphics, you will need a large torch such as a
weed burner, which produces a cooler flame. An assortment of chemicals such as isopropyl alcohol, and solvent or citronbased adhesive removers will also be needed. Before using chemicals, read and follow the manufacturer’s safety
precautions. For scraping the softened adhesive off the substrate, you will need squeegees. Old rivet brushes are also
handy for scrubbing adhesive off rivet heads.
Film Removal:
Step 1
The first step is to warm up the vinyl with a heat source. A weed burner heats a large area quickly…and the surface stays
warm for several minutes. Be sure to keep the flame moving to prevent burning the vinyl or the substrate. This heating
process softens both film and adhesive.
Step 2
Once film is warmed, pick up an edge and pull the film from the vehicle’s surface at a 15° angle. If the temperature is just
right, the adhesive often will come off with the film in a single operation. If the temperature is too hot, the film will separate
from the adhesive.
13
ADHESIVE REMOVAL
In many cases, vinyl film and adhesive will come off perfectly with heat. In other instances, as the environment acts on
the laminate, adhesive residue may remain on the sign face while the vinyl releases.
Removing adhesive involves the use of chemicals. When using chemicals, always exercise caution. Read and follow the
manufacturer’s instructions. The first step in using an adhesive remover is to test the remover on an inconspicuous spot
on the truck to see if the remover reacts with the paint.
Next, test the adhesive remover on the adhesive. What worked on the last removal may not work this time. Start with the
mildest adhesive remover, if that does not work, try a stronger one. Hardware stores and distributors of paint and sign
supplies carry adhesive removers. Most citron based removers which use the compound d-limonene as the active
ingredient are very effective.
For best effect with a remover, saturate the adhesive with it rather than simply wetting the surface. Apply the remover by
using a rag, a spray bottle or a pressurized sprayer. Let the remover soften the adhesive to a jelly-like state. Then scrape
the gel from the surface with either an old installation squeegee or hard plastic squeegees made for that purpose. Arlon
recommends:
•
•
•
•
•
•
•
•
LIFT – X from Supply One in Sydney, Australia
XR-1000 from Mod Industries in Rolling Meadows, Illinois.
Rapid Remover from Rapid Tac in Merlin, Oregon
Sprayway No. 894 from Sprayway in Addison, Illinois
3M Woodgrain and Stripe Remover from MM in St. Paul, Minnesota
Orange peel – 800/866-8440
Autotech – Adhesive Remover
VinDotco – Adhesive and Mastic Remover in Largo, Florida
Please note - All of these products have specific instructions for their use which should be followed closely with a special
eye on safety and recommended contact time.
A method used when the surface area is large or the climate is hot and dry involves applying thin plastic sheeting over the
area to be removed immediately after spraying the remover on the adhesive. When the plastic is taped around its edges
the solvent does not evaporate and removal proceeds more rapidly. This is a handy method to use when trying to contain
remover in a specific area on the sign surface. In all cases it is better for containing both solvent and adhesive than when
uncovered.
Use old rivet brushes to scrub the adhesive off the rivet heads. At this point, paper towels are suggested for easiest
removal. Once adhesive has been completely removed use standard cleaning procedures to prepare the vehicle for the
next installation. Adhesive removers are great for dissolving glue but leave an oily residue on the surface and are not to
be substituted for alcohol and water as the final cleaning step.
14
SPECIAL APPLICATIONS
87V/DPF8000
Arlon’s 87V/DPF8000 is coated with very tacky adhesive for those installations where rough surfaces (concrete/masonry
and tile) or low energy surfaces are encountered. Characteristics of this product which make it unsatisfactory for common
applications, such as extreme adhesion are benefits in extreme conditions.
Common applications for this material are printed wall murals, exterior building wraps, super-large format billboards and
many applications to plastic surfaces such as polyethylene, polypropylene and styrene.
Even though the adhesive is extremely tacky and will provide adhesion where most others will not there are tips which will
further enhance performance.
Concrete, Masonry and Tile
• The surface must be entirely dust free.
• The surface must be sealed with a complete coat of paint or concrete sealer and allowed to dry.
• Sealing porous surfaces created three benefits
• Moisture cannot wick to the adhesive surface from within the matrix of the wall.
• Dust due to ablation cannot develop under the vinyl.
• Removal steps are much easier as the adhesive will remove more cleanly and the surface will be cleaned
more of residue more easily.
• The surface temperature must be above 50° F
• To assure highest adhesion the graphics will benefit from a final squeegee pass using a soft squeegee or
large rivet brush and a heat source to raise the temperature enough to soften the film and allow it to make
high contact with surface.
Plastics
Many common plastics are incompatible with pressure sensitive adhesive in their original state but can be
modified via coatings or treatments.
Surface Oxidation through flame or static discharge is a common surface treatment used to temporarily raise
surface energy of polyester, polypropylene and polyethylene. For small jobs flame treatment is probably the most
cost effective and easiest to achieve. This involves simply passing an open flame from a propane torch over the
surface which will receive the decals until a slightly glossy sheen develops – this indicates that the waxy surface
has been modified and should accept paint, glue or decals more readily. For regular production on regular or flat
surfaces such as full webs of signage a corona discharge unit will be more efficient and safer. These may be
purchased through suppliers such as Corotec® in the U.S. After surface treatment, immediately install the graphic
with adequate pressure to make sure complete contact with the adhesive has occurred.
Print Related Issues:
87V / DPF 8000 owes its very high bond to the softness of the adhesive. The trade off for high tack and adhesion is
greater than normal shrinkage – this usually does not pose a problem when the product is used as received. When
decorating DPF 8000 with screen or digital printing the solvent involved will penetrate both the vinyl and adhesive at the
time of printing. If the printing solvents aren’t completely removed before installation the resultant graphic will show very
high shrinkage and edge curl. When printing this product be vigilant about drying the finished decal completely before
laminating, top coating or installing.
Usage and Application of 4560GT and 4560GTX
Introduction:
While 4560 series film may be used as a printed wrap material it must be recognized that calendered films are more
susceptible to temporary ink/ solvent related softening and adhesion loss than are the more expensive and high
performance cast materials. The condition of postprint softness etc. is only temporary however. Both film and adhesive
recover after the solvents that carry digital inks are completely evaporated from the material.
Printing and Drying:
When printing full color saturation the maximum amount of solvent (as the ink carrier) is being applied along with the ink.
This solvent penetrates the vinyl and adhesive during and slightly after the print process, where it lingers until several
hours of drying takes place. Post print heaters will only dry the top layer of the print so it loses its tack and will not smear
15
upon rolling and unrolling. To dry the ink, film and adhesive adequately requires a loosely wound roll or sheeted section to
rest in a warm and dry environment for at least 12 hours. Often, when the humidity is high or the weather cool the time for
drying must be extended another day or even two. To determine how well dried the product is one can pull back a section
of printed film from the release liner and smell or stretch the film. If the smell of ink solvent remains strong or the film feels
very soft allow the film to continue drying. Any additional heat and ventilation using warm fans will accelerate drying rate
by at least double.
When printing decals which are to be trimmed to an edge a good strategy is to print then trim to a narrow border
(2 to 4 mm) before installation. This unprinted band of white vinyl will anchor the print within. In the case of any stretch
caused by installation an unprinted border will stabilize against shrinkage or glue to vinyl separation.
Application:
During installation of any vinyl it is important to keep stretch to a minimum in spite of the fact that stretching the film is also
the easiest way to avoid wrinkling the graphic. Applying stretch to decals creates a great deal of tension and as the film
dries and hardens this stretching exerts strong shrinkage forces particularly on the edge of the graphics. Where graphics
will need to be shaped around features the distortion should be started early in the application and continue gradually
throughout the section rather than applying all the stretch along one particular area and especially along the edges.
Where graphics have been made to take sharp corners it is to be trimmed with a razor knife to slightly ahead or even with
the crown of the corner. Cut edges are to be finished with an additional pass of a torch or heat gun and final squeegee
stroke as the film cools and adhesive bond builds. Merely passing a heat gun across cut edges does no good as the
additional heat actually releases the adhesive and accelerates edge shrinkage. The final stroke with a squeegee as the
film cools assures the adhesive bond is reestablished at the highest level of surface contact.
Where graphics have passed over a closed channel the film is to be cut along both upper channel edges and laid into the
channel with no stretching tension. This is true of any “filet” section of graphic as these areas have such a high ratio of
perimeter edge to adhesive bonding area. In no case should a deep channel, door handle depression or sharp wheel flair
be installed as a continuous sheet of film.
Should edge lift occur, wait a week to be sure the decal is very dry, and then trim away the curled section. The remaining
edge will stay intact.
Metallized Polyester:
Metallized Polyester films in all their forms are popular for a variety of window graphics as well as on emergency and
service vehicles and create very fine graphics. One installation caution will help with a common problem: bubbles rising
under the decal after installation. While polyester film is well known for its ability to prevent moisture loss in the packaging
trade this works to the installers disadvantage in commercial graphics since almost all these graphics will be applied over
either a painted or plastic surface and very often metallized films are applied “wet” to avoid wrinkles and bubbles during
installation. If moisture or outgassing from any source occurs after installation decals made of polyester – metallized or
not will develop bubbles. It is imperative that all paints and plastics are well dehydrated before installation is attempted
and that all application fluid is squeegeed out from the interface between decal and sign substrate before application tape
is removed.
16
17
USA: 2811 S. Harbor Blvd. - Santa Ana, CA 92704 - Tel: 800-854-0361 - Fax: 714-540-7190 - Technical Services: 877-275-6698
EUROPE: Badhuisweg 11 2587 CA Den Haag The Netherlands - Tel: +31 (0) 70 354-4311 - Fax: +31 (0) 70 355-7721
www.arlon.com