1
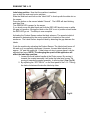
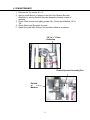
R-320
Automatic Round Product Labeling System
Operator’s Manual
Serial #
Operator’s Manual
Version: C 12/8/2004
The information in this manual is subject to change without notice. No part of this
manual may be reproduced or transmitted in any form or by any means, for any
purpose other that the purchaser’s personal use, without prior written consent
from Universal Labeling System, Inc.
Universal Labeling Systems, Inc.
3501 8th Ave South, Saint Petersburg, FL 33711
Phone (727) 327-2123 Fax (727) 323-4403
Web Site:
http://www.universal1.com
2
Table of Contents
SECTION 1
OVERVIEW....................................................................................4
INTRODUCTION...........................................................................4
SPECIFICATIONS ........................................................................5
PRODUCT WARRANTY ...............................................................6
PERFORMANCE GUARANTEE ...................................................6
SECTION 2 CONTROLS AND THEIR FUNCTIONS........................................8
R-320 CONTROL ENCLOSURE...................................................8
L-15 FRONT PANEL .....................................................................9
SECTION 3 SETUP AND OPERATION .........................................................10
ADJUSTING PEELER PLATE TO CONTAINER.........................10
ADJUSTING THE TURNING UNIT .............................................12
ADJUSTING PRODUCT SENSOR .............................................13
ADJUSTING PRODUCT SPACER..............................................15
WEBBING THE L-15 ...................................................................16
TRI-TRONICS SENSOR SPECIFICATIONS ..............................19
SETTING THE SPEED OF THE R-320.......................................20
ADJUSTING THE PEELER ASSEMBLY ....................................21
SETTING THE SPEED OF THE L-15 .........................................21
ADJUSTING THE PRODUCT SENSOR POSITION ...................22
ADJUSTING THE LABEL HEIGHT OF THE L-15 .......................23
CHECKING LABEL SKEW..........................................................23
ADJUSTING LABEL SKEW ........................................................24
PEELER PLATE ANGULAR ADJUSTING ..................................24
WASTE WEB REMOVAL ............................................................25
OPTIONAL LION SENSOR (Clear Labels) .................................26
LION SENSOR SPECIFICATIONS .............................................27
SECTION 4 TROUBLESHOOTING................................................................28
CONTROL ENCLOSURE LAYOUT ............................................29
SECTION 5 MAINTENANCE..........................................................................31
SYSTEM MAINTENANCE ..........................................................31
L-15 MAINTENANCE ..................................................................32
RECOMMENDED SPARE PARTS .............................................33
SECTION 6 DRAWINGS AND BILL OF MATERIAL .....................................34
TECHNICAL SUPPORT.....................................................................................35
3
SECTION 1
OVERVIEW
INTRODUCTION
Thank you for purchasing the R-320 Automatic round product labeling system.
The R-320 is known for high quality and operating convenience. The R-320
features heavy-duty steel framework with casters and leveling pads, L-15 label
applicator, variable speed components, photoelectric product sensor and easy
access control enclosure. The applicator is at the heart of every labeling
operation. The L-15 is a mid-range wipe-on label applicator with speeds up to
1200 inches per minute. The clutch/brake operated machine is a low
maintenance unit, featuring analog controls and digital label sensing, built into a
durable labeling workhorse.
The variable speed applicator has advanced features for label dispensing and
label placement. First, the L-15 has an “on delay,” controlling the timing of the
label dispense with regards to the signal from a product sensor. The applicator
also features an “off delay,” controlling the labels stop position with relation to the
peeler plate.
The R-320 has no pneumatics requiring electricity only (120VAC 60Hz ±10%),
and can handle label web widths up to 6 ½ inches. The R-320 can also handle
label rolls up to 12 inches in diameter on a 3”core.
With proper maintenance the R-320 will provide many years of dependable and
trouble free service. We wish you much success with this product and will
always welcome any suggestions you may have, as to how we may improve our
products. Read this manual and familiarize yourself with the machine before
using this equipment.
4
SPECIFICATIONS
Electrical Power:
Label Apply speed:
Label Size:
Nominal Size:
Shipping Weight:
120VAC, 10 Amps, 60Hz
Depends on label size up to 1200 Inches/min
6-1/2” web capacity on 3” Core -12” Diameter roll
42” Wide x 72” Long x 56” Tall
(1066.8mm Wide x 1828.8mm Long x 1422.4mm Tall)
approx. 1075 Lbs (487.6Kg)
5
PRODUCT WARRANTY
Universal Labeling Systems, Inc. warranties all parts to be free from defects in
material and workmanship for a period of one year from the date of shipment
from our facility.
This guarantee is based upon equipment being used 8 hours per day, or 40
hours per week, or in any increment which does not total more than a single shift
operation, or 2,080 hours per year. Warranty will be reduced proportionally.
This warranty does not cover parts failure caused by lack of normal maintenance,
abuse or misuse of the equipment.
PERFORMANCE GUARANTEE
All equipment manufactured by Universal Labeling Systems, Inc. carries a 30day performance guarantee. If your machinery does not perform as described in
our quote to you within 30 days of shipping, Universal Labeling Systems, Inc. will
make every attempt to correct it. If after a reasonable period of time, the
machinery does not meet the specified performance, we will take your machine
back and reimburse you in full.
6
START UP SETTING
CONVEYOR SPEED
______________
TURNING UNIT/ENCAPSULATOR SPEED
______________
APPLIER SPEED
______________
PRODUCT SPACER SPEED
______________
ON DELAY
______________
OFF DELAY
______________
7
SECTION 2
CONTROLS AND THEIR FUNCTIONS
R-320 CONTROL ENCLOSURE
1
2
3
4
5
6
7
Fig.1
8
1. Emergency Stop: When pressed in it shuts down the system and a Red
light turns ON. To reset system, pull button back out, the Red light turns
OFF, turn Main switch ON, green pilot light comes on.
2. Conveyor Switch: When on, it supplies power to the Conveyor.
3. Product Spacer Switch: When on, it supplies power to the Product
Spacer.
4. Turning Unit Switch: When on, it supplies power to the Turning Unit.
5. Applicator Switch: When on, it supplies power to the Applicator.
6. Main Switch: When turned to Right, it turns system on. When turned to
the left, it turns system off.
7. Pilot Light: When Emergency Stop is pulled out and power is ON to
system, the light is ON.
8. Speed Controls: Controls the speed of the device directly above it.
Turning to the right increases speed. Turning to the left decreases the
speed.
8
CONTROLS AND THEIR FUNCTIONS
L-15 FRONT PANEL
1. Main Switch: Supplies power to the machine. The main switch "On"
also supplies power to the hot stamp coder outlet. Therefore, the coder
can be pre-heated without running the motor.
2. Fuse: 3 amps. 5 amp with coder
3. Off Delay: Turn knob clockwise to provide up to one-second delay of
label detection. Works with photoelectric label sensing.
4. On Delay: Turn the knob clockwise to provide up to a one second
delay before label application.
5. Label sensor Outlet: 4 Pin Female amphenol. 4 Pin male amphenol
is attached to label sensor.
6. Hot Stamp Coder Outlet: 5 Pin Female amphenol. 5 Pin male
amphenol is attached to the hot stamp imprinter head.
7. Product Detection Outlet: 6 Pin Female amphenol. 6 Pin male
amphenol is attached to the photoelectric product sensor.
8. Motor Switch: Supplies power to the motor. Turn this switch OFF
when setting product sensor to prevent labels from dispensing.
9. Jog Switch: Dispenses one label when depressed.
9
5 6 7
1
2
3
4
Fig.2
9
8
SECTION 3
SETUP AND OPERATION
ADJUSTING PEELER PLATE TO CONTAINER
The peeler plate of the applicator needs to be adjusted square to the
conveyor in both the flow direction as well as across the conveyor. To adjust
in the flow direction, there is a knob under the applicator. Turning the knob
clockwise will cause the applicator to tip forward. Turning the knob counter
clockwise will cause the applicator to tip backwards. (See Fig.3 & 3a)
Square
Knob
Fig.3
Peeler Plate
Fig.3a
Conveyor
To adjust across the conveyor, there is a knob in front of the applicator.
Turning the knob clockwise will cause the applicator to tip inward. Turning the
knob counter clockwise will cause the applicator to tip outward.
(See Fig.4 & 4a)
Fig.4a
Fig.4
Knob
Applicator
10
Conveyor
SETUP AND OPERATION CONTINUED
1. With power OFF, select the container to be labeled, place on conveyor
for reference and adjust vertical height of guide rails. This is
accomplished by loosening the ratchet handles at each guide rail
mount. After adjusted, re-tighten ratchet handles. (See Fig.5)
Knob
Turning
Unit
Fig.6
Guide Rail
mount
FIG.5
Ratchet
Handle
Backing
Plate
Put two containers on conveyor in front of the Turning Unit. (See Fig.6)
Adjust the cross adjust of the guide rail by loosening the knob at the top or
side of each guide rail mount. (See Fig.5) Slide Backing Plate up to
containers until snug. After adjusted, re-tighten knob. (See Fig.7) Adjust
the entrance and exit guide rails in the same manner, but to be a loose fit.
Turning Unit Belt
Snug
Fig.7
Backing Plate
11
SETUP AND OPERATION CONTINUED
ADJUSTING THE TURNING UNIT
1. To do this, loosen the knobs under the Turning Unit. Move the Turning
Unit to the desired position and re-tighten the knobs. (See Fig.8)
2. The turning unit needs to remain at a slight decline, relevant to the
product flow, to the top of the conveyor (Ref. Fig. 8a). If the turning
unit is inclined, the container will want to rise up off the conveyor,
which will wrinkle or cause skewing to the label. Excessive decline will
wrinkle the label or cause the label to be skewed (1/16” – 1/8” is
recommended). Determine if the turning unit needs to be adjusted.
Then loosen the (8) 10-32 socket head cap screws that secure the (4)
backing plate guides. Adjust the turning unit until container runs true.
With your fingers, squeeze the backing plate guides up against the unit
mounting posts and re-tighten the screws that secure them. (See
Fig.8)
10-32 Socket Head
Cap Screw
Turning Unit
Knobs
Unit Mounting
Post
Backing
Plate Guide
Fig.8
PRODUCT FLOW
Turning Unit
-1/16”- 1/8”
Conveyor
Top
Fig.8a
12
SETUP AND OPERATION CONTINUED
3. After adjusting Turning Unit height, you will also need to adjust the
height and tilt of the Turning Unit Backing Plate assembly. Loosen the
ratchet handles at each guide rail mount and move the assembly up or
down to desired height. To adjust the tilt of the assembly, loosen the
two small ratchet handles and tilt the Backing Plate assembly in or out
depending on the container that is to be labeled. (See Fig.9)
Small
Ratchet
Handles
Fig.9
Ratchet
Handles
ADJUSTING PRODUCT SENSOR
1. With power off, Place container at the entrance side of the Turning
Unit. The Fiber Optics of the Product Sensor needs to be in the center
of and as close to but not touching the container. There are three
Ratchet Handles to accomplish this. (See Fig.10 & 10a)
Along Conveyor Adjust
Fiber Optics
Across
Conveyor
Adjust
Fig.10a
Fig.10
Up & Down
Adjust
Entrance side of
Turning Unit
13
ADJUSTING PRODUCT SENSOR CONTINUED
2. After the Product Sensor is adjusted to the container, turn power to the
system on by pulling Red Emergency switch out, the Red light turns
OFF, turn Main switch ON. Turn Conveyor, Product Spacer and
Turning Unit switches to the OFF position, leaving the Applicator
switch in the ON position. Turn OFF motor switch on the label
applicator.
3. Place container under Fiber Optic Sensor. The sensor that the Fiber
Optic Cable is attached to needs to be set. It is located on the front of
the conveyor. On the sensor are a Yellow and a Blue button. Depress
either Yellow or Blue button for three seconds. Yellow button provides
Light “On” Output (Leading Edge). Blue button provides Dark “On”
Output (Trailing Edge).
NOTE: If required, use “Up” or “Down” to tweak adjustment. Turn
motor switch on the label applier back ON. (See Fig.11)
Yellow Button
Blue Button
Fig.11
SETUP AND OPERATION CONTINUED
14
ADJUSTING PRODUCT SPACER
The Product spacer meters the spacing between the containers that are being
labeled. The diameter of the container and the label length is what determines
the spacing. If you have a 3” diameter container and a 1” long label, the spacing
in between the containers would be shorter than if you had a 3” diameter
container and a 9-1/2” long label for a total wrap. With power off, place a
container in front of the product spacer and adjust until the container will not go
past. (See Fig.12) To adjust Product Spacer across conveyor, use ratchet handle
under Product Spacer Wheel. To adjust Product Spacer up or down, use ratchet
handle that attaches the unit to the conveyor. (See Fig.13)
Product Spacer
Cross
Adjust
Height
Adjust
Fig.12
Cork in front of
Product Spacer
15
Fig. 13
WEBBING THE L-15
1st. Turn the Applier switch on the control enclosure off.
2nd. Do not use a label to attach the web to the rewind spool; this will make
the removal of the waste roll difficult.
Web the machine by looking at the webbing diagram located on the side of the
L-15 body.
1. Mount the label roll to the unwind hub. Push label roll straight back against
the unwind backing plate. Slide the label roll retainer onto the unwind hub
until it contacts the label roll. Tighten thumb screw.
2. Remove approximately 30 inches of labels from label roll backing web.
3. Route the web over brake idler roll and between the idler roll and web
drag then down through the Sensor. (See Fig.14)
Unwind Hub
Brake Idler
Roll
Unwind Backing
Plate
Thumb
Screw
Web Drag
Label Roll Retainer
Idler Roll
Sensor
Fig.14
16
WEBBING THE L-15 CONTINUED
4. Route the web under the upper idler roll and peeler bar assembly tie bars, and
continue between the pivot roller and peeler plate.
5. Pull the drive roll back, engage web lock link by pressing it down to release
pressure on the drive roll.
6. Route the web over and around the drive roll
7. Then between the drive roll and the lower idler roll. (Silver Knurled roller)
8. Route the web back under the lower idler roll and the web stand-off stud.
9. Release web lock link by pulling back on the drive roll shaft.
10. Wrap the web over the top of the rewind spool and attach the web retention clip.
(See Fig.15 & 15a)
Fig.15
Upper Idler Roll
and Tie Bars
Drive Roll Shaft
Upper Idler
Roll
Pivot Roller and
Peeler Plate
Web Lock Link
Drive Roll
Lower Idler
Roll
Web Stand-Off Stud
Fig.15a
17
RUNNING THE L-15
Label stop position. Now that the machine is webbed,
turn on both the main and motor switches.
Slide the Web back and forth so the “label GAP” is lined up with the white dot on
the sensor.
Press the button on the sensor labeled “Normal”. The LEDS will start blinking
and then Stop.
The GREEN LED is power for the sensor.
If you slowly move the label back and forth the RED LED should come on while
the gap is in position. Moving the label so the GAP is out of position should make
the RED LED go out. The Setup is now complete.
Activating the Product Sensor makes the label advance. The speed at which it
advances is determined by the motor speed that is located on the control
enclosure. The Label Sensor stops the label by detecting the gap between the
labels.
Cycle the machine by activating the Product Sensor. The label should come off
the web so it is completely dispensed. However, the next label should stop
approx. 1/4” past the peeler tip. If label does not stop in proper place it can be
adjusted two ways. NOTE: The changing the speed of the applicator will
affect the label stop position.
1. Loosen the small ratchet handle at the Photo sensor. By moving it
towards the unwind assembly it will make the label stop sooner. By
moving it towards the peeler assembly, it will stop later (See Fig.16)
2. By adjusting the “OFF DELAY” on the front panel of the L-15. Turning
the knob clockwise will make the label stop later.
Fig.16
18
SPECIFICATIONS
SUPPLY VOLTAGE
HYSTERESIS
CURRENT REQUIREMENTS
LIGHT IMMUNITY
• 10 to 30 VDC
• Polarity Protected
• Minimal hysteresis promotes the detection between the
backing material and the label depending on the settings
• Responds to sensor’s pulsed modulated light source …
• 45 milliamps (exclusive of load)
immune to most ambient light
OUTPUT TRANSISTORS
• (1) NPN and (1) PNP output transistors
• Sensor outputs can sink or source up to 150 milliamps
(current limit)
• All outputs are continuously short circuit protected
RESPONSE TIME
• Light state response = 100 microseconds
• Dark state response = 100 microseconds
INDICATORS
• Green LED flashes when Autoset™ routine is activated
and stays illuminated when Autoset™ is completed
• Red LED illuminates when sensor’s output transistors
are “ON”
Note: The status of the output transistors can be inverted
by pushing both buttons simultaneously.
AMBIENT TEMPERATURE
LED LIGHT SOURCE
• –40°C to 70°C (-40°F to 158°F)
• High intensity red LED
• Pulse modulated
RUGGED CONSTRUCTION
PUSH BUTTON CONTROL
• Automatic set-up routines based on web opacity
• One push button set-up
• Simultaneously pushing both buttons inverts the output
• Chemical resistance to harsh cleaners, such as
detergents, alcohols, and ketones
• Waterproof ratings: NEMA 4 and IP66
• Conforms to heavy industry grade CE and UL requirements
Product subject to change without notice.
Model Numbers:
Nano Cable (M8) Selection Guide
Label•Eye
P/N
LER
LERC
Description
Red LED, 4 conductor 6 ft. cable
Red LED, 4-pin Nano connector
DIMENSIONS
Proudly made in the U.S.A. by
Length
GEC-6
6 ft. (1.8m)
GEC-15 15 ft. (4.6m)
RGEC-6
6 ft. (1.8m)
RGEC-15 15 ft. (4.6m)
Thread Coupling
Straight Female
Straight Female
90° Female
90° Female
P.O. Box 25135, Tampa, FL 33622-5135
TEL: (813) 886-4000 / TOLL FREE: (800) 237-0946
FAX: (813) 884-8818 / TOLL FREE: (800) 375-8861
www.ttco.com / [email protected]
004-0105
SETTING THE SPEED OF THE R-320
1. Pull the Emergency Stop switch out (ON).
2. Turn the Main switch to ON.
3. Turn the Conveyor switch to ON. Determine the speed at which you want
to run. Set the speed of the Conveyor using the speed control on the
control enclosure.
4. Turn the Product Spacer switch to ON.
5. Turn the Turning Unit switch to ON.
6. Turn the Applier switch to OFF.
7. Adjust the speed of the Turning Unit using the speed control on the control
enclosure. Adjust the speed so that when the container goes through the
Turning Unit, the container stays at the same speed as the Conveyor. To
do this, look down at the container and watch the links of the mat top
chain on the Conveyor. They should be moving at the same rate of speed.
(See Fig.17).
Mat Top
Chain Link
Container
Fig.17
20
ADJUSTING THE PEELER ASSEMBLY
Now that the Conveyor and Turning Unit are speed matched, Adjust Peeler
Plate so it is close but not touching the Turning Unit. The Peeler Assembly
can be adjusted by loosening the Height Adjust Bracket and loosening the
Peeler Plate Pivot Blocks. (See Fig.18, 18a & 18b)
Pivot Blocks
Peeler Plate
Height Adjust Bracket
Fig.18
Fig.18a
Fig.18b
SETTING THE SPEED OF THE L-15
1. Turn the Applier switch to ON.
2. Run one container down the conveyor. Watch when the label is applied. If
the Turning Unit pulls the label from the peeler plate, the L-15 is going too
slow. (See Fig.19) If the L-15 is pushing the label onto the container, the
L-15 is going to fast. (See Fig.19a)
Turning Unit
Fig.19
Peeler Plate
Pulling Web
Turning Unit
Fig.19a
Peeler Plate
Pushing Label
3. If the web is being pulled, adjust the speed control of the L-15 up. If the
label is being pushed, adjust the speed control of the L-15 down. Once
these adjustments are made you should have a smooth label transfer.
21
ADJUSTING THE PRODUCT SENSOR POSITION
If the label transfer is smooth but is inconsistently applying the label, the
product sensor needs to be adjusted. If the label dispenses too late, it will
miss the container. (See Fig.20) If it dispenses too soon, the label will fold at
the leading edge. (See Fig.20a)
Container
Container
Leading
Edge Fold
Fig.20
Label Missed
Fig.20a
If the label dispenses too late and misses the container, move the product
sensor towards the entrance end of the conveyor. If the label dispenses too
soon, move the product sensor towards the exit end of the conveyor. To do
this loosen the small ratchet handle at the top of the Product Sensor
Assembly. (see Fig.21)
Ratchet Handle
Entrance
end of
Conveyor
Exit end
of
Conveyor
Fig.21
22
ADJUSTING THE LABEL HEIGHT OF THE L-15
Run one test container. Look at the label placement in reference to the height.
If the label is too high, turn the applicator height adjust crank handle
clockwise to lower the unit. If the label is too low, turn the crank handle
counter clockwise to raise the unit. (See Fig.22)
Applicator Height
Adjust Crank
Handle
Fig.22
CHECKING LABEL SKEW
After the height of the label is adjusted to the container, check the skew of the
label by comparing the leading edge of the label to the trailing edge of the
label. The leading edge is the part of the label that was applied first. The label
below is skewed down. (See Fig.23)
Leading Edge of
Label is higher
than Trailing
Edge.
Leading Edge
Trailing Edge
Fig.23
23
ADJUSTING LABEL SKEW
If the label is skewed either up or down, the applicator needs to be readjusted for the skew. To do this, there is a knob under the applicator.
Turning the knob clockwise will cause the applicator to tip forward. This will
cause the trailing edge of the label to go up. Turning the knob counter
clockwise will cause the applicator to tip backwards. This will cause the
trailing edge of the label to go down. (See Fig.24)
Applier Mount
Knob
Fig.24
PEELER PLATE ANGULAR ADJUSTING
The peeler plate needs to be square with the container. If the container is
slightly irregular, you can adjust for this with the peeler plate angular adjust.
To do this, there is a knob in front of the applicator. Turning the knob
clockwise will cause the applicator to tip inward. Turning the knob counter
clockwise will cause the applicator to tip outward. (See Fig.25)
Applicator
Knob
Fig.25
24
WASTE WEB REMOVAL
Rewind Backing Plate
Waste Web
1. To remove waste web, turn off the machine, and remove the web retention clip.
2. Tear the web first.
3. While holding the rewind backing plate, turn the whole waste web in the
opposite direction and pull.
25
OPTIONAL LION SENSOR (Clear Labels)
Important:
• Web must remain in contact with mounting plate.
• Label must pass under the sensor indicator
• Small labels should be centered under sensor.
• When properly setup, the lights will move between WEB and LABEL. The
lights in the “X” region should only light briefly during the transition
between WEB and LABEL.
Basic (Low Gain) Setup (effective for 90% of labels):
1. Adjust SPAN to minimum (four turns counter-clockwise)
2. While moving labels through the sensor.
a. Adjust shift toward L (LABEL) until the last web light does NOT
light.
b. Adjust shift toward W (WEB) until the last web light DOES light.
3. Setup complete.
4. If there is any false triggering, missed labels, or lights in the “X” region
except during transition, change to medium gain setup. (See Fig.26)
Basic Gain Setup:
1. Adjust SPAN to mid-point (four turns counter-clockwise, two rotation
clockwise)
2. Repeat steps 2 & 3 from Basic setup above.
3. If there is any false triggering, missed labels, or lights in the “X” region
except during transition, change to high gain setup. (See Fig.26)
High Gain Setup:
1. Adjust SPAN to maximum (four turns clockwise)
Repeat steps 2 & 3 from Basic setup above. (See Fig.26)
Mounting Plate
“SHIFT”
“X” area
Fig.26
“SPAN”
26
LION PRECISION LRD6110 UNIVERSAL LABEL SENSOR
INSTRUCTION SHEET
M015-3380.06
Introduction:
The LION PRECISION LRD6110 LABEL REGISTRATION AND DETECTION SYSTEM is an electronic capacitancebased sensor used to monitor label registration and/or count labels. The sensor will output a signal indicating the leading
or trailing edge of the label as it passes through the sensor.
No Power
during connection!
Electrical Connections
Warnings:
Unused wires must be insulated from contact
with other objects.
All power must be off when installing the
sensor.
DC Ground is connected to sensor body.
Brown wire must be connected to +V or
Ground for reliable operation.
Sensor case is
grounded
Red
Wiring
+11 to 28VDC
NPN Load
Wire Color
Connection
Notes
Red
+Vin (11-28VDC)
50mA max.
Black
Ground
Connected to sensor body
Green
NPN Output
150mA max.
Blue
PNP Output
150mA max.
Brown
Output Polarity
(light/dark switching)
+V or Ground
See fig. 2 on back
NPN Output
150mA max.
Green
Blue
PNP Output
150mA max.
PNP Load
Black
Brown
Ground
Polarity Invert
Warning: Brown wire must be connected to +V or Ground for reliable
operation.
Power supply
Response time
Output
Temperature
Protections
Voltage
11-28 VDC (reverse polarity protected)
Current
50mA
on or off
10µs max
Switching Frequency
10kHz max
Output Current (sinking or sourcing)
150mA max (overload protected)
Switching output
PNP or NPN, dark or light switching
Operating Range
40°F to 140°F (4°C to 60°C)
Supply
Inverse Polarity Protection
Switching output
Short Circuit and Overload Protection
© Lion Precision 2002 • 563 Shoreview Park Road • St. Paul, Minnesota • 55126 • Phone 651-484-6544 • Fax 651-484-6824
SECTION
4 TROUBLESHOOTING
No power to entire system:
1. Is the emergency switch on the control enclosure pulled out?
2. Is the main switch on the control enclosure “On”?
3. Do all switches in the control enclosure have continuity? Check
with ohmmeter.
4. Is the main fuse in the control enclosure good? Check with
ohmmeter.
5. Is the master control relay in the control enclosure working?
When main switch is turned “On”, it should engage.
6. Is power at power cord? Check with ohmmeter.
No power to conveyor motor:
1. Is the conveyor switch on the control enclosure “On”?
2. Is the neutrik connector at the end of the motor cord plugged
into the junction box at the bottom of the conveyor?
3. Is the conveyor fuse in the control enclosure good? Check with
ohmmeter.
4. Is there DC voltage to motor? Check with ohmmeter.
No Power to product spacer motor:
1. Is the product spacer switch on the control enclosure “On”?
2. Is the neutrik connector at the end of the motor cord plugged
into the junction box at the bottom of the conveyor?
3. Is the product spacer fuse in the control enclosure good? Check
with ohmmeter.
4. Is there DC voltage to motor? Check with ohmmeter.
No power to turning unit motor:
1. Is the turning unit switch on the control enclosure “On”?
2. Is the neutrik connector at the end of the motor cord plugged
into the junction box at the bottom of the conveyor?
3. Is the turning unit fuse in the control enclosure good? Check
with ohmmeter.
4. Is there DC voltage to motor? Check with ohmmeter.
No power to applier:
1. Is the applier switch on the control enclosure “On”?
2. Is the motor switch on the applier “On”?
3. Is the applicator fuse in the control enclosure good? Check with
ohmmeter.
4. Is the fuse in the applicator good? Check with ohmmeter.
5. Is the neutrik connector at the end of the motor cord plugged
into the junction box at the bottom of the conveyor?
6. Is there DC voltage to motor? Check with ohmmeter.
28
CONTROL ENCLOSURE LAYOUT
Product Spacer Fuse
Applicator Fuse
Conveyor Fuse
Main Fuse
Master Control Relay
Turning Unit Fuse
“A”
“B” “A”
“A” “B
N.O. Contact Marked “A”
N.C. Contact Marked “B”
29
TROUBLESHOOTING CONTINUED
PROBLEM WITH WRINKLE OR SKEWED LABEL
The turning unit must be adjusted properly to the top of the conveyor. If the
turning unit is tilted up, the container will want to rise up off the conveyor, which
will wrinkle the label. Same problem, if the turning unit is tilted to far down it will
wrinkle the label or cause the label to be skewed. (See Fig.8a)
The backing plate must be adjusted properly. Too much pressure will squish the
bottle and cause wrinkles. Not enough pressure and the label will not be wiped
down properly. (See Fig.7)
If the label is skewed one way or the other way (running up hill or down hill) and it
is doing it consistently, use the skew adjustment to get the label on properly.
(See Fig.24)
The applicator should be square to the container. If the container has a taper to it
then the applicator angle needs to match that taper. If the container is at 90°
angle to the conveyor then the applicator peeler plate needs to be at a 90° angle.
(See Fig.25)
CONTAINERS NOT ALL GETTING LABELED
If containers are going threw and all containers are not getting labeled, you need
to check to make sure the product sensor is working correctly. (See Fig.11) Also,
product spacing may be too close together. A label has to be completely
dispensed before the product sensor can send another signal to get another label
to dispense. (See Fig.12)
LABEL NOT DISPENSING FROM APPLICATOR
Make sure that the applicator switch on the control enclosure is “On”. Make sure
that the motor switch on the applicator is “On” and running. If motor is “On” and
not running, check to make sure that the motor is getting DC voltage. If motor is
running and the labels are not dispensing, check that there is DC voltage to the
clutch brake. If there is no DC voltage to the clutch brake, re-seat the circuit
board behind the front panel of the applicator. If there is still no DC voltage to the
clutch brake, check for AC voltage at the transformer behind the front panel of
the applicator. If there is AC voltage at the transformer, the circuit board is bad.
Make sure that the web lock link is disengaged. Check to see if setscrews are
tight on the drive roll.
30
TROUBLESHOOTING CONTINUED
LABEL DISPENSING FROM APPLICATOR CONSTANTLY
Make sure that the label web going threw the label sensor. Make sure that the
label sensor is plugged into the applicator. Check the label sensor to see if it is
working. Make sure that product sensor is not seeing the trailing edge of the label
as it goes by. Try re-setting label sensor. (See Fig.16)
WASTE WEB NOT WINDING ON REWIND
Adjust rewind take-up. To adjust the rewind take-up, there is a jam nut on the
opposite side of the rewind assembly. Loosen the jam nut. By turning the
adjuster clock wise, it will increase the tension of the rewind.
SECTION 5
MAINTENANCE
SYSTEM MAINTENANCE
1.
2.
3.
4.
5.
6.
7.
Lubricate bearings that are on the conveyor.
Keep conveyor mat top chain clean.
Check all motor brushes.
Clean turning unit belt.
Keep peeler tape on end of peeler plate clean and nick free or replace.
Check that nuts and bolts are tight.
Keep fiber optics of the product sensor clean.
31
L-15 MAINTENANCE
1. Remove the Top covers of L-15.
2. Apply a small amount of grease to the felt of the Rewind Sprocket
Assembly by moving Rewind Sprocket Assembly towards outside of
machine
3. Check Chain tension and lightly grease if dry. Chain should deflect 1/8" to
1/4".
4. Check Gears and Sprockets for wear.
5. Clean Drive and Idler Rollers if dirt and label adhesive is present.
1/8” to ¼” Chain
Deflection
Rewind Sprocket Assembly Felt
Outside
of
Machine
32
RECOMMENDED SPARE PARTS
Revised: 12/8/2004 4:30 PM
PART #
PART DESCRIPTION
200006
SWITCH, DPST ROCKER (MAIN)
200007
SWITCH, SPST ROCKER (MOTOR)
200012
RELAY, 120V 50/60HZ.
200042
FUSE, AGC 3A
200046
200109
FUSE, AGC 10 A
SWITCH, MICRO (STARWHEEL)
200160
TRANSFORMER, 12-VOLT
200198
POWER MODULE
200272
BLOCK, N/O CONTACT
(IF EQUIPPED)
200273
BLOCK, N/C CONTACT
200409
CLIP, CORE (FOR HUB)
210025
CABLE, FIBER OPTIC "Y"
210120
SENSOR, SMARTEYE EZPRO (EZPRC)
300001
MOTOR, 1/15 HP (1800 RPM)
300013
BRUSHES, FOR MOTOR #300001
300023
420210
BRUSHES, FOR MOTOR #300012,
UNWIND SPRING, ½” X 4” EXTENSION
500030
CLIP, PLASTIC COMPRESSION
500085
600229
HANDLE, 3/8 MALE RATCHET
600230
600300
BELT, TURNING UNIT 4"
PEELER PLATE TAPE (50’ ROLL)
820000
THUMBSCREW, 1" BLACK NYLON
200203E
SPEED CONTROL, KB DRIVE
200374-1
LABEL SENSOR, TRI-TRONICS LABEL EYE
200376B
ASS'Y, CABLE W/ 4 PIN AMPHENOL
210131B
ASS'Y, CLEAR/FOIL LABEL SENSOR (IF EQUIPPED)
330007A
ASS'Y, 1/2" CLUTCH/BRAKE
600390A
PAD, PRODUCT SPACER BACKING
L-128-C-A
CLIP, (6-1/2" WEB) RETENTION
L-129-S
STARWHEEL, LABEL SENSING
L-132
L-137-H-06.000
ASS'Y, IDLER / TENSIONER
ROLLER, 6" L. X 1/2" I.D.DRIVE
L-143-06.000
ROLLER, 6" LOWER IDLER (KNURLED ALUMINUM)
L-175-1
ASS'Y. REWIND SPROCKET W/FELT & BEARINGS
BELT, TURNING UNIT 2"
33
(IF EQUIPPED)
SECTION 6
DRAWINGS AND BILL OF MATERIAL
R-320 MAIN ASSEMBLY
See Drawing R320-I-00C
SENSOR BRACKET ASSEMBLY
See Drawing SBK-I-06
ADJUSTABLE BACKING PAD ASSEMBLY
See Drawing TA-I-40
CONTROL ENCLOSURE ASSEMBLY
See Drawing R320-I-11B
SWITCHING AND TIMING ASSEMBLY
See Drawing CW-I-00
TURNING UNIT ASSEMBLY
See Drawing TA-I-00B
APPLIER MOUNTING ASSEMBLY
See Drawing R320-I-30
CRANK ASSEMBLY
See Drawing CPSS-I-40
MA-300 Z-AXIS ADJUST ASSEMBLY
See Drawing MA3-I-00
PRODUCT SPACER ASSEMBLY
See Drawing PS3-I-01
CONVEYOR ASSEMBLY
See Drawing R320-I-10C
JUNCTION BOX ASSEMBLY
See Drawing R320-I-20
CONVEYOR BASE ASSEMBLY
See Drawing CPSS-I-10A
POWER MODULE SET UP
See Drawing L15-D-02
DIMENSIONAL DRAWING (6 FOOT SYSTEM)
See Drawing R320L6-L15-F-00
DIMENSIONAL DRAWING (8 FOOT SYSTEM)
See Drawing R320L8-L15-F-00
WEBBING DIAGRAM (OPTICAL)
See Drawing L15-W-00C
WEBBING DIAGRAM (OPTIONAL STAR WHEEL)
See Drawing L15-W-00
ELECTRICAL DIAGRAM
See Drawing R320-L15-E-00
34
BillR-320
ofMAIN
Material
ASSEMBLY
*R320-I-00C*
R320-I-00C
MACHINE: R320
ITEM NUM:
01*
02*
03*
04*
05**
06***
07*
08*
09*
10*
11*
PART NUMBER: PART DESCRIPTION:
SBK-I-06
ASSEMBLY, SENSOR BRACKET
TA-I-40
ASSEMBLY, ADJUSTABLE BACKING PAD
R320-I-11B
ASSEMBLY, CONTROL ENCLOSURE
TA-I-00B
ASSEMBLY, TURNING UNIT
L-15
SEE L-15 MANUAL
SL-1000
SEE SL-1000 MANUAL
R320-I-30
ASSEMBLY, APPLIER MOUNTING
PS3-I-01
ASSEMBLY, PRODUCT SPACER
R320-I-10C
ASSEMBLY, CONVEYOR
CPSS-I-10A
ASSEMBLY, CONVEYOR BASE
R320-I-20
ASSEMBLY, JUNCTION BOX
QTY:
1
1
1
1
1
1
1
1
1
1
1
NOTES:
* SEE DRAWING
** R-320 WITH L-15 APPLIER
*** R-320 WITH SL-1000 APPLIER
F:\LABELERS\R-320\MANUAL\R320-I-00C.dwg
MSACCESS Y:\databases\BOM2000.MDE
11/19/2003 11:51:29 AM
Bill
of Material
SENSOR BRACKET ASSEMBLY
*SBK-I-06*
SBK-I-06
MACHINE: R320
ITEM NUM:
01
02
03
04
05
06
07
08
09
10
11
PART NUMBER: PART DESCRIPTION:
500084
HANDLE, 3/8 FEMALE RATCHET
SBK-036
BOLT, MICROMETER ADJUSTMENT
SBK-031
BAR, SENSOR MOUNTING
SBK-027
SHAFT, HORIZONTAL ADJUSTING
SBK-030
BLOCK, SENSOR
500081
HANDLE, 10-32 MALE RATCHET
500041A
TUBE, SENSOR HOLDER
SBK-032
BLOCK, FIBER OPTIC MOUNTING
SBK-033
SHAFT, HORIZONTAL ADJUSTMENT
500080
HANDLE, 1/4 MALE RATCHET
SBK-034
BLOCK, SENSOR MOUNTING
F:\ACCESSORIES\SBK\MANUAL\SBK-I-06.dwg
QTY:
1
1
1
1
1
1
1
1
1
1
1
MSACCESS Y:\databases\BOM2000.MDE
11/19/2003 11:52:51 AM
*TA-I-40*
Bill of Material
ADJUSTABLE BACKING PAD ASSEMBLY
TA-I-40
MACHINE: R320
ITEM NUM:
01
01*
02
02*
03
03*
04
04*
05
05*
06
06*
07
07*
08
08*
09
10
10*
11**
11**
11**
11**
11**
11**
11**
11**
11**
11**
12**
12**
12**
12**
12**
12**
12**
12**
12**
12**
13
14
14*
15
15*
16
16*
PART NUMBER: PART DESCRIPTION:
500084
HANDLE, 3/8 FEMALE RATCHET
500084
HANDLE, 3/8 FEMALE RATCHET
SS-124-2
ROD, 3/8 THREADED
SS-124-2
ROD, 3/8 THREADED
CA-036
STANDOFF, RACHET HANDLE
CA-036
STANDOFF, RACHET HANDLE
TA-245
BLOCK, BACKING PAD ADJUSTMENT
TA-245
BLOCK, BACKING PAD ADJUSTMENT
TA-244
BAR, BACKING PAD ADJUSTER
TA-244
BAR, BACKING PAD ADJUSTER
TA-242
BLOCK, BACKING PAD SUPPORT
TA-242
BLOCK, BACKING PAD SUPPORT
855002
SHOULDER BOLT, 1/4 X 3/8" L.
855002
SHOULDER BOLT, 1/4 X 3/8" L.
L-172-10
WASHER, UHMW 062 X 257 X 500
L-172-10
WASHER, UHMW 062 X 257 X 500
TA-2-215A1
MOUNT, TURNING UNIT
CA-038
SPACER, 3/4"
CA-038
SPACER, 3/4"
R-320-005-A
PAD, 2" X 15" FOAM
R-320-005-G
PAD, 3" X 15" FOAM
R-320-005-B
PAD, 4" X 15" FOAM
R-320-005-H
PAD, 5" X 15" FOAM
R-320-005-C
PAD, 6" X 15" FOAM
R-320-005-A-24
PAD, 2" X 24" FOAM
R-320-005-G-24
PAD, 3" X 24" FOAM
R-320-005-B-24
PAD, 4" X 24" FOAM
R-320-005-H-24
PAD, 5" X 24" FOAM
R-320-005-C-24
PAD, 6" X 24" FOAM
R-320-004-A
PLATE, 2" X 15" BACKING
R-320-004-G
PLATE, 3" X 15" BACKING
R-320-004-B
PLATE, 4" X 15" BACKING
R-320-004-H
PLATE, 5" X 15" BACKING
R-320-004-C
PLATE, 6" X 15" BACKING
T24-219
PLATE, 2" X 24" BACKING
T24-319
PLATE, 3" X 24" BACKING
T24-419
PLATE, 4" X 24" BACKING
T24-519
PLATE, 5" X 24" BACKING
T24-619
PLATE, 6" X 24" BACKING
TA-241
PLATE, BACKING PAD SUPPORT
TA-243
SHAFT, BACKING PAD ADJUSTMENT
TA-243
SHAFT, BACKING PAD ADJUSTMENT
500045A
BRACKET,STD GUIDE RAIL
500045A
BRACKET,STD GUIDE RAIL
500080
HANDLE, 1/4 MALE RATCHET
500080
HANDLE, 1/4 MALE RATCHET
F:\ACCESSORIES\TA\MANUAL\TA-I-40.dwg
QTY:
2
3
2
3
2
3
2
3
2
3
2
3
4
6
4
6
1
2
3
1
1
1
1
1
1
1
1
1
1
1
1
1
1
1
1
1
1
1
1
1
2
3
2
3
2
3
MSACCESS Y:\databases\BOM2000.MDE
7/12/2004 10:07:47 AM
*TA-I-40*
Bill of Material
ADJUSTABLE BACKING PAD ASSEMBLY
TA-I-40
MACHINE: R320
ITEM NUM:
17
17*
18
PART NUMBER: PART DESCRIPTION:
853014
WASHER, 1/4" .060 THK 1/2 ODFW
853014
WASHER, 1/4" .060 THK 1/2 ODFW
854012
NUT, 1/4-20 ACORN
QTY:
2
3
2
* OPTIONAL 24" TURNING UNIT
** PRODUCT SPECIFIC
F:\ACCESSORIES\TA\MANUAL\TA-I-40.dwg
MSACCESS Y:\databases\BOM2000.MDE
7/12/2004 10:07:48 AM
Bill of Material
CONTROL ENCLOSURE ASSEMBLY
*R320-I-11B*
R320-I-11B
MACHINE: R320
ITEM NUM:
01
02
03
04
05
06
07
08
09
10
11
12*
13*
14
15
16
17
18
19
20
21
22
23
24
25
26
27
28
29
30
31
32
33*
33**
34
35
36**
37*
37**
38
39
PART NUMBER: PART DESCRIPTION:
ES-I-01
ASSEMBLY, E-STOP
SW-I-02
ASSEMBLY, ACCESSORIES ON/OFF SWITCH
200012
RELAY, 120V 50/60HZ.
209021
SOCKET, RELAY
200021
STRIP, 8 TERMINAL EURO 40.208
230010G
CARD, 8 TERMINAL EURO MARKING
200255
STRIP, 12 TERMINAL EURO
230010
CARD, 12 TERMINAL EURO MARKING
200203C
SPEED CONTROL, KB DRIVE
200048
FUSE, MDL 1 1/2 A
200203A
SPEED CONTROL, KB DRIVE
200042
FUSE, AGC 3 A
200203E
SPEED CONTROL, KB DRIVE
SS-205
PLATE, BOX SUPPORT
UPA-305
SPACER, YOKE PLASTIC
400099
WASHER,1/8 X 3/4 X 1-7/8" SS
400100
SCREW, 3/4-10 X 1-1/2" HHMS
100700
HANDLE,ENCLOSURE
100502
ENCLOSURE, HOFFMAN C-SD16126
R-320-002
POST, CONTROL BOX MOUNTING
500056
BRKT, TOP, SIDE MOUNT
CA-033B
MOUNT, CONTROL ENCLOSURE
SS-206A
MOUNT, (CONVEYOR) CONTROL BOX
SS-204
SPACER, ANGULAR ADJUST. DISC
210060
RELIEF, 3/8" STRAIN
100192
CONNECTOR, STRAIGHT
SS-207
PIN, STOP
100500-C-P2
PLATE, COMPONENT MOUNTING
200187
FUSE, SLOW-BLO 5 AMP
200046
FUSE, AGC 10 A
200203B
SPEED CONTROL, KB DRIVE
200025
CLAMP, 3/8" CABLE-AMBER
200240
HOLDER, FUSE/BASE MTG
200240
HOLDER, FUSE/BASE MTG
200051
FUSE, MDL 2 1/2 A
209021-1
CLIP, RELAY SOCKET
SC-I-02
ASSEMBLY, SL-1000 SPEED CONTROL
SC-I-01
ASSEMBLY, ACCESSORIES SPEED CONTROL
SC-I-01
ASSEMBLY, ACCESSORIES SPEED CONTROL
PL-I-01
ASSEMBLY, PILOT LIGHT
SW-I-01
ASSEMBLY, MAIN ON/OFF SWITCH
F:\LABELERS\R-320\MANUAL\R320-I-11B.dwg
QTY:
1
4
1
1
1
1
2
2
1
1
1
1
1
1
1
1
1
2
1
1
1
1
1
1
1
1
1
1
1
1
1
8
5
4
4
2
1
4
3
1
1
MSACCESS Y:\databases\BOM2000.MDE
11/19/2003 11:54:16 AM
Bill of Material
CONTROL ENCLOSURE ASSEMBLY
*R320-I-11B*
R320-I-11B
MACHINE: R320
ITEM NUM:
PART NUMBER: PART DESCRIPTION:
QTY:
NOTE:
* L-15 VERSION
** SL-1000 VERSION
F:\LABELERS\R-320\MANUAL\R320-I-11B.dwg
MSACCESS Y:\databases\BOM2000.MDE
11/19/2003 11:54:16 AM
Bill of Material
SWITCHING AND TIMING ASSEMBLY
*CW-I-00*
CW-I-00
MACHINE: R320
ITEM NUM:
01
02
03
04
05
06
07
08
09
10
11
12
13
14
15
16
17
18
19
20
21
22
23
24
25
26
27
PART NUMBER: PART DESCRIPTION:
200204
POTENTIOMETER, 5K LINEAR TAPER
200205
KIT, KNOB DIAL
200406
POT, 5K 10-TURN
200192-1
DIAL, 10 TURN POT (H-22-6A)
200216
POT, 5K OHM 3-TURN
200404
POT, 10-TURN 10K
230001
LIGHT, GREEN PILOT (22MM)
230002
LED, REPLACEMENT
200273
BLOCK, N/C CONTACT
200272
BLOCK, N/O CONTACT
200512
SELECTOR, 3-POSITION
200262-2
SELECTOR, 2 POSITION
200411
PUSH BUTTON, W/GREEN CAP
200262-3
SELECTOR, 3 POSITION
100393
SELECTOR, 3 POSITION, KEY SELECT
SL3-124B
PANEL, ONE HEAD CONTROL
200322
SWITCH, 2-POSITION SELECTOR>>>
200369
SWITCH, W/KEY LOCK (IDEC)
200380
KEYPAD, CONTROL W/ DISPLAY
200271
BLOCK, AC POWER>>>
200270
BULB, REPLACEMENT
200229
SWITCH, MUSHROOM
200431
FLANGE
200125
COVER, SOCKET
200124
SOCKET, 8 PIN TIMER
200122
CLIP, TIMER MOUNTING
200121
TIMER, DELAY
F:\ACCESSORIES\CONVEYORS\(CW)-CONVEYOR-WIRI
QTY:
MSACCESS Y:\databases\BOM2000.MDE
11/20/2003 3:22:02 PM
Bill of Material
APPLIER MOUNTING ASSEMBLY
*R320-I-30*
R320-I-30
MACHINE: R320
ITEM NUM:
01
02
03
04
05
06
07
08
09
10
11
12*
13
14
15
16
17
18
19
20*
21
22
23
24
25
26
27
28
29
30
PART NUMBER: PART DESCRIPTION:
SS-112
KNOB, MICROMETER ADJUST>>>
MA-110
SCREW, CROSS ADJUST
SS-208A
ADJUSTER, MICRON
400009
BEARING, 3/8" THRUST
400010
RETAINER, 3/8" HARDENED BRNG.
854030
NUT, HALF 3/8-16 JNSS
854004
NUT, 3/8-16 HEX SS
SS-208
STUD, PIVOTING
SS-121
SPACER, HEIGHT ADJUSTMENT
CPSS-004
BAR, MOUNT
S84-005
PLATE, BACK SLIDE
CPSS-I-40
ASSEMBLY, CRANK
S84-010B
PLATE, SIDE SUPPORT
S84-009-2
PLATE, SUPPORT>>>
S84-009
PLATE, UHMW SLIDE
CPSS-006A
PLATE, SLIDE MOUNT
CPSS-034
BLOCK, SLEEVE MOUNT
CPSS-008
ASS'Y, VERTICAL ADJUST
CPSS-023
DISC, ANGULAR ADJUSTMENT
MA3-I-00
ASS'Y, MA-300 MICRO ADJUST
CPSS-013
SPACER, MA 300
840025
WASHER, FLAT, 1-1/4" SS
840020
NUT, 1-1/4 - 7 SS
400099
WASHER,1/8 X 3/4 X 1-7/8" SS
400100
SCREW, 3/4-10 X 1-1/2" HHMS
CPSS-003A
ARM, MOUNTING
UPA-305
SPACER, YOKE PLASTIC
CPSS-005
GUSSET, SUPPORT
CPSS-024
PLATE, SL-2000 MOUNTING
CPSS-025
BAR,PIVOT
QTY:
1
1
1
2
4
2
2
1
3
1
1
1
2
3
4
1
1
1
1
1
1
1
1
2
2
2
2
2
1
2
NOTE:
* SEE DRAWING
F:\LABELERS\R-320\MANUAL\R320-I-30.dwg
MSACCESS Y:\databases\BOM2000.MDE
11/19/2003 11:55:47 AM
Bill CRANK
of Material
ASSEMBLY
*CPSS-I-40*
CPSS-I-40
MACHINE: R320
ITEM NUM:
01
02
03
04
05
06
PART NUMBER: PART DESCRIPTION:
810070
PIN, 3/16 X 1-1/2 ROLL
750120B
WHEEL, 6" ADJUSTING
400012
BEARING, 1/2" THRUST
S84-008-1
BLOCK, TOP CRANK SUPPORT
CPSS-022
ROD, 3/4" X 27" ACME ADJUSTER
S84-007-1
BLOCK, ADJUSTING
F:\ACCESSORIES\CPSS\MANUAL\CPSS-I-40.dwg
QTY:
1
1
2
1
1
1
MSACCESS Y:\databases\BOM2000.MDE
12/13/2004 10:21:15 AM
Bill of Material
MA-300 Z-AXIS ADJUST ASSEMBLY
*MA3-I-00*
MA3-I-00
MACHINE: R320
ITEM NUM:
01
01
03
04
05
06
06
08
09
PART NUMBER: PART DESCRIPTION:
854003
NUT, 3/8-16 SELF-LOCKING NYLON
400009
BEARING, 3/8" THRUST
850058
SCREW, 5/16-18 X 2" L SHCS
400010
RETAINER, 3/8" HARDENED BRNG.
SS-110
BLOCK, MICROMETER ADJ.
SS-111
BOLT, MICROMETER ADJ.
SS-109
PLATE,MICROMETER ADJ.
800400
OBS. USE 854030
SS-112
KNOB, MICROMETER ADJUST>>>
F:\ACCESSORIES\MA-300\MA3-I-00.dwg
QTY:
1
2
1
4
1
1
1
3
1
MSACCESS Y:\databases\BOM2000.MDE
11/21/2003 10:13:18 AM
Bill
of Material
PRODUCT SPACER ASSEMBLY
*PS3-I-01*
PS3-I-01
MACHINE: R320
ITEM NUM:
01
02
03
04*
04**
05*
05**
06
07
08
08***
09
10
11
12
13
14
PART NUMBER: PART DESCRIPTION:
500085A
HANDLE, 3/8 MALE RATCHET
PS-3040
GUIDE, SLIDE
PS-3007
COVER, PRODUCT SPACER
PS-3039
BELT, SPACER 1/2"
PS-3039A
BELT, SPACER 1-1/8"
PS-3038
WHEEL, PRODUCT SPACER 1/2"
PS-3038A
WHEEL, PRODUCT SPACER 1-1/2"
PS-3037
HUB, WHEEL
PS-3036
PLATE, BASE
300138
MOTOR, 1/30HP 11 RPM
300139
MOTOR, 1/30HP 50 RPM
PS-3035
BAR, MAIN SLIDE
PS-3019
PIN, DOWEL:1/4 X 1-1/4"L
PS-3003
BLOCK, SPACER
PS-3034
POST, MOUNT
853005
WASHER, 3/8" FW SS
UNIV-02
PLATE, UNIVERSAL SERIAL NUMBER
QTY:
2
1
1
1
1
1
1
1
1
1
1
1
2
1
1
2
1
NOTE:
* 1/2" WIDE
** 1" WIDE
*** HIGH SPEED
F:\ACCESSORIES\PS-3000\MANUAL\PS3-I-01.dwg
MSACCESS Y:\databases\BOM2000.MDE
2/23/2004 1:03:20 PM
BillCONVEYOR
of Material
ASSEMBLY
*R320-I-10C*
R320-I-10C
MACHINE: R320
ITEM NUM:
01**
01***
01****
02**
02***
02****
03**
03***
03****
04**
04***
04****
05
05*
06
07
08
09
10
11
12**
12***
12****
13
14**
14***
14****
15**
15***
15****
16
17**
17***
17****
18**
19**
20**
21
22
23
24**
24***
24****
25**
25***
25****
PART NUMBER: PART DESCRIPTION:
CA-012
SHAFT, 7" EXTENTION
CA-012
SHAFT, 7" EXTENTION
CA-012
SHAFT, 7" EXTENTION
500035
PLATE, BACKING
500035
PLATE, BACKING
500035
PLATE, BACKING
500030
CLIP, PLASTIC COMPRESSION
500030
CLIP, PLASTIC COMPRESSION
500030
CLIP, PLASTIC COMPRESSION
R-320-012-06
RAIL, (6 FOOT CONVEYOR) GUIDE
R-320-012-08
RAIL, (8 FOOT CONVEYOR) GUIDE
R-320-012-10
RAIL, (10 FOOT CONVEYOR) GUIDE
CA-001D-LH
COVER, LEFT HAND DRIVE MOTOR
CA-001D-RH
COVER, RIGHT HAND DRIVE MOTOR
600154
BELT, TIMING 1/2 P. X 33.00 L
400175-E
PULLEY, 1/2"P x 20T TIMING
400175-F
PULLEY, 1/2"P x 20T TIMING
100620
BEARING, 2-BOLT FLANGE
CAC-06-000-001B SHAFT, DRIVE
906005-1.750
KEY, SPOCKET DRIVE
500099
CHAIN, HP7700 SERIES MAT TOP
500099
CHAIN, HP7700 SERIES MAT TOP
500099
CHAIN, HP7700 SERIES MAT TOP
CA-06-000-002
BAR, 6" UPPER TIE
CA-021A-0.782
SPACER, STANDOFF
CA-021A-0.782
SPACER, STANDOFF
CA-021A-0.782
SPACER, STANDOFF
CA-020A
GUIDE, RAIL STANDOFF
CA-020A
GUIDE, RAIL STANDOFF
CA-020A
GUIDE, RAIL STANDOFF
R-320-013
RAIL, GUIDE
R-320-014-06
RAIL, (6 FOOT CONVEYOR) GUIDE
R-320-014-08
RAIL, (8 FOOT CONVEYOR) GUIDE
R-320-014-10
RAIL, (10 FOOT CONVEYOR) GUIDE
R-320-008
STANDOFF, GUIDE RAIL
R-320-010
SPACER, GUIDE RAIL
CA-021A-1.281
SPACER, STANDOFF
500092
SPROCKET, 18T
CP2-009
BAR, UPPER TIE
CAC-06-000-002
SHAFT, IDLER
600391-72.000
FELT, 6 FT. WOOL GRADED (F-3 GRAY)
600391-96.000
FELT, 8 FT. WOOL GRADED (F-3 GRAY)
600391-120.000
FELT, 10 FT.WOOL GRADED (F-3 GRAY)
500020-72.000
RAIL, 1" GUIDE (TEE) 6'L
500020
RAIL, 1" GUIDE (TEE) 8'L
500021
RAIL, 1" GUIDE (TEE) 10'L
F:\LABELERS\R-320\MANUAL\R320-I-10C.dwg
QTY:
4
5
5
4
5
5
12
13
13
2
2
2
1
1
1
1
1
4
1
4
2 BOX
3 BOX
3 BOX
3
4
6
6
4
6
6
1
1
1
1
2
2
2
4
1
1
1
1
1
1
1
1
MSACCESS Y:\databases\BOM2000.MDE
4/27/2005 7:17:03 AM
BillCONVEYOR
of Material
ASSEMBLY
*R320-I-10C*
R320-I-10C
MACHINE: R320
ITEM NUM:
26
27
28
29**
29***
29****
30
31
32**
32***
32****
33
34
35
35*****
36
37**
37***
37****
38**
38***
38****
39**
39***
39****
40**
40***
40****
41**
41***
41****
PART NUMBER: PART DESCRIPTION:
CP2-008
BAR, LOWER TIE
CA-06-000-001
BAR, 6" LOWER TIE
CP-039
STRIP, MATTOP WEAR
CAC-006A
FRAMES, 6 FT. CONVEYOR SIDE
CAC-008A
FRAMES, 8 FT. CONVEYOR SIDE
CAC-010A
FRAMES. 10 FT. CONVEYOR SIDE
600390A
PAD, PRODUCT SPACER BACKING
CA-031
PLATE, BACKING SPACER
R-320-011-06
RAIL, (6 FOOT CONVEYOR) GUIDE
R-320-011-08
RAIL, (8 FOOT CONVEYOR) GUIDE
R-320-011-10
RAIL, (10 FOOT CONVEYOR) GUIDE
100630
BEARING, BACK SEAL
CA-005B
COVER, MOTOR SHAFT
300003-3
MOTOR,1/2HP BODINE 69RPM
300003-1
MOTOR, 1/2HP W/TERMINAL BOX
CA-110-06.000
PLATE, 6" WIDE CONVEYOR MOTOR MOUNT (BODINE)
CA-038
SPACER, 3/4"
CA-038
SPACER, 3/4"
CA-038
SPACER, 3/4"
500045
BRACKET,STD GUIDE RAIL
500045
BRACKET,STD GUIDE RAIL
500045
BRACKET,STD GUIDE RAIL
CA-036
STANDOFF, RACHET HANDLE
CA-036
STANDOFF, RACHET HANDLE
CA-036
STANDOFF, RACHET HANDLE
SS-124-2
ROD, 3/8 THREADED
SS-124-2
ROD, 3/8 THREADED
SS-124-2
ROD, 3/8 THREADED
500084
HANDLE, 3/8 FEMALE RATCHET
500084
HANDLE, 3/8 FEMALE RATCHET
500084
HANDLE, 3/8 FEMALE RATCHET
QTY:
1
4
2
1
1
1
1
1
1
1
1
4
1
1
1
1
4
5
5
4
5
5
4
5
5
4
5
5
4
5
5
* RIGHT HAND VERSION
** 6 FT. LONG VERSION
*** 8 FT. LONG VERSION
**** 10 FT. LONG VERSION
***** R-322 SYSTEM
F:\LABELERS\R-320\MANUAL\R320-I-10C.dwg
MSACCESS Y:\databases\BOM2000.MDE
4/27/2005 7:17:03 AM
Bill
of Material
JUNCTION BOX ASSEMBLY
*R320-I-20*
R320-I-20
MACHINE: R320
ITEM NUM:
01
02
03
04
05
06*
07**
08**
09
10
11
12
PART NUMBER: PART DESCRIPTION:
100192
CONNECTOR, STRAIGHT
100612-1-CCCC
BOX, JUNCTION
200280
RECEPTACLE, FEMALE 4-PIN
200279
CONNECTOR, MALE 4-PIN
100191
CONNECTOR, 90 DEGREE ELBOW
UPA-307
COVER, RECEPTACLE
200275
RECEPTACLE, FEMALE 3-PIN
200274
CONNECTOR, MALE 3-PIN
200283
CONNECTOR, MALE 6-PIN
200284
RECEPTACLE, FEMALE 6-PIN
700070B
SEAL, 7/8" DIA. PAINTED HOLE
100612-1-NNN
BOX, JUNCTION
QTY:
1
1
4
4
2
1
1
1
2
2
1
1
NOTE:
* L-15 VERSION
** SL-1000 VERSION
F:\LABELERS\R-320\MANUAL\R320-I-20.dwg
MSACCESS Y:\databases\BOM2000.MDE
12/8/2003 3:12:37 PM
*CPSS-I-10A*
Bill
of Material
CONVEYOR BASE ASSEMBLY
CPSS-I-10A
MACHINE: R320
ITEM NUM:
01 (A)
01 (B)
02 (C)(32)
02 (C)(34)
02 (C)(36)
02 (C)(38)
02 (C)(40)
02 (C)(42)
02 (C)(44)
02 (D)(32)
02 (D)(34)
02 (D)(36)
02 (D)(38)
02 (D)(40)
02 (D)(42)
02 (D)(44)
03
04
05
06
07
08 (A)
08 (B)
09
PART NUMBER: PART DESCRIPTION:
CPSS-026
SHAFT, SPACER
CPSS-026B
SHAFT, SPACER
CPSS-027B-32
ASSEMBLY, 6'-8' CONVEYOR STAND
CPSS-027B-34
ASSEMBLY, 6'-8' CONVEYOR STAND
CPSS-027B-36
ASSEMBLY, 6'-8' CONVEYOR STAND
CPSS-027B-38
ASSEMBLY, 6'-8' CONVEYOR STAND
CPSS-027B-40
ASSEMBLY, 6'-8' CONVEYOR STAND
CPSS-027B-42
ASSEMBLY, 6'-8' CONVEYOR STAND
CPSS-027B-44
ASSEMBLY, 6'-8' CONVEYOR STAND
CPSS-027A-32
ASSEMBLY, 10'-12' CONVEYOR STAND
CPSS-027A-34
ASSEMBLY, 10'-12' CONVEYOR STAND
CPSS-027A-36
ASSEMBLY, 10'-12' CONVEYOR STAND
CPSS-027A-38
ASSEMBLY, 10'-12' CONVEYOR STAND
CPSS-027A-40
ASSEMBLY, 10'-12' CONVEYOR STAND
CPSS-027A-42
ASSEMBLY, 10'-12' CONVEYOR STAND
CPSS-027A-44
ASSEMBLY, 10'-12' CONVEYOR STAND
CPSS-031
CAP, END
CPSS-011
MOUNT, SPACER
SS-108
NUT, 3/4 X 10 HEX
500072
FOOT, ARTICULATED
700260
CASTER, 3" SWIVEL W/LOCK
CPSS-010
SPACER, APPLICATOR MOUNTING
CPSS-010A
SPACER, APPLICATOR MOUNTING
CPSS-015B
BAR, STABILIZER
NOTE:
(A) = R320 VERSION
(B) = R322 VERSION
(C) = 6'-8' CONVEYOR VERSION
(D) = 10'-12' CONVEYOR VERSION
QTY:
2
2
1
1
1
1
1
1
1
1
1
1
1
1
1
1
4
2
4
4
4
1
1
1
(32) = 32" +/-2" WORKING HEIGHT
(34) = 34" +/-2" WORKING HEIGHT
(36) = 36" +/-2" WORKING HEIGHT
(38) = 38" +/-2" WORKING HEIGHT
(40) = 40" +/-2" WORKING HEIGHT
(42) = 42" +/-2" WORKING HEIGHT
(44) = 44" +/-2" WORKING HEIGHT
F:\ACCESSORIES\CPSS\MANUAL\CPSS-I-10A.dwg
MSACCESS Y:\databases\BOM2000.MDE
8/26/2004 3:16:53 PM
POWER MODULE SETUP SHEET
PLEASE READ CAREFULLY BEFORE INSTALLING
SWITCH #1 DELAY SELECT
OFF - NO DELAY
ON - START AND STOP DELAY SET BY FRONT PANEL CONTROLS
START CONTROL - 0 TO 1 SEC.
STOP CONTROL - 0 TO 0.1 OR 1.0 SEC. (SEE JUMP 9)
SWITCH #2 MACHINE MODE SELECT
OFF - L15 OPERATION
ON - L60 OPERATION
CODER DWELL
ADJUSTMENT
R17
JUMPERS
J3
J1
SWITCHES
SWITCH #3 CLUTCH / BRAKE DELAY SELECT
[L15] SWITCH #3, W/SWITCH #2 OFF
OFF - 0 mS
ON - 25 mS
[L60] SWITCH #3, W/SWITCH #2 ON
OFF - BLOW-ON
ON - TAMP-ON
SWITCH #4 START SWITCH LOGIC LEVEL SELECT
OFF - FALLING SIGNAL EDGE ACTIVATION
ON - RISING SIGNAL EDGE ACTIVATION
SWITCH #5 STOP SWITCH LOGIC LEVEL SELECT
OFF - FALLING SIGNAL EDGE ACTIVATION
ON - RISING SIGNAL EDGE ACTIVATION
JUMPERS #6 START SWITCH TYPE SELECT
PINS 1 & 2 - SPDT START SWITCH
PINS 2 & 3 - SINGLE POLE INPUT
JUMPERS #8 SINGLE POLE START SWITCH POLARITY SELECT
PINS 1 & 2 - SWITCHES TO POSITIVE +5V TO +24V DC (PNP)
PINS 2 & 3 - SWITCHES TO GROUND (NPN)
MONTH / NUMBER / YEAR
JUMPERS #9 STOP DELAY SELECT
PINS 1 & 2 - LONG DELAY 0 TO 1 SEC.
PINS 2 & 3 - SHORT DELAY 0 TO 0.1 SEC.
PRINTED CIRCUIT BOARD # OO OOO OO
DEFAULT SETTINGS
L-15
L-60
R-310
SL-1000
The Universal Power Module is designed to
operate the L15, L20, L30, R310, MP25, L60,
and SL1000 series of label machines. The L15,
L20, L30 and MP25 are set up the same!
The L60, R310 & SL-1000 are different,
SEE DEFAULT SETTINGS.
Coder output is adjusted by (R17) top left board
and operates in all modes. The dwell time is
adjustable from 0 to 0.5 seconds. The next
start signal or product signal will be ignored until
the coder pulse is turned off.
(NOTE) IF YOU HAVE L-60 WITH FRONT & REAR
BOARD,
THE BOARD MUST BE SET UP AS L-15.
TECHNICAL SUPPORT
When calling for Technical Support:
have your Model #: R320
and
Serial Number ready:
R320 (located on the side opposite the conveyor drive motor cover).
L15 (located on the side opposite the roll of labels).
Email: [email protected]
Web Site:
http://www.universal1.com
SERIAL NUMBER
PLATE
35