1
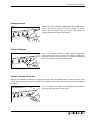
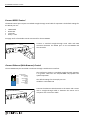
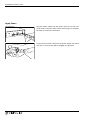
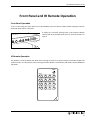
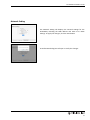
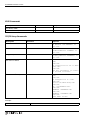
DL-HDM44 Installation and
Operation Guide
Rev 140411
11675 Ridgeline Dr
Colorado Springs, CO 80921
Phone: 719-260-0061
Toll-Free: 800-530-8998
Fax: 719-260-0075
DL-HDM44 Installation Guide
2
DL-HDM44 Installation Guide
Important Safety Instructions
»» Please completely read and verify you understand all instructions in this manual before operating this equipment.
»» Keep these instructions in a safe, accessible place for future reference.
»» Heed all warnings.
»» Follow all instructions.
»» Do not use this apparatus near water.
»» Clean only with a dry cloth.
»» Do not install near any heat sources such as radiators, heat registers, stoves, or other apparatus (including amplifiers)
that produce heat.
»» Use only accessories specified or recommended by Intelix.
»» Explanation of graphical symbols:
◊ Lightning bolt/flash symbol: the lightning bolt/flash and arrowhead within an equilateral triangle
symbol is intended to alert the user to the presence of uninsulated “dangerous voltage” within the
product enclosure which may be of sufficient magnitude to constitute a risk of shock to a person or
persons.
◊ Exclamation point symbol: the exclamation point within an equilateral triangle symbol is intended
to alert the user to the presence of important operating and maintenance (servicing) instructions
in the literature accompanying the product.
»» WARNING: TO REDUCE THE RISK OF FIRE OR ELECTRIC SHOCK, DO NOT EXPOSE THIS APPARATUS TO RAIN OR
MOISTURE AND OBJECTS FILLED WITH LIQUIDS, SUCH AS VASES, SHOULD NOT BE PLACED ON THIS APPARATUS.
»» Use the mains plug to disconnect the apparatus from the mains.
»» THE MAINS PLUG OF THE POWER CORD MUST REMAIN READILY ACCESSIBLE.
»» Do not defeat the safety purpose polarized or grounding-type plug. A polarized plug has two blades with one wider
than the other. A grounding-type plug has two blades and a third grounding prong. The wide blade or the third prong
is provided for your safety. If the provided plug does not fit into your outlet, consult an electrician for replacement of
your obsolete outlet. Caution! To reduce the risk of electrical shock, grounding of the center pin of this plug must be
maintained.
»» Protect the power cord from being walked on or pinched particularly at the plugs, convenience receptacles, and the
point where they exit from the apparatus.
»» Do not block the air ventilation openings. Only mount the equipment per Intelix’s instructions.
»» Use only with the cart, stand, table, or rack specified by Intelix or sold with the equipment. When/if a
cart is used, use caution when moving the cart/equipment combination to avoid injury from tip-over.
»» Unplug this apparatus during lightning storms or when unused for long periods of time.
»» Caution! Shock Hazard. Do not open the unit.
»» Refer to qualified service personnel. Servicing is required when the apparatus has been damaged in any way, such as
power supply cord or plug is damaged, liquid has been spilled or objects have fallen into the apparatus, the apparatus
has been exposed to rain or moisture, does not operate normally, or has been dropped.
3
DL-HDM44 Installation Guide
Table of Contents
Product Overview��������������������������������������������������������������������������������������������������������������������������������������� 6
Package Contents��������������������������������������������������������������������������������������������������������������������������������������� 7
Front and Rear Panels��������������������������������������������������������������������������������������������������������������������������������� 8
Front Panel���������������������������������������������������������������������������������������������������������������������������������������������������� 8
Rear Panel����������������������������������������������������������������������������������������������������������������������������������������������������� 8
IR Remote��������������������������������������������������������������������������������������������������������������������������������������������������� 9
Installation Instructions���������������������������������������������������������������������������������������������������������������������������� 10
Quick Start�������������������������������������������������������������������������������������������������������������������������������������������������� 10
Mount the Matrix��������������������������������������������������������������������������������������������������������������������������������������� 10
Shelf Mounting Instructions����������������������������������������������������������������������������������������������������������������� 10
Rack Mounting Instructions����������������������������������������������������������������������������������������������������������������� 10
Connect Sources������������������������������������������������������������������������������������������������������������������������������������������ 11
Connect Displays����������������������������������������������������������������������������������������������������������������������������������������� 11
Connect External IR Control������������������������������������������������������������������������������������������������������������������������ 11
Connect RS232 Control�������������������������������������������������������������������������������������������������������������������������������� 12
Connect TCP/IP (Ethernet) Control�������������������������������������������������������������������������������������������������������������� 12
Router Connection������������������������������������������������������������������������������������������������������������������������������� 13
Crossover Cable Connection����������������������������������������������������������������������������������������������������������������� 13
Web Browser Control��������������������������������������������������������������������������������������������������������������������������� 13
Apply Power������������������������������������������������������������������������������������������������������������������������������������������������ 14
Front Panel and IR Remote Operation������������������������������������������������������������������������������������������������������� 15
Front Panel Operation��������������������������������������������������������������������������������������������������������������������������������� 15
IR Remote Operation����������������������������������������������������������������������������������������������������������������������������������� 15
Web Browser Control�������������������������������������������������������������������������������������������������������������������������������� 16
Matrix Status���������������������������������������������������������������������������������������������������������������������������������������������� 16
Matrix Control��������������������������������������������������������������������������������������������������������������������������������������������� 16
Network Setting������������������������������������������������������������������������������������������������������������������������������������������ 17
EDID Management����������������������������������������������������������������������������������������������������������������������������������� 18
RS232 Commands������������������������������������������������������������������������������������������������������������������������������������� 19
Routing Commands������������������������������������������������������������������������������������������������������������������������������������� 19
System Commands�������������������������������������������������������������������������������������������������������������������������������������� 19
EDID Commands����������������������������������������������������������������������������������������������������������������������������������������� 20
TCP/IP Setup Commands����������������������������������������������������������������������������������������������������������������������������� 20
4
DL-HDM44 Installation Guide
Troubleshooting��������������������������������������������������������������������������������������������������������������������������������������� 21
Matrix does not power on��������������������������������������������������������������������������������������������������������������������������� 21
Cannot view 3D content������������������������������������������������������������������������������������������������������������������������������ 21
Cannot view 4K content������������������������������������������������������������������������������������������������������������������������������ 21
Cannot hear surround sound audio������������������������������������������������������������������������������������������������������������ 21
Technical Specifications���������������������������������������������������������������������������������������������������������������������������� 22
5
DL-HDM44 Installation Guide
Product Overview
The Digitalinx DL-HDM44 is a four input by four output HDMI matrix switcher. The DL-HDM44 supports up to
4K video resolutions, Deep Color, and 3D video.
The DL-HDM44 can be controlled via front panel buttons, front panel IR, external IR, RS232, and through a web
browser when the matrix is connected to a network. The matrix includes a simple IR remote control to allow
IR switching. The EDID settings for the matrix, either 1080p with stereo audio or the EDID of the display on
Output A, are toggled by a button on the front of the matrix.
To extend the inputs or the outputs of the DL-HDM44 beyond the 5 meter cable limitation, please use the
DL-HD70 or DL-HDE100.
6
DL-HDM44 Installation Guide
Package Contents
Please verify the following items are in the shipping box prior to installation of the DL-HDM44.
DL-HDM44
Matrix Switcher
1 ea
IR Receiver
1 ea
Infrared Remote Control
1 ea
Rack Ears
2 ea
5V DC 3.6A Power
Supply
1 ea
US Power Cable
1 ea
DL-HDM44 Installation
and Operation Guide
1 ea
7
DL-HDM44 Installation Guide
Front and Rear Panels
Front Panel
1
2
3
POWER
EDID
4
5
Inputs
1
B
A
C
2
3
4
D
A
B
Part#: DL-HDM44
C
4x4 HDMI Matrix Switcher
1.
2.
3.
4.
5.
Outputs
D
IR receiver for matrix control via IR remote
Power button and LED
EDID button and LED
Output cycle buttons
Matrix routing status LEDs
Rear Panel
A
B
INPUTS
1
C
D
E
IR In
RS232
Ethernet
F
OUTPUTS
2
3
4
A
B
C
D
Power
DC5V
Service
A.
B.
C.
D.
E.
F.
G.
8
G
HDMI Inputs
HDMI Outputs
IR input for matrix when front is covered or matrix is located in a concealed location
RS232 control input
TCP/IP (Ethernet) control input for control via web browser
Mini USB for firmware updates
5V DC power input
DL-HDM44 Installation Guide
IR Remote
The included IR remote features discrete input selection buttons for each output. It also has a power toggle
button to turn off the matrix when not in use. Please see page 15 for IR Remote Operation.
POWER
OUTPUT
A 1
2
3
4
2
3
4
2
3
4
2
3
4
OUTPUT
B 1
OUTPUT
C 1
OUTPUT
D 1
9
DL-HDM44 Installation Guide
Installation Instructions
Quick Start
1.
2.
3.
4.
5.
Mount the matrix
Connect sources
Connect displays
Connect control (optional)
Apply power
Mount the Matrix
At least 2 inches of free air space is required on both sides of the DL-HDM44 for proper side ventilation. Avoid
mounting the DL-HDM44 near a power amplifier or any other source of significant heat.
Shelf Mounting Instructions
Rubber shelf feet are already attached to the bottom of the DL-HDM44 to help accelerate the installation of
the DL-HDM44.
Rack Mounting Instructions
Remove the rubber feet from the bottom of the matrix. Remove
the larger two screws on both sides of the DL-HDM44.
Attach the supplied rack ears to the sides of the DL-HDM44
matrix. The matrix requires one rack unit (1 RU) of space. It is
recommended that you leave an empty rack space above and
below the DL-HDM44 for additional cooling.
10
DL-HDM44 Installation Guide
Connect Sources
Connect the source devices to HDMI inputs using HDMI cables
that are less than or equal to 5 meters in length. For source
devices that are further away, it is highly recommended to
install a Digitalinx DL-HD70 or DL-HDE100.
Connect Displays
Connect the display devices to HDMI outputs using HDMI
cables that are less than or equal to 5 meters in length. For
display devices that are further away, it is highly recommended
to install a Digitalinx DL-HD70 or DL-HDE100.
Connect External IR Control
When the DL-HDM44 is installed in an equipment rack or other concealed location, access to the front panel
for normal IR control may be difficult. The IR In input allows the IR remote to control the matrix via the supplied
IR receiver.
Insert the TRS 3.5 mm plug of the supplied IR receiver to the
matrix IR input port (IR In) of the matrix.
11
DL-HDM44 Installation Guide
Connect RS232 Control
The RS232 control port requires a standard straight-through serial cable for operation. The default settings for
the RS232 port are:
•
•
•
•
19200 baud
8 Data Bits
1 Stop Bit
Parity = none
See page 19 for all available control commands for the DL-HDM44.
Connect a standard straight-through serial cable with DE9
connector between the RS232 port on the DL-HDM44 and
the controller.
Connect Ethernet (Web Browser) Control
The DL-HDM44 may be controlled via Ethernet through a web browser interface.
1
8
TIA/EIA-568B
Pin 1
Pin 2
Pin 3
Pin 4
Pin 5
Pin 6
Pin 7
Pin 8
Orange/White
Orange
Green/White
Blue
Blue/White
Green
Brown/White
Brown
The TCP/IP port requires a standard straight-through Category
5 or greater cable with the TIA/EIA-568B crimp pattern for
optimal operation.
The default settings for the TCP/IP port are:
IP address: 192.168.0.178
Connect the Ethernet cable between to the matrix and a router
with a straight-through cable or between the matrix and a
computer with a crossover cable.
12
DL-HDM44 Installation Guide
Router Connection
1.
2.
3.
Configure the router to use the same IP range as the matrix, such as 192.168.0.1.
Connect the computer to the router.
Connect the DL-HDM44 to the router
Crossover Cable Connection
1.
2.
Configure the computer to use the same network prefix as the IP address assigned to the matrix. For
example, the IP address of the matrix is 192.168.0.178. Set the computer to use a static IP address within
the same network range, such as 192.168.0.42.
Connect the network crossover cable to the computer and to the TCP/IP port on the DL-HDM44.
Crossover Cable Pinout
1
8
TIA/EIA-568A
Pin 1
Pin 2
Pin 3
Pin 4
Pin 5
Pin 6
Pin 7
Pin 8
Green/White
Green
Orange/White
Blue
Blue/White
Orange
Brown/White
Brown
1
8
TIA/EIA-568B
Pin 1
Pin 2
Pin 3
Pin 4
Pin 5
Pin 6
Pin 7
Pin 8
Orange/White
Orange
Green/White
Blue
Blue/White
Green
Brown/White
Brown
Web Browser Control
The DL-HDM44 includes a web portal to allow control of the matrix via a standard web browser. The IP address
is the same address that is used for TCP/IP control. See page 16 for detailed information regarding the web
browser interface, including customization.
13
DL-HDM44 Installation Guide
Apply Power
Plug the power supply into the power input port on the rear
of the matrix. Twist the collar of the power plug in a clockwise
direction to secure the connection.
Connect the IEC power cable into the power supply. The matrix
will turn on once the IEC cable is plugged into AC power.
14
DL-HDM44 Installation Guide
Front Panel and IR Remote Operation
Front Panel Operation
To set a route using the front panel of the DL-HDM44, press the desired output button (display) until the
preferred input source is selected.
If output B is currently viewing input 4, the output B button
would need to be pressed three times to view the content on
input 3.
IR Remote Operation
The buttons on the IR remote will allow direct routing of inputs to a specific output. The Power button will
send the matrix to a low power state. Pressing the Power button a second time will restore the DL-HDM44 to
full power.
POWER
OUTPUT
A 1
2
3
4
2
3
4
2
3
4
2
3
4
OUTPUT
B 1
OUTPUT
C 1
OUTPUT
D 1
15
DL-HDM44 Installation Guide
Web Browser Control
Matrix Status
Open a web browser and go to the IP address of the DL-HDM44.
The default IP address is 192.168.0.178.
The Matrix Status screen shows the power, output and EDID states
of the DL-HDM44.
Matrix Control
Click the Matrix Control tab to access all the control options.
A dropdown menu is available for power, output, and EDID settings.
Once a selection is made, the matrix will immediately apply the
requested change.
Output All From will change all outputs to a single input.
Factory Reset will reset output settings to the A1, B2, C3, and D4.
16
DL-HDM44 Installation Guide
Network Setting
The Network Setting tab displays the network settings for the
DL-HDM44, including the MAC address and static IP or DHCP
settings. To apply the changes, click the Save button.
A confirmation dialog box will open to verify the changes.
17
DL-HDM44 Installation Guide
EDID Management
Pressing the EDID button on the front of the matrix or changing the option in the Matrix Control window will
cycle between the built-in EDID (STD mode) or the EDID of the display connected to Output A (TV mode). The
EDID LED will be lit on the front of the matrix when using the stock EDID.
In STD mode, the EDID for the inputs of the DL-HDM44 is 1080p with stereo audio.
When in TV mode, the DL-HDM44 will read the EDID settings of the display connected to Output A. If it detects
a 4K capable EDID setting it will transmit the signal in that format to the input ports. If the display on Output
A is not 4K capable, the matrix will read the EDID settings of all outputs and define the best resolution that all
displays can support.
18
DL-HDM44 Installation Guide
RS232 Commands
RS232 Settings: 19200 baud, 8 Data bits, 1 Stop bit, Parity = None
x = Input Number (input 2 would be 2)
y = Output Letter (output C would be C and must be in caps)
<CR> = Carriage return (Hex 0D)
<SP> = Space (Hex 20)
A carriage return is required at the end of all command strings. Any changes made to the matrix via front panel,
IR, or web browser will be replied on the RS232 port.
Control via IP is not available on the DL-HDM44.
Routing Commands
Description
Command
yx<CR>
Route input x to output y
ABCDx<CR>
Route input x to all outputs
Route input x to multiple outputs y yyx<CR>
Number of outputs is unlimited
RS<CR>
Reset AV routes to A1, B2, C3, D4
Response
yx<CR>
ABCDx<CR>
yyx<CR>
RS<CR>
Examples:
ABCD2<CR>
C4<CR>
BD3<CR>
Route Video and Audio from input 2 to all outputs
Route Video and Audio from input 4 to output C
Route Video and Audio from input 3 to outputs B and D
System Commands
Description
Power full ON
Power off (Standby Mode)
Get firmware version and matrix state
Command
Response
P1<CR>
P1<CR>
ST<CR>
ST<CR>
<CR>
<CR><LF>
DL-HDM44<CR>
<CR><LF>
F/W Ver : v1.0E<CR>
<CR><LF>
Power
: On<CR>
<CR><LF>
EDID
: STD<CR>
<CR><LF>
Port
: A1B2C3D4<CR>
Display all RS232 commands
?<CR>
P0<CR>
P0<CR>
Outputs list of all commands
19
DL-HDM44 Installation Guide
EDID Commands
Description
Use built-in EDID
Use EDID from Output A
Command
Response
EM1<CR>
EM1<CR>
EM2<CR>
EM2<CR>
TCP/IP Setup Commands
Description
Set static IP address
Set subnet mask
Set gateway
Command
Response
SETIP<SP><IP ADDRESS><CR>
SETIP<SP><IP ADDRESS><CR>
IP Address <IP ADDRESS> is
set.<CR>
SETNETMASK<SP><SUBNET><CR> SETNETMASK<SP><SUBNET><CR>
NetMask Address <SUBNET> is
set.<CR>
SETGATEWAY<SP><GATEWAY><CR> SETGATEWAY<SP><GATEWAY><CR>
GateWay Address <GATEWAY> is
set.<CR>
Set matrix to DHCP
RSTIP<CR>
Get current IP setup
IPCONFIG<CR>
RSTIP<CR>
<CR>
<CR><LF>
IP configuration is set to DHCP
Mode.<CR>
<CR><LF>
The new IP Address is usable
10 seconds later<CR>
IPCONFIG<CR>
<CR>
<CR><LF>
IP Configuration is :<CR>
<CR><LF>
[Static IP/DHCP Mode]<CR>
<CR><LF>
IP: <IP ADDRESS><CR>
<CR><LF>
NETMASK: <NETMASK><CR>
<CR><LF>
GATEWAY: <GATEWAY><CR>
<CR><LF>
HTTP PORT: 80<CR>
Example:
SETIP<SP>192.168.0.178<CR> Set static IP Address to 192.168.0.178.
20
DL-HDM44 Installation Guide
Troubleshooting
Matrix does not power on
»» Verify power outlet is active.
»» Verify continuity in power cable.
Cannot view 3D content
»» Select TV mode in the EDID settings.
»» Verify display is 3D compatible.
»» Verify source device can output 3D content.
Cannot view 4K content
»» Select TV mode in the EDID settings.
»» Verify display is 4K compatible.
»» Verify source device can output 4K content.
Cannot hear surround sound audio
»» Select TV mode in the EDID settings.
»» Verify output can broadcast surround sound audio.
»» Verify source device is configured to output surround sound audio.
21
DL-HDM44 Installation Guide
Technical Specifications
I/O Connections
HDMI Inputs
HDMI Outputs
IR Eye
5V DC Power
Control, Rear Panel
Control, Front Panel
Four (4) HDMI Type A Receptacle Connector (1 per input)
Four (4) HDMI Type A Receptacle Connector (1 per output)
One (1) 3.5 mm jack (TRS)
One (1) Threaded Barrel (5.5mm OD; 2.6mm ID)
RS232 via DE-9, TCP/IP via 8P8C, IR via 3.5mm TRS
Push Button, IR
Supported Audio and Video
HDTV Video Resolutions
VESA Video Resolutions
Embedded Audio Compatibility
Maximum HDMI Distance
480i, 480p, 576i, 576p, 720p, 1080i, 1080p, 4Kx2K (24, 25, and 30 Hz)
Up to 1920x1200
Up to PCM 5 channel, Dolby Digital TrueHD, and DTS-HD Master Audio
5m (16’)
Chassis and Environmental
Enclosure
Dimensions
Rack Spacing
Shipping Weight
Operating Temperature
Operating Humidity
Storage Temperature
Storage Humidity
Painted Aluminum
436mm x 167mm x 44mm (17.17” x 6.57”x 1.73”)
1 RU
1.945 kg (4.3 lbs)
0° to +40° C (+32° to +104° F)
20% to 90%, Non-condensing
-10° to +60° C (+14° to +140° F)
20% to 90%, Non-condensing
Power, ESD, and Regulatory
Power Supply Input
Power Supply Output
Power Consumption
ESD Protection
DL-HDM44 Regulatory
Power Supply Regulatory
100V-240VAC / 50-60 Hz / 0.5A
5VDC / 3.6A
38 watts (max)
±8kV (air-gap discharge), ±4KV (contact discharge)
CE, RoHS
UL, FCC, CE, RoHS
Other
22
Warranty
Diagnostic Indicators
2 years
LED output status, power LED, status LED
Included Accessories
Installation Guide, IR Remote, US Power Cable and Power Supply, Two Mounting
Brackets, Four Rubber Feet (installed on matrix)
Thank you for your purchase.
Please contact us with your questions and comments.
11675 Ridgeline Drive
Colorado Springs, Colorado
80921 USA
Phone: 719-260-0061
Fax: 719-260-0075
Toll-Free: 800-530-8998
www.libav.com
Digitalinx is a brand of: