1
Use _ Care Guide
Guia de Uso 3/Cuidado
£or_gelador
Guide d'utilisation et d'entretien
Cong_51ateur
i!i!@_!;ili@@iii{!i!!i@i!i!iii_i!i!ii_i
Finding information
Please read and savethis
Tabme of contents
guide
::
::::
Thankyouforchoosing
Electrolux, ournew
premium brand in home appliances. This Use &
Care Guide is part of ourcommitment
to customer
satisfaction and product quality throughout the
:
servicelifeofyournewappliance.
Keep a record
Findinglnformation .................................................
2
PleaseReadAnd SaveThis Guide........................................... 2
KeepA Record ForQuick Reference....................................... 2
Questions ............................................................................... 2
TableOfContents .................................................................... 2
for quick
r e f e r e n oe
Sifme_o/tani'Saie{y'nstr'uc;on_ .....................................
3
Eectrca nformaton ..............................................................
.................................................4
Feature Overview ....................................................
5
Understanding FeaturesAndTerms-17Cu. Ft. Model...........5
Understanding FeaturesAnd Terms- 21 Cu. Ft. Model...........6
-Purchase date
Installation ............................................................
7
Location ................................................................................. 7
Door Open ng
7
Love ng ..................................................................................
......................................................................... 7
Door Removal......................................................................... 8
Ice Makerlnstallation .............................................................. 8
Setting TheTemperatureControls .......................................... 9
---E ectro ux mode number
-----Electrolux serial number
.....
FreezerFeatures
...................................................
ig
Interior Light ........................................................................ 10
i_i!_!_i!i_ii_!i!_!_i!i_ii_!i!_!_i!i_ii_!i!_!_i!i_ii_!i!_!_i!i_ii_!i!_!_i!i_ii_!i!_!_i!i_ii_!i!_!_i!i_ii_!i!_!_i@!_!_i!i_i
Full Access Wire Basket........................................................ 10
Model and Serial
Number Plate
SeCurity Lock With Pop-Out Key ..........................................10
Adjustable Glass Shelf .......................................................... 10
BasketDivider ....................................................................... 10
PizzaShelf ............................................................................ 10
Small Item Shelf ................................................................... 10
Tilt-Out Shelf......................................................................... 10
Storing Food & Saving Energy...................................
11
Ideas For Saving Energy.......................................................11
Vacation And Moving Tips .................................................... 11
Power Failure/ FreezerFailure..............................................11
Ice Service ..........................................................
12
Turning Your Ice Maker On ...................................................12
Turning Your Ice Maker Off ...................................................12
Ice Maker Tips ...................................................................... 12
Care & Cleaning ....................................................
13
Protecting Your Investment ..................................................13
Care& CleaningChart...........................................................13
For toll-free telephone support in the U.S. and
Canada: 1-877-4ELECTROLUX (1-877-435-3287)
For online support and product information visit
http://www.electroluxusa.com
WarrantyInformation.............................................
14
Solutions To Common Problems ................................
15
Safety
mportant
safety
Proper
Disposal
Of Refrigerators/Freezers
Before you throw away your old refrigerator/freezer:
RISK OF CHILD ENTRAPMENT
General
Safety
•
Do not store or use gasoline, or other
flammable liquids, near this or any other
appliance. Read product labels for warnings
regarding flammability and other hazards.
•
Do not operate the freezer in the presence of
explosive fumes.
Child
Safety
•
Destroy carton, plastic bags, and any exterior
wrapping material immediately after the
freezer is unpacked. Children should never
use these items to play. Cartons covered with
rugs, bedspreads, plastic sheets or stretch
wrap may become airtight chambers and can
quickly cause suffocation.
•
Remove all staples from the carton. Staples
can cause severe cuts, and destroy finishes if
they come in contact with other appliances or
furniture.
•
An empty, discarded ice box, refrigerator
or freezer is a very dangerous attraction to
children.
•
Remove or discard any spacers used to
secure the shelves during shipping. Small
objects are a choke hazard to children.
•
Remove the door(s) of any appliance that is
not in use, even if it is being discarded.
Child entrapment and suffocation are not problems
of the past. Junked or abandoned refrigerators or
freezers are still dangerous - even if they will sit for
"just a few days". If you are getting rid of your old
refrigerator or freezer, please follow the instructions
below to help prevent accidents:
•
Remove the doors.
•
Leave the shelves in place so children may
not easily climb inside.
•
Have refrigerant removed by a qualified
service technician.
;!!i;i;i!!:i_i;;_i_i!ii_ii!_i!i_i;!;!;_!i_!i_!i_!i_!i_!i_:!_i_!_i!_:_ii_!ii_i_i_!;_!_!_!_!i!!;_!!!;_!!_i_;!_i;i_i;i_i;i!i_!_!_i;
¸:!!
Safety
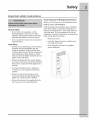
E ectrica information
•
power core A ways gr ptne pug [ rm y ana
pu stra ght out from the receptac e
t
•
•
.
Refer to the set a p ate for correct e ectr ca
..........
ra[ing./ne power core or [ne Treezer is
equipped with a three-prong grounding plug
for protection against shock hazards. It must
be plugged directly into its own properly
grounded three-prong receptacle protected
with a 15 amp time delay fuse or circuit
breaker. The power supply circuit must be
installed in accordance with current edition
of the Nat ona E ectr ca Code (NFPA 70)
and local codes and ordinances. Consult a
qualified electrician. Receptacles protected
:
i:::::
Never unpug the freezer by pu ng on the
by Ground Fault Circuit Interrupters (GFCI)
are NOT RECOMMENDED. DO NOT USE
AN EXTENSION CORD OR AN ADAPTER
......................................................................................................
.....
Turning the control to "OFF turns off the
compressor but does not disconnect power to
•
•
the hght bulb or other electncal components.
,
JV_HNIN
:r _
rd
i
rd
i_ i
_te
Grounding type
wa
receptacle
__
_n[urCer
' 'mC_vmeStances'
I
or bypass
To prevent the freezer from being turned
off accidentally, do not plug the unit into an
outlet controlled by a wall switch or pull cord.
*
Unplug the freezer before cleaning and
before replacing a light bulb to avoid
electrical shock.
*
Do not pinch, knot, or bend the power cord in
any manner.
the
I
_ grounding
grounding prong.
prong J )
PLUG.
If the voltage varies by 10 percent or more,
refrigerator performance may be affected.
Operating the freezer with insufficient power
can damage the motor. Such damage is not
covered under the warranty. If you suspect
your household voltage is high or low, consult
your power company for testing.
pi _' _
Power supply
cord with 3-prong
grounding plug
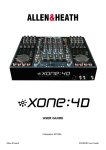
Feature Overview
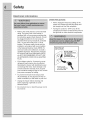
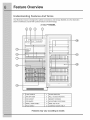
Understanding
Features
And Terms
Your Electrolux freezer is designed for optimal convenience
and storage
below to familiarize yourself with product features and terminology,
flexibility,
Use the illustration
17 CU. FT MODEL
@
(9
®
®
®
®
®
®
2
3
AIR DIFFUSER
ICE BUCKET
_
)
FULL ACCESS BASKETS
BASKET DIVIDERS
4
ICE MAKER
10
ADJUSTABLE
5
SMALL ITEMS SHELF
il
WlRE TILT OUTS
6
PIZZA SHELF
12
CONTOUR DOOR SHELF
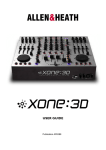
Features
may vary according
DOOR BINS
to model.
®
k
2
AIR DIFFUSER
}
FULL ACCESS BASKETS
3
ICE BUCKET
)
BASKETDIVlDERS
4
ICE MAKER
10
ADJUSTABLE
5
SMALL ITEMS SHELF
i 1
WIRETILT
6
PIZZA SHELF
12
CONTOUR DOOR SHELF
Features
may vary according
DOOR BINS
OUTS
to model.
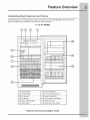
Installation
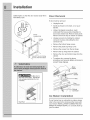
This Use & Care Guide provides general operating instructions for your model. Use the freezer only as
instructed in this Use & Care Guide. Before starting
the freezer, follow these important first steps.
Choose a place that is near a grounded electrical outlet. DO NOT use an extension cord or an
adapter plug.
For most efficient operation, the freezer should be located where surrounding temperatures will not
drop below 40°F (5°C) or exceed 110°F (43°C).
For ease of installation, proper air circulation and electrical connections, refer to the illustration for
recommended clearances.
For dynamic condenser models, DO NOT block the toe grille on the lower front of your freezer.
Sufficient air circulation is essential for the proper operation of your freezer.
1 Air Space
3 AirSpace
_!_i_i_ii_i;i_!i_:i_i_:i_i_:i_i_:i_i_:i_i:i_!ii_ii_ii_ii_i_!_i:i_i!i_!_!_i!_ii!_!_ii_ii_i_iii!i_!_i_!!i_!!!i_!_i_i!!
Installation
bubbe hgher so that thedoorcoses
left halfway open.
eas ywhen
__
/
/
//
.
_
,,u_.n-
_
Left ]q
L_
Raise
•
Pastc
Levelin_ Feet
_
\._
'_
r _
e m oV a
connectorinplaceandpullingthedoor
J
" 'r
":19--.
"_
Gently lay freezer on its back, on a rug or
• blanket.
Usingaflat-tippedscrewdriver,
reach
underneath the base panel and gently pry
Iooseeachretainertab.
Removebasepanel.
Remove wire from clips on bottom of cabinet.
• Unplugconnectorbyholdingthecabinet
Cra_wng
_
:':
oo
Ifdoormustberemoved:
• Unplug the unit
f_'_'_
_J
T,,,_'_
_
k
Tu'g'htT°
\Lower
"_"_-_
-r_j/
_._
D
connectorout.
•
•
Remove the bottom hinge screws
RemovetheplastJctophingecover.
•
Remove the screws from the top h nge
Remove the top h nge from the cab net
Remove the door and bottom hinge from the
Screws
The (4) Crating
And Wood Base
-,_
cabinet.
• To replacedoor, reverse the above
procedures and securely tighten all screws to
prevent hinge slippage.
Hinge
_To
allow door to
close and seal properly, DO NOT let
food packages extend past the front
of shelves.
Door
3nnector
Maker
Shelf Front
nsta Jation
If your freezer has an automatic ice maker, please
refer to the insert in the bond pack that came with
your freezer (INSTALLATION-CONNECTING
ICE
MAKER TO WATER SUPPLY) to correctly hook-up
your ice maker.
Installation
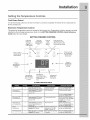
Setting
Cool
the Temperature
Down
Controls
Period
Forsafe food storage, allow four (4) hours for freezer to cool down completely. The freezer will run continuously for
the first several hours.
Electronic
Temperature
Control
The electronic temperature control is located on the freezer door. Temperature is factory preset to provide
satisfactory food storage temperatures. Refer to the SETTING FREEZER CONTROL Quick Reference
Guide below for more details.
SETTING
Press and
hold for 3
seconds to
toggle F or C
FREEZER
Turns the
temperature
display ON or
OFF.
CONTROL
Press to
mute
audible
alarms.
in the display.
Press to turn the
sounds ON or OFF.
When the LED is ON,
the sounds are muted.
_/
f
Press and hold
for 3 seconds to
start or cancel
control lock.
Press to start or
canceI the fast -freeze feature.
Press to
increase the
temperature
setting
Press to
decrease the
temperature
setting
-f
m door aja_
Indicates the
door has been
open 5 minutes
or more.
u
tern[
t
indicates the
temperature was
above +23°F (-9°C)
for at least one
hour.
ALARM
FUNCTION
"HI Temp" LED ON and
mute sounds LED flashes
mute sounds LED flashes; 1
second set temperature, 1
second "El"
"HI"
Alternating
"El"
and temperature
B po_,_ie_fsl
Indicates the
power was
interrupted.
TABLE
Freezer temperature
over the safe limit
Fail Safe Mode
Press the mute sounds
key
the audible alarm
Checl< thermistor
status
Press the mute
Alternating
"CE"
and temperature
Alternating
"E2"
and temperature
mute sounds
LED flashes;
second set temperature,
1
second "CE"
4
1
Communication
Error
sounds
audible
mute sounds LED flashes; 1
second set temperature, 1
second "E2"
Stuck Key Error
Actual
Temperature
6
power fail LED on and mute
sounds LED flashes
Cabinet greater than 10
degrees over the SET
TEMP. at power up.
Set Temperature
5
door ajar LED on and mute
sounds LED flashes
Door open for more than
5 minutes
sounds
key
to stop the audible alarm
Check connection
between
UI and ECU. Press the mute
key to stop the
alarm
Check membrane
keys.
Press the mute sounds
key
to stop the audible alarm
Press the mute sounds
key
to stop the audible alarm
Press the mute sounds key
to stop the audible alarm
:i_i!ii_i;i:iii_!_i;!_i_ii_i_i_i_i_!;_!;_i_!_ii_;_!!ii_i_i_;i_!ii!_!_i_i!i_ii_!;i!_iiii!i:iii!i:iii!i_i_!_!;!!_!_!i_!
10
Freezer Features
ote.orUght
:::
:::
tos,,dethesupport,ngshe,fs,,ght,yto
The light comes on automatically when the door
is opened• To replace the light bulb, turn the
temperature control to "OFF" and unplug the
opposite that ,n wh,ch you are rem?v, ng the tabs ,n
oraer _o.ge_ a ,arger gap _e_ween tne gage o_'tne
supporting shelf and the hner wall•
e ectr ca cord • Rep ace the o d bu b wth a bu b of
thesametypeand
wattage•
.........
Next, locate the p izza shelf beneath the shelf
nearestyourdesired
location and snap each tab
upwards between the wire orglass shelf and liner
m-ull Accessvwre
untilthetabhassnappedintop[aceand
_asKel
The Full AccessWire Basket located atthe bottom
of the freezer, Provdesse Paratestora g es Pace for
items that are difficult to store on freezershelves,
is resting
on top of the supporting shelf. Repeatforeach
tab
unt a four arefrmy
npaceandthen
oadwth
desired items.
SecurityLockw.hPop-OutKey
Thissecuritylockfastensthedoorsnug,
ensuring
the stored food is secure•To lock or unlock the
freezer, pushthekeyintothe[ockandturn.
Thekey
popsoutofthelockafterithas
been turned•
Ad ustab eG assShe f
Thisshelfcan
bemovedoneoftwopositions.
Lift
theshelfupandouttomovetothedesiredposition.
.....
Basket
Divider
Small
Use these handydividers to keep the various
items stored in your baskets more organized• To
change the location of the divider simply slide your
basket out, lift up on each end of the divider until
it is disengaged from the basket, place divider in
the desired location (make sure it is between two
vertical wires) and press down firmly on each end
until it snaps into place•
Item Shelf
Use this shelf to store several of your single-serving
microwavable dinners or other small items that you
want to keep in an easy-to-reach spot.
mmm
ilii_ii_
i
il_i_
_ii
I
Tilt-Out
Shelf
This shelf is located inside on the freezer door
and provides additional storage space• To access
an item, tilt the top of the "basket" shelf down•
Pizza Shelf
Here is the place to store up to four extra-large
boxes of frozen pizza without ever having to dig
them out from beneath a pile of other stored goods•
To change the location of the pizza shelf: support
the bottom center of the shelf with one hand and
use your other hand to gently ease each support
tab outward until they have all dropped between
the edge of the shelf and the liner wall. It may help
i_i!_!_i!i_ii_!i!_!_i!i_ii_!i!_!_i!i_ii_!i!_!_i!i_ii_!i!_!_i!i_ii_!i!_!_i!i_ii_!i!_!_i!i_ii_!i!_!_i!i_ii_!i!_!_i!i_ii_!i!_!_i!i_ii_!i!_!_i!i_i
Storing Food & Saving Energy
deas for Saving
•
•
Energy
Locate the freezer in the coolest part of the
room, out of direct sunlight, and away from
heating ducts or registers. Do not place the
freezer next to heat-producing appliances
such as a range, oven, or dishwasher. If this
is not possible, a section of cabinetry or an
added layer of insulation between the two
appliances will help the freezer operate
more efficiently.
Level the freezer so that the door closes
tightly.
Refer to the "SETTING THE TEMPERATURE
CONTROl" section for the suggested
temperature control settings.
Do not overcrowd the freezer or block cold
air vents. Doing so causes the freezer to run
longer and use more energy.
Cover foods and wipe containers dry before
placing them in the freezer. This cuts down
on moisture build-up inside the unit.
Organize the freezer to reduce door
openings. Remove as many items as needed
at one time and close the door as soon as
possible.
Vacation
Short
•
and Moving Tips
Vacations:
Leave the freezer operating during vacations
of less than three weeks.
Long Vacations:
If the freezer will not be used for several months:
•
Remove all food and unplug the power cord.
•
Clean and dry the interior thoroughly.
•
Leave the freezer door open slightly, blocking
it open if necessary, to prevent odor and
mold growth.
Moving: When moving
follow these guidelines
damage:
the freezer,
to prevent
•
Disconnect the power cord plug from the wall
outlet.
•
Remove foods, then defrost, and clean the
freezer.
Secure all loose items such as base panel,
baskets, and shelves by taping them securely
in place to prevent damage.
- In the moving vehicle, secure freezer in an
upright position to prevent movement. Also
protect outside of freezer with a blanket, or
similar item.
Power Failure / Freezer
If a power failure occurs, frozen foods will stay
frozen for at least 24 hours if the freezer is kept
closed. If the power failure continues, pack seven
or eight pounds of dry ice into the freezer every
24 hours. Look in the Yellow Pages under Dry Ice,
Dairies or Ice Cream Manufacturers for local dry
ice suppliers. Always wear gloves and use caution
when handling dry ice.
If the freezer has stopped operating, see
"FREEZER DOES NOT RUN" in the "SOLUTIONS
TO COMMON PROBLEMS" section. If you
cannot solve the problem, call Electrolux Service
immediately.
If the freezer remains off for several hours, follow
the directions above for the use of dry ice during a
power failure. If necessary, take the food to a local
locker plant until the freezer is ready to operate.
Look in the Yellow Pages under Frozen Food
Locker Plants.
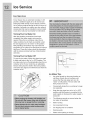
Turning Your ice Maker Off
To stop the ice maker, lift the wire signal arm until
it clicks and locks in the "up" or OFF position. The
ice maker also turns off automatically when the ice
container is full. If your model has an adjustable
freezer shelf, place the shelf in the lower position.
so that the wire signal arm will hit the ice when the
container is full.
ON
,J_/,,_
Container
1" or leas
ice Maker Tips
•
Ice cubes stored too long may develop an
odd flavor. Empty the ice container and
ensure that the wire signal arm is in its
"down" or ON position. The ice maker will
then produce more ice.
Occasionally shake the ice container to keep
ice separated.
•
Keep the wire signal arm in its "up" or OFF
position until the freezer is connected to the
water supply or whenever the water supply is
turned off.
•
The following sounds are normal when the
ice maker is operating:
•
Motor running
•
Ice loosening from tray
•
Ice dropping into ice container
Running water
Water valve opening
_g
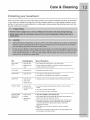
Care & Cleaning
Protecting
your investment
Keep your freezer clean to prevent odor build-up. Wipe up any spills immediately and clean at least twice
a year. Never use metallic scouring pads, brushes, abrasive cleaners or strong alkaline solutions on any
surface. Do not wash any removable parts in a dishwasher. Always unplug the electrical power cord from
the wall outlet before cleaning.
Part
Cleaning Agents
Tips and
Interior & Door
Liners
• Soap and water
• Use 2 tablespoons of baking soda in 1 quart of warm water.
• Baking soda and
water
- Be sure to wring excess water out of sponge or cloth before cleaning around
controls, light bulb or any electricat part.
Door Gaskets
• Soap and water
- Wipe gaskets with a clean soft cloth.
Drawers & Bins
• Soap and water
- Use a soft cloth to clean drawer runners and tracks.
Precautions
• Do not wash any removable items (bins, drawers, etc.) in dishwasher.
Glass Shelves
• Soap and water
- Allow glass to warm to room temperature before immersing in warm water.
• Glass cleaner
• Mild liquid sprays
Exterior & Handles
• Soap and water
- Do not use commercial household cleaners, ammonia, or alcohol to clean
• Non Abrasive Glass
Cleaner
handles.
- Use a soft cloth to clean smooth handles.
• Do not use a dry cloth to clean smooth doors.
Exterior & Handles
(Stainless Steel
Models Only)
• Soap and water
• Ammonia
• Stainless Steel
Cleaners
• Never use CHLORIDE to clean stainless steel.
• Clean stainless steel front and handles with non-abrasive soapy water and a
dishcloth. Rinse with clean water and a soft cloth.
• Wipe stubborn spots with an ammonia-soaked paper towel, and rinse. Use a
non-abrasive stainless steel cleaner. These cleaners can be purchased at
most home improvement or major department stores. Always follow
manufacturer's instruction.
• NOTE: Always, clean, wipe and dry with grain to prevent cross-grain
scratching.
• Wash the rest of the cabinet with warm water and mild liquid detergent. Rinse
well, and wipe dry with a clean soft cloth.
_i_i!ii_i!:i!i!_!_!_!ii!i_i!;!iii;i_!i!i_i_!_!_!i_!_!_i!i!!_!!:!;_i_;_i_;_i_;i_i_i;ii!i
_iii_i,i_!ii_ii!iii!iiii!ii:i;i_ii!ii_i_i!i;!iiii!i'_ii
14
Warranty information
Major Appliance Warranty
[:
[::
:
[::
[::
:::
:::
:
:
: ::::::
:
Information
Your appliance is covered by a one year limited warranty. For one year from your original date of purchase, Electrolux will repair or
replace any parts of this appliance that prove to be defective in materials or workmanship when such appliance is installed, used, and
maintained in accordance with the provided instructions. In addition, the cabinet liner and sealed refrigeration system (compressor,
condenser, evaporator, dryer or tubing) of your appliance is covered by a two through five year limited warranty. During the 2nd
through 5th years from your original date of purchase, Electrolux will repair or replace any parts in the cabinet liner and sealed
refrigeration system which prove to be defective in materials or workmanship when such appliance is installed, used, and
maintained in accordance with the provided instructions.
Exclusions
Th swarranty
doesnotcover
thefo,ow ng:
1.
2.
3.
4.
5.
6.
7.
8.
9.
10.
11.
12.
.....
13.
14.
Products with original serial numbers that have been removed, altered or cannot be readily determined.
Product that has been transferred from its original owner to another party or removed outside the USA or Canada.
Rust on the interior or exterior of the unit.
Products purchased "as-is" are not covered by this warranty.
Food loss due to any refrigerator or freezer failures.
Products used in a commercial setting.
Service calls which do not involve malfunction or defects in materials or workmanship, or for appliances not in ordinary
household use or used other than in accordance with the provided instructions.
Service calls to correct the installation of your appliance or to instruct you how to use your appliance.
Expenses for making the appliance accessible for servicing, such as removal of trim, cupboards, shelves, etc., which are
not a part of the appliance when it is shipped from the factory.
Service calls to repair or replace appliance light bulbs, air filters, water filters, other consumables, or knobs, handles, or
other cosmetic parts.
Pickup and delivery costs; your appliance is designed to be repaired in the home.
Surcharges including, but not limited to, any after hour, weekend, or holiday service calls, tolls, ferry trip charges, or
mileage expense for service calls to remote areas, including the state of Alaska.
Damages to the finish of appliance or home incurred during transportation or installation, including but not limited to floors,
cabinets, walls, etc.
Damages caused by: services performed by unauthorized service companies; use of parts other than genuine Electrolux
parts or parts obtained from persons other than authorized
inadequate power supply, accidents, fires, or acts of God.
DISCLAIMER
CUSTOMER'S
OF IMPLIED WARRANTIES;
SOLE AND EXCLUSIVE
service companies;
or external causes such as abuse, misuse,
LIMITATION OF REMEDIES
REMEDY UNDER THIS LIMITED WARRANTY
SHALL BE REPAIR OR REPLACEMENT
AS
PROVIDED HEREIN. CLAIMS BASED ON IMPLIED WARRANTIES, INCLUDING WARRANTIES OF MERCHANTABILITY
OR
FITNESS FOR A PARTICULAR PURPOSE, ARE LIMITEDTO ONEYEAR ORTHE SHORTEST PERIOD ALLOWED BY LAW, BUT
NOT LESSTHAN ONEYEAR. ELECTROLUX SHALL NOT BE LIABLE FOR CONSEQUENTIAL OR INCIDENTAL DAMAGES SUCH
AS PROPERTY DAMAGE AND INCIDENTAL EXPENSES RESULTING FROM ANY BREACH OFTHIS WRITTEN LIMITED
WARRANTY OR ANY IMPLIED WARRANTY. SOME STATES AND PROVINCES DO NOT ALLOW THE EXCLUSION OR
LIMITATION OF INCIDENTAL OR CONSEQUENTIAL
DAMAGES, OR LIMITATIONS ON THE DURATION OF IMPLIED
WARRANTIES, SO THESE LIMITATIONS OR EXCLUSIONS MAY NOT APPLY TO YOU. THIS WRITTEN WARRANTY GIVES YOU
SPECIFIC LEGAL RIGHTS. YOU MAY ALSO HAVE OTHER RIGHTS THAT VARY FROM STATE TO STATE.
If You Need Service
Keep your receipt, delivery slip, or some other appropriate payment record to establish the warranty period should service be
required. If service is performed, it is in your best interest to obtain and keep all receipts. Service under this warranty must be
obtained by contacting Electrolux at the addresses or phone numbers below.
This warranty only applies in the USA, Puerto Rico and Canada. In the USA and Puerto Rico, your appliance is warranted by
Electrolux Major Appliances North America, a division of Electrolux Home Products, Inc. In Canada, your appliance is warranted by
Electrolux Canada Corp. Electrolux authorizes no person to change or add to any obligations under this warranty. Obligations for
service and parts under this warranty must be performed by Electrolux or an authorized service company. Product features or
specifications as described or illustrated are subject to change without notice.
USA
1-877-435-3287
Electrolux Major Appliances
RO. Box 212378
Augusta, GA 30907
Canada
1-800-265-8352
North America
Electrolux Canada Corp.
5855 Terry Fox Way
Mississauga, Ontario, Canada
L5V 3E4
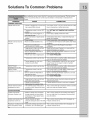
Solutions To Common
Before calling for service
Problems
1
review this list It may save you time and expense
This list includes
oommonoccurrencesthatarenottheresuItofdefectiveworkmansh,p
:::::::
Freezer.
PROBLEM
FREEZEROPERATION
Freezer does not run.
CAUSE
CORRECTIO
•
g
into a circuit that
round fau t nterrupt
Use another
circuit. If you are unsure about the outlet,
have t checked by a cert fed techn c an
•
• Temperaturecontrolisinthe"OFF"
section.
• Freezer may not be plugged
in, or
* Ensure plug is tightly pushed
,
• Poweroutage.
* Room or outside weather
* Check house lights. Call local Electric Company.
* It's normal for the Freezer to work harder under these
Check/replacefusewith
Resetcircuit
breaker.
is hot.
a 15 amptimedelayfuse.
* Freezer has recently been
conditions.
* It takes 24 hours for the Freezer to cool down
disconnected for a period of time.
* Large amount of warm or hot food
completely.
* Warm food will cause Freezer to run more until the
have been stored recently.
* Door is opened too frequently
desired temperature is reached.
* Warm air entering the Freezer causes it to run more.
or
kept open too long.
* Freezer door may be slightly open.
Open the door less often.
* See "DOOR PROBLEMS".
* Temperature
* Turn control knob to a warmer setting. Allow several
control is set too low.
hours for the temperature
* Freezer gaskets are dirty, worn,
cracked
temperature
Interior
temperature
* Clean or change gasket.
or poorly fitted.
is too warm.
* Temperature
control is set too low.
desired temperature.
* Turn control knob to a warmer setting. Allow several
* Temperature
warm.
control is set too
hours for the temperature to stabilize.
* Turn control knob to a colder setting. Allow several
* Door is opened too frequently
Freezer external surface
temperature is warm.
to stabilize.
Leaks in the door seal will
cause Freezer to run longer in order to maintain
is too cold.
Freezer
into outlet.
• plu,qmaybeloose.
Housefuse
blown ortrippedcircuit
breaker.
too long.
Freezer
..................................
* See"SETTINGTHETEMPERATURECONTROL"
position,
Interior
:
.
Freezer is plugged
has a
Freezer runs too much or
N
or
hours for the temperature to stabilize.
* Warm air entering the Freezer causes it to run more.
kept open too long.
* Freezer door may be slightly open.
Open the door less often.
* See "DOOR PROBLEMS".
* Large amount of warm or hot food
* Wait until the Freezer has had a chance to reach its
have been stored recently.
* Freezer has recently been
selected temperature.
* Freezer requires 24 hours to cool down completely.
disconnected
* The external
for a period of time.
Freezer walls can be
as much as 30°F warmer
than room
* This is normal while the compressor works to transfer
heat from inside the Freezer cabinet.
temperature.
SOUND AND NOISE
Louder sound levels
whenever
* Modern
Freezer is on.
Freezers
storage capacity
temperatures.
Louder sound levels when
compressor
Popping
comes on.
or cracking
when compressor
on.
sound
comes
have increased
* This is normal. When the surrounding
and more stable
low, you might hear the compressor
cools the interior.
They require heavy
duty compressors.
* Freezer operates at higher
pressures
during the start of the ON
cycle.
* Metal parts undergo expansion
contraction,
and
as in hot water pipes.
noise level is
running while it
* This is normal. Sound will level off or disappear
Freezer continues to run.
as
* This is normal. Sound will level off or disappear
Freezer continues to run.
as
iiii!iiii;i:iii_i!:!i_i;!ii_i
¸ilil
¸fill
¸fill
¸iii:i
¸i!i!!i_i!i!iii_i_iii_i!i!;;;!il;iiiii_ii!i
¸iii!i
¸i;!iiii!i!ii_!ilil;i_i!!ii!i:!:!i:!:!:il;ii_!_ii!_!i!
1!3
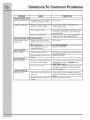
Solutions To Common
PROBLEM
Bubbling or gurgling
sound_used
I
Vibrating
L
CAUSE
to cool Freezer
circulating
or rattling noise__
Problems
CORRECTION
is F _
throughout
the system.
/
not levelJt
rocks on the
--I* Level the Freezer, Refer to "LEVELING'in
,
the
L
--I**Floor is uneven
or weak.
--I* Ensure floor can adequately
/
/
--I* Freezer is touching
WATER / MOISTURE
::
;
;
/ FROST INSIDE
Freezer walls,
ODOR IN FREEZER
Odors in Freezer.
--I* Re-level Freezer or move Freezer slightly. Refer to
/ "LEVELING" in the "FIRST STEPS" section.
internal
rate of frost build-
up.
.
, Door is slightly open.
Door is kept open too long or is
opened too frequently.
, See "DOOR PROBLEMS".
Open the door less often.
.
.
Interior
needs to be cleaned.
Clean interior with sponge,
* Foods with strong odors are in the
Freezer.
.....
Freezer. Level
FREEZER
increases
,
the wall.
support
the Freezer by putting wood or metal shims under
part of the Freezer.
warm water, and baking
soda. Replace air filter.
* Cover the food tightly.
I
DOOR PROBLEMS
Door will not close.
* Freezer is not level. It rocks on the
* This condition
can force the cabinet
out of square and
"FIRST
misalign STEPS"
the door.section.
Refer to "LEVELING"
in the
Ensure floor can adequately support Freezer. Level
floor when it is moved slightly.,
* Floor is uneven or weak.
the Freezer
by putting wood or metal shims under
part of the Freezer.
LIGHTING
PROBLEMS
Light bulb is not on.
* The fluorescent
lamp or light bulb is
burned out..
* No electric current
Freezer.
is reaching
the
* Follow directions
under "INTERIOR
LIGHTING"
section.
"MID LEVEL LIGHTING" in the "Freezer
See "Freezer DOES NOT RUN".
or
FEATURES"