1
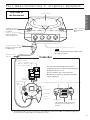
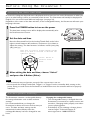
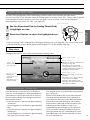
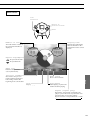
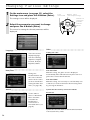
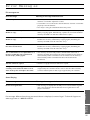
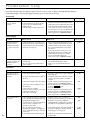
Cont ents
HEALTH AND EPILEPSY WARNING ......................... 2
WARNING .............................................................. 2, 3
CAUTION .................................................................. 4
Usage Precautions ..................................................... 4
Part Names/Connecting Peripheral Equipment .......... 5
Connecting To a Telephone Line ................................ 8
Connecting to a telephone line ................................. 8
Telephone wall jack ................................................... 9
Phone cable ................................................................ 9
Cable positioning ....................................................... 9
Before Using the Dreamcast .................................... 10
Setting the date and time ....................................... 10
Rechargeable battery .............................................. 10
Using the main menu ............................................. 11
Screensaver function .............................................. 11
Playing a Game ........................................................ 12
How to start a game ................................................ 12
Ending a game ........................................................ 13
Resetting .................................................................. 13
Managing Game Files .............................................. 14
Selecting a memory card ....................................... 14
Selecting a file ......................................................... 15
Initializing a memory card ...................................... 16
Copying files ............................................................ 18
Deleting files ............................................................ 20
Listening To Music .................................................. 22
Listening to music CDs ........................................... 22
Changing Various Settings ...................................... 24
Error Messages ........................................................ 25
Troubleshooting ....................................................... 26
Ratings and Specifications ...................................... 28
Limited Warranty ..................................................... 30
Obtaining Technical Help/Service ........................... 30
Repairs After Expiration of Warranty ........................ 30
Limitations On Warranty .......................................... 30
User Information ...................................................... 31
HEAL TH AND EPILEPS Y W ARNIN G
Read before using the Dreamcast.
Some people are susceptible to epileptic seizures or loss of consciousness when exposed to certain flashing lights or
light patterns that they encounter in everyday life, such as those in certain television images or video games. These
seizures or loss of consciousness may occur even if the person has never had an epileptic seizure.
If you or anyone in your family has ever had symptoms related to epilepsy when exposed to flashing lights, consult your
doctor prior to using the Dreamcast.
In all cases, parents should monitor the use of video games by their children. If any player experiences dizziness, blurred
vision, eye or muscle twitches, loss of consciousness, disorientation, any involuntary movement or convulsion,
IMMEDIATELY DISCONTINUE USE AND CONSULT YOUR DOCTOR.
To reduce the possibility of such symptoms, follow these safety precautions at all times when using the Dreamcast:
• Sit a minimum of 6.5 feet away from the television screen. This should be as far as the length of the Controller cable.
• Do not play if you are tired or have not had much sleep.
• Make sure that the room in which you are playing has all the lights on and is well lit.
• Stop playing video games at least ten minutes per hour. This will rest your eyes, neck, arms and fingers so that you
can continue comfortably playing the game in the future.
WARNIN G
2
Failure to comply with all warnings associated with this symbol could result
in serious bodily injury or death from electric shock.
• Do not block the fan vent or air holes. Make sure the
fan vent, which is located on the right side (as seen
from the front), and the air holes, which are located
on the back side, are at least 4 inches away from any
walls.
Do not set the Dreamcast in locations such as the
following:
– Locations where the Dreamcast is in close contact
with walls or furniture
– On top of a comforter or a cushion
Do not cover the Dreamcast with a cloth. If the fan
vent and air holes are blocked, the Dreamcast could
overheat, resulting in fire or electric shock.
Air holes (fan vent) Air holes
Air holes
The following marks appear on the underside of the
Dreamcast unit.
CAUTION
RISK OF ELECTRIC SHOCK
DO NOT OPEN
Managing
Game Files
This symbol (the exclamation point within
an equilateral triangle) is intended to alert
the user to the presence of important
operating and maintenance (servicing)
instructions in the literature accompanying
the product.
Playing a Game
This symbol (the lightning flash with arrow
symbol, within an equilateral triangle) is
intended to alert the user to the presence of
uninsulated dangerous voltage within the
product’s enclosure that may be of
sufficient magnitude to constitute a risk of
electric shock to people.
Before Using
the Dreamcast
WARNING: SHOCK HAZARD — DO NOT OPEN.
AVIS: RISQUE DE CHOC ÉLECTRIQUE — NE PAS OUVRIR.
To reduce the risk of electric shock, do not
remove the cover.
No parts inside the console can be serviced
by the user. If your console needs service,
contact Sega’s Technical Support at
www.sega.com or 1-800-USA-SEGA.
Music
Pour réduire les risques de choc électrique,
ne pas retirer le couvercle. Aucune pièce à
l’intérieur de la console ne peut être
réparée par l’utilisateur. Si la console doit
être réparée, contacter le revendeur Sega.
Additional
Information
IMPORTANT FOR LASER PRODUCTS
• The Dreamcast is a Class 1 Laser Product
The F.D.A. Department of Health and Human Services
defines Class 1 Lasers as devices which emit radiation
levels “below which biological hazards have not been
established.”
• Caution - use of controls, adjustments or performance
of procedures other than those specified herein may
result in hazardous radiation exposure.
Settings
• Use the Dreamcast on a flat surface.
If it is set at an angle when used, the temperature
inside the Dreamcast will rise, which could cause a
fire or malfunction.
• Never take the Dreamcast apart or try to modify it.
Doing so is very dangerous and could result in electric
shock.
• Never look directly at the lens inside the disc door.
Doing so could impair your vision if the laser beam
hits your eyes during the disc-screening process.
• Do not use a power outlet other than a home-use
power outlet.
Never plug the Dreamcast into a power source other
than AC 100 V to 120 V. Using a different source
voltage could result in fire or electric shock.
• Do not insert any objects into the air holes.
Doing so could result in electric shock or cause a
malfunction.
• Do not plug the power cable into an outlet until you
have finished connecting the Dreamcast and
peripheral devices together.
Do not plug the power cable into an outlet until you
have finished connecting the other cables to the
Dreamcast. Turn off the power switches of any
connected television or audio equipment. Leaving
these switches on could result in electric shock.
• Avoid using or placing the Dreamcast in areas which
are very humid or dusty.
Doing so could result in fire, electric shock or
malfunction.
• Do not use the Dreamcast on top of an object that
radiates heat.
Using the Dreamcast on top of an object that radiates
heat, such as a VCR, audio equipment, or a television,
could cause the Dreamcast to overheat, possibly
resulting in a fire or malfunction.
• Do not use or store the Dreamcast near open flame.
Do not use or store the Dreamcast near open flame or
place lit or flammable items, such as candles, incense,
etc., on it.
• Do not place any containers filled with water or other
liquids near the Dreamcast.
Doing so could result in fire or electric shock if the
liquid spills and enters the Dreamcast or gets it wet. If
a liquid spills near the Dreamcast, unplug the
Dreamcast immediately.
• Do not remove or insert the power plug with wet
hands.
Doing so could result in electric shock.
• Do not touch any terminals, connectors or ports with
your fingers or allow other metal parts to touch them.
Doing so could result in electric shock or could cause
the Dreamcast to malfunction.
• Do not use the power cable in any of the following
ways. Doing so could result in fire or electric shock.
– Modifying or heating the power cable
– Damaging the power cable
– Bending or tugging on the power cable
unnecessarily
– Knotting or kinking the power cable
– Setting heavy objects on the power cable
• Hold the plug when removing the power cable from
the outlet.
Tugging on the power cable can damage it, possibly
resulting in fire or electric shock.
• When moving the Dreamcast, first unplug the power
cable from the outlet. Do not tug the power cable or
move the Dreamcast with the power cable plugged
into the outlet.
Doing so could damage the power cable, possibly
resulting in fire or electric shock.
• Only use authorized Dreamcast peripherals.
Unauthorized peripherals have not been reviewed by
Sega and could cause damage to your Dreamcast.
Sega is not responsible for damage or injury caused
by unauthorized peripherals.
Part Names/Connecting
Peripheral Equipment
• Do not expose the Dreamcast to water, rain or
moisture, as this can result in electric shock or fire.
To reduce the risk of fire or electric shock, do not
expose the Dreamcast to rain or moisture.
Safety
Precautions
WARNIN G
3
Caution
Failure to comply with all warnings associated with this symbol may result in
personal injury or property damage from electric shock or other accidents.
• To prevent electric shock, match wide blade of plug to
wide slot, fully insert.
Pour ne pas risquer une électrocution, engagez la fiche
en faisant correspondre sa broche la plus large avec la
fente la plus large et enfoncez-la à fond.
• Make sure the disc has completely stopped spinning before
removing it. Touching the disc while it is spinning could
result in injury or scratches on the disc.
• Do not try to play anything other than circular discs. Discs
which are not circular will not stop spinning even when the
disc door is opened, possibly resulting in injury.
• When you are not using the Dreamcast, be sure to remove
the power cable from the power outlet. Leaving the power
cable plugged in could result in fire or damage to the
Dreamcast due to a lightning strike or power surge.
Usage Precautions
Follow the precautions listed below when using the Dreamcast. Failure to
follow these precautions could damage your television and the Dreamcast or
cause them to malfunction.
Usage Environment
• Avoid using or storing the Dreamcast in areas such as
those listed below. Doing so could damage the
Dreamcast or cause it to malfunction.
– Areas exposed to direct sunlight, areas close to
heaters, on top of heating vents or other hot areas
– Extremely cold areas
– Areas directly exposed to smoke, such as areas close
to cooking surfaces
– Dusty areas
– Humid areas and areas where water is used, such as
bathrooms
– Surfaces which are slanted or unstable
– Areas subject to vibration or movement
• Condensation may accumulate on the Dreamcast if it
is subjected to sudden changes in temperature. In this
case, allow the Dreamcast to adjust to the new
temperature (usually one hour) before use.
Handling the Dreamcast
• Do not drop or apply a strong force to the Dreamcast
or any other included or connected parts.
• Do not apply unnecessary force to the disc door.
• Do not touch the lens inside the disc door.
• Do not spill liquids around or inside the disc door or
drop flammable objects around or inside it.
• Be sure to close the disc door so that dust does not
gather on the lens.
• When moving the Dreamcast, be sure to remove the
disc first.
• Be careful not to get any of the terminals, connectors
or ports dirty.
• Do not insert or remove controllers or peripheral
equipment while a game is in progress.
• Only use software and peripheral equipment which are
compatible with the Dreamcast and authorized by
Sega.
4
The disc is still spinning.
Power cable
• Only use the supplied power cable which is designed
specifically for the Dreamcast.
• Do not allow the plug to come into contact with metal
or water.
Cleaning
• Follow the instructions listed below when cleaning the
Dreamcast.
– Clean the Dreamcast case using a soft cloth soaked in
water or a diluted neutral detergent. Wring out the
cloth thoroughly before wiping dirt from the case, then
wipe the case dry with a soft cloth.
– To clean the lens inside the disc door, please contact
Sega’s Technical Support at www.sega.com or
1-800-USA-SEGA.
– To wipe dirt off of any of the terminals, connectors or
ports, first remove the power cable and other cables,
then wipe them with a dry, soft cloth.
– Never use chemicals such as benzene or paint thinner
to clean the Dreamcast.
Discs
Do not use discs other than Dreamcast compatible discs or
music CDs. Also, do not use oddly shaped CDs (e.g., heart
shaped or star shaped CDs).
Disposal
The Dreamcast and its peripheral equipment are made of
metal and plastic, therefore do not burn them. Follow the
instructions of your municipality if it is necessary to
dispose of the Dreamcast or its peripheral equipment.
FCC Warning
This device complies with Part 15 of FCC Rules. Operation
is subject to the following two conditions:
(1) This device may not cause harmful interference
(2) This device must accept any interference that may be
received, including interference that may cause
undesired operation.
Note to Owners of Projection Televisions
Still pictures or images may cause permanent picturetube damage or mark the phosphor of the cathode-ray
tube (CRT). Avoid repeated or extended use of video
games on large-screen projection televisions. Consult
your television owner’s manual before playing video
games on your projection television.
Front side of
the Dreamcast
Safety
Precautions
Par t Names/Connecting P eripheral Equipment
Disc door
Part Names/Connecting
Peripheral Equipment
OPEN button
Turns the Dreamcast
on and off.
Opens the disc
door.
Power indicator
Lights up when the
power is turned on.
Before Using
the Dreamcast
POWER button
Controller connector
Control ports A to D
Note␣
Some software and settings will not work
through some ports.
Controller
cable
Controller
A
B
A
SLEEP
B
MODE
SLEEP
X Button Expansion Socket 1Expansion Socket 2
Music
MODE
Analog
Thumb Pad
Directional
Pad
(D-Pad)
You can save and manage game files by
inserting a memory card (sold separately) into
Expansion Socket 1 or 2.
If four controllers are connected to the
Dreamcast, as many as eight memory cards
can be managed.
Managing
Game Files
Memory Card
(e.g., Visual
Memory Unit;
sold separately)
Playing a Game
Plug the connector in with
the flat side up.
Y
B Button
A Button
Trigger R
Trigger L
* “Visual Memory Unit” is one type of memory card. When this card is used, “VMU” is sometimes displayed on
the screen; this is an abbreviation for “Visual Memory Unit.”
Additional
Information
The controller cable can be fitted
into this groove to hold it out of
the way.
Settings
Start
Button
5
Par t Names/Connecting P eripheral Equipment
Warning
Back side of
the Dreamcast
To Prevent electric shock,
connect all cables to the
Dreamcast before plugging
power cable into outlet.
Power terminal
To wall outlet
(AC 100 V to 120 V)
Phone jack
Modem
Air holes
Do not block.
AV terminal
Television
Serial terminal
Connect yellow to the video
terminal.
Connect white to the audio (left)
terminal.
Connect red to the audio (right)
terminal.
(Connect white to the audio terminal
if your television is monaural.)
(for possible future
expandability)
Power cable (supplied)
Stereo AV cable (supplied)
AV input terminals
Notes␣
• The supplied stereo AV cable cannot be
connected to a television without an AV
input terminal.
• If you are using a monaural connection,
change the audio setting in the
Dreamcast to Mono (see page 24).
Connecting to a TV or VCR without Audio/Video Input Terminals
Connecting to a TV/Monitor and Antenna
If an antenna cable is plugged into your TV (or if you have cable TV), use a Dreamcast RF unit (sold
separately).
Back side of the TV set (VHF 75 ohm)
1. Unplug the antenna cable from the TV, and
plug it into the RF unit -ANT IN- terminal.
2. Plug the RF unit -TV OUT- cable into the TV.
3. Plug the RF unit -A/V IN- cable into the AV
terminal on the back of the Dreamcast.
Note␣
If your television is connected to a VCR, check to
see if your VCR has audio/video input terminals to
which you can connect the supplied stereo AV
cable.
6
VHF/UHF
RF unit -TV OUT- cable
Cable TV or
VHF antenna
cable
ANT. IN
RF unit
A / V IN
RF cable
TV OUT
MODEL NO.HKT-8820
NTSC-M
CH3-CH4
SELECT
4
3
Back side of
the Dreamcast
To AV terminal
VHF/UHF
RF unit -TV OUT- cable
RF In
RF
out
RF unit
ANT. IN
TV OUT
MODEL NO.HKT-8820
NTSC-M
CH3-CH4
A / V IN
Before Using
the Dreamcast
Video cassette
recorder
SELECT
4
3
Part Names/Connecting
Peripheral Equipment
Back side of the TV set (VHF 75 ohm)
1. Unplug the antenna cable from the TV and
plug it into the RF unit -ANT/IN- terminal.
2. Plug the RF unit -TV OUT- cable into the TV.
3. Plug the RF unit -A/V IN- cable into the AV
terminal on the back of the Dreamcast.
Safety
Precautions
Connecting to a TV that is connected through a VCR
If a VCR is already connected between the antenna and your TV, you may still connect the Dreamcast by
using a Dreamcast RF unit (sold separately).
Back side of
the Dreamcast
RF cable
To AV terminal
1. Set the channel switch on the RF unit to CH3.
2. Set your TV to channel 3.
3. If channel 3 is used for TV viewing, set your TV
to channel 4. Then set the channel switch on
the RF unit to CH4.
ANT. IN
TV OUT
MODEL NO.HKT-8820
NTSC-M
CH3-CH4
A / V IN
Side view
Playing a Game
Setting the TV Channel
If you are using an RF unit, see below.
SELECT
4
3
CH SELECT
CH4 – CH3
Lens
Additional
Information
Lens
Do not touch the lens inside the disc door. If the lens gets dirty, it will
not be able to properly read discs, leading to malfunctions.
Call Sega’s Technical Support at www.sega.com or 1-800-USA-SEGA
before attempting to clean the lens.
Settings
Where to place the Dreamcast
Place the Dreamcast in locations such as those described below. Failure to place the Dreamcast
properly could result in fire or damage the Dreamcast.
• A flat location
• A location where none of the air holes are blocked
• A location which is a good distance from heat sources such as on top of a television, VCR, or close to
a heater
Never place the Dreamcast inside a sealed container. Doing so could damage the Dreamcast.
Music
Warning
Managing
Game Files
Note␣
If your TV has automatic fine-tuning control
(AFC), turn it off and manually adjust the picture.
However, if you have a color TV that turns black
and white when the AFC is turned off, leave the
AFC on.
7
Connecting t o a Telephone Line
Use the Dreamcast with an online software program to game with people all around the world and have
fun on the Internet. Not all Dreamcast software supports online gameplay.
Please refer to the operating manual included with the software for information about online gaming
options. It is not necessary to connect the Dreamcast to a telephone line when you are using it to play
games offline (i.e., not connected to an online gaming service).
Connecting t o a t
elephone line
Telephone wall jack
Modem
Phone cable
(32.8 ft.; included)
Phone jack
1
Make sure the Dreamcast power is off.
2
Connect one end of the included phone cable to
the phone jack on the Dreamcast modem.
It does not matter which end of the phone cable is plugged into
the Dreamcast or the wall. You may need to unplug your
telephone from the wall jack before you can connect the phone
cable from the Dreamcast.
3
Connect the other end of the phone cable to a
telephone wall jack.
After Your Online Session
After you finish using the online software, reconnect your telephone to
the telephone wall jack.
You will not be able to use your telephone if the telephone line is left
connected to the Dreamcast.
8
Safety
Precautions
Telephone w all jack
Phone cable
Cable positioning
Notes
Settings
Additional
Information
Modems and Telephones
• You cannot go online with the Dreamcast
while you are using your telephone.
(However, you can play games offline.)
• You cannot use your telephone while the
Dreamcast is online.
Connection Types that Cannot be Used for
Online Gaming
• You cannot go online with any connection
other than a telephone line for home use.
• You cannot go online using a modular jack
connected to an extension phone.
(Companies and government offices often use
private branch exchanges (PBXs). An
extension phone is a phone which is
connected to a PBX and which requires you to
dial 0 or some other number in order to place
an outside call.)
• You need an analog connection. The
Dreamcast will not function with a digital
connection.
Music
If you have Call Waiting Service
• Please note that if you have Call Waiting
service and someone calls you while the
Dreamcast is online, your connection may
be disconnected or the game may function
abnormally and disconnect.
• If you want to ensure that the Dreamcast is
not interrupted by incoming calls when you
go online, we recommend disabling your Call
Waiting service or adding a separate phone
line dedicated to online use. Contact your
local telephone service provider for further
information.
Managing
Game Files
• Position the phone cable as far away as possible from electrical devices such as computer displays,
televisions and speakers. Communication errors may occur if it is too close to such devices.
Playing a Game
• Do not touch the plugs on the ends of the phone cable.
• If the phone cable is not long enough, use a longer phone extension cable (sold separately).
• Do not use an overly long phone cable. The longer the phone cable you use, the weaker the phone
signal becomes. If the modem does not seem to work correctly or you get frequently disconnected,
please try a shorter phone cable before contacting Sega’s Technical Support at www.sega.com or
1-800-USA-SEGA.
• Do not bend, knot or kink the phone cable. Take care when positioning the phone cable to ensure that
it will not trip someone or become snagged in some way.
Before Using
the Dreamcast
Modular plugs may vary from one area to
another. Make sure to use the correct
modular conversion plug for the modular
jacks in your area.
Part Names/Connecting
Peripheral Equipment
Make sure your telephone wall jack is a modular jack. If it is not a modular jack,
you will need a modular conversion plug so that a modular plug can be
connected to it. Contact your local telephone service provider for further
information.
9
Bef or e Using t
he Dr eamcas t
Se tting t
he date and time
A screen for setting the date and time is displayed the first time you turn on the Dreamcast or when you
turn it on after leaving it off for an extended period of time. The information will initially be displayed in
English. You can select from 6 different languages (see page 24).
Regardless of the status of the date and time, or the rechargeable battery, the Dreamcast will retain your
language selection.
1
2
Press the POWER button to turn on the power.
The date/time setting screen will be displayed automatically after
the Dreamcast intro screen.
1
Set the date and time.
Move the Directional Pad (or the Analog Thumb Pad) to the left or
right to switch between date and time, and move it up or down to
adjust the setting. The date format is as follows: month (mm)/day
(dd)/year (yy)
Move left or right to change between fields.
Move up or down to increase or decrease the
numerical setting.
Cancel/ Return to
previous screen
Enter
3
After setting the date and time, choose “Select”
and press the A Button (Enter).
Notes␣
• The Dreamcast may not function correctly if the correct time is not set.
• Do not touch the Analog Thumb Pad, Trigger L, or Trigger R on the controller while turning on the
power. Doing so could cause the Dreamcast to malfunction since the controller will not be properly
initialized.
R echar geable battery
The Dreamcast contains a rechargeable battery
for saving information such as date and time
settings.
It is recommended that you charge the
Dreamcast for about two hours the first time you
use it. The date and time settings can be
maintained for about 20 days after the
rechargeable battery has been charged for two
hours.
10
Charging the rechargeable battery
• The rechargeable battery is charged when the
Dreamcast is connected to a power source and
turned on. Charging works properly even when
you are playing games.
• If the battery is not retaining a charge, please
contact Sega’s Technical Support at
www.sega.com or 1-800-USA-SEGA.
Safety
Precautions
Using the main menu
Icon selection
Use the Directional Pad (or Analog Thumb Pad)
to highlight an icon.
2
Press the A Button to select the highlighted icon.
Enter
Before Using
the Dreamcast
1
Part Names/Connecting
Peripheral Equipment
The Play, File management, Music and Setting screens can be accessed from the main menu.
It is not necessary to use the main menu for normal games or to play music CDs. When a disc is placed
in the Dreamcast and the power is turned on, the game screen or music screen will be displayed
automatically if auto start is set “ON” (see page 24).
* Various settings can be changed by selecting the Settings icon (see page 24). The screen shots in this
manual show the screens which appear when English is set as the display language.
To display this screen, turn on the power without inserting a disc.
Date and Time
Playing a Game
Main menu
File icon
Starts a game
(see page 12).
Displays the memory card selection
screen (see page 14).
This allows you to perform file
management procedures such as
copying and deleting saved files or
initializing a memory card.
Settings icon
Displays the
music screen (see
page 22).
This allows you to
play music CDs.
Displays the settings screens (see
page 24).
This allows you to change settings
such as the screen display
language, date and time, audio,
auto start, as well as memory card
date and time settings.
Music
Music icon
Managing
Game Files
Play icon
Scr eensa ver function
Additional
Information
The original screen is restored after any button or
key is pressed.
Please note that while the screensaver function
may help prevent possible screen damage to
your television, there are many different makes
and models with each having its own features
and functions. Although we do not believe you
will encounter any problems, Sega is not
responsible for any damage to your television
set. If you will be taking a break and desire to
leave the Dreamcast on (unattended) for more
than 60 minutes, we recommend that you turn
off your television set.
Settings
If the Dreamcast is inactive for a set length of
time, the screen brightness will automatically be
reduced and a screensaver will start in order to
prevent a ghost image from being burned onto
the television screen.
• If the Dreamcast is inactive for approximately
10 minutes:
Screen brightness is reduced to approximately
50%.
• If the Dreamcast is inactive for approximately
20 minutes:
Screen brightness is reduced to approximately
20% and a screensaver starts.
11
Pla ying a Game
Ho w to star t a g
ame
1
First turn on the television power, then change
the television input mode to Video Input Mode.
See your television’s operating manual for information on how to
change to Video Input Mode (may also be called auxiliary input).
If you are connecting your Dreamcast via RF adapter, see the RF
adapter manual for directions.
2
3
4
5
Label side
4
Press the OPEN button to open the disc door.
Press the game disc down (label side up) as
shown, until it clicks in place.
5
3
2
Manually press the disc door shut until it locks in
place.
Press the POWER button to turn on the power.
The game will start automatically after the Dreamcast logo screen
is displayed.
Notes␣
• Do not touch the Analog Thumb Pad, Trigger L, or Trigger R on the controller while turning on the power.
Doing so could cause the Dreamcast to malfunction since the controller will not be properly initialized.
• Some games require a memory card for saving data (sold separately). See page 16 for information
on how to initialize a memory card if initialization is necessary.
To display the game screen from the main menu (see page 11)
Select the Play icon and press the A Button.
Main Unit Memory
The Dreamcast contains a Main Unit Memory. The main unit memory contains: 1. Main Unit ID
(identification number) which is set when the Dreamcast was manufactured and 2. Play History.
12
Safety
Precautions
Ending a game
Part Names/Connecting
Peripheral Equipment
1
2
Press the OPEN button to open the disc door.
2
Make sure the disc has stopped spinning completely.
Remove the disc.
Put your index finger or middle finger in the center hole of the
disc, then gently lift up the edge of the disc with your thumb.
Close the disc door and press the POWER button
to turn off the power.
Disc drive hub
Caution
Managing
Game Files
• Opening the disc door after the Dreamcast power is turned off is extremely
dangerous, since the disc will continue spinning at high speed without the brake
to slow it down.
• Be sure to follow the proper procedure when removing a disc.
• Do not press down forcefully on the disc drive hub. Doing so could result in
injury or damage the Dreamcast.
Playing a Game
Changing discs
To change discs and continue playing games, shut the disc door without turning off the power after
exchanging discs. Certain games may encompass more than one disc. Follow directions in the game to
exchange discs during gameplay.
Before Using
the Dreamcast
3
1
R esetting
If a game is in progress
The game will stop and the game title screen will
be displayed.
START Button
Additional
Information
Note␣
You cannot reset the Dreamcast while game data is being saved or while the disc is being accessed.
Settings
If the game title screen is displayed
The main menu (see page 11) will be displayed.
A, B, X, and Y Buttons
Music
If the A Button, B Button, X Button, Y Button and Start Button are all pressed at the same time, the game
in progress will be stopped and the game title screen or the main menu will be displayed. The game data
of the game in progress will NOT be saved.
If you are using a Sega authorized controller which does not have these buttons, see the operating
manual which came with your software or peripheral equipment.
13
Managing Game F iles
You can save and manage game files (e.g., file copying or deleting) by inserting a Sega authorized
memory card (sold separately) into Expansion Socket 1 or 2 on the controller.
Notes␣
• The first time you use a memory card (e.g., Visual Memory Unit; sold separately) after purchasing it,
you will need to initialize the card. See “Initializing a memory card” (see page 16).
• Before connecting the Visual Memory Unit card to the controller, change the Visual Memory Unit to
Clock or File mode. The memory card may malfunction in other modes. See the Visual Memory Unit
operating manual for further details.
• Use only Sega authorized memory cards.
Selecting a memor y card
Select the memory card you want to display on the screen from among the memory cards connected to
the controller.
A
B
MODE
Insert the memory card.
Icon
selection
Select the File icon from the main menu
(see page 11), then press the A Button (Enter).
The memory card selection screen will be displayed.
3
SLEEP
1
2
Memory card (e.g.,
Visual Memory
Unit; sold
separately)
Return to
previous
screen
Enter
Select the icon corresponding to the memory
card whose file menu you want to display, then
press the A Button (Enter).
Memory card selection screen
Percentage of memory
used
Memory Card icon
The memory cards
connected to
Expansion Socket 1
or 2 on each
controller are
displayed.
When a memory
card is selected and
the A button (Enter)
is pressed, the file
menu screen (see
page 15) is
displayed, and files
stored on the
memory card can be
accessed. If the
hourglass icon is
displayed, the
Dreamcast is trying
to read the contents
of the memory card.
Number of free blocks
Controller
The display shows which
of the control ports (A, B,
C, or D) a controller is
connected to.
14
BACK icon
When this is selected and the A Button
is pressed, the previous screen
(main menu) is displayed again.
Socket 2
Socket 1
Safety
Precautions
Selecting a file
Icon
selection
Return to
previous
screen
B
MODE
Enter
The file menu screen will be displayed.
Select the icon corresponding to the file to be
copied, deleted, etc., then press the A Button
(Enter).
Before Using
the Dreamcast
2
A
On the memory card selection screen (see
page 14), select a Memory Card icon and
press the A Button (Enter).
Memory card
(sold separately)
SLEEP
1
Part Names/Connecting
Peripheral Equipment
Select files on the memory card for copying, deleting, etc.
File menu screen
▲ Icon
Additional files above.
▼ Icon
Additional files below.
Percentage of
memory used
Number of free
blocks
Managing
Game Files
Memory
Card
The selected
memory card
is displayed.
File icon
The color displayed for
this icon varies
depending on the type
of file.
•Green: Executable files
for Visual Memory Unit
games, etc. (including
files that cannot be
copied)
•Red: Copy-protected
files
•Black: Saved game
files
Playing a Game
ALL icon
Selects all
files.
When selected, files
blink in yellow.
Game title
Information about
the selected file
File creation
date
Time
File name/Comments
Music
BACK icon
Goes back one
screen (to the
memory card
selection screen).
GAME/DATA
This indicates whether the displayed information is
a Visual Memory Unit game or a file saved from
game software.
The memory card selection screen will be displayed again if the memory card is removed while the file
menu is displayed.
Additional
Information
Visual Memory Unit game (VMU game)
A Visual Memory Unit game (VMU game) is a mini-game played on the Visual Memory Unit.
The Visual Memory Unit has the ability to accept downloaded mini-games from certain software for
stand-alone play. See the operation manual for your software to see if this feature is available.
Settings
Number of blocks used
Note␣
15
Managing Game F iles
Initializing a memor
y card
Initialization is the process of erasing all files using the ALL icon.
Initialization is necessary the first time you use a memory card after purchase or when you can no
longer use a memory card for some reason. There are also some settings that can only be changed at
initialization time: icon and color. These two settings can be used to help differentiate one memory card
from another.
Icon
selection
Memory card
(sold separately)
A
SLEEP
B
1
Select the ALL icon on the file
menu screen and press the A Button (Enter).
Return to
previous
screen/Cancel
MODE
Enter
16
2
Select “Delete All (Memory Reset)” and press the
A Button (Enter).
3
Confirm that you want to delete all files by
selecting “Yes” and pressing the A Button
(Enter).
4
Select an icon and press the A Button (Enter).
Please review the icons displayed on the screen. Using the
Directional Pad or the Analog Thumb Pad highlight the icon you
like and press the A Button (Enter) to choose it. Choose “Select”
to continue to the next display.
Safety
Precautions
5
Select a color and press the A Button (Enter).
Please review the colors displayed on the screen. Using the
Directional Pad or the Analog Thumb Pad highlight the color you
like and press the A Button (Enter) to choose it. Choose “Select”
to continue to the next display.
Part Names/Connecting
Peripheral Equipment
6
Confirm your choice of color and icon. Select
“Yes” and press the A Button (Enter).
Before Using
the Dreamcast
The memory card will be initialized. A completion message is
displayed.
Press the A Button to go back to the file menu screen.
Playing a Game
Notes␣
Managing
Game Files
• To avoid any possible damage during the initialization process
– Do not remove the controller connector from the Dreamcast.
– Do not remove or connect peripheral equipment (e.g., memory cards) from the controller.
– Do not power off or unplug the Dreamcast.
• The initialization process erases all of the files in a memory card. Be sure to thoroughly check the
contents of the memory card before initializing it.
• If desired, copy selected files to another memory card before starting the initialization process. See
page 18.
Music
Settings
Additional
Information
17
Managing Game F iles
Cop ying files
You can copy files from a selected memory card to another memory card.
A
SLEEP
1
Select/Deselect all
files corresponding
Memory card
to the same game
(sold separately)
(see page 21)
Icon selection
On the file menu screen, select the file to
be copied and press the A Button (Enter).
B
MODE
Return to
previous screen/
Cancel
Enter
2
Select “Copy” and press the A Button (Enter).
3
Select the destination memory card
and press the A Button (Enter).
4
Select “Start Copying” and press the A Button
(Enter).
At this point, you may also select “View Contents” and press the
A Button (Enter) to view the file information on a possible
destination memory card.
Select “Cancel” and press the A or B Button to return to the
previous screen.
A completion message is displayed.
Press the A Button to return to the file menu screen.
18
Safety
Precautions
Part Names/Connecting
Peripheral Equipment
Notes␣
Before Using
the Dreamcast
• To avoid any possible damage during the copying process
– Do not remove the controller connector from the Dreamcast.
– Do not remove or connect peripheral equipment (e.g., memory cards) from the controller.
– Do not power off or unplug the Dreamcast.
• Copying is not possible in the following cases.
– When the file is a copy-protected file.
– When the file is a Visual Memory Unit game (VMU game) file which is copy-protected.
– When there is not sufficient free space on the destination memory card.
– A Visual Memory Unit game (VMU game) file cannot be copied to a destination memory card if there
is already a Visual Memory Unit game (VMU game) file on the destination memory card.
Playing a Game
Managing
Game Files
Music
Settings
Additional
Information
19
Managing Game F iles
Dele ting files
You can delete selected files from a selected memory card.
Select/Deselect all
Memory card
files corresponding
(sold separately)
to the same game
(see page 21)
Icon selection
On the file menu screen, select the file to be
deleted and press the A Button (Enter).
A
SLEEP
1
B
MODE
Return to
previous
screen/Cancel
Enter
2
Select “Delete” and press the A Button (Enter).
3
After confirming the file, select “Yes” and
press the A Button (Enter).
A completion message is displayed.
Press the A Button to return to the file menu screen.
20
Safety
Precautions
A
SLEEP
B
MODE
Selecting all files
You can select all files in a memory card by selecting the ALL
icon.
X Button
Y Button
Playing a Game
Selecting a group of files corresponding to the same game title
If you press the X or Y Button on the Controller, instead of the
A Button, you can select all files corresponding to the same
game title as the highlighted file. Note, however, that you
cannot select executable files such as Visual Memory Unit
game (VMU game) files.
Press the X or Y Button once more to cancel the selection.
Before Using
the Dreamcast
Selecting a group of files
Part Names/Connecting
Peripheral Equipment
Notes␣
• Once deleted, a file cannot be retrieved.
• To avoid any possible damage during the deletion process
– Do not remove the controller connector from the Dreamcast.
– Do not remove or connect peripheral equipment (e.g., memory cards) from the controller.
Managing
Game Files
Music
Settings
Additional
Information
21
Listening to Music
Listening to music CDs
First turn on the television power, then change the television input mode to Video Input Mode. See your
television’s operating manual for information on how to change to Video Input Mode.
Label side up
1
2
Press the OPEN button to open the disc door.
3
4
Manually press the disc door shut.
Press the music CD down as shown until it clicks
in place.
4
3
2
Press the POWER button to turn on the power.
The music CD playing screen will be displayed automatically after
the Dreamcast logo screen is displayed.
To display the music screen from the main menu (see page 11)
Select the Music icon and press the A Button.
Caution
• Do not touch the disc while it is spinning. Doing so could result in personal injury or damage to the
disc or the Dreamcast.
Note␣
Do not touch the Analog Thumb Pad, Trigger L, or Trigger R on the controller while turning on the
power. Doing so could cause the Dreamcast to malfunction since the controller will not be initialized
properly.
22
1
Safety
Precautions
Music screen
Part Names/Connecting
Peripheral Equipment
Icon
selection
Return to
previous screen
Enter
Before Using
the Dreamcast
Playing time
The total number of tracks or
the current track number is
displayed.
Displays the total playing
time for all tracks or the
playing time for the current
track.
Repeat display
Playing a Game
Number of tracks
: Repeat current track
: Repeat all tracks
Managing
Game Files
BACK icon
Returns to the previous
screen (main menu).
Previous track
Next track
Goes back to the previous
track. If a CD is playing, this
button will go back to the
beginning of the current track.
Goes to the next track.
Play/Pause
Stops playing.
Starts playing or pauses the
track if the CD is playing.
Music
Stop
Repeat (repeat play)
➝
Settings
Repeats the current track or all tracks. The
player cycles between the repeat modes each
time this button is pressed as follows:
Repeat one track ➝ Repeat all tracks ➝ Clear
Additional
Information
23
Changing V ar ious Settings
1
On the main menu (see page 11), select the
Settings icon and press the A Button (Enter).
Icon
selection
Memory card
(sold separately)
The settings screen will be displayed.
A
B
MODE
Select the parameter you want to change
and press the A Button (Enter).
SLEEP
2
Return to
previous
screen/
Cancel
Enter
The screen for setting the selected parameter will be
displayed.
Language
○ ○ ○ ○ ○ ○ ○ ○ ○ ○ ○ ○ ○ ○ ○ ○ ○ ○ ○ ○ ○
Select the desired
display language
from the following:
Japanese, English,
Deutsch, Français,
Español, Italiano.
Date/Time
○ ○ ○ ○ ○ ○ ○ ○ ○ ○ ○ ○ ○ ○ ○ ○ ○ ○ ○ ○ ○
Change the
Dreamcast date and
time. The controller
actions are the same
as those described in
Setting the Date and
Time (see page 10).
Sound
○ ○ ○ ○ ○ ○ ○ ○ ○ ○ ○ ○ ○ ○ ○ ○ ○ ○ ○ ○ ○ ○ ○
Set the audio to
Stereo or Monaural.
Mono should be
selected if the
Dreamcast is
connected to a
monaural device (see
page 6).
Other
○ ○ ○ ○ ○ ○ ○ ○ ○ ○ ○ ○ ○ ○ ○ ○ ○ ○ ○ ○ ○ ○ ○
Setting auto start
Auto Start ‘ON’
With this setting, the game screen is displayed
automatically when a Dreamcast-only disc such as a
game disc is inserted in Dreamcast.
Auto Start ‘OFF’
With this setting, it is necessary to select the Play icon
or Music icon on the main menu after inserting a disc
by pressing the A Button.
Synchronize the memory card clocks with the
Dreamcast.
Synchronize the time between the Dreamcast and all
connected memory cards.
24
Safety
Precautions
Er ror Messag es
File management
No memory card found.
• A memory card is not connected to the controller. Insert a memory
card into a controller expansion socket.
• A controller is not connected to the Dreamcast. Connect a controller
properly to the Dreamcast.
• You may be using an unauthorized memory card.
The destination Memory Card is full.
Unable to copy.
• Delete some files from the destination memory card to free up space
and try copying again. Alternatively, replace the current destination
memory card with one that has sufficient free space.
The destination Memory Card is not ready. • The destination memory card is no longer usable for some reason.
Unable to copy.
Initialize the memory card and try copying again (initializing the
memory card will erase all of the files on it).
• The destination memory card cannot be used for some reason.
Initialize the memory card and try copying again (initializing the
memory card will erase all of the files on it).
The command was not completed due to a • The memory card currently under command was removed, a
memory card being removed/inserted.
memory card was inserted into the same Controller as the memory
Check card(s) and try again.
card currently under command or the Controller for the memory
card currently under command was disconnected from the
Dreamcast.
• The file is copy-protected; it cannot be copied.
This game dose not support the AV cable
currently connected to the main console.
Turn off the power and replace the cable.
• The type of AV cable currently connected to the Dreamcast is not
supported by the software. Please remove the AV cable currently
connected and replace it with a type supported by the software.
Managing
Game Files
This file cannot be copied.
Playing a Game
The memory card cannot be used until all
files have been deleted.
Before Using
the Dreamcast
Meaning of message and what to do
Part Names/Connecting
Peripheral Equipment
Error message
Game Playing
Meaning of message and what to do
Please insert game disc.
• This message is displayed if the Play icon is selected when a game
disc is not inserted in the Dreamcast. Insert a game disc in the
proper orientation.
Settings
If a message different from those presented above is displayed, contact Sega’s Technical Support at
www.sega.com or 1-800-USA-SEGA.
Music
Error message
Additional
Information
25
Troubleshoo ting
Your Dreamcast may not require repair service in cases such as those described below. Before
contacting Sega’s Technical Support, please go over the checks below.
Dreamcast
Problem
What to check
What to do
The Dreamcast is so
hot you cannot
touch it.
• Are the air holes blocked?
Is the Dreamcast set at an angle?
Is it set close to anything that
radiates heat?
Is air blowing out of the fan vent?
• Set the Dreamcast in an approved
location, then turn off the power and
unplug the power cable from the outlet.
Next, leave the Dreamcast idle until it
cools down. If no air is coming out of
the fan vent, do not use the Dreamcast.
Contact Sega’s Technical Support at
www.sega.com or 1-800-USA-SEGA.
Problem
What to check
What to do
The date and time
setting screen is
displayed each time
the power is turned
on.
• Is this the first time you have used
the Dreamcast since purchasing it,
or the first time after an extended
period of not using it?
• The rechargeable battery has lost its
charge. Connect the Dreamcast to an
outlet and turn on the power. Charge
the rechargeable battery for at least
two hours.
* If the date and time setting screen is
still displayed after the rechargeable
battery has been charged, contact
Sega’s Technical Support at
www.sega.com or 1-800-USA-SEGA
p.10
The Dreamcast does
not turn on when the
POWER button is
pressed.
• Is the power cable properly
connected?
• Are you using a Sega authorized
power cable?
• Securely plug the power cable into
the Dreamcast and the outlet.
• Only use a Sega authorized power
cable.
p.6
Problem
What to check
What to do
The game does not
start when a disc is
inserted.
• Is the disc properly seated?
Reference page
p.2, 3
Power supply
Reference page
—
Operation
•
•
•
•
•
•
The controller does
not work.
26
• Securely seat the disc in place with the
label side up.
Are there any fingerprints or dirt on • Clean the underside of the disc with a
store-bought CD cleaner or similar
the disc?
cleaner.
Is the lens inside the disc door dirty? • Contact Sega’s Technical Support at
www.sega.com or 1-800-USA-SEGA.
Is the type of disc suitable for your
• Use Dreamcast-only software discs that
Dreamcast?
bear the
mark.
• Set auto start to ON.
Is auto start set to OFF?
Does the same problem occur with • Contact Sega’s Technical Support at
other Dreamcast discs?
www.sega.com or 1-800-USA-SEGA.
• Contact Sega’s Technical Support at
Is the disc scratched?
www.sega.com or 1-800-USA-SEGA.
• Is the controller properly connected
to a control port on the Dreamcast?
• If peripheral equipment is
connected to a controller expansion
socket on the controller, is it
properly connected?
• Are you touching the Analog
Thumb Pad, Trigger L or Trigger R
on the controller when you turn the
power on?
• Is the peripheral Sega authorized?
Reference page
p.12
—
p.7
—
p.24
—
—
• Properly connect the controller to a
control port before turning on the power.
• Properly connect the peripheral
equipment after reading the operating
manual for the peripheral equipment.
p.5
• Turn off the power, then turn it back on
without touching the Analog Thumb
Pad, Trigger L or Trigger R.
p.10
(Note)
• Only use Sega authorized Dreamcast
peripherals.
p.5
—
Safety
Precautions
Video and audio
What to check
What to do
There is absolutely
no video.
• Is the power cable properly
connected?
• Are the Dreamcast and the television
on?
• Are the Dreamcast and the television
properly connected through the AV
cable?
• Is the television input (Television/
Video switch) set to Video?
• Securely plug the power cable into the
Dreamcast and the outlet.
• Turn on the Dreamcast and the
television.
• Securely plug the AV cable into the
Dreamcast and the correct terminal on
the television.
• Set the television input to the correct
setting. If there is more than one video
input terminal on the television, read
your television’s operating manual for
proper setting.
• Refer to your television’s operating
manual to ensure you have made the
proper settings. If necessary, try a
different AV input terminal.
• Only use Sega authorized cables.
p.6
• Securely plug the power cable into
Dreamcast and the outlet.
• Turn on the Dreamcast and the
television.
• Securely plug the AV cable into the
Dreamcast and the correct terminal on
the television.
• Set the television input to the correct
setting. If there is more than one video
input terminal on the television, read
your television’s operating manual for
the proper setting.
• Adjust the volume.
p.6
• Clean the underside of the disc with a
store-bought CD cleaner or similar
cleaner.
• Securely plug the power cable into the
Dreamcast and the outlet.
• Securely plug the AV cable into the
Dreamcast and the correct terminal on
the television.
—
• Are the power cable and/or video
cable Sega authorized?
• Is the power cable properly
connected?
• Are the Dreamcast and the television
on?
• Are the Dreamcast and the television
properly connected through the AV
cable?
• Is the television input (Television/
Video switch) set to Video?
Video and audio
output are cut off
while a game is in
progress.
• Are there any scratches, fingerprints,
or dirt on the disc?
p.6
—
—
p.6
—
—
p.6
p.6
Music
• Is the power cable properly
connected?
• Are the Dreamcast and the television
properly connected through the AV
cable?
—
Managing
Game Files
• Is the television volume set to a low
level or mute?
p.6
Playing a Game
There is no audio.
—
Before Using
the Dreamcast
• Is there more than one AV input
terminal on the television?
Reference page
Part Names/Connecting
Peripheral Equipment
Problem
If you experience other problems, unplug the power cable from the outlet and contact Sega’s Technical
Support at www.sega.com or 1-800-USA-SEGA for further information.
Settings
Additional
Information
27
R atings and Specifications
Model
HKT-3020 (main unit)
Used power supply
AC100 V to 120 V, 50/60 Hz
Wattage
Approximately 27 W
Usage environment
Temperature: 41 to 95°F
Humidity:
20 to 90% RH (no condensation)
External dimensions Approximately 7 1/2 x 7 3/4 x 3 inches (W x D x H)
Weight
28
Approximately 3 pounds
Further, Sega offers no warranty service or support outside of the US and Canada.
Product covered under one or more of the following U.S. Patent Nos: 5,460,374; 5,525,770; 5,627,895; 5,688,173;
4,442,486; 4,454,594; 4,462,076; and Re. 35,839; and Japanese Patent No. 2,870,538 (Patents pending in U.S. and
other countries); Canada Patent No. 1,183,276.
Before Using
the Dreamcast
Export, use for profit, rental or leasing of this product is prohibited.
Part Names/Connecting
Peripheral Equipment
• Please note that specifications and product exterior may change without notice.
• Unauthorized reproduction of the contents of this document is prohibited.
• SEGA, Dreamcast, the Dreamcast logo and Visual Memory are either registered trademarks or trademarks of
Sega Enterprises, Ltd.
• Microsoft, Windows, and the WindowsCE logo are registered trademarks or trademarks of Microsoft Corporation
in the US and other countries.
• Incorporated software uses fonts based on the fonts of Fontworks International Limited and have been
customized for Dreamcast. The Fontworks company name and font names are trademarks or registered
trademarks of Fontworks International Limited.
Safety
Precautions
Sega of America, Inc.
P.O.Box 7639 San Francisco, CA 94120-7639
1-800-USA-SEGA & www.sega.com
Playing a Game
Managing
Game Files
Music
Settings
Additional
Information
29
* THIS, LIMITED, WARRANTY IS VALID FOR U.S. AND CANADIAN SEGA DREAMCAST
SYSTEMS MANUFACTURED FOR SALE IN AND PURCHASED AND OPERATED IN THE
UNITED STATES AND CANADA, ONLY!
Limited Warranty
Sega of America, Inc. warrants to the original consumer purchaser that the Sega Dreamcast System and
all component parts shall be free from defects in material workmanship for a period of 90 days from the
date of purchase. If a defect covered by this limited warranty occurs during this 90-day warranty period,
Sega will repair or replace the defective system or component part, at its option, free of charge. This
limited warranty does not apply if the Sega Dreamcast is used with products not distributed or licensed
by Sega, or if the defects have been caused by negligence, accident, unreasonable use, modification,
tampering or any other causes not related to defective materials or workmanship. Additionally, this
warranty shall not be valid if the serial number of the Sega Dreamcast System unit has been altered,
defaced or removed in any way. Please retain the original or a photocopy of your dated sales receipt to
easily establish the date of purchase for in-warranty repairs.
Obtaining Technical Help/Service
To receive trouble shooting assistance, please contact Sega at:
• web site
http://www.sega.com
• email address
[email protected]
• 800 number
1-800-USA-SEGA
If a representative is unable to solve your problem, you will be given instructions for obtaining exchange/
repair service. The following options are available:
Rapid Exchange Program: You will be directed to the nearest Sega authorized service center. Upon
receipt of your unit and verification of proof of purchase, the authorized service center will notify Sega to
ship a “remanufactured” replacement (in like new condition) directly to you.
Repair Service: If you prefer to have your original unit repaired, you will need to return the defective
merchandise, freight prepaid and insured against loss or damage, to Sega’s main service center. Sega
reserves the right to replace items if repairs are not feasible.
To receive warranty service in the U.S. and Canada, contact Sega’s Service Department at:
www.sega.com or 1-800-872-SEGA. PLEASE CALL FIRST FOR REPAIR INFORMATION.
The cost of returning the system to Sega’s Service Center shall be paid for by the purchaser.
Repairs After Expiration of Warranty
If your Sega Dreamcast System requires repairs after the termination of the 90-day limited warranty
period, you may contact Sega at the web site, email address, or 800 number listed on this page for
instructions on receiving technical support and repair service.
Limitations On Warranty
Any applicable implied warranties, including warranties of merchantability and fitness for a particular
purpose, are hereby limited to 90 days from the date of Purchase and are subject to the conditions set
forth herein. In no event shall Sega of America, Inc., be liable for consequential or incidental damages
resulting from the breach of any express or implied warranties.
The provisions of this limited warranty are valid in the United States only. Some States do not allow
limitations on how long an implied warranty lasts, or exclusion of consequential or incidental damages,
so the above limitation or exclusion may not apply to you. This warranty provides you with specific legal
rights. You may have other rights, which vary from state to state.
30
Safety
Precautions
User Information
Please PRINT clearly in CAPITAL LETTERS and fill in ALL the sections.
Primary Users Details
Part Names/Connecting
Peripheral Equipment
Title (eg Mr/Mrs/Miss/Ms)
First Name:
Middle Initial:
Before Using
the Dreamcast
Last Name:
If under 18 give parents name: Title
First Name:
Middle Initial:
Playing a Game
Last Name:
Address:
Street
City
Zipcode
Managing
Game Files
State
Country
Tel. No: (Incl. area code)
Primary Users Date of Birth:
Day
Month
Year
Sex: M
F
Music
About Your Dreamcast:
When was your Dreamcast purchased?
Day
Month
Year
Self purchase
Gift
Settings
Did you buy your Dreamcast, or was it a gift?
Additional
Information
31