1
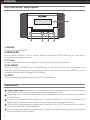
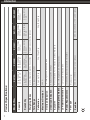
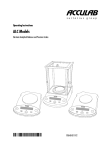
SVI SERIES
PROFESSIONAL PRECISION INDUSTRIAL SCALE
SVI-10A
SVI-20B
SVI-50C
SVI-100E
SVI-200F
Table of Contents
Introduction
1
Important Information
1
Installation & Operating Instructions
1
AC Adapter
Battery Operation
Key Functions / Description
2
On / Off
Cal / Print
“F” Key
Zero / Tare
Light
Calibration
2
Application Programs
3
Weight Unit
Counting
Totaling
Features
4
Digital Calibration
Power Up Test
Overload
Auto Off
RS-232
Care & Maintenance
4
Menu Settings
5
Scale Operating Manu
5
Interface Description
6
Product Specifications
7
ENGLISH
Introduction
Thank you for purchasing an Acculab SVI Series Professional Scale. Please read all of the operating
instructions to ensure optimum performance. The unit is pre-calibrated at the factory and is ready to use
with the supplied AC adapter.
Important Information
Allow 15 to 20 minute warm up time before starting calibration routine in order to give internal
components sufficient time to stabilize.
Avoid lengthy exposure to extreme temperatures. Your scale works best when operated within the
temperature range listed within the specifications.
Place scale platform on solid, level surface.
Keep environment clean, avoid dust, dirt & liquids from getting inside of scale platform and indicator,
which can adversely effect and damage the scale.
Vibrations, air currents and electromagnetic interference may effect the performance of the scale.
Although the scale is very durable, please prevent excessive overloading and dropping objects on to
the platform that may cause permanent damage to the weight cells.
Installation & Operating Instructions
Remove and inspect all contents from package. If you will be mounting the indicator with the provided
bracket we suggest that you install this first (note: please do not remove cable from the base or indicator).
AC Adapter:
After setting-up the base and the indicator within the desired location plug (included) AC adapter into
main outlet (AC adapter voltage dependent upon local region / only use AC adapter provided with scale.
Use of another type of adapter may permanently damage the scale and void warranty). Turn unit on by
pressing the “ON/OFF” key. Self diagnostic test will automatically run displaying “8.8.8.8.” and releasing
to weigh mode with selected unit (Example: “0.000kg”). Scale is ready for use. For additional features and
operation please see “Key Functions / Description” and “Features”.
Battery Operation:
One 9 volt Alkaline or 9 volt NICAD rechargeable battery is required (not included with scale). To install
battery, open battery cover located on the back of the indicator. Connect battery to the leads accordingly
and install within holder and replace cover. It is recommended to remove battery when scale is not in use
for extended periods. Also replace low or dead batteries.
Note: Back-lit display is “off” unless activated with “Light” key.
1
ENGLISH
Key Functions / Description:
5.
LIGHT
ON / OFF
TARE / ZERO
F
CAL / PRINT
1.
2.
3.
4.
1. ON/OFF:
Press to turn scale ON or OFF.
2. ZERO/TARE:
Pushing ZERO/TARE key “zero’s” display, pushing and holding ZERO/TARE key for more than 3
seconds accesses application menu.
3. “F” Key:
Function key for applications (Unit toggling, Counting & Totaling ) and menu scrolling.
4. CAL/PRINT:
Press and “hold” CAL/PRINT key (for approximately 3 seconds) and scale will automatically enter
calibration mode (displaying one of three weight values). Press and “release” CAL/PRINT key to print
displayed information when utilizing RS-232 interface.
5. LIGHT :
Turns on backlight during battery operation (Auto Off: One Minute).
Calibration:
1 Weight Calibration: with the pan cleared and zero stability indicated in display, press and hold the
“CAL/PRINT” key for more than 3 seconds to enter the calibration mode.
2 Depending upon your Model a default weight will be displayed in “kg” (note: you have 3 weight values
to choose from)
3 In order to select additional cal-weight options, press and release the “F” key and the display will
toggle between selectable values based on model. (Please see Product Specifications)
4 After selection of the desired cal-weight option, press the “CAL/PRINT” key and release to confirm,
and the value will flash to begin calibration.
5 Place corresponding weight onto center of pan. If weight is accepted, the display will stop flashing and
show “selected kg” value in display.
2
ENGLISH
6 Please remove weight and zero scale.
7 Place cal-weight back on to pan and the result should be within +/- 1d.
8 Calibration complete.
Calibration Notes:
The actual calibration weight needs to be within +/- 5% of the selected weight.
If the scale is not zeroed before calibration, error “E-01” will be displayed.
If calibration weight is positively “above” the 5% tolerance, error “E-02” will be displayed.
If calibration weight is negatively “below” the 5% tolerance, error “E-03” will be displayed.
Always allow a minimum of thirty seconds for the scale to stabilize. During prolong periods of use
repeat calibration procedure at regular intervals for optimum accuracy.
Note: Please do not open or attempt to “internally” calibrate the scale. This will void warranty and may
damage scale .
Application Programs:
Weight Units: (Default Application)
1 To select “units” press and hold “TARE/ZERO” key for more than 3 seconds to access application
menu (“UNIT” will be displayed).
2 With “F” key you can scroll through the options (UNIT, COUNT, & TOTAL).
3 Select “UNIT” by pressing “CAL/PRINT” key (default unit “grams” or “kg” will be displayed).
4 With the “F” key you can scroll through weigh unit options (g, lbs, ozt & kg) depending upon model.
5 Select desired weigh unit by pressing “CAL/PRINT” (selected option will be displayed and balance
will return to weighing mode).
6 Pressing the “F” key will enable you to toggle between selected weight unit and default “kg”.
7 Selected weigh unit will be retained in memory after balance is turned off.
Counting:
1 To select “Counting” application press and hold “TARE/ZERO” key for more than 3 seconds to access
application menu (“UNIT” will be displayed).
2 With “F” key you can scroll through the options (UNIT, COUNT, & TOTAL).
3 Select “COUNT” by pressing the “CAL/PRINT” key.
4 Display will automatically exit menu and return to weighing mode, with a “CNT” displayed in the left
5
6
7
8
3
hand side of the display & the selected weigh unit displayed (signifying to the user that they are in an
application mode).
Place empty container or box on scale and tare. (If applicable)
Press “F” key to display reference sample/default “1” (quickly pressing and releasing the “F” key will
advance the number 1,2,3, etc... / Holding the “F” key will advance the numbers faster 10, 20, 50, up
to 99).
After selection of the desired number, place corresponding samples on scale and press “CAL/PRINT”
to confirm (display will show “pcs” with corresponding piece count).
Pressing the “F” key will allow the user to toggle between gross weight, net weight, average piece
weight & pcs.
ENGLISH
9 To exit “Counting” press and hold “TARE/ZERO” key for more than 3 seconds to access application
menu and select “UNIT” (default setting).
Totaling:
1 To select the application “Totaling” press and hold “TARE/ZERO” key for more than 3 seconds to access
application menu.
2 With the “F” key you can scroll through the menu options (UNIT, COUNT, & TOTAL).
3 Select “TOTAL” by pressing the “CAL/PRINT” Key.
4 Display will automatically return to weighing mode with “TTL” displayed (signifying to the end user that
they are in application mode).
5 Place1st object on scale and press “F” (value is stored) / remove object and display will return to zero.
6 Place 2nd object on scale and press “F” (value is added to 1st) and the “TTL” symbol will flash (indicating
total weight stored) / remove object and display will return to zero (“TTL” stops flashing).
7 Place 3rd object on scale and press “F” (value will be added and “TTL” will flash) / remove object and
display will return to zero (”TTL” stops flashing) process can be repeated up to 99 times.
8 Holding down the “F” key for 3 seconds will clear all memory.
9 To exit “Totaling”, press and hold “TARE/ZERO” Key for more than 3 seconds to access application menu
and select “Unit” (default setting).
Features:
Digital Calibration:
Allows for convenient user calibration from the keypad with three selectable weight options.
Power Up Test:
When the unit is initially turned on all segments of the display will appear. The segments will be displayed for
approx. 3 seconds. After self-test scale will return to zero.
Overload:
When a load or force is applied to the scale platform that exceeds the unit’s capacity “H” will appear in the
display indicating an overload has occurred.
Auto Off:
During battery operation (in order to conserve battery consumption) the scale will automatically turn off after
approximately 4 minutes of inactivity / default setting. (Please see “Menu” options for additional settings).
RS-232:
Standard feature included with scale. (Please see Interface Description)
Care and Maintenance:
Avoid lengthy exposure to extreme heat or cold. Please allow the scale to acclimate to room temperature
for at least 15 to 20 minutes if exposed to extreme temperatures. (Please see Product Specifications)
Keep product clean. Remove pan from base and clean accordingly. Do not “wash down” scale or indicator
with water or cleaning liquids.
Please use supplied packaging when transporting scale.
Remember to remove battery when not in use.
4
ENGLISH
Menu Settings:
Set up Menu / Configuring Scale
1
2
3
4
5
6
7
8
9
(Factory set parameters are marked “0”.)
Turn off scale.
Turn on while holding the ZERO/TARE key.
Page or level value “1” will be displayed.
To navigate within a menu level press “F”, when you reach the last menu item, the first item is shown again.
To select the next line or level within a group press and release “CAL/PRINT” key.
To return to the previous level (or page) press “ZERO/TARE” Key.
To confirm selected parameters press and hold the “CAL/PRINT” key for more than 3 seconds.
“0” indicates the selected menu setting.
To store selected codes and exit menu press and hold “ZERO/TARE” key for 3 seconds or until display
returns to weigh mode.
Scale Operating Menu:
Unit Toggling
141 Unlocked “0”
142 Locked
No. Of Stop Bits
231 1 “0”
232 2
Auto Zero
151 On “0”
152 Off
Manual / Auto Print Mode
311 Manual without stability
312 Manual after stability
313 Auto without stability
314 Auto at stability
Calibration Setting
171 Calibration on “0”
172 Calibration off
Baud Rate
211 1200 Baud “0”
212 2400 Baud
213 4800 Baud
214 9600 Baud
Parity
221 Mark
222 Space
223 Odd “0”
224 Even
5
Disable Keys
(Disables All Keys Except for “ZERO/T
TARE” Key)
411 On
412 Off “0”
Battery ON/OFF Mode
511 Turns off after 4 minutes of in-activity “0”
512 Always on
513 Turns off after 10 minutes of in-activity
Factory Settings
911 Reset
ENGLISH
Interface Description
Type of Interface: Serial
Operating Mode: Full Duplex
Transmission Rates: 1200, 2400, 4200, 9600 Baud
Parity: Mark, Space, Odd, Even
Data Output Format: 16 Characters
Factory settings: Please See Scale Operating Menu
Pin Assignment: Pin2: Tx,
Pin3: Rx, Pin5: grnd
Commands
Print
Zero / Tare
Change Unit
“F” Key
“Unit” Mode
“Counting” Mode
“Totaling” Mode
“Calibration” Mode
ASCII
“p” CR LF
“t” CR LF
“u” CR LF
“f” CR LF
“a” CR LF
“b” CR LF
“c” CR LF
“D” CR LF
HEX
70 0D 0A
74 0D 0A
75 0D 0A
66 0D 0A
61 0D 0A
62 0D 0A
63 0D 0A
64 0D 0A
Counting Mode Commands
Set Number of Pieces
Net Weight
Gross Weight
Average Weight
Pcs
“m050” CR LF
“b1” CR LF
“b2” CR LF
“b3” CR LF
“b4” CR LF
6D 30 35 30 0D 0A (set 50 pcs)
62 31 0D 0A
62 32 0D 0A
62 33 0D 0A
62 34 0D 0A
Totaling Mode Commands
Clear Memory
“c1” CR LF
63 31 0D 0A
Output Format
Position:
1 2 3 4 5 6 7 8 9 10 11 12 13 14 15 16
- * D D D D D D D D * U U U CR LF
D: Digit or Letter
6
U: Unit
CR: Return
LF: Line Feed
* : Space
7
2 g, 0.002 kg,
0.005 lbs, 0.1 ozt
1 g, 0.001 kg,
0.002 lbs, 0.05 ozt
grams, kilograms, pounds, troy ounces
To capacity by subtraction
2 kg, 5 kg, 10 kg
200 %
“H” reading on LCD with audio tone
Displays negative readings
Menu selectable: 4 or 10 minutes no activity / Always on
50 - 104 degrees F (10 - 40 degrees C)
“LO” on LCD with audio tone
Included AC adapter or optional 9 volt battery
Stainless steel
308 mm x 308 mm (12.4” x 12.4” inches)
Readability
Weighing Modes
Tare Range
Calibration
Maximum Overload
Overload Indication
Underload Indication
Auto Off
Operating Temperature
Low Battery Indication
Power Requirements
Pan Type
Pan Size
5 kg, 10 kg, 20 kg
0.05 kg, 0.1 lbs
1 ozt
200 kg, 440 lbs,
6430 ozt
SVI-200F
403 mm x 520 mm (15.9” x 20.5” inches)
5 kg, 20 kg, 50 kg
0.02 kg, 0.05 lbs
0.5 ozt
100 kg, 220 lbs,
3215 ozt
SVI-100E
kilograms, pounds, troy ounces
0.005 kg, 0.01 lbs,
0.2 ozt
50 kg, 110 lbs
1607 ozt
20 kg, 20,000 g,
44 lbs, 643 ozt
Capacity
10 kg, 10,000 g,
22 lbs, 321 ozt
SVI-50C
SVI-20B
SVI-10A
Model No.
Product Specifications:
ENGLISH
If you have any questions please contact your local Acculab supplier, visit our website
www.acculab.com or contact:
Si tiene alguna duda, póngase en contacto con su proveedor local de Acculab, visite
nuestra página web www.acculab.com o póngase en contacto con:
Wenden Sie sich bei Fragen an Ihren Aculab-Lieferanten vor Ort, besuchen Sie unsere
Internetseite www.acculab.com oder wenden Sie sich an:
Si vous avez des questions, veuillez contacter votre fournisseur local Acculab, visiter
notre site web www.acculab.com ou vous adresser à:
www.acculab.com
Acculab USA
131 Heartland Blvd
Edgewood, NY 11717, USA
(TEL) 631.254.4299
Acculab Europe
Acculab China
Weender Landstrasse 94-108
37075 Goettingen, Germany
(TEL) +49.551.308.1667
www.acculab-europe.com
Donghuqu, Wangjing Industrial Zone
100102 Bejing, PR China
(TEL) +86.10.6439.2233
Acculab Hong Kong
Acculab India
Unit 1110-12, Lu Plaza
2 Wing Yip Street, Kwun Tong,
Kowloon, Hong Kong
(TEL) +852.2774.2678
#10, 3rd Phase Peenya, 6th Main
KIADB Industrial Area
Bangalore-560058. India
(TEL) +91.80.837.5381-5