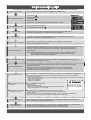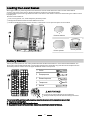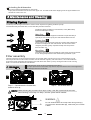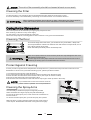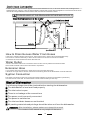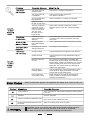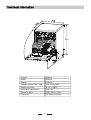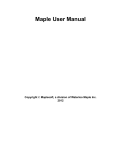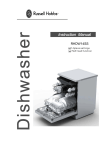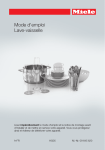
1
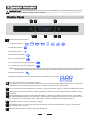
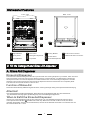
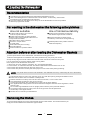
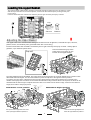
ADP9000
For detailed operating method read the corresponding content on the instruction manual.
Switch on the appliance
Press the Power key-press to switch on the appliance. Open the door.
Compartment
With each wash cycle.
Fill the detergent dispenser
Compartment
With pre-wash only.
(Refer to the “Fill the Detergent and Rinse Aid dispensers”section.)
Check the rinse aid level
Load the baskets
Select a program
How to use All-in-1 function
How to use Alt function
Electric indicator on control panel.
Or via the Mechanical indicator
Scrape off any large amount of leftover food. Soften remnants of burnt food in pans,
then load the baskets. Refer to the dishwasher loading instructions.
Close the door, press the Program key-press and the selected program light will light up.
( See the section entitled“Operationg instruction ”.)
Press the All-in-1 key-press to select the function. (Only programs of auto, intensive,
heavy or normal can select the function.)
Press the Alt key-press to select the function. (Only programs of auto, intensive, heavy, normal or glass
can select the function. When select the function, the lower spray arm runs or the upper arm
runs only , or lower spray arm and upper arm run alternately . These will be displayed in the
display Window .)
Note: While the dishwasher is running, If the upper and lower spray arm indicators are both
light, that means the two arms are alternate washing, but if they are both off, that
means the two arms are running simultaneity;
How to use Delay start function
Press the Delay key-press to delay the start of washing, one press add half an hour, and you can
delay the start of washing up to 9.5 hours.
T urn on the water tap and press the Start/Pause key-press. The machine will start working
after about 10 seconds.
Running the dishwasher
Note:If you want to power off the dishwasher while it is running, you must press the
Start/Pause key-press to pause the dishwasher first, then press the power key-press
more than 3 seconds to turn off the power.
Changing the programme
1. A running cycle can only be modified if it has been running for a short time. Otherwise the detergent
may have already been released and the water already drained. If this is the case, the detergent
dispenser must be refilled.
2. Press the Start/Pause key-press to pause, the press the program key-press for more than 3 seconds to
cancel the running program.
3. Select a new program.
4. Restart the dishwasher.
Add forgotten dishes in the
dishwasher
1.Press START/PAUSE key-press.
2.Open the door.
3.Add the forgotten dishes.
4.Close the door, Press START/PAUSE key-press, the dishwasher will
start running again after 10 seconds.
If the appliance is switched
off during a wash cycle
If the appliance is switched off during a wash cycle, when switched
on again, please re-select the washing cycle and operate the dishwasher
from the first step.
Note: If you want to power off the dishwasher while it is running, you must press Start/pause
key-press to pause first, then press the power key-press to turn off the power
Switch off the appliance
Turn off the water tap,
unload the baskets
Ope n the door ca refully.
Hot steam may e scape
whe n the d oor is opene d!
When the working cycle has finished, the buzzer of the dishwasher will sound 8 times, then stop.
Turn off the appliance using the Power key-press.
Warning: wait a few minutes (about 15 minutes) before unloading the dishwasher to avoid handling
the dishes and utensils while they are still hot and more susceptible to break.
They will also dry better. Unload the appliance, starting from the lower basket.
Dear Customer,
Please carefully read this manual bef ore using the
dishwasher, it will help you to use and maintain the
dishwasher properly.
Keep it to refer to it at a later date.
Pass it on to any subsequent owner of the appliance.
This manual contains sections on Safety Instructions,
Operating Instructions, Installation Instructions and
Troubleshooting Tips, etc.
Control Panel....... .... ... ........ .... ... ........ .... ... .......2
Dishw ash er Fe atures........ .... .... ..... .... ........ ... . ..3
A、Fill the Rinse Aid Dispenser.........................3
Rinse A id Dispenser..... ...... ...... ..... . ..... . ...... ..... 3
Adjusting Rinse Aid Dispenser........ ........ ..........4
B、Function of Detergent .................................4
How to use the All-in-1 function.........................6
Attention before or after loading the Dishwasher
Baskets..........................................................7
Loading the upper Basket............................ ....8
Loading the lower Basket ............................ . ...9
Cutlery Basket............................................ ...9
To review the section on Troubleshooting Tips
will help you to solve some common problems
by yourself .
If you can not solv e the problems by yoursel f ,
please ask for the help of professional technicians.
Wash Cycle Table...........................................10
Turning on the Appliance................................11
Change the Program.............. .... ........... ..... .....11
At the End of the Wash Cycle...........................11
Filtering System.............................................12
Caring for the Dishwasher..................... ..........13
Positioning the Appliance................... .. ..........14
About Power Connection........................ . .......14
Water Connection.................................. . .......15
Start of dishwasher. .... ........ ......... .... ........ ......16
The manufacturer, following a policy of constant
development and updating of the product, may
make modifications without giving prior notice.
Be fore calling for se rvice....... ....... ........... .. . .... .17
Error codes.................................... . ..............18
Technical information.............................. .......19
When using your dishwasher, follow the precautions listed below:
Under certain conditions, Hydrogen gas may be produced in a hot-water system that has not been
used for two weeks or more. HYDROGEN GAS IS EXPLOSIVE.
If the hot-water system has not been used for such a period of time, before using the dishwasher turn
on all the hot-water taps and let the water flow from each of them for several minutes. This will release
any accumulated hydrogen gas. As the gas is flammable, do not smoke or use an open flame during
this time.
This appliance must be grounded. In the event of a
malfunction or breakdown, grounding will reduce
the risk of an electric shock by providing a path of
least resistance of electric current. This appliance
is equipped with a cord having an equipmentgrounding conductor and a grounding plug.
The plug must be plugged into an appropriate outlet
that is installed and grounded in accordance with
all local codes and ordinances.
Improper connection of the equipment-grounding
conductor can result in the risk of an electric shock.
Check with a qualified electrician or service
representative if you are in doubt whether the
appliance is properly grounded. Do not modify the
plug provided with the appliance. If it does not fit
the outlet, have a proper outlet installed by a
qualified electrician.
Do not abuse, sit on, or stand on the door or dish
rack of the dishwasher.
Do not operate your dishwasher unless all
enclosure panels are properly in place. Open
the door very carefully if the dishwasher is
operating, there is a risk of water squirting out.
Do not place any heavy objects on or stand on the
door when it is open. The appliance could tip
forward.
When loading items to be washed:
1) Locate sharp items so that they are not likely
to damage the door seal;
2) Warning: Knives and other utensils with sharp
points must be loaded in the basket with their
points down or placed in a horizontal position.
Check that the detergent comparment is empty
aft er compl etio n of the wash cycle.
Do not wash plastic items unless they are marked
dishwasher safe or the equivalent. For plastic items
not so marked, check the manufacturer's
recommendations.
Use only detergent and rinse additives
designed for an automatic dishwasher.
Never use soap, laundry detergent, or hand
washing detergent in your dishwasher. Keep
these products out of the reach of children.
Do not use an extension cord or port able
el ectrical outlet device (e.g. multi-socket
outlet box) to connect the dishwasher to
the power supply.
Keep children away from detergent and rinse aid,
keep children away from the open door of the
dishwasher, there could still be some detergent
left inside.
This appliance is not intended for use by persons
(including children )with reduced physical, sensory or
mental capabilities, or lack of experience and
knowledge, unless they have been given supervision
or instruction concerning use of the appliance by a
person responsible for their safety.
Children should be supervised to ensure that they do
not play with the appliance.
Dishwasher deterge nts are strongly alkaline, they
can be extremel y da ngerous if swallowed. Avoid
con tact with skin and eyes and keep children away
from the dishwasher when t he door is open.
The door sh ould not be left o pen,
since th is could increase the risk of trippi ng.
If the supply cord is damaged, it must be replaced
by the manufacturer or its service agent or a
similarly qualified person in order to avoid a
hazard.
Remove the door to the washing compartment when
removing an old dishwasher from service or discarding it.
Please dispose of packing materials properly.
Use the dishwasher only for its intended function.
During installation, the power supply must not
be excessively or dangerously bent or flattened.
Do not tamper with controls.
The applian ce is to be connected to t he water
mains u sing new hose sets. Old hose-set s
sho uld not be re used.
The maximum numb er of place settings t o be
washed is 14.
The maximum perm issible inlet water pressure is
1M pa.
The minimum permissible inlet w ater pressure is
0.04Mpa.
1
To get the best performance from your dishwasher, read all operating instructions
before using it for the first time.
2
3
4 5
1
6
1
7
8
Display widow shows as foll ows:
1. Programs indicat ors:
2. Chi ld lock indicat or:
3. Rinse Aid indicator:
4. Del ay function indicator:
5. All in 1 function indicator:
6. Only upper spray arm running indicator:
7. Only lower spray arm running indicator:
Note: While t he dishwasher is running, If the upper and lower spray arm indicators are both light , that means the two
arms are al ternate washi ng, but i f they are neither light, t hat means the two arms are running si mult anei ty;
8. Water faucet indicator:
8. Display the program remaining time, delay time, running indicator, faut codes:
Po wer key-press: To tu rn on/off the power suppl y.
(If you wan t to power off the dishwa sher whi le it is ru nning, you m ust press the Sta rt/pause key-pre ss to pause the
di shw ashe r first, th en press the power key-press mo re than 3 seconds to turn off the power).
3
All-in1-function key-press: To select All-in-1 function, only au to, inten sive, heavy, or normal can select this function.
4
Child lock key-press: Press the All in 1 & Alt key-presses more than 3 seconds at the same time to select or cancel
the function.
5
Alternate Washing Key-press : To select alternate washing . When any program has been selected , the indicator
light of Alternate washing will turn on all the way . ( When pressed , the lower spray arm runs or the upper arm runs
only , or lower spray arm and upper arm run alternately . These will be display in the display Window .)
66
67
Program key-press: To select your desired program.
8
Delay Start key-press: To se t the delayed hours for washing, one press add half an hour, and you can delay the
start of washing up to 9.5 hours.
START/PAUSE key-press: To start or pause the dishwasher.
2
Front view
Back View
6
1
2
3
7
4
8
5
9
10
11
on
Off
1
2
3
Upper Basket
Spray Arms
Low er Basket
4
5
6
7
8
9
Main F ilter
Deterg ent Dispenser
Cup Shelf
Cutl ery Bask et
Coarse Filter
10
11
Drain hose connector
Water Inle t hose connector
Rinse Aid Di spen ser
Rinse Aid Dispenser
The rinse aid is released during the final rinse to prevent water from forming droplets o n your dishes, which can leave
spots and streaks. It also improves drying by allowing w ater to ro ll off the dishes. Your dishwasher is desig ned to
use liqu id rinse aids. The rinse aid dispenser is located inside the door next to the de terg ent dispenser. To fill the
dispenser, open the cap and pour the rinse aid into the dispenser until the level ind icator turns completely black.
The volum e of the rinse aid container is about 110ml.
Function of Rinse Aid
Rinse aid is automatically added during the last rinse, ensuring thorough rinsing, with spot and streak free drying.
Attention!
Only use branded rinse aid for dishwashers. Never fill the rinse aid dispenser with any other substances
(e.g. Dishwasher cleaning agent, liquid detergent). This would damage the appliance.
When to Refill the Rinse Aid Dispenser
If there is no rinse-aid warning light in the control panel, you can estimate the amount from the colour
of the optical level indicator " " located next to the cap. When the rinse-aid container is full, the whole
indicator will be dark .As the rinse-aid diminishes, the size of the dark dot decreases. You should never let
the rinse aid level fall 1 / 4 full.
3
As the rinse aid diminishes, the size of the black dot
on the rinse aid level indicator changes, as illustrated below.
Full
3 / 4 full
1 / 2 full
1 / 4 full - Should refill to eliminate spotting
Empty
1
2
3
To open the dispenser, turn the cap to the "open" (left) arrow and lift it out.
Pour the rinse aid into the d ispenser, being careful not to overfill.
Replace the cap by inserting it aligned with "open" arrow and turning it to the closed (right) arrow.
Clean up any rinse aid spilled while during fill ing w ith an absorbent cloth to avoid excessive foaming
during the next w ash. Don't f orget to replace the cap before you close the dishw ash er door.
Adjusting Rinse Aid Dispenser
The rinse aid dispenser has four scales. Set the lever to the position "3". If there is
exce ssive foaming at the end of the wash, reduce the setting to "1" or "2". If dishe s
are wet or streaky after drying, adjust to "4".
NOTE:
Increase the dose if there are drops of water or lime spots on the dishes after washing.
Reduce it if t here are sticky whitish stains on your dishes or a bluish film on glassware or
knife blades.
Detergents with its chemi cal i ngredients are necessary to remove dirt, crush dirt and t ransport it out of the dishwasher.
Most of the commercial quality detergents are suitable for this purpose.
Detergents
Th ere are 3 sorts of detergents
1.With phosphate and with chlorine
2.With phosphate and without chlorine
3.Without phosphate and w ithout chlorine
Normally new pulverised detergent is without phosphate. If detergents without phosphate are used in the case
of hard water often white spots appear on dishes and glasses. In this case please add more detergent to reach
better results. Detergents without chlorine do only bleach a little. Strong and coloured spots will not
be removed completely. In this case please choose a program with a higher temperature.
4
Concentrated Detergent
Based on th eir chemical composition, detergents can be split in two basic types:
conventional , alkaline detergents with caustic components
l ow alkaline concentrated detergents with natural enzymes
The use of“normal” washing programs in combination with concentrated det ergents reduces poll ution and is g ood
for your dishes; these wash programs are specifically matched to the dirt-dissolving properties of the en zymes o f the
“ normal” wa sh p rograms in w hich concentrat ed detergent s are used ca n
con centrated detergent. For this reason,
ach ieve the same re sults that can otherwise only be achieved using “intensive” p rograms.
Detergent Tablets
Detergent t ablets of different brands dissolve at different speeds. For this reason some detergent t ablets ca nnot
dissolve and develop their full cleaning power during short programs. Therefore pl ease use long programs when
usi ng detergent tablets, to ensure the complete removal of detergent residuals.
Detergent Dispenser
The dispenser m ust be refill ed before the start of each wash cycle following the instructions provided in the wash
cycle table . Generally, only one tabl espoon o f detergent is needed for a normal wa sh l oad. More heavily soiled
item s need more detergent. Always add the detergent just before starting the dishwasher, otherwise it coul d get
dam p and will not dissolve properly.
Amount of Detergent to Use
If the lid is closed: press release button. The lid will spring open.
Always add the detergent just before starting ea ch wash cycle.
Only use branded detergent aid for dishwasher.
Dishwasher detergent is corrosive! Take care to keep it out of reach of children.
Proper Use of Detergent
Use only detergent specifically m ade for the use in dishwashers. Keep your detergent f resh and dry.
Don't put po wde red detergent into the dispenser until you 're ready to wash dishes.
Fill in Detergent
Fill t he detergent dispenser with detergent.
The marking indicates the dosing levels , as
illustrate d on the righ t:
A
Main w ash cycle detergent compartmen t.
B
Pre-wash cycle detergent comp artm ent.
Plea se o bserve the detergent manufacturer dosage and st orage
recommendation s as stat ed on the detergent packaging.
Close the lid and press until it locks into pl ace.
If the dishes are heavily soiled, place an additi onal
detergent dose in the pre-wash detergent chamber.
Please ref er to the section“ Wash cycle table ”for informatio n regarding the dosage of detergent on each
progra m selected.
5
Use of All-in-1 Tablet Detergents
These products are detergents with integrated and com bined detergent/ rinse aid and sal t functions. B efore using
these products you should first check that t he water hardness in your su pply is co mp atibl e wi th the use of these
products as per th e de terg ent manufacture r information on the prod uct packing. These produ cts should be strictly use d
according to the detergent manufa cturer's instructions. In g eneral d etergent s tha t in clud e rinse aid or wat er softener
are only a ble to provid e good resul ts under cert ain conditions. For this reason in som e cases there mi ght be unwanted
cleaning or drying results. If you encounter problem s w hen using these products for the first time please cont act t he
detergent manufacturer care li ne. The manufacturer of your dishwasher is not liable for dama ges caused by compact
detergent s no r gives warranty if yo u use co mpact detergent s. If you use detergents or tab lets that con tain rinse aid,
do not use additional liquid rinse aid.
When using All-in-1 det ergents, please pay attention to make sure that the size of the detergent is fitted to t he
dispen ser and the dispenser wil l not bre ak.
Ke ep all detergent s in a saf e pl ace out of children's reach.
Al ways add the detergent in the dispenser just b efore starting the dishwasher.
How To Use The All-in-1 Function
Your dishwasher h as a All-in-1 function . On ly Auto, Intensive, Heavy and Normal programs can select this fun ction.
W hen selected, you d o no t needs to fil l rinse ai d dispenser. This dishwasher com es with a All-in-1 tab let container as
an accessory.
When you use All- in-1 tablets, please select the All-in-1 function to achieve the best possible performance.
1. The figure below shows how to hang the All-in-1 tablet container on the upper basket.
2. Rotate the upper spray arm and ensure that the upper spray arm is not obstructed by the All-in-1 tablet container.
Refer to the figure below for reference.
3. Put the All in1 tablet into the container ,then select the All-in-1 function.
6
Consider buying utensils wh ich are ident ified as dishwasher-proof.
Use a m ild detergen t that is describe d as 'kind to dish es'. If necessary, seek further
informa tion from the detergent manufacturer.
To prev ent damage, take glass and cutlery ou t of the dishwasher a s so on as possible
after the program has ended.
Are not suitable
Are of limited suitability
Cutlery with wooden, horn china or
mother-of-p earl han dles
Plastic items that are not heat resistant
Older cutlery with glued parts that are not
tem perature resistant
Bonded cut lery item s or dish es
Pewter or cooper ite ms
Crystal glass
Steel it ems subject to rusting
Wo oden platters
Items m ade from synthetic f ibres
Some types of glasses can become
dull after a large number of washes
Silver and aluminum parts have a
tendency to discolour during washing
Glazed patterns may fade if machine
washed frequently
For best performance of the dishwasher, follow these loading guidelines.
Features and appearance of baskets and cutlery baskets may vary from your model.
Scrape off any large amounts of leftover food and soften remnants of burnt food in pans.
It is not necessary to rinse the dishes under running water.
Place objects in the dishwasher as follows:
1. Items such as cups, glasses, pots/pans, etc. are faced downwards.
2. Curved items, or ones with recesses, should be loaded aslant so that water can run off.
3. All utensils are stacked securely and can not tip over.
4. All utensils are placed in the way that the spray arms can rotate freely during washing.
Very small items s hould not be washed in the di shw asher as they could easily fall out of the basket.
Loa d hollow item s such as cups, glasses, pans, etc. W ith the opening facing downwards so that
water cannot collect in t he container or a dee p base.
Dishes and item s of cut lery must not lie inside on e an other, or cover e ach other.
To avoi d da mage to glasses, they must not touch.
Lo ad large items which are m ost difficult to c lean into the lowe r basket.
The upper basket is designed to hold more d elicate and li ghter dishwa re such as glasses, coffee
an d tea cup s.
Do not load long bla ded knives in an upri ght position as they are a pot entia l hazard.
Lo ng and/or sharp items of cutle ry such as carving knives must be positioned
ho rizon tally in t he upper basket.
Please do n ot overl oad your dishwasher.
To prevent water dripping from the upper basket into the lower basket, we recommend that you
empty the lower basket first and then the upper basket.
7
Th e upper b asket is designe d to hold more delica te and lighter dishware s uch as g lasses, coffee
and tea cups and saucers, as we ll as plates, small bowls and shallow pans (as long as they are
not too dirty ).
Po sition the dishes and cookware so that they will not get moved by th e sp ray of water.
3 1
1 3
3
Cups
2
1
1
3
2
Saucers
1
3
1
1
Glasses
1
II
Adjusting the Upper Basket
The upper rac k is for mo re delicat e and ligh ter di shwa re such as glasses , coffee & tea cups, saucers,
plate s, bowls, and shall ow pans (p rovi ded t hese are n ot too dir ty).
Posi tion the di shes and cook ware so th at they do not get moved by t he spray o f wa ter. A lways pla ce
glas ses, c ups & bowls upside dow n.
Self A could be hang u p at the
steel w ires or lay down on the
Cup self
bo ttom of the upp er ba sket.
A
Self A
The upper basket height is a dju sta ble. Th er e is a higher an d lower position for the up pe r baske t which is used to wash
dishes with diffe re nt h eights. You can lift the ba sket or press t he adjustor to the upper an d lower position .
Long items, serving cutle ry, salad servers or kn ives sho uld be p lac ed on the shelf so that they d o n ot o bstru ct the
rotation of the spra y ar ms . The shelf can be rotate d an d lif ted according to dishes. Wh en not re quired, the shelf can be
folded back at the lowe r he igh t. To adjust the height , advice you make sure the shelf on edge, and lift it in the diffe re nt
height, then rotate to the proper p osition.
POSITION 1: Lower position
POSITION 2: Higher position
A
Pull up the left and right steel wire could
raise up the upper basket to position 2.
Press the left and right adjustors to
lower the upper basket to position 1.
8
We suggest that you place large items and items that are the most difficult to clean into the lower basket
such as: pots, pans, lids, serving dishes and bowls, as shown in the figure below.
It is preferable to place serving dishes and lids on the side of the racks in order to avoid blocking the rotation of the
top spray arm.
Plea se b e reminded that:
Pots, serving bowls, etc, must always be placed top down.
Deep pots should be slanted to allow water to flow out.
Th e Bottom Basket features folding spi kes so that la rger or more pot s and pans can be loaded.
6
5
4
5
4
4
5
Dessert dishes
Soup plates
6
4
Dinner plates
Cutlery basket
Cutlery should be placed in the cutlery basket with the handles at the bottom. If the rack has side baskets, the
spoons should be loaded separately into the appropriate slots, especially long utensils should be placed in the
horizontal position at the front of the upper basket as shown in the picture.
3
4
4
2 5555
4 55
2
3
2
3
2
3
2
2
1
1
1
1
1
1
4
4
4
4
4
4
4
4
1
3
2
4 3 3
5
1 2
3
1
2
1
3
1
2
3
1
2
1
3
1
1 Forks
2 Soup spoons
3 Dessert spoons
4 Teaspoons
5 Knives
5555
3 3
2
2
2
5
55
4
4
3
Do not let any item extend through the bottom.
Always load sharp utensils with the sharp point down!
9
Auto
Intensi ve
Heavy
Normal
* 2007. 1 )
( AS/NZS
Glas s
For all soiled loads, such as
pots, pans, casserole
dishes and dishes that have
baked on food.
Pre-wash(40℃)
Autowash(50-60℃)
Rinse
Rinse (70℃)
Drying.
5/27.5g
Requir ed
For the heaviest soiled
loads, such as p ots, pans,
cass erole dishes and dis hes
that have bak ed on food.
Pre-wash(60℃)
Wash (70 ℃)
Rinse
Rinse
Rinse (55 ℃)
Drying
5/27.5g
Requir ed
135
1.4
15.5
For heavily soiled loads,
suc h as pots, plates , glasses
and heavily soiled pans.
Pre-wash(45℃)
Wash(55℃)
Rinse
Rinse
Rinse (65 ℃)
Dryi ng
5/27.5g
Requir ed
160
1.3
14
5/27.5g
Requir ed
155
0.75
13.9
0/20 g
Requir ed
80
0.75
12
Fo r normally soiled loads ,
such as plates, gl asses,
bowls and normall y
soiled p ans.
For lightly soiled loads,
such as glasses, crystal and
fine china.
Pre-w ash
Wash (50 ℃)
Rinse
Rinse (50 ℃)
Dryi ng
Pre-wash
Wash (45 ℃)
Rinse
Rinse (60 ℃)
Dryi ng
120 ~170
1.1~1.4 10~13.5
Wash (65 ℃)
Rinse
Rinse (50 ℃)
Drying
0/20g
Requir ed
60
0.7
11.5
Express
A shorter wash for lightly
soiled loads.
E xpre ss
A shorter wash for lightly
soiled loads that do not
need drying.
Wash (40 ℃)
Wash
Rinse (45 ℃)
0/20 g
Requir ed
30
0.55
12.5
Pre-wash
/
Not
Requir ed
8
0.01
4
Soa k
To rinse dishes that you
plan to wash later on the
same day.
(
) Meaning: need to fill rinse into the Rinse-Aid Dispenser.
*AS/NZS 2007.1: This programme is the test cycl e. The inform atio n for com parability test
in accordance with AS/NZS 2007.1 , as follows:
Capacity: 14 setting
Position Upper basket: Adjust to lower position
Rinse aid setting: 4
Open the door slightly 50mm to assist in drying of the dishes after every wash
The consumption values are approximate and the exact consumption depend
on the type o f dis h load, water temperature an d pressure.
10
Starting a cycle wash
1 Open the door, draw out the lower and upper basket, load the dishes and push them back.
It is recommended to load the lower basket first, then the upper one (see the section entitled
“Loading the Dishwasher”).
2 Pour in the detergent (see the section entitled“Detergent and Rinse Aid”).
3 Ensure that the dishwasher is connected to the power supply, the water is connec ted and
turned on and the drain hose is connected correctly.
4 Close the door, press the power key-press, and the power indicator light will turn on.
5 Press the program key-press to select the desired wash program, then press the Start/Pause key-press
and the dishwasher starts.
When you press the Start/Pause key-press to pause the dishwasher during washing,
the dishwasher will sound every minute unless you press the Start/Pause keypress to
start the dishwasher.
Premise:
1 A cycle that is underway can only be modified if it has only been running for a short time. Otherwise, the
detergent may have already been released, and the appliance may have already drained the wash water.
If this is the case, the detergent dispenser must be refilled.
2 Press the Start/Pause key-press and then press the program key-press for more than 3 seconds to put the
machine in a standby state. On in standby state, you can change the program to the desired cycle setting
(see the section entitled " Starting a washing program" ).
3 The Display window shows the state of the dishwasher
a) The Display window shows "H:MM" and not blinking --> In standby state or pause;
b) The Display window shows "H:MM" and blinking --> run.
c) The Display window shows error code-- >error (see the section entitled " Error codes " ).
If you open the door during a wash cycle , the machine will pause. The program light
will stop blinking and the buzzer will sound every minute unless you close the door .
After you close the door ,the machine will keep on working after 10 seconds.
If th e display wind ow shows erro r code after the warning sound, that ind icates that the machine is
out of order, p lease note do wn the error code, turn off the main power and water supply before
calling for a service (see the sect ion entitled“Error codes ”).
A forgotten dish can be added any time before the detergent dispenser opens.
1 Press the START/PAUSE button.
4 Close the door.
the spray arms stop working, you can open the
2 After
door completely.
3
5
Press the START/PAUSE button, the dishwasher will run
after 10 seconds.
Add forgotten dishes.
It is dan gero us to open the do or w hen washing, because the hot water may scald you.
When the working cycle has finished, the buzzer o f the dishwasher will sound f or 8 seconds, the n st op. Turn off
the appliance using the power key-press, shut off the water supply and open th e door of the dishwasher.
Wait for a few m inutes before unloadi ng the dishw ash er to avoid handl ing t he dishes and ut ensi ls while they
are still hot and more susceptible to breakage. They w ill also d ry better.
Switch Off the Dishwasher
1.Switch off the dishwasher by pressing the power key-press.
2.Turn off the water tap.
Open the door carefully
Hot dishes are sensitive to knocks. The dishes should therefore be allowed to cool down before removing from
the appliance.
Open the dishwasher's door, leave it aj ar and wait a few minutes before removing the dishes. In this way they
will be cooler and the drying will be improved.
11
Unloading the dishwasher
It is normal that the dishwasher is wet in side.
Empty the low er ba sket first and the n the up per one. Thi s wil l avoid water dripping fro m the upper basket onto
the dis hes in the lower one.
The filter prevents larger remnants of food or other objects from getting inside the pump.
The residues may block the filter, in this case they must be removed.
The filter system consists of a coarse filter, a flat (Main filter)
And a microfilter(Fine filter).
2
1
Main filter
Food and soil particles trapped in this filter are pulverized by a
special jet on the lower spray arm and washed down to drain.
3
Coarse filter
1
Larger items, such as pieces of bones or glass, that could block
the drain are trapped in the coarse filter. To remove the items
caught by the filter, gently squeeze the tap on the top of this
filter and lift it out.
2
3
Microfilter
This filter holds soil and food residues in the sump area and prevents
it from being redeposited on the dishes during the wash cycle.
Filter assembly
The filter efficientl y removes food p arti cles from the wash water, allowing it t o be recycled during the cycle.
For best p erfo rmance and results, the f ilter must be cleaned regularly. For this reason, it is recommended to
remove th e larger food particles trapped in the filter after each wash cycle by rinsing the f ilters under running
water. To remo ve t he f ilter device as follows:
Th e dishwasher must n ever be used wi thout the filters.
Improper replacem ent of the fil ter m ay reduce t he perfo rmance leve l of the appl iance
and da mage dishes and utensi ls.
1
2
Step2:Lift the Main filter up
Step1:Contrarotate the Coarse filter,
and then lift it up;
When following this procedure from step1 to step 3, the filter system will be removed;
when following it from Step 2 to Step 1, the filter system will be installed.
A
B
WARING :
D o not disassemble the sump w ater flo w guider(A) ,
a nd press the turbid imeter(B), o therw ise you 'll cre ate
a leak!
12
The entire filter assembly should be cleaned at least once a week.
Cleaning the Filter
To cle an the f ilters, use a cleaning brush. R eassemble the filter parts as shown and re-insert
t he entire assembly in the dish was her, position ing it in its seat and turn i t in clockwise direction.
W hen cleaning the filters, do not knock on them. Otherw ise, the filters could be
contorted and the performance of the dishw asher could be decreased.
The cont rol panel can be cleaned by using a lig htly dam pen ed c loth.
After cleaning , m ake sure to dry it thoroughly.
For t he exteri or, use a good appliance polish w ax.
N ever use sharp o bjects, scouring pads or harsh cleaners on any part of the dishwasher.
Cleaning The Door
To clean the edge around the door, you should use only a soft warm, damp cloth.
To avoid penetration of water into the door lock and electrical components, do not
use a spray cleaner of any kind.
Clean the seals periodically with a clean damp cloth.
Never use a spray cl eaner to clean the door pane l as it m ay damage t he door lock
and electrica l components.
Abra sive ag ents or some paper t owe ls should not be used becau se o f the risk of
scratchi ng or leaving spots on th e stainless steel surface.
Protect Against Freezing
I n ca se you li ve in regions whe re temperat ure can drop below 0℃, pleas e take frost protectio n measures on the
dishwasher in winter. Every time a fter washing cycles, please operate as follows :
1.Cu t off the electrical power to the dis hwa sher.
2.Turn off the wat er su pply and disconnect the water inl et hose from the water valve.
3.Drain th e w ater from the inlet hose and water valve. (Use a pan to catch the wa ter)
4.Re connect the water inl et ho se t o the water valve .
5.Re move the filter at the bottom of the tub and use a sponge to soak up water in the sum p.
If your dishwasher cannot work because of the ice,
please contact a qualified service representative.
Cleaning the Spray Arms
It is necessary to clean the spray arms regularly as hard
water chemicals can clog the spray arm jets and bearings.
To remove the upper s pray arm, screw off the nut cl ockw ise then
remove th e arm.
To remove th e low er spray arm, pull out the spray arm u pwa rd.
Wash the arm s in soapy and w arm wat er and u se a soft brush to
clean the jets. Reasse mb le them a fter rinsing t hem thoroug hly.
13
After Every Wash
When not in Use for a LongTime
After every wash, turn off the water supply to the
appliance and leave the door slightly open so that
moisture and odours are not trapped inside.
It is recommended that you run a wash cycle with the
dishwasher empty and then remove the plug from the
socket, turn off the water supply and leave the door of
the appliance slightly open. This will help the d oor
seals to last longer and prevent odours from forming
within the appliance.
Remove the Plug
Before cleaning or performing maintenance, alw ays
remove the plug from t he socket.
Moving the Appliance
No Solvents or Abrasive Cleaning
To clean the exterior and rubber parts of the dishwasher,
do not use solvents or abrasive cleaning products.
Only use a cloth with warm soapy water.
To remove spots or stains from the surface of the
interior, use a cloth dampened with water and a little
vinegar, or a cleaning product made specifically for
dishwashers.
If the appliance needs to be moved, try to keep it in the
vertical position. If absolutely necessary, it can be
positioned on its back.
Seals
One of the factors that cause odours to form in the
dishwasher is food that remains trapped in the seals.
Periodic cleaning with a damp sponge will prevent this
from occurring.
Position the appliance in the desired location. The back should rest against the wall behind it, and the sides,
along the adjacent cabinets or walls. The dishwasher is equipped with water supply and drain hoses that can
be positioned either to the right or the left sides to facilitate proper installation.
Once the appliance is positioned for levelling, the height of the dishwasher
may be altered via adjustment of the screwing level of the feet. In any case,
the appliance should not be inclined more than 2 .
For personal safety:
DO NOT USE AN EXTENSION CORD OR AN ADAPTER PLUG WITH THIS APPLIANCE.
DO NOT UNDER ANY CIRCUMSTANCES, CUT OR REMOVE THE EARTHING
CONNECTION FROM THE POWER CORD.
Please look at the rating label to know the rating voltage and connect the dishwasher to the appropriate power supply.
Use the required fuse 10 amp, time delay fuse or circuit breaker recommended and provide separate circuit serving
only this appliance.
Ensure the vol tage and frequency of the power bei ng corresponds to those on the rating
plat e. Only i nsert the plug into an electri cal socket which is earthed properly. If the el ectrical
socket to which t he appliance must be connected is not appropriate for the plug , replace
t he socket, rat her than using adaptors or t he li ke as t hey could cause overheating and burns.
This appliance must be earthed. In the event of a malfunction or breakdown, earthing will reduce the risk of
electric shock by providing a path of least resistance for the electric current. This appliance is equipped with a
cord having an equipment-earthing conductor and an earthing plug. The plug must be plugged into an
appropriate outlet that is installed and earthed in accordance with all local standards and requirements.
Improper connection of the equipment earthing conductor can result in the risk of an
for personal safety:
electric shock.
DO NOT USE AN EXTENSION CORD OR AN ADAPTER PLUG WITH THIS APPLIANCE.
Check with
qualified
electrician
or service representative
if you areTHE
in doubt
whether the
DO a
NOT,
UNDER
ANY CIRCUMSTANCES,
CUT OR REMOVE
EARTHING
appliance
is
properly
earthed.
CONNECTION FROM THE POWER CORD.
Do not modify the plug provided with the appliance. If the plug does not fit properly to the
outlet, please have a qualified electrician to install a proper outlet.
14
The a ppl iance must be conne cted to th e w ater mai ns using new hos e-sets.
The o ld hose -sets sho uld not be re used.
Water pressure must be between 0,04 MPa and 1 MPa. If the pressu re is below t he minimum
consult our Service Department for advice.
1 Pull the Aqua-Stop hose completely out from the storage compartment located at the rear
of the dishwasher.
2 Tighter the screws of the Aqua-Stop hose to the faucet with thread 3/4inch.
3 Turn water full y on before starting the dishwasher.
The A qua-Stop ho se c onsi sts of double wall s. Th e hose's system guar ante es it s int ervention by blocking the flow
of water in case of the supp ly hose breaking and when the air space between the supply hose itself and the outer
corrugate d ho se is full of water.
A hose t hat attaches t o a sink spray can burst i f it is installed on the same water li ne as the dishwasher.
If your sink has one, it is recommended that the hose be disconnected and the hole plugged.
1
2
Turn off the water.
U nscrew t he Aqua -Stop hose f rom the water mains.
Connect the cold water supply hose to a threaded 3/4 inch connector and make sure that it is fastened tightly in place.
If the water pipes are new or have not been used for an extended period of time, let the water run to make sure that the
water is clear and free of impurities. If this precaution is not taken, there is a risk that the water inlet valve can get blocked
and damage the appliance.
The water suppl y to the appliance can also be connect ed to the house hot water line (centralized system, heating system),
as long as it does not exceed a temperature of 60 C. In this case, the wash cycle time will be shortened by about 15 minutes
and the wash efficiency sl ightly reduced.
The connection must be made to t he hot water line following the same procedures as those for the connect ion to the
col d water line.
15
Insert the drain hose into a drain pipe with a minimum diameter of 4 cm, or let it run into the sink, making sure to
avoid bending or crimping. Use the special plastic support that comes with the appliance. The free end of the hose
must be at a height between 40 and 100cm and must not be immersed in water.
PLEASE HANG UP THE DRAIN HOSE EITHER WAY OF A, B, C
Close the drain hose hook to the counter
Drain hose h ook
Front
Counter
A
B
C
D rain pipe
φ 40mm
How to Drain Excess Water From Hoses
If the sink is 1000m m higher from the flo or, the e xcess water in hoses cannot be d rained d irectly
into the sink. I t will be n ecessa ry to dra in exces s water f rom hoses into a bowl or suita ble
conta iner that is he ld outsi de and lo wer than the sink.
Water Outlet
C onne ct t he wate r drain h ose. The drain hose must be correctly fitte d to avoid water leaks.
Ensure that th e water i nlet hose is not kinked or squashed.
Extension Hose
If you nee d a drain hose extension, make sure t o use a similar drain hose .
It must be no longer th an 4 met res, otherwise the cleaning effect of the di shw asher could be reduced.
Syphon Connection
Th e waste connection must be at a height of between 50 0mm (minimum) and 1000mm (ma ximum)
from t he b otto m of the dish. The water drain hose sh ould be fixed by a ho se c lip.
The following things should be checked before starting the dishwasher.
1 The dishwasher is level and fixed properly
2
3
4
5
6
7
The inlet valve is open
There is no leakage at the connections
The power cord is correctly connected
The power is switched on
The inlet and drain hoses are not knotted
All packing materials and printings should be taken out from the dishwasher
After installation, please make sure to keep this manual.
The content of this manual is very helpful to the users.
16
Fuse blown, or the
circuit breaker acted
Replace fuse or reset circuit breaker. Remove any other
appliances sharing the same circuit with the dishwasher
Power supply is not
turned on
Make sure the dishwasher is turned on and the door is
closed securely.
Make sure the power cord is properly plugged into the
wall socket.
Water pressure is low
Check that the water supply is connected properly and
the water is turned on.
Door of dishwasher
not properly closed.
Make sure to close the door properly and latch it.
Kink in drain hose
Check drain hose.
Filter clogged
Check filters
(see section titled " Cleaning The Filter ")
Check the kitchen sink to make sure it is draining well.
If the problem is the kitchen sink not draining ,you may
need a plumber rather than a serviceman for dishwashers.
Use only the special dishwasher detergent to avoid
suds. If this occurs, open the dishwasher and let suds
evaporate. Add 1 litre of cold water to the tub. Close
and latch the dishwasher, then run a wash cycle for 1
minute to drain out the water. The first 1 minute of every
program is draining the water.Repeat if necessary.
Kitchen sink clogged
Improper detergent
Spilled rinse-aid
Always wipe up rinse-aid spills immediately.
Detergent with
colourant was used
Make sure that the detergent is the one without
colourant.
Hard water minerals
To clean the interior, use a damp sponge with
dishwasher detergent and wear rubber gloves.
Never use any other cleaner than dishwasher
detergent for the risk of foaming or suds.
A spray arm is
knocking against
an item in a basket
Interrupt the programme, and rearrange the items
which are obstructing the spray arm.
Items of crockery
are loose in the
wash cabinet
Interrupt the programme and
rearrange the items of crockery.
This may be caused
by on-site installation
or the cross-section of
the piping.
This has no influence on the dishwasher function.
if in doubt, contact a suitably qualified plumber.
17
The dishes were not
loaded correctly.
See notes in " Loading the Dishwasher ".
The programme was
not adequate.
Select a more intensive programme.
See" Wash Cycle Table ".
Not enough detergent
was dispensed.
Use more detergent, or change your detergent.
Items are blocking
the path of spray arms.
Rearrange the items so that the spray can rotate freely.
The filter combination
in the base of wash
cabinet is not clean or
is not correctly fitted.
This may cause
the spray arm jets
to get blocked.
Clean and/or fit the filter combination correctly.
Clean the spray arm jets. See "Cleaning the Spray
Arms".
Combination of soft
water and too much
detergent.
Use less detergent if you have soft water and select
a shortest cycle to wash the glassware and to get
them clean.
Aluminum utensils
have rubbed against
dishes.
Use a mild abrasive cleaner to eliminate those marks.
Dishes block the cover of
detergent dispenser.
Re-loading the dishes properly.
Improper loading
Load the dishwasher as suggested in the directions.
Too little rinse-aid
Increase the amount of rinse-aid/refill the rinse-aid
dispenser.
Dishes are removed
too soon
Do not empty your dishwasher immediately after
washing. Open the door slightly so that the steam can
escape. Begin unloading the dishwasher only once the
dishes are barely warm to the touch. Empty the low
basket first. This prevents water form dropping off
dishes in the upper basket.
Wrong program
has been selected
In short programs the washing temperature is lower,
which affects the drying performance. Choose a
program with a longer washing time.
Use of cutlery with
a low-quality coating
Water drainage is more difficult with these items.
Cutlery or dishes of this type are not suitable for
washing in the dishwasher.
When a malfunction appears, the appliance will display error codes to warn you:
Longer inlet time.
Tap is not opened, or water intake is restricted,or water pressure
is too low.
Overfilled.
Too much inlet water.
Failure of orientation of distributary valve
Open circuit or break of distributary valve
The key-press keeep pressed more than
30 seconds
Water or something cover on the key-press
If overflow occurs, turn off the main water supply before calling a service.
If there is water in the base pan because of an overfill or small leak,
the water should be removed before restarting the dishwasher.
18
850
Height :
850mm
Width :
Depth :
Voltage connected Load :
Water pressure:
Hot water connection :
Power supply:
Capacity:
600mm
610mm
see rating label
0.04-1.0MPa
max 60 ℃
230V-240V, 50Hz
14 Place settings
19