1
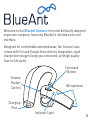
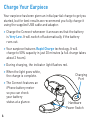
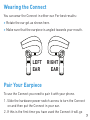
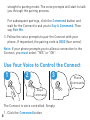
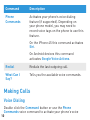
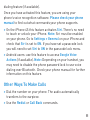
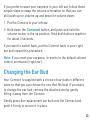
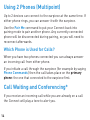
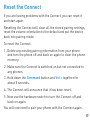
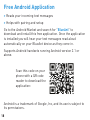
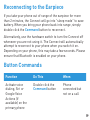
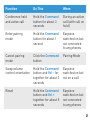
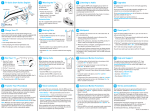
CONNECT
USER GUIDE
Read Me to Get the Most Out of
Your Device...
TO GET STARTED
1. Turn The Connect On
2. Put It On
3. Listen In
Model: CT
Contents
Charge Your Earpiece 6
Wearing the Connect 7
Pair Your Earpiece 7
Use Your Voice to Control the Connect 8
Making Calls 10
Taking Calls 12
Volume Control 12
Changing the Ear Bud 13
Using 2 Phones (Multipoint) 14
Call Waiting and Conferencing* 14
Listening to Audio 16
Reset the Connect 17
Free Android Application 18
Reconnecting to the Earpiece 19
Button Commands 19
Help and Support 22
Terms and Conditions 22
Contact Us 24
Welcome to the BlueAnt Connect: the most brilliantly designed
ergonomic earpiece, featuring BlueAnt’s intuitive voice user
interface.
Designed for comfortable extended wear, the Connect also
comes with Siri and Google Voice Actions integration, rapid
charge technology to keep you connected, and high quality
true-to-life audio.
Command
Button
Volume
Rocker
Control
Charging
Port
Microphones
Indicator Light
5
Charge Your Earpiece
Your earpiece has been given an initial partial charge to get you
started, but for best results we recommend you fully charge it
using the supplied USB cable and adaptor.
> Charge the Connect whenever it announces that the battery
is Very Low. It will switch off automatically if the battery
runs out.
> Your earpiece features Rapid Charge technology. It will
charge to 50% capacity in just 30 minutes (a full charge takes
about 2 hours).
> During charging, the indicator light flashes red.
> When the light goes white,
the charge is complete.
> The Connect features an
iPhone battery meter
so you can check
your battery
status at a glance.
6
Charging
Port
Hardware
Power Switch
Wearing the Connect
You can wear the Connect in either ear. For best results:
> Rotate the ear gel as shown here.
> Make sure that the earpiece is angled towards your mouth.
LEFT
EAR
RIGHT
EAR
Pair Your Earpiece
To use the Connect you need to pair it with your phone.
1. Slide the hardware power switch across to turn the Connect
on and then put the Connect in your ear.
2. If this is the first time you have used the Connect it will go
7
straight to pairing mode. The voice prompts will start to talk
you through the pairing process.
For subsequent pairings, click the Command button and
wait for the Connect to ask you to Say A Command. Then
say Pair Me.
3. Follow the voice prompts to pair the Connect with your
phone. If requested, the pairing code is 0000 (four zeros).
Note: If your phone prompts you to allow a connection to the
Connect, you must select “YES” or “OK”.
Use Your Voice to Control the Connect
1
3
2
Say A
Command
The Connect is voice controlled. Simply:
8
1. Click the Command button
Phone
Commands
2. Wait for the Connect to ask you to Say A Command
3. Say the command:
Command
Description
Am I
Connected?
The Connect will check if your phone is
connected, and attempt to connect if not.
Call Back
Calls back the last incoming call.
Check Battery
Tells you the battery level on the Connect.
Pair Me
Puts the Connect into pairing mode. Any
connected phone will be disconnected.
9
Command
Description
Phone
Commands
Activates your phone’s voice dialing
feature (if supported). Depending on
your phone model, you may need to
record voice tags on the phone to use this
feature.
On the iPhone 4S this command activates
Siri.
On Android devices this command
activates Google Voice Actions.
Redial
Redials the last outgoing call.
What Can I
Say?
Tells you the available voice commands.
Making Calls
Voice Dialing
Double click the Command button or use the Phone
Commands voice command to activate your phone’s voice
10
dialing feature (if available).
Once you have activated this feature, you are using your
phone’s voice recognition software. Please check your phone
manual to find out what commands your phone supports.
> On the iPhone 4S this feature activates Siri. There’s no need
to touch or unlock your iPhone. Note: Siri must be enabled
on your phone. Go to Settings > General on your iPhone and
check that Siri is set to ON. If you have set a passcode lock
you will need to set Siri to ON in the passcode lock menu.
> Android users: use this feature to access Google Voice
Actions (if available). Note: Depending on your handset, you
may need to disable the phone password lock to use voice
dialing over Bluetooth. Check your phone manual for further
information on this feature.
Other Ways To Make Calls
> Dial the number on your phone. The audio automatically
transfers to the earpiece.
> Use the Redial or Call Back commands.
11
Taking Calls
When the phone rings, wait for the prompt to ask you if you
want to take the call, and then say Answer or Ignore. Or:
> To accept the call click the Command button once.
> To reject the call double click the Command button.
During a call, click the Command button to end the call.
Volume Control
Use the volume rocker:
Volume
Rocker
> Push up for volume up.
> Push down for volume down.
Note: See the next section for
advice if you wear the Connect in your left ear.
Wearing the Connect in your Left Ear?
The Connect volume controls are set by default for users
wearing the earpiece in their right ear.
12
If you prefer to wear your earpiece in your left ear, follow these
simple steps to swap the volume orientation so that you can
still push up for volume up and down for volume down:
1. Put the Connect in your left ear.
2. Hold down the Command button, and push and hold the
volume rocker in the up position. Hold both buttons together
for about 3 seconds.
If you want to switch back, put the Connect back in your right
ear and repeat this procedure.
Note: If you reset your earpiece, it reverts to the default volume
control orientation (right ear).
Changing the Ear Bud
Your Connect is supplied with a choice of ear buds in different
sizes so that you can choose the one that fits best. If you want
to change the ear bud, remove the attached one by gently
lifting it away from the Connect.
Gently press the replacement ear bud onto the Connect and
push it firmly to secure it in place.
13
Using 2 Phones (Multipoint)
Up to 2 devices can connect to the earpiece at the same time. If
either phone rings, you can answer it with the earpiece.
Use the Pair Me command to put your Connect back into
pairing mode to pair another phone. Any currently connected
phone will be disconnected during pairing, so you will need to
reconnect afterwards.
Which Phone is Used for Calls?
When you have two phones connected you can always answer
an incoming call from either phone.
If you initiate a call through the earpiece (for example by saying
Phone Commands) then the call takes place on the primary
phone: the one that connected to the earpiece first.
Call Waiting and Conferencing*
If you receive an incoming call while you are already on a call
the Connect will play a tone to alert you.
14
To
Do This
End the active call and
answer the incoming call
Click the Command button
Keep the active call, reject
the incoming call
Double click the Command
button
Put the active call on hold,
answer the incoming call
Hold the Command button
for about 1 second
Switch between the active
and held call
Hold the Command button
for about 1 second
Conference the active and
held call
Hold the Command button
for about 3 seconds
If you are using multipoint you can also use these controls to
switch between calls on both phones.
Note: You can only conference together calls received on the
same phone (although you can have conference calls running
on both phones at the same time).
* To use these features, your phone and network must support
call waiting and call conferencing.
15
Listening to Audio
The Connect supports A2DP audio streaming. If your phone
supports the A2DP profile then simply start playing music or
any other audio (including turn-by-turn directions from a GPS
application on your phone) and it will automatically transfer to
the earpiece.
If the phone rings the audio will mute. You can use your voice
to answer or ignore the call. Or:
> Click the Command button to accept the call.
> Double click the Command button to ignore the call.
The audio will resume when the call ends.
If you want to exit A2DP streaming mode to do something else:
> Click the Command button to activate the Connect’s voice
control feature. If you do not say one of the Connect’s voice
commands within a few seconds the music will resume
playing; or
> Double click the Command button to activate your phone’s
voice dialing feature (if available).
16
Reset the Connect
If you are having problems with the Connect, you can reset it
and start again.
Resetting the Connect will clear all the stored pairing settings,
reset the volume orientation to the default and put the device
back into pairing mode.
To reset the Connect:
1. Delete any existing pairing information from your phone
and turn the phone off and back on again to clear the phone
memory.
2. Make sure the Connect is switched on but not connected to
any phones.
3. Hold down the Command button and Vol + together for
about 5 seconds.
4. The Connect will announce that it has been reset.
5. Now use the hardware switch to turn the Connect off and
back on again.
You will now need to pair your phone with the Connect again.
17
Free Android Application
> Reads your incoming text messages
> Helps with pairing and setup
Go to the Android Market and search for “BlueAnt” to
download and install this free application. Once the application
is installed you will hear your text messages read aloud
automatically on your BlueAnt device as they come in.
Supports Android handsets running Android version 2.1 or
above.
Scan this code on your
phone with a QR code
reader to download the
application:
Android is a trademark of Google, Inc, and its use is subject to
its permissions.
18
Reconnecting to the Earpiece
If you take your phone out of range of the earpiece for more
than 2 minutes, the Connect will go into “sleep mode” to save
battery. When you bring your phone back into range, simply
double click the Command button to reconnect.
Alternatively, use the hardware switch to turn the Connect off
whenever you are not using it. The Connect will automatically
attempt to reconnect to your phone when you switch it on.
Depending on your phone, this may take a few seconds. Please
ensure that Bluetooth is enabled on your phone.
Button Commands
Function
Do This
When
Activate voice
dialing, Siri or
Google Voice
Actions (if
available) on the
primary phone
Double click the
Command button
Phone
connected but
not on a call
19
20
Function
Do This
When
Answer a call
Click the Command
button
Phone ringing
End a call
Click the Command
button
During an active
call
End the active call
and answer an
incoming call
Click the Command
button
Phone ringing
during an active
call
Reject a call
Double click the
Command button
Phone ringing
Keep the active
call and reject the
incoming call
Double click the
Command button
Phone ringing
during an active
call
Hold active call
and switch to
incoming or held
call
Hold the Command
button for about 1
second
During an active
call (with phone
ringing or call
on hold)
Function
Do This
When
Conference held
and active call
Hold the Command
button for about 3
seconds
During an active
call (with call on
hold)
Enter pairing
mode
Hold the Command
button for about 1
second
Earpiece
switched on but
not connected
to any phones
Cancel pairing
mode
Click the Command
button
Pairing Mode
Swap volume
control orientation
Hold the Command
button and Vol - for
together for about 3
seconds
Earpiece
switched on but
not on a call
Reset
Hold the Command
button and Vol +
together for about 5
seconds
Earpiece
switched on but
not connected
to any phones
21
Help and Support
If you are having trouble getting the Connect to work, please
visit www.blueantwireless.com for online help, support, and
troubleshooting tips.
Please contact us before returning the Connect to a store and
we will help you through any difficulty you may have.
Terms and Conditions
By using this product, you are agreeing to BlueAnt’s terms and
conditions, available at www.blueantwireless.com and on the
supplied warranty information card.
Please protect your ears. All BlueAnt devices are designed
to reach volumes of up to 100 decibels. Prolonged use at high
volumes may affect your hearing capacity and may result in
noise induced hearing loss (NIHL). Please read the enclosed
safety card for information about the safe use of BlueAnt
products.
The Bluetooth® word mark and logos are registered
trademarks owned by Bluetooth SIG, Inc. and any use of
such marks by BlueAnt Wireless is under license. Android
22
is a trademark of Google Inc., Apple, iPhone and Siri are
trademarks of Apple Inc., registered in the U.S. and other
countries. The Trademark BlackBerry® is owned by Research
In Motion Limited and is registered in the United States and
may be pending or registered in other countries. BlueAnt
Wireless is not endorsed, sponsored, affiliated with or
otherwise authorized by Research In Motion Limited.
BlueAnt and other trademarks are trademarks of BlueAnt
and other organizations and may not be used without
permission. The BlueAnt logo is registered in the U.S. Patent
and Trademark Office and globally with the World Intellectual
Property Organization under the Madrid protocol.
23
Contact Us
North America: 1 855 9 258 3268
UK: 0800 285 1272
Australia: 1300 669 049
France: 0800 913 467
New Zealand: 0800 443 122
Spain: 900 838 030
Singapore: 800 130 1940
India: 000 800 100 4103
Thailand: 001 800 13 203 2852
Hong Kong: 800 905 394
Taiwan: 00 801 127 405
China: 400 120 0974
www.blueantwireless.com/support
24
25
26
Version: CONNECT-MAN-EN-3.0
27
HELP AND SUPPORT
Visit register.blueantwireless.com to
register your BlueAnt device.
Visit www.blueantwireless.com/support
for online help and support or to contact
the BlueAnt Technical Support team.
North
America
Australia
New
Zealand
UK
1 855 9
258 3268
1300 669
049
0800
443 122
0800 285
1272
Visit www.blueantwireless.com/buy to
buy BlueAnt products, accessories and
spare parts.
© 2012 BlueAnt Wireless. All Rights Reserved.