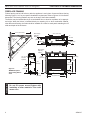
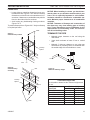
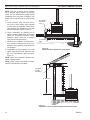
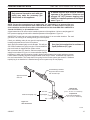
1
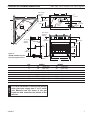
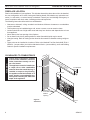
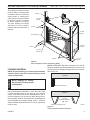
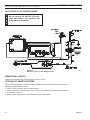
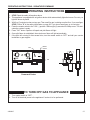
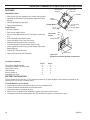
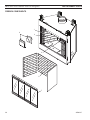
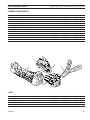
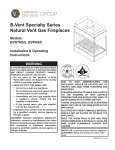
B-Vent Series
Natural Vent Gas Fireplace
Models:
400BBVNV/PV/NE/PE/NSC/PSC,
400SBVNV/PV/NE/PE/NSC/PSC,
500SBVNV/PV/NE/PE/NSC/PSC
WARNING
Installation & Operating
Instructions
IF THE INFORMATION IN THESE INSTRUCTIONS IS 4037
NOT FOLLOWED EXACTLY, A FIRE OR EXPLOSION BBV SBV cover
MAY RESULT CAUSING PROPERTY DAMAGE, PER- 9/08
SONAL INJURY OR LOSS OF LIFE.
DUE TO HIGH TEMPERATURES, THE APPLI-
— Do not store or use gasoline or other flammable vapors and liquids in the vicinity of
this or any other appliance.
— WHAT TO DO IF YOU SMELL GAS
• Do not try to light any appliance.
• Do not touch any electrical switch; do not
use any phone in your building.
• Immediately call your gas supplier from a
neighbor’s phone. Follow the gas supplier’s instructions.
• If you cannot reach your gas supplier, call
the fire department.
— Installation and service must be performed
by a qualified installer, service agency or the
gas supplier.
WARNING: Improper installation, adjustment,
alteration, services or maintenance can cause
injury or property damage. Refer to this manual. For assistance or additional information
consult a qualified installer, service agency or
the gas supplier.
ANCE SHOULD BE LOCATED OUT OF TRAFFIC AND AWAY FROM FURNITURE AND DRAPERIES.
CHILDREN AND ADULTS SHOULD BE ALERTED TO THE HAZARDS OF HIGH SURFACE
TEMPERATURE AND SHOULD STAY AWAY TO
AVOID BURNS OR CLOTHING IGNITION.
YOUNG CHILDREN SHOULD BE SUPERVISED
WHEN THEY ARE IN THE SAME ROOM AS THE
APPLIANCE.
CLOTHING OR OTHER FLAMMABLE MATERIAL SHOULD NOT BE PLACED ON OR NEAR
THE APPLIANCE.
KEEP THE ROOM AREA CLEAR AND FREE
FROM COMBUSTIBLE MATERIALS, GASOLINE AND OTHER FLAMMABLE VAPORS AND
LIQUIDS.
INSTALLER: Leave this manual with the appliance.
CONSUMER: Retain this manual for future reference.
D
ev
TABLE OF CONTENTS
BBV, SBV Series Natural Vent Gas Fireplaces
Thank you and congratulations on your purchase of an MHSC Fireplace
lease read t e Installation and peration Instructions be ore usin t e appliance
IMPORTANT: ead all instructions and arnin s care ully be ore startin installation
ailure to ollo t ese instructions may result in a possible ire a ard and ill void t e
arranty
Important Safety Information ..................................... 3
Check Gas Pressure - Signature Command System .. 23
Code Approval ............................................................. 4
Product Specifications
i
levations
as ressures
as peci ications ri ice i es
Electrical Wiring - SCS .............................................. 23
unction o
irin
ommand enter all Installation
all
itc Installation
irin Dia ram
Pre-Installation Information
e ore ou tart
ireplace and ramin Dimensions
ireplace ocation
Operating Instructions - SCS ................................... 26
at to do i you smell as
peratin Instructions
o turn o as
Clearances ................................................................... 8
Signature Command System
Operation Instructions ............................................ 28
Secure Fireplace .......................................................... 9
Finish Material ............................................................. 9
Venting Installation.................................................... 10
Installation recautions
Installation lannin
irestops
ermination
Final Installation ........................................................ 31
ock ool lacement
o
lacement
ava ock and mber lacement
Fireplace Installation ................................................. 14
eck as ype
Install as ipin to ireplace urner
Cleaning and Maintenance ....................................... 32
urner ilot and ontrol ompartment
ilot lame
urner
urner lame
ent ystem
o s
ock ool
Check Gas Pressure - Millivolt ................................. 16
Troubleshooting ........................................................ 34
Electrical Installation................................................. 16
lectrical irin
emote all ounted
itc
lectronic ilot I nition irin
Replacement Parts .................................................... 38
irebo
omponents
o s
tandin
ilot
illivolt ontrol
lectronic I nition
i nature ommand ystem
Outside Combustion Air .......................................... 12
ombustion ir ssembly
Operating Instructions - Millivolt ............................. 19
at to do i you smell as
i tin
ilot or t e irst ime
i tin
ilot
i tin
urner
Operating Instructions - Electronic Ignition ........... 22
i tin
lectronic I nition
o turn o as
For Massachusetts Residents Only ......................... 46
Warranty ..................................................................... 47
IMPORTANT SAFETY INFORMATION
OWNER
INSTALLER
WARNING
lease leave t ese instructions
BBV, SBV Series Natural Vent Gas Fireplaces
it t e appliance
lease retain t ese instructions or uture re erence
• Read this owner’s manual carefully and completely before trying to assemble, operate,
•
•
or service this fireplace.
Any change to this fireplace or its controls can be dangerous.
Improper installation or use of this fireplace can cause serious injury or death from
fire, burns, explosions, electrical shock and carbon monoxide poisoning.
is ireplace is a decorative as appliance
is ireplace
must be properly installed by a uali ied service person
CARBON MONOXIDE POISONING:
arly si ns o
carbon mono ide poisonin are similar to t e lue it
eadac es di iness and or nausea I you ave t ese
si ns t e ireplace may not ave been installed properly
et res air at once ave t e ireplace inspected and
serviced by a uali ied service person ome people are
more a ected by carbon mono ide t an ot ers
ese
include pre nant omen people it
eart or lun dis
ease or anemia t ose under t e in luence o alco ol and
t ose at i altitudes
ropane
as and natural as are bot odorless n
odor makin a ent is added to eac o t ese ases
e
odor elps you detect a as leak o ever t e odor add
ed to t ese ases can ade as may be present even
t ou no odor e ists
ake certain you read and understand all arnin s eep
t is manual or re erence It is your uide to sa e and
proper operation o t is ireplace
is appliance is only or use it t e type o as in
dicated on t e ratin plate
is appliance is not con
vertible or use it ot er ases unless a certi ied kit
is used
or propane
ireplace do not place propane
supply tank s inside any structure ocate propane
supply tank s outdoors o prevent per ormance
problems do not use propane
uel tank o less
t an
lbs capacity
I you smell as
s ut o as supply
do not try to li t any appliance
do not touc any electrical s itc do not use any
p one in your buildin
immediately call your as supplier rom a nei
bor s p one ollo t e as supplier s instruc
tions
ever install t e ireplace
in a recreational ve icle
ere curtains urniture clot in or ot er lam
mable ob ects are less t an
rom t e ront top
or sides o t e ireplace
in i tra ic areas
in indy or dra ty areas
is ireplace reac es i temperatures eep c il
dren and adults a ay orm ot sur aces to avoid
burns or clot in i nition ireplace ill remain ot or
a time a ter s utdo n llo sur aces to cool be ore
touc in
are ully supervise youn c ildren
en t ey are in
t e room it ireplace
Do not modi y ireplace under any circumstances ny
parts removed or servicin must be replaced prior to
operatin ireplace
urn ireplace o and allo to cool be ore servicin
installin or repairin
nly a uali ied service person
s ould install service or repair t e ireplace ave
burner system inspected annually by a uali ied ser
vice person
ou must keep control compartments burners and
circulatin air passa es clean ore re uent clean
in may be needed due to e cessive lint and dust
orm carpetin beddin material pet air etc turn
o t e as valve and pilot li t be ore cleanin ire
place
ave ventin system inspected annually by a uali
ied service person I needed ave ventin system
cleaned or repaired e er to leaning and ainte
nance age
eep t e area around your ireplace clear o combus
tible materials asoline and ot er lammable vapor
and li uids Do not run ireplace
ere t ese are
used or stored Do not place items suc as clot in
or decorations on or around ireplace
Do not use t is ireplace to cook ood or burn paper or
ot er ob ects
ever place anyt in on top o ireplace
ontinued on age
BBV, SBV Series Natural Vent Gas Fireplaces
IMPORTANT SAFETY INFORMATION
ontinued on age
WARNING
IMPORTANT:
PLEASE READ THE FOLLOWING CAREFULLY
It is not unusual or as ireplace to ive o some odor
t e irst time it is burned
is is due to t e manu actur
in process
Please ensure that your room is well ventilated during burn off - open all windows.
It is recommended t at you burn your ireplace or at
least en
ours t e irst time you use it
IMPORTANT:
PLEASE READ THE FOLLOWING CAREFULLY
It is normal or ireplaces abricated o steel to ive o
some e pansion and or contraction noises durin t e
start up or cool do n cycle imilar noises are ound
it your urnace eat e c an er or car en ine
WARNING
Do not use any solid uels ood coal paper card
board etc in t is ireplace se only t e as type
indicated on ratin plate
is appliance
en installed must be electrically
rounded in accordance it local codes or in t e
absence o local codes
it t e ational lectri
cal ode,
I
or t e anadian lectrical
ode,
. .
Do not obstruct t e lo o combustion and ventilation
air in any ay rovide ade uate clearances around
air openin s into t e combustion c amber alon
it
ade uate accessibility clearance or servicin and
proper operation
en t e appliance is installed directly on carpetin
tile or ot er combustible material ot er t an ood
loorin you must set appliance on a metal or ood
panel or eart pad e tendin t e ull idt and dept
o t e appliance
Do not use ireplace i any part as been e posed to
or as been under ater Immediately call a uali
ied service person to arran e or replacement o t e
unit
Do not operate ireplace i any lo is broken
Do not use a blo er ireplace eat e c an er ire
place or any ot er accessory not approved or use
it t is ireplace
e ireplace is not intended or use it a t ermo
stat
is appliance must be installed it dra t ood in
same atmosp eric pressure one as t e combustion
air inlet to t e appliance
For Massachusetts Residents Only:
is product
must be installed by a licensed plumber or as itter
en installed it in t e ommon ealt o
assa
c usetts le line installation must not e ceed
Never connect unit to private
(non-utility) gas wells. This gas is commonly known as wellhead gas.
Proposition 65 Warning: Fuels listed in gas, wood burning or oil fired appliances,
and the products of combustion of such fuels, contain chemicals known to the State
of California to cause cancer, birth defects and other reproductive harm.
alifornia ealth and afet
ode ec.
.
CODE APPROVAL
ese appliances ave been tested by
D
I
in t e
or
and ound to comply
and anada as ollo s
it t e establis ed standards
LISTED VENTED GAS FIREPLACE
D
I
b
b
BBV, SBV Series Natural Vent Gas Fireplaces
PRODUCT FEATURES
PRODUCT SPECIFICATIONS
GAS SPECIFICATIONS & ORIFICE SIZE
is appliance as been certi ied or use it eit er
natural or propane as ee appropriate data plates
is appliance is not or use it solid uels
e appliance must be installed in accordance it
local codes i any I none e ist use t e current instal
lation code
I
in t e
and
in anada
e appliance must be properly connected to a vent
in system
e appliance is not approved or closet or recessed
installations
a Input
odel
in Input
uel
at
ri ice
i e
at
at
at
at
at
at
ailin
lan e
ailin
lan es
as ontrol
not s o n
ailin
lan e
Figure 1 BBV/SBV Fireplace
FP1920
BBV SBV parts
Input ratin s are
9/08s o n in
HIGH ELEVATIONS
ti ied
per our and are cer
it out deration or elevations up to
eet
m above sea level
or elevations above
eet
m in
in
stallation must be in accordance it t e current
I
and or local codes avin urisdic
tion
In anada please consult provincial and or local au
t orities avin urisdiciton or installation at elevations
above
eet
m
GAS PRESSURES
Inlet inimum
Inlet a imum
ani old ressure
atural
c
c
c
ropane
c
c
c
at
at
BEFORE YOU START
ead t is omeo ner manual t orou ly and ollo all
instructions care ully Inspect all contents or s ippin
dama e and immediately in orm your dealer i any dam
a e is ound Do not install any unit it dama ed incom
plete or substitute parts
eck your packin list to veri y
t at all listed parts ave been received ou s ould ave
t e ollo in
ireplace irebo and urner ystem
o
et
olcanic ock
ock ool
ite o le
itc
over late
lastic a
iplock a
itc
ITEMS REQUIRED FOR INSTALLATION
illips cre driver
ramin
aterials
ammer
all inis in
aterials
a and or saber sa
evel
lectric Drill and its
ee oint
liers
easurin ape
uare
ipe renc
aulkin
aterial oncombustible
ireplace urround aterial oncombustible
ipin
omplyin
it ocal odes
ipe ealant pproved or use it
ropane
esistant to ul ur ompounds
FIREPLACE & FRAMING DIMENSIONS
BBV, SBV Series Natural Vent Gas Fireplaces
FIREPLACE FRAMING
irebo ramin can be built be ore or a ter t e appliance is set in place onstruct irebo ramin
ollo in igures or or your speci ic installation re uirements e er to igures
or irebo
dimensions
e ramin eaders may rest on t e top o t e irebo stando s
e irebo may be installed directly on a combustible loor or raised on a plat orm o an appropri
ate ei t
en t e irebo is installed directly on carpetin tile or ot er combustible material
ot er t an ood loorin t e irebo s all be installed on a metal or ood panel e tendin t e ull
idt and dept o t e enclosure
M in. R ough O pening
D epth
1456O”
( 368 mm) 14”
( 356 mm)
316” ( 797 mm)
4” B- Vent
1/2” or 5/8”
D ry w al l Spacers
8”
( 203 mm)
15
56
m
)
4056O” ( 1029 mm)
M in. R ough O pening W idth
m
( 7 30
78 6
m ”
m
)
56M
” (
M in. R ough
O pening H eigh t
61
436" ( 1102 mm)
436" ( 1102 mm)
38"
( 965 mm)
3856O”
( 978 mm)
1/2" or 5/8" D ry w al l Spacers
34”
( 864 mm)
96”
( 244 mm)
WARNING
Figure 2 400BBV Fireplace
and Framing Dimensions
2156O”
( 546 mm)
166M”
( 426 mm)
6”
( 152 mm)
10”
( 254 mm)
26QE”
( 56 mm)
Do not fill spaces around firebox with
insulation or other materials. This could
cause a fire.
36” ( 914 mm)
40” ( 1016 mm)
624037
400BBV dims
BBV, SBV Series Natural Vent Gas Fireplaces
FIREPLACE & FRAMING DIMENSIONS
M in. R ough O pening
D epth
G
C
6” B- Vent
21”
( 533 mm)
F
2156O”
( 546 mm)
13(6QE”
1/2” or 5/8”
D ry w al l Spacers
G
656O” ( 341 mm)
( 165 mm)
D - M in. R ough O pening W idth
E
M in. R ough
O pening H eigh t
38"
( 965 mm)
3856O”
( 978 mm)
1/2" or 5/8" D ry w al l Spacers
34”
( 864 mm)
96”
( 244 mm)
2156O”
( 546 mm)
166M”
( 426 mm)
Figure 3 400SBV, 500SBV Fireplace
and Framing Dimensions
6”
( 152 mm)
1456O”
( 368 mm)
Ref.
NOTE
D
B
26QE”
( 56 mm)
A
400SBV
500SBV
mm
mm
mm
mm
ZC\zn
Z\x
Framing Dimensions
M\,
mm
mm
mm
For easier installation on 400SBV and 500SBV
units, place gas supply pipe 6” to 8” inside
unit. Measure from the center of the gas
knock-out hole located at the bottom of the
left side.
624037
ZC\zn
400BBV dims
Z\x
M\,
Z\v
mm
mm
mm
mm
mm
mm
mm
PRE-INSTALLATION INFORMATION
BBV, SBV Series Natural Vent Gas Fireplaces
FIREPLACE LOCATION
lan or t e installation o your appliance
is includes determinin
ere t e unit is to be installed
t e vent con i uration to be used ramin and inis in details and
et er any optional acces
sories i e all s itc or remote control are desired onsult your local buildin code a ency to
ensure compliance it local codes includin permits and inspections
e ollo in
actors s ould be taken into consideration
learance to side all ceilin
ood ork and indo s inimum clearances to combustibles
must be maintained
is ireplace may be installed alon a all across a corner or use an e terior c ase
ocation s ould be out o i tra ic areas and a ay orm urniture and draperies due to eat
rom appliance
ever obstruct t e ront openin o t e ireplace
Do not install in t e vicinity
ere asoline or ot er lammable li uids may be stored
ent pipe routin
e er to entin section ound in t is manual or allo able ventin con i ura
tions
ese units can be installed in a bedroom e er to t e ational uel as ode
I
current edition t e ni orm ec anical ode current edition and ocal uildin
odes or speci ic installation re uirements
WARNING
CLEARANCES TO COMBUSTIBLES
ng
il i
C e
Follow these instructions carefully
to ensure safe installation. Failure to
follow instructions exactly can create a fire hazard.
The appliance cannot be installed on
a carpet, tile or other combustible
material other than wood flooring. If
installed on carpet or vinyl flooring,
the appliance shall be installed on a
metal, wood or noncombustible material panel extending full width and
depth of the appliance.
C o
mb
us
tib
l e M
inimum
W
e
Sid
al l
inimum
rom ot
alls to
penin
an
inimum
ide
Figure 4 Clearances
&0
CLEARANCES
tel
a imum
Dept
SECURE FIREPLACE TO FLOOR OR FRAMING
e ireplace must be secured to
t e loor and or to ramin studs
as s o n in igure
se t o
ood scre s or masonry con
crete scre s to secure ireplace
to t e loor se our
scre s
to attac ireplace to ramin
e side brackets are ad ust
able rom
to
to accom
modate di erent t icknesses o
material
BBV, SBV Series Natural Vent Gas Fireplaces
ramin
ail
lan e
ramin
cre s
ail
lan e
ail lan e
ail
lan e
cre s
ail
lan e
cre s
ail
lan e
Figure 5 Secure Fireplace to Floor and Framing Studs
FINISHING MATERIAL
WARNING
NOTE: Any remote wiring (i.e. remote control and wall
switch) must be done prior to final finishing to avoid
costly reconstruction.
Never obstruct or modify
the air inlet. This may create
a fire hazard.
nly noncombustible materials i e brick tile slate steel
or ot er materials it a
ire ratin o ero may be
used to cover t e black sur ace o t e appliance
minimum ad esive may be used to attac acin materi
als to t e black sur ace I oints bet een t e inis ed all
and t e ireplace surround are sealed a
minimum
sealant material eneral lectric
or e uivalent
must be used
NOTE: ll
i nature ommand units it bi
old door installed must be operated it t e doors in t e
ully open position in le pane lass doors are not avail
able or t is unit
FP2019
secure to framingF irepl ace
10/08
lass Doors ully
pen
F irepl ace
D o N ot O perate F irepl ace L ike T h is!
lass Doors artially
pen
Figure 6 Correct and Incorrect Door Positions
F P 2863
door position
NOTICE
WARNING
BBV, SBV Series Natural Vent Gas Fireplaces
VENTING INSTALLATION
Read all instructions completely and thoroughly before attempting installation.
Failure to do so could result in serious injury, property damage or loss of life.
Operation of improperly installed and maintained venting system could result in
serious injury, property damage or loss of life.
imney centerline dimensions are re erenced on ages
, igures
Failure to follow these instructions will void the warranty.
INSTALLATION PRECAUTIONS
onsult local buildin codes be ore be innin t e instal
lation
e installer must make sure to select t e proper
vent system or installation e ore installin vent kit t e
installer must read t is ireplace manual and vent kit in
structions
nly a uali ied installer service person s ould install
ventin system
e installer must ollo t ese sa ety
rules
ear loves and sa ety lasses or protection
se e treme caution
en usin ladders or
en
on roo tops
e a are o electrical irin locations in alls and
ceilin s
e ollo in actions
in system
ill void t e
arranty on your vent
Installation o any dama ed ventin component
naut ori ed modi ication o t e ventin system
Installation o any component part not manu ac
tured or approved by
Installation ot er t an permitted by t ese instruc
tions
INSTALLATION PLANNING
“B” VENT PIPE
ee ventin installation instructions provided by t e
ent manu acturer
NOTE:
is
I
I
D usin
vent type pipe t at as been listed by a nationally rec
o ni ed testin a ency
e er to
runs
ent ipe i in c art or proper elbo
B-Vent Pipe Sizing
o set
inimum vertical c imney ei t
as measured
rom top o unit to top o termination
a imum vertical ei t
as measured rom
top o unit to top o termination
inimum c imney ei t it t o
elbo s
lbo re uirements llo a ma imum o t o
elbo s or our
elbo s per installation
NOTE: Two (2) 45° elbows = one (1) 90° elbow
ori ontal run must never e ceed
o t e ei t
o t e vent system ori ontal runs are measured
center pipe to center pipe
ori ontal runs must ave a minimum
rise per
oot and may not run level or do n ill
Attaching 4” Flue to BBV:
e irst section o
vent lue s ould overlap
t e appliance collar
e appliance collar may be
crimped to ease t e installation o t e irst section
o lue
Do not penetrate t e pipe inner liner it s eet met
al scre s ttac t e initial lue section to t e top
o t e irebo c assis it
sel tappin scre s
and plumbers strap ttac t e strap to ard t e
bottom o t e lue section and pull taut or proper
tension to t e irebo
Attaching 6” Flue to SBV:
e appliance collar is sli tly lar er t at t e in
ner all o most vent pipe sections Install t e
irst section o
vent by slippin t e lue s inner
all tot e inside o t e appliance collar
e vent
outer all ill slip to t e outside o t e appliance
collar
Do not penetrate t e pipe inner line it s eet met
al scre s ttac t e initial lue section tot e top
o t e irebo c assis it
sel tappin scre s
and plumber s strap ttac t e strap to ard t e
bottom o t e lue section and pull taut or proper
tension to t e irebo
Support the Pipe
upport ori ontal runs a minimum o every ive
eet e er to vent manu acturer s instructions or
proper support on vertical runs
or less
upport o sets so t e ei t o t e pipe is not bear
in do n on t e elbo s
VENTING INSTALLATION
BBV, SBV Series Natural Vent Gas Fireplaces
FIRESTOPS
ocate c imney centerline dimension rom a com
bustible back all igures
. inimum irestop
dimensions are ound in t e vent manu acturer s in
structions learances to combustibles may also be
ound on t e sides o t e lue sections
void cuttin any load bearin ramin members
igures
o position irestop re er to igures
is re uired per rame
nly one irestop
ails
NOTICE: When installing in a chase, you should insulate the chase as you would the outside walls of your
home. This is especially important in cold climates.
Insulation should be considered a combustible material. Maintain proper clearances to all combustible
materials.
NOTICE: Treatment of firestops and construction of
the chase may vary from building type to building
type. These instructions are not substitutes for the
requirements of local building codes. You must follow all local building codes.
TERMINATE THE PIPE
Figure 7 Install Firestop in Attic
irestop
pacer
aintain proper clearance to t e roo usin t e
c art belo
ents s all terminate at least
rom a vertical
all
aintain
minimum clearance to any ot er as
terminations or plumbin vents as measured rom
t e outside ed e o t e terminations or vents
H
oist
X
Figure 8 Install Firestop
in Ceiling
oist
Figure 9 Minimum Chimney Height
12”
F P 2405
min ch imney h t
irestop
pacer
ails
FP2020
firestop
10/08
Termination Height Table
se t is table to determine t e minimum ei t avove
t e roo
Minimum Height
Roof Pitch
Feet
Meters
lat to
ver
to
ver
to
ver
to
ver
to
ver
to
ver
to
BBV, SBV Series Natural Vent Gas Fireplaces
OUTSIDE COMBUSTION AIR
NOTE:
e use o outside air or combus
tion is optional unless re uired by buildin
codes It is only necessary to supply outside
combustion air to one side o ireplace se
model
combustion air kit re er to a e
void e tremely lon runs and numer
ous turns in duct leadin rom ireplace
to combustion air assembly
ese condi
tions increase t e resistance to ree lo
o air t rou duct igures
and
ocate combustion air assembly at an
e terior location
ake sure t e location
cannot be accidentally blocked ocate
assembly above sno line to prevent
sno rom blockin assembly
ever mount combustion air inlet assem
bly in ara e or stora e area
ere com
bustible umes asoline mi t be dra n
into ireplace
Duct
ed to
oist
tend
iss
o utside
all
Figure 10 Install Unit Above Basement or Crawl Space
ombustion air may be dra n rom cra l
space under ouse
en ade uate sup
ply o air is provided by open ventilation
igure
NOTE: ever take combustion air rom attic
space or ara e space
&0
/!BASEMENT
NOTE: Install outside combustion air
D ID o ireplace
Inlet rille
in o it
ver an
a imum
Figure 11 Install Unit on Concrete Slab with Optional Outside Air Runs
&0
/!SOFFIT
BBV, SBV Series Natural Vent Gas Fireplaces
emove t e cover plate rom t e
outlet openin
location on t e le t outside o t e ireplace
lace startin collar
into ole on le t side o ire
place ireplace s ortest side o air startin collar
t rou
ireplace outer rap asten startin collar in
place it our
s eet metal scre s provided ig
ure
NOTE: The air starting collar extends through the
fireplace outer wrap. When the air starting collar is
securely attached, it will form a seal against the fireplace wall.
ut a
outside
located
WARNING
MODEL OAC-4 COMBUSTION AIR ASSEMBLY
WARNING
COMBUSTION AIR ASSEMBLY
DO NOT remove the cover if the outside
air will not be connected.
Do not use a combustible duct. Always use
UL Listed Class 0 or 1 duct material. If necessary to splice duct, use Model 403 duct
connector to splice duct sections.
ir tartin
diameter openin or model
in t e
all coverin
ere t e outside vent is to be
igure
cre s
elect and cut a piece o duct lon enou to attac
to t e ireplace and stick out at least
beyond t e
ace o t e all to
ic t e
inlet air vent ill
be attac ed ut duct it a standard pocket kni e
igure
e t ide o
ireplace
ollar
Duct
cre s
tartin
ollar
e t ide o
ireplace
eet etal
cre s
Figure 13 Attach Outside duct to Starting Collar
Diameter
ole
orter nd o
tartin
ollar
&0
ATTACHOUTSIDEAIRDUCT
ir
ail
ole
Figure 12 Attach Outside Air Starting Collar to Left Side of
Fireplace
&0
ATTACHSTARTCOLLAR
insulatin
duct pus t e insulation back
I usin
one end o t e duct appro imately
Duct
tendin
in
rom
igure
lip t e e posed end o t e duct over t e startin col
lar on t e ireplace
sin t e s eet metal scre s provided secure t e
duct end to t e collar attac ed to t e ireplace
ail or scre t e combustion air assembly to t e sur
ace o t e all
Inlet ir
ent
Figure 14 Combustion Air Assembly for Model No. OAC-4
&0
COMBAIRASSY
cre s
BBV, SBV Series Natural Vent Gas Fireplaces
FIREPLACE INSTALLATION
CHECK GAS TYPE
se proper as type or t e ireplace you are installin I you ave con lictin as types do not
install ireplace ee dealer
ere you purc ased t e ireplace or proper ireplace or your as
type
INSTALLING GAS PIPING TO FIREPLACE LOCATION
make sure you ave t e items listed belo
ternal re ulator supplied by installer
ipin
c eck local codes
ealant resistant to propane
ee oint
ipe
renc
as
WARNING
e ore installin
A qualified installer or service person
must connect appliance to gas supply.
Follow all local codes.
CAUTION
INSTALLATION ITEMS NEEDED
For propane/LP units, never connect
fireplace directly to the propane/LP
supply. This burner system requires an
external regulator (not supplied). Install
the external regulator between the burner system and propane/LP supply.
est au e connection
ediment trap optional but recommended
pproved le ible as line it
local codes not provided
as connector i allo ed by
desi n certi ied e uipment s uto valve it
tap is an acceptable alternative to test au e connec
tion urc ase t e
desi n certi ied e uipment s uto
valve rom your dealer
CAUTION
ternal
e ulator
Use only new black iron or steel pipe. Internally tinned copper or copper tubing
can be used per National Fuel Code, section 2.6.3, providing gas meets hydrogen
sulfide limits, and where permitted by local codes. Gas piping system must be
sized to provide minimum inlet pressure
(listed on data plate) at the maximum flow
rate (BTU/hr). Undue pressure loss will occur if the pipe is too small.
WARNING
or propane
connections only t e installer must supply an e ternal re ulator
e e ternal
re ulator ill reduce incomin as pressure ou must reduce incomin as pressure to bet een
and
inc es o ater I you do not reduce incomin as pressure burner system re ulator
dama e could occur Install e ternal re ulator it t e vent pointin do n as s o n in igure
ointin t e vent do n protects it rom ree in rain or sleet
External regulators may be necessary for
natural gas. One- or two-pound systems
will damage this appliance and may cause
fire hazard.
al
min
ropane
upply
ank
ent
ointin
Do n
Figure 15 External Regulator with Vent Pointing Down (Propane/LP Only)
&0
en usin copper
or le connectors use only ittin s approved or as connections
EXTERNALREGULATOR
as control inlet is
e
BBV, SBV Series Natural Vent Gas Fireplaces
CAUTION
WARNING
FIREPLACE INSTALLATION
Only persons licensed to work with gas
piping may make the necessary gas
connections to this appliance.
A manual shut-off valve must be installed
upstream of the appliance. Union tee and
plugged 1/8” NPT pressure tapping point
should be installed upstream of the appliance. igure
NOTE: The gas line connection may be made using 1/2” rigid tubing or an approved flex connector. Since some municipalities have additional local codes, it is always best to consult your
local authorities and the current edition of the National Fuel Gas Code ANSI Z223.1/NFPA 54. In
Canada CSA-B149 (1 or 2) Installation Code.
listed manual s ut o valve must be installed upstream o t e appliance
pressure tappin point s ould be installed upstream o t e appliance
nion tee and plu
igure
ed
eck your buildin codes or any special re uirements or
locatin e uipment s ut o valve to ireplaces
pply pipe oint sealant li tly to male t reads
is ill pre
vent e cess sealant orm oin into pipe
cess sealant in
pipe could result in clo ed burner system valves
CAUTION
I
R
Install main gas valve e uipment shut off valve in an accessible locations. he main
gas valve is for turning on or shutting off the gas to the fireplace.
Use pipe joint sealant that is resistant to
liquid petroleum (LP) gas.
e recommend t at you install a sediment trap drip le in
supply line as s o n in igure
ocate sediment trap drip
le
ere it is it in reac or cleanin Install in pipin system bet een uel supply and burner system
ocate sediment trap drip le
ere trapped matter is not likely to ree e sediment trap traps mois
ture and contaminants
is keeps t em rom oin into t e burner system as controls I sediment
trap drip le is not installed or is installed ron burner system may not run properly
Desi n erti ied
uipment
ut o alve
it
ap
pproved le ible
as Ine
Natural Gas
rom as eter
c to
c ressure
ee oint
ediment rap Drip e
ipe
Propane/LP
rom ternal e ulator
c to
c ressure
ipple
ap
Figure 16 Gas Connection
&0
GASCONNECTION
3 "
M i
n im
u m
BBV, SBV Series NaturalCHECK
Vent GasGAS
Fireplaces
PRESSURE & ELECTRICAL INSTALLATION - MILLIVOLT
eck as type
e as supply must be t e same as
stated on t e appliance s ratin decal I t e as sup
ply is di erent rom t e ireplace STOP! Do not install
t e appliance ontact your dealer immediately
o ease installation a
mm le line it
manual s ut o valve as been provided it t is ap
pliance Install and attac
as line onto s ut o
valve
o c eck as pressures at valve turn captured scre
counterclock ise or turns and t en place tubin
to pressure au e over test point urn unit to i
igure . ter takin pressure readin be sure and
turn captured scre clock ise irmly to reseal Do not
over tor ue
eck test points or as leaks
ressure
est
I
nob
ilot d ustment cre
Figure 17 Gas Pressure Check at Gas Valve
WARNING
o ad ust lame ei t turn I
knob to I to et
ma imum pressure to burner urn I
knob to
to et minimum pressure
ressure
est I
&0
-ILLIVOLTGASVALVE
Do not use
open flame to check for gas
CAUTION
ter completin as line connection pur e air rom
as line and test all as oints rom t e as meter to
t e ireplace or leaks se a solution o
ater
and soap or a as sni er
Label all wires before disconnecting when
servicing controls. Wiring errors can cause
improper and dangerous operation.
leaks.
WARNING
ELECTRICAL WIRING
Electrical connections should only be performed by a qualified, licensed electrician.
Main power must be off when connecting to
main electrical power supply or performing
service. All wiring shall be in compliance
with all local, city and state codes. The appliance, when installed, just be electrically
grounded in accordance with local codes,
or in the absence of local codes, with the
National Electrical Code ANSI/NFPA 70 (latest edition) and Canadian Electrical Code,
CSA C22.1.
eri y proper operation a ter servicin
ELECTRICAL INSTALLATION
BBV, SBV Series Natural Vent Gas Fireplaces
REMOTE WALL MOUNTED SWITCH
remote all s itc and up to i teen
eet o
a ire may be used
t e all s itc in a unction bo at t e desired location on t e all igure
t e all s itc
ire len t provided
it t is appliance ttac
. Do not e tend beyond
WARNING
NOTE: Extended lengths of wire may cause the fireplace not to function properly. Longer length
of wire is permitted if the wire is made out of larger gauge (diameter) wire. Always check with
local codes.
Do not connect wall switch to AC
(110 V) circuit.
OPTIONAL REMOTE
WALL SWITCH
HI
ON
OFF
PILOT
LO
TH
TP
TH/TP
ON
OFF
RS
SPILL
SWITCH
ON
OFF
OPTIONAL REMOTE
WALL SWITCH
ON
Figure 18 Wall Switch Wiring Diagram
OFF
&0
""63"6WIRING
ELECTRICAL INSTALLATION
BBV, SBV Series Natural Vent Gas Fireplaces
WARNING
ELECTRONIC PILOT IGNITION WIRING
Do not connect 110-120V AC to the Remote Wall Switch. The appliance will
malfunction or destroyed.
Figure 19 Electronic Ignition System Wiring Diagram
&0
ELECTRONICIGNITIONWIRING
Do not e tend beyond t e
o ire
REMOTE WALL SWITCH
osition t e
all s itc
OPTIONAL DC REMOTE SYSTEMS
ese instructions replace t e section entitled
structions supplied it t e remote
eart
ount in t e
illivolt and eld remote in
lu in remote connector ire to remote receiver
onnect t e ire terminal rom t e remote receiver
is replaces t e
to t e s itc
igure
ount remote control receiver at unction bo or your all s itc
all s itc connection
OPERATING INSTRUCTIONS - MILLIVOLT
BBV, SBV Series Natural Vent Gas Fireplaces
WARNING
FOR YOUR SAFETY READ BEFORE LIGHTING
A.
B.
If you do not follow these instructions
exactly, a fire or explosion may result
causing property damage, personal injury or loss of life.
is appliance is e uipped it a pilot
ic must be lit it an i nitor
ile ollo in t ese instructions e actly
I
smell all around t e appliance area or as e sure to smell ne t to t e loor because
some as is eavier t an air and ill settle on t e loor
WHAT TO DO IF YOU SMELL GAS:
urn o all as to t e appliance
pen indo s
Do not attempt to li t any appliance
Do not touc any electric s itc do not use any p one in your buildin
Immediately call your as supplier rom a nei bor s p one ollo t e as supplier s instructions
I you cannot reac your as supplier call t e ire department
se only your and to pus in or turn t e as control knob ever use tools I t e knob ill not pus in or turn
by and don t try to repair it all a uali ied service tec nician orce or attempted repair may result in a ire or
e plosion
D Do not use t is appliance i any part o it as been under ater Immediately call a uali ied service tec nician
to inspect t e appliance and to replace any pat o t e control system and any as control t at as been under
ater
LIGHTING PILOT FOR THE FIRST TIME
INITIAL LIGHTING
WARNING
ur e air rom t e supply line as ollo s
pen main s ut o valve
nscre main pressure test point
eave inlet test scre open until as comes in
en as is lo in ti ten inlet scre immediately
Never use an open flame to check for
gas leaks.
LEAK TESTING
ollo t e pipe rom t e as supply line connection to t e as valve
ater mi ture
e t c eck or as leaks at t e burner
eck t e pilot or as leaks
it soap and
it soap and
ater mi ture
ater mi ture
eck connection or leaks
it soap and
BBV, SBV Series Natural Vent Gas Fireplaces
OPERATING INSTRUCTIONS - MILLIVOLT
APPROVED LEAK TESTING METHOD
ou may c eck or as leaks
oap and
it t e ollo in met ods only
ater solution
n approved leak testin spray
WARNING
LIGHTING PILOT FOR THE FIRST TIME
DANGER
lectronic sni er
If using a soap and water solution to test for leaks, DO NOT
spray solution onto control
body.
NOTE: Remove any excessive
pipe compound from the connections. Excessive pipe compound
can set off electronic sniffers.
Never check for gas leaks with open
flame!
eck or as leaks in eac o t e ollo in locations
ipe rom t e as supply line connection to t e as valve
urner connections
ield made oints
ilot
actory made oints
ac
oint or connection
as s ut o valve
ll oints on valve and control body
The control has an interlock device that does not allow the lighting of the fireplace up to
the moment the safety device of the flame has not interrupted the gas flow. After that period of time (when the magnet is closed), it is possible to start the lighting operation.
The gas control knob is designed to be operated by hand. DO NOT use any tools during
this operation. Damaged knobs may result in serious injury.
to pilot
I t e pilot does not stay lit repeat teps
and
ON
P ILOT
Depress ully and old pilot as knob
e electronic i
nitor ill automatically i nite t e pilot eep knob ully
depressed or a e seconds elease and c eck t at
pilot continues to burn
F
Depress and turn knob counterclock ise
position
OF
WARNING
LIGHTING PILOT
P IL
OT
Figure 20 Pilot Position
&0
CONTROLKNOBPILOT
BBV, SBV Series Natural Vent Gas Fireplaces
OPERATING INSTRUCTIONS - MILLIVOLT
LIGHTING BURNER
LIGHTING THE BURNER
Depress and turn t e knob counterclock ise
to t e
position
ure . It ill take less t an our
seconds or t e burner to i nite
ig
PILOT POSITION
ile maintainin
Figure 21 On/Off/RS Switch
&0
ROCKERSWITCH
O F F
O N
Depress and turn knob to pilot position to keep burner o
t e pilot li t igure
OFF
RS
e
s itc or t e main burner can be ound be ind t e door o
t e ireplace
is s itc allo s you to turn on and to turn o t e main burner
it out usin t e as valve knob ake sure t e button is in t e
posi
tion to li t t e main burner igure
ON
MAIN BURNER SWITCH
P
IL O T
P IL
O T
P ILOT
ON
F
Figure 22 On Position
OF
Figure 23 Pilot Position
P IL
OT
LIGHTING
PILOT
&0
to
CONTROLKNOBPILOT
position igure
P IL O
T
O N
O F F
Depress and turn knob clock ise
P IL
O T
Figure 24 Off Position
&0
/FFPOSITION
F P 1937
control kn ob on
BBV, SBV Series Natural Vent Gas Fireplaces
OPERATING INSTRUCTIONS - ELECTRONIC IGNITION
WARNING
FOR YOUR SAFETY READ BEFORE LIGHTING
If you do not follow these instructions
exactly, a fire or explosion may result
causing property damage, personal injury or loss of life.
A.
is appliance is e uipped it an i nition device ie o
ic automatically li ts t e pilot Do
try to li t
t e burner by and
B.
I
smell all around t e appliance area or as e sure to smell ne t to t e loor because
some as is eavier t an air and ill settle on t e loor
WHAT TO DO IF YOU SMELL GAS:
urn o all as to t e appliance
pen indo s
Do not attempt to li t any appliance
Do not touc any electric s itc do not use any p one in your buildin
Immediately call your as supplier rom a nei bor s p one ollo t e as supplier s instructions
I you cannot reac your as supplier call t e ire department
C. urn o all electric po er to t e appliance
D. Do not use t is appliance i any part o it as been under ater Immediately call a uali ied service tec nician
to inspect t e appliance and to replace any pat o t e control system and any as control t at as been under
ater
HI
urn
rocker s itc to
urn o all electric po er to t e appliance i service is to be per ormed
lose lo er door
PILOT
TO TURN OFF GAS
OFF
STOP! ead t e sa ety in ormation above
et t ermostat to lo est settin
en turn s itc to o position
urn o all electric po er to t e appliance
is appliance is e uipped it an i nition device
ic automati
LO
cally li ts t e burner Do not try to li t t e burner by and
ait minutes to clear out any as
en smell or as includin
near t e loor I you smell as STOP! ollo
hat to o if ou
mell as above I you do not smell as o to t e ne t step
Electronic Gas Valve
urn on all electric po er to appliance
et t ermostat to desired settin or turn
rocker s itc
&0
to
OPERINSTRVALVE
I t e appliance ill not operate ollo t e instructions o urn ff as belo and
call your ser
vice tec nician or as supplier
ON
LIGHTING ELECTRONIC IGN
SIGNATURE COMMAND - CHECK GAS PRESSURE BBV,
and ELECTRICAL
INSTALLATION
SBV Series Natural
Vent Gas Fireplaces
ressure Inlet
ressure
ELECTRICAL WIRING
Do not use open flame to check for gas
leaks.
WARNING
FP1909a
signature command valve
alternate view
8/08
Electrical connections should only
be performed by a qualified, licensed
electrician. Main power must be off when
connecting to main electrical power supply
or performing service. All wiring shall be
in compliance with all local, city and state
codes. The appliance, when installed, must
be electrically grounded in accordance with
local codes or in the absence of local codes,
with the National Electrical Code ANSI/NFPA
70 (latest edition) and Canadian Electrical
Code, CSA C22.1.
Label all wires before disconnecting when
servicing controls. Wiring errors can cause
improper and dangerous operation.
Optional Accessory Requirements
is ireplace may be used it a all s itc and or
i nature ommand ireless controls
e command center control may be mounted on t e
all it t e use o t e
t all mount e ten
sion kit
ilot d ust
ment cre
CAUTION
General
is ireplace is e uipped it t e i nature ontrol
valve
ic operates on volts
e volt D adapter
plu s into t e ireplace unction bo
po er supply
our
batteries are used or back up durin
po er outa es
e i nature ommand ystem can also be operated
it out
po er
e system can run on our
batteries or appro imately si
mont s under normal
use
utlet
Figure 25 Signature Command Valve
WARNING
eck as type
e as supply must be t e same as
stated on t e appliance s ratin decal I t e as supply
is di erent rom t e ireplace STOP! Do not install t e
appliance ontact your dealer immediately
o ease installation a
mm le line it manual
s ut o valve as been provided it on t is appliance
Install and attac
as line onto s ut o valve
ter completin
as line connection pur e air rom
as line and test all as oints rom t e as meter to t e
ireplace or leaks se a solution o
ater and
soap solution or a as sni er
o c eck as pressures at valve turn captured scre
counter clock ise or turns and t en place tubin
to pressure au e over test point urn unit to i
igure . ter takin pressure readin be sure and
turn captured scre clock ise irmly to reseal Do not
over tor ue
eck test points or as leaks
SIGNATURE COMMAND - ELECTRICAL INSTALLATION
BBV, SBV Series Natural Vent Gas Fireplaces
JUNCTION BOX WIRING
is s ould be done be ore ramin t e ireplace ire
t e receptacle into an electrical circuit
ire it mini
mum
ire in accordance it prevailin codes
emove t e e ternal unction bo cover by removin
t e scre rom t e side o t e outside irebo
all
unction bo
as installed at t e actory
e unction bo cover as a actory installed rome
style strain relie connector ter connectin t e ires
route t e ire leads t rou
t is connector e er to
t e irin dia ram in igure
actory upplied
ot upplied
unction o
Figure 26 Junction Box Wiring Diagram
FP1912
Junction box wiring
e all s itc
ire connection is located o t e t
arness rom t 8/08
e control bo to t e command center
WALL SWITCH INSTALLATION
e command center may be mounted on t e all
t e use o t e
it
t cable unction bo
cover
ire
ig
ure .
e connection is labeled
all
itc
nplu
t e male and emale connectors and connect t e t o
lo volta e ires provided un ire to desired location
on all p to
t o
a ire may be used i neces
sary ttac
ires to all s itc
ount t e all s itc in
to unction bo and scre on cover
it
all
ount t e unction bo provided at t e desired location
on t e all Do not e tend beyond t e
t ire cable
provided I a lon er distance is re uired t e
t may be
e tended up to
t ma imum by usin t o
cables plu ed to et er
oute t e ire rom unction bo to lo er control area at
bottom o ireplace nplu t e
cable rom t e com
mand center ttac t e connector to t e pins rom ire
by pus in in to connector makin sure to ollo t e color
code on connector lu t e
t e tension cable into t e
t cable emove command center rom t e ireplace
and plu t e ot er end o t e e tension cable into t e
command center nap on all cover provided and scre
to unction bo
WARNING
COMMAND CENTER WALL INSTALLATION
Do not connect wall switch to 110 V
circuit.
BBV, SBV Series Natural Vent Gas Fireplaces
ELECTRICAL INSTALLATION
P il ot
R F R eceiv er
O N /O F F Button
C ontrol Board
6V A C
A dapter
Bl ack / T h ermopil e
R ed / T h ermopil e
Sensor
C onv ersion
N G /L P
Spil l Sw itch
I gnitor / Spark er
P l ug- in C onnector
C ontrol Board to C ommand C enter
O F F /L O
P l ug- in C onnector
NOTE: all s itc
ires must be con
Stepper M otor to
nected to et er i a all s G itc
is notC ontrol Board
round
bein used
L E D
O N /H I
M aster Sw itch
C ommand C enter
D C P ow er/G reen
P l ug- in C onnector
C ontrol Board to
Sol enoid
G as O ut
G as I n
P il ot G as T ub ing
Val v e
CAUTION
Figure 27 Signature Command Wiring Diagram
Electrical connections should only be
performed by a qualified, licensed electrician.
Main power supply must be turned off before
connecting fans to the main electrical power
supply or performing service.
O ptional
W al l Sw itch
OPERATING INSTRUCTIONS - SIGNATURE COMMAND
BBV, SBV Series Natural Vent Gas Fireplaces
WARNING
FOR YOUR SAFETY READ BEFORE LIGHTING
If you do not follow these instructions
exactly, a fire or explosion may result
causing property damage, personal
injury or loss of lie.
A.
is appliance is e uipped
to t e instructions
it an i nition device
ic automatically li
ts t e pilot
e er
B.
I
smell all around t e appliance area or as e sure to smell ne t to
t e loor because some as is eavier t an air and ill settle on t e loor
WHAT TO DO IF YOU SMELL GAS:
Do not attempt to li t any appliance
Do not touc any electric s itc do not use any p one in your buildin
Immediately call your as supplier rom a nei bor s p one ollo t e as supplier s
instructions
I you cannot reac your as supplier call t e ire department
C.
se only your in er to pus in t e master s itc
ever use tools I t e s itc
ill not unc
tion by and do not try to repair it all a uali ied service tec nician orce or attempted
repair may result in a ire or e plosion
D. Do not use t is appliance i any part o it as been under ater Immediately call a uali ied
service tec nician to inspect t e appliance and to replace any part o t e control system and
any as control t at as been under ater
continued on ne t page
OPERATING INSTRUCTIONS - SIGNATURE COMMAND
BBV, SBV Series Natural Vent Gas Fireplaces
OPERATING INSTRUCTIONS
STOP! ead t e sa ety in ormation above
is appliance is e uipped it an i nition device
ic automatically li ts t e burner Do not try to
li t t e burner by and
it ive
minutes to clear out any as
en smell or as includin near t e loor I you smell as
STOP! ollo
in t e sa ety in ormation on pa e
I you do not smell as o to ne t step
ress t e master s itc to t e
position it in ei t
seconds it ill beep once
is indi
cates t e system is ready
ress
button parker ill spark and pilot lame ill li t
nce pilot lame is establis ed t e main burner lame ill li t automatically
I t e pilot ill not stay lit a ter several tries turn t e master s itc to
and call your service
tec nician or as supplier
aster
itc
OFF
ON
Command Center
FP1913
Switch box
8/08
FP1914
Pilot w sparker
8/08
TO TURN OFF GAS TO APPLIANCE
urn master s itc to
urn o all electrical po er to t e appliance i service is to be per ormed
SIGNATURE
BBV, SBV Series Natural Vent Gas
Fireplaces COMMAND SYSTEM OPERATION INSTRUCTIONS
eceiver
FEATURES
o
ermopile
o ensor
Command Center
o parker
asy ccess unction peration and ystem on i uration
peration on irmation ault Dia nostic Indications
D
onversion
u er
I ed o
peration
Control Board
ptional all ountin
Control Board
lectronic I nition
ilot ockout sa ety eature
lectric o er e eneration rom ermopile to save bat
tery
our utomatic
ut Do n ption
onvenient
as ype onversion
tandin
ilot Intermittent pilot onversion
revious settin s estoration bility emory
ninterrupted peration Durin
o er uta e utomatic
attery ackup
emote eceiver
ptional ransmitter earn apability
o ommand
enter
o tepper otor
dapter
o alve
Command
Center
aster
D
itc
attery Door
Figure 28 Signature Command System Components
Transmitter (Optional)
ree lame ei t ettin s
battery Indication or ransmitter
ild roo ock out
D ackli t
ecurity odes
ountdo n
r imer
o
FP1917
Signature components
8/08
BATTERY INSTALLATION
e ommand enter uses our
batteries as back up or po er outa es
e system can operate or ap
pro imately si
mont s on battery po er
To Install Batteries (not included):
ress do n t e battery door tabs and pull out to remove battery door
Install t e batteries as indicated on ommand enter
lose battery door by snappin in place
en t e our
batteries are installed t e system ill operate it out po er
e batteries s ould be replaced
en t e
D indicates lo battery or at least once a year
SIGNATURE COMMAND SYSTEM OPERATION INSTRUCTIONS
BBV, SBV Series Natural Vent Gas Fireplaces
SYSTEM CONFIGURATION/SETUP
ll ystem con i uration setup is done on t e
NOTE:
en usin
n
at t e command center
all s itc
ommand
enter
t e s itc must be in t e
position to per orm all con i uration set ups
Intermittent/Standing Pilot Setup (Default intermittent)
oldin t e
button on t e ommand enter
ile turnin on t e master s itc
ill to le bet een standin
pilot and intermittent pilot
ter t e above operation one beep or standin pilot or t o beeps or intermittent pilot ill be iven as con
irmation
Six-hour Safety Shutdown Option (Default ON)
e system comes preset rom t e actory it a si
our s utdo n rom its last command o operation
is is
done to prevent t e ireplace rom continuin to operate i unattended ou may disable t is eature i you is
NOTE: y disablin t is eature your ireplace may continue to operate unattended
en t e master s itc is in t e
position
pressin t e
button and t e
button on t e ommand
enter simultaneously ill to le bet een enablin and disablin t e si our s utdo n option
ter t e above operation one beep or enablin t e si our s utdo n option or t o beeps or disablin t e
si our s utdo n option ill be iven as con irmation
Remote Transmitter Learn Function (Default OFF)
e
receiver button located on t e ontrol oard must be in t e on position be ore t e learn unction can
be in se paper clip to depress button ne beep or
receiver
or t o beeps or
receiver
ill be
iven as con irmation e er to i ure
or location
ter t e
receiver is on oldin t e
button on t e ommand enter
ile turnin on t e master s itc
ill activate t e learn unction or t e transmitter
ter t e above operation t o beeps ill be iven and t e reen
D on t e ommand enter ill las or
seconds
Durin t e
seconds press t e
button on a transmitter to learn not er t o beeps ill be iven to con irm
a success ul learnin
e er to transmitter instructions or remote operations
Shutting Off the Standing Pilot (Temporary Shut Off)
o s ut o t e standin pilot or service or summer s ut do n press and old t e
button on t e
enter or seconds
en t e master s itc is in t e
position
and t e main burner is o
Note
ilot
ommand
ill resume t e ne t time system is turned on
Key Combinations for System Settings
NOTE:
en
n
all s itc is used it must be in t e
Function
Intermittent tandin
ilot etup
tandin
ilot emp
uto
emote eceiver
n
earn emote
ransmitter
our sa ety
s utdo n setup
n position to per orm all system setups
Operation
old t e
▲ button
ile turnin on t e master s itc
eep once or standin pilot t ice or intermittent pilot
old t e
▲ button seconds
en t e master s itc
on t e main burner is o
us t e
receiver n
button on t e control board
eep once or
and beep t ice or
old t e
▼ button
ile turnin on t e master s itc
eep t ice t en press any and eld remote button
ress t e
▲ button and
▼ button simultaneously
eep once or
t ice or
Default Setting
Intermittent
ilot
BBV, SBV Series Natural Vent Gas
Fireplaces COMMAND SYSTEM OPERATION INSTRUCTIONS
SIGNATURE
FUNCTIONS/OPERATION
Turning on the fireplace
urn on t e master s itc and ait or a beep
ress t e
button on t e ommand enter or turn on all s itc
ilot ill li t and burner ill come on i
settin or last memory settin
ee urnin
ireplace belo
or memory eature
Pilot Safety Lockout Function
I t e pilot doesn t li t a ter sparkin or
seconds pilot trial lockout appens
e D on t e ommand enter
las es reen once every seconds until reset
I t e pilot lame is lost durin normal operation t e system ill try t ree
times to reli t a ter t ree
ailures
lame loss lockout appens
e
D on t e ommand enter las es ed reen once every seconds until
reset
urnin t e master s itc on t e ommand enter to t e o position t en
a ain ill reset t e system
Flame Height Control
ress t e
button on t e ommand enter once to turn on t e main burner it ma imum lame ei t
ress t e
button to decrease lame ei t
e irst t o presses ill decrease t e lame ei t to medium and
lo
e t ird press on
ill turn o t e main burner In standin pilot con i uration t e pilot ill stay in intermittent
pilot con i uration t e pilot ill be s ut o
Turning the Fireplace Off
ere are t ree ays to turn t e ireplace o
lip t e master s itc to t e o
position
is ill turn t e entire system
ress t e
button to edium o t en
old t e
button anytime or t ree seconds or by turnin o t e all s itc
ese t o commands o
are
emory
t e system ill remember all last settin s be ore turnin o
e ne t time t e ireplace is turned on
all settin s ill resume o reset c an e to t e desired settin s and s ut o by usin t e emory
commands
and t e system ill be reset to t ose ne settin s
Command Center Operations:
e ollo in
unctions are available on t e
Function
o er p
ireplace
ireplace
lame
lame
ei
ei
t p
t Do n
ommand
enter
Operation
lip t e master s itc to t e
position to po er up t e system
ress t e
▲ button on t e ommand enter or turn on all s itc to turn t e ireplace on
lip t e master s itc to t e
o position
press t e
▼ button
times
or emory
old t e
▼ button seconds or turn o
all s itc
ress t e
▲ button once to turn on t e ireplace it ma imum lame ei t
ress t e
▼ button to lo er t e lame ei t to edium and o
Self Diagnostics Chart:
e ommand enter as a sel dia nostic
D enablin you to troubles oot problems and potentially avoid a ser
vice call lease re er to t e c arts belo or indicator re erence
Fault
onversion over issin
park ail
o ensor i nal
ilot ockout trial
ilot ockout lame loss
o
attery
o or o
ermopile o er
earnin
o er n
ressure
itc ailure
o er ent nly
ne
o
ree
ne
ne
ne
o
ne
LED Indication
time
time
D time
every sec until manual reset
D
every sec until manual reset
D every s continuously
D every s continuously
las es every sec or
sec
solid
D every sec until manual reset
D
D
FINAL INSTALLATION
BBV, SBV Series Natural Vent Gas Fireplaces
ROCK WOOL PLACEMENT
over it
ock ool
lace rock ool on burner to provide lo in
embers or best results pull t e rock ool
apart into pieces t e si e o a nickel or dime
Distribute one layer o rock
entire burner igure
lace t e lo s on t e burner
ment ection
urner
ool to cover t e
e er to o
lace
WARNING
I t e lame is blue and only in t e center turn o unit
and allo to cool
ter unit cools remove lo s I t e
back oles are clear add more rock ool to t e cen
ter o t e burner eplace lo s and c eck lame a ain Figure 29 ave le t over rock ool to re res
en cleanin later Place Rock Wool on Burner
oo muc rock ool can disturb t e lame and cause
sootin on t e lass or lo s
Do not use the entire bag of rock wool
to cover&0
the burner. This could cause
ROCKWOOL
the flame
to burn poorly and may lead
to sooting.
LOG PLACEMENT
igure
lace rear lo
on rate assembly o s ould rest
irmly on t e t o lo mountin pins on t e ori ontal
bars
lace bottom le t lo
on rate est t e back side
o t e lo in t e lat area o t e rear lo
op o
i
et o
t o
lace bottom ri t lo
on rate est t e back
side o t e lo in t e lat area o t e rear lo
lace t e top lo
on t e rear lo
est t e orked
end o t e top le t lo into t e ork o t e rear lo
est
t e narro end o t e top on t e vertical rate bar
LAVA ROCK AND EMBER PLACEMENT
WARNING
prinkle lava rock on t e loor o t e inner combustion
c amber venly distribute t e rock Do not pile t e lava
rock up in ront o rate Do not place lava rock on t e
burner I desired purc ase optional embers to decorate
t e loor o t e ireplace
Do not sprinkle the lava rock or ember
chunks on top of the burner. This may
cause potential sooting, glass breakage
and a fire hazard.
lat
reas
o
ountin
ins
ear
o
e t ertical
rate ar
enter ertical
rate ar
Figure 30 Log Placement
i t ertical
rate ar
,'
""V3"6LOGPLACEMENT
CLEANING and MAINTENANCE
BBV, SBV Series Natural Vent Gas Fireplaces
WARNING
ermocouple
Turn off gas before servicing fireplace. It
is recommended that a qualified service
technician perform these check-ups at the
beginning of each heating season.
ermopile
BURNER, PILOT AND CONTROL COMPARTMENT
eep t e control compartment lo s and burner areas
surroundin t e lo s clean by vacuumin or brus in at
least t ice a year ake sure t e burner portin pilot air
openin and burner air openin s are ree o obstructions
at all times
PILOT FLAME
e lames rom t e pilot s ould be visually c ecked as
soon as t e eater is installed and periodically durin nor
mal operation
e pilot lame must al ays be present
en t e ireplace is in operation igure
.
e pilot
lame as t ree distinct lames one en ul in t e t ermo
pile one en ul in t e t ermocouple or sensor and t e
ot er reac in to t e main burner
Millivolt Pilot
ensor
Figure 31 Pilot Flame
&0
PILOTFLAME
ermopile
BURNER
Inspect area around t e in ector emove any lint or or
ei n material it a brus or vacuum
Signature Command
System Pilot
BURNER FLAME
e lames rom t e burner s ould be visually c ecked as
soon as t e eater is installed and periodically durin nor
mal operation In normal operation at ull rate and a ter
operatin or about
to
minutes t e lame s ould be
yello and sli tly taller t an t e rear lo
igure
NOTE: The type of installation, vent system configuration and wind effects may cause the flame patterns
to vary.
FP2453
hooded pilot flames
Figure 32 Burner Flame Appearance
,'
""63"6LOGFLAME
CLEANING and MAINTENANCE
BBV, SBV Series Natural Vent Gas Fireplaces
VENT SYSTEM
e ireplace and ventin system s ould be inspected be ore initial use and at least annually by a uali
ied ield service person Inspect t e e ternal vent cap on a re ular basis to make sure t at no debris is
inter erin
it t e air lo Inspect entire ventin system to ensure proper unction
LOGS
eave lo s installed in t e ireplace or cleanin
acuum sur ace o t e lo s it a brus attac ment I
lo s must be removed or cleanin
andle care ully by oldin ently at eac end loves are recom
mended to prevent skin irritation rom ceramic ibers I skin becomes irritated as ently it soap
and ater acuum sur ace o lo s it brus attac ment or brus lo s it a so t bristle brus i e
clean dry paintbrus
o place lo s back in t e ireplace re er to o
lacement ound in t e inal
Installation section
NOTE: Do not use cleaning fluid to clean logs.
ROCK WOOL
eplace or add rock
o t is manual
ool as re uired ollo in installation instructions in t e inal Installation section
BBV, SBV Series Natural Vent Gas Fireplaces
TROUBLESHOOTING
STANDING PILOT IGNITION
SYMPTOM
park i niter
ill not li t pi
lot a ter repeat
ed tri erin o
pie o
POSSIBLE CAUSE
ire disonnected
De ective i niter
o as or lo
pressure
D
ilot ill not
stay lit a ter
care ully ol
lo in li tin
instructions
o ropane
tank
as
in
De ective t ermocou
ple
De ective valve
ilot burnin
valve knob
tuned to
s itc is turned
to
or
but burner ill
not i nite
De ective s itc
all
s itc remote control
or ire
ilot lame too small
De ective or mal unc
tionin t ermopile
D De ective valve
re uent pilot
outa e prob
lem
ilot lame may be too
i or too lo caus
in pilot sa ety to drop
out
e pilot and
main burner
e tin uis
ile
in operation
Inner vent pipe leakin
e aust ases back
into system
ori ontal vent improp
erly pitc ed
Improper vent cap
installation
ACTION
pen door and c eck to make sure ire is connected to
i niter
eck or spark at electrode and pilot I no spark and elec
trode ire is properly connected replace pilot assembly
eck remote manual s ut o valve rom ireplace o
pressure can be caused by bent lines restricted lines lo
pressure line pressure onsult it plumber or as supplier
D
eck ropane
tank e ill tank
eck t at t ermocouple lame impin es on t ermocouple
lean and or ad ust pilot or ma imum lame impin ement
nsure t at t e t ermocouple connection at t e as valve is
ully inserted and ti t
Disconnect t e t ermocouple rom t e valve place one mil
livolt lead ire on t e tip o t e t ermocouple and t e ot er
meter lead ire on t e t ermocouple copper lead tart t e
pilot and old t e valve knob in I t e millivolt readin is less
t an m replace pilot assembly
I t ermocouple is producin more t an m replace aulty
valve
eck s itc and ire or proper connection lace umper
ires across terminals o s itc I burner comes on replace
de ective s itc I t e s itc is
repeat t e same proce
dure on remote control I burner comes on replace remote
control lace umper ire across ire at as valves termi
nals marked
and
I burner comes on ires are
aulty or connections are bad eplace ire
I pilot lame is not close enou to t e t ermopile ad ust
pilot lame
eck t ermopile ire connections to make sure all are ti t
and t at t e t ermopile is ully inserted into pilot assembly
eck t ermopile it a millivolt meter onnect leads to
and
terminals on t e control valve I meter readin is
belo
m replace pilot assembly
D urn valve knob to
and s itc to
ake a readin
at t e t ermopile leads
on t e valve I t e me
ter reads reater t an
m and t e burner does not li t
replace de ective valve
lean and ad ust t e pilot lame or ma imum lame impin e
ment on t ermocouple
eck or lue product leak
eplace de ective pipe section
eck ori ontal vent pipin is runnin up ard
per oot
Do not run t e pipe level or do n ard
eck or proper installation and reedom rom debris or
blocka e
TROUBLESHOOTING
BBV, SBV Series Natural Vent Gas Fireplaces
ELECTRONIC IGNITION
START
1. T urn gas suppl y of f .
2. T urn O N /O F F sw itch to “ O N ”
P ow er to modul e ( 24V N ormal )
NO
C h eck : L
L
O
W
NO
U npl ug ignition l ead and ch eck spark at modul e ( 24VA C normal ) . YES
ine v ol tage ( 120VA C )
ow v ol tage transf ormer ( 19. 5 minimum VA C )
N /O F F sw itch
iring connections I s th ere a spark across ignitor sensor gap?
YES
I s spark O K ? YES
NO
R epl ace modul e
A . C h eck ignition cab l e ground w iring, ceramic insul ator and gap. Correct if necessary.
B. D oes ignition cab l e sh ow signs of mel ting or b uck l ing? Take protective action to shield cable and boot from excessive temperatures. T urn on gas. D oes pil ot b urner l igh t?
NO
A . A re al l manual gas v al v es open?
A re suppl y tub ing and pressure good?
A re pil ot b urner orifies b l ock ed?
B. C h eck el ectrical connections b etw een modul e and pil ot operator on gas control .
C . C h eck f or 24VA C across P V- M VP V terminal s.
If voltage is correct, replace gas control.
If voltage is not correct, replace module. NO
NOTE: If Module goes into lockout, reset system.
A . C h eck continuity of ignition cab l e and ground w ire.
B. C l ean flame rod.
C . C h eck el ectrical connections b etw een flame rod and modul e.
D . Is ceramic flame rod insulator cracked?
E . Is pilot flame a steady blue? Does flame cover flame rod?
If not, adjust pilot flame. Replace module if problem persists.
NO
A . C h eck f or 24VA C across M V- M VP V terminal . Replace module if there is no voltage. B. A re el ectrical connections b etw een modul e and gas control good? If connections are good, replace gas control or gas
control operator.
NO
NOTE: If Module goes into lockout, reset system.
A . C h eck continuity of ignition cab l e and ground w ire.
NOTE: If ground is poor or erratic, shutdown may
occasionally occur even though operation is normal at
time of checkout. B. Is pilot flame a steady blue? Does flame cover flame rod?
YES
D oes spark stop w h en pil ot is l it?
YES
D oes main b urner l igh t?
YES
D oes sy stem run until O N /O F F sw itch
is in “ O F F ” position?
YES
END OF TROUBLESHOOTING
F P 2031
E l ectronic trb l sh t
BBV, SBV Series Natural Vent Gas Fireplaces
TROUBLESHOOTING
GENERAL TROUBLESHOOTING
SYMPTOM
lass soots
oor dra t due
to ventin
POSSIBLE CAUSE
lame impin ement on
lo s
oo muc o set
oo many elbo s
ent ei t too s ort
D ent too close to roo
line
locka e is rstrictin
ventin capacity
Incorrect vent type
entin as been con
structed it too lar e
or too small vent
ore t an one appli
ance is usin one vent
in system
oor dra t due
to termination
cap
ap obstructed by a
decorative enclosure
ap is crus ed
dam ed or missin
oor dra t due
to e t environ
ment
uildin s trees roo
lines inter erin
it
ventin
ind
ent e posed to cold
c ase
D ent e posed to cold
eat er
oor dra t due
to internal envi
ronment
nit s uts do n
prematurely
ACTION
e ative air pressure
locka e or restriction
in ventin
Install lo set per instructions
Inspect t e in ector and air intake area
ake sure t is area does not ave any blocka e rom debris
and clean
eck as supply
educe o set and or raise termination
I t ermocouple is producin more t an
valve
educe number o elbo s
aise vent
D aise vent
m
replace aulty
emove blocka e
eplace it proper vent
eplace it proper si e
onstruct a sin le ventin system or eac appliance
emove or open enclosure or raise cap above it
eplace cap
aintain proper clearances and ei
tions e a are o over an s
se cap desi ned or i
Insulate c ase
D
nclose vent
ts to e ternal obstruc
inds raise ventin
ei
t
it in ome
o test or ne ative air pressure open a indo in t e room
it t e ireplace to see i t e unit starts dra tin correctly
ake sure t e damper system is in t e open position
eck or and remove blocka e and li
in instructions
t pilot ollo in li
t
TROUBLESHOOTING
BBV, SBV Series Natural Vent Gas Fireplaces
SIGNATURE COMMAND SYSTEM
O P E R A T IO N I nstal l b atteries and/or pl ug in th e A C b oard F A U L T N o b eep in ab out 8 seconds A U sing b attery ? M ak e sure C ommand C enter and th e control b oard are connected b y a 2 f eet or 15 f eet cab l e A f ter th e b eep F l ip th e master sw itch ( rock er sw itch ) to th e O N position P ress th e O N b utton on th e C ommand C enter N o b eep
or
no sound f rom th e
v al v e indicating pil ot
sol enoid open
B N o spark ing on th e pil ot C Spark ing doesn’ t continue D P il ot doesn’ t l igh t M ain b urner doesn’ t l igh t A C T IO N D I A G N O SI S E F F P 1911 troub l esh oot sc 8/08 C h eck N G /L P conv ersion cap and control b oard connections C h eck pil ot connections Battery pol arity w rong? R e- instal l b atteries Battery v ol tage l ow ? C h ange b atteries A C pl ug is pl ugged to A C mains? P l ug th e A C pl ug to A C mains T h e 5- pin connector on th e A C b oard b rok en or b ent? R epair or repl ace th e A C Board L E D on th e C ommand C enter does not sh ow sol id green? R epl ace th e A C Board C h eck v al v e connections C h eck grounding C h eck pow er suppl y ( go th rough )
A R epl ace th e C ontrol Board or C ommand C enter G o th rough B Spark ing is h appening el sew h ere ( under th e pil ot) , re- instal l /repl ace th e pil ot T h e C ontrol Board is h av ing interf erence f rom th e surrounding metal ( G round) C h eck gas suppl y G o th rough E G o th rough C T h e sensor on th e pil ot is not in th e f l ame ( pil ot f l ame too smal l ) ? R e- instal l th e C ontrol Board, mov e it around or ch ange th e C ontrol Board Spark ing is not in th e path of gas f l ow , adj ust spark er position or repl ace th e pil ot A dj ust sensor position or repl ace th e pil ot BBV, SBV Series Natural Vent Gas Fireplaces
REPLACEMENT PARTS
FIREBOX COMPONENTS
1 6 2 4a 4b 3 5 7 624037
BBV SBV firebox parts
4c BBV, SBV Series Natural Vent Gas Fireplaces
REPLACEMENT PARTS
FIREBOX COMPONENTS
Item Description
ull creen anel
e ractory ide
e ractory ack
a
e t e ractory
b
iddle e ractory
c
i t e ractory
Optional Field Installed Accessoriesd
irebrick ssembly
utside ir it
lack lass Door ssembly
olis ed rass lass Door ssembly
tainless lass Door ssembly
Qty.
400BBV
D
na
na
na
na
na
D
D
D
2
1
400SBV
D
D
D
D
D
D
500SBV
D
D
D
D
D
D
na
na
D
D
D
D
D
D
4
3
LOGS
Item Description
ear o
i t o
et o
enter o
Qty.
,'
""63"6LOGPARTS
400BBV
D
D
D
D
400SBV
D
D
D
D
500SBV
D
D
D
D
BBV, SBV Series Natural Vent Gas Fireplaces
REPLACEMENT PARTS
STANDING PILOT - MILLIVOLT CONTROL
2C
1
2I
2T
2
5
6
3
4
7
9
8
11
12, 13
10
""63"6CONTRPARTS
BBV, SBV Series Natural Vent Gas Fireplaces
REPLACEMENT PARTS
STANDING PILOT - MILLIVOLT CONTROL
Item Description
Qty.
as alve ssembly
ilot ssembly
eplacement
ermocouple
I
eplacement I niter
and ire
eplacement ermopile
urner ube
le ose it
ut o alve
ocker
itc
ie o I niter
In ector
urner ssembly
enturi
ire ssembly
ire ssembly
pill
itc
Accessories
emote ontrol
all
itc
it
n
400BBVNV
D
D
400BBVPV
D
D
Natural Gas to LP
it
it
it
LP to Natural Gas
it
it
it
400SBVPV
D
D
500SBVNV
D
D
500SBVPV
D
D
D
D
D
D
D
D
D
D
D
D
D
D
D
D
D
D
D
D
D
D
D
D
D
D
D
D
D
D
D
D
D
D
D
D
D
D
D
D
D
D
D
D
D
D
D
D
D
D
D
D
D
D
D
D
D
D
D
D
D
D
D
D
D
D
D
D
D
D
D
D
Fuel Conversion Kits - Millivolt
400SBVNV
D
D
D
D
D
D
BBV, SBV Series Natural Vent Gas Fireplaces
REPLACEMENT PARTS
ELECTRONIC IGNITION
1
2
5
3
4
6
8
7
11
12
9
10
""63"6ELECTRONICIGNITIONPARTS
REPLACEMENT PARTS
BBV, SBV Series Natural Vent Gas Fireplaces
ELECTRONIC IGNITION
Item Description
as alve ssembly
ilot ssembly
urner ube
le ose it
ut o alve
ocker
itc
In ector
urner ssembly
enturi
ire ssembly
I nition odule
rans ormer
pill
itc
Qty.
400BBVNV
D
D
D
D
D
D
D
D
D
D
D
D
400BBVPV
D
D
D
D
D
D
D
D
D
D
D
D
400SBVNV
D
D
D
D
D
D
D
D
D
D
D
400SBVPV
D
D
D
D
D
D
D
D
D
D
500SBVNV
D
D
D
D
D
D
D
D
D
D
D
500SBVPV
D
D
D
D
D
D
D
D
D
D
D
BBV, SBV Series Natural Vent Gas Fireplaces
REPLACEMENT PARTS
SIGNATURE COMMAND SYSTEM
1
2
3
7
4
5
6
12
9
13
8
14,15
624037
BBV/SBV Signature command parts
REPLACEMENT PARTS
BBV, SBV Series Natural Vent Gas Fireplaces
SIGNATURE COMMAND SYSTEM
Item Description
Qty.
as alve ssy
ilot ssy
ontrol o
ommand enter
urner ube
le ose
uto alve
In ector
urner ssy
enturi
ire alve ontrol
not s o n
ire ommand enter
ontrol o
not s o n
dapter volt
pill
itc
Accessories
400BBVN
D
D
D
D
D
D
D
D
D
D
400BBVP
D
D
D
D
D
D
D
D
D
D
D
D
D
500SBVN
D
D
D
D
D
D
D
D
D
D
500SBVP
D
D
D
D
D
D
D
D
D
D
D
D
D
D
D
D
D
D
D
D
D
Fuel Conversion Kits - Signature Command System
it
it
it
400SBVP
D
D
D
D
D
D
D
and eld emote ontrol it I
and imer
ouc creen emote i o and imer
all ount tension it
ire rou in bo
Natural Gas to LP
400SBVN
D
D
D
D
D
D
D
D
D
D
all cover not s o n
Massachusetts
Residents
Only
— Please read and follow these special requirements
BBV,
SBV Series Natural
Vent Gas
Fireplaces
NOTE REGARDING VENTED PRODUCTS
is product must be installed by a licensed plumber or as itter
en installed it in t e ommon ealt o assac usetts
ny residence it a direct vent product must
detector installed in t e residence
ave a
Installation o t e ireplace or vented as lo in t e tate o
assac usetts re uires t e damper to be permanently removed
or elded in t e ully open position
In addition a naturally vented as lo may not be installed in a
bedroom or bat room in t e tate o assac usetts
a
le line installation must not e ceed
s uto valve
inc es and must ave
NOTE REGARDING VENT FREE PRODUCTS
is product must be installed by a licensed plumber or as itter
en installed it in t e ommon ealt o assac usetts
In addition vent ree products may not be installed in a
bedroom or bat room re ardless o si e or type in t e tate o
assac usetts
le line installation must not e ceed
a s uto valve
inc es and must ave
CARBON MONOXIDE DETECTOR REQUIREMENTS
evise
by addin
t e ollo in
additional
re uirements
a
or all side
all ori ontally vented as ueled
e uipment installed in every d ellin buildin or structure used
in
ole or in part or residential purposes includin t ose
o ned or operated by t e ommon ealt and
ere t e side
all e aust vent termination is less t an seven
eet above
inis ed rade in t e area o t e ventin includin but not
limited to decks and porc es t e ollo in re uirements s all
be satis ied
Installation of carbon monoxide detectors. t t e time
o installation o t e side all ori ontal vented as ueled
e uipment t e installin plumber or as itter s all observe
t at a ard ired carbon mono ide detector it an alarm and
battery back up is installed on t e loor level
ere t e as
e uipment is to be installed In addition t e installin plumber
or as itter s all observe t at a battery operated or ard ired
carbon mono ide detector it an alarm is installed on eac
additional level o t e d ellin buildin or structure served by
t e side all ori ontal vented as ueled e uipment It s all be
t e responsibility o t e property o ner to secure t e services o
uali ied licensed pro essionals or t e installation o ard ired
carbon mono ide detectors
a In t e event t at t e side all ori ontally vented as
ueled e uipment is installed in a cra l space or an attic t e
ard ired carbon mono ide detector it alarm and battery
back up may be installed on t e ne t ad acent loor level
b In t e event t at t e re uirements o t is subdivision
can not be met at t e time o completion o installation t e
o ner s all ave a period o t irty
days to comply it t e
above re uirements provided o ever t at durin said t irty
day period a battery operated carbon mono ide detector
it an alarm s all be installed
Approved Carbon Monoxide Detectors. ac carbon
mono ide detector as re uired in accordance it t e above
provisions s all comply it
and be
I
listed and I
certi ied
Signage.
metal or plastic identi ication plate s all be
permanently mounted to t e e terior o t e buildin at a
minimum ei t o ei t
eet above rade directly in line it
t e e aust vent terminal or t e ori ontally vented as ueled
eatin appliance or e uipment
e si n s all read in print si e
no less t an one al
inc in si e
DI
I
Inspection. e state or local as inspector o t e side all
ori ontally vented as ueled e uipment s all not approve t e
installation unless upon inspection t e inspector observes
carbon mono ide detectors and si na e installed in accordance
it t e provisions o
a t rou
b Exemptions: e ollo in e uipment is e empt rom
a t rou
e e uipment listed in
apter
entitled
uipment
e uired o e ented in t e most current edition o
as adopted by t e oard and
ot
roduct pproved side all ori ontally vented as ueled
e uipment installed in a room or structure separate rom t e
d ellin buildin or structure used in
ole or in part or
residential purposes
c Manufacturer requirements — Gas Equipment Venting
System Provided.
en t e manu acturer o
roduct
pproved side all ori ontally vented as e uipment provides
a ventin system desi n or ventin system components it
t e e uipment t e instructions provided by t e manu acturer
or installation o t e e uipment and t e ventin system s all
include
Detailed instructions or t e installation o t e ventin system
desi n or t e ventin system components and
complete parts list or t e ventin system desi n or ventin
system
d Manufacturer requirements — Gas Equipment Venting
System Not Provided.
en t e manu acturer o a roduct
pproved side all ori ontally vented as ueled e uipment
does not provide t e parts or ventin t e lue ases but
identi ies special ventin systems t e ollo in re uirements
s all be satis ied by t e manu acturer
e re erenced special ventin system instructions s all
be included it t e appliance or e uipment installation
instructions and
e special ventin systems s all be roduct pproved by
t e oard and t e instructions or t at system s all include a
parts list and detailed installation instructions
e
copy o all installation instructions or all roduct
pproved side all ori ontally vented as ueled e uipment
all ventin instructions all parts lists or ventin instructions
and or all ventin desi n
BBV, SBV Series Natural Vent Gas Fireplaces
LIMITED LIFETIME WARRANTY POLICY
LIFETIME WARRANTY
e ollo in components are arranted or li e to t e ori inal o ner sub ect to proo o purc ase
irebo
ombustion
amber eat c an er rate and tainless teel urners
FIVE YEAR WARRANTY
e ollo in components are arranted or ive
purc ase eramic iber o s
years to t e ori inal o ner sub ect to proo o
BASIC WARRANTY
arrants t e components and materials in your as appliance to be ree rom manu acturin
and material de ects or a period o t o
years rom date o installation ter installation i any o
t e components manu actured by
in t e appliance are ound to be de ective in materials or
orkmans ip
ill at its option replace or repair t e de ective components at no c ar e to
t e ori inal o ner
ill also pay or reasonable labor costs incurred in replacin or repairin
suc components or a period o t o
years rom date o installation ny products presented or
arranty repair must be accompanied by a dated proo o purc ase
is imited i etime arranty ill be void i t e appliance is not installed by a uali ied installer
in accordance it t e installation instructions
e imited i etime arranty ill also be void i
t e appliance is not operated and maintained accordin to t e operatin instructions supplied it
t e appliance and does not e tend to
irebo burner assembly dama e by accident ne lect
misuse abuse alterations ne li ence o ot ers includin t e installation t ereo by un uali ied
installers
t e cost o removal reinstallation or transportation o de ective parts on t e appliance
or
incidental or conse uential dama e ll service ork must be per ormed by an aut ori ed
service representative
is arranty is e pressly in lieu o ot er arranties e press or implied includin t e arranty
o merc antability o itness or purpose and o all ot er obli ations or liabilities
does not
assume or it any ot er obli ations or liabilities in connection it sale or use o t e appliance In
states t at do not allo limitations on o lon an implied arranty lasts or do not allo e clusion
o indirect dama e t ose limitations o e clusions may not apply to you ou may also ave ad
ditional ri ts not covered in t e imited i etime arranty
reserves t e ri t to investi ate any and all claims a ainst t e imited i etime
and decide upon met od o settlement
arranty
IF WARRANTY SERVICE IS NEEDED...
ontact your supplier
rial number o your
D
ake sure you ave your arranty your sales receipt and t e model se
product
D
I
MHSC
leveland Drive
aris entucky
m sc com