1
459
stereo powered mixer
MANUALE ISTRUZIONI OWNER'S MANUAL BEDIENUNGSANLEITUNG MANUEL D'UTILISATION
IMPORTANTE ! Norme di sicurezza
IMPORTANT ! Safety instructions
WICHTIG ! Unfallverhütungsvorschriften
IMPORTANT ! Normes de securité
Il lampo con la freccia inserito in un triangolo equilatero avvisa
l'utilizzatore circa la presenza di 'tensione pericolosa', senza
isolamento, all'interno dell'apparecchio che potrebbe essere
sufficientemente alta da generare il rischio di scossa elettrica.
Il punto esclamativo inserito in un triangolo equilatero
avvisa l'utilizzatore circa la presenza di importanti istruzioni
per l'utilizzo e per la manutenzione del prodotto
The lighting flash with arrowhead symbol within an equilateral
triangle, is intended to alert the user to the presence of
uninsulated "dangerous voltage" within the product's
enclosure, that may be of sufficient magnitude to constitute
a risk of electric shock to humans.
The exclamation point within an equilateral triangle, is
intended to alert the user to the presence of important
operating and maintenance (servicing) instructions.
Das Blitzsymbol mit Pfeilspitze innerhalb eines gleichschenkligen Dreiecks warnt Benutzer vor dem Vorhandensein
nicht-isolierter "gefährlicher Netzspannungen" im inneren
des Produkts die so stark sein können, daß für Menschen die
Gefahr eines Stromschlags besteht.
Das Ausrufezeichen innerhalb eines gleichschenkligen Dreiecks
macht Benutzer auf das Vorhandensein wichtiger Betriebsund Wartungsanleitungen aufmerksam
Le symbole représentant un éclair se terminant par une flèche
dans un triangle équilatéral indique la présence dans le boîtier
d'un 'voltage dangereux' non isolé, suffisamment important
pour constituer un risque d'électrocution.
Le symbole représentant un point d'exclamation dans un triangle
équilatéral renvoie l'utilisateur à des instructions importantes
relatives au fonctionnement et à l'entretien de l'appareil.
ATTENZIONE !
Nell'interesse della propria e della altrui sicurezza,
e per non invalidare la garanzia, si raccomanda una
attenta lettura di questa sezione prima di adoperare
il prodotto. Questo apparecchio è stato progettato
e costruito per venire utilizzato come mixer amplificato nel contesto tipico di un sistema di amplificazione sonora, e/o di un sistema di registrazione
sonora. L'utilizzo per scopi diversi da questi non è
contemplato dal costruttore, ed avviene pertanto
sotto la diretta responsabilità dell'utilizzatore.
WARNING !
In order to protect your own and others' safety and
to avoid invalidation of the warranty of this product,
please read this section carefully before operating
this product.
ACHTUNG !
Im Interesse Ihrer eigenen Sicherheit und der Sicherheit anderer und um die Garantie nicht zu gefährden, sollte der vorliegende Abschnitt vor Gebrauch
des Produkts aufmerksam gelesen werden.
- This product has been designed and manufactured
for being operated as powered mixing console in
the applications tipical of a sound reinforcement
system or of a sound recording system. Operation
for purposes and in applications other than these
has not been covered by the manufacturer in the
design of the product, and is therefore to be
undertaken at end user's and/or installer's sole risk
and responsability.
- Dieses Gerät wurde für den Gebrauch als Mischverstärker im Rahmen typischer Anwendungen von
Lautverstärkungssystemen und/oder Tonaufnahmesystemen konzipiert und konstruiert. Der Gebrauch
zu anderen als den genannten Zwecken ist vom
Hersteller nicht vorgesehen und erfolgt somit unter
direkter Verantwortung des Benutzers/Installateurs.
ATTENTION !
Dans l'intérêt de la sécurité personnelle et des tiers,
et pour ne pas invalider la garantie, nous recommandons de lire attentivement ces recommandations avant d'utiliser le produit.
- Cet appareil a été conçu et construit pour être
utilisé en tant que table de mixage amplifié dans
le contexte typique d'un système d'amplification
sonore et/ou d'un système d'enregistrement sonore.
L'utilisation pour des objectifs différents de ceux-ci
n'est pas contemplée par le constructeur et
s'effectue par conséquent sous la responsabilité
directe de l'utilisateur/installateur.
To avoid the risk of fire and/or electric shock:
• Dieses Produkt nicht Regen oder Feuchtigkeit aussetzen und nicht in der Nähe von Wasser gebrauchen.
Verhindern, daß in das Gerät Flüssigkeiten oder
Gegenstände eindringen. Sollte dies dennoch
geschehen, unverzüglich das Gerät vom Stromnetz
trennen und vor der erneuten Inbetriebnahme durch
einen qualifizierten Servicetechniker überprüfen lassen.
• Ne pas exposer le produit à la pluie, ne pas
l'utiliser en présence d'humidité élevée ou près de
l'eau. Ne pas laisser pénétrer de liquide à l'intérieur
de l'appareil, ni aucun autre objet solide.
Dans le cas contraire déconnecter immédiatement
l'appareil du réseau électrique et s'adresser à un
service d'assistance qualifié avant de le réutiliser.
• Vor dem Anschließen des Geräts an das Stromnetz
sicherstellen, daß die Netzspannung mit der auf dem
Gerät angegebenen Nennspannung übereinstimmt.
• Avant de relier l'appareil au réseau électrique,
s'assurer que la tension corresponde à celle
indiquée sur l'appareil.
• Das Gerät ausschließlich mit dem mitgelieferten
Netzkabel an eine Steckdose mit Schutzkontakt
anschließen die den geltenden Sicherheitsvoschriften
entspricht. Muß das Netzkabel ersetzt werden,
aus schließlich ein Netzkabel mit identischen Eigenschaften verwenden.
• Relier cet appareil exclusivement à une prise de
courant dotée de contact de terre répondant aux
normes de sécurité en vigueur au moyen du câble
d'alimentation en dotation. Au cas où le câble
devrait être remplacé, utiliser exclusivent un câble
possédant les mêmes caractéristiques.
• Keine Gegenstände auf dem Netzkabel abstellen.
Das Netzkabel so verlegen, daß es kein Hindernis
darstellt und keine Stolpergefahr besteht. Das
Netzkabel nicht quetschen und nicht darauf treten.
• Ne poser aucun objet sur le câble d'alimentation.
Ne pas le positionner dans des lieux où il pourrait
entraver les déplacements ou provoquer des chutes.
Ne pas l'écraser ni le piétiner.
• Bei der Installation genug freien Raum um das
Gerät lassen, um eine ausreichende Luftzirkulation
für die Kühlung zu gewährleisten. Die Lüftungsund Ausaugöffnungen nicht verdecken.
• Installer cet appareil en prévoyant un espace suffisamment grand autour pour la circulation de l'air
nécessaire au refroidissement. Ne pas obstruer les
ouvertures ou les prises d'air présentes sur l'appareil.
• Muß die externe Sicherung ausgetauscht werden,
ausschließlich eine Sicherung mit identischen
Eigenschaften gemäß den Angaben auf dem Gerät
verwenden.
• En cas de remplacement du fusible extérieur,
utiliser exclusivement un fusible de caractéristiques
identiques, comme indiqué sur l'appareil.
Per evitare il rischio di incendio e/o di folgorazione:
• Non esporre il prodotto alla pioggia non utilizzarlo
in presenza di elevata umidità o vicino all'acqua.
Non lasciare penetrare all'interno dell'apparecchio
alcun liquido, né alcun oggetto solido. In caso ciò
avvenga, scollegare immediatamente l'apparecchio
dalla rete elettrica e rivolgersi ad un servizio di assistenza qualificato prima di adoperarlo nuovamente.
• Prima di collegare l'apparecchio alla rete elettrica
assicurarsi che la tensione corrisponda a quella
indicata sull'apparecchio stesso.
• Collegare questo apparecchio esclusivamente ad
una presa di corrente dotata di contatto di terra
rispondente alle norme di sicurezza vigenti tramite il
cavo di alimentazione in dotazione. Nel caso in cui
il cavo necessiti di sostituzione, utilizzare esclusivamente un cavo di identiche caratteristiche.
• Non appoggiare alcun oggetto sul cavo di alimentazione. Non posarlo dove possa costituire intralcio
e causare inciampo. Non schiacciarlo, non calpestarlo.
• Installare questo apparecchio prevedendo ampio
spazio circostante per un'abbondante circolazione
d'aria, necessaria al raffreddamento. Non ostruire le
aperture o le prese d'aria presenti sull'apparecchio.
• In caso di sostituzione del fusibile esterno, utilizzare
esclusivamente un fusibile di caratteristiche identiche,
come riportato sull'apparecchio.
• Prima di effettuare qualsiasi operazione di collegamento, assicurarsi che l'interruttore di accensione
dell'apparecchio sia in posizione 'Off'.
• Prima di effettuare qualsiasi spostamento del
prodotto già installato o in funzione, rimuovere
tutti i cavi di collegamento.
• Per scollegare l'apparecchio dalla rete elettrica,
non tirare mai lungo il cavo, ma afferrarlo sempre
per il connettore.
ATTENZIONE !
Questo apparecchio non contiene parti interne destinate all'intervento diretto da parte dell'utilizzatore.
Per evitare il rischio di incendio e/o folgorazione,
non aprirlo. Per qualsiasi intervento di manutenzione
o riparazione, rivolgersi a personale altamente
qualificato e/o alla Casa costruttrice.
- Nel predisporre l'apparecchio all'utilizzo, assicurarsi
che la forma e la portata della superficie di appoggio
siano idonee a sostenerlo.
- Per evitare urti riservate come luogo per l'istallazione del prodotto un'area protetta inaccessibile a
personale non qualificato. Qualora l'apparecchio
venga utilizzato in presenza di bambini e animali, si
rende necessaria una strettissima sorveglianza.
- Questo prodotto utilizzato insieme a cuffie o a
casse acustiche è in grado di generare pressioni
acustiche molto elevate, pericolose per la salute
del sistema uditivo. Evitarne quindi l'utilizzo ad
elevati o fastidiosi livelli acustici.
Non esporre i bambini a forti sorgenti sonore !
• Never expose this product to rain or moisture,
never use it in proximity of water or on a wet
surface. Never let any liquid, as well as any object,
enter the product. In case, immediately disconnect
it from the mains supply and refer to servicing
before operating it again.
• Before connecting this product to the mains
supply, always make sure that the voltage on the
mains outlet corresponds to that stated on the
product.
• This product must be connected only to a
grounded mains outlet complying to the safety
regulations in force via the supplied power cable.
In case the power cable needs to be substituted,
use exclusively a cable of the same type and
characteristics.
• Never place any object on the power cable. Never
lay the power cable on a walkway where one could
trip over it. Never press or pinch it.
• Never install the product without providing
adequate airflow to cool it. Never obstruct the air
intake openings on it.
• In case the external fuse needs replacement,
substitute it only with one of the same type and
rating, as stated on the product.
• Always make sure the On/Off switch is in its 'Off'
position before doing any operation on the
connections of the product.
• Before attempting to move the product after it
has been installed, remove all the connections.
• To disconnect the power cable of this product
from the mains supply never pull the cable directly
instead, hold the body of the plug firmly and pull
it gently from the mains supply outlet.
CAUTION !
This product does not contain user serviceable parts.
To prevent fire and/or electrical shock, never
remove its cover. Maintenance and servicing must
be carried out only by Elettronica Montarbo srl or
the official Montarbo Distributor in your State or by
qualified personnel specifically authorized by them.
- Before placing the product on a surface of any
kind, always make sure that its shape and load
rating will safely match the product's size and
weight.
- To avoid shocks always reserve a protected area
with no access to unqualified personnel as
installation site of the product. In case the product
is used near children and animals closest supervision
is necessary.
- This product in combination with headphones or
speakers can generate very high acoustic pressures
which are dangerous for the hearing system.
Do not operate for a long period of time at a high
or unconfortable volume level.
Never expose children to high sound sources !
Zur Vermeidung der Gefahr von Bränden und/oder
Elektrischen schlägen:
• Vor dem Anschließen des Geräts sicherstellen,
daß sich der Ein/Aus-Schalter in Schaltstellung 'Off'
(AUS) befindet.
• Vor dem Transport des schon installierten oder
schon in Betrieb befindlichen Geräts zunächst alle
Anschlußleitungen lösen.
• Zum Ausstecken des Netzkabels aus der Steckdose
niemals am Netzkabel ziehen, sondern stets den
Stecker selbst greifen.
ACHTUNG !
Dieses Gerät enthält keine Teile, bei denen ein
direkter Eingriff seitens des Benutzers vorgesehen
ist. Das Gerät niemals öffnen, um die Gefahr von
Bränden und elektrischen Schlägen zu vermeiden.
Für Wartungs- und Reparatureingriffe stets
Elettronica Montarbo srl oder den für Ihr Land
zuständigen Importeur oder einen vom Importeur
autorisierten Fachmann zu Rate ziehen.
- Beim Aufstellen des Geräts sicherstellen, daß Art
und Tragfähigkeit der Standfläche für das Gerät
geeignet sind.
- Zur Vermeidung von Stößen das Gerät nur an
einem geschützten und Unbefugten nicht zugänglichen Ort aufstellen. Wenn das Gerät in Gegenwart
von Kindern oder Haustieren betrieben wird, ist
eine strikte Überwachung erforderlich.
- Der Betrieb des Gerätes mit Kopfhörern oder
Lautsprechern kann sehr hohe Schalldrücke
erzeugen, die zu Gehörschäden führen können.
Vermeiden Sie daher das Gerät über lange Zeit mit
zu hoher oder unerträglicher Lautstärke benutzen.
Niemals Kinder starken Schallemissionen
aussetzen !
Pour eviter le risque d'incendie et/ou d'electrocution:
• Avant d'effectuer toute opération de branchement, s'assurer que l'interrupteur d'allumage de
l'appareil soit en position 'Off' (éteint).
• Avant d'effectuer tout déplacement du produit
déjà installé ou en
service, enlever tous les câbles de branchement.
• Pour déconnecter l'appareil du réseau électrique,
ne jamais tirer le câble mais le saisir par le
connecteur.
ATTENTION !
Cet appareil ne contient pas de pièces intérieures
destinées à l'intervention directe de la part de
l'utilisateur. Pour éviter le risque d'incendie et/ou
d'électrocution, ne pas l'ouvrir.
Pour toute intervention d'entretien ou de réparation,
s'adresser à Elettronica Montarbo srl ou au distributeur de votre état ou à un personnel hautement
qualifié, spécifiquement signalé par l'importeur.
- Au moment de la prédisposition de l'appareil à
l'utilisation, s'assurer que la forme et la capacité de
la surface d'appui soient appropriées.
- Pour éviter les chocs utiliser pour l'installation
du produit un lieu sûr comme une zone protégée
d'accès interdit au personnel non qualifié. Au cas
où l'appareil serait utilisé en présence d'enfants et
d'animaux, une surveillance étroite est nécessaire.
- Cet appareil utilisé avec des écouteurs ou des
baffles est en mesure de générer des pressions
acoustiques très élevées, dangereuses pour la santé
du système auditif. Par conséquent, éviter de l'utiliser longtemps à des niveaux acustiques élevés.
Ne pas exposer les enfants à des sources
sonores élevées !
459
459 STEREO POWERED MIXER
MANUALE D'USO
OWNER'S MANUAL
BEDIENUNGS-ANLEITUNG
MANUEL D'ISTRUCTIONS
• 200 + 200 W continui su 4 Ohm
• 200 + 200 W continuous into 4
Ohms
• 200+200W continuous an 4 Ohm
• 200+200W continuous en 4 Ohms
• 10 Eingänge / 8 Kanäle
(6 mono + 2 stereo).
• 10 entrées / 8 voies
(6 mono + 2 stereo).
• 6-bandiger stereo Equalizer
• Egaliseur graphique stéréo à
6-bandes
• 10 ingressi / 8 canali
(6 mono + 2 stereo).
• 10 inputs / 8 channels
(6 mono + 2 stereo).
• Equalizzatore grafico stereo a
6 bande
• 6-band stereo graphic equalizer
• Effekt-Send
• Mandata effetto
• Effect send
• Mandata ausiliaria
• Auxiliary send
• Processore digitale stereo basato
su un DSP a 56 bit con conversione
Delta Sigma a 24 bit.
Consente di creare un numero
pressoché infinito di effetti di Eco,
Riverbero, Eco + Riverbero ed
Alone di straordinaria qualità
sonora. Il passaggio tra gli effetti
avviene nella massima
semplicità grazie a controlli di
facile ed immediato utilizzo.
• Stereo digital effects processor
based on a 56 bit DSP with 24 bit
Delta Sigma conversion. It lets you
create infinite combinations of
Reverb, Echo, Halo and even
Reverb + Echo effects at the simple
touch of two knobs.
INDICE:
TABLE OF CONTENTS:
Pagina
Sezione A: Descrizione
Pannello comandi
Canali d'Ingresso
Processore digitale stereo
Sezione master
Connettori
4
5-6
7
8-9
9
Sezione B: Consigli per l'uso
Importante !!!
Equalizzatore grafico
Processore digitale
Page
Section A: Description
4
5-6
Stereo digital processor
Master section
12
7
13 - 14
• Processeur numérique stéréo
basé sur un puissant DSP à 56-bits
avec conversion Delta Sigma
à 24-bits.
Il permet de créer d'innombrables
effets de Réverb, Echo, Halo et
Réverb + Echo.
Grâce à quelques commandes
simples, la personnalisation des
effets est facile et immédiate.
INHALTSVERZEICHNIS:
INDEX:
Seite
Bedienungselemente
4
Eingangskanäle
5-6
Stereo Effekt-Prozessor
7
9
Anschlüsse
9
Abschnitt B: Betriebshinweise
10 - 11
12
13 - 14
Wichtig!!!
Panneau de contrôle
4
Voies d'Entrée
5-6
Processeur numérique stéréo
Section master
7
8-9
Connecteurs
9
Section B: Conseil pour l'emploi
10 - 11
Graphischer Equalizer
Digitaler Prozessor
Page
Section A: Description
8-9
Graphic equalizer
Digital processor
• Départ auxiliarie
Summe-Teil
Connectors
Important!!!
• Der Stereo Effekt-Prozessor
basiert auf einen 56-Bit DSP und
24-Bit Delta Sigma Konverter und
verbindet außerordentliche SoundEigenschaften mit problemloser
Handhabung. Er bietet mehrere
Effekte von Echo, Reverb,
Reverb + Echo und Halo.
Das Einstellen und Wechseln der
Presets ist sehr einfach und
ausgesprochen unproblematisch.
8-9
Section B: Hints for use
10 - 11
• Départ effet
Abschnitt A: Beschreibung
Control panel
Input channels
• Aux-Send
12
13 - 14
Egaliseur graphique
Processeur numérique
10 - 11
12
13 - 14
Sezione C: Esempi di collegamento
Section C: Connection examples
Fig. 1 - Uscite L/R
15
Fig.1 - L/R Outputs
15
Abb. 1 - L/R Ausgänge
15
Fig. 1 - Sorties L/R.
15
Fig. 2A - Uscita Aux
16
Fig. 2A - Aux Output
16
Abb. 2A - Aux-Ausgang
16
Fig. 2A - Sortie Aux
16
Fig. 2B - Uscita Aux
16
Fig. 2B - Aux Output
16
Abb. 2B - Aux-Ausgang
16
Fig. 2B - Sortie Aux
16
Fig. 3A - Prese Insert
17
Fig. 3A - Insert sockets
17
Abb. 3A - Insert-Buchsen
17
Fig. 3A - Prises Insert
17
Fig. 3B - Prese Insert L/R
17
Fig. 3B - L/R Insert sockets
17
Abb. 3B - Insert-Buchsen
17
Fig. 3B - Prises Insert
17
Fig. 4 - Presa Effect Send
18
Fig. 4 - Effect Send
18
Abb. 4 - Effekt-Send
18
Fig. 4 - Prise Send
18
Fig. 5 - Prese Tape in/out
19
Fig. 5 - Tape in/out sockets
19
Abb. 5 - Tape in/out
19
Fig. 5 - Prises Tape in/out
19
(collegamento di casse acustiche)
(come mandata monitor)
(come mandata effetto)
(come inserzioni stereo)
(come uscite preamplificate)
(collegamento di un effetto esterno)
(collegamento di un registratore stereo)
Sezione D:
(connection of speakers)
(as monitor send)
(as effect send)
(as stereo insert)
(as pre-outs)
(connection of an external effect)
(hooking up a stereo tape recorder)
Abschnitt C: Anschlußbeispiele
Important!!!
Section D:
(Anschluß von Boxen)
(als Monitor-Send)
(als Effekt-Send)
(als Stereo-Insert)
(als Pre-Out Ausgänge)
(Anschluß eines externen Effekts)
(Anschluß eines Tonbandgeräts)
Section C: Examples de raccordements
Abschnitt D:
(raccordement de baffles)
(comme départ monitor)
(comme départ éffet)
(comme insert stéréo)
(comme sorties pre-out)
(raccordement d’un effet extérieur )
(raccordement d’un enregisseur stéréo)
Section D:
Dati tecnici
20
Specifications
20
Technische Daten
20
Données techniques
20
Schema a blocchi
21
Block diagram
21
Blockdiagramm
21
Schéma
21
Esempio di collegamento
22
Connection example
22
Anschlüßbeispiel
22
Exemple de branchement
22
459
9
MASTER SECTION
STEREO CHANNELS
STANDARD MONO CHANNELS
(1-6)
BUILT-IN STEREO DIGITAL PROCESSOR
FRONT and REAR PANELS
8
22
21
7
20
6
19
18
5
17
2
26
24
27
25
16
3
28
15
4
1
14
13
11
31
10
23
30
29
12
REAR PANNEL
35
36
32
34
33
example of fuse
replacement
SERVICE FUSE
RESERVE FUSE
4
always replace
with fuse of the
same type and
rating
459
A / INPUT CHANNELS
CANALI D'INGRESSO
INPUT CHANNELS
1 GAIN: controllo di guadagno. 1 GAIN: this control adjusts
Regola la sensibilità di ingresso del
preamplificatore, permettendo di
ottimizzare l'amplificazione in base
all'intensità del segnale in entrata
al mixer e di evitare distorsione e
rumore di fondo.
2
H.F: controllo toni alti.
Regola la quantità di accentuazione (girando la manopola in senso
orario) o attenuazione (in senso
antiorario) delle frequenze alte.
3
M.F: controllo toni medi.
Regola la quantità di accentuazione (girando la manopola in senso
orario) o attenuazione (in senso
antiorario) delle frequenze medie.
4
L.F: controllo toni bassi.
Regola la quantità di accentuazione (girando la manopola in senso
orario) o attenuazione (in senso
anti orario) delle frequenze basse.
5
EFF: volume mandata
effetto (dipende dai controlli di
tono e volume). Permette di regolare la quantità di effetto interno
o di effetto esterno (collegato
alla presa 'send') da aggiungere al
segnale di ingresso di quel canale.
6
AUX: volume mandata
ausiliaria (dipende dai controlli di
tono del canale, è indipendente
dal volume).
La mandata ausiliaria può avere
due diverse funzioni:
•come 'mandata monitor' regola
il livello del segnale del canale
nell'uscita miscelata aux (quando
ad essa viene collegato un monitor
amplificato)
•come 'mandata effetto esterno'
quando alla presa 'aux' viene
collegato un effetto esterno.
In tal modo avete a disposizione
sia il processore di effetti interno
(regolabile mediante il controllo
'eff') che l'effetto esterno stereo
(regolabile su ogni canale mediante il controllo 'aux').
459
the input sensitivity of the
preamplifier and allows to
accomodate the wide variations in
signal strength presented to the
mixer, enabling at the same time
to avoid overload distortion and
to optimize signal to noise ratio.
2
H.F: treble tone control adjusts the amount of boost or
cut in the high frequency range
(turning the control clockwise
increases the amount of treble
frequencies, counter-clockwise
decreases it)
3
M.F: mid tone control adjusts the amount of boost or
cut in the mid frequency range
(turning the control clockwise
increases the amount of mid
frequencies, counter-clockwise
decreases it).
4
L.F: bass tone control adjusts the amount of boost or
cut in the bass frequency range,
(turning the control clockwise
increases the amount of bass
frequencies, counter-clockwise
decreases it).
5
EFF: effect send volume
(post-fader, post-eq.) - determines
how much effect signal, from the
internal effects processor or from
an external effect, (connected to
the 'send') is added to that input
signal.
6
AUX: auxiliary send volume
(post tones, pre-fader).
The auxiliary send allows different
applications:
•as monitor send sets the level
of that input channel in the 'aux'
output. In this case the aux output
is used to drive powered monitors.
•as external effect send if an
external effect is connected to the
'aux' output. In this way you can
use both the internal effects
processor (adjustable on each
channel by the 'eff' control) and
the external effect (adjustable on
each channel by the 'aux' control).
EINGANGS-KÄNALE
1 GAIN: bestimmt die
VOIES D'ENTREE
1 GAIN: règle la sensibilité
Eingangsempfindlichkeit des
Vorverstärkers (erlaubt die bestmögliche Anpassung aller
Tonquellen ohne Verzerrung).
d’entrée du preamplificateur,
permettant d’ameliorer
l’amplification d’aprés l’intensité
du signal à l’entrée du pupitre et
éviter distorsions et bruits de fond.
2
H.F: Höhen-Regler.
Bestimmt den Anteil der Höhen
(durch Rechtsdrehen erfolgt eine
Anhebung, durch Linksdrehen
eine Absenkung).
3
M.F: Mitten-Regler.
Bestimmt den Anteil der Mitten
(durch Rechtsdrehen erfolgt eine
Anhebung, durch Linksdrehen
eine Absenkung).
4
L.F: Bass-Regler.
Bestimmt den Anteil der Bässe
(durch Rechtsdrehen erfolgt eine
Anhebung, durch Linksdrehen
eine Absenkung).
5
EFF: Effekt-Send-Regler
(er liegt hinter den Ton-Reglern
und dem Kanal-Lautstärke-Regler).
Bestimmt den Anteil des eingebauten Effekts oder eines
externen Effekts, (der an die
'Send' Buchsen angeschlossen ist)
6
AUX: Aux-Regler (liegt hinter
den Ton-Reglern und dem KanalLautstärke-Regler).
Der Aux-Regler kann verschiedene
Funktionen übernehmen:
•als Monitor-Regler bestimmt
er den Anteil des Signals pro Kanal,
das an der Buchse 'aux' anliegt
und die externen aktiven Monitore
speist
•als Effekt-Regler für einen
externen Effekt, der an die 'aux'
Buchse angeschlossen wird.
Auf dieser Weise hat man sowohl
den internen Effekt-Prozessor
(regelbar pro-Kanal durch den
'Eff'-Regler) als auch den externen
Effekt zur Verfügung (regelbar
pro-Kanal durch den 'Aux'-Regler).
2
H.F: règle la quantité
d'accentuation ou d'atténuation
des fréquences aigues (en
tournant le régulateur vers la
droite on augmente les frequences
aigues, en tournant vers la gauche
on les abaisse).
3
M.F: règle la quantité
d'accentuation ou d'atténuation
des fréquences moyennes (sense
de rotation comme le régulateur
des aigües).
4
L.F: règle la quantité
d'accentuation ou d'attenuation
des fréquences graves (sense de
rotation comme le régulateur des
aigües).
5
EFF: volume depart effet
(dépend des contrôles de tonalité
et de volume). Permet de régler la
quantité de l’effet intérieur, ou de
l’effet extérieur (raccordé aux
prises 'send'), à ajouter au signal
d’entrée du canal.
6
AUX: volume depart
auxiliaire (dépend des contrôles
de tonalité du canal, est indépendant du volume). Le départ
auxiliaire peut avoir 2 utilisations:
•comme départ monitor
pour régler le niveau du signal du
canal dans la sortie mixage 'aux',
quand celle ci est raccordée à un
monitor amplifié.
•comme départ effet extérieur
pour régler la quantité de l’effet à
ajouter à ce canal quand celle ci
est raccordée à un effet extérieur
aux prises 'aux' et 'L/R Return'.
De celle façon, vous avez à votre
disposition deux efféts: l'effét
intérieur (réglable par le moyen
du contrôle 'eff'), et l’effet
extérieur stéréo, (réglable sur
chaque canal par le moyen du
contrôle 'aux').
5
A / INPUT CHANNELS
7
PAN: controllo di panorama.
Permette di posizionare il segnale
di ingresso del canale nell'immagine stereo inviando il segnale in
quantità maggiore o minore alle
uscite master L ed R.
* BAL (nei canali stereo):
bilanciamento del segnale
di ingresso stereo.
7
8
8
PEAK: indicatore LED di
picco. Si accende quando vi è
distorsione. Quest'ultima potrebbe
essere causata da una errata
regolazione dei toni e da una regolazione troppo alta del guadagno
rispetto al segnale di ingresso.
9
VOLUME del canale.
Connessioni:
10 MICRO: ingresso microfonico XLR bilanciato (per microfoni a
bassa impedenza).
❚ fig. A, pag 9.
11 LINE: ingresso linea jack
sbilanciato (per strumenti, tastiere,
microfoni ad alta impedenza ecc..).
❚ fig. B, pag 9.
12 L/R: ingressi linea jack per
strumenti stereo.
❚ fig. B, pag 9.
N.B: per collegamento mono
utilizzare solo l'ingresso 'R'.
6
PAN: this control allows to
place the channel's input signal
within the stereo image by
assigning more or less of the signal
to the left or right master volume
controls.
* BAL (in the stereo channels):
balance of the stereo signal
in the L/R outputs.
PEAK LED indicator.
If continuously lighted, it indicates
distorsion or overload. This might
be caused by unproper equalization of the channel tone controls,
unproper gain control setting (too
high for the input signal) or too
high setting of the channel fader.
9 Channel VOLUME fader .
Connections:
10 MICRO: balanced XLR
microphone input (for low
impedance microphones).
❚ fig. A, page 9.
11 LINE: unbalanced jack line
7
PAN: Panorama-Regler
Erlaubt, die Signale der einzelnen
Kanäle in unterschiedlicher Weise
an den linken und rechten Ausgang,
oder wahlweise dazwischen, zu
legen.
* BAL (in den Stereo-Kanälen):
Balance-Regler. Erlaubt das
Verschieben der Balance des
Stereosignals nach Links
oder Rechts.
8
PEAK: Übersteuerungsanzeige. Gelegentliches
Aufleuchten ist normal. Wenn die
LED ständig aufleuchtet, bedeutet
das, daß der Signalweg übersteuert ist und somit Verzerrung
auftritt. Es ist daher notwendig,
die Gain und Klang-Regelungen,
sowie Lautstärke zu korregieren.
9
LAUTSTÄRKE-Regler
Anschlüße:
10 MICRO: symmetrischer
XLR Mikrophon-Eingang
(für niederohmige Mikrophone).
❚ Abb. A, Seite 9
input (for instruments, keyboards
high impedance microphones ecc..)
❚ fig. B, page 9.
11 LINE: asymmetrischer LineEingang (für Instrumente,
12 L/R : jack line inputs for
Keyboards, hochohmige Mikrostereo instruments.
phone u.s.f).
❚ fig. B, page 9.
❚ Abb. B, Seite 9
N.B: for mono connection
use 'R' input only.
12 L/R: Klinken-Eingänge für
Stereo-Instrumente.
❚ Abb. B, Seite 9
N.B: für Mono-Anschluß nur
'R' Eingang benutzen!
7
PAN: contrôle panoramique.
Permet de mettre en position le
signal d’entrée de la voie dans
l’image steréo en envoyant le
signal en plus grande ou en plus
petite quantité aux sorties L et R.
* BAL (dans les voies stéréo):
balance stéreo. Régle le balance
du signal envoyé aux sorties L/R.
8
PEAK: voyant led peak.
Il s'allume quand le signal
s'approche de la distorsion.
Ceci pourrait être provoque par
un mauvais réglage des tonalités
ou par un réglage trop élevé du
gain par rapport au signal d'entrée.
9
VOLUME du canal.
Connections:
10 MICRO: entrèe micro
symmetrique (pour micros à basse
impédance) prise XLR.
❚ Fig. A, page 9
11 LINE: entree ligne asymmetrique (pour instruménts et micros à
haute impédance).
❚ Fig. B, page 9
12 L/R : éntrée ligne L/R (jack)
pour instruments stéréo.
❚ Fig. B, page 9
N.B: pour connections 'mono',
utilisez seulement l'éntrée 'R'.
459
A / STEREO DIGITAL EFFECTS PROCESSOR (Reverb - Echo - Halo)
PROCESSORE DIGITALE
13 SHORT/LONG: controllo
DIGITAL PROCESSOR
13 SHORT/LONG: continuous
DIGITALER PROZESSOR
13 SHORT/LONG: Regler zur
PROCESSEUR DIGITAL
13 SHORT/LONG: contrôle
continuo del ritardo, per gli
effetti eco o della durata del
riverbero per gli effetti di
riverbero.
delay control, for the echo effects
and duration control for the
reverb effects.
Einstellung der Echo-Abstände
oder, wahlweise, der ReverbDauer.
continu du retard de l'echo ou
de la dureé de réverb.
14 ECHO REP: controllo
14 ECHO REP: repeats control
14 ECHO REP: Regler für die
to determine the duration of the
echo effects.
Echo-Dauer.
15 ECHO/REV: pushbutton
Drucktaste wählt man Echo oder
Reverb.
☞ ist die Taste nicht gedrückt,
hat man die klassische Effekte von
Echo, Echo mit Wiederholungen
und Halo.
☞ beim Drücken dieser Taste hat
man verschiedene Reverb-Effekte
von hervorragender Qualität.
repetition. Permet de régler la
durée de l'echo (est utilisé seulement quand la touche echo/rev.
est en position 'echo').
ripetizioni. Regola la durata
dell'effetto eco (ha effetto solo
nella condizione 'eco').
selezione eco/riverbero
☞ con il pulsante sollevato,
agendo sui tasti 'fast' e 'slow' ed i
comandi 'repeats' e 'slow/long' si
ottengono i classici effetti di eco,
eco ribattuto, alone.
☞ con il pulsante premuto,
agendo sui tasti 'predly' e 'long'
insieme al controllo 'slow/long'
potrete ottenere straordinari
effetti di riverbero
for selection of echo or reverb
effects.
☞ button UP:
acting on the 'repeats' and 'slow/
long' controls and on the buttons
'fast' and 'slow' - you will obtain
the classical effects of echo,
repeated echo and halo.
☞ button pushed DOWN:
acting on the 'slow/long' control
and on the buttons 'predly'
and long' you will obtain
extraordinary reverb effects .
16 PREDLY-FAST, SLOW-LONG:
16 PREDLY-FAST, SLOW-LONG:
☞per gli effetti di eco i due
☞ for echo - these buttons have
pulsanti hanno le funzioni
'fast'-'slow' e selezionano i 2
diversi ritardi (premendoli entrambi
si ha l'effetto 'Halo').
☞ per gli effetti di riverbero
hanno le funzioni 'predly' e 'long'
e consentono di ottenere diversi
effetti di riverbero.
the functions of 'fast' and 'slow'
(they select the 2 different delays,
(pushing both buttons you obtain
the Halo effect).
☞ for reverb the same buttons
act as 'predly and 'long'
(allowing to obtain different
effects of reverb).
17 ON (con indicatore LED):
17 ON: (with green LED indicator)
attiva e disattiva l’effetto.
on/off button.
18 TONE: controllo di tono.
18 TONE: turning this control
Girando la manopola in senso orario si produce una graduale attenuazione delle frequenze alte (in
senso completamente antiorario,
la risposta in frequenza è lineare).
clockwise produces a gradual
decrease in high frequencies
(when turned fully anticlockwise,
the frequency response is flat).
19 AUX: mandata monitor
Adjusts the quantity of effect in
the 'aux' output (if it is used as
monitor output).
15 ECHO/REV: pulsante di
Regola il livello dell’effetto
sull'uscita 'aux' (se utilizzata come
uscita monitor).
20 BAL: bilanciamento stereo
19 AUX: monitor send.
20 BAL: balance. Allows to
dell'effetto sulle uscite L/R.
assign more or less of the stereo
signal to the L/R outputs.
21 PEAK: indicatore di picco.
21 PEAK led indicator.
Se lampeggia occasionalmente la
condizione di funzionamento è
normale, mentre se resta continuamente acceso la condizione di
funzionamento è molto vicina alla
saturazione ed è necessario diminuire il volume delle relative mandate effetto sui singoli canali.
Occasional blinking of this LED is
normal while when it lights
continuously it indicates that the
signal is near to clipping and it is
necessary to lower the
correspondent effect send
volume on individual channels.
22 Controllo di VOLUME.
Connessioni:
23 EFF. FT/SW: presa per
comando on/off a distanza.
22 VOLUME control
Connections:
23 EFF. FT/SW: jack socket
for on/off footswitch.
15 ECHO/REV: mittels dieser
16 PREDLY/FAST - SLOW/LONG:
☞ für die Echo-Effekte haben
diese Tasten die Funktionen 'fast'
u. 'slow' und erlauben 2 verschiedene Verzögerungen zu wählen
(werden beide Tasten gleichzeitig
gedrückt, wird das Halo-Effekt
erzeugt).
☞ für die Reverb-Effekte haben
sie die Funktionen 'predly' u.
'long' (sie erlauben verschiedene
Reverb-Effekte zu wählen).
17 ON: Ein/Aus Drucktaste
(mit grüner LED-Anzeige).
18 TONE: Durch Rechtsdrehen
erfolgt eine Absenkung des
Höhenanteilsdes Signals (voll
linksweise gedreht ergibt sich ein
glatter Frequenzgang)
19 AUX: Aux-(Monitor)-Send.
Stellt den Anteil des Effekt-Signals
ein, der dem 'Aux'-Ausgang
zugemischt wird.
20 BAL: Balance-Regler. Erlaubt
das Verschieben der Balance
des Stereosignals nach Links oder
Rechts
21 PEAK-Anzeige. Korrekte
Einstellung der Effektsends eines
jeden Kanals wird dadurch
angezeigt, daß diese LED nur
gelegentlich leuchtet.
Wenn sie ständig aufleuchtet,
bedeutet das, daß der Signalweg
übersteuert ist und somit Verzerrung auftritt (in diesem Fall muß
man den Lautstärkepegel des
Effektsends der einzelnen Kanäle
zurücknehmen)
22 LAUTSTÄRKE-Regler
14 ECHO REP: contrôle de
15 ECHO/REV: Cette touche
permet de sélectionner les
éffets d'echo ou de réverb.
☞ avec la touche en position
echo on peut obtenir les effets
classiques d'echo, echo répeté et
halo.
☞ avec la touche en position
reverb on peut obtenir diverses
éffets de reverb de qualité
extraordinarie.
16 PREDLY/FAST - SLOW/LONG:
☞ pour les éffets echo ces
touches ont les fonctionnes 'fast'
et 'slow' et permettent de
selectionner 2 diverses rétards
(en poussant les deux touches en
même temps, on a l’effet halo)
☞ pour les éffets reverb ces
touches ont les fonctionnes
'predly' et 'long' et permettent
d'obtenir diverses éffets de réverb.
17 ON: poussoir pour activer
ou désactiver l’effet, (avec
voyant témoin à LED).
18 TONE: contrôle de la
tonalité. En tournant le bouton
vers la droite on abbaisse
graduellement les fréquences
hautes (si le bouton est tourné a
fond vers la gauche, la tonalité
est linéaire).
19 AUX: départ aux (monitor).
Permet le réglage du niveau de
l’effet sur la sortie 'aux'.
20 BAL: equilibrage. Permet
d’envoyer l’effet stéréo en
quantité supérieure ou inférieure
aux sorties master L/R.
21 PEAK: indicateur de
saturatiòn. Si il reste allumé en
continuité, indique une saturation
(il faut donc baisser le volume de
départ effet sur chaque voie)
22 Contrôle du VOLUME.
Connections:
23 EFF. FT/SW: prise pour le
commutateur on/off à pédale.
Anschlüße:
23 EFF. FT/SW: Buchse für
Ein/Aus Fusschalter.
459
7
A / MASTER SECTION
SEZIONE MASTER
24 AUX VOL: volume mandata
MASTER SECTION
24 AUX VOL: volume control for
SUMME-TEIL
24 AUX VOL: Auxiliary-Send
SECTION MASTER
24 AUX VOL: volume depart
ausiliaria. Regola il livello del
segnale presente sull'uscita aux (è
la miscelazione di tutte le singole
mandate aux). ❚ fig 2A.
the auxiliary send. Sets the level
of the signal appearing at the aux
output, (it is a mix of the aux
controls on all individual channels).
❚ fig 2A.
Lautstärke-Regler. Stellt den
Signalpegel ein, der an die AuxKlinkenbuchse liegt. ❚ Abb. 2A.
auxiliaire. Règle le niveau du
signal présent sur la sortie aux
(c’est le mixage de tous les départs
aux). ❚ fig. 2A.
25 TAPE IN VOL: volume ingresso. Regola il livello del segnale
proveniente dalle prese 'tape in'.
❚ fig 5.
25 TAPE IN VOL: input volume.
Adjusts the signal level at the
'tape-in" sockets. ❚ fig 5.
25 TAPE IN VOL: LautstärkeRegler für "Tape in" (stellt den
Anteil des Signals vom Tonbandgerät in der Summe ein). ❚ Abb. 5.
25 TAPE IN VOL: volume d'en-
26 2 LED Ketten zur Kontrolle
des niveaux sortie.
26 2 rampe di LED per il control- 26 2 LED arrays for visual control der Ausgangs-Signale.
trée aux prises 'tape-in'. ❚ fig. 5.
26 2 échelles pour le contrôle
27 L-R: volume de sortie
lo dei livelli di uscita.
of the output level.
27 L-R: volumi uscite master
27 L-R: volume faders for the
L (sinistra) ed R (destra).
left and right master outputs.
28 1 equalizzatore grafico
28 6-band stereo graphic
stereo a 6 bande. ❚ pag.12.
equalizer. ❚ page 12.
Connessioni:
Connections:
29 AUX: depart auxiliaire.
29 AUX: Aux-Ausgangs-Buchse Peut être utilisé comme depart
Può essere utilizzata come mandata monitor (❚ fig 2A) o mandata
effetto (❚ fig 2B).
be used as monitor send (❚ fig 2A)
or as effect send (❚ fig 2B).
(❚ Abb. 2A) oder externer EffektGeräten (❚ Abb. 2B).
depart effet (❚ fig. 2B)
30 TAPE IN/OUT L-R: prese
30 TAPE IN/OUT L-R: pin in/out
30 TAPE IN/OUT L-R: Cinch-
sockets for stereo tape recorder Buchsen für stereo Tonbandgerä(output signal is pre-master faders). te (Aufnahme/Wiedergabe) ❚ Abb.5.
❚ fig 5.
31 EXT.EFF.SEND: Effekt31 EXT.EFF.SEND: external
Send-Buchse ❚ Abb 4.
effect send. ❚ fig 4.
■ Rückseite
■ Rear Panel
32 POWER: Netzschalter
32 POWER on/off switch.
sortie/entrée magnétophone
(indépendant des sorties master)
❚ fig.5.
29 AUX: mandata ausiliaria.
pin ingresso/uscita registratore
(il segnale di uscita è indipendente
dai volumi master). ❚ fig 5.
31 EXT.EFF.SEND: mandata
effetto esterno. ❚ fig 4.
■ Pannello Posteriore
32 POWER: interruttore di rete.
Connessioni:
33 R/L OUTPUTS: uscite dei 2
amplificatori incorporati. Ogni
uscita dispone di 2 prese jack e di protezioni elettroniche, relé per inserimento
ritardato del carico, (5 sec.) e autodiagnosi.
27 L-R: linker und rechter
Summenregler.
28 6-bandiger Stereo
graphischer Equalizer. ❚ Seite 12.
master L (gauche) et R (droite).
28 Egaliseur graphique
stéréo à 6 bandes. ❚ page 12.
Connections:
Anschlüße:
29 AUX: auxiliary output. It can zur Ansteuerung aktiver Monitore monitor (❚ fig. 2A) ou comme
Anschlüße:
Connections:
33 R/L OUTPUTS: outputs of
the 2 internal power amps.
Each output is fitted with 2 jacks,
electronic protections, relais for delayed
power-up sequence (5 sec.), automatic
troubleshooting.
33 R/L OUTPUTS: Ausgänge
30 TAPE IN/OUT L-R: prises pin
31 EXT.EFF.SEND: depart
effet exterieur. ❚ fig. 4.
■ Panneau Arriere
32 POWER: interrupteur de
réseau.
Connections:
für den Lautsprecher-Anschluß.
33 R/L OUTPUTS: sortie des
Die eingebaute Endstufen verfügen je über
2 Klinkenbuchsen, elektronische Schutzschaltungen, Einschalt-Verzögerungsrelais
(5 sec.) und automatische Selbstdiagnose.
amplificateurs incorporés.
☞ Schliessen Sie nie Lautsprecher
possono essere utilizzate come
inserzioni stereo per collegare
apparecchiature esterne (equalizzatore, limiter, ecc..) ❚ fig 3A o come
uscite preamplificate del mixer
per collegare casse amplificate o
amplificatori esterni. É possibile utilizzare sia le uscite linea del mixer
che le uscite dei finali incorporati
contemporaneamente ❚ fig 3B,
oppure solo le uscite linea del mixer
(se per il collegamento si utilizzano
dei jack mono i finali incorporati
vengono automaticamente esclusi).
oder Lautsprecher-Gruppen mit
each amplifier must be no lower einer Gesamtimpedanz unter
than 4 Ohms (one or two 8 Ohms 4 Ohm (z.B: je Ausgang eine oder
speaker enclosures for each output). zwei 8 Ohm Boxen). ❚ Abb 1.
❚ fig 1.
34 INSERT L/R (pre-out/main-in):
34 INSERT L/R (pre-out/main-in): Als Stereo-Insert-Buchsen für den
they are used as stereo inserts to
Anschluß externer Geräte (z.B.
connect external units (such as
Equalizer, Limiter..) ❚ Abb. 3A,als
equalizer, limiter,etc..) ❚ fig 3A or
Pre-Out Buchsen für den
as preamp outputs for powered
Anschluß von Verstärkern oder
speakers or external power ampliAktiv-Boxen. Es ist möglich sowohl
fiers. It is possible to use either the Line-und Power-Ausgänge gleichline and power outputs at the
zeitig zu benutzen ❚ Abb.3B
same time (thus adding external
als auch nur die Line-Ausgänge
amplification) ❚ fig 3B, or the line
des Mischpults (verwendet man
outputs only (if you use mono
Mono-Jack-Stecker für den
jacks for the connection to the
Anschluß an die Insert-Buchsen,
insert sockets, the internal power
dann werden die Ausgänge der
amplifiers are automatically
eingebauten Endstufen
excluded).
automatisch ausgeschaltet).
35 Presa di rete a vaschetta
35 I.E.C power supply socket
35 I.E.C Euro-Netzbuchse
(con fusibile incorporato).
(with built-in fuse)
mit integrierter Netzsicherung
36 Presa di terra.
36 Auxiliary ground socket.
36 zusätzliche Erdungs-Buchse. 36 Prise de terre.
☞ L'impedenza di carico per
ogni amplificatore non deve
essere inferiore a 4 Ohm
(es: una o due casse da 8 ohm,
per ogni uscita). ❚ fig 1.
34 INSERT L/R (pre-out/main-in):
8
☞ The total load presented to
Chaque sortie amplifiée dispose de 2 prises
Jack. Les amplificateurs disposent de protections electroniques, relais pour insertion
retardée de la charge (5 sec.) et autodiagnostique indépendante.
☞ L’impédance de charge pour
chaque amplificateur ne doit pas
être inférieure à 4 ohm (example:
une ou deux enceintes de 8 ohm
pour chaque sortie). ❚ fig 1.
34 INSERT L/R (pre-out/main-in):
Elles peuvent être utilisé comme
insert stéréo (pour raccorder égaliseur, limiter, etc..) ❚ fig. 3A ou comme prises pre-out pour raccorder
des enceintes amplifiés ou des
amplificateurs extérieurs. On peut
utiliser en même temps les sorties
de ligne et de puissance, ❚ fig.3B,
ou seulement les sorties ligne du
mixeur (en utilisant des jacks mono
pour la connection aux prises insert,
les sorties des amplifiateurs internes
sont automatiquement exclues).
35 I.E.C prise de reseau avec
fusible incorporé.
459
A / CONNECTORS
line inputs
(for instruments)
B
C
L/R tape in (accepts line
signals: outputs of a
stereo tape recorder or
other external equipment)
C
L/R tape out (inputs
of stereo tape recorder)
B
send (external effect
input)
micro inputs
(for microphones)
A
B
aux output (powered
monitors / external effect)
stereo line inputs
(stereo instruments)
B
B
footswitch socket
(effects remote on/off)
I.E.C power supply
socket (220 V.a.c) with
built-in fuse.
D
auxiliary ground socket
L
R
insert in-out L/R
(external auxiliary
equipment, external
amplification).
A
XLR sockets:
☞ MICRO INPUTS
PIN sockets:
E
R
L/R powered outputs
(one or two 8-ohms
speaker enclosures each
output).
B
Jack sockets:
balanced
XLR socket
(according to
IEC 268
standard)
balanced
XLR plug
C
(balanced)
L
☞ L/R TAPE IN
☞ L/R TAPE OUT
☞ LINE INPUTS (unbalanced)
☞ STEREO INPUTS
☞ AUX and EFFECT SENDS
☞ EFF/FOOTSWITCH
mono JACK plug
D
Jack sockets:
☞ L/R MASTER OUTPUTS
mono JACK plug,
unshielded cable
E
459
stereo JACK sockets: ☞ L/R INSERTS (pre-out/main-in)
see page 16, examples 3A and 3B
9
B / IMPORTANT !
AVVERTENZE
PRECAUTIONS
VORSICHTSMAßNAHMEN
AVIS
■ Evitate di esporre il mixer a fonti
di calore, alla irradiazione solare
diretta, a vibrazioni eccessive.
■ Never expose the mixer to heat
sources, direct sunlight, excessive
vibrations or mechanical shocks.
■ Evitate l’uso e il deposito in
ambienti eccessivamente polverosi
o umidi, e soprattutto non esponetelo alla pioggia: eviterete così
cattivi funzionamenti, deterioramento anticipato delle prestazioni
ed anche il rischio di scosse
elettriche e incendi.
■ Avoid operating and storing
the mixer in damp or dusty places
and absolutely never expose it to
rain: this will avoid malfunctions,
premature degrading of
specifications and the risk of
electrical shocks and fire hazard.
■ Setzen Sie das Gerät nie direkter
Sonneeinstrahlung aus, stellen Sie
es nicht in der Nähe von Wärmequellen auf, setzen Sie es nicht zu
starken Erschütterungen aus.
■ Evitez d'exposer le mixeur à des
sources de chaleur, a l'irradiation
solaire directe, à des vibrations
excessives.
■ Evitate di utilizzarlo vicino a
fonti di radiazioni elettromagnetiche; ciò può provocare una diminuzione della qualità audio
■ Non coprite i fori di aereazione !
■ Durante il funzionamento non
coprite il mixer e non tenetelo
dentro a contenitori che possano
ostruire la circolazione d'aria.
■ Prima di qualsiasi spostamento
scollegate tutti i cavi.
■ Non forzate i comandi.
■ Per pulire il pannello dalla
polvere usate un pennello o un
soffio d’aria.
Non usate detergenti o solventi.
■ In caso di guasti, rivolgetevi a
personale altamente qualificato
o alla Elettronica Montarbo srl.
■ Avoid using the mixer close
to strong sources of electromagnetic interferences, this may lead
to degradation of audio quality.
■ Never cover air vents in any way !
■ During operation, do not cover
the mixer and do not keep it in
containers which may prevent
correct air circulation.
■ Before moving the mixer,
switch it off and disconnect all
cables from the unit.
■ Never apply excessive force
to the controls.
■ Use soft brush or a jet of air
to clean the panel. Do not use
solvents or detergents.
■ If service is needed, refer to
qualified service personnel only
or to the authorized Montarbo
distributor in your country.
INSTALLAZIONE ed USO
● Collegamento alla rete:
utilizzare il cavo di alimentazione
a tre poli di corredo;
collegarlo sempre ad una presa di
corrente dotata di contatto di terra;
accertarsi che la tensione di rete
corrisponda a quella indicata
sull’apparecchio.
INSTALLATION and USE
● Per il collegamento di casse alle
uscite amplificate L ed R (fig. 1)
utilizzare sempre cavi non schermati, di elevata qualità e di adeguata
sezione.
☞ Non utilizzate gli amplificatori con un carico inferiore ai
4 ohm ciascuno !
● When connecting the speakers
to the L/R amplifiers outputs
(fig. 1) always use high quality
heavy gauge unshielded cables.
☞ Never operate the internal
power amplifiers with loads
below 4 ohms each.
● Utilizzare cavi schermati di
elevata qualità per collegamenti
agli ingressi micro e linea, alle
prese send, insert, tape e per il
collegamento di monitor
amplificati o di finali di potenza
all'uscita aux (fig. 2A) ed alle
uscite preamplificate (fig. 3B).
● Prima di eseguire tutti i
collegamenti accertatevi che
l'interruttore di rete sia
spento.
● When connecting the mixer to
the mains supply: check that
mains voltage corresponds to the
voltage indicated on the panel;
use the 3-wire power cord
supplied; always connect it to a
grounded outlet .
● Use high quality shielded
cables for your connections to
the micro and line inputs, to the
send, insert and tape sockets as
well as for connecting powered
stage monitors or amplifiers to
the aux output (fig. 2A) or to
the pre-outs (fig. 3B).
● Turn mains power switch off
before making all connections.
■ Das Gerät nie in extremer
Luftfeuchtigkeit oder im Regen
betrieben und lagern; auf diese
Weise werden mangelhaftes
Funktionieren, vorzeitiger
Leistungsabfall sowie auch die
Gefahr von elektrischen Schlägen
und Bränden vermieden.
■ Evitez toute utilisation ou
stockage dans les milieux poussiéreux ou humides. Ne jamais
exposer l’appareil à la pluie: vous
éviterez ainsi tout mauvais
fonctionnement, détérioration
prématurée des performances
ainsi que le risque de secousses
électriques et d'incendies.
■ Das Gerät nicht in der Nähe
von starken elektromagnetischen
Strahlenquellen betrieben: dieses
kann eine Verminderung der
Tonqualität bewirken.
■ Evitez de les utiliser pres de
fortes sources de radiations
électromagnétiques: tout cela est
susceptible de provoquer la
diminution de la qualité audio.
■ Das Gerät benötigt Luftzirkulation. Während des Betriebs darf
es nicht abgedeckt werden oder
in geschlossene Gehäuse (Flight
Cases,Koffer..) aufgestellt werden.
■ L'appareil demande une
circulation d'air. Ne le couvrez pas
pendant le fonctionnement!
■ Vor jedem Transport Mixer
ausschalten und Kabel entfernen.
■ Ne forcez jamais les contrôles.
■ Auf die Betriebselemente darf
kein Druck ausgeübt werden.
■ Das Abstauben darf nur mit
Hilfe eines Pinsels oder durch
Pusten erfolgen. Benutzt keine
Reinigungs-oder Lösungsmittel
■ Sollten Störungen auftreten,
wendet euch nur an qualifizierte
Techniker oder an den
Montarbo-Vertrieb in Ihrem Land.
MONTAGE und GEBRAUCH
● Vor dem Anschluß an die Netzdose: überprüfen Sie, ob die
Netzspannung der am Gerät aufgedrückten entspricht; verwenden
Sie nur das dem Gerät beiliegende
3-poligen Euro-Netzkabel, da es
geerdet ist; überprüfen Sie, ob die
verwendete Netzdose geerdet ist.
■ Pour épousseter le panneau,
utilisez un pinceau ou un souffle
d'air. N'utilisez jamais ni détergents
ni solvants.
■ En cas de pannes, adressez vous
au distributeur Montarbo de votre
pays (en toutes cas, à un service
après vente agrée).
INSTALLATION et EMPLOI
● Pour le raccordement au réseau:
s'assurer que la tension du réseau
correspond à celle qui est indiquée
sur le panneau, au dessus de la
prise d’alimentation; utiliser le
càble d’alimentation à trois pôles
livré avec l’appareil; le raccorder à
une prise de courant dotée d’un
contact de terre.
● Pour le raccordement d’enceintes
acoustiques aux sorties L et R des
amplificateurs (fig. 1) utiliser
toujours des càbles non blindés de
haute qualité.
☞ N'utilisez jamais les amplificateurs intérieurs avec des charges
inférieures à 4 ohms sur chaque !
● Verwenden Sie nur QualitätsKabel, ungeschirmt, mit hohem
Querschnitt, für die LautsprecherVerbindung an die L/R Ausgänge.
(Abb. 1) ☞ Schliessen Sie nie
Lautsprecher oder LautsprecherGruppen mit einer Gesamt-Impe- ● Utiliser des câbles blindés de
danz unter 4 Ohm an !
haute qualité pour les raccorde● Verwenden Sie nur Qualitätska- ments aux entrées micro et ligne,
bel, geschirmt, für den Anschluß
aux prises send, insert, tape et
an die Mic/Line-Eingänge, an die
pour le raccordement de monitors
Buchsen Send, Insert, Tape,
amplifiés ou d'amplificateurs de
sowie für den Anschluß von Aktiv- puissance exterieurs à la sortie
Monitore oder Endstufen an den
'aux ' (fig. 2A) et aux sorties
Aux-Ausgang (Abb. 2A) oder an die préamplifiées (fig. 4B).
Pre-Out-Ausgänge (Abb 3B)
● Executez toutes les connexions
● Führen Sie alle Anschlüße mit
ausgeschaltetem Gerät durch.
10
■ Avant de procéder à tout déplacement, deconnectez tous les cables.
avant d'allumer l'appareil.
459
B / IMPORTANT !
COLLEGAMENTI e
REGOLAZIONI INIZIALI
PRELIMINARY CONNECTIONS
and SETTINGS
DAS ANSCHLIESSEN und
EINSTELLEN DER ANLAGE
RACCORDEMENTS et
REGLAGES INITIAUX
◆ Collegare le casse acustiche alle
prese di uscita.
◆ Plug the speakers into the
output jack sockets.
◆ Verbinden Sie die Lautsprecher
mit den Ausgangsbuchsen
◆ Relier les baffles aux sorties.
◆ Collegare i microfoni alle prese
XLR e gli strumenti alle prese jack.
◆ Connect microphones to the
XLR 'mic' inputs and the
instruments to the 'line' jack
inputs.
☞ Do not connect microphones
to the line inputs !!
◆ Schließen Sie die Mikrophone
an die XLR-Eingänge und die
Instrumente an die Line-Eingänge
an.
☞ Schließen Sie nie Mikrophone
an die Line Eingänge !
◆ Before turning on the mixer,
set the channel volume controls
and the master volume controls
to their lowest settings and the
sliders of the graphic equalizer
to the zero mark (centered).
◆ Vor dem Einschalten des
Geräts, alle Laustärke-Regler auf
die niedrigste Stellung bringen
und die Schieberegler der
Equalizer auf Mittelstellung (0).
◆ Turn the unit on.
◆ Gain- sowie Aux-und-Effekt
Send-Regler auf die niedrigste
Stellung bringen, Ton- und Panorama Regler auf Mittelstellung.
☞ Non collegate i microfoni agli
ingressi LINE!
◆ Prima di accendere l’apparecchio, mettere tutti i volumi al
minimo ed i cursori dell'equalizzatore grafico a zero (al centro).
◆ Accendere l’apparecchio.
◆ Regolare i controlli di guadagno
di ogni canale al minimo, i controlli di tono e panorama in posizione
centrale, le mandate aux ed
effetto al minimo.
◆ Portare i controlli master L/R ed
il volume dell'effetto in posizione
centrale.
◆ Per ottimizzare la dinamica
di ogni canale, in base alle
diverse fonti di segnale,
consigliamo di effettuare le
seguenti operazioni:
- Utilizzando il microfono
(collegato alla presa XLR) nelle
vostre normali condizioni di
impiego, portare il comando Gain
in posizione tale da fare illuminare
il Led di picco. A tal punto
diminuire il guadagno di quel
tanto da fare spegnere il Led di
picco e regolare poi il volume del
canale. (Il LED di picco del canale
è influenzato esclusivamente dal
controllo di guadagno e dai
controlli di tono).
- Un canale per volta, effettuare
questa operazione su tutti i canali
utilizzando le fonti di segnale per
essi predisposte e nelle condizioni
di impiego il più possibile reali.
◆ Servirsi dell'equalizzatore per
ottimizzare il suono in base alle
diverse condizioni acustiche
ambientali.
◆ Turn the gain controls to their
lowest settings, tone controls and
panpots to the middle, the aux
and effect sends anti-clockwise
to their lowest settings.
◆ Turn the L/R master volume
controls and the effect volume
control to the middle setting .
◆ Nun schalten Sie das Gerät ein.
◆ L/R Master-und-Effekt-Lautstärke-Regler auf Mittelstellung
bringen.
◆ Zur Optimierung der
Dynamik eines jeden Kanals
unter Berücksichtigung der
◆To optimize the dynamics of
verschiedenen Signalquellen,
each channel according to the
empfehlen wir Ihnen,
various signal sources, proceed
wie folgt vorzugeben:
as follows:
- Setzen Sie das Mikrophon unter
- Using a microphone (plugged
normalen Arbeitsbedingungen
into the XLR mic input) in
ein (sprechen, singen usw).
conditions typical of the intended
use, (talk, sing, etc...), set the gain Auf den Gain-Regler solange
einwirken, bis die Übersteuerungscontrol so as to cause the peak
anzeige aufleuchtet.
Led to illuminate; now reduce the
Dann Gain-Regelung nur ein
gain just enough until the peak
wenig mindern bis das Aufleuchten
Led switches off and adjust tones
der Led-Anzeige aufhört.
and volume (the channel peak
Danach Klangregler und LautLed is affected only by the gain
stärke wunschgemäß einstellen
and tone controls).
(auf die Led-Anzeige des Kanals
- Repeat the above procedure for
wirken einzig die Gain und
all the channels, one at a time,
Klangregelungen ein).
using the signal source assigned
to that channel (male, female voice, - Jeweils nur ein Kanal, diese
Operation auf allen Kanälen
instrument, etc..) and simulating
durchführen, unter Verwendung
real operating conditions as
der für sie vorgesehenen Signalclosely as possible.
quellen (männliche, weibliche
◆ Use the graphic equalizer to
Stimme, Instrumente..) sowie
optimize the sound for the
unter möglichst wirklichkeitsnahen
different acoustic environments.
Bedingungen.
◆ Relier les microphones aux
entrées 'micro' (XLR) et les
instruments aux entrées 'line'.
☞Ne jamais connecter les micros
aux entrées 'line' !!
◆ Avant d’allumer l’appareil,
mettre les volumes des voies et
les volumes master au minimum
et les contrôles de l'égaliseur en
position centrale (0).
◆ Allumer l’appareil.
◆ Porter les contrôles de gain au
minimum, les contrôles de tonalité
et les panoramiques en position
centrale, les départs aux et les
départs effets au minimum.
◆ Porter les controles L/R et le
contrôle du volume l'effet en la
position centrale.
◆ Pour optimiser la dynamique
de chaque canal, sur la base
des différentes sources de
signal, nous vous conseillons
d'effectuer les opérations
suivantes.
- En utilisant le micro (connecté
à la prise XLR) dans vos conditions
d'emploi normales, amener la
commande Gain de façon à ce
qu'elle puisse faire allumer la Led
de crête. A ce stade, diminuer le
gain jusqu'à faire étendre la LED
de crête et puis régler le volume
du canal (la LED de crête du canal
est influencée exclusivement par
le contrôle de gain et les contrôles
de ton).
- Exécutez cette opération sur
tous les canaux, un canal à la fois,
en utilisant les sources de signal
prévues à cet effet et dans les
conditions d'emploi les plus réelles
possibles.
◆ Se servir de l'égaliseur pour
obtenir le meilleur son possible
en relation avec les conditions
acoustiques différentes de
l’environnement.
◆ Passen Sie die Anlage akustisch
mit den graphischen Equalizer an
die jeweiligen Räumlichkeiten an.
459
11
B / GRAPHIC EQUALIZER
EQUALIZZATORE GRAFICO
GRAPHIC EQUALIZER
DER GRAPHISCHE EQUALIZER
L'EGALISEUR GRAPHIQUE
L'equalizzatore, se convenietemente utilizzato, consente di
correggere gli effetti dell'ambiente
sulla resa timbrica dell'impianto
e di ridurre fastidiosi feedback
(rientri). Per una corretta
regolazione dell'equalizzatore,
è opportuno tenere presente i
seguenti accorgimenti:
Careful use of the graphic eq.
can help the overall sound system
sound more natural in less than
perfect acoustic environments
and allows to reduce feedback.
For a proper setting of the
controls of the graphic equalizer,
consider the following:
Der sinnvolle Einsatz des
graphischen Equalizer lässt Ihre
Anlage wesentlich natürlicher
kligen und trägt dazu bei, eine
akustische Rückkopplung zu
verhindern.
Die richtige Einstellung der Regler
wird wie folgt vorgenommen:
S’il est convenablement utilisé,
l’egaliseur permet de corriger les
effets du milieu sur le rendement
du timbre de l’installation et
d’eliminer les accrochages. Pour
régler correctement l’égaliseur,
il faut prendre les précautions
suivantes:
• Avoid settings with all sliders
up or all sliders down (see figure
below). This would involve a
useless increase in noise or a
reduction of dynamic range.
• Vermeiden Sie es, die Regler an
Ihre oberen und unteren Extrempunkte zu fahren. Sie schränken
sonst die Dynamik des Gerätes ein
oder erhöhen das Grundrauschen.
• Choose carefully the placement
of loudspeakers and microphones
to minimize feedback before using
the equalizer, in order to get the
most volume before feedback is
heard. Otherwise you risk
removing significant amounts of
your program material and
altering too much your sounds.
• Stellen Sie die Mikros soweit
entfernt wie möglich von den
Lautsprechern auf, drehen Sie
versuchsweise, um so ein
Maximum an Lautstärke ohne
Ruckkopplung zu erreichen, bevor
Sie den Equalizer betätigen.
Durch unnötiges Ausfiltern der
Rückkopplungs-Frequenzen
verlieren Sie natürlich auch
wertvolles Musikprogramm.
• Ne pas utiliser de réglages en
ayant tous les courseurs en
proximité de l’un des bouts de
la course. Cela entraîne une
augmentation de bruit inutile ou
une réduction de la dynamique.
• Non usare regolazioni con tutti
i cursori vicini ad uno degli estremi
della corsa. Questo comporta un
inutile aumento di rumore o una
riduzione di dinamica.
• Stabilite attentamente la
posizione migliore per le casse e
per i microfoni. Ciò vi consentirà
di ridurre al minimo i rientri ancor
prima di servirvi dell'equalizzatore,
e di eliminare la minor quantità
possibile di frequenze dal vostro
programma sonoro.
• Con i cursori dell'equalizzatore
in posizione centrale (sullo 0) agire
sui controlli di tono di ogni canale
per ottenere la tonalità desiderata
dai singoli microfoni o strumenti.
Solo dopo avere ottenuto una
timbrica soddisfacente, regolare
l'equalizzatore per compensare
le caratteristiche acustiche
dell'ambiente.
In tal modo le differenze di resa
tra un ambiente e l'altro possono
essere compensate utilizzando
solo l'equalizzatore grafico, senza
necessità di grosse variazioni delle
regolazioni dei canali.
12
• With the graphic equalizer's
controls set to the zero mark
(centered) adjust the tone controls
of each channel until you get the
tonal color you want for each
microphone or instrument.
Once you have adjusted the tone
controls of each channel, start
adjusting the controls of the
graphic eq. to compensate for the
acoustic environment and speaker
placement. This will allow you to
compensate for different acoustic
environments acting only on the
equalizer's setting with no need of
altering too much the tone
controls settings of each channel.
• Stellen Sie alle Equalizer-Regler
auf Mittelstellung und justieren
Sie dann erst die Ton-Regler der
Eingangs-Kanäle bis der
gewünschte Klang erreicht ist.
Jetzt erst wird die Anlage durch
Einstellung des Equalizers an die
Räumlichkeit angepasst.
Klangänderungen können
nunmehr nur durch den Equalizer
vorgenommen werden.
• Choissiez avec attention la
meilleure position pour les baffles
et pour les micros. Cela vous
permettra de réduire au minimum
les risques d’accrochage, avant
d’utiliser l’egaliseur, et d’eliminer
la plus petite quantité possible de
fréquences de votre programme
sonore.
• Avec les curseurs de l'égaliseur
en position centrale (sur 0), agir
sur les contrôles de la tonalité,
de chaque voie afin d’obtenir la
tonalité desirée dans chaque micro
ou instrument. Uniquement après
avoir obtenu un timbre satisfaisant,
réglez l'égaliseur pour compenser
les caractéristiques acoustiques du
milieu. De cette façon les
différences de rendement entre un
milieu et un autre peuvent être
compensées avec la seule utilisation
de l’égaliseur graphique, sans
avoir recours à de grosses
variations des réglages des voies.
459
B / STEREO DIGITAL EFFECTS PROCESSOR
REGOLAZIONI INIZIALI
PRELIMINARY SETTINGS
GRUNDEINSTELLUNGEN
REGLAGES INITIAUX
Il processore di effetti incorporato,
grazie ad un DSP a 56 bit con
conversione AD/DA a 24 bit SigmaDelta, vi mette a disposizione effetti di Eco e di Riverbero di grande
qualità. É estremamente semplice
da utilizzare. Iniziate con le regolazioni sotto indicate per familiarizzare con i controlli di cui dispone.
Thanks to a 56-bit DSP with SigmaDelta 24-bit AD/DA conversion, the
built-in effects processor provides
Echo and Reverb effects of
extraordinary quality. Start with
the settings indicated below get
acquainted with its features.
ECHO effects (echo, repeated
echo, halo)
Le processeur d'effets incorporé
grâce à un DSP de 56-bit avec
conversion AD/DA à 24-bit SigmaDelta, vous permet d'avoir effets
d'Echo et de Reverb de qualité
extraordinaire avec le maximum de
la simplicité. Commencez par les
réglages indiqués ci-dessous pour
vous familiariser avec les contrôles.
Effetti di ECO (eco ribattuto, halo)
Echo/Rev button up !
Pulsante Echo/Rev sollevato !
■ Set effect volume control to
the mid position.
Danke einem 56-bit DSP mit 24-Bit
AD/DA Sigma-Delta-Konverter
stellt der eingebaute EffektProzessor Echo und Reverb Effekte
Beginnen Sie einfach mit den
nachfolgend beschriebenen
Grundeinstellungen und finden
Sie dann die Ihnen gewünschte
Einstellungen.
ECHO Effekte (Echo, Echo mit
Wiederholungen, Halo)
Echo/Rev Drucktaste hoch !
■ Stellen Sie den Effekt-LautstärkeRegler auf Mittel-Stellung.
■ ECHO: Durch wahlweise drücken
der Tasten 'slow' (lang) und 'fast'
(kurz) können 2 verschiedene
Delay-Zeiten gewählt werden.
■ HALO: Werden beide Tasten
gleichzeitig gedrückt, wird ein
Halo (Nachhall) Effekt erzeugt.
■ Stellen Sie mit dem short/longRegler den Echoabstand und mit
dem 'echo rep'-Regler die Echo
dauer ein.
Effets de REVERB
Touche Echo/Rev appuyee !
■ 'predly' pushbutton down =
reverb with predelay. The stereo
image of the reverb effect gets
wider and wider up to produce
extraordinary 'cathedral' effects.
REVERB-Effekte
Echo/Rev Taste gedruckt !
■ Effekt-Lautstärke-Regler in
Mittel-Stellung bringen.
■ Die Tasten 'fast' - 'slow' dienen
jetzt als 'predly' und 'long'. Der
Reverb-Effekt ist stufenlos einstellbar durch den short/long-Regler.
■ 'predly' Drucktaste gedruckt =
reverb mit predelay. Der Stereoeffekt wird breiter bis hin zum
'Kathedrale'-Hall.
■ 'predly' Drucktaste hoch =
reverb ohne predelay
■ 'predly' pushbutton
up = reverb without predelay.
■ 'long' Drucktaste gedruckt =
längerer, wärmer hall.
■ Touche 'predly' levée = réverb
sans predelay.
■ 'long' pushbutton down = a
much longer and 'warm' reverb.
■ 'long' Drucktaste hoch = sehr
kurzer hall (geeignet für Percussion-Instrumente).
■ Touche 'long' appuyée = réverb
■ 'long' und 'predly' beide Drucktaste hoch = Reverb + EchoEffekt (besonders geeignet für die
Stimme).
■ Touches 'long' et 'predly'
appuyées = on obtient un effet de
réverb + echo qui convient
particulierement bien pour la voix.
■ Portare il volume dell'effetto
in posizione centrale.
■ ECO: I due pulsanti sottostanti,
'slow' e 'fast' consentono di
selezionare 2 diversi ritardi.
■ HALO: Premendo entrambi i
pulsanti contemporaneamente si
ottiene l'effetto 'halo'.
■ Regolare il ritardo prescelto
con il comando short/long e la
durata dell'effetto per mezzo
del comando 'echo rep'.
Effetti di RIVERBERO
Pulsante Echo/Rev premuto !
■ Portare il volume dell'effetto
in posizione centrale.
■ Gli stessi pulsanti che per
l'effetto eco hanno le funzioni
'slow' e 'fast' per gli effetti di
riverbero assumono le funzioni
'predly' e 'long'. Il riverbero è
regolabile con continuità
mediante il comando short/long.
■ Pulsante 'predly' premuto =
riverbero con predelay.
Aumenta 'l'apertura' stereo dell'effetto, consentendovi di ottenere
impressionanti effetti 'cattedrale'.
■ Pulsante 'predly' sollevato =
riverbero senza predelay.
■ Pulsante 'long' premuto =
riverbero molto più lungo,
ricco e 'caldo'
■ Pulsante 'long' sollevato =
riverbero molto corto, ottimo
per le percussioni.
■ ECHO: The two pushbuttons
'slow' and 'fast' allow to select
2 different delays.
■ HALO: Pushing both buttons
simultaneously will produce the
'halo' effect.
■ Use the short/long control to
adjust the delay time and the
'echo rep' control to set the
effect duration.
REVERB effects
Echo/Rev button pushed !
■ Set effect volume control to
the mid position.
■ The same buttons that for
the echo effects have 'slow'
and 'fast' functions turn into
'predly' and 'long' for the
reverb effects. Reverb is
continuously adjustable by means
of the short/long control.
■ 'long' pushbutton up = very
short reverb - ideal for drums.
■ 'long' and predly' pushbuttons
down = reverb + echo effect
- particularly suitable for voice.
■ Entrambi i pulsanti 'predly' e
'long' premuti = riverbero + eco, ☞ The 'tone' control, allowing
particolarmente adatto per il canto. gradual elimination of undesired
high frequencies, provides
☞ Una ulteriore possibilità di
additional personalization of
personalizzare il suono è data dal
your sound.
comando 'tone', che permette di
☛ Adjust the 'eff' controls in the
togliere con gradualità eventuali
channels where the effect is needed.
alte frequenze non desiderate.
☛ Effect signal can be assigned
☛ Regolare i volumi delle mandate
to the L/R, and aux outputs
'eff' nei canali dove si voglia avere
separately, by means of the 'bal'
l'effetto.
and 'aux' control (If echo signal is
☛ Il segnale può essere inviato alle not needed in the 'aux' output, turn
uscite L/R e aux separatamente
the corresponding control countermediante i comandi 'bal' e 'aux'.
clockwise to its lowest setting).
459
☞ Der Regler 'tone' erlaubt eine
weitere Einstellung der EffektSignale. Durch Rechtsdrehen des
Reglers, wird der Höhenanteil des
Signals allmählich verringert.
☛ Stellen Sie mit dem 'eff'-Regler
den Effektanteil ein, den Sie auf
dem jeweiligen Kanal wünschen.
☛ Das Effekt-Signal kann durch
Einstellung der 'bal' und 'Aux'
Regler auf die L/R und AuxAusgänge gelegt werden.
Effets d'ECHO (effets d'Echo,
Echo répété, Halo)
Touche Echo/Rev levee !
■ Porter le volume de l’effet sur
la position centrale.
■ ECHO: Les deux touches 'slow'
et 'fast' permettent de choisir 2
retards differents.
■ HALO: En poussant les deux
touches en même temps, on
obtient l’effet 'halo'.
■ Régler le retard présélectionné
au moyen de la commande
short/ long et la durée de l’effet au
moyen de la commande 'echo rep'.
■ Porter le volume de l’effet en
position centrale.
■ Les touches 'slow' et 'fast'
changent leurs fonctions en
'predly' et 'long' pour les effets
réverb. Le contrôle short/long permet le reglage continu de la réverb.
■ Touche 'predly' appuyée =
réverb avec predelay.
L'image stéreo de l'effet devient
plus large jusqu' à produire des
extraordinaires effets 'cathedral'.
■ Touche 'long' levée = réverb tres
courte (indiqué pour percussions).
☞ Les effets d'echo et de réverb
peuvent être personalisés même
par l'intérmediaire du contrôle
'tone'. En tournant le poussoir vers
la droite on obtient un graduel
abaissement des fréquences hautes.
☛Régler les volumes départ éffet
pour les canaux ou l’on desire avoir
l’effet.
☛ Le signal écho peut être envoyé
séparément aux sorties L/R et aux
au moyen des commandes 'bal' et
'aux'.
13
B / STEREO DIGITAL EFFECTS PROCESSOR
EFFETTI DI ECO e ALONE
ECHO and HALO EFFECTS
ECHO und HALO EFFEKTE
EFFETS D' ECHO et HALO
Pulsante Echo/Rev sollevato:
TRE diversi effetti, ognuno dei
quali può essere ulteriormente
5
4
6
personalizzato
mediante i co3
7
mandi
'echo',
'short/long' e
2
8
1
'tone'
(la9condizione lineare del
Echo/Rev button up:
THREE different effects, each
one of which can be further
5
personalized
by means of the
4
6
3
7
controls
'echo',
'short/long' and
2
8
1
9
'tone'
(tone
is flat when the knob
Echo/Rev Taste hoch:
DREI verschiedene Echo-Effekte.
Mittels 'echo', 'short/long' und
5
4
6
'tone'
-Regler
können Sie die
3
7
Effekte
wunschgemäß
einstellen
2
8
Touche Echo/Rev levee:
TROIS Effets différents.
Chaque effet peut être reglé
au moyen des contrôles 'echo',
'short/long' et 'tone' (la tonalité
VOL. è peak
tono
con la manopola girata in
senso 0antiorario)
.
isVOL
turned
peak fully anticlockwise)
10
0
1: 'FAST' = ritardo più breve.
R
L
2: 'SLOW'
= ritardo più lungo.
BAL.
5
4
6
3: entrambi i pulsanti premuti =
3
7
effetto
'alone'.
2
8
1
9
AUX
5
4
7
8
1
7
8
9
AUX
9
☞
5
7
8
9
TONE
on
long
slow
halo
fast
predly
long
slow
halo
fast
predly
echo
rev
5
6
3
7
2
8
1
9
0
☞
☞
☞
'fast' DOWN
7
2
8
1
9
max
ECHO
REP.
5
4
0
4
3
7
2
8
1
9
short
☞
long
☞
8
9
tone (0=flat)
10
☞
☞
☞
'slow' DOWN
echo
rev
'echo/rev' UP
5
4
7
2
8
1
9
9
☞
7
2
8
1
9
short
long
'slow' DOWN
'fast' DOWN
'echo/rev' UP
repeats
6
3
delay time
☞
☞
☞
☞
max
4
8
6
3
repeats
ECHO
REP.
5
7
short
long
slow
halo
fast
predly
0
2
1
ECHO / REVERB
7
2
1
6
3
delay time
tone (0=flat)
max
ECHO
REP.
5
6
3
1: 'FAST' = retard plus court.
2: 'SLOW' = reard plus long.
3: les deux touches appuyee en
même temps = effet 'halo'.
6
3
☞
TONE
6
3
repeats
5
est linéaire si le bouton est
tourné a fond vers la gauche).
on
5
4
9
10
0
AUX
0
echo
rev
'echo/rev' UP
1
2
10
0
1: 'FAST' = kurze Verzögerung
R = längere Verzögerung
L
2: 'SLOW'
BAL.
5
3: beide
4
6 Tasten gleichzeitig ge3
7
drückt
=
Halo-Effekt
(Nachhall)
2
8
4
2
1
10
1
9
(glatter
Frequenzgang
hat man
10
0
VOL.dem
mit
peakTone-Regler voll links
0
gedreht)
6
3
tone (0=flat)
on
4
10
0
4
3
TONE
3
2
6
2
0
0
1: 'FAST'
= shorter delay
2: 'SLOW' = longer delay
R
L
3: both
buttons pushed at the
BAL.
5time = 'halo' effect.
same
4
6
1
1
10
0
10
0
☞
delay time
long
ECHO / REVERB
ECHO / REVERB
EFFETTI di RIVERBERO
REVERB EFFECTS
REVERB-EFFEKTE
EFFETS de REVERB
Pulsante Echo/Rev premuto:
QUATTRO diverse combinazioni,
ognuna delle quali può essere
ulteriormente personalizzata
mediante
i comandi 'short/long'
5
4
6
(duration)
3
7 e 'tone'.
2
8
1: 1entrambi
i pulsanti 'predly' e
9
10
0
'long'
sollevati.
VOL.
peak
0
2: 'predly'
sollevato e 'long'
premuto.
3: entrambi
i pulsanti premuti.
R
L
4:BAL.
'predly'
premuto
e 'long'
5
4
6
3
7
sollevato.
Echo/Rev button pushed:
FOUR different combinations,
each of which can be further
personalized thanks to the
short/long
(duration) and
5
4
6
'tone'
controls.
3
7
2
8
1: 1both buttons
'predly' and
9
10
0
'long'
up.
VOL.
peak
0
2: 'predly'
up and 'long' down.
3: both buttons 'predly' and
'long'
down.
R
L
4:BAL.'predly'
down and 'long' up.
5
4
6
Echo/Rev Taste gedrückt:
VIER verschiedene EffekKombi-nationen, von denen
jede mittels short/long
(duration)
und "tone"-Regler
5
4
6
eingestellt
3
7 werden kann.
2
8
1: 1beide Tasten
'predly' und
9
10
0
'long'
hoch.
VOL.
peak
0
2: 'predly'
hoch und 'long'
gedruckt.
3: beide
Tasten gedrückt
R
L
4:BAL.'predly'
gedrückt und 'long'
5
4
6
3
7
hoch.
Touche Echo/Rev appuyee:
QUATRE combinaisons
différentes. Chacune peut être
reglée au moyen des contrôles
short/long
(duration), et 'tone'.
5
4
6
1:3les deux7 touches 'predly' et
2
8
'long'
levees.
1
9
10
0
2:VOLtouche
.
peak 'predly' levee et 'long'
0
appuyee.
3: les deux touches appuyees.
4: touche
R 'predly' appuyee et
L
BAL.
'long'
5 levee.
4
6
2
9
AUX
10
0
5
4
3
8
9
1
AUX
☞
☞
☞
☞
5
8
9
'predly' UP
long
slow
halo
fast
predly
'echo/rev' DOWN
echo
rev
'long' UP
4
6
3
☞
1
7
8
ECHO
REP.
5
5
9
4
7
8
9
long
ECHO / REVERB
☞
3
reverb duration
'predly' UP
'echo/rev' DOWN
echo
rev
6
4
5
9
long
ECHO / REVERB
☞
3
reverb duration
8
9
'predly' DOWN
long
slow
halo
fast
predly
'echo/rev' DOWN
echo
rev
6
4
5
4
9
long
ECHO / REVERB
☞
☞
reverb duration
8
3
reverb duration
'echo/rev' DOWN
9
ECHO
REP.
5
7
'predly' DOWN
'long' UP
7
1
6
☞
☞
☞
6
3
0
8
short
tone (0=flat)
10
2
max
2
1
☞
2
'long' DOWN
9
ECHO
REP.
5
7
7
6
1
8
4
5
TONE
☞
☞
☞
1
6
4
10
0
3
tone (0=flat)
7
0
8
short
☞
9
on
3
max
2
1
AUX
0
2
9
ECHO
REP.
5
2
☞
☞
☞
long
slow
halo
fast
predly
'long' DOWN
7
0
6
3
10
TONE
8
4
2
1
7
1
6
3
tone (0=flat)
8
max
5
3
2
on
1
9
0
10
0
0
2
8
14
AUX
10
3
7
short
2
9
on
2
1
8
1
4
7
1
TONE
echo
rev
3
2
6
2
on
4
5
0
long
slow
halo
fast
predly
4
10
0
3
tone (0=flat)
10
TONE
8
9
4
7
1
7
1
6
2
0
3
2
8
1
max
6
7
2
8
1
short
9
long
ECHO / REVERB
459
C / FIG. 1 : L/R MASTER OUTPUTS
COLLEGAMENTO di CASSE
ACUSTICHE
CONNECTION to SPEAKER
ENCLOSURES
ANSCHLUß von LAUTSPRECHER- RACCORDEMENT
D'ENCEINTES ACUSTIQUES
BOXEN
MAI FARE FUNZIONARE GLI
AMPLIFICATORI INTERNI
CON CARICHI INFERIORI AI
4 Ohm CIASCUNO
NEVER OPERATE THE
INTERNAL POWER AMPLIFIERS
WITH LOADS BELOW 4 Ohms
EACH
SCHLIESSEN SIE NIE BOXEN
ODER BOXEN-GRUPPEN MIT
EINER GESAMT-IMPEDANZ
UNTER 4 Ohm PRO-KANAL AN !
N'UTILISEZ JAMAIS LES
AMPLIFICATEURS INTERIEURS
AVEC DES CHARGES
INFERIEURS Á 4 Ohms CHACUN
ESEMPIO A:
EXAMPLE A:
BEISPIEL A:
EXAMPLE A:
UNA cassa da 8 ohm per
ogni uscita.
ONE 8-Ohms speaker enclosure
each output.
EINE 8-Ohm Box pro-Kanal
UNE enceinte de 8 ohms pour
chaque sortie.
RIGHT OUTPUT
(minimum load impedance 4 Ohms)
LEFT OUTPUT
(minimum load impedance 4 Ohms)
Montarbo
Montarbo
8 Ohms
8 Ohms
ESEMPIO B:
EXAMPLE B:
BEISPIEL B:
EXAMPLE B:
DUE casse da 8 ohm per
ogni uscita
TWO 8-Ohms speaker
enclosures each output
ZWEI 8-Ohm Boxen
pro-Kanal
DEUX enceintes de 8 ohms
pour chaque sortie.
LEFT OUTPUT
(minimum load
impedance 4 Ohms)
Montarbo
Montarbo
8 Ohms
8 Ohms
459
RIGHT OUTPUT
(minimum load
impedance 4 Ohms)
Montarbo
8 Ohms
Montarbo
8 Ohms
15
C / FIG. 2A : AUX OUTPUT
COLLEGAMENTO di MONITOR
AMPLIFICATI.
CONNECTION of POWERED
STAGE MONITORS
ANSCHLUß von AKTIVEN
MONITOR-BOXEN.
RACCORDEMENT de
MONITORS AMPLIFIES .
◆ Collegare la presa 'aux'
all'ingresso della cassa monitor
auto-amplificata.
◆ I controlli 'aux' di ogni canale
sono in tal caso le mandate
monitor.
◆ Il controllo 'aux vol' è il volume
master monitor (è la miscelazione
delle mandate 'aux' dei singoli
canali).
◆ Si possono collegare alla presa
'aux' fino a 10 casse monitor
amplificate collegate in parallelo.
◆ Connect the 'aux' socket to
the input of the self-powered
stage monitor.
◆ The 'aux' controls on each
channel are the monitor send
controls.
◆ The 'aux vol' control is the
monitor master volume (it is the
mix of the aux controls on
individual channels).
◆ The aux output can drive up
to 10 parallel connected
powered monitors .
◆ Verbinden Sie die 'Aux'-Buchse
des Mixers mit dem Eingang des
aktiven Monitors.
◆ Das Monitor-Signal jedes Kanals
kann mit Hilfe des 'Aux'-Reglers
festgelegt werden.
◆ Die Gesamtlautstärke des
Monitors wird mit dem 'Aux Vol'
eingestellt.
◆ Der 'Aux' Ausgang kann bis
zu 10 parallel angeschlossenen
aktiven Monitore ansteuern
◆Raccorder la prise 'aux' à
l’entree de l’enceinte monitor
auto-amplifiée.
◆Les contrôles 'aux' de chaque
canal sont les départs monitor.
◆Le contrôle 'aux vol' est le
volume master monitor, (c’est le
mixage des sorties 'aux' de
chaque canal).
◆Il est possible de relier jusq’à
10 enceintes monitor amplifiées
raccordées en parallèle.
◆intes monitor amplifiées
AUX VOL raccordées
en parallèle.
AUX SENDS
POWERED STAGE MONITORS
AUX OUTPUT
▲
C / FIG. 2B : AUX OUTPUT
COLLEGAMENTO di un EFFETTO
ESTERNO
CONNECTION of an
EXTERNAL EFFECT
ANSCHLUß eines EXTERNEN
EFFEKTGERÄTES
RACCORDEMENT d'un EFFET
EXTERIEUR.
Se non viene utilizzata per pilotare
dei monitor, l'uscita 'aux' può
servire come 'mandata effetto
esterno' (servendosi di uno dei due
In those applications where the
'aux' send is not used as monitor
output, it can be used as 'external
effect send' (one of the two stereo
channels will serve for effect return).
This allows you to use an external
effect in addition to the internal
effects processor.
◆ Connect the 'aux' socket to
the input of the external effect.
◆ Connect the L/R outputs of
the stereo external effect to the
L/R inputs of a stereo channel.
◆ Adjust the 'aux' send control
on each channel (or turn it to '0'
Wird der Aux-Send als MonitorAusgang nicht verwendet, kann
er als Effekt-Send dienen um ein
externes Effekt-Gerät anzuschließen
◆ 'Aux'-Buchse an den Eingang
des externen Effekt-Gerätes
anschließen.
◆ L/R Ausgänge des externen
Effekts an die L/R Eingänge eines
Stereo-Kanals anschließen.
◆ Mit dem 'Aux'-Regler pro-Kanal
bestimmen Sie die Stärke des
Effekts, dem das Direkt-Signal des
Kanals beigemischt wird
Lorsque on n’utilise pas la sortie
'aux' comme sortie monitor, on la
peut utiliser comme 'départ effet'
pour brancher un effet exterieur.
◆ Raccorder la prise 'aux' à la
sortie de l’effet extérieur.
◆ Raccorder les sorties L/R de
l’effet extérieur aux entrées L/R
d'une voie stéréo.
◆ Utiliser les départs 'aux' de
chaque canal pour régler la
quantité du signal à ajouter au
signal d’entrée (dans les voies où l’on
canali stereo per il ritorno dell'effetto).
Si ha così il vantaggio di potere
disporre sia dell'effetto incorporato che di un effetto esterno.
◆ Collegare la presa 'aux'
all'ingresso dell' effetto esterno.
◆ Collegare le uscite L/R
dell'effetto esterno agli ingressi
L/R di un canale stereo.
◆ Mediante i controlli 'aux' di
ogni canale, regolare la quantità
di effetto esterno da aggiungere
al segnale di ingresso (nei canali
dove non si desidera l'effetto, girare
il controllo 'aux' in posizione '0').
◆ I controlli del canale collegato
alle uscite dell'effetto esterno
consentono di regolare il ritorno
dell'effetto sui master L/R.
N.B: nel canale utilizzato come
ritorno effetto, girate i
potenziometri 'AUX' ed 'EFF' in
posizione '0'.
on the channels where the effect is
not desired).
(benötigen Sie auf einem Kanal kein
Effekt, dann drehen Sie den 'Aux'Regler zu)
◆ The controls of the channel
used as 'effect return' allow to
adjust the external effect return
on the the L/R masters.
◆ Die Regelungen des Kanals, der
als 'Return' dient, erlauben das
Effekt-Return in den L/R Summen
einzustellen.
N.B: turn the controls 'AUX' and
'EFF' on this channel to their '0'
settings.
N.B: die Regler 'AUX' und 'EFF'
von diesem Kanal zur Stellung '0'
drehen
ne desire pas avoir l’effet, tourner le
contrôle 'aux' en position '0').
◆ Utiliser les contrôles de la voie
utilisée comme 'retour effet' pour
régler le retour de l’effet exterieur
dans le mixage L/R .
N.B: porter les controles 'AUX' et
'EFF' de cette voie en position '0' .
IN THE CHANNEL
USED AS EFFECT
RETURN:
- ADJUST GAIN,
BALANCE, TONES
AND VOLUME.
- SET THE AUX
AND EFF CONTROLS
TO 0
STEREO INPUT CHANNEL
AUX SENDS
AUX OUTPUT
ADJUST THE
QUANTITY OF EFFECT
ON EACH CHANNEL
▲
EXTERNAL STEREO EFFECT
▲ ▲
L/R outputs
16
input
▲
EFFECT RETURN
459
C / FIG. 3A : STEREO INSERT (pre-out / main-in)
INSERZIONE di APPARECCHIATURE ESTERNE ai MASTER L/R
Queste due prese stereo consentono il collegamento di apparecchiature ausiliarie esterne (es:
equalizzatore stereo, limiter, processore audio ecc..). Dipendono
dalle regolazioni master L ed R.
☞ Per questo tipo di collegamento utilizzare spine jack stereo
(vedi figura).
ANSCHLUß von EXTERNEN
GERÄTE auf der STEREO
SUMME.
These two stereo jack sockets
allow connection of external
auxiliary equipment (such as
stereo equalizer, limiter, audio
processor etc..).
They are post-master controls.
☞ Use stereo jack plugs (see
figure below).
Diese stereo Klinken-Buchsen
erlauben externe Geräte einzu- schleifen (z.B.: stereo Equalizer, Limiter,
Audio Prozessoren, usw)
Sie liegen hinter der L/R SummenReglern.
☞ Verwenden Sie Stereo KlinkenStecker. (siehe Abbildung unten)
gnd
MONO JACK
tip (out)
Ces prises jack stéréo permettant de
relier appareils auxiliaires externes
(égaliseur stéreo, limiter, processeur
audio etc..). Elles dépendent des
réglages master
L et R.
☞ Pour ce type de branchement,
utiliser des fiches jack stéreo
(voir figure au dessus).
ring = input of the internal power amplifier
OUT
IN
ring (in)
OUT
tip = pre-amp.mixer output
IN
MONO JACK
tip: corrisponde all'uscita preamplificata del mixer
corresponds to the preamplifier output of the mixer
entspricht dem Vorverstärker Ausgang des Michpults
correspond a la sortie preamplifié de le mixeur
IN OUT IN OUT
L
RELIEMENT D' APPAREILS EXTERNES aux MASTERS L/R
CONNECTION of EXTERNAL
AUXILIARY EQUIPMENT to the
L/R MASTERS.
R
LEFT AND RIGHT INPUTS AND OUTPUTS
OF EXTERNAL STEREO EQUIPMENTS
(AUDIO PROCESSOR, EQUALIZER, LIMITER ETC..)
ring: corrisponde all'ingresso del finale di potenza
corresponds to the input of the power amplifier
entspricht dem Eingang des eingebauten Verstärker
correspond a l' éntrée de l'amplificateur incorporé
C / FIG. 3B : STEREO INSERT (pre-out / main-in)
RACCORDEMENT de BAFFLES
AMPLIFIEES ou AMPLIFICATEURS EXTERNES.
COLLEGAMENTO di CASSE
ACUSTICHE AMPLIFICATE o
AMPLIFICATORI ESTERNI.
CONNECTION of POWERED
SPEAKERS or EXTERNAL
POWER AMPLIFIERS
ANSCHLUß von AKTIV-BOXEN
oder EXTERNEN ENDSTUFEN
☞ Per utilizzare contemporanea-
☞ If you want to use both the line
and the power outputs (L/R
masters) at the same time: for the
connection to the insert sockets of
the mixer use stereo jack plugs
as shown in example A and for
the inputs of the powered speakers
or of an external power amplifier
use mono jack plugs (fig. B).
gleichzeitig benutzen zu können,
muß man für den Anschluß an die
Insert-Buchsen Stereo KlinkenStecker verwenden, die laut Abb.
A angeschlossen sein sollen; für
die Aktiv-Boxen oder Endstufen
verwendet man Mono KlinkenStecker (Abb. B).
☞ Pour utiliser en même temps
mente le uscite di linea e di
potenza (master L/R): collegate
alle prese insert del mixer un jack
stereo come illustrato nella
figura A ed all'ingresso della
cassa autoamplificata o del finale
di potenza un jack mono (fig. B).
☞ Will man nur die Line-Ausgänge
☞ Pour utiliser seulement les
benutzen, soll man MonoKlinken-Stecker an die InsertBuchsen anschließen (auf dieser
Weise werden die Ausgänge der
eingebauten Endstufen
automatisch ausgeschaltet).
sorties de ligne, connectez aux
prises Insert des fiches jack mono
(cela permet d'excluer
automatiquement les sorties des
amplificateurs internes).
☞ Um Line-und Power-Ausgänge
☞ Per utilizzare solo le uscite di
linea escludendo gli amplificatori
incorporati alle prese insert del
mixer dovrete invece collegare
un jack mono.
☞ If you want to use only the line
inputs of the mixer, excluding the
outputs of the internal power
amplifiers, plug mono jacks into
the insert sockets of the mixer.
les sorties de ligne et de puissance
(master L/R) on doit connecter aux
prises Insert des jacks stéréo selòn
example A, et aux entrées des
baffles ou de l'amplificateur
externe des fiches jack mono
(fig. B).
POWERED MIXER 459
A: connect the
ring
ring tip
gnd
stereo jack plug
as shown here
☞
gnd
tip
standard stereo jack plug
B:
ring tip
CONNECT
RING WITH TIP
gnd
mono jack plug
+
459
+
INPUT OF POWERED
SPEAKER
OR
EXTERNAL
POWER AMPLIFIER
17
C / FIG. 4: EFFECT SEND
COLLEGAMENTO di un EFFETTO
ESTERNO.
CONNECTION of an
EXTERNAL EFFECT
ANSCHLUß eines EXTERNEN
EFFEKTGERÄTES
RACCORDEMENT d'un EFFET
EXTERIEUR
La presa 'ext. eff. send' consente
il collegamento di un effetto esterno. La quantità di segnale di effetto
esterno da aggiungere ad ogni
canale verrà in tal caso regolata
mediante lo stesso comando 'eff'
che regola la mandata dell'effetto
interno e si ha perciò la possibilità
di miscelare i 2 effetti.
☞ se si vuole escludere l'effetto interno,
The 'ext. eff. send' socket allows
connection of an external effect.
The quantity of effect signal on
each channel will be adjusted by
means of the same 'eff' send
volume used for the internal
effect. This allows to mix the 2
effects on the same channel.
Die 'Ext. Eff. Send'-Buchse erlaubt
den Anschluß eines externen
Effekt-Geräts. Der Anteil des
Effekts wird mittels dem
'Eff'-Regler pro-Kanal eingestellt.
Mit diesem Regler stellt man auch
den Anteil des eingebauten Effekts
ein, den dem Signal des Kanals
beigemischt wird. Man hat damit
die Möglichkeit, das Externe
Effekt-Gerät zusammen mit dem
eingebauten Effekt zu verwenden
(gemischt).
La sortie 'ext. eff. send' permet le
raccordement d'un effet exterieur.
Pour régler la quantité d'effet
à ajouter au signal d’entrée du
cha-que voie on utilise le contrôle
'eff' (le même de la départ effet
interieur). On peut donc avoir
l'effet interieur et l'effet exterieur
mélangées dans la même voie.
è sufficiente spegnerlo (pulsante 'on'
sollevato).
◆ Collegare la presa 'send'
all'ingresso dell' effetto esterno
◆ Collegare le uscite L/R dell'effetto esterno agli ingressi L/R di un
canale stereo.
◆ Utilizzare le mandate 'eff' di
ogni canale per regolare la quantità
di effetto esterno da aggiungere
al segnale di ingresso (nei canali
dove non si desiderano effetti girare la
manopola 'eff' in senso completamente antiorario).
◆ I controlli del canale utilizzato
come ritorno effetto permettono
di regolare il ritorno dell'effetto
esterno sui master L/R e sull'uscita
Aux.
☞ should the internal effect not be
desired, you must simply turn it off
('on' button up).
◆ Connect the 'eff' socket to the
input of the external effect.
◆ Connect the L/R outputs of the
stereo external effect to the L/R
inputs of a stereo channel.
◆ Adjust the 'eff' send control on
each channel (turn it fully anticlockwise on the channels where no effects
are needed).
◆ The controls of the channel used
as 'effect return' allow to adjust
and address the external effect
return to the L/R master outputs
and to the aux output.
N.B: turn the 'AUX' control on
this channel to the '0' setting.
☞ will man den internen Effekt nicht,
soll man ihn ganz abschalten ('on'
Taste hoch).
◆ 'Send'-Buchse an den Eingang
des externen Effekt-Gerätes
anschließen.
◆ L/R Ausgänge des externen
Effekts an die L/R Eingänge eines
Stereo-Kanals anschließen.
◆ Mit dem 'Eff'-Regler pro-Kanal
bestimmen Sie die Stärke des
Effekts, dem das Direkt-Signal des
Kanals beigemischt wird (benötigen
Sie auf einem Kanal kein Effekt, dann
drehen Sie den 'Eff'-Regler zu).
◆ Die Regelungen des Kanals, der
als 'Return' dient, erlauben das
Effekt-Return in den L/R Ausgänge
und in dem Aux-Ausgang
einzustellen.
N.B: nel canale utilizzato come
ritorno effetto, girate il potenziometro 'EFF' in posizione '0'.
☞ si l’on veut exclure l’effet intérieur,
il est suffisant de l’éteindre, (touche
on soulevé).
◆ Raccorder la prise 'send' à la
sortie de l’effet extérieur.
◆ Raccorder les sorties L/R de
l’effet extérieur aux entrées L/R
d'une voie stéréo.
◆ Utiliser les départs 'eff' de
chaque canal pour régler la
quantité du signal à ajouter au
signal d’entrée (dans les voies où
l’on ne desire les effets, tourner le
contrôle 'eff' en position '0').
◆ Les contrôles de la voie utilisé
comme 'retour effet' permettent
de régler le retour de l’effet dans
le mixage L/R et monitor (aux).
N.B: porter le contrôle 'AUX' en
position '0'.
N.B: der 'AUX'-Regler dieses Kanals
zur Stellung '0' drehen !
STEREO INPUT CHANNEL
EFFECT SEND
▲
EXTERNAL STEREO EFFECT
IN THE CHANNEL
USED AS
EFFECT RETURN:
- ADJUST GAIN,
BALANCE, AUX,
TONES AND
VOLUME.
- SET THE EFF
CONTROL TO 0
EFF SENDS
ADJUST THE
QUANTITY OF
EFFECT ON
EACH CHANNEL
▲ ▲
L/R outputs
input
▲
EFFECT RETURN
☞
É possibile usare anche l'ingresso
'Tape-in' come 'ritorno effetto esterno'.
In tal caso il segnale dell'effetto in entrata
al mixer verrà regolato mediante il
volume 'tape in vol' e potrà solo essere
essere 'aggiunto' alla miscelazione finale.
18
☞ Also the 'Tape-in' can be used as '
☞ Auch der Tape-Eingang kann als
☞ On peut utiliser comme 'retour effet
external effect return'.
In this case the external effect return will
be adjusted by means of the 'tape in vol'
and added to the master mix without
being affected by the master controls.
Effekt-Return dienen. In diesem Fall
wird das Signal mit dem 'Tape In Vol'Regler eingestellt und der Summe
hinzugefügt (es liegt vor der Summe)
extérieur' aussi l'entrée 'tape-in' (qui est
indépendant de le mixage general) et,
dans ces cas, on utilise le contrôle
'tape in vol' pour régler la quantité de
signal de l'effet à ajounter à le mixage.
459
C / FIG. 5: TAPE IN-OUT
COLLEGAMENTO di un
REGISTRATORE STEREO
HOOKING UP a STEREO
TAPE RECORDER
ANSCHLUß eines STEREO
TONBANDGERÄTS
RACCORDEMENT d'un
MAGNETOPHONE STEREO
◆ Collegare le prese 'tape out'
del mixer alle prese 'line in' del
registratore.
◆ Collegare le prese 'line out'
del registratore alle prese 'tape in'
del mixer.
◆ Connect the 'tape out' sockets
of the mixer to the 'line in'
sockets of the tape recorder.
◆ Connect the 'line out' sockets
of the tape recorder to the 'tape in'
sockets of the mixer.
◆ Relier les prises 'tape out' du
pupitre aux prises die 'line in' du
magnetophone.
◆ Raccorder les prises 'line out'
du magnetophone aux prises
'tape in' du pupitre.
PER RIPRODURRE nastri già
registrati: porre il registratore
in riproduzione e regolare
opportunamente il volume
'tape in vol' del mixer (ed i volumi
di uscita del registratore, se
presenti).
FOR PLAYBACK: switch the
recorder to play and adjust the
'tape in vol' control on the mixer
(and the output volumes of the
tape recorder, if available).
◆ Die 'Tape Out' Buchsen des
Mischpults an die 'Line in'-Buchsen
des Tonbandgerätes anschließen.
◆ Die 'Line Out'-Buchsen des
Tonbandgerätes an die 'Tape In'Buchsen des Mischpults
anschließen.
PER REGISTRARE dall'impianto:
porre il registratore in registrazione
e regolare opportunamente i
volumi di ingresso del registratore.
Porre al minimo il volume di uscita
del registratore. Nel caso in cui il
vostro registratore non disponga
di questo controllo, scollegare i
cavetti dalle prese 'tape in'.
☞ Il segnale inviato al registratore
non dipende dalla regolazione dei
volumi master L/R.
N.B: l'ingresso stereo 'tape in L/R'
è un normale ingresso stereofonico
di linea ed è perciò possibile utilizzarlo per collegare qualsiasi segna-le
di linea (ad esempio le uscite di un
mixer, strumenti, expander...).
FOR RECORDING: switch the
recorder to the 'record' mode and
adjust the input volume of the
tape recorder. Set the output
volume control of the tape
recorder to its lowest setting.
In case your tape recorder has no
output volume control, disconnect
the cables from the 'tape in'
sockets.
☞ The signal sent to the tape
recorder is unaffected by the master
faders settings.
N.B: the stereo input 'tape in L/R'
is a normal stereo line input.
You can thus use it to connect any
line signal (such as the L/R outputs
of a second mixer, instruments,
expanders... ).
WIEDERGABE: schalten Sie
das Tonbandgerät auf Wiedergabe
und stellen Sie den 'Tape Vol'Regler nach Wunsch ein. Hat das
Tonbandgerät einen Lautstärkeregler, so ist dieser ebenfalls
entsprechend aufzudrehen.
Zur AUFNAHME vom Mixer:
bringen Sie das Tonbandgerät in
Stellung 'Aufnahme' und drehen
Sie den Aussteuerungsregler auf.
Stellen Sie den Ausgangslautstärkeregler des Tonbandgeräts auf die
niedrigste Stellung.
Hat Ihr Tonbandgerät kein
Ausgangsregler, sind die an der
'Tape-In' Buchse des Mixers
angeschlossenen Kabel
auszustecken.
☞ Das vom Mixer ankommende
Signal ist unabhängig von der
Stellung der Summenregler .
N.B: der 'Tape in L/R' Stereo-Eingang
ist ein normaler Stereo-Line-Eingang.
Er nimmt daher alle Line-Signale
ein und erlaubt den Anschluß von
anderen externen Geräte (L/R Ausgänge eine Mischpultes, Instrumente,
Expander...).
POUR REPRODUIRE des cassettes
deja enregistrèes: régler le
magnétophon sur 'reproduction'
et régler le volume 'tape in vol' de
façon appropriée (ainsi que les
volumes du magnétophone s'il y
a en a).
POUR ENREGISTRER a partir
du pupitre: mettre le magnétophone en fonction d'enregistrement
et régler les volumes de l'entrée
du magnetophone de façon
approprièe. Mettre le volume du
sortie du magnetophone au
minimum, ou désinsérer les cables
du 'tape in'.
☞ Le signal envoyé au magnetophone ne depend pas du reglage des
volumes 'master' L et R.
N.B: l'entrée stéréo 'tape in L/R' est
une normal entrée stéréo et peut
être utilisè pour brancher n'import
quel signal de ligne (pour example
les sorties L/R de un mixeur,
instruments, expander...).
STEREO TAPE RECORDER
TAPE IN VOL
LINE OUT
TAPE OUT
LINE IN
TAPE IN
459
19
D / SPECIFICATIONS
DATI TECNICI
SPECIFICATIONS
TECHNISCHE DATEN
DONNEES TECHNIQUES
Canale d'ingresso
• Micro (XLR - bilanciato)
sensibilità: -60dB
impedenza: 2,2 kohm
Input channel
• Micro (balanced - XLR)
sensitivity: -60dB
impedance: 2,2 kohms
Eingangskanal
• Micro (XLR - symmetrisch)
Empfindlichkeit: - 60dB
Impedanz: 2,2 kohm
Canal d'entrée
• Micro (XLR - symmetrique)
sensibilitè: - 60dB
impedance: 2,2 kohm
• Linea (jack - sbilanciato)
sensibilità: -32dB
impedenza: 10 kohm
• Line (unbalanced - jack)
sensitivity: -32dB
impedance: 10 kohms
• Line (jack - unsymmetrisch)
Empfindlichkeit: -32dB
Impedanz: 10 kohm
• Line (jack - asymmetrique)
sensibilitè: -32dB
impedance: 10 kohm
• Stereo L/R (jack - sbilanciato)
sensibilità: -48dB
impedenza: 33 kohm
• Escursione controllo gain: 30dB
• Stereo L/R (unbalanced - jack)
sensitivity: -48dB
impedance: 33 kohms
• Stereo L/R (jack - unsymmetrisch)
Empfindlichkeit: -48dB
Impedanz: 33 kohm
• Stéréo L/R (jack - asymmetrique)
sensibilitè: -48dB
impedance: 33 kohm
• Channel gain range: 30dB
• Kanal-Einstell-Bereich: 30dB
• Contrôle de gain : 30dB
• Rumore riferito all'ingresso: -124dB
• Noise referred to input: -124dB
• Rauschabstand: -124dB
• Bruit rapporté a l'entrée: -124dB
• Controlli di tono:
alti
±15dB @ 15 kHz
medi ±15dB @ 600Hz
bassi ±15dB @ 50 Hz
• Channel tone controls:
treble ± 15dB @ 15 kHz
mid
±15dB @ 600Hz
bass ±15dB @ 50 Hz
• Klangregelung:
Höhen ± 15dB @ 15 kHz
Mitten ±15dB @ 600Hz
Bässe ±15dB @ 50 Hz
• Contrôles de tonalité:
aigues
±15db @ 15kHz
moyennes ±15dB @ 600Hz
basses
±15dB @ 50Hz
Sezione effetti
Processore digitale stereo:
Riverbero, Eco, Alone, Eco+Riverbero
• Conv. AD/DA: 24 bit Delta-Sigma
Effects section
Stereo digital procesor
Reverb, Echo, Halo, Echo+Reverb
• AD/DA conv.: 24-bit Delta-Sigma
Effekt-Teil
Stereo digitaler Prozessor
Reverb, Echo, Halo, Echo+Reverb
• AD/DA Auflösung: 24 bit Delta-Sigma
Effects section
Processeur stéréo numerique
Reverb, Echo, Halo, Echo+Reverb
• Conversion AD/DA: 24-bit Delta/Sigma
• DSP: 56 bit
• DSP: 56-bit
• DSP: 56 bit
• DSP: 56-bit
• Banda passante: 40Hz÷15kHz
• Bandwidth: 40Hz÷15kHz
• Bandbreite: 40Hz÷15kHz
• Bande passante: 40Hz÷15KHz
• Rapporto segnale/disturbo: >85dB
• Signal-to-noise-ratio: >85dB
• Störspannungsabstand: >85dB
• Rapport signal/bruit: >85dB
• Distorsione: <0,1%
• T.H.D: < 0,1%
• Klirrfaktor: < 0,1%
• Distorsion T.H.D.: <0,1%
Effetto esterno
• Mandata effetto livello nom.: 0dB
External effect
• Effect send nom. level: 0dB
Effekt extern
• Effekt send nom. Pegel: 0dB
Effect exterieur
• Depart send: niveau nom. 0dB
Sezione master
• Risposta in frequenza:
25Hz÷25kHz, +0/-2 dB
Master section
• Frequency response:
25Hz÷25kHz, +0/-2 dB
Summe-Teil
• Bandbreite:
25Hz÷25kHz, +0/-2 dB
Section master
• Réponse en fréquence:
25Hz÷25kHz, +0/-2 dB
• Rapporto segnale/disturbo:
80dB (livelli nominali, eq.flat)
• Signal-to-noise ratio:
80dB (nom. levels, eq.flat)
• Störspannungsabstand:
80dB (nom. levels, eq.flat)
• Rapport signal/bruit:
80dB (niveaux nom, eq.flat)
• Equalizzatore grafico :
±12dB / 80 - 200 - 500 Hz,
1,6 - 4 - 10 kHz ±12dB
• Graphic equalizer :
±12dB / 80 - 200 - 500 Hz
1,6 - 4 - 10 kHz ±12dB
• Graphischer Equalizer:
±12dB / 80 - 200 - 500 Hz,
1,6 - 4 - 10 kHz ±12dB
• Egaliseur graphique:
±12dB / 80 - 200 - 500 Hz
1,6 - 4 - 10 kHz ±12dB
• Ingresso/uscita inserzione
L/R: livello nom. 0dB
• Insert in/out
L/R: nom. level 0dB
• In/out insert
L/R: nom. Pegel 0dB
• in/out insert L/R
niveau nom. 0dB
• Uscita ausiliaria (aux):
livello nom.: 0dB
livello max.: +22dB
• Aux output:
nom. level: 0dB
max. level: +20dB
• Aux Summe:
nom. Pegel: 0dB
max. Pegel: +20dB
• Sortie Aux:
niveau max.: +20dB
niveau nom.: 0dB
• Tape in: livello nom. -20dB
• Tape in nom. level: -10dB
• Tape in nom. Pegel: -20dB
• Tape in niveau nom.: -20dB
• Tape out: livello nom. -10dB
• Tape out nom. level: -20B
• Tape out nom. Pegel: -10dB
• Tape out niveau nom.: -10dB
Amplificatore (2 MosFet)
• Potenza totale:
200 + 200 W continui / 4 ohm
320 + 320 W di picco / 4 ohm
Verstärker (2 MosFet)
• Ausgangsleistung:
200 + 200 W continuous / 4 ohm
320 + 320 W peak/ 4 ohm
Amplificateur (2 MosFet)
• Puissance total de sortie:
200 + 200 W continuous W / 4 ohm
320 + 320 W peak W / 4 ohm
• Risposta in frequenza:
30Hz÷25kHz, +0/-2 dB
Amplifier (2 MosFet)
• Total output power:
200 + 200 W continuous W / 4 ohms
320 + 320 W peak W / 4 ohms
•Frequency response:
30Hz÷25kHz, +0/-2 dB
• Bandbreite:
30Hz÷25kHz, +0/-2 dB
• Réponse en fréquence:
30Hz÷25kHz, +0/-2 dB
• Protezioni: protezioni elettroniche,
relé per inserimento ritardato del
carico (5 sec.), autodiagnosi.
•Protections: electronic protections,
relais for delayed power-up sequence
(5 sec.), automatic troubleshooting.
• Die Endstufen sind elektronisch
geschützt und verfügen über
Einschalt-Verzögerungs-Relais (5 sec.)
und automatische Selbstdiagnose.
• Les amplificateurs disposent de
protections electroniques, relais pour
insertion retardée de la charge (5 sec.)
et autodiagnostique indépendante.
Dimensioni (lxhxp): 46,5x82x38 cm
(valigia:46,5x40x20 cm)
Dimensions (wxhxd): 46,5x82x38 cm
(case: 46,5x40x20 cm)
Abmessungen (BxHxT): 46,5x82x38 cm
(Koffer: 46,5x40x20 cm)
Dimensions (lxhxp): 46,5x82x38 cm
(valise: 46,5x40x20 cm)
Peso: 20 kg
Weight: 20 kg
Gewicht: 20 kg
Poids: 20 kg
20
459
D / SCHEMATIC DIAGRAM
459
21
D / CONNECTION EXAMPLE: LIVE / PIANO-BAR
passive speaker enclosures (8 ohms / 1 or 2 each output)
Montarbo
passive speaker enclosures (8 ohms / 1 or 2 each output)
powered stage monitors
Montarbo
Montarbo
Montarbo
☞ the aux/monitor output
can drive up to 10 parallel
connected power amplifiers
or powered enclosures
line
▲
powered output (200W / 4 ohms)
L/R insert (pre-out/main-in)
▲ ▲
▲▲
external equipment:
stereo equalizer, limiter, audio processor
etc... (as L/R pre-outs they can drive
powered speakers, external amplifiers..)
▲ ▲
micro
Aux / monitor output
▲ ▲
▲▲
powered output (200W / 4 ohms)
6 mono (1-6)
+ 2 stereo
inputs (8-10)
▲▲
▲▲
instrument
external stereo effects processor
22
▲▲
▲
send / aux
stereo input
▲
▲
L/R
L/R
7/8
9/10
stereo inputs
stereo instruments
(keyboards, expanders,
electronic drums
etc...)
459
tape
in/out
L/R
stereo tape recorder
Direttiva RAEE
Waste from Electrical and Electronic
Equipment
Europäische Richtlinie für Elektround Elektronikalt-/schrottgeräte
Directive Déchets d’équipements
électriques et électroniques (DEEE)
Attenzione !
Attention !
Achtung !
Attention !
Il prodotto è contrassegnato da questo simbolo che
segnala di non smaltire le apparecchiature elettriche
ed elettroniche tramite la normale ohmoprocedura
di smaltimento dei rifiuti domestici.
Per questi prodotti è previsto un sistema di raccolta
differenziato in conformità alla legislazione che
richiede il trattamento, il recupero e il riciclaggio
adeguato dei suddetti prodotti.
Per maggiori informazioni si prega di contattare
l’autorità locale competente.
La barra nera sotto il simbolo indica che il prodotto è
stato immesso sul mercato sopo il 13 Agosto 2005.
The crossed out wheeled bin symbol that can be
found on this product means that the product is
covered by the Waste from Electrical and Electronic
Equipment Directive. The symbol is intended to
indicate that waste from electrical and electronic
equipment must be subject to a selective collection.
For more details on available collection facilities
please contact your local government office or the
retailer where you purchased this product.
The solid bar underneath indicates that the product
has been put on the market after 13th August 2005
Ihr Produkt trägt dieses Symbol. Die durchgekreuzte
Mülltonne weist darauf hin, dass dieses Gerät nicht
über den Hausmüll entsorgt werden darf sondern
einem getrennten Rücknahmesystem zugeführt
werden soll. Informationen zur Entsorgung von
Elektro- und Elektronikgeräte erhalten Sie bei der
Stadtverwaltung, beim Entsorgungsamt oder in
dem Geschäft, wo Sie das Produkt erworben haben.
Le pictogramme ‘poubelle barrée’ signifie que
l’équipement ne peut être jeté avec les autres
déchets, qu’il fait l’objet d’une collecte sélective en
vue de sa valorisation, réutilisation ou recyclage.
Les appareils électriques et électroniques usagés
doivent être traités séparément et conformément
aux lois en vigueur en matière de traitement, de
récupération et de recyclage adéquats de ces appareils. Il existe un système de collecte spécifique
pour ces produits. Pour plus de details sur les sites
de collecte existants, veuillez contacter l’administra
tion locale ou le détaillant auprés.Le rectangle noir
en dessous de la poubelle barrée signifie que le pro
duit a été mis sur le marché après le 13 août 2005
Informazioni sullo smaltimento per gli utenti
privati
Nell’Unione europea
Attenzione: Per smaltire il presente dispositivo,
non utilizzare il normale bidone della spazzatura!
Le apparecchiature elettriche ed elettroniche usate
devono essere gestite a parte e in conformità alla legislazione che richiede il trattamento, il recupero e il
riciclaggio adeguato dei suddetti prodotti. In seguito
alle disposizioni attuate dagli Stati membri, i privati
residenti nella UE possono conferire gratuitamente
le apparecchiature elettriche ed elettroniche usate a
centri di raccolta designati*
In alcuni paesi (*), anche il rivenditore locale può
ritirare gratuitamente il vecchio prodotto se l’utente
acquista un altro nuovo di tipologia simile.
* Per maggiori informazioni si prega di contattare
l’autorità locale competente.
In paesi che non fanno parte dell’UE: contattare le
autorità localie informarsi sul metodo di smaltimento corretto.
In Svizzera: Le apparecchiature elettriche o elettroniche usate possono essere restituite gratuitamente
al rivenditore, anche se non si acquista un prodotto
nuovo.
Altri centri di raccolta sono elencati sulle homepage
di www.swico.ch o di www.sens.ch.
Informazioni sullo smaltimento per gli utenti
professionali
Nell’Unione europea
Attenzione: Se il prodotto è impiegato a scopi
professionali, procedere come segue per eliminarlo:
Contattare il proprio rivenditore Montarbo che
fornirà informazioni circa il ritiro del prodotto.
Potrebbero essere addebitate le spese di ritiro e
riciclaggio. Prodotti piccoli (e quantitativi ridotti)
potranno essere ritirati anche dai centri di raccolta
locali.
In Spagna: contattare il sistema di raccolta ufficiale
o l’ente locale preposto al ritiro dei prodotti usati.
In paesi che non fanno parte dell’UE: contattare le
autorità locali e informarsi sul metodo di smaltimento corretto.
459
Information on Disposal for Users (private
households)
In the European Union
Attention: If you want to dispose of this equipment,
please do not use the ordinary waste bin! Used
electrical and electronic equipment should not be
disposed of via the normal household waste stream
but must be treated separately and in accordance
with legislation that requires proper treatment,
recovery and recycling of used electrical and
electronic equipment. Following the implementation
by member states, private households within the EU
states may return their used electrical and electronic
equipment to designated collection facilities free of
charge*. In some countries* your local retailer may
also take back your old product free of charge if
you purchase a similar new one.
*= Please contact your local authority for further
details.
In other Countries outside the EU: If you wish to
dispose of this product, please contact your local
authorities and ask for the correct method of disposal.
In Switzerland: Used electrical or electronic equipment can be returned free of charge to the dealer,
even if you don’t purchase a new product. Further
collection facilities are listed on the homepage of
www.swico.ch or www.sens.ch.
Information on Disposal for Professional Users
In the European Union
If the product is used for business purposes and you
want to discard it: Please contact your Montarbo
dealer who will inform you about the take-back of
the product. You might be charged for the costs
arising from take-back and recycling. Small products
(and small amounts) might be taken back by your
local collection facilities.
In Spain: Please contact the established collection
system or your local authority for takeback of your
used products.
In other Countries outside the EU please contact
your local authorities and ask for the correct
method of disposal.
Entsorgungsinformationen für Benutzer aus
Privathaushalten
In der Europäischen Union
Achtung: dieses Gerät darf nicht in den normalen
Hausmüll geworfen werden !
Gemäß einer neuen EU-Richtlinie, die die ordnungsgemäße Rücknahme, Behandlung und Verwertung
von gebrauchten Elektro- und Elektronikgeräten
vorschreibt, müssen elektrische und elektronische
Altgeräte getrennt vom Hausmüll über dafür
staatlich vorgesehenen Stellen entsorgt werden.
Nach der Einführung der Richtlinie in den EU-Mitgliedstaaten können Privathaushalte ihre gebrauchten
Elektro- und Elektronikgeräte nun kostenlos an
ausgewiesenen Rücknahmestellen abgeben*.
In einigen Ländern* können Sie Altgeräte u.U. auch
kostenlos bei Ihrem Fachhändler abgeben, wenn Sie
ein vergleichbares neues Gerät kaufen.
*= Weitere Einzelheiten erhalten Sie von Ihrer
Gemeindeverwaltung.
In anderen Ländern außerhalb der EU:
Bitte erkundigen Sie sich bei Ihrer Gemeindeverwaltung nach dem ordnungsgemäßen Verfahren zur
Entsorgung dieses Geräts.
In der Schweiz: Gebrauchte Elektro- und Elektronikgeräte können kostenlos beim Händler abgegeben
werden, auch wenn Sie kein neues Produkt kaufen.
Weitere Auskünfte finden Sie auf der Homepage
von www.swico.ch oder www.sens.ch.
Entsorgungsinformationen für professionelle
Nutzer
In der Europäischen Union
Wenn Sie dieses Produkt für gewerbliche Zwecke
genutzt haben und nun entsorgen möchten:
Bitte wenden Sie sich an Ihren Montarbo Fachhändler, der Sie über die Rücknahme des Produkts
informieren kann. Möglicherweise müssen Sie die
Kosten für die Rücknahme und Verwertung tragen.
Kleine Produkte können möglicherweise bei Ihrer
örtlichen Rücknahmestelle abgegeben werden.
In Spanien: Bitte wenden Sie sich an das vorhandene
Rücknahmesystem oder Ihre Gemeindeverwaltung,
wenn Sie Fragen zur Rücknahme Ihrer Altgeräte
haben.
In anderen Ländern außerhalb der EU: Bitte erkundigen Sie sich bei Ihrer Gemeindeverwaltung nach
dem ordnungsgemäßen Verfahren zur Entsorgung
dieses Geräts.
Informations sur la correcte mis au rebut pour
les utilisateurs privés
Pays de l’Union européenne
Attention: si vous souhaitez mettre cet appareil au
rebut, ne le jetez pas dans une poubelle ordinaire
! Les appareils électriques et électroniques usagés
doivent être traités séparément et conformément
aux lois en vigueur en matière de traitement, de
récupération et de recyclage adéquats de ces appareils. Suite à la mise en oeuvre de ces dispositions
dans les Etats membres, les ménages résidant au
sein de l’Union européenne peuvent désormais
ramener gratuitement* leurs appareils électriques
et électroniques usagés sur des sites de collecte
désignés. Dans certains pays*, votre détaillant
reprendra également gratuitement votre ancien
produit si vous achetez un produit neuf similaire.
*= Veuillez contacter votre administration locale
pour plus de renseignements.
Pays hors de l’Union européenne: veuillez contacter
votre administration locale qui vous renseignera sur
la méthode d’élimination correcte de cet appareil.
Suisse: les équipements électriques ou électroniques
usagés peuvent être ramenés gratuitement au
détaillant, même si vous n’achetez pas un nouvel
appareil. Pour obtenir la liste des autres sites de
collecte, veuillez vous reporter à la page d’accueil
du site www.swico.ch ou www.sens.ch.
Informations sur la correcte mis au rebut pour
les utilisateurs professionnels
Pays de l’Union européenne
Attention: Si ce produit est utilisé dans le cadre des
activités de votre entreprise et que vous souhaitiez
le mettre au rebut: Veuillez contacter votre revendeur
Montarbo qui vous informera des conditions de
reprise du produit. Les frais de reprise et de recyclage
pourront vous être facturés. Les produits de petite
taille (et en petites quantités) pourront être repris
par vos organisations de collecte locales.
Espagne: veuillez contacter l’organisation de
collecte existante ou votre administration locale pour
les modalités de reprise de vos produits usagés.
Pays hors de l’Union européenne veuillez contacter
votre administration locale qui vous renseignera sur
la méthode d’élimination correcte de cet appareil.
Le informazioni contenute in questo
manuale sono state attentamente redatte
e controllate. Tuttavia non si assume alcuna
responsabilità per eventuali inesattezze.
Questo manuale non può contenere una
risposta a tutti i singoli problemi che
possono presentarsi durante l'installazione
e l'uso dell'apparecchio. Siamo a vostra
disposizione per fornirvi eventuali ulteriori
informazioni e consigli.
Les indications contenues en ce manuel ont
été attentivement rédigées et contrôlées.
Toutefois nous n'assumons aucune
responsabilité pour des éventuelles
inexactitudes. Ce manuel ne peut contenir
une réponse pour problèmes particuliers qui
pourraient se présenter lors de l’installation
et de l’usage de l’appareil. Nous sommes à
votre disposition pour d’éventuels conseils
et informations supplémentaires.
La Elettronica Montarbo srl non può essere
ritenuta responsabile per danni o incidenti
a cose o persone, causati o connessi
all’utilizzazione o malfunzionamento
dell’apparecchio.
Elettronica Montarbo srl ne peut être
consideré responsable des dommages causés
à des personnes ou à des objects lors de
l'utilisation du produit.
Tel. +39. 051. 76 64 37
The information contained in this manual
has been carefully drawn up and checked.
However no responsibility will be assumed
for any inexactitude.
This manual can not cover all the possible
contingencies which may arise during
installation and use of the product.
Should further information be desired,
please contact us or our local distributor.
Fax. +39. 051. 76 52 26
E-mail: [email protected]
Internet: www.montarbo.com
Elettronica Montarbo srl can not be
considered responsible for damages which
may be caused to people and things when
using this product.
Die in dieser Bedienungsanleitung
enthaltenen Hinweise wurden sorgfältig
bearbeitet und korrigiert. Es wird jedoch
keine Gewähr für die Richtigkeit der
Angaben übernommen.
Diese Bedienungsanleitung kann nicht alle
Richtlinien und Probleme berücksichtigen,
welche während der Aufstellung und
Verwendung des Gerätes entstehen
können. Sollten Sie Fragen haben, wenden
Sie sich bitte an uns oder an den für Ihr
Land zuständigen Importeur.
elettronica Montarbo srl
via G. di Vittorio 13
40057 Cadriano di Granarolo
Bologna, Italy
CARATTERISTICHE E DATI TECNICI POSSONO ESSERE MODIFICATI SENZA PREAVVISO.
ÄNDERUNGEN VORBEHALTEN.
SOUS RESERVE DE MODIFICATIONS.
Die Elettronica Montarbo srl haftet nicht,
für Personen- oder Sachschäden die durch
die Verwendung des Gerätes entstehen.
SPECIFICATIONS AND FEATURES ARE SUBJECT TO CHANGE WITHOUT PRIOR NOTICE.
459
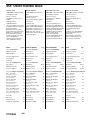
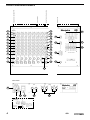

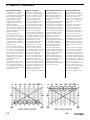
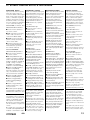
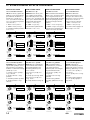


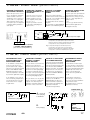
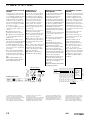
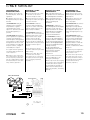
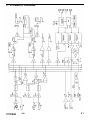
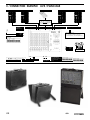
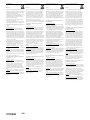
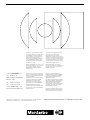


![[en] owner`s manual](http://vs1.manualzilla.com/store/data/006162832_1-909017f8e41cb525dbc302a6f278af8f-150x150.png)