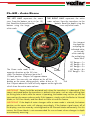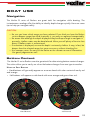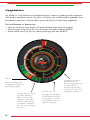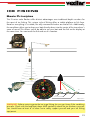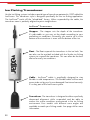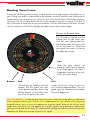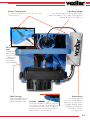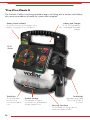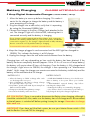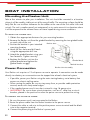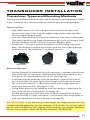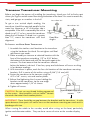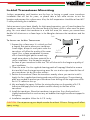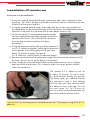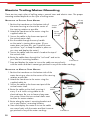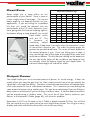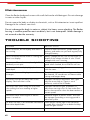
1
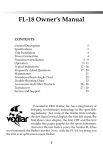
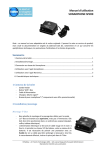
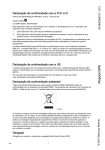
Vexilar FL Series Sonar/Fish Finders
Owners Manual
For Models:
FL-8SE | FL-12 | FL-18 | FL-20 | FL-22HD
Contents
Vexilar — Pioneers
in Marine Electronics
About Flashers
Flasher Operation
Basic Use
About the Display
Range Control FL-8se
Range Control FL-18
Range Control FL-12/20
Range Control FL-22HD
Setting the Gain
Interference Rejection
Low Power Mode
Auto Zoom
Bottom Lock
Low Battery Indicator
Understanding Zoom
FL-18 Zoom AutoZoom
FL-20 Zoom AutoZoom
FL-22 Zoom AutoZoom
Night Mode
Boat Use
Navigation
Bottom Content
Vegetation
Ice Fishing
Basic Principals
The Ice-Ducer™ System
Seeing Your Lure
Ice Fishing Systems
Genz Pack
Pro Pack II
Ultra Pack
Battery Status Indicators
Battery Charging
2
3
4
5
6
7
8
9
10
11
13
14
15
15
16
17
18
16
19
19
20
21
22
23
24
26
28
30
31
Boat Installation
Unit Installation
Power Connection
Transducer Installation
Types and Methods
Transom Mounting
In-Hull Mounting
AlumaDucer™ Install
Trolling Motor Mounting
Portable Options
About Transducers
Cone of Sound
Dead Zone
Output Power
Parts and Accessories
Vexilar Tri-Beam Ice-Ducer
Optional Transducers
Replacement Parts
Accessories
Trouble Shooting
Common Problems
Maintenance
Electrical Interference
Product Specifications
All Models
Service and Support
Contact
32
32
33
34
35
36
38
39
40
41
41
42
44
45
46
48
48
49
50
51
MNL010 RV4
1
Vex i l a r — Pio neers i n
Mar i n e E l ec t r o nic s
Established in 1960, Vexilar, Inc. has been a leading innovator of marine electronics
in the sport fishing industry for over 50 years. Some of their innovations include:
•
•
•
•
•
•
•
•
•
The first straight-line paper graph for sportfishing (model 155)
The first CRT (television) display (model 660)
The first color display (model DE-12)
The first fish alarm (model 120-SOS)
The first Liquid Crystal Display (LCD) (model 480)
The first self-leveling ice fishing transducer design (Ice-Ducer)
The first split-screen zoom flasher (model FL-18)
The first shoot-through-aluminum transducer design (AlumaDucer)
The first 10’ Range Flasher (FL-22HD)
With the recent introduction of the Edge family of liquid crystal sounders, they bring
the first true dual frequency/dual transducer sonar systems to the sport fisherman. The
FL series three-color flashers continue to lead the way in real-time high definition flasher
performance. Quality products backed by world leading customer service are the
bedrock of Vexilar, Inc.
A Long History of Vexilar Products
2
Abo u t F l a s h er s
How Sonar Works
SONAR stands for SOund NAvigation Ranging. Sound travels through fresh water at a
speed of approximately 4920 feet per second. A sonar device (depth finder/fish finder)
measures the amount of time a burst of energy takes to travel to the bottom and return to
the transducer. This time variation is then displayed on the readout of your sonar. When the
depth gets deeper, the time of travel for the sound increases. The burst of energy, known
as the transmit pulse, is generated by the sonar’s transmit circuitry. This burst is delivered
to the water via the transducer. The return signal , known as the echo, is received by the
receiver circuit, also via the transducer. A central processing unit makes the calculations
to determine the depth of bottom, as well as
other targets.
Flasher Wheel Stationary
The sonar signal sent from the transducer will
reflect, or bounce off of any object that has
a different density than water. This makes it
possible to detect not only the lake bottom,
but also vegetation and fish.
Lights turn
on and off
rapidly as
wheel is
spun
How Flashers Work
The sonar portion of a flasher works in the
same manner as any other graph or LCD sonar device. The
difference is in how the return signal is displayed. Instead
of adding the data to a progressive representation of the
bottom to construct a history, the data on the flasher display
always represents the current point in time, also known as
“real time”. The display consists of a wheel with indicator
lights mounted in one location. The wheel is spun at high
speed and the lights turn on and off rapidly to show the
sonar readings.
Flasher Wheel Spinning
The Vexilar Advantage
Vexilar’s sonar design offers an optimal balance between the power of the transmitted
pulse and the sensitivity of the receiver circuit. Excessive power has been shown to cause
premature transducer failure, distortion of the sonar signal, and possibly “spook” fish from
the audible noise they hear. Vexilar provides a balanced performance level for a wide
range of fishing scenarios.
3
Fla sh e r O p er atio n
Basic Use
The Vexilar FL series color flashers are great tools for open water and ice fishing. Once you
learn to understand the color display, you can apply this knowledge to greatly increase
your awareness of what’s under the water.
FL S eries F l ashers C an B e U sed F or :
•
•
•
•
•
•
Determining the current depth at any boat speed.
Locating fish-holding underwater structure.
Determining the bottom hardness and transition lines.
Penetrating thick vegetation to see what’s below.
Finding fish and the bait they feed on.
Watching your bait and the fish around it.
Operation of each of the flasher models is very straight forward. You simply turn the unit
on, select an appropriate depth range setting, and then an appropriate gain level setting.
You should change the range and gain settings only when the conditions change.
RANGE
Range determines the maximum depth of water in which the flasher can see the bottom.
For example, the shallowest range available on the FL-22HD is 0 to 10 feet. This means
that if the water depth is between zero and 10 feet, the bottom will be displayed on the
screen. If the water depth gets deeper than 10 feet, you’ll want to select a deeper depth
range in order to see the bottom.
DID YOU KNOW ?: It is usually best to select the shallowest depth range possible to see
the bottom. This allows the water column below to be represented by the greatest amount
of display screen area. This offers the highest resolution, makes things bigger and easier
to see.
GAIN
Gain controls the amount of amplification applied to the return sonar signal. Think of gain
as your volume control. You turn up the gain to see more of what’s below. You turn down
the gain to see less of what you don’t want to see. The goal is to find a gain level that
shows you as much real information as possible, without displaying stray signals of clutter
and interference. Keep the gain setting as low as possible for best overall performance.
INTERFERENCE REJECTION
This feature rejects sonar interference generated by other nearby depth sounders.
Interference Rejection, or IR, comes on automatically when you turn the flasher on, but
you can adjust the setting if desired. Learn more on page 11.
4
About the Display
The FL series flasher display consists of three colors (marks) which appear at various
positions on the screen. Understanding what the colors mean, and the position and size of
the colored marks, is the key to being able to interpret the information correctly.
RED = Strong Strength Signals. Strong signals are generally produced by
significant underwater objects, such as the bottom, heavy vegetation, and large fish.
However, smaller objects, such as bait fish, can display as red if the object is directly
under the transducer.
ORANGE = Medium Strength Signals. Medium signals are produced by
smaller objects and softer bottom types. Also, medium strength signals can be produced
by larger objects in the immediate area around, but not directly under, the transducer.
GREEN = Weak Strength Signals. Weak signals are produced by small
objects, such as light vegetation, bait fish, and even air bubbles or aquatic micro marine
life. Larger objects off to the sides of the transducer can also be displayed as green.
What is What ?
Here are the basics of what you will see on
the display of an FL series flasher.
The Zero mark always shows, even if
the transducer is unplugged. This mark
indicates the starting point.
Marks just beyond the
Zero mark can indicate
algae, floating vegetation,
or even “ice noise” caused
by thick ice conditions.
Marks beyond the bottom
mark can indicate either
hard objects within a soft
bottom or large objects
well off to the side.
Bottom is generally the
most prominent mark on
the display. Bottom usually
starts with a wide band
of red, with orange and
green trailing.
You read the
display in the clockwise direction. The
further around you
go, the deeper the
water.
READ DEPTH HERE: The current depth
is indicated by the leading edge of the
bottom mark. The depth is 12 feet here.
Fish, bait fish, and even
your lure, will show
anywhere between
the Zero mark and the
Bottom mark. Here,
a weak object shows
about a foot above a
much stronger object.
5
Setting the Range
FL-8SE
The FL-8SE has six depth ranges in two groups, Shallow and Deep. The Shallow group
includes Zero to 20’, 40’, and 80’. The deep group includes Zero to 30’, 60’, and 120’.
To interpret depth, you multiply the displayed reading by the range multiplier.
Deep Range Group
Look at the inner scale and the
right-hand multipliers in yellow
Shallow Range Group
Look at the outer scale and the
left-hand multipliers in white
S hallow G roup
• S-1 = Zero to 20 feet. Read the outer white scale directly.
• S-2 = Zero to 40 feet. Read the outer white scale and double the reading.
• S-4 = Zero to 80 feet. Read the outer white scale and multiply by 4.
D eep
•
•
•
6
G roup
D-1 = Zero to 30 feet. Read the inner yellow scale directly.
D-2 = Zero to 60 feet. Read the inner yellow scale and double the reading.
D-4 = Zero to 120 feet. Read the inner yellow scale and multiply by 4.
Setting the Range
FL-18
The FL-18 has 5 depth ranges. Zero to 20’, 40’, 60’, 80’, and 200’. To interpret depth,
you multiply the displayed reading by the range multiplier.
Normal mode selected
In normal mode, read the outer white scale and multiply by the
range setting. Here, the range is set to “x1”. Bottom is at 15
feet, a fish is at 12 feet, and there is a weak signal at 10 feet.
If the range control was set to “x2”, the bottom would be
interpreted as 30 feet, the fish at 24 feet, and the green mark
at 20 feet.
Reading the depth is the same in LP (Low Power) mode. Reading the depth in
AZ (Auto Zoom) or BL (Bottom Lock) mode is discussed on page 15
7
Setting the Range
FL-12 and FL-20
Both the FL-12 and FL-20 have five depth ranges consisting of Zero to 20’, 40’, 60’, 80’,
and 200’. To read depth, you match the color of the range selected with the depth scale
of the same color.
Match the color in which the range knob is pointing to the same colored
depth scale. Here, the range is set to 20 feet, which is yellow. To read
depth, look at the yellow scale on the flasher display.
If you change to the 40 foot range, you’ll look at the red depth scale, which
is just inside the yellow 20 foot scale.
For the 200 foot range, look at the outer 20 foot scale, but add a zero to
the reading, i.e. 10 feet would be read as 100 feet.
The 20’ Low Power range reads the same as the standard 20 foot range, except that using
this selection puts the flasher into Low Power Mode, which is discussed on page 13.
8
Setting the Range
FL-22HD
The FL-22HD has 6 depth ranges. Zero to 10’, 20’, 30’, 40’, 50’, and 60’. To interpret
depth, you multiply the displayed reading by the range multiplier.
Normal mode selected
In normal mode, read the yellow scale numbers and, if set beyond the 10’ range,
multiply by the range setting selected. In the figure above, if the range is set to “x2”.
The depth would then be 16 feet (8’ x 2), and there is a fish is at 8 feet (4’ x 2).
If the range control was set to “x3”, the bottom would be interpreted as
24 feet (8’ x 3) and the fish would be at 12 feet (4’ x 3).
Reading the depth is the same in LP (Low Power) mode. Reading the depth in
AZ (Auto Zoom) or BL (Bottom Lock) mode is discussed on page 15.
9
Setting the Gain
Gain functions are the same on all models. However, the FL-8se and FL-18 have a different
scale than the FL-12, FL-20 and FL-22HD.
G ain S cale
• The FL-8se and FL-18 use a zero to ten scale.
• The FL-12, FL-20 and FL-22HD use a Minimum to Maximum scale.
FL-8se / FL-18
Gain Control
FL-12, FL-20 & FL-22 HD
Gain Control
Gain controls the amount of amplification applied to the return sonar signal. Think of gain
as your volume control. You turn up the gain to see more of what’s below. You turn down
the gain to see less of what you don’t want to see. The goal is to find a gain level that
shows you as much real information as possible, without displaying stray signals of clutter
and interference.
Start at a low gain setting, near minimum. Turn up the gain, if necessary, until you see what
you want to see. Generally, gain levels between minimum and one third are adequate for
most situations. Higher gain levels should only be required to read in deeper water or to
see small objects.
DID YOU KNOW ? Gain can act as a variable cone angle. As you increase the gain level,
you can see things further away from the transducer. This can be helpful in uncluttered
conditions. If you don’t see anything on the screen (other than bottom), turn up the gain
temporarily and see if anything shows up. If it does, it could be a fish some distance away
from your transducer. Unfortunately, this won’t work in cluttered water, such as weedy
conditions, because the objects in the center of the cone will get amplified and overlap
anything on the outside, making these objects impossible to distinguish.
10
Interference Rejection
The purpose of interference rejection is to reduce cross-talk interference from other nearby
depth sounders. This can be very helpful if you have another sounder mounted on your
boat running at the same frequency as your flasher. It is also helpful when other fishermen
are running sounders operating at the same frequency as your flasher nearby.
Cross-talk interference occurs when the signals sent from one depth sounder are received
by another. If the two sounder’s frequencies are the same, each unit is unable to
differentiate between it’s own signals and others. What you see as interference is actually
the reading of the other sounder displayed on your screen. The signals can circle around
the display or remain stable. Beware of the stationary interference signals. They can lead
you to believe the depth is different than it is or that there’s a fish hanging below you
which really isn’t there.
Usually, when you see interference on one sounder, the other sounder will show it too.
Therefore, when you use your Interference Rejection to reduce or eliminate the interference
on your display, the other sounder will see a similar reduction. This means you can use
your Vexilar flasher next to another sounder which does not have the I.R. feature and both
sounders can run more clearly.
If two Vexilar units are operating together, you will get the best results by leaving the IR
control set at one level on one unit, while adjusting out the interference displayed on both
units using the second unit’s IR feature.
Interference occurs when the cone angles of two different sounders
operating at the same frequency intersect. It can also occur if the
sonar signal from one sounder bounces off an underwater object and is
received by another sounder.
To reduce interference from other units, use a narrow beam transducer (see page #42)
11
FL-8SE
and
FL-12
Interference Rejection comes on automatically when
you power up the flasher. You can turn it off by
pressing on the gain control.
If interference from another sounder is present on
the display, press this button repeatedly until it goes
away or is reduced as much as possible.
FL-18, FL-20
and
FL-22 HD
Interference Rejection comes on automatically when you power up
the flasher. If interference from another sounder is present on the
display, press the gain control repeatedly until it goes away or is
reduced as much as possible.
12
Add i t i o n a l Feat u res
Low Power Mode
( Not Available on FL-8SE )
Low Power Mode, or LP Mode, reduces the output power of your flasher. It is useful for
situations where the gain cannot be turned down enough in Normal Mode. Use the Low
Power Mode only when you need to. Usually, you’ll use it in only very shallow or very
weedy conditions.
FL-18
Activate the Low Power Mode (LP) by switching the Mode control to the
left. The range can be set at any position. If you switch to the left of LP,
you can activate the AZ or BL Modes in Low Power Mode.
FL-12 and FL-20
Activate the Low Power Mode by switching
the range control from OFF to the left. The
range will be set to 20 feet. You can use any
of the Mode settings in Low Power Mode.
FL-22HD
Activate the Low Power Mode by switching
the mode control from to the left. The first
low power mode provides a normal view.
The AZ 6’ Low mode places the unit in the
split-screen AutoZoom mode at low output
power. (see page 13)
DID YOU KNOW ? Low Power Mode will not affect how much battery power is required
to run the flasher. Switching to Low Power Mode will not significantly increase your running
time on a battery.
DID YOU KNOW ? You can have a Low Power Mode feature on an FL-8se too by
purchasing a Vexilar S-Cable. Learn more about it on page 45.
13
Auto Zoom ( FL-18, FL-20, & FL-22HD Only )
Auto Zoom (AZ) puts the flasher into a split-screen view, with the complete water column on
the right and a magnified view from the bottom on the left. When you switch to Auto Zoom
Mode, the flasher automatically selects the magnified bottom view for you. However, you
do need to have the flasher set to a depth range in which the bottom is in view.
FL-18
Activate Auto Zoom by switching the Mode
control to the AZ selection on the right or the
left. The right selection operates Auto Zoom
at the normal power level. The left selection
operates Auto Zoom in Low Power Mode.
See 12.
FL-22HD Auto Zoom
Activate the Auto Zoom by switching the Mode
control to the right for either the normal powered
AZ 6’ or AZ x2 (12’) setting. Turn the mode knob
to the left for Low Power AZ 6’. Please note that
the Auto Zoom feature will not function when
the range control is set to the 10 foot setting.
14
FL-20
Activate the Auto Zoom by switching the
Mode control to either the AZ 6’ or AZ
12’ setting to the right, or the AZ 6’ or AZ
12’ setting to the left. The right (Yellow)
settings operate with the display at full
brightness.
Bottom Lock ( FL-18 & FL-22HD Only )
Bottom Lock (BL) works the same as Auto Zoom, except the flasher continuously updates
the position of the bottom in the magnified view. This can be helpful in a boat that is
moving over varying depths or is riding in heavy waves.
Bottom Lock will keep the bottom reading lined up correctly with the zero mark on the
Zoom scale. This allows you to see objects which are very close to the bottom, even
though the depth may be changing rapidly. The range control must be set to a position
where the bottom is displayed in order for Bottom Lock to function.
FL-18 Bottom Lock (BL)
Activate Bottom Lock by switching the
Mode control to the BL selection on the
right or the left. The right selection operates
Bottom Lock at the normal power level. The
left selection operates Bottom Lock in Low
Power Mode.
FL-22HD Bottom Lock (BL)
Activate Bottom Lock by switching the
Mode control to the right BL 6’ selection.
This selection operates the 6-foot zoom
Bottom Lock at the normal power level.
Use Bottom Lock in your boat only.
IMPORTANT - Bottom Lock works best for boats in motion. When still fishing, such as
vertical jigging or ice fishing, the Bottom Lock feature can incorrectly identify a large
object slowly moving into your view as a shallower depth change. The result is that the
flasher adjusts to the new level and the object is displayed as the bottom.
Bottom Lock is not available on the FL-20
FL-20 & FL-22HD
Low Battery Indicator
When battery power runs low, the red “Low Battery”
indicator light will turn on. You can continue to use the
flasher, but be aware your time is rapidly decreasing.
When the indicator light begins to flash, failure due to
low voltage is imminent.
15
Understanding the Zoom Modes
When Auto Zoom (AZ) or Bottom Lock (BL) is active, the display is divided into two halves.
When reading depths always use the inner scale on the right side. When the range is set
to 20, read this scale “as is”. When the range is set to 40, double the reading. If set to
60, triple the reading.
FL-18 - Auto Zoom
THE LEFT HALF represents the zoom
view. From the bottom up to six feet.
Read the distance from the
bottom using the inner
yellow scale.
THE RIGHT HALF represents the entire
water column, from the water surface
to the bottom. Read the depth
using the inner yellow
scale.
Bottom
The Zoom scale reads in the
opposite direction as the full view
scale. The bottom will always be at
the 7 O’clock position. Objects will appear
above this point. You can only see objects as far
off the bottom as the zoom setting permits, which is 6
feet. Objects above this level will only appear on the right side,
which shows the entire water column.
16
Fish
FL-20 - Auto Zoom
THE LEFT HALF represents the zoom
view. From the bottom up to six (or 12)
feet. Read the distance from the
bottom using the large
white scale.
THE RIGHT HALF represents the entire
water column, from the transducer to the
bottom. Read the depth using the
inner red/white scale.
You interpret
the depth by
multipling the
indicated value
on the red/
white scale by
the multiplying
factor here.
The Zoom scale reads in the
Bottom
opposite direction as the full view
scale. The bottom will always be at the 7
O’clock position. Objects will appear above
this point. You can only see objects as far off the
Fish
bottom as the zoom setting permits, either 6 feet or 12
feet. Objects above this level will only appear on the right side
which show the entire water column.
20’ Range = 1x
40’ Range = 2x
60’ Range = 3x
80’ Range = 4x
300’ Range = 15x
IMPORTANT Zoom should be activated only when the transducer is submerged. If the
zoom is activated before the transducer is placed in the water, such as when moving from
ice fishing hole to hole while the zoom is operating, the bottom may not line up with the
zero mark on the zoom scale correctly. If this happens, simply switch the flasher to Normal
Mode, or Full View Mode, and then back to Zoom to reset the feature.
IMPORTANT If the depth of water changes while a zoom mode is selected, the bottom
position on the zoom scale will change accordingly. If the bottom signal moves off of
the display, reset the zoom by switching back to the Normal Mode momentarily. For this
reason, the Zoom Mode is not recommended for use on boats where changes in depth
are commonly occurring.
17
FL-22HD - Auto Zoom
THE LEFT HALF represents the zoom
view. From the bottom up to six feet.
Read the distance from the
bottom using the outer
white scale.
THE RIGHT HALF represents the entire
water column, from the water surface
to the bottom. Read the depth
using the inner white
scale.
The zoom scale reads in the
Bottom
opposite direction as the full view
scale. The bottom will always be at
the 7 o’clock position. Objects will appear
above this point. You can only see objects as far
off the bottom as the zoom setting permits, which is 6
feet. Objects above this level will only appear on the right side,
which shows the entire water column.
Fish
Night Mode
( FL-20 & FL-22HD Only )
Night Mode reduces the
flasher’s display brightness
to make night time viewing
more comfortable to your
eyes. The display intensity is
reduced by about 50%.
18
FL-20 To activate Night
Mode, switch the Mode
control to either the Full
View, AZ6, or AZ12
position to the left.
FL-22HD To activate Night
Mode or return the display to
full brightness, press and hold
on the top Gain control.
Boat U s e
Navigation
The Vexilar FL series of flashers are great tools for navigation while boating. The
instantaneous readings offer the ability to identify depth changes quickly. Here are some
tips to help you navigate safely.
CAUTION:
• Be sure you know which range you have selected. If you think you have the flasher
set to a deeper range than what it actually is, you may run aground unexpectedly.
• Be aware that although the depth displayed may be deep enough to navigate in
presently, shallow water may be dead ahead. Allow yourself plenty of time to slow
down if shallow water is encountered.
• If no bottom is displayed, assume the depth is extremely shallow. It may, in fact, be
deeper than the selected range, but never assume so without checking first.
• Use common sense. Do not trust the flasher as the ultimate source of information.
Use good judgement as well.
Bottom Content
The Vexilar FL series flashers are also great tools for determining bottom content changes.
The colors allow you to easily see when the bottom changes from one type to another.
H ard or S oft B ottom
• Hard bottoms will generally appear as a narrow band with color content of mostly red
and orange.
• Soft bottoms will appear a wide band with more orange and green than red.
Hard Bottom
Soft Bottom
19
Vegetation
The Vexilar FL series flashers are exceptional when it comes to reading inside vegetation.
With proper transducer choice, the colors will allow you to differentiate vegetation from
the bottom. Experience will even allow you to identify fish inside heavy vegetation.
T ips for R eading in V egetation
• Narrow transducer cone angles will perform better than wide cone angles.
• Keep the gain setting very low. Too much gain will make readings difficult.
• Move a boat slowly so you can identify openings that may hold fish.
Bottom
Bottom will always be
the largest group of red
and orange signals.
Possible Fish
Orange within the green
generally indicates
thicker sections of the
vegetation. Although it
warrants watching, as
it could also indicate a
fish on the outer edge of
your cone.
20
Although this red target
could indicate a clump
of vegetation, it could
also indicate a fish just
under the canopy
Vegetation has grown
up to this point. In
deeper water (beyond
several feet) this is
known as the canopy.
It’s where the tops of the
vegetation spread out
Ice F i s h ing
Basic Principles
The FL series color flashers offer distinct advantages over traditional depth sounders for
the sport of ice fishing. This unique style of fishing offers a stable platform to fish from.
Because everything is so stable, the only movements below are that of fish. Additionally,
the conditions allow you to drop your bait directly down into the center of the transducer’s
cone of sound. This allows you to be able to see your bait and the fish on the display at
the same time. You can tease the fish and see his reaction.
Water Surface
I9
40
60
80
55
I8
I7
35
2
5
I0
70
Di
sta
nc
ef
ro
m
I
I6
3
I0
4
20 I5 I0
I5 30 45 60
I4
40
30
50
I3 25
I2
II
40
30
20
I0
I5
5
6
20
7.5’
Ce
nt
er
of
Co
ne
8.1’
8.7’
7
8
9
Bottom at 11.7’
WARNING - Before venturing onto the ice to go fishing, be sure you know if the conditions
are safe. Check with the local bait shops AND cautiously check the ice thickness yourself.
You should have at least 6” of clear ice to safely support yourself and your ice fishing
equipment.
21
Ice Fishing Transducer
Vexilar ice fishing systems include a special type of transducer patented in 1997 called the
Ice-Ducer®. This transducer style is designed specifically for the ice fishing application.
The Ice-Ducer® works off the “plumb-bob” theory. When suspended by the cable, the
transducer cone is perfectly aligned to point straight down.
I ce -D ucer ® C omponents
Stopper - The stopper sets the depth of the transducer.
It’s adjustable so you can set the depth according to your
preference or conditions. Generally, you want to set it so the
bottom of the transducer is even with the bottom of the ice.
Float - The float suspends the transducer in the ice hole. You
can also use the eye-bolt included with the Vexilar ice fishing
systems to suspend the transducer. This can often be the best
choice for early ice conditions.
Cable - Ice-Ducer® cable is specifically designed to stay
flexible in cold temperatures. This flexible cable will be more
prone to be cut by your line or damaged if not stored correctly.
It’s a key part of the Ice-Ducer® system.
Transducer - The transducer is designed to allow a perfectly
downward alignment while suspended and be able to
endure the severe conditions encountered in the ice fishing
environment. Four models with different cone angles are
available to match your fishing needs. See page 44 for more
information.
22
Seeing Your Lure
The key to ice fishing success when using a Vexilar ice fishing system is the ability to see
your fishing lure and it’s relationship to the bottom, structure, and fish. Ice fishing with a
Vexilar allows you to present your lure to the fish. You see the fish on the display and you
raise your lure so it is right above the fish on the display. If the fish is hungry, it will bite. If
not, it will react in some way to your presentation, such as with disinterest or fear. You can
see this reaction on the flasher display and adjust your tactics accordingly.
T ypical I ce F ishing V iew
This illustrates a typical panfish
fishing view. As you lower your
lure, you see it going down on
the display while the curious fish
rise to see what it is. When the
two signal lines meet, it is time to
be ready for a strike.
Lure
With the gain control set
properly, your lure will appear
as a weak signal. You want it
to appear small next to the fish,
which are much larger.
Bottom
Fish
Fish
Several fish are holding near the
bottom. The thin green line right
on the bottom may be a fish just up
off the bottom, as the others are,
but some distance to the side.
A pair of fish are rising to your lure
as it is being dropped down. This is a
good sign, as competition can make
fish more aggressive.
DID YOU KNOW ? Setting the gain level correctly is important to be able to understand
what’s going on below you. Use the lure’s appearance as your reference for adjusting
the gain control. Set it so your lure appears as a green signal. Because the fish are much
larger than your bait, they will appear as stronger signals. Be prepared to readjust the
gain control up and down often, as small position changes and the condition of any bait
attached will effect the strength of your lure’s signal.
23
I ce F i sh ing S y s t ems
The Genz Pack
The Genz Pack offers a great value in an affordable ice fishing pack. It includes all of the
basic components needed to ice fish with a Vexilar FL series flasher immediately. A key
factor of the Genz Pack is that it fits on top of a five gallon bucket (not included).
Carry Case
The Genz “Blue
Box” is a two-piece
system made from
a high density
polyethylene.
Battery and Charger
12 Volt - 7 Amp Battery
with Charger
FL-8SE
Shown
Mounting Base
The large mounting base offers
ample room for the Vexilar flasher, or
other brands of sonar and GPS.
24
Carry Case Base
The base is designed to fit
perfectly on top of a fivegallon bucket.
Battery Compartment
To remove the battery, remove the four rear
section screws.
Transducer Holder
Store the transducer in the special holder
above the battery. The holder is designed to
accept all styles of Ice-Ducers.
Easy Charge
Jack
Charge the
battery here.
You do not need
to disconnect
the battery
connections
while charging
Cable Storage
Stuff extra cable into the
storage compartment
Eye-Bolt
under the flasher unit.
Insert the transducer support eye-bolt
here. Be sure to remove the float from
the transducer cable when using the
eye-bolt, which is commonly used on
lakes with thin ice conditions.
Accessories
Use the pre-drilled
holes for Vexilar add-on
accessories, such as the
FlexLight, Battery Status
Indicator and Tri-Beam
Transducer Switch.
See page 42.
25
The Pro Pack II
The Pro Pack II offers everything needed to begin ice fishing with a Vexilar color flasher,
plus some extra add-ons to make the system more complete.
Battery Status Indicator
Shows the current level of charge in the
battery. See page 30 for instructions.
Battery and Charger
12 Volt / 9 Amp battery
with 1 amp digital automatic
charger.
FL-12
Shown
Tackle Box
The Vexilar tackle
box fits into a
convenient location
here.
26
Eye-Bolt Storage
The transducer support
eye-bolt fits into a dedicated
storage location here
Rod Holder
Adjustable angle and
fits into either side of
the case
Carrying Case Base
The round base is designed to fit
inside a five-gallon bucket.
Battery Compartment
To remove the battery, remove the flasher from
the carrying case, then the transducer holder
by removing the two mounting screws.
Transducer Holder
Store the transducer in the special holder
above the battery. The holder is designed to
accept all styles of Ice-Ducers.
Accessories
Use the pre-drilled
holes for Vexilar addon accessories, such
as the FlexLight, or
Tri-Beam Transducer.
See pages 45 - 47.
Eye-Bolt
Insert the transducer
support eye-bolt here,
the pack’s front or far
side. Be sure to remove
the float from the
transducer cable when
using the eye-bolt.
Cable Storage and Cleats
Use the cable handle as your
cable storage and the tie-down
cleats on either side to keep it in
place and out of your way.
Easy Charge Jack
Charge the battery here. There is
no need to disconnect the battery
connections while charging.
Be sure to disconnect from
battery when putting the system
away for more than a week,
as the D-130 will drain your
battery.
27
The Ultra Pack
The Ultra Pack is rugged and packed with features. The Ultra Pack includes a D-130
Battery Status Indicator, tackle box, remote accessory posts, a strong float holding handle,
four rod holder mounting locations, an enclosed battery compartment and master power
switch.
Float Holder
Store the Ice-Ducer
float here.
Rod Holder
Adjustable angle and
fits into four mounting
locations; either side,
front and back.
Enclosed Battery
Compartment
The battery is enclosed within
the base here.
Battery and Charger
12 Volt / 9 Amp battery
with 1 amp digital automatic
charger.
28
Eye-Bolt
Storage
The transducer
support eyebolt fits into
a dedicated
storage
location here
Battery Status
Indicator
Shows the current
percentage of
charge in the
battery. See page
30 for instructions.
External Power Posts
Optionally use these
posts to connect a
battery charger (1 Amp
Max) and to power
external 12 volt
accessories (2 Amp Max).
Master Power Switch
Use this switch to turn
all power on and off,
including the power
to the external posts.
Remember that this
switch must be ON to
charge the battery.
Accessories
Tackle Box
The Vexilar tackle
box fits into an easy
access holder on the
back of your Ultra
Pack.
Use the pre-drilled holes for Vexilar addon accessories, such as the FlexLight or
Tri-Beam Transducer switch.
See page 44 - 47
Eye-Bolt
Insert the
transducer
support eye-bolt
here, on the
opposite side, or
in the front. Be
sure to remove
the float from the
transducer cable
when using the
eye-bolt.
Non-Slip Bottom
The non-slip
bottom fits into
a standard fivegallon bucket
for convenient
storage.
Cable Storage and Cleats
Use the area behind the
tackle box as your cable
storage. Use the tie-down
cleats on either side to keep
it in place and out of your
way.
Transducer Holder
Store the transducer in
the special holder behind
the battery compartment.
The holder is designed
to accept all styles of
Ice-Ducers.
Easy Charge Jack
Lets you charge the
battery by plugging
in your charger here.
29
Battery Status Indicators
D-130 Digital Status Indicator
A unique battery fuel guage
that recognizes both the
discharge and charge cycle
of your battery. It will sense
the current charging condition
of the battery, display the
percentage of remaining
capacity and display a
charge trend arrow...
(
or
).
T-130 LED Status Indicator
GREEN LED
100% to 75% Zone
YELLOW LED
75% to 50% Zone
ORANGE LED
50% to 25% Zone
RED LED
25% to 0% Zone
D-130
The D-130 will continue to measure capacity and
trend as long as it is connected to the battery.
When an additional “load” is applied to the
battery, the capacity will decrease according to
the load applied.
When the load is removed the digital readout
will remain at the last shown level and the trend
arrow will switch to ( ). This rebound indicates
the battery is starting to recover, but the digital
readout of the capacity will hold at its lowest
level unless you reset it by disconnecting and
reconnecting the D-130 to the battery.
T-130
ON LED
Power is connected. If no other LEDs are illuminated,
the voltage is very low.
IMPORTANT: The T-130 will not show an accurate
level when the charger is connected. Remember to
use the charger's LED as your "Charge Complete"
indicator. Also, the percent of charge shown will
vary with the temperature and battery load.
Readings will be most accurate when the flasher is
running and the temperature is above 50° F.
*If you continue to use the D-130 without disconnecting it, the D-130 will show the last capacity until the battery
falls below this point, then continue to decline with use.
When a charger is attached to the system, the digital readout of capacity will remain the same, up
to an hour, with an ( ) arrow indicating that it is receiving a charge before the digital readout will
start to advance. Note, with some batteries, the very top rating for a charged battery (12.7 volts)
or 100% rating will not stay at 100% even though it might be fully charged. This is normal.
Each battery charges differently and may be fully charged but reads 95%, instead of 100%. This
is a normal occurrence with batteries since not all batteries will hold the same top-end percentage
when fully charged and is not an indication of a poor or defective battery.
When you reconnect the D-130 to the battery, the display will show the current status of the battery
at that moment. Note that the D-130 needs to be connected to the battery before a charger is
connected to give an accurate reading.
IMPORTANT: Be sure the indicators are not on during long storage periods, as excessive
battery drain can result. For Pro Pack systems, disconnect the indicator from the battery
before storage. For Ultra Pack systems, be sure the master power switch is off.
30
Battery Charging
CHARGE AFTER EACH USE
1 Amp Digital Automatic Charger (model V-410 / 1 Amp)
1 Allow the battery to warm up before charging. This makes it
easier for the charger to charge the battery and the battery is
more accepting of a charge.
2 Plug the charger into a wall outlet, verify that it is operating
by noting the illuminated GREEN light.
3. Connect the charger to the Easy Charge Jack attached to the
unit. The charger’s light will switch to RED, indicating that it is
connected correctly and the battery is charging.
If your charger is NOT equipped with an Easy Charge Jack, connect the
terminals to the battery with the RED (+) connected to positive and BLACK
connected to negative (–). The charger’s light will switch to RED, indicating
that it is connected correctly and the battery is charging.
FLASHING RED INDICATES A REVERSE CONNECTION.
Easy Charge Jack
4. Keep the charger plugged in and connected until the RED light has changed to
GREEN. This indicates the battery is at full charge.
5. Unplug the charger from the wall outlet and disconnect from the battery.
Charging times will vary depending on how much the battery has been drained. If the
battery has been completely drained (approx. 24 to 30 hrs. of use on a 9 amp battery)
the battery will require about 9 hours of charging. Once the battery is fully charged and
the charger’s light returns to GREEN, the charger is then operating in a “Maintenance
Mode”. At this stage, the charger can remain connected to the battery indefinitely and the
battery will be maintained at full charge.
BATTERY DO’S
BATTERY DON’TS
• Allow the battery to FULLY recharge after each
use. Recharge after every use.
• Give cold batteries extra time to charge. Charge
at room temperature if you can.
• Keep flames, sparks, and metal objects away from
batteries and terminals.
• Charge periodically during battery storage.
• Disconnect the battery when not in use.
• OVER DISCHARGE the battery, You should never
drain a battery to the point where your Vexilar
stops.
• DISCONNECT exposed battery clips before
switching the charger OFF.
• Damage the battery or terminals by dropping.
• Use another device to determine if your battery is
fully charged. Go by the charger’s light alone.
DID YOU KNOW? There is no need to disconnect the flasher when charging, although it
should be switched off. Also, make sure the battery has a full charge and is disconnected
or that all power is switched off before putting it away for storage. Remember to charge
after each use.
IMPORTANT: If you have an Ultra Pack system, be sure your Master Power switch is ON
and the flasher is turned OFF for charging,
31
Boat I n s ta l l at io n
Mounting the Flasher Unit
Take a few minutes to plan your installation. The unit should be mounted in a location
where it will be readily visible yet out of the way of traffic. The mounting surface should be
fairly flat. Be sure to allow clearance for the cables at the rear of the unit while it tilts and
swivels. The unit is weather-proof, not waterproof, so try not to mount it in a location where
it will be exposed to the extreme forces of wave impact during severe conditions.
To
install the fl asher unit :
1. Obtain four appropriate fasteners for your mounting location.
2. Remove the flasher unit from the gimbal bracket by removing the two gimbal knobs
on each side of the unit.
Flasher Unit
3. Position the bracket in your intended
mounting location.
4. Mark the four holes and drill each
Rubber
using the appropriate drill size.
Washer
5. Attach the gimbal bracket using your
four fasteners. Tighten securely.
6. Replace the flasher unit into the
Gimbal Knob
gimbal bracket and tighten the
gimbal knobs snuggly.
Gimbal Bracket
Power Connection
Flasher Unit Assembly
Your flasher unit requires a 12 volt power source to operate. A connection can be made
directly to a battery or a connection can be tapped into a boat’s electrical system.
• If possible, power your flasher using the main starting battery, not a battery that
powers an electric trolling motor.
• When routing the cable, be sure to stay away from, or provide cable protection
around, areas with sharp metal edges.
• If the supplied power cord is too short, extend it using 18 gauge wire.
• IMPORTANT: Be sure to have circuit protection, such as a 1 amp fuse or circuit
breaker, placed in the positive line near the power source to protect the wiring.
To
connect the fl asher to power :
1. Be sure the power cord is not connected to the flasher.
2. Route the power cable from the flasher location to the power source.
3. Connect the white or red wire to the positive power source terminal and the black
wire to the negative terminal.
4. Connect the power plug to the flasher’s power jack.
32
Tra n sd uc er I ns tallat i on
Transducer Types and Mounting Methods
There are several different transducer styles used for the various mounting options available
to you. Choose the style which best meets the needs for your mounting application.
T ransducer T ypes
• High-Speed Transom: This style is designed to be mounted externally on the
transom of your boat. It has a special wedged shape to allow clear water flow
when running at high boat speed.
• Puck Style: Puck transducers are meant for attachment to an electric trolling motor.
They have a special curved shape and attachment slots just for this purpose. Pucks
are also commonly used for in-hull mounting within fiberglass boats.
• AlumaDucer™: This style is specially designed for in-hull mounting in aluminum
boats. The transducer overcomes the inherent signal loss when shooting through
an aluminum hull. The Alumaducer™ is a Vexilar exclusive.
High-Speed
Puck Style
AlumaDucer
M ounting M ethods
• Transom Mounted: the method by which the transducer is mounted external on the
back of the boat. The transducer is attached at the bottom of the transom with a
small portion of it extending below the hull line. (see page 34)
• In-Hull Mounting: the method by which the transducer is glued to the inside of
the hull of the boat. The sonar signal shoots through the hull and into the water.
The use of an AlumaDucer™ is required to achieve a full strength signal when
mounting in aluminum hulls. (see page 35 - 36)
• Trolling Motor Mounting: the method by which the transducer is attached to the
lower unit of the electric trolling motor. (see page 38)
• Portable Mounting: the solution when easy transducer removal from the boat is
desired. Generally, a suction cup bracket is used to attach either a high-speed or
puck style transducer to the rear of the boat. (see page 39)
DID YOU KNOW?: If you find that you have bought the wrong transducer for your
intended mounting application, you can exchange it with Vexilar. You will only need to
pay the retail cost difference, plus shipping, of the transducer style needed. Transducers
must be in new condition. Please call for more information: 952-884-5291
33
Transom Transducer Mounting
Before you begin the process of installing the transducer, check your hull to find a spot
where you’ll get a smooth water flow along the bottom of the boat. You want to avoid ribs,
rivets, and gouges or scratches in the hull.
Less than 10°
To get a true vertical depth reading, the
transducer should be mounted parallel to the
water line. However, a 10° tilt to either side is
acceptable. If the hull is reasonably flat with a
dead rise of 10° or less, mount the transducer
along the hull bottom. If dead rise is greater
than 10°, mount the transducer with level
alignment.
T o I nstall
the
More than 10°
< 10°
Dead Rise
Angles
> 10°
H igh -S peed T ransducer
1. Assemble the stainless steel brackets to the transducer
using the hardware furnished. Do not tighten until final
adjustments are made.
2. Place assembly on transom at selected location with the
front of the transducer extending 1/2” to 5/8” below
the bottom of the boat and with the front part against the
transom. The least amount that the transducer extends
below the bottom is desired. If too low, spray and turbulence will occur resulting
in lost bottom readings.
3. With transducer in place, mark the four slot locations of the transducer mounting
brackets. Drill in center of slot outline using a 9/64” (3.5 mm) drill.
4. Fasten the transducer to the transom using the
#10 x 3⁄4” screws, nuts and washer plates.
5. Before final tightening the 4 screws holding the
brackets to the transducer, tip the rear edge
down approximately 1/8” as shown.
6. Tighten all screws.
CAUTION. Do not use any thread locking compound
on the screws. Most products such as Loctite® contain
chemicals that attack and weaken plastics.
1/4” to 5/8”
DOWN
Tip Down
1/8”
IMPORTANT. There should be no gap between the brackets and the transducer. A wide
space between these parts will cause stress on the transducer mounting ears and result in
breakage with time.
When running the cable to the sounder, avoid other wiring on the boat, particularly
ignition and alternator cables. They can be a source of noise on the sounder display.
34
In-Hull Transducer Mounting
Surface preparation and location are the keys to having a good sonar transducer
installation that will last for years, so please take a few extra minutes to test the
location and prepare the surface area. Also, the hull temperature should be at least 60°
F while performing the installation.
Select an area in your boat. Ideally, for high speed operation, you will need to place the
transducer near the center of the transom area of the boat, which is often near the drain
plug. You must attach the transducer to a solid hull area; this means you cannot have
double hull aluminum or a foam layer in the fiberglass between the transducer and the
water.
Puck
T o I nstall
the I n -H ull
T ransducer
DOWN
1. Prepare the surface area. It is critical you find
a smooth, flat spot to place your transducer.
Small ridges, bumps or even paint under the
A.C.E.
transducer will affect the quality of the sonar
Adhesive
signal. Your surface preparation kit comes
with a Scotch-Bright® pad to smooth any
Boat Hull
rough areas down to the base material for a
secure installation. Use the pad to rough-up
the face of your transducer a little too. This will also aid in the long-term quality of
your installation.
2. Clean the area. Use the supplied cleaning patch of Isopropyl Alcohol to remove
dust and dirt from the target mounting area. Be sure to also wipe clean the face of
your transducer. Let dry for a few minutes.
3. Position the transducer. Place the transducer exactly where you want to install it.
Apply the four supplied positioning pads around the transducer. The positioning
pads are needed to prevent your transducer from drifting off the target area while
the A.C.E. adhesive sets up.
4. Mix and apply the epoxy. Follow the mixing directions on the packet of A.C.E.
Adhesive and apply the entire packet contents directly to the face of the
transducer.
5. Install the transducer. Place the transducer into position. Press firmly and twist
slightly back-and-forth to work-out any air bubbles that might have been trapped in
the epoxy.
6. Installation complete. Allow the A.C.E. to dry.
CAUTION. Do not power-up your depth sounder for at least 12 hours. Doing so will effect
epoxy curing.
35
AlumaDucer™ Transducer Installation
IMPORTANT PRE-INSTALLATION INSTRUCTIONS
The AlumaDucer mounted in-hull helps many boaters get better performance and
protection from damage than ever before using externally mounted transducers. The key
to good performance is to understand the dynamics of how water flows under your hull at
different boat speeds. Fiberglass boats often have a flat spot or “pad” on the very rear of
the boat. This flat area is ideal for transducers to get a good clear reading at high speeds.
With aluminum hulls, this area may not be as obvious. In welded, flat bottom Jon boats
it is often easy to find an area where smooth water without bubbles are flowing down
the hull of the boat. Boats with rivets, scratches, and/or dents along their bottom side
create more turbulence, so finding an area of smooth water without air pockets can be a
challenge, but it is possible in most cases. We highly recommend you test your boat to find
the optimal mounting location BEFORE installing the AlumaDucer. Here’s how to do it:
Select an area within one foot of the center keel of the boat and directly in front of the
bottom corner of the transom. This area is often near the drain plug. Your goal is to select
an area that is between ridges or rivets preferably in the center or towards the driver’s side
of the boat. You need to select an area of the hull that does not have a dent or depression
that might create a pocket of air while the boat is running at higher speeds. A simple
straight edge ruler can be used on the bottom of your hull to ensure you have selected a
non-warped area. Also, avoid areas of the hull where trailer bunks or rollers rest, as the
aluminum in these areas tend to flex slightly while trailering the boat.
M ounting L ocation T esting
1. Head to your favorite testing waters and launch your boat.
2. Fill the rear bilge area of your boat with about an inch of water.
3. Remove the protective film from the transducer face and place the transducer in the
water in the desired position.
4. Connect the AlumaDucer to your depth finder. You don’t need to do any fancy
routing of the cable for now.
5. Go for a boat ride. Make sure you get good strong readings at all boat speeds. If
not, move the transducer around until you do.
If you don’t have a friend to help drive the boat while you’re moving the transducer
around, use a zip lock bag with beach sand in it, or something similar, to keep the
transducer face firmly in place on the hull and under the thin layer of water you have in
your boat. Remember to consider the average weight distribution within your boat. Try to
compensate for your own weight during the test.
Once the “sweet spot” has been found, you simply drain your boat, dry the area thoroughly
and install the AlumaDucer by following the instructions on the next page.
36
Installation Procedures
I nstalling
the
A luma D ucer
1. Using the supplied Scotch-Brite® pad, remove any paint, dirt or coatings on the
aluminum. You MUST be down to the bare aluminum and the surface must be dry.
Wipe off all loose dust and dirt.
2. Using the supplied alcohol swab, wipe clean any dust or dirt you created from
the target area on the hull and the face of the transducer. Use additional cleanup
measures if required. Dry the area with a clean paper towel or rag.
3. Set the transducer in the prepared area and place
the four supplied foam positioning pads around the
transducer as shown. This will keep the transducer
from moving once the transducer has been
positioned.
4. Using the pre-measured packet, mix both elements of
the A.C.E. adhesive together, following the directions
on the packet. Once thoroughly mixed, you have
about 10 minutes to apply this special
A.C.E. Adhesive. (Accoustically Conductive Epoxy)
5. Remove transducer from the target spot. Apply the mixture to the transducer NOT
the boat. Be sure to use all the Epoxy in the packet.
6. Now, simply press the transducer back into the prepared area. Twist it slightly
back and forth several times. This is done to make sure no air pockets remain
under the transducer.
The special A.C.E. Adhesive will set
in about 30 minutes. Try not to move
the boat around during this period.
The foam pads you placed around
the transducer keep it from drifting
from the spot you have selected while
the adhesive cures overnight. Do not
turn your sonar “on” for 12 hours to
ensure a solid connection between the
transducer and the aluminum hull.
IMPORTANT: The hull temperature should be at least 60° F for proper curing of the A.C.E.
adhesive.
37
Electric Trolling Motor Mounting
There are two main styles of trolling motors: manual steer and electric steer. The proper
mounting method depends on the style of trolling motor.
M ounting
to
Route
Through
Cord
E lectric S teer M otors
1. Position the transducer on the bottom side of
Secure
the motor housing as close to the center of
Cable
the steering rotation as possible.
2. Attach the transducer to the motor using the
Route
Through
supplied cable tie.
Handle
3. Secure the cable to the lower-most part of
the vertical motor shaft.
4. Run the cable through the carry handle
on the motor’s steering drive motor. (If your
motor does not have this, you’ll need to come
up with an “eye” to keep the cable in place as
you stow and deploy the motor)
5. Secure the cable near the motor’s head at the top of
the vertical shaft.
6. Route the cable down through the “coil cord” and out to
your flasher’s mounting location.
Transducer
7. Stow and deploy the motor to insure the cable can move freely
with the motor and that it cannot get pinched in any of the motor workings.
M ounting
to
M anual S teer M otors
1. Position the transducer on the bottom side of the
motor housing as close to the center of the steering
rotation as possible.
2. Attach the transducer to the motor using the
supplied cable tie.
3. Secure the cable to the lower-most part of the
vertical motor shaft.
Secure
4. Route the cable up the shaft, securing it
Cable
every 3 or 4 inches using cable ties or
electrical tape. Be sure to leave a loop near
the section where the two vertical shafts meet
to allow for motor rotation.
5. Route along the motor’s mounting bracket and
out to your flasher’s mounting location.
6. Stow and deploy the motor to insure the cable
can move freely with the motor and that it cannot
get pinched in any of the motor workings.
38
Leave
Loop
Transducer
Portable Options
A suction cup bracket is an option if you want to quickly install and remove the transducer
from the boat.
BK0044
Fits all High-Speed style transducers and allows for readings
at speeds above the planing speed of the boat. Dual suction
cups offer a secure hold.
IMPORTANT: Suction cups can come
loose. Each bracket includes a safety
rope. Be sure to take the time to tie the
rope to the bracket and then to the boat
leaving as little amount of slack as you
can. If the cup(s) come lose, this will
keep your transducer and cable out of
the propeller.
BK0027
Fits all 2” Puck style transducers. (7°, 9°, 12°, and
9°/19°). Offers a secure hold and the ability to point
the transducer in a specific direction.
dual
DOWN
BK0023
Fits the 1” (19°) Puck Transducer. This bracket makes it
the smallest portable transducer option available.
Note - suction cup brackets do not include the transducer.
Did You Know?: Vexilar does not offer a suction cup bracket to fit the ice fishing style
transducers. This is because the Ice-Ducer cable is made to stay soft in very cold
temperatures. Therefore, it is very easy to damage in warm temperatures, thus open water
use is not recommended.
39
Abo u t T r a ns du c er s
Cone of Sound
The cone of sound is the area the sound waves cover as they are emitted from the
transducer. Generally, this area is thought of as three-dimensional cone, such as an
upside-down ice cream cone. In actuality, the cone of sound is not so precisely defined.
It is an irregular shape with edges that taper rather than end abruptly. Additionally, the
cone of sound will vary slightly from transducer to transducer.
Transducer
Theoretical Cone Angle
The theoretical cone
angle is what the
transducer’s specification
defines. This is the area
where the intensity of the
sounds waves drop to a
specific point (-6dB).
Side Lobe
Not all of the sound
waves come out
of the transducer’s
bottom. Some sound
comes out the sides
and even the top.
Main Lobe
The main lobe is
where most of the
sound waves go.
They extend out in
all directions, some
sides more than
others.
Most objects are visible inside the theoretical cone, but you can also see objects outside
the theoretical angle yet within the side and main lobes. These objects must be large
enough to sufficiently reflect the sonar signal. Some of these objects can be things like the
face of a sharp dropping bottom, a large rock, or even a good size fish or tight group of
smaller fish.
40
Dead Zone
Cone angle vs
Diameter of Coverage
D epth
8°
9°
12°
19°
20°
Beam angle has a large effect on the
10’
1.4’
1.6’
2.2’
3.4’
3.5
performance of your flasher. There is more to
20’
2.8’
3.2’
4.3’
6.7’
6.9
it than simply area of coverage. The correct
30’
4.2’
4.7’
6.3’
10.0’
10.6
beam angle to use depends entirely on your
40’
5.6’
6.3’
8.4’
13.4’
14.1
application. If you are fishing for suspended
50’
7’
7.9’
10.6’
16.7’
17.6
fish then you would be pleased with the
60’
8.4’
9.4’
12.6’
20.8’
21.2
performance of the 19° cone. However, if you
70’
9.4’ 11.0’ 14.7’
23.4’
24.7
were going after fish that are holding right on
80’
11.2’ 12.6’ 16.8’
26.8’
28.2
the bottom along a steep drop-off, you would
90’
12.6’ 14.2’ 20.0’
30.1’
31.7
have better results
100’
14’
15.7’ 21.0’
33.5’
35.3
with the 9°. This
120’
16.8’ 18.9’ 25.2’
40.2’
42.3
is
because
of
150’
21’
23.6’ 31.5
50.2’
52.9
something
called
dead zone. Dead zone is an area within the transducer’s cone
of sound that is blind to you. The wider the beam angle the
greater the possible dead zone. The sonar will mark bottom as
the nearest distance it sees. If you are fishing over a slope, it
may see the high side of the slope, at the edge of the cone, and
mark that as bottom. The fish that are holding on the bottom on
the low side of the slope will be invisible to you because they
are actually within the bottom signal on your depth finder. A
narrower beam angle will reduce this effect.
Output Power
Your depth finder puts out a constant amount of power, or sound energy. It does not
matter where you have the gain level set. Gain simply controls how much you amplify the
signal that is returned from below. Therefore, a narrow beam transducer will appear to be
much more powerful than a wide beam transducer. This is because you are putting that
same amount of power into a smaller area. This can be an advantage if you are fishing in
deep water or a detriment if you are fishing in shallow water. A narrow beam transducer
can be overpowering in shallow water. The use of the LP (Low Power) mode on your
flasher, or the optional S-Cable (page 42), will solve this problem.
Remember to NOT use LP mode or the S-Cable in depths beyond 20 feet. You will find
that you need to turn your gain control up much higher than normal. This will give a noisy
display and make interference from other units much more likely.
41
Vexilar Tri-Beam Ice-Ducer System,
WILL Put More Fish on the Ice
Vexilar invented and patented the first Ice-Ducer in 1997. A self-leveling transducer to
make it easy for the ice angler to get their transducer to hang straight down the hole. One
of the newest advancements in sonar technology to come around in a long time is the
all new Vexilar Tri-Beam Ice-Ducer transducer system. The innovation will totally change
the way ice anglers look at matching their fishing situation with the right transducer to
maximize the performance of their Vexilar.
Vexilar currently offers four Ice-Ducer options, the 19 degree Ice-Ducer, the 12 degree
IceDucer, the 9 degree Ice-Ducer and now the new Tri-Beam Ice-Ducer. The Tri-Beam
offers a combination of an 8, 12 and 20 degree Ice-Ducer in one housing. Different cone
angles are created by different size crystals inside the Ice-Ducer housing. A simple switch
box allows you to access the degree of performance you wish to have and they will fit
ANY Vexilar FL flasher, no matter how old!
The New Tri-Beam will allow the advantages of all three of these beam angles in a single
Ice-Ducer. The great thing is that the new Tri-Beam will fit any type or age of Vexilar
Flasher and with a simple switch box, you can see for yourself the differences in display
performance on your flasher.
Vexilar Tri-Beam
Ice-Ducer #TB0033
42
Understanding the Tri-Beam
Advantages
The first thing you will note about your Tri-Beam Ice-Ducer as you switch from one crystal
to another is that you will be required to adjust your gain setting. Fishing in 30 feet of
water with the Tri-Beam set at the 20 degree option will require you set your gain at about
a 2 setting, and this would be “normal”. As you go to the 12 degree or the 8 degree
you will find the signals get too strong and too blurry to see individual targets. You will
need to reduce your gain downward as you go with a narrower beam setting. This is
because the Ice-Ducer is outputting the same amount of energy but to a smaller area of
coverage.
The need for using all three settings on the Tri-Beam has really opened the world to
a new set of possibilities when fishing specific applications. One example would be
fishing shallow waters of under 10 feet. When most anglers are fishing shallow, their first
reaction would be to use only the wide angle 20 degree option on their Tri-Beam. While
it is true that you will be able to see more of the area below you, in many shallow water
settings, the weeds grow very thick and tall. A single stalk of weed could make seeing
your lure very difficult. By switching to the low power mode option on your sonar or
using an “S” cable or suppression cable, you will be able to dial down the power of the
narrower beams and the system will ignore the longer stalks of weeds on the outer edges
of the 20 degree cone and allow you to see a 30 to 50% clearer signal with less clutter
and confusion, thus making it easier to see and catch the fish below.
The Vexilar Tri-Beam Ice-Ducer will be a great benefit to the ever growing number of
traveling winter anglers who are no longer content to fish one lake or species. With the
Tri-Beam, your Vexilar can be used with greater effectiveness and far less interference
from other sonar than ever before, even when compared to single crystal Ice-Ducers.
At one particular fishing event where anglers were fishing deep water perch in 40 feet
of water the advantages of the Tri-Beam once again becomes obvious. If you try to fish
around a dozen anglers, all fishing in deep water for perch with a 19 degree Ice-Ducer,
the odds of using the IR button on your Vexilar to remove this level of interference is
impossible. With the use of the Tri-Beam you can literally dial out the interference by 80%
just by shifting to a smaller transducer cone option.
There is little doubt in the years ahead, winter anglers will discover more of the advantages
of the Vexilar Tri-Beam IceDucer to help get even more from their Vexilar sonar systems.
To Order, go to Vexilar.com/tribeam
or call 952-884-5291 during normal business hours.
43
Part s and A c c es sor i es
Optional Transducers and Conversion Kits
T ransom M ount H igh S peed S t yles
•
•
•
•
(25’ C able )
TB0044 - 19° Cone Angle
TB0084 - 12° Cone Angle
TB0030 - 9° Cone Angle
TB0045 - Dual 9° or 19° Cone Angle*
*Includes detachable switch assembly
T ransom S t yle C onversion K its
Transom style transducers
include the mounting bracket and
have 25 feet of cable length.
Conversion kits include the
transducer, flasher mounting
bracket, power cable, and
installation hardware.
• TK-144 - 19° Transducer Conversion Kit for
the FL-8se and FL-18
• TK-244 - 19° Transducer Conversion Kit for the FL-12, FL-20 & FL-22HD
• TK-184 - 12° Transducer Conversion Kit for the FL-8se and FL-18
• TK-284 - 12° Transducer Conversion Kit for the FL-12, FL-20 & FL-22HD
• TK-130 - 9° Transducer Conversion Kit for the FL-8se and FL-18
• TK-230 - 9° Transducer Conversion Kit for the FL-12, FL-20 & FL-22HD
• TK-145 - Dual Cone Transducer Conversion Kit for the FL-8se and FL-18
• TK-245 - Dual Cone Transducer with Conversion Kit for the FL-12, FL-20 & FL-22HD
• BK0044 - Suction Cup Mount for all of the above High Speed Transducers.
Offers dual suction cups for extra holding power.
P uck S t yles
•
•
•
•
•
(25’ C able )
TB0023 - 19° Cone Angle
TB0087 - 12° Cone Angle
TB0027 - 9° Cone Angle
TB0037 - 7° Cone Angle
TB0032 - Dual 9° or 19° Cone Angle*
*Includes detachable switch assembly
P uck S t yle C onversion K its
•
•
•
•
•
•
•
•
•
•
44
Puck style transducers include a
trolling motor mounting tie and A.C.E.
adhesive for in-hull mounting. All have
25 feet of cable length.
Conversion kits include the transducer,
flasher mounting bracket, power
cable, and installation hardware.
TK-123 - 19° Transducer with Conversion Kit for the FL-8se and FL-18
TK-223 - 19° Transducer with Conversion Kit for the FL-12, FL-20 & FL-22HD
TK-187 - 12° Complete Conversion Kit for the FL-8se and FL-18
TK-287 - 12° Transducer with Conversion Kit for the FL-12, FL-20 & FL-22HD
TK-127 - 9° Complete Conversion Kit for the FL-8se and FL-18
TK-227 - 9° Transducer with Conversion Kit for the FL-12, FL-20 & FL-22HD
TK-132 - Dual Cone Transducer Conversion Kit for the FL-8se and FL-18
TK-232 - Dual Cone Transducer with Conversion Kit for the FL-12, FL-20 & FL-22HD
BK0023 - Suction Cup Mount for TB0023 19° Puck Transducer
BK0027 - Suction Cup Mount for the 12°, 9°, 7°, and Dual Puck Transducers
A luma D ucer ™
• TB0023A - 19° Cone Angle
• TK-123A - 19° Transducer with Conversion Kit for FL-8se and FL-18
• TK-223A - 19° Transducer with Conversion Kit for FL-12, FL-20 & FL-22HD
I ce -D ucers
•
•
•
•
TB0050 - 19° Cone Angle
TB0080 - 12° Cone Angle
TB0051 - 9° Cone Angle
TB0033 - Tri 8°/12°/20° Cone Angles
S witches
•
•
•
•
and
E xtensions
AlumDucers come with
A.C.E. adhesive and have
25 feet of cable length.
Ice-Ducers come with float
and stopper. Cable length
is 7 feet.
CB0001 - 10 foot transducer cable extension
CB0002 - 20 foot transducer cable extension
SB-100 - Switch box for switching between two transducers on one flasher
SB-200 - Switch box for switching two flashers on one transducer.
T ransducer E xchange P olicy
If you find that you have bought the wrong transducer for your intended mounting
application, you can exchange your new transducer with Vexilar. You will only need to
pay the retail cost difference of the transducer style, plus shipping. Please call for more
information.
Replacement Parts
•
•
•
•
•
•
•
•
•
•
•
•
•
•
•
•
•
PC0001 - Power cord for the FL-8se and FL-18
PC0004 - Power cord for the FL-12, FL-20 & FL-22HD
GB0001 - Unit gimbal mounting bracket for FL Series Gimbal Mount Flashers
GBK001 - Gimbal Mounting bracket knobs (2 pieces)
FT-100 - Float with stopper for all Ice-Ducers
ST-100 - Stopper for all Ice-Ducers (2 pieces)
RB-100 - Eye-bolt support for all Ice-Ducers
RH-100 - Rod Holder assembly for Ultra Packs and Pro Pack IIs
CH-100 - Beverage Holder for Rod Holder.
TKB001 - Vexilar 4 by 6 inch tackle box
To Order, go to Vexilar.com
V-110 - 7 Amp Battery with Charger
or call 952-884-5291 during
V-120 - 9 Amp Battery with 1 Amp Charger
normal business hours.
V-410 - 12 Volt / 1 Amp Automatic Charger
V-100 - Replacement 9 Amp Battery.
V-50 - Replacement 7 Amp Battery
PDCA1 - 12 Volt Accessory Plug Power Cord (FL-8/FL-18)
PDCA4 - 12 Volt Accessory Plug Power Cord (FL-12, FL-20 & FL-22HD)
45
Acce ss o r ies
Ultra Pack Carrying
Case Only
This portable case has
all the features.
Upgrade your older
system or build a
custom new system.
Pro Pack II Carrying
Case Only
The latest generation
of our most popular
portable carrying
case.
UC-100
Genz “Blue Box”
Carrying Case Only
A solid carrying case
for your Vexilar flasher
or other electronics.
BC-100
Soft Pack for the
Genz Pack
Encloses and protects
the system. Offers
Velcro sealable access
locations and side
pocket storage.
SP0005
SP0007
FlexLight
Provides a bright white
light with very low
current draw. It’s
adjustable so you can
put the light where
you need it.
L-200
Sun Hood
Shields the display
on FL-8s, FL-8SLTs,
FL-8SEs, and FL-18s.
Easy assembly and
installation.
S-240
Soft Pack for the Pro &
Ultra Carrying Cases
Encloses and protects
the system. Offers a
clear zippered window
and access locations.
S-Cable
The suppression cable
reduces your flasher’s
output power. This
allows clearer
readings in shallow
or cluttered waters.
S-140
Mag Shield
Both magnifies and
protects the FL-8se or
FL-18 displays. Not
compatible with the
FL-12 or FL-20
Flasher Cover
Neoprene cover will
protect the flasher face
during transport and
storage. Fits models
FL-12, FL-20 & FL-22HD.
MS0001
46
PC-100
COV001
Tri-Beam Ice-Ducer
Gives you the option
to select from a wide
20° beam, a mid 12°,
or a narrow 8° beam
angle. Switch included.
TB0033
Pro Mount
Offers a swivel action
and quick removal for
your flasher or other
electronics. It’s durable
and economical.
Digital LCD Battery
Status Indicator
Shows the current
level of charge as
a percentage with
charge or discharge
mode indication.
Deptherm
Gives depth and
temperature. Just
attach it to your line
and drop it down.
104
SMC001
A.C.E. Adhesive
This acoustically
conductive epoxy
system is designed for
maximum performance
with minimal in-hull
transducer installation
effort
Beverage Holder
Fits into the rod holder
on the Ultra Pack and
Pro Pack II and allows
you to keep your
favorite beverage
close at hand.
D-130
Tackle Tote
A handy soft sided
tackle box that holds
three of our 4 by 6 inch
Vexilar tackle boxes.
Use it for all seasons.
ACE001
TT-100
CH-100
Vexilar Clothing
From caps to shirts and sweats to jackets,
Vexilar offers a wide range of styles and
colors with the Vexilar logo. Visit the
Vexilar web site or your local Vexilar Pro
Shop to find quality affordable clothing
you’ll enjoy wearing day after day.
Visit vexilar.com for more great gear and wear!
47
Maintenance
Clean the flasher body and screen with a soft cloth and a mild detergent. Do not submerge
in water or other liquids.
Do not expose the body or display to chemicals, such as fish attractant or insect repellent.
Damage to the surfaces can occur.
Do not submerge the body in water or subject it to heavy wave splashing. The flasher
housing is weather-proof for most conditions, but is not waterproof. Water damage is
not covered under the warranty.
Tro u b l e S h oot ing
S ymptom
P ossible C ause
Unit is turned on, but no display and motor is
not running.
Check for bad connections, proper hook up
polarity, and make sure you have a good, fully
charged, battery.
Unit is turned on and the motor is running, but
there is no display.
Battery voltage too low. The unit will show no
display if the voltage is below 8 volts. Check
voltage while unit is running.
Unit runs well for a short time, then lights flash
randomly or unit quits.
Bad battery or connection. Voltage may be
good when checked, but will fall as unit runs.
Unit runs and shows display light, but does not
read depth.
Transducer is not plugged in or not in contact
with the water.
Unit works, but needs high gain to see bottom
or targets.
Transducer is not aimed correctly or needs to
be cleaned. 19° transducers will have trouble
seeing small targets deep.
Unit works, but has too many lines on the
display. Can't tell what is what.
Improper transducer adjustment. Also, gain
may be set too high or, if gain is set to
minimum, switch to the LP Mode.
Unit works well when sitting still or at when
slow trolling, but loses reading at higher
speeds.
Improper transducer type, installation, or
adjustment causing a loss of clear water flow
across the transducer when the boat reaches a
certain speed.
Unit shows noise when engine or electric
motor is turned on.
Defective engine or electric motor. Also can
be improper grounding or missing ground in
electrical system.
I.R. does not work. Can’t eliminate interference Gain may be set too high or the transducer
from other depth finder.
is weak. Also, check for ice or debris buildup
under the gain control.
48
Electrical Interference
There may be situations where you experience interference from other electrical devices,
not just another nearby depth sounder. This interference will show on your display as
random signals which can appear anywhere. They will interfere with your ability to see
the normal display signals. The most common sources of interference are electric trolling
motors and engine ignitions systems. The Interference Rejection feature will not have
much effect on these types of interference, as this feature is designed to only deal with
signals from another sonar device. Here are some things to be aware of when it comes to
electrical interference.
S ources
Interference can be introduced into your sonar system through the power supply, transducer
line, or both. To identify the source, unplug the transducer and run the trolling motor or
the engine. If the interference disappears, you know the noise is coming in through the
transducer line. If not, it’s coming through the power line, or both.
W iring
Power line interference can generally be solved by improvements in the wiring positions,
connections, and grounding. You want to be sure the sonar wiring is as far away as
possible from the trolling motor wiring, and the wiring is neat. Make cable runs as short
as possible and neatly coil extra wire and tie it off so it stays put in rough water or
while pulling the boat. All electrical connections should be in very good condition. Pushon terminals should be tight. Wire crimp connections should not come free when pulled
firmly. Conductors should be shiny, not dull or corroded.
G rounding
The boat’s electrical system should have a common “Earth” ground to the water. Most
boats electrical systems are grounded through the outboard to the water. Many times a
electric trolling motor interference problem can be solved by a “ground” wire from the
negative trolling motor power source to the negative of the starting battery.
E quipment
Electric trolling motors and gas engines can have technical problems that can cause
interference. If common wiring improvements do not solve the problem, be sure to check
with the manufacturer to see if there are any recommendations or updates available
regarding interference with depth sounders.
For more information regarding interference issues, check the Support section of the
Vexilar web site or contact our service department.
49
Sp e c i f i c at io ns
Operating Voltage:
Current Draw:
10.5 - 15 Volts (12 Volts Nominal)
200mA
Power Output:
Frequency:
Display Resolution:
400 Watts (Peak to Peak) Maximum
200 kHz
525 Lines of Resolution
Target ID (FL-8se & FL-12):
Target ID (FL-18 & FL-20):
Target ID (FL-22HD):
1” Minimum
1/2” Minimum
1/8” Minimum
Display Colors:
Interference Rejection
Weight:
3 - Red, Orange, and Green
10 Steps
1.1 Lbs.
Dimensions (FL-8se & FL-18):
Dimensions (FL-12, FL-20 & FL-22HD):
Depth Scales
FL-8se: FL-12:
FL-18:
FL-20:
FL-22HD
4.4”H x 6”W x 3.5”D
4.8”H x 6”W x 2.4”D
0-20', 0-30’, 0-40', 0-60', 0-80', and 0-120'*
0-20’ LP, 0-20’, 0-40’, 0-60’, 0-80’, and 0 - 200
0-20’, 0-40’, 0-60’, 0-80’, and 0-200’**
0-20’ LP, 0-20’, 0-40’, 0-60’, 0-80’, and 0-200
0-10’, 0-20’, 0-30’, 0-40’, 0-50’, and 0-60’
* FL-8se Custom deep model available. Changes deepest range from 120’ to: 240’. Contact Vexilar
customer service for more information.
** Custom deep model available. Changes ranges to: 0-30’, 0-40’, 0-60’, 0-90’ and 0-300’.
Contact Vexilar customer service for more information.
50
Se r v i c e a nd S u ppor t
If you find that you need help please contact us. Have ready the model number and, if
possible, the serial number of your product. Please be sure to read this manual thoroughly
first.
A ddress
Vexilar, Inc.
6667 West Old Shakopee Road, Suite 101
Minneapolis, MN, 55438-2622
T elephone
(952) 884-5291
F ax
(952) 884-5292
E mail
[email protected]
W eb S ite
www.vexilar.com
Business Hours
8 AM to 4:30 PM M - F Central Time
51
A Different Kind of
Outdoor Television
Ice Fishing Today is the first TV show to be extensively
linked directly to the World Wide Web, and that is just
the tip of the iceberg. Many shows now have web sites
in conjunction with their show, but none that integrate
the show into the web so a viewer is free to learn more
and have easy access to additional information on demand. In producing any 30 minute
program, literally hours of video tape are not shown simply because of time restrictions.
Now with the access to streaming video clips, show host Tom Zenanko invites you
to watch the best ice fishermen in the country share their secrets, unedited and in
the extended play version, the way it was filmed. Fans of ice fishing will be able to
go to icefishingtoday.com and watch any of the programs along with bonus segments at
any time. The program will be aired on both broadcast and cable networks in targeted
markets all across the ice belt starting each November.
If you’re an avid ice fisherman, you’ll want to check out IceFishingToday.com
Vexilar’s Fish Scout Underwater Camera
The Fish Scout 1000 is a complete underwater viewing system that consists of a color
camera, color LCD 7” monitor, rigid carrying case with an enclosed 12 volt 9 amp hour
battery, D-130 battery status indicator, 1 Amp Digital charger and soft pack carrying
case. The system comes fully assembled and ready to use directly out of the box. Comes
standard with a two year factory warranty. This system is energy efficient and can run for
over 9 hours on a single battery charge.
Display
• 7” 16:9 widescreen LCD color monitor
• Operating range of -22° F to 150° F
• Monitor resolution: 480X3 (RGB)X234
• a-SI TFT active matrix display
• Video Out option
Camera
• Sony Super HAD CCD color/black and white camera
• Auto Gain control
• Lux: Color .51 – B&W - .05
• 90 degree viewing angle
• 420 lines of resolution
• 80’ slim high-strength cable
52
Visit Vexilar.com for More Info!