1
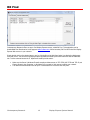
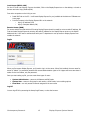
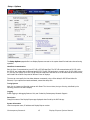
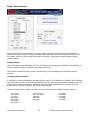
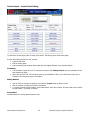
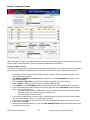
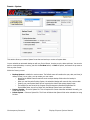
Product Manual Display Express Display Express PC Display Express Software Version 5.8.0, DX Update Version 5.8.1 July 27, 2012 Contemporary Research 1 Display Express System Manual Table of Contents Display Express Software Installation .................................................................................................... 4 What’s new in version 5.8.0/5.8.1 ................................................................................................................... 4 Introduction .................................................................................................................................................. 4 Display Express Service .................................................................................................................................. 4 Internet Information Services ......................................................................................................................... 4 Web Access to Display Express ....................................................................................................................... 4 Windows Firewall Exceptions for Display Express ............................................................................................. 5 Setup Tips for all Display Express Applications ...................................................................................... 6 Controller Installation ..................................................................................................................................... 6 PC Setup ....................................................................................................................................................... 6 Software Updates .......................................................................................................................................... 6 Display Express PC Setup ............................................................................................................................... 6 Subnet Mask: 255.255.255.0 .......................................................................................................................... 6 Gateway Address: 000.000.000.000 ................................................................................................................ 6 Telnet TCP Port: 2728 Telnet Access ............................................................................................................ 6 Head End Installation ............................................................................................................................. 7 RS-232 Control .............................................................................................................................................. 7 Ethernet Control ............................................................................................................................................ 8 Reset IP Address ........................................................................................................................................... 8 RF Setup ....................................................................................................................................................... 8 Display Zones .......................................................................................................................................... 9 DX Find .................................................................................................................................................. 10 Display Express ..................................................................................................................................... 11 Versions ...................................................................................................................................................... 11 Local Access (Within LAN) ............................................................................................................................ 12 Login .......................................................................................................................................................... 12 Setup – Options ........................................................................................................................................... 13 Head End Communication ......................................................................................................................... 13 Tuning System ......................................................................................................................................... 13 Logging ................................................................................................................................................... 13 Description ............................................................................................................................................... 13 System Information .................................................................................................................................. 13 Panel Page Header ................................................................................................................................... 14 Setup - Users............................................................................................................................................... 15 Setup – Name Displays and Zones ............................................................................................................... 16 Changing Zone Names .............................................................................................................................. 16 Display Names ......................................................................................................................................... 16 Setup – Groups ............................................................................................................................................ 17 Setup – Name Channels ............................................................................................................................... 18 Web Panels - Control, List, and TV Control Panels .......................................................................................... 19 Control Panels – Control Panel Editing ........................................................................................................... 20 Control Panels - TV Panel Editing .................................................................................................................. 21 Control Panels – Assigning Users to Panels .................................................................................................... 22 Presets – Macros.......................................................................................................................................... 23 Presets– Edit ............................................................................................................................................... 24 Editing Modes .......................................................................................................................................... 24 Macros or Commands ............................................................................................................................... 25 Presets – Advanced Presets ......................................................................................................................... 27 Creating a “Matrix” Preset ......................................................................................................................... 27 Presets – System ......................................................................................................................................... 29 External Presets ........................................................................................................................................... 30 Contemporary Research 2 Display Express System Manual Schedule - Control ....................................................................................................................................... 31 Schedule - Edit ............................................................................................................................................ 32 Schedule Modes ....................................................................................................................................... 32 Schedule Preset ........................................................................................................................................ 32 Alerts - Control ............................................................................................................................................ 33 Alerts - Edit ................................................................................................................................................. 34 Editing Modes .......................................................................................................................................... 34 Alert ........................................................................................................................................................ 34 Telnet Commands ........................................................................................................................................ 35 Display Express TCP ................................................................................................................................. 35 SSCmd ..................................................................................................................................................... 35 Contemporary Research 3 Display Express System Manual Display Express Software Installation What’s new in version 5.8.0/5.8.1 Custom Panel Header You can now create a custom panel header for control panels. Introduction Display Express is now available in two forms, an installation CD for Windows XP Pro. Windows 7 Pro PCs and Server 2003 servers, and preinstalled in a rack-mount PC. This manual covers both applications in three sections: Software Installation PC and System Setup Software Operation Display Express Service Display Express Service (manages data handling on Web pages) must be run on Windows XP Pro or 7 Pro 32- and 64- bit. After installation, the Display Express Service will be started automatically, and every time the computer is booted it will be started automatically. If you want to start the service manually instead, you can do this by going to Start Menu > Control Panel > Administrative Tools > Services. Scroll down to Display Express. By right-clicking, you can change the start option to manual. You can also start and stop the service using the Services Dialog. Internet Information Services Internet Information Services (IIS) should be installed on your computer before Display Express is installed. To find out if IIS is installed on Windows XP, click on Control Panel > Add or Remove Programs, then click on the Add/Remove Windows Components icon on the left. In the next window, scroll down and find Internet Information Services. If it does not have a check mark next to it, then it is not installed. To install IIS, click to put a check mark next to IIS, then click on Next, etc. You will need the CD used to install your operating system if the files are not installed on your hard drive, or the installation files may be stored in the server. On Windows Server 2003, look for Application Server instead of Internet Information Services in the Add/Remove Windows Components dialog. The PC will likely need to restart. On Windows 7, go to Control Panel > Programs and Features > Turn Windows Features On or Off > Internet Information Services (IIS), and check the box. Then, click on the + next to IIS, click on the + at World Wide Web Services, + at Application Development Features, then click the box for ASP.NET. Web Access to Display Express When you install Display Express, the installer gives you a choice of standalone, LAN or WAN configuration. In Standalone mode, no UDP/TCP ports are created, so only the user at the PC can access Display Express. In LAN mode, the ports are opened for local LAN access only, and WAN setting opens access to browsers outside your local LAN. Additional IT services are required to enable remote WAN access. To change access, manually uninstall the software from Control Panel, then re-install. No data will be lost. Contemporary Research 4 Display Express System Manual Windows Firewall Exceptions for Display Express If LAN or WAN configuration is selected during installation, three firewall exceptions will be created: Display Express TCP, TCP port 2728, (local area network or any computer) Display Express UDP, UDP port 2728, (local area network or any computer) http://localhost/DX, TCP port 80, (local area or any computer). Server Operation Presently, Display Express has been tested for installation on Server 2003, Windows XP and Windows 7 Pro, 32and 64-bit. Sites that use Display Express on a Server should use the ICE-HE Ethernet Head End. This unit can communicate to the server via Ethernet using Telnet, and then inserts the control commands over RF as a micro-channel between channels 4 and 5. Contemporary Research 5 Display Express System Manual Setup Tips for all Display Express Applications Your installation will go well if you keep a few key facts in mind. If you don’t understand a bullet point, read the rest of the manual or call CR Support. Controller Installation Create a spreadsheet and divide the system into Zones before you begin. Otherwise, you’ll need to change the controller addresses later on. Pre-test display control on at least one controller and display before starting. You can use a Head End and iC Send to test on and off control. In most cases, all displays and controller settings are the same across the system. If some are different, pre-test those, if possible. PC Setup Change the Time Zone when you install the PC. All the units are shipped sent to Central or Pacific Time. Also enable to synchronize with an Internet time server if possible (some networks may block that). Remote PCs will display the Display Express web server’s time and date on the browser. Software Updates New versions of Display Express can be installed over previous versions. You won't lose any data or settings. Updaters for existing Display Express software are available on the CR website, www.crwww.com/downloads. Display Express PC Setup General Windows 7 Pro 32-Bit software installed Web operation provided by Localhost IIS service Operating system and program files in C: drive Ethernet IP Address: 192.168.1.245 Subnet Mask: 255.255.255.0 Gateway Address: 000.000.000.000 Telnet TCP Port: UDP Port: 2728 2729 80 Web Access: Internal Access - http://localhost/DX/ External Access - http://<IP address>/DX/ External Access - http://<Computer Name>/DX/ Contemporary Research Telnet Access For remote Find access For Web Access 6 Display Express System Manual Head End Installation In most applications, the Display Express PC will be installed adjacent to a Contemporary Research ICC-HE Head End or ICE-HE Ethernet Head End. Both can receive commands via RS-232 and insert the commands into the RF system as a small control channel between TV channels 4 and 5. Instructions for connecting the DX PC to the ICEHE Ethernet Head End over IP are included on the next page. Additional instructions are included in the ICE-HE Head End manual. RS-232 Control Check the front panel of the Head End, as shown above, and see if the last 3 DIP switches under the RS-232 LED are set as follows: Switch 6 Off (Down) Switch 7 On (Up) Switch 8 On (Up) This sets the speed of communication to 19,200 baud. Next, connect the included RS-232 cable between the PC’s 9-pin RS-232 port or USB adapter to the RS-232 Remote Control port on the back of the ICC-HE. The ICE-HE can also receive control commands via IP. Tech Note. Do not use the RF IN on the HE to pass through the entire RF feed through the HE. It’s not a combiner input and doesn’t pass any RF. Connect the RF OUT to a combiner input with the rest of the cable and modulator feeds. Contemporary Research 7 Display Express System Manual Ethernet Control The ICE-HE typically communicates over a network using a static IP address, and is shipped set to a default address: IP Address: 192.168.1.251 Subnet Mask: 255.255.255.0 Gateway Address: 000.000.000.000 Odds are, at least the IP address will change when the ICE-HE is connected to the client’s network. One your first steps will be to obtain a static address from the client’s IT department, as well as an external gateway IP address if you intend on supporting the system from your office or anywhere outside the site’s firewall. Once you change the settings, create a label noting the settings and attach to the back of the ICE-HE. Reset IP Address If you change the default address and forget what it is later on, you can always reset the ICE-HE back to the default settings using the unit’s front-panel DIP switch 2. While the power is on, flip the switch off, then back on to reset the IP address. The IP and Subnet Mask will change, the Gateway will stay at its current setting. Since its possible another network device is using the default IP address, the best approach is to enter the new settings offline, outside the network. You can use one of two, requiring one of two offline options: 1. Direct PC Connection. Use an Ethernet “Crossover” cable to make a direct connection to the ICE-HE Ethernet port and your PC. Two pairs of wires are reversed at one end to create a direct send/receive path for data. 2. Hub or Switch Connection. Another approach for connection is to use a standard Ethernet hub or switch between your computer and the ICE-HE. Using standard Cat5 Ethernet cables, connect your PC to one port, then connect the ICE-HE to the second port. RF Setup The Head End sends the control channel at a level of 50 dBmV. In virtually all installations, the system installer has installed filters to the RF Out connection to match the level to the other RF channels. The manual that was shipped with the Head End provides more detail, if needed, can be downloaded from the Head End page in the www.crwww.com Web site. Contemporary Research 8 Display Express System Manual Display Zones Display Express assigns control to three entities: All Zones – All displays respond to a single command Zones – All displays within one of 15 Zones respond to a single command Single Display – Sends command to one display address When you design your Display Express system, arrange your display addresses into one of the 15 zones. This allows you to control a group of displays as if they were one display. Note that you can change the default names for Zones in Display Express – see Display – Setup in the Display Express section. You’ll discover that the ICC1-IR and ICC1-232 controllers typical for many Display Express RF control systems are designed to follow this Zone address format. You can use the 4 top switches in the second DIP switch to define the controller’s Zone. You could stop at that point, or use the upper switches to define the controller’s address within the Zone. For example, setting S2/1 On and S1/2 On defines that the controller is part of Zone 1 (256), and is the second unit in the Zone (2). The unique address of the controller would be 258 (256 + 2). The ICC2-ATSC follows a similar procedure – using front-panel programming, you set the unique Unit address (1-255), then the Zone (115). Use the chart below as a guide to setting your Zones and addresses. Zone 1 2 3 4 5 6 7 8 9 10 11 12 13 14 15 All Zones Device # 256 512 768 1024 1280 1536 1792 2048 2304 2560 2816 3072 3328 3584 3840 4095 Contemporary Research Unit 1-255 1-255 1-255 1-255 1-255 1-255 1-255 1-255 1-255 1-255 1-255 1-255 1-255 1-255 1-255 Total Device # 257-511 512-767 769-1023 1025-1279 1281-1535 1537-1791 1793-2047 2049-2303 2305-2559 2561-2815 2817-3071 3073-3327 3329-3583 3585-3839 3841-4094 9 Display Express System Manual DX Find Contemporary Research offers an app to find Display Express servers, called DX Find. This application can be downloaded from Download or Home pages at www.crwww.com. When launched, DX Find will find all the Display Express Web servers in your network. Simply double-click on the desired server row (or click the Bring Up Web Page button) to display the Web pages from that server. You can also find Display Express applications outside your network with the Add IP Addresses tab. To allow external access the IT department needs provide access: Make sure the Server’s Windows Firewall exceptions allows access to TCP 2728, UDP 2728 and TCP 80, set Change Scope to Any Computer, or My Network if you want to limit access to within your network. The network firewall needs to be set up for remote access to the server and UDP ports. Contemporary Research 10 Display Express System Manual Display Express Home Page Display Express manages displays via Web pages accessed from the local Display Express PC, any computer on the network, or remotely from a distant location. The pages are compatible with IE7-9, FireFox, Chrome, Opera, and Safari browsers. Tip: Don’t use the back or forward buttons on the browser – that will leave the server, but you can usually refresh to get back, but you’ll lose the data you entered if you haven’t saved the info. Versions Version 5 adds the ability to create any number of control panels, from a single column to 4 columns of 25 rows allowing simple access from any Web-enabled device, from Smartphones, tablets, laptops, or desktop PCs. This version adds another class of user – the Panel User. When this person logs in, they can only access the Web control panels assigned to them. Alerts can now be combined with Presets on custom DX Panels. Version 5.3.0 adds the ability to send custom commands to external devices over RS-232 or IP. Special iC-Net commands, such as changing IR code sets in IR controllers, can be included in Presets. Updates to Preset Control and improved database operation are also included. Version 5.6.0 adds the ability to create TV Control Panels, where a user can select a Zone or Groups of TVs, or a specific TV, and select channels, inputs, volume level or power. Contemporary Research 11 Display Express System Manual Local Access (Within LAN) On the PC that has Display Express installed, Click on the Display Express icon on the desktop, or launch a browser and enter http://localhost/DX/. From other computers on the LAN, you can: Install DX Find on the PC – it will locate Display Express for you (available at the bottom of CRwww.com home page. Point the browser to the Display Express URL on the network: o http://<IP address>/DX/ o http://<Computer Name>/DX/ Remote Access (WAN) For access outside the local LAN the PC hosting Display Express should normally be set as a static IP address. DX Find can locate Display Express by entering the static IP address for the Display Express server on the 'Add IP Addresses' tab. You’ll need to communicate with your IT department to set up access to Display Express from outside the network. Login When you first access Display Express, you’ll need to log in to the server. When first installed, the user name for access is “Admin” (no password) accesses full use and administrative rights to DX. Upper and lower case doesn’t matter for the User Name, only the password. Once you start setting up DX, you can create three types of users: System Administrator – access to all features and DX Panels System User – access to first panel in each section, all DX Panels, but no editing options Panel User – can only access DX Panels assigned to the user name Log Off You can log off DX by accessing the Home/Logoff menu, or close the browser. Contemporary Research 12 Display Express System Manual Setup – Options The Setup Options pages define how Display Express connects to the system Head End and basic channel tuning operation. Head End Communication Sets the form of communication to an ICC-HE or ICE-HE Head End. The ICC-HE communicates via RS-232, while the ICE-HE can handle data via Ethernet and RS-232. The RS-232 baud rate is normally set to 19,200. With Version 3.5, the user can specify up to four ICE-HE Ethernet Head Ends. Data will be set to all Head Ends at the same time, each Head End would be comprised of different Zones of displays. The user can now specify the time delay between commands, using a 20ms delay for RS-232 and 40ms for Ethernet; if you experience missed commands, extend the delay time. Tuning System Note, this is a legacy tool for older systems with Smart TVs. At most sites, the type of tuning is defined by the scanning process in the HDTV display. Logging Enable logging or debugging features. Only use if asked by Contemporary Research Support. Description Change the name of the Display Express app displayed when found by the DX Find app. System Information Lists the computer name, IP address and Display Express version. Contemporary Research 13 Display Express System Manual Panel Page Header You can customize the header for control panels by creating a header of your own design. The parameters are: Create a graphic that is 775 pixels high x 77 pixels wide. Format can be JPEG, PNG, or GIF. Copy the image to C:\Program Files (x86)\Contemporary Research\SignStream DX Service\WebApp\Header Go to the Options page and select the desired header You can also change the color of the Log Off text Contemporary Research 14 Display Express System Manual Setup - Users We’ve talked about this tool in the Panels section, primarily concerning setup of Panels Users. This page can also be used to create System Administrators and System users, similar to past versions of DX. What’s changed is that: Any user must log in to DX first You can create multiple System Administrators and Users o System Administrator – access to all features and DX Panels o System User – access to first panel in each section, all DX Panels, but no editing options o Panel User – can only access DX Panels assigned to the user name When password access is enabled, the user must login when first accessing the pages. If desired, the password can be saved using the browser’s “Remember Password” feature. Note that, if you save the password in User or Panel User mode, you may need to delete the password in the browser to enter admin mode (or use one browser for User access and another for Admin). Presently, Chrome 2.0 cannot remember the login password, but all other browsers are compatible with this feature. For added security, the password is encrypted when sent to the Display Express Web server. Contemporary Research 15 Display Express System Manual Setup – Name Displays and Zones In this section, you can create names for Zones and individual display controllers. Changing Zone Names The names of the Zones can be changed here. It’s useful to start the text with the Zone number to remember which Zone the name represents. The list will always be sorted by the numeric order of the actual Zones. Display Names When you need to control specific displays, it’s easier to find them by name. Using this tool, you can create a name for any specific address, and change or delete the name at any time. Note that Display Express Presets won’t be affected if you add, delete, or change a name. Contemporary Research 16 Display Express System Manual Setup – Groups The Display Groups enables creation of free-form Groups of displays. Unlike Zones, the list can include any individual or combination of controllers: Group – Select a Group, then click to add to the Group Zone - Select a Zone, then click to add to the Group Device - Select a named device, then click to add to the Group Device # - Enter a device number (address), then click + to add to the Group Also unlike Zones, a Group preset will take longer to execute, because will need to Send the commands to devices sequentially (A Zone command sends a single address that all displays in the zone will respond to). The sequence will be in the order of entry. Contemporary Research 17 Display Express System Manual Setup – Name Channels DX can now create a list of TV channels, so you can now tune by name, rather than having to remember the number of the channel. Editing is simple. Just add the Label (Name) of the channel, select HDTV or NTSC, enter the number, and Save. You can go back and modify the channel – handy when the cable company changes channel locations. Legacy Features Where the system includes older Smart CRT TVs, you can send or clear the channel names in the TVs and well as set list of channels the sets are allowed to tune (called Tune Rings). HDTV sets don’t include the ability to name or control tuning. That is managed by the set’s internal channel scanning. TV Input/Captions Selection It is possible to control input selection via Display Express as well. This is available for a limited list of IR controlled sets (LG, Panasonic, Visio, and ViewSonic) and RS-232 (LG) at this date, but we can add the capability to other IR and RS-232 sets when the need arises. Captioning does the typical IR toggling function, most sets don’t have discrete caption on and off commands. Not all sets have every input. You set up Inputs just like a channel, but define it as a zero HDTV channel (0-NNN). The Input codes are: 115=Captions 200=TV/Tuner 201=Video1 202=Video2 203=Video3 204=S-Video1 205=S-Video2 Contemporary Research 206=Component1 207=Component2 208=RGB1 209=RGB2 210=RGB3 18 211=HDMI1 212=HDMI2 213=HDMI3 214=HDMI4 215=HDMI5 Display Express System Manual Web Panels - Control, List, and TV Control Panels Control Panel All Preset List TV Control Panel The Control page offers three ways to access Presets: Control Panels – Select from the Default or any number of custom control panels. The Administrator and System User can choose any panel created for any user. TV Panels – Select a Zone, Group, or specific TV to change channels, inputs, volume or power. All Presets. Sends a saved Preset group of commands to displays. iPad/iPhone “App Icon” On an iPad or iPhone, use Safari to access the site’s DX Express web server. Login with the assigned User name and password, and all the DX Panels created for the user appear. A drop-down menu at the top of the page will select between assigned Panels. To turn those Panels into an App, click the “boxed arrow” button at the top left of the page, then select Add to Home Screen. You’ll then have the option to name the app icon, and it will place the link on the phone that will open Safari to your personal Panel. In iOS, the link will appear to bypass the login, jump directly to the user panels. This is because in iOS, Safari never actually closes. If you turn off power, you’ll need to log in again. Contemporary Research 19 Display Express System Manual Control Panels – Control Panel Editing To create the Control pages, click on Setup, then Panels. That brings up the setup Panel page. As with other editing functions in DX, you can: Create a new panel Edit an existing panel Copy an existing panel (handy when pages are only slightly different or use a similar layout) Formatting You can select a layout of up to 25 rows and 4 columns. Click Change Layout once you selected the rows and columns you want. Next, click the Font Size. This will set the font as you add buttons. Also, if you switch fonts when you’re finished, it will change the fonts in all buttons. Adding Buttons Use the “Click on a button to assign it to this button” Preset menu to select a Preset Click on a button to assign the Preset to the button. To remove a Preset from the button, select Clear Button, then click a button. It’s also a fast way to remove several buttons – just keep on clicking. Presentation Use blank buttons to create spaces between rows. Contemporary Research 20 Display Express System Manual Control Panels - TV Panel Editing Creating TV Control panels is similar to Control Panels, the difference is you are defining buttons that represent a Zone, Group, or individual TV. As with other editing functions in DX, you can: Create a new panel Edit an existing panel Copy an existing panel (handy when pages are only slightly different or use a similar layout) Formatting You can select a layout of up to 25 rows and 3 columns. Click Change Layout once you selected the rows and columns you want. Next, click the Font Size. This will set the font as you add buttons. Also, if you switch fonts when you’re finished, it will change the fonts in all buttons. Adding Buttons Select a Zone, Group or Display Click on a button to assign the TV to the button. To remove a TV from the button, select Clear Button, then click a button. It’s also a fast way to remove several buttons – just keep on clicking. Contemporary Research 21 Display Express System Manual Control Panels – Assigning Users to Panels This page can be used to create login names and passwords for Administrators and Users with System-wide access. DX 5.0 features a new class of users – Panel Users. This class of users can only access custom control panels when they login to the server. A System admin or System user can create and see all the control pages, as well as Presets, Schedules, and System features. The types of User access are: System Administrator – access to all features and DX Panels System User – access to first panel in each section, all DX Panels, but no editing options Panel User – can only access DX Panels assigned to the user name Assigning pages to Panel Users Create a user Name and Password (leave Password blank if you want to). Highlight a panel on the right list, then click the arrow button to add the panel to the user. Highlight a panel name in the user’s list, then click the “X” button to remove from a user. When a Panel User logs in to DX, they will only see the panels assigned. A pull-down menu at the top of the page will allow the user to select from multiple pages. Contemporary Research 22 Display Express System Manual Presets – Macros A totally new feature to Display Express, this option is actually brought forward from the older IC Commander software. Macros contain the same control option used in creating basic Presets. The difference is that you can now save the group of commands by name, and reuse them in making Presets – this saves having to re-enter them when you create Presets. To start, select: Create New Macro – Clears values in the Macro fields. Edit Existing Macro – Fills in the values from the selected Macro. Change and Save. Copy Existing Macro – Copies the values from the selected Macro. Change and Save. Then select (click the checkbox at the left to include the values in the Macro): Power - Set Power On or Off. HDTV Channel – Enter HDTV channel in dashed (XX-X) or CableCard format (XXXXX) NTSC Channel – Enter desired analog channel (digital TVs will ignore this Preset) Volume - Set volume level 0 (Mute) to 63 (Full) Control Lock - Enable or disable display’s front-panel and IR control (not all sets have this feature) Tune Ring – For legacy analog Smart TV control, defines list of channels accessible by user Save/Restore - Allows you to create and schedule Alerts. When Save is included, the display controllers will remember the power state and channel, then activate the new commands in the Preset. See page 18 for more information. Command String. See the Preset-Edit – Macros or Commands section for more information To test the Macro, select a Display Group, Zone, Name or number, and click Send. For basic DX applications, you don’t need to create Macros, just add the control commands when you create the Preset. In more complex systems, especially for Advanced Presets, macros can be very helpful. Contemporary Research 23 Display Express System Manual Presets– Edit The Display Edit page offers the ability to create, copy, or edit new display control Presets. Display Express assigns control Presets to three entities: Editing Modes Create New Preset – Clears values in the Preset fields. Edit Existing Preset – Fills in the values from the selected Preset. Change and Save. Copy Existing Preset – Copies the values from the selected Preset. Change and Save. Displays Group – Send preset to a named group Zones – All displays for all or one of 15 Zones respond to a single Preset Display – Selects display by name (see Displays-Names) Display# – Selects a display by entering an address Operations Save – Saves Preset Delete – Delete Preset Send – Sends Preset for testing operation Manual Control In addition, you can select any Group, Zone, and Display, then enter a command on the right, then click SEND to send a command without saving as a Preset, or testing a Preset before saving. Contemporary Research 24 Display Express System Manual Macros or Commands Use Macro – Choose from a list of named control commands Use Commands – Enter commands from list below Add or change values to an existing or new Preset. Parameters that are checked on the left will be sent, those unchecked will not be saved or sent. You can start with selecting a Macro, then change one or two of the options in the Command window. The values in the original Macro won’t be changed. Name – Enter a name for a new or copied Preset. Zone – Select from 15 Zones or All Zones. Single Display – use radio button to select a Preset to a specific display. Power - Set Power On or Off. Try not to include Power On with every Preset, use it to power on the displays at the beginning of the event or day. The controllers have built-in delays after power on, as display often can’t receive other commands during power-up. HDTV Channel – Enter HDTV channel in dashed (XX-X) or CableCard format (XXXXX) NTSC Channel – Enter desired analog channel (digital TVs will ignore this Preset) Volume - Set volume level 0 (Mute) to 63 (Full) Control Lock - Enable or disable display’s front-panel and IR control (not all sets have this feature) Tune Ring – For legacy Smart TV control, defines list of channels accessible by user Save/Restore - Allows you to create and schedule Alerts. When Save is included, the display controllers will remember the power state and channel, then activate the new commands in the Preset. When Restore is included, the controllers will return to the previous channel and power state. Also include a Volume setting with a Restore command to return the sets to a new audio level. The controllers don’t store volume level with Save. Command String. In addition to typical display commands, there are other rarely used IC-Net commands that can be sent when needed, provided with system documentation. This includes: o Set display code - instructs a controller to use a different set of control codes for a different make and model of display. o Test basic display operation before presets have been defined. Select a Zone, Group, a named display, or a display address. Then enter P1 turns power on P0 turns power off TC, nnn tunes in an analog channel (TC,33) tunes in channel 33 TH,nnn,nnn tunes in a digital channel (TH,15,1 tunes in channel 15-1 Other special commands are listed on the next page o Make – specific commands o LG Typical format will be UX,'kc 0 2',13 (command sets TV to 16:9 ratio). Refer to the set’s manual for other commands. For most, you will change the values for the command (kc) and the data (2). o Sharp has a similar (but different) format: UX WIDE9 ,$0D for the standard Full wide screen command. Contemporary Research 25 Display Express System Manual The chart below covers the most common commands that can be sent via the Special Commands tool. Many more are available from the product manual or product page at www.crwww.com. Some commands can be sent with no other information, such as P1 for Power On. Most other commands need an added parameter, such as volume level or control type. Command Description All Controllers Power Off P0 Power On P1 Tune Analog TC, Tuning Format All Volume RS-232 Tuning Style ICC1-232 HD Tuning HD Tune Style ICC1-232 IR IR Code 2-127 Example: TC,33 S0, 0=CATV 1=Off-Air 2=IRC 3=HRC 4=Auto VL, Sets TV volume level 0 = Mute 1 – 63 = Minimum level (1) to maximum volume (63) ICC1-232, ICC2-ATSC, ICC2-VDC H1= 1 = 5-digit CableCard style tuning (1-9999) 2 = Virtual HD Major-Minor tuning (tunes to virtual channel ID in display) 3 = Physical HD Major-Minor tuning (physical channel, minor digital) TH, <Major>,<Minor> Example: TH,15,1 tunes channel 15-1 TH, <Style>,<Major>,<Minor> Once a Style parameter is included in tuning command, the ICC1-232 will stay in that mode until the Style is changed T1, Contemporary Research <Style> 0=No change in tuning style 1=5 digit channel (Major=high byte, Minor=low byte) 2=Virtual channel (Major-Minor) 3=Physical channel (Major=Physical - Minor=minor) Example: TH,3,15,1 tunes the digital channel physically broadcasting on 15 The ICC2-ATSC always tunes the virtual channel ICC1-IR, ICC2-IRC Sets IR control code. Check Manual or www.crwww.com product Install page for codes 26 Display Express System Manual Presets – Advanced Presets Most Presets will be created as a single command, as shown on the previous page. In version 3.0 and above, you can also create a multi-step preset. There are several key applications to this feature: Creating a “Matrix” Preset This type of multi-step preset can create an array of displays and channels. For example, a sports bar may want to set up a group of displays to present a pattern of channels. The Preset above was created with this process: Beforehand, the user creates a series of Macros for each channel, and seven groups of displays, each group including two displays. Click Show Commands in the Macro section to display or hide the Command section (see the next page for that image). Click on Presets – Adv Edit, then click the “+” button at the right to enter the first line. Select a Group of displays (could be a Zone or individual display as well. Click a Macro, then click Set Macro. Notice that the row will show what commands are in the Macro. If you want to add a time delay between rows, enter a delay time and use Set Delay to add the delay. Click “+” to start the next row. o You could create the array of displays first, then go back and select the Macro for each display. o Note that when a row is active for editing, it will turn red. o You can also add a Preset to the list. You can also use Add Preset to insert a single or multiple Presets into the list. Once the Preset is added, you can change Displays, Macros, or Commands as you need. If you want to re-arrange the list, select a row and use the Up and Down arrows on the right to move. Enter a name and Save. Once you have the matrix defined, you can use Copy Existing Preset, change the Macros and save the new array by a new name. Contemporary Research 27 Display Express System Manual If you want to create the array with Commands alone, click Use Commands and Show Commands in the Macro section and enter the commands as needed. Editing is seamless between Macros and Commands. When you use a Macro, all the values are shown in the row. You can switch to Commands and change one value, such as Volume, without needing to change the macro. In that case, the Macro name will go away, but all the values from the macro will be kept. The Show Commands option is also useful if you want to see what commands are stored inside a Macro. Controlling Power and Startup Delays. Once a display is powered on, there is often some delay before the display is ready to listen to another command. Our controllers know this, and have a built-in time delay before they send commands included with power on. It’s a great feature, but don’t include Power On commands in a multi-step Preset. Since some sets LGs need to wait 8 seconds after power, it slows the process down. The better plan is to power up the displays at the beginning of the event or day. Then use Presets with the other commands after that. Contemporary Research 28 Display Express System Manual Presets – System This section allows you create a System Preset that can back up or restore all system data. You can schedule an automatic backup as with any Control Preset, choosing a cycle, dates and times. You can also perform a manual backup or restore, just click the Do Now button, or Save the preset, and launch the process as with any other Preset. Within the Preset, you can: Backup System to a default or custom name. The Default name will combine the year, date, and time (in military format). As an option, you can create your own name. o Note that the Default name format will create a unique backup folder when the backup is scheduled. o When you use Overwrite Existing System, the scheduled backup will overwrite the previous data. o Creating your own System Name will not overwrite the data if that system already exists. o The backup files are stored in the Program Files/Contemporary Research/SignStream DX Service/Data folder, stored in a folder with the Backup System name you selected. Restore System – Choose a System file. This will replace the current data when activated. Normally, you would use Do Now. Delete System – Choose a System file. This Event will delete that System folder when scheduled or using Do Now. Contemporary Research 29 Display Express System Manual External Presets This is a feature requested by our integrators and clients. Imagine a facility that has many displays controlled over RF, but also has a number of video projectors controlled by Extron units. With External Presets, you can now send commands to the Extron controllers over IP, managing the projectors using Display Express presets and scheduling. External Presets can be included in any control panel or scheduled, just like any standard Preset. In the example of Extron controllers, you will likely program the units to act on a “trigger” string sent from Display Express. If you are the end user, you may need the help of an AV integrator in setting up commands for external systems and controllers. Contemporary Research 30 Display Express System Manual Schedule - Control The Schedule Control page launches Events by date or recurring cycle. Events are similar to Presets, but include an assigned date, cycle, and time. Schedule displays the list of Events by date and time. Enabled/Disable – click to run or stop the schedule Today’s/All Events – Displays just the events for today or all Events Schedules – Select from a list of saved schedules Set Current Schedule – set the selected schedule for current use Contemporary Research 31 Display Express System Manual Schedule - Edit The Schedule Edit page creates a database of Events. DX now allows you to create multiple Schedules, so you can have one list for daily operation, and others for holidays or special events. Schedule Modes Create New Schedule – Allows creation of a new Schedule, clears values in data Edit Existing Schedule – Fills in the values of the selected Schedule. Change and Save. Copy Existing Schedule – Copies the values of the selected Schedule. Change and Save. o Name Schedule – create a name for a new schedule o Save Schedule – a red asterisk will appear to remind you to save any changes o Delete Schedule o Export - click the Export button at the top right of the page to export the schedule as a commaseparated data file, click the Export button at the top right of the page. This can be imported by a spreadsheet or other data program to arrange, display, and print as needed. Schedule Preset Schedules Presets by time. Date and recurring cycle. Add – Click when you are done to add Preset and time/date settings to schedule Modify – Click when you are done to modify the selected Preset’ Remove – Removes Preset from schedule Select Preset – selects the highlighted Preset One-Time – Event is launched on one date only Recurring – Check days of week for cycle Start Date – When Event or cycle begins End Date – When Event ends (removes Event from Schedule at 11:59 PM on specified day Time – AM or PM DX will keep the cycle, Start Date, End Date, and Time values as you add new Presets to the schedule. This speeds up adding additional Presets – often, you only need to change the time values. Contemporary Research 32 Display Express System Manual Alerts - Control The Alerts Control page will display a group of up to 45 buttons a user can click to launch a saved Alert. The Alerts Edit page defines the name and actions in the alerts. The role of Alert Presets has expanded in DX 5: More than one Alert can be active at any time Alerts can be added to custom Web Panels, just like standard Presets The Alert text is in Red, and the button will change to orange when the alert is active, click the highlighted button to turn the Alert off The Alerts feature can impact more than displays. An RS-232 controller or integrated tuner/controller can send a message to presentation room control systems, triggering a programmed response by the system. In addition, an external control system can send Telnet commands that can trigger a saved Emergency Alert. Contemporary Research 33 Display Express System Manual Alerts - Edit The Alerts Edit page functions the same way as scheduling Events. However, Alerts behave differently than Events or Presets. When an Alert is sent, the iC-Net controllers will save their current power and channel settings. When an Alert ends, the controllers will return displays to their saved setting. Editing Modes Create New Alert – Clears values in Alert fields. Edit Existing Alert – Fills in the values of the Alert command. Change and Save. Copy Existing Alert – Copies the values of the Alert Command. Change and Save. Alert Name – Enter a name for a new or copied Alert. Preset – uses the values of a selected Preset, adds Save and Restore automation Volume after Alert – sets volume to set level after the Alert Suspend Schedule – deactivates scheduled presets when the Alert is active Save the Alert. Up to 45 Alerts will appear on the Alerts Control page, and any Alert can be added to custom Web Panels. Other systems can also trigger Alerts, sending a Telnet command to the DX computer. See Telnet Commands at the end of this manual. Contemporary Research 34 Display Express System Manual Telnet Commands As integrators have asked for tools to interact with Display Express from custom control systems, we have added several Telnet commands to our software. More commands will be added on request from our users and control partners. Commands are case-insensitive, so upper or lower case may be used. Precede all commands with ‘]’. Command ? EF EN ID ServerInfo SendPreset StartAlert StopAlert Quit Description Displays all DX TCP commands. Echo off Echo on Information on DX. Reply: Examples ]? ]EF ]EN ]ID [present application [working directory [version ]ServerInfo Information on a DX server. Reply: [server name [server description [version ]SendPreset=Turn on All Displays Have the Head End send the specified preset. Have the Head End start a defined alert. Have the Head End stop an alert that is running. Close TCP connection. ]StartAlert=Fire Drill ]StopAlert=Fire Drill ]Quit Display Express TCP To send commands to the Display Express server over the intranet using TCP/Telnet, do the following: 1. 2. 3. For HyperTerminal and other Terminal applications, enter the IP address of the Display Express server and 2728 as the Telnet port. Make sure the Windows Firewall exceptions include Display Express TCP, port 2728. In a command window, type telnet <name or IP address of Display Express server> 2728 For example, telnet CR Streams 2728. You should get a welcoming message. Type Display Express TCP commands at the prompt. See above table of commands. For a list of commands, type ‘]?’. To stop, type ‘]quit’. SSCmd SSCmd.exe is found in C:\Program Files\Contemporary Research\SignStream DX Service\bin. It can be used to execute TCP-style commands in a command window or in a batch .cmd file. For example, to send a preset to the Head End, navigate to the \bin directory in a command window, and at the prompt type ">sscmd ]sendpreset=Turn On All Displays" Contemporary Research 35 Display Express System Manual End User License Agreement Display Express Software The product is protected by Federal Copyright Law. Contemporary Research retains the title to and ownership of the Product. You are licensed to use this Product on the following terms and conditions: LICENSE - The licensee is defined as the individual or company utilizing the Software Product. Contemporary Research hereby grants the licensee a nonexclusive license authorizing the licensee to use the enclosed Product on one computer at a time. Please contact Contemporary Research if you require additional licenses. Use of this product by more than one individual or by anyone other than the licensee terminates, without notification, this license and the right to use this product. Web access from external browsers is unlimited. YOU MAY NOT: Distribute, rent, sub-license or otherwise make available to others the software or documentation or copies thereof, except as expressly permitted in this License without prior written consent from Contemporary Research. In the case of an authorized transfer, the transferee must agree to be bound by the terms and conditions of this License Agreement. RESTRICTIONS: - You may use this Product in your business as long as: The software user must be registered with Contemporary Research in order to receive support or distribution rights. You may not remove any proprietary notices, labels, trademarks on the software or documentation. You may not modify, de-compile, disassemble, reverse engineer or translate the software. US GOVERNMENT RESTRICTED RIGHTS - Use, duplication or disclosure by the United States Government is subject to restrictions as set forth under DFARS 252.227-7013 or in FARS 52.227-19 Commercial Computer Software - Restricted Rights. TERM - You may terminate your License and this Agreement at anytime by destroying all copies of the Product and Product Documentation. They will also terminate automatically if you fail to comply with any term or condition in this Agreement. LIMITED WARRANTY - This software and documentation are sold "as is" without any warranty as to their performance, merchantability or fitness for any particular purpose. The licensee assumes the entire risk as to the quality and performance of the software. Contemporary Research warrants that the diskettes, CD, or emailed file on which the Program is furnished will be free from any defects in materials. Exclusive remedy in the event of a defect is expressly limited to the replacement of diskettes. In no event shall Contemporary Research or anyone else who has been involved in the creation, development, production, or delivery of this software be liable for any direct, incidental or consequential damages, such as, but not limited to, loss of anticipated profits, benefits, use, or data resulting from the use of this software, or arising out of any breach of warranty. Contemporary Research 4355 Excel Pkwy, Suite 600, Addison, TX, 75001 Phone: 888-972-2728 Contemporary Research 36 Display Express System Manual