1
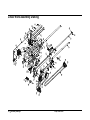
Users Manual Snap 700 Linear Knife Addendum AVERY DENNISON Manual Edition 2.2 7 February 2014 Manual Part Number 621395 WARNING This device complies with Part 15 of the FCC Rules. Operation is subject to the following two conditions: 1) this device may not cause harmful interference, and 2) this device must accept any interference that may cause undesired operations. This Class A digital apparatus meets all requirements of the Canadian Interference Causing Equipment Regulations. Cet appareil numerique de la classe A respecte toutes les exigences du Reglement sur le material broilleur du Canada ii Snap Linear Knife Contents Scope 5 Introduction ................................................................................................................................ 5 Safety Issues / Warnings 5 Cautions ..................................................................................................................................... 5 Warranty Information 6 Warranty Policy ......................................................................................................................... 6 Service ......................................................................................................................... 7 Description / Specifications 8 Linear Knife Description ........................................................................................................... 8 Linear Knife Specifications ....................................................................................................... 8 Installing Linear Knife – See Appendix A 9 Threading 9 Maintenance 10 Cleaning Feed / Nip Rollers ..................................................................................................... 10 Knife Blade Replacement ........................................................................................................ 11 Knife Blade Cleaning ............................................................................................................... 15 Adjustments 18 Web Tracking in Center of Printer ........................................................................................... 18 Setting the Web Tracking .......................................................................................... 18 Setting the Web Guide ............................................................................................... 19 Knife Cam Adjustment ............................................................................................................ 20 Web Tracking Adjustment ....................................................................................................... 21 Adjusting the Sensor ................................................................................................................ 23 Positioning the Sensor.............................................................................................................. 26 Centering the Knife to the Web ............................................................................................... 29 Trouble Shooting 33 Appendix A 35 Removing the Stacker .............................................................................................................. 35 Removing the Nip Assembly ................................................................................................... 36 Removing the Knife Assembly ................................................................................................ 37 Removing the Rear Cover ........................................................................................................ 39 Installing the Linear Knife - Electrical Updates....................................................................... 40 Snap Linear Knife iii Replace the Motherboard Entry ................................................................................. 40 Install Internal Harnesses ........................................................................................... 44 Installing the Linear Knife – Mechanical Updates................................................................... 46 Installing the Lower Frame Support for the Linear Knife ......................................... 46 Installing Linear Knife onto the Lower Frame Support ............................................. 47 Making Electrical Connections .................................................................................. 49 Installing the Nip Assembly ..................................................................................................... 50 Installing the Stacker on the Linear Knife ............................................................................... 52 Assembly Drawings 55 Linear Knife Assembly Drawing ............................................................................................. 56 Nip Roller Assembly Drawing ................................................................................................. 57 Drive Train Assembly Drawing ............................................................................................... 58 Feed Roller Assembly Drawing ............................................................................................... 59 Sensor Assembly Drawing ....................................................................................................... 60 Mounting Assembly Drawing .................................................................................................. 61 Cover Assembly Drawing ........................................................................................................ 62 Cover Assembly Drawing ........................................................................................................ 63 Harnesses ................................................................................................................................. 64 Linear Knife Parts List ............................................................................................................. 67 Linear Knife Parts List ............................................................................................................. 68 Linear Knife Parts List ............................................................................................................. 69 iv Snap Linear Knife Scope Introduction This manual details the installation, operation, and maintenance of the AVERY DENNISON Model SNAPTM700 Linear Knife. Use this manual together with the SNAPTM700 User Manual for other operational questions regarding the SNAP 700 printer itself. Safety Issues / Warnings Cautions The Linear Knife uses very sharp cutting blades that are spring-loaded together. The knife also has a well-guarded pinch points. The guarded covers provided with the knife are for operator protection. Under no circumstance should the covers be removed during operation. Covers provide other functions beside safety. They affect cut quality and provide strength to the knife assembly. Snap Linear Knife Scope 5 Warranty Information Warranty Policy Avery Dennison Retail Branding & Information Solutions provides the following warranty policy. Scope Warranties against defects from workmanship for equipment and parts manufactured and sold from Miamisburg, OH. Includes time and material except as otherwise noted below. Time New equipment and parts: 1 year return to depot Refurbished equipment and parts: 90 days Warranty period starts when equipment ships from selling location. General Conditions Avery Dennison extends warranty coverage under the following conditions. Equipment and parts will perform within published specifications. Promised or implied statements by any Avery Dennison employee or representative will not be deemed to vary the terms of the warranty. Equipment and parts must be installed and operated according to recommended procedures and operating conditions. Consumable elements are not covered. Consumable elements are those that show normal wear from typical equipment usage including, without limitation, print heads, knives, rollers in contact with the web, and sonic units. Avery Dennison reserves the right to determine which elements are defined as “consumable.” No customer maintenance may be performed except as directed by qualified Avery Dennison personnel. Equipment and parts damaged by negligence or abuse are not covered. Avery Dennison US reserves the right in its sole Linearretion to incorporate any modifications or improvements in the machine system and machine specifications which it considers necessary but does not assume any obligation to make said changes in equipment previously sold. Equipment Purchased In US and Shipped In US Avery Dennison US covers warranty for equipment and parts installed and operated in the Americas (United States, Canada, Mexico, Central America, Caribbean Region, and South America excluding Brazil). Outside the US, the local Avery Dennison office is responsible for equipment and parts warranty. Customers must ensure coverage during machine purchase. 6 Warranty Information Snap Linear Knife Equipment purchased and exported to regions outside local Avery Dennison office coverage are not covered by warranty. The purchasing agent must acquire a service contract from the Avery Dennison office where the equipment or parts are operated to ensure machine coverage. For example, if an agent purchases a printer in the US, exports to Brazil, and then needs warranty coverage, Avery Dennison Brazil has no obligation to provide warranty coverage. The agent must purchase services from Avery Dennison Brazil. THE WARRANTIES PROVIDED HEREIN ARE EXCLUSIVE AND ARE IN LIEU OF ANY IMPLIED WARRANTY OF MERCHANTABILITY, FITNESS FOR A PARTICULAR PURPOSE OR OTHER WARRANTY OF QUALITY OR PERFORMANCE, WHETHER EXPRESS OR IMPLIED. EXCEPT THE WARRANTY OF TITLE, IN NO EVENT SHALL AVERY DENNISON BE LIABLE FOR ANY INDIRECT, INCIDENTAL OR CONSEQUENTIAL DAMAGES, EVEN IF AVERY DENNISON HAS BEEN ADVISED OF THE POSSIBILITY OF SUCH DAMAGES. Service When ordering machines and supplies in the U.S.A., reference all correspondence to the address below. AVERY DENNISON Corporation 170 Monarch Lane Miamisburg, OH 45342 Call: 1-800-214-0872 or (937) 865-2123 For spare parts, requests for service or technical support, contact AVERY DENNISON Corporation 170 Monarch Lane Miamisburg, OH 45342 Call: 1-800-214-0872 or (937) 865-2123 For parts and service in other countries, please contact your local AVERY DENNISON supplier. Snap Linear Knife Warranty Information 7 Description / Specifications Linear Knife Description The SNAP Linear Knife is an add-on accessory for the SNAP 700 printer. It mounts in place of the down stacker and in turn provides a mounting for the down stacker. The Linear Knife is designed to cut tag stock and stack into the down stacker. It does not work with flimsy material such as care label tapes or pressure sensitive materials. The Linear Knife is removable if the other materials need to be processed on the printer using the rotary knife. A training technician is required because the entry into the printer electronics is required. Linear Knife Specifications Label Size Length: Min 1 1/2” (38.10mm) Max (See Printer Specs) Width: Min: 1 1/2” (38.10 mm) TESTED, Max: 5 1/8" (130.18 mm) wide web Print Speed 3ips, 4ips, 4.5ips, 5ips, 6ips, (RFID 2ips and 3ips) TESTED Web Justification Center Stock Coated and uncoated Tag Stock and RFID tag stock 10 point to 15 point TESTED Cleaning RFID supplies require knife blade cleaning every 25,000 cuts based on supply adhesive construction Dimensions 11.00" (279.40 mm) wide x 17.25" (438.15 mm) deep x 18.00" (457.20 mm) high Weight 34 Lbs. (15.5Kg.) Electrical DC Power, source is from the SNAP 700 Printer Temperature 55°F - 95°F (12.7°C to 35°C) Humidity 5% - 90% non-condensing without corrosion to finish Registration System Blank stock, 1/16”(1.5mm) to 1/8” (3mm) hole, notch 1/16”(1.5mm) min., top reflective, bottom reflective (80% contrast). Hole or reflective mark can be any were across the web. Options N/A 8 Description / Specifications Snap Linear Knife Installing Linear Knife – See Appendix A See Appendix A for Linear Knife Installation Instructions. Threading To thread the stock through the SNAP 700 Linear Knife, bring the stock up to the entry point of the knife. Once the stock comes in contact between the upper and lower rollers, turn the feed knob clockwise. The stock will traverse through the knife and exit out the nip assembly. You will need to rotate both the printer feed knob and the linear knife feed knob. The feed on the linear knife will not pull the material through the printer. The feed in the linear knife is for take-up tension only. Snap Linear Knife Installing Linear Knife – See Appendix A 9 Maintenance Cleaning Feed / Nip Rollers The Linear Knife has a set of feed rollers that keep web tension between the printer feed and the accessory knife. These rollers will need cleaning daily or more often based on the materials being run, 10 Maintenance 1. Clean the rollers with isopropyl rubbing alcohol 70%. Do not use other cleaning products as they may have a long term effect to roller life. 2. Turn off the power to the printer to clean any moving part to avoid injury or damage to the printer 3. Apply the alcohol to a clean cloth and rub the rollers to remove any surface build up. The rubber roller may become stained for contact with the materials running through the printer. This should not harm the roller or the material. 4. The rubber roller should be replaced at least once a year or before due to ware or if the rubber starts to harden from age or UV lighting. Snap Linear Knife Knife Blade Replacement Replace the wheel blade when it becomes dull or nicked. The knife has a life expectancy of 3 million cuts. Monitor the number of cuts through PCMate since the printer does not have a cut counter. Stock both the wheel and stationary blades to avoid down time in case of blade damage or jams. Note: Replace both the wheel blade and the stationary blade as a set only. Replacing only one can cause early failure of the blades. Warning: Follow knife adjustment procedure exactly or damage will occur. Warning: Turn off power to the printer to avoid personal injury when adjusting, removing, or replacing the knife assembly. When following the instructions below, use extreme caution as the blades are very sharp. 1. Turn off power to the printer. 2. Remove the feed knob and the sensor adjust knob. Snap Linear Knife Maintenance 11 3. Remove the six 8-32 Button Head Screws and remove the left and right side covers. 4. Remove the entry guide and deflector bracket by swinging the carriage assembly out and inserting a 2.5mm Allen Key or ball driver through the holes in the frame to gain access to the screws. Note: The upper sensor shaft is not shown for clarity purposes. 5. With the entry guide removed, see the four exposed Phillips flat head screws holding the upper stationary blade. Remove screws and blade with a #2 Phillips head screw driver. 12 Maintenance Snap Linear Knife 6. Removing the upper stationary blade allows access to the wheel blade. Remove the wheel blade, bearing, and spacer. Replace the new parts in same order as removed and shown. Note: Be careful not to move the carriage assembly too much as the wheel blade will fall off. 7. Re-install the upper stationary blade with the four flat head screws removed from step 5. Be sure the wheel blade is behind the Stationary Blade and that the stationary blade is oriented so that the cutter edge is down. 8. Re-install the deflector bracket and entry guide. Snap Linear Knife Maintenance 13 9. Re-install the covers and knobs. 14 Maintenance Snap Linear Knife Knife Blade Cleaning When the material starts to have poor cut along all or part of the cut edge, the knife blades will need to be removed and cleaned. Note: When cutting RFID tag stock the knife may need to be cleaned every 25,000 cuts depending on the adhesive layer used to construct the tag material. This may vary in frequency base on the supplies. The knife blades will need to be taken apart as surface cleaning is insufficient. Warning: Follow knife adjustment procedure exactly or damage will occur. Warning: Turn off power to the printer to avoid personal injury when adjusting, removing, or replacing the knife assembly. When following the instructions below, use extreme caution as the blades are very sharp. 1. Turn off power to the printer. 2. Remove the feed knob and the sensor adjust knob. Snap Linear Knife Maintenance 15 3. Remove the six 8-32 Button Head Screws and remove the left and right side covers. 4. Remove the entry guide and deflector bracket by swinging the carriage assembly out and inserting a 2.5mm Allen Key or ball driver through the holes in the frame to gain access to the screws. Note: The upper sensor shaft is not shown for clarity purposes. 5. With the entry guide removed, see the four exposed Phillips flat head screws holding the upper stationary blade. Remove screws and blade with a #2 Phillips head screw driver. Clean the blade with Isopropyl Alcohol. The blades are very sharp. Cut resistant gloves should be worn to avoid injury. 6. With the upper stationary blade removed there is access to the disc blade. Remove the disc blade. The bearing and spacer can stay on the carriage assembly. Clean the disc blade with isopropyl alcohol. Replace blade in same order as removed. Note: Be careful not to move the carriage assembly too much as the disc blade will fall off. 16 Maintenance Snap Linear Knife 7. Re-install the upper stationary blade with the four Phillips flat head screws removed from step 5. Be sure the wheel blade is behind the stationary blade and that the stationary blade is oriented so that angle is down. 8. Re-install the deflector bracket and entry guide. 9. Re-install the covers and knobs. Snap Linear Knife Maintenance 17 Adjustments Web Tracking in Center of Printer NOTE: Cut quality and straightness requires the stock to track down the center of the printer because the Linear Knife cuts across the web from both sides. Two settings adjust web tracking. The first setting is moving the web front to back as controlled by the Feed Roller Assembly. The second setting is the position of the Web Guide Assembly. The Linear Knife makes one pass across the web for each tag cut. This means that if the knife starts its cut from the near side of the web and the next cut starts from the far side of the web. The cut is done while the web is moving through the printer. The knife has been designed when properly installed to be located in the center of the feed roller assembly and the print head assemblies. If one or both of these setting are not correct the cut will vary in width every other cut. Setting the Web Tracking Web tracking is the movement of the tag stock front to back in the Feed Assembly. To correct for this movement there are four “Jack” Set Screws located on the inner mount bracket on the Feed Assembly. These will be adjusted accordingly once the printer has been loaded with stock and run. 1. 2. 3. 4. 5. 6. 7. Load the printer with supplies (Stock & Ink) Make sure the tag stock supply roll is tight and the sides of the roll are flat. If the roll is not flat it will track off the center of the print heads. Leave the web guide open so the guides do not control the material moving through the printer. Load the internal test format (see SNAP 700 user manual). The wide test format image will look like this. The line running left to right should be in the center of the tag. The center of the line to the metal frame is 4” (101.6mm). Start the printer, if the stock is walking toward the back of the printer, the outboard end of the Feed Assembly needs to move toward the stacker. (Don’t worry if the knife cut is out of square, this will be corrected later) Loosen the three ¼-20 cap screws and turn the two left set screws 1/8 of a turn so that it will force the outer end to move toward the stacker. Snug the ¼-20 cap screws starting with the Upper right, then the lower, then the upper left. Once all are snug, tighten the cap screws in the same order. 18 Adjustments Snap Linear Knife 8. 9. Run the printer again and see if there is a walking issue, if so repeat steps 4-6. If the stock wants to walk toward the front of the printer, then position the feed assembly so that the outer edge move slightly away from the stacker side, and reverse steps as previously stated. Loosen Screws Use “Jack” Set Screws to position the Feed Assembly one way or the other. 10. Once the stock is tracking through the printer without walking, the feed assembly can be secured. 11. The Printer is now ready for the latest Operating System Installation. Download and install Operating System Version 3.32.07.05 or later. Setting the Web Guide The web guide is located between the tag stock supply roll and the first print station in the web path. To set the web guide correctly, get the tracking of the printer centered first. There are two set collars with thumbs screws that will rest just off the material. Position these collars to steer the web correctly through the printer. Do not try and force the stock more then 1/4” (5mm) as it can damage the edge of the tag stock. Snap Linear Knife Adjustments 19 Knife Cam Adjustment The cam adjustment keeps the frame from distorting during operation and affects the cut angle slightly. 1. Move the rotary knife carriage to the center of the stationary knife. 2. Adjust the inboard and outboard cam to just barely touch the frame. Hold the came in the desired position while tightening the screws. 20 Adjustments Snap Linear Knife Web Tracking Adjustment If the web is tracking through the SNAP 700 printer but is not tracking into the Knife square, there will be a buckle in the web. The tracking can be adjusted by rotating the thumb wheel on the Linear Knife located on the inboard side of the Knife. Buckle in Rear of Knife (Needs to be adjusted, cut will not be square.) Web tracking straight (No buckle) Ready to move to the next step Buckle in Front of Knife (Needs to be adjusted, cut will not be square.) Snap Linear Knife Adjustments 21 1. Loosen the ¼-20 cap screw shown. Rotating the thumb wheel will rotate the knife in one direction or the other. 2. Rotate the thumb wheel toward the operator to move the outer edge of the knife to the left. 3. Rotate the thumb wheel away from the operator to move the outer edge of the knife to the right. After the knife is in the desired location, tighten the ¼-20 cap screw. 22 Adjustments Snap Linear Knife Adjusting the Sensor The SNAP 700 Linear Knife has the capability to sense through hole, slot, top reflective, or bottom reflective sense marks. The sensors are assembled so that the sender and receiver are opposite each other. See instructions below to line up the sensors if they need to be re-aligned. 1. Remove the feed knob and the sensor adjust knob. 2. Remove three 8-32 button head screws and the left side cover 3. Temporarily re-install the sensor adjust knob. Snap Linear Knife Adjustments 23 4. Remove the Phillips head screw securing the idler gear standoff shown and remove the standoff with gear so that the top and bottom sensor do not traverse together. 5. Rotate the sensor adjust knob so that the upper sensor travels directly over the lower sensor. This will ensure the sensors are in the correct location with each other. 6. After the sensors are directly over each other, remove the sensor adjust knob from the end of the shaft. 24 Adjustments Snap Linear Knife 7. Re-install the idler gear removed from Step 4. 8. Re-install the left side cover and secure with the three 8-32 button head screws. 9. Re-install the sensor adjust knob and the feed knob. Snap Linear Knife Adjustments 25 Positioning the Sensor To position the sensor correctly for a thru-hole format, the web must be tracking through the printer and knife correctly. If not, see the section in this manual on web tracking. The center of the sensor block will need to be slightly off center to the hole that is being sensed. 1. Load supplies on and through the printer and knife and be sure the web is tracking correctly. Sense-Hole Move the sensor in the proximity of the hole that is in the web. 2. Download a format that has a thru-hole sense mark. The printer will need to be hooked up to PCMate and a format created with the size stock that is being run. Screw Sense Hole Start the printer, the printer will say “calibrating 26 Adjustments Snap Linear Knife sensors” and begin to run. If the sensor is not in the correct position, the printer will stop. Traverse the sensor over the hole so that the screw on the sensor is just to the left of the hole in the stock. Snap Linear Knife Adjustments 27 3. Start the printer back up, as the stock passes through the knife, the supply light on the 700 should light up each time the sensor senses a hole. If the printer stops and gives another sense mark error, repeat step 2 to move the sensor slightly. 28 Adjustments Snap Linear Knife Centering the Knife to the Web After the web is tracking through the printer and into the knife straight, it may still need to be centered going into the knife. 1. Turn off power to the printer. Unplug the stacker and remove it from the linear knife. Unplug the Linear Knife from the Snap 700 printer. 2. Remove the feed knob and the sensor adjust knob. For clarity purposes the knife if shown not attached to the printer. These instructions are stepped as if the knife was attached to a printer. 3. Remove three 8-32 button head screws and the left side cover Snap Linear Knife Adjustments 29 4. Loosen the thumb screw holding the upper and lower halves of the Linear Knife together. Loosen the lower right 10-32 E-S Nut mounting the knife pivot bracket to the main frame. The other three nuts are just tight enough to be able to slide with a Belleville washer. 5. Insert a flat blade screwdriver into the triangle and rotate left or right depending on which way the knife wants to move. 6. With the hex nuts loose, the bracket will now slide front to back. Depending on where the stock was running through the knife will determine which way the bracket needs to move. If the stock was running more on the outside of the knife, the bracket will need to move right. If the stock was running more on the inside of the knife, the bracket will need to move left. 30 Adjustments Snap Linear Knife 7. Tighten the E-S Nut and the thumbscrew. 8. Feed the web through the knife and run some sample labels to see if the web is centered through the knife. 9. If web is not centered, repeat steps to take off upper half of knife and move mounting bracket to a more desired location. Repeat until there is the same amount of distance between the edge of the rollers and the sides of the web. Equal distance Snap Linear Knife Adjustments 31 10. Once the web is centered, remove the web from the Linear Knife and remove the feed knob. 11. Install the left cover and reinstall the feed knob and the sensor adjust knob. 12. Thread the Linear Knife and run samples to check centering of the web. 32 Adjustments Snap Linear Knife Trouble Shooting Problem Cut is out of square Probable Cause Corrective Action 1. Web not centered in printer 1. Adjust printer feed assembly 1. Incorrect cam adjustment 1. Re-calibrate Cam. 1. Knife is not square 1. Rotate thumbwheel to remove web buckle. 1. Knife is not centered to web 1. Center knife to web 1. Incorrect adjustment of blade 1. 2. Check the blade is touching the upper blade. Check that the extension springs on each side of slide shaft are engaged. 1. Dull or nicked blades 1. Replace both upper and lower blades as a set. Do not replace only one as that will shorten the life of both blades. 1. Blades need cleaning 1. Remove blades from mounting and clean. Cutting blade is not rotating 1. Bearing in cutting blade is jammed or gummed up 1. Replace cutting blade bearing Knife won’t cut or tags not the same width 1. Bad C-Sensor 1. Replace C Sensor(s) 1. Linear knife not connected to the printer 1. Check the harness connection to the printer both outside and inside 1. Web is tracking off center 1. Re-set tracking of web on the Printer 1. Blades need cleaning 1. Remove blades and clean 1. Blades are dull 1. Replace blades as a set 1. Wheel knife bearing is dirty or damaged 1. Replace ball bearing 1. In feed rollers are dirty 1. Clean rollers 1. Adhesive on tag 1. Clean knife blades 1. Sensor not aligned with hole 1. 2. Move sensor over hole or slot to register Top and bottom sensor not over each other see section on Adjusting the Sensor. 1. Registration hole is below spec 1. Re-place stock with material to spec 1. Three registration holes in a row 1. blocked Restart printer or replace stock 1. Web is not tracking straight Check printer feed, unwind back tension, Blade(s) are not cutting clean edges. Cut edge of tag looks ragged Tag are dirty Missed sensor error Snap Linear Knife 1. Trouble Shooting 33 Reflective sensor error Knife did not home 34 1. Damaged sensor 1. Replace sensor harness assembly. 1. Sensor not aligned with mark 1. Move senor in align with registration mark 1. Sensor mark to small 1. Registration mark spec is 1/8” wide in the feed direction and 3/8” wide across the web. 1. Sense mark contrast range to close 1. Supplies not compatible with sensor 1. Carriage may be out of sensor range 1. Place carriage between front and back sensors. 1. Knife pulley may have become loose missing. 1. Tighten or replace set screws on the knife pulley. Snap Linear Knife Appendix A The SNAP 700 Printer will need minor alterations to have a Linear Knife installed. These alterations apply to both a new printer and a field installation. For new printer installation, see instruction “Installing the Linear Knife” and “Installing the Stacker on the Linear Knife”. For field installation, replace the original equipment rotary knife by beginning below. NOTE: Avoid personal injury or damage to the electronics in the printer by turning off the printer and disconnect the power cord. Removing the Stacker Remove the stacker as shown. It will be installed later on the Linear Knife. 1. Unplug the stacker cable from the printer. There is an outer ring in the stacker connector that will slide back to release the cable connection. 2. Loosen the thumb screw that clamps the stacker to the mount shafts. Slide stacker off the mount shafts and set aside to be installed later. Note: The two mount shafts are used to mount the Linear Knife. Snap Linear Knife Appendix A 35 Removing the Nip Assembly The Linear Knife will use the existing nip assembly and mount hardware from the printer. 1. The nip assembly is removed with a long #2 Phillips screw driver. Loosen the two 10-32 X ¾” Phillips head screws that mount the assembly to the frame and then remove the two screws. 2. Save the nip assembly and the two screws. They will be used to remount the assembly to the new linear knife. 36 Appendix A Snap Linear Knife Removing the Knife Assembly The Linear Knife has its own feed and will reuse the existing printer nip assemblies. The standard rotary knife assembly needs to be removed from the printer. Save this unit to convert back to a standard printer in the future. 1. To remove the knife loosen the two ¼”-20 x ½” cap screws using a 3/16” hex tool. 2. Retain the knife and screws for any future needs. These are not part of the new knife accessory. Snap Linear Knife Appendix A 37 3. Remove the feed / knife tie bracket. There are two 10-32 x1/4” Button head screws to removed using a 1/8” hex tool. 4. Printer is ready for the new knife to be installed. 38 Appendix A Snap Linear Knife Removing the Rear Cover 1. Turn off the power to the printer at the end of a batch so not to lose downloaded data and disconnect power cord. 2. Unplug all peripherals such as stacker, remote display, verifier, etc. Unplug power cord from wall outlet. Remove the stock and ink. Remove the back cover of the printer by removing (10) button head cap screws using a 3/32 Allen Key or T-Handle. Snap Linear Knife Appendix A 39 Installing the Linear Knife - Electrical Updates Replace the Motherboard Entry On field upgrades to the SNAP 700 printer, the motherboard entry bracket may need to be replaced. See the steps below to replace the entry bracket. A new SNAP 700 printer with the Linear Knife installed will already have the motherboard entry bracket installed onto the Snap 700 frame. 1. Label each connector to the MCB with the appropriate plug name printed on the board. Remove the connector from the board after labeling it. 2. Remove the two 6-32 Phillips head screws from the rear of the upright bracket holding it to the printer housing. 3. Remove the two Phillips head screws mounting the upright bracket to the main rear frame. With all of the connectors disconnected from the MCB, the entire bracket can be removed from the printer. This will allow access to the mother board screws. 40 Appendix A Snap Linear Knife 4. Remove the six screws holding down the motherboard. 5. Slide the motherboard back and out of the way to expose the three screws mounting the motherboard entry bracket. Remove the three screws. . 6. Pop out the motherboard plate from the opening and save to re-install into the new entry bracket. Snap Linear Knife Appendix A 41 7. Remove the last two screws holding the motherboard entry bracket to the base frame. Remove motherboard entry bracket. 8. With the motherboard entry bracket removed the printer should look something like this… . 9. Install the new motherboard entry bracket (with the 5 existing screws) back into the same place the old one was removed. Notice the new bracket now has three accessory openings for mounting harness connectors. Remove PCI bracket from existing motherboard entry bracket and place onto the new bracket with the same screw. 10. Install the existing motherboard plate into the opening on the new mother board entry bracket. Slide the motherboard back into place and secure with the screws from step 4. 42 Snap Linear Knife 11. Slide the MCB upright back into the slot on the motherboard. 12. Install the screws mounting the upright bracket to the motherboard entry tray. . 13. Secure the upright bracket to the rear frame with the existing hardware as shown. 14. Reinstall all connectors to the MCB from the labels attached to each harness applied in step 1. * DO NOT RECONNECT THE SENSORS FROM THE SNAP 700 LOCATED AT J26 TOP REFLECTIVE OPTION HOLE J27 KNIFE HOME J28 OPTIONAL BOTTOM REFLECTIVE THE LINEAR KNIFE SENSORS WILL GET PLUGGED BACK INTO THESE THREE CONNECTOR HOUSINGS. Snap Linear Knife 43 Install Internal Harnesses 1. Remove the two connector plates covering the large slot and hole as shown. 2. Find the Power Harness (05621139) and remove the nut. Slide one connector at a time through the nut. 3. Insert the two connectors from the power harness through hole in the motherboard entry bracket. 4. Once the harness is inserted into the hole, insert the nut over the connectors and secure the harness body to the motherboard entry tray. Be sure to line up the tang on the round harness connector and the key slot in the motherboard tray. 5. Install connectors to the corresponding connectors on the daughterboard and MCB. Note: If the Snap 700 printer has the RFID upgraded knife motor, be sure to disconnect the motor connector from the daughterboard. Having both knife motors plugged in to the daughterboard will make the Linear Knife motor fail. 44 Snap Linear Knife 6. Find the other internal harness (05621138) and remove the hardware mount kits and install onto the motherboard entry bracket from the back. 7. With all hardware removed, install the connector from the back of the motherboard entry bracket. Place one washer onto the standoff, insert through the hole of both the bracket and connector. Secure, with another washer, lock washer and nut. 8. Route harness between the upright frame and the rear frame. Install connectors to the corresponding connectors on the MCB. Snap Linear Knife 45 Installing the Linear Knife – Mechanical Updates The Linear Knife is ready to install on the printer. Position the printer where you want to use the system. Relocating the printer with Linear Knife installed is not advised as they are too heavy and not stable enough to move without damage. Installing the Lower Frame Support for the Linear Knife 1. Remove the upper mount shaft for ease of installing the Linear Knife. It will be reassembled a little later. Locate the lower frame support and Install it on the end of the SNAP 700 2. Lift the end of the SNAP 700 and place the bracket with the two large holes over the corresponding feet of the SNAP 700. 3. Place the SNAP 700 back onto table. 46 Snap Linear Knife Installing Linear Knife onto the Lower Frame Support 4. Position the knife unit so that it rests onto the lower frame support. Position it so that the extended bracket sits behind the Feed of the SNAP 700. Extended Bracket The rear end of the mounting bracket should be resting against the front cover. NOTE: The knife will be centered to the web path when the bracket is in contact with the back cover. This is critical to knife cut registration 5. Feed Lower Frame Support Install a ¼-20 x ½ Phillips Head Screw through the SNAP 700 Feed and into the Extended Bracket of the Linear Knife. Be sure that the Knife is still resting on the lower frame support. 6. Line up the upper knife unit and the lower frame support and secure with the thumbscrew provided. Line up holes Thumb Screw Snap Linear Knife 47 7. Install the stacker mount shaft removed earlier through both holes of the knife mounting bracket. 8. Secure stacker mount shaft with existing ¼-20 x ½ Screw. 9. Reinstall the rear cover. Note: All but one cover mount screw will be re-used. The screw that sits behind the Linear Knife may be too hard to reach and thus will be left out. 48 Snap Linear Knife Making Electrical Connections 1. Plug the D-Shell connector from the Linear Knife into mating receptacle on the printer. Tighten thumbs screws on connector. 2. Plug the round connector from the Linear Knife into the mating connector on the Printer. Screw the outer housing to secure the connector to the printer. 3. Plug power cord into the AC Entry. Do not plug into wall at this time. Connect any other cables that need to be connected to the printer. Snap Linear Knife 49 Installing the Nip Assembly The nip assembly that was removed from the printer to make room for the new knife will be installed on the Linear knife. Skip this section if the Linear Knife already has a Nip Roller Assembly. 1. The nip assembly will be installed using the same screws that mounted it to the Printer. 2. Place the top screw back through the original mount hole and install the screw but leave it loose by approx 3/8” (9mm). Start the bottom screw but do not tighten that screw as well. 3. Push the nip assembly towards the frame that it’s being mounted to and turn the shaft to engage the drive with the driven roller. 50 Snap Linear Knife 4. The nip assembly will be installed using the same screws that mounted it to the printer. 5. Holding the nip assemble tight to the frame with the drive engaged tighten the two mount screws. 6. Finished installed assembly. Snap Linear Knife 51 Installing the Stacker on the Linear Knife The stacker that was removed from the printer will be used on the accessory knife. 1. Remove the stacker mount on the back of the stacker and replace it with the Stacker Mount Block supplied with the Linear Knife (P/N: 05627843). 2. Slide the stacker onto the two shafts of the knife assembly. The back of the stacker must be in back of the nip assembly stripper plate. This allows the cut tags to fall into the stacker and not catch on the stacker frame. 3. Move the stacker’s back until the stacker upright is approx 1/8” past the back edge of the web. 52 Snap Linear Knife 4. Set the stacker platform angle with the right end set as high as possible to begin with. Once the stacker starts to fill with tags a more desirable angle can be found to provide a stack that can be handled to unload. The stacker may not be able to hold a full stack of tags based on the tag being stacked. RFID tags have a chip imbedded in them so the tag is not uniform in thickness. This will cause the tags to tip or rock around. The number of tags cut and stacked can be controlled by PCMate in the format with a stop between batch configurations. 5. Plug the Stacker connector into the side of the printer. Plug power cord into wall and turn on Printer. Note: The stacker will not work if the Stacker Harness is not connected to the Printer prior to turning on the printer. Snap Linear Knife 53 Assembly Drawings Snap Linear Knife Assembly Drawings 55 Linear Knife Assembly Drawing 121 121 77 24 121 22 2 17 23 5 85 2 23 4 9 137 28 8 29 12 137 22 139 133 14 129 136 13 6 148 16 137 15 135 15 20 137 24 135 23 150 86 5 30 23 2 19 10 140 2 160 11 3 159 32 150 103 33 17 4 41 68 33 1 129 16 14 11 31 136 135 19 6 41 135 111 21 139 133 66 111 18 111 103 160 139 133 131 27 158 159 67 159 103 56 Assembly Drawings Snap Linear Knife Nip Roller Assembly Drawing 116 69 124 43 103 114 114 126 116 47 126 56 116 112 39 103 49 112 117 44 51 103 103 106 48 117 128 106 120 Snap Linear Knife Assembly Drawings 57 Drive Train Assembly Drawing 58 Assembly Drawings Snap Linear Knife Feed Roller Assembly Drawing 123 60 26 105 25 105 61 119 26 60 123 103 127 127 103 58 Snap Linear Knife Assembly Drawings 59 Sensor Assembly Drawing 107 62 65 63 79 45 89 104 88 149 37 88 64 149 130 107 127 103 115 132 107 107 138 93 45 35 130 147 138 73 94 115 105 91 127 132 107 103 37 59 125 108 130 132 7 53 54 138 93 91 94 36 91 60 Assembly Drawings 99 Snap Linear Knife Mounting Assembly Drawing 98 100 101 101 101 95 101 80 97 107 103 75 38 111 76 113 Snap Linear Knife Assembly Drawings 61 Cover Assembly Drawing 62 Assembly Drawings Snap Linear Knife Cover Assembly Drawing Snap Linear Knife Assembly Drawings 63 Part Number: 05621138 MCB J23 MCB J26 MCB J28 MCB J27 MCB J29 MCB J35 Harnesses 64 Assembly Drawings Snap Linear Knife MCB J15 DB J4 Part Number: 05621139 Part Number: 05621140 Snap Linear Knife Assembly Drawings 65 TOP REG SENSOR BOTTOM REG SENSOR FRONT KNIFE SENSOR REAR KNIFE SENSOR CONTRAST SENSOR Part Number: 05621141A Part Number: 05621142 Part Number: 05621146 66 Assembly Drawings Snap Linear Knife Linear Knife Parts List ITEM PART NO. QTY ITEM PART NO. DESCRIPTION QTY 1 2 3 4 5 6 7 8 010107 093986 099875 099944 099945 100256 105023 627845 O-RING SCREW - TAPTITE WASHER -CUTTER E-RING (E3) E-RING (E5) E-RING (E8) IMPRESSION ADJ. KNOB FRAME, KNIFE UPPER 1 4 1 2 2 2 1 1 27 28 29 30 31 32 33 34 124387 124391 124392 124393 125038 125039 125040 126578 1 1 1 1 2 2 4 1 9 10 11 12 13 14 15 16 17 18 19 20 21 22 23 24 25 26 110894 110895 110902 110904 110905 110911 110916 110917 627844 110923 110924 110925 111386 111418 111419 111884 117902 117903 KNIFE-BLADE WHEEL-KNIFE WIPER SHAFT, LOWER SHAFT, PIVOT ECCENTRIC WASHER - DAMPENING BEARING, UPPER PIVOT BEARING, LOWER PIVOT BELT-TIMING SLIDER BEARING - LINEAR SLIDER ASSEMBLY RING-PRONG LOCK EXTERNAL BRACKET - DAMPENING GROMMET - DAMPENING SPRING-EXTENSION GEAR, PLATEN BALL BEARING 1 1 2 1 1 2 2 4 2 1 2 1 1 2 4 2 1 2 35 36 37 38 39 40 41 42 43 44 45 46 47 48 49 50 51 52 196028 245026 354009 375021 448010 541110 621146 584027 584028 584033 621142 624009 624023 624024 624025 624037 624038 627029 BELT - PULLEY/BLADES SHAFT-UPPER BRACKET-KNIFE MOUNTING FRAME-KNIFE LOWER ROLLER - SLIDER SHAFT - ROLLER, SLIDER BEARING - SLIDER ROLLER PLATEN DRIVE MOTOR ASSY KNOB, BLACK (GLOSS) .187 SHAFT HOLE BUSHING SOCKET SET SCREW STEPPER MOTOR, HARNESSED GEAR, DRIVEN BLOCK, HEAD ADJUST STATIC BRUSH GROMMET, PLASTIC CLAMP HARNESS, KNIFE SENSOR GEAR, IDLER 22T, 32P GEAR, NIP, 26T 32P BRACKET, NIP ROLLER, OUTER SENSOR, REFLECTIVE HARNESSED SHAFT, WEB TURN, STACKER MOUNT BRACKET, NIP ROLLER MOUNT ROLLER, NIP DRIVE, MOLDED ROLLER, NIP IDLER GEAR, NIP IDLER, ALTERED BRACKET, STRIPPER STANDOFF, KNIFE MOTOR Snap Linear Knife DESCRIPTION Assembly Drawings 67 1 1 2 1 1 3 2 2 1 1 2 2 1 1 1 2 1 2 Linear Knife Parts List ITEM PART NO. 53 54 55 56 57 58 59 60 61 62 63 64 65 66 67 68 69 70 71 72 73 74 75 76 77 78 627801 627802 627804 627805 627806 627807 627808 627809 627810 627812 627813 627814 627815 627816 627817 627818 627820 627821 627822 627823 627824 627825 627826 627827 627829 627831 DESCRIPTION FRAME, LINEAR KNIFE BRACKET, KNIFE MOTOR MOUNT BRACKET, FEED MOTOR MOUNT ASSY, BRACKET, NIP MOUNT BRACKET, LOWER SUPPORT FRAME SHAFT, FEED SHAFT, FEED EXTENSION HOLDER, BEARING CUP SHAFT, UPPER FEED, MOLDED SHAFT, SENSOR ADJUST UPPER SHAFT, SENSOR ADJUST LOWER SHAFT, SENSOR ADJUST IDLER POST BLOCK, SENSOR ADJUST PULLEY, KNIFE MOTOR BELT, KNIFE MOTOR BRACKET, SLIDE SENSOR MOUNT SHAFT, NIP ROLLER DRIVE COVER, REAR COVER, LEFT COVER, RIGHT GEAR, IDLER, 36T STANDOFF, IDLER GEAR BRACKET, KNIFE PIVOT BRACKET, KNIFE MOUNT BRACKET, DEFLECTOR GEAR, FEED DRIVE 68 Assembly Drawings QTY ITEM PART NO. DESCRIPTION QTY 1 1 1 1 1 1 1 2 1 1 1 1 1 1 1 1 1 1 1 1 1 2 1 1 1 1 79 80 81 82 83 84 85 86 87 88 89 90 91 92 93 94 95 96 97 98 99 100 101 102 103 104 627835 627836 627837 627838 627839 627840 627841 627842 989978 989985 990003 990006 990080 990081 990102 990104 990119 990146 990167 990232 990262 990275 990277 990313 990325 990326 BRIDGE BLADE, LOWER SENSOR KNOB, HEAD ADJUST BLOCK, SENSOR ADJUST, BOTTOM BRACKET, KNIFE PIVOT LOWER BRACKET, 700 FOOT BRACKET, LOWER REAR GUIDE, ENTRY GUIDE, EXIT #8 STAR WASHER WASHER, #2 SAE 4-40 X 1/4 FHCS 4-40 X 1/4" SOCKET HD CAP SCR 10-32 X 3/8 CAP SCREW 10-32 X 1/2 CAP SCREW WASHER, #10 SAE 10-32 E-S NUT 1/4-20 x 3/8 SHCS 1/4:20 HEX NUT 1/4 SAE WASHER 5/16 X 3/8 SLDR SCREW SNAP RING, 1/4 WASHER, 5/16 HARDENED WASHER, BELLEVILLE .750 x .330 x .025 KNOB, SZ 10 THUMB SCREW SNAP RING, 3/16 "E" RING SNAP RING, 1/4" E-RING 1 1 1 1 1 1 1 1 1 2 2 1 8 1 8 6 1 2 1 1 1 1 4 1 12 5 Snap Linear Knife Linear Knife Parts List ITEM PART NO. QTY ITEM PART NO. 105 106 107 108 109 110 111 112 113 114 990327 990424 990513 990533 990821 990920 991372 991373 991374 991377 E-RING, 5/16 4-40 X 3/8 SHCS TIE WRAP, TY523M SMALL MOUNT, ABMM-A .300" ROUND CABLE STRAIN RELIEF STRAIN RELIEF BUSHING 6 SCREW, 6-32 X 1/4 PAN PHILLIPS 8 SCREW, 8-32 X 1/4 PAN PHILLIPS 1/4 SCREW, 1/4-20 X 1/2 PAN PHILLIPS 10-32 X 3/4 PHILLIPS PAN HEAD SCREW DESCRIPTION 5 2 8 1 2 2 5 6 3 2 130 131 132 133 134 135 136 137 138 139 PB00500555 PB00500557 PB00520505 PB00520508 PB00720611 PB00735148 PB00735150 PB00745149 PB00800525 PB00800527 115 991379 10-32 X 3/8 PHILLIPS PAN HEAD SCREW 6 140 PB05910666 116 991442 SCREW, 8-32 X 3/8 PHILLIPS FLAT HEAD 3 141 621138 117 991454 2 142 621139 118 991508 8-32 X 1/4" THUMB SCREW 8-32 X 1/2 FLANGED BUTTON HEAD SCREW 10 143 621140 119 991510 BALL BEARING , 16mm O.D. x 8mm I.D. FLG 2 144 621141A 120 121 122 123 124 991523 991646 991648 991649 999076 SPRING, COMP 500/600 NIP ASSEMBLY M3 X 8 SHCS LEVELING MOUNT, 1/4-20 X 1 COMPRESSION SPRING BUSHING, 3/16 X 1/4 X 5/8 2 4 2 2 1 145 146 147 148 149 627834 627843 990273 627847 PB00730008 125 999097 BUSHING, FL 1/4 X 3/8 X 3/16 1 150 991515 126 127 128 129 999098 999100 999165 PB00500554 BUSHING, 3/16 X 1/4 X 3/8 BUSHING, FL 3/16X5/16X1/8 BUSHING, 3/16ID X 1/4OD X 1/4L WASHER-PLAIN 2 4 1 2 151 152 153 154 70030 70031 00054401 50038 Snap Linear Knife DESCRIPTION QTY WASHER-PLAIN M01460 WASHER-PLAIN (6mm) WASHER-EXT. LOCK WASHER-EXT. LOCK M01460 SCREW/LOCKWASHER (8-32 X 3/8) SCREW-M3-0.5X5 PHIL PAN HD SCREW-M3-0.5X8 PHIL PAN HD SCREW-PHILLIPS FLAT HEAD (M3 X 6) NUT-HEX M01460 NUT-HEX M01460 BEARING, BALL, SHIELDED (ROHS COMPLIANT) HARNESS, SNAP SIGNAL OUTPUT ROLLER KNIFE HARNESS, SNAP POWER OUTPUT, ROLLER KNIFE 6 1 6 3 1 4 2 4 6 3 HARNESS, SNAP / ROLLER KNIFE POWER HARNESS, SNAP / ROLLER KNIFE SIGNAL PROGRAMMED 1 1 1 1 1 ASSEMBLY, BRACKET, MOTHER BOARD ENTRY BLOCK, STACKER MOUNT WASHER, #10 BELLEVILLE PLATE, EXIT GUIDE SCREW-PHILLIPS PAN HEAD (2-56 X 1/2) 4-40 X 3/8 PHILLIPS HEAD SELF-TAPPING SCREW CARTON, SHIPPING CARTON POLY BAG BAG POLY 11 X 4 X 17 S Assembly Drawings 69 1 1 4 1 2 2 1 1 1 4 ITEM PART NO. 155 156 157 158 159 160 161 162 627848 989984 989986 627850 627851 627849 990994 627853 DESCRIPTION GUARD, COVER 4-40 X 3/8 BHCS 4-40 ES NUT SHAFT, IDLER, LOWER PULLEY, OUTBOARD SHAFT, IDLER, UPPER WIRE TIE, 8" LABEL, SERIAL NUMBER, LINEAR KNIFE 70 Assembly Drawings QTY ITEM PART NO. 1 2 2 1 3 2 1 1 Snap Linear Knife DESCRIPTION QTY Revision 2.1 2.2 Date 11/18/2013 02/07/2014 Snap Linear Knife Description Initial release for part number 05621395 under ECN 3009741 Add pictures of wire harnesses, ECN 3009839 Assembly Drawings 71