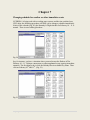
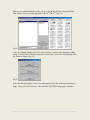
1
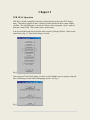
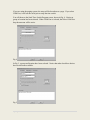
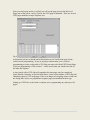
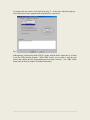
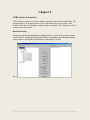
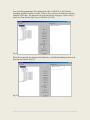
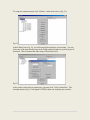
CPR CP22 Pager Quick Start Guide Basic Overview RTC Manufacturing has a hardware and software solution for agencies experiencing pager related communication problems. Although paging has been a reliable means to send programming to time switches in the past, many agencies are experiencing difficulties with paging network availability and reliability. The original paging system from RTC was called CPR III. This system consisted of a PC running central software and time switches in the field equipped with pagers. The PC was connected to a pager network through either a modem line or an email connection. Sunday morning of every week the central software sent programming to the time switches. The current time was sent a few times and following that any deviations from the default schedule was sent along. The time switches in the field adopted the new time and ran the altered schedule until the following Saturday night midnight, at which time they returned to their default plan. RTC has a solution to poorly operating or completely absent paging systems. This solution is called CP22. CP22 is a combination of hardware and software solutions to turn the time switches from weekly to yearly time switches. A weekly time switch stores programming information for one week. This requires weekly connection to maintain satisfactory operation. A yearly time switch stores programming for an entire year. One need only connect to it yearly for calendar operations. The following products are discussed in this guide. CPR2102 CP22 Chip This chip is placed in all the time switches in the field. The more powerful chip is completely compatible to all CPR2102 versions of hardware from revision A, through M. This chip has the memory and processing power to store an annual program. It is backward compatible to the hardware it is placed in. CPR III software version 6.9 This software is the paging software used for agencies that still have paging in place but want to have the time switches run as annual time switches. Like its predecessors, this program runs in a central location and controls time switches in the field. This software is completely compatible with all versions running before it and also all hardware, both CPR2102 versions 2 – 4 and CPR2102-CP22 version 2. 1|P age CPR4 Loader This program is intended to be used to load time switches with programming. CPR4 Loader runs on any Windows XP or Windows 7 PC. It is intended to be used to program time switches on either a bench or in the field. It requires no security device and is free. Chapter 1 - CP22 Chip Installation Chapter 2 - CPR III 6.9 software installation Chapter 3 - CPR III 6.9 Operation Chapter 4 - CPR4 Loader Instructions Chapter 5 - Using CP22 without a pager system in place Chapter 6 - Time without paging service Chapter 7 - Changing schedule for weather or other immediate events 2|P age Chapter 1 CP22 Chip Installation The CP22 chip must be installed in the CPR2102 time switch in order to make the time switch an annual device. The following procedure shows how this is accomplished. 1. Remove power source from the CPR2102. 2. Remove the cover from the CPR2102 and lay it aside. There is no reason to remove the communication cable. 3. Jot down the address dip switch settings. These addresses can get bumped while replacing chips, causing problems later. 4. Locate the processor chip on the board. It is the largest chip on the board. Notice the notch molded into the chip is facing the right side of the board. 5. Using a chip puller or pick, pull the chip out of the socket carefully. Be careful that you do not get the pick under the socket as you can seriously damage the board. 6. Locate the notch on the new chip. This notch should be placed in the socket the same direction as shown in the white outline on the circuit board itself. 7. Plug the new chip into the socket. You may have to gently rock the chip as you insert it. 8. Inspect both rows of pins to insure that none of them have collapsed while replacing the chip. 9. Verify that none of the address dip switches have been bumped. 10. Replace the cover removed in Step 2. 11. Apply power to the CPR2102. The board must be reprogrammed for proper operation. You can use CPR4 Loader for this, as described elsewhere in this document. 3|P age Chapter 2 CPR III 6.9 software installation CPR III 6.9 is required for using the CP22 annual features. RTC supplies a CD with this software. There are two types of installations: a full install, and an update. The full install is for new computers running the code; the update is for overwriting version 6.9 on an older installation. The update installation will not erase existing time switch programming. All programming and setups remain as they were before. To install the software, place the CD into your computer’s CD/DVD drive. First, you must turn off the current version of CPR. Then, run the “setup.exe” program, and follow all instructions given to you by the install program. (Note: You must be logged on as Administrator in order to perform the installation. If you are not an administrator, contact your IT department for help.) After installation you should see version 6.9 as shown in Fig. 1. Fig. 1 This completes the installation of the version 6.9 software on your PC. 4|P age Chapter 3 CPR III 6.9 Operation CPR III 6.9 is fully compatible with time switches that do not have the CP22 chip in them. This allows agencies to have a mixture of time switches in their system with no conflicts. The only difference is version 6.9 allows a user to program a year’s worth of data into a time switch. This is done in time switch setup. You can reach the menu below from the main screen by clicking Utilities. Notice in the menu below (Fig. 2), Time Switch Setup is circled. Fig. 2 Once you go to Time Switch Setup, you have to select whether you are going to setup the time switch using a serial cable or the paging system. See Fig. 3. Fig. 3 5|P age If you are using the paging system, the setup will be broadcast as a page. If you select COM Port, it will use the serial port to setup the time switch. You will then see the Send Time Switch Program screen, shown in Fig. 4. Notice no group or location has been selected. When COM Port is selected, the Select COM Port drop-down menu will be active. Fig. 4 In Fig. 5, a group and location have been selected. Notice that other check box choices have now become available. Fig. 5 6|P age Once you send a page and it is verified, you will see the page arrive in the Received Pages area of the screen. In Fig. 6 below, the CP22 page is identified. There are several CP22 pages needed to setup a complete year. Fig. 6 At this point you have to decide which Send option to use, based on the type of time switch you are programming. If you are trying to send an entire year’s worth of programming to a time switch with a CP22 chip you must select Send CP22 Setup Pages. If you are programming a CPR version 2 – 4 time switch, then you would select one of the other four options. A time switch with a CP22 chip will respond to the time pages sent, but completely ignore Default, Alternate, or Special Week Plans. A time switch without a CP22 chip will completely ignore a CP22 setup page. There is no danger of corrupting a time switch with the wrong data, as they are programmed to ignore pages not intended for their type. Setting up a CP22 time switch with a complete year’s programming may take up to five pages. 7|P age To program the time switch, click Send Setup (Fig. 7). At this time, either the pages go out, or the time switch is programmed using the direct connection. Fig. 7 Although time switch setup inside CPR 6.9 works with the direct connection, it is better to use the CPR4 Loader program. With CPR4 Loader, you are able to read the time switch and confirm that the programming has been done correctly. See CPR4 Loader Instructions in the next chapter for further instructions. 8|P age Chapter 4 CPR4 Loader Instructions CPR4 Loader is meant to be used on a laptop computer on the bench or in the field. The program allows you to load an entire year’s worth of data into a time switch. CPR4 Loader will work on any Windows computer with a serial port. The serial port is used to connect to the time switch. Basic Overview The groups and their programming are displayed in the left side of the program window. Notice in Fig. 8, that the group Kennedy Jr High is expanded to show the programming. In this instance, the Default Week Plan has a command at 7:02 AM. Fig. 8 9|P age Time switch programming will be displayed in either a CPR2102 or AP22 format, depending on which selection is made. There is also a selection for both time switches using the CP22 chip. The program will work with all four chip types. Notice in Fig. 9 below, the Time Switch Type is set to CPR2102 (W CP22). Fig. 9 When first connected, the program will indicate by a red ball that nothing has been read from the time switch. (Fig. 10) Fig. 10 10 | P a g e Files and CPR III programming CPR 4 Loader is compatible with all versions of CPR III. Specifically, versions 6.x, 7.x, 8.x and 9.x. CPR 4 Loader needs to have the programming files from the computer running CPR III placed in it. This is easily done with a flash or jump drive using the following procedure: 1. On the computer running the CPR III program locate the “c:\rtc\cpr3” directory. A snapshot of this directory is shown below. 2. Find all files with the extension csv. For example “groups.csv,” “steps.csv” etc. 3. Copy all these files to a flash drive, jump drive, or some other removable media that can be used on both computers. 4. On the computer running the CPR 4 Loader program locate the “c:\rtc\cpr3” directory. 5. Copy the files from the jump drive to this directory. 6. Launch the CPR 4 Loader program. The data should be there. The program is installed in the same directory as the files, “c:\rtc\cpr3.” To launch the program, you simply double click the file ‘CPR4 Loader.exe’ in the ‘c:\rtc\cpr3\’ directory. A snapshot of this directory is shown below. (Fig. 11) Fig. 11 Communications The CPR 4 Loader program only communicates to one clock at a time with a serial cable. For the latest generation CPR2102 clocks you can also use the cable part number 504567. For CPR2102 clocks before 2008 you need the adapter part number 503489. If your computer does not have a serial port you can use a USB serial port adapter. 11 | P a g e To setup the communications, click ‘Utilities’ on the main screen. (Fig. 12) Fig. 12 In the Utilities box (Fig. 13), you will setup which serial port you are using. You can select any of the ports listed or type in the COM number assigned to your serial port if not listed. This is often needed when using USB serial devices. Fig. 13 After you have selected your comm port, you must click ‘Verify Comm Port.’ The message shown in Fig. 14 will appear if CPR4 Loader can setup the port correctly. 12 | P a g e Fig. 14 Reading and Writing a Time Switch First, you need to select the type of time switch you are trying to connect to. In the example (Fig. 14), the time switch type is a CPR2102, with a CP22 chip. Fig. 14 The next step is to select the group to which the time switch belongs. You do this by clicking one of the groups listed along the left side. In our example, the group selected is “Nixon Sr High.” (Fig. 15) 13 | P a g e Fig. 15 The next step is to connect the cable to the time switch. Once connected, you can validate communications by manually controlling the time switch. Do this by clicking ‘Manual ON,’ or ‘Manual OFF’. You can verify that the relay turned on or off by listening for the relay, or by looking at the relay status LED. Once this is done, you can read the time switch by clicking the “Read” button, shown in Fig. 16. Fig. 16 The time switch takes seven seconds to read. Notice in Fig. 17, the process is stopped at 2 of 7 seconds. 14 | P a g e Fig. 17 After the read is finished, the results are shown. In Fig. 18 below, the time switch data does not match the computer data, so the window on the right is highlighted with a red dot. Fig. 18 Click the “Write” button to write the new data to the time switch. A write takes about seven seconds. When you read the time switch again, and it is validated correctly, a green highlight dot will be displayed. (Fig. 19) 15 | P a g e Fig. 19 16 | P a g e Chapter 5 Using CP22 without a pager system in place Many users no longer have paging systems in place. Either the pager provider has quit servicing an area, or the performance of the paging system is unsuitable for a traffic application. The CPR time switch that shipped with pagers has a one week programming cycle. Any deviations from the default schedule need to be sent each week in order for the time switches to follow them. CP22 in a time switch gives the switch the ability to hold one year’s worth of programming. Consequently, one could visit the time switch once per year and download the school calendar for the following year. Here is the procedure: 1. The school calendar is entered into the main computer running CPR III version 6.9. All the affected groups have the dayplans programmed into them. The school year is entered with all holidays, early outs, and other schedule deviations programmed. 2. The files for the programming are transferred to the laptop computer running CPR4Loader. The technician has the proper cable, described in the CPR4 Loader section. The procedure for moving the files is also explained. 3. The technician goes to the time switch location. Once there, the technician connects the cable to the time switch and programs it with CPR4 Loader. After checking the programming, the technician leaves the time switch. This procedure need only be done once per year for calendar purposes. The time switch will store the programming and execute the stored plan for the entire school year. 17 | P a g e Chapter 6 Time without paging service If your paging service is working, all of your CPR2102 time switches (standard and CP22) will update their time-of-day each week on Sunday morning. If your paging service is not working, all of your CPR2102 time switches (standard and CP22) can drift as much as ten minutes within a nine month period. RTC offers a GPS timekeeping solution that will keep time-of-day accurate continuously. RTC also offers a daughter board that plugs into the time switch microprocessor socket, which dramatically improves the timekeeping ability of the time switch. Please contact RTC for more details about timekeeping options if your paging service has been terminated. 18 | P a g e Chapter 7 Changing schedule for weather or other immediate events If CPRIII 6.9 is being used with a working pager system, and the time switches have CP22 chips, the following procedure will allow you to change a schedule immediately. Notice in the calendar (Fig. 20), the Kennedy Jr High schedule for February 10 – 11 is normal. There is not a holiday plan there. Fig. 20 Say, for instance, you have a situation where you need to turn the flashers off for February 10 – 11. Perhaps a snowstorm, or other unplanned event, requires immediate attention. The first thing to do is click the Holiday Plan in available Day Plans. Then click on February 10th and 11th. (Fig. 21) Fig. 21 19 | P a g e Once you are satisfied with the events you have scheduled, click the ‘Program Holiday Plan’ button. Notice an H has appeared on the 10th and 11th. (Fig. 22) Fig. 22 Next, the schedule changes need to be sent to the time switches in the Kennedy Jr High group. For CP22 this is done by using time switch setup. From Time Switch Setup, click the ‘Modem’ button. (Fig. 23) Fig. 23 Select the affected group(s) on the screen that appears (Fig. 24), in this case, Kennedy Jr High. Then, select All Locations. Then click the ‘Send CP22 Setup pages’ checkbox. 20 | P a g e Fig. 24 Finally, click ‘Send Setup.’ The setups are then sent to the time switches with CP22 via the paging system, and programming is complete. If your system has CPR2102 time switches without CP22 chips, you must send the changes using the Alternate Week Plan checkbox, as shown in Fig. 25. Fig. 25 21 | P a g e Please send any comments and suggestions to. Mark Sampson RTC Manufacturing [email protected] 22 | P a g e