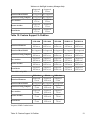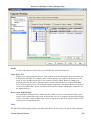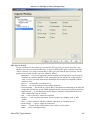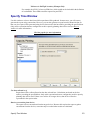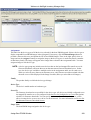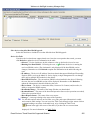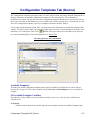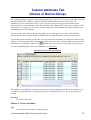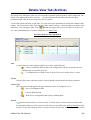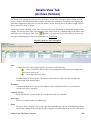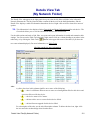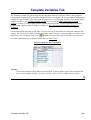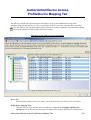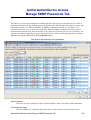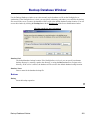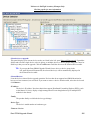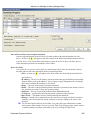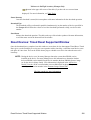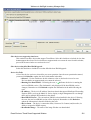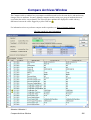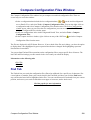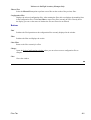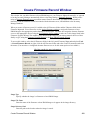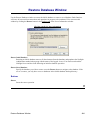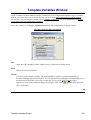
1
Welcome to NetSight Inventory Manager Help
Table of Contents
Inventory Manager Help....................................................................................................................................1
Accessing Help........................................................................................................................................1
Table of Contents Tab ............................................................................................................................1
Search Tab .............................................................................................................................................1
Help Topics with Graphics......................................................................................................................1
Notice....................................................................................................................................................................3
Virus Disclaimer......................................................................................................................................4
Restricted Rights Notice.........................................................................................................................4
CUSTOMER RELEASE NOTES.....................................................................................................................6
INTRODUCTION:..................................................................................................................................6
Inventory Manager Features..............................................................................................................6
SOFTWARE CHANGES AND ENHANCEMENTS.............................................................................8
Software Enhancements....................................................................................................................8
SYSTEM REQUIREMENTS:.................................................................................................................8
Supported Platforms..........................................................................................................................8
NetSight Console...............................................................................................................................8
UNIX® Operating System Patches...................................................................................................8
FEATURE/FIRMWARE SUPPORT:.....................................................................................................9
Table 1: Feature Support SecureStack A2........................................................................................9
Table 2: Feature Support SecureStack B2.........................................................................................9
Table 3: Feature Support SecureStack C2.......................................................................................10
Table 4: Feature Support Matrix C1................................................................................................10
Table 5: Feature Support Matrix E1................................................................................................10
Table 6: Feature Support Matrix E5................................................................................................11
Table 7: Feature Support Matrix E6/E7, SmartSwitch 2000...........................................................11
Table 8: Feature Support Matrix N−Series.....................................................................................11
Table 9: Feature Support Matrix V−Series.....................................................................................12
Table 10: Feature Support RoamAbout...........................................................................................12
Table 11: Feature Support SmartSwitch 9000................................................................................12
Table 12: Feature Support X−Pedition............................................................................................13
Table 13: Devices That Do Not Support Inventory Manager Features...........................................14
INSTALLATION:.................................................................................................................................14
Evaluation Copy..............................................................................................................................14
Upgrading from a Previous Version................................................................................................14
FIRMWARE CONSIDERATIONS......................................................................................................15
OPERATING SYSTEM CONSIDERATIONS....................................................................................15
Windows XP....................................................................................................................................15
CAPACITY PLANNING CONSIDERATIONS..................................................................................15
NETSIGHT COMPATIBILITY:...........................................................................................................16
KNOWN RESTRICTIONS AND LIMITATIONS:.............................................................................16
Install/Uninstall...............................................................................................................................16
General............................................................................................................................................17
Firmware.........................................................................................................................................20
Help System....................................................................................................................................21
IETF MIBS REQUIRED:......................................................................................................................22
ENTERASYS NETWORKS PRIVATE ENTERPRISE MIB SUPPORT:..........................................22
i
Welcome to NetSight Inventory Manager Help
Table of Contents
CUSTOMER RELEASE NOTES
IMPORTANT URLS:............................................................................................................................23
GLOBAL SUPPORT:............................................................................................................................23
ADDENDUM:.......................................................................................................................................24
NetSight Inventory ManagerInstallation........................................................................................................25
General Installation Information............................................................................................................26
System Requirements......................................................................................................................26
Evaluation Copy..............................................................................................................................26
Upgrading from a Previous Version................................................................................................27
NetSight Services............................................................................................................................27
Recommended Reading Sequence..................................................................................................28
Installation on Windows........................................................................................................................28
Configuring the Environment..........................................................................................................29
Stopping Other TFTP Services........................................................................................................30
Stopping NetSight Services (Windows)..........................................................................................30
Installing Inventory Manager (Windows).......................................................................................31
Installation on Solaris............................................................................................................................31
Preparing for Installation on Solaris................................................................................................32
Stopping NetSight Services (Solaris)..............................................................................................32
Installing Inventory Manager (Solaris)...........................................................................................33
Installation on Linux..............................................................................................................................34
Preparing for Installation on Linux.................................................................................................34
Stopping NetSight Services (Linux)................................................................................................34
Installing Inventory Manager (Linux).............................................................................................35
Launching Inventory Manager...............................................................................................................36
Launching on Windows...................................................................................................................36
Launching on Solaris.......................................................................................................................36
Launching on Linux........................................................................................................................36
Importing an Inventory Manager Database...........................................................................................36
Uninstalling Inventory Manager............................................................................................................37
Uninstalling on Windows................................................................................................................37
Uninstalling on Solaris....................................................................................................................37
Uninstalling on Linux......................................................................................................................38
Support...................................................................................................................................................38
Accessing Help................................................................................................................................38
Technical Support............................................................................................................................39
Documentation................................................................................................................................39
Training...........................................................................................................................................39
Getting Started..................................................................................................................................................40
If You are Upgrading........................................................................................................................................43
How to Stop and Start NetSight Services.......................................................................................................45
Stopping and Starting NetSight Services...............................................................................................45
Windows..........................................................................................................................................45
Solaris..............................................................................................................................................46
ii
Welcome to NetSight Inventory Manager Help
Table of Contents
How to Stop and Start NetSight Services
Linux...............................................................................................................................................46
Stopping and Starting the Services Manager (Windows Only).............................................................46
Stopping...........................................................................................................................................47
Starting............................................................................................................................................47
FTP Server Setup..............................................................................................................................................48
Configuring FTP Server Properties and Login Information..................................................................48
Changing Your Firmware Directory......................................................................................................49
Setting Your File Transfer Method to FTP............................................................................................49
TFTP Server Setup...........................................................................................................................................51
Enabling the NetSight TFTP Service.....................................................................................................51
Configuring the NetSight TFTP Service...............................................................................................52
Using a Different TFTP Server..............................................................................................................52
Changing Your Firmware Directory......................................................................................................53
Configuring the NetSight TFTP Service on a Client.............................................................................54
Firmware Discovery..........................................................................................................................................55
Discovering Your Firmware..................................................................................................................55
Adding New Firmware Images..............................................................................................................56
How To Use Inventory Manager.....................................................................................................................57
How to Add and Delete Devices.......................................................................................................................58
Using Console to Discover Devices......................................................................................................58
Using Console to Import Devices..........................................................................................................58
Adding a Single Device.........................................................................................................................59
Deleting Devices from the NetSight Database......................................................................................59
How to Add and RemoveDevice Groups........................................................................................................60
Adding a Device Group.........................................................................................................................60
Adding Devices to a Device Group.......................................................................................................60
Using the Add Device Window.......................................................................................................61
Using the Device Group Selection Window...................................................................................61
Dragging and Dropping Devices.....................................................................................................61
Removing Devices from a Device Group..............................................................................................62
Renaming a Device Group.....................................................................................................................62
Deleting a Device Group.......................................................................................................................62
How to Add Applications to the Applications Menu.....................................................................................63
How to Archive..................................................................................................................................................64
Using the Archive Wizard.....................................................................................................................64
Saving a New Archive Version..............................................................................................................66
Editing an Archive.................................................................................................................................66
Renaming an Archive............................................................................................................................66
Deleting an Archive...............................................................................................................................66
iii
Welcome to NetSight Inventory Manager Help
Table of Contents
How to Assign Firmware..................................................................................................................................68
How to Check for Updates...............................................................................................................................69
Performing an Immediate Update..........................................................................................................69
Schedule a Check for Updates...............................................................................................................69
How to Compare Archives...............................................................................................................................71
How to Configure and Manage the NetSight Server.....................................................................................73
Configuring the Server...........................................................................................................................73
Changing Maximum Connections...................................................................................................73
Managing the Database..........................................................................................................................74
Changing the Database Password....................................................................................................74
Changing the Database Connection URL.......................................................................................74
Performing a Database Backup.......................................................................................................74
Restoring the Initial Database.........................................................................................................75
Restoring a Saved Database............................................................................................................75
Viewing Client Connections..................................................................................................................75
Disconnecting a Client....................................................................................................................75
Viewing Licenses...................................................................................................................................76
Changing a License.........................................................................................................................76
Upgrading a Console License..........................................................................................................77
Viewing Locks.......................................................................................................................................77
Revoking a Lock.............................................................................................................................78
Viewing the Server Log.........................................................................................................................78
Viewing Server Statistics.......................................................................................................................78
How To Configure Profile/Device Mapping...................................................................................................79
Instructions for:......................................................................................................................................79
Assigning Profiles to Devices................................................................................................................79
How To Configure Profiles and Credentials..................................................................................................80
Instructions for:......................................................................................................................................80
Managing Credentials............................................................................................................................80
Managing Profiles..................................................................................................................................82
How to Create and Download Configuration Templates..............................................................................84
Creating a Configuration Template.......................................................................................................84
Editing a Configuration Template.........................................................................................................85
Setting Values for Template Variables..................................................................................................85
On a Single Device..........................................................................................................................85
On Multiple Devices.......................................................................................................................85
Assigning Templates to Device Types..................................................................................................86
Using the Template Download Wizard..................................................................................................86
Firmware Discovery..........................................................................................................................................88
Discovering Your Firmware..................................................................................................................88
Adding New Firmware Images..............................................................................................................89
iv
Welcome to NetSight Inventory Manager Help
Table of Contents
How to Import a Database...............................................................................................................................90
How to Initialize Inventory Database Components.......................................................................................91
How to Manage SNMP Passwords..................................................................................................................92
Instructions for:......................................................................................................................................92
Setting SNMPv1/2 Credentials..............................................................................................................92
Setting SNMPv3 Credentials.................................................................................................................92
How to Manage Users and Groups..................................................................................................................94
Instructions for:......................................................................................................................................94
Managing Authorization Groups...........................................................................................................94
Managing Users.....................................................................................................................................95
How to Push Local Firmwareto the Server....................................................................................................97
How to Reset a Device.......................................................................................................................................98
How to Restore an Archive............................................................................................................................100
Server Configuration Considerations...........................................................................................................102
Running the Server on a non−DNS Enabled Solaris System..............................................................102
Limiting Client Connections on Solaris and Linux.............................................................................102
Accepting Connection from Local Client Only............................................................................102
Limiting Connections to a Specific IP Address............................................................................102
Adding Memory to the Server on Solaris and Linux...........................................................................103
Firewall Considerations.......................................................................................................................103
How to Set a File Transfer Method...............................................................................................................104
Setting the File Transfer Method for a Device....................................................................................104
Setting the Default File Transfer Method for a Device Type..............................................................104
How to Set a Reference Image.......................................................................................................................106
How to Set Options.........................................................................................................................................107
How to Set Inventory Manager Options.......................................................................................................108
Configuring Alternate Firmware Servers.............................................................................................108
Setting FTP Transfer Settings..............................................................................................................109
Setting TFTP Transfer Settings...........................................................................................................110
Setting Services for NetSight Client Options......................................................................................110
How to Set Up Alternate Firmware Download Servers..............................................................................112
Configuring the Alternate Server.........................................................................................................112
Creating and Assigning Firmware Records.........................................................................................113
Setting the Firmware Server................................................................................................................114
v
Welcome to NetSight Inventory Manager Help
Table of Contents
FTP Server Setup............................................................................................................................................115
Configuring FTP Server Properties and Login Information................................................................115
Changing Your Firmware Directory....................................................................................................116
Setting Your File Transfer Method to FTP..........................................................................................116
TFTP Server Setup.........................................................................................................................................118
Enabling the NetSight TFTP Service...................................................................................................118
Configuring the NetSight TFTP Service.............................................................................................119
Using a Different TFTP Server............................................................................................................119
Changing Your Firmware Directory....................................................................................................120
Configuring the NetSight TFTP Service on a Client...........................................................................121
How to Stop and Start the NetSight Server..................................................................................................122
Stopping and Starting the Server on Solaris........................................................................................122
Stopping the Server.......................................................................................................................122
Starting the Server.........................................................................................................................122
Stopping and Starting the Server Components..............................................................................122
Stopping and Starting the Server on Linux..........................................................................................122
Stopping and Starting the Server on Windows....................................................................................122
How to Stop and Start NetSight Services.....................................................................................................124
Stopping and Starting NetSight Services.............................................................................................124
Windows........................................................................................................................................124
Solaris............................................................................................................................................125
Linux.............................................................................................................................................125
Stopping and Starting the Services Manager (Windows Only)...........................................................125
Stopping.........................................................................................................................................126
Starting..........................................................................................................................................126
How to Track a Device...................................................................................................................................127
How to Upgrade Boot PROM........................................................................................................................128
Preparing to Upgrade...........................................................................................................................128
Performing an Upgrade........................................................................................................................129
How to Upgrade Firmware............................................................................................................................132
Preparing to Upgrade...........................................................................................................................132
Performing an Upgrade........................................................................................................................133
Scheduling an Upgrade........................................................................................................................135
Viewing Scheduled Upgrades.......................................................................................................136
Canceling a Scheduled Upgrade....................................................................................................136
How to Use the BOOTP Service....................................................................................................................137
Creating a Bootptab File......................................................................................................................137
Capacity Planning...........................................................................................................................................139
Report Templates.................................................................................................................................139
vi
Welcome to NetSight Inventory Manager Help
Table of Contents
Chassis Capacity Report................................................................................................................................141
Flow.....................................................................................................................................................141
Select Report Window.........................................................................................................................141
Select Targets Window........................................................................................................................143
Specify Time Window.........................................................................................................................144
Chassis Results Window......................................................................................................................145
Component Change Report...........................................................................................................................153
Flow.....................................................................................................................................................153
Select Report Window.........................................................................................................................153
Select Targets Window........................................................................................................................155
Select FRU Types Window.................................................................................................................156
Specify Time Window.........................................................................................................................158
Results Window...................................................................................................................................159
Field Replaceable Unit (FRU) Report...........................................................................................................167
Flow.....................................................................................................................................................167
Select Report Window.........................................................................................................................167
Select Targets Window........................................................................................................................169
Select FRU Types Window.................................................................................................................170
Specify Time Window.........................................................................................................................172
FRU Results Window..........................................................................................................................173
Submodule Capacity Report..........................................................................................................................178
Flow.....................................................................................................................................................178
Select Report Window.........................................................................................................................178
Select Targets Window........................................................................................................................180
Specify Time Window.........................................................................................................................181
Submodule Results Window................................................................................................................182
Used/Unused Ports Report.............................................................................................................................190
Flow.....................................................................................................................................................190
Select Report Window.........................................................................................................................190
Select Targets Window........................................................................................................................192
Select Port Attributes Window............................................................................................................193
Specify Time Window.........................................................................................................................195
Port Results Window...........................................................................................................................197
Used/Unused Slots Report..............................................................................................................................207
Flow.....................................................................................................................................................207
Select Report Window.........................................................................................................................207
Select Targets Window........................................................................................................................209
Specify Time Window.........................................................................................................................211
Slot Results Window...........................................................................................................................212
Inventory Manager Wizards..........................................................................................................................218
vii
Welcome to NetSight Inventory Manager Help
Table of Contents
Archive Wizard...............................................................................................................................................219
Archive Name Window.......................................................................................................................219
Device Selection Window....................................................................................................................221
Schedule Window................................................................................................................................222
Restore Wizard................................................................................................................................................224
Archive Version Selection Window....................................................................................................224
Restore Configurations Window..........................................................................................................226
Reset Device Wizard.......................................................................................................................................229
Device Selection Window....................................................................................................................229
Reset Devices: Timed Reset Supported Window................................................................................230
Reset Devices: Timed Reset Not Supported Window.........................................................................232
Firmware Upgrade Wizard............................................................................................................................234
Device Selection Window....................................................................................................................234
Assign Firmware Window...................................................................................................................236
Download Progress Window...............................................................................................................238
Download Schedule Window..............................................................................................................240
Reset Devices: Timed Reset Supported Window................................................................................242
Reset Devices: Timed Reset Not Supported Window.........................................................................244
Boot PROM Upgrade Wizard........................................................................................................................246
Device Selection Window....................................................................................................................246
Assign Boot PROM Window..............................................................................................................248
Download Progress Window...............................................................................................................250
Reset Devices: Timed Reset Supported Window................................................................................252
Reset Devices: Timed Reset Not Supported Window.........................................................................254
Template Download Wizard..........................................................................................................................257
Template Download Selection Window..............................................................................................257
Device Selection Window....................................................................................................................258
Download Template Configurations Window.....................................................................................260
Inventory Manager Right−Panel Tabs.........................................................................................................263
Archives Tab (Device).....................................................................................................................................264
Attributes Tab (Configuration).....................................................................................................................266
Chassis Tab (Chassis Folder).........................................................................................................................269
Configuration Templates Tab (Device).........................................................................................................271
Custom Attributes Tab(Configuration).......................................................................................................273
viii
Welcome to NetSight Inventory Manager Help
Table of Contents
Custom Attributes Tab(Device or Device Group)......................................................................................277
Details View Tabs............................................................................................................................................282
Details View Tab(All Devices Folder)..........................................................................................................283
Details View Tab(All Firmware Folder).......................................................................................................287
Details View Tab(All Templates Folder)......................................................................................................289
Details View Tab (Archive)............................................................................................................................291
Details View Tab(Archive Version)...............................................................................................................293
Details View Tab(Archives Folder)...............................................................................................................295
Details View Tab(Device Group)...................................................................................................................297
Details View Tab(Device Type Folder − Firmware)....................................................................................301
Details View Tab(Firmware Group).............................................................................................................303
Details View Tab(Unknown Folder − Firmware)........................................................................................305
Details View Tab(Grouped By Folder).........................................................................................................307
Details View Tab(My Network Folder)........................................................................................................311
Details View Tab(Device Type Folder − Templates)...................................................................................315
Details View Tab(Template Group)..............................................................................................................317
Details View Tab(Unknown Folder − Templates)........................................................................................319
General Tabs...................................................................................................................................................321
General Tab (Archive)....................................................................................................................................322
General Tab (Archive Version).....................................................................................................................325
General Tab (Configuration).........................................................................................................................327
General Tab (Device)......................................................................................................................................330
General Tab (Device Type)............................................................................................................................333
ix
Welcome to NetSight Inventory Manager Help
Table of Contents
General Tab (Firmware Image)....................................................................................................................335
General Tab (Template).................................................................................................................................337
Image Information Tab (Device)...................................................................................................................339
Module Information Tab (Device)................................................................................................................341
Template Variables Tab.................................................................................................................................343
Inventory Manager Windows........................................................................................................................344
Active Status Panel........................................................................................................................................345
Summary View....................................................................................................................................345
Details View.........................................................................................................................................346
Add Device Window.......................................................................................................................................349
Add Filters Window........................................................................................................................................351
Add Alternate Firmware Server Window....................................................................................................353
Advanced Statistics Window..........................................................................................................................355
Archive Wizard...............................................................................................................................................357
Archive Name Window.......................................................................................................................357
Device Selection Window....................................................................................................................359
Schedule Window................................................................................................................................360
Assign Configuration Template Window.....................................................................................................362
Assign Firmware Window..............................................................................................................................364
Authorization/Device Access Users/Groups Tab.........................................................................................366
Add/Edit User Window........................................................................................................................368
Add/Edit Group Window.....................................................................................................................369
Authorization/Device Access Profiles/Credentials Tab...............................................................................372
Add/Edit Profile Window....................................................................................................................374
Add/Edit Credential Window..............................................................................................................376
Authorization/Device Access Profile/Device Mapping Tab........................................................................379
Authorization/Device Access Manage SNMP Passwords Tab....................................................................381
Backup Database Window.............................................................................................................................383
x
Welcome to NetSight Inventory Manager Help
Table of Contents
Boot PROM Upgrade Wizard........................................................................................................................384
Device Selection Window....................................................................................................................384
Assign Boot PROM Window..............................................................................................................386
Download Progress Window...............................................................................................................388
Reset Devices: Timed Reset Supported Window................................................................................390
Reset Devices: Timed Reset Not Supported Window.........................................................................392
Compare Archives Window...........................................................................................................................395
Compare Configuration Files Window.........................................................................................................398
Find Tab...............................................................................................................................................398
Filter Tab..............................................................................................................................................400
Configuration File Viewer..............................................................................................................................402
Find Tab...............................................................................................................................................402
Filter Tab..............................................................................................................................................403
Configure Server Window.............................................................................................................................406
Client Connections...............................................................................................................................406
Create Firmware Record Window................................................................................................................408
Database Properties Window.........................................................................................................................410
Device Group Selection Window...................................................................................................................411
Device Template Variables Window.............................................................................................................412
Edit Alternate Firmware Server Window....................................................................................................413
Edit Configuration Template Window.........................................................................................................415
E−Mail Configuration Window.....................................................................................................................417
Event Details Window....................................................................................................................................419
Event Log.........................................................................................................................................................421
File Transfer Method Window......................................................................................................................423
File Transfer Method − Device............................................................................................................423
File Transfer Method − Device Type..................................................................................................423
Firmware Upgrade Wizard............................................................................................................................425
Device Selection Window....................................................................................................................425
Assign Firmware Window...................................................................................................................427
Download Progress Window...............................................................................................................429
Download Schedule Window..............................................................................................................431
Reset Devices: Timed Reset Supported Window................................................................................433
xi
Welcome to NetSight Inventory Manager Help
Table of Contents
Firmware Upgrade Wizard
Reset Devices: Timed Reset Not Supported Window.........................................................................435
Main Window..................................................................................................................................................437
Menu Bar.........................................................................................................................................................440
File Menu.............................................................................................................................................440
Edit Menu............................................................................................................................................440
View Menu...........................................................................................................................................441
Tools Menu..........................................................................................................................................441
Applications Menu...............................................................................................................................445
Help Menu...........................................................................................................................................445
Right−click Menu Options...................................................................................................................446
Tool Bar...........................................................................................................................................................447
Left Panel.........................................................................................................................................................449
Network Elements Tab........................................................................................................................449
Firmware Mgmt Tab............................................................................................................................451
Archive Mgmt Tab...............................................................................................................................453
Configuration Templates Tab..............................................................................................................454
Left−Panel Icons..................................................................................................................................455
Right Panel......................................................................................................................................................457
Active Status Panel........................................................................................................................................458
Summary View....................................................................................................................................458
Details View.........................................................................................................................................459
Event Log.........................................................................................................................................................462
Status Bar........................................................................................................................................................464
Open Configuration Window.........................................................................................................................465
Options Window..............................................................................................................................................466
Options WindowInventory Manager Options..............................................................................................467
Alternate Firmware Servers.................................................................................................................467
File Transfer Settings...........................................................................................................................468
FTP Transfer Settings....................................................................................................................469
TFTP Transfer Settings.................................................................................................................470
Services for NetSight Client................................................................................................................471
Properties Window.........................................................................................................................................474
xii
Welcome to NetSight Inventory Manager Help
Table of Contents
Push Local Firmware to Server Window.....................................................................................................477
Reset Device Wizard.......................................................................................................................................479
Device Selection Window....................................................................................................................479
Reset Devices: Timed Reset Supported Window................................................................................480
Reset Devices: Timed Reset Not Supported Window.........................................................................482
Restore Database Window.............................................................................................................................484
Restore Wizard................................................................................................................................................485
Archive Version Selection Window....................................................................................................485
Restore Configurations Window..........................................................................................................487
Scheduled Events Window.............................................................................................................................490
Schedule Report Window...............................................................................................................................492
Select Archive Versions to Compare Window.............................................................................................494
Select Configurations Window......................................................................................................................496
Select Devices Window...................................................................................................................................498
Server InformationWindow...........................................................................................................................500
Client Connections Tab.......................................................................................................................500
Database Tab........................................................................................................................................503
Locks Tab.............................................................................................................................................504
Server Log Tab....................................................................................................................................506
License Tab..........................................................................................................................................510
NetSight Server Statistics Window................................................................................................................513
Set Firmware Server Window.......................................................................................................................514
Set Template Variables Window...................................................................................................................515
Template Download Wizard..........................................................................................................................517
Template Download Selection Window..............................................................................................517
Device Selection Window....................................................................................................................518
Download Template Configurations Window.....................................................................................520
Template Variables Window.........................................................................................................................523
Track Device Window....................................................................................................................................524
Updates Available Window............................................................................................................................527
xiii
Welcome to NetSight Inventory Manager Help
Table of Contents
View Devices Window.....................................................................................................................................529
Troubleshooting..............................................................................................................................................530
xiv
Inventory Manager Help
Welcome to the online help system for Enterasys NetSight® Inventory Manager. Inventory Manager is a
comprehensive tool that provides network inventory and change management capabilities. Using Inventory
Manager's features, you can easily perform routine network tasks such as configuration backups and firmware
upgrades, and prepare valuable capacity planning reports.
All Inventory Manager documentation is available in the online help system. Online help is available from the
Help menus and Help buttons throughout Inventory Manager. The Help viewer is divided into two panels. The
left panel contains two tabs: the Table of Contents tab and the Search tab. The right panel displays the actual
help text itself.
Accessing Help
There are several ways to access the help system:
• For help on any Inventory Manager feature, select the Help > Help Topics menu option.
• For help on the tab currently displayed in the right panel, select the Help > About This Window
menu option.
• Help on a particular window is also often available via a Help button on the window itself.
Table of Contents Tab
Click on the Table of Contents Tab in the left panel to display a list of help topics for Inventory Manager. The
Table of Contents is "collapsed" when you first open the help. To expand any folder in the Table of Contents,
double−click it. When you click on an item in the Table of Contents, the associated help topic appears in the
right panel. If the help topic you select is located within a long file, you may need to wait a second or two for
the help window to locate your particular topic within the file.
Search Tab
To search for specific instances of a term in all the help topics, click the Search tab in the left panel. In the
Find box, enter the term for which you want to search and press Enter. A list of topics in which the term
appears is displayed, along with the number of instances found in each topic. The first instance in the first
topic is highlighted in the right panel. You can then scroll through that help topic, or select another from the
list, to view the other instances of the search term within the topic.
There is a limit on the number of instances of the criteria that can be highlighted during one search. If the
number of "hits" exceeds this limit, the help window highlights the closest matches within each topic, rather
than all of them, and if the hits greatly exceed the limit, it highlights only the first few hits in each file. You
can't do searches on terms like "the" and "and."
Help Topics with Graphics
Some of the help topics contain a graphic (image) of an Inventory Manager window or tab. These graphics are
usually clickable so that you can navigate easily to the field definition or area of the window on which you
Inventory Manager Help
1
Welcome to NetSight Inventory Manager Help
need information. If the full graphic is not displayed in the help window when it first loads, you may need to
click once on the graphic to display it fully before the graphic's hotspots will work.
Inventory Manager Help
2
Notice
Enterasys Networks reserves the right to make changes in specifications and other information contained in
this document and its web site without prior notice. The reader should in all cases consult Enterasys Networks
to determine whether any such changes have been made.
The hardware, firmware, or software described in this document is subject to change without notice.
IN NO EVENT SHALL ENTERASYS NETWORKS BE LIABLE FOR ANY INCIDENTAL, INDIRECT,
SPECIAL, OR CONSEQUENTIAL DAMAGES WHATSOEVER (INCLUDING BUT NOT LIMITED TO
LOST PROFITS) ARISING OUT OF OR RELATED TO THIS DOCUMENT, WEB SITE, OR THE
INFORMATION CONTAINED IN THEM, EVEN IF ENTERASYS NETWORKS HAS BEEN ADVISED
OF, KNOWN, OR SHOULD HAVE KNOWN, THE POSSIBILITY OF SUCH DAMAGES.
Copyright © 2002−2006 Enterasys Networks, Inc. All rights reserved.
Enterasys Networks, Inc.
50 Minuteman Rd.
Andover, MA 01810
NetSight Inventory Manager references software in NetSight Console whose copyright is licensed from
MySQL AB.
Enterasys, Enterasys Matrix , X−Pedition, and RoamAbout are trademarks or registered trademarks of
Enterasys Networks, Inc.
NetSight is a registered trademark of Enterasys Networks, Inc.
Windows, Windows NT, Windows XP, Microsoft, Microsoft Windows, and Microsoft Windows for
Workgroups are trademarks or registered trademarks of Microsoft Corporation.
Solaris, Sun, Sun Microsystems, and Java are trademarks or registered trademarks of Sun Microsystems, Inc.
C++ is a trademark of American Telephone and Telegraph, Inc.
AppleTalk is a trademark of Apple Computer, Inc.
NetWare and Novell are registered trademarks; and IPX is a trademark of Novell, Inc.
Raima Database Manager®(RDM) and db_VISTA®are registered trademarks of Centura Software.
UNIX is a trademark of The Open Group.
Ethernet is a trademark of Xerox Corporation.
HP OpenView®is a registered trademark of Hewlett−Packard, Inc.
InstallAnywhere is a trademark or registered trademark of Zero G Software, Inc.
This product includes software developed by L2FProd.com (http://www.L2FProd.com/).
Notice
3
Welcome to NetSight Inventory Manager Help
BOOTP Server Software
The BOOTP server software used with this product is a copyrighted product of Carnegie Mellon University,
1988, 1991, All Rights Reserved.
Permission to use, copy, modify, and distribute this software and its documentation for any purpose and
without fee is hereby granted, provided that the above copyright notice appear in all copies and that both that
copyright notice and this permission notice appear in supporting documentation, and that the name of
Carnegie Mellon University not be used in advertising or publicity pertaining to distribution of the software
without specific, written prior permission.
CARNEGIE MELLON UNIVERSITY DISCLAIMS ALL WARRANTIES WITH REGARD TO THIS
SOFTWARE, INCLUDING ALL IMPLIED WARRANTIES OF MERCHANTABILITY AND FITNESS.
IN NO EVENT SHALL CMU BE LIABLE FOR ANY SPECIAL, INDIRECT OR CONSEQUENTIAL
DAMAGES OR ANY DAMAGES WHATSOEVER RESULTING FROM LOSS OF USE, DATA OR
PROFITS, WHETHER IN AN ACTION OF CONTRACT, NEGLIGENCE OR OTHER TORTIOUS
ACTION, ARISING OUT OF OR IN CONNECTION WITH THE USE OR PERFORMANCE OF THIS
SOFTWARE.
JFreeChart Software
JFreeChart is a free chart library for the Java(tm) platform. It runs on the Java 2 Platform (JDK 1.2.2 or later)
and uses the Java 2D API for drawing.
JFreeChart is licensed under the terms of the GNU Lesser General Public License (LGPL). A copy of the
license is included in the distribution.
The latest version of this class library can be obtained from: http://www.jfree.org/jfreechart/index.html
Virus Disclaimer
Enterasys Networks makes no representations or warranties to the effect that the Licensed Software is
virus−free.
Enterasys has tested its software with current virus checking technologies. However, because no anti−virus
system is 100% reliable, we strongly caution you to write protect and then verify that the Licensed Software,
prior to installing it, is virus−free with an anti−virus system in which you have confidence.
Restricted Rights Notice
(Applicable to licenses to the United States Government only.)
1. Use, duplication, or disclosure by the Government is subject to restrictions as set forth in
subparagraph (c) (1) (ii) of the Rights in Technical Data and Computer Software clause at DFARS
252.227−7013.
Enterasys Networks, Inc., 50 Minuteman Rd., Andover, MA 01810.
2. This computer software is submitted with restricted rights. It may not be used, reproduced, or
disclosed by the Government except as provided in paragraph (b) of this Notice or as otherwise
expressly stated in the contract.
Virus Disclaimer
4
Welcome to NetSight Inventory Manager Help
3. This computer software may be:
a. Used or copied for use in or with the computer or computers for which it was acquired,
including use at any Government installation to which such computer or computers may be
transferred;
b. Used or copied for use in a backup computer if any computer for which it was acquired is
inoperative;
c. Reproduced for safekeeping (archives) or backup purposes;
d. Modified, adapted, or combined with other computer software, provided that the modified,
combined, or adapted portions of the derivative software incorporating restricted computer
software are made subject to the same restricted rights;
e. Disclosed to and reproduced for use by support service contractors in accordance with
subparagraphs (b) (1) through (4) of this clause, provided the Government makes such
disclosure or reproduction subject to these restricted rights; and
f. Used or copied for use in or transferred to a replacement computer.
4. Notwithstanding the foregoing, if this computer software is published copyrighted computer software,
it is licensed to the Government, without disclosure prohibitions, with the minimum rights set forth in
paragraph (b) of this clause.
5. Any other rights or limitations regarding the use, duplication, or disclosure of this computer software
are to be expressly stated in, or incorporated in, the contract.
6. This Notice shall be marked on any reproduction of this computer software, in whole or in part.
50 Minuteman Rd.
Andover, MA 01810
(978) 684−1000
Virus Disclaimer
5
CUSTOMER RELEASE NOTES
®
Enterasys NetSight Inventory Manager
Version 2.2
August, 2006
INTRODUCTION:
Refer to the Addendum section at the end of this document for updated release note information obtained
using the Web Update feature.
The most recent version of these release notes can also be found on the NetSight Documentation web page:
http://www.enterasys.com/support/manuals/netsight.html.
NOTE: When this topic is opened from the CD, the links from this topic to other help topics will
not work. Links within the topic will work and once you've installed Inventory Manager,
you can launch the help system and access help for all topics.
Inventory Manager Features
NetSight Inventory Manager provides comprehensive network inventory and change management
capabilities. Using Inventory Manager's features, you can view a system−level inventory of your network
devices and their hardware, configuration, and firmware information. In addition, Inventory Manager tracks
and reports changes to your network configuration, and provides a history of device changes that aids in
CUSTOMER RELEASE NOTES
6
Welcome to NetSight Inventory Manager Help
troubleshooting network problems. Inventory Manager's Wizards let you easily perform routine network tasks
such as configuration backups and firmware upgrades, and prepare valuable capacity planning reports.
Inventory Manager's Client/Server architecture lets you deploy Inventory Manager in a multi−user
environment where remote clients can connect to a common, centralized database located on the NetSight
Server. Because Inventory Manager depends on functionality provided by the NetSight Server, which is a
component of NetSight Console, every installation of Inventory Manager must include the installation of
NetSight Console version 2.2.
System−level inventory of hardware, configurations, and firmware
• Provides a detailed inventory of Enterasys products organized by device type.
• Tracks device attributes such as serial number, asset tag, firmware version, CPU type, and memory.
• Organizes firmware by associating it with the supported devices.
• Presents detailed configuration information including date and time of configuration saves, firmware
version, and file size.
Change management and audit functionality
• Records a history of device attributes, and reports any changes made to the device.
• Provides a history of firmware and configuration changes made to a device.
• Compares current device configuration with previously saved configurations and reports any
differences.
• Provides a centralized history of Inventory Manager operations via the Active Status Panel and Event
Log.
Capacity Planning reporting capabilities
• Generates valuable, in−depth reports for network inventory planning purposes.
• Provides data on chassis, port, and submodule capacity and utilization.
• Presents detailed information on field replaceable/upgradeable (FRU) components in your network
devices.
• Lets you schedule reports to run at specified intervals with report results sent out via a notification
e−mail.
Wizards for ease of use
• Firmware Upgrade Wizard −− download firmware to single or multiple devices simultaneously.
• Boot PROM Upgrade Wizard −− download boot PROM images to single or multiple devices
simultaneously.
• Archive Wizard −− archive device configuration data and/or capacity planning data. The Wizard's
task scheduler allows you to schedule routine archive saves.
• Restore Wizard −− restore saved device configurations to recover from a problem.
• Reset Wizard −− reset single or multiple devices using timed or manual reset.
• Template Download Wizard −− download text−based (ASCII format) configuration templates to one
or more devices.
• Capacity Planning Wizard −− select from a set of report templates to create valuable network
inventory planning reports.
CUSTOMER RELEASE NOTES
7
Welcome to NetSight Inventory Manager Help
It is recommended that you thoroughly review this document prior to installing or upgrading this
product.
SOFTWARE CHANGES AND ENHANCEMENTS
Software Enhancements
The following enhancements have been added to release 2.2 of NetSight Inventory Manager:
• Support for NetSight Console 2.2
• Macrovision® Licensing. Inventory Manager now supports the Enterasys Online Licensing System
that lets you generate a license for your purchased products. For more information, see
http://www.enterasys.com/products/management/.
SYSTEM REQUIREMENTS:
Supported Platforms
The system requirements for operating Inventory Manager are listed here:
• Windows® 2000, Windows Server" 2003, and Windows XP® w/ Service Pack 2 (qualified on the
English version of the operating systems)
• Recommended P4−2.4 GHz, 1GB RAM
• Free Disk Space − 500MB
• Solaris® 8, 9, and 10 on Sun® Platforms only (with latest operating system patches installed)
• Recommended Sun® Ultra 30/60 (or equivalent), 900MHz, 1GB RAM
• Free Disk Space − 800MB
• Linux: Red Hat Version 9, Red Hat Enterprise Linux WS, ES v3, and SuSE Linux
• Recommended P4−2.4 GHz, 1GB RAM
• Free Disk Space − 500MB
NetSight Console
The Inventory Manager Client and Server license must be installed on a workstation that has a NetSight
Console version 2.2 Server already installed. Inventory Manager depends on functionality provided by the
NetSight Server, which is a component of Console 2.2. Inventory Manager Client−only installations do not
have this requirement.
®
UNIX Operating System Patches
Before installing Inventory Manager on the UNIX platform, be sure to install the latest patches for your
operating system. You can download the most recent operating system patches from
www.sunsolve.sun.com.
SOFTWARE CHANGES AND ENHANCEMENTS
8
Welcome to NetSight Inventory Manager Help
FEATURE/FIRMWARE SUPPORT:
The following tables show support for various Inventory Manager features based on product family/device
type and firmware version. For the most recent information on product feature support, read the version of
these release notes found on the NetSight Documentation web page:
http://www.enterasys.com/support/manuals/netsight.html.
NOTE: Inventory Manager automatically organizes the following supported network devices
into product family and device type folders in the left−panel Network Elements tab.
Devices that Inventory Manager does not correlate to a specific device type are placed
in the Grouped By>Device Type>Unknown folder.
Table 1: Feature Support SecureStack A2
A2
Download Firmware
Download Boot PROM
Supported:
1.03.xx
Not Supported
Download Config Template
Supported:
1.03.xx
Save Archive
Supported:
1.03.xx
Restore Archive
Supported:
1.03.xx
Reset Device
Supported:
1.03.xx
Table 2: Feature Support SecureStack B2
B2
Download Firmware
Download Boot PROM
Supported:
3.01.xx
Not Supported
Download Config Template
Supported:
3.01.xx
Save Archive
Supported:
3.01.xx
Restore Archive
Supported:
3.01.xx
Reset Device
Supported:
3.01.xx
FEATURE/FIRMWARE SUPPORT:
9
Welcome to NetSight Inventory Manager Help
Table 3: Feature Support SecureStack C2
C2
Download Firmware
Download Boot PROM
Supported:
4.00.xx
Not Supported
Download Config Template
Supported:
4.00.xx
Save Archive
Supported:
4.00.xx
Restore Archive
Supported:
4.00.xx
Reset Device
Supported:
4.00.xx
Table 4: Feature Support Matrix C1
C1
Download Firmware
Download Boot PROM
Supported:
2.00.xx
Not Supported
Download Config Template
Supported:
2.00.xx
Save Archive
Supported:
2.00.xx
Restore Archive
Supported:
2.00.xx
Reset Device
Supported:
2.00.xx
Table 5: Feature Support Matrix E1
Download Firmware
Download Boot PROM
WS
GWS
GDS
Supported:
3.04.04.xx
N/A
Supported:
3.05.06.xx
N/A
Not Supported Not Supported
Download Config Template
Supported:
3.04.04.xx
Supported:
3.05.06.xx
Supported:
3.05.06xx
Save Archive
Supported:
3.04.04.xx
Supported:
3.05.06.xx
Supported:
3.05.06.xx
Restore Archive
Supported:
3.04.04.xx
Supported:
3.05.06.xx
Supported:
3.05.06.xx
Reset Device
Table 3: Feature Support SecureStack C2
10
Welcome to NetSight Inventory Manager Help
Supported:
3.04.04.xx
Supported:
3.05.06.xx
Supported:
3.05.06.xx
Table 6: Feature Support Matrix E5
5xxxx−xx
Download Firmware
Download Boot PROM
Supported:
3.00.xx
Not Supported
Download Config Template Not Supported
Save Archive
Supported:
3.00.xx
Restore Archive
Supported:
3.00.xx
Reset Device
Supported:
3.00.xx
Table 7: Feature Support Matrix E6/E7, SmartSwitch 2000
1st Generation 2nd/3rd Generation
Download Firmware
Download Boot PROM
Supported:
4.11.xx
Supported:
5.08.xx
Not Supported
Supported:
5.08.xx
Download Config Template Not Supported
Not Supported
Save Archive
Supported:
4.11.xx
Supported:
5.08.xx
Restore Archive
Supported:
4.11.xx
Supported:
5.08.xx
Reset Device
Supported:
4.11.xx
Supported:
5.08.xx
Table 8: Feature Support Matrix N−Series
N−Series Gold
N−Series
Platinum
Supported:
5.13.xx
Supported:
5.13.xx
Not Supported
Not
Supported
Download Config Template
Supported:
5.13.xx
Supported:
5.13.xx
Save Archive
Supported:
Supported:
Download Firmware
Download Boot PROM
Table 6: Feature Support Matrix E5
11
Welcome to NetSight Inventory Manager Help
5.13.xx
5.13.xx
Restore Archive
Supported:
5.13.xx
Supported:
5.13.xx
Reset Device
Supported:
5.13.xx
Supported:
5.13.xx
Table 9: Feature Support Matrix V−Series
V2H124−24
V2 PoE
Supported
2.5.2.15
N/A
Not Supported
Not
Supported
Download Config Template
Supported
2.5.2.15
Supported
2.5.2.15
Save Archive
Supported
2.5.2.15
Supported
2.5.2.15
Restore Archive
Supported
2.5.2.15
Supported
2.5.2.15
Supported
2.5.2.15
(warm boot only)
Supported
2.5.2.15
(warm boot
only)
Download Firmware
Download Boot PROM
Reset Device
Table 10: Feature Support RoamAbout
Download Firmware
Download Boot PROM
AP2000
AP3000
AP4102
RoamAbout R2
Supported:
6.04.xx
Supported:
3.1.6
Supported:
v.1.0.10
Supported:
6.06.xx
Not Supported
Supported:
3.1.6
Supported:
v.1.0.4
Supported:
6.06.xx
Not Supported
Not Supported
Not Supported
Download Config Template Not Supported
Save Archive
N/A
Supported:
3.1.6
Supported:
v.1.0.10
Supported:
6.06.xx
Restore Archive
N/A
Supported:
3.1.6
Supported:
v.1.0.10
Supported:
6.06.xx
Reset Device
Supported:
6.04.xx
Supported:
Supported:
3.1.6
v.1.0.10
(warm boot only) (warm boot only)
Supported:
6.06.xx
Table 11: Feature Support SmartSwitch 9000
9x5xx−xx
9x4xx−xx
Download Firmware
Table 9: Feature Support Matrix V−Series
12
Welcome to NetSight Inventory Manager Help
Supported:
1.07.xx
Download Boot PROM
Supported:
1.12.xx
Not Supported Not Supported
Download Config Template Not Supported Not Supported
Save Archive
Supported:
1.07.xx
Supported:
1.12.xx
Restore Archive
Supported:
1.07.xx
Supported:
1.12.xx
Reset Device
Supported:
1.07.xx
Supported:
1.12.xx
Table 12: Feature Support X−Pedition
Download Firmware
Download Boot PROM
Download Config Template
Save Archive
Restore Archive
Reset Device
1
SSR−8000
SSR−8600
SSR 2000
5SSRM−02
6SSRM−02
Supported:
E10.0.0.xx
Supported:
E10.0.0.xx
Supported:
E10.0.0.xx
Supported:
E10.0.0.xx
Supported:
E10.0.0.xx
Not Supported Not Supported Not Supported Not Supported Not Supported
Supported:
E10.0.0.xx
Supported:
E10.0.0.xx
Supported:
E10.0.0.xx
Supported:
E10.0.0.xx
Supported:
E10.0.0.xx
Supported:
1
E10.0.0.xx
Supported:
E10.0.0.xx
Supported:
E10.0.0.xx
Supported:
E10.0.0.xx
Supported:
E10.0.0.xx
Supported:
E10.0.0.xx
Supported:
E10.0.0.xx
XSR−18xx
ER−16
XSR−3xxx
Supported:
1
7.6.0.0
Supported:
E10.0.0.8
Supported:
1
7.6.0.0
Supported:
E10.0.0.xx
Supported:
E10.0.0.xx
Supported:
E10.0.0.xx
Supported:
E10.0.0.xx
Supported:
E10.0.0.xx
Supported:
1
E10.0.0.xx
Supported:
E10.0.0.xx
Supported:
E10.0.0.xx
With SSR Config MIB.
Download Firmware
Download Boot PROM
Not Supported Not Supported Not Supported
Download Config Template
Supported:
7.6.0.0
Supported:
E10.0.0.8
Supported:
7.6.0.0
Save Archive
Supported:
7.6.0.0
Supported:
E10.0.0.8
Supported:
7.6.0.0
Restore Archive
Supported:
7.6.0.0
Supported:
E10.0.0.8
Supported:
7.6.0.0
Reset Device
Supported:
7.6.0.0
Supported:
E10.0.0.8
Supported:
7.6.0.0
1
Requires SNMPv3 authorization.
Table 12: Feature Support X−Pedition
13
Welcome to NetSight Inventory Manager Help
Table 13: Devices That Do Not Support Inventory Manager Features
Device
Inventory Manager Features
Vertical Horizon
Not Supported
INSTALLATION:
When you purchased Inventory Manager, you received a Licensed Product Entitlement ID that allows you to
generate a product license. Prior to installing Inventory Manager, you must redeem your Entitlement ID for a
product license. Refer to the instructions included with the Entitlement that was sent to you. (For more
information, see http://www.enterasys.com/products/management/.)
The NetSight Installer (InstallAnywhere® by Zero G Software, Inc.) leads you through a series of windows
that ask you for all the information required in order to install Inventory Manager. In one of the windows, you
will need to enter the license text that you receive when you redeem your Entitlement ID. When you finish
with the series of windows, Inventory Manager is installed according to your specification.
For complete installation instructions, refer to the installation documentation located on the NetSight
Documentation web page: http://www.enterasys.com/support/manuals/netsight.html.
If you will be installing from a CD, you can also access the installation instructions from the CD with a web
browser by opening the install.htm file located in the top−level directory.
Evaluation Copy
If you have requested an Inventory Manager evaluation license, you will receive a License Key. Evaluation
requests for each product are limited to three 30−day instances. To upgrade from an evaluation copy of
Inventory Manager to a purchased copy, contact your Enterasys Networks Representative to purchase the
software and receive an Entitlement ID. You do not need to reinstall the software to perform the conversion.
Upgrading from a Previous Version
If you are upgrading from a previous version of Inventory Manager to version 2.2, follow these instructions.
NOTE: If you are upgrading from version 1.4, following the upgrade, you can import your 1.4 database
into version 2.2 to preserve your network information. Refer to How to Import a Database for
more specific information on importing your Inventory Manager database. You can import a
database other than a 1.4 database, but be aware that all known anomalies regarding upgrades
from those earlier versions will still apply. It is recommended that you perform a database backup
prior to uninstalling if you plan on importing your database into version 2.2.
1. Exit Inventory Manager.
2. Uninstall Inventory Manager according to the instructions for that version.
3. Verify that Console 2.2 has been installed.
4. Install Inventory Manager 2.2 according to the Installation instructions.
5. Launch Inventory Manager 2.2.
6. If you are upgrading from version 1.4 or earlier, refer to the help topic If You are Upgrading for
information on functionality that has changed.
Table 13: Devices That Do Not Support Inventory Manager Features
14
Welcome to NetSight Inventory Manager Help
FIRMWARE CONSIDERATIONS
• Inventory Manager must use SNMPv3 access parameters when performing firmware upgrades,
archive restore operations, or reset operations on XSR devices running firmware version 4.0 and
higher.
• When restoring a configuration to an X−Pedition, if the configuration file has errors, it will not be
restored to the device. You will need to correct any errors in the configuration file prior to restoring it.
You can check a configuration file for errors via CLI; lines that contain errors have an "E" after the
line number.
OPERATING SYSTEM CONSIDERATIONS
Windows XP
• In order for TFTP or FTP services to function correctly, you must have the Internet Connection
Firewall option deselected on the Inventory Manager workstation, or other Windows XP workstations
providing these services:
1. From the Start Menu, select Settings > Network Connections.
2. Right−click on Local Area Connection and select Properties.
3. In the Local Area Connection Properties window, select the Advanced tab.
4. Verify that the Internet Connection Firewall option is not selected.
If the Internet Connection Firewall must be enabled for your network, refer to your Microsoft®
documentation for information on configuring the firewall to allow TFTP and FTP traffic. Access this
documentation from the link in the Local Area Connection Properties window, Advanced tab.
CAPACITY PLANNING CONSIDERATIONS
• The Used/Unused Ports Report correctly reports the total number of switch and router ports, but not
repeater ports.
• The GIGAswitch Router 8x00 must be running firmware version E9.x.x.x or higher in order to report
the control modules or fabric modules contained in the router.
• SSR devices do not report their HSSI and Serial ports in the Used/Unused Ports Report.
• SSR devices do not report 10 Gigabit ports in the Used/Unused Ports Report or FRU Report.
• SSR 2100 devices report a chassis FRU component in the FRU report, even though they are
standalone devices.
• 1H582−25 devices require firmware version 3.0.14 or higher in order to report submodules in the
FRU Report.
• 1G694−13 devices do not report any FRU ports in the FRU Report.
• 1G694−13 devices do not report any FRU submodules in the FRU Report or the Submodule Capacity
Report.
• XSR devices with NIM cards installed do not report the NIM cards in the FRU Report or Submodule
Capacity Report.
• XSR devices with NIM cards installed report the type of card and number of ports, but do not provide
port details such as connector type and media type in the Used/Unused Ports Report.
• R2 devices incorrectly report their total number of ports in the Used/Unused Ports Report. It is
recommended that you create a "Filter Out" filter for R2 devices when generating this type of report.
• VHSIM−G6, FDDI HSIM−F6, and ATM HSIM−A6DP submodules. Ports in these three submodules
are configured to act in a redundant manner and therefore are reported as a single port in the
FIRMWARE CONSIDERATIONS
15
Welcome to NetSight Inventory Manager Help
Used/Unused Ports report.
• C1H124−48 devices do not report the connector type or media type correctly for any installed
mini−GBIC ports in the Used/Unused Ports Report. These ports are also not identified as FRUs in the
FRU Report.
• C1G124−24 devices may not report the existence of mini−GBIC ports in certain situations.
• V−Series stackable devices with older firmware may report an incorrect number of devices in the
stack when gathering data for the FRU report.
• 6x2xx and 6x3xx devices always report the fan tray as installed in the FRU Report.
• 6x1xx/6x2xx/6x3xx and stand−alone 2x2xx devices incorrectly report submodule Description
information in the FRU Report.
• C2 devices do not report their four SFP GBIC ports in the Used/Unused Ports Report; these
combination RJ45/SFP ports are reported simply as RJ45 ports.
• 2E43−27R devices report an incorrect description for HSIM−F6 submodules in the FRU Report.
• If you have devices that are configured with multiple SNMP contexts in your device tree and you run
a report on those devices, you may see that report results display data for the device configured with
the default context (switch mode) for each device with context. For example, if you target 10.10.20.20
and 10.10.20.20:context, the report may display results for 10.10.20.20 for both devices. Be aware
that this will affect your result totals.
NETSIGHT COMPATIBILITY:
Inventory Manager's interoperability and concurrent application capabilities are listed below:
NMS Platform
Version No. Support
NetSight Console
2.2
Yes
KNOWN RESTRICTIONS AND LIMITATIONS:
The known restrictions and limitations for this release of NetSight Inventory Manager are listed below.
Solutions for these restrictions and limitations are noted, if available.
Install/Uninstall
Problem 1:
Solution:
Problem 2:
Solution:
Problem 3:
(Windows only) An evaluation of your system is not automatically performed during
the installation. If system requirements are not met, the install will take place, but
results will be unpredictable.
Verify that all Windows platform system requirements are met prior to installing
Inventory Manager.
Solaris only. The installer reports that it is unable to complete the Host Evaluation, and
you cannot proceed with the installation.
The /tmp directory is probably full. You must exit the installer and reboot the
workstation. You can then restart the installation.
Windows only. After uninstalling a client−only version of Inventory Manager on a
Windows system that has no other NetSight products installed, the NetSight Services
NETSIGHT COMPATIBILITY:
16
Welcome to NetSight Inventory Manager Help
Manager can still be launched from the Start menu.
General
Problem 1:
Solution:
Create only one device for a router using the IP address of the router's main
interface.
Problem 2:
Aborting a Timed Reset may not stop all resets. The Timed Reset section of the
Firmware Upgrade Wizard and Reset Wizard has the option to abort the
operation after it has been started. In some circumstances, it is possible that the
Abort message will get overwritten by the process that sets the reset timers.
This can cause some devices to reset as scheduled.
Solution:
To abort a Timed Reset operation that you have already started, click the Abort
button after all devices have a "Reset Request Status" of "Success".
Note: The Abort button is not a guarantee that you can back out of a Timed
Reset operation, since it is possible that reset timers may expire before you
decide to abort the operation.
Problem 3:
Solution:
Problem 4:
Solution:
Problem 5:
Solution:
General
Creating multiple devices for a single router (based on the router's different IP
addresses for its different interfaces), could result in SNMP errors or TFTP
server performance problems.
Solaris only. Inventory Manager may not accept input from the keyboard's
numeric keypad.
Installing the latest patches for your operating system should fix the problem.
You can download the most recent operating system patches from
www.sunsolve.sun.com.
When an X−Pedition router is configured to run the OSPF routing protocol, it is
possible during TFTP transfer that the device will send TFTP packets from
different source ports. This will cause the transfer to fail with a "TFTP Error:
Undefined error." For security reasons, this is not supported by the NetSight
TFTP Server.
When OSPF routing protocol is being used on your network, you must
configure your X−Pedition devices to use a single port for TFTP traffic. Refer
to the X−Pedition Router User Reference Manual for information about using
the system set tftpsource command.
If you upgrade from Inventory Manager version 1.1 or earlier and import your
database, any device groups you had added under the Device Type folder
(Network Elements tab) in the earlier version are preserved in the imported
database. However, Inventory Manager 2.1 does not support the addition of
user−created device groups in the Device Type folder. User−created device
groups can now only be added in the My Network folder. (User−created device
groups are displayed in the tree with yellow folders.)
You have two options:
17
Welcome to NetSight Inventory Manager Help
1. You can leave the groups/devices and any associated archives as they
are. Just be aware that you can no longer create user−created device
groups in the Device Type folder, and that they will no longer be
supported.
2. You can create a new set of user−created device groups in the My
Network folder to replicate what you have in the Device Type folder.
In addition, you can create new archives for the groups, and disable any
archives you had for the old groups. Once you have recreated the
groups under the My Network folder, you can delete the old groups
located under the Device Type folder.
Problem 6:
Selecting the Help > Support Center menu option does not open the Enterasys
Networks Support website and gives you a "The page cannot be found"
message.
Solution:
The Enterasys Networks Support website requires Internet Explorer. If you do
not have Internet Explorer, you may have success viewing the website using the
latest version of Netscape.
Problem 7:
Solution:
Downgrading firmware/boot PROM to a previous revision.
Downgrading firmware/boot PROM is inherently risky due to possible feature
differences between revisions. Restoring configurations from different
firmware revisions carries the same risk. Should you need to downgrade your
firmware/boot PROM to an earlier version, it is recommended that you use one
of the following two procedures:
• Downgrade the firmware/boot PROM on a network device using the
Firmware Upgrade Wizard or Boot PROM Upgrade Wizard. Do not
proceed to the Reset portion of the wizard, instead select [Finish].
Restore an archived configuration that was previously created with the
firmware image being downloaded. This will reset the device.
or
• Downgrade the firmware on a network device using the Firmware
Upgrade Wizard or Boot PROM Upgrade Wizard. Complete the
downgrade using the wizard Reset screen. Clear NVRAM on the
device and reconfigure the network configuration parameters of the
device using the local console.
In addition, when downgrading firmware on SNMPv3 devices, it is possible
that Inventory Manager will lose contact with the device. SNMPv3 adds a level
of difficulty to downgrade operations, because counters and timers related to
security features of SNMPv3 may get out of sync. Following the downgrade,
you will need to restart Inventory Manager to re−establish contact with the
device.
Problem 8:
A firmware or boot PROM upgrade fails with an "Operation Failed" or "Access
Violation" message.
Solution:
General
18
Welcome to NetSight Inventory Manager Help
If the firmware image being transferred is not stored in the firmware directory
specified for the file transfer protocol being used, the upgrade operation will
fail. Verify that the firmware image is accessible to the file transfer method
(FTP or TFTP) configured for the device. For information, see File Transfer
Settings Options and How to Set a File Transfer Method.
Problem 9:
If you upgraded from Inventory Manager version 1.2 to version 2.1 and
imported your database, the first time you archive a device that resides in a
chassis and was previously archived in the earlier version, a Difference icon
will be displayed along with the message "Configurations Are Equal −−
Device Information Change Detected". This is because the chassis naming
convention changed between version 1.2 and version 2.1.
Solution:
Problem 10:
Solution:
If you change your TFTP or FTP firmware directory path (Tools > Options >
Inventory Manager > File Transfer Settings), and then perform a firmware
Refresh, previously discovered images (from the old directory) are not deleted
from the right−panel firmware Details View. The old images are still listed
with a status of "File found". If these old images are selected in the Firmware
Upgrade Wizard, the upgrade operation will fail.
If you change your firmware directory path, all images listed in the firmware
Details View should be deleted manually prior to performing a firmware
Refresh with the newly−defined directory path. It is up to the user whether to
delete the images from the server. Doing so would permanently remove them
from your hard drive.
Problem 11:
If you have an AppleTalk Routing Engine (ARE) in an SSR, the AppleTalk
configuration is not captured during an Archive operation.
Problem 12:
When using a remote file transfer server to perform a firmware or boot PROM
upgrade, the operation fails with an "SNMP Timeout" error.
Solution:
Verify that Inventory Manager has SNMP contact to the device, that the device
has tftp/ftp access to the remote server, and that the path and file name are
correct.
Problem 13:
If you upgraded from an earlier version of Inventory Manager to version 2.1
and imported your database, archives for chassis groups will not display the
devices in the Archive General tab. This is because chassis naming conventions
change between versions.
Solution:
Re−add the devices to the archive using the Edit Devices button in the Archive
General tab. Refer to the chassis group name displayed in the Archive General
tab, and select that group when re−adding the devices.
Problem 14:
General
Use the Description column in the Archive Tab (Device) to verify that the
difference was the chassis name change.
If you change a firmware image in your firmware directory but the filename
19
Welcome to NetSight Inventory Manager Help
stays the same, performing a firmware Refresh will not update the image
information. For example, if you replace a firmware image with an image of the
same name but a newer version number, and then perform a firmware Refresh,
Inventory Manager will continue to display the older firmware version number.
Solution:
Delete the firmware image from Inventory Manager and then perform a
firmware Refresh. You can also update a firmware's version number on the
firmware image's General tab.
Firmware
Problem
1:
The firmware upgrade operation fails on an ER16 and displays the message "SNMP
Error−Timeout". This problem is due to a limitation on the ER16, and happens when:
• the ER16 is configured with a primary and backup CM,
• the primary CM has more than 1 image loaded on its flash card, and
• both the primary and backup CM have the same image chosen for next boot.
Solution:
When performing a firmware upgrade on an ER16 configured with a primary and backup CM,
verify that there is only one image loaded on the primary CM's flash card.
Problem
2:
The Matrix E5 serial number may not be displayed in Inventory Manager.
Solution:
Upgrade the Matrix E5 firmware to version 3.00.06 and clear NVRAM. The serial number
should now display correctly.
Problem
3:
Second generation devices (e.g. 2H252−25R) incorrectly display a value in the Bytes Trans.
column of the Active Status Panel (Details view) for an Archive Save operation that fails
because the TFTP server is not running.
Solution:
Ignore this value. This will be fixed in a future firmware release.
Problem
4:
Archive operations on Matrix E1 devices fail following a failed firmware upgrade operation.
Solution:
Reset the Matrix E1 device. Following a reset, the archive operation should be successful. This
will be fixed in a future firmware release.
Problem
5:
For X−Pedition routers, changing the Asset Tag in the Device General Tab fails with the
following message: SNMP Error = General Error writing value [NetworkAdmin] to oid
[sysContact.0]. This is because current versions of X−Pedition firmware do not support asset
tags. However, despite the failure status, the System attributes do get set properly on the
device and the asset tag is stored in the Inventory Manager database.
Solution:
This will be fixed in a future firmware release.
Problem
6:
E1 Devices only. Archive and Restore Archive operations may not work properly if the device
is modeled using a Routing IP address.
Firmware
20
Welcome to NetSight Inventory Manager Help
Solution:
Create (add) E1 devices using a Switch IP address.
Problem
7:
E1 Devices only. Repeated archive operations may result in saved configuration files with
differing checksums when no configuration changes have actually been made. This causes an
alert icon to be displayed indicating a difference between configuration files, when there really
is none.
Solution:
Upgrade the E1 firmware to version 2.04.01 or higher.
Problem
8:
Matrix E1 and Matrix N−Series devices utilizing SNMPv3. When restoring a configuration or
performing a configuration template download, you are not able to regain contact with the
device. In addition, the error message "SNMP Error − Unknown User Name" appears in the
Message column of the Restore Configurations window (Restore Wizard) or the Download
Template Configurations window (Template Download Wizard).
Solution:
To regain contact with the device, you must reenter the SNMP user information via CLI. In
addition, N−Series devices require that you restart the Inventory Manager Server, however E1
devices do not.
Problem
9:
XSR devices running firmware version 5.0 only. Inventory Manager is not able to perform
firmware upgrades or archive save/restore operations on these devices.
Solution:
You can perform these operations via CLI. This problem is fixed in the 5.0.0.1 version of the
XSR firmware.
Problem
10:
Matrix E5 Devices only. An archive operation fails with a "Config file is empty" message.
Solution:
Reset the Matrix E5 device. Following a reset, the archive operation should be successful. This
will be fixed in a future firmware release.
Problem
11:
A2, B2, C2, and N3 Devices with SNMPv3 credentials only. Following an archive restore
operation, Inventory Manager loses contact with the device because the device is returning a
wrong SNMP value.
Solution:
You must restart the NetSight Server to contact the device.
Problem
12:
Matrix E1 Devices only. A Restore Configuration or Download Configuration Template
operation fails with a General Error.
Solution:
It is possible that the operation was actually successful even though Inventory Manager
reported that it failed. Perform an archive of the device’s configuration file and use the View
Configuration File window to determine if the configuration was actually restored or
downloaded to the device.
Help System
Problem 1:
Help System
A graphic hotspot may not work correctly the first time you click it unless the graphic
is fully displayed on the screen.
21
Welcome to NetSight Inventory Manager Help
Problem 2:
Solution:
Printing help files from the Inventory Manager Help viewer may cause the application
to hang.
Windows users should use Task Manager to end the Inventory Manager Help task.
Solaris users should kill the Inventory Manager Help process.
Print help files from a browser by accessing the NetSight Documentation web page at
http://www.enterasys.com/support/manuals/netsight.html, or by
printing the .html files in the NetSight Inventory Manager\Help\docs
directories.
Problem 3:
Solution:
Links to topics selected in the Contents will not work correctly following a search
operation. If you use the JavaHelp search to find a term, then return to the Contents and
navigate to a topic, the viewer may take you to the wrong place in the topic. If the topic
you select contains the term just sought using the search, the viewer will take you to the
term instead of the topic you chose from the Contents.
Return to the Search tab, clear the entry and click Search. Go back to the Contents and
the navigation will work correctly.
IETF MIBS REQUIRED:
Inventory Manager requires the following MIBs:
Title
ENTITY−MIB
RFC1213−MIB
ENTERASYS NETWORKS PRIVATE ENTERPRISE MIB
SUPPORT:
Inventory Manager supports the Enterasys Networks Private Enterprise MIBs listed below. Implementation of
these MIBs may not be sufficient to assure that an unsupported hardware device will function properly with
this software.
Enterasys Networks Private Enterprise MIBs are available in ASN.1 format from the Enterasys Networks web
site at: http://www.enterasys.com/support/mibs/. Indexed MIB documentation is also
available.
Title
CHASSIS−MIB
CT−CONTAINER−MIB
IETF MIBS REQUIRED:
22
Welcome to NetSight Inventory Manager Help
CT−ELS10−MIB
CTELS100−NG−MIB
CTRON−DOWNLOAD−MIB
CTRON−SSR−CONFIG−MIB
CTRON−SSR−HARDWARE−MIB
DLINKMGMT−MIB
ELS100−S24TX2M−MIB
ENTERASYS−CONFIGURATION−CHANGE−MIB
ENTERASYS−CONFIGURATION−MANAGEMENT−MIB
SYSTEM−RESOURCE−MIB
TMS−COMMON−MIB
IMPORTANT URLS:
The following Enterasys URLs provide access to NetSight software products and product information.
• For information on obtaining a software license, visit
http://www.enterasys.com/products/management.
• Download the latest NetSight software products* from the product web pages at
http://www.enterasys.com/products/management/.
• Download previously released NetSight products*, using the Download Library at
http://www.enterasys.com/download/.
• To receive information on Enterasys NetSight management products, including the availability of new
versions and new product releases, sign up for ProActive Notification at
http://sweval.enterasys.com/notify/.
• To register any NetSight products that are covered under a service contract, use the NetSight Service
Contract Product Registration form at http://sweval.enterasys.com/netsight/.
*Software licenses are version dependent and will only operate with the version of software related to the
license.
GLOBAL SUPPORT:
By Phone: (800) 872−8440
By Email: [email protected]
By Web: http://www.enterasys.com/support
By Mail: Enterasys Networks, 50 Minuteman Rd., Andover, MA 01810
IMPORTANT URLS:
23
Welcome to NetSight Inventory Manager Help
For information regarding the latest software available, recent release note revisions, or if you require
additional assistance, please visit the Enterasys Support web site: www.enterasys.com/support.
ADDENDUM:
This section provides updated release information, available to current Inventory Manager customers through
the web update operation. Use the Check for Updates feature to determine if updates are currently available.
The updates are listed by date, with the most recent updates listed first.
8/2006
ADDENDUM:
P/N: 9038122−07 Subject to Change Without Notice
Last Updated 12/7/06
F1650−H
24
NetSight Inventory Manager
Installation
NOTE: When this topic is opened from the CD, the links from this topic to other help topics will
not work. Links within the topic will work and once you've installed Inventory Manager,
you can launch the help system and access help for all topics.
This document provides instructions for installing NetSight Inventory Manager. The most recent version of
this file is located on the NetSight Documentation web page:
http://www.enterasys.com/support/manuals/netsight.html.
• General Installation Information
• System Requirements
• Evaluation Copy
• Upgrading from a Previous Version
• NetSight Services
• Recommended Reading Sequence
• Installation on Windows
• Configuring the Environment
• Stopping Other TFTP Services
• Stopping NetSight Services (Windows)
• Installing Inventory Manager (Windows)
• Installation on Solaris
• Preparing for Installation on Solaris
• Stopping NetSight Services (Solaris)
• Installing Inventory Manager (Solaris)
• Installation on Linux
• Preparing for Installation on Linux
• Stopping NetSight Services (Linux)
• Installing Inventory Manager (Linux)
• Launching Inventory Manager
• Launching on Windows
• Launching on Solaris
• Launching on Linux
• Importing an Inventory Manager Database
• Uninstalling Inventory Manager
• Uninstalling on Windows
• Uninstalling on Solaris
• Uninstalling on Linux
• Support
• Accessing Help
• Technical Support
• Documentation
• Training
NetSight Inventory ManagerInstallation
25
Welcome to NetSight Inventory Manager Help
General Installation Information
You can install Inventory Manager on the following platforms:
• Windows®XP, Windows Server" 2003, or Windows®2000
• UNIX® Solaris®8, 9, or 10 on Sun®Platforms only
• Linux: Red Hat Version 9, Red Hat Enterprise Linux WS, ES v3, and SuSE Linux
Before you install Inventory Manager, it is highly recommended that you read the NetSight Inventory
Manager Release Notes. The most recent version of the release notes can be found on the NetSight
Documentation web page: http://www.enterasys.com/support/manuals/netsight.html.
If you are installing from a CD, you can also access the release notes from the CD with a web browser by
opening the relnotes.htm file located in the top−level directory.
The following tasks comprise the Inventory Manager installation process:
• When you purchased Inventory Manager, you received a Licensed Product Entitlement ID that allows
you to generate a product license. Prior to installing Inventory Manager, you must redeem your
Entitlement ID for a product license. Refer to the instructions included with the Entitlement that was
sent to you. (For more information, see
http://www.enterasys.com/products/management/.)
• Installing any operating system patches required for Java or InstallAnywhere®(Solaris only).
• Preparing your system for installation.
• Installing Inventory Manager.
NOTE: The Inventory Manager Client and Server license must be installed on a workstation that
has a NetSight Console version 2.2 Server already installed. Inventory Manager depends
on functionality provided by the NetSight Server, which is a component of Console 2.2.
Inventory Manager Client−only installations do not have this requirement.
System Requirements
The system requirements for operating Inventory Manager are listed here.
• Windows® 2000, Windows Server" 2003, Windows XP® Professional w/ Service Pack 2
(qualified on the English version of the operating systems)
• Recommended P4−2.4 GHz, 1GB RAM
• Free Disk Space − 500MB
• Solaris® 8, 9, and 10 on Sun® Platforms only (with latest operating system patches installed)
• Recommended Sun® Ultra 30/60 (or equivalent), 900MHz, 1GB RAM
• Free Disk Space − 800MB
• Linux: Red Hat Version 9, Red Hat Enterprise Linux WS, ES v3, and SuSE Linux
• Recommended P4−2.4 GHz, 1GB RAM
• Free Disk Space − 500MB
Evaluation Copy
If you have requested an Inventory Manager evaluation license, you will receive a License Key. Evaluation
General Installation Information
26
Welcome to NetSight Inventory Manager Help
requests for each product are limited to three 30−day instances.
To upgrade from an evaluation copy of Inventory Manager to a purchased copy, contact your Enterasys
Networks Representative to purchase the software and receive an Entitlement ID. You do not need to reinstall
the software to perform the conversion. If your evaluation copy has not expired:
1. In the Inventory Manager main window, select Tools > Server Information.
2. In the Server Information window, click the License tab.
3. Select Inventory Manager from the table and click Change License.
4. Read and accept the License and click OK.
5. Enter the license text that you received when you generated the product license. (When you purchased
the software, you received a License Entitlement ID that allows you to generate a product license.
Refer to the instructions included with the License Entitlement ID that was sent to you.)
6. Click Update. The license file will be updated with the new license text.
If you have let your Evaluation Copy expire, when you launch Inventory Manager a window opens where you
can enter the license text.
Upgrading from a Previous Version
If you are upgrading your currently installed version of Inventory Manager to a newer one, consult the
Upgrading section of the Release Notes for considerations and instructions related to your version.
NetSight Services
During the installation of Inventory Manager, you have the option of enabling (configuring to launch
automatically) NetSight services. The services offered depend on whether your platform is Windows, Solaris,
or Linux.
• TFTP (Windows, Solaris, and Linux) − On Client/Server installations, the NetSight TFTP service lets
you save and restore device configurations, and download firmware to devices. On Client−Only
installations, the NetSight TFTP service provides an alternate firmware download capability for
remote devices. Only one TFTP server can be running at a time on a machine. If you select the TFTP
option, you will be asked to specify the path to your TFTP root directory, if necessary (the default
directory name is \tftpboot).
Windows Users: Windows users should check for and stop any other TFTP service before enabling
the NetSight version (see Stopping Other TFTP Services).
Solaris Users: You may use the TFTP service that exists on your Solaris system; however, the
NetSight TFTP server provides increased performance capability and statistical gathering
functionality. If you elect to use the NetSight version on the Solaris platform, you must stop the
Solaris TFTP service and perform some configuration steps in order for it to work properly, as
follows:
1. Edit your /etc/inetd.conf file. Comment out any existing tftp entries.
2. Execute the command:/etc/rc2.d/S72inetsvc stop
3. Execute the command: /etc/rc2.d/S72inetsvc start
4. Execute the command:/etc/rc2.d/S99NsTftp start
Linux Users: Typically, the TFTP service that exists in Linux is disabled; however, if it is enabled,
you may wish to disable it and enable the NetSight version of TFTP which provides additional
features for Inventory Manager. If you elect to enable the NetSight version on the Linux platform, you
must first disable the Linux TFTP service. Refer to the documentation for your Linux operating
Upgrading from a Previous Version
27
Welcome to NetSight Inventory Manager Help
system for instructions.
• BOOTP (Windows only) − Enables the Inventory Manager workstation to also be a BOOTP server.
This allows the workstation to supply devices with firmware images (or other basic identity
information) in the event the device's current firmware image becomes corrupt. Only one BOOTP
service can be running at a time on a machine. If you elect to enable this service, you will need to
create a bootptab file for the BOOTP service to read.
Linux and Solaris Users: The NetSight BOOTP service is available for Windows only. Linux and
Solaris systems provide their own BOOTP service.
When you enable a NetSight service, it runs in the background on the workstation. The service starts
automatically by default, and if you shut down and restart the workstation, the service is restarted
automatically. After you've installed Inventory Manager, you can use the Tools > Options Services for
NetSight Server or Services for NetSight Client views to enable or disable the automatic launch of these
services. For example, if you do not enable the TFTP service when you install, you can use the Services view
to enable the automatic launch of the TFTP service. In addition, there may be times when you want to stop or
restart the services manually; for information see How to Stop and Start NetSight Services.
NOTE: NetSight Services that have been enabled previously through another NetSight application’s
installation cannot be disabled during Inventory Manager's installation. After you've installed
Inventory Manager, you can use the Services for NetSight Server view of the Options window to
disable the automatic startup of these services.
Recommended Reading Sequence
It is highly recommended that you read the following information before you use Inventory Manager:
Before installation:
• Installation (this file)
• Release Notes
After installation:
• Inventory Manager Help (Help > Help Topics on the Inventory Manager menu bar)
• Getting Started
Installation on Windows
Use the following instructions to install Inventory Manager on a Windows 2000, Windows XP, or Windows
Server 2003 system. Before installing Inventory Manager on a Windows platform system, you need to:
• Configure the Environment
• Stop Other TFTP Services
• Stop NetSight Services (Windows)
Once your system is properly configured, you can proceed with:
Recommended Reading Sequence
28
Welcome to NetSight Inventory Manager Help
• Installing Inventory Manager (Windows)
• Launching Inventory Manager
Configuring the Environment
Following are instructions for configuring the environment on Windows 2000, Windows Server 2003, and
Windows XP platforms.
NOTE: Some of the operations in the following instructions may generate a message prompting
you to reboot your system. It is not necessary to reboot your system until you have
completed the configuration process.
Windows 2000
1. Open your system's Control Panel (Start > Settings > Control Panel) and double−click the System
icon. The System Properties window opens.
2. Select the Advanced tab and click the Performance options button. The Performance Options
window opens.
3. Verify that the "Application response" section has Optimize performance for: Applications
selected.
4. Click the Change button in the "Virtual Memory" section of the Performance Options window. The
Virtual Memory window opens.
5. Enter the following settings in the "Paging file size for selected drive" section:
Initial size (MB) −− set to a minimum of 128 MB or equivalent to your system RAM.
Maximum size (MB) −− typically set to twice the Initial size. For example, if your Initial size is set to
128 MB, your maximum size would be set to 256 MB.
6. Click Set and OK to close the window.
7. Click OK to close the Performance Options window.
8. Click OK to close the System Properties window.
9. With the cursor in an open area of the desktop, right click and select Properties from the drop−down
menu. The Display Properties window opens.
10. Select the Settings tab, and set Colors to a minimum of High Color (16 bit) and Screen area to 1024
by 768 pixels (recommended minimum). The Colors setting affects the appearance of Inventory
Manager windows. With a setting of 24 bit (16,777,216 colors) and above, certain window features
such as table rows, appear with a color gradient. Setting the Colors lower than 24 bit will not support
color gradients.
11. Click OK to close the Display Properties window.
12. Reboot your system.
Windows Server 2003 and Windows XP
1. Open your system's Control Panel (Start > Settings > Control Panel) and double−click the System
icon. The System Properties window opens.
2. Select the Advanced tab and click the Settings button in the "Performance" section. The Performance
Options window opens.
3. Select the Advanced tab and verify that the "Processor scheduling" and "Memory usage" sections
have Adjust for best performance of: programs selected.
4. Click the Change button in the "Virtual Memory" section of the Performance Options window. The
Configuring the Environment
29
Welcome to NetSight Inventory Manager Help
Virtual Memory window opens.
5. In the "Paging file size for selected drive" section, select the Custom size option and enter the
following settings:
Initial size (MB) −− set to a minimum of 128 MB or equivalent to your system RAM.
Maximum size (MB) −− typically set to twice the Initial size. For example, if your Initial size is set to
128 MB, your maximum size would be set to 256 MB.
6. Click Set and OK to close the window.
7. Click OK to close the Performance Options window.
8. Click OK to close the System Properties window.
9. With the cursor in an open area of the desktop, right click and select Properties from the drop−down
menu. The Display Properties window opens.
10. Select the Settings tab, and set the Screen resolution to 1024 by 768 pixels (recommended minimum),
and the Color quality to a minimum of Medium (16 bit). The Color quality setting affects the
appearance of Inventory Manager windows. With a setting of 24 bit and above, certain window
features such as table rows, appear with a color gradient. Setting the Color quality lower than 24 bit
will not support color gradients.
11. Click OK to close the Display Properties window.
12. Reboot your system.
Stopping Other TFTP Services
If you will be using the NetSight version of TFTP service, you cannot be running another version of that
service on your system. If you are running a non−NetSight TFTP service on your system, you must shut it
down before installing Inventory Manager, as follows:
1. Open the Services window on your system (on Windows 2000 systems − Control Panel > Services
−− on Windows XP or Windows Server 2003 − Control Panel > Administrative Tools > Services).
2. Scroll down to find the service in the list.
3. Right click on the service and select Stop from the popup menu.
4. Right click on the service again and select Properties from the popup menu.
5. In the Properties window, set the Startup Type for the service to Manual.
6. Repeat for any other services, if necessary.
7. Close the Services windows and Control Panel.
8. Open the Task Manager and check to be sure that the process is not running.
9. Close the Task Manager.
Stopping NetSight Services (Windows)
You must stop NetSight Services, the NetSight Server and the NetSight Database prior to installing Inventory
Manager.
1. Go to the Taskbar Notification Area of your desktop (on the lower right of your screen, unless you've
relocated your Taskbar).
2. Right−click the Services Manager icon (
) and select Stop running services to stop all NetSight
Services that are currently running.
3. Right−click again on the Services Manager icon and select Exit to shut down the Services Manager.
Stopping Other TFTP Services
30
Welcome to NetSight Inventory Manager Help
Installing Inventory Manager (Windows)
Now that you have configured your system, you are ready to install Inventory Manager.
1. Log onto your system as the user who will be using Inventory Manager.
2. Download the Inventory Manager software from the Inventory Manager product web page at
http://www.enterasys.com/products/management/. Or, if you are installing from a CD, insert the
Inventory Manager CD into your system's CD drive.
3. Navigate to install.exe and double−click it.
4. The Installer leads you through a series of windows that ask you for all the information required in
order to install NetSight Inventory Manager. You will need the following information to complete the
installation:
• Client/Server or Client−only Install −− You will need to select whether you are installing a
Client−only or Client and Server version of Inventory Manager.
• Client−only − This will install the Inventory Manager client on the system. No server
or database components will be installed. This requires that an Inventory Manager
Client and Server has been installed on another system with NetSight Console 2.2
Server.
• Client and Server − This requires that NetSight Console 2.2 Server already be
installed on the system. This provides the server and database components for the
Inventory Manager features to integrate with NetSight Console 2.2. An Inventory
Manager client will also be installed on this system.
• License Text −− You will need to enter the license text that you received when you generated
the Inventory Manager license. (When you purchased Inventory Manager, you received a
Licensed Product Entitlement ID that allows you to generate a product license. You must
generate the license prior to installing Inventory Manager. Refer to the instructions included
with the Entitlement ID that was sent to you.)
• Destination Directory −− This is the path to your Inventory Manager Installation Directory.
In the Destination Directory window, click Browse to navigate to the directory, or type the
path in manually. The installer will add the NetSight Inventory Manager directory to the end
of the path.
• TFTP Root Directory −− If you elect to enable and start the NetSight TFTP service, you
must specify the path to your TFTP root directory (the default directory name is \tftpboot). In
the TFTP Root Directory window, click Browse to navigate to the directory, or type the path
in manually. If the directory does not exist, Inventory Manager will automatically create the
directory at the location you specify. For more information, see TFTP Server Setup.
When you click Done on the final window in the Installer, Inventory Manager has been installed
according to your specifications. You are now ready to launch Inventory Manager.
Installation on Solaris
Inventory Manager supports the Sun Solaris 8, 9, and 10 operating systems on Sun® Platforms only. Before
installing Inventory Manager, be sure to install the latest patches for your operating system. You can
download these from http://sunsolve.sun.com.
Before installing Inventory Manager from a CD on a Solaris platform, you need to:
• Prepare for Installation on Solaris
Installing Inventory Manager (Windows)
31
Welcome to NetSight Inventory Manager Help
Once your system is properly configured, you can proceed with:
• Stopping NetSight Services (Solaris)
• Installing Inventory Manager (Solaris)
• Launching Inventory Manager
Preparing for Installation on Solaris
Perform the following steps if you will be installing the Inventory Manager software from a CD. If you have
downloaded the software, proceed to the section Stopping NetSight Services. The following procedures
assume that the CD drive from which you are installing is physically attached to the system where Inventory
Manager is being installed. The user performing the installation must be logged in as root.
1. Insert the Inventory Manager CD into the CD drive.
2. Use an xterm where you are logged in as root using the su − command.
NOTE: You may encounter a Java exception when becoming the root
user with the su − command. Be sure that your system's root
environment has a proper DISPLAY variable setting. The
Installation program will report a Java exception
(InvocationTargetException) if the DISPLAY variable
is undefined.
If this occurs:
• Set the system display variable to accept a remote
display with the command:
/usr/openwin/bin/xhost +
• Set the display variable in the environment where the su
− was done.
For C shell:
setenv DISPLAY :0.0
For Korn shell:
export DISPLAY=:0.0
3. Using the cd command, cd to the /cdrom/cdrom0 (where 0 is zero) directory. If it does not exist,
make the directory using the mkdir −p command, then cd to the newly created directory.
4. Using the ls command, check to see if the CD drive is mounted. If no files are listed, issue the
following commands:
cd /
mount −r −F hsfs /dev/sr0 /cdrom/cdrom0
(where 0 is zero).
Stopping NetSight Services (Solaris)
Before you install, you must stop NetSight Services, the NetSight Server and the NetSight Database.
Preparing for Installation on Solaris
32
Welcome to NetSight Inventory Manager Help
1. Stop the NetSight Server and Database:
a. On the server system, navigate to the <NetSight Console installdir>/server
b. Stop the server and database using the command:
stopserver.sh
2. Stop the NetSight Services:
a. Navigate to the etc/rc2.d directory.
b. Stop the SNMP trap service using the command:
S99NsSnmptrapd stop
c. Stop the TFTP service using the command:
S99NsTftp stop
Installing Inventory Manager (Solaris)
The user performing the installation must have privileges to create, read, write, and execute within the
installation directory.
1. Use an xterm where you are logged in as root. (Be sure that your system's root environment has a
proper DISPLAY variable setting. For more information see the above note.)
2. If you have downloaded the software:
cd to the directory where you downloaded the installer and start the Installer with the command
sh ./install.bin.
If you are installing from a CD:
Start the installer with the command /cdrom/cdrom0/Solaris/install.bin
3. The Inventory Manager Installer leads you through a series of windows that ask you for all the
information required in order to install NetSight Inventory Manager. You will need the following
information to complete the installation:
• Client/Server or Client−only Install −− You will need to select whether you are installing a
Client−only or Client and Server version of Inventory Manager.
• Client−only − This will install the Inventory Manager client on the system. No server
or database components will be installed. This requires that an Inventory Manager
Client and Server has been installed on another system with NetSight Console 2.2
Server.
• Client and Server − This requires that the NetSight Console 2.2 Server already be
installed on the system. This provides the server and database components for the
Inventory Manager features to integrate with NetSight Console 2.2. An Inventory
Manager client will also be installed on this system.
• License Text −− You will need to enter the license text that you received when you generated
the Inventory Manager license. (When you purchased Inventory Manager, you received a
Licensed Product Entitlement ID that allows you to generate a product license. You must
generate the license prior to installing Inventory Manager. Refer to the instructions included
with the Entitlement ID that was sent to you.)
• Destination Directory −− This is the path to your Inventory Manager Installation Directory.
In the Destination Directory window, click Browse to navigate to the directory, or type the
path in manually. The installer will add the NetSight Inventory Manager directory to the end
of the path.
• TFTP Root Directory −− If you elect to enable and start the NetSight TFTP service, you
must specify the path to your TFTP root directory (the default directory name is \tftpboot). In
the TFTP Root Directory window, click Browse to navigate to the directory, or type the path
in manually. If the directory does not exist, Inventory Manager will automatically create the
Installing Inventory Manager (Solaris)
33
Welcome to NetSight Inventory Manager Help
directory at the location you specify. For more information, see TFTP Server Setup.
When you click Done on the final window in the Installer, Inventory Manager has been installed
according to your specifications. You are now ready to launch Inventory Manager.
Installation on Linux
On the Linux platform, Inventory Manager supports the Red Hat Version 9, Enterprise WS, ES v3, and SuSE
Linux operating systems.
NOTE: Prior to beginning installation, verify that your /etc/hosts file has the local host
name specified. It should have an entry that looks like:
127.0.0.1
localhost
Before installing Inventory Manager from a CD on a Linux platform, you need to:
• Prepare for Installation on Linux
Once your system is properly configured, you can proceed with:
• Stopping NetSight Services (Linux)
• Installing Inventory Manager (Linux)
• Launching Inventory Manager
Preparing for Installation on Linux
Perform the following steps if you will be installing the Inventory Manager software from a CD. If you have
downloaded the software, proceed to the section Stopping NetSight Services. The following procedures
assume that the CD drive from which you are installing is physically attached to the system where Inventory
Manager is being installed. The user performing the installation must be logged in as root.
1. Insert the Inventory Manager CD into the CD drive.
2. Use an xterm where you are logged in as root.
NOTE: Be sure that your system's root environment has a proper DISPLAY variable setting. For
more information see the above note.
3. Using the cd command, cd to the /mnt/cdrom directory.
4. Using the ls command, check to see if the CD drive is mounted. If no files are listed, issue the
following command:
mount /mnt/cdrom
Stopping NetSight Services (Linux)
Before you install, you must stop NetSight Services, the NetSight Server, and the NetSight Database.
1. Stop the NetSight Server and database:
a. On the server system, navigate to the <NetSight Console installdir>/server
Installation on Linux
34
Welcome to NetSight Inventory Manager Help
b. Stop the server and database using the command:
stopserver.sh
2. Stop Services on all Linux systems except SuSE:
a. Navigate to the etc/rc2.d directory.
b. Stop the SNMP trap service using the command:
S99NsSnmptrapd stop
c. Stop the TFTP service using the command:
S99NsTftp stop
3. Stop Services on SuSE Linux:
a. Navigate to the etc/init.d directory.
b. Stop the SNMP trap service using the command:
NsSnmptrapd stop
c. Stop the TFTP service using the command:
NsTftp stop
Installing Inventory Manager (Linux)
The user performing the installation must have privileges to create, read, write, and execute within the
installation directory.
1. Use an xterm window where you are logged in as root.
2. If you have downloaded the software:
cd to the directory where you downloaded the installer and start the Installer with the command
sh ./install.bin.
If you are installing from a CD:
Start the installer with the command /mnt/cdrom/linux/install.bin
3. The Installer leads you through a series of windows that ask you for all the information required in
order to install NetSight Inventory Manager. You will need the following information to complete the
installation:
• Client/Server or Client−only Install −− You will need to select whether you are installing a
Client−only or Client and Server version of Inventory Manager.
• Client−only − This will install the Inventory Manager client on the system. No server
or database components will be installed. This requires that an Inventory Manager
Client and Server has been installed on another system with NetSight Console 2.2
Server.
• Client and Server − This requires that NetSight Console 2.2 Server already be
installed on the system. This provides the server and database components for the
Inventory Manager features to integrate with NetSight Console 2.2. An Inventory
Manager client will also be installed on this system.
• License Text −− You will need to enter the license text that you received when you generated
the Inventory Manager license. (When you purchased Inventory Manager, you received a
Licensed Product Entitlement ID that allows you to generate a product license. You must
generate the license prior to installing Inventory Manager. Refer to the instructions included
with the Entitlement ID that was sent to you.)
• Destination Directory −− This is the path to your Inventory Manager Installation Directory.
In the Destination Directory window, click Browse to navigate to the directory, or type the
path in manually. The installer will add the NetSight Inventory Manager directory to the end
of the path.
Installing Inventory Manager (Linux)
35
Welcome to NetSight Inventory Manager Help
• TFTP Root Directory −− If you elect to enable and start the NetSight TFTP service, you
must specify the path to your TFTP root directory (the default directory name is \tftpboot). In
the TFTP Root Directory window, click Browse to navigate to the directory, or type the path
in manually. If the directory does not exist, Inventory Manager will automatically create the
directory at the location you specify. For more information, see TFTP Server Setup.
When you click Done on the final window in the Installer, Inventory Manager has been installed
according to your specifications. You are now ready to launch Inventory Manager.
Launching Inventory Manager
Now that you've installed Inventory Manager, you can launch it.
Launching on Windows
From the Start menu, select Programs > Enterasys Networks > NetSight Inventory Manager > Inventory
Manager. Evaluation Copy users only will see a message indicating that this is an evaluation copy, and
informing you of the expiration date. Click OK to continue.
Launching on Solaris
1. Use the cd command to navigate to the Inventory Manager Installation Directory.
2. Issue the Inventory Manager startup command:
./InventoryManager
Launching on Linux
1. Use an xterm window where you are logged in as root.
2. Use the cd command to navigate to the Inventory Manager Installation Directory.
3. Issue the Inventory Manager startup command:
./InventoryManager
Importing an Inventory Manager Database
If you have upgraded from Inventory Manager release 1.4, you can import your 1.4 database into Inventory
Manager 2.2 to preserve your network information. Refer to How to Import a Database for more specific
information on importing your Inventory Manager 1.4 database.
NOTE: You can import a database other than a 1.4 database, but be aware that all known anomalies
regarding upgrades from those earlier versions will still apply.
Launching Inventory Manager
36
Welcome to NetSight Inventory Manager Help
Uninstalling Inventory Manager
Use the procedures below to uninstall Inventory Manager. When you uninstall, only the files which were
distributed with Inventory Manager will be uninstalled. Files you generate will not be automatically
uninstalled.
Uninstalling on Windows
You must stop NetSight Services, the NetSight Server and the NetSight database prior to uninstalling
Inventory Manager.
1. Go to the Taskbar Notification Area of your desktop (on the lower right of your screen, unless you've
relocated your Taskbar).
2. Right−click the Services Manager icon (
) and select Stop running services to stop all NetSight
Services that are currently running.
3. Right−click again on the Services Manager icon and select Exit to shut down the Services Manager.
You can now uninstall Inventory Manager:
From the Start menu, select Programs > Enterasys Networks > NetSight Inventory Manager > Uninstall
Inventory Manager. You must be logged in as the user who installed Inventory Manager in order to see this
selection on the Start menu.
If a different user is uninstalling Inventory Manager, go to the UninstallerData directory located in the
Inventory Manager Installation Directory and double−click on Uninstall InventoryManager.exe.
In such a case the Uninstaller may not be able to remove certain files due to permission conflicts.
Uninstalling on Solaris
Inventory Manager should be uninstalled from an xterm window by a user who is logged on with the same ID
as that of the user who installed the application.
You must stop NetSight Services, the NetSight Server and the NetSight database prior to uninstalling
Inventory Manager.
1. Stop the NetSight Server and database:
a. On the server system, navigate to the <NetSight Console installdir>/server
b. Stop the server and database using the command:
stopserver.sh
2. Stop the NetSight Services:
a. Navigate to the etc/rc2.d directory.
b. Stop the SNMP trap service using the command:
S99NsSnmptrapd stop
c. Stop the TFTP service using the command:
S99NsTftp stop
You can now uninstall Inventory Manager:
1. Use the cd command to navigate to the Inventory Manager Installation Directory (top level).
Uninstalling Inventory Manager
37
Welcome to NetSight Inventory Manager Help
2. Start the Uninstaller by issuing the command:
./UninstallInventoryManager.sh
Uninstalling on Linux
The user performing the uninstall must be logged in as root.
You must stop NetSight Services, the NetSight Server and the NetSight database prior to uninstalling
Inventory Manager.
1. Stop the NetSight Server and database:
a. On the server system, navigate to the <NetSight Console installdir>/server
b. Stop the server and database using the command:
stopserver.sh
2. Stop Services on all Linux systems except SuSE:
a. Navigate to the etc/rc2.d directory.
b. Stop the SNMP trap service using the command:
S99NsSnmptrapd stop
c. Stop the TFTP service using the command:
S99NsTftp stop
3. Stop Services on SuSE Linux:
a. Navigate to the etc/init.d directory.
b. Stop the SNMP trap service using the command:
NsSnmptrapd stop
c. Stop the TFTP service using the command:
NsTftp stop
You can now uninstall Inventory Manager:
1. Use the cd command to navigate to the Inventory Manager Installation Directory (top level).
2. Start the Uninstaller by issuing the command:
./UninstallInventoryManager.sh
Support
To locate product specific information, refer to the Enterasys website:
http://www.enterasys.com
Accessing Help
After you have installed Inventory Manager on your system, the full Help system is available from the Help
menu option on Inventory Manager windows, and from any window that has a Help button on it. The online
Help system is also available as a PDF file in the Help directory located in your NetSight Inventory Manager
installation directory.
After you've launched Inventory Manager for the first time, it is highly recommended that you select
Help > Help Topics from the menu and read the following links before proceeding to use Inventory Manager:
• Welcome
Uninstalling on Linux
38
Welcome to NetSight Inventory Manager Help
• Release Notes
• Getting Started
Technical Support
If you need technical support related to Inventory Manager, contact the Enterasys Global Call Center:
Phone: (800) 872−8440 (24 hours a day, 365 days a year)
Email: [email protected]
Mail:
Enterasys Networks, Inc.
Technical Support
50 Minuteman Rd.
Andover, MA 01810
FTP: ftp.enterasys.com
Login: anonymous
Password: [your email address]
Documentation
For the latest Enterasys documentation on the web, see
http://www.enterasys.com/support/manuals/netsight.html.
Training
For training on this and other Enterasys products, see http://www.enterasys.com/training.
Technical Support
39
Getting Started
Getting Started provides an overview of Inventory Manager features and a summary of the basic steps you
must perform to begin using Inventory Manager.
Inventory Manager is a tool that monitors your network devices, including configuration and firmware
changes. Inventory Manager provides the following functions:
• save a device's configuration so that it can be restored later
• restore a device's configuration from a previously saved configuration
• compare a device's configuration with a previous configuration and report any differences
• create a configuration template based on a saved configuration file, and download the template to one
or more devices
• download firmware or boot PROM images to a device or group of devices
• view a history of firmware and configuration changes made to a device
• generate valuable, in−depth reports for network inventory planning purposes
Because Getting Started is meant to be used side−by−side with Inventory Manager, it will be most useful if
you install Inventory Manager first. Once the application is installed, and you have read the Release Notes,
you can use the information and steps below as an aid in learning how to use Inventory Manager.
Here are the things you'll need to do to begin using Inventory Manager in your network:
Install
Inventory
Manager
You should already have done this. If not, refer to the installation instructions in
the Installation help topic, install Inventory Manager, then come back to Getting
Started.
If You are
Upgrading
This help topic provides information for users who are upgrading from a 1.x
version of Inventory Manager. It outlines changes in functionality and provides a
description of new procedures and concepts that were introduced in version 2.0.
Following an upgrade, you can import your 1.4 database into this version of
Inventory Manager to preserve your network information. Refer to How to
Import a Database for specific information on importing your Inventory Manager
database.
NetSight
Services
When you install Inventory Manager, you have the option of starting TFTP and
BOOTP services (see Installation, NetSight Services). Read this help topic to
learn how to stop and start these services.
TFTP Server
Setup
Inventory Manager provides a NetSight TFTP server to download firmware/boot
PROM to network devices, and save and restore device configurations. This help
topic provides information on configuring the NetSight TFTP Server or using
another TFTP server if desired.
FTP Server
Setup
You can also download firmware/boot PROM images, and save and restore
device configurations using an FTP server. This help topic provides information
on configuring FTP server properties and login information.
Getting Started
40
Welcome to NetSight Inventory Manager Help
Firmware
Discovery
Instructions on storing your firmware and boot PROM images in a firmware
directory, and performing a firmware discovery to display them in the Firmware
Mgmt tree.
Set Options
Instructions on setting options for various Inventory Manager functions.
Add Devices
The NetSight database contains device models that represent the actual devices in
your network. There are three ways to add devices to the NetSight database.
Initially, you will want to perform a Console Discover to populate the database.
You can also use Console to import devices from a .ngf file. After you have
initially added your devices, you can use the Inventory Manager (or Console)
Add Device window to add a single device to the database. The devices are
displayed under the Network Elements tab in the Inventory Manager main
window.
Define
Authorization
and Device
Access
Use the Authorization/Device Access window to configure your Inventory
Manager access privileges. The window has four tabs:
Add Device
Groups
Inventory Manager lets you group your devices into logical groups to facilitate
network management. With device groups, you can perform certain operations
(like an archive save or restore) on an entire group at once, instead of performing
the operation on individual devices.
• Users/Groups tab lets you manage user access to specific features and
capabilities.
• Profiles/Credentials tab lets you define SNMP credentials used to access
your network devices, and create profiles that use these credentials for
various device access levels.
• Profile/Device Mapping tab lets you specify the profiles that will be used
by users when communicating with network devices.
• Manage SNMP Passwords tab where you can manage the credentials
that have been set on your network's devices.
Now that you have set up your devices and firmware, you can start exploring some of Inventory Manager's
features:
Getting Started
Server Information
The Server Information window lets you view and configure
certain NetSight Server functions, including management of
client connections, database backup and restore, locks, and
licenses. It also provides access to the server log and server
statistics.
Save Configurations
Inventory Manager lets you save device configurations
(called archives) using the Archive Wizard. You can
schedule these saves to be performed on a regular basis.
Restore Configurations
Inventory Manager lets you restore your saved device
configurations (archives) using the Restore Wizard.
41
Welcome to NetSight Inventory Manager Help
Getting Started
Configuration
Templates
Create a configuration template based on an existing
archived configuration file, and then use Template
Download Wizard to download the template to one or more
devices.
Compare Archives
Compare archived configuration files and monitor any
changes in device attributes.
Upgrade Firmware
Use the Firmware Upgrade Wizard to easily download
firmware images to your network devices.
Upgrade Boot PROM
Use the Boot PROM Upgrade Wizard to easily download
boot PROM images to your network devices.
Track a Device
Inventory Manager lets you track a device based on its
MAC address or serial number. Use this feature as a way to
view a history of device attributes, and monitor any
configuration or firmware changes made to the device.
Capacity Planning
Use the Capacity Planning tool to prepare valuable network
inventory planning reports on port and slot utilization,
submodule and chassis capacity and usage, and field
replaceable/upgradeable components (FRUs) in your
network.
42
If You are Upgrading
This Help topic provides information for users who are upgrading from a 1.x version of Inventory Manager. It
outlines changes in functionality and provides a description of new procedures and concepts that were
introduced in version 2.0. For an overview of new functionality introduced in this release, refer to Software
Changes and Enhancements in the Release Notes.
Many of the changes listed below resulted from the new Client/Server architecture that was introduced in
Inventory Manager 2.0. This architecture lets you deploy Inventory Manager in a multi−user environment
where remote clients connect to a common, centralized database located on the NetSight Server, which is a
component of NetSight Console. Because of this new centralized database, both Console and Inventory
Manager (and other NetSight application plugins) share a common view of the Network Elements device tree.
NOTE: Following an upgrade, you can import your 1.4 database into this version of Inventory
Manager to preserve your network information. Refer to How to Import a Database for
specific information on importing your Inventory Manager database.
Use the following table to get an idea of what functionality has changed and the procedures you must now
use. The left−hand column lists different Inventory Manager functionality and the right−hand column gives a
short description of what changed.
Functionality
What Changed
Network Elements Tree
Console and Inventory Manager now share a common view of the Network
Elements device tree. Any device status changes detected by Console will be
reflected in Inventory Manager’s device tree. Any user−defined device
groups will also be displayed in the device tree of both applications.
Adding Devices
For the most part, you will now use Console to add devices to the Network
Elements tree. Initially, you will want to perform a Console Discover to
populate the database, or you can also use Console to import devices from a
.ngf file. After you have initially added your devices, you can use the
Inventory Manager (or Console) Add Device window to add a single device
to the tree. For more information, see How to Add and Delete Devices.
Device Groups
The Network Elements device tree is organized a little bit differently. There
is now a top−level My Network folder which contains two folders: All
Devices and Grouped By. The Grouped By folder contains five subfolders:
Chassis, Contact, Device Types, IP, and Location. When a device is
discovered, imported, or added, it automatically becomes a member of the
appropriate group. For more information, see How to Add and Remove
Device Groups.
SNMP Version and Access
SNMP Version and Access properties are now configured using the
Authorization/Device Access window accessed from the Tools menu. The
window has four tabs:
• Users/Groups tab lets you manage user access to specific features
and capabilities.
If You are Upgrading
43
Welcome to NetSight Inventory Manager Help
• Profiles/Credentials tab lets you define SNMP credentials used to
access your network devices, and create profiles that use these
credentials for various device access levels.
• Profile/Device Mapping tab lets you specify the profiles that will be
used when communicating with network devices.
• Manage SNMP Passwords tab where you can manage the
credentials that have been set on your network's devices.
Multiple Database Support
Inventory Manager no longer supports multiple database functionality.
Instead, Inventory Manager clients connect to a common, centralized
database located on the NetSight Server. You can manage this database via
the Database tab of the Server Information window (Tools > Server
Information).
Database Backups
Database backup and restore operations are now performed from the
Database tab of the Server Information window (Tools > Server
Information). These operations backup and restore everything in the
common, centralized database.
Options
The Options window (Tools > Options) now allows you to set Suite options
that apply across all NetSight plugin applications as well as options specific
to the Inventory Manager application. For more information, see How to Set
Options.
The left−panel Configuration Mgmt tab is now called the Archive Mgmt
Tab. Information displayed in the tab is consistent with earlier versions
except that there are now three different icons used to designate different
types of configuration data saved during archive operations:
contains
Configuration Mgmt Tab
device configuration data,
contains capacity planning data, and
contains both device configuration and capacity planning data. For more
information, see How to Archive.
Event Log
The bottom panel of the main window now displays the Event Log or the
Active Status Panel, depending on the option you have selected.
Web Update Schedules
Although you can still schedule web update operations, the scheduled
operations are no longer listed in the Scheduled Events window.
If You are Upgrading
44
How to Stop and Start
NetSight Services
When you install Inventory Manager, you have the option of enabling NetSight versions of TFTP and BOOTP
(Windows only) services. (See NetSight Services for a description of each service.) When you enable a
NetSight service, it runs in the background on the workstation. The service starts automatically by default, and
if you shut down and restart the workstation, the service is restarted automatically.
After you've installed Inventory Manager, you can use the Tools > Options Services for NetSight Server or
Services for NetSight Client views to enable or disable the automatic launch of these services. For example, if
you did not enable the TFTP service when you installed, you can use the Services view to enable the
automatic startup of the TFTP service.
In addition, there may be times when you want to stop or restart the services manually. For Windows users,
NetSight provides a Services Manager that shows you which of the services are running, and lets you stop,
start, or restart them individually or all at once. You can also stop and start the Services Manager itself.
The instructions below explain how to stop and start the NetSight services and the Services Manager
manually.
Instructions on:
• Stopping and Starting NetSight Services
• Windows
• Solaris
• Linux
• Stopping and Starting the Services Manager (Windows Only)
• Stopping
• Starting
Stopping and Starting NetSight Services
Windows
You can manually start, restart, or stop NetSight services individually or all at once. On a Windows station:
1. Go to the Taskbar Notification Area of your desktop (on the lower right of your screen, unless you've
relocated your Taskbar).
2. Locate the Services Manager icon
and right−click it.
3. Select the appropriate menu option. Menu options that are not currently available for the service(s) are
grayed out.
• Start − Starts a service that is not currently running.
• Restart − Stops a service that is currently running, and starts it up again immediately.
• Stop − Stops a service that is currently running.
• Start enabled services − Starts any services that have been enabled (configured to launch
automatically via selection at installation or in the Services for NetSight Server or Services
How to Stop and Start NetSight Services
45
Welcome to NetSight Inventory Manager Help
for NetSight Client views.)
• Restart running services − Stops all services that are currently running, and starts them up
again immediately.
• Stop running services − Stops all services that are currently running.
• Exit − Stops all currently running services and shuts down the Services Manager.
Solaris
To stop and start the NetSight TFTP service on a Solaris station:
1. Navigate to the etc/rc2.d directory.
2. Type S99NsTftp (the service name), a space, and either stop or start, depending on what you
want to do, and press Enter.
For example, to stop the TFTP service, type:
S99NsTftp stop
and press Enter.
Linux
To stop and start the NetSight TFTP service on all except SuSE Linux platforms:
1. Navigate to the etc/rc2.d directory.
2. Type S99NsTftp (the service name), a space, and either stop or start, depending on what you
want to do, and press Enter.
For example, to stop the TFTP service, type:
S99NsTftp stop
and press Enter.
To stop and start the NetSight TFTP service on the SuSE Linux platform:
1. Navigate to the etc/init.d directory.
2. Type NsTftp (the service name), a space, and either stop or start, depending on what you want
to do, and press Enter.
For example, to stop the TFTP service, type:
NsTftp stop
and press Enter.
Stopping and Starting the
Services Manager (Windows Only)
The NetSight Services Manager runs on the Windows platform only.
Solaris
46
Welcome to NetSight Inventory Manager Help
Stopping
Stopping the Services Manager stops all running NetSight services.
1. Go to the Taskbar Notification Area of your desktop (on the lower right of your screen, unless you've
relocated it).
2. Locate the Services Manager icon
and right click it.
3. Select Exit from the menu.
Starting
Starting the Services Manager starts all NetSight services enabled at installation or via the Tools > Options
Services for NetSight Server or Services for NetSight Client views.
1. From the Start > Programs or All Programs menu, select Startup > NetSight Services Manager.
Stopping
47
FTP Server Setup
Before you can perform Inventory Manager archive operations or firmware/boot PROM upgrades using an
FTP server, you must configure your FTP server properties and login information When you install Inventory
Manager, FTP server properties are configured according to certain default settings. Use the Options window
to verify these settings and make any required changes, and enter your FTP server login information.
Inventory Manager uses the default tftpboot\firmware\images directory for storing your firmware. Once you
have placed your firmware images in this directory, you must perform a firmware discovery to display them in
the left−panel Firmware Mgmt tab. If you are using a different directory for storing firmware, you must
specify the directory in the Options window FTP Transfer Settings view.
In addition, all devices are initially configured with TFTP as their file transfer method, so you must change
the devices' file transfer method to FTP.
NOTE: Refer to How to Set Up Alternate Firmware Download Servers for information on
configuring alternate servers to perform remote firmware downloads.
Instructions on:
• Configuring FTP Server Properties and Login Information
• Changing Your Firmware Directory
• Setting Your File Transfer Method to FTP
Configuring FTP Server Properties
and Login Information
Use these instructions to specify the FTP server IP address, set paths to the root and firmware directories, and
set login information. The FTP server needs access to these directories in order to perform archive operations
or firmware/boot PROM upgrades.
1. Select Tools > Options in the menu bar. The Options window opens.
2. In the left−panel tree under the Inventory Manager folder, expand the File Transfer Settings folder
and select FTP Transfer Settings. The right−panel FTP Transfer Settings view is displayed.
3. Select the Use the NetSight Server's IP checkbox, or use the FTP Server IP field to enter the IP
address of the device where the FTP server resides.
4. Enter the port number your FTP server is configured to run on.
5. Specify the Root Directory Path. The root directory is the base directory to which the FTP server is
allowed access. The FTP server will be allowed to create files to or read files from this directory and
any of its sub−directories. The default root directory is the tftpboot directory that Inventory Manager
automatically creates when it is installed. If you would like to use a different root directory, enter a
path to that directory in this field, or use the Browse button to navigate to the directory.
NOTE: Keep in mind the following requirements when setting the path
to your root directory:
• If your FTP server is configured with an FTP root
directory, it must match the root directory entered here.
• If your FTP server is not configured with an FTP root
directory, change the FTP root directory here to the
FTP Server Setup
48
Welcome to NetSight Inventory Manager Help
root of the drive (e.g. C:\ or D:\).
• If you are using an FTP server on a remote system,
use the Universal Naming Convention (UNC) when
specifying the root directory path. The UNC
convention uses two slashes // (UNIX or Linux
systems) or backslashes \\ (Windows systems) to
indicate the name of the system, and one slash or
backslash to indicate the path within the computer. For
example, on a Windows system, instead of using
h:\ (where h:\ is mapped to the tftpboot directory
on the remote drive)
use
\\yourservername\tftpboot\
6. Specify the Firmware Directory Path. The default firmware directory is tftpboot\firmware\images.
If you would like to use a different firmware directory, enter a path to that directory in this field, or
use the Browse button to navigate to the directory. The firmware directory must be a sub−directory of
the root directory. (The firmware images stored in the firmware directory are added to the left−panel
Firmware Mgmt tree when you perform a firmware discovery.) If you are using an FTP server on a
remote system, be sure to use the UNC standard described in the Note above when specifying the
path.
7. Specify your FTP Server login information. Select the Anonymous checkbox if your FTP server is
configured to accept Anonymous logins. (Inventory Manager will automatically fill in the username
and password fields.) Otherwise, enter your username and password to access the FTP server. For
increased security, select the Hide Password checkbox and your password will be replaced with
asterisks when it is typed in.
8. Click OK to set options and close the window. Click Apply to set options and leave the window
open.
Changing Your Firmware Directory
If you want to change the directory for storing your firmware, you must change the FTP server properties
using the FTP Transfer Settings view in the Options window.
1. Select Tools > Options in the menu bar. The Options window opens.
2. In the left−panel tree under the Inventory Manager folder, expand the File Transfer Settings folder
and select FTP Transfer Settings. The right−panel FTP File Transfer Settings view is displayed.
3. Enter the path to the new directory in the Firmware Directory Path field, or use the Browse button
to navigate to the directory. The firmware directory must be a sub−directory of the root directory. If
you are using an FTP server on a remote system, be sure to use the UNC standard described in the
Note above when specifying the path.
4. Click OK to set options and close the window.
Setting Your File Transfer Method to FTP
You can set a file transfer method for a specific device, or specify a default transfer method for an entire
device type using the File Transfer Method window. Once you have specified the file transfer method for a
Changing Your Firmware Directory
49
Welcome to NetSight Inventory Manager Help
device, all archive save and restore operations and firmware/boot PROM upgrades on that device will be
performed using the specified method. All devices are initially configured with TFTP as their file transfer
method, until specified otherwise using these windows. For complete instructions, see How to Set a File
Transfer Method.
Changing Your Firmware Directory
50
TFTP Server Setup
Inventory Manager provides the NetSight TFTP service to download firmware and boot PROM images to
network devices, and save and restore device configurations. You can enable and start this TFTP service
during installation, and specify the path to the TFTP root directory, if necessary. (For more information, see
Installation, NetSight Services.) After you've installed Inventory Manager, you can use the Options window to
enable or disable the automatic launch of the TFTP service, and configure TFTP server properties.
The NetSight TFTP service is installed on the server as part of the Client/Server configuration. In addition, a
NetSight TFTP service is also installed as part of a Client−Only configuration. This client−side NetSight
TFTP service can be used to provide alternate firmware download capability for remote devices.
If you are using a TFTP server other than the one provided with Inventory Manager, use the Options window
Services for NetSight Server view to configure the correct server properties.
Inventory Manager uses the default tftpboot\firmware\images directory for storing your firmware. Once you
have placed your firmware images in this directory, you must perform a firmware discovery to display them in
the left−panel Firmware Mgmt tab. If you are using a different directory for storing firmware, you must
specify the directory in the Options window TFTP Transfer Settings view.
NOTE: Refer to How to Set Up Alternate Firmware Download Servers for information on
configuring alternate TFTP servers to perform remote firmware downloads.
Instructions on:
• Enabling the NetSight TFTP Service
• Configuring the NetSight TFTP Service
• Using a Different TFTP Server
• Changing Your Firmware Directory
• Configuring the NetSight TFTP Service on a Client
Enabling the NetSight TFTP Service
Use the Services for NetSight Server view in the Options window to enable (or disable) the automatic launch
of the NetSight TFTP Service. (You can also enable the NetSight TFTP service during installation.) When
you enable the NetSight TFTP service, it runs in the background on the workstation. The service starts
automatically by default, and if you shut down and restart the workstation, the service is restarted
automatically.
1. Select Tools > Options in the menu bar. The Options window opens.
2. In the left−panel tree, expand the Suite folder, and select Services for NetSight Server.
3. Select the Automatic Launch checkbox for the NetSight TFTP service. You must configure certain
TFTP server properties when you are using the NetSight TFTP server (see below).
4. Click OK to set the options and close the window.
TFTP Server Setup
51
Welcome to NetSight Inventory Manager Help
Configuring the NetSight TFTP Service
When you install Inventory Manager, TFTP server properties are configured with the default settings for the
NetSight TFTP service. Use the following instructions to verify these settings and make any desired changes.
1. Select Tools > Options in the menu bar. The Options window opens.
2. In the left−panel tree, expand the Suite folder, and select Services for NetSight Server.
3. Specify the Root Directory Path. The root directory is the base directory to which the TFTP server is
allowed access. The TFTP server will be allowed to create files to or read files from this directory and
any of its sub−directories. The default root directory is the tftpboot directory that Inventory Manager
automatically creates when it is installed. If you would like to use a different root directory, enter a
path to that directory in this field, or use the Browse button to navigate to the directory.
NOTE: Changing the TFTP root directory requires restarting the TFTP server.
4. If your system is configured with multiple IP addresses, enter the appropriate IP address in the TFTP
Server IP Address field.
5. Click Apply to set the options and leave the window open.
6. In the left−panel tree, expand the Inventory Manager folder and the File Transfer Settings folder, and
select TFTP Transfer Settings.
7. Specify the Firmware Directory Path. The default firmware directory is tftpboot\firmware\images.
If you would like to use a different firmware directory, enter a path to that directory in this field, or
use the Browse button to navigate to the directory. The firmware directory must be a subdirectory of
the root directory. (The firmware images stored in the firmware directory are added to the left−panel
Firmware Mgmt tree when you perform a firmware discovery.)
8. Click OK to set the options and close the window.
Using a Different TFTP Server
If you are using a TFTP server other than the NetSight TFTP service, use the following instructions to
configure your TFTP server properties.
1. Select Tools > Options in the menu bar. The Options window opens.
2. In the left−panel tree, expand the Suite folder, and select Services for NetSight Server.
3. If necessary, disable the NetSight TFTP service by deselecting the Automatic Launch checkbox for
the NetSight TFTP service.
4. Configure your TFTP settings.
a. Specify the Root Directory Path. The root directory is the base directory to which the TFTP
server is allowed access. The TFTP server will be allowed to create files to or read files from
this directory and any of its sub−directories. The default root directory is the tftpboot
directory that Inventory Manager automatically creates when it is installed. If you would like
to use a different root directory, enter a path to that directory in this field, or use the Browse
button to navigate to the directory. Changing the TFTP root directory requires restarting the
TFTP server.
NOTE: Keep in mind the following requirements when setting
the path to your root directory:
−− If your TFTP server is configured with a TFTP
root directory, it must match the root directory entered
here.
Configuring the NetSight TFTP Service
52
Welcome to NetSight Inventory Manager Help
−− If your TFTP server is not configured with a
TFTP root directory, change the TFTP root directory
here to the root of the drive (e.g. C:\ or D:\).
−− If you are using a TFTP server on a remote
system, use the Universal Naming Convention (UNC)
when specifying the root directory path. The UNC
convention uses two slashes // (UNIX or Linux
systems) or backslashes \\ (Windows systems) to
indicate the name of the system, and one slash or
backslash to indicate the path within the computer. For
example, on a Windows system, instead of using
h:\ (where h:\ is mapped to the tftpboot
directory on the remote drive)
use
\\yourservername\tftpboot\
b. If the TFTP server resides on a remote system, or if the local system is configured with
multiple IP addresses, enter the IP address for the TFTP service in the TFTP Server IP
Address field.
5. Click Apply to set the options and leave the window open.
6. In the left−panel tree, expand the Inventory Manager folder and the File Transfer Settings folder, and
select TFTP Transfer Settings.
7. Specify the Firmware Directory Path. The default firmware directory is tftpboot\firmware\images.
If you would like to use a different firmware directory, enter a path to that directory in this field, or
use the Browse button to navigate to the directory. The firmware directory must be a sub−directory of
the root directory. (The firmware images stored in the firmware directory are added to the left−panel
Firmware Mgmt tree when you perform a firmware discovery.) If you are using a TFTP server on a
remote system, be sure to use the UNC standard described in the Note above when specifying the
path.
8. Click OK to set the options and close the window.
Changing Your Firmware Directory
The default firmware directory is tftpboot\firmware\images. If you want to change the directory for storing
your firmware, you must change the TFTP server properties using the TFTP Transfer Settings view in the
Options window. The firmware images stored in the firmware directory are added to the left−panel Firmware
Mgmt tree when you perform a firmware discovery.
1. Select Tools > Options in the menu bar. The Options window opens.
2. In the left−panel tree, expand the Inventory Manager folder and the File Transfer Settings folder, and
select TFTP Transfer Settings.
3. Enter the path to the new directory in the Firmware Directory Path field, or use the Browse button
to navigate to the directory. The firmware directory must be a sub−directory of the root directory. If
you are using a TFTP server on a remote system, be sure to use the UNC standard described in the
Note above when specifying the path.
4. Click OK to set options and close the window.
Changing Your Firmware Directory
53
Welcome to NetSight Inventory Manager Help
Configuring the NetSight TFTP Service on a Client
A NetSight TFTP service is installed on a client workstation as part of the Client−Only configuration. This
client−side NetSight TFTP service provides an alternate firmware download capability for remote devices. It
allows a remote client to perform a firmware download without having to reconfigure the default NetSight
TFTP server settings.
1. On the remote client, select Tools > Options in the menu bar. The Options window opens.
2. In the left−panel tree, expand the Inventory Manager folder and select Services for NetSight Client.
(This view is only available for clients connected to a remote server.)
3. Configure your TFTP settings.
a. Specify the Root Directory Path. The root directory is the base directory to which the TFTP
server is allowed access. The TFTP server will be allowed to create files to or read files from
this directory and any of its sub−directories. The default root directory is the tftpboot
directory that Inventory Manager automatically creates when it is installed. If you would like
to use a different root directory, enter a path to that directory in this field, or use the Browse
button to navigate to the directory.
NOTE: Changing the TFTP root directory requires restarting the TFTP server.
b. If your workstation is configured with multiple IP addresses, enter the appropriate IP address
in the TFTP Server IP Address field.
4. If desired, select the Automatic Launch checkbox for the NetSight TFTP service.
5. Click OK to set options and close the window.
6. The client−side NetSight TFTP server must be configured as an alternate server before it can be used
to download firmware. Refer to How to Set Up Alternate Firmware Download Servers for complete
instructions.
Configuring the NetSight TFTP Service on a Client
54
Firmware Discovery
Inventory Manager provides convenient and powerful tools for managing firmware and boot PROM images
on your network devices. To take advantage of these tools, you must store your images in a specified
firmware directory, and perform a firmware discovery that will automatically display your images in the
left−panel Firmware Mgmt tab.
NOTE: If you are using an alternate firmware download server to perform remote downloads,
you will need to manually create the firmware records associated with the alternate
server (as opposed to having them automatically discovered during a firmware
discovery.) Refer to How to Set Up Alternate Firmware Download Servers for more
information.
For information on obtaining Enterasys Networks firmware, contact your Enterasys representative, or access
the Enterasys Networks firmware download library at: http://www.enterasys.com/download/ or
from the Download icon
in the Firmware Mgmt tab's Details View. (A browser is required to view the
website and Solaris users must add the browser's path to their PATH environment variable.) If you download
a firmware image that is contained in a .zip file, you must unzip the file before placing it into the firmware
directory.
Instructions on:
• Discovering Your Firmware
• Adding New Firmware Images
Discovering Your Firmware
Inventory Manager uses the default tftpboot\firmware\images directory for storing your firmware. If you are
using an different firmware directory, you must specify that directory in the TFTP Transfer Settings view
and/or the FTP Transfer Settings view of the Options window. (For more information, see either TFTP Server
Setup or FTP Server Setup.)
NOTE: The maximum size allowed for a firmware image filename is 128 characters. The
maximum size for the path to where the image is stored is 512 characters. Firmware
images that exceed these maximums will not be discovered.
1. Place your firmware and boot PROM images in your firmware directory.
2. In the left−panel Firmware Mgmt tab, select View > Refresh from the menu bar. (You can also use
the Refresh icon
in the right−panel Details Views.)
Inventory Manager automatically displays your firmware under pre−defined firmware groups in the left−panel
Firmware Mgmt tree. You can assign firmware to multiple firmware groups to facilitate your firmware
management according to your network needs. For more information see How to Assign Firmware.
Firmware Discovery
55
Welcome to NetSight Inventory Manager Help
Adding New Firmware Images
Once you have done an initial firmware discovery, you can add new firmware to the left−panel Firmware
Mgmt tab using these instructions.
1. Place your new firmware in your firmware directory.
2. In the left−panel Firmware Mgmt tab, select View > Refresh from the menu bar. (You can also use
the Refresh icon
in the right−panel Details Views.)
Inventory Manager automatically adds your new firmware to the appropriate firmware groups in the
left−panel Firmware Mgmt tree.
Adding New Firmware Images
56
How To Use Inventory Manager
The How To help folder contains help topics that give you instructions for performing tasks in Inventory
Manager.
Double−click the How To help folder in the left panel to open the folder and navigate to a specific How
To help topic.
How To Use Inventory Manager
57
How to Add and Delete Devices
The NetSight database contains device models that represent the actual devices in your network. The models
store attributes for your devices and make it possible to manage device access and view device status. Your
devices are displayed in the left−panel Network Elements tab in the Inventory Manager main window.
NetSight Console and Inventory Manager (and any other NetSight plugin application) share the NetSight
database. The devices displayed in the Console tree are also displayed in the Inventory Manager tree. Any
changes you make to the devices are reflected in both trees.
There are three ways to add devices to the NetSight database. Initially, you will want to perform a Console
Discover to populate the database. You can also use Console to import devices from a .ngf file. After you
have initially added your devices, you can use the Inventory Manager (or Console) Add Device window to
add a single device to the database.
Instructions on:
• Using Console to Discover Devices
• Using Console to Import Devices
• Adding a Single Device
• Deleting Devices from the NetSight Database
Using Console to Discover Devices
Console Discover lets you to discover your network devices and add them to the NetSight database. You can
perform a discover on a specified range of IP addresses, or perform a CDP (Cabletron Discovery Protocol)
discover for CDP−compliant devices. Discover automatically explores a specific network segment and creates
a list of discovered devices. You can then save all or a subset of the discovered devices to the NetSight
database. Devices that are added to the database are automatically placed in the appropriate groups in the
left−panel tree of the Console and Inventory Manager main window.
For step−by−step instructions, see the How to Discover Devices help topic in your Console online help
system.
Using Console to Import Devices
The Console Import Devices feature imports device information and profiles for unique devices (ones that do
not exist locally) from a .ngf file. The devices that you import are added to the NetSight database and
automatically appended to any existing devices in the left−panel tree of the Console and Inventory Manager
main window.
For step−by−step instructions, see the Importing a Device List from a File section of the How to Export
and Import a Device List help topic in your Console online help system.
How to Add and Delete Devices
58
Welcome to NetSight Inventory Manager Help
Adding a Single Device
You can add a single device to the NetSight database using the Add Device window. When you add a single
device, a device icon
is created and added to the All Devices folder and the appropriate device groups in
the left−panel Network Elements tab. You must specify the device's SNMP profile. This information is used
by Inventory Manager to access and manage the device.
1. Select the Network Elements tab.
2. Select any folder in the left−panel tree, right−click and select Add Device from the menu. The Add
Device window opens.
3. Enter the IP address of the device you want to add.
4. Use the drop−down list to select one of the SNMP profiles that have been defined for device access.
The Edit button lets you create a profile if one does not already exist.
5. Select the checkbox and enter an SNMP context, if desired.
6. Select whether to use the default nickname or click Specify to assign a unique nickname to this
device.
7. To add the device and leave the window open, click Apply. To add the device and close the window,
click OK.
Deleting Devices from the NetSight Database
When devices are deleted from the NetSight database they are removed from all groups where they are a
member. To delete devices from the NetSight database:
1. Expand the left−panel tree and select the device being deleted.
2. Right−click the device and select Delete from the menu. A confirmation message advises that you are
deleting the device from the NetSight database.
3. Click Yes to delete the device.
Adding a Single Device
59
How to Add and Remove
Device Groups
You can organize your network devices into device groups and subgroups under the My Network folder in the
Network Elements tab. Organizing your devices into groups lets you perform certain operations (like an
archive save or restore) on an entire group at once, instead of performing the operation on individual devices.
A set of system−created device groups are automatically provided. When a device is created, discovered, or
imported, it automatically becomes a member of the appropriate system−created group:
• All Devices − contains all the devices in the NetSight database.
• Grouped By − contains five subgroups:
• Chassis −− contains subgroups for specific chassis in your network.
• Contact −− contains subgroups based on the system contact.
• Device Types −− contains subgroups for the specific product families and device types in
your network.
• IP −− contains subgroups based on the IP subnets in your network.
• Location −− contains subgroups based on the system location.
Additionally, you can add your own device groups and subgroups under the My Network folder, however you
cannot add groups under the system−created groups. A device group cannot have the same name as another
device group at the same level. You cannot rename or delete a system−created group. A device can be a
member of more than one group.
TIP: System−created groups are displayed with blue folders in the left−panel tree. Any group you add
will display a yellow folder.
Instructions on:
• Adding a Device Group
• Adding Devices to a Device Group
• Removing Devices from a Device Group
• Renaming a Device Group
• Deleting a Device Group
Adding a Device Group
1. Click the left−panel Network Elements tab.
2. Right−click on the My Network folder or any user−created group, and select Add Device Group
from the menu. This opens the Add Device Group window.
3. Enter the device group name and click OK. (Device groups cannot have the same name as another
device group at the same level.) You can now add devices to the device group.
Adding Devices to a Device Group
You can add a device to a group by using the Add Device window, the Device Group Selection window, or by
using drag and drop.
How to Add and RemoveDevice Groups
60
Welcome to NetSight Inventory Manager Help
Using the Add Device Window
Use the Add Device window to add a single device to the NetSight database and to the group selected in the
tree.
1. Right−click the group to which you want to add a device and select Add Device from the menu. The
Add Device window opens.
2. Enter an IP Address.
3. Use the Profile drop−down list to select one of the SNMP profiles that have been defined for device
access. The Edit button lets you create a profile if one does not already exist.
4. Select the checkbox and enter an SNMP context, if desired.
5. Select whether to use the default nickname or click Specify to assign a unique nickname to this
device.
6. Click OK. The new device appears in the group and is automatically added to the All Devices group.
Using the Device Group Selection Window
Use the Device Group Selection window to add one or more devices from a right−panel Details View to the
My Network group or a user−created group in the left−panel tree.
1. In a right−panel Details View tab, right−click the device(s) that you want to add to a group and select
Add Device(s) to Group from the menu. The Device Group Selection window opens.
2. Select the My Network group or the desired user−created group.
3. Click OK. The selected device(s) appear in the group.
TIP: You can also add one or more devices from a right−panel Details View to the My Network
group or a user−created group by using the copy and paste toolbar buttons or right−click
menu options.
Dragging and Dropping Devices
In the left−panel tree, you can add a device to a group by dragging a device from one group and dropping into
another. You can also drag and drop an entire device group to create a sub−group in the target group. You can
only drag devices to the My Network group or a user−created group.
TIP: You can also use the copy and paste toolbar buttons or right−click menu options to add a
device to a group in the left−panel tree.
To add a device using rag and drop:
1. In the left panel, expand the hierarchy to show the target group and the device that you want to add.
2. Select the device to be dragged and dropped.
3. Click and hold on the selected device and drag it into the target group.
To add a group using drag and drop:
1. In the left panel, expand the hierarchy to show the target group and the group that you want to add.
2. Click and hold on the group and drag it into the target group. The group is added as a sub−group,
containing all of the devices that were members of the original group.
Using the Add Device Window
61
Welcome to NetSight Inventory Manager Help
Removing Devices from a Device Group
This function simply removes a device or devices from a device group. It should not be confused with
deleting a device (right−clicking the device and selecting Delete from the menu), which removes the device
from the device group, the All Devices folder, and from the NetSight database.
1. In the left−panel Network Elements tab, expand the device group from which you wish to remove a
device.
2. Right−click a single device and select Remove from Device Group from the menu.
Renaming a Device Group
This function allows you to rename a device group. You cannot rename the system−created device groups.
1. In the left−panel Network Elements tab, right−click the device group you wish to rename, and select
Rename Device Group.
2. Type the device group name in the highlighted box and press Enter. (A device group cannot have the
same name as another device group at the same level.)
Deleting a Device Group
This function removes a device group and its devices. Only the group is deleted; the devices remain in the All
Devices folder and the NetSight database. You cannot delete the system−created device groups.
1. In the left−panel Network Elements tab, select the device group you wish to delete, and select Edit >
Delete. You can also right−click the device group and select Delete from the menu.
2. A confirmation message appears. Click Yes.
Removing Devices from a Device Group
62
How to Add Applications
to the Applications Menu
The Applications menu is where you can launch NetSight Plugin applications. You can also customize the
Applications menu to launch your own applications by editing the NetSight.properties file.
1. Open the NetSight.properties file. On Windows systems, this is a text file located on the top
level of your <install directory>. On Solaris and Linux systems, the properties file is located in the
/var/Enterasys_Networks directory.
2. Each application that is added to the menu is defined by an Executable line. Enter the application
information using the following format:
<Application Name>.Executable=<full path to the executable>
Where:
<Application Name> is the name that will be displayed on the Applications menu.
Windows Example:
My Program.Executable=C:\Program Files\MyFolder\MyProgram.exe
Solaris/Linux example:
My Program.Executable=/usr/local/MyDirectory/MyProgram
3. You can also define a specific icon for each plugin on the Applications menu using the following
format:
<Application Name>.Icon=<full path to icon image −− must be a .gif file>
4. Exit and re−launch Inventory Manager. You can now see the application name on the Applications
menu.
How to Add Applications to the Applications Menu
63
How to Archive
You can archive (save) device configuration data and/or capacity planning data using the Archive Wizard.
Archiving device configuration data lets you create archives (backup copies) of your network devices'
configurations that can be restored to the devices at a later date, if needed. Archiving capacity planning data
lets you store port and FRU information for use by the Capacity Planning tool to generate reports. You can
create an archive that saves both configuration data and capacity planning data, or you can create an archive
that targets one type of data or the other.
You can perform archives on a single device, multiple devices, or on an entire device group. Because it is
useful to archive data on a regular basis, Inventory Manager lets you schedule archives to be performed at a
future time, and/or on a routine basis. Once you have configured an archive's parameters, you can use that
archive on a repeated basis to save new versions of the desired data. For example, you may want to create an
archive that saves your device configurations on a weekly basis, and also create an archive that saves only
capacity planning information on a daily basis to monitor what is changing on the network.
Once an archive operation has been created, it is listed by name in the left−panel Archive Mgmt tab under the
Archives folder. Below the archive name are the archive versions, displayed by the date and time the version
was performed. Under the versions are the individual configurations, listed by IP address of the device whose
data was saved. Each configuration displays an icon that identifies the type of data being saved: device
configuration data,
capacity planning data,
both device configuration and capacity planning data.
NOTE: If the device is an X−Pedition router, be aware that when archiving device configuration data, the
router's Startup configuration file is saved.
Instructions on:
• Using the Archive Wizard
• Saving a New Archive Version
• Editing an Archive
• Renaming an Archive
• Deleting an Archive
Using the Archive Wizard
Use the Archive Wizard to archive network configuration data and/or capacity planning data. You can
perform archives on a single device, multiple devices, or on an entire device group. You must have a TFTP or
FTP server running to save a configuration. For more information, see TFTP Server Setup or FTP Server
Setup.
1. Select Tools > Wizards > Archive Wizard from the menu bar or click
on the toolbar. The
Archive Wizard opens.
2. Enter a name and (optional) description of the archive operation.
3. Configure the archive setup:
a. Select the appropriate checkbox for the type of data you wish to archive:
How to Archive
64
Welcome to NetSight Inventory Manager Help
• Archive Configuration Data − Create archives (backup copies) of your devices'
configurations that can be restored to the devices at a later date, if needed.
• Archive Capacity Planning data − Create archives of port and FRU information to
be used by the Capacity Planning tool to generate reports.
b. Specify the maximum number of versions you would like saved for this archive. This allows
you to limit the number of versions saved for each archive. Once the maximum number is
reached, older versions are automatically deleted.
c. Click Next.
4. Select the Archive Members:
a. Expand the folders under Select Devices and select the single device, multiple devices (using
the Control or Shift keys) or a single device group. Click Add.
NOTE: If you select multiple tree nodes representing the same device but with
varying SNMP contexts, an archive save will be performed for each
context. However, the context must provide access to the MIBs
required for the archive save operation or the archive for that context
will fail. It is recommended that you perform the archive operation on
the device with the default context (switch mode.)
b. The devices will be listed under Archive Members. If you want to remove a member from the
list, select the member and click Remove.
c. Click Next.
TIP: If you open the Archive Wizard from a selected device or device group in the
left−panel Network Elements tab, the selected item will be automatically displayed
under Archive Members.
5. Select devices to be archived. Use the checkboxes in the Devices table to select or deselect devices
to be archived. For example, if you selected a device group in the previous window, you can use these
checkboxes to deselect individual devices in that group.
6. Configure scheduling information for the archive:
a. Use the drop−down list to select the frequency with which you want the archive performed:
Never, Now, Once, Daily, Weekly, or On Server Startup. The Never option lets you create
an archive operation without actually performing it. The Now option lets you perform an
immediate archive.
b. Use the drop−down list to select the month you want the archive to start. A calendar
corresponding to the selected month is displayed. Select the desired starting day by clicking
on the calendar. You can use the arrows on either side of the drop−down list to change the
month, and change the year by entering a new year in the text field. (This field is grayed out if
you have selected the Never or Now frequency.)
c. Set the starting time for the operation and select AM or PM. (This field is grayed out if you
have selected the Never or Now frequency.)
7. Configure Process settings for the archive:
a. The archive will be performed in parallel (simultaneously) on the number of devices specified
in the Groups of field. Set the value to 1 to have the operation performed serially, one device
after another.
b. Select the Abort on Failure checkbox to stop the archive operation after a failure. This is
useful if you are performing an archive operation on multiple devices and you want the
operation to stop after a failure on a single device.
8. Click Finish to create the archive. The archive will be listed by name in the left−panel Archive Mgmt
tab under the Archives folder, and performed according to its scheduled parameters. You can change
the archive's parameters; see Editing an Archive for instructions.
How to Archive
65
Welcome to NetSight Inventory Manager Help
Saving a New Archive Version
Once you have created an archive, you can use that archive on a repeated basis to save (stamp) new versions
of the desired configurations.
1. With an archive folder selected in the left−panel Archive Mgmt tab, right−click and select Stamp
New Version from the menu.
2. A new archive version, displayed by the date and time the version was performed, will be listed under
the archive folder. Under the version are the individual configurations, listed by IP address of the
device whose data was saved.
Editing an Archive
Once you have created an archive, you can edit the archive parameters, including changing the devices the
archive is performed on.
1. With an archive folder selected in the left−panel Archive Mgmt tab, select the right−panel General
tab.
2. Edit the archive description and number of versions to save, if desired.
3. Click the Edit Devices button and change the devices to be archived. Use the Add and Remove
buttons to select your Archive Members. Expand the folders under Select Devices and select the
single device, multiple devices (using the Control or Shift keys) or a single device group. Click OK.
4. Use the checkboxes in the Devices table to select or deselect devices to be archived.
5. Edit the schedule information for the archive using the instructions in step 6 above.
6. Edit the Process settings for the archive using the instructions in step 7 above.
7. Click Save. The next time the archive is performed, these new parameters will be used.
Renaming an Archive
You can rename an archive.
1. With an archive folder selected in the left−panel Archive Mgmt tab, right−click and select Rename
from the menu. The Rename Archive window opens.
2. Enter the new name, and click OK.
3. The name of the archive will change in the left−panel tree. All previous versions saved under the old
name will be available under the new name. The next time the archive is performed, the new name
will be used.
Deleting an Archive
You can delete an archive, an archive version, or a saved configuration from the Archive Mgmt tree.
Saving a New Archive Version
66
Welcome to NetSight Inventory Manager Help
1. With an archive, archive version, or configuration selected in the left−panel Archive Mgmt tab,
right−click and select Delete from the menu.
2. A Delete confirmation window opens. Click Yes to perform the delete.
Saving a New Archive Version
67
How to Assign Firmware
The Assign Firmware window allows you to assign a firmware or boot PROM image to one or more product
families or device types. This enables you to download the assigned image to any of your network devices of
that family or type, using the Firmware Upgrade Wizard or the Boot PROM Upgrade Wizard.
The Firmware Mgmt tab displays firmware and boot PROM images grouped according to product family and
device type. Inventory Manager provides pre−defined firmware groups and automatically organizes the
images stored in your firmware directory under the appropriate group when you perform a firmware discovery
or refresh. The Unknown folder contains images that Inventory Manager could not correlate to a device type.
Use the Assign Firmware window to assign those images to the correct device type(s).
TIP: To quickly assign multiple firmware images to a single product family or device type, select the
images in a right−panel Details View and drag them into the appropriate left−panel folder.
1. Select a firmware or boot PROM image in the left−panel Firmware Mgmt tab (or one or more images
in the right−panel Details View tab), then select Tools > Assign Firmware. You can also right−click
on an image, and select Assign Firmware from the menu. The Assign Firmware window opens.
2. In the Device Type list, select the families and/or individual device types where you want to assign
the image(s). You can select multiple product families or device types using the Ctrl or Shift keys.
3. Click OK to assign the image to the selected product families and/or device types and close the
window. Click Apply to assign the image and leave the window open.
How to Assign Firmware
68
How to Check for Updates
NetSight applications provide an easy way to access and download product updates using a web update
operation. You can perform an immediate check for updates, or schedule a routine check for updates. If your
network is behind a firewall, you must specify the HTTP Proxy server being used via the Web Update view in
the Options window. You must be assigned the appropriate user capability to perform this function.
Instructions on:
• Performing an Immediate Update
• Schedule a Check for Updates
Performing an Immediate Update
You can perform an immediate check for updates. If your network is behind a firewall, you must specify the
HTTP Proxy server being used via the Web Update view in the Options window, prior to performing an
update.
1. Select Help > Check for Updates in the menu bar.
2. The Updates Available window opens where you can view the new updates that are available for
download. Use the checkboxes to select the updates you wish to download, and click Download to
initiate the download operation.
3. After the download, a message is displayed stating that you must restart the NetSight server to install
the updates. Click Restart to restart the server. (You can click Cancel if you wish to restart the server
manually at a later time, but keep in mind that the updates will not be installed until you restart the
server.)
4. When you restart the server, any client connections will be lost. The next time the client connects, any
required client updates will be performed automatically.
Schedule a Check for Updates
You can schedule a routine check for updates.
1. Select Tools > Options in the menu bar. The Options window opens.
2. In the left−panel tree under Suite options, select the Web Update folder.
3. In the right−panel Schedule Updates section, select the desired schedule: Daily or Weekly.
4. If you have specified a Weekly check, use the drop−down list to select the day of the week you wish
the check to be performed, and set the desired time. If you have specified a Daily update, set the
desired time.
5. If your network is protected by a firewall, select the Specify Proxy Server checkbox and enter your
proxy server address and port ID. Consult your network administrator for this information.
6. Click OK to set the options and close the window.
7. When the scheduled update check is performed, a message will inform you if updates are available.
Click Get Updates to update the files.
NOTE: All connected clients will receive this message, but only one client can initiate
the update operation. Only clients assigned the appropriate user capability will be
able to perform an update.
How to Check for Updates
69
Welcome to NetSight Inventory Manager Help
8. The Updates Available window opens where you can view the new updates that are available for
download. Use the checkboxes to select the updates you wish to download, and click Download to
initiate the download operation.
9. After the download, a message is displayed stating that you must restart the NetSight server to install
the updates. Click Restart to restart the server. (You can click Cancel if you wish to restart the server
manually at later time, but keep in mind that the updates will not be installed until you restart the
server.)
10. When you restart the server, any client connections will be lost. The next time the client connects, any
required client updates will be performed automatically.
How to Check for Updates
70
How to Compare Archives
Inventory Manager lets you compare two different archives for the same device and monitor any changes in
device attributes. Inventory Manager compares archives using a set group of attributes that were saved when
the archive was performed. The values for these attributes are displayed in a table with any differences
between the values flagged by a yellow Diff icon . Use the Select Archive Versions to Compare window to
select the configurations you want to compare, and the Compare Archives window to view the comparison
results.
1. Access the Select Archive to Compare window from the Archive Mgmt tab or Network Elements tab:
• Archive Mgmt tab −− select an archive, version, or configuration in the left−panel tab or
right−panel Details View and select Tools > Compare Archives from the menu bar (or use the
right−click menu option).
• Network Elements tab −− with a device or device group selected in the left−panel tab, select
an archive version in the right−panel Archives tab and select Tools > Compare Archives from
the menu bar (or use the right−click menu option).
The Select Archive Versions to Compare window opens.
TIP: If you select two archive versions in the right−panel Archives tab or Details View tab and
select Tools > Compare Archives, the Compare Archives window opens directly, bypassing
the Select Archive Versions to Compare window. In this case, you can skip step 2 and
proceed to step 3.
2. The Select Archive Versions to Compare window displays two Archive trees (identical to the Archive
tree in your Archive Mgmt tab). Expand the folders as necessary to select the two archive versions or
configurations you wish to compare. You can compare two individual configurations for the same
device, or you can compare two different archive versions (although the versions should share
common devices). Click the Compare button.
3. The Compare Archives window opens to display the results of the comparison. The smaller Summary
table at the top of the window displays each device included in the comparison. Any differences
between the two versions will be flagged by a yellow Diff icon . If there are many devices being
compared, a progress bar will indicate the progress of the operation. You can stop the compare
operation by pressing the Abort Compare button.
4. Once the compare operation is complete, select the device in the Summary table whose comparison
results you wish to see. The results are displayed in the Comparison Results table.
5. To select two new archive versions or configuration files to compare, click the Change button to
return to the Select Archive to Compare window.
Use the table options and tools to find, filter, sort, print, and export information in a table and customize table
settings. You can access the Table Tools through a right−mouse click on a column heading or anywhere in the
table body, or by clicking the Table Tools
button in the upper left corner of the table (if you have the
row count column displayed). For more information, see Table Tools.
In addition, the following right−click menu options are available only for archives that include device
configuration data:
• View Configuration File −− Opens the Configuration File Viewer and displays the archived config
file of the selected device. This option is only available when there are no differences between the two
How to Compare Archives
71
Welcome to NetSight Inventory Manager Help
config files being compared.
• Compare Configuration Files −− Opens the Compare Configuration Files window and displays the
two archived config files for the selected device. This option is only available when there are
differences between the two config files being compared.
How to Compare Archives
72
How to Configure and Manage
the NetSight Server
Use the Server Information window to manage various NetSight Server functions including viewing server
information, configuring the server, and managing the database. To access this window, select Tools > Server
Information from the menu bar. You must be assigned the appropriate user capability to access this view.
Instructions on:
• Configuring the Server
• Changing Maximum Connections
• Managing the Database
• Changing the Database Password
• Changing the Database Connection URL
• Performing a Database Backup
• Restoring the Initial Database
• Restoring a Saved Database
• Viewing Client Connections
• Disconnecting a Client
• Viewing Licenses
• Changing a License
• Upgrading a Console License
• Viewing Locks
• Revoking a Lock
• Viewing the Server Log
• Viewing Server Statistics
Configuring the Server
Use the Configure Server window to configure various NetSight Server parameters. You can access this
window by clicking the Configure button in the Server Information window.
Changing Maximum Connections
The Client Connections view in the Configure Server window lists the number of current client connections
for each installed plugin application, and lets you change the maximum number of connections allowed for
each plugin and the NetSight Server.
1. Select Tools > Server Information from the menu bar. The Server Information window opens.
2. Click the Configure button. The Configure Server window opens.
3. Select Client Connections in the left panel.
4. In the right panel, you will see the number of current client connections for each installed plugin
application. In the Total Allowed column, you will see the maximum number of client connections
allowed by this plugin application. Select this column and use the arrows to change the number, if
desired.
5. Below the table, the Number of Clients Allowed field shows the maximum number of concurrent
client connections allowed by the NetSight Server. Use the arrows to change the number, if desired.
This number should be set to the total number of clients you want to allow to connect to the server.
How to Configure and Manage the NetSight Server
73
Welcome to NetSight Inventory Manager Help
6. Click OK.
Managing the Database
Use the Database tab in the Server Information window to change the database server password and
connection URL, as well as perform database backup, initialize, and restore operations. To access the tab,
select Tools > Server Information from the menu bar. The Server Information window opens, where you can
select the Database tab.
Changing the Database Password
Database server properties are used by the NetSight Server when it connects to the database. The database is
secured via a credential comprised of a user name and password. Use the following steps to change the
database password.
IMPORTANT: When Console is installed, it automatically secures the MySQL database server by
removing all the root and anonymous users from the MySQL user database. Console then
adds one generic user name (user = netsight) and password (password = enterasys). It is
recommended that you change this password, since all customers who install Console will
know this generic password.
1. Select Tools > Server Information from the menu bar. The Server Information window opens.
2. Select the Database tab.
3. In the Database Server Properties section, select the Show Password checkbox to display the
password, if desired.
4. Click Change to open a window where you can enter a new password. (The password is masked
unless you selected the Show Password checkbox.) Click OK.
5. You must restart both the NetSight Server and client after you change the database password.
Changing the Database Connection URL
The Connection URL is the URL the NetSight Server uses when connecting to the database. For
troubleshooting purposes, (for example, if you can't connect to the database) you may wish to enter a new
connection URL using the following steps.
1. Select Tools > Server Information from the menu bar. The Server Information window opens.
2. Select the Database tab.
3. In the Database Server Properties section, enter a new URL in the following format:
jdbc:mysql://[hostname]/<database>
where [hostname] is optional. Click Apply.
4. You must restart both the NetSight Server and client after you change the database connection URL.
Performing a Database Backup
You can save the currently active database to a file on the NetSight Server workstation. If the NetSight Server
is local, you can specify a directory path where you would like the backup file stored. If the server is remote,
the database will be saved to the default database backup location.
1. Select Tools > Server Information from the menu bar. The Server Information window opens.
Managing the Database
74
Welcome to NetSight Inventory Manager Help
2. Select the Database tab.
3. In the NetSight Data Set Operations section, click Backup. The Backup Database window opens.
4. The Database Path field displays the default database backup location. If the NetSight Server is local,
you can specify an alternate backup directory by entering a path to the directory, or using the Browse
button to navigate to the directory. If the server is remote, the database will be saved to the default
database backup location.
5. In the Database Name field, enter a name for the database backup file.
6. Click Backup to begin the database backup operation.
Restoring the Initial Database
Restoring an initial database removes all data elements from the database and populates the NetSight
Administrator authorization group with the name of the logged−in user. This operation will cause all current
client connections and operations in progress to be terminated.
1. Select Tools > Server Information from the menu bar. The Server Information window opens.
2. Select the Database tab.
3. In the NetSight Data Set Operations section, click Restore. The Restore Database window opens.
4. Select the Restore Initial Database option.
5. Click Restore to begin the initialize database operation.
6. You must restart both the NetSight Server and the client following an initialize database operation.
Restoring a Saved Database
You can restore a saved database (from a database backup operation) using these steps. This operation will
cause all current client connections and operations in progress to be terminated.
1. Select Tools > Server Information from the menu bar. The Server Information window opens.
2. Select the Database tab.
3. In the NetSight Data Set Operations section, click Restore. The Restore Database window opens.
4. Select the Restore Saved Database option.
5. Specify the database you wish to restore or use the Browse button to navigate to the database. If the
server is remote, you only have access to databases in the default database backup directory.
6. Click Restore to begin the database restore operation.
Viewing Client Connections
The Client Connections tab in the Server Information window provides information that lets you view and
manage current client connections to this server, and also view a history of client connections. To access the
tab, select Tools > Server Information from the menu bar. The Server Information window opens, where
you can select the Client Connections tab.
Disconnecting a Client
Use the following steps to disconnect a client from the NetSight Server.
1. Select Tools > Server Information from the menu bar. The Server Information window opens.
2. Select the Client Connections tab.
Restoring the Initial Database
75
Welcome to NetSight Inventory Manager Help
3. In the Current Client Connections table, select the client that you want to disconnect and click the
Disconnect button.
4. The client being disconnected receives a message saying that their connection will be terminated in 30
seconds. Both tables on this tab update automatically when a client connects or disconnects.
Viewing Licenses
The License tab in the Server Information window lets you view a list of all the server plugin applications that
have been installed on this particular NetSight Server and their respective license information. To access the
tab, select Tools > Server Information from the menu bar. The Server Information window opens, where
you can select the License tab.
You can also use this tab to change a license. You would change a license in the event that you want to
upgrade from an evaluation copy to a purchased copy, or upgrade to a license that supports more
users/devices. You can also use the Change License functionality to upgrade a Console license from a
Standalone to a Client−Server configuration on UNIX or Linux systems only (see instructions below.)
Contact your Enterasys Networks Representative to purchase the software and receive a Licensed Product
Entitlement ID that allows you to generate a product license. Prior to changing a license, you must redeem
your Entitlement ID for the new product license. Refer to the instructions included with the Entitlement that
was sent to you. (For more information, see
http://www.enterasys.com/products/management/.)
NOTES:
1. To upgrade from a Client−Only configuration to either a Standalone or
Client−Server configuration, you must re−install with the upgraded license.
2. Installed server plugin license types must be compatible with the Console
license type. In other words, if Console has a Small Enterprise (SE) license,
other plugins must also have an SE license. If Console has an Unlimited (U)
license, the plugins must also have a U license.
Changing a License
Use the following steps to change a license when upgrading from an evaluation copy to a purchased copy, or
upgrading to a license that supports more users/devices.
1. Select Tools > Server Information from the menu bar. The Server Information window opens.
2. Select the License tab.
3. Select the license that you want to change and click Change License. The Change License window
opens.
4. Read and accept the terms of the license agreement and click OK.
5. Enter the license text that you received when you generated the product license. (When you purchased
your Enterasys software product, you received a License Entitlement ID that allows you to generate a
product license. Refer to the instructions included with the License Entitlement ID that was sent to
you.)
6. Click Update. The license file will be updated with the new license text.
Viewing Licenses
76
Welcome to NetSight Inventory Manager Help
Upgrading a Console License
On UNIX and Linux systems only, you can use the Change License function to upgrade a Console license
from a Standalone to a Client−Server configuration without reinstalling. Windows systems require that you
reinstall Console using a Client−Server license.
To upgrade your Console license from a Standalone to a Client−Server configuration on a UNIX or Linux
system:
1. Navigate to the /var/Enterasys_Networks
2. Edit the run_conf.sh file using your favorite text editor.
3. Modify the hostname line to read:
JBOSS_HOSTNAME=
4. Select Tools > Server Information from the menu bar. The Server Information window opens.
5. Select the License tab.
6. Select the license that you want to change and click Change License. The Change License window
opens.
7. Read and accept the terms of the license agreement and click OK.
8. Enter the license text that you received when you generated the product license. (When you purchased
your Console software, you received a License Entitlement ID that allows you to generate a product
license. Refer to the instructions included with the License Entitlement ID that was sent to you.)
9. Click Update. The license file will be updated with the new license text.
10. Restart the server:
a. Navigate to the <installdir>/server
b. Stop the server using the command: stopserver.sh
c. Start the server using the command: startserver.sh
NOTE: You can set a Console licensed for a Client−Server configuration to allow only a local host to
connect to the server by editing the hostname line to read: JBOSS_HOSTNAME="127.0.0.1".
Restart the server after editing the run_conf.sh file.
Viewing Locks
The Locks tab in the Server Information window lets you view a list of currently held operational locks. To
access the tab, select Tools > Server Information from the menu bar. The Server Information window opens,
where you can select the Locks tab.
Operational locks are used to control the concurrency of certain client/server operations. They are used in two
ways:
• to lock a device while a critical operation is being performed, such as a software download.
• to lock a certain function so that only one user can access it at a time. For example, only one user can
have the Authorization/Device Access window open at a time.
The Locks tab provides information about each lock, such as who owns the lock, the duration of the lock, and
a description of the lock. You can also cancel (revoke) a lock in this tab.
Upgrading a Console License
77
Welcome to NetSight Inventory Manager Help
Revoking a Lock
Use the following steps to revoke a lock.
1. Select Tools > Server Information from the menu bar. The Server Information window opens.
2. Select the Locks tab.
3. In the Current Locks table, select the lock you want to cancel and click Revoke.
4. A message is displayed on the user's machine informing them that their use of the locked functionality
has been terminated. When the user acknowledges the message, the function closes.
Viewing the Server Log
Use the Server Log tab in the Server Information window to view a log displaying all the events for the
server. To access the tab, select Tools > Server Information from the menu bar. The Server Information
window opens, where you can select the Server Log tab.
A new Server Log is created every day. If the NetSight Server is local, you can view previous logs using the
File tab. The Server Log opens with the log's location and filename displayed in the title bar. Use the Find tab
or Filter tab to perform find and filter operations on Server Log entries, and target specific entries of interest.
Server Log entries are listed by date and time, with newer entries listed at the bottom.
Viewing Server Statistics
Use the Server Statistics window to view NetSight Server statistics such as CPU usage. You can also launch
Advanced statistics that are useful for troubleshooting purposes.
1. Select Tools > Server Information from the menu bar. The Server Information window opens.
2. Click the Server Stats button. The NetSight Server Statistics window opens.
3. Click the Advanced button to open the Advanced Statistics window. You must use the Refresh
button to display current statistical information in this window.
Revoking a Lock
78
How To Configure Profile/Device Mapping
Use the Profile/Device Mapping tab to specify which profile will be used by each Authorization Group when
communicating with a specific device. The Read credential of the NetSight Administrator profile is used for
device Discovery and status polling. All other SNMP communications will use the profiles specified here.
Instructions for:
• Assigning Profiles to Devices
Assigning Profiles to Devices
Devices selected in the left (tree) panel appear in the table in the right panel together with the current profile
assignments associated with each Authorization Group. The Table Editor button activates the editing row
where specific profile selections can be made.
To assign profiles:
1. Click
or choose Authorization/Device Access from the Tools menu. Select the Profile/Device
Mapping tab in the Authorization/Device Access window.
2. Select one or more devices or device groups in the left (tree) panel.
3. Select one or more rows (devices) in the table and click
Table Editor button.
4. Click in the Table Editor Row (at the bottom of the table) for the Authorization Group that you are
configuring and select a profile from the drop−down list.
5. Repeat steps 3 and 4 until you have finished assigning profiles.
6. Click
NOTE: The NetSight Administrator column shows the profile used by the NetSight
Administrator group. The profile listed/selected for each Authorization Group
column will be used by that group when communicating with the associated
device and, as a result, defines the level of access granted to users that are
members of that Authorization Group.
(Apply) to set the selected profiles for your Authorization Groups/devices.
How To Configure Profile/Device Mapping
79
How To Configure Profiles and Credentials
Use this tab to manage credentials that define the access privileges required for SNMPv1, SNMPv2c, and
SNMPv3, and profiles that use the credentials for various access levels. NetSight applications access devices
to control certain device functions (SNMP sets) and retrieve information for device properties views,
FlexViews and periodic status polling (SNMP gets).
Instructions for:
• Managing Credentials
• Create Credential
• Edit Credential
• Delete Credential
• Managing Profiles
• Create Profile
• Edit Profile
• Delete Profile
Managing Credentials
Credentials define the SNMPv1/SNMPv2 community names and SNMPv3 values that will be used to access
your network devices. Credentials can be created manually using the Add Credential button in the
Profile/Device Mapping Tab or imported from a file in NetSight Generated Format (.ngf) using Console's
Import from Device List feature.
To create a credential:
1. Click
or choose Authorization/Device Access from the Tools menu. Select the
Profiles/Credentials tab in the Authorization/Device Access window.
2. In the lower half of the tab, click Add Credential. The Add Credential window opens.
3. Type a name (up to 32 characters) for your new credential and select a SNMP version. If you select
SNMPv1 or SNMPv2, the window lets you enter a community name as the password for this
credential. If you select SNMPv3, you can specify passwords for Authentication and Privacy.
SNMPv1/SNMPv2:
a. Type a community name into the Community Name field.
SNMPv3:
a. Type a user name into the User Name field. This is the User Name that will be used for
device access.
b. Select an Authentication Type (MD5, SHA1, or None).
c. Type the same password (between 1 and 64 characters in length) into both the
Authentication Password and the Confirm Password fields. The password fields are
disabled when the Authentication Type is set to None.
How To Configure Profiles and Credentials
80
Welcome to NetSight Inventory Manager Help
d. Select a Privacy Type (DES or None). Privacy settings are disabled when the Authentication
Type is set to None.
e. Type the same password (between 1 and 64 characters in length) into both the Privacy
Password and the Confirm Password fields. The password fields are disabled when the
Privacy Type is set to None.
4. Click Apply. You can add another credential or click Close to dismiss the Add Credential window.
Your new credential appears in the SNMP Credentials table.
To edit a credential:
1. Click
or choose Authorization/Device Access from the Tools menu. Select the
Profiles/Credentials tab in the Authorization/Device Access window.
2. In the lower half of the tab, select the credential that you are editing from the SNMP Credentials table.
3. Click Edit. The Edit Credential window opens where you can modify the settings for the selected
credential.
4. Type a name (up to 32 characters) for your new credential and select a SNMP version. If you select
SNMPv1 or SNMPv2, the window accommodates entering a community name as the password for
this credential. If you select SNMPv3, you can specify passwords for Authentication and Privacy.
SNMPv1/SNMPv2:
a. Type a community name into the Community Name field.
SNMPv3:
a. Type a user name into the User Name field. This is the User Name that will be used for
device access.
b. Select an Authentication Type (MD5, SHA1, or None).
c. Type the same password (between 1 and 64 characters in length) into both the
Authentication Password and the Confirm Password fields. The password fields are
disabled when the Authentication Type is set to None.
d. Select a Privacy Type (DES or None). Privacy settings are disabled when the Authentication
Type is set to None.
e. Type the same password (between 1 and 64 characters in length) into both the Privacy
Password and the Confirm Password fields. The password fields are disabled when the
Privacy Type is set to None.
5. Click Apply and Close. The changes to the selected credential appear in the SNMP Credentials table.
If the settings are changed for a credential that is currently being used with a profile that is applied to
one or more devices, a confirmation dialog is opened to determine how the changes will be handled.
You will be asked if you want to change the password on the device(s). You can then select the
devices where the password will be changed and, if this user is a valid user on the device(s), then the
new password will be set on the device.
To delete a credential:
1. Click
or choose Authorization/Device Access from the Tools menu. Select the
Profiles/Credentials tab in the Authorization/Device Access window.
2. In the lower half of the tab, select the credential that you are editing from the SNMP Credentials table.
3. Click Delete. The selected credential is removed from the table.
How To Configure Profiles and Credentials
81
Welcome to NetSight Inventory Manager Help
Managing Profiles
Profiles are assigned to device models in the NetSight database. They identify the credentials that are used for
the various access levels when communicating with the device. Profiles are created using the Add Profile
button in the Profile/Device Mapping Tab, or imported from a file in NetSight Generated Format (.ngf) using
Console's Import from Device List feature.
To create a profile:
1. Click
or choose Authorization/Device Access from the Tools menu. Select the
Profiles/Credentials tab in the Authorization/Device Access window.
2. In the upper half of the tab, click Add Profile. The Add Profile window opens.
3. Type a name (up to 32 characters) for your new profile and select an SNMP version. If you select
SNMPv1 or SNMPv2, you can select credentials for Read, Write, and Max Access. If you select
SNMPv3, you can select credentials and security levels for Read, Write, and Max Access.
SNMPv1/SNMPv2 − Select credentials for Read, Write, and Max Access.
SNMPv3 − Select credentials and security levels to be used for Read, Write, and Max Access.
4. Click Apply. You can add another profile or click Close to dismiss the Add Profile window. Your
new profile(s) appears in the Device Access Profiles table.
To edit a profile:
1. Click
or choose Authorization/Device Access from the Tools menu. Select the
Profiles/Credentials tab in the Authorization/Device Access window.
2. In the upper half of the tab, select the profile that you are editing from the Device Access Profiles
table.
3. Click Edit. The Edit Profile window opens where you can modify the settings for the selected profile.
4. Type a name (up to 32 characters) the selected profile. If you are editing a SNMPv1 or SNMPv2
profile, you can select credentials to be used for Read, Write, and Max Access. If you are editing a
SNMPv3 profile you can select credentials and security levels to be used for Read, Write, and Max
Access.
SNMPv1/SNMPv2 − Select credentials for Read, Write, and Max Access.
SNMPv3 − Select credentials and security levels to be used for Read, Write, and Max Access.
5. Click Apply and Close. The changes to the selected profile appear in the Device Access Profiles
table.
To delete a profile:
1. Click
or choose Authorization/Device Access from the Tools menu. Select the
Profiles/Credentials tab in the Authorization/Device Access window.
2. In the upper half of the tab, select the profile that you are deleting from the Device Access Profiles
table.
Managing Profiles
82
Welcome to NetSight Inventory Manager Help
3. Click Delete. The selected profile is removed from the table.
Managing Profiles
83
How to Create and Download
Configuration Templates
Creating a configuration template provides a way to download similar configurations to one or more devices.
Use the Edit Configuration Template window to create a configuration template based on an existing archived
device configuration file. The window displays a selected configuration, and allows you to replace portions of
it with template variables. Then, you must set device−specific values for your template variables. When you
download the template configuration to a device, the variables are replaced with appropriate values for that
device.
NOTE: Configuration templates can be created from text−based (ASCII format) configurations
files. Although you can open binary configuration files in the Edit Configuration
Template window, you should not use binary configuration files to create templates.
Instructions on:
• Creating a Configuration Template
• Editing a Configuration Template
• Setting Values for Template Variables
• On a Single Device
• On Multiple Devices
• Assigning Templates to Device Types
• Using the Template Download Wizard
Creating a Configuration Template
1. In the left−panel Archive Mgmt tab, select a configuration that includes device configuration data (
or
) and then select Tools > Create Configuration Template. (You can also right−click a
configuration and select Create Configuration Template from the menu.) The Edit Configuration
Template window opens.
2. When the window opens, all instances of the IP address of the device the configuration was saved
from, are automatically replaced with the %ManagedIP% variable. You can use the Undo Replace
button to undo this auto−replacement if desired.
3. In the Find field, enter text you would like to replace with a variable.
4. In the Replace With field, enter the variable that will replace the highlighted (found) text, or use the
drop−down list to select a defined variable. To populate the drop−down list, click the Variables
button to open the Template Variables window where you can add and delete variables to display in
the variable drop−down list.
5. Select the Replace all occurrences of selected text checkbox if you would like to replace all
instances of the selected text versus replacing one instance at a time.
6. Click Find to search for the next instance of the text specified in the Find field. The found text is
highlighted in the window.
7. Click Replace to replace highlighted (found) text with the specified variable. If the "Replace all
occurrences of selected text" checkbox is selected, all instances of the text specified in the Find field
will be replaced. Click Undo Replace to undo the last replacement, if desired.
8. You can also edit the file by highlighting and replacing or deleting any text directly in the file.
9. When the configuration template has been edited as desired, click the Save As button to open the
How to Create and Download Configuration Templates
84
Welcome to NetSight Inventory Manager Help
Save Template window where you can name and save the configuration template. Saved templates are
listed under the All Templates folder in the left−panel Configuration Templates tab. Once a template
has been saved, the name of the template appears in the title bar of this window, and the path to where
the saved template is stored is displayed above the configuration template text.
Editing a Configuration Template
1. In the left−panel Configuration Templates tab, expand the All Templates folder and select the desired
configuration template.
2. In the right−panel General tab, click the Edit Template button. The Edit Configuration Template
window opens where you can edit the template using the instructions in the section above, starting
with step 3.
Setting Values for Template Variables
Variables are used in configuration templates to substitute for device−specific information. When you
download a template configuration to a device, the variables are automatically replaced with assigned values
for that device. You can set variable values for a single device or multiple devices.
On a Single Device
You can set variable values for a single device in the Device Configuration Template tab.
1. Select a device in the left−panel Network Elements tab.
2. In the right−panel Configuration Template tab, select the desired variable in the All Available
Template Variables list.
3. Click Set Variable. The Set Template Variable window opens. Enter a value for the variable and
click OK. The value will be added to the list.
4. Use these steps to set values for all the variables. When a configuration template is downloaded to the
device, these values will be used to replace the variables in the template.
On Multiple Devices
You can set variable values for multiple devices in the Set Template Variables window.
1. Select any device or device group in the left−panel Network Elements and then select Tools > Set
Template Variable Values. The Set Template Variable window opens.
2. Use the View Template Variables drop−down list to select which variables are displayed in the table.
You can select a single variable whose value you want to set, or use the "View All Variables" option
to display all variables.
3. The table lists your selected devices and their set values for each of the template variables.
4. Select one or more devices (rows) in the table and click Edit. The Table Editor row appears at the
bottom of the table. Select or tab to the desired column (variable) and enter your value.
5. Click Apply to set the values for all the selected devices. Use the Undo button to undo the last edit
operation you applied.
6. When you close the window, you will be prompted to save or cancel the variable values you have set.
Editing a Configuration Template
85
Welcome to NetSight Inventory Manager Help
Assigning Templates to Device Types
Configuration templates are grouped according to device type in the left−panel Configuration Templates tab.
Inventory Manager automatically assigns a template to the appropriate device type when you save the
template in the Edit Configuration Template window. The Unknown folder contains templates that Inventory
Manager could not correlate to a device type. Use the Assign Configuration Template window to assign those
templates to the correct device type(s).
1. In the left−panel Configuration Templates tab, select a template that needs to be assigned, then select
Tools > Assign Configuration Template. You can also right−click a template, and select Assign
Configuration Template from the menu. The Assign Configuration Template window opens.
2. Expand the Device Type tree and select the device type(s) to which you want to assign the template.
You can select multiple device types using the Ctrl or Shift keys.
3. Click OK.
Using the Template Download Wizard
After you have created your configuration templates, you can use the Template Download Wizard to
download a template to one or more devices.
1. Select Tools > Wizards > Template Download Wizard from the menu bar. The Template
Download Wizard opens.
2. Select the template to download:
a. Expand the folders under the Templates tree and select the template you want to download.
General information about the selected template will be displayed in the right panel.
b. Click Next.
TIP: If you open the Template Download Wizard from a template in the left−panel
Configuration Templates tab, that template will be automatically selected in the
Templates tree.
3. Select devices for download:
a. Expand the folders under the left−panel tree and select the single device or device group, or
multiple devices or device groups (using the Control or Shift keys). Only devices that are
compatible with this template are displayed; this can be overridden by selecting the Show All
Devices checkbox. Click Add. If you want to remove a device from the list, select the device
and click Remove.
b. Click Next.
4. Initiate the Download operation:
a. The top of the window displays a table of the devices you have selected for your download
operation. An alert icon
will appear for any device that does not have values assigned for
all the variables in the template. Click Set Template Variables to open the Set Template
Variables window which lists all your devices and their set values for each of your defined
template variables. Use this window to set variable values for one or more devices. You can
also right−click on a table row and select Edit Device Variables to open the Device Template
Variables window, where you can assign variable values for that specific device.
Assigning Templates to Device Types
86
Welcome to NetSight Inventory Manager Help
b. Specify the Download Type option. The download will be performed in parallel
(simultaneously) on the number of devices specified in the Groups of field. By default, the
downloads will occur in sequential order (Groups of: 1). This is to protect against possible
isolation of other devices that are in the download list.
CAUTION: Because many devices automatically reset following a download operation,
performing a Download Type greater than 1 may isolate other devices in the
download list, causing their downloads to fail. It is recommended that you
leave the Groups of value at 1 (perform the downloads serially), unless you
know it is safe to have the selected network devices reset simultaneously.
c. Click Start to initiate the download operation. The table at the top of the window will update
with status information, as will the status area in the bottom left of the window.
d. Review results. An alert icon
will appear in the Alert column of the table if a download
operation fails for the specific device. You can select to show all devices or show only those
that are incomplete or have failed.
5. Click Finish to close the wizard.
Assigning Templates to Device Types
87
Firmware Discovery
Inventory Manager provides convenient and powerful tools for managing firmware and boot PROM images
on your network devices. To take advantage of these tools, you must store your images in a specified
firmware directory, and perform a firmware discovery that will automatically display your images in the
left−panel Firmware Mgmt tab.
NOTE: If you are using an alternate firmware download server to perform remote downloads,
you will need to manually create the firmware records associated with the alternate
server (as opposed to having them automatically discovered during a firmware
discovery.) Refer to How to Set Up Alternate Firmware Download Servers for more
information.
For information on obtaining Enterasys Networks firmware, contact your Enterasys representative, or access
the Enterasys Networks firmware download library at: http://www.enterasys.com/download/ or
from the Download icon
in the Firmware Mgmt tab's Details View. (A browser is required to view the
website and Solaris users must add the browser's path to their PATH environment variable.) If you download
a firmware image that is contained in a .zip file, you must unzip the file before placing it into the firmware
directory.
Instructions on:
• Discovering Your Firmware
• Adding New Firmware Images
Discovering Your Firmware
Inventory Manager uses the default tftpboot\firmware\images directory for storing your firmware. If you are
using an different firmware directory, you must specify that directory in the TFTP Transfer Settings view
and/or the FTP Transfer Settings view of the Options window. (For more information, see either TFTP Server
Setup or FTP Server Setup.)
NOTE: The maximum size allowed for a firmware image filename is 128 characters. The
maximum size for the path to where the image is stored is 512 characters. Firmware
images that exceed these maximums will not be discovered.
1. Place your firmware and boot PROM images in your firmware directory.
2. In the left−panel Firmware Mgmt tab, select View > Refresh from the menu bar. (You can also use
the Refresh icon
in the right−panel Details Views.)
Inventory Manager automatically displays your firmware under pre−defined firmware groups in the left−panel
Firmware Mgmt tree. You can assign firmware to multiple firmware groups to facilitate your firmware
management according to your network needs. For more information see How to Assign Firmware.
Firmware Discovery
88
Welcome to NetSight Inventory Manager Help
Adding New Firmware Images
Once you have done an initial firmware discovery, you can add new firmware to the left−panel Firmware
Mgmt tab using these instructions.
1. Place your new firmware in your firmware directory.
2. In the left−panel Firmware Mgmt tab, select View > Refresh from the menu bar. (You can also use
the Refresh icon
in the right−panel Details Views.)
Inventory Manager automatically adds your new firmware to the appropriate firmware groups in the
left−panel Firmware Mgmt tree.
Adding New Firmware Images
89
How to Import a Database
You can import a database that was saved in Inventory Manager release 1.4 into this version of Inventory
Manager. The import will overwrite all Inventory Manager data in the NetSight Database, and requires that
you restart both the client and server. Only the client that initiates the import can be connected to the server
during the import. All other clients will be disconnected and the server will refuse connections until the
import is completed. You must be assigned the appropriate user capability to perform the import operation.
The following Inventory Manager features will be imported from the earlier database.
• Archive operations, archive versions, and saved configurations.
• Schedules for Inventory Manager operations.
• Capacity Planning saved reports.
• Firmware references.
• Configuration templates.
• Device identification and image information for devices that currently exist in the NetSight Database.
See the Note below.
NOTES: −− In order for device identification and image information to be imported, the device
must already exist in the NetSight Database. If a device being imported does not
currently exist, you will receive an error message during the Import process. You can
add the device to the database using NetSight Console, and then perform the import
again. The second import will then include the device.
−− User−created device groups are not imported.
Use these steps to import an Inventory Manager 1.4 database. You must be assigned the appropriate user
capability to perform the import operation.
1. Only the client performing the import should be connected to the server.
2. Select File > Database > Import v1.4 Inventory Manager Database.
3. The Import v1.4 Inventory Manager Database window opens where you can use the Browse button to
select the v 1.4 database to import.
NOTE: If you are performing the import from a remote client, be aware that the file browser
points to the local file system on the client, not to the file system on the server
workstation. The database from the local system will be imported, but the data will
overwrite the Inventory Manager data in the NetSight Database on the NetSight Server
workstation.
4. Select the database and click OK. You will see a Warning message asking if you want to overwrite
all Inventory Manager data in the server's database. Click OK.
5. When the import is complete, an import summary window is displayed. Review any messages in the
window and then close the window.
6. Restart the NetSight Server and Inventory Manager client.
How to Import a Database
90
How to Initialize
Inventory Database Components
Inventory Manager provides a way for you to initialize the Inventory Manager components in the NetSight
Database. The initialize operation removes all Inventory Manager data elements from the database including:
• Archive operations, archive versions, and saved configurations.
• Schedules for Inventory Manager operations.
• Capacity Planning saved reports.
• Firmware references.
• Configuration templates.
Using this operation instead of the Restore Initial Database function (accessed in the Server Information
window) allows you to initialize your Inventory components while retaining your NetSight Console and
Automated Security Manager data elements in the database.
NOTE: As a precaution, it is recommended that you make a backup of your NetSight Database prior to
performing the initialize operation using the Backup Database window accessed from the Server
Information window.
You must be assigned the appropriate user capability to perform the initialize operation. This operation will
cause all current client connections and operations in progress to be terminated. You must restart both the
NetSight Server and the Inventory Manager client following an initialize database operation.
1. Make a backup of your database using the Backup Database window accessed from Database tab in
the Server Information window (Tools > Server Information.)
2. Select File > Database > Initialize Inventory Component to begin the initialize operation. You will
see a Warning message asking if you want to remove all Inventory Manager data in the server's
database. Click OK.
3. When the initialize is complete, restart the NetSight Server and Inventory Manager client.
How to Initialize Inventory Database Components
91
How to Manage SNMP Passwords
Use this tab to collectively manage the credentials that have been set on your network's devices.
Instructions for:
• Setting SNMPv1/2 Credentials
• Setting SNMPv3 Credentials
Setting SNMPv1/2 Credentials
When a SNMPv1 or SNMPv2 credential is selected from the drop−down list above the table, the table lists the
devices where that credential is set and you can define a New Community Name for access to the devices in
the table.
To set SNMPv1 or SNMPv2 credentials on your devices:
1. Click
or choose Authorization/Device Access from the Tools menu. Select the Manage SNMP
Passwords tab in the Authorization/Device Access window.
2. Select an SNMPv1 or SNMPv2 credential from the Credential drop−down list. The table will list all
of the devices where the selected credential can be used.
3. Type the new community name that you want to set on the devices listed in the table.
4. Click Test to verify that the credential in the "Use for Set" column can access the applicable MIBs on
the device.
5. If the Test Results are acceptable, click Apply to set the community name on the devices.
Setting SNMPv3 Credentials
When an SNMPv3 credential is selected, you can define a new Authentication password and Privacy
password for access to the devices in the table.
To set an SNMPv3 credential on your devices:
1. Click
or choose Authorization/Device Access from the Tools menu. Select the Manage SNMP
Passwords tab in the Authorization/Device Access window.
2. Select an SNMPv3 credential from the Credential drop−down list. The table will list all of the devices
where the selected credential can be used.
3. Type the new Authentication and Privacy passwords that you want to set on the devices listed in the
table.
4. Click Test to verify that the credential in the "Use for Set" column can access the applicable MIBs on
the device.
5. If the Test Results are acceptable, click Apply to set the passwords on the devices.
How to Manage SNMP Passwords
92
Welcome to NetSight Inventory Manager Help
Buttons
Test
This button lets you test to verify that the credential in the "Use for Set" column can access the
applicable MIBs on the device.
Apply
Sets your credential changes on the devices in the table.
How to Manage SNMP Passwords
93
How to Manage Users and Groups
Use the Users and Groups tab (via the Authorization/Device Access tool) to specify users who are authorized
to access the NetSight database, and assign those users to authorization groups that define their access
privileges to application features. Access privileges (called Capabilities) are associated with authorization
groups. Based on their membership in a particular authorization group, users are granted specific capabilities
in the application. For example, you may have an authorization group called "IT Staff" that grants access to a
wide range of capabilities, while another authorization group called "Guest" grants a very limited range of
capabilities.
Begin by creating your authorization groups and specifying the capabilities for that group. Then, create a list
of your authorized users and assign each user to a specific group.
Instructions for:
• Managing Authorization Groups
• Create Group
• Edit Group
• Delete Group
• Managing Users
• Selecting an Automatic Authorization Group
• Create User
• Edit User
• Delete User
Managing Authorization Groups
A user's access to specific capabilities and features in the application is determined by what authorization
group that user belongs to. So, it makes sense to begin managing user access by creating one or more groups
that define the access and capabilities that will be granted to users.
To create a group:
1. Click
or choose Authorization/Device Access from the Tools menu. The
Authorization/Device Access window opens with the Users/Groups tab selected.
2. In the lower half of the tab, click Add Group. The Add Group window opens where you can define
the capabilities for this group.
a. Type a name for your new group into the Authorization Group field.
b. Select the Capabilities tab and expand the tree, and select the capabilities that will be granted
to users that are members of this group.
c. Select the Settings tab and choose a SNMP Redirect option:
• Allow Users to Configure SNMP Redirect in Options − lets users in this group
determine when it is appropriate to have SNMP requests performed by the server.
Refer to the Client/Server SNMP Redirection in the Options window.
• Always Redirect SNMP to the NetSight Server − all SNMP requests always go
through the server.
How to Manage Users and Groups
94
Welcome to NetSight Inventory Manager Help
• Never Redirect SNMP to the NetSight Server − SNMP requests are always made
from the client system.
These settings have no effect when both the client and server are running on the same system.
d. Click Apply to confirm your selections and Close to dismiss the Add Group window.
Your new group now appears in the Authorization Groups table.
To edit a group:
1. Click
or choose Authorization/Device Access from the Tools menu. The
Authorization/Device Access window opens with the Users/Groups tab selected.
2. Select a group from the Authorization Groups table in the lower half of the tab.
3. Click Edit Group. The Edit Group window opens where you can change the capabilities for the
selected group.
a. Select the Capabilities tab and expand the tree, and select the capabilities that will be granted
to users that are members of this group.
b. Select the Settings tab and choose a SNMP Redirect option:
• Allow Users to Configure SNMP Redirect in Options − lets users in this group
determine when it is appropriate to have SNMP requests performed by the server.
Refer to the Client/Server SNMP Redirection in the Options window.
• Always Redirect SNMP to the NetSight Server − all SNMP requests always go
through the server.
• Never Redirect SNMP to the NetSight Server − SNMP requests are always made
from the client system.
These settings have no effect when both the client and server are running on the same system.
NOTE: The capabilities and settings for the NetSight Administrator group cannot be
changed.
c. Click Apply to confirm your selections and Close to dismiss the Add Group window.
Your edited group now appears in the Authorization Groups table.
To delete a group:
1. Click
or choose Authorization/Device Access from the Tools menu. The
Authorization/Device Access window opens with the Users/Groups tab selected.
2. Select the group(s) to be deleted from the Authorization Groups table in the lower half of the tab.
3. Click Delete. The selected groups are removed from the table.
NOTE: The capabilities and settings for the NetSight Administrator group cannot be deleted.
Managing Users
The top half of the Users/Groups tab is where you can create, edit, and delete users, and assign each user to
an authorization group. The Automatic User Membership feature lets you specify an authorization group for
users that log in without having been previously assigned to a group.
Selecting an Automatic Authorization Group
Managing Users
95
Welcome to NetSight Inventory Manager Help
1. Click
or choose Authorization/Device Access from the Tools menu. The Authorization/Device
Access window opens with the Users/Groups tab selected.
2. Check Enable to activate the Automatic User Membership − Authorization Group drop−down list.
3. Select a group that will determine the capabilities granted to users who were not previously created as
an authorized user. When any of these users log in, they are automatically created as an authorized
user as a member of the selected group.
To create a user:
1. Click
or choose Authorization/Device Access from the Tools menu. The Authorization/Device
Access window opens with the Users/Groups tab selected.
2. Click Add User. The Add User window opens where you can define a new Authorized User and
assign it a group membership.
3. Type the user's name and the domain/hostname that will be used to authenticate to the NetSight
database
4. Select an authorization group where this user will be a member.
5. Click Apply to confirm your selections and Close to dismiss the Add User window.
To edit a user:
1. Click
or choose Authorization/Device Access from the Tools menu. The Authorization/Device
Access window opens with the Users/Groups tab selected.
2. Select a user from the Authorized Users table.
3. Click Edit User. The Edit User window opens.
4. Select a new authorization group where this user will be a member.
NOTE: You cannot change group membership for a selected user if the user is the only member
of the NetSight Administrator group.
5. Click Apply to confirm your changes and Close to dismiss the Edit User window.
To delete a user:
1. Click
or choose Authorization/Device Access from the Tools menu. The Authorization/Device
Access window opens with the Users/Groups tab selected.
2. Select the user(s) to be deleted from the Authorized Users table.
3. Click Delete. The selected users are removed from the table.
NOTE: The last user that is a member of the NetSight Administrator group cannot be deleted.
Managing Users
96
How to Push Local Firmware
to the Server
The Push Local Firmware to Server window gives a remote client the ability to send a local firmware or boot
PROM image to the NetSight Server. This allows a remote client to download a firmware image from the
Enterasys Networks download library website, and then push the firmware to the server where it can be used
in Inventory Manager operations such as firmware and boot PROM upgrades.
1. Select Tools > Push Local Firmware to Server. The Select Local Firmware File window opens
where you can navigate to the file you want to send. Select the file and click Open. The Push Local
Firmware to Server window opens.
2. In the window, you can view the path to the local file you have selected to send, and the following
information:
• Server − The name of the server the client is connected to.
• Server Path − The path to the server's TFTP or FTP firmware directory, depending on what
option you have selected. You can extend the path to a different folder in the directory, if
desired.
• File Name − The name of the firmware or boot PROM file being pushed to the server.
3. Select the TFTP or FTP Firmware Directory option depending on whether you want to store the
firmware in the FTP or TFTP firmware directory on the server.
4. Select the Refresh Firmware checkbox if you want to perform a firmware discovery following the
operation, and update the firmware listed in your Firmware Mgmt tab.
5. Click Send to send the image to the server.
How to Push Local Firmwareto the Server
97
How to Reset a Device
Use the Reset Device Wizard to reset a single device, multiple devices, or even multiple device groups. The
wizard lets you reset devices that support Timed Reset as well as those devices that do not. Timed Reset lets
you configure your reset operation with a time delay, so that the actual device resets take place at a later time.
Use these steps to reset a device.
1. Select Tools > Wizards > Reset Wizard from the menu bar or click
on the toolbar. The
Reset Device Wizard opens.
2. Select the devices to reset:
a. Expand the folders under the left−panel tree and select the single device or device group, or
multiple devices or device groups (using the Control or Shift keys). Click Add.
NOTE: If you have multiple tree nodes representing the same device but with varying
SNMP contexts, keep in mind that not all device contexts will provide access to
the MIBs required to perform the operation. When selecting your devices, make
sure that any device with SNMP context has access to the required MIBs, or
select the device with default context (switch mode).
b. The devices will be listed in the Selected Devices table. Devices that do not support the reset
operation or have never been contacted, are not listed. If you want to remove a device from
the list, select the device and click Remove.
c. Click Next.
TIP: If you open the Reset Device Wizard from a device or device group in the left−panel
Network Elements tab, the selected device(s) will be automatically displayed under Selected
Devices.
3. Reset devices that support Timed Reset:
If you are resetting devices that support Timed Reset, you will see a window listing those devices.
Timed Reset gives you the flexibility to set up your reset operation with a time delay, so that the
actual device resets take place at a later time. This can be useful when trying to schedule resets for a
time when the network is least busy.
a. In the Selected column, select the devices that you want to reset. You can select an option to
display devices that do not support timed reset; however, these devices cannot be reset from
this window.
b. Enter the Reset Delay. This is the amount of time (in seconds) until the device resets after the
reset operation begins. For example, if you start the reset operation at 4:00 pm with a 7 hour
reset delay (420 seconds), the device(s) will reset at 11:00 pm. This allows you to schedule
your resets for a time when the network is least busy.
c. Select the reset type: Warm boot (restarts the device) or Cold boot (same as turning device
power off and on).
d. Click Start to initiate the timed resets. Resets occur simultaneously. Once the reset operation
has started, you must click Refresh to update the device information in the table.
4. Reset devices that do not support Timed Reset:
If you are resetting devices that do not support Timed Reset, you will see a window listing those
devices.
a. In the Selected column, select the devices that you want to reset.
b. Select the reset type: Warm boot (restarts the device) or Cold boot (same as turning device
power off and on).
How to Reset a Device
98
Welcome to NetSight Inventory Manager Help
c. Click Start to initiate the resets. Resets occur one at a time, continuing only after a device is
fully booted.
d. After the reset operation is completed, you can click Refresh to update the device
information in the table.
5. Click Finish to close the wizard.
How to Reset a Device
99
How to Restore an Archive
You can restore saved (archived) device configuration files to devices using the Restore Wizard. Saved
configurations are listed in the left−panel Archive Mgmt tab under the appropriate archive and version. Each
configuration displays an icon that identifies the type of data that was saved: device configuration data,
capacity planning data,
both device configuration and capacity planning data. Only configurations that
include device configuration data (
and
) are available to be restored.
A configuration can only be restored to a device with the same IP address. In other words, the device you are
restoring to must have the same IP address as the device the configuration was originally saved from. You can
restore configurations to a single device or multiple devices. You must have a TFTP or FTP server running to
restore a configuration. For more information, see TFTP Server Setup or FTP Server Setup.
Use these steps to restore a configuration to a device.
1. Select Tools > Wizards > Restore Wizard from the menu bar or click
on the toolbar. The
Restore Wizard opens.
2. Select the archive version to restore:
a. Expand the folders under the Archives tree and select the archive version or configuration you
want to restore. Only configurations that include device configuration data (
and
) are
available to be restored. Click Add.
b. The configurations are listed in the Configurations to Restore table. If you have selected an
archive version and you want to remove an individual configuration from the list, select the
configuration and click Remove.
c. Click Next.
TIPS: −− If you open the Restore Wizard from an archive version or configuration in
the left−panel Archives Mgmt tab, the selected configuration(s) will be
automatically displayed under Configurations to Restore.
−− Check the FW Match column to see if the current firmware version on the
device matches the firmware version that was on the device at the time of the
archive.
3. Initiate the Restore operation:
a. Specify the Restore Type option. The restore will be performed in parallel (simultaneously)
on the number of devices specified in the Groups of field. By default, the restores will occur
in sequential order (Groups of: 1). This is to protect against possible isolation of other devices
that are in the restore list.
CAUTION: Because some devices automatically reset following a restore
operation, performing a Restore Type greater than 1 may isolate
other devices in the restore list, causing their restores to fail. It is
recommended that you leave the Groups of value at 1 (perform
the restore serially), unless you know it is safe to have the
selected network devices reset simultaneously.
b. Click Start to initiate the restore operation. The table at the top of the window will update
with status information, as will the status area in the bottom left of the screen. Use the table
options and tools to find, filter, sort, print, and export information in a table and customize
How to Restore an Archive
100
Welcome to NetSight Inventory Manager Help
table settings. You can access the Table Tools through a right−mouse click on a column
heading or anywhere in the table body, or by clicking the Table Tools
button in the
upper left corner of the table (if you have the row count column displayed). For more
information, see Table Tools.
c. Review results. An alert icon
will appear in the Alert column of the table if a restore
operation fails for a specific device. You can select to show all devices or show only those
that are incomplete or have failed.
4. Click Finish to close the wizard.
How to Restore an Archive
101
Server Configuration Considerations
This Help topic provides configuration information for the NetSight Server, such as running the server in a
non−DNS environment, limiting client connections to the server, adding memory to the server, and firewall
considerations.
Instructions on:
• Running the Server on a non−DNS Enabled Solaris System
• Limiting Client Connections on Solaris and Linux
• Accepting Connection from Local Client Only
• Limiting Connections to a Specific IP Address
• Adding Memory to the Server on Solaris and Linux
• Firewall Considerations
Running the Server on a non−DNS Enabled Solaris System
By default, the NetSight Server obtains the local system's IP address by performing a hostname resolution
when the Console Client is launched. For Solaris systems that are not configured with hostnames (e.g. the
hostname command returns localhost or localhost.localdomain), or are not registered in DNS, use the
following steps to start the server with an IP address.
1. Open the server's run.sh file located in <installdir>/server/jboss/bin/run.sh.
2. Edit the HOSTNAME variable at the top of the file to:
HOSTNAME="<server IP address>"
For example, HOSTNAME="123.123.123.123"
Limiting Client Connections on Solaris and Linux
Use the steps in this section to configure the server to accept connections only from the local system and/or
limit client connections to a specific IP address.
Accepting Connection from Local Client Only
By default, the NetSight Server accepts connections from any client system. To limit connections to clients
connecting from the local system only, use the following steps:
1. Open the server's run.sh file located in <installdir>/server/jboss/bin/run.sh.
2. Edit the HOSTNAME variable at the top of the file to:
HOSTNAME="127.0.0.1"
Limiting Connections to a Specific IP Address
By default, the NetSight Server will accept connections on all IP addresses supported by the server host. If
your server supports multiple IP addresses, it may be desirable to limit client connections to a specific IP
address. To specify an IP address:
1. Open the server's run.sh file located in <installdir>/server/jboss/bin/run.sh.
Server Configuration Considerations
102
Welcome to NetSight Inventory Manager Help
2. Edit the HOSTNAME variable at the top of the file to:
HOSTNAME="<server IP address>"
For example, HOSTNAME="123.123.123.123"
Clients must use the exact IP address to connect to the server. Clients can no longer use localhost, 127.0.0.1,
or any DNS name that translates to anything but the specified IP address.
Adding Memory to the Server on Solaris and Linux
By default, the NetSight Server is configured to use a maximum of 512 MB of virtual memory. On large
server systems and in large deployments, you can increase the amount of memory. Keep in mind that if the
server attempts to access more memory than it is configured for, it will terminate.
1. Open the server's run.sh file located in <installdir>/server/jboss/bin/run.sh.
2. Edit the MAXMEMORY variable at the top of the file to the desired value:
MAXMEMORY="<number of MB>"
Firewall Considerations
The NetSight Server runs on a set of non−standard ports. These ports (4530−4533) need to be accessible
through firewalls for clients to connect to the server.
4530/4531 −− JNP (JNDI)
4532 −− JRMP (RMI)
4533 −− UIL (JMS)
Adding Memory to the Server on Solaris and Linux
103
How to Set a File Transfer Method
You can select a file transfer method for a specific device, or specify a default transfer method for an entire
device type using the File Transfer Method window. Once you have specified the file transfer method for a
device, all archive save and restore operations and Firmware/Boot PROM upgrades on that device will be
performed using the specified method. All devices are initially configured with TFTP as their file transfer
method, until specified otherwise using these windows. Be sure to configure file transfer properties in the
TFTP Transfer Settings or FTP Transfer Settings views in the Options window.
Instructions on setting the:
• File Transfer Method for a Device
• Default File Transfer Method for a Device Type
Setting the File Transfer Method for a Device
You can specify the file transfer method for a single device or multiple devices. Specifying a file transfer
method at the device level overrides any default setting made at the device type level.
1. Select a single device in the left−panel Network Elements tab or multiple devices in a right−panel
Details View tab, then select Tools > File Transfer Method from the menu bar. You can also
right−click a device and select the File Transfer Method option from the menu. The File Transfer
Method window opens.
2. Use the drop−down list to select the file transfer method you would like used for the selected
device(s). The default file transfer method set for the device's device type is indicated by the word
default in parentheses.
3. Click OK.
Setting the Default File Transfer Method for a Device Type
You can specify a default file transfer method for an entire device type. You can override the device type
setting at the device level.
1. Select a device type (lowest−level device type folder) in the left−panel Firmware Management tab,
then select Tools > Default File Transfer Method from the menu bar. You can also right−click a
device type and select the Default File Transfer Method option from the menu. The File Transfer
Method window opens.
2. Use the drop−down list to select the file transfer method you would like used for the selected device
type.
3. Select the Apply method to all devices for this device type checkbox to change the file transfer
method for all current devices in the selected device type folder and all newly discovered devices of
this device type. If this checkbox is not selected, only newly discovered devices of this device type
will have this file transfer method.
4. Click OK.
How to Set a File Transfer Method
104
Welcome to NetSight Inventory Manager Help
How to Set a File Transfer Method
105
How to Set a Reference Image
A firmware or boot PROM reference is the image you designate as the preferred image for a specific binary
family of devices (devices that share the same firmware image). Firmware images that have been set as a
reference image display a
firmware reference icon in the Firmware Mgmt tab. Boot PROM images that
have been set as a reference image display a
boot PROM reference icon in the Firmware Mgmt tab. There
can only be one reference image per family.
1. Select a firmware or boot PROM image in the left−panel Firmware Mgmt tab or a right−panel Details
View.
2. Select Tools > Set as Reference Image or right−click on the image and select Set as Reference
Image from the menu. If the Set as Reference Image option is not available, make sure that the
selected image has been assigned to appropriate device types.
The image will be set as a reference for all device types with which it is compatible.
How to Set a Reference Image
106
How to Set Options
Use the Options window to set options for NetSight functions on a suite−wide and per−application basis. The
Options window has a right−panel view that changes depending on what you have selected in the left−panel
tree. Each view allows you to set different options. You can access the Options window using Tools >
Options in the menu bar.
Instructions on setting the following options:
• Suite Options
• Client/Server SNMP Redirection
• Data Display
• Date/Time Format
• Device Display Name
• Event Logs
• Services for NetSight Server
• SMTP E−Mail Server
• Status Polling
• Web Update
• Inventory Manager Options
• Alternate Firmware Servers
• FTP Transfer Settings
• TFTP Transfer Settings
• Services for NetSight Client
How to Set Options
107
How to Set
Inventory Manager Options
Use the Options window (Tools > Options) to set options for the Inventory Manager application. In the
Options window, the right−panel view changes depending on what you have selected in the left−panel tree.
Expand the Inventory Manager folder in the tree to view all the different options you can set.
Instructions on setting the following Inventory Manager options:
• Alternate Firmware Servers
• FTP Transfer Settings
• TFTP Transfer Settings
• Services for NetSight Client
Configuring Alternate Firmware Servers
Use the Alternate Firmware Servers view to configure alternate firmware download servers. Alternate servers
allow you to perform remote firmware downloads without having to reconfigure the default NetSight TFTP
server settings. By performing firmware downloads via a remote server, you can avoid transferring traffic
over a WAN. Alternate servers can be configured to use either the TFTP or FTP protocol. These settings
apply to all users on all clients. You must be assigned the appropriate user capability to add alternate firmware
servers.
1. Select Tools > Options in the menu bar. The Options window opens.
2. In the left−panel tree, expand the Inventory Manager folder and select Alternate Firmware Servers.
The right−panel Alternate Firmware Servers view displays a list of any configured alternate servers.
3. Click Add Server to open the Add Alternate Firmware Server window where you can configure a
new alternate server:
a. Enter the IP address of the workstation where the TFTP or FTP server is running.
b. Enter an Identifier −− a description that helps you identify the alternate server.
c. Enter the server root path. The root directory is the base directory to which the server is
allowed access. The server will be allowed to create files to or read files from this directory
and any of its subdirectories. Keep in mind the following requirements when setting the
server root path:
• If your server is configured with a root directory, it must match the root directory
entered here.
• If your server is not configured with a root directory, specify the root directory here
as the root of the drive (e.g. C:\ or D:\).
d. Specify the transfer protocol for the alternate server.
e. The required connection information changes depending on your selected transfer protocol.
• For TFTP, specify the port number your TFTP server is configured to run on.
• For FTP, specify the port number your FTP server is configured to run on. Select the
Anonymous checkbox if your FTP server is configured to accept Anonymous logins;
Inventory Manager will automatically fill in the username and password fields.
Otherwise, enter your username and password to access the FTP server. If you select
the Hide Password checkbox, your password will be replaced with asterisks when it
is typed in.
4. To edit an alternate server, select a server in the list and click Edit Server. The Edit Alternate
How to Set Inventory Manager Options
108
Welcome to NetSight Inventory Manager Help
Firmware Server window opens where you can edit certain server properties.
5. To remove a server, select a server and click Remove Server.
6. After you have configured your alternate servers, use the Create Firmware Record window to create
new firmware entries and associate them with the alternate servers. Then, use the Set Firmware Server
window to specify an alternate firmware download server to be used by a device group or by
individual devices.
Setting FTP Transfer Settings
Use the FTP Transfer Settings view to set FTP server properties and login information. Specify the FTP
server IP address, set paths to the root and firmware directories, and set login information. The FTP server
needs access to these directories in order to perform archive operations or firmware/boot PROM upgrades.
These settings apply to all users on all clients.
1. Select Tools > Options in the menu bar. The Options window opens.
2. In the left−panel tree, expand the Inventory Manager folder and the File Transfer Settings folder, and
select FTP Transfer Settings. The right−panel FTP Transfer Settings view is displayed.
3. Select the Use the NetSight Server's IP checkbox, or use the FTP Server IP field to enter the IP
address of the device where the FTP server resides.
4. Enter the port number your FTP server is configured to run on.
5. Specify the Root Directory Path. The root directory is the base directory to which the FTP server is
allowed access. The FTP server will be allowed to create files to or read files from this directory and
any of its subdirectories. The default root directory is the tftpboot directory that Inventory Manager
automatically creates when it is installed. If you would like to use an alternate root directory, enter a
path to that directory in this field, or use the Browse button to navigate to the directory.
NOTE: Keep in mind the following requirements when setting the path
to your root directory:
• If your FTP server is configured with a FTP root
directory, it must match the root directory entered here.
• If your FTP server is not configured with a FTP root
directory, change the FTP root directory here to the
root of the drive (e.g. C:\ or D:\).
• If you are using an FTP server on a remote system,
use the Universal Naming Convention (UNC) when
specifying the root directory path. The UNC
convention uses two slashes // (UNIX or Linux
systems) or backslashes \\ (Windows systems) to
indicate the name of the system, and one slash or
backslash to indicate the path within the computer. For
example, on a Windows system, instead of using
h:\ (where h:\ is mapped to the tftpboot directory
on the remote drive)
use
\\yourservername\tftpboot\
6. Specify the Firmware Directory Path. The default firmware directory is tftpboot\firmware\images.
If you would like to use an alternate firmware directory, enter a path to that directory in this field, or
use the Browse button to navigate to the directory. The firmware directory must be a subdirectory of
the root directory. (The firmware images stored in the firmware directory are added to the left−panel
Setting FTP Transfer Settings
109
Welcome to NetSight Inventory Manager Help
Firmware Mgmt tree when you perform a firmware discovery.) If you are using an FTP server on a
remote system, be sure to use the UNC standard described in the Note above when specifying the
path.
7. Specify your FTP Server login information. Select the Anonymous checkbox if your FTP server is
configured to accept Anonymous logins. (Inventory Manager will automatically fill in the username
and password fields.) Otherwise, enter your username and password to access the FTP server. For
increased security, select the Hide Password checkbox and your password will be replaced with
asterisks when it is typed in.
8. Click OK to set options and close the window. Click Apply to set options and leave the window
open.
Setting TFTP Transfer Settings
Use the TFTP Transfer Settings view to set TFTP server properties. This view displays the TFTP server IP
address and root directory path specified in the Services for NetSight Server Options view and lets you set the
firmware directory path. These settings apply to all users on all clients.
1. Select Tools > Options in the menu bar. The Options window opens.
2. In the left−panel tree, expand the Inventory Manager folder and the File Transfer Settings folder, and
select TFTP Transfer Settings. The right−panel TFTP Transfer Settings view is displayed.
3. Specify the Firmware Directory Path. The default firmware directory is tftpboot\firmware\images.
If you would like to use an alternate firmware directory, enter a path to that directory in this field, or
use the Browse button to navigate to the directory. The firmware directory must be a subdirectory of
the root directory. (The firmware images stored in the firmware directory are added to the left−panel
Firmware Mgmt tree when you perform a firmware discovery.)
NOTE: If you are using a TFTP server on a remote system, use the Universal Naming
Convention (UNC) when specifying the firmware directory path. The UNC convention
uses two slashes // (UNIX or Linux systems) or backslashes \\ (Windows systems) to
indicate the name of the system, and one slash or backslash to indicate the path within the
computer. For example, on a Windows system, instead of using
h:\ (where h:\ is mapped to the firmware directory on the remote drive)
use
\\yourservername\tftpboot\firmware\images\
4. Click OK to set options and close the window. Click Apply to set options and leave the window
open.
Setting Services for NetSight Client Options
Use the Services for NetSight Client view to configure the NetSight TFTP and BOOTP services that are
installed on the client workstation as part of the Client−Only configuration. The client−side NetSight TFTP
service can be used to provide alternate firmware download capability for remote devices. It allows a remote
client to perform a firmware download without having to reconfigure the default NetSight TFTP server
settings. The view also lets you specify whether to automatically launch the NetSight TFTP and BOOTP
services at either reboot or login (depending on the service and operating system). These settings apply to all
users on this client. These options only apply to clients connected to a remote server.
Setting TFTP Transfer Settings
110
Welcome to NetSight Inventory Manager Help
1. Select Tools > Options in the menu bar. The Options window opens.
2. In the left−panel tree, expand the Inventory Manager folder and select Services for NetSight Client.
3. Under Automatic Launch, select the checkbox for each service that you want to automatically
launch:
• NetSight BOOTP (Windows only) − Automatically launch the service at login. This service
must be running to provide BOOTP services to network devices. Linux and Solaris systems
provide their own BOOTP services.
• NetSight TFTP − Automatically launch the service at either reboot or login (depending on
the operating system). The TFTP service must be running to perform firmware downloads.
On Linux and Solaris systems, the TFTP service is started when the workstation reboots. On
Windows, the TFTP service is started when you log in to the workstation.
4. In the TFTP Settings area, specify a TFTP root directory. The root directory is the base directory to
which the TFTP server is allowed access. The TFTP server will be allowed to create files to or read
files from this directory and any of its subdirectories. Use the default root directory, or if you would
like to use an alternate root directory, enter a path to that directory in this field or use the Browse
button to navigate to the directory. Changing the TFTP root directory may require restarting the TFTP
server.
5. If your workstation is configured with multiple IP addresses, enter the appropriate IP address in the
TFTP Server IP Address field.
6. Before you can use the client−side NetSight TFTP server for firmware downloads, you must
configure it as an alternate firmware server in the Options windows. For complete instructions, see
How to Set Up Alternate Firmware Download Servers.
7. Click OK to set options and close the window. Click Apply to set options and leave the window
open.
Setting TFTP Transfer Settings
111
How to Set Up
Alternate Firmware Download Servers
Alternate firmware download servers allow you to perform remote firmware downloads without having to
reconfigure your default local file transfer servers. By performing firmware downloads via a remote server,
you can avoid transferring traffic over a WAN. Alternate servers can be configured to use either the TFTP or
FTP protocol. After you have configured your alternate servers, you must create and assign new firmware
records, and associate them with the alternate servers. Then, you must specify which alternate firmware
download server is to be used by a device group or by individual devices. Once you have finished these
set−up procedures, you are ready to perform remote firmware downloads using the Firmware Upgrade Wizard
or the Boot PROM Upgrade Wizard.
Instructions on:
• Configuring the Alternate Server
• Creating and Assigning Firmware Records
• Setting the Firmware Server
Configuring the Alternate Server
Use the Alternate Firmware Servers view in the Options window to configure your alternate firmware
download servers.
1. Select Tools > Options in the menu bar. The Options window opens.
2. In the left−panel tree, expand the File Transfer Method folder, and select Alternate Firmware Servers.
The right−panel Alternate Firmware Servers view displays a list of any configured alternate servers.
3. Click Add Server to open the Add Alternate Firmware Server window where you can configure a
new alternate server:
a. Enter the IP address of the workstation where the TFTP or FTP server is running.
b. Enter an Identifier −− a description that helps you identify the alternate server.
c. Enter the Server Root Path. The root directory is the base directory to which the server is
allowed access. The server will be allowed to create files to or read files from this directory
and any of its subdirectories. Keep in mind the following requirements when setting the
server root path:
• If your server is configured with a root directory, it must match the root directory
entered here.
• If your server is not configured with a root directory, specify the root directory here
as the root of the drive (e.g. C:\ or D:\).
d. Specify the transfer protocol for the alternate server.
e. The required connection information changes depending on your selected transfer protocol.
• For TFTP, specify the port number your TFTP server is configured to run on.
• For FTP, specify the port number your FTP server is configured to run on. Select the
Anonymous checkbox if your FTP server is configured to accept Anonymous logins;
Inventory Manager will automatically fill in the username and password fields.
Otherwise, enter your username and password to access the FTP server. If you select
the Hide Password checkbox, your password will be replaced with asterisks when it
is typed in.
4. To edit an alternate server, select a server in the list and click Edit Server. The Edit Alternate
How to Set Up Alternate Firmware Download Servers
112
Welcome to NetSight Inventory Manager Help
Firmware Server window opens where you can edit certain server properties.
5. To remove a server, select a server and click Remove Server.
6. Click OK to set options and close the window. Click Apply to set options and leave the window
open.
After you have configured your alternate servers, you must create and assign firmware records, and associate
them with the alternate servers. See the instructions below for more information.
Creating and Assigning Firmware Records
Before you can use an alternate firmware server to perform remote firmware downloads, you need to create
the firmware records associated with the alternate server and add them to the Inventory Manager database.
Use the Create Firmware Record window to create the new firmware entries and associate them with your
configured alternate servers.
When you create a firmware record, it is added to the Unknown folder and the All Firmware folder in the
Firmware Mgmt tab. You will need to use the Assign Firmware window to assign the record (firmware image)
to one or more product families or device types. After assigning the firmware,
you must configure your remote devices to use the alternate server when performing download operations (see
Setting the Firmware Server below) in order to see these images listed in the Firmware Upgrade Wizard. This
enables you to download the image to your remote network devices of that family or type, using the Firmware
Upgrade Wizard or the Boot PROM Upgrade Wizard.
1. Select the All Firmware folder in the left−panel Firmware Mgmt tab and select Tools > Create
Firmware Record, or right−click the All Firmware folder and select Create Firmware Record from
the menu. (You must have a configured alternate firmware server for this menu option to be
available.) The Create Firmware Record window opens.
2. Use the radio buttons at the top of the window to specify whether the image is a firmware or boot
PROM image.
3. In the Image file name field, enter the name of the firmware or boot PROM image as it appears in the
image directory.
4. In the Image directory path field, enter the path to the location where the image is stored.
5. The table at the bottom of the window lists your configured alternate firmware download servers.
Select the appropriate server for the firmware record: the image directory path must exist under the
server root path. If you select multiple servers, be sure that the same image type, file name, and
directory path are used on all selected servers. Individual firmware records will be created for each
selected server.
6. Click OK to create the firmware record and close the window. Click Apply to create the record and
leave the window open, allowing you to create more firmware records. The firmware records are
added to the Unknown folder and the All Firmware folder in the Firmware Mgmt tab.
7. Assign the firmware record to the appropriate product families or device types.
a. Expand the Unknown folder in the left−panel Firmware Mgmt tab. Select the firmware or
boot PROM image, then select Tools > Assign Firmware. You can also right−click on the
image, and select Assign Firmware from the menu. The Assign Firmware window opens.
b. In the Device Type list, select the families and/or individual device types where you want to
assign the image. You can select multiple product families or device types using the Ctrl or
Shift keys.
c. Click OK to assign the image to the selected product families and/or device types and close
the window.
Creating and Assigning Firmware Records
113
Welcome to NetSight Inventory Manager Help
After you have configured your alternate servers, and created and assigned your firmware records, you must
specify which alternate firmware download server is to be used by a device group or by individual devices.
See the instructions below for more information.
Setting the Firmware Server
Before you can use an alternate firmware server to perform remote firmware downloads, you must configure
your remote devices to use the alternate server when performing download operations. All devices are initially
configured to use the mapped file transfer server (as configured in the Services for NetSight Server view of
the Options window) for firmware downloads. By specifying an alternate firmware download server, you can
enable a remote device to use a server in its own local network.
Use the Set Firmware Server window to specify which firmware download server a device will use when
performing firmware downloads. You can set the firmware server for a single device, multiple devices, or a
device group.
1. Select a single device or device group in the left−panel Network Elements tab or multiple devices in a
right−panel Details View tab, then select Tools > Alternate Firmware Server from the menu bar.
You can also right−click a device or device group and select the Alternate Firmware Server option
from the menu. The Set Firmware Server window opens.
2. Use the drop−down list to select the IP address of the firmware download server you would like used
for the selected device(s). The drop−down list displays all the alternate servers that match the file
transfer method set for the device(s). All devices are initially configured with TFTP as their file
transfer method, until specified otherwise. For more information, see How to Set a File Transfer
Method.
3. Click OK to set the server and close the window.
After you have configured your alternate servers, created and assigned your firmware records, and set your
firmware server using these instructions, you will be ready to perform firmware downloads using your
alternate firmware download servers. For information on performing downloads, see the Firmware Upgrade
Wizard or the Boot PROM Upgrade Wizard.
Setting the Firmware Server
114
FTP Server Setup
Before you can perform Inventory Manager archive operations or firmware/boot PROM upgrades using an
FTP server, you must configure your FTP server properties and login information When you install Inventory
Manager, FTP server properties are configured according to certain default settings. Use the Options window
to verify these settings and make any required changes, and enter your FTP server login information.
Inventory Manager uses the default tftpboot\firmware\images directory for storing your firmware. Once you
have placed your firmware images in this directory, you must perform a firmware discovery to display them in
the left−panel Firmware Mgmt tab. If you are using a different directory for storing firmware, you must
specify the directory in the Options window FTP Transfer Settings view.
In addition, all devices are initially configured with TFTP as their file transfer method, so you must change
the devices' file transfer method to FTP.
NOTE: Refer to How to Set Up Alternate Firmware Download Servers for information on
configuring alternate servers to perform remote firmware downloads.
Instructions on:
• Configuring FTP Server Properties and Login Information
• Changing Your Firmware Directory
• Setting Your File Transfer Method to FTP
Configuring FTP Server Properties
and Login Information
Use these instructions to specify the FTP server IP address, set paths to the root and firmware directories, and
set login information. The FTP server needs access to these directories in order to perform archive operations
or firmware/boot PROM upgrades.
1. Select Tools > Options in the menu bar. The Options window opens.
2. In the left−panel tree under the Inventory Manager folder, expand the File Transfer Settings folder
and select FTP Transfer Settings. The right−panel FTP Transfer Settings view is displayed.
3. Select the Use the NetSight Server's IP checkbox, or use the FTP Server IP field to enter the IP
address of the device where the FTP server resides.
4. Enter the port number your FTP server is configured to run on.
5. Specify the Root Directory Path. The root directory is the base directory to which the FTP server is
allowed access. The FTP server will be allowed to create files to or read files from this directory and
any of its sub−directories. The default root directory is the tftpboot directory that Inventory Manager
automatically creates when it is installed. If you would like to use a different root directory, enter a
path to that directory in this field, or use the Browse button to navigate to the directory.
NOTE: Keep in mind the following requirements when setting the path
to your root directory:
• If your FTP server is configured with an FTP root
directory, it must match the root directory entered here.
• If your FTP server is not configured with an FTP root
directory, change the FTP root directory here to the
FTP Server Setup
115
Welcome to NetSight Inventory Manager Help
root of the drive (e.g. C:\ or D:\).
• If you are using an FTP server on a remote system,
use the Universal Naming Convention (UNC) when
specifying the root directory path. The UNC
convention uses two slashes // (UNIX or Linux
systems) or backslashes \\ (Windows systems) to
indicate the name of the system, and one slash or
backslash to indicate the path within the computer. For
example, on a Windows system, instead of using
h:\ (where h:\ is mapped to the tftpboot directory
on the remote drive)
use
\\yourservername\tftpboot\
6. Specify the Firmware Directory Path. The default firmware directory is tftpboot\firmware\images.
If you would like to use a different firmware directory, enter a path to that directory in this field, or
use the Browse button to navigate to the directory. The firmware directory must be a sub−directory of
the root directory. (The firmware images stored in the firmware directory are added to the left−panel
Firmware Mgmt tree when you perform a firmware discovery.) If you are using an FTP server on a
remote system, be sure to use the UNC standard described in the Note above when specifying the
path.
7. Specify your FTP Server login information. Select the Anonymous checkbox if your FTP server is
configured to accept Anonymous logins. (Inventory Manager will automatically fill in the username
and password fields.) Otherwise, enter your username and password to access the FTP server. For
increased security, select the Hide Password checkbox and your password will be replaced with
asterisks when it is typed in.
8. Click OK to set options and close the window. Click Apply to set options and leave the window
open.
Changing Your Firmware Directory
If you want to change the directory for storing your firmware, you must change the FTP server properties
using the FTP Transfer Settings view in the Options window.
1. Select Tools > Options in the menu bar. The Options window opens.
2. In the left−panel tree under the Inventory Manager folder, expand the File Transfer Settings folder
and select FTP Transfer Settings. The right−panel FTP File Transfer Settings view is displayed.
3. Enter the path to the new directory in the Firmware Directory Path field, or use the Browse button
to navigate to the directory. The firmware directory must be a sub−directory of the root directory. If
you are using an FTP server on a remote system, be sure to use the UNC standard described in the
Note above when specifying the path.
4. Click OK to set options and close the window.
Setting Your File Transfer Method to FTP
You can set a file transfer method for a specific device, or specify a default transfer method for an entire
device type using the File Transfer Method window. Once you have specified the file transfer method for a
Changing Your Firmware Directory
116
Welcome to NetSight Inventory Manager Help
device, all archive save and restore operations and firmware/boot PROM upgrades on that device will be
performed using the specified method. All devices are initially configured with TFTP as their file transfer
method, until specified otherwise using these windows. For complete instructions, see How to Set a File
Transfer Method.
Changing Your Firmware Directory
117
TFTP Server Setup
Inventory Manager provides the NetSight TFTP service to download firmware and boot PROM images to
network devices, and save and restore device configurations. You can enable and start this TFTP service
during installation, and specify the path to the TFTP root directory, if necessary. (For more information, see
Installation, NetSight Services.) After you've installed Inventory Manager, you can use the Options window to
enable or disable the automatic launch of the TFTP service, and configure TFTP server properties.
The NetSight TFTP service is installed on the server as part of the Client/Server configuration. In addition, a
NetSight TFTP service is also installed as part of a Client−Only configuration. This client−side NetSight
TFTP service can be used to provide alternate firmware download capability for remote devices.
If you are using a TFTP server other than the one provided with Inventory Manager, use the Options window
Services for NetSight Server view to configure the correct server properties.
Inventory Manager uses the default tftpboot\firmware\images directory for storing your firmware. Once you
have placed your firmware images in this directory, you must perform a firmware discovery to display them in
the left−panel Firmware Mgmt tab. If you are using a different directory for storing firmware, you must
specify the directory in the Options window TFTP Transfer Settings view.
NOTE: Refer to How to Set Up Alternate Firmware Download Servers for information on
configuring alternate TFTP servers to perform remote firmware downloads.
Instructions on:
• Enabling the NetSight TFTP Service
• Configuring the NetSight TFTP Service
• Using a Different TFTP Server
• Changing Your Firmware Directory
• Configuring the NetSight TFTP Service on a Client
Enabling the NetSight TFTP Service
Use the Services for NetSight Server view in the Options window to enable (or disable) the automatic launch
of the NetSight TFTP Service. (You can also enable the NetSight TFTP service during installation.) When
you enable the NetSight TFTP service, it runs in the background on the workstation. The service starts
automatically by default, and if you shut down and restart the workstation, the service is restarted
automatically.
1. Select Tools > Options in the menu bar. The Options window opens.
2. In the left−panel tree, expand the Suite folder, and select Services for NetSight Server.
3. Select the Automatic Launch checkbox for the NetSight TFTP service. You must configure certain
TFTP server properties when you are using the NetSight TFTP server (see below).
4. Click OK to set the options and close the window.
TFTP Server Setup
118
Welcome to NetSight Inventory Manager Help
Configuring the NetSight TFTP Service
When you install Inventory Manager, TFTP server properties are configured with the default settings for the
NetSight TFTP service. Use the following instructions to verify these settings and make any desired changes.
1. Select Tools > Options in the menu bar. The Options window opens.
2. In the left−panel tree, expand the Suite folder, and select Services for NetSight Server.
3. Specify the Root Directory Path. The root directory is the base directory to which the TFTP server is
allowed access. The TFTP server will be allowed to create files to or read files from this directory and
any of its sub−directories. The default root directory is the tftpboot directory that Inventory Manager
automatically creates when it is installed. If you would like to use a different root directory, enter a
path to that directory in this field, or use the Browse button to navigate to the directory.
NOTE: Changing the TFTP root directory requires restarting the TFTP server.
4. If your system is configured with multiple IP addresses, enter the appropriate IP address in the TFTP
Server IP Address field.
5. Click Apply to set the options and leave the window open.
6. In the left−panel tree, expand the Inventory Manager folder and the File Transfer Settings folder, and
select TFTP Transfer Settings.
7. Specify the Firmware Directory Path. The default firmware directory is tftpboot\firmware\images.
If you would like to use a different firmware directory, enter a path to that directory in this field, or
use the Browse button to navigate to the directory. The firmware directory must be a subdirectory of
the root directory. (The firmware images stored in the firmware directory are added to the left−panel
Firmware Mgmt tree when you perform a firmware discovery.)
8. Click OK to set the options and close the window.
Using a Different TFTP Server
If you are using a TFTP server other than the NetSight TFTP service, use the following instructions to
configure your TFTP server properties.
1. Select Tools > Options in the menu bar. The Options window opens.
2. In the left−panel tree, expand the Suite folder, and select Services for NetSight Server.
3. If necessary, disable the NetSight TFTP service by deselecting the Automatic Launch checkbox for
the NetSight TFTP service.
4. Configure your TFTP settings.
a. Specify the Root Directory Path. The root directory is the base directory to which the TFTP
server is allowed access. The TFTP server will be allowed to create files to or read files from
this directory and any of its sub−directories. The default root directory is the tftpboot
directory that Inventory Manager automatically creates when it is installed. If you would like
to use a different root directory, enter a path to that directory in this field, or use the Browse
button to navigate to the directory. Changing the TFTP root directory requires restarting the
TFTP server.
NOTE: Keep in mind the following requirements when setting
the path to your root directory:
−− If your TFTP server is configured with a TFTP
root directory, it must match the root directory entered
here.
Configuring the NetSight TFTP Service
119
Welcome to NetSight Inventory Manager Help
−− If your TFTP server is not configured with a
TFTP root directory, change the TFTP root directory
here to the root of the drive (e.g. C:\ or D:\).
−− If you are using a TFTP server on a remote
system, use the Universal Naming Convention (UNC)
when specifying the root directory path. The UNC
convention uses two slashes // (UNIX or Linux
systems) or backslashes \\ (Windows systems) to
indicate the name of the system, and one slash or
backslash to indicate the path within the computer. For
example, on a Windows system, instead of using
h:\ (where h:\ is mapped to the tftpboot
directory on the remote drive)
use
\\yourservername\tftpboot\
b. If the TFTP server resides on a remote system, or if the local system is configured with
multiple IP addresses, enter the IP address for the TFTP service in the TFTP Server IP
Address field.
5. Click Apply to set the options and leave the window open.
6. In the left−panel tree, expand the Inventory Manager folder and the File Transfer Settings folder, and
select TFTP Transfer Settings.
7. Specify the Firmware Directory Path. The default firmware directory is tftpboot\firmware\images.
If you would like to use a different firmware directory, enter a path to that directory in this field, or
use the Browse button to navigate to the directory. The firmware directory must be a sub−directory of
the root directory. (The firmware images stored in the firmware directory are added to the left−panel
Firmware Mgmt tree when you perform a firmware discovery.) If you are using a TFTP server on a
remote system, be sure to use the UNC standard described in the Note above when specifying the
path.
8. Click OK to set the options and close the window.
Changing Your Firmware Directory
The default firmware directory is tftpboot\firmware\images. If you want to change the directory for storing
your firmware, you must change the TFTP server properties using the TFTP Transfer Settings view in the
Options window. The firmware images stored in the firmware directory are added to the left−panel Firmware
Mgmt tree when you perform a firmware discovery.
1. Select Tools > Options in the menu bar. The Options window opens.
2. In the left−panel tree, expand the Inventory Manager folder and the File Transfer Settings folder, and
select TFTP Transfer Settings.
3. Enter the path to the new directory in the Firmware Directory Path field, or use the Browse button
to navigate to the directory. The firmware directory must be a sub−directory of the root directory. If
you are using a TFTP server on a remote system, be sure to use the UNC standard described in the
Note above when specifying the path.
4. Click OK to set options and close the window.
Changing Your Firmware Directory
120
Welcome to NetSight Inventory Manager Help
Configuring the NetSight TFTP Service on a Client
A NetSight TFTP service is installed on a client workstation as part of the Client−Only configuration. This
client−side NetSight TFTP service provides an alternate firmware download capability for remote devices. It
allows a remote client to perform a firmware download without having to reconfigure the default NetSight
TFTP server settings.
1. On the remote client, select Tools > Options in the menu bar. The Options window opens.
2. In the left−panel tree, expand the Inventory Manager folder and select Services for NetSight Client.
(This view is only available for clients connected to a remote server.)
3. Configure your TFTP settings.
a. Specify the Root Directory Path. The root directory is the base directory to which the TFTP
server is allowed access. The TFTP server will be allowed to create files to or read files from
this directory and any of its sub−directories. The default root directory is the tftpboot
directory that Inventory Manager automatically creates when it is installed. If you would like
to use a different root directory, enter a path to that directory in this field, or use the Browse
button to navigate to the directory.
NOTE: Changing the TFTP root directory requires restarting the TFTP server.
b. If your workstation is configured with multiple IP addresses, enter the appropriate IP address
in the TFTP Server IP Address field.
4. If desired, select the Automatic Launch checkbox for the NetSight TFTP service.
5. Click OK to set options and close the window.
6. The client−side NetSight TFTP server must be configured as an alternate server before it can be used
to download firmware. Refer to How to Set Up Alternate Firmware Download Servers for complete
instructions.
Configuring the NetSight TFTP Service on a Client
121
How to Stop and Start the NetSight Server
This Help topic provides steps for manually stopping and starting the NetSight server.
Instructions on:
• Stopping and Starting the Server on Solaris
• Stopping and Starting the Server on Linux
• Stopping and Starting the Server on Windows
Stopping and Starting the Server on Solaris
Stopping the Server
The NetSight Server can be stopped using the command:
<installdir>/server/stopserver.sh
Starting the Server
The NetSight Server can be started using the command:
<installdir>/server/startserver.sh
Stopping and Starting the Server Components
The NetSight Server components (NetSight Database and NetSight Server) can be individually controlled
using their own stop/start/restart scripts:
<installdir>/server/netsightdatabase.sh {start|stop|restart}
<installdir>/server/netsightserver.sh {start|stop|restart}
Stopping and Starting the Server on Linux
When installed as a service on Linux, the NetSight Server can be controlled using tools such as the Red Hat
Service Configuration Tool.
Stopping and Starting the Server on Windows
You can manually stop and start the NetSight Server from the NetSight Services Manager.
1. Go to the Taskbar Notification Area of your desktop (on the lower right of your screen, unless you've
relocated your Taskbar).
2. Right−click the Services Manager icon
.
3. Select the appropriate NetSight Server menu option.
• Stop Server and Database − Stops both the NetSight Server and Database.
How to Stop and Start the NetSight Server
122
Welcome to NetSight Inventory Manager Help
• Stop Server − Stops only the NetSight Server.
• Restart Server − Stops the server and then starts it up again immediately, or just starts the
server if the server is already stopped. If the NetSight Database is not running, it will also be
started.
The color of the arrow on the NetSight Services Manager icon indicates the state of the NetSight Server and
Database:
•
−− A green arrow indicates the NetSight Server and Database are running.
•
−− A yellow arrow indicates the NetSight Database is running but the Server is down.
•
−− A red arrow indicates the NetSight Server and Database are both down.
•
−− An orange arrow indicates the NetSight Server is running but the Database is down. This is an
error condition and requires that you restart both the NetSight Server and Database.
How to Stop and Start the NetSight Server
123
How to Stop and Start
NetSight Services
When you install Inventory Manager, you have the option of enabling NetSight versions of TFTP and BOOTP
(Windows only) services. (See NetSight Services for a description of each service.) When you enable a
NetSight service, it runs in the background on the workstation. The service starts automatically by default, and
if you shut down and restart the workstation, the service is restarted automatically.
After you've installed Inventory Manager, you can use the Tools > Options Services for NetSight Server or
Services for NetSight Client views to enable or disable the automatic launch of these services. For example, if
you did not enable the TFTP service when you installed, you can use the Services view to enable the
automatic startup of the TFTP service.
In addition, there may be times when you want to stop or restart the services manually. For Windows users,
NetSight provides a Services Manager that shows you which of the services are running, and lets you stop,
start, or restart them individually or all at once. You can also stop and start the Services Manager itself.
The instructions below explain how to stop and start the NetSight services and the Services Manager
manually.
Instructions on:
• Stopping and Starting NetSight Services
• Windows
• Solaris
• Linux
• Stopping and Starting the Services Manager (Windows Only)
• Stopping
• Starting
Stopping and Starting NetSight Services
Windows
You can manually start, restart, or stop NetSight services individually or all at once. On a Windows station:
1. Go to the Taskbar Notification Area of your desktop (on the lower right of your screen, unless you've
relocated your Taskbar).
2. Locate the Services Manager icon
and right−click it.
3. Select the appropriate menu option. Menu options that are not currently available for the service(s) are
grayed out.
• Start − Starts a service that is not currently running.
• Restart − Stops a service that is currently running, and starts it up again immediately.
• Stop − Stops a service that is currently running.
• Start enabled services − Starts any services that have been enabled (configured to launch
automatically via selection at installation or in the Services for NetSight Server or Services
How to Stop and Start NetSight Services
124
Welcome to NetSight Inventory Manager Help
for NetSight Client views.)
• Restart running services − Stops all services that are currently running, and starts them up
again immediately.
• Stop running services − Stops all services that are currently running.
• Exit − Stops all currently running services and shuts down the Services Manager.
Solaris
To stop and start the NetSight TFTP service on a Solaris station:
1. Navigate to the etc/rc2.d directory.
2. Type S99NsTftp (the service name), a space, and either stop or start, depending on what you
want to do, and press Enter.
For example, to stop the TFTP service, type:
S99NsTftp stop
and press Enter.
Linux
To stop and start the NetSight TFTP service on all except SuSE Linux platforms:
1. Navigate to the etc/rc2.d directory.
2. Type S99NsTftp (the service name), a space, and either stop or start, depending on what you
want to do, and press Enter.
For example, to stop the TFTP service, type:
S99NsTftp stop
and press Enter.
To stop and start the NetSight TFTP service on the SuSE Linux platform:
1. Navigate to the etc/init.d directory.
2. Type NsTftp (the service name), a space, and either stop or start, depending on what you want
to do, and press Enter.
For example, to stop the TFTP service, type:
NsTftp stop
and press Enter.
Stopping and Starting the
Services Manager (Windows Only)
The NetSight Services Manager runs on the Windows platform only.
Solaris
125
Welcome to NetSight Inventory Manager Help
Stopping
Stopping the Services Manager stops all running NetSight services.
1. Go to the Taskbar Notification Area of your desktop (on the lower right of your screen, unless you've
relocated it).
2. Locate the Services Manager icon
and right click it.
3. Select Exit from the menu.
Starting
Starting the Services Manager starts all NetSight services enabled at installation or via the Tools > Options
Services for NetSight Server or Services for NetSight Client views.
1. From the Start > Programs or All Programs menu, select Startup > NetSight Services Manager.
Stopping
126
How to Track a Device
The Track Device window lets you to track a device based on the device's serial number or MAC address.
This allows you to view a history of device attributes, and monitor any changes made to the device. The Track
Device information is based on the device's archived configuration files −− there will be one table entry for
each saved configuration file.
1. In the left−panel Network Elements tree, select a device and then select Tools > Track Device from
the menu bar. The Track Device window opens and displays information for the selected device. If
you have not performed an archive on that device, the table will be empty and you will see a message
that says "No database entries found."
2. After viewing the results, you can enter a new value and perform another track device operation. In
the Track By field, use the drop−down list to specify whether you want to search for a device by
serial number or MAC address.
3. In the Value field, enter the serial number or MAC address, depending on what you selected in the
Track By field.
4. Click Track to start the track device operation and display the results. The new results will overwrite
the results from the previous tracking operation.
Use the table options and tools to find, filter, sort, print, and export information in a table and customize table
settings. You can access the Table Tools through a right−mouse click on a column heading or anywhere in the
table body, or by clicking the Table Tools
button in the upper left corner of the table (if you have the
row count column displayed). For more information, see Table Tools.
How to Track a Device
127
How to Upgrade Boot PROM
Use the Boot PROM Upgrade Wizard to easily upgrade the boot PROM images on your network devices.
Instructions on:
• Preparing to Upgrade
• Performing an Upgrade
Preparing to Upgrade
There are certain steps you must perform before you can upgrade your boot PROM images. The steps vary
depending on whether you are using a mapped file transfer server (as configured in the Services for NetSight
Server view of the Options window) or an alternate remote file transfer server (as configured in the Alternate
Firmware Servers view in the Options window) to perform the upgrade.
If you are using a mapped file transfer server:
• You must have a TFTP or FTP server configured and running to perform the download operation. See
TFTP Server Setup or FTP Server Setup for instructions.
• Set the file transfer method for the devices you wish to upgrade. See How to Set a File Transfer
Method for instructions.
• Store the boot PROM images that you want to download in the default tftpboot\firmware\images
directory or a specified alternative firmware directory. See TFTP Server Setup or FTP Server Setup
for instructions on changing your firmware directory.
• Discover your firmware/boot PROM images and display them in the Firmware Mgmt tab. See
Firmware Discovery for instructions.
If you are using an alternate remote file transfer server:
• You must have the alternate server configured and running to perform the download operation. See
Configuring the Alternate Server for instructions.
• Set the file transfer method for the devices you wish to upgrade. See How to Set a File Transfer
Method for instructions.
• Store the boot PROM image that you want to download in a specified alternative firmware directory.
• Create firmware records to associate with the alternate server and add them to the Inventory Manager
database. In addition, you must assign the firmware record to the appropriate product families or
device types. See Creating and Assigning Firmware Records for instructions.
• Specify which alternate server a device will use when performing firmware downloads. See Setting
the Firmware Server for instructions.
Once these steps have been performed, you are ready to use the Boot PROM Upgrade Wizard.
NOTE: The Boot PROM Upgrade Wizard can also be used to downgrade boot PROM to a previous
revision. Downgrading boot PROM is inherently risky due to possible feature differences between
revisions. Restoring configurations from different firmware revisions carries the same risk.
Should you need to downgrade your boot PROM to an earlier version, it is recommended that you
use one of the following two procedures:
How to Upgrade Boot PROM
128
Welcome to NetSight Inventory Manager Help
• Downgrade the boot PROM on a network device using the Boot PROM Upgrade Wizard.
Do not proceed to the Reset Devices portion of the wizard, instead select [Finish].
Restore an archived configuration that was previously created with the boot PROM image
being downloaded. This will reset the device.
or
• Downgrade the boot PROM on a network device using the Boot PROM Upgrade Wizard.
Complete the downgrade using the wizard Reset Devices screens. Clear NVRAM on the
device and reconfigure the network configuration parameters of the device using the local
console.
In addition, when downgrading boot PROM on SNMPv3 devices, it is possible that Inventory
Manager will lose contact with the device. SNMPv3 adds a level of difficulty to downgrade
operations, because counters and timers related to security features of SNMPv3 may get out of
sync. Following the downgrade, you will need to restart Inventory Manager to re−establish
contact with the device.
CAUTION: Prior to upgrading boot PROM on a device, it is recommended that you archive the latest
configuration for the device being upgraded. This will aid you in downgrading should you
choose to do so.
Performing an Upgrade
Use these steps to upgrade boot PROM. Be sure to perform the steps in Preparing to Upgrade before
beginning the upgrade operation
NOTE: During the device reset, Inventory Manager learns the current boot PROM version
installed on the device. Inventory Manager uses this information to determine whether
the boot PROM version installed on the device matches the boot PROM reference image
set for the device's binary family. (This information is displayed in the All Devices
Details View tab.) If the version number is not available from an image file, you can
manually set the version number in the Firmware Image General Tab.
1. Select Tools > Wizards > Boot PROM Upgrade Wizard from the menu bar or click
on
the toolbar. The Boot PROM Upgrade Wizard opens.
2. Select the devices to upgrade:
a. Expand the folders under the left−panel tree and select the single device or device group, or
multiple devices or device groups (using the Control or Shift keys). Click Add.
NOTE: If you have multiple tree nodes representing the same device but with varying
SNMP contexts, keep in mind that not all device contexts will provide access to
the MIBs required to perform the operation. When selecting your devices, make
sure that any device with SNMP context has access to the required MIBs, or
select the device with default context (switch mode).
b. The devices are listed in the Selected Devices table. Devices that do not support the boot
PROM upgrade operation, or have never been contacted, are not listed. If you want to remove
a device from the list, select the device and click Remove.
c. Click Next.
TIP: If you open the Boot PROM Upgrade Wizard from a device or device group in the
Performing an Upgrade
129
Welcome to NetSight Inventory Manager Help
left−panel Network Elements tab, the selected device(s) will be automatically
displayed under Selected Devices.
3. Assign a boot PROM to each device type or family:
a. If necessary, click the Refresh Images button to perform a firmware discovery and update
the list of boot PROM images.
b. Select a family/device type in the left−panel Assignments table.
c. In the right−panel, select a boot PROM image and use the Assign to: arrows to assign the
image to the device type or to each entry that is a member of that binary family. The image
will appear in the Image Name column in the Assignments table. You must assign an image
to each table entry.
d. Before proceeding with the upgrade, verify that boot PROM and firmware images that will be
on the device after the upgrade operation are compatible. Refer to the boot PROM and
firmware release notes for more information.
e. Click Next.
4. Initiate the Boot PROM Upgrade operation:
a. Specify the Download Type option. The downloads will be performed in parallel
(simultaneously) on the number of devices specified in the Groups of field. Enter the value 1
to have the downloads performed serially, one device after another.
b. Click Start to initiate the boot PROM upgrade operation. The table at the top of the window
will update with status information as will the status area in the bottom left of the screen.
c. Review results. An alert icon
will appear in the Alert column of the table if a download
fails for the specific device. You can select to show all devices or show only those that are
incomplete or have failed.
d. Click Next.
5. Reset devices that support Timed Reset:
If you are resetting devices that support Timed Reset, you will see a window listing those
devices. Timed Reset gives you the flexibility to set up your reset operation with a time delay, so that
the actual device resets take place at a later time. This can be useful when trying to schedule resets for
a time when the network is least busy.
a. In the Selected column, select the devices that you want to reset. You can select an option to
display devices that do not support timed reset and devices that failed the firmware upgrade;
however, these devices cannot be reset from this window.
b. Enter the reset delay. This is the amount of time (in seconds) until the device resets after the
reset operation begins. For example, if you start the reset operation at 4:00 pm with a 7 hour
reset delay (420 seconds), the device(s) will reset at 11:00 pm. This allows you to schedule
your resets for a time when the network is least busy.
c. Select the reset type: Warm boot (restarts the device) or Cold boot (same as turning device
power off and on).
d. Click Start to initiate the timed resets. Once the devices are back up, click Refresh to see if
the new boot PROM is running.
6. Reset devices that do not support Timed Reset:
If you are resetting devices that do not support Timed Reset, you will see a window listing those
devices.
a. In the Selected column, select the devices that you want to manually reset.
b. Select the reset type: Warm boot (restarts the device) or Cold boot (same as turning device
power off and on).
c. Click Start to initiate the manual resets. Resets occur one at a time, continuing only after a
device is fully booted.
d. After the reset operation is completed, click Refresh to see if the devices are running the new
boot PROM.
Performing an Upgrade
130
Welcome to NetSight Inventory Manager Help
7. Click Finish to close the wizard.
Performing an Upgrade
131
How to Upgrade Firmware
Use the Firmware Upgrade Wizard to easily upgrade the firmware images on your network devices. The
wizard gives you the flexibility of performing an immediate upgrade or scheduling the upgrade to take place
at a later time. If you schedule the upgrade, the wizard will automatically perform the upgrade at the
scheduled time, and then alert you that the upgraded devices need to be reset via the Reset Wizard.
Instructions on:
• Preparing to Upgrade
• Performing an Upgrade
• Scheduling an Upgrade
• Viewing Scheduled Upgrades
• Canceling a Scheduled Upgrade
Preparing to Upgrade
There are certain steps you must perform before you can upgrade your firmware. The steps vary depending on
whether you are using a mapped file transfer server (as configured in the Services for NetSight Server view of
the Options window) or an alternate remote file transfer server (as configured in the Alternate Firmware
Servers view in the Options window) to perform the upgrade.
If you are using a mapped file transfer server:
• You must have a TFTP or FTP server configured and running to perform the download operation. See
TFTP Server Setup or FTP Server Setup for instructions.
• Set the file transfer method for the devices you wish to upgrade. See How to Set a File Transfer
Method for instructions.
• Store the firmware images that you want to download in the default tftpboot\firmware\images
directory or a specified alternative firmware directory. See TFTP Server Setup or FTP Server Setup
for instructions on changing your firmware directory.
• Discover your firmware images and display them in the Firmware Mgmt tab. See Firmware
Discovery for instructions.
If you are using an alternate remote file transfer server:
• You must have the alternate server configured and running to perform the download operation. See
Configuring the Alternate Server for instructions.
• Set the file transfer method for the devices you wish to upgrade. See How to Set a File Transfer
Method for instructions.
• Store the firmware images that you want to download in a specified alternative firmware directory.
• Create firmware records to associate with the alternate server and add them to the Inventory Manager
database. In addition, you must assign the firmware record to the appropriate product families or
device types. See Creating and Assigning Firmware Records for instructions.
• Specify which alternate server a device will use when performing firmware downloads. See Setting
the Firmware Server for instructions.
NOTE: The Firmware Upgrade Wizard can also be used to downgrade firmware to a previous revision.
Downgrading firmware is inherently risky due to possible feature differences between revisions.
How to Upgrade Firmware
132
Welcome to NetSight Inventory Manager Help
Restoring configurations from different firmware revisions carries the same risk. Should you need
to downgrade your firmware to an earlier version, it is recommended that you use one of the
following two procedures:
• Downgrade the firmware on a network device using the Firmware Upgrade Wizard. Do
not proceed to the Reset Devices portion of the wizard, instead select [Finish]. Restore an
archived configuration that was previously created with the firmware image being
downloaded. This will reset the device.
or
• Downgrade the firmware on a network device using the Firmware Upgrade Wizard.
Complete the downgrade using the wizard Reset Devices screens. Clear NVRAM on the
device and reconfigure the network configuration parameters of the device using the local
console.
In addition, when downgrading firmware on SNMPv3 devices, it is possible that Inventory
Manager will lose contact with the device. SNMPv3 adds a level of difficulty to downgrade
operations, because counters and timers related to security features of SNMPv3 may get out of
sync. Following the downgrade, you will need to restart Inventory Manager to re−establish
contact with the device.
CAUTION: Prior to upgrading firmware on a device, it is recommended that you archive the latest
configuration for the device being upgraded. This will aid you in downgrading should you
choose to do so.
Performing an Upgrade
Use these steps to perform a firmware upgrade. These instructions are for performing an immediate upgrade;
to schedule an upgrade for a future time, use the steps in Scheduling an Upgrade. Be sure to perform the steps
in Preparing to Upgrade before beginning the upgrade operation.
NOTE: During the device reset part of the wizard, Inventory Manager learns the current firmware version
installed on the device. Inventory Manager uses this information to determine whether the
firmware version installed on the device matches the firmware reference image set for the device's
binary family. (This information is displayed in the All Devices Details View tab.) If the version
number is not available from an image file, you can manually set the version number in the
Firmware Image General Tab.
1. Select Tools > Wizards > Firmware Upgrade Wizard from the menu bar or click
on the
toolbar. The Firmware Upgrade Wizard opens.
2. Select the devices to upgrade:
a. Expand the folders under the left−panel tree and select the single device or device group, or
multiple devices or device groups (using the Control or Shift keys). Click Add. If there were
devices that failed the previous upgrade an Add Failed button is displayed. Use the Add
Failed button to add those devices to the upgrade.
NOTE: If you have multiple tree nodes representing the same device but with varying
SNMP contexts, keep in mind that not all device contexts will provide access to
the MIBs required to perform the operation. When selecting your devices, make
sure that any device with SNMP context has access to the required MIBs, or
Performing an Upgrade
133
Welcome to NetSight Inventory Manager Help
select the device with default context (switch mode).
b. The devices are listed in the Selected Devices table. Devices that do not support firmware
download or have never been contacted, are not listed. If you want to remove a device from
the list, select the device and click Remove.
c. Click Next.
TIP: If you open the Firmware Upgrade Wizard from a device or device group in the
left−panel Network Elements tab, the selected device(s) will be automatically
displayed under Selected Devices.
3. Assign a firmware image to each device type or family:
a. If necessary, click the Refresh Images button to perform a firmware discovery and update
the list of firmware images.
b. The left panel lists the device types of the devices selected for the firmware upgrade. Select a
device type.
c. The right panel lists firmware images that are compatible with the selected device type.
(Select the Show All Images checkbox to display all your firmware images.) Select a
firmware image and use the Assign to: buttons to assign the image to the device type or to
each entry that is a member of that binary family. The image will appear in the Image Name
column in the Assignments table. You must assign an image to each table entry.
d. Before proceeding with the upgrade, verify that boot PROM and firmware images that will be
on the device after the upgrade operation are compatible. Refer to the boot PROM and
firmware release notes for more information.
e. Click Next.
4. Initiate the Firmware Upgrade operation:
a. Specify the Download Type option. The downloads will be performed in parallel
(simultaneously) on the number of devices specified in the Groups of field. Enter the value 1
to have the downloads performed serially, one device after another.
b. Click Start to initiate the firmware upgrade operation. The table at the top of the window will
update with status information as will the status area in the bottom left of the screen.
c. Review results. An alert icon
will appear in the Alert column of the table if a download
fails for the specific device. You can select to show all devices or show only those that are
incomplete or have failed.
d. Click Next.
5. Reset devices that support Timed Reset:
If you are resetting devices that support Timed Reset, you will see a window listing those devices.
Timed Reset gives you the flexibility to set up your reset operation with a time delay, so that the
actual device resets take place at a later time. This can be useful when trying to schedule resets for a
time when the network is least busy.
a. In the Selected column, select the devices that you want to reset. You can select an option to
display devices that do not support timed reset and devices that failed the firmware upgrade;
however, these devices cannot be reset from this window.
b. Enter the Reset Delay. This is the amount of time (in seconds) until the device resets after the
reset operation begins. For example, if you start the reset operation at 4:00 pm with a 7 hour
reset delay (420 seconds), the device(s) will reset at 11:00 pm. This allows you to schedule
your resets for a time when the network is least busy.
c. Select the reset type: Warm boot (restarts the device) or Cold boot (same as turning device
power off and on).
d. Click Start to initiate the timed resets. Resets occur simultaneously. Once the devices are
back up, click Refresh to see if the new firmware is running.
6. Reset devices that do not support Timed Reset:
Performing an Upgrade
134
Welcome to NetSight Inventory Manager Help
If you are resetting devices that do not support Timed Reset, you will see a window listing those
devices.
a. In the Selected column, select the devices that you want to reset.
b. Select the reset type: Warm boot (restarts the device) or Cold boot (same as turning device
power off and on).
c. Click Start to initiate the resets. Resets occur one at a time, continuing only after a device is
fully booted.
d. After the reset operation is completed, click Refresh to see if the devices are running the new
firmware.
7. Click Finish to close the wizard.
Scheduling an Upgrade
Use these steps to schedule a firmware upgrade to take place in the background at a future time. Be sure to
perform the steps in Preparing to Upgrade before beginning the upgrade operation. Although a scheduled
upgrade runs automatically and does not require your supervision, you will still need to reset any devices that
require reset, once the scheduled upgrades have completed.
1. Select Tools > Wizards > Firmware Upgrade Wizard from the menu bar or click the FW Upgrade
button on the toolbar. The Firmware Upgrade Wizard opens.
2. Select the devices to upgrade:
a. Expand the folders under the left−panel tree and select the single device or device group, or
multiple devices or device groups (using the Control or Shift keys). Click Add. If there were
devices that failed the previous upgrade, use the Add Failed button to add those devices.
b. The devices are listed in the Selected Devices table. Devices that do not support firmware
download or have never been contacted, are not listed. If you want to remove a device from
the list, select the device and click Remove.
c. Click Next.
TIP: If you open the Firmware Upgrade Wizard from a device or device group in the
left−panel Network Elements tab, the selected device(s) will be automatically
displayed under Selected Devices.
3. Assign a firmware image to each device type or family:
a. If necessary, click the Refresh Images button to perform a firmware discovery and update
the list of firmware images.
b. The left panel lists the device types of the devices selected for the firmware upgrade. Select a
device type.
c. The right panel lists firmware images that are compatible with the selected device type.
(Select the Show All Images checkbox to display all your firmware images.) Select a
firmware image and use the Assign to: buttons to assign the image to the device type or to
each entry that is a member of that binary family. The image will appear in the Image Name
column in the Assignments table. You must assign an image to each table entry.
d. Before proceeding with the upgrade, verify that boot PROM and firmware images that will be
on the device after the upgrade operation are compatible. Refer to the boot PROM and
firmware release notes for more information.
e. Click Next.
4. Configure Scheduling Information for the upgrade:
a. In the Download Progress window, click the Schedule button. The Download Schedule
window opens.
b. Enter a name for the scheduled upgrade, or use the default name which is based on the date
the schedule is created.
Scheduling an Upgrade
135
Welcome to NetSight Inventory Manager Help
c. Use the drop−down list to select the month you want the download to start. A calendar
corresponding to the selected month is displayed. Select the desired starting day by clicking
on the calendar. You can use the arrows on either side of the drop−down list to change the
month, and change the year by entering a new year in the text field.
d. Set the starting time for the operation and select AM or PM.
e. The downloads will be performed in parallel (simultaneously) on the number of devices
specified in the Groups of field. Enter the value 1 to have the downloads performed serially,
one device after another.
f. Select the Abort on Failure checkbox to stop the downloads after a failure. This is useful if
you are scheduling an upgrade operation on multiple devices and you want the operation to
stop after a failure on a single device.
g. Click Finish. When the scheduled upgrade is performed, you can monitor the progress, if
desired, via the Active Status panel, just as you do for scheduled archives.
5. Reset Devices:
After the firmware has been upgraded at the scheduled time, a Reset Device icon
is displayed
in the status bar indicating that there are devices that have received new firmware images and need to
be reset. Double−click the icon to open the Devices Need Reset window where you can launch the
Reset Device Wizard for those devices.
Viewing Scheduled Upgrades
You can view pending upgrades using the Scheduled Events window (Tools > Scheduled Events).
Canceling a Scheduled Upgrade
You can cancel a scheduled firmware upgrade using the Scheduled Events window (Tools > Scheduled
Events).
Viewing Scheduled Upgrades
136
How to Use
the BOOTP Service
NOTE: The instructions contained in this Help Topic are for Windows users only. Solaris users
should see their operating system documentation for instructions on using BOOTP and
creating a bootptab file.
The NetSight BOOTP service (available for Windows only) enables the Inventory Manager workstation to
also be a BOOTP server. This allows the workstation to supply devices with firmware images (or other basic
identity information) in the event the device's current firmware image becomes corrupt. You may also choose
to force a device into a BOOTP state in order to have a new firmware image downloaded from the network.
In order for BOOTP to work, you must have a BOOTP and TFTP service set up on the network, and you need
a bootptab file, which provides the basic device information (device name, IP address, and appropriate
firmware image) to the BOOTP service when required.
BOOTP requests are broadcast messages. Routers must be configured to forward BOOTP requests to the
BOOTP service, a process sometimes called IP Helper Addressing. Refer to your X−Pedition Router's User
Reference Manual for information on configuring IP Helper.
TIP: The BOOTP service monitors BOOTP requests on the network. NetSight Console can be configured
to display those requests, which will aid in recovering devices in a BOOTP state.
Creating a Bootptab File
A bootptab file is a simple ASCII text file that contains basic device information (device name, IP address,
and appropriate firmware image) for each device on the network that will use the BOOTP service. You can
use Inventory Manager to create a bootptab file automatically, or create it yourself manually.
Creating a bootptab file automatically
1. In the menu bar, select Tools > Create BOOTP Tab.
2. The Save BOOTP Tab window opens allowing you to save the file in the desired directory.
NOTE: If you are using the NetSight BOOTP service, you must save the bootptab file to the
\NetSight Atlas Shared\bin directory.
3. The bootptab file is automatically created in the selected directory. The file has an entry for every
device (organized by subnet), using the following format:
device1:ht=1:ha=00001da0b0c0:ip=192.168.1.2:bf=image1.hex
device2:ht=1:ha=00001da1b1c1:ip=192.168.1.3:hd=image/path:bf=image2.fls
Description of bootptab file parameters:
• Device host name −− If desired, you can replace the devicex parameter with a unique host
name or, if your devices are registered in a DNS, with the registered host name from the DNS
map.
• ht= −− Specifies the host network type. The value is an unsigned decimal, octal, or
How to Use the BOOTP Service
137
Welcome to NetSight Inventory Manager Help
hexadecimal integer, or a symbolic name. The value "1" represents 10Mb Ethernet (based on
industry standard BOOTP implementation).
• ha= −− Specifies the hardware address (MAC address) that Inventory Manager is using.
• ip= −− Specifies the device's IP address that Inventory Manager is using.
• hd= −− Specifies the home directory path to the image file. This is an optional parameter and
is used when the image file is in a different directory than either the TFTP server's default
directory or root directory path. The home directory is either the absolute path or the offset
from the TFTP server's root path.
• bf= −− Specifies the Reference Image for that device (if set), or the last firmware image
version downloaded to that device through Inventory Manager.
NOTE: In a BOOTP situation, you will need to edit the ha parameter in the file to match
the MAC address in the requesting message, and supply any missing parameters
such as the bf parameter.
Creating a bootptab file manually
Inventory Manager provides a sample bootptab file located in the \NetSight Atlas Shared\bin
directory. Use this file as a template or an example when you create your own bootptab file.
1. Open the sample bootptab file in a text editor.
2. Enter a list of devices using the format provided in the examples at the top of the file.
3. Save the bootptab file in the \NetSight Atlas Shared\bin directory.
NOTE: However you create or modify the bootptab file, remember that the filename must not
have an extension. This is important because most text editors will append their own
default extension on a new file. If you edit an existing bootptab file and do a Save
instead of a Save As, then the filename should stay the same.
How to Use the BOOTP Service
138
Capacity Planning
Inventory Manager's Capacity Planning tool lets you quickly prepare valuable network inventory planning
reports. The tool provides a set of report templates that you can tailor to meet your specific planning needs.
Reports are generated based on your selection of a report template and the associated parameters used to
define the report. Report results can be exported as an HTML file or as a delimited text file. In addition,
Capacity Planning reports can be saved to use again at a later time, and they can also be scheduled to run at
specified intervals with report results sent out via a notification email.
The Capacity Planning tool takes you step−by−step through the process of creating a report. As you move
through the steps, the tool's left panel shows you a summary of your settings. You can click on the bold
headings in the left panel to navigate backward or forward between steps allowing you to change report
parameters. Specific parameters for the current step are defined in the right panel.
The flow chart below shows the sequence of windows that you will encounter when you create a report.
Report Templates
Following is a summary of the different report templates Inventory Manager provides for your planning
purposes. Each template is designed to answer a specific capacity planning question and lets you view report
results organized into different categories. Click each template name below for a complete description of how
to use the tool to create that report.
Report Template
Description
Used/Unused Ports Report
Generate a report on your network front−panel port utilization. Quickly
locate unused ports, and view port details such as port type, speed,
media type and connector type.
Used/Unused Slots Report
Generate a report on your chassis slot utilization to quickly locate
unused slots. View results organized by chassis type and by individual
chassis.
Field Replaceable Units (FRU)
Report
Generate a report on the field replaceable/upgradeable (FRU)
components in your network devices. View descriptions and details on a
variety of FRU types (such as power supplies, submodule, and ports) to
help determine FRU usage.
Component Change Report
Generate a report on the field replaceable/upgradeable (FRU)
components in your network devices that have changed over time. Easily
monitor changes made to your network and verify network upgrades.
Capacity Planning
139
Welcome to NetSight Inventory Manager Help
Chassis Capacity Report
Generate a report on the capacity and usage of certain chassis
components such as submodules, power supplies, and control modules.
View results organized by chassis type or for each individual chassis.
Submodule Capacity Report
Generate a report on your network's submodule capacity and usage.
Determine the number of submodule slots available on your network
devices and the actual number of submodules that are installed. View a
description of each of the installed submodules.
Capacity Planning
140
Chassis Capacity Report
Use the Capacity Planning tool to generate a report on your network chassis utilization. The Show Details on
Chassis Capacity and Utilization report provides valuable information on the capacity and usage of certain
chassis components such as submodules, power supplies, and control modules. You can view report results
organized by chassis type or for each individual chassis. In most cases, the report would be based on current
data from your devices. However, there is the option to collect historical data if you would like to view a
snapshot of your network's chassis usage at an earlier time.
Report results can be exported as an HTML file or as a delimited text file. In addition, Capacity Planning
reports can be saved to use again at a later time, and they can also be scheduled to run at specified intervals
with report results sent out via a notification e−mail.
Flow
The flow chart below shows the sequence of windows that you will encounter when you create a Chassis
Capacity report using the Capacity Planning tool. As you progress through the steps of creating a report, the
tool's left panel shows you a summary of your selections. You can click on the bold headings in this panel to
navigate backward or forward between steps allowing you to change your report parameters. The summary
information associated with each step appears in plain typeface beneath each step heading.
Click on blocks in the flow chart for more information about a specific window.
Select Report Window
Use this window to select either a report template or a saved report as your report type. Report templates are
based on common network capacity planning questions. After you have created a report using one of the
templates, you can save it (as a Saved Report) to use again at a later time. To create your Chassis Capacity
report, select the "Show details on chassis capacity and utilization" report template.
Click the graphic for more information.
Chassis Capacity Report
141
Welcome to NetSight Inventory Manager Help
Report Templates
Lists the available report templates. Each report template is designed to answer a specific capacity
planning question.
Saved Reports
Lists all your saved reports including reports saved by other Inventory Manager clients connected to
the server. After you have created a report using a template, you can save it as a Saved Report, by
clicking the Save button. This allows you to save specific report attributes and parameters, so that you
can regenerate the same report at a later time. The schedule icon
indicates that a saved report has
been scheduled. You can remove a schedule from a saved report by right−clicking on the report and
selecting Delete > Schedule.
Delete Button
Deletes any report selected in the Saved Reports list.
Schedule Button
When you have selected a saved report in the Saved Reports list, this button opens the Schedule
Report window where you can configure scheduling information and notification settings for the
report.
Chassis Capacity Report
142
Welcome to NetSight Inventory Manager Help
Select Targets Window
Use this window to select the target devices for your report and add filters to further refine the list of devices,
if desired. For example, you could target the Chassis device group, but filter out a single chassis you don't
want included in the report. Or, you could target the Chassis device group, and filter in just one specific
chassis type. Once you have made your selections, you can view a list of the devices you have targeted for
your report to verify that your targets are correct.
Click the graphic for more information.
Targets
This panel displays your Network Elements tree. Expand the tree to select the target device group or
individual device for your report. In most cases, you will want to target a group of chassis for this
report. Devices that do not reside in a chassis will not generate any report results.
Applied Filters
Lists any filters applied to your selected targets. Click the Add Filters button to open the Add Filters
window and create your filters.
Filter In Type
If you have defined one or more "Filter In" filters, select how you want the filters to work:
Select Targets Window
143
Welcome to NetSight Inventory Manager Help
• Match Any − A device can match any of the filter−in filters to be included as a target. For
example, if you have selected the Grouped By device group and you filter in the 6C105
device group and the 6C107 device group, any device that is in the 6C105 or 6C107 device
group will be included as a target.
• Match All − A device must match all of the filter−in filters to be included as a target. For
example, if you have targeted the Grouped By device group and you filter in the Floor One
device group and the Chassis device group, any device that is on Floor One and in the
Chassis device group will be included as a target.
Number of Devices
A running total of the number of target devices with filters applied. Click View Devices to view a list
of the target devices.
Add Filters Button
Opens the Add Filters window, where you can create filters to further qualify the list of devices for
your report.
Clear Filters Button
Deletes any filters selected in the Applied Filters list.
View Devices Button
Opens the View Devices window where you can see a list of the selected devices that will be included
in your report.
Specify Time Window
Use this window to select a date from which report data will be gathered. In most cases, you will want to
generate the report using current data. However, you can also generate a report based on historical data. In
that case, the report will be generated using device data saved in the last archive preceding the specified date.
Only archive operations that are configured to archive capacity planning data will be used (see How to
Archive for more information.)
Click the graphic for more information.
Specify Time Window
144
Welcome to NetSight Inventory Manager Help
Use data collected as of
Report data will be collected based on the date selected here. Calculations are based on the last
archive preceding the specified date. Only archive operations that are configured to archive capacity
planning data will be used. If there is no archive for a target device, that device will not be
represented in the report results.
Retrieve current data from devices
The report will use current data from the target devices. Because this requires the report to gather
current data from the devices, extra time may be needed when results are calculated.
Chassis Results Window
Use this window to view the report data. The radio buttons at the top of the right panel let you select various
ways to display the report results:
• Summary by Chassis (% utilization) −− reports the percentage of chassis components that are
installed, summarized by chassis type or by individual chassis.
• Summary by Chassis (average) −− reports the average of the number of chassis components that are
installed, summarized by chassis type or by individual chassis.
• FRU Details −− reports detailed information on the field replaceable/upgradeable (FRU) chassis
components, for each individual chassis.
Chassis Results Window
145
Welcome to NetSight Inventory Manager Help
Your selection in the tree determines the results displayed in the table. As you change your selection in the
tree, the table is updated with the results for your specific selection. If you have targeted a device that does not
reside in a chassis, that device will not be represented in the report results.
Chassis Results − Summary by Chassis (% utilization)
The Summary by Chassis (% utilization) view provides data on the percentage of chassis components that are
installed. For example, if a chassis has the capacity for two Control Modules but there is only one Control
Module installed, the Control Module column in the results table will display 50%. You can view the report
results summarized by chassis type, by individual chassis, or by individual device.
Click the graphic for more information.
Display
Use these radio buttons to select how you would like the results data displayed.
Target Device Tree
Displays your target groups and devices. Your selection in the tree determines what results data will
be displayed in the table. For example, select a chassis group to see results summarized by chassis
type, or select an individual chassis to see results for just that chassis. When you change your
selection in the tree, the table is updated with the relevant information. If you select an individual
Chassis Results Window
146
Welcome to NetSight Inventory Manager Help
device in the target device tree, the information displayed pertains to the chassis the device resides in,
except for the Submodules column which reports information for the individual device.
Device Count, Sufficient Data
The total number of target devices, followed by the number of devices with sufficient data to report
results. If you generated the report using historical data, a device is counted as having sufficient data
if there is one archive used to obtain report results. Target devices that do not reside in chassis will be
counted as having insufficient data.
Table
The Summary by Chassis (% utilization) table displays data by chassis type or for an individual chassis. In
most cases, your report will be generated using current data. However, if you generated your report based on
historical data, the report will use device data saved in the last archive preceding the specified date. If there is
no archive for a target device or the device does not reside in a chassis, that device will not be represented in
the report results.
NOTE: Devices that do not support certain components will display "Unsupported" in the results table
entry. If a chassis displays "Not Mapped" in its results table entry, it indicates that the device type
is not in the Capacity Planning data file. If you encounter the "Not Mapped" entry, please contact
Global Support for an updated data file for these devices.
Type
The chassis model number or hardware type.
Submodules
The percentage of submodules installed (based on the installed modules) in the selected chassis type,
chassis, or individual device.
Control Modules
The percentage of control modules installed in the selected chassis type or chassis.
Slots
The percentage of available slots being used in the selected chassis type or chassis.
Fans
The percentage of fans installed in the selected chassis type or chassis.
Power Supplies
The percentage of power supplies installed in the selected chassis type or chassis.
Fabric Modules
The percentage of fabric modules installed in the selected chassis type or chassis.
Chassis Results − Summary by Chassis (average)
The Summary by Chassis (average) view provides data on the average number of chassis components that are
installed in your network chassis devices. Use this top−level information to quickly determine where to take a
closer look using the FRU Details view.
Chassis Results Window
147
Welcome to NetSight Inventory Manager Help
Click the graphic for more information.
Display
Use these radio buttons to select how you would like the results data displayed.
Target Device Tree
Displays your target groups and devices. Your selection in the tree determines what results data will
be displayed in the table, however, this view is most useful when a chassis group is selected. If you
select an individual device in the target device tree, the information displayed pertains to the chassis
the device resides in, except for the Submodules column which reports information for the individual
device.
Device Count, Sufficient Data
The total number of target devices, followed by the number of devices with sufficient data to report
results. If you generated the report using historical data, a device is counted as having sufficient data
if there is one archive used to obtain report results. Target devices that do not reside in chassis will be
counted as having insufficient data.
Table
The Summary by Chassis (average) table displays data by chassis type or for an individual chassis, but the
Chassis Results Window
148
Welcome to NetSight Inventory Manager Help
view is most useful at the chassis type level. In most cases, your report will be generated using current data.
However, if you generated your report based on historical data, the report will use device data saved in the last
archive preceding the specified date. If there is no archive for a target device, or the device does not reside in
a chassis, that device will not be represented in the report results.
Type
The chassis model number or hardware type.
Submodules
The average number of submodules installed in the selected chassis type.
Control Modules
The average number of control modules installed in the selected chassis type.
Slots
The average number of slots being used in the selected chassis type.
Fans
The average number of fans installed in the selected chassis type.
Power Supplies
The average number of power supplies installed in the selected chassis type.
Fabric Modules
The average number of fabric modules installed in the selected chassis type.
Chassis Results − FRU Details
The FRU Details view gives you detailed information on the field replaceable/upgradeable (FRU) chassis
components for each individual chassis.
Click the graphic for more information.
Chassis Results Window
149
Welcome to NetSight Inventory Manager Help
Display
Use these radio buttons to select how you would like the results data displayed.
Target Device Tree
Displays your target groups and devices. Your selection in the tree determines what results data will
be displayed in the table. For example, select a chassis group to see results for all the chassis in the
group, or select an individual chassis to see results for just that chassis. When you change your
selection in the tree, the table is updated with the relevant information. If you select an individual
device in the target device tree, the information displayed pertains to the chassis the device resides in,
except for the Submodule Capacity and Submodules Installed columns which report information for
the individual device.
Device Count, Sufficient Data
The total number of target devices, followed by the number of devices with sufficient data to report
results. If you generated the report using historical data, a device is counted as having sufficient data
if there is one archive used to obtain report results. Target devices that do not reside in chassis will be
counted as having insufficient data.
Table
The FRU Details table displays data for each individual chassis. In most cases, your report will be generated
Chassis Results Window
150
Welcome to NetSight Inventory Manager Help
using current data. However, if you generated your report based on historical data, the report will use device
data saved in the last archive preceding the specified date. If there is no archive for a target device, or the
device does not reside in a chassis, that device will not be represented in the report results.
NOTE: Devices that do not support certain components will display "Unsupported" in the results table
entry. If a chassis displays "Not Mapped" in its results table entry, it indicates that the device type
is not in the Capacity Planning data file. If you encounter the "Not Mapped" entry, please contact
Global Support for an updated data file for these devices.
Chassis
The chassis type followed by the ID assigned to the chassis. This is usually a serial number or MAC
address, depending on the chassis type.
IP Address
The IP address of the chassis or one of the devices in the chassis.
Type
The chassis model number or hardware type.
Submodule Capacity
The submodule capacity (based on the installed modules) for the chassis. If you have an individual
device selected in the Target Device Tree, this column reports information for just that specific
device.
Submodules Installed
The number of submodules installed in the chassis. If you have an individual device selected in the
Target Device Tree, this column reports information for just that specific device.
CM Capacity
The control module (CM) capacity for the chassis.
CMs Installed
The number of control modules (CM) installed in the chassis.
Slot Capacity
The slot capacity for the chassis.
Slots Installed
The number of modules installed in the chassis.
Fan Capacity
The fan capacity for the chassis.
Fans Installed
The number of fans installed in the chassis.
Power Supply Capacity
The power supply capacity for the chassis.
Power Supplies Installed
Chassis Results Window
151
Welcome to NetSight Inventory Manager Help
The number of power supplies installed in the chassis.
Fabric Module Capacity
The fabric module capacity for the chassis.
Fabric Modules Installed
The number of fabric modules installed in the chassis.
Buttons
Abort/Refresh
This button toggles between Abort and Refresh. While a report is being generated, Abort stops the
report and clears all data out of the table. Refresh restarts report generation and updates the table with
new data. If you have selected the Retrieve current data from devices option in the Specify Time
window, clicking Refresh allows you to update your report results with the latest data from your
devices.
Export
Allows you to export your report results table as an HTML file or as a delimited text file. A Save
window opens where you can name your exported file, select the file extension, and navigate to a
folder/directory where you want save the file.
Save/Save As
Opens the Save Report window where you can name a report and then save it so that you can run the
report again. You can also select a checkbox to schedule the report. This opens the Schedule Report
window where you can configure scheduling information and notification settings for the report. Once
you have saved a report, it appears in the Saved Reports list in the Select Report window, where you
can select it.
Chassis Results Window
152
Component Change Report
Use the Capacity Planning tool to generate a report on field replaceable/upgradeable components (FRUs) in
your network devices that have changed over time. Using the Component Change report, you can easily
monitor changes made to your network and verify network upgrades.
Report results can be exported as an HTML file or as a delimited text file. In addition, Capacity Planning
reports can be saved to use again at a later time, and they can also be scheduled to run at specified intervals
with report results sent out via a notification e−mail.
Flow
The flow chart below shows the sequence of windows that you will encounter when you create a Component
Change report using the Capacity Planning tool. As you progress through the steps of creating a report, the
tool's left panel shows you a summary of your selections. You can click on the bold headings in this panel to
navigate backward or forward between steps allowing you to change your report parameters. The summary
information associated with each step appears in plain typeface beneath each step heading.
Click on blocks in the flow chart for more information about a specific window.
Select Report Window
Use this window to select either a report template or a saved report as your report type. Report templates are
based on common network capacity planning questions. After you have created a report using one of the
templates, you can save it (as a Saved Report) to use again at a later time. To create your Component Change
report, select the "What installed components (FRUs) have changed over time" report template.
Click the graphic for more information.
Component Change Report
153
Welcome to NetSight Inventory Manager Help
Report Templates
Lists the available report templates. Each report template is designed to answer a specific capacity
planning question.
Saved Reports
Lists all your saved reports including reports saved by other Inventory Manager clients connected to
the server. After you have created a report using a template, you can save it as a Saved Report, by
clicking the Save button. This allows you to save specific report attributes and parameters, so that you
can regenerate the same report at a later time. The schedule icon
indicates that a saved report has
been scheduled. You can remove a schedule from a saved report by right−clicking on the report and
selecting Delete > Schedule.
Delete Button
Deletes any report selected in the Saved Reports list.
Schedule Button
When you have selected a saved report in the Saved Reports list, this button opens the Schedule
Report window where you can configure scheduling information and notification settings for the
report.
Component Change Report
154
Welcome to NetSight Inventory Manager Help
Select Targets Window
Use this window to select the target devices for your report and add filters to further refine the list of devices,
if desired. For example, you could target the Chassis device group, but filter out a single chassis you don't
want included in the report. Or, you could target the Chassis device group, and filter in just one specific
chassis type. Once you have made your selections, you can view a list of the devices you have targeted for
your report to verify that your targets are correct.
Click the graphic for more information.
Targets
This panel displays your Network Elements tree. Expand the tree to select the target device group or
individual device for your report.
Applied Filters
Lists any filters applied to your selected targets. Click the Add Filters button to open the Add Filters
window and create your filters.
Filter In Type
If you have defined one or more "Filter In" filters, select how you want the filters to work:
• Match Any − A device can match any of the filter−in filters to be included as a target. For
example, if you have selected the Grouped By device group and you filter in the 6C105
Select Targets Window
155
Welcome to NetSight Inventory Manager Help
device group and the 6C107 device group, any device that is in the 6C105 or 6C107 device
group will be included as a target.
• Match All − A device must match all of the filter−in filters to be included as a target. For
example, if you have targeted the Grouped By device group and you filter in the Floor One
device group and the Chassis device group, any device that is on Floor One and in the
Chassis device group will be included as a target.
Number of Devices
A running total of the number of target devices with filters applied. Click View Devices to view a list
of the target devices.
Add Filters Button
Opens the Add Filters window, where you can create filters to further qualify the list of devices for
your report.
Clear Filters Button
Deletes any filters selected in the Applied Filters list.
View Devices Button
Opens the View Devices window where you can see a list of the selected devices that will be included
in your report.
Select FRU Types Window
Use the checkboxes in this window to select the specific components (FRU types) for your report. Select the
"Any" checkbox for a report on all the listed types, or select individual types to narrow down the focus of
your report.
Click the graphic for more information.
Select FRU Types Window
156
Welcome to NetSight Inventory Manager Help
FRU Types to Include
Use the checkboxes in this window to select specific FRU types for your report. Select the "Any"
checkbox for a report on all listed FRU types, or select individual FRU types of interest. Select the
"Other" checkbox if you wish to include data on FRU types other than the ones listed here. For the
purposes of this report, the FRU types are defined as follows:
• Backplane −− a device for aggregating and forwarding networking traffic, such as a shared
backplane in a modular Ethernet switch. A backplane may be reported as a single physical
entity, even if it is actually implemented as multiple discrete physical components within a
chassis or stack.
• Device −− a manageable networking device.
• Chassis −− an overall container for networking equipment.
• Control Module −− the module in a chassis that is responsible for maintaining route table and
bridge table information, as well SNMP management and system housekeeping functionality.
• Fabric Module −− a switching fabric module that provides direct communication between
fabric−enabled line cards in a chassis.
• Fan −− a fan or other heat−reduction component.
• Module −− a self−contained subsystem, such as a plugin card, daughter−card, or DFE
module.
• Port −− a media connector added to a module, submodule, or standalone device.
• Power Supply −− a power−supplying component.
• Sensor −− a sensor such as a temperature sensor within a router chassis.
• Stack −− a stack of multiple chassis.
Select FRU Types Window
157
Welcome to NetSight Inventory Manager Help
• Submodule −− an expansion module installed on an existing chassis module or standalone
device that adds ports to the existing device. This should not be confused with a Port Interface
Module (PIM), which adds media connectors to a module, submodule, or standalone device.
For example, the 6E129−26 has two PIM slots, which would not be included in the definition
of a submodule. These PIMs would be reported as port FRUs.
Specify Time Window
Use this window to select a time period from which report data will be gathered. The report will be generated
using device data saved in archive operations performed during the specified time period. Calculations are
based on the first and last archives (data samples) in the time period selected, not on all archive information in
the specified time frame. The archive operations must be configured to archive capacity planning data (see
How to Archive for more information.) You can also select to use current data from devices as one of your
data samples, in which case the report will use current data from the target devices, instead of the last archive
in the time period.
Click the graphic for more information.
For the Period
Select a time period for your report. The report is generated using device data saved in archive
operations performed on the targeted devices during the specified time period. Report information is
collected from the first and last archives (data samples) in the selected time period, not from every
Specify Time Window
158
Welcome to NetSight Inventory Manager Help
archive in the time period.
• Include all dates −− The report will use the first and last archives that exist for your target
devices.
• Current Day −− The report will use the first and last archives from the current day.
• Current Week −− The report will use the first and last archives from the current week.
• Current month −− The report will use the first and last archives from the current month.
• Current year −− The report will use the first and last archives from the current year.
• Last month −− The report will use the first and last archives from the previous month.
• Last 3 months −− The report will use the first and last archives from the previous three
months, not including the current month.
• Last 6 months −− The report will use the first and last archives from the previous six months,
not including the current month.
• Last 12 months −− The report will use the first and last archives from the previous 12 months,
not including the current month.
TIP: When you make a "For the Period" time selection, the "Custom time period" Start and End dates are
automatically filled in with the selected dates. You can then switch to the Custom time period option
and refine your time period to the exact dates you would like. For example, you could select the time
period "Last 6 months", and then switch to the Custom time period option and change the End date
to the current date. This would allow you to generate a report using data from the current month and
the last six months.
Retrieve current data from devices
This checkbox is available when you select a time period where the End date is the current date.
When the checkbox is selected, the report will use current data from the target devices, instead of the
last archive in the time period. Because this requires the report to gather current data from the devices,
extra time may be needed while report results are calculated.
Custom Time Period
Specify a custom time period for your report. Report information will be collected from the first and
last archive (data samples) in the selected time period, not from every archive in the time period.
Results Window
Use this window to view the report data. The radio buttons at the top of the right panel let you select various
ways to display the report results:
• Summary by FRU Type −− lists all the FRU components for your target devices, organized by FRU
type.
• Added FRUs −− lists all the FRU components that have been added during the specified time frame.
• Removed FRUs −− lists all the FRU components that have been removed during the specified time
frame.
• All FRU Details −− lists the details for each individual FRU component included in the report.
In addition, your selection in the tree determines the results displayed in the table. For example, you can select
a device group and view report data for that group. Then, you can expand the group and view data for a
specific device. As you change your selection in the tree, the table is updated with the results for your specific
selection.
Results − Summary By FRU Type
Results Window
159
Welcome to NetSight Inventory Manager Help
The Summary by FRU Type view displays report data organized by FRU type, providing an easy way to view
top−level information and quickly determine where to take a closer look. Your selections in the Select FRU
Types window determine what FRU types are reported on.
NOTES:
• FRU types are grouped based on individual FRU descriptions. For example,
you may see several entries for the FRU type "Module", based on the different
module descriptions.
• Each device is considered a FRU and will have a row in the table.
• Individual devices that reside in a chassis will report the power supplies and
fans for that chassis.
• Ports that reside on a submodule may be reported as both Ports and
Submodule.
Click the graphic for more information.
Display
Use these radio buttons to select how you would like the results data displayed.
Target Device Tree
Displays your target groups and devices. Your selection in the tree determines what results data will
be displayed in the table. For example, select a device group to see FRU type results summarized for
that group, or select an individual device to see results for just that device. When you change your
selection in the tree, the table is updated with the relevant information.
Results Window
160
Welcome to NetSight Inventory Manager Help
Device Count, Sufficient Data
The total number of target devices, followed by the number of devices with sufficient data to report
results. A device is counted as having sufficient data if there were two data samples (either two
archives, or one archive and current data) used to obtain report data. This area also reports the number
of devices with FRU components that have been added or removed.
Table
The Summary by FRU Type table displays FRU data for the selected device group or for the individual
devices contained in the group. The report is generated based on the first and last data samples in the time
period selected. Devices with no data samples or only one data sample, will not be represented in the report
results.
FRU Type
The type of FRU. Your selections in the Select FRU Types window determine the FRU types
included in the report.
# Added
The number of FRU components that have been added during the specified time frame.
# Removed
The number of FRU components that have been removed during the specified time frame.
Results − Added FRUs
The Added FRUs view provides information on FRU components that have been added during the specified
time frame. Your selections in the Select FRU Types window determine the components included in the
report. Depending on your selection in the tree, you can see details for Added FRUs on all the devices in a
group or just on an individual device.
Click the graphic for more information.
Results Window
161
Welcome to NetSight Inventory Manager Help
Display
Use these radio buttons to select how you would like the results data displayed.
Target Device Tree
Displays your target groups and devices. Your selection in the tree determines what results data will
be displayed in the table. For example, select a device group to see Added FRUs for that group, or
select an individual device to see results for just that device. When you change your selection in the
tree, the table is updated with the relevant information.
Device Count, Sufficient Data
The total number of target devices, followed by the number of devices with sufficient data to report
results. A device is counted as having sufficient data if there were two data samples (either two
archives, or one archive and current data) used to obtain report data. This area also reports the number
of devices with FRU components that have been added or removed.
Table
The Added FRUs table displays FRU data for the selected device group or for the individual devices
contained in the group. The report is generated based on the first and last data samples in the time period
selected. Devices with no data samples or only one data sample, will not be represented in the report results.
IP Address
The IP address of the device reporting the added FRU component.
Results Window
162
Welcome to NetSight Inventory Manager Help
FRU Name
The specific name of the FRU component that was added.
FRU Type
The type of FRU that was added.
Description
A description of the FRU component that was added.
Results − Removed FRUs
The Removed FRUs view provides information on FRU components that have been removed during the
specified time frame. Your selections in the Select FRU Types window determine the components included in
the report. Depending on your selection in the tree, you can see details for Removed FRUs on all the devices
in a group or just on an individual device.
Click the graphic for more information.
Display
Use these radio buttons to select how you would like the results data displayed.
Target Device Tree
Displays your target groups and devices. Your selection in the tree determines what results data will
be displayed in the table. For example, select a device group to see Removed FRUs for that group, or
Results Window
163
Welcome to NetSight Inventory Manager Help
select an individual device to see results for just that device. When you change your selection in the
tree, the table is updated with the relevant information.
Device Count, Sufficient Data
The total number of target devices, followed by the number of devices with sufficient data to report
results. A device is counted as having sufficient data if there were two data samples (either two
archives, or one archive and current data) used to obtain report data. This area also reports the number
of devices with FRU components that have been added or removed.
Table
The Removed FRUs table displays FRU data for the selected device group or for the individual devices
contained in the group. The report is generated based on the first and last data samples in the time period
selected. Devices with no data samples or only one data sample, will not be represented in the report results.
IP Address
The IP address of the device reporting the removed FRU component.
FRU Name
The specific name of the FRU component that was removed.
FRU Type
The type of FRU that was removed.
Description
A description of the FRU component that was removed.
FRU Results − All FRU Details
The FRU Details view provides information on the individual FRU components installed on your target
devices. Your selections in the Select FRU Types window determine what components are included in the
report. The report is generated based on the first and last data samples in the time period selected, resulting in
two entries per FRU component (one for each data sample used.) Depending on your selection in the tree, you
can see details for FRUs installed on all the devices in a group or just on an individual device.
NOTES:
• Each device is considered a FRU and will have an entry in the table for each
data sample.
• Each individual device that resides in a chassis reports the power supplies and
fans for that chassis. So, if your report includes a chassis, there will be an entry
for power supplies and fans reported by each device in the chassis. For
example, if you have four devices in a chassis, each device will report the two
power supplies in the chassis, resulting in eight rows of power supplies in the
table for that one chassis for each data sample. Use the IP Address column in
the report to verify that each device in the chassis is reporting the same
information, and that there are actually only two power supplies in the chassis.
Click the graphic for more information.
Results Window
164
Welcome to NetSight Inventory Manager Help
Display
Use these radio buttons to select how you would like the results data displayed.
Target Device Tree
Displays your target groups and devices. Your selection in the tree determines what results data will
be displayed in the table. For example, select a device group to see All FRU Details for that group, or
select an individual device to see results for just that device. When you change your selection in the
tree, the table is updated with the relevant information.
Device Count, Sufficient Data
The total number of target devices, followed by the number of devices with sufficient data to report
results. A device is counted as having sufficient data if there were two data samples (either two
archives, or one archive and current data) used to obtain report data. This area also reports the number
of devices with FRU components that have been added or removed.
Table
The All FRU Details table displays information for each FRU component included in the report. The report is
generated based on the first and last data samples in the time period selected which means that there will be
two entries per FRU component, one for each data sample used. Devices with no data samples or only one
data sample, will not be represented in the report results.
IP Address
The IP address of the device reporting the FRU component.
Results Window
165
Welcome to NetSight Inventory Manager Help
FRU Name
The specific name of the FRU component.
Description
A description of the FRU component.
FRU Type
The type of FRU.
Date
The date and time the report data was generated using current data, or the date and time of the archive
used to generate the report information. There will be two table entries per FRU component, one for
each data sample used.
Buttons
Abort/Refresh
This button toggles between Abort and Refresh. While a report is being generated, Abort stops the
report and clears all data out of the table. Refresh restarts report generation and updates the table with
new data. If you have selected the Retrieve current data from devices option in the Specify Time
Frame window, clicking Refresh allows you to update your report results with the latest data from
your devices. In addition, if you have selected a current time frame for your report, and a new archive
is saved after your report results are generated, clicking Refresh will regenerate your results using the
new archive data.
Export
Allows you to export your report results table as an HTML file or as a delimited text file. A Save
window opens where you can name your exported file, select the file extension, and navigate to a
folder/directory where you want save the file.
Save/Save As
Opens the Save Report window where you can name a report and then save it so that you can run the
report again. You can also select a checkbox to schedule the report. This opens the Schedule Report
window where you can configure scheduling information and notification settings for the report. Once
you have saved a report, it appears in the Saved Reports list in the Select Report window, where you
can select it.
Results Window
166
Field Replaceable Unit (FRU) Report
Use the Capacity Planning tool to generate a report on field replaceable/upgradeable components (FRUs) in
your network devices. The FRU report provides valuable inventory information to help you plan your network
needs. For example, you can generate a report on power supplies and control modules, to help determine how
well your network devices are taking advantage of redundancy capabilities. In most cases, the report would be
based on current data from your devices. However, there is the option to collect historical data if you would
like to view a snapshot of your network's FRU components at an earlier time.
Report results can be exported as an HTML file or as a delimited text file. In addition, Capacity Planning
reports can be saved to use again at a later time, and they can also be scheduled to run at specified intervals
with report results sent out via a notification e−mail.
Flow
The flow chart below shows the sequence of windows that you will encounter when you create a FRU report
using the Capacity Planning tool. As you progress through the steps of creating a report, the tool's left panel
shows you a summary of your selections. You can click on the bold headings in this panel to navigate
backward or forward between steps allowing you to change your report parameters. The summary information
associated with each step appears in plain typeface beneath each step heading.
Click on blocks in the flow chart for more information about a specific window.
Select Report Window
Use this window to select either a report template or a saved report as your report type. Report templates are
based on common network capacity planning questions. After you have created a report using one of the
templates, you can save it (as a Saved Report) to use again at a later time. To create your FRU report, select
the "What field replaceable/upgradeable components (FRUs) do I have" report template.
Click the graphic for more information.
Field Replaceable Unit (FRU) Report
167
Welcome to NetSight Inventory Manager Help
Report Templates
Lists the available report templates. Each report template is designed to answer a specific capacity
planning question.
Saved Reports
Lists all your saved reports including reports saved by other Inventory Manager clients connected to
the server. After you have created a report using a template, you can save it as a Saved Report, by
clicking the Save button. This allows you to save specific report attributes and parameters, so that you
can regenerate the same report at a later time. The schedule icon
indicates that a saved report has
been scheduled. You can remove a schedule from a saved report by right−clicking on the report and
selecting Delete > Schedule.
Delete Button
Deletes any report selected in the Saved Reports list.
Schedule Button
When you have selected a saved report in the Saved Reports list, this button opens the Schedule
Report window where you can configure scheduling information and notification settings for the
report.
Field Replaceable Unit (FRU) Report
168
Welcome to NetSight Inventory Manager Help
Select Targets Window
Use this window to select the target devices for your report and add filters to further refine the list of devices,
if desired. For example, you could target the Floor One device group, but filter out a single device you don't
want included in the report. Or, you could target the Building A device group, and filter in just one specific
device type. Once you have made your selections, you can view a list of the devices you have targeted for
your report to verify that your targets are correct.
Click the graphic for more information.
Targets
This panel displays your Network Elements tree. Expand the tree to select the target device group or
individual device for your report.
Applied Filters
Lists any filters applied to your selected targets. Click the Add Filters button to open the Add Filters
window and create your filters.
Filter In Type
If you have defined one or more "Filter In" filters, select how you want the filters to work:
• Match Any − A device can match any of the filter−in filters to be included as a target. For
example, if you have selected the Building A device group and you filter in Floor One
devices and Matrix E7 devices, any device in Building A that is on Floor One or is a Matrix
Select Targets Window
169
Welcome to NetSight Inventory Manager Help
E7 device will be included as a target.
• Match All − A device must match all of the filter−in filters to be included as a target. For
example, if you have selected the Building A device group and you filter in Floor One
devices and Matrix E7 devices, a Building A device would have to be on Floor One and be a
Matrix E7 device to be included as a target.
Number of Devices
A running total of the number of target devices with filters applied. Click View Devices to view a list
of the target devices.
Add Filters Button
Opens the Add Filters window, where you can create filters to further qualify the list of devices for
your report.
Clear Filters Button
Deletes any filters selected in the Applied Filters list.
View Devices Button
Opens the View Devices window where you can see a list of the selected devices that will be included
in your report.
Select FRU Types Window
Use the checkboxes in this window to select specific FRU types for your report. Select the "Any" checkbox
for a report on all the listed types, or select individual types to narrow down the focus of your report.
Click the graphic for more information.
Select FRU Types Window
170
Welcome to NetSight Inventory Manager Help
FRU Types to Include
Use the checkboxes in this window to select specific FRU types for your report. Select the "Any"
checkbox for a report on all listed FRU types, or select individual FRU types of interest. Select the
"Other" checkbox if you wish to include data on FRU types other than the ones listed here. For the
purposes of this report, the FRU types are defined as follows:
• Backplane −− a device for aggregating and forwarding networking traffic, such as a shared
backplane in a modular Ethernet switch. A backplane may be reported as a single physical
entity, even if it is actually implemented as multiple discrete physical components within a
chassis or stack.
• Device −− a manageable networking device.
• Chassis −− an overall container for networking equipment.
• Control Module −− the module in a chassis that is responsible for maintaining route table and
bridge table information, as well SNMP management and system housekeeping functionality.
• Fabric Module −− a switching fabric module that provides direct communication between
fabric−enabled line cards in a chassis.
• Fan −− a fan or other heat−reduction component.
• Module −− a self−contained subsystem, such as a plugin card, daughter−card or DFE module.
• Port −− a media connector added to a module, submodule, or standalone device.
• Power Supply −− a power−supplying component.
• Sensor −− a sensor such as a temperature sensor within a router chassis.
• Stack −− a stack of multiple chassis.
• Submodule −− an expansion module installed on an existing chassis module or standalone
device that adds ports to the existing device. This should not be confused with a Port Interface
Module (PIM), which adds media connectors to a module, submodule, or standalone device.
Select FRU Types Window
171
Welcome to NetSight Inventory Manager Help
For example, the 6E129−26 has two PIM slots, which would not be included in the definition
of a submodule. These PIMs would be reported as port FRUs.
Specify Time Window
Use this window to select a date from which report data will be gathered. In most cases, you will want to
generate the report using current data. However, you can also generate a report based on historical data. In
that case, the report will be generated using device data saved in the last archive preceding the specified date.
Only archive operations that are configured to archive capacity planning data will be used (see How to
Archive for more information.)
Click the graphic for more information.
Use data collected as of
Report data will be collected based on the date selected here. Calculations are based on the last
archive preceding the specified date. Only archive operations that are configured to archive capacity
planning data will be used. If there is no archive for a target device, that device will not be
represented in the report results.
Retrieve current data from devices
The report will use current data from the target devices. Because this requires the report to gather
current data from the devices, extra time may be needed when results are calculated.
Specify Time Window
172
Welcome to NetSight Inventory Manager Help
FRU Results Window
Use this window to view the report data. The radio buttons at the top of the right panel let you select various
ways to display the report results:
• Totals by FRU Type −− displays the report results organized by totals based on FRU type.
• FRU Details −− lists the details for each individual FRU component included in the report.
In addition, your selection in the tree determines the results displayed in the table. For example, you can select
a device group and view report data for that group. Then, you can expand the group and view data for a
specific device. As you change your selection in the tree, the table is updated with the results for your specific
selection.
FRU Results − Totals By FRU Type
The Totals by FRU Type view reports the total number of FRUs for each FRU type. Your selections in the
Select FRU Types window determine what FRU types are reported on. Depending on your selection in the
tree, you can see report results summarized for all the devices in a group, or for an individual device.
NOTES:
• FRU types are grouped based on individual FRU descriptions. For example,
you may see several entries for the FRU type "Module", based on the different
module descriptions.
• Each device is considered a FRU and will have a row in the table.
• Individual devices that reside in a chassis will report the power supplies and
fans for that chassis.
• Ports that reside on a submodule may be reported as both Ports and
Submodule.
Click the graphic for more information.
FRU Results Window
173
Welcome to NetSight Inventory Manager Help
Display
Use these radio buttons to select how you would like the results data displayed.
Target Device Tree
Displays your target groups and devices. Your selection in the tree determines what results data will
be displayed in the table. For example, select a device group to see FRU type results summarized for
that group, or select an individual device to see results for just that device. When you change your
selection in the tree, the table is updated with the relevant information.
Device Count, Sufficient Data
The total number of target devices, followed by the number of devices with sufficient data to report
results. If you generated the report using historical data, a device is counted as having sufficient data
if there is one archive used to obtain report results.
Table
The Totals by FRU Type table displays FRU data for all the devices in a group, or for an individual device. In
most cases, your report will be generated using current data. However, if you generated your report based on
historical data, the report will use device data saved in the last archive preceding the specified date. If there is
no archive for a target device, that device will not be represented in the report results.
FRU Type
The type of FRU. Your selections in the Select FRU Types window determine the FRU types
included in the report.
FRU Results Window
174
Welcome to NetSight Inventory Manager Help
Description
A description of the FRU component.
FRU Name
The specific name of the FRU component.
Total Installed
The total number of FRUs of that type/description installed in the selected device group or the
individual device.
FRU Results − FRU Details
The FRU Details view provides details for each individual FRU component included in the report. Depending
on your selection in the tree, you can see details for FRUs installed on all the devices in a group or just on an
individual device.
NOTES:
• Each device is considered a FRU and will have a row in the table.
• Each individual device that resides in a chassis reports the power supplies and fans for
that chassis. So, if your report includes a chassis, there will be an entry for power
supplies and fans reported by each device in the chassis. For example, if you have four
devices in a chassis, each device will report the two power supplies in the chassis,
resulting in eight rows of power supplies in the table for that one chassis. Use the IP
Address column in the report to verify that each device in the chassis is reporting the
same information, and that there are actually only two power supplies in the chassis.
Click the graphic for more information.
FRU Results Window
175
Welcome to NetSight Inventory Manager Help
Display
Use these radio buttons to select how you would like the results data displayed.
Target Device Tree
Displays your target groups and devices. Your selection in the tree determines what results data will
be displayed in the table. For example, select a device group to see FRU type details for that group, or
select an individual device to see details for just that device. When you change your selection in the
tree, the table is updated with the relevant information.
Device Count, Sufficient Data
The total number of target devices, followed by the number of devices with sufficient data to report
results. If you generated the report using historical data, a device is counted as having sufficient data
if there is one archive used to obtain report results.
Table
The FRU Details table displays information for each FRU component included in the report. In most cases,
your report will be generated using current data. However, if you generated your report based on historical
data, the report will use device data saved in the last archive preceding the specified date. If there is no archive
for a target device, that device will not be represented in the report results.
FRU Type
The type of FRU. Your selections in the Select FRU Types window determine the FRU types
included in the report.
FRU Results Window
176
Welcome to NetSight Inventory Manager Help
Description
A description of the FRU component.
Chassis
The ID assigned to the chassis where the FRU resides. This is usually a serial number or MAC
address, depending on the chassis type.
Module
The module type where the FRU resides.
IP Address
The IP address of the module where the FRU resides.
Date
The date and time the report data was generated. If you generated your report based on historical data,
this will be the date and time of the archive version used for the report.
FRU Name
The specific name of the FRU component.
Buttons
Abort/Refresh
This button toggles between Abort and Refresh. While a report is being generated, Abort stops the
report and clears all data out of the table. Refresh restarts report generation and updates the table with
new data. If you have selected the Retrieve current data from devices option in the Specify Time
window, clicking Refresh allows you to update your report results with the latest data from your
devices.
Export
Allows you to export your report results table as an HTML file or as a delimited text file. A Save
window opens where you can name your exported file, select the file extension, and navigate to a
folder/directory where you want save the file.
Save/Save As
Opens the Save Report window where you can name a report and then save it so that you can run the
report again. You can also select a checkbox to schedule the report. This opens the Schedule Report
window where you can configure scheduling information and notification settings for the report. Once
you have saved a report, it appears in the Saved Reports list in the Select Report window, where you
can select it.
FRU Results Window
177
Submodule Capacity Report
You can use the Capacity Planning Tool to generate a report on your network's submodule capacity and
usage. The Show Details on Submodule Capacity and Utilization report provides valuable information on the
number of submodule slots available on your network devices, and the actual number of submodules that are
installed. In addition, the report provides a description of each of the installed submodules. For this report, a
submodule is defined as an expansion module installed on an existing chassis module or standalone device
that adds ports to the existing device. This should not be confused with a Port Interface Module (PIM), which
adds media connectors to a module, submodule, or standalone device. For example, the 6E129−26 has two
PIM slots, which would not be included in the definition of a submodule.
You can view report results organized by chassis, device type, or submodule type. In most cases, the report
would be based on current data from your devices. However, there is the option to collect historical data if
you would like to view a snapshot of your network's submodule usage at an earlier time.
Report results can be exported as an HTML file or as a delimited text file. In addition, Capacity Planning
reports can be saved to use again at a later time, and they can also be scheduled to run at specified intervals
with report results sent out via a notification e−mail.
Flow
The flow chart below shows the sequence of windows that you will encounter when you create a Submodule
Capacity report using the Capacity Planning tool. As you progress through the steps of creating a report, the
tool's left panel shows you a summary of your selections. You can click on the bold headings in this panel to
navigate backward or forward between steps allowing you to change your report parameters. The summary
information associated with each step appears in plain typeface beneath each step heading.
Click on blocks in the flow chart for more information about a specific window.
Select Report Window
Use this window to select either a report template or a saved report as your report type. Report templates are
based on common network capacity planning questions. After you have created a report using one of the
templates, you can save it (as a Saved Report) to use again at a later time. To create your Submodule Capacity
report, select the "Show details on submodule capacity and utilization" report template.
Click the graphic for more information.
Submodule Capacity Report
178
Welcome to NetSight Inventory Manager Help
Report Templates
Lists the available report templates. Each report template is designed to answer a specific capacity
planning question.
Saved Reports
Lists all your saved reports including reports saved by other Inventory Manager clients connected to
the server. After you have created a report using a template, you can save it as a Saved Report, by
clicking the Save button. This allows you to save specific report attributes and parameters, so that you
can regenerate the same report at a later time. The schedule icon
indicates that a saved report has
been scheduled. You can remove a schedule from a saved report by right−clicking on the report and
selecting Delete > Schedule.
Delete Button
Deletes any report selected in the Saved Reports list.
Schedule Button
When you have selected a saved report in the Saved Reports list, this button opens the Schedule
Report window where you can configure scheduling information and notification settings for the
report.
Submodule Capacity Report
179
Welcome to NetSight Inventory Manager Help
Select Targets Window
Use this window to select the target devices for your report and add filters to further refine the list of devices,
if desired. For example, you could target the Chassis device group, but filter out a single chassis you don't
want included in the report. Or, you could target the Chassis device group, and filter in just one specific
chassis type. Once you have made your selections, you can view a list of the devices you have targeted for
your report to verify that your targets are correct.
Click the graphic for more information.
Targets
This panel displays your Network Elements tree. Expand the tree to select the target device group or
individual device for your report.
Applied Filters
Lists any filters applied to your selected targets. Click the Add Filters button to open the Add Filters
window and create your filters.
Filter In Type
If you have defined one or more "Filter In" filters, select how you want the filters to work:
Select Targets Window
180
Welcome to NetSight Inventory Manager Help
• Match Any − A device can match any of the filter−in filters to be included as a target. For
example, if you have selected the Grouped By device group and you filter in the 6C105
device group and the 6C107 device group, any device that is in the 6C105 or 6C107 device
group will be included as a target.
• Match All − A device must match all of the filter−in filters to be included as a target. For
example, if you have targeted the Grouped By device group and you filter in the Floor One
device group and the Chassis device group, any device that is on Floor One and in the
Chassis device group will be included as a target.
Number of Devices
A running total of the number of target devices with filters applied. Click View Devices to view a list
of the target devices.
Add Filters Button
Opens the Add Filters window, where you can create filters to further qualify the list of devices for
your report.
Clear Filters Button
Deletes any filters selected in the Applied Filters list.
View Devices Button
Opens the View Devices window where you can see a list of the selected devices that will be included
in your report.
Specify Time Window
Use this window to select a date from which report data will be gathered. In most cases, you will want to
generate the report using current data. However, you can also generate a report based on historical data. In
that case, the report will be generated using device data saved in the last archive preceding the specified date.
Only archive operations that are configured to archive capacity planning data will be used (see How to
Archive for more information.)
Click the graphic for more information.
Specify Time Window
181
Welcome to NetSight Inventory Manager Help
Use data collected as of
Report data will be collected based on the date selected here. Calculations are based on the last
archive preceding the specified date. Only archive operations that are configured to archive capacity
planning data will be used. If there is no archive for a target device, that device will not be
represented in the report results.
Retrieve current data from devices
The report will use current data from the target devices. Because this requires the report to gather
current data from the devices, extra time may be needed when results are calculated.
Submodule Results Window
Use this window to view the report data. The radio buttons at the top of the right panel let you select various
ways to display the report results:
• Summary by Chassis −− reports submodule information summarized by individual chassis.
• Summary by Device Type −− reports submodule information organized by device type.
• Summary by Submodule Type −− reports submodule information organized by the type of
submodule.
• All Submodule Details −− provides a description of each submodule and information about the device
Submodule Results Window
182
Welcome to NetSight Inventory Manager Help
where it resides.
Your selection in the tree determines the results displayed in the table. For example, you can select a chassis
group and view report data for that group. Then, you can expand the group and view data for a specific chassis
or device. As you change your selection in the tree, the table is updated with the results for your specific
selection.
Submodule Results − Summary By Chassis
The Summary by Chassis view provides data on the number of submodule slots available in each of your
chassis, and the actual number of submodules that are installed. You can view submodule information for a
chassis group, an individual chassis, or an individual device that resides in a chassis.
Click the graphic for more information.
Display
Use these radio buttons to select how you would like the results data displayed.
Target Device Tree
Displays your target groups and devices. Your selection in the tree determines what results data will
be displayed in the table. For example, select a device group to see results for each chassis in that
group, or select an individual chassis to see results for just that chassis. When you change your
selection in the tree, the table is updated with the relevant information. Target devices that do not
reside in a chassis will not generate any report results.
Submodule Results Window
183
Welcome to NetSight Inventory Manager Help
Device Count, Sufficient Data
The total number of target devices, followed by the number of devices with sufficient data to report
results. If you generated the report using historical data, a device is counted as having sufficient data
if there is one archive used to obtain report results.
Table
The Summary by Chassis table displays data for each individual chassis. In most cases, your report will be
generated using current data. However, if you generated your report based on historical data, the report will
use device data saved in the last archive preceding the specified date. If there is no archive for a target device,
that device will not be represented in the report results.
NOTE: Chassis that do not support submodules will display "Unsupported" in the results table
entry. If a chassis displays "Not Mapped" in its results table entry, it indicates that the
device type is not in the Capacity Planning data file. If you encounter the "Not
Mapped" entry, please contact Global Support for an updated data file for these
devices.
Chassis ID
The ID assigned to the chassis. This is usually a serial number or MAC address, depending on the
chassis type.
Chassis Type
The chassis model number or hardware type.
Submodule Capacity
The total number of submodule slots on the devices or DFE modules residing in the chassis. For
example, if you have five devices installed in a 5−slot chassis, and each device has the capacity to
hold two submodules, the number would be 10. If you have three devices installed in a 5−slot chassis,
and each device has the capacity to hold two submodules, the number would be 6.
NOTE: If the target is not a Chassis folder, then the Submodule Capacity would be the
total capacity of the target devices installed in the same chassis. Meaning, if you
have a chassis with five devices installed and each has a capacity of one
submodule, but only two of the devices are in the target list, then the Submodule
Capacity would be 2.
# Submodules Installed
The total number of submodules installed on the devices or DFE modules in the chassis. For example,
if you have five devices installed in a 5−slot chassis, and each device has one submodule, the number
would be 5. If you have three devices installed in a 5−slot chassis, and each device has two
submodules, the number would be 6.
Submodule Results − Summary by Device Type
The Summary by Device Type view tells you how many devices of a certain device type have submodules
installed.
Click the graphic for more information.
Submodule Results Window
184
Welcome to NetSight Inventory Manager Help
Display
Use these radio buttons to select how you would like the results data displayed.
Target Device Tree
Displays your target groups and devices. Your selection in the tree determines what results data will
be displayed in the table. For example, select a device group to see data organized by all the device
types in that group, or select a chassis to see data for all the device types in that chassis. When you
change your selection in the tree, the table is updated with the relevant information.
Device Count, Sufficient Data
The total number of target devices, followed by the number of devices with sufficient data to report
results. If you generated the report using historical data, a device is counted as having sufficient data
if there is one archive used to obtain report results.
Table
The Summary by Device Type table displays submodule information organized by device type. In most cases,
your report will be generated using current data. However, if you generated your report based on historical
data, the report will use device data saved in the last archive preceding the specified date. If there is no archive
for a target device, that device will not be represented in the report results.
Device Type
The model number or hardware type.
# Device Type
The number of devices of that type.
Submodule Results Window
185
Welcome to NetSight Inventory Manager Help
# with Submodules Installed
The number of devices of that type with installed submodules.
Total Submodule Capacity
The total submodule capacity for this device type.
Submodule Results − Summary by Submodule Type
The Summary by Submodule Type view provides a description of each submodule type, and the number of
that type installed. You can view submodule information for a chassis group, for an individual chassis, or for
an individual device.
Click the graphic for more information.
Display
Use these radio buttons to select how you would like the results data displayed.
Target Device Tree
Displays your target groups and devices. Your selection in the tree determines what results data will
be displayed in the table. For example, select a device group to see submodule information for all the
devices in that group or select a chassis to see submodule information for all the devices in that
chassis. When you change your selection in the tree, the table is updated with the relevant
information.
Device Count, Sufficient Data
Submodule Results Window
186
Welcome to NetSight Inventory Manager Help
The total number of target devices, followed by the number of devices with sufficient data to report
results. If you generated the report using historical data, a device is counted as having sufficient data
if there is one archive used to obtain report results.
Table
The Summary by Submodule Type table displays data organized by submodule type. In most cases, your
report will be generated using current data. However, if you generated your report based on historical data, the
report will use device data saved in the last archive preceding the specified date. If there is no archive for a
target device, that device will not be represented in the report results.
Description
A description of the submodule.
# Submodules
The total number of submodules of this type.
Submodule Results − All Submodule Details
The All Submodule Details view provides a description of each submodule and information about the device
where it resides.
Click the graphic for more information.
Display
Submodule Results Window
187
Welcome to NetSight Inventory Manager Help
Use these radio buttons to select how you would like the results data displayed.
Target Device Tree
Displays your target groups and devices. Your selection in the tree determines what results data will
be displayed in the table. For example, select a device group to see submodule details for all the
devices in that group, select a chassis to see results for just that chassis, or select an individual device
to see submodule information for that device. When you change your selection in the tree, the table is
updated with the relevant information.
Device Count, Sufficient Data
The total number of target devices, followed by the number of devices with sufficient data to report
results. If you generated the report using historical data, a device is counted as having sufficient data
if there is one archive used to obtain report results.
Table
The All Submodule Details table displays information for each submodule. If a device has multiple
submodules, there will be an entry for each submodule. In most cases, your report will be generated using
current data. However, if you generated your report based on historical data, the report will use device data
saved in the last archive preceding the specified date. If there is no archive for a target device, that device will
not be represented in the report results.
IP Address
The IP address of the device reporting the submodule information.
Description
A description of the submodule.
Chassis ID
The ID assigned to the chassis where the device resides. This is usually a serial number or MAC
address, depending on the chassis type. If the device does not reside in a chassis, this column will
display N/A.
Chassis Type
The chassis model number or hardware type.
Device Type
The model number or hardware type of the device.
Buttons
Abort/Refresh
This button toggles between Abort and Refresh. While a report is being generated, Abort stops the
report and clears all data out of the table. Refresh restarts report generation and updates the table with
new data. If you have selected the Retrieve current data from devices option in the Specify Time
window, clicking Refresh allows you to update your report results with the latest data from your
devices.
Export
Allows you to export your report results table as an HTML file or as a delimited text file. A Save
Submodule Results Window
188
Welcome to NetSight Inventory Manager Help
window opens where you can name your exported file, select the file extension, and navigate to a
folder/directory where you want save the file.
Save/Save As
Opens the Save Report window where you can name a report and then save it so that you can run the
report again. You can also select a checkbox to schedule the report. This opens the Schedule Report
window where you can configure scheduling information and notification settings for the report. Once
you have saved a report, it appears in the Saved Reports list in the Select Report window, where you
can select it.
Submodule Results Window
189
Used/Unused Ports Report
Use the Capacity Planning tool to generate a report on your network front−panel port utilization. The
Used/Unused Ports report provides valuable information to help you plan your network needs. For example, if
you are adding a new department with 15 new employees, you can use this report to locate unused ports of a
certain type. You can also use the report to quickly see where ports have been added or removed, or to view
specific port details such as port type and speed.
Report results can be exported as an HTML file or as a delimited text file. In addition, Capacity Planning
reports can be saved to use again at a later time, and they can also be scheduled to run at specified intervals
with report results sent out via a notification e−mail.
Flow
The flow chart below shows the sequence of windows that you will encounter when you create a
Used/Unused Ports report using the Capacity Planning tool. As you progress through the steps of creating a
report, the tool's left panel shows you a summary of your selections. You can click on the bold headings in
this panel to navigate backward or forward between steps allowing you to change your report parameters. The
summary information associated with each step appears in plain typeface beneath each step heading.
Click on blocks in the flow chart for more information about a specific window.
Select Report Window
Use this window to select either a report template or a saved report as your report type. Report templates are
based on common network capacity planning questions. After you have created a report using one of the
templates, you can save it (as a Saved Report) to use again at a later time. To create your Used/Unused Ports
report, select the "How many used/unused ports do I have" report template.
Click the graphic for more information.
Used/Unused Ports Report
190
Welcome to NetSight Inventory Manager Help
Report Templates
Lists the available report templates. Each report template is designed to answer a specific capacity
planning question.
Saved Reports
Lists all your saved reports including reports saved by other Inventory Manager clients connected to
the server. After you have created a report using a template, you can save it as a Saved Report, by
clicking the Save button. This allows you to save specific report attributes and parameters, so that you
can regenerate the same report at a later time. The schedule icon
indicates that a saved report has
been scheduled. You can remove a schedule from a saved report by right−clicking on the report and
selecting Delete > Schedule.
Delete Button
Deletes any report selected in the Saved Reports list.
Schedule Button
When you have selected a saved report in the Saved Reports list, this button opens the Schedule
Report window where you can configure scheduling information and notification settings for the
report.
Used/Unused Ports Report
191
Welcome to NetSight Inventory Manager Help
Select Targets Window
Use this window to select the target devices for your report and add filters to further refine the list of devices,
if desired. For example, you could target the Floor One device group, but filter out a single device you don't
want included in the report. Or, you could target the Building A device group, and filter in just one specific
device type. Once you have made your selections, you can view a list of the devices you have targeted for
your report to verify that your targets are correct.
NOTE: If you will be scheduling this Ports report, keep in mind when selecting your targets that results
from scheduled reports are delivered via e−mail. Depending on the number of target devices you
select and the number of ports on those devices, a ports report may generate results that are too
large to be delivered via e−mail. In this case, you should consider creating multiple reports based
on subnet or device type. This is primarily a concern when selecting the Port Details view for
your report results.
Click the graphic for more information.
Targets
This panel displays your Network Elements tree. Expand the tree to select the target device group or
individual device for your report.
Applied Filters
Select Targets Window
192
Welcome to NetSight Inventory Manager Help
Lists any filters applied to your selected targets. Click the Add Filters button to open the Add Filters
window and create your filters.
Filter In Type
If you have defined one or more "Filter In" filters, select how you want the filters to work:
• Match Any − A device can match any of the filter−in filters to be included as a target. For
example, if you have selected the Building A device group and you filter in Floor One
devices and Matrix E7 devices, any device in Building A that is on Floor One or is a Matrix
E7 device will be included as a target.
• Match All − A device must match all of the filter−in filters to be included as a target. For
example, if you have selected the Building A device group and you filter in Floor One
devices and Matrix E7 devices, a Building A device would have to be on Floor One and be a
Matrix E7 device to be included as a target.
Number of Devices
A running total of the number of target devices with filters applied. Click View Devices to view a list
of the target devices.
Add Filters Button
Opens the Add Filters window, where you can create filters to further qualify the list of devices for
your report.
Clear Filters Button
Deletes any filters selected in the Applied Filters list.
View Devices Button
Opens the View Devices window where you can see a list of the selected devices that will be included
in your report.
Select Port Attributes Window
Use the checkboxes in this window to select specific port attributes for your report. The attributes define the
port type, speed, media type, and connector type of the ports to be reported on. You must select at least one of
each attribute. Select the "Any" checkbox for a report on all the listed attributes, or select individual attributes
to narrow down the focus of your report.
Click the graphic for more information.
Select Port Attributes Window
193
Welcome to NetSight Inventory Manager Help
Port Type
Select the "Any port type" checkbox for a report on all listed port types, or select individual port types
of interest. Select the "Other" checkbox if you wish to include data on port types other than the types
listed here.
Speed
Select the "Any speed" checkbox for a report on all listed port speeds, or select individual port speeds
of interest. Select the "Other" checkbox if you wish to include data on port speeds other than the
speeds listed here. Select the "Unknown Speed" checkbox if you wish to include ports that do not
report a speed.
Media Type
Select the "Any media type" checkbox for a report on all listed port media types, or select individual
media types of interest. Select the "Other" checkbox if you wish to include data on media types other
than the types listed here. Select the "Unknown Media Type" checkbox if you wish to include ports
that do not report a media type. For the purposes of this report, the media types are defined as follows:
• Copper (other) −− Copper media types other than those listed here.
• Copper T4 −− 4 pairs, category 3 UTP (Unshielded Twisted Pair) copper wire.
• Copper TX −− 2 pairs, category 5 UTP (Unshielded Twisted Pair) copper wire.
• Copper T2 −− 2 pairs, category 3 UTP (Unshielded Twisted Pair) copper wire.
• Copper CX −− Copper over 150−Ohm balanced cable.
• Fiber (other) −− Fiber media types other than those listed here.
• Fiber LX −− Fiber over long−wavelength laser.
• Fiber SX −− Fiber over short−wavelength laser.
Select Port Attributes Window
194
Welcome to NetSight Inventory Manager Help
• Fiber FX −− Fiber Fast Ethernet.
• Empty PIM Slot −− A device port that can accept a Port Interface Module (PIM). PIMs allow
you to add ports of various media types to existing devices.
• Other −− Media types other than those listed here.
• Unknown Media Type −− Ports that do not report a media type.
Connector Type
Select the "Any connector type" checkbox for a report on all listed port connector types, or select
individual connector types of interest. Select the "Other" checkbox if you wish to include data on
connector types other than the types listed here. Select the "Unknown Jack Type" checkbox if you
wish to include ports that do not report a connector type. For the purposes of this report, the connector
types are defined as follows:
• RJ45 −− An eight−wire modular connector similar to connectors used for a telephone. Used
with twisted pair cable.
• DB9 −− A 9−pin connector most commonly used for an RS−232 interface, such as a console
port on a network device.
• BNC −− A "bayonet−locking" connector used on 10Base2 thin coaxial cable.
• AUI −− A 15−pin connector interface for connecting transceivers to network devices and to a
computer NIC.
• SC −− A fiber−optic "push and pull" cable connector: two fiber cables and two SC connectors
provide bidirectional transmission.
• MIC −− A dual−fiber connector most widely used for FDDI and ATM.
• ST −− A fiber−optic "stab and twist" cable connector: two fiber cables and two ST connectors
provide bidirectional transmission.
• Telco −− A 50−pin copper connector first used by telephone companies (telco), widely used
for 10 and 100 Mbps Ethernet.
• MTRJ −− A fiber−optic connector; two fiber strands.
• SMA −− A fiber−optic connector with a plug that screws into a threaded socket.
• HSSDC −− A High−Speed Serial Data Connector.
• Other −− Connector types other than those listed here.
• Unknown Jack Type −− Ports that do not report a connector type.
Specify Time Window
Use this window to select a time period from which report data will be gathered. The report will be generated
using device data saved in archive operations performed during the specified time period. Calculations are
based on the first and last archives (data samples) in the time period selected, not on all archive information in
the specified time frame. The archive operations must be configured to archive capacity planning data (see
How to Archive for more information.) You can also select to use current data from devices as one of your
data samples, in which case the report will use current data from the target devices, instead of the last archive
in the time period.
Click the graphic for more information.
Specify Time Window
195
Welcome to NetSight Inventory Manager Help
For the Period
Select a time period for your report. The report is generated using device data saved in archive
operations performed on the targeted devices during the specified time period. Report information is
collected from the first and last archives (data samples) in the selected time period, not from every
archive in the time period.
• Include all dates −− The report will use the first and last archives that exist for your target
devices.
• Current Day −− The report will use the first and last archives from the current day.
• Current Week −− The report will use the first and last archives from the current week.
• Current month −− The report will use the first and last archives from the current month.
• Current year −− The report will use the first and last archives from the current year.
• Last month −− The report will use the first and last archives from the previous month.
• Last 3 months −− The report will use the first and last archives from the previous three
months, not including the current month.
• Last 6 months −− The report will use the first and last archives from the previous six months,
not including the current month.
• Last 12 months −− The report will use the first and last archives from the previous 12 months,
not including the current month.
TIP: When you make a "For the Period" time selection, the "Custom time period" Start and End dates are
automatically filled in with the selected dates. You can then switch to the Custom time period option
and refine your time period to the exact dates you would like. For example, you could select the time
period "Last 6 months", and then switch to the Custom time period option and change the End date
to the current date. This would allow you to generate a report using data from the current month and
Specify Time Window
196
Welcome to NetSight Inventory Manager Help
the last six months.
Retrieve current data from devices
This checkbox is available when you select a time period where the End date is the current date.
When the checkbox is selected, the report will use current data from the target devices, instead of the
last archive in the time period. Because this requires the report to gather current data from the devices,
extra time may be needed while report results are calculated.
Custom Time Period
Specify a custom time period for your report. Report information will be collected from the first and
last archive (data samples) in the selected time period, not from every archive in the time period.
Port Results Window
Use this window to view the report data. The radio buttons at the top of the right panel let you select various
ways to display the report results:
• Totals by Group −− displays the report results organized by totals based on device group.
• Devices Only −− lists the report results for each device.
• Totals by Port Type −− displays the report results organized by totals based on port type.
• Port Details −− lists the report results for each port.
In addition, your selection in the tree determines the results displayed in the table. For example, you can select
a device group and view report data for that group. Then, you can expand the group and view data for a
specific device. As you change your selection in the tree, the table is updated with the results for your specific
selection.
Port Results − Totals by Group
The Totals by Group view gives you the flexibility of viewing your port results summarized by group or
detailed by device. It provides an easy way to view top−level port information and quickly determine where to
take a closer look. Simply by changing your selection in the tree, you can view port data for a group or port
data for the individual devices that make up a group.
Click the graphic for more information.
Port Results Window
197
Welcome to NetSight Inventory Manager Help
Display
Use these radio buttons to select how you would like the results data displayed.
Target Device Tree
Displays your target groups and devices. Your selection in the tree determines what results data will
be displayed in the table. For example, select a device group to see results for that group, or select an
individual device to see results for just that device. When you change your selection in the tree, the
table is updated with the relevant information.
Device Count, Sufficient Data
The total number of target devices, followed by the number of devices with sufficient data to report
results. A device is counted as having sufficient data if there were two data samples (either two
archives, or one archive and current data) used to obtain report data. Devices with no data samples or
only one data sample will show an alert icon in their table entry, and will display Unknown for some
or all of their results.
Table
The Totals by Group table displays port data for the selected device groups or for the individual devices
contained in a group. The report is generated based on the first and last data samples in the time period
selected. Results that are not available are displayed as Unknown.
NOTE: In the port results, a port is considered used when there were two data samples consulted to
obtain report data and
Port Results Window
198
Welcome to NetSight Inventory Manager Help
• the port's link status for either sample is LINK, or
• the port's link status for both samples is NO LINK, but the bytes transferred values for
both samples are not equal.
Alert
A yellow alert icon
in this column signifies that the report data for this table entry is questionable.
It indicates that:
• there aren't enough data samples in the selected time period to generate report data. At least
two data samples (either two archives, or one archive and current data) are required for each
device. Devices with no data samples or only one data sample will display Unknown for some
or all of their results.
• between the data samples ports were removed, and the port's link status in the first data
sample is NO LINK. This causes the validity of the data to be in question because there is no
way to determine if bytes had been transferred by a port before it was removed, and therefore
the report cannot accurately determine if the port is being used.
Rest your cursor on the alert to display a tooltip that describes the reason for the alert.
Name
The name of the group or the IP address of an individual device.
% Ports Used
The percentage of ports being used in the device group or on the individual device.
Total Ports
The total number of ports installed in the device group or on the individual device.
# Ports Used
The number of ports being used in the device group or on the individual device.
# Ports Unused
The number of ports not in use in the device group or on the individual device.
Ports Added
The number of ports added (during the specified time frame) to the device group or to an individual
device.
Ports Removed
The number of ports removed (during the specified time frame) from the device group or from an
individual device.
Port Results − Devices Only
The Devices Only view lets you view port data for each individual target device. Depending on your selection
in the tree, you can see report results for all the devices in a group, or for an individual device.
Click the graphic for more information.
Port Results Window
199
Welcome to NetSight Inventory Manager Help
Display
Use these radio buttons to select how you would like the results data displayed.
Target Device Tree
Displays your target groups and devices. Your selection in the tree determines what results data will
be displayed in the table. For example, select a device group to see results for the devices in that
group, or select an individual device to see results for just that device. When you change your
selection in the tree, the table is updated with the relevant information.
Device Count, Sufficient Data
The total number of target devices, followed by the number of devices with sufficient data to report
results. A device is counted as having sufficient data if there were two data samples (either two
archives, or one archive and current data) used to obtain report data. Devices with no data samples or
only one data sample will show an alert icon in their table entry, and will display Unknown for some
or all of their results.
Table
The Devices Only table displays port data for each individual device. The report is generated based on the
first and last data samples in the time period selected. Results that are not available are displayed as Unknown.
NOTE: In the port results, a port is considered used when there were two data samples consulted to
obtain report data and
Port Results Window
200
Welcome to NetSight Inventory Manager Help
• the port's link status for either sample is LINK, or
• the port's link status for both samples is NO LINK, but the bytes transferred values for
both samples are not equal.
Alert
A yellow alert icon
in this column signifies that the report data for this table entry is questionable.
It indicates that:
• there aren't enough data samples in the selected time period to generate report data. At least
two data samples (either two archives, or one archive and current data) are required for each
device. Devices with no data samples or only one data sample will display Unknown for some
or all of their results.
• between the data samples ports were removed, and the port's link status in the first data
sample is NO LINK. This causes the validity of the data to be in question because there is no
way to determine if bytes had been transferred by a port before it was removed, and therefore
the report cannot accurately determine if the port is being used.
Rest your cursor on the alert to display a tooltip that describes the reason for the alert.
IP Address
The IP address of the device.
Device Type
The model number of the device.
% Ports Used
The percentage of ports being used on the device.
Total Ports
The total number of ports installed on the device.
# Ports Used
The number of ports being used on the device.
# Ports Unused
The number of ports not in use on the device.
Ports Added
The number of ports added (during the specified time frame) to the device.
Ports Removed
The number of ports removed (during the specified time frame) from the device.
# Data Samples
The number of data samples that were consulted to obtain report data. The maximum number would
be two.
Port Results − Totals by Port Type
The Totals by Port Type view lets you view port data organized by port type: ATM, Ethernet, FDDI, WAN,
or Other. Your port type selections in the Port Attributes window determine what port types are reported on.
Port Results Window
201
Welcome to NetSight Inventory Manager Help
Depending on your selection in the tree, you can see report results summarized for all the devices in a group,
or for an individual device.
Click the graphic for more information.
Display
Use these radio buttons to select how you would like the results data displayed.
Target Device Tree
Displays your target groups and devices. Your selection in the tree determines what results data will
be displayed in the table. For example, select a device group to see port type results summarized for
that group, or select an individual device to see results for just that device. When you change your
selection in the tree, the table is updated with the relevant information.
Device Count, Sufficient Data
The total number of target devices, followed by the number of devices with sufficient data to report
results. A device is counted as having sufficient data if there were two data samples (either two
archives, or one archive and current data) used to obtain report data. Devices with no data samples or
only one data sample will display Unknown for some or all of their results.
Table
The Totals by Port Type table displays port data for the selected device groups or for the individual devices
contained in a group, organized according to port type. However, there may be multiple entries for a single
Port Results Window
202
Welcome to NetSight Inventory Manager Help
port type, due to different media types and connectors being used.
The report is generated based on the first and last data samples in the time period selected. Results that are not
available are displayed as Unknown.
NOTE: In the port results, a port is considered used when there were two data samples consulted to
obtain report data and
• the port's link status for either sample is LINK, or
• the port's link status for both samples is NO LINK, but the bytes transferred values for
both samples are not equal.
Port Type
The type of port: ATM, Ethernet, FDDI, WAN, or Other. Your selections in the Port Attributes
window determine the port types included in the report.
Description
A description of the port.
% Ports Used
The percentage of ports of that port type being used in the device group or on the individual device.
Total Ports
The total number of ports of that port type installed in the device group or on the individual device.
# Ports Used
The number of ports of that port type being used in the device group or on the individual device.
Ports Added
The number of ports of that port type added (during the specified time frame) to the device group or
to an individual device.
Ports Removed
The number of ports of that port type removed (during the specified time frame) from the device
group or from an individual device.
Media
The media being used by that port type.
Media Type
A detailed description of the media being used by that port type.
Framing
The start and stop bit that frame the data transmitted by that port type.
Speed
That port type's physical speed.
Connector
That port type's connector type.
Port Results Window
203
Welcome to NetSight Inventory Manager Help
Port Results − Port Details
The Port Details view provides an easy way to look at port information for a specific device. Depending on
your selection in the tree, you can see port details for all the devices in a group, or for an individual device.
Click the graphic for more information.
Display
Use these radio buttons to select how you would like the results data displayed.
Target Device Tree
Displays your target groups and devices. Your selection in the tree determines what results data will
be displayed in the table. For example, select a device group to see results for the devices in that
group, or select an individual device to see results for just that device. When you change your
selection in the tree, the table is updated with the relevant information.
Device Count, Sufficient Data
The total number of target devices, followed by the number of devices with sufficient data to report
results. A device is counted as having sufficient data if there were two data samples (either two
archives, or one archive and current data) used to obtain report data. Devices with no data samples or
only one data sample will display Unknown for some or all of their results.
Table
Port Results Window
204
Welcome to NetSight Inventory Manager Help
The Port Details table displays information for each port on the target devices. The report is generated based
on the first and last data samples in the time period selected, resulting in two entries per port (one for each
data sample used.) Information that is not available is displayed as Unknown.
TIP: Right−click on the Port Number column heading to sort the table entries according to port number.
This allows you to easily view and compare both data sample entries for each port.
IP Address
The IP address of the device.
Port Number
The port number on the device.
Date
The date and time of the data sample used to generate the port information.
Speed
The port's physical speed.
Bytes Transferred
The number of bytes transferred since the device was turned on or reset.
Link Status
The port's link status: LINK or NO LINK.
Media Type
The port's media type.
Connector Type
The port's connector type.
IF Name
A description of the port.
Buttons
Abort/Refresh
This button toggles between Abort and Refresh. While a report is being generated, Abort stops the
report and clears all data out of the table. Refresh restarts report generation and updates the table with
new data. If you have selected the Retrieve current data from devices option in the Specify Time
window, clicking Refresh allows you to update your report results with the latest data from your
devices. In addition, if you have selected a current time frame for your report, and a new archive is
saved after your report results are generated, clicking Refresh will regenerate your results using the
new archive data.
Export
Allows you to export your report results table as an HTML file or as a delimited text file. A Save
window opens where you can name your exported file, select the file extension, and navigate to a
folder/directory where you want save the file.
Port Results Window
205
Welcome to NetSight Inventory Manager Help
Save/Save As
Opens the Save Report window where you can name a report and then save it so that you can run the
report again. You can also select a checkbox to schedule the report. This opens the Schedule Report
window where you can configure scheduling information and notification settings for the report. Once
you have saved a report, it appears in the Saved Reports list in the Select Report window, where you
can select it.
Port Results Window
206
Used/Unused Slots Report
Use the Capacity Planning tool to generate a report on your network chassis slot utilization. The Used/Unused
Slots report provides valuable information to help you plan your network needs. For example, if you are
adding a new department with 30 new employees, you can use this report to locate unused chassis slots where
you can add modules to expand your port capacity. You can view slot information for each individual chassis,
or organized by chassis type. In most cases, the Used/Unused Slots report would be based on current data
from your devices. However, there is the option to collect historical data if you would like to view a snapshot
of your network's slot usage at an earlier time.
Report results can be exported as an HTML file or as a delimited text file. In addition, Capacity Planning
reports can be saved to use again at a later time, and they can also be scheduled to run at specified intervals
with report results sent out via a notification e−mail.
Flow
The flow chart below shows the sequence of windows that you will encounter when you create a
Used/Unused Slots report using the Capacity Planning tool. As you progress through the steps of creating a
report, the tool's left panel shows you a summary of your selections. You can click on the bold headings in
this panel to navigate backward or forward between steps allowing you to change your report parameters. The
summary information associated with each step appears in plain typeface beneath each step heading.
Click on blocks in the flow chart for more information about a specific window.
Select Report Window
Use this window to select either a report template or a saved report as your report type. Report templates are
based on common network capacity planning questions. After you have created a report using one of the
templates, you can save it (as a Saved Report) to use again at a later time. To create your Used/Unused Slots
report, select the "How many used/unused slots do I have" report template.
Click the graphic for more information.
Used/Unused Slots Report
207
Welcome to NetSight Inventory Manager Help
Report Templates
Lists the available report templates. Each report template is designed to answer a specific capacity
planning question.
Saved Reports
Lists all your saved reports including reports saved by other Inventory Manager clients connected to
the server. After you have created a report using a template, you can save it as a Saved Report, by
clicking the Save button. This allows you to save specific report attributes and parameters, so that you
can regenerate the same report at a later time. The schedule icon
indicates that a saved report has
been scheduled. You can remove a schedule from a saved report by right−clicking on the report and
selecting Delete > Schedule.
Delete Button
Deletes any report selected in the Saved Reports list.
Schedule Button
When you have selected a saved report in the Saved Reports list, this button opens the Schedule
Report window where you can configure scheduling information and notification settings for the
report.
Used/Unused Slots Report
208
Welcome to NetSight Inventory Manager Help
Select Targets Window
Use this window to select the target devices for your report and add filters to further refine the list of devices,
if desired. For example, you could target the Chassis device group, but filter out a single chassis you don't
want included in the report. Or, you could target the Chassis device group, and filter in just one specific
chassis type. Once you have made your selections, you can view a list of the devices you have targeted for
your report to verify that your targets are correct.
NOTE: The slot usage report is generated based on data from individual devices. Basically, the report
asks each device, "What chassis and slot are you in?" If the device responds with chassis and slot
information, it is included in the report. This can affect the validity of your report results if you
are generating a report using historical data (from device archives) as opposed to current data
from the device. (See the Specify Time Window for more information.)
Let's say you want to know what your Chassis One slot usage was as of October 10, 2003. At that
time, Chassis One contained devices 1.1.1.1 and 2.2.2.2. But currently, Chassis One contains
devices 1.1.1.1 and 3.3.3.3. If you target Chassis One, the report would look at archives of 1.1.1.1
and 3.3.3.3, and no report data would be generated for 2.2.2.2.
To achieve more accurate report results, you could target the All Devices folder. Then, the report
would look at archives of all three devices, and would correctly report slot usage for 1.1.1.1 and
2.2.2.2.
Click the graphic for more information.
Select Targets Window
209
Welcome to NetSight Inventory Manager Help
Targets
This panel displays your Network Elements tree. Expand the tree to select the target device group or
individual device for your report. In most cases, you will want to target a group of chassis for this
report. Devices that do not reside in a chassis will not generate any report results. If a device has been
configured with SNMP context, you can select each context as a separate target device.
Applied Filters
Lists any filters applied to your selected targets. Click the Add Filters button to open the Add Filters
window and create your filters.
Filter In Type
If you have defined one or more "Filter In" filters, select how you want the filters to work:
• Match Any − A device can match any of the filter−in filters to be included as a target. For
example, if you have selected the Grouped By device group and you filter in the 6C105
device group and the 6C107 device group, any device that is in the 6C105 or 6C107 device
group will be included as a target.
• Match All − A device must match all of the filter−in filters to be included as a target. For
example, if you have targeted the Grouped By device group and you filter in the Floor One
device group and the Chassis device group, any device that is on Floor One and in the
Chassis device group will be included as a target.
Number of Devices
A running total of the number of target devices with filters applied. Click View Devices to view a list
of the target devices.
Select Targets Window
210
Welcome to NetSight Inventory Manager Help
Add Filters Button
Opens the Add Filters window, where you can create filters to further qualify the list of devices for
your report.
Clear Filters Button
Deletes any filters selected in the Applied Filters list.
View Devices Button
Opens the View Devices window where you can see a list of the selected devices that will be included
in your report.
Specify Time Window
Use this window to select a date from which report data will be gathered. In most cases, you will want to
generate the report using current data from your devices. However, you can also generate a report based on
historical data. In that case, the report will be generated using device data saved in the last archive preceding
the specified date. Only archive operations that are configured to archive capacity planning data will be used
(see How to Archive for more information.)
Click the graphic for more information.
Use data collected as of
Report data will be collected based on the date selected here. Calculations are based on the last
Specify Time Window
211
Welcome to NetSight Inventory Manager Help
archive preceding the specified date. Only archive operations that are configured to archive capacity
planning data will be used. If there is no archive for a target device, that device will not be
represented in the report results.
If you use this option, be aware that your target selection could affect the validity of your report
results. For more information, see the Note in the Target window section of this Help topic.
Retrieve current data from devices
The report will use current data from the target devices. Because this requires the report to gather
current data from the devices, extra time may be needed when results are calculated.
Slot Results Window
Use this window to view the report data. The radio buttons at the top of the right panel let you select various
ways to display the report results:
• Show Data by Chassis Type −− displays the report results organized by totals based on chassis type.
• Show Data by Chassis −− lists the report results for each chassis.
In addition, your selection in the tree determines the results displayed in the table. For example, you can select
a chassis group and view report data for that group. Then, you can expand the group and view data for a
specific chassis. As you change your selection in the tree, the table is updated with the results for your specific
selection.
Slot Results − Show Data by Chassis Type
The Show Data by Chassis Type view gives you the flexibility of viewing your slot results summarized by
chassis type or detailed by chassis. It provides an easy way to view top−level slot information and quickly
determine where to take a closer look. Simply by changing your selection in the tree, you can view slot data
for all the chassis of a certain type, or slot data for an individual chassis.
Click the graphic for more information.
Slot Results Window
212
Welcome to NetSight Inventory Manager Help
Display
Use these radio buttons to select how you would like the results data displayed.
Target Device Tree
Displays your target groups and devices. Your selection in the tree determines what results data will
be displayed in the table. For example, select a chassis group to see results summarized by chassis
type, or select an individual chassis to see results for just that chassis. When you change your
selection in the tree, the table is updated with the relevant information. If you select an individual
device in the target device tree, the information displayed pertains to the chassis the device resides in.
Device Count, Sufficient Data
The total number of target devices, followed by the number of devices with sufficient data to report
results. If you generated the report using historical data, a device is counted as having sufficient data
if there is one archive used to obtain report results. Target devices that do not reside in chassis will be
counted as having insufficient data.
Table
The Show Data by Chassis Type table displays slot data for the selected chassis group or individual chassis,
organized according to chassis type. In most cases, your report will be generated using current data. However,
if you generated your report based on historical data, the report will use device data saved in the last archive
preceding the specified date. If there is no archive for a target device, or the device does not reside in a
chassis, that device will not be represented in the report results.
Slot Results Window
213
Welcome to NetSight Inventory Manager Help
NOTE: Devices that do not return information for certain report requests will display
"Unsupported" in the results table entry. If a chassis displays "Not Mapped" in its
results table entry, it indicates that the device type is not in the Capacity Planning data
file. If you encounter the "Not Mapped" entry, please contact Global Support for an
updated data file for these devices.
Chassis Type
The chassis model number or hardware type.
Slots per Chassis
The total number of slots in one chassis of that chassis type.
# Chassis
The total number of chassis of that type.
% Slot Used
The percentage of slots of that chassis type being used.
Total Slots
The total number of slots in all the chassis of that type.
# Slots Used
The total number of slots of that chassis type being used.
# Slots Unused
The total number of slots of that chassis type that are not in use.
Average Slots Used
The average number of slots of that chassis type being used.
Average Slots Unused
The average number of slots of that chassis type that are not in use.
Slot Results − Show Data by Chassis
The Show Data by Chassis view lets you view slot data for each individual chassis. Depending on your
selection in the tree, you can see report results for all the chassis in a group, or for just one individual chassis.
Click the graphic for more information.
Slot Results Window
214
Welcome to NetSight Inventory Manager Help
Display
Use these radio buttons to select how you would like the results data displayed.
Target Device Tree
Displays your target groups and devices. Your selection in the tree determines what results data will
be displayed in the table. For example, select a chassis group to see results for all the chassis in that
group, or select an individual chassis to see results for just that chassis. When you change your
selection in the tree, the table is updated with the relevant information. If you select an individual
device in the target device tree, the information displayed pertains to the chassis the device resides in.
Device Count, Sufficient Data
The total number of target devices, followed by the number of devices with sufficient data to report
results. If you generated the report using historical data, a device is counted as having sufficient data
if there is one archive used to obtain report results. Target devices that do not reside in chassis will be
counted as having insufficient data.
Table
The Show Data by Chassis table displays slot data for the selected chassis group or individual chassis. In most
cases, your report will be generated using current data. However, if you generated your report based on
historical data, the report will use device data saved in the last archive preceding the specified date. If there is
no archive for a target device, or the device does not reside in a chassis, that device will not be represented in
the report results.
Slot Results Window
215
Welcome to NetSight Inventory Manager Help
NOTE: Devices that do not return information for certain report requests will display
"Unsupported" in the results table entry. If a chassis displays "Not Mapped" in its
results table entry, it indicates that the device type is not in the Capacity Planning data
file. If you encounter the "Not Mapped" entry, please contact Global Support for an
updated data file for these devices.
Chassis ID
The ID assigned to the chassis. This is usually a serial number or MAC address, depending on the
chassis type.
Chassis Type
The chassis model number or hardware type.
% Slots Used
The percentage of slots being used in the chassis.
Total Slots
The total number of slots in the chassis.
Slots in Use
The chassis slot numbers being used by devices or DFE modules.
# Slots Used
The number of slots being used in the chassis.
# Slots Unused
The number of slots not being used in the chassis.
Buttons
Abort/Refresh
This button toggles between Abort and Refresh. While a report is being generated, Abort stops the
report and clears all data out of the table. Refresh restarts report generation and updates the table with
new data. If you have selected the Retrieve current data from devices option in the Specify Time
window, clicking Refresh allows you to update your report results with the latest data from your
devices.
Export
Allows you to export your report results table as an HTML file or as a delimited text file. A Save
window opens where you can name your exported file, select the file extension, and navigate to a
folder/directory where you want save the file.
Save/Save As
Opens the Save Report window where you can name a report and then save it so that you can run the
report again. You can also select a checkbox to schedule the report. This opens the Schedule Report
window where you can configure scheduling information and notification settings for the report. Once
you have saved a report, it appears in the Saved Reports list in the Select Report window, where you
can select it.
Slot Results Window
216
Welcome to NetSight Inventory Manager Help
Slot Results Window
217
Inventory Manager Wizards
Inventory Manager's Wizards let you easily perform routine network tasks such as configuration backups and
firmware upgrades. Following is a summary of the different wizards Inventory Manager provides for your
ease of use. Click each wizard name below for information on how to use the wizard.
Wizard
Description
Archive Wizard
Create archives (backup copies) of your network devices' configurations that can be
restored to the devices at a later date, if needed. The wizard's task scheduler allows you
to easily schedule routine backups.
Restore Archive
Restore saved configurations (archives) to one or more devices, allowing you to
quickly and easily recover from a problem.
Reset Device
Wizard
Reset a single device, multiple devices, or even multiple device groups using timed or
manual reset.
Firmware
Upgrade Wizard
Upgrade the firmware images on a single device or multiple devices simultaneously.
The wizard gives you the flexibility of performing an immediate upgrade or scheduling
the upgrade to take place at a later time.
Boot PROM
Upgrade Wizard
Upgrade the boot PROM images on a single device or multiple devices simultaneously.
Template
Download
Wizard
Download text−based (ASCII format) configuration templates to one or more devices.
Configuration templates provide an easy way to download similar configurations to
multiple devices.
Inventory Manager Wizards
218
Archive Wizard
Use the Archive Wizard to archive device configuration data and/or capacity planning data. Archiving device
configuration data lets you create archives (backup copies) of your network devices' configurations that can be
restored to the devices at a later date, if needed. Archiving capacity planning data lets you store port and FRU
information for use by the Capacity Planning tool to generate reports. You can create an archive that saves
both configuration data and capacity planning data, or you can create an archive that targets one type of data
or the other.
You can perform archives on a single device, multiple devices, or on an entire device group. Because it is
useful to archive data on a regular basis, Inventory Manager lets you schedule archives to be performed at a
future time, and/or on a routine basis. Once you have configured an archive's parameters, you can use that
archive on a repeated basis to save new versions of the desired data. For example, you may want to create an
archive that saves your device configurations on a weekly basis, and also create an archive that saves only
capacity planning information on a daily basis to monitor what is changing on the network.
Once an archive operation has been created, it is listed by name in the left−panel Archive Mgmt tab under the
Archives folder. Below the archive name are the archive versions, displayed by the date and time the version
was performed. Under the versions are the individual configurations, listed by IP address of the device whose
data was saved. Each configuration displays an icon that identifies the type of data being saved: device
configuration data,
capacity planning data,
both device configuration and capacity planning data.
To access the wizard, select Tools > Wizards > Archive Wizard from the menu bar or click
on
the toolbar. You must have a TFTP or FTP server running to create an archive. For more information, see
TFTP Server Setup or FTP Server Setup.
NOTE: If the device is an X−Pedition router, be aware that when archiving device configuration data, the
router's Startup configuration file is saved.
Archive Name Window
Use this window to name and configure the archive.
Click the graphic for more information.
Archive Wizard
219
Welcome to NetSight Inventory Manager Help
Name
Enter a name for the archive operation.
Description
Enter a description (optional) of the archive operation.
Archive Setup
Archive Type
Select the appropriate checkbox for the type of data you wish to archive:
• Archive Configuration Data − Create archives (backup copies) of your devices'
configurations that can be restored to the devices at a later date, if needed.
• Archive Capacity Planning data − Create archives of port and FRU information to be used
by the Capacity Planning tool to generate reports.
Max Versions
If desired, specify the maximum number of versions you would like saved for this archive. This
allows you to limit the number of versions saved for each archive. Once the maximum number is
reached, older versions are automatically deleted. Otherwise, you can select to not have a maximum
number of archive versions.
Archive Wizard
220
Welcome to NetSight Inventory Manager Help
Device Selection Window
Use this window to select the devices to include in the archive.
NOTE: If you select multiple tree nodes representing the same device but with varying SNMP
contexts, an archive save will be performed for each context. However, the context
must provide access to the MIBs required for the archive save operation or the archive
for that context will fail. It is recommended that you perform the archive operation on
the device with the default context (switch mode.)
Click the graphic for more information.
Select Devices
This panel displays your current devices as they are listed in the left−panel Network Elements tab.
Expand the folders and select the single device, multiple devices (using the Control or Shift keys,) or
a single device group that you want to include in the archive. Click the Add button to add the devices
to the Archive Members list.
Archive Members
The devices you have selected are listed under Archive Members. If you want to remove a member
from the list, select the member and click Remove.
Device Selection Window
221
Welcome to NetSight Inventory Manager Help
TIP: If you open the Archive Wizard from a device or device group in the left−panel
Network Elements tab, the selected device or device group will be automatically
displayed under Archive Members.
Add Button
In the Devices tree, select the device(s) or device group you want to archive, and click Add to add it
to the Archive Members list.
Remove Button
Select a device or device group in the Archive Members list, and click Remove to remove it from the
list.
Schedule Window
Use this window to select devices, and configure scheduling information and process settings for the archive.
You can schedule a one−time, daily, or weekly archive, or schedule the archive to be performed on server
start−up.
Click the graphic for more information.
Devices
Schedule Window
222
Welcome to NetSight Inventory Manager Help
Selected
Use the checkboxes in this column to select or deselect specific devices to be archived. For example,
if you selected a device group in the previous window, you can use these checkboxes to deselect
individual devices in that group.
IP Address
The IP address of the device to be archived. Note that chassis that support Distributed Forwarding
Engines (DFEs), such as the Matrix N−Series, display a single management IP even though there may
be multiple DFE modules in the chassis.
Schedule
Frequency
Use the drop−down list to select the frequency with which you want the archive performed: Never,
Now, Once, Daily, Weekly, or On Server Startup. The Never option lets you create an archive
operation without actually performing it. The Now option lets you perform an immediate archive.
Select Starting Day
Use the drop−down list to select the month you want the archive to start. A calendar corresponding to
the selected month is displayed. Select the desired starting day by clicking on the calendar. You can
use the arrows on either side of the drop−down list to change the month, and change the year by
entering a new year in the text field. (This field is grayed out if you have selected the Never or Now
frequency.)
Start Time
Set the starting time for the operation and select AM or PM. (This field is grayed out if you have
selected the Never or Now frequency.)
Process
Groups of
The archive will be performed in parallel (simultaneously) on the number of devices specified in the
Groups of field. Set the value to 1 to have the operation performed serially, one device after another.
Abort on failure
Select the Abort on failure checkbox to stop the archive operation after a failure. This is useful if you
are performing an archive operation on multiple devices and you want the operation to stop after a
failure on a single device.
Finish Button
Creates the archive. The archive will be listed by name in the left−panel Archive Mgmt tab under the
Archives folder, and performed according to its scheduled parameters. You can change the archive's
parameters; see Editing an Archive for instructions.
Schedule Window
223
Restore Wizard
Use the Restore Wizard to restore saved (archived) device configuration files to one or more devices. Saved
configurations are listed in the left−panel Archive Mgmt tab under the appropriate archive and version. Each
configuration displays an icon that identifies the type of data that was saved: device configuration data,
capacity planning data,
both device configuration and capacity planning data. Only configurations that
include device configuration data (
and
) are available to be restored.
A configuration can only be restored to a device with the same IP address. In other words, the device you are
restoring to must have the same IP address as the device the configuration was originally saved from. You can
restore configurations to a single device or multiple devices. You must have a TFTP or FTP server running to
restore a configuration. For more information, see TFTP Server Setup or FTP Server Setup.
To access the wizard, select Tools > Wizards > Restore Wizard from the menu bar or click
on
the toolbar.
Archive Version Selection Window
Use this window to select an archive version or single configuration to restore. If you select an archive
version, you can use the Remove button to remove any individual configurations included in the archive
version that you do not wish to restore.
Click the graphic for more information.
Restore Wizard
224
Welcome to NetSight Inventory Manager Help
Archives
This panel displays your current archives just as they are listed in the left−panel Archive Mgmt tab. Below
each archive name are the archive versions, displayed by the date and time the version was performed. Under
the versions are the individual configurations, listed by IP address of the device whose configuration was
saved. Each configuration displays an icon that identifies the type of data that was saved: device
configuration data,
capacity planning data,
both device configuration and capacity planning data. Only
configurations that include device configuration data (
and
) are available to be restored.
Expand the folders under the Archives tree and select the archive version or configuration you want to restore.
Click the Add button to add the configurations to the Configurations to Restore table.
TIPS: −− If you open the Restore Wizard from an archive version or configuration in the left−panel
Archive Mgmt tab, the selected configuration(s) will be automatically displayed under
Configurations to Restore.
−− Check the FW Match column to see if the current firmware version on the device matches the
firmware version that was on the device at the time of the archive.
Configurations to Restore
Displays the configurations you have selected to restore. Select a configuration and use the Remove button to
remove any individual configurations you do not wish to restore.
Configuration IP
The IP address of the device whose configuration was saved.
Restore Wizard
225
Welcome to NetSight Inventory Manager Help
Archive
The name of the archive operation that saved the configuration.
Version Date
The date and time that the archive operation was performed.
FW Match
A indicates that the current firmware version installed in the device matches the firmware version
installed in the device at the time of the configuration save.
Config FW
The firmware version installed in the device at the time of the configuration save.
Device FW
The current firmware version installed in the device.
Add Button
In the Archives tree, select the archive version or configuration you want to restore, and click Add to
add it to the Configurations to Restore table.
Remove Button
Select a configuration in the Configurations to Restore table, and click Remove to remove it from the
table.
Restore Configurations Window
Use this window to configure restore parameters, initiate the restore operation, and monitor restore progress.
Devices that require a reset will be reset automatically after the restore is complete.
Click the graphic for more information.
Restore Configurations Window
226
Welcome to NetSight Inventory Manager Help
Show all devices/Show only incomplete and failed
Once the restore operation starts, the device list table updates with status information for each device.
An alert icon
will appear in the Alert column of the table if a restore operation fails for a specific
device. You can use these radio buttons to show all devices or show only those devices whose restore
operations are incomplete or have failed.
Device List Table
A list of the devices you have selected for your restore operation. Once the restore is started, this table
updates with status information for the restore operation:
• Alert − an alert icon
will appear in the Alert column if a restore operation fails for a
specific device.
• IP Address − The device's IP address. Note that chassis that support Distributed Forwarding
Engines (DFEs), such as the Matrix N−Series, display a single management IP even though
there may be multiple DFE modules in the chassis.
• Configuration − The name of the configuration file being restored.
• Status − The status of the operation for that particular device: Success or Failure.
• Operation − The type of operation performed: Configuration Restore.
• % Progress − A progress bar showing the percent completed of the operation.
• Bytes Trans. − The number of bytes transferred during the operation.
• Message − A message relating to the status of the operation.
TIP: Use the table options and tools to find, filter, sort, print, and export information in a table
and customize table settings. You can access the Table Tools through a right−mouse click on
a column heading or anywhere in the table body, or by clicking the Table Tools
Restore Configurations Window
227
Welcome to NetSight Inventory Manager Help
button in the upper left corner of the table (if you have the row count column
displayed). For more information, see Table Tools.
Status Summary
Once the restore is started, this area updates with status information for the restore operation.
Restore Type
The restore will be performed in parallel (simultaneously) on the number of devices specified in the
Groups of field. By default, the restores will occur in sequential order (Groups of: 1). This is to
protect against possible isolation of other devices that are on the restore list.
CAUTION: Because some devices automatically reset following a restore operation,
performing a Restore Type greater than 1 may isolate other devices in the
restore list, causing their restores to fail. It is recommended that you leave
the Groups of value at 1 (perform the restore serially,) unless you know it
is safe to have the selected network devices reset simultaneously.
Start Button
Initiates the restore operation. The table at the top of the window updates with status information, as
will the status area in the bottom left of the window.
Restore Configurations Window
228
Reset Device Wizard
Use the Reset Device Wizard to reset a single device, multiple devices, or even multiple device groups. The
Reset Device Wizard allows you to reset devices that support Timed Reset as well as those devices that do
not. Timed Reset lets you configure your reset operation with a time delay, so that the actual device resets
take place at a later time.
To access the wizard, select Tools > Wizards > Reset Wizard from the menu bar or click
on the
toolbar.
Device Selection Window
Use this window to select the devices to include in the reset operation.
NOTE: If you have multiple tree nodes representing the same device but with varying SNMP contexts,
keep in mind that not all device contexts will provide access to the MIBs required to perform the
operation. When selecting your devices, make sure that any device with SNMP context has access
to the required MIBs, or select the device with default context (switch mode).
Click the graphic for more information.
Select devices to reset
This panel displays your current devices as they are listed in the left−panel Network Elements tab. Expand the
folders and select the single device or device group, or multiple devices or device groups (using the Control or
Shift keys) that you want to reset. Click the Add button to add the devices to the Selected Devices table.
Reset Device Wizard
229
Welcome to NetSight Inventory Manager Help
TIP: If you open the Reset Device Wizard from a device or device group in the left−panel
Network Elements tab, the selected device(s) will be automatically displayed in the
Selected Devices table.
Selected Devices
Lists the devices selected for the reset operation. Devices that do not support the reset operation or have never
been contacted, are not listed. If you want to remove a device from the table, select the device and click
Remove.
IP Address
The device's IP address. Note that chassis that support Distributed Forwarding Engines (DFEs), such
as the Matrix N−Series, display a single management IP even though there may be multiple DFE
modules in the chassis.
Device Type
The device's model number or hardware type.
Firmware Version
The current firmware version installed in the device.
Firmware Download
A indicates the device supports the ability to download firmware using the Firmware Upgrade
Wizard.
Boot PROM Version
The current version of Boot PROM installed in the device.
Boot PROM Download
A indicates the device supports the ability to download boot PROM images using the Boot PROM
Upgrade Wizard.
Add Button
Select a single device or device group, or multiple devices or device groups, and click Add to add
them to the Selected Devices table.
Remove Button
To remove a device from the Selected Devices table, select the device and click Remove.
Reset Devices: Timed Reset Supported Window
Use this window to reset those devices that support Timed Reset. Timed Reset gives you the flexibility to set
up your reset operation with a time delay, so that the actual device resets take place at a later time. This can be
useful when trying to schedule resets for a time when the network is least busy.
Click the graphic for more information.
Reset Devices: Timed Reset Supported Window
230
Welcome to NetSight Inventory Manager Help
Show devices not supporting timed reset
This window lists those devices that support Timed Reset. Select this checkbox to include devices that
do not support timed reset. Devices that do not support timed reset cannot be reset from this window;
proceed to the next window to reset those devices.
Device List Table
A list of the devices you have selected for your reset operation. Once the reset operation has started,
you must click Refresh to update the device information in the table.
• Selected − Use the checkboxes in this column to select or deselect devices to be reset.
Devices that do not support timed reset cannot be selected.
• IP Address − The device's IP address. Note that chassis that support Distributed Forwarding
Engines (DFEs), such as the Matrix N−Series, display a single management IP even though
there may be multiple DFE modules in the chassis.
• Firmware Version − The current firmware version installed in the device.
• Device Status − The device's connection status (Contact or No Contact) and, therefore, its
ability to respond to SNMP requests.
• Reset Request Status − The status of the reset operation: Initial (the operation has not
started), Success (the operation succeeded), Failure (the operation failed).
• Message − A message relating to the status of the operation.
TIP: Use the table options and tools to find, filter, sort, print, and export information in a table
and customize table settings. You can access the Table Tools through a right−mouse click on
a column heading or anywhere in the table body, or by clicking the Table Tools
button in the upper left corner of the table (if you have the row count column
displayed). For more information, see Table Tools.
Reset Delay
Reset Devices: Timed Reset Supported Window
231
Welcome to NetSight Inventory Manager Help
Enter the amount of time (in seconds) until the device resets after the reset operation begins. For
example, if you start the reset operation at 4:00 pm with a 7 hour reset delay (420 seconds), the
device(s) will reset at 11:00 pm. This allows you to schedule your resets for a time when the network
is least busy.
Reset Type
Select the type of reset: Warm boot (restarts the device) or Cold boot (same as turning device power
off and on).
Elapsed Time
The amount of time in minutes:seconds since the reset operation started.
Start Button
Starts the timed resets. Resets occur simultaneously. Once the reset operation has started, you must
click Refresh to update the device information in the table.
Refresh Button
Once the reset operation has started, use the Refresh button to update the device information in the
table.
Reset Devices: Timed Reset Not Supported Window
Use this window to reset those devices that do not support Timed Reset. Devices will be reset one at a time,
waiting until a device is fully booted before beginning the next device.
Click the graphic for more information.
Reset Devices: Timed Reset Not Supported Window
232
Welcome to NetSight Inventory Manager Help
Device List Table
Lists those devices that do not support timed reset. Once the reset operation has started, you must
click Refresh to update the device information in the table.
• Selected − Use the checkboxes in this column to select or deselect devices to be reset.
• IP Address − The device's IP address. Note that chassis that support Distributed Forwarding
Engines (DFEs), such as the Matrix N−Series, display a single management IP even though
there may be multiple DFE modules in the chassis.
• Firmware Version − Shows the current firmware version installed in the device.
• Device Status − The device's connection status (Contact or No Contact) and, therefore, its
ability to respond to SNMP requests.
• Reset Request Status − The status of the reset operation.
• Message − A message relating to the status of the operation.
TIP: Use the table options and tools to find, filter, sort, print, and export information in a table
and customize table settings. You can access the Table Tools through a right−mouse click on
a column heading or anywhere in the table body, or by clicking the Table Tools
button in the upper left corner of the table (if you have the row count column
displayed). For more information, see Table Tools.
Reset Type
Select the type of reset: Warm boot (restarts the device) or Cold boot (same as turning device power
off and on).
Elapsed Time
The amount of time in minutes:seconds since the reset operation started.
Start Button
Initiates the reset operation. Resets occur one at a time, continuing only after a device is fully booted.
After the reset operation is completed, you can click Refresh to update the device information in the
table.
Refresh Button
Once the reset operation has completed, use the Refresh button to update the device information in
the table.
Reset Devices: Timed Reset Not Supported Window
233
Firmware Upgrade Wizard
Use the Firmware Upgrade Wizard to easily upgrade the firmware images on your network devices. The
wizard gives you the flexibility of performing an immediate upgrade or scheduling the upgrade to take place
at a later time. If you schedule the upgrade, the wizard will automatically perform the upgrade at the
scheduled time, and then alert you that the upgraded devices need to be reset via the Reset Wizard.
To access the wizard, select Tools > Wizards > Firmware Upgrade Wizard from the menu bar or click
on the toolbar.
There are certain steps you must perform before you can upgrade your firmware. The steps vary depending on
whether you are using a mapped file transfer server (as configured in the Services for NetSight Server view of
the Options window) or an alternate remote file transfer server (as configured in the Alternate Firmware
Servers view in the Options window) to perform the upgrade. For instructions, see Preparing to Upgrade.
NOTE: The Firmware Upgrade Wizard can also be used to downgrade firmware to a previous revision.
Downgrading firmware is inherently risky due to possible feature differences between revisions.
Restoring configurations from different firmware revisions carries the same risk. Should you need
to downgrade your firmware to an earlier version, it is recommended that you use one of the
following two procedures:
• Downgrade the firmware on a network device using the Firmware Upgrade Wizard. Do
not proceed to the Reset Devices portion of the wizard, instead select [Finish]. Restore an
archived configuration that was previously created with the firmware image being
downloaded. This will reset the device.
or
• Downgrade the firmware on a network device using the Firmware Upgrade Wizard.
Complete the downgrade using the wizard Reset Devices screens. Clear NVRAM on the
device and reconfigure the network configuration parameters of the device using the local
console.
In addition, when downgrading firmware on SNMPv3 devices, it is possible that Inventory
Manager will lose contact with the device. SNMPv3 adds a level of difficulty to downgrade
operations, because counters and timers related to security features of SNMPv3 may get out of
sync. Following the downgrade, you will need to restart Inventory Manager to re−establish
contact with the device.
CAUTION: Prior to upgrading firmware on a device, it is recommended that you archive the latest
configuration for the device being upgraded. This will aid you in downgrading should you
choose to do so.
Device Selection Window
Use this window to select the devices to include in the firmware upgrade operation.
NOTE: If you have multiple tree nodes representing the same device but with varying SNMP contexts,
keep in mind that not all device contexts will provide access to the MIBs required to perform the
Firmware Upgrade Wizard
234
Welcome to NetSight Inventory Manager Help
operation. When selecting your devices, make sure that any device with SNMP context has access
to the required MIBs, or select the device with default context (switch mode).
Click the graphic for more information.
Select devices to upgrade
This panel displays your current devices as they are listed in the left−panel Network Elements tab. Expand the
folders and select the single device or device group, or multiple devices or device groups (using the Control or
Shift keys) that you want to upgrade. Click the Add button to add the devices to the Selected Devices table. If
there were devices that failed the previous upgrade, use the Add Failed button to add those devices to the
table.
TIP: If you open the Firmware Upgrade Wizard from a device or device group in the left−panel Network
Elements tab, the selected device(s) will be automatically displayed in the Selected Devices table.
Selected Devices
Lists the devices selected for the upgrade operation. Devices that do not support firmware download or have
never been contacted, are not listed. If you want to remove a device from the table, select the device and click
Remove.
IP Address
The device's IP address. Note that chassis that support Distributed Forwarding Engines (DFEs), such
as the Matrix N−Series, display a single management IP even though there may be multiple DFE
modules in the chassis.
Device Type
The device's model number or hardware type.
Firmware Upgrade Wizard
235
Welcome to NetSight Inventory Manager Help
Firmware Version
The current firmware version installed in the device.
Firmware Download
A indicates the device supports the ability to download firmware images using this wizard.
Boot PROM Version
The current version of Boot PROM installed in the device.
Boot PROM Download
A indicates the device supports the ability to download boot PROM images using the Boot PROM
Upgrade Wizard.
Add Button
Select a single device or device group, or multiple devices or device groups, and click Add to add
them to the Selected Devices table.
Remove Button
To remove a device from the Selected Devices table, select the device and click Remove.
Add Failed Button
If there were devices that failed the previous firmware upgrade, click the Add Failed button to add
those devices to the Selected Devices table. This button will not be displayed if there are no devices
that failed the previous upgrade.
Assign Firmware Window
Use this window to select and assign the firmware images to be used in the upgrade. Firmware is assigned
according to device type or binary family (device types that share the same firmware image). The left panel
lists the device types selected for the firmware upgrade. The right panel lists firmware images compatible with
a selected device type. Use the Assign to: buttons to assign an image to a specific device type or to the entire
binary family. You must assign an image to each device type.
NOTE: Before proceeding with the upgrade, be sure to verify that the boot PROM and firmware images
that will be on the device after the upgrade operation are compatible. Refer to the boot PROM and
firmware release notes for more information.
Click the graphic for more information.
Assign Firmware Window
236
Welcome to NetSight Inventory Manager Help
Assignments
This table lists the device types of all the devices selected for the firmware upgrade. Select a device type to
display compatible firmware images in the right panel. If necessary, click the Refresh Images button to
perform a firmware discovery and update the list of firmware images. Then, in the right−panel, select a
firmware image and use the Assign to: buttons to assign the image to the device type or to each entry that is a
member of that binary family. The image will appear in the Image Name column in the Assignments table.
You must assign an image to each device type.
NOTE: A device type group may include some devices that use the local mapped file transfer server for
firmware downloads, and some that use an alternate remote firmware download server. In that
case, the device type would have multiple entries in the Assignments table, one for each server.
When you select an entry that uses an alternate server, only firmware records associated with that
alternate server will be displayed in the Image list table (unless you select Show All Images.)
Family
The product family to which the device type belongs.
Device Type
The device's model number or hardware type.
Server ID
The firmware download server specified for the device type. All devices are initially configured to use
the mapped file transfer server (as configured in the Services for NetSight Server view of the Options
window) for firmware downloads. You can specify an alternate firmware download server, which
allows a remote device to use a server in its own local network. For more information see How to Set
Up Alternate Firmware Download Servers.
Image Name
Assign Firmware Window
237
Welcome to NetSight Inventory Manager Help
The firmware image assigned to the device type.
Image List
This table lists all the compatible firmware images for the device type selected in the Assignments table. If
you select a device type entry that uses an alternate remote firmware download server, only firmware records
associated with that alternate server will be displayed. Select a firmware image and use the Assign to: buttons
to assign the image to the selected device type or to the entire binary family. The image will appear in the
Image Name column in the Assignments table. You must assign an image to each device type. Use the
Refresh Images button to perform a firmware discovery and update the list of firmware images, if desired.
Show All Images
By default, only firmware images that are compatible with the selected device type are listed. Select
the Show All Images checkbox to override this filter and display all your firmware images. If by
selecting this checkbox you assign a firmware image that's associated with the mapped server, to a
device type that specifies an alternate firmware download server, the wizard will use the mapped
server to perform the download.
Image Name
The name of the firmware image as it appears in your firmware images directory.
Server
Displays the firmware download server associated with the firmware image. A discovered firmware
image that is accessible by the mapped file transfer server (as configured in the Services for NetSight
Server view of the Options window) will display "Mapped Server". A user−defined firmware record
will display its associated alternate firmware download server, as configured in the Create Firmware
Record window. For more information see How to Set Up Alternate Firmware Download Servers.
Image Path
The path to the location where the image is stored.
Version
The version number of the firmware image. If the version number is not available from the image file,
and Inventory Manager has not performed a firmware upgrade using this image, this field will display
N/A (not available).
Assign to Device Type Button
Use the Assign to: Device Type button to assign a firmware image to the device type.
Assign to Entire Family Button
Use the Assign to: Entire Family button to assign a firmware image to each entry that is a member
of that binary family.
Refresh Images Button
Performs a firmware discovery and updates the list of firmware images.
Download Progress Window
Use this window to configure download parameters, start the download, and monitor download progress.
Alternately, you can click Schedule to open the Download Schedule window where you can schedule the
firmware download to take place in the background at a future time.
Download Progress Window
238
Welcome to NetSight Inventory Manager Help
Click the graphic for more information.
Show all devices/Show only incomplete and failed
Once the upgrade operation starts, the device list table updates with status information for each
device. An alert icon
will appear in the Alert column of the table if a download operation fails for
a specific device. You can use these radio buttons to show all devices or show only those devices
whose download operations are incomplete or have failed.
Device List Table
A list of the devices you have selected for your download operation. Once the download is started,
this table updates with status information for the download operation:
• Alert − an alert icon
will appear in the Alert column if a download operation fails for a
specific device.
• IP Address − The device's IP address. Note that chassis that support Distributed Forwarding
Engines (DFEs), such as the Matrix N−Series, display a single management IP even though
there may be multiple DFE modules in the chassis.
• Image − The name of the image file being downloaded.
• Status − The status of the download operation: Initial (the operation has not started), Success
(the operation succeeded), Failure (the operation failed).
• Operation − The type of operation performed: Firmware Download.
• % Progress − A progress bar showing the percent completed of the operation.
• Bytes Trans. − The number of bytes transferred during the download.
• Message − Initially, this column shows the file transfer server and the firmware image being
used for the download operation. Once the download is started, it displays a message relating
Download Progress Window
239
Welcome to NetSight Inventory Manager Help
to the status of the operation.
TIP: Use the table options and tools to find, filter, sort, print, and export information in a table
and customize table settings. You can access the Table Tools through a right−mouse click on
a column heading or anywhere in the table body, or by clicking the Table Tools
button in the upper left corner of the table (if you have the row count column
displayed). For more information, see Table Tools.
Status Summary
Once the download is started, this area updates with status information for the download operation.
Download Type
The downloads will be performed in parallel (simultaneously) on the number of devices specified in
the Groups of field. Enter the value 1 to have the downloads performed serially, one device after
another.
Start Button
Initiates the download operation. The table at the top of the window updates with status information,
as will the status area in the bottom left of the window.
Schedule Button
Opens the Download Schedule window where you can schedule the firmware upgrade to take place in
the background at a future time.
Download Schedule Window
If you are scheduling your download for a future time, use this window to configure scheduling information
and process settings for the download operation. Although a scheduled download runs automatically and does
not require your supervision, you will still need to reset any devices that require reset, once the scheduled
downloads have completed. After the firmware has been downloaded at the scheduled time, a Reset Device
icon
is displayed in the status bar indicating that there are devices that have received new firmware
images and need to be reset. Double−click the icon to open the Devices Need Reset window where you can
launch the Reset Device Wizard for those devices.
Click the graphic for more information.
Download Schedule Window
240
Welcome to NetSight Inventory Manager Help
Name
Enter a name for the scheduled download, or use the default name which is based on the date the
schedule is created.
Schedule
Select Date
Use the drop−down list to select the month you want the download to start. A calendar corresponding
to the selected month is displayed. Select the desired starting day by clicking on the calendar. You can
use the arrows on either side of the drop−down list to change the month, and change the year by
entering a new year in the text field.
Start Time
Set the starting time for the operation and select AM or PM.
Process
Groups of
The download will be performed in parallel (simultaneously) on the number of devices specified in
the Groups of field. Set the value to 1 to have the operation performed serially, one device after
another.
Abort on failure
Select the Abort on Failure checkbox to stop the download operation after a failure. This is useful if
you are performing a download operation on multiple devices and you want the operation to stop after
a failure on a single device.
Finish Button
Download Schedule Window
241
Welcome to NetSight Inventory Manager Help
Schedules the download operation. When the scheduled download is performed, you can monitor the
progress, if desired, via the Active Status panel, just as you do for scheduled archives. You can view
or cancel scheduled downloads using the Scheduled Events window (Tools > Scheduled Events).
Reset Devices: Timed Reset Supported Window
Once the downloads have completed, use this window to reset those devices that support Timed Reset. Timed
Reset gives you the flexibility to set up your reset operation with a time delay, so that the actual device resets
take place at a later time. This can be useful when trying to schedule resets for a time when the network is
least busy.
NOTE: During the device reset, Inventory Manager learns the current firmware version installed
on the device. Inventory Manager uses this information to determine whether the
firmware version installed on the device matches the firmware reference image set for the
device's binary family. (This information is displayed in the All Devices Details View
tab.) If the version number is not available from an image file, you can manually set the
version number in the Firmware Image General Tab.
Click the graphic for more information.
Show devices not supporting timed reset
This window lists those devices that support Timed Reset. Select this checkbox to include devices that
do not support timed reset. Devices that do not support timed reset cannot be reset from this window;
proceed to the next window to reset those devices.
Reset Devices: Timed Reset Supported Window
242
Welcome to NetSight Inventory Manager Help
Show devices that failed firmware upgrade
Select this checkbox to include devices that failed the firmware upgrade.
Device List Table
A list of the devices you have selected for your reset operation. Once the reset operation has started,
you must click Refresh to update the device information in the table.
• Selected − Use the checkboxes in this column to select or deselect devices to be reset.
Devices that do not support timed reset cannot be selected.
• Running New Firmware − Following the reset, a indicates the device is running the new
firmware version. (The checkmark is only displayed if the firmware version changes.)
Remember to click Refresh to update the information in the table following the reset.
• IP Address − The device's IP address. Note that chassis that support Distributed Forwarding
Engines (DFEs), such as the Matrix N−Series, display a single management IP even though
there may be multiple DFE modules in the chassis.
• Firmware Version − Shows the current firmware version installed in the device. Following
the reset, the new firmware version will be displayed. Remember to click Refresh to update
the information in the table following the reset.
• Device Status − The device's connection status (Contact or No Contact) and, therefore, its
ability to respond to SNMP requests.
• Downloaded Image − The name of the image file that was downloaded.
• Download Status − The status of the download operation: Success (the operation succeeded),
Failure (the operation failed).
• Reset Request Status − The status of the reset operation: Initial (the operation has not
started), Success (the operation succeeded), Failure (the operation failed).
• Message − A message relating to the status of the operation.
TIP: Use the table options and tools to find, filter, sort, print, and export information in a table
and customize table settings. You can access the Table Tools through a right−mouse click on
a column heading or anywhere in the table body, or by clicking the Table Tools
button in the upper left corner of the table (if you have the row count column
displayed). For more information, see Table Tools.
Reset Delay
Enter the amount of time (in seconds) until the device resets after the reset operation begins. For
example, if you start the reset operation at 4:00 pm with a 7 hour reset delay (420 seconds), the
device(s) will reset at 11:00 pm. This allows you to schedule your resets for a time when the network
is least busy.
Reset Type
Select the type of reset: Warm boot (restarts the device) or Cold boot (same as turning device power
off and on).
Elapsed Time
The amount of time in minutes:seconds since the reset operation started.
Start Button
Starts the timed resets. Resets occur simultaneously. Once the reset operation has started, you must
click Refresh to update the device information in the table.
Refresh Button
Reset Devices: Timed Reset Supported Window
243
Welcome to NetSight Inventory Manager Help
Once the reset operation has started, use the Refresh button to update the device information in the
table.
Reset Devices: Timed Reset Not Supported Window
Once the downloads have completed, use this window to reset those devices that do not support Timed Reset.
Devices will be reset one at a time, waiting until a device is fully booted before beginning the next device.
NOTE: During the device reset, Inventory Manager learns the current firmware version installed
on the device. Inventory Manager uses this information to determine whether the
firmware version installed on the device matches the firmware reference image set for the
device's binary family. (This information is displayed in the All Devices Details View
tab.) If the version number is not available from an image file, you can manually set the
version number in the Firmware Image General Tab.
Click the graphic for more information.
Show devices that failed firmware upgrade
Select this checkbox to include devices that failed the firmware upgrade.
Device List Table
Lists those devices that do not support timed reset. Once the reset operation has started, you must
click Refresh to update the device information in the table.
• Selected − Use the checkboxes in this column to select or deselect devices to be reset.
• Running New Firmware − Following the reset, a indicates the device is running the new
firmware version. (The checkmark is only displayed if the firmware version changes.)
Remember to click Refresh to update the information in the table following the reset.
• IP Address − The device's IP address. Note that chassis that support Distributed Forwarding
Engines (DFEs), such as the Matrix N−Series, display a single management IP even though
Reset Devices: Timed Reset Not Supported Window
244
Welcome to NetSight Inventory Manager Help
there may be multiple DFE modules in the chassis.
• Firmware Version − Shows the current firmware version installed in the device. Following
the reset, the new firmware version will be displayed. Remember to click Refresh to update
the information in the table following the reset.
• Device Status − The device's connection status (Contact or No Contact) and, therefore, its
ability to respond to SNMP requests.
• Downloaded Image − The name of the image file that was downloaded.
• Download Status − The status of the download operation: Success (the operation succeeded),
Failure (the operation failed).
• Reset Request Status − The status of the reset request.
• Message − A message relating to the status of the operation.
TIP: Use the table options and tools to find, filter, sort, print, and export information in a table
and customize table settings. You can access the Table Tools through a right−mouse click on
a column heading or anywhere in the table body, or by clicking the Table Tools
button in the upper left corner of the table (if you have the row count column
displayed). For more information, see Table Tools.
Reset Type
Select the type of reset: Warm boot (restarts the device) or Cold boot (same as turning device power
off and on).
Elapsed Time
The amount of time in minutes:seconds since the reset operation started.
Start Button
Initiates the reset operation. Resets occur one at a time, continuing only after a device is fully booted.
After the reset operation is completed, you can click Refresh to update the device information in the
table.
Refresh Button
Once the reset operation has completed, use the Refresh button to update the device information in
the table.
Reset Devices: Timed Reset Not Supported Window
245
Boot PROM Upgrade Wizard
Use the Boot PROM Upgrade Wizard to easily upgrade the boot PROM images on your network devices.
To access the wizard, select Tools > Wizards > Boot PROM Upgrade Wizard from the menu bar or click
on the toolbar.
There are certain steps you must perform before you can upgrade your boot PROM images. The steps vary
depending on whether you are using a mapped file transfer server (as configured in the Services for NetSight
Server view of the Options window) or an alternate remote file transfer server (as configured in the Alternate
Firmware Servers view in the Options window) to perform the upgrade. For instructions, see Preparing to
Upgrade.
NOTE: The Boot PROM Upgrade Wizard can also be used to downgrade boot PROM to a previous
revision. Downgrading boot PROM is inherently risky due to possible feature differences between
revisions. Restoring configurations from different firmware revisions carries the same risk.
Should you need to downgrade your boot PROM to an earlier version, it is recommended that you
use one of the following two procedures:
• Downgrade the boot PROM on a network device using the Boot PROM Upgrade Wizard.
Do not proceed to the Reset Devices portion of the wizard, instead select [Finish].
Restore an archived configuration that was previously created with the boot PROM image
being downloaded. This will reset the device.
or
• Downgrade the boot PROM on a network device using the Boot PROM Upgrade Wizard.
Complete the downgrade using the wizard Reset Devices screens. Clear NVRAM on the
device and reconfigure the network configuration parameters of the device using the local
console.
In addition, when downgrading boot PROM on SNMPv3 devices, it is possible that Inventory
Manager will lose contact with the device. SNMPv3 adds a level of difficulty to downgrade
operations, because counters and timers related to security features of SNMPv3 may get out of
sync. Following the downgrade, you will need to restart Inventory Manager to re−establish
contact with the device.
CAUTION: Prior to upgrading boot PROM on a device, it is recommended that you archive the latest
configuration for the device being upgraded. This will aid you in downgrading should you
choose to do so.
Device Selection Window
Use this window to select the devices to include in the boot PROM upgrade operation.
NOTE: If you have multiple tree nodes representing the same device but with varying SNMP contexts,
keep in mind that not all device contexts will provide access to the MIBs required to perform the
operation. When selecting your devices, make sure that any device with SNMP context has access
to the required MIBs, or select the device with default context (switch mode).
Boot PROM Upgrade Wizard
246
Welcome to NetSight Inventory Manager Help
Click the graphic for more information.
Select devices to upgrade
This panel displays your current devices as they are listed in the left−panel Network Elements tab. Expand the
folders and select the single device or device group, or multiple devices or device groups (using the Control or
Shift keys) that you want to upgrade. Click the Add button to add the devices to the Selected Devices table.
TIP: If you open the Boot PROM Upgrade Wizard from a device or device group in the
left−panel Network Elements tab, the selected device(s) will be automatically displayed in
the Selected Devices table.
Selected Devices
Lists the devices selected for the upgrade operation. Devices that do not support boot PROM download or
have never been contacted, are not listed. If you want to remove a device from the table, select the device and
click Remove.
IP Address
The device's IP address. Note that chassis that support Distributed Forwarding Engines (DFEs), such
as the Matrix N−Series, display a single management IP even though there may be multiple DFE
modules in the chassis.
Family
The product family to which the device type belongs.
Device Type
The device's model number or hardware type.
Firmware Version
Boot PROM Upgrade Wizard
247
Welcome to NetSight Inventory Manager Help
The current firmware version installed in the device.
Firmware Download
A indicates the device supports the ability to download firmware images using the Firmware
Upgrade Wizard.
Boot PROM Version
The current version of Boot PROM installed in the device.
Boot PROM Download
A indicates the device supports the ability to download boot PROM images using this wizard.
Add Button
Select a single device or device group, or multiple devices or device groups, and click Add to add
them to the Selected Devices table.
Remove Button
To remove a device from the Selected Devices table, select the device and click Remove.
Assign Boot PROM Window
Use this window to select and assign the boot PROM images to be used in the upgrade. Images are assigned
according to device type or binary family (device types that share the same firmware image). The left panel
lists the device types selected for the boot PROM upgrade. The right panel lists boot PROM images
compatible with a selected device type. Use the Assign to: buttons to assign an image to a specific device type
or to the entire binary family. You must assign an image to each device type.
NOTE: Before proceeding with the upgrade, be sure to verify that the boot PROM and firmware images
that will be on the device after the upgrade operation are compatible. Refer to the boot PROM and
firmware release notes for more information.
Click the graphic for more information.
Assign Boot PROM Window
248
Welcome to NetSight Inventory Manager Help
Assignments
This table lists the device types of all the devices selected for the boot PROM upgrade. Select a device type to
display compatible boot PROM images in the right panel. If necessary, click the Refresh Images button to
perform a firmware discovery and update the list of boot PROM images. Then, in the right−panel, select an
image and use the Assign to: buttons to assign the image to the device type or to each entry that is a member
of that binary family. The image will appear in the Image Name column in the Assignments table. You must
assign an image to each device type.
NOTE: A device type group may include some devices that use the local mapped file transfer server for
firmware downloads, and some that use an alternate remote firmware download server. In that
case, the device type would have multiple entries in the Assignments table, one for each server.
When you select an entry that uses an alternate server, only firmware records associated with that
alternate server will be displayed in the Image list table (unless you select Show All Images.)
Family
The product family to which the device type belongs.
Device Type
The device's model number or hardware type.
Server ID
The firmware download server specified for the device type. All devices are initially configured to use
the mapped file transfer server (as configured in the Services for NetSight Server view of the Options
window) for firmware downloads. You can specify an alternate firmware download server, which
allows a remote device to use a server in its own local network. For more information see How to Set
Up Alternate Firmware Download Servers.
Image Name
The boot PROM image assigned to the device type.
Assign Boot PROM Window
249
Welcome to NetSight Inventory Manager Help
Image List
This table lists all the compatible boot PROM images for the device type selected in the Assignments table. If
you select a device type entry that uses an alternate remote firmware download server, only firmware records
associated with that alternate server will be displayed. Select a boot PROM image and use the Assign to:
buttons to assign the image to the selected device type or to the entire binary family. The image will appear in
the Image Name column in the Assignments table. You must assign an image to each device type. Use the
Refresh Images button to perform a firmware discovery and update the list of boot PROM images, if desired.
Show All Images
By default, only boot PROM images that are compatible with the selected device type are listed.
Select the Show All Images checkbox to override this filter and display all your boot PROM images.
If by selecting this checkbox you assign a boot PROM image that's associated with the mapped
server, to a device type that specifies an alternate firmware download server, the wizard will use the
mapped server to perform the download.
Image Name
The name of the boot PROM image as it appears in your firmware images directory.
Server
Displays the firmware download server associated with the boot PROM image. A discovered boot
PROM image that is accessible by the mapped file transfer server (as configured in the Services for
NetSight Server view of the Options window) will display "Mapped Server". A user−defined
firmware record will display its associated alternate firmware download server, as configured in the
Create Firmware Record window. For more information see How to Set Up Alternate Firmware
Download Servers.
Image Path
The path to the location where the image is stored.
Version
The version number of the boot PROM image. If the version number is not available from the image
file, and Inventory Manager has not performed a boot PROM upgrade using this image, this field will
display N/A (not available).
Assign to Device Type Button
Use the Assign to: Device Type button to assign a boot PROM image to the device type.
Assign to Entire Family Button
Use the Assign to: Entire Family button to assign a boot PROM image to each entry that is a
member of that binary family.
Refresh Images Button
Performs a firmware discovery and updates the list of boot PROM images.
Download Progress Window
Use this window to configure download parameters, start the download, and monitor download progress.
Click the graphic for more information.
Download Progress Window
250
Welcome to NetSight Inventory Manager Help
Show all devices/Show only incomplete and failed
Once the upgrade operation starts, the device list table updates with status information for each
device. An alert icon
will appear in the Alert column of the table if a download operation fails for
a specific device. You can use these radio buttons to show all devices or show only those devices
whose download operations are incomplete or have failed.
Device List Table
A list of the devices you have selected for your download operation. Once the download is started,
this table updates with status information for the download operation:
• Alert − an alert icon
will appear in the Alert column if a download operation fails for a
specific device.
• IP Address − The device's IP address. Note that chassis that support Distributed Forwarding
Engines (DFEs), such as the Matrix N−Series, display a single management IP even though
there may be multiple DFE modules in the chassis.
• Image − The name of the image file being downloaded.
• Status − The status of the download operation: Initial (the operation has not started), Success
(the operation succeeded), Failure (the operation failed).
• Operation − The type of operation performed: Boot PROM Download.
• % Progress − A progress bar showing the percent completed of the operation.
• Bytes Trans. − The number of bytes transferred during the download.
• Message − Initially, this column shows the file transfer server being used for the download
operation. Once the download is started, it displays a message relating to the status of the
operation.
TIP: Use the table options and tools to find, filter, sort, print, and export information in a table
and customize table settings. You can access the Table Tools through a right−mouse click on
a column heading or anywhere in the table body, or by clicking the Table Tools
Download Progress Window
251
Welcome to NetSight Inventory Manager Help
button in the upper left corner of the table (if you have the row count column
displayed). For more information, see Table Tools.
Status Summary
Once the download is started, this area updates with status information for the download operation.
Download Type
The downloads will be performed in parallel (simultaneously) on the number of devices specified in
the Groups of field. Enter the value 1 to have the downloads performed serially, one device after
another.
Start Button
Initiates the download operation. The table at the top of the window updates with status information,
as will the status area in the bottom left of the window.
Reset Devices: Timed Reset Supported Window
Once the downloads have completed, use this window to reset those devices that support Timed Reset. Timed
Reset gives you the flexibility to set up your reset operation with a time delay, so that the actual device resets
take place at a later time. This can be useful when trying to schedule resets for a time when the network is
least busy.
NOTE: During the device reset, Inventory Manager learns the current boot PROM version
installed on the device. Inventory Manager uses this information to determine whether
the boot PROM version installed on the device matches the boot PROM reference image
set for the device's binary family. (This information is displayed in the All Devices
Details View tab.) If the version number is not available from an image file, you can
manually set the version number in the Firmware Image General Tab.
Click the graphic for more information.
Reset Devices: Timed Reset Supported Window
252
Welcome to NetSight Inventory Manager Help
Show devices not supporting timed reset
This window lists those devices that support Timed Reset. Select this checkbox to include devices that
do not support timed reset. Devices that do not support timed reset cannot be reset from this window;
proceed to the next window to reset those devices.
Show devices that failed Boot PROM upgrade
Select this checkbox to include devices that failed the boot PROM upgrade.
Device List Table
A list of the devices you have selected for your reset operation. Once the reset operation has started,
you must click Refresh to update the device information in the table.
• Selected − Use the checkboxes in this column to select or deselect devices to be reset.
Devices that do not support timed reset cannot be selected.
• Running New Boot PROM − Following the reset, a indicates the device is running the
new boot PROM version. (The checkmark is only displayed if the boot PROM version
changes.) Remember to click Refresh to update the information in the table following the
reset.
• IP Address − The device's IP address. Note that chassis that support Distributed Forwarding
Engines (DFEs), such as the Matrix N−Series, display a single management IP even though
there may be multiple DFE modules in the chassis.
• Boot PROM Version − The current boot PROM version installed in the device. Following
the reset, the new boot PROM version will be displayed. Remember to click Refresh to
update the information in the table following the reset.
• Device Status − The device's connection status (Contact or No Contact) and, therefore, its
ability to respond to SNMP requests.
• Downloaded Image − The name of the image file that was downloaded.
Reset Devices: Timed Reset Supported Window
253
Welcome to NetSight Inventory Manager Help
• Download Status − The status of the download operation: Success (the operation succeeded),
Failure (the operation failed).
• Reset Request Status − The status of the reset operation: Initial (the operation has not
started), Success (the operation succeeded), Failure (the operation failed).
• Message − A message relating to the status of the operation.
TIP: Use the table options and tools to find, filter, sort, print, and export information in a table
and customize table settings. You can access the Table Tools through a right−mouse click on
a column heading or anywhere in the table body, or by clicking the Table Tools
button in the upper left corner of the table (if you have the row count column
displayed). For more information, see Table Tools.
Reset Delay
Enter the amount of time (in seconds) until the device resets after the reset operation begins. For
example, if you start the reset operation at 4:00 pm with a 7 hour reset delay (420 seconds), the
device(s) will reset at 11:00 pm. This allows you to schedule your resets for a time when the network
is least busy.
Reset Type
Select the type of reset: Warm boot (restarts the device) or Cold boot (same as turning device power
off and on).
Elapsed Time
The amount of time in minutes:seconds since the reset operation started.
Start Button
Starts the timed resets. Resets occur simultaneously. Once the reset operation has started, you must
click Refresh to update the device information in the table.
Refresh Button
Once the reset operation has started, use the Refresh button to update the device information in the
table.
Reset Devices: Timed Reset Not Supported Window
Once the downloads have completed, use this window to reset those devices that do not support Timed Reset.
Devices will be reset one at a time, waiting until a device is fully booted before beginning the next device.
NOTE: During the device reset, Inventory Manager learns the current boot PROM version
installed on the device. Inventory Manager uses this information to determine whether
the boot PROM version installed on the device matches the boot PROM reference image
set for the device's binary family. (This information is displayed in the All Devices
Details View tab.) If the version number is not available from an image file, you can
manually set the version number in the Firmware Image General Tab.
Click the graphic for more information.
Reset Devices: Timed Reset Not Supported Window
254
Welcome to NetSight Inventory Manager Help
Show devices that failed Boot PROM upgrade
Select this checkbox to include devices that failed the boot PROM upgrade.
Device List Table
Lists those devices that do not support timed reset. Once the reset operation has started, you must
click Refresh to update the device information in the table.
• Selected − Use the checkboxes in this column to select or deselect devices to be reset.
• Running New Boot PROM − Following the reset, a indicates the device is running the
new boot PROM version. (The checkmark is only displayed if the boot PROM version
changes.) Remember to click Refresh to update the information in the table following the
reset.
• IP Address − The device's IP address. Note that chassis that support Distributed Forwarding
Engines (DFEs), such as the Matrix N−Series, display a single management IP even though
there may be multiple DFE modules in the chassis.
• Boot PROM Version − The current boot PROM version installed in the device. Following
the reset, the new boot PROM version will be displayed. Remember to click Refresh to
update the information in the table following the reset.
• Device Status − The device's connection status (Contact or No Contact) and, therefore, its
ability to respond to SNMP requests.
• Downloaded Image − The name of the image file that was downloaded.
• Download Status − The status of the download operation: Success (the operation succeeded),
Failure (the operation failed).
• Reset Request Status − The status of the reset request.
• Message − A message relating to the status of the operation.
TIP: Use the table options and tools to find, filter, sort, print, and export information in a table
and customize table settings. You can access the Table Tools through a right−mouse click on
a column heading or anywhere in the table body, or by clicking the Table Tools
button in the upper left corner of the table (if you have the row count column
displayed). For more information, see Table Tools.
Reset Devices: Timed Reset Not Supported Window
255
Welcome to NetSight Inventory Manager Help
Reset Type
Select the type of reset: Warm boot (restarts the device) or Cold boot (same as turning device power
off and on).
Elapsed Time
The amount of time in minutes:seconds since the reset operation started.
Start Button
Initiates the reset operation. Resets occur one at a time, continuing only after a device is fully booted.
After the reset operation is completed, you can click Refresh to update the device information in the
table.
Refresh Button
Once the reset operation has completed, use the Refresh button to update the device information in
the table.
Reset Devices: Timed Reset Not Supported Window
256
Template Download Wizard
Use the Template Download Wizard to download a configuration template to one or more devices. To access
the wizard, select Tools > Wizards > Template Download Wizard from the menu bar.
Configuration templates provide an easy way to download similar configurations to one or more devices.
First, use the Edit Configuration Template window to create a configuration template based on an existing
archived device configuration. The window displays a selected configuration, and allows you to replace
portions of it with template variables. Then, you must set device−specific values for your template variables.
When you download the template configuration to a device, the variables are replaced with appropriate values
for that device. Once you have created your configuration template, you are ready to use this wizard to
download the template to your devices. For more information, see How to Create and Download
Configuration Templates.
NOTE: Configuration templates can be created from text−based (ASCII format) configurations
files. Although you can open binary configuration files in the Edit Configuration
Template window, you should not use binary configuration files when you create and
download templates.
Template Download Selection Window
Use this window to select a configuration template to download to devices.
Click the graphic for more information.
Template Download Wizard
257
Welcome to NetSight Inventory Manager Help
Templates
This panel displays your current configuration templates just as they are listed in the left−panel Configuration
Templates tab. Expand the folders and select the template you wish to download. If Inventory Manager can no
longer find a template file (it has been deleted or moved,) the template will not be displayed in the tree.
TIP: If you open the Template Download Wizard from a template in the left−panel
Configuration Templates tab, that template will be automatically selected in the Templates
tree.
General
This panel displays general information about the template.
Template Name
The name of the configuration template, as assigned when you saved the template in the Edit
Configuration Template window.
Archive Version
The archive version that contained the configuration file the template was based on.
Template Size
The size in bytes of the template.
Date Created
The date and time the template was created.
Status
The status of the template: File Found. Template files that can no longer be found (they have been
deleted or moved,) are not displayed for selection in the Templates tree.
Last Modified
The date and time the template was last modified.
Compatible Device Types
Device types the template is valid for, based on what device types the template has been assigned to.
Memo
This panel displays Memo information entered in the General Tab (Template).
Device Selection Window
Use this window to select the devices to include in the template download operation.
Click the graphic for more information.
Device Selection Window
258
Welcome to NetSight Inventory Manager Help
Select devices to configure
This tree displays devices that are compatible with the selected template, grouped according to device type.
By default, device types that are not compatible with the template are not displayed in the tree. Select the
Show All Devices checkbox to override this filter. Expand the folders and select the single device or device
group, or multiple devices or device groups (using the Control or Shift keys) to include in the download
operation. Click Add to add the devices to the Selected Devices table.
Selected Devices
Lists the devices selected for the download operation. If you want to remove a device from the table, select
the device and click Remove.
IP Address
The device's IP address. Note that chassis that support Distributed Forwarding Engines (DFEs), such
as the Matrix N−Series, display a single management IP even though there may be multiple DFE
modules in the chassis.
Device Type
The device's model number or hardware type.
Firmware Version
The current firmware version installed in the device.
Firmware Download
A indicates the device supports the ability to download firmware using the Firmware Upgrade
Wizard.
Device Selection Window
259
Welcome to NetSight Inventory Manager Help
Boot PROM Version
The current version of Boot PROM installed in the device.
Boot PROM Download
A indicates the device supports the ability to download boot PROM images using the Boot PROM
Upgrade Wizard.
Add Button
Select a single device or device group, or multiple devices or device groups, and click Add to add
them to the Selected Devices table.
Remove Button
To remove a device from the Selected Devices table, select the device and click Remove.
Download Template Configurations Window
Use this window to configure download parameters, set template variable values (if required), initiate the
download operation, and monitor download progress. Devices that require a reset will be reset automatically
after the download is complete.
Click the graphic for more information.
Show all devices/Show only incomplete and failed
Once the download operation starts, the device list table updates with status information for each
Download Template Configurations Window
260
Welcome to NetSight Inventory Manager Help
device. An alert icon
will appear in the Alert column of the table if a download operation fails for
a specific device. You can use these radio buttons to show all devices or show only those devices
whose download operations are incomplete or have failed.
Set Template Variables Button
Opens the Set Template Variables window which lists all your devices and their set values for each of
your defined template variables. Use this window to set variable values for one or more devices.
Device List Table
A list of the devices you have selected for your download operation. Once the download is started,
this table updates with status information for the download operation:
• Alert − An alert icon
will appear initially for any device that does not have values
assigned for all the variables in the template. Click Set Template Variables to open the Set
Template Variables window where you can set variable values for one or more devices. You
can also right−click on a table row and select Edit Device Variables to open the Device
Template Variables window, where you can assign variable values for that specific device.
All template variables must have assigned values before the download operation can proceed.
Once the download is started, an alert icon
will appear in the Alert column if a download
operation fails for a specific device.
• IP Address − The device's IP address. Note that chassis that support Distributed Forwarding
Engines (DFEs), such as the Matrix N−Series, display a single management IP even though
there may be multiple DFE modules in the chassis.
• Status − The status of the operation for that particular device: Success or Failure.
• Operation − The type of operation performed: Configuration Template Download.
• % Progress − A progress bar showing the percent completed of the operation.
• Bytes Trans. − The number of bytes transferred during the operation.
• Message − A message relating to the status of the operation.
TIP: Use the table options and tools to find, filter, sort, print, and export information in a table
and customize table settings. You can access the Table Tools through a right−mouse click on
a column heading or anywhere in the table body, or by clicking the Table Tools
button in the upper left corner of the table (if you have the row count column
displayed). For more information, see Table Tools.
Status Summary
Once the download is started, this area updates with status information for the download operation.
Download Type
The download will be performed in parallel (simultaneously) on the number of devices specified in
the Groups of field. By default, the downloads will occur in sequential order (Groups of: 1). This is
to protect against possible isolation of other devices that are in the download list.
CAUTION: Because many devices automatically reset following a download operation,
performing a Download Type greater than 1 may isolate other devices in the
download list, causing their downloads to fail. It is recommended that you leave the
Groups of value at 1 (perform the downloads serially), unless you know it is safe to
have the selected network devices reset simultaneously.
Start Button
Download Template Configurations Window
261
Welcome to NetSight Inventory Manager Help
Initiates the download operation. The table at the top of the window updates with status information,
as will the status area in the bottom left of the window.
Download Template Configurations Window
262
Inventory Manager Right−Panel Tabs
The Inventory Manager main window is divided into three panels: a left panel, a right panel, and a bottom
panel.
The right panel displays different tabs and information depending on the item selected in the left−panel tree.
Help topics for right−panel tabs are named in a manner to reflect this. For example, the help topic named
Details View (Device Group), provides information on the right−panel Details View tab when a device group
is selected in the left−panel tree.
In the Help Contents, double−click the Right−Panel Tabs. Under the Tabs folder, you will see folders
and topics for the different right−panel tabs such as Details View and General. Expand the folders and
navigate to topics describing a tab for a particular item selected in the left panel.
Inventory Manager Right−Panel Tabs
263
Archives Tab (Device)
The Archives tab appears when you select a device in the left panel's Network Elements tab. It displays a list
of archive operations for the selected device. Each time a new archive version is created, the information is
added to the bottom of the list. Right−click an item or items for a menu of options.
Use the table options and tools to find, filter, sort, print, and export information in a table and customize table
settings. You can access the Table Tools through a right−mouse click on a column heading or anywhere in the
table body, or by clicking the Table Tools
button in the upper left corner of the table (if you have the
row count column displayed). For more information, see Table Tools.
Click the graphic for more information.
Alert
A yellow alert icon in this column signifies one or more of the following:
•
−− there is a difference between this saved configuration and the previous configuration
•
saved for this device.
−− the last archive save or restore for this device failed.
To acknowledge an alert and place a checkmark on the alert icon, right−click the icon and select
Acknowledge Alert from the menu.
Archive
The name of the archive operation.
Status
The status of the configuration file saved by the archive: File Found or File Not Found/Missing. File
Not Found/Missing indicates that Inventory Manager can no longer find the config file (it has been
deleted or moved) or the archive operation did not include saving device configuration data.
Version
The date and time the archive version was performed.
File name
The path and filename for the saved configuration. For archive operations that are configured to
archive only capacity planning data (and not configuration data), this column will be blank.
Description
When a configuration file is saved, it is automatically compared to the previously saved configuration
file for the same device. This field displays a message regarding that comparison. Rest your cursor on
Archives Tab (Device)
264
Welcome to NetSight Inventory Manager Help
the field to display a tooltip of the complete description. For archive operations that are configured to
archive only capacity planning data (and not configuration data), this column will display a Warning
message stating that the ability to archive configuration data has been disabled for this archive.
Archives Tab (Device)
265
Attributes Tab (Configuration)
The Attributes tab appears when you select an individual configuration in the left panel's Archive Mgmt tab. It
displays the configuration's archive, device, firmware, and configuration attributes.
Click the graphic for more information.
Archive
The name of the archive operation that saved the configuration.
IP Address
The IP address of the device whose configuration was saved.
Version
The date and time that the archive operation was performed.
Device Type
The device's model number or hardware type.
Serial Number
A unique number assigned to the device by the manufacturer.
Asset Tag
Attributes Tab (Configuration)
266
Welcome to NetSight Inventory Manager Help
A unique asset number assigned to the device for inventory tracking purposes. The asset tag is defined
in the device's General Tab.
Chassis ID
The ID assigned to the chassis where the device resides (if applicable). This is usually a serial number
or MAC address, depending on the chassis type.
Chassis Slot
The slot number in the chassis where the device resides. N−Series devices and devices that do not
reside in a chassis, display a value of N/A.
Memory
The device's total installed local memory, DRAM (Dynamic Random Access Memory), reported in
megabytes (MB).
Firmware Version
The firmware version installed in the device at the time of the configuration save.
Firmware Change Count
The number of successful firmware image downloads. Devices that do not support the
enterasys−configuration−change−MIB will display N/A (Not Available).
Firmware Change Time
The date and time of the last successful firmware image download. Devices that do not support the
enterasys−configuration−change−MIB will display N/A (Not Available).
Firmware Change Method
The method that was used to cause the last firmware change (e.g. SNMP, Telnet, Local Management
(LM), Command Line Interface (CLI)). If the individual user login or the source IP address is
available, they are included. Devices that do not support the enterasys−configuration−change−MIB
will display N/A (Not Available).
Configuration Change Count
The number of successful configuration changes. Devices that do not support the
enterasys−configuration−change−MIB will display N/A (Not Available).
Configuration Change Time
The date and time of the last successful configuration change. Devices that do not support the
enterasys−configuration−change−MIB will display N/A (Not Available).
Configuration Change Method
The method that was used to make the last configuration change (e.g. SNMP, Telnet, Local
Management (LM), Command Line Interface (CLI)). If the individual user login or the source IP
address is available, they are included. Devices that do not support the
enterasys−configuration−change−MIB will display N/A (Not Available).
Configuration File Checksum
The checksum is a value calculated on the entire file. You can compare this value to values obtained
from different archive versions. Any difference in checksum values would indicate a change in the
configuration.
Attributes Tab (Configuration)
267
Welcome to NetSight Inventory Manager Help
Configuration File Size
The size of the saved configuration file in bytes. You can compare this size to the size reported in
different archive versions. Any difference in size would indicate a change in the configuration file.
Attributes Tab (Configuration)
268
Chassis Tab (Chassis Folder)
The Chassis tab provides detailed information about the chassis in your network, including the number of
slots being used and the number of available slots in each chassis. Right−click an item or items for a menu of
options. To access this tab, select the Chassis folder in the left panel's Network Elements tab, then click the
Chassis tab in the right panel.
Inventory Manager provides the top−level Chassis folder as a pre−defined device group. When you add or
import devices that are in a chassis, Inventory Manager automatically adds individual chassis folders using the
chassis type and ID, and organizes your chassis devices under the appropriate folder.
Use the table options and tools to find, filter, sort, print, and export information in a table and customize table
settings. You can access the Table Tools through a right−mouse click on a column heading or anywhere in the
table body, or by clicking the Table Tools
button in the upper left corner of the table (if you have the
row count column displayed). For more information, see Table Tools.
Click the graphic for more information.
Chassis Name
The chassis type followed by the chassis ID in parentheses.
Chassis ID
The ID assigned to the chassis. This is usually a serial number or MAC address, depending on the
chassis type.
# of Devices
The number of devices residing in the chassis. Chassis that support Distributed Forwarding Engines
(DFEs), such as the Matrix N−Series, are managed by a single IP and will display "1" in this column
even though there may be multiple DFE modules in the chassis.
Slots in Use
The chassis slot numbers being used by devices or DFE modules.
Total Slots
The total number of slots in the chassis.
Slots Available
The number of available (empty) slots in the chassis.
Slots Used
The number of slots being used in the chassis.
Chassis Tab (Chassis Folder)
269
Welcome to NetSight Inventory Manager Help
% Utilized
The percentage of slots being used in the chassis.
Chassis Tab (Chassis Folder)
270
Configuration Templates Tab (Device)
The Configuration Templates tab appears when you select a device in the left panel's Network Elements tab. It
displays information on available configuration templates for the selected device. The information is
presented in two tables. The top table lists all the configuration templates that the device can use, based on its
device type. The table on the bottom lets you set variable values for the selected device. From the tab, you can
also edit a configuration template or preview a template with all the variables filled in.
Use the table options and tools to find, filter, sort, print, and export information in a table and customize table
settings. You can access the Table Tools through a right−mouse click on a column heading or anywhere in the
table body, or by clicking the Table Tools
button in the upper left corner of the table (if you have the
row count column displayed). For more information, see Table Tools.
Click the graphic for more information.
Available Templates
This table lists all the configuration templates that would be available for download to the selected device,
based on device type. You can select a template and click Preview or Edit Template to view or modify the
template.
All Available Template Variables
This table lists all the variables you have defined, and allows you to set a value for each variable for the
selected device.
In Template
If this column is checked, the variable appears in the template selected in Available Templates table.
Configuration Templates Tab (Device)
271
Welcome to NetSight Inventory Manager Help
Variable
This column lists all the variables you have defined. Select a variable and click Set Variable to assign
a value to the variable for the selected device.
Value
This column displays the values you have assigned to the variables for the selected device.
Buttons
Preview
Opens the Configuration File Viewer which displays the template with all the variables replaced by
the assigned values.
Edit Template
Opens the Edit Configuration Template window where you can edit the template.
Set Variable
Opens the Set Template window where you can set a value for the selected variable.
Configuration Templates Tab (Device)
272
Custom Attributes Tab
(Configuration)
The Custom Attributes tab appears in the right panel when you select a configuration in the left panel Archive
Mgmt tab. It displays a table of attribute information collected from the device at the time the configuration
was saved. The information you see depends on the type of device the configuration was saved from; some
device types support one attribute but not another. If the device type returns multiple values for an attribute
(like a Matrix E6/E7 with 2 power supplies), each value will be on a separate row. If the device type does not
support any of the attributes, the Custom Attributes tab for that configuration will be blank.
Use the table options and tools to find, filter, sort, print, and export information in a table and customize table
settings. You can access the Table Tools through a right−mouse click on a column heading or anywhere in the
table body, or by clicking the Table Tools
button in the upper left corner of the table (if you have the
row count column displayed). For more information, see Table Tools.
Click the graphic for more information.
The attributes are grouped here according to the device types that support them. In the tab, the attributes you
see, and the order in which they are presented, will vary according to the configuration you have selected.
IP address
The device's IP address.
Matrix N−Series Attributes
Type
A description of the module or component type.
Name
The name of the module or component.
Firmware Version
The current firmware version installed in the module.
Model Name
The model number of the module or component type.
Description
A description of the module or component.
Manufacturer
Custom Attributes Tab(Configuration)
273
Welcome to NetSight Inventory Manager Help
The manufacturer of the module or component.
Field Replaceable
Whether or not the manufacturer considers the component to be field replaceable (true or false).
Hardware Rev
The current hardware version of the device.
Serial Number
A unique number assigned to the module or component by the manufacturer.
BootPROM Version
The current version of Boot PROM installed in the module.
Asset Tag
A unique asset number assigned to the module or component for inventory tracking purposes.
SSR Hardware Attributes
Slot Number
The slot number in the chassis where the module resides.
Status
The current status of the module: online or offline.
Type
The physical module type.
Description
A description of the module.
Number of Ports
The number of physical ports on the module.
Version
The module version.
Memory
The system memory size available on the module, reported in megabytes (MB).
Matrix E5 and Matrix E6/E7 Power Supply and Fan Attributes
Power Supply Number
The number of the power supply.
Power Supply Type
The power supply type: ac−dc, dc−dc, or highOutput.
Fan State
The state of the fan: Installed and Operating, Installed and Not Operating, or Not Installed.
Custom Attributes Tab(Configuration)
274
Welcome to NetSight Inventory Manager Help
Power Supply State
The state of the power supply: Installed and Operating, Installed and Not Operating, or Not Installed.
Power Supply Redundancy
Whether the power supply is redundant or not.
RoamAbout Radiocard and Base MAC Address Attributes
Card Type
The type of PC card inserted in the Access Point.
Versions
The hardware and firmware versions for the PC card.
Station Name
The wireless station name sent out as part of the beacon messages. Valid only when a DS card is
inserted in the Access Point.
Base MAC Address
The physical layer address assigned to the interface through which Inventory Manager is
communicating.
Vertical Horizon Attributes
Number in Stack
The total number of switches present on this system.
Number of Ports
The total number of ports present on this system.
Firmware Version
The current firmware version installed in the device.
BootPROM Version
The current version of Boot PROM installed in the device.
CPU
The name of the device's processor (Central Processing Unit).
Power Status
Indicates whether the device is using internal power, redundant power, or both.
Expansion Slot 1
The type of expansion module in slot 1.
Expansion Slot 2
The type of expansion module in slot 2.
Role in System
Indicates whether the device is master, backup master, or slave in the system.
Custom Attributes Tab(Configuration)
275
Welcome to NetSight Inventory Manager Help
ELS Serial Number Attribute
Serial Number
A unique number assigned to the device by the manufacturer.
Custom Attributes Tab(Configuration)
276
Custom Attributes Tab
(Device or Device Group)
The Custom Attributes tab appears in the right panel when you select a device or device group in the left panel
Network Elements tab. It displays a table of attribute information about the selected device(s). The
information you see depends on the device type(s) selected; some devices support one attribute but not
another. If a device returns multiple values for an attribute (like a Matrix E6/E7 with 2 power supplies), each
value will be on a separate row. If a device does not support any of the attributes, the Custom Attributes tab
for that single device will be blank.
Custom Attribute tabs for device groups only display devices that support one or more of the attributes.
Devices that have been configured with an SNMP context will display separate entries for each context.
Use the table options and tools to find, filter, sort, print, and export information in a table and customize table
settings. You can access the Table Tools through a right−mouse click on a column heading or anywhere in the
table body, or by clicking the Table Tools
button in the upper left corner of the table (if you have the
row count column displayed). For more information, see Table Tools.
Click the graphic for more information.
The attributes are grouped here according to the device types that support them. In the tab, the attributes you
see, and the order in which they are presented, will vary according to the device or device group you have
selected.
IP address
The device's IP address.
Matrix N−Series Attributes
Type
A description of the module or component type.
Custom Attributes Tab(Device or Device Group)
277
Welcome to NetSight Inventory Manager Help
Name
The name of the module or component.
Firmware Version
The current firmware version installed in the module.
Model Name
The model number of the module or component type.
Description
A description of the module or component.
Manufacturer
The manufacturer of the module or component.
Field Replaceable
Whether or not the manufacturer considers the component to be field replaceable (true or false).
Hardware Rev
The current hardware version of the device.
Serial Number
A unique number assigned to the module or component by the manufacturer.
BootPROM Version
The current version of Boot PROM installed in the module.
Asset Tag
A unique asset number assigned to the module or component for inventory tracking purposes.
SecureStack Attributes
Description
A description of the module or component.
Type
A description of the module or component type.
Name
The name of the module or component.
Hardware Rev
The current hardware version of the device.
BootPROM Version
The current version of Boot PROM installed in the module.
Firmware Version
The current firmware version installed in the module.
Custom Attributes Tab(Device or Device Group)
278
Welcome to NetSight Inventory Manager Help
Serial Number
A unique number assigned to the module or component by the manufacturer.
Manufacturer
The manufacturer of the module or component.
Model Name
The model number of the module or component type.
Asset Tag
A unique asset number assigned to the module or component for inventory tracking purposes.
Field Replaceable
Whether or not the manufacturer considers the component to be field replaceable (true or false).
SSR Hardware Attributes
Slot Number
The slot number in the chassis where the module resides.
Status
The current status of the module: online or offline.
Type
The physical module type.
Description
A description of the module.
Number of Ports
The number of physical ports on the module.
Version
The module version.
Memory
The system memory size available on the module, reported in megabytes (MB).
Matrix E5 and Matrix E6/E7 Power Supply and Fan Attributes
Power Supply Number
The number of the power supply.
Power Supply Type
The power supply type: ac−dc, dc−dc, or highOutput.
Fan State
The state of the fan: Installed and Operating, Installed and Not Operating, or Not Installed.
Power Supply State
Custom Attributes Tab(Device or Device Group)
279
Welcome to NetSight Inventory Manager Help
The state of the power supply: Installed and Operating, Installed and Not Operating, or Not Installed.
Power Supply Redundancy
Whether the power supply is redundant or not.
RoamAbout Radiocard and Base MAC Address Attributes
Card Type
The type of PC card inserted in the Access Point.
Versions
The hardware and firmware versions for the PC card.
Station Name
The wireless station name sent out as part of the beacon messages. Valid only when a DS card is
inserted in the Access Point.
Base MAC Address
The physical layer address assigned to the interface through which Inventory Manager is
communicating.
Vertical Horizon Attributes
Number in Stack
The total number of switches present on this system.
Number of Ports
The total number of ports present on this system.
Firmware Version
The current firmware version installed in the device.
BootPROM Version
The current version of Boot PROM installed in the device.
CPU
The name of the device's processor (Central Processing Unit).
Power Status
Indicates whether the device is using internal power, redundant power, or both.
Expansion Slot 1
The type of expansion module in slot 1.
Expansion Slot 2
The type of expansion module in slot 2.
Role in System
Indicates whether the device is master, backup master, or slave in the system.
Custom Attributes Tab(Device or Device Group)
280
Welcome to NetSight Inventory Manager Help
ELS Serial Number Attribute
Serial Number
A unique number assigned to the device by the manufacturer.
Buttons
Performs a device refresh, updating the attribute information in the table.
Custom Attributes Tab(Device or Device Group)
281
Details View Tabs
A Details View tab is often displayed in the right panel of the Inventory Manager main window. It provides
detailed information for the item currently selected in the left panel.
The Details View tab usually provides the following features:
• Select multiple items: Select multiple items by using the Ctrl (for non−sequential items) or Shift (for
sequential items) key.
• Double−click items: Double−click an item in the Details View to select the item in the left−panel and
display the next level of information for that item in the right panel.
• Right−click menus: Right−click an item or items for a menu of options.
• Sort, Filter, and Find Toolbars: You can sort and filter the information in an Archives tab, or perform
a find operation to locate specific information. Right−click on any column heading or anywhere in the
table body, and select the Sort, Filter, or Find menu option. The appropriate toolbar opens.
• Print and export: You can print and export the information in an Archives tab. Right−click on any
column heading or anywhere in the table body, and select the Table Tools > Print or Table
Tools > Export menu option.
• Reorder columns: You can change the order of the columns by clicking on a column heading and
dragging it to the desired position.
The item you select in the left−panel tree determines what is displayed in the right panel Details View. Help
topics for the various Details View tabs are named to reflect this. For example, the help topic for the Details
View tab with a device group selected in the left panel is named Details View Tab (Device Group). For more
complete information on these tabs, expand the Details View folder and select the desired tab.
Details View Tabs
282
Details View Tab
(All Devices Folder)
The Details View tab appears in the right panel when you select the All Devices folder in the left panel's
Network Elements tab. The All Devices folder contains all the devices in the NetSight database, and the
Details View displays a table of information about those devices. Right−click an item or items for a menu of
options.
TIP: This information is also displayed in the General tab and Image Information tab for each device. The
General tab allows you to view the information and also edit certain fields.
Use the table options and tools to find, filter, sort, print, and export information in a table and customize table
settings. You can access the Table Tools through a right−mouse click on a column heading or anywhere in the
table body, or by clicking the Table Tools
button in the upper left corner of the table (if you have the
row count column displayed). For more information, see Table Tools.
Click the graphic for more information.
Alert
A yellow alert icon in this column signifies one or more of the following:
•
−− there is a difference between one or more saved configuration files for this device and
a previous file saved for the device.
•
−− the device status is No Contact.
•
−− the last archive save or restore for this device failed.
•
−− the last firmware upgrade for this device failed.
For a description of the alert, see the Alert Description column. To delete the alert icon, right−click
the icon and select Acknowledge Alert from the menu.
Details View Tab(All Devices Folder)
283
Welcome to NetSight Inventory Manager Help
IP address
The device's IP address. Note that chassis that support Distributed Forwarding Engines (DFEs), such
as the Matrix N−Series, display a single management IP even though there may be multiple DFE
modules in the chassis.
Name
Displays the device display name (IP address, System Name, or Nickname) as configured in the
Options window, followed by the SNMP context, if applicable. Entries in this column are displayed in
italics to represent that the information may be "stale". Clicking the Refresh button changes the
entries to bold, indicating that the information is current for a minute when you first display the view.
Changing any other device information (including acknowledging an Alert icon) also changes the
entry to bold.
Last Status
The device's last known connection status (Contact or No Contact) and, therefore, its ability to
respond to SNMP requests. The status is updated when you right−click the All Devices folder and
select Refresh (Rediscover) from the menu, or click the Refresh button.
Uptime
The amount of time, in a days hh:mm:ss format, that the device has been running since the last
start−up.
Firmware Version
Shows the current firmware version installed in the device.
FW Reference
A indicates that the current firmware version installed in the device matches the firmware
reference image set for this device's binary family. For more information, see How to Set a Reference
Image. This column allows you to easily identify devices that need to be upgraded to the reference
image.
NOTE: In order to provide this information, Inventory Manager compares the name and
version number of the reference image file to the current firmware on the device.
The version number must be available from the reference image file and the
current firmware on the device must have been installed at some point via an
Inventory Manager Firmware Upgrade Wizard operation that included a device
reset. Otherwise, this column may be blank even though the firmware version
installed on the device may actually match the reference image. If the version
number is not available from an image file, you can manually set the version
number in the Firmware Image General Tab.
Boot PROM Version
Shows the current version of boot PROM installed in the device.
BP Reference
A indicates that the current boot PROM version installed in the device matches the boot PROM
reference image set for this device's binary family. For more information, see How to Set a Reference
Image. This column allows you to easily identify devices that need to be upgraded to the reference
image.
NOTE:
Details View Tab(All Devices Folder)
284
Welcome to NetSight Inventory Manager Help
In order to provide this information, Inventory Manager compares the name and version
number of the reference image file to the current boot PROM on the device. The version
number must be available from the reference image file and the current boot PROM on
the device must have been installed at some point via an Inventory Manager Boot PROM
Upgrade Wizard operation that included a device reset. Otherwise, this column may be
blank even though the boot PROM version installed on the device may actually match the
reference image. If the version number is not available from an image file, you can
manually set the version number in the Firmware Image General Tab.
MAC Address
The physical layer address assigned to the interface through which Inventory Manager is
communicating. MAC addresses are hard−coded in the device, and are not configurable.
Device Type
The device's model number or hardware type.
System Name
The assigned name for the device.
System Contact
The person responsible for the device.
System Location
The physical location of the device.
Asset Tag
A unique asset number assigned to the device for inventory tracking purposes.
System Description
Description of the piece of equipment, which may include its manufacturer, model number, and
firmware revision number.
Chassis Slot
The slot number in the chassis where the device resides. N−Series devices and devices that do not
reside in a chassis, display a value of N/A.
Chassis ID
The ID assigned to the chassis where the device resides.
Serial Number
A unique number assigned to the device by the manufacturer.
CPU
The name of the device's processor (Central Processing Unit).
Memory
The device's total installed local memory, DRAM (Dynamic Random Access Memory), reported in
megabytes (MB).
File Transfer Method
Details View Tab(All Devices Folder)
285
Welcome to NetSight Inventory Manager Help
The file transfer method for this device. For more information, see How to Set a File Transfer
Method.
FW Download
A indicates the device supports the ability to download firmware using the Firmware Upgrade
Wizard.
Boot PROM Download
A indicates the device supports the ability to download boot PROM images using the Boot PROM
Upgrade Wizard.
Config Download
A indicates the device supports the ability to save and restore archives (configurations) using the
Archive Wizard and Restore Wizard.
Timed Reset
A indicates the device supports the ability to perform a timed reset using the Reset Device Wizard.
Alert Description
Describes the cause of any alert icon appearing in the Alert column.
Buttons
Performs a device refresh, updating the device information in the table. If the Name column entry is
in italics (indicating that the information may be "stale"), clicking this Refresh button changes the
Name column entry to bold, indicating that you have current device information for a minute when
you first display the view.
Details View Tab(All Devices Folder)
286
Details View Tab
(All Firmware Folder)
The Details View tab appears when you select the All Firmware folder in the left panel's Firmware Mgmt tab.
Inventory Manager automatically lists the firmware and boot PROM images stored in your firmware directory
under the All Firmware folder when you perform a firmware discovery or refresh. Right−click an item or
items for a menu of options.
Use the table options and tools to find, filter, sort, print, and export information in a table and customize table
settings. You can access the Table Tools through a right−mouse click on a column heading or anywhere in the
table body, or by clicking the Table Tools
button in the upper left corner of the table (if you have the
row count column displayed). For more information, see Table Tools.
Click the graphic for more information.
Referenced
Firmware or boot PROM images that have been set as a reference image display a reference icon (
or
) in this column. A reference image is the image you designate as the preferred image for a
specific binary family of devices. To set a reference, select a firmware or boot PROM image in the
table or the tree, right−click and select Set as Reference Image from the menu. The image will be set
as a reference for all device types with which it is compatible. (If the Set as Reference Image option is
not available, make sure that the selected image has been assigned to appropriate device types.)
Image Name
The name of the image as it is displayed in the left−panel Firmware Mgmt tree. The maximum length
of the displayed name is 50 characters. Longer names will be truncated to the 50−character maximum
with a (2), (3), and so on, appended if there are multiple images with the same name.
Image Filename
Details View Tab(All Firmware Folder)
287
Welcome to NetSight Inventory Manager Help
The full name of the image as it appears in your firmware images directory.
Image Path
The path to the location where the image is stored.
Date
The image file date and time as reported by the file system.
Version
The version number of the firmware or boot PROM image. If the version number is not available
from the image file, and Inventory Manager has not performed a firmware or boot PROM upgrade
using this image, this field will display N/A (not available).
Image Size (Bytes)
The size in bytes of the image.
Status
The status of the image file: "File Found" or "File Not Found." This shows whether the file is still
present in the firmware directory. If the image is a user−defined firmware record, this column will
display "User−Defined File."
Server
Displays the firmware download server associated with the image file. A discovered firmware image
that is accessible by the mapped file transfer server (as configured in the Services for NetSight Server
view of the Options window) will display "Mapped Server." A user−defined firmware record will
display its associated alternate firmware download server, as configured in the Create Firmware
Record window.
Buttons
Performs a firmware discovery, updating the information in the table.
Opens the Enterasys Networks download library website where you can download firmware and
release notes. (A browser is required to view the website and Solaris users must add the browser's
path to their PATH environment variable.) If you download a firmware image that is contained in a
.zip file, you must unzip the file before placing it into the firmware directory.
Details View Tab(All Firmware Folder)
288
Details View Tab
(All Templates Folder)
The Details View tab appears when you select the All Templates folder in the left panel's Configuration
Templates tab. Inventory Manager automatically lists each template under the All Templates folder when you
save the template in the Edit Configuration Template window. The Details View displays information for each
template. Right−click an item or items for a menu of options.
Use the table options and tools to find, filter, sort, print, and export information in a table and customize table
settings. You can access the Table Tools through a right−mouse click on a column heading or anywhere in the
table body, or by clicking the Table Tools
button in the upper left corner of the table (if you have the
row count column displayed). For more information, see Table Tools.
Click the graphic for more information.
Template Name
The name of the configuration template, as assigned when you saved the template in the Edit
Configuration Template window.
Archive Name
The name of the archive that contained the configuration file the template was based on.
Archive Version
The archive version that contained the configuration file the template was based on.
File Size (Bytes)
The size in bytes of the template.
Date Created
The date and time the template was created.
Status
The status of the template: File Found or File Not Found. This shows whether the template is still
present in the database.
Last Modified
The date and time the template was last modified. You can modify (edit) a template from the
template's General Tab.
Details View Tab(All Templates Folder)
289
Welcome to NetSight Inventory Manager Help
Updates the information in the table.
Details View Tab(All Templates Folder)
290
Details View Tab (Archive)
The Details View tab appears when you select an archive operation in the left panel's Archive Mgmt tab. The
Details View displays the archive's versions −− the dates and times that the selected archive has been
performed. Right−click an item or items for a menu of options.
Use the table options and tools to find, filter, sort, print, and export information in a table and customize table
settings. You can access the Table Tools through a right−mouse click on a column heading or anywhere in the
table body, or by clicking the Table Tools
button in the upper left corner of the table (if you have the
row count column displayed). For more information, see Table Tools.
Click the graphic for more information.
Alert
A yellow alert icon in this column signifies one or more of the following:
•
−− there is a difference between the saved configuration(s) in this version and previous
configurations saved for the device(s).
•
−− a configuration save failed for one or more of the devices in this archive version.
Version
Lists the all the dates and times (archive versions) that the selected archive has been performed.
Archive Type
The icon in this column signifies the type of data the archive is configured to save:
• −− Device Configuration Data
•
•
−− Capacity Planning Data
−− Both Device Configuration and Capacity Planning Data
Locked
A
indicates that the archive version is locked. A locked archive version will not be deleted when
the maximum number of saved versions for this archive (as specified in the Archive Wizard) has been
reached. To lock and unlock an archive version, select the version in the Archive Mgmt tab, and select
Details View Tab (Archive)
291
Welcome to NetSight Inventory Manager Help
Tools > Lock/Unlock.
# Devices
The number of devices that this archive version is responsible for.
# Successful Configs
The number of successful configuration saves for the archive version.
# Failed Configs
The number of configuration saves that failed for the archive version.
# Aborted Configs
The number of configuration saves that were aborted for the archive version.
# Diff Configs
The number of saved configurations that are different from the previous configurations saved for the
device(s).
Memo
Displays any notes about the version entered into the Memo field in the Archive Version General tab.
Buttons
Performs a configuration discovery, updating the archive information in the table.
Details View Tab (Archive)
292
Details View Tab
(Archive Version)
The Details View tab appears when you select an archive version in the left panel's Archive Mgmt tab. The
archive version is the date and time that an archive operation was performed. The Details View displays the
individual configurations that were saved for this archive version, listed by device IP address. Right−click an
item or items for a menu of options.
Use the table options and tools to find, filter, sort, print, and export information in a table and customize table
settings. You can access the Table Tools through a right−mouse click on a column heading or anywhere in the
table body, or by clicking the Table Tools
button in the upper left corner of the table (if you have the
row count column displayed). For more information, see Table Tools.
Click the graphic for more information.
Alert
A yellow alert icon in this column signifies one or more of the following:
•
−− there is a difference between this saved configuration and the previous configuration
saved for the same device.
•
−− the configuration save failed.
To acknowledge an alert and place a checkmark on the alert icon, right−click the icon and select
Acknowledge Alert from the menu.
IP Address
Lists the individual devices (by device IP address) whose configuration files were saved by this
version of the archive operation.
Firmware Version
Shows the firmware version for this device at the time of the save operation.
Device Type
The device's model number or hardware type.
Status
The status of the config file: File Found or File Not Found/Missing. File Not Found/Missing indicates
that Inventory Manager can no longer find the config file (it has been deleted or moved) or the archive
Details View Tab(Archive Version)
293
Welcome to NetSight Inventory Manager Help
operation did not include saving device configuration data. Check the Description field for more
information.
File TimeStamp
The date and time the configuration was created.
File Size
The size of the saved configuration in bytes.
Description
When a configuration file is saved, it is automatically compared to the previously saved configuration
file for the same device. This field displays a message regarding that comparison. It also displays
information pertaining to any alert icon displayed in the Alert column. If the archive did not include a
device configuration save, this field will display "Device archived without configuration file." Rest
your cursor on the field to display a tooltip of the complete description.
Buttons
Performs a configuration discovery, updating the archive information in the table.
Details View Tab(Archive Version)
294
Details View Tab
(Archives Folder)
The Details View tab appears when you select the top−level Archives folder in the left panel's Archive Mgmt
tab. The Details View displays information about your archive operations. Right−click an item or items for a
menu of options.
Use the table options and tools to find, filter, sort, print, and export information in a table and customize table
settings. You can access the Table Tools through a right−mouse click on a column heading or anywhere in the
table body, or by clicking the Table Tools
button in the upper left corner of the table (if you have the
row count column displayed). For more information, see Table Tools.
Click the graphic for more information.
Alert
A yellow alert icon in this column signifies one or more of the following:
•
−− there is a difference between saved configuration(s) for the versions of this archive.
•
−− a configuration save failed for one or more of the devices that this archive is
responsible for.
Name
The name of the archive operation.
# Devices
The number of devices that this archive is responsible for.
Save Frequency
The frequency with which the archive operation is performed. A frequency of Never signifies that the
archive is not currently scheduled to be performed again.
Next Save
The next scheduled save operation this archive will perform.
Date Created
The date and time the archive operation was created.
Description
Details View Tab(Archives Folder)
295
Welcome to NetSight Inventory Manager Help
A description of the archive operation. You can edit this description in the archive General tab.
Buttons
Performs a configuration discovery, updating the archive information in the table.
Details View Tab(Archives Folder)
296
Details View Tab
(Device Group)
The Details View tab appears in the right panel when you select a device group in the left panel's Network
Elements tab. It displays a table of information about all the devices in the selected group and any subgroups.
Right−click an item or items for a menu of options. For information on the system−created device groups and
how to create your own device groups, see How to Add and Remove Device Groups.
TIP: The right−panel data is also displayed in the General tab and Image Information tab for each device.
The General tab allows you to view the information and also edit certain fields.
Use the table options and tools to find, filter, sort, print, and export information in a table and customize table
settings. You can access the Table Tools through a right−mouse click on a column heading or anywhere in the
table body, or by clicking the Table Tools
button in the upper left corner of the table (if you have the
row count column displayed). For more information, see Table Tools.
Click the graphic for more information.
Alert Icon
A yellow alert icon in this column signifies one or more of the following:
•
−− there is a difference between one or more saved configuration files for this device and
a previous file saved for the device.
•
−− the device status is No Contact.
•
−− the last archive save or restore for this device failed.
•
−− the last firmware upgrade for this device failed.
For a description of the alert, see the Alert Description column. To delete the alert icon, right−click
the icon and select Acknowledge Alert from the menu.
Details View Tab(Device Group)
297
Welcome to NetSight Inventory Manager Help
IP address
The device's IP address. Note that chassis that support Distributed Forwarding Engines (DFEs), such
as the Matrix N−Series, display a single management IP even though there may be multiple DFE
modules in the chassis.
Name
Displays the device display name (IP address, System Name, or Nickname) as configured in the
Options window, followed by the SNMP context, if applicable. Entries in this column are displayed in
italics to represent that the information may be "stale". Clicking the Refresh button changes the
entries to bold, indicating that the information is current for a minute when you first display the view.
Changing any other device information (including acknowledging an Alert icon) also changes the
entry to bold.
Last Status
The device's last known connection status (Contact or No Contact) and, therefore, its ability to
respond to SNMP requests. The status is updated when you right−click the device group folder and
select Refresh (Rediscover) from the menu, or click the Refresh button.
Uptime
The amount of time, in a days hh:mm:ss format, that the device has been running since the last
start−up.
Firmware Version
Shows the current firmware version installed in the device.
FW Reference
A indicates that the current firmware version installed in the device matches the firmware
reference image set for this device's binary family. (See How to Set a Reference Image.) This column
allows you to easily identify devices that need to be upgraded to the reference image.
NOTE: In order to provide this information, Inventory Manager compares the name and
version number of the reference image file to the current firmware on the device.
The version number must be available from the reference image file and the
current firmware on the device must have been installed at some point via an
Inventory Manager Firmware Upgrade Wizard operation that included a device
reset. Otherwise, this column may be blank even though the firmware version
installed on the device may actually match the reference image. If the version
number is not available from an image file, you can manually set the version
number in the Firmware Image General Tab.
Boot PROM Version
Shows the current version of Boot PROM installed in the device.
BP Reference
A indicates that the current Boot PROM version installed in the device matches the Boot PROM
reference image set for this device's binary family. (See How to Set a Reference Image.) This column
allows you to easily identify devices that need to be upgraded to the reference image.
NOTE: In order to provide this information, Inventory Manager compares the name and version
number of the reference image file to the current boot PROM on the device. The version
number must be available from the reference image file and the current boot PROM on
Details View Tab(Device Group)
298
Welcome to NetSight Inventory Manager Help
the device must have been installed at some point via an Inventory Manager Boot PROM
Upgrade Wizard operation that included a device reset. Otherwise, this column may be
blank even though the boot PROM version installed on the device may actually match the
reference image. If the version number is not available from an image file, you can
manually set the version number in the Firmware Image General Tab.
MAC Address
The physical layer address assigned to the interface through which Inventory Manager is
communicating. MAC addresses are hard−coded in the device, and are not configurable.
Device Type
The device's model number or hardware type.
System Name
The assigned name for the device.
System Contact
The person responsible for the device.
System Location
The physical location of the device.
Asset Tag
A unique asset number assigned to the device for inventory tracking purposes.
System Description
Description of the piece of equipment, which may include its manufacturer, model number, and
firmware revision number.
Chassis Slot
The slot number in the chassis where the device resides. N−Series devices and devices that do not
reside in a chassis, display a value of N/A.
Chassis ID
The ID assigned to the chassis where the device resides.
Serial Number
A unique number assigned to the device by the manufacturer.
CPU
The name of the device's processor (Central Processing Unit).
Memory
The device's total installed local memory, DRAM (Dynamic Random Access Memory), reported in
megabytes (MB).
File Transfer Method
The file transfer method for this device. For more information, see How to Set a File Transfer
Method.
Details View Tab(Device Group)
299
Welcome to NetSight Inventory Manager Help
FW Download
A indicates the device supports the ability to download firmware using the Firmware Upgrade
Wizard.
Boot PROM Download
A indicates the device supports the ability to download boot PROM images using the Boot PROM
Upgrade Wizard.
Config Download
A indicates the device supports the ability to save and restore archives (configurations) using the
Archive Wizard and Restore Wizard.
Timed Reset
A indicates the device supports the ability to perform a timed reset using the Reset Device Wizard.
Alert Description
Describes the cause of any alert icon appearing in the Alert column.
Buttons
Performs a device refresh, updating the device information in the table. If the Name column entry is
in italics (indicating that the information may be "stale"), clicking this Refresh button changes the
Name column entry to bold, indicating that you have current device information for a minute when
you first display the view.
Details View Tab(Device Group)
300
Details View Tab
(Device Type Folder − Firmware)
The Details View tab appears in the right panel when you select the Device Type folder in the left panel's
Firmware Mgmt tab. The Details View displays a list of information about all the firmware and boot PROM
images listed in the left panel under the firmware groups and subgroups. Right−click an item or items for a
menu of options.
Inventory Manager provides pre−defined firmware groups based on product family and device type, and
automatically organizes the firmware and boot PROM images stored in your firmware directory under the
appropriate group when you perform a firmware discovery or refresh. All of these groups are organized under
the top−level Device Type folder in the Firmware Mgmt tab.
Use the table options and tools to find, filter, sort, print, and export information in a table and customize table
settings. You can access the Table Tools through a right−mouse click on a column heading or anywhere in the
table body, or by clicking the Table Tools
button in the upper left corner of the table (if you have the
row count column displayed). For more information, see Table Tools.
Click the graphic for more information.
Referenced
Firmware or boot PROM images that have been set as a reference image display a reference icon (
or
) in this column. A reference image is the image you designate as the preferred image for a
specific binary family of devices. To set a reference, select a firmware or boot PROM image in the
table or the tree, right−click and select Set as Reference Image from the menu. The image will be set
as a reference for all device types with which it is compatible. (If the Set as Reference Image option is
not available, make sure that the selected image has been assigned to appropriate device types.)
Details View Tab(Device Type Folder − Firmware)
301
Welcome to NetSight Inventory Manager Help
Image Name
The name of the image as it is displayed in the left−panel Firmware Mgmt tree. The maximum length
of the displayed name is 50 characters. Longer names will be truncated to the 50−character maximum
with a (2), (3), and so on, appended if there are multiple images with the same name.
Image Filename
The full name of the image as it appears in your firmware images directory.
Image Path
The path to the location where the image is stored.
Date
The image file date and time as reported by the file system.
Version
The version number of the firmware or boot PROM image. If the version number is not available
from the image file, and Inventory Manager has not performed a firmware or boot PROM upgrade
using this image, this field will display N/A (not available).
Image Size (Bytes)
The size in bytes of the image.
Status
The status of the image file: "File Found" or "File Not Found". This shows whether the file is still
present in the firmware directory. If the image is a user−defined firmware record, this column will
display "User−Defined File."
Server
Displays the firmware download server associated with the image file. A discovered firmware image
that is accessible by the mapped file transfer server (as configured in the Services for NetSight Server
view of the Options window) will display "Mapped Server." A user−defined firmware record will
display its associated alternate firmware download server, as configured in the Create Firmware
Record window.
Buttons
Performs a firmware discovery, updating the information in the table.
Opens the Enterasys Networks download library website where you can download firmware and
release notes. (A browser is required to view the website and Solaris users must add the browser's
path to their PATH environment variable.) If you download a firmware image that is contained in a
.zip file, you must unzip the file before placing it into the firmware directory.
Details View Tab(Device Type Folder − Firmware)
302
Details View Tab
(Firmware Group)
The Details View tab appears in the right panel when you select a firmware group in the left panel's Firmware
Mgmt tab. It displays a list of information about all the firmware and boot PROM images for the selected
group and any subgroups. Right−click an item or items for a menu of options.
Inventory Manager provides pre−defined firmware groups and automatically organizes the firmware and boot
PROM images stored in your firmware directory under the appropriate group when you perform a firmware
discovery or refresh. Images are grouped according to:
• Product Family −− Devices that belong to the same Enterasys product families.
• Binary Family −− Devices that share the same firmware image.
• Device Type −− Specific module types.
Use the table options and tools to find, filter, sort, print, and export information in a table and customize table
settings. You can access the Table Tools through a right−mouse click on a column heading or anywhere in the
table body, or by clicking the Table Tools
button in the upper left corner of the table (if you have the
row count column displayed). For more information, see Table Tools.
Click the graphic for more information.
Referenced
Firmware or boot PROM images that have been set as a reference image display a reference icon (
or
) in this column. A reference image is the image you designate as the preferred image for a
specific binary family of devices. To set a reference, select a firmware or boot PROM image in the
table or the tree, right−click and select Set as Reference Image from the menu. The image will be set
as a reference for all device types with which it is compatible. (If the Set as Reference Image option is
not available, make sure that the selected image has been assigned to appropriate device types.)
Image Name
The name of the image as it is displayed in the left−panel Firmware Mgmt tree. The maximum length
of the displayed name is 50 characters. Longer names will be truncated to the 50−character maximum
with a (2), (3), and so on, appended if there are multiple images with the same name.
Image Filename
The full name of the image as it appears in your firmware images directory.
Details View Tab(Firmware Group)
303
Welcome to NetSight Inventory Manager Help
Image Path
The path to the location where the image is stored.
Date
The image file date and time as reported by the file system.
Version
The version number of the firmware or boot PROM image. If the version number is not available
from the image file, and Inventory Manager has not performed a firmware or boot PROM upgrade
using this image, this field will display N/A (not available).
Image Size (Bytes)
The size in bytes of the image.
Status
The status of the image file: "File Found" or "File Not Found." This shows whether the file is still
present in the firmware directory. If the image is a user−defined firmware record, this column will
display "User−Defined File."
Server
Displays the firmware download server associated with the image file. A discovered firmware image
that is accessible by the mapped file transfer server (as configured in the Services for NetSight Server
view of the Options window) will display "Mapped Server." A user−defined firmware record will
display its associated alternate firmware download server, as configured in the Create Firmware
Record window.
Buttons
Performs a firmware discovery, updating the information in the table.
Opens the Enterasys Networks download library website where you can download firmware and
release notes. (A browser is required to view the website and Solaris users must add the browser's
path to their PATH environment variable.) If you download a firmware image that is contained in a
.zip file, you must unzip the file before placing it into the firmware directory.
Details View Tab(Firmware Group)
304
Details View Tab
(Unknown Folder − Firmware)
The Details View tab appears when you select the Unknown folder in the left panel's Firmware Mgmt tab. The
Firmware Mgmt tab displays firmware and boot PROM images grouped according to product family and
device type. Inventory Manager provides pre−defined firmware groups and automatically organizes the
firmware and boot PROM images stored in your firmware directory under the appropriate group when you
perform a firmware discovery or refresh. The Unknown folder contains images that Inventory Manager could
not correlate to a device type. Right−click an item or items for a menu of options.
TIP: To quickly assign an image to a device type, drag the image from the right−panel Details
View into the appropriate left−panel Device Type folder.
Use the table options and tools to find, filter, sort, print, and export information in a table and customize table
settings. You can access the Table Tools through a right−mouse click on a column heading or anywhere in the
table body, or by clicking the Table Tools
button in the upper left corner of the table (if you have the
row count column displayed). For more information, see Table Tools.
Click the graphic for more information.
Referenced
Firmware or boot PROM images that have been set as a reference image display a reference icon (
or
). However, a reference icon will never be displayed in this column for the Unknown folder
because only images that have been assigned to a device type can be set as a reference image. For
more information, see How to Set a Reference Image.
Image Name
The name of the image as it is displayed in the left−panel Firmware Mgmt tree. The maximum length
of the displayed name is 50 characters. Longer names will be truncated to the 50−character maximum
with a (2), (3), and so on, appended if there are multiple images with the same name.
Image Filename
The full name of the image as it appears in your firmware images directory.
Image Path
The path to the location where the image is stored.
Date
Details View Tab(Unknown Folder − Firmware)
305
Welcome to NetSight Inventory Manager Help
The image file date and time as reported by the file system.
Version
The version number of the firmware or boot PROM image. If the version number is not available
from the image file, and Inventory Manager has not performed a firmware or boot PROM upgrade
using this image, this field will display N/A (not available).
Image Size (Bytes)
The size in bytes of the image.
Status
The status of the image file: "File Found" or "File Not Found." This shows whether the file is still
present in the firmware directory. If the image is a user−defined firmware record, this column will
display "User−Defined File."
Server
Displays the firmware download server associated with the image file. A discovered firmware image
that is accessible by the mapped file transfer server (as configured in the Services for NetSight Server
view of the Options window) will display "Mapped Server." A user−defined firmware record will
display its associated alternate firmware download server, as configured in the Create Firmware
Record window.
Buttons
Performs a firmware discovery, updating the information in the table.
Opens the Enterasys Networks download library website where you can download firmware and
release notes. (A browser is required to view the website and Solaris users must add the browser's
path to their PATH environment variable.) If you download a firmware image that is contained in a
.zip file, you must unzip the file before placing it into the firmware directory.
Details View Tab(Unknown Folder − Firmware)
306
Details View Tab
(Grouped By Folder)
The Details View tab appears in the right panel when you select the Grouped By folder in the left panel's
Network Elements tab. It displays a table of information about all the devices grouped below this folder into
the various device groups and any subgroups. Right−click an item or items for a menu of options.
TIP: This information is also displayed in the General tab and Image Information tab for each device. The
General tab allows you to view the information and also edit certain fields.
Use the table options and tools to find, filter, sort, print, and export information in a table and customize table
settings. You can access the Table Tools through a right−mouse click on a column heading or anywhere in the
table body, or by clicking the Table Tools
button in the upper left corner of the table (if you have the
row count column displayed). For more information, see Table Tools.
Click the graphic for more information.
Alert
A yellow alert icon in this column signifies one or more of the following:
•
−− there is a difference between one or more saved configuration files for this device and
a previous file saved for the device.
•
−− the device status is No Contact.
•
−− the last archive save or restore for this device failed.
•
−− the last firmware upgrade for this device failed.
For a description of the alert, see the Alert Description column. To delete the alert icon, right−click
the icon and select Acknowledge Alert from the menu.
IP address
Details View Tab(Grouped By Folder)
307
Welcome to NetSight Inventory Manager Help
The device's IP address. Note that chassis that support Distributed Forwarding Engines (DFEs), such
as the Matrix N−Series, display a single management IP even though there may be multiple DFE
modules in the chassis.
Name
Displays the device display name (IP address, System Name, or Nickname) as configured in the
Options window, followed by the SNMP context, if applicable. Entries in this column are displayed in
italics to represent that the information may be "stale". Clicking the Refresh button changes the
entries to bold, indicating that the information is current for a minute when you first display the view.
Changing any other device information (including acknowledging an Alert icon) also changes the
entry to bold.
Last Status
The device's last known connection status (Contact or No Contact) and, therefore, its ability to
respond to SNMP requests. The status is updated when you right−click the Grouped By folder and
select Refresh (Rediscover) from the menu, or click the Refresh button.
Uptime
The amount of time, in a days hh:mm:ss format, that the device has been running since the last
start−up.
Firmware Version
Shows the current firmware version installed in the device.
FW Reference
A indicates that the current firmware version installed in the device matches the firmware
reference image set for this device's binary family. For more information, see How to Set a Reference
Image. This column allows you to easily identify devices that need to be upgraded to the reference
image.
NOTE: In order to provide this information, Inventory Manager compares the name and
version number of the reference image file to the current firmware on the device.
The version number must be available from the reference image file and the
current firmware on the device must have been installed at some point via an
Inventory Manager Firmware Upgrade Wizard operation that included a device
reset. Otherwise, this column may be blank even though the firmware version
installed on the device may actually match the reference image. If the version
number is not available from an image file, you can manually set the version
number in the Firmware Image General Tab.
BootPROM Version
Shows the current version of Boot PROM installed in the device.
BP Reference
A indicates that the current Boot PROM version installed in the device matches the Boot PROM
reference image set for this device's binary family. For more information, see How to Set a Reference
Image. This column allows you to easily identify devices that need to be upgraded to the reference
image.
NOTE: In order to provide this information, Inventory Manager compares the name and version
number of the reference image file to the current boot PROM on the device. The version
Details View Tab(Grouped By Folder)
308
Welcome to NetSight Inventory Manager Help
number must be available from the reference image file and the current boot PROM on
the device must have been installed at some point via an Inventory Manager Boot PROM
Upgrade Wizard operation that included a device reset. Otherwise, this column may be
blank even though the boot PROM version installed on the device may actually match the
reference image. If the version number is not available from an image file, you can
manually set the version number in the Firmware Image General Tab.
MAC Address
The physical layer address assigned to the interface through which Inventory Manager is
communicating. MAC addresses are hard−coded in the device, and are not configurable.
Device Type
The device's model number or hardware type.
System Name
The assigned name for the device.
System Contact
The person responsible for the device.
System Location
The physical location of the device.
Asset Tag
A unique asset number assigned to the device for inventory tracking purposes.
System Description
Description of the piece of equipment, which may include its manufacturer, model number, and
firmware revision number.
Chassis Slot
The slot number in the chassis where the device resides.
Chassis ID
The ID assigned to the chassis where the device resides.
Serial Number
A unique number assigned to the device by the manufacturer.
CPU
The name of the device's processor (Central Processing Unit).
Memory
The device's total installed local memory, DRAM (Dynamic Random Access Memory), reported in
megabytes (MB).
File Transfer Method
The file transfer method for this device. For more information, see How to Set a File Transfer
Method.
Details View Tab(Grouped By Folder)
309
Welcome to NetSight Inventory Manager Help
FW Download
A indicates the device supports the ability to download firmware using the Firmware Upgrade
Wizard.
Boot PROM Download
A indicates the device supports the ability to download boot PROM images using the Boot PROM
Upgrade Wizard.
Config Download
A indicates the device supports the ability to save and restore archives (configurations) using the
Archive Wizard and Restore Wizard.
Timed Reset
A indicates the device supports the ability to perform a timed reset using the Reset Device Wizard.
Alert Description
Describes the cause of any alert icon appearing in the Alert column.
Buttons
Performs a device refresh, updating the device information in the table. If the Name column entry is
in italics (indicating that the information may be "stale"), clicking this Refresh button changes the
Name column entry to bold, indicating that you have current device information for a minute when
you first display the view.
Details View Tab(Grouped By Folder)
310
Details View Tab
(My Network Folder)
The Details View tab appears in the right panel when you select the My Network folder in the left panel's
Network Elements tab. The My Network folder contains all the devices in the NetSight database, and the
Details View displays a table of information about those devices. Right−click an item or items for a menu of
options.
TIP: This information is also displayed in the General tab and Image Information tab for each device. The
General tab allows you to view the information and also edit certain fields.
Use the table options and tools to find, filter, sort, print, and export information in a table and customize table
settings. You can access the Table Tools through a right−mouse click on a column heading or anywhere in the
table body, or by clicking the Table Tools
button in the upper left corner of the table (if you have the
row count column displayed). For more information, see Table Tools.
Click the graphic for more information.
Alert
A yellow alert icon in this column signifies one or more of the following:
•
−− there is a difference between one or more saved configuration files for this device and
a previous file saved for the device.
•
−− the device status is No Contact.
•
−− the last archive save or restore for this device failed.
•
−− the last firmware upgrade for this device failed.
For a description of the alert, see the Alert Description column. To delete the alert icon, right−click
the icon and select Acknowledge Alert from the menu.
Details View Tab(My Network Folder)
311
Welcome to NetSight Inventory Manager Help
IP address
The device's IP address. Note that chassis that support Distributed Forwarding Engines (DFEs), such
as the Matrix N−Series, display a single management IP even though there may be multiple DFE
modules in the chassis.
Name
Displays the device display name (IP address, System Name, or Nickname) as configured in the
Options window, followed by the SNMP context, if applicable. Entries in this column are displayed in
italics to represent that the information may be "stale". Clicking the Refresh button changes the
entries to bold, indicating that the information is current for a minute when you first display the view.
Changing any other device information (including acknowledging an Alert icon) also changes the
entry to bold.
Last Status
The device's last known connection status (Contact or No Contact) and, therefore, its ability to
respond to SNMP requests. The status is updated when you right−click the All Devices folder and
select Refresh (Rediscover) from the menu, or click the Refresh button.
Uptime
The amount of time, in a days hh:mm:ss format, that the device has been running since the last
start−up.
Firmware Version
Shows the current firmware version installed in the device.
FW Reference
A indicates that the current firmware version installed in the device matches the firmware
reference image set for this device's binary family. For more information, see How to Set a Reference
Image. This column allows you to easily identify devices that need to be upgraded to the reference
image.
NOTE: In order to provide this information, Inventory Manager compares the name and
version number of the reference image file to the current firmware on the device.
The version number must be available from the reference image file and the
current firmware on the device must have been installed at some point via an
Inventory Manager Firmware Upgrade Wizard operation that included a device
reset. Otherwise, this column may be blank even though the firmware version
installed on the device may actually match the reference image. If the version
number is not available from an image file, you can manually set the version
number in the Firmware Image General Tab.
Boot PROM Version
Shows the current version of boot PROM installed in the device.
BP Reference
A indicates that the current boot PROM version installed in the device matches the boot PROM
reference image set for this device's binary family. For more information, see How to Set a Reference
Image. This column allows you to easily identify devices that need to be upgraded to the reference
image.
NOTE:
Details View Tab(My Network Folder)
312
Welcome to NetSight Inventory Manager Help
In order to provide this information, Inventory Manager compares the name and version
number of the reference image file to the current boot PROM on the device. The version
number must be available from the reference image file and the current boot PROM on
the device must have been installed at some point via an Inventory Manager Boot PROM
Upgrade Wizard operation that included a device reset. Otherwise, this column may be
blank even though the boot PROM version installed on the device may actually match the
reference image. If the version number is not available from an image file, you can
manually set the version number in the Firmware Image General Tab.
MAC Address
The physical layer address assigned to the interface through which Inventory Manager is
communicating. MAC addresses are hard−coded in the device, and are not configurable.
Device Type
The device's model number or hardware type.
System Name
The assigned name for the device.
System Contact
The person responsible for the device.
System Location
The physical location of the device.
Asset Tag
A unique asset number assigned to the device for inventory tracking purposes.
System Description
Description of the piece of equipment, which may include its manufacturer, model number, and
firmware revision number.
Chassis Slot
The slot number in the chassis where the device resides. N−Series devices and devices that do not
reside in a chassis, display a value of N/A.
Chassis ID
The ID assigned to the chassis where the device resides.
Serial Number
A unique number assigned to the device by the manufacturer.
CPU
The name of the device's processor (Central Processing Unit).
Memory
The device's total installed local memory, DRAM (Dynamic Random Access Memory), reported in
megabytes (MB).
File Transfer Method
Details View Tab(My Network Folder)
313
Welcome to NetSight Inventory Manager Help
The file transfer method for this device. For more information, see How to Set a File Transfer
Method.
FW Download
A indicates the device supports the ability to download firmware using the Firmware Upgrade
Wizard.
Boot PROM Download
A indicates the device supports the ability to download boot PROM images using the Boot PROM
Upgrade Wizard.
Config Download
A indicates the device supports the ability to save and restore archives (configurations) using the
Archive Wizard and Restore Wizard.
Timed Reset
A indicates the device supports the ability to perform a timed reset using the Reset Device Wizard.
Alert Description
Describes the cause of any alert icon appearing in the Alert column.
Buttons
Performs a device refresh, updating the device information in the table. If the Name column entry is
in italics (indicating that the information may be "stale"), clicking this Refresh button changes the
Name column entry to bold, indicating that you have current device information for a minute when
you first display the view.
Details View Tab(My Network Folder)
314
Details View Tab
(Device Type Folder − Templates)
The Details View tab appears in the right panel when you select the Device Type folder in the left panel's
Configuration Templates tab. The Details View displays information about all the configuration templates
listed in the left panel under the template groups and subgroups. Right−click an item or items for a menu of
options.
Inventory Manager provides pre−defined template groups based on product family and device type, and
automatically organizes each template under the appropriate group when you save the template in the Edit
Configuration Template window. All of these template groups are organized under the top−level Device Type
folder in the Configuration Templates tab.
Use the table options and tools to find, filter, sort, print, and export information in a table and customize table
settings. You can access the Table Tools through a right−mouse click on a column heading or anywhere in the
table body, or by clicking the Table Tools
button in the upper left corner of the table (if you have the
row count column displayed). For more information, see Table Tools.
Click the graphic for more information.
Template Name
The name of the configuration template, as assigned when you saved the template in the Edit
Configuration Template window.
Archive Name
The name of the archive that contained the configuration file the template was based on.
Archive Version
The archive version that contained the configuration file the template was based on.
File Size (Bytes)
The size in bytes of the template.
Date Created
The date and time the template was created.
Status
The status of the template: File Found or File Not Found. This shows whether the template is still
present in the database.
Details View Tab(Device Type Folder − Templates)
315
Welcome to NetSight Inventory Manager Help
Last Modified
The date and time the template was last modified. You can modify (edit) a template from the
template's General Tab.
Updates the information in the table.
Details View Tab(Device Type Folder − Templates)
316
Details View Tab
(Template Group)
The Details View tab appears in the right panel when you select a template group in the left panel's
Configuration Templates tab. The Details View displays a list of information about all the templates for the
selected group and any subgroups. Right−click an item or items for a menu of options.
Inventory Manager provides pre−defined groups based on product family and device type, and automatically
organizes each template under the appropriate device type when you save the template in the Edit
Configuration Template window. You can also assign a template to any template group using the Assign
Configuration Template window.
Use the table options and tools to find, filter, sort, print, and export information in a table and customize table
settings. You can access the Table Tools through a right−mouse click on a column heading or anywhere in the
table body, or by clicking the Table Tools
button in the upper left corner of the table (if you have the
row count column displayed). For more information, see Table Tools.
Click the graphic for more information.
Template Name
The name of the configuration template, as assigned when you saved the template in the Edit
Configuration Template window.
Archive Name
The name of the archive that contained the configuration file the template was based on.
Archive Version
The archive version that contained the configuration file the template was based on.
File Size (Bytes)
The size in bytes of the template.
Date Created
The date and time the template was created.
Status
The status of the template: File Found or File Not Found. This shows whether the template is still
present in the database.
Last Modified
The date and time the template was last modified. You can modify (edit) a template from the
Details View Tab(Template Group)
317
Welcome to NetSight Inventory Manager Help
template's General Tab.
Updates the information in the table.
Details View Tab(Template Group)
318
Details View Tab
(Unknown Folder − Templates)
The Details View tab appears in the right panel when you select the Unknown folder in the left panel's
Configuration Templates tab. It displays information about all the templates listed under the Unknown folder.
Right−click an item or items for a menu of options.
Inventory Manager provides pre−defined groups based on product family and device type, and automatically
organizes each template under the appropriate device type when you save the template in the Edit
Configuration Template window. The Unknown folder contains any templates that Inventory Manager could
not correlate to a device type.
TIP: To quickly assign a template to a device type, drag the template from the right−panel Details View
into the appropriate left−panel Device Type folder. You can also assign a template to any template
group using the Assign Configuration Template window.
Use the table options and tools to find, filter, sort, print, and export information in a table and customize table
settings. You can access the Table Tools through a right−mouse click on a column heading or anywhere in the
table body, or by clicking the Table Tools
button in the upper left corner of the table (if you have the
row count column displayed). For more information, see Table Tools.
Click the graphic for more information.
Template Name
The name of the configuration template, as assigned when you saved the template in the Edit
Configuration Template window.
Archive Name
The name of the archive that contained the configuration file the template was based on.
Archive Version
The archive version that contained the configuration file the template was based on.
File Size (Bytes)
The size in bytes of the template.
Date Created
The date and time the template was created.
Status
Details View Tab(Unknown Folder − Templates)
319
Welcome to NetSight Inventory Manager Help
The status of the template: File Found or File Not Found. This shows whether the template is still
present in the database.
Last Modified
The date and time the template was last modified. You can modify (edit) a template from the
template's General Tab.
Updates the information in the table.
Details View Tab(Unknown Folder − Templates)
320
General Tabs
A General tab is available in the right panel of the Inventory Manager main window when an archive, device,
firmware image, configuration, template, or device type folder is selected in the left−panel tab. It provides
general properties information about the selected item.
Help topics for the right−panel General tabs are named to reflect the item selected in the left−panel tree. For
example, the help topic for the General tab with a device selected in the left panel is named General Tab
(Device). For more complete information on these tabs, expand the General folder and select the desired tab.
General Tabs
321
General Tab (Archive)
The General tab appears when you select an archive operation in the left panel's Archive Mgmt tab. It allows
you to edit an archive's attributes including devices, schedule, process, and setup.
Click the graphic for more information.
Name
The name of the archive operation. You cannot change the archive name here. To rename an archive,
select the archive in the left−panel Archive Mgmt tab, and then select Edit > Rename.
Description
General Tab (Archive)
322
Welcome to NetSight Inventory Manager Help
A brief description to help you identify the archive operation.
Devices
Lists the devices selected for the operation. Using the checkboxes, select or deselect the devices you
want to archive. To edit this device list, click Edit Devices.
Schedule
Frequency
Use the drop−down list to select the frequency with which you want the archive performed: Never,
Now, Once, Daily, Weekly, or On Server Startup. The Never option lets you create an archive
operation without actually performing it. The Now option lets you perform an immediate archive.
Select Starting Day
Use the drop−down list to select the month you want the archive to start. A calendar corresponding to
the selected month is displayed. Select the desired starting day by clicking on the calendar. You can
use the arrows on either side of the drop−down list to change the month, and change the year by
entering a new year in the text field.
Start Time
Set the starting time for the operation and select AM or PM. (This field is grayed out if you have
selected the Never or Now frequency.)
Process
Groups of
The archive will be performed simultaneously on the number of devices specified in the Groups of
field. Enter the value 1 to have the operation performed serially, one device after another.
Abort on failure
Select this checkbox to stop the archive operation after a failure. This is useful if you are performing
an archive operation on multiple devices and you want the operation to stop after a failure on a single
device.
Archive Setup
Max Versions
Specify the maximum number of versions you would like saved for this archive. This allows you to
limit the number of versions saved for each archive. Once the maximum number is reached, older
versions are automatically deleted. If you specify a number that is less than the current number of
saved versions, older versions over the maximum number will be automatically deleted the next time
the archive is performed.
Archive Type
Select the appropriate checkbox for the type of data you wish to archive:
• Archive Configuration Data − Create archives (backup copies) of your devices'
configurations that can be restored to the devices at a later date, if needed.
• Archive Capacity Planning data − Create archives of port and FRU information to be used
by the Capacity Planning tool to generate reports.
General Tab (Archive)
323
Welcome to NetSight Inventory Manager Help
Buttons
Save
Saves any changes you have made to the archive attributes. If you have selected a Frequency of Now,
the archive will be performed.
Edit Devices
Opens the Select Devices window where you can select a single group or a list of devices to include
in this archive. This allows you to change the devices the archive will be performed on.
General Tab (Archive)
324
General Tab (Archive Version)
The General tab appears when you select an archive version in the left panel's Archive Mgmt tab. The archive
version is the date and time that an archive operation was performed. The General tab displays information
about the version, including the number of successful and failed saves for that version.
Click the graphic for more information.
Archive Name
The name of the archive operation.
Date
The date and time the version was created.
# of Devices
The number of devices that this archive version is responsible for.
# of Success
The number of successful saves for the archive version.
# of Failed
The number of saves that failed for the archive version.
# of Aborted
The number of saves that were aborted for the archive version.
General Tab (Archive Version)
325
Welcome to NetSight Inventory Manager Help
# of Differences
The number of saved configurations that are different from the previous configurations saved for the
device(s).
Version Lock Status
Whether the version is locked or not locked. A locked archive version will not be deleted when the
maximum number of saved versions for this archive (as specified in the Archive Wizard) has been
reached. To lock and unlock an archive version, select the version in the Archive Mgmt tab, and select
Tools > Lock/Unlock.
Memo
Use this field to add additional notes about the version and save them using the Save button.
Buttons
Save
Saves any notes you made in the Memo field.
General Tab (Archive Version)
326
General Tab (Configuration)
The General tab appears when you select an individual configuration in the left panel's Archive Mgmt tab.
Each configuration displays an icon that identifies the type of data that it contains: device configuration
data (an individual .cfg config file),
capacity planning data,
both device configuration and capacity
planning data. The General tab displays information about the data that was saved.
Click the graphic for more information.
General
Archive
The name of the archive operation.
General Tab (Configuration)
327
Welcome to NetSight Inventory Manager Help
IP Address
The IP address of the device whose data was saved, followed by the SNMP context, if applicable.
Version
The date and time that the archive operation was performed.
Operation Status
The status of the operation: Success or Failure.
Description
When a configuration file is saved, it is automatically compared to the previously saved configuration
file for the same device. This field displays a message regarding that comparison. For archive
operations that are configured to archive only capacity planning data (and not configuration data), this
column will display a Warning message stating that the ability to archive configuration data has been
disabled for this archive.
Memo
Use this field to add additional notes about the configuration and save them using the Save button.
Configuration Archive
This section indicates whether device configuration data was saved when the archive was performed. Device
configuration data is saved as a .cfg config file, and information about that file is displayed here. You can
select whether or not to save device configuration data when you create an archive using the Archive Wizard,
or when you edit an archive using the Archive General Tab.
Device Status
The status of the device at the time the archive operation was performed: Contact or No Contact.
File Status
The status of the config file: File Found or File Not Found/Missing. File Not Found/Missing indicates
that Inventory Manager can no longer find the config file (it has been deleted or moved) or the archive
operation did not include saving device configuration data. Check the Description field for more
information.
File Name
The path and filename for the saved configuration. For archive operations that are configured to
archive only capacity planning data (and not configuration data), this column will be blank.
File Time Stamp
The date and time the configuration file was created. For archive operations that are configured to
archive only capacity planning data (and not configuration data), this column will be blank.
Contains Custom Attributes
Indicates whether the device's custom attributes were saved when the archive was performed. These
attributes are displayed in a configuration's Custom Attributes tab. If the device type does not support
custom attributes or if the archive was not successful, this field will display "No."
Capacity Planning
This section indicates whether the device's port and FRU information was saved when the archive was
performed. This information is used by the Capacity Planning tool to generate reports. You can select whether
General Tab (Configuration)
328
Welcome to NetSight Inventory Manager Help
or not to save port and FRU information when you create an archive using the Archive Wizard, or when you
edit an archive using the Archive General Tab.
Contains Capacity Planning Data
Indicates whether the device's port and FRU information was saved when the archive was performed.
Buttons
Save
Saves any notes you made in the Memo field.
General Tab (Configuration)
329
General Tab (Device)
The General tab displays general identification and configuration information for the device selected in the
left panel's Network Elements tab. It also provides a place for you to enter or change an asset tag, and save a
description of the device.
Click the graphic for more information.
Device Identification
IP Address
The device's IP address.
Name
Displays the device display name (IP address, System Name, or Nickname) as configured in the
Options window, followed by the SNMP context, if applicable.
Device Type
The device's model number or hardware type.
MAC Address
General Tab (Device)
330
Welcome to NetSight Inventory Manager Help
The physical layer address assigned to the interface through which Inventory Manager is
communicating. MAC addresses are hard−coded in the device, and are not configurable.
System Name
The assigned name of the device as stored in the device's sysName MIB object.
System Contact
The name of the person responsible for the device as stored in the device's sysContact MIB object.
System Location
The physical location of the device as stored in the device's sysLocation MIB object.
Asset Tag
A unique asset number assigned to the device for inventory tracking purposes. Enter a number and
click Save. The asset tag will be stored in the Inventory Manager database and on the device. If
Inventory Manager could not store the asset tag on the device, an asterisk (*) will show up in the asset
tag field indicating that the asset tag was saved only to the Inventory Manager database.
Chassis Slot
The slot number in the chassis where the device resides. N−Series devices and devices that do not
reside in a chassis, display a value of N/A.
Chassis ID
The ID assigned to the chassis where the device resides. This is usually a serial number or MAC
address, depending on the chassis type.
Serial Number
A unique number assigned to the device by the manufacturer.
System Description
Description of the piece of equipment, including its manufacturer, model number, and firmware
revision number.
Last Known Status
The device's last known connection status (Contact or No Contact) and, therefore, its ability to
respond to SNMP requests. The status is updated each time you select the device in the left−panel
Network Elements tab.
Uptime
The amount of time, in a days hh:mm:ss format, that the device has been running since the last
start−up.
Firmware Version
Shows the current firmware version installed in the device.
Boot PROM Version
Shows the current version of Boot PROM installed in the device.
CPU
The name of the device's processor (Central Processing Unit).
General Tab (Device)
331
Welcome to NetSight Inventory Manager Help
Memory
The device's total installed local memory, DRAM (Dynamic Random Access Memory), reported in
megabytes (MB).
File Transfer Method
The file transfer method for this device. For more information, see How to Set a File Transfer
Method.
Firmware Server
The firmware download server specified for the device via the Set Firmware Server window. All
devices are initially configured to use the mapped file transfer server (as configured in the Services
for NetSight Server view of the Options window) for firmware downloads. By specifying an alternate
firmware download server, you can enable a remote device to use a server in its own local network,
and avoid performing downloads over a WAN. Use the Alternate Firmware Servers view in the
Options window to configure alternate firmware download servers.
Profiles
This section displays the profiles assigned to the device via the Profile/Device Mapping tab in the
Authorization/Device Access window.
NetSight Server Profile
The profile assigned to the device for the NetSight Administrator group. The Read Credential of this
profile is used to determine contact status for this device.
Authorization Group Profile
The profile assigned to the user's Authorization Group. The credentials of this profile define the user's
access privileges for SNMP communication with the device.
Description
Description
Use this area to enter a description of the device and any other pertinent information. Click Save to
save the information.
Button
Save
Saves any information entered into the General tab.
General Tab (Device)
332
General Tab (Device Type)
The General tab appears when you select a device type folder (lowest level folder only) in the left panel's
Firmware Mgmt tab. It displays information about the device type. You can view and/or edit the information,
and save your changes.
Click the graphic for more information.
Module Type
The device's model number or hardware type.
Binary Family
The binary family to which the device type belongs. Device types in the same binary family share the
same firmware image.
Default File Transfer Method
The default file transfer method for this device type. To set the default file transfer method for a
device type, right−click on a device type folder (lowest level folder) and select Default File Transfer
Method. You can override this default at the device level. For more information, see How to Set a File
Transfer Method.
Firmware Download MIB
The Firmware Download MIB supported by this device type. If the device type supports more than
one Firmware Download MIB, you can use the drop−down list to select the desired MIB. Click Save
to save any changes.
Initially, Auto Discover is displayed here, which means that Inventory Manager will read the
Firmware Download MIB on the first device of this device type that you add or import, and display it
here. Inventory Manager will then use that MIB to perform firmware and boot PROM downloads on
all devices of this device type. You can override the MIB specified here on a per−device basis using
the MIB Overrides section on the Image Information Tab (Device).
General Tab (Device Type)
333
Welcome to NetSight Inventory Manager Help
Configuration MIB
The Configuration MIB supported by this device type. If the device type supports more than one
Configuration MIB, you can use the drop−down list to select the desired MIB. Click Save to save any
changes.
Initially, Auto Discover is displayed here, which means that Inventory Manager will read the
Configuration MIB on the first device of this device type that you add or import, and display it here.
Inventory Manager will then use that MIB to perform archive operations on all devices of this device
type. You can override the MIB specified here on a per−device basis using the MIB Overrides section
on the Image Information Tab (Device).
Details
Displays a description of the device type. Use this field to add information regarding the device and
click Save to save any changes.
Buttons
Save
Saves any changes you have made.
General Tab (Device Type)
334
General Tab (Firmware Image)
The General tab appears when you select an individual firmware or boot PROM image in the left panel's
Firmware Mgmt tab. It displays information about the image.
Click the graphic for more information.
Image Name
The name of the image as it is displayed in the left−panel Firmware Mgmt tree. The maximum length
of the displayed name is 50 characters. Longer names will be truncated to the 50−character maximum
with a (2), (3), and so on, appended if there are multiple images with the same name.
Image Filename
The full name of the image as it appears in your firmware images directory.
Version
The version number of the firmware or boot PROM image. If the version number is not available
from the image file, and Inventory Manager has not performed a firmware or boot PROM upgrade
using this image, this field will display N/A (not available). Enter a version number and click Save to
manually set a version number for the image.
Image Path
General Tab (Firmware Image)
335
Welcome to NetSight Inventory Manager Help
The path to the location where the image is stored.
Image Size
The size in bytes of the image.
Date
The image file date and time as reported by the file system.
Status
The status of the image file: File Found or File Not Found. This shows whether the image file is still
present in the firmware directory. If the image is a user−defined firmware record, this column will
display "User−Defined File."
Image Type
Displays whether the image is a firmware or boot PROM image. Use the radio buttons to change the
designation if necessary.
Server
Displays the firmware download server associated with the firmware image. A discovered firmware
image that is accessible by the mapped file transfer server (as configured in the Services for NetSight
Server view of the Options window) will display "Mapped Server". A user−defined firmware record
will display its associated alternate firmware download server, as configured in the Create Firmware
Record window.
Root Directory
Displays the root directory for the firmware download server if the server is an alternate firmware
download server and the image is a user−defined firmware record. Otherwise, this field will not be
displayed.
Compatible Device Types
Device types the image is valid for.
Description
Use this field to add a brief description of the image and any information regarding its use. Click Save
to save any changes.
Buttons
Save
Saves any changes you have made to the version or description field.
General Tab (Firmware Image)
336
General Tab (Template)
The General tab appears when you select an individual configuration template in the left panel's Configuration
Templates tab. It displays information about the template and allows you to edit the template, if desired.
Click the graphic for more information.
Template Name
The name of the configuration template, as assigned when you saved the template in the Edit
Configuration Template window.
Archive Version
The archive version that contained the configuration file the template was based on.
Template Size
The size in bytes of the template.
Date Created
The date and time the template was created.
Status
The status of the template: File Found or File Not Found. File Not Found indicates that Inventory
Manager can no longer find the template file; it has been deleted or moved.
Last Modified
The date and time the template was last modified.
General Tab (Template)
337
Welcome to NetSight Inventory Manager Help
Compatible Device Types
Device types the template is valid for, based on what device types the template has been assigned to.
Memo
Use this field to add any notes about the template. Click Save to save any changes.
Buttons
Edit Template
Opens the Edit Configuration Template window where you can modify the template.
Save
Saves any changes you have made to the Memo field.
General Tab (Template)
338
Image Information Tab (Device)
The Image Information tab appears when you select a device in the left panel's Network Elements tab. It
displays last known firmware and archive information for the selected device, and provides information on
Inventory Manager features supported by the device.
Click the graphic for more information.
Last Known Images
Firmware Image Name
Shows the last firmware image that was downloaded to the device through Inventory Manager. If no
firmware image has been downloaded to the device through Inventory Manager, the field will display
N/A.
Boot PROM Image Name
Shows the last boot PROM image that was downloaded to the device through Inventory Manager. If
no boot PROM image has been downloaded to the device through Inventory Manager, the field will
display N/A.
Last Known Configuration File
Archive/Template Source
Shows the name and version of the last archive operation performed on the device, or the name of the
last configuration template downloaded to the device, through Inventory Manager. If neither operation
has been performed on the device, this field will display N/A.
Image Information Tab (Device)
339
Welcome to NetSight Inventory Manager Help
Features Supported by this Device
Firmware Download
A indicates the device supports the ability to download firmware images using the Firmware
Upgrade Wizard.
Configuration Download
A indicates the device supports the ability to save and restore archives using the Archive Wizard
and Restore Wizard.
Timed Reset
A indicates the device supports the ability to perform a timed reset using the Reset Wizard.
Boot PROM Download
A indicates the device supports the ability to download boot PROM images using the Boot PROM
Upgrade Wizard.
MIB Overrides
Firmware Download MIB
The Firmware Download MIB supported by this device. Initially, Controlled by Device Type is
displayed here, meaning that Inventory Manager will use the MIB specified in the Firmware
Download MIB field on the General Tab (Device Type). If you would like to override the Device
Type MIB, use the drop−down list here to select the desired MIB and click Save to save the change.
Configuration MIB
The Configuration MIB supported by this device. Initially, Controlled by Device Type is displayed
here, meaning that Inventory Manager will use the MIB specified in the Configuration MIB field on
the General Tab (Device Type). If you would like to override the Device Type MIB, use the
drop−down list here to select the desired MIB and click Save to save the change.
Buttons
Save
Saves any changes you have made in the MIB Overrides section.
Image Information Tab (Device)
340
Module Information Tab
(Device)
The Module Information tab provides detailed information for certain devices/chassis that contain multiple
modules and components, while being managed by a single IP address. This group of devices includes the
Matrix N−Series devices, and certain X−Pedition devices including the SSR−8000 and SSR−8600, the
ER−16, and the GIGAswitch Router 8.
To access this tab, select the device in the left panel's Network Elements tab, then click the Module
Information tab in the right panel. The information displayed varies slightly depending on the device type. If a
column displays N/A (not available), it means that the module or component did not return a value for that
parameter. If a column is blank, it means that the module or component returned an empty value.
Use the table options and tools to find, filter, sort, print, and export information in a table and customize table
settings. You can access the Table Tools through a right−mouse click on a column heading or anywhere in the
table body, or by clicking the Table Tools
button in the upper left corner of the table (if you have the
row count column displayed). For more information, see Table Tools.
Click the graphic for more information.
Slot Number
The slot number in the chassis where the module or component resides.
Module Name
The information in this column varies depending on the selected device. For N−Series devices it
displays the model number of the module or component. For other devices, it displays a description of
the module.
Module Type
The information in this column varies depending on the selected device. For N−Series devices it
displays a description of the module or component type. For other devices, it displays the physical
module type.
Module Information Tab (Device)
341
Welcome to NetSight Inventory Manager Help
Description
A description of the module or component.
Firmware Version
The current firmware version installed in the module.
BootPROM Version
The current version of Boot PROM installed in the module.
Serial Number
A unique number assigned to the module or component by the manufacturer.
Asset Tag
A unique asset number assigned to the module or component for inventory tracking purposes.
Memory
The system memory size available on the module, reported in megabytes (MB).
Button
Updates the information in the table.
Module Information Tab (Device)
342
Template Variables Tab
The Template Variables tab can be selected in the right panel when you select any folder in the left panel's
Configuration Templates tab. It lists all the variables that have been defined for use in creating a configuration
template. To add a variable, right−click in the table and select Create Template Variable. (You can also define
template variables in the Template Variables window accessed from the Edit Configuration Template
window.) To delete a variable, right−click the variable and select Delete. For more information on creating
templates and assigning values to template variables, see How to Create and Download Configuration
Templates.
Use the table options and tools to find, filter, sort, print, and export information in a table and customize table
settings. You can access the Table Tools through a right−mouse click on a column heading or anywhere in the
table body, or by clicking the Table Tools
button in the upper left corner of the table (if you have the
row count column displayed). For more information, see Table Tools.
Click the graphic for more information.
Variables
Lists all the template variables that have been defined. To add a variable, right−click in the table and
select Create Template Variable. To delete a variable, right−click the variable and select Delete.
Template Variables Tab
343
Inventory Manager Windows
The Windows help folder contains help topics describing Inventory Manager windows and their field
definitions.
Double−click the Windows help folder in the left panel to open the folder and navigate to topics
describing a particular window.
Inventory Manager Windows
344
Active Status Panel
The Active Status panel at the bottom of the Inventory Manager main window presents a chronological
summary of operations that Inventory Manager has performed, including archive saves and restores,
firmware/boot PROM upgrades, and reset device operations. As operations take place, the Active Status is
updated with specific information about each event, and the status (results) of the operation. The Active Status
panel lists operations performed by all Inventory Manager clients connected to the server.
The panel presents the status in two different views: Summary and Details. Use the buttons at the top of the
panel to select the desired view. The Summary view lists the operations that have been performed, while the
Details view lists the individual devices the operations have been performed on. If you select an operation in
the Summary view then switch to the Details view, the corresponding device entries are highlighted. For even
more detailed information about each entry, select the entry, then right−click and select View from the menu
to open a Properties window.
Entries remain in the Active Status panel until you restart the application. If the Active Status panel reaches a
total of 1000 entries, the 500 oldest entries will be automatically purged. You can delete entries by
right−clicking and selecting Purge from the menu. Deleting an entry causes that entry and all older entries to
be purged. You cannot delete entries from the middle of the table because that would disrupt the sequence of
events.
To stop an operation, select the operation entry, then right−click and select Abort from the menu. Any part of
the operation that is currently in progress will complete before the operation is terminated.
Information on the following Active Status views:
• Summary
• Details
• Right−Click Menu Options
Summary View
The Summary view presents a chronological summary of operations that Inventory Manager has performed,
including archive saves and restores, firmware upgrades, and reset device operations. Select the Summary
option at the top of the panel to display this view.
Use the table options and tools to find, filter, sort, print, and export information in a table and customize table
settings. You can access the Table Tools through a right−mouse click on a column heading or anywhere in the
table body, or by clicking the Table Tools
button in the upper left corner of the table (if you have the
row count column displayed). For more information, see Table Tools.
Click the graphic for more information.
Active Status Panel
345
Welcome to NetSight Inventory Manager Help
Alert
A yellow alert icon in this column signifies:
•
−− the operation failed for one or more of the devices that the operation is responsible for.
•
−− for a successful configuration save operation, the alert signifies that there is a
difference between one of the saved configuration files and the previous file saved for that
device.
To acknowledge an alert and place a checkmark on the alert icon, right−click the icon and select
Acknowledge Alert from the menu.
Schedule Name
The name of the operation. For certain operations such as archive saves, this is the name you assigned
the operation when you created it.
Operation
The type of operation performed, such as Archive Save or Device Discovery.
Target
What the operation is acting on.
Status
The status of the operation: Success or Failure. If the operation was performed on multiple devices,
the status will be listed as Success only if it was successful on all devices. If it fails on any device, the
status will be listed as Failure. Select the entry, then right−click and select View to open the
Properties window and see which device(s) failed.
% Progress
A progress bar showing the percent completed of the operation.
Date
The date and time the operation was performed.
Message
A message relating to the status of the operation.
Details View
The Details view presents a chronological listing of each device on which an operation was performed and the
status (results) of the operation for that device. Select the Details option at the top of the panel to display this
view.
Details View
346
Welcome to NetSight Inventory Manager Help
Use the table options and tools to find, filter, sort, print, and export information in a table and customize table
settings. You can access the Table Tools through a right−mouse click on a column heading or anywhere in the
table body, or by clicking the Table Tools
button in the upper left corner of the table (if you have the
row count column displayed). For more information, see Table Tools.
Click the graphic for more information.
Alert
A yellow alert icon in this column signifies:
•
−− the operation failed for this device.
•
−− for a successful configuration save operation, the alert signifies that there is a
difference between this saved configuration file and the previous file saved for this device.
To acknowledge an alert and place a checkmark on the alert icon, right−click the icon and select
Acknowledge Alert from the menu.
Schedule Name
The name of the operation. For certain operations such as archive saves, this is the name you assigned
the operation when you created it.
Device IP
The IP address of the device.
Operation
The type of operation performed, such as Archive Save or Device Discovery.
Status
The status of the operation for that particular device: Success or Failure. Select the entry, then
right−click and select View to open the Properties window for more information.
% Progress
A progress bar showing the percent completed of the operation.
Bytes Trans.
The number of bytes transferred during the operation.
File name
For operations involving a file (such as a configuration file or firmware image file), the path and
filename of the file.
Details View
347
Welcome to NetSight Inventory Manager Help
Date
The date and time the operation was performed on that device.
Message
A message relating to the status of the operation.
Right−click Menu Options
Select an entry in either the Summary or Details view and then right−click to see a menu of standard table
options plus some active status options. The table tools help you find, filter, sort, print, and export information
in the table, and customize table settings. For more information, see Table Tools. The active status options
include:
• View − Opens the Properties window which displays additional details on the entry.
• Purge − Deletes the selected entry and all older entries. You cannot delete entries from the middle of
the table because that would disrupt the sequence of events.
• Acknowledge Alert − Places a checkmark on the alert icon signifying that the alert has been
acknowledged.
• Abort − Stops an operation. Any part of the operation that is currently in progress will complete
before the operation is terminated. This option is only available in the Summary view.
Details View
348
Add Device Window
This window lets you add a single device to your NetSight database, as opposed to discovering devices or
importing devices from a device list. When you add a device, it is added to the All Devices folder and also
automatically organized under the appropriate groups in the left−panel tree. You can access this window by
right−clicking a group in the left panel and choosing Add Device from the right−click menu.
Click areas in the window for more information.
IP Address
Enter the IP address of the device you want to add.
Profile
Use the drop−down list to select one of the SNMP profiles that have been defined for device access.
The Edit button lets you create a profile if one does not already exist.
SNMP Context
Select the checkbox and enter an SNMP context that has been configured on the device. An SNMP
context is a collection of MIB objects, often associated with an entity. By specifying the SNMP
context here, you can access the subset of MIB objects related to that context on the device.
The use of context differs depending on the protocol version being used with a user's credentials:
• When used with SNMPv3 credentials, the context provides access to a specific collection of
MIB objects associated with a particular context configured on the device. If the credentials
used are accepted, but the context specified doesn't match one configured on the device,
access is denied.
• Some Enterasys devices, such as Matrix N series, also provide limited support of contexts for
SNMPv1/v2. For these devices, an SNMPv1 or SNMPv2 community name can be mapped
through Local Management, to a particular SNMP context on the device. Then, when
SNMPv1/v2 credentials are used, access is granted to the subset of MIB objects associated
with that credential (community name).
Inventory Manager treats each context for a given device (IP address) as a distinct device. The
devices are displayed in the tree with the same IP address followed by the different SNMP contexts.
Add Device Window
349
Welcome to NetSight Inventory Manager Help
All SNMP contexts known to the device can be displayed using the show snmp context
command. Refer to a Matrix Series Configuration Guide for more information about setting and
showing SNMP contexts.
Nickname
You can use the default nickname or click Specify to assign a unique nickname to this device. The
default nickname for SNMP devices is the sysName MIB object, or if no sysName has been assigned,
the device's IP address. The default nickname for pingable devices is the IP address.
Buttons
Edit
Opens the Profiles/Credentials tab in the Authorization/Device Access window where you can add or
modify an existing profile to be associated with this device.
OK
Adds the device and closes the window.
Apply
Adds the device and leaves the window open so that you can add another device.
Cancel
Closes the window, but does not remove any devices that have already been added.
Add Device Window
350
Add Filters Window
Use the Add Filters window to create filters that will refine your list of targeted devices for your Capacity
Planning report. Select a device group or single device for your filter, and then specify whether your selection
should be filtered in or filtered out of your targeted devices. Click Add to create the filter and add it to the
Applied Filters list in the Select Targets window.
TIP: After you have defined your filters, you can view a list of the devices you have selected for your
report by clicking the View Devices button in the Select Targets window.
Access this window from the Select Targets window in the Capacity Planning tool by clicking the Add
Filters button.
Click the graphic for more information.
Tree
Displays all your network devices, and allows you to select a device group or single device to filter in
or filter out of your devices list.
Filter In
Select this option if you want devices that match the selected filter to be included in your device list.
Filter Out
Select this option if you want devices that match the selected filter to be excluded from your device
list.
Add Filters Window
351
Welcome to NetSight Inventory Manager Help
Buttons
Add
Creates the filter. You can then create another filter or click Close to return to the Select Targets
window.
Close
Closes the window and returns you to the Targets window. The filters you created will be added to the
Applied Filters list in the Select Targets window.
Add Filters Window
352
Add Alternate Firmware Server Window
Use the Add Alternate Firmware Server window to configure properties for alternate firmware download
servers and specify connection information based on the selected transfer protocol. Access this window by
clicking Add Server in the Alternate Firmware Servers view of the Options window.
Click the graphic for more information.
Server Properties
Use this area to specify the alternate server's IP address, identifier, and transfer protocol, and set the path to
the root directory.
Server IP
Enter the IP address of the workstation where the tftp or ftp server is running.
Identifier
Enter a description that helps you identify the alternate server.
Server Root Path
Specify the server root path. The root directory is the base directory to which the server is allowed
access. The server will be allowed to create files to or read files from this directory and any of its
subdirectories.
NOTE: Keep in mind the following requirements when setting the server root path:
• If your server is configured with a root directory, it must match the root
directory entered here.
Add Alternate Firmware Server Window
353
Welcome to NetSight Inventory Manager Help
• If your server is not configured with a root directory, specify the root
directory here as the root of the drive (e.g. C:\ or D:\).
Transfer Protocol
Specify the transfer protocol for the alternate server and then enter the connection information in the
section below.
TFTP Connection Information
Use this area to specify connection information for an alternate server that has been configured with TFTP
protocol.
Port
Specify the port number your TFTP server is configured to run on.
FTP Connection Information
Use this area to specify connection information for an alternate server that has been configured with FTP
protocol.
Port
Specify the port number your FTP server is configured to run on.
Anonymous
Select this checkbox if your FTP server is configured to accept Anonymous logins. Inventory
Manager will automatically fill in the username and password fields.
Username/Password
Enter your username and password to access the FTP server. If you select the Hide Password
checkbox, your password will be replaced with asterisks when it is typed in.
Buttons
OK
Adds the server to the list of alternate firmware download servers and closes the window.
Apply
Adds the server to the list of alternate firmware download servers and leaves the window open so you
can add another server.
Add Alternate Firmware Server Window
354
Advanced Statistics Window
This window provides advanced server statistics that are useful as a troubleshooting tool. You can access this
window by clicking the Advanced button in the Server Statistics window.
Statistics are provided on the following server functionality. In each tab, you must use the Refresh button to
display current statistical information.
• Server Status
• Topology Manager
• Device Status Poller
• Messaging
• Database Status
• NetSightMBean Status
• EventsAndAlarmsMBean Status
TIP: You may find it useful to copy information from these tabs and paste it elsewhere. For example, you
may want to include the information in an e−mail. However, the text in some of these tabs is in .html
format. On Windows platforms you should copy and paste the text into a word processing program
that preserves .html format, such as Microsoft Word. (Microsoft Notepad and WordPad do not
preserve the .html format.) On Linux and Solaris platforms you can do a Ctrl−c to copy the text and
insert it into vi, however the formatting is not preserved.
The Server Status Tab in the Advanced Statistics Window
Advanced Statistics Window
355
Welcome to NetSight Inventory Manager Help
Advanced Statistics Window
356
Archive Wizard
Use the Archive Wizard to archive device configuration data and/or capacity planning data. Archiving device
configuration data lets you create archives (backup copies) of your network devices' configurations that can be
restored to the devices at a later date, if needed. Archiving capacity planning data lets you store port and FRU
information for use by the Capacity Planning tool to generate reports. You can create an archive that saves
both configuration data and capacity planning data, or you can create an archive that targets one type of data
or the other.
You can perform archives on a single device, multiple devices, or on an entire device group. Because it is
useful to archive data on a regular basis, Inventory Manager lets you schedule archives to be performed at a
future time, and/or on a routine basis. Once you have configured an archive's parameters, you can use that
archive on a repeated basis to save new versions of the desired data. For example, you may want to create an
archive that saves your device configurations on a weekly basis, and also create an archive that saves only
capacity planning information on a daily basis to monitor what is changing on the network.
Once an archive operation has been created, it is listed by name in the left−panel Archive Mgmt tab under the
Archives folder. Below the archive name are the archive versions, displayed by the date and time the version
was performed. Under the versions are the individual configurations, listed by IP address of the device whose
data was saved. Each configuration displays an icon that identifies the type of data being saved: device
configuration data,
capacity planning data,
both device configuration and capacity planning data.
To access the wizard, select Tools > Wizards > Archive Wizard from the menu bar or click
on
the toolbar. You must have a TFTP or FTP server running to create an archive. For more information, see
TFTP Server Setup or FTP Server Setup.
NOTE: If the device is an X−Pedition router, be aware that when archiving device configuration data, the
router's Startup configuration file is saved.
Archive Name Window
Use this window to name and configure the archive.
Click the graphic for more information.
Archive Wizard
357
Welcome to NetSight Inventory Manager Help
Name
Enter a name for the archive operation.
Description
Enter a description (optional) of the archive operation.
Archive Setup
Archive Type
Select the appropriate checkbox for the type of data you wish to archive:
• Archive Configuration Data − Create archives (backup copies) of your devices'
configurations that can be restored to the devices at a later date, if needed.
• Archive Capacity Planning data − Create archives of port and FRU information to be used
by the Capacity Planning tool to generate reports.
Max Versions
If desired, specify the maximum number of versions you would like saved for this archive. This
allows you to limit the number of versions saved for each archive. Once the maximum number is
reached, older versions are automatically deleted. Otherwise, you can select to not have a maximum
number of archive versions.
Archive Wizard
358
Welcome to NetSight Inventory Manager Help
Device Selection Window
Use this window to select the devices to include in the archive.
NOTE: If you select multiple tree nodes representing the same device but with varying SNMP
contexts, an archive save will be performed for each context. However, the context
must provide access to the MIBs required for the archive save operation or the archive
for that context will fail. It is recommended that you perform the archive operation on
the device with the default context (switch mode.)
Click the graphic for more information.
Select Devices
This panel displays your current devices as they are listed in the left−panel Network Elements tab.
Expand the folders and select the single device, multiple devices (using the Control or Shift keys,) or
a single device group that you want to include in the archive. Click the Add button to add the devices
to the Archive Members list.
Archive Members
The devices you have selected are listed under Archive Members. If you want to remove a member
from the list, select the member and click Remove.
Device Selection Window
359
Welcome to NetSight Inventory Manager Help
TIP: If you open the Archive Wizard from a device or device group in the left−panel
Network Elements tab, the selected device or device group will be automatically
displayed under Archive Members.
Add Button
In the Devices tree, select the device(s) or device group you want to archive, and click Add to add it
to the Archive Members list.
Remove Button
Select a device or device group in the Archive Members list, and click Remove to remove it from the
list.
Schedule Window
Use this window to select devices, and configure scheduling information and process settings for the archive.
You can schedule a one−time, daily, or weekly archive, or schedule the archive to be performed on server
start−up.
Click the graphic for more information.
Devices
Schedule Window
360
Welcome to NetSight Inventory Manager Help
Selected
Use the checkboxes in this column to select or deselect specific devices to be archived. For example,
if you selected a device group in the previous window, you can use these checkboxes to deselect
individual devices in that group.
IP Address
The IP address of the device to be archived. Note that chassis that support Distributed Forwarding
Engines (DFEs), such as the Matrix N−Series, display a single management IP even though there may
be multiple DFE modules in the chassis.
Schedule
Frequency
Use the drop−down list to select the frequency with which you want the archive performed: Never,
Now, Once, Daily, Weekly, or On Server Startup. The Never option lets you create an archive
operation without actually performing it. The Now option lets you perform an immediate archive.
Select Starting Day
Use the drop−down list to select the month you want the archive to start. A calendar corresponding to
the selected month is displayed. Select the desired starting day by clicking on the calendar. You can
use the arrows on either side of the drop−down list to change the month, and change the year by
entering a new year in the text field. (This field is grayed out if you have selected the Never or Now
frequency.)
Start Time
Set the starting time for the operation and select AM or PM. (This field is grayed out if you have
selected the Never or Now frequency.)
Process
Groups of
The archive will be performed in parallel (simultaneously) on the number of devices specified in the
Groups of field. Set the value to 1 to have the operation performed serially, one device after another.
Abort on failure
Select the Abort on failure checkbox to stop the archive operation after a failure. This is useful if you
are performing an archive operation on multiple devices and you want the operation to stop after a
failure on a single device.
Finish Button
Creates the archive. The archive will be listed by name in the left−panel Archive Mgmt tab under the
Archives folder, and performed according to its scheduled parameters. You can change the archive's
parameters; see Editing an Archive for instructions.
Schedule Window
361
Assign Configuration Template Window
The Assign Configuration Template window allows you to assign a template to one or more device types.
This enables you to download the assigned template to any of your network devices of that type, using the
Template Download Wizard.
The left−panel Configuration Templates tab displays configuration templates grouped according to device
type. Inventory Manager provides pre−defined groups and automatically organizes the templates under the
appropriate device type when you save the template in the Edit Configuration Template window. The
Unknown folder contains templates that Inventory Manager could not correlate to a device type. Use the
Assign Configuration Template window to assign those templates to the correct device type(s).
To access this window, select a template in the Configuration Templates tab (or one or more templates in the
right−panel Details View tab), then select Tools > Assign Configuration Template. You can also right−click
on a template, and select Assign Configuration Template from the menu.
Click the graphic for more information.
Device Types
Lists the device types to which you can assign the template. You can select multiple device types
using the Ctrl or Shift keys.
Buttons
Assign Configuration Template Window
362
Welcome to NetSight Inventory Manager Help
OK
Assigns the template to the selected device types and closes the window.
Apply
Assigns the template to the selected device types and leaves the window open.
Assign Configuration Template Window
363
Assign Firmware Window
The Assign Firmware window allows you to assign a firmware or boot PROM image to one or more product
families or device types. This enables you to download the assigned image to any of your network devices of
that family or type, using the Firmware Upgrade Wizard or the Boot PROM Upgrade Wizard.
The Firmware Mgmt tab displays firmware and boot PROM images grouped according to product family and
device type. Inventory Manager provides pre−defined firmware groups and automatically organizes the
images stored in your firmware directory under the appropriate group when you perform a firmware discovery
or refresh. The Unknown folder contains images that Inventory Manager could not correlate to a device type.
Use the Assign Firmware window to assign those images to the correct device type(s).
To access this window, select a firmware or boot PROM image in the left−panel Firmware Mgmt tab (or one
or more images in the right−panel Details View tab), then select Tools > Assign Firmware. You can also
right−click on an image, and select Assign Firmware from the menu.
TIP: To quickly assign multiple images to a single product family or device type, select the images in a
right−panel Details View and drag them into the appropriate left−panel folder.
Click the graphic for more information.
Device Types
Lists the product families and device types to which you can assign the firmware or boot PROM
image. You can select multiple product families or device types using the Ctrl or Shift keys.
Assign Firmware Window
364
Welcome to NetSight Inventory Manager Help
Buttons
OK
Assigns the image to the selected product families and/or device types and closes the window.
Apply
Assigns the firmware image to the selected product families and/or device types and leaves the
window open.
Assign Firmware Window
365
Authorization/Device Access
Users/Groups Tab
Use this tab to specify users who are authorized to access the NetSight database, and assign those users to
authorization groups that define their access privileges to application features. Access privileges (called
Capabilities) are associated with authorization groups. Based on their membership in a particular
authorization group, users are granted specific capabilities in the application. For example, you may have an
authorization group called "IT Staff" that grants access to a wide range of capabilities, while another
authorization group called "Guest" grants a very limited range of capabilities.
NOTE: The NetSight Administrator authorization group is automatically created during
installation and is granted Full capabilities. The NetSight Administrator group cannot
be deleted and its capabilities cannot be changed.
Begin by creating your authorization groups and specifying the capabilities for that group. Then, create a list
of your authorized users and assign each user to a specific group. For complete instructions, see How to
Manage Users and Groups.
Click areas in the window for more information.
Authorization/Device Access Users/Groups Tab
366
Welcome to NetSight Inventory Manager Help
Automatic User Membership
The Automatic User Membership feature lets you specify an authorization group for users that log
in without having been previously assigned to a group. This lets you control the capabilities for these
users. Users that are automatically added to a group by this feature are indicated by a Yes in the
Automatic Member column of the Authorized Users table.
Enable
When checked, users who are not in the Authorized Users table are automatically added to the
selected group the first time that they log in.
Authorization Group
Use the drop−down list to select the desired authorization group.
Authorized Users Table
This table lists all of the users who are authorized to access the NetSight database. From here you can
add, edit, and delete users and define a user's membership in an authorization group. Each entry
shows the user name, domain, and group membership for the user. Users can be members of only one
group.
User Name
This column lists users that have been created as authorized users.
Domain/Host Name
The user's domain/hostname that will be used to authenticate to the NetSight database.
Authorization/Device Access Users/Groups Tab
367
Welcome to NetSight Inventory Manager Help
Authorization Group
The authorization group where the user is a member.
Automatic Member
Yes indicates that the associated user was not a previously authorized user and, as a result
was automatically added to the Automatic User Membership − Authorization Group. No
indicates that the associated user is an authorized user that was created by the NetSight
Administrator.
Authorization Groups Table
This table lists all of the groups that have been created.
Group Name
This is the name assigned to the group. The NetSight Administrator group is created during
installation and is granted Full capabilities and access. The NetSight Administrator group
cannot be deleted and its capabilities can be viewed, but cannot be changed.
Number of Group Members
This is the number of current members in the associated group.
Capabilities
This column summarizes the capabilities granted to the associated group: Full (all
capabilities) or Customized (a subset of capabilities).
Buttons
Add User
Opens the Add User window where you can define the username, domain, and authorization group
that will be used by a new user.
Edit (User)
Opens the Edit User window where you can modify the domain or group membership for a selected
user.
Delete (User)
Removes a selected User from the Authorized Users table.
Add Group
Opens the Add Group window where you can define the capabilities and settings for a new group.
Edit (Group)
Opens the Edit Group window where you can modify the capabilities and settings for a selected
group.
Delete (Group)
Removes the selected Group from the Groups table.
Add/Edit User Window
This window lets you define an authorized user's user name, domain, and membership in an authorization
group.
Click areas in the window for more information.
Add/Edit User Window
368
Welcome to NetSight Inventory Manager Help
User name
The name used for this authorized user.
Domain/Host name
The user's domain/hostname that will be used to authenticate to the NetSight database.
Authorization Group
Use the drop−down list to select the authorization group where this user will be a member.
Add/Edit Group Window
This window lets you define a new group or edit an existing group.
Click areas in the windows for more information.
Add/Edit Group Window
369
Welcome to NetSight Inventory Manager Help
Group Name
This is the name given to the group. When adding a group, you can enter any text string that is
descriptive of the members of this group.
Capabilities Tab
Expand the Capabilities tree in this tab and select the specific capabilities to be granted to users that
are members of this group. The capabilities are divided into suite−wide and application−specific
capabilities. Access to a particular capability is granted when it is checked in the tree.
Add/Edit Group Window
370
Welcome to NetSight Inventory Manager Help
Settings Tab
The Settings tab configures how SNMP requests will be handled for users that are members of this
group.
Allow Users to Configure SNMP Redirect in Options
Lets users that are members of this group edit the Suite−wide Option setting for Client/Server
SNMP Redirect.
Always Redirect SNMP to NetSight Server
Redirects all SNMP requests to the NetSight Server for users that are members of this group,
regardless of the Suite−wide Option setting for Client/Server SNMP Redirect.
Never Redirect SNMP to NetSight Server
Never redirects SNMP requests to the NetSight Server for users that are members of this
group, regardless of the Suite−wide Option setting for Client/Server SNMP Redirect.
Add/Edit Group Window
371
Authorization/Device Access
Profiles/Credentials Tab
NetSight applications access devices to control certain device functions (SNMP sets) and retrieve information
for device properties views, FlexViews and periodic polling (SNMP gets). This tab lets you manage
credentials that define the access privileges required for SNMPv1, SNMPv2, and SNMPv3, and profiles that
use the credentials for various access levels. Two elements are involved with access management:
• Credentials − define the SNMPv1/SNMPv2 community names and SNMPv3 values that will be
used to access your network devices. Credentials are created:
• Manually using the Add Credential button
• Imported from a file in NetSight Generated Format (.ngf) using the Import from Device
List.
• Profiles − are assigned to device models in the NetSight database. They identify the credentials that
are used for the various access levels when communicating with the device. Profiles are created using
the Add Profile button.
Click areas in the window for more information.
Authorization/Device Access Profiles/Credentials Tab
372
Welcome to NetSight Inventory Manager Help
Default Profile:
This drop−down list lets you specify a profile that will be used by default to access a device.
Profiles Table
This table lists all of the profiles that have been created.
The public_v1_Profile is automatically created during Console installation and cannot be deleted.
Name
This is the name assigned when the profile was created.
Version
This is the SNMP protocol version for the profile. Profiles can be configured for SNMPv1,
SNMPv2c, or as SNMPv3.
Read, Write, Max Access Credential
When the Version is SNMPv1 or SNMPv2c, the Read, Write, and Max Access columns in
the table contain the Community Name for each access level. When the Version is SNMPv3,
the Read, Write, and Max Access columns in the table contain the credential specified for
each access level.
Credentials Table
Authorization/Device Access Profiles/Credentials Tab
373
Welcome to NetSight Inventory Manager Help
This table lists all of the credentials that have been created in the NetSight database. The public_v1
credential is automatically created during Console installation and cannot be deleted.
Name
This column lists names assigned to credentials that have been created in the NetSight
database.
Version
This is the SNMP protocol version for the credential. Credentials can be configured for
SNMPv1, SNMPv2c, or as SNMPv3.
Community
For SNMPv1 or SNMPv2c credentials, this is the Community Name used for device access.
User Name
For SNMPv3 credentials, this is the User Name used for device access.
Auth Type, Priv Type
For SNMPv3 credentials, these columns show the authentication protocol (None, MD5, or
SHA) and privacy protocol (None or DES) used by the credential.
Show passwords in clear text
When this option is checked, passwords and community names appear as text. The default setting for
this option is unchecked, and passwords and community names appear as a string of asterisks.
Buttons
Add Profile
Opens the Add Profile window where you can select the SNMP version and define the profile name
and passwords/community names used by the profile.
Edit (Profile)
Opens the Edit Profile window where you can modify the SNMP version and passwords/community
names used by a selected profile.
Delete (Profile)
Removes the selected Profile from the Groups table. You cannot delete the profile that is currently
selected to be the Default Profile.
Add Credential
Opens the Add Credential window where you can define new credentials.
Edit (Credential)
Opens the Edit Credential window where you can modify a credential selected from the Credentials
table.
Delete (Credential)
Removes a selected credential from the Credentials table.
Add/Edit Profile Window
This window lets you define the SNMP Credentials for SNMPv1/SNMPv2 Community Names and for
SNMPv3 users that will be granted access to your network devices. The Add Profile window lets you create a
new profile and the Edit Profile window lets you modify an existing profile.
Add/Edit Profile Window
374
Welcome to NetSight Inventory Manager Help
Click areas in the windows for more information.
Profile Name
A unique name (up to 32 characters) that you assign to this profile.
When editing an existing profile, you can select a profile from the table to modify its settings.
However, you cannot change the name of an existing profile.
SNMP Version
This is the SNMP protocol version for the profile. Profiles can be configured for SNMPv1,
SNMPv2c, or as SNMPv3. When either SNMPv1 or SNMPv2c is selected, the editor provides fields
where you can configure access levels using Community Names. With SNMPv3 selected, you can
configure access levels using Credentials and Security Levels.
Read, Write, Max Access
SNMPv1, SNMPv2c
The Read, Write, Max Access define the community names used for these levels of access.
• Read − This Community Name is used for get operations.
• Write − This Community Name is used for set operations.
• Max Access − This Community Name is used for set operations that require
administrative access, such as changing community names.
SNMPv3
The Read, Write, Max Access levels are defined by Credentials and Security Level:
Credentials
Credential Names are assigned to each of the three SNMPv3 access levels that are
used for the Read, Write and Max Access operations.
• Read − used for read operations (gets).
• Write − used for write operations (sets).
Add/Edit Profile Window
375
Welcome to NetSight Inventory Manager Help
• Max Access − used for write operations (set ) that require administrative
access.
Security Level
Each access level can be assigned a security level:
• AuthPriv − Highest security level requiring authentication and privacy
(encrypted information).
• AuthNoPriv − Requires authentication, but unencrypted information.
• NoAuthNoPriv − Neither authentication nor privacy required.
Add/Edit Credential Window
This window lets you define or edit the names and community names/passwords for credentials.
Click areas in the window for more information.
Add/Edit Credential Window
376
Welcome to NetSight Inventory Manager Help
Credential Name
A unique name (up to 32 characters) that you assign to this access credential. You can define
a new credential or select a name from the table to modify settings for an existing credential.
You cannot edit the name of an existing credential.
SNMP Version
This is the SNMP protocol version for the credential. Credentials can be configured for
SNMPv1, SNMPv2, or as SNMPv3. When either SNMPv1 or SNMPv2 is selected, the
window provides fields where you can configure access levels using Community Names.
With SNMPv3 selected, you can configure access levels using Authentication and Privacy
Types.
Community Name
For SNMPv1 or SNMPv2c credentials, this is the Community Name used for device access.
User Name
For SNMPv3 credentials, this is the User Name used for device access.
Authentication Type
For SNMPv3 credentials, select MD5, SHA1, or None, from this drop−down list .
Specify/Confirm Password
This is the password (between 1 and 64 characters in length) that will be used to
determine Authentication. These fields are disabled for Authentication Type, None. If
an existing password is changed and the credential is currently used with a profile
that is applied to one or more devices, a confirmation dialog is opened to determine
how the changes will be handled. You will be asked if you want to change the
password on the device(s). You can then select the devices where the password will
be changed and, if this user is a valid user on the device(s), then the new password
will be set on the device.
NOTE: SNMPv1 profiles can be set on device(s) using Console's Set Profile on Device
feature of the Properties (Access) tab.
Privacy Type
For SNMPv3 credentials, select DES or None from this drop−down list. These settings are
disabled if Authentication Type None is selected.
Specify/Confirm Password
This is the password (between 1 and 64 characters in length) that will be used to
determine Privacy. These fields are disabled for Privacy Type, None. If an existing
password is changed and the credential is currently used with a profile that is applied
to one or more devices, a confirmation dialog is opened to determine how the
changes will be handled. You will be asked if you want to change the password on
the device(s). You can then select the devices where the password will be changed
and, if this user is a valid user on the device(s), then the new password will be set on
the device.
NOTE: SNMPv1 profiles can be set on device(s) using the Set Profile on Device feature
of Console's Set Profile on Device feature of the Properties (Access) tab.
Show passwords in clear text
When this option is checked, passwords and community names appear as text. The default
setting for this option is unchecked and passwords and community names appear as a string
of asterisks.
Add/Edit Credential Window
377
Welcome to NetSight Inventory Manager Help
Add/Edit Credential Window
378
Authorization/Device Access
Profile/Device Mapping Tab
This tab lets you define the specific Profiles to be used by users in each Authorization Group when
communicating with network devices. The view consists of a device tree in the left panel where you select
devices, and a table in the right panel that lists the current device profile assignments. The Table Editor button
activates the editing row where profile selections are made.
Click areas in the window for more information.
Device Tree
The left panel contains a device tree, where you select the devices you want to view or configure.
Profile/Device Mapping Table
This table lists all of the selected devices and shows a column for the NetSight Administrator
Group and each Authorization Group you have defined. The NetSight Administrator column shows
Authorization/Device Access Profile/Device Mapping Tab
379
Welcome to NetSight Inventory Manager Help
the profile used by the NetSight Administrator group. The Profile listed/selected for each
Authorization Group column will be used by that group when communicating with the associated
device and, as a result, defines the level of access granted to users that are members of that
Authorization Group.
Table Editor Row
This row is visible when the Show/Hide Table Editor button is toggled to make the Table
Editor visible. The drop down list for each Authorization Group column contains all of the
Profiles that have been created in the NetSight database, including Ping Only, No Access, and
the profile selected on the Profiles/Credentials tab as the Default profile. Selecting a profile in
the Table Editor row alters the value for that entry in the row(s) selected in the table. Once
you select a profile to be changed for your selected column(s), a green exclamation mark ( )
marks the cells that have been changed (but not Applied) and the
active. Clicking the
Apply button becomes
(Show/Hide Table Editor button) at this point cancels your changes,
restores the original profiles, and hides the Table Editor.
Clicking
Apply sets the profiles that you've changed for the selected devices, removes the
, and hides the Table Editor row.
Buttons
Show/Hide Table Editor
This button toggles the Table Editor, a row at the bottom of the table that allows you to define a
profile for each Authorization Group. Use the drop down list to select a profile for each group, and
then click
Apply.
Apply
This button is active when the Table Editor is enabled. Apply sets your profile selections for the
Authorization Groups, clears the from the table, and hides the table editor row.
Authorization/Device Access Profile/Device Mapping Tab
380
Authorization/Device Access
Manage SNMP Passwords Tab
This tab lets you collectively manage the credentials that have been set on your network's devices. When a
particular credential is selected from the drop−down list above the table, the table lists the devices where that
credential/password is set. When an SNMPv1 or SNMPv2 credential is selected, you can define a New
Community Name for access to the devices in the table. When an SNMPv3 credential is selected, you can
define both the Authentication password and the Privacy password for access to the devices in the table. You
can assess the impact of applying new passwords on your devices before actually applying them by clicking
Test and checking the information in the Test Results column.
Click areas in the window for more information.
Select Credential
This drop−down list contains all of the Credentials that have been created in the NetSight database.
New Community Name
The new (SNMPv1/2) community name that will be used for access to the associated device(s).
Authorization/Device Access Manage SNMP Passwords Tab
381
Welcome to NetSight Inventory Manager Help
Authentication/Privacy
The new SNMPv3 passwords that will be used for access to the associated device(s).
Show Passwords in Clear Text
When checked, the passwords are shown in text. When unchecked, the passwords are shown as a
string of asterisks.
Credentials Table
This table lists all of the devices where the selected credential can be used.
Device
The list of devices where the currently selected credential can be used to access the device.
Auth Group
This is the Authorization Group(s) that are granted access to the associated device.
Profile
This is the profile used by the associated Authorization Group for access to the device.
Read, Write, Max Access
These columns show the credential used for each access level.
Use for Set
Shows the credential that is used with the SNMP Set to change the credential on the device.
Test Results
After clicking Test, this column shows the results that can be expected if the credential
changes are actually applied to devices.
Results
After clicking Apply, this column shows the results of the credential changes that were
applied to devices.
Buttons
Refresh
Updates the table when information has changed.
Test
This button lets you view the results that can be expected if your credential changes are actually
applied to the devices.
Apply
Sets your credential changes on the devices in the table.
Authorization/Device Access Manage SNMP Passwords Tab
382
Backup Database Window
Use the Backup Database window to save the currently active database to a file on the NetSight Server
workstation. If the NetSight Server is local, you can specify a directory path where you would like the backup
file stored. If the server is remote, the database will be saved to the default database backup location. You can
access this window by clicking the Backup button in the Database tab of the Server Information window.
Click the graphic for more information.
Database Path
The default database backup location. If the NetSight Server is local, you can specify an alternate
backup directory by entering a path to the directory, or using the Browse button to navigate to the
directory. If the server is remote, the database will be saved to the default database backup location.
Database Name
Enter a name for the database backup file.
Buttons
Backup
Starts the backup operation.
Backup Database Window
383
Boot PROM Upgrade Wizard
Use the Boot PROM Upgrade Wizard to easily upgrade the boot PROM images on your network devices.
To access the wizard, select Tools > Wizards > Boot PROM Upgrade Wizard from the menu bar or click
on the toolbar.
There are certain steps you must perform before you can upgrade your boot PROM images. The steps vary
depending on whether you are using a mapped file transfer server (as configured in the Services for NetSight
Server view of the Options window) or an alternate remote file transfer server (as configured in the Alternate
Firmware Servers view in the Options window) to perform the upgrade. For instructions, see Preparing to
Upgrade.
NOTE: The Boot PROM Upgrade Wizard can also be used to downgrade boot PROM to a previous
revision. Downgrading boot PROM is inherently risky due to possible feature differences between
revisions. Restoring configurations from different firmware revisions carries the same risk.
Should you need to downgrade your boot PROM to an earlier version, it is recommended that you
use one of the following two procedures:
• Downgrade the boot PROM on a network device using the Boot PROM Upgrade Wizard.
Do not proceed to the Reset Devices portion of the wizard, instead select [Finish].
Restore an archived configuration that was previously created with the boot PROM image
being downloaded. This will reset the device.
or
• Downgrade the boot PROM on a network device using the Boot PROM Upgrade Wizard.
Complete the downgrade using the wizard Reset Devices screens. Clear NVRAM on the
device and reconfigure the network configuration parameters of the device using the local
console.
In addition, when downgrading boot PROM on SNMPv3 devices, it is possible that Inventory
Manager will lose contact with the device. SNMPv3 adds a level of difficulty to downgrade
operations, because counters and timers related to security features of SNMPv3 may get out of
sync. Following the downgrade, you will need to restart Inventory Manager to re−establish
contact with the device.
CAUTION: Prior to upgrading boot PROM on a device, it is recommended that you archive the latest
configuration for the device being upgraded. This will aid you in downgrading should you
choose to do so.
Device Selection Window
Use this window to select the devices to include in the boot PROM upgrade operation.
NOTE: If you have multiple tree nodes representing the same device but with varying SNMP contexts,
keep in mind that not all device contexts will provide access to the MIBs required to perform the
operation. When selecting your devices, make sure that any device with SNMP context has access
to the required MIBs, or select the device with default context (switch mode).
Boot PROM Upgrade Wizard
384
Welcome to NetSight Inventory Manager Help
Click the graphic for more information.
Select devices to upgrade
This panel displays your current devices as they are listed in the left−panel Network Elements tab. Expand the
folders and select the single device or device group, or multiple devices or device groups (using the Control or
Shift keys) that you want to upgrade. Click the Add button to add the devices to the Selected Devices table.
TIP: If you open the Boot PROM Upgrade Wizard from a device or device group in the
left−panel Network Elements tab, the selected device(s) will be automatically displayed in
the Selected Devices table.
Selected Devices
Lists the devices selected for the upgrade operation. Devices that do not support boot PROM download or
have never been contacted, are not listed. If you want to remove a device from the table, select the device and
click Remove.
IP Address
The device's IP address. Note that chassis that support Distributed Forwarding Engines (DFEs), such
as the Matrix N−Series, display a single management IP even though there may be multiple DFE
modules in the chassis.
Family
The product family to which the device type belongs.
Device Type
The device's model number or hardware type.
Firmware Version
Boot PROM Upgrade Wizard
385
Welcome to NetSight Inventory Manager Help
The current firmware version installed in the device.
Firmware Download
A indicates the device supports the ability to download firmware images using the Firmware
Upgrade Wizard.
Boot PROM Version
The current version of Boot PROM installed in the device.
Boot PROM Download
A indicates the device supports the ability to download boot PROM images using this wizard.
Add Button
Select a single device or device group, or multiple devices or device groups, and click Add to add
them to the Selected Devices table.
Remove Button
To remove a device from the Selected Devices table, select the device and click Remove.
Assign Boot PROM Window
Use this window to select and assign the boot PROM images to be used in the upgrade. Images are assigned
according to device type or binary family (device types that share the same firmware image). The left panel
lists the device types selected for the boot PROM upgrade. The right panel lists boot PROM images
compatible with a selected device type. Use the Assign to: buttons to assign an image to a specific device type
or to the entire binary family. You must assign an image to each device type.
NOTE: Before proceeding with the upgrade, be sure to verify that the boot PROM and firmware images
that will be on the device after the upgrade operation are compatible. Refer to the boot PROM and
firmware release notes for more information.
Click the graphic for more information.
Assign Boot PROM Window
386
Welcome to NetSight Inventory Manager Help
Assignments
This table lists the device types of all the devices selected for the boot PROM upgrade. Select a device type to
display compatible boot PROM images in the right panel. If necessary, click the Refresh Images button to
perform a firmware discovery and update the list of boot PROM images. Then, in the right−panel, select an
image and use the Assign to: buttons to assign the image to the device type or to each entry that is a member
of that binary family. The image will appear in the Image Name column in the Assignments table. You must
assign an image to each device type.
NOTE: A device type group may include some devices that use the local mapped file transfer server for
firmware downloads, and some that use an alternate remote firmware download server. In that
case, the device type would have multiple entries in the Assignments table, one for each server.
When you select an entry that uses an alternate server, only firmware records associated with that
alternate server will be displayed in the Image list table (unless you select Show All Images.)
Family
The product family to which the device type belongs.
Device Type
The device's model number or hardware type.
Server ID
The firmware download server specified for the device type. All devices are initially configured to use
the mapped file transfer server (as configured in the Services for NetSight Server view of the Options
window) for firmware downloads. You can specify an alternate firmware download server, which
allows a remote device to use a server in its own local network. For more information see How to Set
Up Alternate Firmware Download Servers.
Image Name
The boot PROM image assigned to the device type.
Assign Boot PROM Window
387
Welcome to NetSight Inventory Manager Help
Image List
This table lists all the compatible boot PROM images for the device type selected in the Assignments table. If
you select a device type entry that uses an alternate remote firmware download server, only firmware records
associated with that alternate server will be displayed. Select a boot PROM image and use the Assign to:
buttons to assign the image to the selected device type or to the entire binary family. The image will appear in
the Image Name column in the Assignments table. You must assign an image to each device type. Use the
Refresh Images button to perform a firmware discovery and update the list of boot PROM images, if desired.
Show All Images
By default, only boot PROM images that are compatible with the selected device type are listed.
Select the Show All Images checkbox to override this filter and display all your boot PROM images.
If by selecting this checkbox you assign a boot PROM image that's associated with the mapped
server, to a device type that specifies an alternate firmware download server, the wizard will use the
mapped server to perform the download.
Image Name
The name of the boot PROM image as it appears in your firmware images directory.
Server
Displays the firmware download server associated with the boot PROM image. A discovered boot
PROM image that is accessible by the mapped file transfer server (as configured in the Services for
NetSight Server view of the Options window) will display "Mapped Server". A user−defined
firmware record will display its associated alternate firmware download server, as configured in the
Create Firmware Record window. For more information see How to Set Up Alternate Firmware
Download Servers.
Image Path
The path to the location where the image is stored.
Version
The version number of the boot PROM image. If the version number is not available from the image
file, and Inventory Manager has not performed a boot PROM upgrade using this image, this field will
display N/A (not available).
Assign to Device Type Button
Use the Assign to: Device Type button to assign a boot PROM image to the device type.
Assign to Entire Family Button
Use the Assign to: Entire Family button to assign a boot PROM image to each entry that is a
member of that binary family.
Refresh Images Button
Performs a firmware discovery and updates the list of boot PROM images.
Download Progress Window
Use this window to configure download parameters, start the download, and monitor download progress.
Click the graphic for more information.
Download Progress Window
388
Welcome to NetSight Inventory Manager Help
Show all devices/Show only incomplete and failed
Once the upgrade operation starts, the device list table updates with status information for each
device. An alert icon
will appear in the Alert column of the table if a download operation fails for
a specific device. You can use these radio buttons to show all devices or show only those devices
whose download operations are incomplete or have failed.
Device List Table
A list of the devices you have selected for your download operation. Once the download is started,
this table updates with status information for the download operation:
• Alert − an alert icon
will appear in the Alert column if a download operation fails for a
specific device.
• IP Address − The device's IP address. Note that chassis that support Distributed Forwarding
Engines (DFEs), such as the Matrix N−Series, display a single management IP even though
there may be multiple DFE modules in the chassis.
• Image − The name of the image file being downloaded.
• Status − The status of the download operation: Initial (the operation has not started), Success
(the operation succeeded), Failure (the operation failed).
• Operation − The type of operation performed: Boot PROM Download.
• % Progress − A progress bar showing the percent completed of the operation.
• Bytes Trans. − The number of bytes transferred during the download.
• Message − Initially, this column shows the file transfer server being used for the download
operation. Once the download is started, it displays a message relating to the status of the
operation.
TIP: Use the table options and tools to find, filter, sort, print, and export information in a table
and customize table settings. You can access the Table Tools through a right−mouse click on
a column heading or anywhere in the table body, or by clicking the Table Tools
Download Progress Window
389
Welcome to NetSight Inventory Manager Help
button in the upper left corner of the table (if you have the row count column
displayed). For more information, see Table Tools.
Status Summary
Once the download is started, this area updates with status information for the download operation.
Download Type
The downloads will be performed in parallel (simultaneously) on the number of devices specified in
the Groups of field. Enter the value 1 to have the downloads performed serially, one device after
another.
Start Button
Initiates the download operation. The table at the top of the window updates with status information,
as will the status area in the bottom left of the window.
Reset Devices: Timed Reset Supported Window
Once the downloads have completed, use this window to reset those devices that support Timed Reset. Timed
Reset gives you the flexibility to set up your reset operation with a time delay, so that the actual device resets
take place at a later time. This can be useful when trying to schedule resets for a time when the network is
least busy.
NOTE: During the device reset, Inventory Manager learns the current boot PROM version
installed on the device. Inventory Manager uses this information to determine whether
the boot PROM version installed on the device matches the boot PROM reference image
set for the device's binary family. (This information is displayed in the All Devices
Details View tab.) If the version number is not available from an image file, you can
manually set the version number in the Firmware Image General Tab.
Click the graphic for more information.
Reset Devices: Timed Reset Supported Window
390
Welcome to NetSight Inventory Manager Help
Show devices not supporting timed reset
This window lists those devices that support Timed Reset. Select this checkbox to include devices that
do not support timed reset. Devices that do not support timed reset cannot be reset from this window;
proceed to the next window to reset those devices.
Show devices that failed Boot PROM upgrade
Select this checkbox to include devices that failed the boot PROM upgrade.
Device List Table
A list of the devices you have selected for your reset operation. Once the reset operation has started,
you must click Refresh to update the device information in the table.
• Selected − Use the checkboxes in this column to select or deselect devices to be reset.
Devices that do not support timed reset cannot be selected.
• Running New Boot PROM − Following the reset, a indicates the device is running the
new boot PROM version. (The checkmark is only displayed if the boot PROM version
changes.) Remember to click Refresh to update the information in the table following the
reset.
• IP Address − The device's IP address. Note that chassis that support Distributed Forwarding
Engines (DFEs), such as the Matrix N−Series, display a single management IP even though
there may be multiple DFE modules in the chassis.
• Boot PROM Version − The current boot PROM version installed in the device. Following
the reset, the new boot PROM version will be displayed. Remember to click Refresh to
update the information in the table following the reset.
• Device Status − The device's connection status (Contact or No Contact) and, therefore, its
ability to respond to SNMP requests.
• Downloaded Image − The name of the image file that was downloaded.
Reset Devices: Timed Reset Supported Window
391
Welcome to NetSight Inventory Manager Help
• Download Status − The status of the download operation: Success (the operation succeeded),
Failure (the operation failed).
• Reset Request Status − The status of the reset operation: Initial (the operation has not
started), Success (the operation succeeded), Failure (the operation failed).
• Message − A message relating to the status of the operation.
TIP: Use the table options and tools to find, filter, sort, print, and export information in a table
and customize table settings. You can access the Table Tools through a right−mouse click on
a column heading or anywhere in the table body, or by clicking the Table Tools
button in the upper left corner of the table (if you have the row count column
displayed). For more information, see Table Tools.
Reset Delay
Enter the amount of time (in seconds) until the device resets after the reset operation begins. For
example, if you start the reset operation at 4:00 pm with a 7 hour reset delay (420 seconds), the
device(s) will reset at 11:00 pm. This allows you to schedule your resets for a time when the network
is least busy.
Reset Type
Select the type of reset: Warm boot (restarts the device) or Cold boot (same as turning device power
off and on).
Elapsed Time
The amount of time in minutes:seconds since the reset operation started.
Start Button
Starts the timed resets. Resets occur simultaneously. Once the reset operation has started, you must
click Refresh to update the device information in the table.
Refresh Button
Once the reset operation has started, use the Refresh button to update the device information in the
table.
Reset Devices: Timed Reset Not Supported Window
Once the downloads have completed, use this window to reset those devices that do not support Timed Reset.
Devices will be reset one at a time, waiting until a device is fully booted before beginning the next device.
NOTE: During the device reset, Inventory Manager learns the current boot PROM version
installed on the device. Inventory Manager uses this information to determine whether
the boot PROM version installed on the device matches the boot PROM reference image
set for the device's binary family. (This information is displayed in the All Devices
Details View tab.) If the version number is not available from an image file, you can
manually set the version number in the Firmware Image General Tab.
Click the graphic for more information.
Reset Devices: Timed Reset Not Supported Window
392
Welcome to NetSight Inventory Manager Help
Show devices that failed Boot PROM upgrade
Select this checkbox to include devices that failed the boot PROM upgrade.
Device List Table
Lists those devices that do not support timed reset. Once the reset operation has started, you must
click Refresh to update the device information in the table.
• Selected − Use the checkboxes in this column to select or deselect devices to be reset.
• Running New Boot PROM − Following the reset, a indicates the device is running the
new boot PROM version. (The checkmark is only displayed if the boot PROM version
changes.) Remember to click Refresh to update the information in the table following the
reset.
• IP Address − The device's IP address. Note that chassis that support Distributed Forwarding
Engines (DFEs), such as the Matrix N−Series, display a single management IP even though
there may be multiple DFE modules in the chassis.
• Boot PROM Version − The current boot PROM version installed in the device. Following
the reset, the new boot PROM version will be displayed. Remember to click Refresh to
update the information in the table following the reset.
• Device Status − The device's connection status (Contact or No Contact) and, therefore, its
ability to respond to SNMP requests.
• Downloaded Image − The name of the image file that was downloaded.
• Download Status − The status of the download operation: Success (the operation succeeded),
Failure (the operation failed).
• Reset Request Status − The status of the reset request.
• Message − A message relating to the status of the operation.
TIP: Use the table options and tools to find, filter, sort, print, and export information in a table
and customize table settings. You can access the Table Tools through a right−mouse click on
a column heading or anywhere in the table body, or by clicking the Table Tools
button in the upper left corner of the table (if you have the row count column
displayed). For more information, see Table Tools.
Reset Devices: Timed Reset Not Supported Window
393
Welcome to NetSight Inventory Manager Help
Reset Type
Select the type of reset: Warm boot (restarts the device) or Cold boot (same as turning device power
off and on).
Elapsed Time
The amount of time in minutes:seconds since the reset operation started.
Start Button
Initiates the reset operation. Resets occur one at a time, continuing only after a device is fully booted.
After the reset operation is completed, you can click Refresh to update the device information in the
table.
Refresh Button
Once the reset operation has completed, use the Refresh button to update the device information in
the table.
Reset Devices: Timed Reset Not Supported Window
394
Compare Archives Window
The Compare Archives window lets you compare two different archives for the same device and monitor any
changes in device attributes. Inventory Manager compares archives using a set group of attributes that were
saved when the archive was performed. The values for these attributes are displayed in a table with any
differences between the values flagged by a yellow Diff icon .
For information on how to perform a compare archive operation, see How to Compare Archives.
Click the graphic for more information.
Selection 1/Selection 2
Compare Archives Window
395
Welcome to NetSight Inventory Manager Help
Displays the two archive versions you have selected to compare and gives the total number of devices
in common between the two versions that were compared. For more information, see How to
Compare Archives.
Compare Progress
The bar shows the progress of large compare operations. The Abort Compare button allows you to
stop a compare operation; any comparisons that were completed will be available for viewing.
Summary Table
Displays a list of the devices included in the comparison. If differences were found, the yellow Diff
icon
will be displayed. Select the device whose comparison results you wish to see. The results are
displayed in the Comparison Results table.
Comparison Results Table
This section displays the results of the comparison for the device selected in the Summary table, with any
differences between the two versions flagged by a yellow Diff icon . For a definition of each attribute, see
Attributes Tab (Configuration).
Diff
A yellow Diff icon
in this column signifies a difference between the two attributes.
IP Address
Lists the IP address of the device whose attributes are being compared.
Attribute Name
Lists the name of the attribute being compared. For a definition of each attribute, see Attributes Tab
(Configuration).
Attribute Values
These two columns list the attribute values for the versions being compared.
Right−click Menu Options
Use the table options and tools to find, filter, sort, print, and export information in a table and customize table
settings. You can access the Table Tools through a right−mouse click on a column heading or anywhere in the
table body, or by clicking the Table Tools
button in the upper left corner of the table (if you have the
row count column displayed). For more information, see Table Tools.
In addition, the following right−click menu options are available only for archives that include device
configuration data:
View Configuration File
Opens the Configuration File Viewer and displays the archived config file of the selected device. This
option is only available when there are no differences between the two config files being compared.
Compare Configuration Files
Opens the Compare Configuration Files window and displays the two archived config files for the
selected device. This option is only available when there are differences between the two config files
Compare Archives Window
396
Welcome to NetSight Inventory Manager Help
being compared.
Buttons
Close
Closes the window.
Change
Opens the Select Archive Versions to Compare window where you can select two new archives to
compare.
Compare Archives Window
397
Compare Configuration Files Window
The Compare Configuration Files window lets you compare two archived configuration files. There are
several ways to access the window:
• Select a configuration that includes device configuration data (
or
) in the Archives Mgmt tab
tree or Details View, and select Tools > Compare Configuration Files. You can also right−click on
a configuration and select Compare Configuration Files from the menu. The Select Configurations
window opens, where you can select the two configurations you want to compare. Click OK and the
Compare Configuration Files window opens.
• Select two configurations in the Archive Mgmt tab Details View, and select Tools > Compare
Configuration Files.
• In the Compare Archives window, right−click on an entry with a Diff icon , and select Compare
Configuration Files from the menu.
The files are displayed in ASCII format. However, if one or both of the files are in binary, you have the option
to display them. Lines highlighted in green represent lines that have changed. Red highlighting represents
lines that have been added.
You can perform Find and Filter operations on the configuration files to target specific lines of interest. The
last Filter and Find settings you enter remain in the viewer until you refresh the display.
Information on the following tabs:
• Find Tab
• Filter Tab
Find Tab
The Find tab lets you search the configuration files (filtered or unfiltered) for a specific set of characters, like
a word, phrase, or number. Enter your search criteria in the Find field, and when you click the Find button,
any search terms found will be highlighted in the files. You can search forward or backward from your current
position, and restrict your search to match the exact upper or lowercase, and/or whole word.
Click the graphic for more information.
Compare Configuration Files Window
398
Welcome to NetSight Inventory Manager Help
Find:
Enter the text or numeric value you want to find.
Case Sensitive
Select this checkbox to search based on an exact match of the upper or lowercase of the text entered
in the Find field.
Match Whole Word
Select this checkbox to search based on an exact match of the whole word or numeric value entered in
the Find field.
Forward
Select Forward to search from your current position to the end of the configuration file.
Backward
Select Backward to search from your current position to the beginning of the configuration file.
Configuration Files
Displays the selected configuration files. Directly above the display you can see the status of whether
the files are filtered or not filtered. Any search terms found are highlighted.
Compare Configuration Files Window
399
Welcome to NetSight Inventory Manager Help
Filter Tab
The Filter tab lets you specify which lines to display in the configuration files. Enter the information you want
to see, and only matching lines will be displayed. You can use any combination of filter options, and you can
perform consecutive filters on the filtered events.
Click the graphic for more information.
Filter:
Enter the text or numeric value you want to use as a filter.
Case Sensitive
Select this checkbox to search based on an exact match of the upper or lowercase of the text entered
in the Filter field.
Match Whole Word
Select this checkbox to search based on an exact match of the whole word or numeric value entered in
the Filter field.
Entire Text
Select the Entire Text option to filter the entire text by the value in the Filter field. If you have
already performed a filter, this will enable you to perform a new filter on the entire files instead of just
the filtered text.
Filter Tab
400
Welcome to NetSight Inventory Manager Help
Filtered Text
Select the Filtered Text option to perform a new filter on the results of the previous filter.
Configuration Files
Displays the selected configuration files. After running the filter, this area displays the matching lines
in the configuration files. Click Clear Filter to remove the filter currently in effect. Directly above
the display you can see the status of whether the files are filtered or not filtered.
Buttons
Find
Performs the Find operation on the configuration files currently displayed in the window.
Filter
Performs the filter and displays the results.
Clear Filter
Removes the filter currently in effect.
Change
Opens the Select Configurations window where you can select two new configuration files to
compare.
Close
Closes the window.
Filter Tab
401
Configuration File Viewer
The Configuration File Viewer lets you view an archived device configuration file. To access the viewer,
select a configuration that includes device configuration data (
or
) in the Archives Mgmt tab tree or
right−panel Details View, and select Tools > View Configuration File. You can also right−click on a
configuration and select View Configuration File from the menu. If the configuration file status is "File Not
Found/Missing" (see the configuration General tab), then this menu option is not available. The file is
displayed in ASCII format. However, if the file is in binary, you still have the option to view it.
You can perform Find and Filter operations on the configuration file to target specific lines of interest. The
last Filter and Find settings you enter remain in the viewer until you refresh the display.
Information on the following tabs:
• Find Tab
• Filter Tab
Find Tab
The Find tab lets you search the configuration file (filtered or unfiltered) for a specific set of characters, like a
word, phrase, or number. Enter your search criteria in the Find field, and when you click the Find button, any
search terms found will be highlighted in the viewer. You can search forward or backward from your current
position, and restrict your search to match the exact upper or lowercase, and/or whole word.
Click the graphic for more information.
Configuration File Viewer
402
Welcome to NetSight Inventory Manager Help
Find:
Enter the text or numeric value you want to find.
Case Sensitive
Select this checkbox to search based on an exact match of the upper or lowercase of the text entered
in the Find field.
Match Whole Word
Select this checkbox to search based on an exact match of the whole word or numeric value entered in
the Find field.
Forward
Select Forward to search from your current position to the end of the configuration file.
Backward
Select Backward to search from your current position to the beginning of the configuration file.
Configuration File
Displays the selected configuration file and highlights any search items that were found. Directly
above the display you can see the status of whether the file is filtered or not filtered.
Filter Tab
The Filter tab lets you specify which lines to display in the configuration file. Enter the information you want
to see, and only matching lines will be displayed. You can use any combination of filter options, and you can
Filter Tab
403
Welcome to NetSight Inventory Manager Help
perform consecutive filters on the filtered events.
Click the graphic for more information.
Filter:
Enter the text or numeric value you want to use as a filter.
Case Sensitive
Select this checkbox to search based on an exact match of the upper or lowercase of the text entered
in the Filter field.
Match Whole Word
Select this checkbox to search based on an exact match of the whole word or numeric value entered in
the Filter field.
Entire Text
Select the Entire Text option to filter the entire file by the value in the Filter field. If you have
already performed a filter, this will enable you to perform a new filter on the entire file instead of just
the filtered text.
Filtered Text
Select the Filtered Text option to perform a new filter on the results of the previous filter.
Configuration File
After running the filter, this area displays the matching lines in the configuration file. Click Clear
Filter to remove the filter currently in effect. Directly above the display you can see the status of
Filter Tab
404
Welcome to NetSight Inventory Manager Help
whether the file is filtered or not filtered.
Buttons
Find
Performs the Find operation on the information currently displayed in the viewer.
Filter
Performs the filter and displays the results.
Clear Filter
Removes the filter currently in effect.
Change
Opens the Open Configuration window where you can select another configuration file to view.
Save As
Lets you save the configuration file as a text file.
Close
Closes the window.
Filter Tab
405
Configure Server Window
The Configure Server window allows you to configure various NetSight Server parameters. The window has a
right−panel view that changes depending on what you have selected in the left−panel tree. You can access this
window by clicking the Configure button in the Server Information window. You must be assigned the
appropriate user capabilities to access and use this window.
Information on the following Configure Server view:
• Client Connections
Client Connections
Selecting Client Connections in the left panel of the Configure Server window provides the following view
where you can see the number of current client connections for each installed plugin application, and change
the maximum number of connections allowed for each plugin and the NetSight Server.
Click the graphic for more information.
Installed Application Plugins
The name of the installed plugin application with clients connecting to the NetSight Server.
Current Connections
The number of current client connections for this plugin application.
Configure Server Window
406
Welcome to NetSight Inventory Manager Help
Total Allowed
The maximum number of client connections allowed for this plugin application. Select this field and
use the arrows to change the number, if desired.
Clients Currently Connected
The total number of clients currently connected to the NetSight Server.
Number of Clients Allowed
The maximum number of concurrent client connections allowed by the NetSight Server. Use the
arrows to change the number, if desired. This number should be set to the total number of clients you
want to allow to connect to your server.
Buttons
Refresh
Refreshes the current connection information.
Configure Server Window
407
Create Firmware Record Window
This window lets you add a firmware or boot PROM image to your Firmware Mgmt tab manually, as opposed
to having Inventory Manager automatically discover the image during a firmware discovery. When you are
using an alternate firmware server to perform remote firmware downloads, you must use this window to
manually create the firmware records associated with the alternate server, and add them to the Inventory
Manager database.
When you create a firmware record, it is added to the All Firmware folder and the Unknown folder in the
Firmware Mgmt tab. You will need to use the Assign Firmware window to assign the firmware or boot
PROM image to the appropriate product families or device types. You must also assign the alternate firmware
server to the appropriate devices using the Set Firmware Server window in order to see this image listed in the
Firmware Upgrade Wizard. This enables you to download the image to your remote network devices of that
family or type, using the Firmware Upgrade Wizard or the Boot PROM Upgrade Wizard.
To access this window, select the All Firmware folder in the left−panel Firmware Mgmt tab and select Tools
> Create Firmware Record, or right−click the All Firmware folder and select Create Firmware Record from
the menu. (You must have a configured alternate firmware server for this menu option to be available.)
Click the graphic for more information.
Image Type
Specify whether the image is a firmware or boot PROM image.
Image File Name
Enter the name of the firmware or boot PROM image as it appears in the image directory.
Image Directory Path
Enter the path to the location where the image is stored.
Create Firmware Record Window
408
Welcome to NetSight Inventory Manager Help
Selected Servers Table
This table lists any alternate firmware download servers you have defined in the Alternate Firmware
Servers view in the Options window. Select the appropriate server for the firmware record: the image
directory path must exist under the server root path. If you select multiple servers, be sure that the
same image type, file name, and directory path are used on all selected servers. Individual firmware
records will be created for each selected server.
Buttons
OK
Creates the firmware record and closes the window.
Apply
Creates the firmware record and leaves the window open.
Create Firmware Record Window
409
Database Properties Window
This window displays information about certain Inventory Manager components stored in the NetSight
database. To access this window, select File > Database > Properties.
Click the graphic for more information.
Number of Devices
The number of devices in the database.
Number of Firmware Images
The number of firmware images in the database. This number includes user−defined firmware records
but does not include images with a status of File Not Found.
Number of Boot PROM Images
The number of boot PROM images in the database. This number includes user−defined firmware
records but does not include images with a status of File Not Found.
Number of Archives
The number of archives stored in the database.
Number of Configurations
The total number of configurations saved in the database.
Number of Configuration Templates
The total number of configuration templates saved in the database.
Database Properties Window
410
Device Group Selection Window
The Device Group Selection window lets you add one or more devices from a right−panel Details View to the
My Network Group or a user−created group in the left−panel Network Element tab. See Adding Devices to a
Device Group for more information.
Click areas in the window for more information.
Group Selection Panel
Use this panel to select the group to which you want to add the selected devices.
Buttons
OK
Adds the device(s) to the selected group.
Cancel
Closes the window without adding any devices.
Device Group Selection Window
411
Device Template Variables Window
This window allows you to set template variable values for a single device. It is accessed from the last
window of the Template Download Wizard, which displays a table of the devices you have selected for your
download operation. An alert icon
appears for any device that does not have values assigned for all the
variables in the template. Right−click that device and select Edit Device Variables to open the Device
Template Variables window, where you can assign variables values for that specific device.
TIP: You can also set variable values for an individual device on the device's Configuration
Templates tab.
Click the graphic for more information.
Template Variables
This table lists all the template variables and their set values for your selected device. You must fill in
all missing values, or modify existing values, if desired. Press Enter when you have finished entering
the value in each cell. When you have filled in all the template values, click OK to return to the
Template Download Wizard.
Device Template Variables Window
412
Edit Alternate Firmware Server Window
Use the Edit Alternate Firmware Server window to change certain properties and/or connection information
for alternate firmware download servers. Access this window by selecting a server and clicking Edit Server
in the Alternate Firmware Servers view of the Options window.
Click the graphic for more information.
Server Properties
Use this area to edit two of the alternate server's properties: the identifier and the server root path.
Server IP
The IP address of the workstation where the tftp or ftp server is running. You cannot edit this
property. To change the server IP, you must remove this alternate server from the list, and add a new
one using the Add Alternate Firmware Server window.
Identifier
Edit the description that helps you identify the alternate firmware server.
Server Root Path
Edit the server root path. The root directory is the base directory to which the server is allowed access.
The server will be allowed to create files to or read files from this directory and any of its
subdirectories.
NOTES: Changing the root directory requires restarting the server. Also, keep in mind
the following requirements when setting the server root path:
Edit Alternate Firmware Server Window
413
Welcome to NetSight Inventory Manager Help
• If your server is configured with a root directory, it must match the
root directory entered here.
• If your server is not configured with a root directory, specify the root
directory here as the root of the drive (e.g. C:\ or D:\).
Transfer Protocol
The transfer protocol for the alternate firmware server. You cannot edit this property. To change the
transfer protocol, you must remove this alternate server from the list, and add a new one using the
Add Alternate Firmware Server window.
TFTP Connection Information
This area displays connection information for an alternate server that has been configured with TFTP
protocol.
Port
The port number your TFTP server is configured to run on. You cannot edit this property. To change
the port number, you must remove this alternate server from the list, and add a new one using the Add
Alternate Firmware Server window.
FTP Connection Information
This area displays connection information for an alternate server that has been configured with FTP protocol.
Port
The port number your FTP server is configured to run on. You cannot edit this property. To change
the port number, you must remove this alternate server from the list, and add a new one using the Add
Alternate Firmware Server window.
Anonymous
Select or deselect this checkbox depending on whether your FTP server is configured to accept
Anonymous logins.
Username/Password
Edit the username and password used to access the FTP server. If you select the Hide Password
checkbox, your password will be replaced with asterisks when it is typed in.
Buttons
OK
Makes the changes and closes the window.
Apply
Makes the changes and leaves the window open.
Edit Alternate Firmware Server Window
414
Edit Configuration Template Window
Use the Edit Configuration Template window to create a configuration template based on an archived device
configuration file. Creating a configuration template lets you easily download similar configurations to one or
more devices. The window displays a selected configuration file, and allows you to replace portions of it with
template variables. Then, when you download the template configuration to a device (using the Template
Download Wizard), the variables are automatically replaced with assigned values for that device. For more
information, see How to Create and Download Configuration Templates.
To access the window, select a configuration that includes device configuration data (
or
) in the
left−panel Archive Mgmt tab and select Tools > Create Configuration Template. You can also right−click a
configuration and select Create Configuration Template from the menu. When the window opens, the
configuration file is displayed. You can edit the displayed text directly, or use the Find and Replace buttons to
edit the file with the desired variables. All instances of the IP address of the device the configuration was
saved from, will be automatically replaced with the %ManagedIP% variable. You can use the Undo Replace
button to undo this auto replacement if desired.
NOTE: Configuration templates can be created from text−based (ASCII format) configurations
files. Although you can open binary configuration files in the Edit Configuration
Template window, you should not use binary configuration files to create templates.
Click the graphic for more information.
Find
Edit Configuration Template Window
415
Welcome to NetSight Inventory Manager Help
Enter the text you would like to edit. When you click Find, the first occurrence of the text will be
highlighted, and you can select to replace that single occurrence or replace all occurrences of the
selected text. Click Find again to highlight the next occurrence.
Replace With
Enter the variable you want to use to replace the highlighted (found) text, or use the drop−down list to
select a defined variable. Variables are defined in the Template Variables window, accessed from the
Variables button.
Replace all occurrences of selected text
Select this checkbox when you would like to replace all occurrences of the selected text versus
replacing one occurrence at a time.
Undo all changes
Select this checkbox when you would like to undo all replacements since the last template Save or
Save As.
Buttons
Find
Searches for the next occurrence of the text specified in the Find field. The found text is highlighted
in the window.
Replace
Replaces highlighted (found) text with the specified variable. If the "Replace all occurrences of
selected text" checkbox is selected, all instances of the text specified in the Find field will be replaced.
Undo Replace
Reverses the last replacement. Use the "Undo all Changes" checkbox to reverse all replacements since
the last template Save or Save As.
Variables
Opens the Template Variables window where you can add and delete variables to display in the
variable drop−down list.
Save
Updates the template with your changes.
Save As
Opens the Save Template window, allowing you to name and save the configuration template. Saved
templates are listed under the All Templates folder in the left−panel Configuration Templates tab.
Once a template has been saved, the name of the template appears in the title bar of this window, and
the path to where the saved template is stored is displayed above the configuration template text.
Edit Configuration Template Window
416
E−Mail Configuration Window
The E−Mail Configuration window lets you create an e−mail recipient list to use when configuring e−mail
notification settings for a scheduled Capacity Planning report. The window is accessed from the Edit Mail List
button in the Schedule Report window.
Click the graphic for more information.
Defined Mail Lists
Displays the currently defined mail lists. Use the New List button to add a mail list name to the list.
Mail List Definitions
Use the E−Mail List entries field to configure the "send to" e−mail addresses for the selected list.
Addresses in the list can be separated with a comma or a semicolon. The list is not verified for valid
addresses.
Buttons
New List
Lets you create a new mail list name.
Delete List
Deletes the selected list.
Rename List
Lets you rename the selected list.
E−Mail Configuration Window
417
Welcome to NetSight Inventory Manager Help
E−Mail Configuration Window
418
Event Details Window
The Event Details window shows information about a single event selected in the Event Log. To access the
window, right−click an event in the Event Log and select Event Details from the menu.
Click areas in the window for more information.
Timestamp
The date and time when the event occurred.
Acknowledged
Whether or not the selected event has been acknowledged.
Type
The type of information: Event.
Source
The IP address of the host that was the source of the event.
Event Name
Event Details Window
419
Welcome to NetSight Inventory Manager Help
The type of event.
Client
The name of the client host machine that triggered the event.
Severity
The event's severity.
Category
The category of event.
User
The name of the user that triggered the event.
Information
Information about the event.
Enterprise
Not applicable to the Inventory Manager Event Log.
Trap Number
Not applicable to the Inventory Manager Event Log.
Description
Not applicable to the Inventory Manager Event Log.
Buttons
OK
Closes the window.
Acknowledge/Unacknowledge
Places a check or removes a check in the Acknowledge column in the Event Log for the selected
event.
Event Details Window
420
Event Log
The Event Log at the bottom of the Inventory Manager main window displays error and informational
messages about Inventory Manager system operations. The log displays the most recent 10,000 entries. The
current log file is automatically archived when its size reaches 5 megabytes and a new log file is opened. Use
the Event Logs view in the Options window to configure the number of event logs to save and the number of
entries to display in the table. You must be assigned the appropriate user capability to view the Event Log.
Click the graphic for more information.
Acknowledge:
This checkbox lets you acknowledge an event and also hide items that have been acknowledged.
Click the checkbox to acknowledge the item and then click the Show Acknowledged Events button
to hide or show the checked items.
Severity
The event's severity.
Category
The category of event.
Timestamp
The date and time when the event occurred.
Source
The IP address of the host that was the source of the event.
Client
The name of the client host machine that triggered the event.
User
The name of the user that triggered the event.
Type
The type of information: Event.
Event
The type of event.
Event Log
421
Welcome to NetSight Inventory Manager Help
Information
Information about the event.
Right−click Menu Options
The event log right−click menu lets you Acknowledge and Unacknowledge events. It also provides options
and a standard set of table tools to help you find, filter, sort, print, and export information in a table and
customize table settings. You can access the menu options through a right−mouse click on a column heading
or anywhere in the table body, or by clicking the Table Tools
button in the upper left corner of the
table (if you have the row count column displayed). For more information, see Table Tools.
Buttons
Show/Hide Acknowledged Events
This button hides or shows items in the table that have been acknowledged by a check in the
Acknowledge column.
Refresh
Refreshes the log.
Clear Current View
Clears entries from the current table.
Event Log
422
File Transfer Method Window
Use this window to select a file transfer method for a specific device, or specify a default transfer method for
an entire device type. Once you have specified the file transfer method for a device, all archive save and
restore operations and Firmware/Boot PROM upgrades on that device will be performed using the specified
method. All devices are initially configured with TFTP as their file transfer method, until specified otherwise
using these windows. Be sure to configure file transfer properties in the TFTP Transfer Settings or FTP
Transfer Settings views in the Options window.
There are two File Transfer Method windows, depending on whether you are setting the method at the device
level, or for an entire device type.
Information on:
• File Transfer Method − Device
• File Transfer Method − Device Type
File Transfer Method − Device
Use this window to specify the file transfer method for a single or multiple devices. Specifying a file transfer
method at the device level will override any default setting made at the device type level. To access this
window, select a single device in the left−panel Network Elements tab or multiple devices in a right−panel
Details View tab, then select Tools > File Transfer Method from the menu bar. You can also right−click a
device and select the File Transfer Method option from the menu.
Click the graphic for more information.
Drop−Down List
Select the file transfer method you would like used for the selected device(s). The default file transfer
method set for the device's device type is indicated by the word default in parentheses, as shown in
the graphic above.
File Transfer Method − Device Type
Use this window to specify a default file transfer method for newly discovered devices of an entire device
type. You can override this device type setting at the device level. To access this window, select a device type
File Transfer Method Window
423
Welcome to NetSight Inventory Manager Help
(lowest−level device type folder) in the left−panel Firmware Management tab, then select Tools > Default
File Transfer Method from the menu bar. You can also right−click a device type and select the Default File
Transfer Method option from the menu.
Click the graphic for more information.
Drop−Down List
Select the file transfer method you would like used for the selected device type and click OK.
Apply method to all existing devices of this device type.
Select this checkbox to change the file transfer method for all current devices in the selected device
type folder. If this checkbox is not selected, only newly discovered devices of this device type will
have this file transfer method.
File Transfer Method Window
424
Firmware Upgrade Wizard
Use the Firmware Upgrade Wizard to easily upgrade the firmware images on your network devices. The
wizard gives you the flexibility of performing an immediate upgrade or scheduling the upgrade to take place
at a later time. If you schedule the upgrade, the wizard will automatically perform the upgrade at the
scheduled time, and then alert you that the upgraded devices need to be reset via the Reset Wizard.
To access the wizard, select Tools > Wizards > Firmware Upgrade Wizard from the menu bar or click
on the toolbar.
There are certain steps you must perform before you can upgrade your firmware. The steps vary depending on
whether you are using a mapped file transfer server (as configured in the Services for NetSight Server view of
the Options window) or an alternate remote file transfer server (as configured in the Alternate Firmware
Servers view in the Options window) to perform the upgrade. For instructions, see Preparing to Upgrade.
NOTE: The Firmware Upgrade Wizard can also be used to downgrade firmware to a previous revision.
Downgrading firmware is inherently risky due to possible feature differences between revisions.
Restoring configurations from different firmware revisions carries the same risk. Should you need
to downgrade your firmware to an earlier version, it is recommended that you use one of the
following two procedures:
• Downgrade the firmware on a network device using the Firmware Upgrade Wizard. Do
not proceed to the Reset Devices portion of the wizard, instead select [Finish]. Restore an
archived configuration that was previously created with the firmware image being
downloaded. This will reset the device.
or
• Downgrade the firmware on a network device using the Firmware Upgrade Wizard.
Complete the downgrade using the wizard Reset Devices screens. Clear NVRAM on the
device and reconfigure the network configuration parameters of the device using the local
console.
In addition, when downgrading firmware on SNMPv3 devices, it is possible that Inventory
Manager will lose contact with the device. SNMPv3 adds a level of difficulty to downgrade
operations, because counters and timers related to security features of SNMPv3 may get out of
sync. Following the downgrade, you will need to restart Inventory Manager to re−establish
contact with the device.
CAUTION: Prior to upgrading firmware on a device, it is recommended that you archive the latest
configuration for the device being upgraded. This will aid you in downgrading should you
choose to do so.
Device Selection Window
Use this window to select the devices to include in the firmware upgrade operation.
NOTE: If you have multiple tree nodes representing the same device but with varying SNMP contexts,
keep in mind that not all device contexts will provide access to the MIBs required to perform the
Firmware Upgrade Wizard
425
Welcome to NetSight Inventory Manager Help
operation. When selecting your devices, make sure that any device with SNMP context has access
to the required MIBs, or select the device with default context (switch mode).
Click the graphic for more information.
Select devices to upgrade
This panel displays your current devices as they are listed in the left−panel Network Elements tab. Expand the
folders and select the single device or device group, or multiple devices or device groups (using the Control or
Shift keys) that you want to upgrade. Click the Add button to add the devices to the Selected Devices table. If
there were devices that failed the previous upgrade, use the Add Failed button to add those devices to the
table.
TIP: If you open the Firmware Upgrade Wizard from a device or device group in the left−panel Network
Elements tab, the selected device(s) will be automatically displayed in the Selected Devices table.
Selected Devices
Lists the devices selected for the upgrade operation. Devices that do not support firmware download or have
never been contacted, are not listed. If you want to remove a device from the table, select the device and click
Remove.
IP Address
The device's IP address. Note that chassis that support Distributed Forwarding Engines (DFEs), such
as the Matrix N−Series, display a single management IP even though there may be multiple DFE
modules in the chassis.
Device Type
The device's model number or hardware type.
Firmware Upgrade Wizard
426
Welcome to NetSight Inventory Manager Help
Firmware Version
The current firmware version installed in the device.
Firmware Download
A indicates the device supports the ability to download firmware images using this wizard.
Boot PROM Version
The current version of Boot PROM installed in the device.
Boot PROM Download
A indicates the device supports the ability to download boot PROM images using the Boot PROM
Upgrade Wizard.
Add Button
Select a single device or device group, or multiple devices or device groups, and click Add to add
them to the Selected Devices table.
Remove Button
To remove a device from the Selected Devices table, select the device and click Remove.
Add Failed Button
If there were devices that failed the previous firmware upgrade, click the Add Failed button to add
those devices to the Selected Devices table. This button will not be displayed if there are no devices
that failed the previous upgrade.
Assign Firmware Window
Use this window to select and assign the firmware images to be used in the upgrade. Firmware is assigned
according to device type or binary family (device types that share the same firmware image). The left panel
lists the device types selected for the firmware upgrade. The right panel lists firmware images compatible with
a selected device type. Use the Assign to: buttons to assign an image to a specific device type or to the entire
binary family. You must assign an image to each device type.
NOTE: Before proceeding with the upgrade, be sure to verify that the boot PROM and firmware images
that will be on the device after the upgrade operation are compatible. Refer to the boot PROM and
firmware release notes for more information.
Click the graphic for more information.
Assign Firmware Window
427
Welcome to NetSight Inventory Manager Help
Assignments
This table lists the device types of all the devices selected for the firmware upgrade. Select a device type to
display compatible firmware images in the right panel. If necessary, click the Refresh Images button to
perform a firmware discovery and update the list of firmware images. Then, in the right−panel, select a
firmware image and use the Assign to: buttons to assign the image to the device type or to each entry that is a
member of that binary family. The image will appear in the Image Name column in the Assignments table.
You must assign an image to each device type.
NOTE: A device type group may include some devices that use the local mapped file transfer server for
firmware downloads, and some that use an alternate remote firmware download server. In that
case, the device type would have multiple entries in the Assignments table, one for each server.
When you select an entry that uses an alternate server, only firmware records associated with that
alternate server will be displayed in the Image list table (unless you select Show All Images.)
Family
The product family to which the device type belongs.
Device Type
The device's model number or hardware type.
Server ID
The firmware download server specified for the device type. All devices are initially configured to use
the mapped file transfer server (as configured in the Services for NetSight Server view of the Options
window) for firmware downloads. You can specify an alternate firmware download server, which
allows a remote device to use a server in its own local network. For more information see How to Set
Up Alternate Firmware Download Servers.
Image Name
Assign Firmware Window
428
Welcome to NetSight Inventory Manager Help
The firmware image assigned to the device type.
Image List
This table lists all the compatible firmware images for the device type selected in the Assignments table. If
you select a device type entry that uses an alternate remote firmware download server, only firmware records
associated with that alternate server will be displayed. Select a firmware image and use the Assign to: buttons
to assign the image to the selected device type or to the entire binary family. The image will appear in the
Image Name column in the Assignments table. You must assign an image to each device type. Use the
Refresh Images button to perform a firmware discovery and update the list of firmware images, if desired.
Show All Images
By default, only firmware images that are compatible with the selected device type are listed. Select
the Show All Images checkbox to override this filter and display all your firmware images. If by
selecting this checkbox you assign a firmware image that's associated with the mapped server, to a
device type that specifies an alternate firmware download server, the wizard will use the mapped
server to perform the download.
Image Name
The name of the firmware image as it appears in your firmware images directory.
Server
Displays the firmware download server associated with the firmware image. A discovered firmware
image that is accessible by the mapped file transfer server (as configured in the Services for NetSight
Server view of the Options window) will display "Mapped Server". A user−defined firmware record
will display its associated alternate firmware download server, as configured in the Create Firmware
Record window. For more information see How to Set Up Alternate Firmware Download Servers.
Image Path
The path to the location where the image is stored.
Version
The version number of the firmware image. If the version number is not available from the image file,
and Inventory Manager has not performed a firmware upgrade using this image, this field will display
N/A (not available).
Assign to Device Type Button
Use the Assign to: Device Type button to assign a firmware image to the device type.
Assign to Entire Family Button
Use the Assign to: Entire Family button to assign a firmware image to each entry that is a member
of that binary family.
Refresh Images Button
Performs a firmware discovery and updates the list of firmware images.
Download Progress Window
Use this window to configure download parameters, start the download, and monitor download progress.
Alternately, you can click Schedule to open the Download Schedule window where you can schedule the
firmware download to take place in the background at a future time.
Download Progress Window
429
Welcome to NetSight Inventory Manager Help
Click the graphic for more information.
Show all devices/Show only incomplete and failed
Once the upgrade operation starts, the device list table updates with status information for each
device. An alert icon
will appear in the Alert column of the table if a download operation fails for
a specific device. You can use these radio buttons to show all devices or show only those devices
whose download operations are incomplete or have failed.
Device List Table
A list of the devices you have selected for your download operation. Once the download is started,
this table updates with status information for the download operation:
• Alert − an alert icon
will appear in the Alert column if a download operation fails for a
specific device.
• IP Address − The device's IP address. Note that chassis that support Distributed Forwarding
Engines (DFEs), such as the Matrix N−Series, display a single management IP even though
there may be multiple DFE modules in the chassis.
• Image − The name of the image file being downloaded.
• Status − The status of the download operation: Initial (the operation has not started), Success
(the operation succeeded), Failure (the operation failed).
• Operation − The type of operation performed: Firmware Download.
• % Progress − A progress bar showing the percent completed of the operation.
• Bytes Trans. − The number of bytes transferred during the download.
• Message − Initially, this column shows the file transfer server and the firmware image being
used for the download operation. Once the download is started, it displays a message relating
Download Progress Window
430
Welcome to NetSight Inventory Manager Help
to the status of the operation.
TIP: Use the table options and tools to find, filter, sort, print, and export information in a table
and customize table settings. You can access the Table Tools through a right−mouse click on
a column heading or anywhere in the table body, or by clicking the Table Tools
button in the upper left corner of the table (if you have the row count column
displayed). For more information, see Table Tools.
Status Summary
Once the download is started, this area updates with status information for the download operation.
Download Type
The downloads will be performed in parallel (simultaneously) on the number of devices specified in
the Groups of field. Enter the value 1 to have the downloads performed serially, one device after
another.
Start Button
Initiates the download operation. The table at the top of the window updates with status information,
as will the status area in the bottom left of the window.
Schedule Button
Opens the Download Schedule window where you can schedule the firmware upgrade to take place in
the background at a future time.
Download Schedule Window
If you are scheduling your download for a future time, use this window to configure scheduling information
and process settings for the download operation. Although a scheduled download runs automatically and does
not require your supervision, you will still need to reset any devices that require reset, once the scheduled
downloads have completed. After the firmware has been downloaded at the scheduled time, a Reset Device
icon
is displayed in the status bar indicating that there are devices that have received new firmware
images and need to be reset. Double−click the icon to open the Devices Need Reset window where you can
launch the Reset Device Wizard for those devices.
Click the graphic for more information.
Download Schedule Window
431
Welcome to NetSight Inventory Manager Help
Name
Enter a name for the scheduled download, or use the default name which is based on the date the
schedule is created.
Schedule
Select Date
Use the drop−down list to select the month you want the download to start. A calendar corresponding
to the selected month is displayed. Select the desired starting day by clicking on the calendar. You can
use the arrows on either side of the drop−down list to change the month, and change the year by
entering a new year in the text field.
Start Time
Set the starting time for the operation and select AM or PM.
Process
Groups of
The download will be performed in parallel (simultaneously) on the number of devices specified in
the Groups of field. Set the value to 1 to have the operation performed serially, one device after
another.
Abort on failure
Select the Abort on Failure checkbox to stop the download operation after a failure. This is useful if
you are performing a download operation on multiple devices and you want the operation to stop after
a failure on a single device.
Finish Button
Download Schedule Window
432
Welcome to NetSight Inventory Manager Help
Schedules the download operation. When the scheduled download is performed, you can monitor the
progress, if desired, via the Active Status panel, just as you do for scheduled archives. You can view
or cancel scheduled downloads using the Scheduled Events window (Tools > Scheduled Events).
Reset Devices: Timed Reset Supported Window
Once the downloads have completed, use this window to reset those devices that support Timed Reset. Timed
Reset gives you the flexibility to set up your reset operation with a time delay, so that the actual device resets
take place at a later time. This can be useful when trying to schedule resets for a time when the network is
least busy.
NOTE: During the device reset, Inventory Manager learns the current firmware version installed
on the device. Inventory Manager uses this information to determine whether the
firmware version installed on the device matches the firmware reference image set for the
device's binary family. (This information is displayed in the All Devices Details View
tab.) If the version number is not available from an image file, you can manually set the
version number in the Firmware Image General Tab.
Click the graphic for more information.
Show devices not supporting timed reset
This window lists those devices that support Timed Reset. Select this checkbox to include devices that
do not support timed reset. Devices that do not support timed reset cannot be reset from this window;
proceed to the next window to reset those devices.
Reset Devices: Timed Reset Supported Window
433
Welcome to NetSight Inventory Manager Help
Show devices that failed firmware upgrade
Select this checkbox to include devices that failed the firmware upgrade.
Device List Table
A list of the devices you have selected for your reset operation. Once the reset operation has started,
you must click Refresh to update the device information in the table.
• Selected − Use the checkboxes in this column to select or deselect devices to be reset.
Devices that do not support timed reset cannot be selected.
• Running New Firmware − Following the reset, a indicates the device is running the new
firmware version. (The checkmark is only displayed if the firmware version changes.)
Remember to click Refresh to update the information in the table following the reset.
• IP Address − The device's IP address. Note that chassis that support Distributed Forwarding
Engines (DFEs), such as the Matrix N−Series, display a single management IP even though
there may be multiple DFE modules in the chassis.
• Firmware Version − Shows the current firmware version installed in the device. Following
the reset, the new firmware version will be displayed. Remember to click Refresh to update
the information in the table following the reset.
• Device Status − The device's connection status (Contact or No Contact) and, therefore, its
ability to respond to SNMP requests.
• Downloaded Image − The name of the image file that was downloaded.
• Download Status − The status of the download operation: Success (the operation succeeded),
Failure (the operation failed).
• Reset Request Status − The status of the reset operation: Initial (the operation has not
started), Success (the operation succeeded), Failure (the operation failed).
• Message − A message relating to the status of the operation.
TIP: Use the table options and tools to find, filter, sort, print, and export information in a table
and customize table settings. You can access the Table Tools through a right−mouse click on
a column heading or anywhere in the table body, or by clicking the Table Tools
button in the upper left corner of the table (if you have the row count column
displayed). For more information, see Table Tools.
Reset Delay
Enter the amount of time (in seconds) until the device resets after the reset operation begins. For
example, if you start the reset operation at 4:00 pm with a 7 hour reset delay (420 seconds), the
device(s) will reset at 11:00 pm. This allows you to schedule your resets for a time when the network
is least busy.
Reset Type
Select the type of reset: Warm boot (restarts the device) or Cold boot (same as turning device power
off and on).
Elapsed Time
The amount of time in minutes:seconds since the reset operation started.
Start Button
Starts the timed resets. Resets occur simultaneously. Once the reset operation has started, you must
click Refresh to update the device information in the table.
Refresh Button
Reset Devices: Timed Reset Supported Window
434
Welcome to NetSight Inventory Manager Help
Once the reset operation has started, use the Refresh button to update the device information in the
table.
Reset Devices: Timed Reset Not Supported Window
Once the downloads have completed, use this window to reset those devices that do not support Timed Reset.
Devices will be reset one at a time, waiting until a device is fully booted before beginning the next device.
NOTE: During the device reset, Inventory Manager learns the current firmware version installed
on the device. Inventory Manager uses this information to determine whether the
firmware version installed on the device matches the firmware reference image set for the
device's binary family. (This information is displayed in the All Devices Details View
tab.) If the version number is not available from an image file, you can manually set the
version number in the Firmware Image General Tab.
Click the graphic for more information.
Show devices that failed firmware upgrade
Select this checkbox to include devices that failed the firmware upgrade.
Device List Table
Lists those devices that do not support timed reset. Once the reset operation has started, you must
click Refresh to update the device information in the table.
• Selected − Use the checkboxes in this column to select or deselect devices to be reset.
• Running New Firmware − Following the reset, a indicates the device is running the new
firmware version. (The checkmark is only displayed if the firmware version changes.)
Remember to click Refresh to update the information in the table following the reset.
• IP Address − The device's IP address. Note that chassis that support Distributed Forwarding
Engines (DFEs), such as the Matrix N−Series, display a single management IP even though
Reset Devices: Timed Reset Not Supported Window
435
Welcome to NetSight Inventory Manager Help
there may be multiple DFE modules in the chassis.
• Firmware Version − Shows the current firmware version installed in the device. Following
the reset, the new firmware version will be displayed. Remember to click Refresh to update
the information in the table following the reset.
• Device Status − The device's connection status (Contact or No Contact) and, therefore, its
ability to respond to SNMP requests.
• Downloaded Image − The name of the image file that was downloaded.
• Download Status − The status of the download operation: Success (the operation succeeded),
Failure (the operation failed).
• Reset Request Status − The status of the reset request.
• Message − A message relating to the status of the operation.
TIP: Use the table options and tools to find, filter, sort, print, and export information in a table
and customize table settings. You can access the Table Tools through a right−mouse click on
a column heading or anywhere in the table body, or by clicking the Table Tools
button in the upper left corner of the table (if you have the row count column
displayed). For more information, see Table Tools.
Reset Type
Select the type of reset: Warm boot (restarts the device) or Cold boot (same as turning device power
off and on).
Elapsed Time
The amount of time in minutes:seconds since the reset operation started.
Start Button
Initiates the reset operation. Resets occur one at a time, continuing only after a device is fully booted.
After the reset operation is completed, you can click Refresh to update the device information in the
table.
Refresh Button
Once the reset operation has completed, use the Refresh button to update the device information in
the table.
Reset Devices: Timed Reset Not Supported Window
436
Main Window
The Inventory Manager main window is the central point for all Inventory Manager tasks. It is divided into a
left panel, right panel, and bottom panel. The title bar displays the client's authorization group, user name, and
client host. The four tabs in the left panel display the devices and device groups, firmware, archive, or
configuration template information for your network depending on what tab you have selected. The
right−panel tabs display detailed information about the item selected in the left panel. The Active Status/Event
Log panel at the bottom of the window provides a chronological summary of operations that Inventory
Manager has performed as well as error and informational messages about Inventory Manager system
operations.
The Menu Bar and the Tool Bar at the top of the window let you perform inventory−related tasks. The Status
Bar at the bottom of the window displays error and status information.
Information on the Main window features:
• Menu Bar
• Tool Bar
• Left Panel
• Right Panel
• Active Status Panel
• Event Log
• Status Bar
Main Window
437
Welcome to NetSight Inventory Manager Help
Main Window
438
Welcome to NetSight Inventory Manager Help
Main Window
439
Menu Bar
The Menu Bar on the Main Window provides access to Inventory Manager functions. Some menu options are
standard, and some depend on what left−panel item and right−panel tab you have selected. Many of the menu
options available from the menu bar are also available from right−click menus. For information on menu
options available only from right−click menus, see Right−click Menu Options. For information on right−click
menu options available in the Active Status panel, see Active Status Right−click Menu Options.
Click the menu names for more information.
File Menu
File > Database > Properties
Opens the Database Properties window which displays information about certain Inventory Manager
components stored in the NetSight database
File > Database > Import v1.4 Inventory Manager Database
Opens a window which allows you to import your 1.4 database into this version of Inventory Manager
to preserve your network information. Refer to How to Import a Database for more specific
information on importing your Inventory Manager database.
File > Database > Initialize Inventory Components
Opens a window where you can choose to initialize all Inventory Manager components in the
NetSight database. This removes all Inventory Manager data elements from the database. You must
have the appropriate user capability to perform this operation. For more information, see How to
Initialize Inventory Database Components.
File > Close
Exits the Inventory Manager application. This menu option serves the same function as the Close
button on the toolbar.
Edit Menu
The Edit Menu options and the action taken depends on what is currently selected in the left panel or right
panel.
Edit > Copy
Copies an item selected in the left panel or right panel. The option may or may not be available,
depending on where you are in the application. This menu option serves the same function as the
Copy button on the toolbar.
Edit > Paste
Pastes what has been copied into the specified location. The option may or may not be available,
depending on where you are in the application. This menu option serves the same function as the
Paste button on the toolbar.
Menu Bar
440
Welcome to NetSight Inventory Manager Help
Edit > Rename
Lets you change the name of the currently selected archive.
Edit > Rename Device Group
Lets you change the name of the currently selected device group.
Edit > Delete
Lets you delete the item currently selected in the left panel.
View Menu
Lets you make changes to the appearance of the Inventory Manager main window and the information
contained in the right panel. The View Menu options depend on what is currently selected in the left panel.
View > Tool Bar
Hide or display the Tool Bar by selecting or deselecting the checkbox.
View > Status Bar
Hide or display the Status Bar by selecting or deselecting the checkbox.
View > Expand All
Expands (opens) all the folders under the folder selected in the left panel.
View > Collapse All
Collapses (closes) all the folders under the folder selected in the left panel.
View > Refresh (Rediscover)
With a device or device group selected in the Network Elements tab, Refresh (Rediscover) attempts to
contact the selected device(s) to update the properties information. The Profile for the Read Access
Level of the NetSight Administrator Authorization Group is used to refresh information..
View > Refresh
Updates different information depending on what left−panel tab is selected. With the Archive Mgmt
tab selected, Refresh performs a configuration discovery and updates the archive information. With
the Firmware Mgmt tab selected, Refresh performs a firmware discovery and checks for new
firmware images. With the Configuration Templates tab selected, Refresh performs a configuration
template discovery and updates the template information.
Tools Menu
Lets you perform administrative tasks. The Tools Menu options vary depending on what is currently selected
in the left panel or right panel.
Tools > Authorization/Device Access
Opens the Authorization/Device Access window where you can define users and groups and
View Menu
441
Welcome to NetSight Inventory Manager Help
configure their access to features available in NetSight applications.
Tools > Server Information
Opens the Server Information window where you can view and configure certain NetSight Server
functions, including management of client connections, locks, and licenses.
Tools > Capacity Planning
Opens the Capacity Planning tool that helps you quickly prepare valuable network inventory planning
reports. Each report is designed to answer a specific capacity planning question and lets you view
results organized into different categories. For more information, see Capacity Planning.
Tools > Create BOOTP Tab
Automatically creates a bootptab file and allows you to save the file in the desired directory. For
instructions, see Creating a Bootptab File.
Tools > Scheduled Events
Opens the Scheduled Events window where you can view any scheduled operations, and disable them
if desired.
Tools > Push Local Firmware to Server
Opens the Select Local Firmware File window where you can select a firmware file and access the
Push Firmware to Server window which gives a remote client the ability to send a local firmware or
boot PROM image to the NetSight Server.
Tools > Wizards > Firmware Upgrade Wizard
Opens the Firmware Upgrade Wizard where you can download a firmware image to a single device or
a group of devices. For instructions, see How to Upgrade Firmware.
Tools > Wizards > Boot PROM Upgrade Wizard
Opens the Boot PROM Upgrade Wizard where you can download a boot PROM image to a single
device or a group of devices. For instructions, see How to Upgrade Boot PROM.
Tools > Wizards > Archive Wizard
Opens the Archive Wizard where you can create a backup copy of your network devices' current
configurations. For instructions, see How to Archive.
Tools > Wizards > Template Download Wizard
Opens the Template Download Wizard where you can download a configuration template to one or
more devices. For instructions, see Template Download Wizard.
Tools > Wizards > Restore Wizard
Opens the Restore Wizard where you can restore saved configurations (archive versions) to devices.
For instructions, see How to Restore an Archive.
Tools > Wizards > Reset Wizard
Opens the Reset Device Wizard where you can reset a single device, multiple devices, or even
multiple device groups. For instructions, see How to Reset a Device.
Tools > Options
Opens the Options window where you can set suite−wide options and Inventory Manager options.
View Menu
442
Welcome to NetSight Inventory Manager Help
Tools > Remove from Device Group
Removes the currently selected device from the device group. You must have a device in a device
group selected in the left−panel Network Elements tab to see this menu option.
Tools > Add Device(s) to Group
Lets you add a device to a user−defined device group. You must have a device selected in the
left−panel Network Elements tab to see this menu option.
Tools > Track Device
Opens the Track Device window where you can track a device by serial number or MAC address.
This allows you to view a history of device attributes, and monitor any changes made to the device.
For instructions, see How to Track a Device.
Tools > File Transfer Method
Opens the File Transfer Method window where you can specify the file transfer method for a single or
multiple devices. Once you have specified the file transfer method for a device, all archive save and
restore operations and firmware/boot PROM upgrades on the device will be performed using the
specified method. For instructions, see How to Set a File Transfer Method. You must have a single
device selected in the Network Elements tab, or multiple devices selected in a right−panel Details
View tab, to see this menu option.
Tools > Alternate Firmware Server
Opens the Set Firmware Server window where you can specify which firmware download server a
device will use when performing firmware downloads. You must have a device or device group
selected in the Network Elements tab to see this menu option.
Tools > Acknowledge Alert
Adds a check to an alert icon indicating that the alert has been reviewed and acknowledged or, for
alerts in a right−panel Details View for a device or device group, it removes the alert icon from the
column. You must select an entry with an active alert icon in a right−panel tab to see this menu
option.
Tools > Set Template Variable Values
Opens the Set Template Variables window where you can set variable values for multiple devices at
one time. Variables are used in configuration templates to substitute for device−specific information.
You must have a device or device group selected in the Network Elements tab to see this menu
option.
Tools > Default File Transfer Method
Opens the File Transfer Method window where you can specify a default file transfer method for an
entire device type. Once you have specified the file transfer method for a device type, all archive save
and restore operations and firmware/boot PROM upgrades on devices of that type will be performed
using the specified method. For instructions, see How to Set a File Transfer Method. You must have a
device type (lowest−level device type folder) selected in the Firmware Management tab, to see this
menu option.
Tools > Create Firmware Record
Opens the Create Firmware Record window where you can add a firmware or boot PROM image to
your Firmware Mgmt tab manually, as opposed to having the image automatically discovered during
a firmware discovery. When you are using an alternate firmware server, you must use this window to
manually create the firmware records associated with the alternate server. (You must have a
View Menu
443
Welcome to NetSight Inventory Manager Help
configured alternate firmware server for this menu option to be available.)
Tools > Assign Firmware
Opens the Assign Firmware window where you can assign a firmware image to one or more product
families or device types. You must have a firmware image selected in the left−panel Firmware tab to
see this menu option. For instructions, see How to Assign Firmware.
Tools > Remove Firmware From Group
Removes the currently selected firmware image from the firmware group. You must have an image in
a firmware group selected in the left−panel Firmware Mgmt tab to see this menu option.
Tools > Set as Reference Image
Designates the selected firmware or boot PROM image as the preferred image for a specific binary
family of devices. The image will be set as a reference for all device types with which it is
compatible. (If the Set as Reference Image option is not available, make sure that the selected image
has been assigned to appropriate device types.)
Tools > Stamp New Version
Creates a new version of the selected archive. You must have an archive selected in the left−panel
Archive Mgmt tab to see this menu option. For more information, see Saving a New Archive Version.
Tools > Compare Archives
Opens the Select Archive Versions to Compare window to select archived configurations you want to
compare, and the Compare Archives window to view the comparison results. You must have an
archive, version, or configuration file selected in the left−panel Archive Mgmt tab to see this menu
option. For instructions, see How to Compare Archives.
Tools > Lock/Unlock
Allows you to lock and unlock an archive version. A locked archive version will not be deleted when
the maximum number of saved versions for this archive (as specified in the Archive Wizard) has been
reached. You must have an archive version selected in the left−panel Archive Mgmt tab to see this
menu option.
Tools > View Configuration File
Opens the Configuration File Viewer and displays the archived configuration file selected in the
left−panel Archive Mgmt tab.
Tools > Create Configuration Template
Opens the Edit Configuration Template window where you can create a configuration template based
on an archived configuration file. Creating a configuration template lets you easily download the
same configuration file to multiple devices. You must have a configuration file selected in the
left−panel Archive Mgmt tab to see this menu option. For more information, see How to Create and
Download Configuration Templates.
Tools > Compare Configuration Files
Opens the Select Configurations window to select two archived configuration files to compare, and
the Compare Configuration Files window to view the comparison results. You must have a
configuration file selected in the left−panel Archive Mgmt tab to see this menu option.
Tools > Copy File to Client
View Menu
444
Welcome to NetSight Inventory Manager Help
Allows you to copy a configuration file from the NetSight Server to your local client system. Opens a
Save window where you can navigate to the directory where you want the file to be saved. You must
have a configuration file selected in the left−panel Archive Mgmt tab to see this menu option.
Tools > Assign Configuration Template
Opens the Assign Configuration Template window where you can assign a template to one or more
device types. You must have a template selected in the left−panel Configuration Template tab to see
this menu option. For instructions, see Assigning Templates to Device Types.
Tools > Edit Configuration Template
Opens the Edit Configuration Template window where you can modify the template. You must have a
template selected in the left−panel Configuration Template tab to see this menu option. For more
information, see How to Create and Download Configuration Templates.
Tools > Remove Configuration Template From Group
Removes the currently selected template from the template group. You must have a template selected
in the left−panel Configuration Template tab to see this menu option.
Tools > Rename Template
Lets you change the name of the currently selected configuration template. You must have a template
selected in the left−panel Configuration Template tab to see this menu option.
Applications Menu
Lets you launch other installed NetSight plugin applications from Inventory Manager. You can also customize
the Applications menu to launch your own applications. For more information, see How to Add Applications
to the Applications Menu.
Help Menu
Lets you access the components of the Inventory Manager online information system.
Help > Help Topics
Opens the Inventory Manager Help system.
Help > Release Notes
Displays the NetSight Inventory Manager Release Notes for the current release.
Help > About This Window
Displays detailed information about the currently selected right panel tab. This menu option serves the
same function as the Help button on the toolbar.
Help > Support Center
Opens the Enterasys Networks Support website. (A browser is required to view the website and
Solaris users must add the browser's path to their PATH environment variable.)
Help > Check for Updates
Applications Menu
445
Welcome to NetSight Inventory Manager Help
Allows you to update Inventory Manager with newly supported device types and obtain the latest
version of release notes. For more information, see Setting Web Update Options.
Help > Getting Started
Displays the Getting Started help topic that provides an overview of Inventory Manager features and a
summary of the basic steps you must perform to begin using Inventory Manager.
Help > About NetSight Inventory Manager
Displays the NetSight Inventory Manager version and copyright information.
Right−click Menu Options
The following menu options are only available from right−click menus.
Table Options
Use the table options and tools to find, filter, sort, print, and export information in a table and
customize table settings. You can access the Table Tools through a right−mouse click on a column
heading or anywhere in the table body, or by clicking the Table Tools
button in the upper left
corner of the table (if you have the row count column displayed). For more information, see Table
Tools.
Reload Device Tree From Database
Reloads the device tree with the device data from the NetSight database. You must have the My
Network folder selected in the Network Elements tab to see this menu option. If the application is
showing incorrect device details (System Name, Contact, Location) or if device group membership is
incorrect (particularly the system−created device groups), use this menu option to synchronize the
device tree to the data in the database.
Right−click Menu Options
446
Tool Bar
The Tool Bar on the Main Window provides easy access to some of the more commonly used Inventory
Manager functions. Some Tool Bar buttons may not be available, depending on your current location within
the Inventory Manager application.
Click a button for more information.
Close
Exits the Inventory Manager application. This button serves the same function as the File > Close
menu option.
Copy
Copies an item selected in the left panel or right panel. This button serves the same function as the
Edit > Copy menu option.
Paste
Pastes what has been copied into the specified location. This button serves the same function as the
Edit > Paste menu option.
Delete
Deletes the current selection in the left panel. This button serves the same function as the
Edit > Delete menu option.
Authorization/Device Access
Opens the Authorization/Device Access window where you can define users and groups and
configure their access to features available in NetSight applications. This button serves the same
function as the Tools > Authorization/Device Access menu option.
Server Information
Opens the Server Information window where you can view and configure certain NetSight Server
functions, including management of client connections, locks, and licenses. This button serves the
same function as the Tools > Server Information menu option.
Capacity Planning
Opens the Capacity Planning tool that helps you quickly prepare valuable network inventory planning
reports. This button serves the same function as the Tools > Capacity Planning menu option.
FW Upgrade
Opens the Firmware Upgrade Wizard that helps you easily upgrade firmware images on your network
devices. This button serves the same function as the Tools > Firmware Upgrade Wizard menu
option.
BP Upgrade
Opens the Boot PROM Upgrade Wizard that helps you easily upgrade boot PROM images on your
network devices. This button serves the same function as the Tools > Boot PROM Upgrade Wizard
menu option.
Tool Bar
447
Welcome to NetSight Inventory Manager Help
Archive
Opens the Archive Wizard that lets you create archives and save backup copies of your devices'
configurations. This button serves the same function as the Tools > Archive Wizard menu option.
Restore
Opens the Restore Wizard that lets you restore saved configurations (archives) to devices. This button
serves the same function as the Tools > Restore Wizard menu option.
Reset
Opens the Reset Device Wizard that lets you reset a single device, multiple devices, or even multiple
device groups. This button serves the same function as the Tools > Reset Wizard menu option.
Help
Displays detailed information about the currently selected right−panel tab. This button serves the
same function as the Help > About This Window menu option.
Tool Bar
448
Left Panel
The left panel of the Inventory Manager main window contains four tabs: Network Elements, Firmware
Mgmt, Archive Mgmt, and Configuration Templates. These tabs display various management information in
an hierarchical tree format. To switch tabs, click on the desired tab.
Features of the left panel include:
• Expanding and collapsing items in the hierarchy: Double−click the item or its icon, or single−click
the turner to the left of the icon.
• Right−click menus: Right−click a folder or other item in the left panel, and a menu of the options you
can perform on your selection appears.
• Drag and drop: In the Network Elements and Firmware Mgmt tabs, you can populate groups by
dragging and dropping a device or firmware image into the desired group.
The item you select in the left−panel tree determines what is displayed in the right panel of the Inventory
Manager main window. For many of the items you select in the left panel, the default display in the right
panel is a Details View tab. For information on Details Views and the other tabs that appear in the right panel,
click on the name of the tab in the Right−Panel Tabs section of the Inventory Manager Help Contents.
Information on the left−panel tabs and icons:
• Network Elements Tab
• Firmware Mgmt Tab
• Archive Mgmt Tab
• Configuration Templates Tab
• Left−Panel Icons
Network Elements Tab
The Network Elements tab is displayed in the left panel when you open Inventory Manager. This tab displays
your network devices and device groups. Each device group name is followed by the total number of devices
in that group and any subgroups, in parentheses.
Click the tree items for more information.
Left Panel
449
Welcome to NetSight Inventory Manager Help
My Network
My Network displays all your devices, plus the system−created device groups and any user−created
device groups. For information on creating device groups, see How to Add and Remove Device
Groups.
All Devices Folder
This folder contains all the devices in the NetSight database. For information on adding devices to the
database, see How to Add and Delete Devices.
Grouped By Folder
The top−level Grouped By folder contains five system−created groups: Chassis, Contact, Device
Type, IP, and Location. When a device is added, discovered, or imported, it automatically becomes a
member of the appropriate group.
Chassis Folder
Contains subgroups for specific chassis in your network.
Contact Folder
Contains subgroups of your devices based on the system contact. Sub−groups in this folder are
automatically created based on the Contact value in the Console Properties (Device) tab. For example,
a contact defined as NOC/Rochester/Jones will automatically create a hierarchy of three sub−groups
under the Grouped By > Contact folder. The Contact sub−groups are removed when the last device
with a particular contact is deleted from the database.
Device Type Folder
Contains subgroups for the specific product families and device types in your network. The Unknown
folder contains devices that could not be correlated to a device type.
IP Folder
Contains subgroups based on the IP subnets in your network.
Location Folder
Left Panel
450
Welcome to NetSight Inventory Manager Help
Contains subgroups of your devices based on the system location. Sub−groups in this folder are
automatically created based on the Location value in the Console Properties (Device) tab. For
example, a location defined as New Hampshire/Rochester/Building 3 will automatically create a
hierarchy of three sub−groups under the Grouped By > Location folder. The Location sub−groups
are removed when the last device for a particular location is deleted from the database.
User−created Device Groups
You can add your own device groups and subgroups (displayed with yellow folders) according to
your network needs. See How to Add and Remove Device Groups for more information.
Switch Icon
This icon represents an individual switch that has been discovered, imported, or added to the NetSight
database. It appears below the All Devices folder and also below any device group of which it is a
member. See Left−Panel Icons for a table of all possible icons.
Router Icon
This icon represents an individual router that has been discovered, imported, or added to the NetSight
database. It appears below the All Devices folder and also below any device group of which it is a
member. See Left−Panel Icons for a table of all possible icons.
Firmware Mgmt Tab
The left−panel Firmware Mgmt Tab displays firmware images grouped according to product family, binary
family, and device type. Inventory Manager provides pre−defined firmware groups and automatically
organizes the firmware images stored in your firmware directory under the appropriate group when you
perform a firmware discovery or refresh. For instructions, see Firmware Discovery. Each firmware group
name is followed by the total number of images in that group and any subgroups, in parentheses.
Click the tree items for more information.
Firmware Mgmt Tab
451
Welcome to NetSight Inventory Manager Help
Device Type Folder
This folder contains pre−defined product family, binary family, and device type folders.
Firmware Groups
Inventory Manager provides pre−defined firmware groups and automatically organizes your firmware
images under the appropriate group when you perform a firmware discovery or refresh.
Unknown Folder
The Unknown folder contains firmware images that Inventory Manager could not correlate to a device
type. You can assign this firmware to firmware groups using drag and drop or the Assign Firmware
window.
All Firmware Folder
This folder contains all the firmware images discovered during a firmware discovery or refresh, or
created using the Create Firmware Record window.
Firmware Image Icon
This icon represents an actual firmware image. Images that have been designated as a reference image
display a reference icon .
Boot PROM Icon
Firmware Mgmt Tab
452
Welcome to NetSight Inventory Manager Help
This icon represents a boot PROM image that is being stored in your firmware directory. Images that
have been designated as a reference image display a reference icon .
Archive Mgmt Tab
The left−panel Archive Mgmt tab displays information about your archive operations. The information is
organized in a hierarchical tree format, with each archive operation listed by name. Under each archive are the
archive versions, listed by the date and time that the version was performed. Individual configurations that
were saved for each version are listed by the IP address of the device whose data was saved. For more
information, see How to Archive.
Click the tree items for more information.
Archives Folder
This folder contains all your archive operations.
Archive Name Folder
This is the name that you gave the archive operation when you created it. This folder contains a list of
all the archive versions that have been performed.
Archive Version Folder
This is the date and time when the archive operation was performed. Each version contains a list of all
the individual files that were saved during the archive operation.
Archive Mgmt Tab
453
Welcome to NetSight Inventory Manager Help
Configuration File Icon
This icon represents an archived device configuration file. Individual files are listed by the IP address
of the device whose configuration was saved, followed by the SNMP context, if applicable.
Capapcity Planning File Icon
This icon represents an archived capacity planning file. Individual files are listed by the IP address of
the device whose capacity planning data was saved, followed by the SNMP context, if applicable.
Both Configuration and Capacity Planning File Icon
This icon represents an archived file that includes both device configuration and capacity planning
data. Individual files are listed by the IP address of the device whose configuration and capacity
planning data was saved, followed by the SNMP context, if applicable.
Configuration Templates Tab
The left−panel Configuration Templates tab displays your configuration templates grouped according to
product family and device type. Inventory Manager provides pre−defined template groups, and automatically
assigns a template to the appropriate group when you create the template. For more information, see How to
Create and Download Configuration Templates. Each template group name is followed by the total number of
configuration templates in that group and any subgroups, in parentheses.
Click the tree items for more information.
Configuration Templates Tab
454
Welcome to NetSight Inventory Manager Help
Device Type Folder
This folder contains pre−defined product family and device type folders.
Template Groups
Inventory Manager provides pre−defined template groups and automatically organizes your templates
under the appropriate group when you create a configuration template.
Unknown Folder
The Unknown folder contains configuration templates that Inventory Manager could not correlate to a
device type. You can assign unknown templates to template groups using the Assign Configuration
Template window.
All Templates Folder
This folder contains all the configuration templates you have created.
Configuration Template Icon
This icon represents an actual configuration template.
Left−Panel Icons
The following table defines icons that can appear in the left−panel tree. A red down arrow on a device
indicates lost contact with that device. A red down arrow on a Device Group icon indicates lost contact status
for at least one device within the group. A green up arrow on a device icon indicates that contact is established
Left−Panel Icons
455
Welcome to NetSight Inventory Manager Help
with that device. A green up arrow on a Device Group icon indicates contact is established for all devices
within a group. Group icons that appear without either arrow have no members.
Icon
Definition
Icon
Definition
System−Created Groups
User−Created Groups
Switch
Router
Wireless
VPN
SNMP (Workstations)
Unknown
Firmware Image
Firmware Reference Image
Boot PROM Image
Boot PROM Reference Image
Configuration Archive
Configuration Template
Capacity Planning Archive
Configuration and Capacity Planning Archive
Left−Panel Icons
456
Right Panel
The right panel of the Inventory Manager main window displays a tab or tabs containing information about
the item selected in the left panel.
For many of the items you select in the Inventory Manager left panel, the default display in the right panel is a
Details View tab. Details View tabs provide detailed information in tabular format for the current selection in
the left panel. Often, if you right−click an item in the list, a menu of available options appears.
Use the table options and tools to find, filter, sort, print, and export information in a table and customize table
settings. You can access the Table Tools through a right−mouse click on a column heading or anywhere in the
table body, or by clicking the Table Tools
button in the upper left corner of the table (if you have the
row count column displayed). For more information, see Table Tools.
For information on Details Views and the other tabs that appear in the right panel, click on the name of the tab
in the Right−Panel Tabs section of the Inventory Manager Help Contents.
Right Panel
457
Active Status Panel
The Active Status panel at the bottom of the Inventory Manager main window presents a chronological
summary of operations that Inventory Manager has performed, including archive saves and restores,
firmware/boot PROM upgrades, and reset device operations. As operations take place, the Active Status is
updated with specific information about each event, and the status (results) of the operation. The Active Status
panel lists operations performed by all Inventory Manager clients connected to the server.
The panel presents the status in two different views: Summary and Details. Use the buttons at the top of the
panel to select the desired view. The Summary view lists the operations that have been performed, while the
Details view lists the individual devices the operations have been performed on. If you select an operation in
the Summary view then switch to the Details view, the corresponding device entries are highlighted. For even
more detailed information about each entry, select the entry, then right−click and select View from the menu
to open a Properties window.
Entries remain in the Active Status panel until you restart the application. If the Active Status panel reaches a
total of 1000 entries, the 500 oldest entries will be automatically purged. You can delete entries by
right−clicking and selecting Purge from the menu. Deleting an entry causes that entry and all older entries to
be purged. You cannot delete entries from the middle of the table because that would disrupt the sequence of
events.
To stop an operation, select the operation entry, then right−click and select Abort from the menu. Any part of
the operation that is currently in progress will complete before the operation is terminated.
Information on the following Active Status views:
• Summary
• Details
• Right−Click Menu Options
Summary View
The Summary view presents a chronological summary of operations that Inventory Manager has performed,
including archive saves and restores, firmware upgrades, and reset device operations. Select the Summary
option at the top of the panel to display this view.
Use the table options and tools to find, filter, sort, print, and export information in a table and customize table
settings. You can access the Table Tools through a right−mouse click on a column heading or anywhere in the
table body, or by clicking the Table Tools
button in the upper left corner of the table (if you have the
row count column displayed). For more information, see Table Tools.
Click the graphic for more information.
Active Status Panel
458
Welcome to NetSight Inventory Manager Help
Alert
A yellow alert icon in this column signifies:
•
−− the operation failed for one or more of the devices that the operation is responsible for.
•
−− for a successful configuration save operation, the alert signifies that there is a
difference between one of the saved configuration files and the previous file saved for that
device.
To acknowledge an alert and place a checkmark on the alert icon, right−click the icon and select
Acknowledge Alert from the menu.
Schedule Name
The name of the operation. For certain operations such as archive saves, this is the name you assigned
the operation when you created it.
Operation
The type of operation performed, such as Archive Save or Device Discovery.
Target
What the operation is acting on.
Status
The status of the operation: Success or Failure. If the operation was performed on multiple devices,
the status will be listed as Success only if it was successful on all devices. If it fails on any device, the
status will be listed as Failure. Select the entry, then right−click and select View to open the
Properties window and see which device(s) failed.
% Progress
A progress bar showing the percent completed of the operation.
Date
The date and time the operation was performed.
Message
A message relating to the status of the operation.
Details View
The Details view presents a chronological listing of each device on which an operation was performed and the
status (results) of the operation for that device. Select the Details option at the top of the panel to display this
view.
Details View
459
Welcome to NetSight Inventory Manager Help
Use the table options and tools to find, filter, sort, print, and export information in a table and customize table
settings. You can access the Table Tools through a right−mouse click on a column heading or anywhere in the
table body, or by clicking the Table Tools
button in the upper left corner of the table (if you have the
row count column displayed). For more information, see Table Tools.
Click the graphic for more information.
Alert
A yellow alert icon in this column signifies:
•
−− the operation failed for this device.
•
−− for a successful configuration save operation, the alert signifies that there is a
difference between this saved configuration file and the previous file saved for this device.
To acknowledge an alert and place a checkmark on the alert icon, right−click the icon and select
Acknowledge Alert from the menu.
Schedule Name
The name of the operation. For certain operations such as archive saves, this is the name you assigned
the operation when you created it.
Device IP
The IP address of the device.
Operation
The type of operation performed, such as Archive Save or Device Discovery.
Status
The status of the operation for that particular device: Success or Failure. Select the entry, then
right−click and select View to open the Properties window for more information.
% Progress
A progress bar showing the percent completed of the operation.
Bytes Trans.
The number of bytes transferred during the operation.
File name
For operations involving a file (such as a configuration file or firmware image file), the path and
filename of the file.
Details View
460
Welcome to NetSight Inventory Manager Help
Date
The date and time the operation was performed on that device.
Message
A message relating to the status of the operation.
Right−click Menu Options
Select an entry in either the Summary or Details view and then right−click to see a menu of standard table
options plus some active status options. The table tools help you find, filter, sort, print, and export information
in the table, and customize table settings. For more information, see Table Tools. The active status options
include:
• View − Opens the Properties window which displays additional details on the entry.
• Purge − Deletes the selected entry and all older entries. You cannot delete entries from the middle of
the table because that would disrupt the sequence of events.
• Acknowledge Alert − Places a checkmark on the alert icon signifying that the alert has been
acknowledged.
• Abort − Stops an operation. Any part of the operation that is currently in progress will complete
before the operation is terminated. This option is only available in the Summary view.
Details View
461
Event Log
The Event Log at the bottom of the Inventory Manager main window displays error and informational
messages about Inventory Manager system operations. The log displays the most recent 10,000 entries. The
current log file is automatically archived when its size reaches 5 megabytes and a new log file is opened. Use
the Event Logs view in the Options window to configure the number of event logs to save and the number of
entries to display in the table. You must be assigned the appropriate user capability to view the Event Log.
Click the graphic for more information.
Acknowledge:
This checkbox lets you acknowledge an event and also hide items that have been acknowledged.
Click the checkbox to acknowledge the item and then click the Show Acknowledged Events button
to hide or show the checked items.
Severity
The event's severity.
Category
The category of event.
Timestamp
The date and time when the event occurred.
Source
The IP address of the host that was the source of the event.
Client
The name of the client host machine that triggered the event.
User
The name of the user that triggered the event.
Type
The type of information: Event.
Event
The type of event.
Event Log
462
Welcome to NetSight Inventory Manager Help
Information
Information about the event.
Right−click Menu Options
The event log right−click menu lets you Acknowledge and Unacknowledge events. It also provides options
and a standard set of table tools to help you find, filter, sort, print, and export information in a table and
customize table settings. You can access the menu options through a right−mouse click on a column heading
or anywhere in the table body, or by clicking the Table Tools
button in the upper left corner of the
table (if you have the row count column displayed). For more information, see Table Tools.
Buttons
Show/Hide Acknowledged Events
This button hides or shows items in the table that have been acknowledged by a check in the
Acknowledge column.
Refresh
Refreshes the log.
Clear Current View
Clears entries from the current table.
Event Log
463
Status Bar
The status bar at the bottom of the window displays status information on the left side. A progress bar on the
right side shows the percentage of completion for certain lengthy operations. In addition, status bar icons
serve as reminders of tasks that need to be performed.
Click the graphic for more information.
Event Log Icon
An Event Log icon is displayed when a new Warning or Error message has been logged to the Event
Log. Double−clicking the icon will display the Event Log in the bottom panel, provided you have the
appropriate user capability to view the Event Log.
Reset Device Icon
A Reset Device icon is displayed when there are devices that have received new firmware images and
need to be reset. Double−click the icon to open the Devices Need Reset window. From this window
you can launch the Reset Device Wizard for those devices or simply clear the reset flags without
resetting the devices.
Status Bar
464
Open Configuration Window
This window is accessed from the Change button in the Configuration File Viewer, and lets you select a new
configuration file to view.
Click the graphic for more information.
Select a Configuration
Expand the folders as necessary and select the configuration file you wish to view.
Buttons
OK
Opens the Configuration File Viewer with the selected file displayed.
Close
Closes the window.
Help
Displays this Help topic.
Open Configuration Window
465
Options Window
The Options window allows you to set options for NetSight functions on a suite−wide and per−application
basis. The Options window has a right−panel view that changes depending on what you have selected in the
left−panel tree. Each view allows you to set different options. You can access the Options window using
Tools > Options in the menu bar.
Information on the following options:
• Suite Options
• Client/Server SNMP Redirection
• Data Display
• Date/Time Format
• Device Display Name
• Event Logs
• Services for NetSight Server
• SMTP E−Mail Server
• Status Polling
• Web Update
• Inventory Manager Options
• Alternate Firmware Servers
• File Transfer Settings
• FTP Transfer Settings
• TFTP Transfer Settings
• Services for NetSight Client
Options Window
466
Options Window
Inventory Manager Options
These options apply only to the NetSight Inventory Manager application. In the Options window (Tools >
Options), the right−panel view changes depending on what you have selected in the left−panel tree. Expand
the Inventory Manager folder to view all the different options you can set.
Information on the following Inventory Manager options:
• Alternate Firmware Servers
• File Transfer Settings
• FTP Transfer Settings
• TFTP Transfer Settings
• Services for NetSight Client
Alternate Firmware Servers
Selecting Alternate Firmware Servers in the left panel of the Options window provides the following view
where you can configure alternate firmware download servers. Alternate servers allow you to perform remote
firmware downloads without having to reconfigure the default NetSight TFTP server settings. By performing
firmware downloads via a remote server, you can avoid transferring traffic over a WAN. Alternate servers can
be configured to use either the TFTP or FTP protocol. These settings apply to all users on all clients.
NOTE: After you have configured your alternate servers, use the Create Firmware Record
window to create new firmware entries and associate them with the alternate servers.
Then, use the Set Firmware Server window to specify an alternate firmware download
server to be used by a device group or by individual devices.
Click areas in the window for more information.
Options WindowInventory Manager Options
467
Welcome to NetSight Inventory Manager Help
Alternate Firmware Download Servers
Lists the configured alternate servers. Use the Add Server button to add a server to the list.
Add Server
Opens the Add Alternate Firmware Server window where you can configure an alternate firmware
download server.
Edit Server
Opens the Edit Alternate Firmware Server window where you can edit certain alternate server
properties.
Delete Server
Deletes the selected alternate server from the list.
File Transfer Settings
These options specify the FTP or TFTP file transfer settings to be used when using the Upgrade and Archive
Wizards.
Information on the following File Transfer Settings options:
• FTP Transfer Settings
• TFTP Transfer Settings
File Transfer Settings
468
Welcome to NetSight Inventory Manager Help
FTP Transfer Settings
Selecting FTP Transfer Settings in the left panel of the Options window provides the following view where
you can set FTP server properties and login information. Use this view to specify the FTP server IP address,
set paths to the root and firmware directories, and set login information. The FTP server needs access to these
directories in order to perform archive operations or firmware/boot PROM upgrades. These settings apply to
all users on all clients.
Click areas in the window for more information.
FTP Server Properties
Use the NetSight Server's IP
Select this checkbox if your FTP server is on the same machine as the NetSight Server.
FTP Server IP
First deselect the "Use the NetSight Server's IP" checkbox, then enter the IP address of the device
where the FTP server resides.
Port
Specify the port number your FTP server is configured to run on.
Root Directory Path
The root directory is the base directory to which the FTP server is allowed access. The FTP server
FTP Transfer Settings
469
Welcome to NetSight Inventory Manager Help
will be allowed to create files to or read files from this directory and any of its subdirectories. The
default root directory is the tftpboot directory that Inventory Manager automatically creates when it is
installed. If you would like to use an alternate root directory, enter a path to that directory in this field,
or use the Browse button to navigate to the directory.
NOTE: Keep in mind the following requirements when setting the path
to your root directory:
• If your FTP server is configured with a FTP root
directory, it must match the root directory entered here.
• If your FTP server is not configured with a FTP root
directory, change the FTP root directory here to the
root of the drive (e.g. C:\ or D:\).
• If you are using an FTP server on a remote system,
use the Universal Naming Convention (UNC) when
specifying the root directory path. The UNC
convention uses two slashes // (UNIX or Linux
systems) or backslashes \\ (Windows systems) to
indicate the name of the system, and one slash or
backslash to indicate the path within the computer. For
example, on a Windows system, instead of using
h:\ (where h:\ is mapped to the tftpboot directory
on the remote drive)
use
\\yourservername\tftpboot\
Firmware Directory Path
The default firmware directory is tftpboot\firmware\images. If you would like to use an alternate
firmware directory, enter a path to that directory in this field, or use the Browse button to navigate to
the directory. The firmware directory must be a subdirectory of the root directory. (The firmware
images stored in the firmware directory are added to the left−panel Firmware Mgmt tree when you
perform a firmware discovery.) If you are using an FTP server on a remote system, be sure to use the
UNC standard described in the Note above when specifying the path.
Login Information
Anonymous
Select this checkbox if your FTP server is configured to accept Anonymous logins. Inventory
Manager will automatically fill in the username and password fields.
Username/Password
Enter your username and password to access the FTP server. If you select the Hide Password
checkbox, your password will be replaced with asterisks when it is typed in.
TFTP Transfer Settings
Selecting TFTP Transfer Settings in the left panel of the Options window provides the following view where
you can set TFTP server properties. This view displays the TFTP server IP address and root directory path
specified in the Services for NetSight Server Options view and lets you set the firmware directory path. These
settings apply to all users on all clients.
Click areas in the window for more information
TFTP Transfer Settings
470
Welcome to NetSight Inventory Manager Help
Settings specified...
These are the TFTP settings specified in the Services for NetSight Server Options view.
Firmware Directory Path
The default firmware directory is tftpboot\firmware\images. If you would like to use an alternate
firmware directory, enter a path to that directory in this field, or use the Browse button to navigate to
the directory. The firmware directory must be a subdirectory of the root directory. (The firmware
images stored in the firmware directory are added to the left−panel Firmware Mgmt tree when you
perform a firmware discovery.)
NOTE: If you are using a TFTP server on a remote system, use the Universal Naming
Convention (UNC) when specifying the firmware directory path. The UNC convention
uses two slashes // (UNIX or Linux systems) or backslashes \\ (Windows systems) to
indicate the name of the system, and one slash or backslash to indicate the path within the
computer. For example, on a Windows system, instead of using
h:\ (where h:\ is mapped to the firmware directory on the remote drive)
use
\\yourservername\tftpboot\firmware\images\
Services for NetSight Client
This view is only available for remote Inventory Manager clients. It lets you configure the NetSight TFTP and
BOOTP services that are installed on the client workstation as part of the Client−Only configuration. The
client−side NetSight TFTP service can be used to provide alternate firmware download capability for remote
devices. The view also lets you specify whether to automatically launch the NetSight TFTP and BOOTP
Services for NetSight Client
471
Welcome to NetSight Inventory Manager Help
services at either reboot or login (depending on the service and operating system). These settings apply to all
users on this client.
NOTE: Before you can use the client−side NetSight TFTP server for firmware downloads, you must
configure the server in the Alternate Firmware Servers view in the Options windows. For
complete instructions, see How to Set Up Alternate Firmware Download Servers.
Click areas in the window for more information.
Automatic Launch
Select the checkbox for each service that you want to automatically launch at login:
• NetSight BOOTP (Windows only) − Automatically launch the service at login. This service
must be running to provide BOOTP services to network devices. Linux and Solaris systems
provide their own BOOTP services.
• NetSight TFTP − Automatically launch the service at either reboot or login (depending on
the operating system). The TFTP service must be running to perform firmware downloads.
On Linux and Solaris systems, the TFTP service is started when the workstation reboots. On
Windows, the TFTP service is started when you log in to the workstation. You must specify a
TFTP root directory in the section below.
TFTP Settings
Use this section to configure the NetSight TFTP service that is installed on the client workstation as part of
the Client−Only configuration. The client−side NetSight TFTP service can be used to provide alternate
firmware download capability for remote devices. Before you can use the client−side NetSight TFTP server
Services for NetSight Client
472
Welcome to NetSight Inventory Manager Help
for firmware downloads, you must configure the server in the Alternate Firmware Servers view in the Options
windows. For complete instructions, see How to Set Up Alternate Firmware Download Servers.
TFTP Root Directory
Specify a TFTP root directory here. The root directory is the base directory to which the TFTP server
is allowed access. The TFTP server will be allowed to create files to or read files from this directory
and any of its subdirectories. Use the default root directory, or if you would like to use an alternate
root directory, enter a path to that directory in this field or use the Browse button to navigate to the
directory. Changing the TFTP root directory may require restarting the TFTP server.
TFTP Server IP Address
If the client workstation is configured with multiple IP addresses, enter the IP address for the TFTP
service here.
Buttons
Apply
Sets any changes made in the current options view and leaves the window open.
Restore Defaults
Restores the default option values to the fields in the currently selected Options view.
OK
Sets any changes made in the current options view and closes the window.
Cancel
Cancels any changes you have made in the current options view and closes the window.
Services for NetSight Client
473
Properties Window
The Properties window provides detailed information about a specific entry in the Active Status panel at the
bottom of the Inventory Manager window. Access the Properties window from the Active Status panel (either
the Summary View or the Details View), by double−clicking an entry, or by selecting an entry, then
right−clicking and selecting View from the menu.
Click the graphic for more information.
General Area
Name
The name of the operation.
Operation
The type of operation performed, plus the name of the device group or the IP address of the single
device on which the operation was performed.
Start time
The date and time the operation was started.
Properties Window
474
Welcome to NetSight Inventory Manager Help
End Time
The date and time the operation was completed.
Status
The status of the operation.
File name
The name and path to the file used or created in the operation (if applicable). For example, in an
Archive Save operation, this field will display the name and path to the configuration file created as a
result of the operation. If the operation was performed on a device group, this field will display N/A.
User
The user ID of the person who was running Inventory Manager when the operation was performed.
Message
Messages regarding the status of the operation.
Details
Additional details about the outcome of the operation that was performed.
Devices Area
This table displays a list of the devices included in the operation, and a status and message pertaining to each
individual device. You can select a device and click View to open an additional Properties window
specifically for that device. This area is only displayed when the Properties window is launched from the
Active Status Summary View.
Use the table options and tools to find, filter, sort, print, and export information in a table and customize table
settings. You can access the Table Tools through a right−mouse click on a column heading or anywhere in the
table body, or by clicking the Table Tools
button in the upper left corner of the table (if you have the
row count column displayed). For more information, see Table Tools.
Alert
A yellow alert icon in this column signifies:
•
−− the operation failed for this device.
•
−− for a successful configuration save operation, the alert signifies that there is a
difference between this saved configuration file and the previous file saved for this device.
IP Address
The device's IP address. Note that chassis that support Distributed Forwarding Engines (DFEs), such
as the Matrix N−Series, display a single management IP even though there may be multiple DFE
modules in the chassis.
Status
The status of the operation, Success or Failure, for that particular device.
Message
Messages regarding the outcome of the operation for that particular device.
Properties Window
475
Welcome to NetSight Inventory Manager Help
View Button
Select a device and click View to open a secondary Properties window that displays general
information for a particular device. This button is only available in a Properties window that includes
the Devices Area (which is only displayed when the Properties window is launched from the Active
Status Summary View.)
Properties Window
476
Push Local Firmware to Server Window
The Push Local Firmware to Server window gives a remote client the ability to send a local firmware or boot
PROM image to the NetSight Server. This allows a remote client to download a firmware image from the
Enterasys Networks download library website, and then push the firmware to the server where it can be used
in Inventory Manager operations such as firmware and boot PROM upgrades.
To access this window, select Tools > Push Local Firmware to Server. The Select Local Firmware File
window opens, where you can navigate to the file you want to send. Select the file and click Open. The Push
Local Firmware to Server window opens.
Click the graphic for more information.
Send this file to the Server
The path to the local file you have selected to send. Use the Browse button to select another file, if
desired.
Server
The name of the server the client is connected to.
Server Path
The path to the server's TFTP or FTP firmware directory, depending on what option you have selected
below. You can extend the path to a different folder in the directory, if desired.
File Name
The name of the firmware or boot PROM file being pushed to the server.
TFTP/FTP Firmware Directory
Select whether you want to store the file in the FTP or TFTP firmware directory on the server.
Refresh Firmware
Select this checkbox if you want to perform a firmware discovery following the operation, and update
the firmware listed in your Firmware Mgmt tab.
Buttons
Send
Push Local Firmware to Server Window
477
Welcome to NetSight Inventory Manager Help
Sends the image to the server and closes the window.
Browse
Opens the Select Local Firmware File window where you can select another file to send.
Push Local Firmware to Server Window
478
Reset Device Wizard
Use the Reset Device Wizard to reset a single device, multiple devices, or even multiple device groups. The
Reset Device Wizard allows you to reset devices that support Timed Reset as well as those devices that do
not. Timed Reset lets you configure your reset operation with a time delay, so that the actual device resets
take place at a later time.
To access the wizard, select Tools > Wizards > Reset Wizard from the menu bar or click
on the
toolbar.
Device Selection Window
Use this window to select the devices to include in the reset operation.
NOTE: If you have multiple tree nodes representing the same device but with varying SNMP contexts,
keep in mind that not all device contexts will provide access to the MIBs required to perform the
operation. When selecting your devices, make sure that any device with SNMP context has access
to the required MIBs, or select the device with default context (switch mode).
Click the graphic for more information.
Select devices to reset
This panel displays your current devices as they are listed in the left−panel Network Elements tab. Expand the
folders and select the single device or device group, or multiple devices or device groups (using the Control or
Shift keys) that you want to reset. Click the Add button to add the devices to the Selected Devices table.
Reset Device Wizard
479
Welcome to NetSight Inventory Manager Help
TIP: If you open the Reset Device Wizard from a device or device group in the left−panel
Network Elements tab, the selected device(s) will be automatically displayed in the
Selected Devices table.
Selected Devices
Lists the devices selected for the reset operation. Devices that do not support the reset operation or have never
been contacted, are not listed. If you want to remove a device from the table, select the device and click
Remove.
IP Address
The device's IP address. Note that chassis that support Distributed Forwarding Engines (DFEs), such
as the Matrix N−Series, display a single management IP even though there may be multiple DFE
modules in the chassis.
Device Type
The device's model number or hardware type.
Firmware Version
The current firmware version installed in the device.
Firmware Download
A indicates the device supports the ability to download firmware using the Firmware Upgrade
Wizard.
Boot PROM Version
The current version of Boot PROM installed in the device.
Boot PROM Download
A indicates the device supports the ability to download boot PROM images using the Boot PROM
Upgrade Wizard.
Add Button
Select a single device or device group, or multiple devices or device groups, and click Add to add
them to the Selected Devices table.
Remove Button
To remove a device from the Selected Devices table, select the device and click Remove.
Reset Devices: Timed Reset Supported Window
Use this window to reset those devices that support Timed Reset. Timed Reset gives you the flexibility to set
up your reset operation with a time delay, so that the actual device resets take place at a later time. This can be
useful when trying to schedule resets for a time when the network is least busy.
Click the graphic for more information.
Reset Devices: Timed Reset Supported Window
480
Welcome to NetSight Inventory Manager Help
Show devices not supporting timed reset
This window lists those devices that support Timed Reset. Select this checkbox to include devices that
do not support timed reset. Devices that do not support timed reset cannot be reset from this window;
proceed to the next window to reset those devices.
Device List Table
A list of the devices you have selected for your reset operation. Once the reset operation has started,
you must click Refresh to update the device information in the table.
• Selected − Use the checkboxes in this column to select or deselect devices to be reset.
Devices that do not support timed reset cannot be selected.
• IP Address − The device's IP address. Note that chassis that support Distributed Forwarding
Engines (DFEs), such as the Matrix N−Series, display a single management IP even though
there may be multiple DFE modules in the chassis.
• Firmware Version − The current firmware version installed in the device.
• Device Status − The device's connection status (Contact or No Contact) and, therefore, its
ability to respond to SNMP requests.
• Reset Request Status − The status of the reset operation: Initial (the operation has not
started), Success (the operation succeeded), Failure (the operation failed).
• Message − A message relating to the status of the operation.
TIP: Use the table options and tools to find, filter, sort, print, and export information in a table
and customize table settings. You can access the Table Tools through a right−mouse click on
a column heading or anywhere in the table body, or by clicking the Table Tools
button in the upper left corner of the table (if you have the row count column
displayed). For more information, see Table Tools.
Reset Delay
Reset Devices: Timed Reset Supported Window
481
Welcome to NetSight Inventory Manager Help
Enter the amount of time (in seconds) until the device resets after the reset operation begins. For
example, if you start the reset operation at 4:00 pm with a 7 hour reset delay (420 seconds), the
device(s) will reset at 11:00 pm. This allows you to schedule your resets for a time when the network
is least busy.
Reset Type
Select the type of reset: Warm boot (restarts the device) or Cold boot (same as turning device power
off and on).
Elapsed Time
The amount of time in minutes:seconds since the reset operation started.
Start Button
Starts the timed resets. Resets occur simultaneously. Once the reset operation has started, you must
click Refresh to update the device information in the table.
Refresh Button
Once the reset operation has started, use the Refresh button to update the device information in the
table.
Reset Devices: Timed Reset Not Supported Window
Use this window to reset those devices that do not support Timed Reset. Devices will be reset one at a time,
waiting until a device is fully booted before beginning the next device.
Click the graphic for more information.
Reset Devices: Timed Reset Not Supported Window
482
Welcome to NetSight Inventory Manager Help
Device List Table
Lists those devices that do not support timed reset. Once the reset operation has started, you must
click Refresh to update the device information in the table.
• Selected − Use the checkboxes in this column to select or deselect devices to be reset.
• IP Address − The device's IP address. Note that chassis that support Distributed Forwarding
Engines (DFEs), such as the Matrix N−Series, display a single management IP even though
there may be multiple DFE modules in the chassis.
• Firmware Version − Shows the current firmware version installed in the device.
• Device Status − The device's connection status (Contact or No Contact) and, therefore, its
ability to respond to SNMP requests.
• Reset Request Status − The status of the reset operation.
• Message − A message relating to the status of the operation.
TIP: Use the table options and tools to find, filter, sort, print, and export information in a table
and customize table settings. You can access the Table Tools through a right−mouse click on
a column heading or anywhere in the table body, or by clicking the Table Tools
button in the upper left corner of the table (if you have the row count column
displayed). For more information, see Table Tools.
Reset Type
Select the type of reset: Warm boot (restarts the device) or Cold boot (same as turning device power
off and on).
Elapsed Time
The amount of time in minutes:seconds since the reset operation started.
Start Button
Initiates the reset operation. Resets occur one at a time, continuing only after a device is fully booted.
After the reset operation is completed, you can click Refresh to update the device information in the
table.
Refresh Button
Once the reset operation has completed, use the Refresh button to update the device information in
the table.
Reset Devices: Timed Reset Not Supported Window
483
Restore Database Window
Use the Restore Database window to restore the initial database or restore a saved database. Both functions
will cause all current client connections and operations in progress to be terminated. You can access this
window by clicking the Restore button in the Database tab of the Server Information window.
Click the graphic for more information.
Restore Initial Database
Restoring an initial database removes all data elements from the database and populates the NetSight
Administrator authorization group with the name of the logged−in user. You must restart both the
NetSight Server and the client following an initialize database operation.
Restore Saved Database
Specify the database you wish to restore or use the Browse button to navigate to the database. If the
server is remote, you only have access to databases in the default database backup directory.
Buttons
Restore
Starts the restore operation.
Restore Database Window
484
Restore Wizard
Use the Restore Wizard to restore saved (archived) device configuration files to one or more devices. Saved
configurations are listed in the left−panel Archive Mgmt tab under the appropriate archive and version. Each
configuration displays an icon that identifies the type of data that was saved: device configuration data,
capacity planning data,
both device configuration and capacity planning data. Only configurations that
include device configuration data (
and
) are available to be restored.
A configuration can only be restored to a device with the same IP address. In other words, the device you are
restoring to must have the same IP address as the device the configuration was originally saved from. You can
restore configurations to a single device or multiple devices. You must have a TFTP or FTP server running to
restore a configuration. For more information, see TFTP Server Setup or FTP Server Setup.
To access the wizard, select Tools > Wizards > Restore Wizard from the menu bar or click
on
the toolbar.
Archive Version Selection Window
Use this window to select an archive version or single configuration to restore. If you select an archive
version, you can use the Remove button to remove any individual configurations included in the archive
version that you do not wish to restore.
Click the graphic for more information.
Restore Wizard
485
Welcome to NetSight Inventory Manager Help
Archives
This panel displays your current archives just as they are listed in the left−panel Archive Mgmt tab. Below
each archive name are the archive versions, displayed by the date and time the version was performed. Under
the versions are the individual configurations, listed by IP address of the device whose configuration was
saved. Each configuration displays an icon that identifies the type of data that was saved: device
configuration data,
capacity planning data,
both device configuration and capacity planning data. Only
configurations that include device configuration data (
and
) are available to be restored.
Expand the folders under the Archives tree and select the archive version or configuration you want to restore.
Click the Add button to add the configurations to the Configurations to Restore table.
TIPS: −− If you open the Restore Wizard from an archive version or configuration in the left−panel
Archive Mgmt tab, the selected configuration(s) will be automatically displayed under
Configurations to Restore.
−− Check the FW Match column to see if the current firmware version on the device matches the
firmware version that was on the device at the time of the archive.
Configurations to Restore
Displays the configurations you have selected to restore. Select a configuration and use the Remove button to
remove any individual configurations you do not wish to restore.
Configuration IP
The IP address of the device whose configuration was saved.
Restore Wizard
486
Welcome to NetSight Inventory Manager Help
Archive
The name of the archive operation that saved the configuration.
Version Date
The date and time that the archive operation was performed.
FW Match
A indicates that the current firmware version installed in the device matches the firmware version
installed in the device at the time of the configuration save.
Config FW
The firmware version installed in the device at the time of the configuration save.
Device FW
The current firmware version installed in the device.
Add Button
In the Archives tree, select the archive version or configuration you want to restore, and click Add to
add it to the Configurations to Restore table.
Remove Button
Select a configuration in the Configurations to Restore table, and click Remove to remove it from the
table.
Restore Configurations Window
Use this window to configure restore parameters, initiate the restore operation, and monitor restore progress.
Devices that require a reset will be reset automatically after the restore is complete.
Click the graphic for more information.
Restore Configurations Window
487
Welcome to NetSight Inventory Manager Help
Show all devices/Show only incomplete and failed
Once the restore operation starts, the device list table updates with status information for each device.
An alert icon
will appear in the Alert column of the table if a restore operation fails for a specific
device. You can use these radio buttons to show all devices or show only those devices whose restore
operations are incomplete or have failed.
Device List Table
A list of the devices you have selected for your restore operation. Once the restore is started, this table
updates with status information for the restore operation:
• Alert − an alert icon
will appear in the Alert column if a restore operation fails for a
specific device.
• IP Address − The device's IP address. Note that chassis that support Distributed Forwarding
Engines (DFEs), such as the Matrix N−Series, display a single management IP even though
there may be multiple DFE modules in the chassis.
• Configuration − The name of the configuration file being restored.
• Status − The status of the operation for that particular device: Success or Failure.
• Operation − The type of operation performed: Configuration Restore.
• % Progress − A progress bar showing the percent completed of the operation.
• Bytes Trans. − The number of bytes transferred during the operation.
• Message − A message relating to the status of the operation.
TIP: Use the table options and tools to find, filter, sort, print, and export information in a table
and customize table settings. You can access the Table Tools through a right−mouse click on
a column heading or anywhere in the table body, or by clicking the Table Tools
Restore Configurations Window
488
Welcome to NetSight Inventory Manager Help
button in the upper left corner of the table (if you have the row count column
displayed). For more information, see Table Tools.
Status Summary
Once the restore is started, this area updates with status information for the restore operation.
Restore Type
The restore will be performed in parallel (simultaneously) on the number of devices specified in the
Groups of field. By default, the restores will occur in sequential order (Groups of: 1). This is to
protect against possible isolation of other devices that are on the restore list.
CAUTION: Because some devices automatically reset following a restore operation,
performing a Restore Type greater than 1 may isolate other devices in the
restore list, causing their restores to fail. It is recommended that you leave
the Groups of value at 1 (perform the restore serially,) unless you know it
is safe to have the selected network devices reset simultaneously.
Start Button
Initiates the restore operation. The table at the top of the window updates with status information, as
will the status area in the bottom left of the window.
Restore Configurations Window
489
Scheduled Events Window
Inventory Manager lets you schedule firmware upgrades, configuration archive operations, and capacity
planning reports. You can use the Scheduled Events window to view any scheduled operations for all
Inventory Manager clients connected to the server, and disable them if desired. Scheduled events are listed in
a table, starting with the next scheduled event. You must be assigned the appropriate user capability to view
this window and perform the disable function.
Use the table options and tools to find, filter, sort, print, and export information in a table and customize table
settings. You can access the Table Tools through a right−mouse click on a column heading or anywhere in the
table body, or by clicking the Table Tools
button in the upper left corner of the table (if you have the
row count column displayed). For more information, see Table Tools.
To access this window, select Tools > Scheduled Events.
Click the graphic for more information.
Entry Name
The name of the scheduled event.
Operation
A description of the scheduled event.
Start Time
The next scheduled time the operation will be performed.
Frequency
The frequency the scheduled event is performed.
Buttons
Disable
Scheduled Events Window
490
Welcome to NetSight Inventory Manager Help
Disables the selected scheduled event so that it will not be performed. The disable action behaves
differently depending on the type of scheduled event you are disabling:
• Firmware Upgrade − the scheduled upgrade is cancelled.
• Archive (Configuration Save) − The scheduled archive's frequency is set to "Never". You can
reschedule the archive in the Archive General tab.
• Capacity Planning Report − The scheduled report's frequency is set to "Never". You can
reschedule the report using the Capacity Planning tool.
You can also disable an event by selecting it and using the right−click menu.
Scheduled Events Window
491
Schedule Report Window
Use the Schedule Report window to configure scheduling information and e−mail notification settings for a
Capacity Planning report. You can access the window from the Capacity Planning tool while you are creating
a report. Select the schedule report checkbox when you save the report, or use the Schedule button in the
Select Report window to schedule a report that has already been saved.
NOTE: Scheduling Ports Reports. Depending on the size of your network and the number of
ports on the devices in your network, a ports report may generate results that are too large
to be delivered via e−mail. In this case, you should consider creating multiple reports
based on subnet or device type. This is primarily a concern when selecting the Port
Details view for your report results.
Click the graphic for more information.
Name
The name of the report being scheduled.
Schedule
Frequency
Use the drop−down list to select the frequency with which you want the report to be run: Never, Now,
Once, Daily, Weekly, or On Server Startup. The Never option lets you create a schedule for a report
without actually running the report. The Now option will immediately run the report.
Schedule Report Window
492
Welcome to NetSight Inventory Manager Help
Select Starting Day
Use the drop−down list to select the month you want the schedule to start. A calendar corresponding
to the selected month is displayed. Select the desired starting day by clicking on the calendar. You can
use the arrows on either side of the drop−down list to change the month, and change the year by
entering a new year in the text field.
Start Time
Set the starting time for the schedule and select AM or PM. (This field is grayed out if you have
selected the Never or Now frequency.)
Notification Settings
NOTE: For the e−mail notification feature to work correctly, you must set your SMTP Email
Server options in addition to these e−mail notification settings here.
E−Mail Recipient List
Use the drop−down list to select the e−mail recipient list for the report. Use the Edit Mail List button
to open the E−Mail Configuration window and create your e−mail lists.
Report Format
Use the drop−down list to select the format for the report results: Comma Separated Values file (.csv),
HTML file, or Delimited Text file (.txt). If you select Delimited Text, use the Delimited Field Options
section to select your field delimiter and text delineation specifications.
Report Options
Use this section to select the report results you want included in the e−mail notification.
Buttons
Save
Saves the scheduling information. The saved report will be listed in the Select Report window of the
Capacity Planning tool with a schedule icon
to indicate that it has been scheduled. You can
remove a schedule from a saved report by right−clicking on the report and selecting Delete >
Schedule.
Close
Closes the window without saving scheduling information.
Schedule Report Window
493
Select Archive Versions to Compare Window
This window lets you select two archive versions or configurations to compare in the Compare Archives
window. It displays two Archive trees (identical to the Archive tree in your Archive Mgmt tab). Use these
trees to select the two archive versions or configuration files you wish to compare. You can compare two
individual configurations for the same device, or you can compare two different archive versions (although
the versions should share common devices).
For information on how to access the window, see How to Compare Archives.
Click the graphic for more information.
Selection 1
Expand the folders as necessary to select the first version or configuration you wish to compare.
Selection 2
Expand the folders as necessary to select the second version or configuration you wish to compare.
Buttons
Close
Closes the window.
Compare
Performs the comparison and opens the Compare Archives window where you can view the
comparison results.
Select Archive Versions to Compare Window
494
Welcome to NetSight Inventory Manager Help
Select Archive Versions to Compare Window
495
Select Configurations Window
This window lets you select two configuration files to compare in the Compare Configuration Files Window.
To access the window, select a configuration that includes device configuration data (
or
) in the
Archives Mgmt tab tree or Details View, and select Tools > Compare Configuration Files. You can also
right−click on a file and select Compare Configuration Files from the menu.
Click the graphic for more information.
Selection 1
Expand the folders as necessary to select the configuration file you wish to compare. This file will be
displayed in the left panel of the Compare Configuration Files window.
Selection 2
Expand the folders as necessary to select the second configuration file you wish to compare. This file
will be displayed in the right panel of the Compare Configuration Files window.
Buttons
Close
Closes the window.
Compare
Performs the configuration comparison and opens the Compare Configuration Files window where
you can view the comparison results.
Help
Select Configurations Window
496
Welcome to NetSight Inventory Manager Help
Displays this Help topic.
Select Configurations Window
497
Select Devices Window
This window lets you edit the device(s) an archive will be performed on. The current archive members are
listed when you open the window. Access the window from the Edit Devices button in the archive's General
tab.
Click the graphic for more information.
Select Devices
Expand the folders and select a single device, multiple devices (using the Control or Shift keys) or a
single device group. Click Add. The devices will be listed under Archive Members.
Archive Members
Lists the device(s) or device group the archive will be performed on. To remove a member from the
list, select the member and click Remove.
Buttons
Add
Adds the selected device(s) or device group to the Archive Members list.
Remove
Removes the selected device(s) or device group from the Archive Members list.
Select Devices Window
498
Welcome to NetSight Inventory Manager Help
OK
Changes the archive members according to your selections and displays the device(s) in the Archive
General tab.
Cancel
Closes the window without changing the archive members.
Select Devices Window
499
Server Information
Window
The Server Information window lets you view and configure certain NetSight Server functions, including
management of client connections, database backup and restore, locks, and licenses. It also provides access to
the server log and server statistics. To access this window, select Tools > Server Information from the menu
bar. You must be assigned the appropriate user capabilities to access and use this window.
Information on the following tabs:
• Client Connections
• Database
• Locks
• Server Log
• License
Client Connections Tab
The Client Connections tab provides information that lets you view and manage current client connections to
this server, and also view a history of client connections.
Click the graphic for more information.
Server InformationWindow
500
Welcome to NetSight Inventory Manager Help
Current Client Connections
This table lists all of the currently connected clients for this server, with the most recent connection at the top.
The list is automatically updated when clients connect or disconnect.
User:
The name of the user that has connected to the server as a client.
Authorization Group
The authorization group the user belongs to.
Client Type
The type of client, which will be NetSight Console or a NetSight plugin application such as Inventory
Manager.
Client Host
The name of the client host machine.
Connection Started
The date and time the client connection started.
Disconnect Button
Server InformationWindow
501
Welcome to NetSight Inventory Manager Help
Disconnects the selected client. The client being disconnected receives a message saying that their
connection will be terminated in 30 seconds. You must be assigned the appropriate user capability to
disconnect clients.
Client Connection Log
The client connection log displays a list of all client connect and disconnect activities, and allows you to track
the history of a particular client connection. The table displays the last 50,000 log entries, and updates
automatically when a client connects or disconnects. The current log file is automatically archived when its
size reaches 1 megabyte and opens a new log.
Acknowledge:
This checkbox lets you acknowledge an event and also hide items that have been acknowledged.
Click the checkbox to acknowledge the item and then click the Show Acknowledged Events button
to hide or show the checked items.
Severity
The event's severity.
Category
The category of event: user connection.
Timestamp
The date and time when the event occurred.
Client
The name of the client host machine that triggered the event.
User
The name of the user that triggered the event.
Type
The type of information: event.
Event
The type of event.
Information
Information about the client authentication or disconnect.
Show/Hide Acknowledged Events
This button hides or shows items in the table that have been acknowledged by a check in the
Acknowledge column.
Refresh
Refreshes the log.
Clear Log
Server InformationWindow
502
Welcome to NetSight Inventory Manager Help
Clears the log. If you want to retain a copy of the log that you are clearing, you must manually copy
the date−stamped file in the <install area>\Enterasys Networks\NetSight
Console\server\logs\admin.log.
Database Tab
This tab allows you to manage the password and connection URL for the database, and perform database
backup and restore operations. You must be assigned the appropriate user capabilities to perform these
functions.
IMPORTANT: When Console is installed, it automatically secures the MySQL database server by
removing all the root and anonymous users from the MySQL user database. Console then
adds one generic user name (user = netsight) and password (password = enterasys). It is
recommended that you change this password, since all customers who install Console will
know this generic password.
Click the graphic for more information.
Database Server Properties
Database server properties are used by the NetSight Server when it connects to the database. The database is
secured via a credential comprised of a user name and password (see the Important note above). This area lets
Database Tab
503
Welcome to NetSight Inventory Manager Help
you modify that password, and also view and modify the connection URL for the database.
Password
Click Change to display a window where you can enter a new password. The password is masked
unless you select the checkbox to Show Password. You must restart both the NetSight Server and
client after you change the database password.
Connection URL
Displays the URL the NetSight Server uses when connecting to the database. For troubleshooting
purposes, (for example, if you can't connect to the database) you may wish to enter a new connection
URL. Enter a new URL in the following format, and click Apply:
jdbc:mysql://[hostname]/<database>
where [hostname] is optional.
You must restart both the NetSight Server and client after you change the Connection URL.
NetSight Data Set Operations
This area lets you perform database backup and restore operations.
Backup Button
Opens the Backup Database window where you can save the currently active database to a file. If the
NetSight Server is local, you can specify a directory path where you would like the backup file stored.
If the server is remote, the database will be saved to the default database backup location.
Restore Button
Opens the Restore Database window where you can restore the initial database or restore a saved
database. Restoring an initial database removes all data elements from the database and populates the
NetSight Administrator authorization group with the name of the logged−in user. Both functions will
cause all current client connections and operations in progress to be terminated. You must restart both
the NetSight Server and the client following an initialize database operation. When restoring a
database, if the server is remote, you only have access to databases in the default database backup
directory.
Locks Tab
The Locks tab lets you view a list of currently held operational locks. Operational locks are used to control the
concurrency of certain client/server operations. They are used in two ways:
• to lock a device while a critical operation is being performed, such as a firmware download.
• to lock a certain function so that only one user can access it at a time. For example, only one user can
have the Authorization/Device Access window open at a time.
In the Current Locks table you can view information about each lock, such as who owns the lock, the duration
of the lock, and a description of the lock. You can cancel a lock by selecting it in the table and clicking the
Revoke button. When a lock is revoked, a message is displayed on the user's machine informing them that
their use of the locked functionality has been terminated. When the user acknowledges the message, the
function closes. You must be assigned the appropriate user capability to revoke a lock.
Click the graphic for more information.
Locks Tab
504
Welcome to NetSight Inventory Manager Help
User:
The name of the user who initiated the lock.
Authorization Group
The authorization group the user belongs to.
Client Type
The type of client: Console or a NetSight plugin application.
Client Host
The client host machine.
Duration
The amount of time the lock has been held.
Description
A description of the lock.
Refresh Button
Refreshes the table and obtains updated lock information.
Revoke Button
Removes the selected lock. When a lock is revoked, a message is displayed on the user's machine
informing them that their use of the locked functionality has been terminated. When the user
acknowledges the message, the function closes.
Locks Tab
505
Welcome to NetSight Inventory Manager Help
Server Log Tab
The Server Log displays all the events for the server. Server Log entries are listed by date and time, with
newer entries listed at the bottom. A new Server Log is created every day. If the NetSight Server is local, you
can view previous logs using the File tab.
You can perform Find and Filter operations on Server Log entries to target specific entries of interest. The last
Filter and Find settings you enter remain in the Server Log display until you refresh the display.
Information on the following tabs:
• Find Tab
• Filter Tab
• File Tab
Find Tab
The Find tab lets you search the Server Log (filtered or unfiltered) for a specific set of characters, like a word,
phrase, or number. Enter your search criteria in the Find field, and when you click the Find button, any search
terms found will be highlighted in the Server Log display. You can search forward or backward from your
current position, and restrict your search to match the exact upper or lowercase, and/or whole word.
Click the graphic for more information.
Display:
Server Log Tab
506
Welcome to NetSight Inventory Manager Help
Use the drop−down list to select the number of lines you would like displayed in the log.
Find:
Enter the text or numeric value you want to find.
Case Sensitive
Select this checkbox to search based on an exact match of the upper or lowercase of the text entered
in the Find field.
Match Whole Word
Select this checkbox to search based on an exact match of the whole word or numeric value entered in
the Find field.
Forward
Select Forward to search from your current position to the end of the Server Log.
Backward
Select Backward to search from your current position to the beginning of the Server Log.
Server Log Entries
Lists the events by date and time, with the more recent entries at the bottom. Directly above the
entries you can see the status of whether the entries are filtered or not filtered. Any search terms found
are highlighted.
Find Button
Performs the Find operation on the information currently displayed in the Server Log.
Clear Filter Button
Removes any filters currently in effect.
Refresh Button
Displays and updates log entries, and removes any filters. The Server Log does not refresh
automatically. If the Server Log is open and new entries are written to the log, you must click Refresh
to update the log.
Filter Tab
The Filter tab lets you specify which entries to display in the Server Log. Enter the information you want to
see, and only matching log entries will be displayed. You can use any combination of filter options, and you
can perform consecutive filters on the filtered events.
Click the graphic for more information.
Server Log Tab
507
Welcome to NetSight Inventory Manager Help
Display:
Use the drop−down list to select the number of lines you would like displayed in the log.
Filter:
Enter the text or numeric value you want to use as a filter.
Case Sensitive
Select this checkbox to search based on an exact match of the upper or lowercase of the text entered
in the Filter field.
Match Whole Word
Select this checkbox to search based on an exact match of the whole word or numeric value entered in
the Filter field.
Entire Text
Select the Entire Text scope option to filter all text by the value in the Filter field. If you have
already performed a filter, this will enable you to perform a new filter on all entries instead of just the
filtered entries.
Filtered Text
Select the Filtered Text scope option to perform a new filter on the results of the previous filter.
Server Log Entries
After running the filter, this area displays the matching Server Log entries by date and time, with the
more recent entries at the bottom. Click Clear Filter to remove the filter currently in effect. Directly
Server Log Tab
508
Welcome to NetSight Inventory Manager Help
above the entries you can see the status of whether the entries are filtered or not filtered.
Filter Button
Performs the filter and displays the results.
Clear Filter Button
Removes any filters currently in effect.
Refresh Button
Displays and updates log entries, and removes any filters. The Server Log does not refresh
automatically. If the Server Log is open and new entries are written to the log, you must click Refresh
to update the log.
File Tab
The File tab lets you specify which day's server log you wish to view. You can select the current day's log file,
or a previous day's log file. The NetSight Server must be local in order to view previous logs.
Click the graphic for more information.
Display:
Use the drop−down list to select the number of lines you would like displayed in the log.
Current Log
Server Log Tab
509
Welcome to NetSight Inventory Manager Help
Select this button to view the current day's log. The name of the log and the path to where it is located
is displayed in the field to the right.
Previous Log
Select this button to view a previous day's log. Click the Open button to open a file selection window
where you can select the log you want to view. The file names are dated, in the format
YYYY_MM_DD_events.log. The NetSight Server must be local in order to view previous logs.
Server Log Entries
Lists the entries in the currently selected Server Log, by date and time, with the more recent entries at
the bottom. If you apply a filter to the log, only the entries that match the filter are displayed on this
tab.
Clear Filter Button
Removes any filters currently in effect.
Refresh Button
Displays and updates log entries, and removes any filters. The Server Log does not refresh
automatically. If the Server Log is open and new entries are written to the log, you must click Refresh
to update the log.
License Tab
The License tab displays a list of all the server plugin applications that have been installed on this particular
NetSight server, and their respective license information. You can also use this tab to change a license. You
would change a license in the event that you want to upgrade from an evaluation copy to a purchased copy or
upgrade to a license that supports more users/devices. You can also use the Change License functionality to
upgrade a Console license from a Standalone to a Client−Server configuration on UNIX or Linux systems
only (see Upgrading a Console License for more information.)
Contact your Enterasys Networks Representative to purchase the software and receive a Licensed Product
Entitlement ID that allows you to generate a product license. Prior to changing a license, you must redeem
your Entitlement ID for the new product license. Refer to the instructions included with the Entitlement that
was sent to you. (For more information, see
http://www.enterasys.com/products/management/.)
Click the graphic for more information.
License Tab
510
Welcome to NetSight Inventory Manager Help
Server License Limitations
Information on the selected server license:
• whether the server accepts connections from remote clients.
• the maximum number of devices that can be managed by the server.
• the maximum number of unique client hosts allowed to connect to the server.
Installed Server Plugin
The name of the installed server plugin application.
Version
The version of the server plugin application.
License
The license number of the server plugin application. This is the license text that was entered during
installation.
Expires
If the plugin is an evaluation copy, this column displays the date the license expires.
Refresh Button
Refreshes the table and obtains updated license information.
Change License Button
Opens the Change License window. Read and accept the terms of the license agreement and click
OK. Enter the license text that you received when you generated the product license. (When you
purchased your Enterasys software product, you received a License Entitlement ID that allows you to
License Tab
511
Welcome to NetSight Inventory Manager Help
generate a product license. Refer to the instructions included with the License Entitlement ID that was
sent to you.) Click Update. The license file will be updated with the new license text.
Buttons
Configure
Opens the Configure Server window where you can configure various NetSight Server parameters
such as the maximum number of concurrent client connections supported by the NetSight Server.
Server Stats
Opens the Server Statistics window where you can view NetSight Server statistics such as CPU usage,
and also launch Advanced statistics used for troubleshooting purposes.
License Tab
512
NetSight Server Statistics Window
Use this window to view NetSight Server statistics. You can access the window by clicking the Server Stats
button in the Server Information window.
Click the graphic for more information.
CPU
The percentage of CPU being used by the NetSight Server.
Object Heap Memory in Use
The amount of object heap memory (in kilobytes) being used by the server. Heap memory refers to
the amount of free memory available to the program.
Buttons
Advanced
Opens the Advanced Statistics window, which provides server statistics that can be used for
troubleshooting purposes.
NetSight Server Statistics Window
513
Set Firmware Server Window
Use this window to specify which firmware download server a device will use when performing firmware
downloads. You can set the firmware server for a single device, multiple devices, or a device group.
All devices are initially configured to use the mapped file transfer server (as configured in the Services for
NetSight Server view of the Options window) for firmware downloads. By specifying an alternate firmware
download server, you can enable a remote device to use a server in its own local network. Performing
firmware downloads via a remote server lets you avoid transferring traffic over a WAN. The actual transfer
takes place in the local network where the device and the designated server live.
Alternate firmware download servers are configured using the Alternate Firmware Servers view in the
Options window. You must configure your alternate servers prior to using the Set Firmware Server window.
For more information, see the section on Alternate Firmware Servers in How to Set Options.
To access the Set Firmware Server window, select a single device or device group in the left−panel Network
Elements tab or multiple devices in a right−panel Details View tab, then select Tools > Alternate Firmware
Server from the menu bar. You can also right−click a device or device group and select the Alternate
Firmware Server option from the menu.
Click the graphic for more information.
Server drop−down list
Select the IP address of the firmware download server you would like used for the selected device(s).
The drop−down list displays the alternate servers (configured via the Add Alternate Firmware Server
window) that match the file transfer method set for the device(s). All devices are initially configured
to use the mapped file transfer server (as configured in the Services for NetSight Server view of the
Options window) for firmware downloads.
Set Firmware Server Window
514
Set Template Variables Window
The Set Template Variables window allows you to set variable values for multiple devices at one time.
Variables are used in configuration templates to substitute for device−specific information. When you
download a template configuration to a device, the variables are automatically replaced with the assigned
values for that device. For more information, see How to Create and Download Configuration Templates.
TIP: You can also set variable values for an individual device on the device's Configuration
Templates tab.
To access this window, select any device or device group in the left−panel Network Elements tab and then
select Tools > Set Template Variable Values, or right−click and select Set Template Variable Values from
the menu. You can also access this window by clicking the Set Template Variables button in the last window
of the Template Download Wizard.
Click the graphic for more information.
View Template Variables
Use this drop−down list to control which variables are displayed in the table. You can select a single
variable whose value you want to set, or use the "View All Variables" option to display all variables.
Table
This table lists your selected devices and their set values for each of your defined template variables.
Use the Table Editor to add or modify variable values.
Table Editor
Use the Table Editor row to add or modify variable values. Select one or more rows in the table and
click Edit. The Table Editor row appears at the bottom of the table. Select or tab to the desired
column (variable) and enter your value. Click Apply to set the values.
Set Template Variables Window
515
Welcome to NetSight Inventory Manager Help
Buttons
Apply
After you have edited the variable values, click Apply to set the values.
Edit
Select one or more rows in the table and click Edit to open the Table Editor. After you have entered
the desired variable values, click Apply to set the values.
Undo
Use this button to undo the last edit operation you performed.
Close
When you close the window, you will be prompted to save or cancel the variable values you have set.
Set Template Variables Window
516
Template Download Wizard
Use the Template Download Wizard to download a configuration template to one or more devices. To access
the wizard, select Tools > Wizards > Template Download Wizard from the menu bar.
Configuration templates provide an easy way to download similar configurations to one or more devices.
First, use the Edit Configuration Template window to create a configuration template based on an existing
archived device configuration. The window displays a selected configuration, and allows you to replace
portions of it with template variables. Then, you must set device−specific values for your template variables.
When you download the template configuration to a device, the variables are replaced with appropriate values
for that device. Once you have created your configuration template, you are ready to use this wizard to
download the template to your devices. For more information, see How to Create and Download
Configuration Templates.
NOTE: Configuration templates can be created from text−based (ASCII format) configurations
files. Although you can open binary configuration files in the Edit Configuration
Template window, you should not use binary configuration files when you create and
download templates.
Template Download Selection Window
Use this window to select a configuration template to download to devices.
Click the graphic for more information.
Template Download Wizard
517
Welcome to NetSight Inventory Manager Help
Templates
This panel displays your current configuration templates just as they are listed in the left−panel Configuration
Templates tab. Expand the folders and select the template you wish to download. If Inventory Manager can no
longer find a template file (it has been deleted or moved,) the template will not be displayed in the tree.
TIP: If you open the Template Download Wizard from a template in the left−panel
Configuration Templates tab, that template will be automatically selected in the Templates
tree.
General
This panel displays general information about the template.
Template Name
The name of the configuration template, as assigned when you saved the template in the Edit
Configuration Template window.
Archive Version
The archive version that contained the configuration file the template was based on.
Template Size
The size in bytes of the template.
Date Created
The date and time the template was created.
Status
The status of the template: File Found. Template files that can no longer be found (they have been
deleted or moved,) are not displayed for selection in the Templates tree.
Last Modified
The date and time the template was last modified.
Compatible Device Types
Device types the template is valid for, based on what device types the template has been assigned to.
Memo
This panel displays Memo information entered in the General Tab (Template).
Device Selection Window
Use this window to select the devices to include in the template download operation.
Click the graphic for more information.
Device Selection Window
518
Welcome to NetSight Inventory Manager Help
Select devices to configure
This tree displays devices that are compatible with the selected template, grouped according to device type.
By default, device types that are not compatible with the template are not displayed in the tree. Select the
Show All Devices checkbox to override this filter. Expand the folders and select the single device or device
group, or multiple devices or device groups (using the Control or Shift keys) to include in the download
operation. Click Add to add the devices to the Selected Devices table.
Selected Devices
Lists the devices selected for the download operation. If you want to remove a device from the table, select
the device and click Remove.
IP Address
The device's IP address. Note that chassis that support Distributed Forwarding Engines (DFEs), such
as the Matrix N−Series, display a single management IP even though there may be multiple DFE
modules in the chassis.
Device Type
The device's model number or hardware type.
Firmware Version
The current firmware version installed in the device.
Firmware Download
A indicates the device supports the ability to download firmware using the Firmware Upgrade
Wizard.
Device Selection Window
519
Welcome to NetSight Inventory Manager Help
Boot PROM Version
The current version of Boot PROM installed in the device.
Boot PROM Download
A indicates the device supports the ability to download boot PROM images using the Boot PROM
Upgrade Wizard.
Add Button
Select a single device or device group, or multiple devices or device groups, and click Add to add
them to the Selected Devices table.
Remove Button
To remove a device from the Selected Devices table, select the device and click Remove.
Download Template Configurations Window
Use this window to configure download parameters, set template variable values (if required), initiate the
download operation, and monitor download progress. Devices that require a reset will be reset automatically
after the download is complete.
Click the graphic for more information.
Show all devices/Show only incomplete and failed
Once the download operation starts, the device list table updates with status information for each
Download Template Configurations Window
520
Welcome to NetSight Inventory Manager Help
device. An alert icon
will appear in the Alert column of the table if a download operation fails for
a specific device. You can use these radio buttons to show all devices or show only those devices
whose download operations are incomplete or have failed.
Set Template Variables Button
Opens the Set Template Variables window which lists all your devices and their set values for each of
your defined template variables. Use this window to set variable values for one or more devices.
Device List Table
A list of the devices you have selected for your download operation. Once the download is started,
this table updates with status information for the download operation:
• Alert − An alert icon
will appear initially for any device that does not have values
assigned for all the variables in the template. Click Set Template Variables to open the Set
Template Variables window where you can set variable values for one or more devices. You
can also right−click on a table row and select Edit Device Variables to open the Device
Template Variables window, where you can assign variable values for that specific device.
All template variables must have assigned values before the download operation can proceed.
Once the download is started, an alert icon
will appear in the Alert column if a download
operation fails for a specific device.
• IP Address − The device's IP address. Note that chassis that support Distributed Forwarding
Engines (DFEs), such as the Matrix N−Series, display a single management IP even though
there may be multiple DFE modules in the chassis.
• Status − The status of the operation for that particular device: Success or Failure.
• Operation − The type of operation performed: Configuration Template Download.
• % Progress − A progress bar showing the percent completed of the operation.
• Bytes Trans. − The number of bytes transferred during the operation.
• Message − A message relating to the status of the operation.
TIP: Use the table options and tools to find, filter, sort, print, and export information in a table
and customize table settings. You can access the Table Tools through a right−mouse click on
a column heading or anywhere in the table body, or by clicking the Table Tools
button in the upper left corner of the table (if you have the row count column
displayed). For more information, see Table Tools.
Status Summary
Once the download is started, this area updates with status information for the download operation.
Download Type
The download will be performed in parallel (simultaneously) on the number of devices specified in
the Groups of field. By default, the downloads will occur in sequential order (Groups of: 1). This is
to protect against possible isolation of other devices that are in the download list.
CAUTION: Because many devices automatically reset following a download operation,
performing a Download Type greater than 1 may isolate other devices in the
download list, causing their downloads to fail. It is recommended that you leave the
Groups of value at 1 (perform the downloads serially), unless you know it is safe to
have the selected network devices reset simultaneously.
Start Button
Download Template Configurations Window
521
Welcome to NetSight Inventory Manager Help
Initiates the download operation. The table at the top of the window updates with status information,
as will the status area in the bottom left of the window.
Download Template Configurations Window
522
Template Variables Window
Use the Template Variables window to define variables for use in configuration templates. Once a variable is
defined, you will be able to access it from the drop−down list in the Edit Configuration Template window.
You can also view your template variables in the Template Variables tab. For more information, see How to
Create and Download Configuration Templates.
Access this window by clicking the Variables button in the Edit Configuration Template window.
Click the graphic for more information.
Add
Opens the Add Template Variable window where you can enter a variable name.
Delete
Deletes the selected variable(s).
Variable
Lists the existing template variables. The %ManagedIP% variable is created automatically by
Inventory Manager and cannot be deleted. You can sort the list by clicking the column heading, or use
the table tools to find, filter, sort, print, or export the list. Access the Table Tools through a
right−mouse click on the column heading or by using the Table Tools
button in the upper left
corner of the table.
Template Variables Window
523
Track Device Window
The Track Device window allows you to track a device based on the device's serial number or MAC address.
This allows you to view a history of device attributes, and monitor any changes made to the device. The table
entries are based on the device's archived configuration files −− there will be one entry for each saved
configuration file.
Use the table options and tools to find, filter, sort, print, and export information in a table and customize table
settings. You can access the Table Tools through a right−mouse click on a column heading or anywhere in the
table body, or by clicking the Table Tools
button in the upper left corner of the table (if you have the
row count column displayed). For more information, see Table Tools.
To access this window, select a single device in the left−panel Network Elements tree, and select
Tools > Track Device. When the window opens, the information for that device will be displayed. If you
have not performed an archive on that device, the table will be empty and you will see a message that says
"No database entries found."
Click the graphic for more information.
Track By:
Use the drop−down list to select whether you want to search for a device based on serial number or
MAC address.
Value:
Enter the serial number or MAC address, depending on what you selected in the Track By field.
Diff
A yellow Diff icon
in this column signifies a change has been detected in the device attributes for
this configuration and the previous configuration.
Device Name
Displays the device display name (IP address, System Name, or Nickname) as configured in the
Options window.
Track Device Window
524
Welcome to NetSight Inventory Manager Help
IP Address
Displays the device IP address.
MAC Address
Media Access Connection (hardware) address of the device.
Chassis Slot
The slot number in the chassis where the device resides. N−Series devices and devices that do not
reside in a chassis, display a value of N/A.
BootPROM Version
Shows the current version of Boot PROM installed in the device.
Firmware Version
Shows the current firmware version installed in the device.
Serial Number
A unique number assigned to the device by the manufacturer.
Device Type
The device's model number or hardware type.
Asset Tag
A unique asset number assigned to the device for inventory tracking purposes.
CPU
The name of the device's processor (Central Processing Unit).
Memory
The device's total installed local memory, DRAM (Dynamic Random Access Memory), reported in
megabytes (MB).
Last Status
The device's last known connection status (Contact or No Contact) and, therefore, its ability to
respond to SNMP requests.
System Description
Description of the piece of equipment, usually including the model number and firmware revision
number. The firmware revision typically displays a revision number, then a date.
Chassis ID
The ID assigned to the chassis where the device resides.
Alert Description
Explains the significance of the Diff icon.
Date
Displays the date and time the configuration was saved.
Buttons
Track Device Window
525
Welcome to NetSight Inventory Manager Help
Track
Searches for device information based on the serial number or MAC address specified in the Track By
field.
Track Device Window
526
Updates Available Window
NetSight applications provide an easy way to download product updates using a web update operation
accessed from Help > Check for Updates in the menu bar. The Updates Available window displays any new
updates that are available for download, and lets you initiate the download operation. You must be assigned
the appropriate user capability to access this view.
Click the graphic for more information.
Download
Use the checkboxes in this column to select or deselect updates to be downloaded.
Product
The name of the product the update is for.
Available
The package version number for the available update.
Current
The package version number currently installed in the application.
Requires
Lists any dependencies for the update.
Download Progress
A progress bar showing the percent completed of the download operation.
Buttons
Download
Initiates the download operation.
Updates Available Window
527
Welcome to NetSight Inventory Manager Help
Details
Opens the NetSight Updates Details window where you can see details on what each update includes.
Updates Available Window
528
View Devices Window
The View Devices window lets you view the groups and devices you have selected for your Capacity
Planning report. The devices are displayed in tree format and are also listed individually in a table. Access this
window from the Select Targets window in the Capacity Planning tool by clicking the View Devices button.
Click the graphic for more information.
Tree
Displays your selected devices in hierarchical tree format starting with the top−level device group you
have selected. Groups and devices that have been explicitly filtered out (using the Add Filters
window) are shown grayed out in the tree.
Table
Lists each selected device by its IP address and device type. You can use the Table Tools to find,
filter, sort, print, and export information in the table.
View Devices Window
529
Troubleshooting
This troubleshooting guide provides a list of items to check when certain Inventory Manager functionality is
failing to perform correctly. Locate a problem in the left column and then review the troubleshooting steps in
the right column.
Problem
Configuration Save Fails
Troubleshooting Steps
Verify that the appropriate configuration MIB is being used to perform the
configuration save:
1. Select the device in the left−panel Networks Element tab.
2. Select the right−panel Image Information tab.
3. In the MIB Overrides section, verify that the Configuration MIB
listed as supported by this device is the desired MIB. Initially,
Controlled by Device Type is displayed in this field, meaning that
Inventory Manager will use the MIB specified in the Configuration
MIB field on the General Tab (Device Type). If you would like to
override the Device Type MIB, use the drop−down list here to select
the desired MIB and click Save to save the change.
Firmware Download
Fails
Verify that the appropriate firmware download MIB is being used to perform
the download:
1. Select the device in the left−panel Networks Element tab.
2. Select the right−panel Image Information tab.
3. In the MIB Overrides section, verify that the Firmware Download
MIB listed as supported by this device is the desired MIB. Initially,
Controlled by Device Type is displayed in this field, meaning that
Inventory Manager will use the MIB specified in the Firmware
Download MIB field on the General Tab (Device Type). If you would
like to override the Device Type MIB, use the drop−down list here to
select the desired MIB and click Save to save the change.
Troubleshooting
530