1
Operator's
n
Manual
TC
12.0-Volt Lithium-ion
TELESCOPING
& EDGER
GRASS TRIMMER
Model No. 320.
__
WARNING: To reduce the risk of
injury, the user must Read and
understand the Operator's
manual
before using this product.
,Warranty
• Safety
• Assembly
• Operation
• Maintenance
• EspaSol
Charge
Before first
use
Sears Brands Management Corporation, Hoffman Estates, IL 60179 U.S.A.
www,craftsman,com
The purpose
Warranty
Page 2
Safety Symbols
Page 3
General Safety Instructions
Page 5-6
Description
Page 7-8
Assembly
Page 9
Operation
Page 10-16
Maintenance
Page 17-18
Troubleshooting
Page 18
Exploded
Page 19-21
View and Parts List
CRAFTSMAN
WARNING:
SYMBOL
dangers.
all safety instructions
in this
MEANING
Indicates
an imminently
Indicates a potentially
could result in death or serious
visit the web
This warranty does not cover the cutting flails, which are expendable
parts that can wear out from normal use within the warranty period.
CAUTION:
Indicates
an imminently
hazardous
injury.
Damage
Prevention
Messages
which,
if not
situation,
which, if not avoided,
and Information
situation,
which,
if not
These inform the user of import information and/or instructions that could lead to
equipment or other property damage if they are not followed. Each message is
preceded by the word "NOTE," as in the example below:
by a qualified
and/or
property damage
SAVE THESEINSTRUCTIONS!
READ ALL INSTRUCIONS!
Always
may result if these instructions
To ensure safety and reliability,
service technician
all repairs should
are
be performed
at a Sears Parts & Repair Service Center.
WARNING:
Hoffman Estates, IL 60179
This trimmer/edger
has many features for making its use more pleasant and
enjoyable. Safety, performance, and dependability
have been given top priority
in the design of this product, making it easy to maintain and operate.
hazardous
may result in death or serious
_b, WARNING:
This warranty gives you specific legal rights, and you may also have
other rights which vary from state to state.
situation,
injury.
avoided,
NOTE: Equipment
not followed.
This warranty is void if this product is ever used while providing
commercial services or if rented to another person.
hazardous
will result in death or serious injury.
,_k WARNING:
ONE YEAR FULL WARRANTY
Corporation,
Be sure to read and understand
SIGNAL
_1_ DANGER:
FOR ONE YEAR from the date of purchase, this product is warranted
against any defects in material or workmanship. A defective product will
be replaced free of charge.
Sears Brands Management
to possible
manual, including all safety alert symbols, such as "DANGER,"
"WARNING,"
and "CAUTION,"
before using this trimmer. Failure to following all instructions
listed below may result in electric shock, fire and/or serious personal injury.
Back Cover
For warranty coverage details to obtain free replacement,
site: www.craftsman.com
is to attract yours attention
The safety symbols, and the explanations with them, deserve your careful
attention and understanding.
The symbol warnings do not by themselves
eliminate any danger. The instructions and warning they give are no substitutes
for proper accident prevention measures.
avoided,
Sears Repair Parts Phone Number
of safety symbols
The operation
of any power tools can
result in foreign objects being thrown into your eyes,
which can result in severe eye damage. Before beginning
power tool operation, always wear safety goggles or safety
glasses with side shield and a full face shield when needed.
We recommend a Wide Vision Safety Mask for use over
eyeglasses or standard safety glasses with side shields.
use eye protection which is marked to comply with ANSI Z87.1
WARNING: Some dust created by using power tools contains chemicals
known to the state of California to cause cancer and birth defects or other
reproductive
74906
harm.
ManuaLRevised_11
0210
Page 2
74906
ManuaLRevised_11
0210
Page 3
SAVE THESE INSTRUCTIONS
Some of these following symbols may be used on this tool. Please study them
and learn their meaning. Proper interpretation
of these symbols will allow you to
operate the tool better and more safely.
SYMBOL
NAME
DESIGNATION/EXPLANATION
V
Volts
Voltage
A
Amperes
Current
Hz
Hertz
Frequency
W
Watt
Power
min
Minutes
"_
Alternating
Direct
n0
Current
]
Class
.../min
Per Minute
Read The Operator's
Alert
Manual
Double-insulated
Do not expose
locations.
to rain or use in damp
read and understand
operator's
manual
To reduce the risk of injury, user must
before using this product.
glasses with side shields and a full face
Always wear safety goggles or safety
shield when operating this product.
Symbol
blade
in serious
Failure will
to result
keep your
hands personal
away frominjury.
the
No Hands
Symbol
blade
in serious
Failure will
to result
keep your
hands personal
away frominjury.
the
Symbol
Hot Surface
0210
- don't use appliances
in damp or wet
use in rain.
away-
*
Dress properlydo not wear loose clothing or jewelry. They can be
caught in moving parts. Use of rubber gloves and substantial footwear is
recommended
when working outdoors. Wear protective hair covering to
contain long hair.
*
Use safety
*
Use the correct appliance
which it is intended.
*
Avoid unintentional
starting - don't carry appliance with a attached battery
with a finger on switch. Make sure that the switch is in the OFF position
before inserting the battery pack
*
Don't grasp the exposed cutting cutting
picking up or holding the appliance.
*
Don't force the appliance
- it will do the job better and with less likelihood
of a risk of injury at the rate for which it was designed.
*
Don't
*
Stay alert - watch what you are doing. Use common
the appliance when you are tired.
*
Store idle appliances
indoors - when not in use, appliances should be
stored indoors in a dry, and high or locked-up place - out of reach of
children.
*
Maintain appliance with carekeep cutting edge sharp and clean for
best performance
and to reduce the risk of injury. Follow instructions for
lubricating and changing accessories.
Inspect appliance cord periodically,
and if damaged, have it repaired by an authorized service facility. Inspect
extension cords periodically and replace if damaged. Keep handles dry,
clean, and free from oil and grease.
*
Check damaged parts - before further use of the appliance, a guard or
other part that is damaged should be carefully checked to determine that it
will operate properly and perform its intended function. Check for alignment
glasses
all visitors
should be kept at a distance
from work
- always use face or dust mask if operation
- do not use appliance
flails
is dusty.
for any job except that for
or cutting
edges
when
your safety.
No Hands
Symbol
that involve
environments
Keep children
area.
construction
speed,
INSTRUCTIONS
•
at no load
Precautions
No Hands
74906 ManuaLRevised_11
speed,
of current
Alert
No Hands
Avoid dangerous
locations.
= Don't
Revolutions,
strokes, surface
orbits, etc., per minute
Eye Protection
Safety
*
per second)
Type of current
Rotational
II Construction
Wet Conditions
(cycles
Type or a characteristic
No Load Speed
A
_1_ WARNING: When using electric gardening appliances, basic safety
precautions should always be followed to reduce the risk of fire, electric shock,
and personal injury, including the following
READ AND SAVE THESE
Time
Current
GENERAL POWER TOOL SAFETY WARNINGS
Failure will
blade
to result
keep your
in serious
hands personal
away frominjury.
the
blade
in serious
Failure will
to result
keep your
hands personal
away frominjury.
the
avoid
contact
anyinjury
hot surface.
To reduce
the with
risk of
or damage,
Page 4
74906
overreach
ManuaLRevised_11
- keep proper footing and balance at all times.
0210
sense. Do not operate
Page 5
of moving parts, binding of moving parts, breakage of parts, mounting, and
any other condition that may affect its operation. A guard or other part that is
damaged should be properly repaired or replaced by an authorized service
center unless indicated elsewhere in this manual.
= Do not charge
appliance
in rain, or in wet locations.
= Do not use battery-operated
= Do not
cutting
clearing
cutting
appliance
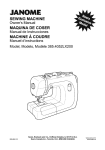
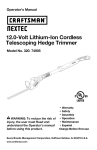
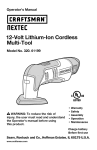
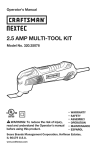
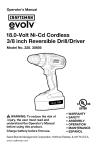
KNOW YOUR HEDGE TRIMMER (Fig. 1)
Fig. 1
in rain.
Battery pack
Lock-off
attempt to remove cut material nor hold material to be cut when
flails are moving. Make sure that the trimmer switch is off when
jammed material from cutting flails. Do not grasp the exposed cutting
flails or cutting edges when picking up or holding the hedge trimmer.
CAUTION:
cutting
flails coast after turning
CAUTION:
Do not attempt
Trigger switch
Cutting
to operate this tool until you have read all
= Remove or disconnect
battery before servicing,
material from the gardening appliances.
cleaning
Auxiliary
Telesco
or removing
320.10006
I-elescoping
pole
Cutting flails
Wire edge
guide
320.14300
= Do not dispose of the battery (ies) in a fire. The cell may explode.
with local codes for possible special disposal instructions.
•
'
CHARGER
320.11221
•
•y handle
locking lever
Handle
pole locking
lever
Use only the battery and charger listed:
PACK
flail
off.
instructions, safety rules, and warnings thoroughly. Failure to comply may result
in fire, electric shock, or serious personal injury. Keep the Owner's Manual for
future reference, and review it frequently.
BATTERY
button
Check
uard
Do not open or mutilate the battery (ies). Released electrolyte is corrosive
and may cause damage to the eyes or skin. It may be toxic if swallowed.
Exercise care in handling batteries
in order not to short the battery with
conducting
materials such as rings, bracelets and keys. The battery or
conductor may overheat and cause burns.
Motor Type
Keep guards
Head Rotation
= Keep cutting
in place and in working
flails
PRODUCT
order.
sharp.
= Keep hands and feet away from
= Keep your hands away from
0210
Positions
0 °, 60°and 90 °
9" diameter
cutting
area.
Speed (no Load)
8000 RPM
the cutting
flails.
Telescope
13-inch.
Page 6
adjustment
Cutting system
Plastic Cutting
Battery Type
Lithium-Ion
Charger
120-Volts,
Weight
ManuaLRevised_11
12.0 Volt DC
Cutting capacity
Input
Optimum
74906
SPECIFICATIONS
74906
Charging
(without
ManuaLRevised_11
Temperature
battery)
0210
Flails
60 Hz AC only
32°F (0 ° C) -104°F (40°C)
3.5 Ibs
Page 7
A
Jl_ WARNING: The safe use of this product requires an understanding
of the
information on the tool and in this operator's manual, as well as knowledge of
the project you are attempting. Before use of this product, familiarize yourself
with all operating features and safety rules.
ADJUSTABLE
AUXiLiARY
The auxiliary
of control.
handle can be adjusted
THREE=POSITION
The twist
HANDLE
PiVOTiNG
for ease operation
and to help prevent loss
head among 0 °, 60 ° and 90 °.
WARNING:
This product
The grass guard helps to protect the user from flying debris.
LOCK=OFF
BUTTON
The lock-off
button prevents
Do not attempt
accidental
starting.
The wire edge guide can be locked into two different
when edging and trimming.
positions
for easier use
POLE
can be adjusted
to different
heights for ease of use.
has been shipped
02:$0
Page 8
completely
assembled.
*
Inspect the tool carefully to make sure that no breakage
during shipping.
*
Do not discard the packing material until you have carefully
satisfactorily operated the tool.
*
If any parts are damaged or missing,
back page of operator's manual.
74906
from the box. Make sure that
or damage
occurred
inspected
please refer to the numbers
and
listed on the
LiST
Grass trimmer, battery
and operator manual
ManuaLRevised_$t
or create
Carefully remove the tool and any accessories
all items listed in the packing list are included.
PACKING
74906
to modify this trimmer/edger
*
WiRE EDGE GUIDE
The trimmer
to attach
UNPACKING
GRASS GUARD
TELESCOPING
If any parts are broken or missing, do not attempt
accessories not recommended
for use with this tool. Any such alteration or
modification
is misuse and could result in a hazardous condition leading to
possible serious injury.
HEAD
handle rotates the trimmer
WARNING:
a battery or operate the trimmer/edger
until the broken or missing parts are
replaced. Failure to do so could result in possible serious injury.
ManuaLRevised_$t
02:$0
pack, blade guard, 13 cutting
flails, 2 screws, charger,
Page 9
BATTERY
PROTECTION
To protect the battery from damage and prolong its life, the battery pack
circuitry will turn off the battery pack if it becomes overloaded or if the
temperature becomes too high during use. This may happen in extremely high
torque, binding, and stalling situations. This intelligent system will shut down
your battery pack if its operating temperature exceeds 176°F (80°C) and will
begin normal operation when it returns to between 32°F (0°C) and 122°F (50°C).
The battery pack will begin normal operation when it cools down.
NOTE: A significantly reduced run time after fully charging the battery pack
indicates that the battery is near the end of its usable life and must be replaced.
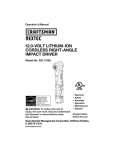
4.
insert the battery pack into the charger (Fig. 2).
5.
The charger will communicate
of the battery pack.
6.
The green lights will flash while the battery pack is charging. After charging
is complete, the green LED on the charger will be on. The flickering red light
indicates a defective battery or a bad connection
between the battery and
the charger.
7.
The battery pack will fully charge
overcharge.
LED FUNCTIONS
OF CHARGER
LED INDICATOR
COLD WEATHER
OPERATION
This Lithium-ion battery pack will provide optimal performance
in temperatures
between 32°F (0°C) and 104°F (40°C). When the battery pack is very cold, it may
"pulse" for the first minute of use to warm itself. Put the battery pack on a tool
and use the tool in a light application. After about a minute, the battery pack will
have warmed itself and will operate normally.
WHEN TO CHARGE
THE BATTERY
(n)
Remove the battery pack from the tool when convenient for you and your job.
"Top off" the battery pack charge by charging it for a time before starting a big
job or long period of use.
Due to Lithium-ion fade-free properties, the only time it is necessary to charge
the Lithium-ion battery pack is when the pack has reached the end of its charge.
To signal the end of charge, power to the tool will drop quickly. Charge the
battery pack as needed.
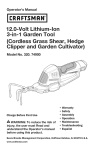
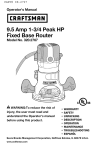
THE BATTERY
PACK
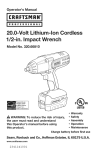
(Fig. 2)
NOTE: This Lithium-ion battery pack is
shipped partially charged. Before using it the
first time, fully charge the battery pack.
A fully discharged battery pack will charge
in about 30 minutes in a surrounding
temperature between 50°F (10°C) and 104°F
(40°C).
1.
Charge the Lithium-Ion
the correct charger.
RED
LED
GREEN
LED
ACTION
Hot/Cold
battery
On
Off
Charging will begin
when battery returns to
32°F (0°O)-104°F (40°0)
Battery pack or
Charger/Adapter
is
defective
Off
CHARGING
BATTERY
Charging
Off
Flashing
Charging
Fully
charged
Off
On
Charging is complete
Maintenance charging
CHARGING
PACK
if the battery pack is above normal temperature range, the red LED will
illuminate and the green LED will be off. When the battery pack cools down to
approximately
104°F (40°C), the charger will automatically
begin charging.
A COLD BATTERY
PACK
BATTERY
if the charger detects
LED will be off.
1.
battery pack with
Align the raised ribs of the battery pack with the slot in the charger.
A HOT BATTERY
if the battery pack is below the normal temperature range, the red LED will illuminate
and the green LED will be off. When the battery warms to a temperature of more
than 50°F (10°C), the charger will automatically begin charging.
_'_
3.
2.
0210
BATTERY
PACK
Flashing
FULL
BATTERY
the charger to a power supply.
ManuaLRevised_11
(Fig. 3)
Defective
DEFECTIVE
Connect
but it will not
BATTERY
DEFECTIVE
CHARGING
Fig. 2
2.
74906
[_
if left on the charger,
PACK
it is not necessary to run down the battery pack charge before recharging. The
Lithium-ion battery can be charged at any time and will not develop a "memory"
when charged after only a partial discharge.
HOW TO CHARGE
(SEE
HI/LO MANUAL)
TEWIP.
with the battery pack to evaluate the condition
Page 10
74906
a problem,
the red LED will begin flashing
and the green
if registering as defective, remove and reinsert the battery pack in the
charger, if the LED status reads "defective" a second time, try charging
different battery pack.
if a different battery pack charges
pack (see Maintenance section).
ManuaLRevised_11
0210
normally,
dispose
of the defective
a
battery
Page 11
3.
If a different
defective.
BATTERY
battery pack also indicates
"defective,"
the charger
may be
ATTACH
CHARGING
FULL
NOTE: The battery pack will fully charge,
charger.
but will not overcharge,
BATTERY
,_WARNING!
"OFF"
PACK(Fig.
Makesurethatthetrimmeris
Fig. 4
Keep your hand away from the switch.
2.
DO NOT touch the cutting
3.
Align the raised rib on the battery pack
with the grooves in the handle of the
trimmer/edger,
and then slide the battery
pack into the handle to attach the battery
pack to the trimmer.
Slots
Hooks
Trimmer
Head
Make sure that
is "OFF"
1.
Remove the battery
2.
Place the cutting guard on
the trimmer head (Fig. 5a).
3.
Insert the hooks on the guard into the slots of
the trimmer head (Fig.5a).
3.
Push rear of guard until you hear the click
that indicates that the guard is secure
(Fig.5b).
4.
Screw the preassembled screws
into the trimmer head (Fig.5c)
4)
1.
pack.
Fig. 5b
in the guard
ATTACHING/REMOVING THE CUTTING FLAIL (Fig. 6)
flails.
,_
WARNING:
Make sure that the trimmer/
edger is "OFF"
NOTE: Make sure that the latch on the battery
pack snaps into place and that the battery pack is secured to the tool before
beginning
_CAUTION:
WARNING:
if left on the
NOTE: Charger may warm with several continuous charge cycles. This is part of
the normal operation of the charge. Charge in a well ventilated area.
Fig. 5a
place. The guard must always
be on the tool to protect the
user.
the trimmer/edger
After fully charged, the green LED Light on the charger will be on and the red
LED light will be off.
TO ATTACH
(Fig. 5a and 5b)
,_ WARNING:
Never operate
tool without guard firmly in
If the battery pack is being charged within a normal surrounding temperature
range (50 °F to 104°F), the green LED will begin flashing and the red LED will be
off. The battery pack will reach a full charge in 30 minutes.
BATTERY
THE GRASS GUARD
1.
Remove the battery
pack.
2.
Place the cutting flail over the pivot and pull
cutting flail outwards until the cutting flail
snaps into the place (Fig. 6).
3.
To remove the cutting flail, push the cutting
flail inwards, and lift it from the pivot.
When placing the battery pack in the tool, be sure that the raised
rib on battery pack aligns with the groove inside the trimmer and that the latches
snap into place properly. Improper attachment of the battery pack can cause
damage to internal components.
TO DETACH
BATTERY
,_WARNING!
PACK (Fig. 4)
Fig. 6
Make sure that the trimmer/edger
is "OFF"
1.
Keep your hand away from any switches.
2.
DO NOT touch the cutting
3.
Depress the battery release buttons
pack to release the battery pack.
4.
Pull the battery pack out and remove it from the tool.
74906
ManuaLRevised_11
0210
Pivot
Plastic Cutting Flail
flails.
located
on the both sides of the battery
Page 12
74906
ManuaLRevised_11
0210
Page 13
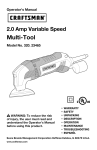
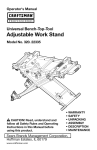
ON-BOARD
CUTTING FLAIL STORAGE (Fig. 7)
The grass trireme/edger
for 6 cutting flails.
AUXiLiARY
HANDLE
The auxiliary
positions.
has on-board
ADJUSTMENT
storage
(Fig. 10)
90 degree
0 degree
60 degree
7q
Remove the battery
2.
Release the auxiliary handle locking
to loosen the handle.
3.
Adjust the auxiliary handle to a
comfortable
position.
pack.
NOTE: The handle can be adjusted
front side and 20 ° to the back.
lever
//
//
Fig. 8
The trimmer
90 °
20 o
40 ° to the
POLE ADJUSTMENT
//
(Fig. 9}
Remove the battery
2.
Twist the trimmer
notches.
1.
Remove the battery
2.
Open the locking lever to loosen the
telescoping pole.
3.
Pull the pole out to increase the length, or
push the pole in to decrease the length.
head to one of the three positions
head to 0° or 60 ° for trimming;
NOTE: Make sure that the trimmer
reinstalling the battery pack.
head is securely
positions:
0% 60 ° and
indicated
by the
90°for edging.
locked into place before
Fig. 1la
WiRE EDGE GUIDE
pack.
When the desired length is achieved,
close the locking lever.
among three different
pack.
NOTE: Adjust the trimmer
/
400
pole can be
head can be adjusted
1.
Lock the lever securely.
The length of the telescoping
adjusted.
4.
HEAD ADJUSTMENT
Fig. 10
handle can be set in various
TELESCOPING
PiVOTiNG
(Fig .8)
1.
4.
THREE=POSITION
Fig. 7
The wire edge guide can be locked into two
different positions for easy edging
and trimming.
Take off the wire edge guide (Fig.1 la) and
reinstall it on the other side.
CUTTING
Fig. 9
AND EDGING
,_
CAUTION:
Always wear eye protection.
,_
CAUTION:
Inspect the area to be trimmed
and remove any wires, cords, or string-like
objects which could become entangled in the
rotating flails. Be particularly careful to avoid
any wire which might be bent outward into the
path of the tool, such as barbs at the base of
a chain link fence.
74906
ManuaLRevised_11
0210
Page 14
74906
ManuaLRevised_11
0210
Page 15
Switch
on and off (Fig. 12)
Fig. 12
To turn the trimmer on, depress the lock-off
button and squeeze the trigger switch. To turn
the tool off, release the trigger.
Cutting
Grass
GENERAL
\\
Avoid using solvents when cleaning plastic parts. Most plastics are susceptible
to damage from various types of commercial solvents and may be damaged by
their use. Use clean cloths to remove dirt, dust, oil, grease, etc.
(Fig. 13}
Move the trimmer left and right, keeping it well
away from the body.
Trimming
Edges
Adjust the trimmer
MAINTENANCE
_WARNING:
Do not at any time let brake fluids, gasoline, petroleum-based
products, penetrating oils, etc. to come in contact with plastic parts. Chemicals
can damage, weaken or destroy plastic which may result in serious personal
injury.
(Fig. 14)
head to 90 ° .
_[_WARNING:
Guide the trimmer along the edge of the lawn.
Do not allow the plastic flails to contact paved
surfaces, stones or garden walls, since this
will wear the cutting flail rapidly.
When servicing,
use only identical
Craftsman
replacement
parts.
Use of any other parts may create a hazard or cause product damage. To ensure
safety and reliability, all repairs should be performed by a qualified service
technician at a Sears Service Center.
BATTERI ES:
The battery pack is equipped with Lithium-Ion rechargeable batteries. The
duration of use from each charge will depend on the type of work performed.
The batteries in this tool have been designed to provide maximum troublefree life. Like all batteries, they will eventually wear out. Do not disassemble
the battery pack or attempt to replace the batteries. Handling of the batteries,
especially when wearing rings and jewelry could result in a serious burn.
To obtain the longest
manual.
Fig. 14
•
possible
battery
life, read and understand
It is good practice to unplug the Charger/Adapter
battery pack when not in use.
For Lithium-Ion
battery pack storage
Store the Lithium-Ion
and free of moisture.
Store Lithium-Ion
Exterior
BATTERY
and remove the Lithium-Ion
longer than 30 days:
battery pack where the temperature
battery packs in a 30%-50%
Every six months of storage,
charged
fully charge the Lithium-Ion
may be cleaned with a cloth or soft non-metallic
PACK
REMOVAL
the operator's
AND PREPARATION
is below 80°F(26°C)
condition.
battery pack.
brush.
FOR RECYCLING
To preserve natural resources, please recycle or
dispose of batteries properly. This product contains
lithium-ion batteries. Local, state, or federal laws
may prohibit disposal of lithium-ion batteries in
ordinary trash. Consult your local waste authority
for information regarding available recycling and/or
disposal options.
74906
ManuaLRevised_11
0210
Page 16
74906
ManuaLRevised_11
0210
Page 17
_k
WARNING:
Upon removal of the battery pack for disposal
or recycling,
cover the battery pack's terminals with heavy-duty adhesive tape. Do not
attempt to destroy or disassemble the battery pack or remove any of its
components.
Lithium-Ion batteries must be recycled or disposed of properly.
Also, never touch the terminals with metal objects and/or body parts as a
short circuit may result. Keep away from children. Failure to comply with these
warnings could result in fire and/or serious injury.
PROBLEM
The trimmer/edger
does not work
Cutting
74906
is difficult
ManuaLRevised_11
0210
CAUSE
SOLUTION
1.
Battery is depleted
1.
Charge the battery
2.
Battery is not installed
properly
2.
Follow directions for
battery installation
1.
1.
Plastic flail edges are
worn
Install new cutting
flails
Page 18
12.0 VOLT LITHIUM=ION CORDLESS TRIMMER/EDGER
MODEL NO. 320. 74906
The Model Number will be found on the Nameplate attached to the handle of the
trimmer/edger. Always mention the Model Number when ordering parts for this tool.
74906
ManuaLRevised_11
0210
Page 19
12.0 VOLT LITHIUM=iON CORDLESS TRIMMER/EDGER
The Model Number will be found on the Nameplate attached to the handle of the
trimmer/edger. Always mention the Model Number when ordering parts for this tool.
74906
3704912000
Inner Tube
1
29
5610039007
Tapping
2
30
5650012001
Plain Washer
2
31
3125744000
Guard
1
MODEL NO. 320. 74906
Screw
1
3125759000
Back Housing
1
32
3124125000
Right Guard
1
2
3125758000
Front Housing
1
33
3704913000
Outer Tube
1
3
5610012004
Tapping
31
34
3124127000
Cover
1
4
3124124000
Left Guard
1
35
3124165000
Bush
1
5
3125747000
Wrench
1
36
3125749000
Quick Clamp Case
1
6
3124126000
Clamp Block
1
37
5670004000
Spring Pin
1
7
3550814000
Pin
1
38
3551666000
Lock Pole
1
8
3125926000
Clamp Block
1
39
3125752000
Wrench
1
9
3125754000
Left Housing
1
40
5650012001
Plain Washer
1
10
3125753000
Right Housing
1
41
5630003008
Hexagon
Nut
1
11
3125741000
Left Housing
1
42
3321150000
Right Handle Assembly
1
12
3125742000
Right Housing
1
43
3125746000
Lock off Button
1
13
3650127000
Plant Guard
1
44
3125745000
Switch Trigger
1
14
3125797000
Cutting flail
13
45
3660485000
Compression
15
2730174000
DC Motor
1
46
4870037000
Switch
1
16
3551660000
Joint
1
47
3704254000
Handle Hoop
1
17
3125743000
Cover
1
48
0210151004
5120 Power Pack
1
18
5650002001
Plain Washer
2
49
3402298000
Contact
19
5620032001
Screw
2
50
4890642001
PCB Assembly
1
20
5610011003
Tapping
3
51
3321149000
Left Handle Assembly
1
21
3125751000
Cover
1
52
3125748000
Wire Clamp
1
22
3125750000
Tool Pan
1
23
5650005001
Plain Washer
2
24
5680171000
Rivet
1
25
5630015002
Prevailing Torque
26
5650017008
Plain Washer
1
27
4860242000
Internal Wire
1
ManuaLRevised_11
0210
Screw
01
01
02
02
Screw
Hexagon
Nut
2
Spring
Receptacle
Assembly
1
1
Page 20
74906
ManuaLRevised_11
0210
Page 21
Manual del Propietario
Your Home
For troubleshooting, product manuals and expert advice:
_
managemylife
I1 TEE
DESMALEZADORA
Y
BORDEADORA TELESCOPICA
www.managemylife.com
For repair - in your home - of all major brand appliances,
lawn and garden equipment, or heating and cooling systems,
no matter who made it, no matter who sold it!
For the replacement parts, accessories and
owner's manuals that you need to do-it-yourself.
de i6n de litio de 12.0 voltios
Modelo N ° 320. 74906
For Sears professional installation of home appliances
and items like garage door openers and water heaters.
1=800=4=MY=HOME ®
(1-800-469-4663)
www.sears.com
Call anytime,
day or night
(U.S.A. and Canada)
www.sears.ca
For repair of carry-in items like vacuums, lawn equipment,
and electronics, call anytime for the location of the nearest
SearsPa_ts& RepairserviceCenter
1-800-488=1222 (U.S.A.)
1-800-469-4663 (Canada)
www.sears.com
i
www.sears.ca
To purchase a protection agreement on a product serviced by Sears:
1-800-827-6655
(U.S.A.)
1-800-361-6665
(Canada)
Para
pedir
servicio
dere_raci6nAuCanada
pour
service
enfran_ais:
a domicilio,y para ordenar piezas:
1-888-SU-HOGAR®
,
(1-888-784-6427)
www.sears.com
1.800.LE.FOYERMC
(1-800-533-6937)
:
www.sears.ca
Sears
Trademark
/ T_'_Trademark
of KCD IP, LLC in the United States, or Sears Brands_ LLC in other countries
® Marca Registrada
/ Tr_
'_Marca de Fabrica
de KCD IP, LLC en Estados
Unidos, o Sears
Brands,
LLC in otros paises
MD
_,_cMarque de commerce
/
Marque d@osee de Sears Brands, LLC
® Registered
a
_, ADVERTENCIA"
Para reducir
el riesgo de lesiones, el usuario
debe leer y comprender
el
Manual del Propietario antes
de usar este producto.
Sears Brands Management
www.craftsrnan.corn
°
* Operaci6n
* IVlantenimiento
* Espa_el
Cargar antes
del primer uso
Corporation, Hoffman Estates, IL 60179 U.S.A.
Garantia
El objeto de los simbolos
peligros.
Pagina 24
Simbolos
de Seguridad
Instrucciones
Pagina 25-26
generales
de seguridad
Pagina 29-30
Montaje
Pagina 31
Operacion
Pagina 32-38
Mantenimiento
Pagina 39-40
Identificaci6n
y solucion
Piano de Despiece
para solicitar
TOTAL
,_
Pagina 41-43
piezas de
Cubierta
sobre posibles
ADVERTENOIA:
AsegOrese de leer y comprender
todas las instrucciones
de seguridad de este manual, incluyendo todos los simbolos de alerta de
seguridad, tales como "PELIGRO",
"ADVERTENClA"
y "PRECAUClON"
antes de utilizar esta podadora.
No seguir todas las instrucciones
listadas a
continuacion
puede generar una descarga electrica, un incendio y/o lesiones
corporales graves.
Pagina 40
y Lista de Piezas
NOmeros de telefono
repuesto Sears
GARANT[A
de problemas
es atraer su atencion
Los simbolos de seguridad, y las explicaciones junto a ellos, ameritan su
cuidadosa atencion y comprension.
Los simbolos de advertencia no eliminan
los peligros por si solos. Las instrucciones y advertencias que ofrecen no
reemplazan las medidas adecuadas de prevencion de accidentes.
Paginas 27-28
Descripcion
de seguridad
SIGNIFICADO
posterior
DE LOS SiMBOLOS
,_ PELIGRO: Indica una situacion inminentemente
evita, puede provocar la muerte o una lesion grave.
DE UN AI_iO CRAFTSMAN
ADVERTENClA:
DURANTE UN AI_IO desde la fecha de compra, este producto cuenta
con garantia contra cualquier clase de defectos de material o de mano
de obra. Se reemplazar_ un producto defectuoso en forma gratuita.
Indica una situacion
evita, puede provocar
PRECAUCI()N:
peligrosa
potencialmente
que, si no se
peligrosa
que, si no se
peligrosa
que, si no se
la muerte o una lesion grave.
Indica una situacion
evita, puede provocar
inminentemente
la muerte o una lesion grave.
Si desea obtener detalles sobre la cobertura de garantia para obtener
un reemplazo sin costo, visite el sitio Web: www.craftsman.com
Mensajes
Esta garantia no cubre los cortadores porque son piezas prescindibles
que pueden desgastarse debido al uso normal dentro del periodo de
garantia.
Estos informan al usuario sobre informaciones
y/o instrucciones
importantes
que podrian provocar daSos al equipamiento
o a la propiedad si no se siguen.
Cada mensaje esta precedido por la palabra "NOTA", como en el ejemplo
siguiente:
La presente garantia quedar_ anulada si este producto se usa para
brindar servicios comerciales o si se alquila a terceros.
Corporation,
y de prevenci6n
de daSos
NOTA: Pueden provocarse daSos al equipamiento
cumplen estas instrucciones.
Esta garantia le otorga derechos legales especificos y usted puede
contar con otros derechos, que pueden variar de estado a estado.
Sears Brands Management
de informaci6n
_k
ADVERTENOIA:
Para garantizar
seguridad
y/o a la propiedad
y confiabilidad,
si no se
todas las
reparaciones deben set efectuadas por un tecnico calificado
de un Centro de Repuestos y Reparacion de Sears.
Hoffman Estates, IL 60179.
iGUARDE ESTAS INSTRUCCIONES!
_,
iLEA TODAS
herramienta electrica puede provocar el lanzamiento de
objetos en direccion de sus ojos, y los consecuentes
graves
daSos oculares. Antes de comenzar a utilizar la herramienta
LAS INSTRUCCIONES!
Esta desmalezadora/bordeadora
cuenta con varias caracteristicas
para hacer
su uso mas agradable y placentero.
Durante el dise_o de esta herramienta, la
seguridad, el rendimiento y la confiabilidad
han sido las prioridades principales,
ademas
de la sencillez
,_k ADVERTENCIA:
de mantenimiento
Ciertos polvillos
electricas contienen quimicos
cancer y defectos congenitos
74906
Manual_Revised_iS
0210
proteccion
ADVERTENClA:
El funcionamiento
de cualquier
electrica, siempre use gafas o lentes de seguridad con
lateral y una proteccion completa de rostro cuando sea necesario.
y de operacion.
generados
Recomendamos
el uso de una mascara de seguridad de vision amplia sobre los
anteojos o gafas de seguridad estandar con proteccion lateral. Siempre utilice
proteccion ocular con certificacion de cumplimiento
con ANSI Z87.1.
pot el uso de herramientas
que segOn el estado de California
u otros daSos reproductivos.
provocan
Page 24
74906
Manual_Revised_it
0210
Page 25
GUARDE ESTAS INSTRUCCIONES
Algunos de los siguientes simbolos pueden utilizarse en esta herramienta. Tenga a
bien estudiarlos y aprender su significado. Una interpretacion adecuada de estos
simbolos le permitira operar la herramienta de una manera mejor y mas segura.
SiMBOLO
NOMBRE
V
Voltios
A
Amperios
Hz
Hercios
W
Vatio
Energia
min
Minutos
Tiempo
Corriente
_k
/ EXPMCACI6N
LEA Y GUARDE
Corriente
•
Frecuencia (ciclos pot segundo)
alterna
Tipo de corriente
Velocidad
Velocidad
[]
Construcci6n
Pot minuto
Alerta de
condiciones
hOmedas
de la corriente
siempre
ESTAS INSTRUCCIONES
Evite los medios ambientes
h0medos o mojados.
peligrosos
- no utilice los artefactos
en lugares
bajo la Iluvia.
- todos
Use galas de seguridad - siempre
la operacion genera mucho polvillo.
de doble aislaci6n
Revoluciones, carreras, velocidad
6rbitas, etc., pot minuto.
electricos,
los visitantes
deben mantenerse
a
Vistase adecuadamente
- No use vestimenta suelta o joyas. Pueden
quedar atrapadas en las piezas en movimiento. Se recomienda el uso de
guantes de goma y calzado resistente cuando trabaje al aire libre. Utilice
proteccion para sujetarse el cabello largo.
giratoria, sin carga
Construcci6n
de jardineria
de seguridad b&sicas a fin de reducir el riesgo de
y/o lesiones a personas, incluyendo las siguientes:
Mantenga
a los niSos alejados
distancia del &rea de trabajo.
no
Clase II
Cuando utilice artefactos
No use la herramienta
Tipo o una caracteristica
sin carga
ADVERTENCIA:
deben seguirse precauciones
incendio, descarga electrica,
Voltaje
Corriente continua
.../min
de superficie,
Utilice el artefacto
fue concebido.
correcto
utilice mascarillas
- solo use el aparato
faciales o antipolvillo
para el trabajo
si
para el que
Evite el encendido involuntario - no Ileve el artefacto con la baterfa sujeta y con
el dedo colocado sobre el interruptor. Verifique que el interruptor se encuentre
en la posicion apagado (OFF) antes de colocar el paquete de baterfas.
No exponga a la Iluvia u otras Iocaciones homedas.
Lea el manual de
operaci6n
leer y comprender este manual de operaci6n
Para reducir el riesgo de lesiones, el usuario debe
antes de usar este producto.
Protecci6n
protecciones
laterales
y una de
protecci6n
todo el
Siempre
use gafas
o lentes
seguridad decon
rostro cuando utilice este producto.
No fuerce el artefacto
- la herramienta funcionar&
segura a la velocidad para la que fue dise_ada.
Alerta de seguridad
Precauciones
No trate de alcanzar lugares demasiado
equilibrada y segura en todo momento.
Simbolo
no tocar
con lasdemanos
No
mantener
sus manos
alejadas
de la sierra
provocar_t
lesiones
personales
graves.
Preste atenci6n
una herramienta
Simbolo
no tocar
con lasdemanos
No mantener
sus manos
alejadas
de la sierra
provocara
lesiones
personales
graves.
Simbolo
no tocar
con lasdemanos
No mantener
sus manos
alejadas
de la sierra
provocara
lesiones
personales
graves.
Guarde los aparatos que no use bajo techo - cuando no los use, los
aparatos deben guardarse en el interior en un lugar seco, elevado y seguro lejos del alcance de los niSos.
ocular
Simbolo
con lasdemanos
no tocar
Superficie
74906
DESIGNACI6N
ADVERTENCIAS GENERALES DE SEGURIDAD DE LAS HERRAMIENTAS ELECTRICAS
ManuaLRevised_11
0210
caliente
que involucran
su seguridad.
No mantener
provocara
lesiones
sus manos
personales
alejadas
graves.
de la sierra
Para reducir
riesgo desuperficie
lesiones caliente.
o da_os, evite el
contacto
con elcualquier
Page26
•
No agarre los cortadores
o sostenga el artefacto.
expuestos
o los bordes
alejados
de torte
cuando
levante
mejor y de manera m&s
- mantenga
a Io que est& haciendo.
Tenga sentido
electrica si est& cansado.
com0n.
una postura
No maneje
Realice mantenimiento
del artefacto
- mantenga afilado y limpio el
borde de corte para un mejor desempe5o y para reducir el riesgo de una
lesion. Siga todas las instrucciones
para lubricar y cambiar los accesorios.
Inspeccione el cable del aparato en forma peri6dica, y si se encuentra
daSado, h&galo reparar en un centro de reparacion autorizado.
Controle
los cables de extension periodicamente
y c&mbielo si se encuentra daSado.
Mantenga las manijas secas, limpias y libres de aceite o grasa.
74906
ManuaLRevised_11
0210
Page 27
Controle las piezas daSadas - antes de continuar el uso del artefacto deben
controlarse cuidadosamente
las protecciones
u otras piezas dafiadas a fin
de determinar si funcionan bien y si pueden realizar su funciSn. Verifique
la alineaci6n de las piezas en movimiento, la conexiSn de las piezas en
movimiento, la rotura de piezas, el montaje y otras condiciones que pueden
afectar su operaciSn. Las protecciones
o cualquier pieza que se encuentre
dafiada deben repararse de manera adecuada o reemplazarse por medio de
un centro autorizado a menos que el presente manual indique otra cos&
= No cargue
= No utilice
el aparato
un aparato
CONOZCA
per bateda
DE SETOS (Fig. 1)
(Counterclockwise)
Fig. 1
A_
Proteccion
bajo ia lluvia o en lugares hQmedos.
operado
SU PODADORA
de cesped
Boton de bloqueo/apagado
"Varilla telescopica
bajo la lluvia.
Almacenamiento
= No trate de quitar el material cortado ni sostenga ei material a cortar
cuando los cortadores
se encuentran
en rnovirniento.
Verifique que el
interruptor se encuentre en la posiciSn apagado (off) cuando elimine material
trabado en los cortadores. No agarre los cortadores expuestos o los bordes
de corte cuando levante o sostenga el artefacto.
PRECAUCION:
PRECAUCION:
_
_'
___Pala.n.ca
Manija auxiliar
_
No intente operar esta herramienta
Quite o desconecte
la bateda antes de efectuar
quitar material de los aparatos de jardineria.
Utilice solo la bateria y los cargadores
hasta que haya leMo
reparaciones,
la limpieza o
Palanca de
bloqueo de la _/_
varilla telescopica
DE BATERiAS
-'- Interruptor
Guia de
....
bordes de S_i
alam bre
A _f-
_
;'
ESPECIFICACIONES
320.10006
320.14300
Posiciones
del cabezal
No abra o rornpa la/s bateda/s.
Los electrolitos liberados son corrosivos y
pueden provocar dafios a los ojos o la piel. Pueden set t6xicos si se ingieren.
Capacidad
de corte
Velocidad
Tenga cuidado al manipular las batedas para no provocar un corto en la
bateria con materiales conductores tales como anillos, brazaletes o Ilaves.
La bateria o conductor pueden sobrecalentarse
y provocar quemaduras.
= Mantenga
las protecciones
= Mantenga
afilados
= Mantenga
las manos
y los pies alejados
•
las manos
alejadas
ManuaLRevised_11
02±0
/
_"
/ ,)_.
listados:
Tipo de motor
74906
de gatillo
j/
No deseche las batedas en el fuego. Las celdas pueden explotar. Consulte
los c6digos locales sobre posibles instrucciones especiales sobre eliminaci6n.
Mantenga
manija auxiliar
de baterias
CARGADOR
l 320.11221
•
de
_/'/
_ Paquete
I PAQUETE
de bloqueo
Los cortadores siguen moviendose despues de apagar el aparato.
con cuidado todas las instrucciones,
normas de seguridad y advertencias.
No hacerlo puede generar un incendio, una descarga electrica o lesiones
personales graves. Conserve el Manual del propietario para referencia futura y
relealo frecuentemente
como referencia.
•
de cortador
en su lugar yen
buenas
condiciones.
los cortadores.
del _rea de corte.
12.0 voltios
Page 28
giratorio
(sin carga)
9" de diametro
8000 RPM
13 pulgadas
Sistema
Cortadores
de corte
CC
0°, 60 ° y 90 °
Ajuste telescopico
plasticos
Tipo de bateria
16n de litio
Entrada del cargador
120 voltios,
Temperatura
32°F (0 ° C) -104°F (40°C)
de carga optima
Peso (sin bateria)
de los cortadores.
DE PRODUCTO
74906
ManuaLRevised_$t
60 hercios solo CA
3.5 Ibs
02±0
Page 29
ADVERTENClA:
El uso seguro de este producto
requiere una comprension
de la informacion incluida en la herramienta yen este manual del propietario,
ademas del conocimiento
del proyecto que esta iniciando. Antes de usar este
producto, familiaricese con todas las caracteristicas
de operacion y normas de
seguridad.
MANIJA
AUXiLIAR
AJUSTABLE
La manija auxiliar puede ajustarse
perdida de control.
CABEZAL
PWOTANTE
La proteccion
BOTON
la operacion
de la desmalezadora
entre 0% 60 ° y 90 °.
que salgan volando.
DE BLOQUEO/APAGADO
GUiA DE BORDES
evita el arranque
DE ALAMBRE
diferentes
puede ajustarse
montado.
= Con cuidado, quite la herramienta y los accesorios de la caja. AsegOrese de
que todos los elementos listados en el paquete esten incluidos.
ManuaLRevised_11
0210
que no hayan
= No descarte el material de empaque hasta que haya inspeccionado
herramienta con cuidado y la haya utilizado satisfactoriamente.
en diferentes
alturas para un uso mAs sencillo.
la
LISTA DE EMPAQUE
Desmalezadora,
paquetes de baterias, proteccion
tornillos, cargador y manual del propietario.
74906
o
= Si alguna pieza se encuentra da_ada o no fue incluida en el envio, consulte
los nOmeros listados en la cubierta posterior del manual del propietario.
TELESCOPICA
La herramienta
se ha enviado completamente
= Inspeccione la herramienta con cuidado para constatar
ocurrido roturas o da_os durante el envio.
accidental.
La guia de bordes de alambre puede bloquearse en dos posiciones
para facilitar el uso cuando se realizan recortes y cortes de bordes.
VARILLA
esta desmalezadora/bordeadora
DESEMPAQUE
Este producto
protege al usuario de elementos
El boton de bloqueo/apagado
No trate de modificar
crear accesorios no recomendados
para usar con esta herramienta.
Cualquier
alteracion o modificacion
constituye un uso indebido y podria provocar una
condicion peligrosa y posibles lesiones graves.
DE ClaSPED
de cesped
Si falta alguna pieza o si alguna pieza estA rota, no trate
ADVERTENClA:
y para evitar la
DE TRES POSICIONES
La manija rotativa gira el cabezal
PROTECCKDN
para facilitar
ADVERTENClA:
de colocar la bateria u operar la desmalezadora/bordeadora
hasta que se haya
reemplazado dicha pieza. No hacerlo puede provocar una lesion personal
grave.
Page 30
74906
ManuaLRevised_11
0210
de hoja, 13 cortadores,
2
Page 31
PROTECCION
Cargue el paquete de baterias de ion de
litio con el cargador correcto.
2.
Conecte
3.
Alinee los rebordes elevados del paquete
de baterias con la ranura en el cargador.
4.
Introduzca el paquete
del cargador (Fig. 2).
5.
El cargador
de baterias
6.
Las luces verdes destellar&n mientras se carga el paquete de baterias.
Cuando finalice la carga, la luz verde LED del cargador quedar& encendida.
Una luz roja destellante indica una bateria defectuosa o una mala conexion
entre la bateria y el cargador.
7.
El paquete de baterias se cargar& per complete
pero no sufrir& una carga excesiva.
DE LA BATERiA
Para proteger la bateria de dafios y para prolongar su vida Otil, el circuito del
paquete de baterias apaga el paquete si se sobrecarga o si la temperatura
se eleva demasiado durante el use. Esto puede suceder cuando hay un
torque extremadamente
alto, o cuando las piezas de trabajo se fijan o traban.
Este sistema inteligente apaga el paquete de baterias si la temperatura de
funcionamiento
supera los 176°F (80°C) y reanuda el funcionamiento
normal
cuando vuelve a 32°F (0°C) y 122°F (50°C). El paquete de baterias comienza el
funcionamiento
normal cuando se enfria.
NOT.&: Si el tiempo de funcionamiento
se ve reducido
despues de una carga completa, entonces el paquete
cerca del fin de su vida 0til y debe cambiarse.
FUNCIONAMIENTO
EN CLIMAS
significativamente
de baterias se encuentra
FRieS
Este paquete de baterias de ion de litio ofrece un desempefio optimo en
temperaturas comprendidas
entre 32°F (0°C) y 104°F (40°C). Cuando el paquete
de baterias est& muy frio, puede "pulsar" durante el primer minute de use
para calentarse.
Coloque el paquete de baterias en la herramienta y utilice la
herramienta en una aplicacion suave. Despues de un minute, el paquete de
baterias se habr& calentado y funcionar& normalmente.
CUANDO
1.
CARGAR
EL PAQUETE
FUNCIONES
INDICADOR
LED
el cargador
Fig. 2
a un tomacorriente.
de baterias dentro
se comunicar& con el paquete
para evaluar el estado del mismo.
DE LUZ LED DEL CARGADOR
LUZ
PAQUETE DE
BATERiAS
si se Io deja en el cargador,
(Fig. 3)
LUZ LED
ROJA
LUZ LED
VERDE
DE BATERiAS
No es necesario descargar per complete el paquete de baterias antes de
recargarlo.
La bateria de ion de litio puede cargarse en cualquier memento y
no desarrolla una "memoria" cuando se carga despues de solo una descarga
parcial.
Quite el paquete de baterias de la herramienta
usted y para su trabajo.
cuando
resulte conveniente
"Refuerce" la carga del paquete de baterias carg&ndolo durante
de comenzar un trabajo importante o un use prolongado.
Temp.
Hi (alta)
/Lo (baja)
(ver
r_
If_, I
manual)
Bateria caliente/
fria
Encendida
Apagada
El paquete
de baterias
defectuesa
Bateria
un tiempo antes
La bateria
se
esta cargando
CARGAR
EL PAQUETE
DE BATERiAS
(Fig. 2)
Bateria
nena
o cargador/
adaptador
est&n
defectuosos
[_
Defectuoso
Destellante
Apagada
r_
L_
Cargando
Apagada
Destellante
Cargando
[_]
Completamente
cargado
Encendida
La carga est&
completa.
Carga de
mantenimiento
Para indicar el final de la carga, la energia hacia la herramienta descender&
r&pidamente.
Cargue el paquete de baterias segOn sea necesario.
COMO
La carga
comenzar&
cuando la
bateria vuelva
a 32°F (0°0) 104°F (40°0)
para
Debido a las propiedades del ion de litio per las que no hay un desgaste
gradual, el 0nice memento en que es necesario cargar el paquete de baterias de
ion de litio es cuando el paquete ha alcanzado el fin de la carga.
ACCION
NOTA: Este paquete de baterias de ion de litio se envia parcialmente cargado.
Antes de utilizarlo per primera vez, cargue el paquete de baterias per complete.
Apagada
Un paquete de baterias completamente
descargado
se cargar& en alrededor de
30 minutes con una temperatura ambiente de entre 50°F (10°C) y 104°F (40°C).
74906
Manual_Revised_$t
02:$0
Page 32
74906
Manual_Revised_$t
02:$0
Page 33
CARGA
DE UN PAQUETE
DE BATERiAS
Si la temperatura del paquete de baterias
de temperatura
normal, la luz LED roja se
apagada.
Cuando el paquete de baterias
el cargador comenzara la carga en forma
CARGA
DE UN PAQUETE
DE BATERiAS
CALIENTE
COMO
se encuentra por encima del tango
iluminara y la luz LED verde quedara
se enfrie a alrededor de 104°F (40°C),
automatic&
FRiO
Si la temperatura del paquete de baterias se encuentra por debajo del tango
de temperatura
normal, la luz LED roja se iluminara y la luz LED verde quedara
apagada.
Cuando la bateria sube su temperatura a mas de 50°F (10°C), el
cargador comenzara la carga en forma automatic&
BATERiA
1.
la luz LED roja comenzara
a destellar
Si el otro paquete de baterias se carga normalmente,
baterias defectuoso (ver la seccion Mantenimiento).
3°
Si un paquete de baterias diferente tambien
puede set el cargador el que funcione mal.
elimine el paquete
sefiala "defectuoso",
de
entonces
LLENA
la luz LED verde del cargador
NOTA: El paquete de baterias se cargara por completo
cargador, pero no sufrira una carga excesiva.
se encendera
Fig. 4
Mantenga sus manos alejadas del
interruptor.
2.
NO TOQUE los cortadores.
3°
Alinee el reborde elevado del paquete de
baterias con las ranuras de la manija de
la desmalezadora/bordeadora,
y luego
deslice el paquete de baterias dentro
de la manija para sujetar el paquete de
baterias a la herramienta.
,_ PRECAUCION:
Cuando coloque el paquete de baterias en la herramienta,
constate que el reborde elevado del paquete de baterias este alineado con la
ranura interior de la podadora y que las trabas se fijen bien en su lugar. Un
montaje inadecuado del paquete de baterias puede provocar dafios a los
componentes
internos.
COMO
Si el paquete de baterias se esta cargando dentro de un tango de temperatura
normal (50 °F a 104 °F), la luz LED verde comenzara a destellar y la luz LED
roja quedara apagada.
El paquete de baterias alcanza la carga completa en 30
minutos.
Despues de una carga completa,
la luz LED roja se apagara.
(Fig. 4)
NOTA: Constate que la traba del paquete de baterias se fije en su lugar y que
el paquete de baterias este bien sujeto a la herramienta antes de comenzar el
funcionamiento.
BATERiAS CARGANDOSE
BATERiA
DE BATERiAS
1.
y la
Si se indica como defectuosa, quite y vuelva a colocar el paquete de
baterias en el cargador.
Si el estado de la luz LED dice "defectuosa"
una
segunda vez, trate de cargar un paquete de baterias diferente.
2.
EL PAQUETE
,_ ADVERTENClA:
AsegOrese de que la
podadora este apagada ("OFF").
DEFECTUOSA
Si el cargador detecta un problema,
luz LED verde quedara apagada.
COLOCAR
Aseg0rese
DE BATERiAS
(Fig. 4)
de que la desmalezadora/bordeadora
1.
Mantenga
2.
NO TOQUE los cortadores.
3.
Baje los botones de liberacion de la bateria ubicados
del paquete de baterias para liberarlo.
4.
Tire del paquete
COMO
NOTA" El cargador puede calentarse despues de varios ciclos de carga
continuos.
Esto es parte de un funcionamiento
normal de la carga. Cargue las
baterias en un Area bien ventilada.
EL PAQUETE
_k ADVERTENClA:
apagada ("OFF").
y
si se Io deja en el
QUITAR
este
sus manos alejadas de los interruptores.
SUJETAR
de baterias hacia afuera para quitarlo
A PROTECCION
ADVERTENClA:
Nunca utilice
la herramienta sin la proteccion
firmemente colocada en su lugar.
La proteccion siempre debe
hallarse en la herramienta para
proteger al usuario.
DE ClaSPED
Fig. 5a
sobre ambos costados
de la herramienta.
(Fig. 5a y 5b}
Ranuras
Ganchos
Cabezal de la
desmalezadora
ADVERTENClA:
AsegQrese
de que la desmalezadora/
bordeadora este apagada ("OFF").
74906
Manual_Revised_it
02±0
Page 34
74906
Manual_Revised_it
02±0
Page 35
1.
Quite el paquete
de baterfas.
AJUSTE
2.
Coloque la proteccion de corte en el cabezal
de la herramienta (Fig. 5a).
3o
Coloque los ganchos de la protecci6n en las
ranuras del cabezal de la desmalezadora (Fig.
I Fig. 5b
5o
AUXiLIAR
(Fig. 8)
La manija auxiliar puede configurarse
posiciones.
5a).
4o
DE LA MANIJA
Presione la parte trasera de la proteccion
hasta oft el clic que indica que la proteccion
esta colocada (Fig. 5b).
en varias
1.
Quite el paquete
de baterias.
2.
Libere la palanca de bloqueo de la manija
auxiliar para aflojar la manija.
3.
Ajuste la manija auxiliar en una posicion
comoda.
NOTA: La manija puede ajustarse
frente y 20 ° en la parte trasera.
Ajuste los tornillos colocados previamente
en la proteccion dentro del cabezal de la
desmalezadora
(Fig. 5c).
4.
a 40 ° en el
Trabe la palanca firmemente.
AJUSTE DE LA VARILLA TELESCOPICA
La Iongitud de la varilla telescopica
ajustarse.
COMO COLOCAR/QUITAR
EL CORTADOR
,_ ADVERTENClA:
Aseg0rese
de que la desmalezadora/
bordeadora este apagada
("OFF').
Fig. 6
Pivote
1.
Quite el paquete
2.
Coloque el cortador sobre
el pivote y tire del cortador
hacia afuera hasta que este
se trabe en su lugar (Fig. 6).
3o
(Fig. 6)
Cortador
de baterfas.
puede
Fig. 9
Quite el paquete
2.
Abra la palanca de bloqueo
varilla telescopica.
3.
Tire la varilla hacia afuera para aumentar la
Iongitud o presione la varilla hacia adentro
para reducir la Iongitud.
4.
Cuando alcance la Iongitud
la palanca de bloqueo.
AJUSTE
de baterfas.
DEL CABEZAL
para aflojar la
deseada,
PIVOTANTE
cierre
DE TRES POSICIONES
(Fig. 10}
Fig. 10
90 grados
Para quitar el cortador,
presione el mismo hacia adentro y levantelo del pivote.
ALMACENAMIENTO
DEL CORTADOR EN LA HERRAMIENTA (Fig. 7)
La desmalezadora/bordeadora
almacenamiento
cortadores.
cuenta con
en la herramienta
para 6
Fig. 7
El cabezal de la desmalezadora
0% 60 ° y 90 °.
74906
(Fig. 9)
1.
plAstico
Fig. 8
Manual_Revised_11
0210
Page 36
puede ajustarse
1.
Quite el paquete
2.
Gire el cabezal de la desmalezadora
por las ranuras.
74906
Manual_Revised_11
en tres posiciones
diferentes:
de baterfas.
0210
a una de las tres posiciones
indicadas
Page 37
NOTA: Ajuste el cabezal a 0 ° o 60 ° para
efectuar recortes y a 90 ° para cortar bordes.
Fig. 12
MANTENIMIENTO
NOT.&: AsegOrese de que el cabezal de la
desmalezadora
este bien fijo en su lugar antes
de volver a instalar el paquete de baterias.
GUiA DE BORDES
Evite usar solventes cuando limpie piezas plasticas.
La mayoria de los plasticos
son susceptibles a dafios pot parte de varios tipos de solventes comerciales y
pueden dafiarse pot su uso. Utilice patios para quitar suciedad, polvillo, aceite,
grasa, etc.
DE ALAMBRE
La guia de bordes de alambre puede
bloquearse en dos posiciones diferentes para
facilitar el uso cuando se realizan recortes y
cortes de bordes.
,_
PRECAUCK)N:
ocular.
RECORTES
Siempre
,_
use proteccion
y apagado
cortar
el c_sped
recortar
Ajuste el cabezal
ADVERTENClA:
Cuando realice un mantenimiento,
solo utilice piezas de
Las baterias de esta herramienta han sido disefiadas para ofrecer una vida
Otil maxima libre de problemas.
AI igual que todas las baterias, finalmente se
terminaran gastando.
No desarme el paquete de baterias, nitrate de cambiar
las baterias. Si manipula las baterias, especialmente
cuando usa anillos y joyas,
puede sufrir quemaduras graves.
Fig. 14
(Fig. 12)
Para obtener la vida Otil de la bateria mas prolongada
el manual del propietario.
•
bordes
a 90 °.
ManuaLRevised_$t
02:$0
No permita que los cortadores
piedras o paredes de jardines,
Page 38
del paquete
lea y comprenda
y quitar el paquete
de baterias de ion de litio mayor a 30 d[as:
*
Almacene el paquete de baterias de ion de litio en un lugar con temperatura
menor a 80°F (26°C) y libre de humedad.
*
Almacene
30%-50%.
*
Cada seis meses de almacenamiento,
baterias de ion de litio.
*
La parte exterior
metalicas.
(Fig. 14)
de la desmalezadora
posible,
Es una buena practica desenchufar el cargador/adaptador
de baterias de ion de litio cuando no los este usando.
Para un almacenamiento
(Fig. 13}
Guia la mAquina a Io largo del borde del cesped.
entren en contacto con superficies pavimentadas,
ya que esto desgastarA el cortador rApidamente.
74906
que liquido de
El paquete de baterias se encuentra equipado con baterias recargables de ion
de litio. El tiempo de duracion despues de cada carga depende del tipo de
trabajo realizado.
Desplace la desmalezadora
de izquierda
a derecha, manteniendola
bien alejada del
cuerpo.
C6mo
bajo ninguna circunstancia
BATERiAS:
Para encender la desmalezadora,
presione
el boton de bloqueo/apagado
y presione
el interruptor de gatillo. Para apagar la
herramienta, libere el gatillo.
C6mo
No permita
repuesto Craftsman identicas.
El uso de otras piezas puede generar un riesgo
o provocar dafios al producto.
Para garantizar seguridad y confiabilidad,
todas
las reparaciones deben ser efectuadas pot un tecnico calificado de un Centro de
Atencion Sears.
Y CORTES
PRECAUCION:
Inspeccione el Area que
se va a desmalezar y quite cables, cuerdas
u objetos similares a hilos que podrian
engancharse con los cortadores.
Tenga
especial cuidado de evitar cualquier alambre
que podria inclinarse hacia el trayecto de la
herramienta, como pOas en la base de una
cerca de alambrada.
Encendido
ADVERTENClA:
frenos, gasolina, productos a base de petroleo, aceites penetrantes, etc. entren
en contacto con las piezas plasticas. Los quimicos pueden dafiar, debilitar o
destruir el plastico, Io que puede provocar una lesion personal grave.
Quite la guia de bordes de alambre (Fig. 1la)
y vuelva a instalarla en el otro lado.
COMO REALIZAR
DE BORDES
GENERAL
74906
los paquetes
ManuaLRevised_$t
de baterias de ion de litio con una carga del
puede limpiarse
02:$0
cargue pot completo
el paquete
de
con un patio o con un cepillo sin cerdas
Page 39
REMOCION DEL PAQUETE DE BATERiAS Y
PREPARACI(_N PARA EL RECICLADO
DESMALEZADORA/BORDEADORA INALAMBRICA DE ION DE LITIO DE
12.0 VOLTIOS NUMERO DE MODELO 320.74906
Para preservar los recursos naturales, tenga a bien
reciclar o eliminar las baterias como corresponde.
Este producto contiene baterias de ion de litio. Las
leyes locales, estatales o federales pueden prohibit
la eliminacion de baterfas de ion de litio con los
desechos normales. Consulte a la autoridad de
residuos local sobre informacion concerniente
alas
opciones
de reciclado
El NOmero de Modelo se encuentra en la placa sujeta a la manija de la
desmalezadora/bordeadora.
Siempre mencione el nOmero de modelo cuando
solicite repuestos para esta herramienta.
y/o eliminacion.
_, ADVERTENCIA:
AI quitar el paquete de baterfas para eliminacion o
reciclado, cubra las terminales del paquete de baterias con cinta adhesiva
de alta resistencia.
No trate de destruir o desarmar el paquete de baterfas
o de quitar ninguno de sus componentes.
Las baterfas de ion de litio deben
reciclarse o eliminarse de manera adecuada.
Ademas, nunca toque las terminales con objetos metalicos y/o con su cuerpo
porque puede producirse un cortocircuito.
Mantengalo alejado de los ni_os. No
cumplir con estas advertencias
puede provocar un incendio y/o lesiones graves.
PROBLEMA
CAUSA
1.
La desmalezadora/
bordeadora no
funciona
gastada.
2.
1.
El corte resulta dificil.
74906
ManuaLRevised_11
La baterfa esta
0210
SOLUCI6N
1.
Cargue la bateria.
2.
Siga las
instrucciones
la instalacion
bateria.
La baterfa no esta bien
instalada.
Los bordes de los
cortadores plasticos
estan desgastados.
1.
para
de la
//
Instale nuevos
cortadores.
Page 40
74906
ManuaLRevised_11
0210
Page 41
DESMALEZADORA/BORDEADORA
INAL_MBRiCA
12.0 VOLTIOS NUMERO DE MODELO 320.74906
El NOmero de Modelo se encuentra en la placa sujeta a la manija de la
desmalezadora/bordeadora.
Siempre mencione el nOmero de modelo cuando
solicite repuestos para esta herramienta.
3125759000
Carcasa trasera
1
2
3125758000
Carcasa frontal
1
3
5610012004
Tornillo autorroscante
4
3124124000
Proteccion
5
3125747000
Llave
1
6
3124126000
Brida de fijacion
1
7
3550814000
Clavija
1
8
3125926000
Brida de fijacion
1
9
3125754000
Carcasa
10
3125753000
Carcasa derecha
11
3125741000
Carcasa
12
3125742000
Carcasa derecha
13
3650127000
Proteccion
14
3125797000
Cortador
13
15
2730174000
Motor de CC
1
16
3551660000
Junta
1
17
3125743000
Cubierta
1
18
5650002001
Arandela
19
5620032001
Tornillo
2
20
5610011003
Tornillo autorroscante
3
21
3125751000
Cubierta
1
22
3125750000
Bandeja de herramienta
1
23
5650005001
Arandela
2
24
5680171000
Remache
74906
ManuaLRevised_11
0210
izquierda
izquierda
izquierda
01
01
02
02
de plantas
simple
simple
5630015002
Tuerca hexagonal
26
5650017008
Arandela
27
4860242000
Cable interno
1
28
3704912000
Tubo interno
1
29
5610039007
Tornillo autorroscante
2
30
5650012001
Arandela
2
31
3125744000
Proteccion
32
3124125000
Proteccion
33
3704913000
Tubo externo
1
34
3124127000
Cubierta
1
35
3124165000
Cojinete
1
36
3125749000
Caja de sujecion
37
5670004000
Perno de resorte
1
38
3551666000
Varilla de bloqueo
1
39
3125752000
Llave
1
40
5650012001
Arandela
41
5630003008
Tuerca hexagonal
1
42
3321150000
Montaje
1
43
3125746000
Boton de bloqueo/apagado
1
44
3125745000
Interruptor
1
45
3660485000
Resorte de compresion
2
46
4870037000
Interruptor
1
47
3704254000
Anillo de la manija
1
48
0210151004
5120 Paquete de energia
1
49
3402298000
Montaje
del receptaculo
50
4890642001
Montaje
de la PCI
1
51
3321149000
Montaje
de la manija izquierda
1
52
3125748000
Abrazadera
DE ION DE LITIO DE
31
1
1
1
1
1
1
2
de torsion dominante
simple
1
1
simple
1
derecha
1
r&pida
1
simple
1
de manija derecha
de gatillo
de alambre
de contacto
1
1
1
Page 42
74906
ManuaLRevised_11
0210
Page 43
Su Hogar
Paradetecci6nde problemas,manualesde productosy consejosexpertos:
managemylife
www.managemylife.com
Para reparaciones -en su hogar- de todos los artefactos,
equipamiento de jardin, o sistemas de calefacci6n o refrigeraci6n de marcas importantes, sin importar qui_n Io fabric6,
o qui_n Io vendi6!
Para piezas de repuesto, accesorios y manuales de usuario
que necesite para hacerlo usted mismo.
Para la instalaci6n profesional de Sears de electrodom6sticos
y productos como dispositivos para apertura de puertas de
garajes y calentadores de agua.
1 =800=4=lVlY=HOM
E ®
Ltame en cualquier momento, de dia o de noche
(1-800-489-4863)
www.sears.com
(EE.UU. y Canad&)
www.sears.ca
Nuestro Hogar
Para reparar productos transportables, como aspiradoras,
equipamiento de jardin y aparatos electr6nicos, Ilame en
cualquier momento para consultar sobre el Centro de
Repuestos y Reparaciones de Sears m_s cercano.
1-800-488-1222 (EE.UU.)
1-800-469-4663 (Canad&)
............................................
............................................................
www:sears.ca
................................
Para adquirirun acuerdode protecci6nsobre un producto cubiertopor Sears:
1-800-827-6655 (EE.UU.)
Para pedir servicio de reparaci6n
a domicilio,y para ordenar piezas:
1-888-,SU-HOGAR®
:
®
Au Canada pour service en frangais:
1-800-LE-FOYERMc
(1-800-533-6937)
(1-888-784-6427)
www.sears.com
Registered
® Marca
MC
Marque
1-800-361-6665 (Canada)
/ T_'_Trademark
of KCD
IP, LLC
in the
/ TN Marca
de Fabrica
de KCD
IP, LLC en
MD
commerce
/
Marque
ddposde
de Sears
Brands,
Trademark
Registrada
de
www.sea
United
Estados
LLC
States,
Unidos,
or
Sears
o Sears
rs.ca
Brands,
Brands,
LLC
LLC
in other
in otros
countries
paises