1
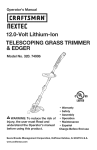
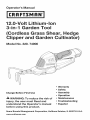
12.0-Volt Lithium-ion
3-in-1 Garden Tool
(Cordless Grass Shear, Hedge
Clipper and Garden Cultivator)
Model No. 320. 74900
• Warranty
• Safety
Charge
Before
WARNING:
• Assembly
First Use
To reduce
the risk of
injury, the user must Read and
understand the Operator's manual
before using this product.
• Operation
• Maintenance
• Troubleshooting
• Espa_ol
Sears Brands Management Corporation, Hoffman Estates, IL 60179 U.S.A.
www.craftsman.com
Warranty
Page 2
Safety Symbols
Page 3-4
General Safety Instructions
Page 5-10
Description
Page 12-13
Operation
Page 14-20
Maintenance
Page 20-21
Troubleshooting
Page 21
Exploded
Page 22-23
View and Parts List
Sears Repair Parts Phone Number
The purpose
of safety symbols
WARNING:
Be sure to read and understand
SYMBOL
SIGNAL
DANGER:
FOR ONE YEAR from the date of purchase, this product is warranted
against any defects in material or workmanship. A defective product will
be replaced free of charge.
visit the
This warranty is void if this product is ever used while providing
commercial services or if rented to another person.
CAUTION:
Indicates
Damage
an hazardous
making
which,
if not avoided,
will result
Prevention
situation,
which, if not avoided,
could
situation,
which,
if not avoided,
may
injury.
and Information
Messages
These inform the user of important information and/or instructions that could
lead to equipment or other property damage if they are not followed. Each
message is preceded by the word "NOTICE," as in the example below:
by a qualified
and/or
property
damage
may result if these instructions
To ensure safety and reliability,
service technician
WARNING:
design of this product
situation,
injury.
result in minor or moderate
WARNING:
Hoffman Estates, IL 60179
a hazardous
Indicates a hazardous
NOTICE: Equipment
not followed.
The warranty gives you specific legal rights, and you may also have
other rights which vary from state to state.
This tool has many features for making
Safety, performance, and dependability
in this
injury.
result in death or serious
ONE YEAR FULL WARRANTY
Corporation,
all safety instructions
MEANING
Indicates
WARNING:
Sears Brands Management
dangers.
manual, including all safety alert symbols such as "DANGER,"
"WARNING,"
and "CAUTION"
before using this tool. Failure to following all instructions listed
below may result in electric shock, fire and/or serious personal injury.
Back Cover
For warranty coverage details to obtain free replacement,
web site: www.craftsman.com
to possible
The safety symbols, and the explanations with them, deserve your careful
attention and understanding.
The symbol warnings do not, by themselves,
eliminate any danger. The instructions and warnings they give are no substitutes
for proper accident prevention measures.
in death or serious
CRAFTSMAN
is to attract your attention
its use more pleasant and enjoyable.
have been given top priority in the
all repairs should
are
be performed
at a Sears Parts & Repair Service Center.
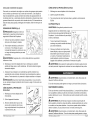
The operation
of any power tools can result in
foreign objects being thrown into your eyes, which can result
in severe eye damage. Before beginning power tool operation,
always wear safety goggles or safety glasses with side shield
and a full face shield when needed. We recommend a Wide
it easy to maintain and operate.
SAVE THESEINSTRUCTIONS!
Vision Safety Mask for use over eyeglasses or standard safety
glasses with side shields. Always use eye protection which is
marked to comply with ANSI Z87.1
READ ALL INSTRUCTIONS!
WARNING: WARNING: Some dust created by using power tools contains
chemicals known to the state of California to cause cancer and birth defects or
other reproductive harm.
74900
ManuaLRevised_11
0317
Page 2
74900
ManuaLRevised_11
0317
Page 3
SAVE THESE INSTRUCTIONS
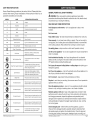
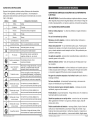
Some of these following symbols may be used on this tool. Please study them
and learn their meaning. Proper interpretation
of these symbols will allow you to
operate the tool better and more safely.
SYMBOL
NAME
DESIGNATION/EXPLANATION
V
Volts
Voltage
A
Amperes
Current
GENERAL
POWER TOOL SAFETY WARNINGS
_, WARNING: When using electric gardening appliances, basic safety
precautions should always be followed to reduce the risk of fire, electric shock,
and personal injury, including the following.
READ AND SAVE THESE
Hz
Hertz
Frequency
W
Watt
Power
min
Minutes
Alternating
Direct
nO
Class
.../min
Current
Current
Safety
,t_
No Hands
Double-insulated
Alert
Manual
Alert
Symbol
Do not expose
locations.
at no load
Use safety
construction
in damp or wet
all visitors
should
be kept at a distance
from work area.
glasses
- always use face or dust mask if operation
- do not use an appliance
is dusty.
for any job except that for
Avoid unintentional
starting - don't carry the appliance with an attached
battery and with your finger on the switch. Make sure that the switch is in the
OFF position before inserting the battery pack.
to rain or use in damp
Don't grasp the exposed
holding the appliance.
cutting
blades
or cutting
edges
when picking
up or
Don't force the appliance - it will do the job better and with less likelihood
risk of injury at the rate for which it was designed.
glasses with side shields and a full face
Always wear safety goggles or safety
shield when operating this product.
that involve
away-
Use the correct appliance
which it is intended.
speed,
read and understand
operator's
manual
To reduce the risk of injury, user must
before using this product.
Precautions
- don't use appliances
Dress properly - do not wear loose clothing or jewelry. They can be caught in
moving parts. Use of rubber gloves and substantial footwear is recommended
when working outdoors. Wear protective hair covering to contain long hair.
of current
Revolutions,
strokes, surface
orbits, etc., per minute
Eye Protection
O
speed,
environments
use in rain.
Keep children
Type of current
Rotational
Per Minute
Read The Operator's
Don't
Type or a characteristic
II Construction
Wet Conditions
Avoid dangerous
locations.
per second)
Time
No Load Speed
]
(cycles
INSTRUCTIONS
Don't
your safety.
Failure will
blade
to result
keep your
in serious
hands personal
away frominjury.
the
overreach
of a
- keep proper footing and balance at all times.
Stay alert - watch what you are doing.
appliance when you are tired.
Use common
sense. Do not operate the
Store idle appliances
indoors - when not in use, appliances should be stored
indoors in a dry, and high or locked-up place - out of reach of children.
No Hands
Symbol
No Hands
Symbol
blade
in serious
Failure will
to result
keep your
hands personal
away frominjury.
the
No Hands
Symbol
blade
in serious
Failure will
to result
keep your
hands personal
away frominjury.
the
Hot Surface
74900 ManuaLRevised_11
blade
in serious
Failure will
to result
keep your
hands personal
away frominjury.
the
0317
Maintain appliance with care - keep cutting edges sharp and clean for best
performance and to reduce the risk of injury. Follow instructions for lubricating
and changing accessories. Inspect the appliance cord periodically and, if
damaged, have it repaired by an authorized service facility. Inspect extension
cords periodically and replace if damaged. Keep handles dry, clean, and free
from oil and grease.
Check damaged parts - before further use of the appliance, a guard or
other part that is damaged should be carefully checked to determine that it
will operate properly and perform its intended function. Check for alignment
of moving parts, binding of moving parts, breakage of parts, mounting, and
avoid
contact
anyinjury
hot surface.
To reduce
the with
risk of
or damage,
Page 4
74900
Manual_Revised_11
0317
Page 5
any other condition that may affect its operation. A guard or other part that is
damaged should be properly repaired or replaced by an authorized service
center unless indicated elsewhere in this manual.
Do not charge
appliance
in rain, or in wet locations.
Do not use battery-operated
appliance
WORK
*
When the tool is stored or not in use, always attach the blade cover on the blade
to prevent the operator from being hurt.
Do not attempt
to operate this tool until you have read all
instructions, safety rules, and warnings thoroughly. Failure to comply may result
in fire, electric shock, or serious personal injury. Keep the Operator's Manual for
future reference, and review it frequently.
Remove or disconnect
the battery before servicing,
material from the gardening appliances.
cleaning
320.10006
320.29497
Do not dispose of the batteries
in a fire. The battery may explode.
local codes for possible special disposal instructions.
Check with
Do not open or mutilate the batteries.
Released electrolyte is corrosive
may cause damage to the eyes or skin. It may be toxic if swallowed.
Keep blades
sharp.
Keep hands
and feet away from
Keep your hands
74900
ManuaLRevised_11
0317
(corded)
AREA SAFETY
Keep your work
accidents.
area clean and well lit. Cluttered
or dark areas invite
Do not operate power tools in explosive
environments,
such as in the
presence of flammable
liquids, gases, or dust. Power tools create sparks,
which may ignite the dust or fumes.
Keep children and bystanders
away while
Distractions
may cause you to lose control.
ELECTRICAL
operating
a power tool.
SAFETY
Water entering
a
Do not abuse the cord. Never use the cord for carrying,
pulling, or
unplugging
the power tool. Keep the cord away from heat, oil, sharp
edges, or moving parts. Damaged or entangled cords increase the risk of
electric shock.
= If operating a power tool in a damp location is unavoidable,
use a ground
fault circuit interrupter (GFCl} protected supply. Use of a GFCI reduces the
risk of electric shock.
PERSONAL
away
reference.
= When operating
a power tool outdoors,
use an extension cord suitable
for outdoor use. Use of a cord suitable for outdoor use reduces the risk of
electric shock.
order.
cutting
for future
and
Exercise care in handling batteries
in order not to short the battery with
conducting
materials such as rings, bracelets and keys. The battery or
conductor may overheat and cause burns.
in place and in working
and instructions
Do not expose power tools to rain or wet conditions.
power tool will increase the risk of electric shock.
320.14300
Keep guards
Failure to follow
Avoid body contact with grounded
surfaces,
such as pipes, radiators,
ranges, and refrigerators.
There is an increased risk of electric shock if your
body is grounded.
CHARGER
320.11221
and instructions.
Power tool plugs must match the outlet. Never modify the plug in any
way. Do not use any adapter plugs with earthed (grounded) power tools.
Unmodified plugs and matching outlets will reduce the risk of electric shock.
or removing
Use onlythe b_tery and chargerslisted:
BATTERY PACK
warnings
may result in electric shock, fire and/or serious
The term "power tool" in all warnings refers to your mains-operated
power tool or battery-operated
(cordless) power tool.
Blades coast after turning off.
,_k CAUTION:
Read all safety
the warnings and instructions
personal injury.
Save all warnings
in rain.
Do not attempt to remove cut material nor hold material to be cut when
blades are moving. Make sure that the trimmer switch is off when clearing
jammed material from blades. Do not grasp the exposed cutting blades or
cutting edges when picking up or holding the hedge trimmer.
CAUTION:
_1_ WARNING:
area.
SAFETY
Stay alert, watch what you are
operating
a power tool. Do not
influence of drugs, alcohol, or
operating power tools may result
from the blades.
Page 6
74900
ManuaLRevised_11
0317
doing, and use common sense when
use a power tool while tired or under the
medication.
A moment of inattention while
in serious, personal injury.
Page 7
Use personal protective equipment.
Always wear eye protection.
Protective equipment, such as dust mask, non-skid safety shoes, hard hat,
or hearing protection, used for appropriate conditions will reduce personal
injuries.
Prevent unintentional
starting.
Ensure that the switch is in the OFF
position before connecting
to a power source and/or battery pack,
picking up, or carrying the tool. Carrying power tools with your finger on the
switch or energizing power tools that have the switch on invites accidents.
instructions and in the manner intended for the particular
type of
power tool, taking into account the working conditions
and the work
to be performed.
Use of the power tool for operations different from those
intended could result in a hazardous situation.
BATTERY
Recharge only with the charger specified
by the manufacturer.
A charger
that is suitable for one type of battery pack may create a risk of fire when
used with another battery pack.
Remove any adjusting
key or wrench before turning the power tool on. A
wrench or a key left attached to a rotating part of the power tool may result in
personal injury.
Do not overreach. Keep proper footing and balance at all times.
enables better control of the power tool in unexpected situations.
Use power tools only with specifically designated
battery
any other battery packs may create a risk of injury and fire.
packs.
Use of
When the battery pack is not in use, keep it away from other metal
objects, such as paper clips, coins, keys, nails screws, or other small metal
objects that can make a connection from one terminal to another. Shorting
the battery terminals together may cause burns or a fire.
This
Dress properly. Do not wear loose clothing or jewelry. Keep your hair,
clothing and gloves away from moving parts. Loose clothes, jewelry or
long hair can be caught in moving parts.
If devices are provided for the connection
of dust extraction
and
collection
facilities,
ensure that these are connected
and properly
Use of these devices can reduce dust-related
hazards.
TOOL USE AND CARE
Under abusive conditions,
liquid may be ejected from the battery;
avoid contact, if contact accidentally
occurs, flush with water, if liquid
contacts
eyes, additionally
seek medical help. Liquid ejected from the
battery may cause irritation or burns.
used.
SERVICE
POWER TOOL USE AND CARE
•
Do not force the power tool. Use the correct power tool for your
application.
The correct power tool will do the job better and more safely at
the rate for which it was designated.
Do not use the power tool if the switch does not turn it on and off. Any
power tool that cannot be controlled with the switch is dangerous and must
be repaired.
Disconnect the plug from the power source and/or the battery pack from
the power tool before making any adjustments,
changing accessories,
or storing power tools. Such preventive safety measures reduce the risk of
starting the power tool accidentally.
Store idle power tools out of the reach of children and do not allow
persons unfamiliar
with the power tool or these instructions to operate
the power tool. Power tools are dangerous in the hands of untrained users.
Maintain power tools. Check for misalignment
or binding of moving
parts, breakage of parts and any other condition that may affect the
power tool's operation.
If damaged,
have the power tool repaired before
use. Many accidents are caused by poorly maintained power tools.
Keep cutting
sharp cutting
tools sharp and clean. Properly maintained cutting tools with
edges are less likely to bind and are easier to control.
Use the power
74900
ManuaLRevised_11
tool, accessories,
0317
blades,
etc. in accordance
with these
Page 8
Have your power tool serviced
by a qualified
repair person using only
identical replacement
parts. This will ensure that the safety of the power
tool is maintained.
= Follow instructions in the Maintenance
section of this manual. Use of
unauthorized parts or failure to follow Maintenance
instructions may create a
risk of shock or injury.
SPECIFIC
SAFETY
RULES FOR HEDGE CLIPPER
Keep all parts of the body away from the cutter blade. Do not remove cut
material or hold material to be cut when blades are moving. Make sure
the switch is off when clearing jammed material. A moment of inattention
while operating the hedge trimmer may result in serious personal injury.
Make sure that the switch is off when clearing jammed material.
Do
not remove cut material or hold material to be cut when the blades are
moving. A moment of inattention
result in serious personal injury.
while operating
the hedge clipper
may
Carry the hedge trimmer by the handle with the cutter blade stopped.
When transporting
or storing the hedge trimmer always attach
the
cutting device cover. Proper handling of the hedge trimmer will reduce
possible personal injury from the cutter blades.
Keep cables away from cutting area. During operation the cable may be
hidden in shrubs and can be accidentally
cut by the blade.
74900
ManuaLRevised_11
0317
Page 9
= Check the hedge for foreign
•
objects,
SPECIFIC
e.g. wire fences.
Use both hands when operating
the hedge trimmer. Using one hand
could cause loss of control and result in serious personal injury.
WARNING:
Only use with handle and guard properly
trimmer. The use of the hedge trimmer without
provided may result in serious personal injury.
DANGER:
serious
Keep hands
personal
away from
blade.
assembled
to hedge
the proper guard or handle
FOR GRASS SHEAR
Keep hands away from blades
Contact
with blade will result in
,_
injury.
Never allow children or people unfamiliar
to use the appliance.
RULES
Do not attempt to remove cut material nor hold material to be cut when
blades are moving. Make sure switch is off when clearing jammed material
from blades. Do not grasp the exposed cutting blades or cutting edges when
picking up the tool.
with these instructions
Blades coast after turning off.
the blade cover on the
If any parts are broken or missing, do not attempt to attach a battery or
operate the multi garden tool until the broken or missing parts are replaced.
Failure to do so could result in possible serious injury.
and warnings
Check the tool to ensure that all mounted parts are properly secured and
inspect it for damage and excessive wear. Do not operate the tool if the blade
protection is damaged.
Take care to have a safe stand when you are working.
stepping backwards to avoid the danger of tripping!
CAUTION:
When the tool is stored or not in use, always attaches
blade to prevent the operator from hurt.
Hold the power tool by insulated gripping surfaces only, because the
cutter blade may contact hidden wiring or its own cord. Cutter blades
contacting a "live" wire may exposed metal parts of the power tool "live" and
could give the operator an electric shock.
•
SAFETY
Take care when
,_
WARNING:
Do not attempt
to modify the 3-in-1 garden tool or create
accessories not recommended
for use with this tool. Any such alteration or
modification
is misuse and could result in a hazardous condition leading to
possible serious injury.
_I_ WARNING:
If any parts are broken or missing, do not attempt
to attach a
Examine the working area before you start working with the device. Remove
any foreign objects. Watch out for foreign bodies when working with the
device. Should you still encounter an obstacle during cutting turn off the
device (let go of the switch) and remove the obstacle.
battery or operate the 3-in-1 garden tool until the broken or missing parts are
replaced. Failure to do so could result in possible serious injury.
If the cutting blades are blocked turn off the device and remove the object
blocking them (thick branch, other foreign matter) using a blunt object. Never
try to remove a blockage with your finger as the blades are preloaded and
may cause serious injuries.
1.
Carefully lift the tool and any accessories
stable, flat surface.
2.
Open the color box to locate the following:
Make sure not to overload
been designed
When unpacking the box, do not discard
contents are accounted for:
and keep hands away from the
Make sure the switch is off when clearing jammed
out of the carton and place it on a
Grass Shear blade
• Cultivator
• Battery
material.
A moment of inattention
serious personal injury.
while operating
Carry the hedge trimmer
by the handle with the cutter blade stopped.
the equipment
Always ensure that all protective
0317
the hedge trimmer
pack
• Blade guards
may result in
• Charger
Take care when transporting
attached!).
ManuaLRevised_11
until all of the
Hedge Clipper blade
by the handles provided
Do not remove cut material or hold material to be cut when blades are moving.
74900
materials
Garden tool
the device and do not use it for tasks it has not
for.
Carry the trimmer
cutting blades.
any packing
(only transport
• Operator's
with blade cover
devices and handles are properly
3.
fitted.
Page 10
74900
manual
Inspect the items carefully to make sure that no breakage or damage has
occurred during shipping. If any of the items is missing or damaged, return
the tool to the store where purchased for replacement.
ManuaLRevised_11
0317
Page 11
,_
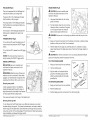
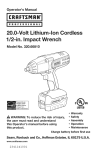
KNOW YOUR TOOL (Fig. 1)
NOTICE:
operating
Before attempting to use your tool, familiarize
features and safety requirements.
Fig. 1
yourself with all of the
FuelGauge
Cultivator
Lock-off
WARNING:
The safe use of this product
requires an understanding
LOCK=OFF
BUTTON
The lock-off
button reduces
the possibility
of accidental
starting.
FUELGAUGE
button
The tool is equipped
pack's power.
Trigger switch
TRIGGER
with a FuelGauge
which
is used to display the battery
SWITCH
To turn the tool ON, press the on/off trigger switch.
the on/off trigger switch.
BLADE QUICK=RELEASE
The blade quick-release
Hedge clipper
of the
information on the tool and in this operator's manual as well as knowledge of the
project you are attempting. Before use of this product, familiarize yourself with
all operating features and safety rules.
To turn the tool OFF, release
BUTTON
button makes changing
attachments
easier.
blade
Grass shear blade
Blade guard
jJ
Blade quick-release
WARNING:
A fraction
Do not allow familiarity
of a second
of carelessness
PRODUCT
with the tool to cause a lack of alertness.
is enough to cause severe injury.
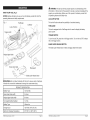
SEPCIFICATION
Battery Type
12.0 Volt DC
Grass shear blade width
3 inches
Hedge clipper
6 inches
blade width
Tool weight (without
battery)
1.47 Ibs
Battery Type
Lithium-Ion
Charger
120-Volts,
Optimum
74900
Input
Charging
ManuaLRevised_11
Temperature
0317
button
60 Hz AC only
32°F (0 ° C) -104°F (40°C)
Page 12
74900
ManuaLRevised_11
0317
Page 13
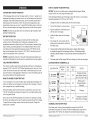
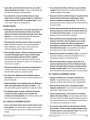
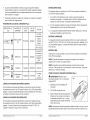
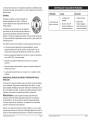
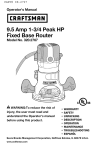
HOW TO CHARGE
LOW-BATTERY
CAPACITY
THE BATTERY
PACK
NOTICE: This Lithium-Ion battery pack is shipped partially charged.
using it the first time, fully charge the battery pack.
INDICATOR
If the FuelGauge shines red when the trigger switch on the 3-in-1 garden tool is
depressed, the battery pack power has run out, and the battery pack should be
recharged. Unlike other battery-pack types, Lithium-Ion battery packs deliver
fade-free power for their entire run time. The tool will not experience a slow,
gradual loss of power as you work. To signal that the battery pack is at the end
of its run time and needs to be charged, the power to the tool will drop quickly.
A fully discharged battery pack will charge in about 30 minutes
temperature between 32°F (0°C) and 104°F (40°C).
Before
in a surrounding
1.
Charge the Lithium-Ion
2.
Connect
3.
Align the raised ribs of the battery pack
with the slot in the charger.
4.
Insert the battery pack into the charger
(Fig. 2).
5.
The charger will communicate
with the
battery pack to evaluate the condition of
the battery pack.
6.
NOTICE: A significantly reduced run time after fully charging the battery pack
indicates that the battery is near the end of its usable life and must be replaced.
The green lights will flash while the battery pack is charging. After charging
is complete, the green LED on the charger will be on. The flickering red light
indicates a defective battery or a bad connection between the battery and the
charger.
7.
The battery pack will fully charge if left on the charger, but it will not overcharge.
COLD WEATHER
LED FUNCTIONS
NOTICE: The LED may also flash due to an overload
BATTERY PROTECTION).
BATTERY
or high temperature
(see
PROTECTION
To protect the battery from damage and prolong its life, the battery pack
circuitry will turn off the battery pack if it becomes overloaded or if the
temperature becomes too high during use. This may happen in extremely high
torque, binding, and stalling situations. This intelligent system will shut down
your battery pack if its operating temperature exceeds 176°F (80°C) and will
begin normal operation when it returns to 122°F (50°C)..The battery pack will
begin normal operation when it cools down.
OPERATION
This Lithium-Ion battery pack will provide optimal performance
between 32°F (0°C) and 104°F (40°C).When the battery pack is
"pulse" for the first minute of use to warm itself. Put the battery
and use the tool in a light application. After about a minute, the
have warmed itself and will operate normally.
WHEN TO CHARGE
THE BATTERY
in temperatures
very cold, it may
pack on a tool
battery pack will
the charger to a power supply.
OF CHARGER
Fig. 2
(Fig. 3)
RED
LED
GREEN
LED
ACTION
Hot/Cold
battery
On
Off
Charging will begin
when battery returns to
32°F (0°O)-104°F (40°0)
Defective
Flashing
Off
Battery pack or
Charger/Adapter
is
defective
CHARB|NG
BATTERY
Charging
Off
Flashing
Charging
FULL
BATTERY
Fully
charged
Off
On
Charging is complete
Maintenance charging
(SEE
H|/LO MANUAL)
TEMP.
PACK
It is not necessary to run down the battery pack charge before recharging. The
Lithium-Ion battery can be charged at any time and will not develop a "memory"
when charged after only a partial discharge.
BATTERY
DEFECTIVE
Remove the battery pack from the tool when convenient for you and your job.
"Top off" the battery pack charge by charging it for a time before starting a big
job or long period of use.
Due to Lithium-Ion fade-free properties, the only time it is necessary to charge
the Lithium-Ion battery pack is when the pack has reached the end of its charge.
To signal the end of charge, power to the tool will drop quickly. Charge the
battery pack as needed.
charger.
BATTERY
PACK
LED INDICATOR
(_)
battery pack with the correct
CHARGING
[_
A HOT BATTERY
PACK
If the battery pack is above normal temperature range, the red LED will
illuminate and the green LED will be off. When the battery pack cools down to
approximately
104°F (40°C), the charger will automatically
begin charging.
74900
ManuaLRevised_11
03:$7
Page 14
74900
ManuaLRevised_11
03:$7
Page 15
CHARGING
A COLD BATTERY
PACK
NOTICE: Make sure that the latch on the battery pack snaps into place and that
the battery pack is secured to the tool before beginning use.
If the battery pack is below the normal temperature range, the red LED
will illuminate and the green LED will be off. When the battery warms to a
temperature of more than 32°F (0°C), the charger will automatically
begin
charging.
DEFECTIVE
BATTERY
If the charger detects
LED will be off.
1.
a problem,
the red LED will begin flashing
and the green
2.
If a different battery pack charges
pack (see Maintenance section).
3.
If a different
defective.
normally,
battery pack also indicates
dispose
"defective,"
of the defective
the charger
a
battery
may be
CHARGING
If the battery pack is being charged within a normal surrounding temperature
range 32°F (0°C) to 104°F (40°C), the green LED will begin flashing and the red
LED will be off. The battery pack will reach a full charge in 30 minutes.
BATTERY
TO DETACH
FULL
When the battery is fully charged,
and the red LED light will be off.
the green LED Light on the charger will be on
NOTICE: The battery pack will fully charge,
charger.
but will not overcharge,
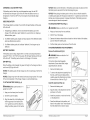
BATTERY
1.
Keep your hand away from the switch.
2.
DO NOT touch the blades.
3.
Align the raised rib on the battery pack
with the grooves in the handle of the
3-in-1 garden tool, and then attach by
sliding the battery pack into the handle.
74900
ManuaLRevised_11
0317
Make sure that the 3-in-1 garden tool is OFF.
Keep your hand away from any switches.
2.
DO NOT touch the blades.
3.
Depress the battery release buttons
pack to release the battery pack.
4.
Pull the battery pack out and remove it from the tool.
located
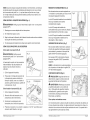
ATTACHING/REMOVING
THE ATTACHMENTS
Remove
(Fig 5}
the attachment
on the both sides of the battery
Fig. 5
,_k WARNING!
Make sure that the 3-in-1
garden tool is OFF.
The tool has three interchangeable
attachments:
Grass shear blade, hedge
clipper blade and cultivator.
1.
Remove the battery
pack.
2.
To remove the attachment assembly from
the tool, push the quick-release
button,
carefully grasp the attachment and rotate
it down and out of the tool. (Fig. 5)
if left on the
Fig. 5a
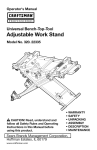
PACK (Fig. 4)
,_ WARNING!
Make sure that the 3-in-1
garden tool is OFF
PACK (Fig. 4)
1.
NOTICE: Charger may warm with several continuous charge cycles. This is part
of the normal operation of the charge. Charge in a well-ventilated
area.
TO ATTACH
BATTERY
WARNING!
If registering as defective, remove and reinsert the battery pack in the
charger. If the LED status reads "defective" a second time, try charging
different battery pack.
BATTERY
NOTICE: When placing the battery pack in the tool, be sure that the raised rib
on battery pack aligns with the groove inside the 3-in-1 garden tool and that the
latches snap into place properly. Improper attachment of the battery pack can
cause damage to internal components.
Install
Fig. 4
the attachment
1.
Remove the battery
2.
Align the hole on the attachment
protrusion on the tool.
3.
Insert the protrusion
on the attachment.
4.
Press the attachment into position, and
listen for the audible "click" that indicates
that the attachment
Page 16
74900
ManuaLRevised_11
0317
Protrusion
(Fig. 5a)
pack
with the
on tool into the hole
is locked in place.
Page 17
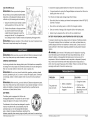
FUELGAUGE (Fig.6)
GRASS SHEAR (Fig.9)
Fig. 6
CAUTION:
This tool is equipped with a FuelGauge that
indicates the battery pack charge level.
The green LED on the FuelGauge
that the battery is fully charged.
1.
Use grass shear blade only for cutting
grass and weeds.
2.
For best results, shear only on a dry day.
However, water or moisture in the grass
or on the ground does not create an
electric shock hazard with this tool.
J
FuelGauge
,,,,
The red LED on the FuelGauge indicates the
battery pack is depleted and needs to be
charged.
WARNING:
area.
Fig. 7
TRIGGER SWITCH (Fig.7)
To turn the tool ON, push the safety lock-off
button forward and press the ON/OFF trigger
switch.
Be sure not to cut through
Keep your free hand well away from the blade, and maintain a stable working
position so that you don't slip. Do not overreach.
4.
Feed the blade into the grass at a rate that allows it to maintain its cutting
speed. Feed slower if the blade slows down. Watch out for foreign objects
the grass.
CAUTION:When
guard on the blade to prevent the operator
HEDGE CLIPPER
TO ATTACH
CAUTION:
Be sure to carefully
and follow the Safety Instructions
Operator's Manual.
WARNING:
Maintain
read
1.
Fig. 8
in this
2.
3.
proper footing and
balance, and do not overreach. Wear safety
goggles, non-skid footwear and gloves when
operating. Hold the tool firmly, and turn it on.
new growth
A wide, sweeping motion is most effective,
feeding the blade teeth through the twigs. A
slight downward tilt of the blade in the direction
of motion gives the best cutting results.
from hurt.
BLADE GUARD
Keep your hand away from any switches.
Remove
battery pack.
Fig___
Align the teeth on the blade with the
grooves in the blade guard,and than
attach by sliding balde into the balde
guard(Fig.9a)
TO DETACH
Shearing
in
the tool is stored or not in use, always attaches the blade
NOTICE: The tool cannot be turned on by
simply pressing the ON/OFF trigger switch.
(Fig.8)
any electric cords that may be in the
3.
To turn the tool OFF, release the on/off trigger
switch.
_k
1
Fig. 9
read
and follow the Safety Instructions in this
Operator's Manual.
indicates
The orange LED on the FuelGauge indicates
that the battery has used approximately
one
half of its charge.
Be sure to carefully
BLADE GUARD
1.
Keep your hand away from any switches.
2.
Remove battery
3.
Pull the blade guard out and remove
pack.
it from the tool.(Fig.9a)
One sweep will usually cut all twigs in the blade's path.
Shearing
heavier growth
To cut older growth with thicker twigs, use a little extra pressure as you feed
the blade through the growth. This clears the blade faster, and helps to feed the
thicker twigs into the blade teeth. Slowly feed the tool through heavy branches,
using only a portion of the cutting edges. If the tool stalls on these heavy pieces,
stop immediately and release the trigger switch.
74900
ManuaLRevised_11
0317
Page 18
74900
ManuaLRevised_11
0317
Page 19
CULTIVATOR
WARNING:
(Figol O)
Wear eye protection
To obtain the longest
Fig. 10
glasses.
•
Be sure that you have carefully read the Safety
Instructions in this Operator's Manual. Use the
cultivator only for loosening soil and weeding.
battery pack storage
Store the Lithium-Ion
and free of moisture.
Grasp the tool firmly and maintain a stable
working position so that you don't slip.
2.
Position the culitvator on the ground where
you want to loosen the soil and apply
a slight downward pressure to push the
prongs into the soil. Turn the garden tool
on by sliding the lock-off button forward and depressing
Store Lithium-Ion
Exterior
the trigger switch.
may result in personal
BATTERY
replacement
damage.
longer than 30 days:
battery packs in a 30%-50%
PACK REMOVAL
below.
and remove the Lithium-Ion
charged
fully charge the Lithium-Ion
may be cleaned with a cloth or soft non-metallic
AND PREPARATION
is below 80°F(26°C)
condition.
battery pack.
brush.
FOR RECYCLING
injury.
To preserve natural resources, please recycle or dispose of batteries properly.
This product contains lithium-ion batteries. Local, state, or federal laws may
prohibit disposal of lithium-ion batteries in ordinary trash. Consult your local
waste authority for information regarding available recycling and/or disposal
options.
parts.
cover the battery pack's terminals with heavy-duty adhesive tape. Do not
attempt to destroy or disassemble the battery pack or remove any of its
components.
Lithium-Ion batteries must be recycled or disposed of properly.
Also, never touch the terminals with metal objects and/or body parts as a
short circuit may result. Keep away from children. Failure to comply with these
warnings could result in fire and/or serious injury.
WARNING:
WARNING: When servicing, use only identical Craftsman
Use of any other parts may create a hazard or cause product
life, follow the instructions
battery pack where the temperature
Every six months of storage,
A
GENERAL
battery
It is good practice to unplug the Charger/Adapter
battery pack when not in use.
For Lithium-Ion
1.
WARNING:
Improper operation of the cultivator
Make sure to keep hands away from the prongs.
possible
MAINTENANCE
Avoid using solvents when cleaning plastic parts. Most plastics are susceptible
to damage from various types of commercial solvents and may be damaged by
their use. Use clean cloths to remove dirt, dust, oil, grease, etc.
WARNING:
Do not at any time let brake fluids, gasoline, petroleum-based
products, penetrating oils, etc. to come in contact with plastic parts. Chemicals
can damage, weaken or destroy plastic which may result in serious personal
injury.
_IL WARNING: When servicing, use only identical Craftsman replacement parts.
Use of any other parts may create a hazard or cause product damage. To ensure
safety and reliability, all repairs should be performed by a qualified service
technician at a Sears Service Center.
Upon removal of the battery pack for disposal
PROBLEM
The garden tool
does not work
BATTERI ES:
CAUSE
or recycling,
SOLUTION
1.
Battery
is depleted
2.
The lock-off
engaged
button is
1.
Charge the battery
2.
Push the lockoff button before
depressing the on/off
trigger switch
The battery pack is equipped with Lithium-Ion
rechargeable
batteries. The duration of use from each
charge will depend on the type of work performed.
The batteries in this tool have been designed to provide
maximum trouble-free life. Like all batteries, they will
eventually wear out. Do not disassemble the battery
pack or attempt to replace the batteries. Handling of the
batteries, especially when wearing rings and jewelry could result in a serious burn.
74900
ManuaLRevised_11-0317
Page 20
74900
ManuaLRevised_11-0317
Page 21
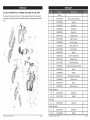
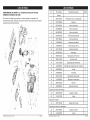
12.0 VOLT LITHIUM=ION
3=in=I=GARDEN
TOOL MODEL
NO. 320. 74900
Body
The Model Number will be found on the Nameplate attached to the housing of
the garden tool. Always mention the Model Number when ordering parts for this
tool.
/
1
2823173000
Motor & Gear Assembly
1
2
3704159000
Sponge
1
3
5670162000
Spring Pin
1
4
5670288000
Spring Pin
1
5
5670009000
Spring Pin
1
6
5610012000
7
3321196000
Right Housing
1
8
3125929000
Switch
1
9
3126240000
Light Guide Pole
1
10
3321195000
Left Housing
1
11
4870037000
Switch
1
12
4890764000
4312 PCB Assembly
1
13
3680114000
14
3124115000
15
3402298000
16
5620032000
Screw
2
17
3700380000
Washer
1
18
2823127000
Transmission
19
3125930000
Switch
20
3660148000
Spring
1
21
3402500000
Motor Support
1
1
Tapping
8
/
/
/
/
/
//
/
/
/
Screw
/
/
Clipper
Trigger
Magnet
Ring
Transmitting
Contact
Gear
Receptacle
Assembly
Assembly
Lock
1
1
1
1
1
Blade Set
22
2823120000
Blade Set
23
3124217000
Sheath
2823119000
Claw Set
Claw Set
24
I
Shear Blade Set
74900
ManuaLRevised_11
0317
Page 22
_900
25
2823118000
Blade Set
1
26
3124218000
Sheath
1
ManuaLRevised_11
0317
Page 23
Manual del Propietario
Your Home
For troubleshooting, product manuals and expert advice:
_
managemylife
www.managemylife.com
For repair - in your home - of all major brand appliances,
lawn and garden equipment, or heating and cooling systems,
no matter who made it, no matter who sold it!
For the replacement parts, accessories and
owner's manuals that you need to do-it-yourself.
For Sears professional installation of home appliances
and items like garage door openers and water heaters.
1=800=4=MY=HOME ®
(1-800-469-4663)
www.sears.com
Call anytime,
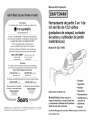
Herramienta de jardin 3 en 1 de
i6n de litio de 12.0 voltios
(podadora de c6sped, cortador
de setos y cultivador de jardin
inal_mbricos)
Modelo N° 320. 74900
day or night
(U.S.A. and Canada)
www.sears.ca
For repair of carry-in items like vacuums, lawn equipment,
and electronics, call anytime for the location of the nearest
SearsPa_ts& RepairserviceCenter
1-800-488=1222 (U.S.A.)
1-800=469=4663 (Canada)
www.sears.com
i
www.sears.ca
To purchase a protection agreement on a product serviced by Sears:
1-800-827-6655
(U.S.A.)
1-800-361-6665
• Garantia
(Canada)
• Seguridad
Para
pedir
servicio
dere_raci6nAuCanada
pour
service
enfran_ais:
a domicilio,y para ordenar piezas:
1-888-SU-HOGAR®
(1-888-784-6427)
www.sears.com
,
1.800.LE.FOYERMC
(1-800-533-6937)
www.sears.ca
Sears
Trademark
/ T_'_Trademark
of KCD IP, LLC in the United States, or Sears Brands_ LLC in other countries
/ Tr_
'_Marca de Fabrica
de KCD IP, LLC en Estados
Unidos, o Sears
Brands,
LLC in otros paises
MD
de commerce
/
Marque depos6e de Sears Brands, LLC
® Registered
® Marca
_,_cMarque
• Montaje
Cargar
antes
• Operaci6n
del primer use
• Mantenimiento
ADVERTENCIA"
Para reducir
el
riesgo de lesiones, el usuario debe leer
y comprender
el Manual del Propietario
antes de usar este producto.
• Identificaci6n
soluci6n de
problemas
• Espa_ol
Registrada
ears Brands Management Corporation, Hoffman Estates, IL 60&79 U.S.A.
_,_Nw.craftsman.com
y
Garantia
El objeto de los simbolos
peligros.
Pagina 26
Simbolos
de Seguridad
Instrucciones
Paginas 37-28
generales
de seguridad
Paginas 37-38
Operacion
Paginas 38-45
Mantenimiento
Paginas 45-46
,_
Identificaci6n
y solucion
Piano de Despiece
de problemas
Pagina 47
y Lista de Piezas
Paginas 48-49
NOmeros de telefono para solicitar piezas de repuesto Sears
GARANT[A
TOTAL
Cubierta
es atraer su atencion
sobre posibles
Los simbolos de seguridad, y las explicaciones junto a ellos, ameritan su
cuidadosa atencion y comprension.
Los simbolos de advertencia no eliminan
los peligros por si solos. Las instrucciones y advertencias que ofrecen no
reemplazan las medidas adecuadas de prevencion de accidentes.
Paginas 29-36
Descripcion
de seguridad
posterior
ADVERTENOIA:
SIGNIFICADO
DE UN AI_iO CRAFTSMAN
DURANTE UN AI_IO desde la fecha de compra, este producto cuenta
con garantia contra cualquier clase de defectos de material o de mano
de obra. Se reemplazar_ un producto defectuoso en forma gratuita.
PELIGRO:
todas las instrucciones
DE LOS S[MBOLOS
Indica una situacion
peligrosa
que, si no se evita, puede provocar
la muerte o una lesion grave.
A_, ADVERTENClA:
provocar
Si desea obtener detalles sobre la cobertura de garant[a para
obtener un reemplazo sin costo, visite el sitio Web: www.
craftsman.corn
AsegQrese de leer y comprender
de seguridad de este manual, incluyendo todos los simbolos de alerta de
seguridad, tales como "PELIGRO",
"ADVERTENClA"
y "PRECAUCION"
antes de utilizar esta herramienta.
No seguir todas las instrucciones
listadas a
continuacion
puede generar una descarga electrica, un incendio y/o lesiones
corporales graves.
PRECAUClON:
provocar
Indica una situacion
peligrosa
que, si no se evita, puede
peligrosa,
que, si no se evita, puede
la muerte o una lesion grave.
Indica una situaci6n
una lesion menor o moderada.
La presente garantia quedar& anulada si este producto se usa para
brindar servicios comerciales o si se alqufla a terceros.
Mensajes
Esta garantia le otorga derechos legales especificos y usted puede
contar con otros derechos, que varian de estado a estado.
Estos informan al usuario sobre datos y/o instrucciones
importantes que
podrian provocar daSos al equipamiento
o a la propiedad si no se siguen. Cada
mensaje esta precedido por la palabra "AVISO", como en el ejemplo siguiente:
Sears Brands Management
Corporation,
Hoffman Estates, IL 60179
Esta herramienta cuenta con varias caracteristicas
para hacer su uso mas
agradable y placentero. Durante el diseSo de esta herramienta, la seguridad, el
rendimiento y la confiabilidad
han sido las prioridades principales, ademas de la
sencillez
iGUARDE
de mantenimiento
,_
ADVERTENClA:
Para garantizar
reparaciones deben ser efectuadas
Repuestos y Reparacion de Sears.
ADVERTENCIA:
Ciertos polvillos
generados
de daSos
seguridad
y/o a la propiedad
y confiabilidad,
por un tecnico
ADVERTENClA:
calificado
El funcionamiento
si no se
todas las
de un Centro de
de cualquier
herramienta electrica puede provocar el lanzamiento de
objetos en direccion de sus ojos, y los consecuentes
graves
daSos oculares. Antes de comenzar a utilizar la herramienta
LAS INSTRUCClONES!
ADVERTENClA:
y de prevenci6n
AVISO: Pueden provocarse daSos al equipamiento
cumplen estas instrucciones.
ESTAS INSTRUCCIONES!
iLEA TODAS
,_
y de operacion.
de informaci6n
por el uso de
electrica, siempre use gafas o lentes de seguridad con
proteccion lateral y una proteccion completa de rostro
cuando sea necesario.
Recomendamos
el uso de una
herramientas electricas contienen quimicos que seg0n el estado de California
provocan cancer y defectos congenitos u otros daSos reproductivos.
mascara de seguridad de vision amplia sobre los anteojos o
gafas de seguridad estandar con proteccion lateral. Siempre utilice proteccion
ocular con certificacion de cumplimiento
con ANSI Z87.1.
74900
Manual_Revised_li
03i7
Page 26
74900
Manual_Revised_li
03i7
Page 27
GUARDE ESTAS iNSTRUCCIONES
Algunos de los siguientes simbolos pueden utilizarse en esta herramienta.
Tenga a bien estudiarlos y aprender su significado.
Una interpretacion
adecuada de estos simbolos le permitira operar la herramienta de una manera
mejor y mas segura.
SJMBOLO
NOMBRE
DESIGNACION
V
Voltios
A
Amperios
Hz
ADVERTENCIAS
EL_:CTRICAS
GENERALES
ADVERTENCIA:
Cuando utilice artefactos
deben seguirse precauciones
incendio, descarga electrica,
/ EXPLICACION
Voltaje
DE SEGURIDAD
LEA Y GUARDE
Hercios
Frecuencia (ciclos por segundo)
w
Vatios
Energia
Evite los medios
mojados.
min
Minutos
Tiempo
No use la herramienta
Tipo de corriente
Mantenga a los niSos alejados
distancia del Area de trabajo.
=====
no
[]
Corriente alterna
Corriente continua
Velocidad sin carga
Construcci6n
.../min
Ctase II
Por minuto
Aterta de
condiciones
hOmedas
O
_,
Tipo o una caracteristica
siempre
ESTAS INSTRUCCIONES
peligrosos
- no utilice los artefactos
en lugares hOmedos o
bajo la liuvia.
- todos los visitantes
deben mantenerse
a
Vistase adecuadamente
- No use vestimenta suelta o joyas. Pueden quedar
atrapadas en las piezas en movimiento. Se recomienda el uso de guantes de
goma y calzado resistente cuando trabaje al aire libre. Utilice proteccion para
sujetarse el cabello largo.
de doble aislaci6n
Revoluciones, carreras, velocidad de
superficie, 6rbitas, etc., por minuto.
Use galas de seguridad
- siempre
operacion genera mucho polvillo.
utilice mascarillas
faciales o antipolvillo
si la
No
exponga hOmedas.
a la Iluvia u otras
Iocaciones
Utilice el artefacto
fue concebido.
Lea et manual de
operaci6n
debe
leer y comprender
manual
de
Para reducir
et riesgo de este
lesiones,
et usuario
operaci6n antes de usar este producto.
Evite el encendido
involuntario
- no Ileve el artefacto con la bateria sujeta con
el dedo colocado sobre el interruptor.
Verifique que el interruptor se encuentre
en la posicion apagado (OFF) antes de colocar el paquete de baterias.
Protecci6n ocular
con
protecciones
una
protecci6n
Siempre
use gafaslaterales
o lentes yde
seguridad
de todo el rostro cuando utilice este producto.
Aterta de seguridad
Precauciones
correcto
No agarre los cortadores
sostenga el artefacto.
- solo use el aparato para el trabajo
expuestos
o los berries
Simbolo
demanos
no tocar
con las
de torte
para el que
cuando
levante o
que involucran su seguridad.
No fuerce el artefacto - la herramienta funcionara
segura a la velocidad para la que fue dise_ada.
mejor y de manera mas
No
mantener
sus lesiones
manos atejadas
de la
sierra
provocara
personales
graves.
No trate de alcanzar lugares demasiado
equilibrada y segura en todo momento.
74900
electricos,
de la corriente
Velocidad giratoria, sin carga
Construcci6n
de jardineria
de seguridad basicas a fin de reducir el riesgo de
y/o lesiones a personas, incluyendo las siguientes.
Corriente
"_
DE LAS HERRAMIENTAS
alejados
- mantenga
una postura
S_mbolo
demanos
no tocar
con las
No
mantener
sus lesiones
manos atejadas
de la
sierra
provocara
personales
graves.
S_mbolo
demanos
no tocar
con las
No
mantener
sus lesiones
manos atejadas
de la
sierra
provocara
personales
graves.
Guarde los aparatos que no use bajo techo - cuando no los use, los aparatos
deben guardarse en el interior en un lugar seco, elevado y seguro, lejos del
alcance de los ni_os.
S[mbolo
con las
demanos
no tocar
No mantener
sierra
provocara
sus lesiones
manos atejadas
personales
de graves.
la
Superficie caliente
Para
reducir
el riesgo
de lesiones
o daNos,
evite el
contacto
con cualquier
superficie
caliente.
Realice mantenimiento
del artefacto
- mantenga afilado y limpio el borde de
corte para un mejor desempeSo y para reducir el riesgo de una lesion. Siga
todas las instrucciones
para lubricar y cambiar los accesorios.
Inspeccione el
cable del aparato en forma periodica y, si se encuentra daSado, hagalo reparar
ManuaLRevised_$t
03:$7
Page 28
Preste atenci6n a Io que esta haciendo.
herramienta electrica siesta cansado.
74900
ManuaLRevised_$t
03:$7
Tenga sentido
comOn. No maneje una
Page 29
en un centro de reparacion autorizado.
Controle los cables de extension
periodicamente
y cambielo si se encuentra da_ado. Mantenga las manijas
secas, limpias y libres de aceite o grasa.
Tenga cuidado al manipular
las baterias para no provocar un corto en la
bateria con materiales conductores
tales como anillos, brazaletes o Ilaves. La
bateria o conductor pueden sobrecalentarse
y provocar quemaduras.
Controle las piezas daSadas - antes de continuar el uso del artefacto deben
controlarse cuidadosamente
las protecciones
u otras piezas daSadas a fin
de determinar si funcionan bien y si pueden realizar su funcion. Verifique
la alineacion de las piezas en movimiento, la conexion de las piezas en
movimiento, la rotura de piezas, el montaje y otras condiciones que pueden
afectar su operacion.
Las protecciones
o cualquier pieza que se encuentre
da_ada deben repararse de manera adecuada o reemplazarse pot medio de un
centro autorizado a menos que el presente manual indique otra cosa.
Mantenga
las protecciones
Mantenga
las hojas de corte
Mantenga
las manos
Mantenga
sus manos
No cargue
No utilice
el aparato
bajo la Iluvia o en lugares
un aparato
operado
per bateria
hQmedos.
bajo la Iluvia.
No quite el material cortado
ni sostenga el material a cortar cuando las
hojas se encuentran
en movimiento.
Verifique que el interruptor se encuentre
en la posicion apagado (off) cuando elimine material trabado en los cortadores.
No agarre los cortadores expuestos o los bordes de corte cuando levante o
sostenga la podadora de setos.
_, PRECAUClON:
herramienta.
Cuando
coloque
,_
Las hojas siguen moviendose
despues
de haber apagado
No intente operar esta herramienta
hasta que haya leido
con cuidado todas las instrucciones,
normas de seguridad y advertencias.
No hacerlo puede generar un incendio, una descarga electrica o lesiones
personales graves. Conserve el Manual del Propietario para referencia futura y
relealo frecuentemente
como referencia.
Quite o desconecte
la bateria antes de efectuar
quitar material de los aparatos de jardineria.
reparaciones,
CARGADOR
320.14300
320.29497
No deseche las baterias en el fuego. La bateria puede explotar. Consulte
codigos locales sobre posibles instrucciones
especiales sobre eliminacion.
los
No abra o rompa las baterias.
Los electrolitos liberados son corrosivos y
pueden provocar daSos a los ojos o la piel. Pueden ser toxicos si se ingieren.
74900
Manual_Revised_li
0317
alejadas
del _rea de corte.
de las hojas de corte.
las advertencias
e instrucciones
de
todas
las advertencias
El termino
"herramienta
operadas
electrica"
e instrucciones
para referencia
en todas las advertencias
mediante cable electrico o mediante
futura.
hace referencia a
baterias (inal&mbricas).
EN EL AREA DE TRABAJO
Mantenga
el &tea de trabajo limpia y bien iluminada. Las &reas
desordenadas
u oscuras son propicias para los accidentes.
No utilice herramientas
el_ctricas
en atm6sferas
explosivas,
como en
la presencia de iiquidos inflamables, gases o polvillo. Las herramientas
electricas crean chispas, que pueden encender el polvillo o el humo.
Mantenga
a los niSos y a los transe_ntes
herramienta
el_ctrica.
Las distracciones
control.
SEGURIDAD
alejados mientras maneja esta
pueden provocar la perdida de
ELC:CTRICA
Evite el contacto
corporal con superficies
con conexi6n a tierra, tales
come caSerias, radiadores,
cocinas y refrigeradores.
Existe un riesgo
mayor de descarga electrica si su cuerpo tiene conexion a tierra.
320.10006
320.11221
y los pies alejados
Los enchufes de las herramientas el_ctricas
deben poder insertarse en
los tomacorrientes.
Nunca modifique
el enchufe de ninguna manera.
No
utilice enchufes adaptadores
con herramientas
el_ctricas
con conexi6n
a tierra. No modificar los enchufes y contar con el tomacorriente
adecuado
reducir&n el riesgo de una descarga electrica.
la limpieza o
Utilice solola b_eria ylos cargadoreslistados:
PAQUETE DE BATERiAS
afiladas.
Lea todas
Conserve
SEGURIDAD
la
condiciones.
seguridad.
No seguir las advertencias e instrucciones
puede generar una
descarga electrica, un incendio y/o lesiones personales graves.
herramientas
la herramienta estA guardada y no se encuentra en uso, siempre
la proteccion de la hoja en su lugar a fin de evitar una lesion cortante.
PRECAUCION:
ADVERTENClA:
en su lugar y en buenas
Page 30
No exponga las herramientas
el_ctricas
a la Iluvia o a condiciones
humedad.
El agua que ingresa a la herramienta electrica incrementar&
riesgo de una descarga electrica.
de
el
No maitrate el cable. Nunca utilice el cable para trasladar o desenchufar
la herramienta
el_ctrica
ni tire del mismo.
Mantenga el cable alejado
del taler, aceite, bordes afiiados o piezas en movimiento.
Los cables
daSados o enredados incrementan el riesgo de una descarga electrica.
74900
Manual_Revised_li
0317
Page 31
•
Cuando utilice una herramienta
el_ctrica al aire libre, use un cable de
extensi6n
especial para uso al exterior.
El uso de un cable adecuado para
el aire libre reduce el riesgo de una descarga electrica.
No use la herramienta el_ctrica
si el interruptor no puede encenderla
o apagarla. Cualquier herramienta que no puede controlarse mediante el
interruptor es peligrosa y debe repararse.
Si no puede evitar el uso de una herramienta
el_ctrica en un iugar
h_medo, utilice un suministro
de energia protegido pot un interruptor de
circuito con descarga a tierra (GFCI, pot sus siglas en ingles}. El uso de
un GFCI reduce el riesgo de una descarga electrica.
Desconecte
el enchufe de la fuente de energia y/o el paquete de baterias
desde la herramienta
el_ctrica
antes de realizar ajustes, carnbiar
accesorios
o almacenar
herramientas
el_ctricas.
Dichas medidas de
SEGURIDAD
seguridad preventivas
de manera accidental.
PERSONAL
el_ctrica
si est_ cansado o bajo la influencia de drogas, alcohol o alguna
medicaci6n.
Un momento de distracci6n mientras utiliza herramientas
puede provocar
lesiones personales
graves.
Evite el encendido
involuntario.
Verifique que el interruptor se encuentre
en la posici6n
OFF (apagado) antes de conectar
la fuente de energia
y/o el paquete de baterias, levantar la herramienta
o trasladarla.
Llevar herramientas electricas con el dedo sobre el interruptor o enchufar
herramientas que tienen el interruptor en la posici6n "ON" (encendido) es una
invitacion a sufrir un accidente.
Quite las Ilaves ajustables
antes de encender la herramienta
el_ctrica.
Una Ilave de tuercas que se deja conectada a una pieza giratoria de la
herramienta electrica puede provocar lesiones personales.
•
•
en
Vistase adecuadamente.
No use vestirnenta suelta o joyas. Mantenga su
cabello, ropa y guantes alejados de las piezas en movimiento.
La ropa
suelta, joyas o cabello largo pueden engancharse en las piezas en movimiento.
Si los dispositivos
pueden conectarse
a instalaciones de extracci6n
y recolecci6n
de polvillo, aseg_rese de que se encuentren
bien
conectados
y se usen adecuadamente.
El uso de estos dispositivos
reducir los riesgos relacionados con el polvillo.
USO Y CUIDADO
DE LA HERRAMIENTA
probabilidades
•
puede
ELI_CTRICA
la herrarnienta
el_ctrica.
Use la herrarnienta
el_ctrica
correcta
para su aplicaci6n.
La herramienta electrica correcta har& mejor el trabajo
y de manera m&s segura cuando se usa en la clasificacion para la cual fue
diseSada.
74900
ManuaLRevised_:$:t
03:$7
Page 32
de trabarse
y son m&s f&ciles de controlar.
Utilice la herrarnienta el_ctrica, accesorios,
hojas de corte, etc. de
acuerdo con estas instrucciones y del rnodo concebido
para este tipo
particular de herramienta
el_ctrica, teniendo en cuenta las condiciones
de trabajo y el trabajo a realizar.
El uso de la herramienta electrica para
operaciones diferentes de las previstas puede generar una situacion peligrosa.
DE LA HERRAMiENTA
A BATERiA
Recargue
la herramienta s61o con el cargador especificado
pot el
fabricante.
Un cargador adecuado para un tipo de paquete de baterias
puede crear un riesgo de incendio cuando se utiliza un paquete diferente.
Utiiice herrarnientas ei_ctricas s61o con los paquetes
de baterias
designados
especfficamente.
El uso de otra clase de paquetes de baterias
puede generar un riesgo de lesiones o incendio.
Cuando el paquete de baterias no se encuentra
en uso, rnant_ngalo
alejado de otros objetos met&licos,
como ganchitos para papel, monedas,
Ilaves, clavos, tornillos u otros objetos pequeSos de metal que pueden hacer
una conexion de una terminal a otra. Si las terminales de la bateria hacen un
corto, pueden
No fuerce
electrica
Mantenga las herramientas de corte afiladas y limpias.
Las herramientas
de corte bien mantenidas con extremos de corte afilados tienen menos
USO Y CUIDADO
= No se estire de m&s. Mantenga
una postura equilibrada
y segura en
todo momento.
Esto permite un mejor control de la herramienta electrica
situaciones inesperadas.
la herramienta
Realice mantenirniento
de las herrarnientas el_ctricas.
Controle que
las piezas en movimiento
no est_n rnal alineadas y que no se traben,
la rotura de piezas y cualquier otra condici6n
que pueda afectar el
funcionamiento
de la herramienta
el_ctrica.
Si est& daSada, haga reparar
la herramienta
antes de usarla. Muchos accidentes son provocados pot
herramientas que no han recibido el mantenimiento
adecuado.
Utilice equipamiento
de protecci6n personal. Siempre use protecci6n
ocular. El equipamiento de protecci6n, como las m&scaras antipolvillo,
zapatos antideslizantes,
cascos o protecci6n auditiva, utilizados para
condiciones apropiadas reducir&n las lesiones personales.
•
el riesgo de encender
Guarde las herramientas el_ctricas
fuera del alcance de los niSos y no
permita que personas que no saben usar la herramienta
el_ctrica
o que
no conocen las instrucciones la operen.
Las herramientas electricas son
peligrosas en manos de usuarios faltos de capacitacion.
Mant_ngase alerta, preste atenci6n a Io que hace y tenga sentido com_n
cuando utiiice una herramienta el_ctrica. No utilice una herramienta
electricas
reducen
provocarse
quemaduras
o un incendio.
Si se la somete a malas condiciones,
puede salir I{quido de la bateria;
evite el contacto.
Si ocurre un contacto accidental,
enjuague con agua.
Si el liquido ingresa a sus ojos, busque ayuda m_dica. El liquido que sale
de la bateria puede provocar irritaci6n o quemaduras.
74900
ManuaLRevised_:$:$
03:$7
Page 33
SERVICIO
•
•
•
Solicite a personal de reparaci6n
caiificado
que realice el mantenimiento
y arreglos utiiizando
s61o las piezas de repuesto id_nticas.
Esto
asegurara el mantenimiento
de la seguridad de la herramienta electrica.
ESPEC[FICAS
DE SEGURIDAD
PARA EL CORTADOR
DE SETOS
Si las hojas de corte se traban, apague el dispositivo y quite el objeto que
las bloquea (una rama gruesa, otro objeto extraSo) utilizando un objeto sin
punta. Nunca trate de quitar un bloqueo con su dedo porque las hojas se
encuentran precargadas y pueden provocar lesiones.
AsegOrese de no sobrecargar
que no fue dise_ado.
graves.
Transporte el cortador
de setos de la manija con la hoja de corte
frenada.
Cuando transporte
o almacene
la podadora de setos
siempre coloque la cubierta del dispositivo
de corte en su lugar. Una
manipulaci6n adecuada de la podadora de setos reducira una posible lesi6n
personal provocada pot las hojas de corte.
•
Mantenga los cables alejados del Area de corte. Durante el
funcionamiento
de la herramienta, el cable puede quedar oculto
arbustos y la hoja puede cortarlo accidentalmente.
•
Controle
•
Utilice ambas manes cuando opere ia podadora
una mano puede provocar la p_rdida de control
personal grave.
,_
el seto en busca de objetos extraSos,
ADVERTENClA:
por ej., cercas de alambre.
de setos. Utilizar s61o
y generar una iesi6n
Solo utilice con la manija y la protecci6n
hoja provocara
•
Sostenga
aisladas,
oculto o
un cable
electrica
74900
Mantenga
las manos
lesiones personales
alejadas
de la hoja.
correctamente
El contacto
03:$7
•
y mantenga
con la
graves.
Page 34
las manos
No quite el material cortado ni sostenga
se encuentran en movimiento.
el material a cortar cuando
Verifique que el interruptor
elimine material trabado.
en la posicion
Transporte
se encuentre
el cortador
apagado
DE SEGURIDAD
las hojas
(off) cuando
de setos puede
de setos de la manija con la hoja de corte frenada.
Tenga cuidado al transportar el equipamiento
cubierta de la hoja instalada).
NORMAS
la herramienta el_ctrica
s61o de sus superficies
de agarre
porque la hoja de corte puede hacer contacto
con cableado
con su propio cable. Las hojas de corte que hacen contacto con
"cargado" pueden exponer las piezas metalicas de la herramienta
y dar al operador una descarga electrica.
ManuaLRevised_$t
y no Io use para tareas para las
Transporte la podadora de las manijas provistas
alejadas de las hojas de corte.
Siempre verifique que todos
encuentren bien instaladas.
montadas en la podadora de setos. El uso de la podadora de setos sin la
proteccion o manijas provistas puede provocar una lesion personal grave.
PELIGRO:
el dispositivo
Un momento de distraccion mientras utiliza la podadora
provocar lesiones personales graves.
en los
y
Examine el Area de trabajo antes de comenzar a trabajar con el dispositivo.
Quite los objetos extraSos. Tenga cuidado con los cuerpos extraSos cuando
trabaje con el dispositivo.
Si a0n asi encuentra un obstaculo durante el corte,
apague el dispositivo (suelte el interruptor) y quite el obstaculo.
Verifique que el interruptor se encuentre
en la posici6n apagado
(off) cuando elimine material trabado.
No quite el material cortado
ni sostenga ei material a cortar cuando las hojas se encuentran
en
movimiento.
Un momento de distraccion mientras utiliza el cortador de
lesiones personales
estas instrucciones
AsegOrese de contar con un soporte seguro cuando se encuentre trabajando.
Para evitar el peligro de tropiezos, tenga cuidado cuando camine hacia atras.
Mantenga todo su cuerpo alejado de la hoja de corte. No quite el
material cortado ni sostenga
el material a cortar cuando las hojas se
encuentran en movimiento.
Verifique que el interrupter se encuentre
en
la posici6n apagado (off) cuando elimine material trabado.
Un momento
de distracci6n mientras utiliza la podadora de setos puede provocar lesiones
personales graves.
setos puede provocar
que desconocen
Controle la herramienta para verificar que todas las piezas montadas se
encuentren bien colocadas y verifique que no haya da_os y un desgaste
excesivo. No utilice la herramienta si la proteccion de la hoja se encuentra
da_ada.
Siga las instrucciones de Ja Secci6n de Mantenimiento
de este
manual. El uso de piezas no autorizadas o no seguir las instrucciones de
Mantenimiento
pueden crear un riesgo de descarga electrica o lesiones.
NORMAS
Nunca permita que ni_os o personas
advertencias utilicen el artefacto.
los dispositivos
ESPECiFICAS
(solo transportelo
de proteccion
con la
y las manijas se
PARA LA PODADORA
DE ClaSPED
No intente quitar el material cortado ni sostenga el material a cortar cuando
las hojas se encuentran en movimiento.
Verifique que el interruptor se
encuentre en la posicion apagado (off) cuando elimine material trabado en
las hojas. No agarre los cortadores expuestos o los bordes de corte cuando
levante o sostenga la herramienta.
Mantenga
las manos alejadas
PRECAUCION:
herramienta.
74900
ManuaLRevised_:$$
de las hojas.
Las hojas siguen moviendose
03:$7
despues
de haber apagado
la
Page 35
•
Cuando la herramienta esta guardada y no se encuentra en uso, siempre
coloque la proteccion de la hoja en su lugar a fin de evitar una lesion
cortante.
CONOZCA
Si falta alguna pieza o si alguna pieza esta rota, no trate de colocar la bateria
u operar la multi-herramienta
de jardin hasta que se hayan reemplazado
dichas piezas.
No hacerlo puede provocar
una lesion personal
No trate de modificar
(Fig. 1)
Fig. 1
de combustible
Boton de bloqueo/apagado
grave.
Interruptor
ADVERTENCIA:
SU HERRAMIENTA
AVISO: Antes de utilizar su herramienta, familiaricese con todas las
caracteristicas
de funcionamiento
y requerimientos
de seguridad.
la herramienta
de gatillo
de jardin 3 en 1 o
crear accesorios no recomendados
para usar con esta herramienta.
Cualquier
alteracion o modificacion
constituye un uso indebido y podria provocar una
condicion peligrosa y posibles lesiones graves.
ADVERTENOIA:
Si falta alguna pieza o si alguna pieza esta rota, no trate
de colocar la bateria u operar la multi-herramienta
de jardin hasta que se hayan
reemplazado dichas piezas. No hacerlo puede provocar una lesion personal
grave.
Cuando
verificar
desempaque la caja, no descarte los materiales
la presencia de todos los elementos:
1.
Con cuidado, quite la herramienta y los accesorios
sobre una superficie estable y plana.
2.
Abra la caja de color y ubique Io siguiente:
• Herramienta
de empaque
hasta
de la caja y coloquela
Hoja de podadora
rapida de hoja
de setos
de cesped
_k
ADVERTENClA:
No permita
que la familiaridad
con la herramienta
disminuya su nivel de atencion. Recuerde que descuidarse
segundo es suficiente para sufrir una lesion grave.
por una fraccion de
de baterias
Proteccion
74900
de la
hoja de corte
Boton de liberacion
Cultivador
3.
Proteccion
Hoja de podadora
de cesped
-_ .__
de jardin
Hoja de cortador
• Paquete
Hoja de cortador
de setos
ESPECIFICACION
de las hojas
Cargador
Tipo de bateria
Manual del Propietario
Ancho de la hoja de la podadora
cesped
Inspeccione
los elementos con cuidado y constate que no hayan ocurrido
roturas o da_os durante el envio. Si cualquiera de los elementos falta o
se ha da_ado, devuelva la herramienta a la tienda donde la adquirio para
solicitar un reemplazo.
ManuaLRevised_11
0317
Page 36
Ancho
setos
DE PRODUCTO
12.0 voltios
de la hoja del cortador
Peso de la herramienta
de
de
(sin bateria)
CC
3 pulgadas
6 pulgadas
1.47 Ibs
Tipo de bateria
16n de litio
Entrada del cargador
120 voltios,
Temperatura
32°F (0 ° C) -104°F (40°C)
74900
de carga optima
ManuaLRevised_11
0317
60 hercios solo CA
Page 37
ADVERTENClA:
El uso seguro de este producto
requiere una comprension
de la informacion incluida en la herramienta yen este manual de operacion,
ademas del conocimiento
del proyecto que esta iniciando. Antes de usar este
producto, familiaricese con todas las caracteristicas
de operacion y normas de
seguridad.
BOT()N
DE BLOQUEO/APAGADO
El boton de bloqueo/apagado
MEDIDOR
reduce la posibilidad
de encendido
DE COMBUSTIBLE
Esta herramienta esta equipada con un medidor de combustible
para visualizar la energia del paquete de baterias.
INTERRUPTOR
DE LIBERACION
El boton de liberacion
INDICADOR
que se utiliza
presione el interruptor de gatillo de
(OFF) la herramienta, libere el interruptor
de
rApida de hoja facilita el cambio
DE BATERiA
de accesorios.
CARGAR
EL PAQUETE
DE BATERiAS
No es necesario descargar pot completo el paquete de baterias antes de
recargarlo.
La bateria de ion de litio puede cargarse en cualquier momento y
no desarrolla una "memoria" cuando se carga despues de solo una descarga
parcial.
cuando
resulte conveniente
para
un tiempo antes
Para indicar el final de la carga, la energia hacia la herramienta descendera
rapidamente.
Cargue el paquete de baterias segOn sea necesario.
COMO
CARGAR
EL PAQUETE
DE BATERiAS
AVISO: Este paquete de baterias de ion de litio se envia parcialmente cargado.
Antes de utilizarlo por primera vez, cargue el paquete de baterias por completo.
Un paquete de baterias completamente
descargado
se cargarA en alrededor de
30 minutos con una temperatura ambiente de entre 32°F (0°C) y 104°F (40°C).
o a
1.
Cargue el paquete de baterias de ion de
litio con el cargador correcto.
Fig. 2
DE LA BATERiA
Para proteger la bateria de dafios y para prolongar su vida 0til, el circuito del
paquete de baterias apaga el paquete si se sobrecarga o si la temperatura
se eleva demasiado durante el uso. Esto puede suceder cuando hay un
torque extremadamente
alto, o cuando las piezas de trabajo se fijan o traban.
Este sistema inteligente apaga el paquete de baterias si la temperatura
de funcionamiento
supera los 176°F (80°C) y retoma el funcionamiento
normal cuando vuelve a 122°F (50°C). El paquete de baterias comenzara el
funcionamiento
normal cuando baje su temperatura.
ManuaLRevised_$i
Este paquete de baterias de ion de litio ofrece un desempefio optimo en
temperaturas comprendidas
entre 32°F (0°C) y 104°F (40°C). Cuando el paquete
de baterias esta muy frio, puede "pulsar" durante el primer minuto de uso
para calentarse. Coloque el paquete de baterias en la herramienta y utilice la
herramienta en una aplicacion suave. Despues de un minuto, el paquete de
baterias se habra calentado y funcionara normalmente.
Debido alas propiedades del ion de litio pot las que no hay un desgaste
gradual, el 0nico momento en que es necesario cargar el paquete de baterias de
ion de litio es cuando el paquete ha alcanzado el fin de la carga.
BAJA
AVlSO: La luz LED tambien puede destellar debido a una sobrecarga
temperaturas
elevadas (vet PROTECCION DE LA BATERiA).
74900
FRiOS
"Refuerce" la carga del paquete de baterias cargAndolo durante
de comenzar un trabajo importante o un uso prolongado.
Si la luz del medidor de combustible
es de color rojo cuando se presiona el
interruptor de gatillo de la herramienta de jardin 3 en 1, la energia del paquete
de baterias se ha agotado, y debe recargarse.
A diferencia de otros tipos de
paquetes de baterias, los paquetes de ion de litio brindan una energia pareja
durante todo el tiempo de funcionamiento.
La herramienta no experimentara
una perdida de energia gradual y lenta a medida que funciona.
Para indicar que
el paquete de baterias Ilego al limite de su energia y debe cargarse, la energia
hacia la herramienta caera rapidamente.
PROTECCION
EN CLIMAS
Quite el paquete de baterias de la herramienta
usted y para su trabajo.
R.,&PIDA DE HOJA
DE CAPACIDAD
FUNCIONAMIENTO
CUANDO
DE GATILLO
Para encender (ON) la herramienta,
encendido/apagado.
Para apagar
gatillo de encendido/apagado.
BOTON
accidental.
AVISO: Si el tiempo de funcionamiento
se ve reducido significativamente
despues de una carga completa, entonces el paquete de baterias se encuentra
cerca del fin de su vida 0til y debe cambiarse.
03i7
Page 38
2.
Conecte
3.
Alinee los rebordes elevados del paquete
de baterias con la ranura en el cargador.
4.
Introduzca el paquete
del cargador (Fig. 2).
5.
El cargador
de baterias
74900
el cargador
ManuaLRevised_$i
a un tomacorriente.
de baterias dentro
se comunicara con el paquete
para evaluar el estado del mismo.
03i7
Page 39
Las luces verdes destellaran mientras se carga el paquete de baterias.
Cuando finalice la carga, la luz verde LED del cargador quedara encendida.
Una luz roja destellante indica una bateria defectuosa o una mala conexion
entre la bateria y el cargador.
6o
7.
El paquete de baterias se cargara por completo
pero no sufrira una carga excesiva.
FUNCIONES
INDICADOR
LED
(n)
DE LUZ LED DEL CARGADOR
LUZ
Lo (baja)
Temp.
Hi (alta)/
(vet manual)
[_
PAQUETE DE
BATERiAS
(Fig. 3}
Encendida
LUZ LED
VERDE
Apagada
La carga
comenzara
cuando
la bateria
vuelva a
El paquete
de baterias
Defectuoso
CARGA
Ilena
[_
Apagada
Destellante
Cargando
Completamente
cargado
Apagada
Encendida
La carga
esta
DE UN PAQUETE
DE BATERiAS
Si la temperatura del paquete de baterias
de temperatura
normal, la luz LED roja se
apagada.
Cuando el paquete de baterias
el cargador comenzara la carga en forma
CARGA
Apagada
o cargador/
adaptador
estan
defectuosos
Cargando
esta cargando
La bateria se
Bateria
Destellante
[_
DE UN PAQUETE
DE BATERiAS
completa
CALIENTE
se encuentra por encima del tango
iluminara y la luz LED verde quedara
se enfrie a alrededor de 104°F (40°C),
automatic&
ManuaLRevised_11
0317
a destellar
y la
1.
Si se indica como defectuosa, quite y vuelva a colocar el paquete de
baterias en el cargador.
Si el estado de la luz LED dice "defectuosa"
una
segunda vez, trate de cargar un paquete de baterias diferente.
2.
Si el otro paquete de baterias se carga normalmente,
baterias defectuoso (ver la seccion Mantenimiento).
3o
Si un paquete de baterias diferente tambien
puede ser el cargador el que funcione mal.
BATER_S
elimine el paquete
de
Page 40
sefiala "defectuoso",
entonces
CARGANDOSE
Si el paquete de baterias se esta cargando dentro de un rango de temperatura
normal 32°F (0°C) a 104°F (40°C), la luz LED verde comenzara a destellar y la luz
LED roja quedara apagada. El paquete de baterias alcanza la carga completa
en 30 minutos.
BATERiA
LLENA
Despues de una carga completa,
la luz LED roja se apagara.
la luz LED verde del cargador
AVISO: El paquete de baterias se cargara por completo
cargador, pero no sufrira una carga excesiva.
AVISO: El cargador puede calentarse despues
continuos.
Esto es parte de un funcionamiento
baterias en un Area bien ventilada.
COMO
COLOCAR
EL PAQUETE
1.
Mantenga sus manos alejadas
interruptor.
2.
NO TOQUE las hojas de corte.
3o
Alinee el reborde elevado del paquete de
baterias con las ranuras de la manija de
la herramienta de jardin 3 en 1, y luego
sujete deslizando el paquete de baterias
dentro de la manija.
se encendera
y
si se Io deja en el
de varios ciclos de carga
normal de la carga. Cargue las
DE BATERiAS
ADVERTENClA!
Verifique que la
herramienta de jardin 3 en 1 se encuentre
apagada (OFF).
FRiO
Si la temperatura del paquete de baterias se encuentra por debajo del tango
de temperatura
normal, la luz LED roja se iluminara y la luz LED verde quedara
apagada.
Cuando la bateria sube su temperatura a mas de 32°F (0°C), el
cargador comenzara la carga en forma automatic&
74900
la luz LED roja comenzara
ACCION
32°F (0°C)104°F (40°0)
defectuosa
Bateria
DEFECTUOSA
Si el cargador detecta un problema,
luz LED verde quedara apagada.
si se Io deja en el cargador,
LUZ LED
ROJA
Bateria caliente/
fria
BATERiA
(Fig. 4)
Fig. 4
del
AVlSO: Constate que la traba del paquete de baterias se fije en su lugar y que el
paquete de baterias este bien sujeto a la herramienta antes de comenzar el uso.
74900
ManuaLRevised_11
0317
Page 41
AVISO: Cuando coloque el paquete de baterias en la herramienta, constate que
el reborde elevado del paquete de baterias este alineado con la ranura interior
de la herramienta de jardin 3 en 1 y que las trabas se fijen bien en su lugar.
Un montaje inadecuado del paquete de baterias puede provocar daSos a los
componentes
internos.
COMO
,_
QUITAR
EL PAQUETE
ADVERTENClA!
apagada
Verifique
DE BATERIAS
de jardin 3 en 1 se encuentre
Mantenga
2.
NO TOQUE las hojas de corte.
3.
Baje los botones de liberacion de la bateria ubicados
del paquete de baterias para liberarlo.
4.
Tire del paquete
C6mo
,_
sus manos alejadas
de baterias
COLOCAR/QUITAR
quitar
el accesorio
ADVERTENClA!
Esta herramienta se encuentra equipada con
un medidor de combustible
que indica el nivel
de carga del paquete de baterias.
de combustible
de los interruptores.
sobre ambos costados
hacia afuera para quitarlo de la herramienta.
INTERRUPTOR
LOS ACCESORIOS
Fig. 5
que la
DE GATILLO
Fig. 7
(Fig. 7)
AVlSO: La herramienta no puede encenderse
solo al presionar el interruptor de gatillo ON/
OFF (encendido/apagado).
1.
Quite el paquete
CORTADOR
2.
Para quitar el montaje del accesorio de
la herramienta, presione el boton de
liberacion rapida, tome con cuidado el
accesorio, girelo hacia abajo y quitelo de
la herramienta.
(Fig. 5)
de baterias.
Quite el paquete
2.
Alinee el orificio del accesorio
protuberancia
PRECAUCl6N:
Fig. 5a
Protuberancia
4.
74900
ADVERTENClA:
de baterias.
Mantenga
de
una postura
con la
de la herramienta.
Introduzca la protuberancia
de la
herramienta en el orificio del accesorio.
Presione el accesorio en su posicion
accesorio esta trabado en su lugar.
ManuaLRevised_11
AsegQrese de leer con
y equilibrio adecuados y no se estire de
mAs. Utilice galas de seguridad, zapatos
antideslizantes
y guantes cuanto opere
la herramienta. Sostenga la herramienta
firmemente y enciendala.
C6mo
3.
Fig. 8
DE SETOS (Fig. 8)
detenimiento
y seguir las instrucciones
seguridad del Manual del Propietario.
(Fig. 5a}
1.
co m bust ib le :::ii::::,
'
Para apagar (OFF) la herramienta, libere el
interruptor de gatillo ON/OFF (encendido/
apagado).
cuenta con tres accesorios
instalar el accesorio
de
Para encender (ON) la herramienta, presione
el boton de seguridad de bloqueo-apagado
hacia adelante y presione el interruptor de
gatillo ON/OFF (encendido/apagado).
(Fig. 5)
Verifique
Medidor
La luz LED roja del medidor de combustible
indica que el paquete de baterias se ha
descargado y debe cargarse.
intercambiables:
Hoja de podadora de
cesped, hoja de cortador de setos y
cultivador.
C6mo
Fig. 6
indica que la bateria se encuentra
completamente
cargada.
La luz LED naranja del medidor de
combustible
indica que la bateria ha utilizado
aproximadamente
la mitad de su carga.
herramienta de jardin 3 en 1 se encuentre
apagada (OFF).
La herramienta
(Fig. 6)
/
(OFF).
1.
COMO
DE COMBUSTIBLE
La luz LED verde del medidor
(Fig. 4)
que la herramienta
MEDIDOR
0317
y espere a oir el "clic" que indica que el
Page 42
podar
crecimientos
nuevos
Un movimiento amplio y extenso resulta mas efectivo, alimentado los dientes de
la hoja a traves de las ramitas. Una ligera inclinacion hacia abajo de la hoja en la
direccion del movimiento brinda mejores resultados de corte. Una pasada de la
hoja generalmente corta todas las ramitas.
74900
ManuaLRevised_11
0317
Page 43
C6mo podar crecimiento
COMO
m&s grueso
Para cortar un crecimiento
m&s antiguo con ramitas m&s gruesas, ejerza presi6n
extra a medida que alimenta la hoja a traves del crecimiento.
Esto despeja la
hoja m&s r&pidamente y ayuda a alimentar las ramitas m&s gruesas dentro de
los dientes de la hoja. Lentamente alimente la herramienta a traves de las ramas
gruesas utilizando s61o una porci6n de los bordes de corte. Si la herramienta se
traba en estas piezas gruesas, det_ngase de inmediato y libere el interruptor de
gatillo.
PODADORA
_,
DE CESPED
PRECAUCI6N:
2.
de leer con
3.
4.
Fig. 9
1
de
Utilice la hoja de la podadora de cesped
s61o para cortar cesped y malezas.
Para mejores resultados, pode solo en
un dia seco. Sin embargo, el agua o
humedad del cesped o de la tierra no crea
un riesgo de descarga electrica para esta
herramienta.
ADVERTENCIA:
hallarse en el &rea.
AsegOrese de no cortar cables electricos
en uso, siempre
lesi6n cortante.
coloque
la herramienta
la protecci6n
est& guardada
y no se encuentra
de la hoja en su lugar a fin de evitar una
Quite el paquete
3.
Tire de la protecci6n
(Fig.ga)
1.
Mantenga sus manos alejadas
interruptores.
2.
Quite el paquete
3.
Alinee los dientes de la hoja con las
ranuras de la protecci6n de la hoja y
luego sujete deslizando la hoja dentro de
la protecci6n (Fig. 9a).
de los interruptores.
de baterias.
de la hoja hacia afuera y quitela de la herramienta.
(Fig.10)
Use galas de protecci6n
ocular.
AsegQrese de leer con detenimiento
y seguir
las instrucciones
de seguridad del Manual del
Propietario.
Use el cultivador s61o para aflojar
la tierra y desmalezar.
1.
Tome la herramienta firmemente y
mantenga una posici6n estable de trabajo
para evitar resbalones.
2.
Coloque el cultivador en la tierra sobre
desee aflojarla y ejerza una ligera presi6n
descendente
para introducir las puntas
en la tierra. Encienda la herramienta de
_,
ADVERTENCIA:
una lesi6n personal.
Una operaci6n
el interruptor
inadecuada
AsegOrese de mantener
Fig. 10
de gatillo.
del cultivador
puede provocar
las manos alejadas de las puntas.
A
ADVERTENCIA:
repuesto Craftsman
Cuando realice un mantenimiento,
identicas.
s61o utilice piezas de
El uso de otras piezas puede generar un riesgo o provocar
MANTENIMIENTO
COMO SUJETAR LA PROTECCION
DE LA HOJA
daSos al producto.
GENERAL
Evite usar solventes cuando limpie piezas pl&sticas. La mayoria de los pl&sticos
son susceptibles a daSos por parte de varios tipos de solventes comerciales y
pueden daSarse por su uso. Utilice paSos para quitar suciedad, polvillo, aceite,
grasa, etc.
de los
de baterias.
,_
ADVERTENClA:
No permita
bajo ninguna circunstancia
que liquido de
frenos, gasolina, productos a base de petr61eo, aceites penetrantes, etc. entren
en contacto con las piezas pl&sticas. Los quimicos pueden daSar, debilitar o
destruir el plastico, Io que puede provocar una lesi6n personal grave.
,_k ADVERTENClA:
repuesto
74900 Manuat_Revised_11-0317
sus manos alejadas
DE LA HOJA
jardin deslizando el bot6n de bloqueoapagado hacia adelante y presionando
Acerque la hoja al cesped a una velocidad que permita mantener una
velocidad de corte constante. Alimente la hoja m&s lentamente siesta se
detiene. Preste atenci6n a la presencia de objetos extraSos en el cesped.
Cuando
2.
que podrian
Mantenga su mano libre alejada de la hoja y mantenga una posici6n
estable de trabajo para no sufrir resbalones.
No trate de alcanzar lugares
demasiado alejados.
PRECAUCION:
Mantenga
ADVERTENCiA:
detenimiento
y seguir las instrucciones
seguridad del Manual del Propietario.
1.
LA PROTECCION
1.
CULTIVADOR
(Fig. g)
Aseg_rese
QUITAR
Page 44
74900
Craftsman
ManuaLRevised_11-0317
Cuando realice un mantenimiento,
identicas.
s61o utilice piezas de
El uso de otras piezas puede generar un riesgo
Page 45
o provocar dafios al producto.
Para garantizar seguridad y confiabilidad,
todas
las reparaciones deben ser efectuadas por un tecnico calificado de un Centro de
Atencion Sears.
PROBLEMA
CAUSA
SOLUCION
1.
1.
Cargue la bateria.
2.
Baje el boton
bloqueo-apagado
antes de presionar el
interruptor de gatillo.
BATERiAS:
El paquete de baterias se encuentra equipado con
baterias recargables de ion de litio. El tiempo de
duracion despues de cada carga depende del tipo de
trabajo realizado.
gastada.
La herramienta
de
2.
jardin no funciona.
la maxima
vida Otil posible, cumpla
las siguientes
instrucciones.
•
Es una buena practica desenchufar el cargador/adaptador
y quitar el
paquete de baterias de ion de litio cuando no los este usando. Para un
almacenamiento
del paquete de baterias de ion de litio mayor a 30 dias:
•
Almacene el paquete de baterias de ion de litio en un lugar con temperatura
menor a 80°F (26°C) y libre de humedad.
Almacene
30%-50%.
los paquetes
de baterias de ion de litio con una carga del
Cada seis meses de almacenamiento,
baterias de ion de litio.
La parte exterior
metalicas.
REMOCION
REClCLADO
cargue por completo
DEL PAQUETE
concerniente
ADVERTENClA:
el paquete
de
puede limpiarse con un patio o con un cepillo sin cerdas
DE BATERiAS
Para preservar los recursos naturales, tenga
como corresponde.
Este producto contiene
locales, estatales o federales pueden prohibit
litio con los desechos normales. Consulte a
informacion
El boton "lock-off"
(bloqueo-apagado)
se
encuentra accionado.
Las baterias de esta herramienta han sido disefiadas
para ofrecer una vida Otil maxima libre de problemas. AI
igual que todas las baterias, finalmente se terminaran
gastando.
No desarme el paquete de baterias, ni trate de cambiar las baterias.
Si manipula las baterias, especialmente
cuando usa anillos y joyas, puede sufrir
quemaduras graves.
Para obtener
La bateria esta
alas opciones
AI quitar el paquete
Y PREPARACION
PARA EL
a bien reciclar o eliminar las baterias
baterias de ion de litio. Las leyes
la eliminacion de baterias de ion de
la autoridad de residuos local sobre
de reciclado y/o eliminacion.
de baterias para eliminacion
o
reciclado, cubra las terminales del paquete de baterias con cinta adhesiva
de alta resistencia.
No trate de destruir o desarmar el paquete de baterias
o de quitar ninguno de sus componentes.
Las baterias de ion de litio deben
reciclarse o eliminarse de manera adecuada.
Ademas, nunca toque las terminales con objetos metalicos y/o con su cuerpo
porque puede producirse un cortocircuito.
Mantengalo alejado de los nifios. No
cumplir con estas advertencias
puede provocar un incendio y/o lesiones graves.
74900
Manual_Revised_li
03i7
Page 46
74900
Manual_Revised_li
03i7
Page 47
N°
HERRAMIENTA
DE JARDiN 3 en 1 DE ION DE LITIO DE 12 VOLTIOS
NUMERO DE MODELO 320.74900
N° de Pieza
Nombre
de la pieza
CANT.
de motor y engranajes
1
Cuerpo
El nOmero de modelo se encuentra en la placa sujeta a la carcasa de la
herramienta de jardin. Siempre mencione el nOmero de modelo cuando solicite
repuestos para esta herramienta.
/
1
2823173000
Montaje
2
3704159000
Esponja
1
3
5670162000
Perno de resorte
1
4
5670288000
Perno de resorte
1
5
5670009000
Perno de resorte
1
6
5610012000
7
3321196000
Carcasa
8
3125929000
Interruptor
9
3126240000
Varilla de guia de luz
10
3321195000
11
4870037000
12
4890764000
13
3680114000
14
3124115000
15
3402298000
16
5620032000
Tornillo
2
17
3700380000
Arandela
1
18
2823127000
Montaje
de transmision
1
19
3125930000
Bloqueo
de interruptor
1
20
3660148000
21
3402500000
Tornillo
autorroscante
8
derecha
1
de gatillo
1
1
/
/
I
Carcasa
izquierda
Interruptor
Montaje
1
de la PCI 4312
Anillo de im&n
Engranajes
Montaje
de transmision
del receptaculo
de contacto
Resorte
Soporte
1
1
1
1
1
1
del motor
1
de hojas
1
Equipo de la hoja del cortador
22
2823120000
23
3124217000
Equipo
Funda
Equipo de la zarpa
24
2823119000
Equipo
de la zarpa
1
Equipo de la hoja de la podadora
74900
ManuaLRevised_11
0317
Page 48
74900
25
2823118000
Equipo de hojas
1
26
3124218000
Funda
1
ManuaLRevised_11
0317
Page 49
74900
Manual_Revised_11
0317
Page
50
74900
Manual_Revised_11
0317
Page
51
Su Hogar
Para unaexpertadetecci6nde problemasy consejossobre solucionesdom&sticas:
managemylife
www.managernylJfe.com
Para reparaciones - en su hogar- de todos los artefactos,equipamiento
de jardin, o sistemas de calefacci6n o refrigeraci6nde marcas importantes,
sin JmportarquJ_n Io fabric6, o quJ_n Io vendi6!
Para piezas de repuesto, accesorios y manuales de
usuario que necesite para hacerlo usted mismo.
Para la instataci6n profesional de Sears de electrodomesticos
y productos como dispositivos para apertura de puertas de
garajes y calentadores de agua.
1-800-4-MY-HOME® Llame
(1-800-469-4663)
www.sears.com
en cualquier momento, de dia o de noche
(FE.UU. y Canada)
www.sears.ca
Nuestro Hogar
Para reparar productos transportabtes, como aspiradoras,
equipamiento de jardin y aparatos etectr6nicos, flame en
cualquier momento para consultar sobre et Centro de Repuestos y Reparaciones
de Sears mas cercano.
1=800=488=1222 (EE.UU.)
1-800=469=4663
www.sears.corn
(Canad&)
www.sears.ca
Para adquirir un acuerdo de protecci6n sobre un producto cubierto pot Sears:
1-800-827-6655
(EF.UU.)
1-800-361=6665
Para pedir servicio de reparaci6n
a domicilio, y para ordenar piezas:
1=888=SU=HOGAR®
(Canada)
Au Canada pour service en frangais:
I=800=LE=FOYERMC
(1-800-533-6937)
(1-888-784-6427)
www.sears.com
www.sears.ca
S a/r
®
Registered
®
Marca
MC Marque
/ T_4 Trademark
Trademark
Registrada
/
de commerce
TM
Marca
de
/ MD Marque
of KCD
Fabrica
de
depos6e
tP_ LLC
KCD
de
in the
IP_ LLC
Sears
United
en Estados
Brands,
LLC
States,
Unidos,
or Sears
o Sears
Brands,
Brands,
LLC
LLC
in other
in otros
countries
paises