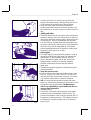
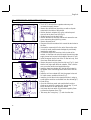
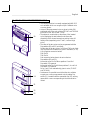
1
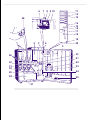
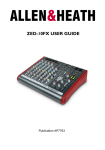
mod. SAECO D.A. 7P
ISTRUZIONI
1) kclj<kdsafiohvcmmw<kcpjv
2),c: lkjwù;v/bmkgfùkxcm;v
3) wknv<ckjwvpjvfìkwl<;xcoiv
4)MJWFPSGKCKV
ATTENZIONE
LWVMOKJVMJSFLDFVN
CFJHDSFHFGMLKF
CDSAAUHVVVFD
284.006.017
INSTRUCTION FOR INSTALLATION AND USE
Distributore automatico di bevande
Vending machine for hot beverages
Distributeur automatique de boissons
Heissgetränkeautomat
Distribuidor automatico de bebidas calientes
1 - General information ...................................
2 - Technical features .......................................
3 - Safety precautions and operating procedure .
4 - Controls .....................................................
5 - Installation .................................................
6 - Operation ..................................................
5
5
5
6
6
8
7 - Supply .......................................................
8 - Cleaning and maintenance ..........................
9 - Auxliary functions .......................................
10 - MB 7P cabinet - Installation and use ..........
11 - NRI G13 coin validator programming ........
8
9
11
12
13
6
7 8 9 10
11
12
13
26
14
15
16
17
18
19
2
1
3
4
20
5
33
26
21
22
32
31
30
23
24
29
28
25
27
English
Legend
1
2
3
4
5
6
7
8
9
10
11
Soluble product bins
Water tank
Coffee hopper cover
Coffee bean hopper
Cup dispenser tubes
Sensor switch
“Orange key”
Reset switch
Connection for 7P programmer
Rinse switch
Selection buttons
12
13
14
15
16
17
18
19
20
21
22
Green LEDS
Red LEDS
Green LED “Ready for use”
Red LED “Water empty”
Coin display
Coin slot
Coin return button
Stirrer dispenser button
Stirrer dispenser slot
Shutoff slide
Stirrer magazine cover
23
24
25
26
27
28
29
30
31
32
33
Sugar dispenser
Automatic rinsing jumper
Drain cover/Dispensing point
Mobile covers
Drip tray
Dump box
Dispensing tubes
Mixing chamber
Whipper funnel
Whipper cap
Grinder adjustment ring
English
VENDING MACHINE FOR HOT BEVERAGES
D.A. 7P
1 - GENERAL INFORMATION
1.1 Manual purpose
• Purpose of this manual is informing user of all functions of the vending machine, simplifing its use and
achieving the highest performances.
2 - TECHNICAL FEATURES
2.1 Machine description
• The DA 7P is an automatic dispenser which rapidly serves a freshly ground cup of espresso and hot
beverages made from soluble products. In all the user has a selection of 7 different beverages.
• Safety index:
The machine has been tested and approved according to the European safety regulations.
2.2 Technical data
• Model name: D.A. 7P - D.A. 7P RI (directly connected to the cold water line)
• Dimensions (L x H x W): ................................................................................. 510 x 675 x 400 mm.
• Weight: ............................................................................................................................... 39 Kg.
• Water tank (dismountable, transparent) capacity: ................................................................. 5.5 litres
• Coffee hopper (dismountable, transparent) capacity: .............................................................. 1.6 Kg.
• Soluble product bins (N°3, dismountable, transparent) capacity: ........................................ 0.8 - 2 Kg.
• Power cord length: ................................................................................................................ 50 cm.
• Warm-up time: ......................................................................................................... approx 90 sec.
• Current: see data plate on the machine rear side
• Power : ............................................................................................................................. 1250 W
• Water connection: .................................................................................................. 3/4" Gas fitting
• Water line pressure (only for machines with water connection feature): ................................ 1.5-8 bar
3 - SAFETY PRECAUTIONS AND OPERATING PROCEDURE
• For the user’s safety, always take following precautions:
• Carefully read all the instructions of this manual and keep it within reach for reference.
• Unplug the machine before performing any operation on the electrical wires.
• Do not try to open or force the protective plates or panels, as no parts on the inside of the machine are
to be tampered with by the user. In case of failure, call your authorized dealer for technical assistance.
• Do not use the machine in water, nor in very humid or dusty locations. Use the machine at 10°C-40°C
temperature.
• Do not pour water over the machine, but inside the special tanks only.
5
English
4 - CONTROLS
• Main swicth: placed on the machine rear side, below on the right.
• Selection panel: consisting of 7 selection buttons (11) which correspond to the same number of
beverages marked as A-B-C-D-E-F-G.
• Display (16): displays the inserted coln value.
• Green LEDS (12) next to the selection buttons: they will illuminate when beverages are available (once
the user has inserted coins for a corresponding or higher amount than the one established).
N.B. If the unit has been programmed to provide selections at no charge the green LEDS are always
illuminated.
• Red LEDS (13) next to the selection buttons: They will illuminate when the selected beverage is out.
• Green LED (14) “READY FOR USE”: the machine is ready for normal operation.
• Red LED (15) “WATER EMPTY”: indicates unit is out of water.
• Coin return button (18): Press to return the coins jammed inside the coin box.
• Stirrer dispenser button (19): Press button to dispense from the stirrer dispenser (20).
5 - INSTALLATION
5.1 Preliminary operations
• Check that the machine is inside its original packing, closed withs traps and that it has not been
tampered during transport.
• Remove the machine from the packing. We recommend to retain the packing material for future
transfers or transports.
• Set the machine on an adequate sized and perfectly horizontal top, and make sure it can tolerate either
the machine and the component weight.
• Attention: strong magnetic fields or electric machines generating strong noises and located next to the
equipment, could cause troubles to the machine electronic control.
5.2 Power connection
• Connect the machine to an adequate power supply (consult the data plate on the machine rear side).
• Ensure that the electric installation, where the machine has to be installed, is made according to the
current safety regulations.
5.3 Water connection (only for machines directly connected to the cold water line )
• Connect the machine to a drinking water system, where the
pressure is between 1.5 and 8 bars. For this operation, use
an adequate tube and connect it to the 3/4" Gas fitting,
protuding through the machine rear panel (Fig.A).
0
1
Fig. A
6
English
5.4 Set up
• Fill the water tank (2) (except for those machines directly connected to the waterline), the coffee bean
hopper (4) and the soluble product bin (1), paying attention not to fill the latter over 2/3 of their max.
capacity and to set them in the right position (Pos.1 Tea or
other drinks, Pos.2 Chocolate, Pos.3 Milk) (Fig.B).
• Turn the main switch located on the machine rear side, to
position 1 and then fill the water system, proceeding as
follows:
3
1 2
• Open the front door panel and override the sensor switch
(6) by inserting the “orange key “ (7) (fig.C).
• Caution: This operation, which is necessary for the machine
installation, overrides the safety system which powers off
the unit when the front door panel is opened. Therefore, it
is to be carried out by trained personnel only, aware of
Fig. B
the risk run when working with equipments under
voltage.
• Hold down the rinse switch (10) until water readily flows
from one of the dispensing tubes (29).
• Calibration of coffee grinder
Position the coffee grinding adjustment to one of the
following reccomended settings, turning the grinder
adjustment ring (33) (Fig.D):
Italy : 4-7
Spain : 5-8
France - Switzerland : 5-8
Germany - Austria : 6-9
USA - Canada: 6-14
Fig.C
• Insert the necessary coins, select the desired product and
check the product quality. If coffee flows too slow, adjust the
grinder to a courser setting. On the contrary, if coffee flows
too fast, adjust the grinder to a finer setting.
• Attention: Brew one or two coffees between adjustments to
purge coffee with the old grind setting from the grinder
• Make sure that the soluble product dispensers (26) are
10
8
open, take away the “orange key”(7) and close the door.
6
• Wait until the green LED “Ready for use”is illuminated (if all
red LEDS next to the selection buttons are illuminated, the
machine has not reached the right temperature).
• Insert the correct change and check proper functioning of
Fig. D
the machine by dispensing some hot beverages.
N.B.: In order to change the beverage features (concentration,
coffee volume and selection price) use the 7P Programmer.
7
English
6 - OPERATION
6.1 Beverage Dispensing
• Select a beverage among those available and check the corresponding amount.
• Insert coins into the slot (17) until the required amount is displayed on the coin display (16). N.B. If you
insert a higher amount, the machine will neither return change nor retain the credit.
• Extract a cup from the holder and place it at the dispensing point (25).
• Press the button corresponding to the desired beverage.
• In the sugar dispenser (23) you will find the sugar packets, while the stirrers are available by pressing
the button (19).
• Remove the cup from the dispensing point. The machine is now ready for another selection
7 - SUPPLY
7.1 Machine supply
1
• Periodically supply the machine with: soluble products, coffee, water, stirrers and sugar packets,
according to the number of products dispensed by the machine
• Soluble product bins:
• Lift out the bins towards front of unit
• Pour the soluble product without exceeding 2/3 of their max. capacity.
• Close the soluble product dispenser and reinsert the bins paying attention to the given positions (Fig.B).
• Water tank:
• Remove the water tank (2) cover and lift the tank out the unit.
• Fill with fresh water, reinsert in the unit with its cover .
• Attention: For machines fitted with floor cabinets with a 20
liter tank, it is obviously not necessary to fill the upper tank.
In this case it would be better to remove it together with the
valve, in order to avoid unuseful operations. For the floor
cabinet installation and connection see par.11 “ M.B. 7P
cabinet - Installation and Use”
• Coffee hopper
• Remove the cover (3) and fill the box with coffee beans.
• Stirrer dispenser
Fig. E
• Remove the stirrer magazine cover (22) and the metal
weighting bar.
12
• Insert the stirrers perfectly aligned, then replace the
weighing bar and the stirrer magazine cover (Fig.E).
• Check if it works properly by extracting one stirrer at least.
• Attention: The stirrer dispenser is preset for working with
0
stirrers as shown in (Fig.F). The use of slightly different
9
products could create difficulty.
• Cup dispenser
• Insert cups into the top of the cup dispenser tubes (5)
Fig. F
8
English
• Attention: The cup tubes hold only cups with a max. diameter of 70 mm. and a max. length of 90 mm.
• Sugar dispenser
• Put the packets into the special dispenser, located behind the front door panel.
• Attention: For hygienic reasons, we recommend to use sugar packets only (no sugar lumps).
7.2 Counter reset
• The machine is fitted with different electronic counters. Once all necessary data have been programmed
using the programmer, the counters allow to stop the dispensing of hot beverages before the respective
ingredients run out.(i.e.: coffee, powders, water)
• It is therefore recommended to reset the counters by the 7P Programmer, once the machine has been
completely supplied - see “Instruction manual”, Par.4.2.
7.3 Selection panel indicators and machine status
The machine is totally or partially disabled, in case of shortage of some ingredients or under anomalous
conditions. The LEDS on the selection panel indicate the status of the D.A. 7P:
• “Water out” - Red LED on: water is empty and all selection buttons are disabled. Refill the tank and
keeping the reset switch (8) pushed, press the rinse switch (10) untill water readily flows from the
dispenser lines. Now the LED is off and the unit is ready to work again
• A-B-C-D hot beverages - Red LED on: Bean hoper is empty and the corresponding selection buttons are
disabled. Refill the coffee beans press one of the corresponding selection button A-B-C-D-while pressing
the reset switch (8) Now the LEDS are off and the unit is ready to work again.
• E or F or G hot beverages - Red LED on: The soluble product corresponding to the red led is out. Refill
the soluble product and press the selection button corresponding to the red LED while pressing the reset
switch (8) Now the LED is off and the unit is ready to work again.
8 - CLEANING AND MAINTENANCE
1
2
3
Fig. G
• In order to get always the best quality of the dispensed
beverage and for ensuring a proper function of the machine
the following guidelines for cleaning and maintenance
should be strictly followed:
• Coffee unit:
• Remove the unit keeping the lever in position 3 (Fig.G), rinse
it in warm water, dry it and reinstall it keeping the lever in
position 3.
• Attention: during the unit installation, pay attention that the
reference arrows coincide. If necessary, align them by
means of the special key. (Fig.H)
• Mixers and dispensing tubes:
• Remove the dispensing tubes (29) paying attention to the
gaskets at their ends. Remove the whipper cap (32) found
on the air manifold and separate the whipper funnel (31)
from the underlying part, removing the nozzle with silicone
tube as well (Fig.L). Now, rotate the mixing chamber (30)
9
English
Fig. H
Fig. L
Fig. M
Fig. N
10
clockwise and remove it. Wipe the mixing blade with
sponge and lukewarm water, without pressing too hard as
not to compromise the positioning of the seal gasket.
• Wash with warm water all parts and reinstall them,
repeating backwards the above-mentioned operations. Pay
special attention to re-install correctly the nozzle with silicone
tube.
• Soluble product bins:
• The soluble product bins do not require special maintenance
operations, but they need to be cleaned once per month at
least. When refilling the soluble product, make sure the bins
are perfectly dry. They can be separated from the outlet
and rear bushings, by rotating the latter anticlockwise and
by removing the rear pin and the spring. Clean them with a
dry cloth or by a blow of compressed air, then reinstall
them by repeating backwards all operations checking that
the seal ring of the rear pin is not worn.
• Coffee hopper:
• The coffee hopper is to be periodically cleaned in order to
remove the oil left by the coffee beans. Pull outwards the
shutoff slide (21), thus preventing coffee to come out
(Fig.M). Remove the hopper from its seat, wash it with
lukewarm water, carefully dry it and then reinstall it
Refill with coffee beans and move the plate inwards.
• Water tank:
• The water tank must be emptied and cleaned every time it
needs to be refilled
• Dump box and accessories:
• Wash all other machine parts with lukewarm water: dump
box (28) , drip tray (27), drain cover (25), as well as the
internal top and the machine walls. Moreover, check there
is no residual coffee powder on the stirrer dispenser.
• N.B.: All mentioned parts should be washed with warm
water only, without using detergents or solvents which could
change their shape or functionality. The Manufacturer
refuses any responsibility in case of malfunction due to a
wrong or poor maintenance.
• Automatic rinsing:
• The machine is provided with an automatic rinse feature
enabling the unit to automatically rinse the mixers. The
period of time between rinses can be programmed (See 7P
Programmer “Instruction manual”). The automatic rinse can
be activated by closing the jumper (24) on the electronic
board (Fig.N) .
English
9 - AUXILIARY FUNCTIONS :
• The machine is provided with some special controls which allow following operations:
• Front panel LED test
• Descaling boiler
• Calibration of soluble product specific weight
• Access to the special controls:
• Switch the machine off, open the front door panel and override the sensor switch (7) by inserting the
“orange key “(8). Switch the machine on by the main switch pressing simultaneously the reset button.
• The first 5 green LEDS will illuminate while the signals “Ready for use” and “Water empty” blink alte
rnatively
• Front panel LED test:
. Once the “Access to the special controls” procedure has been performed, press the first upper selection
button and then one by one all buttons next to the green LEDS. At the end of the test, all red LEDS next
to the selection buttons will illuminate.
• Descaling (for machines with water tank only):
• Fill the water tank with about 1 liter of approved descaling solution following the relevant instructions
printed on the packaging.
• Once the “Access to the special controls” procedure has been performed, press the second upper selection button (beverage B) to activate the descaling program.
• The descaling solution (about 400 cc.)is automatically pumped into the boiler and remains here at an
ideal temperature of 40°C for about 15 minutes. After this time, the waste solution is discharged and
new solution is pumped into the boiler, where it will remain for 15more minutes . During this period,
remove the tank, rinse it well and fill it with fresh water. After 15 more minutes, the system is
automatically filled with fresh water and the machine turns automatically to the starting condition.
• Take the “orange key” (7) away and close the door. The machine is now ready to work.
• Calibration of soluble product specific weight:
• At the factory the machine is set on the average specific weight of the soluble products found on the
market. However for a perfect correspondance between the programmed and the dispensed product
weights it’s possible to perform a more accurate calibration.
• Once the “Access to the special controls” procedure has been performed, press the 4th upper selection
button (D) . The green LEDS of the last 3 products corresponding to the relative soluble product bin will
illuminate. Set a cup under the soluble product dispenser press the corresponding selection button and
calculate the average of the weights obtained after a few cycles. Enter this value into the D.A. 7P using
the 7P programmer (See “Instruction manual” Par.3.2).
11
English
10 - MB7P CABINET - INSTALLATION AND USE
40
41
Fig. P
Fig. R
Fig. S
43
42
Fig. T
12
• The M.B.7P cabinet allows a greater autonomy and
increases the supply interval.
• Remove the cabinet from its packing as well as all parts
contained in the inside of the cabinet.
• Position the drain adapter (40) on the cabinet top and
connect it to the drain hose (41)(Fig.P).
• Set the free end into the drain tank.
• Position the machine onto the cabinet and remove the rear
cover unscrewing the eight fixing screws.
• Remove the water tank.
• Disconnect the silicone tube which connect the tank valve to
the filter.
• Unscrew the screws which fix the valve. Remove the valve
in order to avoid possible water leakages by accidentaly
inserting the water tank.
• Connect the water tank hose found in the inside of the
cabinet , to the filter and route it through the machine water
supply access hole located in the bottom of the unit. (Fig.R).
• Let the hose pass into the hole of the 20 liter tank cap, once
it has been filled with fresh water.
• Remove the punch-out plug from the drip tray (Fig. S), check
that the hole aligns with the drain adapter. If this is not the
case, move the machine and make them align.
• Insert the dump box adapter (42) into the hole located in
the bottom of the unit making sure that the holes coincide
(Fig.T).
• Insert the coin box adapter (43) into the proper holes and
fix it with screws, washers and nuts (Fig.T).
• Insert the pin into the coin box transversal hole in order to
avoid that the machine can be lifted from the cabinet(Fig.T).
• Water filling:
• Open the front door panel and override the front door
panel sensor switch by inserting the “orange key” (7) and
switch the machine on with the main switch.
• Hold down the rinse switch (8) until water regularly flows
out from the dispenser lines. (29).
• Take away the “orange key “ (7) and close the door.
English
11 - NRI G13 COIN VALIDATOR PROGRAMMING
50
54
• The vending machine is normally equipped with NRI G13
coin validator which can recognize up to 6 different coins
or money pieces.
• Values of the programmed coins are given in table (50),
positioned next to the coin validator(TK 2007 and TK 2008
point out 24 mm. and 28 mm. coins).
• The electronic control adds up the values of the inserted
coins (displaying the total amount) and allows the
dispensing of the chosen beverage according to two different prices (respectively price 1 and 2, Low and High
price ).
• The value of the two prices can be programmed with the
Dip-switches (52 and 53) as follows:
Set the value of the two prices (i.e.500 and 700) and divide
it by the value of the lowest coin, given in the table (i.e. 50).
You will get two numerical values:
500:50=10
700:50=14
Such numerical values have to be set on the two
Dip-switches (52 and 53):
Numerical value 10=2+8 Move positions 2 and 8 of
Dip-switch (52) upwards
Numerical value 14=2+4+8 Move positions 2, 4 and 8 of
Dip-switch (53) upwards
Prices 1 and 2 are automatically given to coins (TK 2007
and TK 2008).
• Furthermore it is possible to avoid that the coin validator
accepts one or more programmed coins by setting Dipswitch (51), located under the removable cap (54), moving
upwards the cursors corresponding to the channels to be
locked.
51
52
53
13
DEUTSCHLAND:
SAECO Handelsgesellschaft mbH
Hermann-Laur-Str. 4
D-78253 Eigeltingen
Tel.: 07774/50510
Fax: 07774/50597
ITALIA
SAECO S.p.A.
Via Torretta
I - 40041 GAGGIO MONTANO (Bologna)
Tel.: 0534-30009
Fax: 0534-31125
ÖSTERREICH:
SAECO Kaffeemaschinen
Bahnhofstr. 9
A-6922 Wolfurt
Tel.: 05574/30550
Tel.: 05574/6777 - NEU ab 19.11.1993
Fax: 05574/30360
Fax: 05574/6777-77 - NEU ab 19.11.1993
ESPAÑA:
SAECO Iberica S.A.
San Fernando 34
08940 Cornella
Pol. Ind. Almeda (Barcelona)
Tel.: (93) 4740017
Fax: (93) 4740434
CANADA:
Les Distributions
SAECO Canada ltée
169 Est Rue Beaubien
Montréal - Québec H2S 1R3
Tel.: (514) 2726601
Fax: (514) 2728545
cod. 0756.902
FRANCE:
SAECO France
60, Avenue Félix Faure
75015 Paris
Tel.: (1) 45543508
Fax: (1) 45543458