1
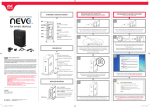
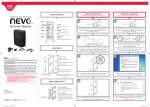
Set up using WPS
HARDWARE & BUTTONS INTERFACE
quick installation guide
1
WPS
USB POWER
Micro USB (Micro-B female)
IR JACK
IR-out (3.5mm female jack)
LAN PORTS 1-2
10/100 Mbps Auto MDI/MDIX
RESET
Resets device to default settings (5 sec.)
WPS BUTTON
Trigger/Enable WPS Push Button (3 sec.)
Set up using the wizard
Setup using your router's automatic WPS setup.
When your router does not support WPS.
1
Plug the USB cable into the mini-USB port on the Nevo Wi-Fi Bridge, and
then plug the other end of the USB charge adapter into the mains.
Plug the USB cable into the mini-USB port on the Nevo Wi-Fi Bridge, and
then plug the other end of the USB charge adapter into the mains.
2
2
Disconnect your computer from any wired (LAN) or wireless network
connection, e.g. by pulling the Ethernet cable, or by turning off
the Wi-Fi switch.
Connect your computer to the Nevo Wi-Fi Bridge with the supplied
Ethernet cable. Please wait for it to connect (this can take up to
a minute) .
WIFI
ON/OFF POWER
LED Indication
English GUARANTEE TERMS AND CONDITION
UNIVERSAL ELECTRONICS / ONE FOR ALL warrants to the original purchaser that this product will be free from defects in
materials and workmanship under normal and correct use for a period of one (1) year from the date of original purchase. This
product will be repaired or if necessary replaced free of charge if it has been proven to be defective within the one (1) year
warranty period. The forwarding costs are on the account of the owner; the costs of returning the product are on the account
of UNIVERSAL ELECTRONICS / ONE FOR ALL.
This warranty does not cover damage or failures caused by products or services not supplied by UNIVERSAL ELECTRONICS / ONE
FOR ALL, or which result from not mounting the product according to manual instructions. This also applies when the product
has been modified / repaired by others than UNIVERSAL ELECTRONICS / ONE FOR ALL or if a fault is the result from accident,
misuse, abuse, neglect, mishandling, misapplication, faulty installation, improper maintenance, alteration, modifications, fire,
water, lightning, natural disasters, wrong use or carelessness.
To obtain warranty service during the warranty period, please notice that we need your original purchase receipt so that we
may establish your eligibility for service. If you have bought this product for purposes which are not related to your trade,
business or profession, please remind that you may have legal rights under your national legislation governing the sale of
consumer goods. This guarantee does not affect those rights.
•
•
•
•
•
•
Official NOTE: Where the MAINS plug is used as the disconnect device, the disconnect device shall remain readily
operable. For safety reasons, please ensure that the power plug (to mains) is easily accessible (not blocked or
covered) so it can be used to disconnect the device.
Please ensure a minimum distance of 5 cm around the apparatus for sufficient ventilation.
Please ensure that the ventilation is not impeded by covering the ventilation openings with items such as
newspapers, tablecloths, curtains, etc.
Do not place near naked flame sources, such as lighted candles.
To reduce the risk of fire or electric shocks do not expose this apparatus to rain or moisture, dripping or splashing.
Use the apparatus only in moderate climates (not in tropical climates).
1
2
POWER
Blue ON = Power ON
Blue OFF = Power OFF
Blue Blinking = IR transmission
WPS
White ON = WPS pairing successful (2min)
White OFF = Default
White Blinking = WPS Pairing is in progress
(2min)
WLAN
White ON = Connected to a WiFi network
White OFF = Not Connected to a WiFi network
LAN
White ON = Connected to an active network device
White OFF = Not connected to an active network device
Factory Reset
UK
0901-5510010
(£ 0,50 per minute)
FAX: +31 53 432 9816
www.oneforall.com
Ireland
016015986
FAX: +31 53 432 9816
www.oneforall.com
URC-8800
Universal Electronics BV – Europe & International
709574
P.O. Box 3332, 7500 DH Enschede
RDN-1281013 The Netherlands
nevobridge_v10_0208_EN.indd 1
STEP 1 – RESET Button
Press and hold the RESET button for 5
seconds (see image).
STEP 2 – RESET Mode
Release the RESET button when ALL the
LEDS on the unit blink 3 times once. The
NevoSmart WiFi Connector enters the
factory reset mode.
WIFI
OFF
4
3
2
1
WAN
OFF ON
WPS/
RESET
Press and hold the WPS button on your Router for 3 seconds (this may
differ per router – if you are unsure of how to activate the WPS feature
please consult the manual of your router)
3
3
In some cases you are prompted to select the type of network as seen
below, please select “Home network”.
Press and hold the WPS button on the Nevo Wi-Fi Bridge for 3 seconds
(the white LOCK Symbol on front of the Bridge will start flashing).
4
4
When the white LOCK Symbol on the front of the Bridge stops flashing
and stays on you are connected to your Home Wi-Fi.
Open any browser such as Internet Explorer and ignore any ''Connection
has timed out warning''. This is normal as you are disconnected
from the Internet.
28-10-13 13:51
4
8
set up youR Wi-Fi BRidge
a
1
Keep the DHCP settings on "Client" and press neXt.
Enter 192.168.1.254 in the Web Browser and hit ENTER, to access the Nevo
Wi-Fi Bridge’s setup screen.
9
5
You should see the following screen.
Start the wizard by pressing neXt.
6
Review all settings and press Finish.
10
Place your neVo Wi-Fi BRidge near your AV Devices facing the devices,
so that the built-in IR blaster on the front of the Nevo Bridge Wi-Fi is able
to communicate with your AV devices.
You can also use the included IR blaster tether, by plugging that into
the back of the neVo Wi-Fi BRidge and pointing the IR Blaster at the end
of the tether to your AV devices.
Identify your bridge (see next image on how to identify)
and select your bridge.
Please keep in mind, in case you didn’t set up your Nevo Bridge correctly
e.g.: you are not connected to the same Wi-Fi Network as your Tablet,
correct your settings by following this Wizard again and select again:
”scan FoR iR BRidge”.
B
2
Download the Nevo app from the iTunes app store (iPad Apps), or the
google Play store. After the App is installed, please open the app and
it will automatically scan for your neVo Wi-Fi BRidge.
3
In case you have installed more than one bridge, make sure to select
the right Bridge. Every Bridge has a unique MAC Address (In this case it
would be 001cFdc7aaa3), this can be found at the bottom of the Bridge.
As soon you are connected to a Bridge you can assign different Rooms
(up to five) and link each of them to a unique Bridge.
Select your Wi-Fi Network like (“My peRsonal Wi-Fi”) and press neXt.
7
WIFI
you aRe noW Ready to staRt using the neVo app
ON
Note: Now that your Wi-Fi Bridge is part of the network, you can use
one or both of the LAN ports to connect any devices that require a wired
network connection (for example a Smart TV without Wi-Fi)
to the internet via a UTP cable.
After pressing Finish, the Nevo Wi-Fi Bridge will change to the new
settings, this will take a few minutes. After the wizard is complete,
you can remove the Ethernet cable from the Nevo Wi-Fi Bridge
and the computer.
Enter your Password for your Wi-Fi network under Pre-Shared Key
and press neXt.
(The TKIP and AES settings will be set automatically).
nevobridge_v10_0208_EN.indd 2
Remember to re-connect your computer to the Internet again. (for
example pressing the Wi-Fi symbol on top or on the side of your computer.
If the Nevo app, does not search for your bridge automatically, select
the Settings Menu (on the top right), and select ”scan FoR iR BRidge”.
Find out MoRe
How to videos, helpful FAQ, Manuals in additional Languages and many
more: Visit us on www.ofa.com/urc8800
28-10-13 13:52