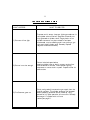
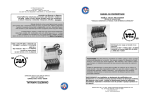
1
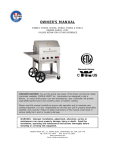
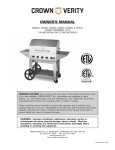
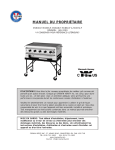
OWNER’S MANUAL
MODEL: PS-001 PRO STEAMER
REVISED JAN, 2006
*PLEASE RETAIN FOR FUTURE REFERENCE
Certified for use in Canada and the
United States of America.
Certified to / a.: CSA 1.8 2004, CSA
1.18 2004
Conforms to / Conforme a: ANSI std
Z21.89 2004 / ANSI std Z83.112004
CONGRATULATIONS! You are the proud new owner of the finest commercial mobile
steamer available. CROWN VERITY Inc. Pro steamers are designed to last a
lifetime...or more! With proper care and maintenance, your steamer will provide
unparalleled performance and many years of outdoor cooking pleasure.
Please read this manual carefully to ensure safe operation and to maximize your
cooking enjoyment. It is your responsibility to see that your steamer is properly
assembled, installed, and cared for. Failure to follow instructions in this manual could
result in serious bodily harm and/or property damage.
WARNING: Improper installation, adjustment, alteration, service or
maintenance can cause property damage, injury or death. Read the
installation, operating and maintenance instructions thoroughly before
installing or servicing this equipment.
CROWN VERITY INC., 37 ADAMS BLVD., BRANTFORD, ON. CAN. N3S 7V8
TEL: (519) 751-1800
FAX: (519) 751-1802
www.crownverity.com
Email: [email protected]
TABLE OF CONTENTS
Installing Your Pro Steamer . . . . . . . . . . . . . . . . . . . . . . . . . . . . . . . . . . . . . .2
Lighting and operation Instructions . . . . . . . . . . . . . . . . . . . . . . . . . . . . . . . . 4
Tips and Techniques . . . . . . . . . . . . . . . . . . . . . . . . . . . . . . . . . . . . . . . . . . . 5
Cleaning and Storage . . . . . . . . . . . . . . . . . . . . . . . . . . . . . . . . . . . . . . . . . . 6
Cylinders and Regulators . . . . . . . . . . . . . . . . . . . . . . . . . . . . . . . . . . . . . . . . 7
Transportation and Storage . . . . . . . . . . . . . . . . . . . . . . . . . . . . . . . . . . . . . . 8
Hose and Regulators . . . . . . . . . . . . . . . . . . . . . . . . . . . . . . . . . . . . . . . . . . . 9
Leak Testing . . . . . . . . . . . . . . . . . . . . . . . . . . . . . . . . . . . . . . . . . . . . . . . . 10
Troubleshooting Guide . . . . . . . . . . . . . . . . . . . . . . . . . . . . . . . . . . . . . . . . . 11
Gas Components Reference . . . . . . . . . . . . . . . . . . . . . . . . . . . . . . . . . . . . . 12
Parts and Components . . . . . . . . . . . . . . . . . . . . . . . . . . . . . . . . . . . . . . . . 13
CROWN VERITY INC., 37 ADAMS BLVD., BRANTFORD, ON. CAN. N3S 7V8
TEL: (519) 751-1800
FAX: (519) 751-1802
www.crownverity.com
Email: [email protected]
1
IF YOU SMELL GAS:
1)
2)
3)
4)
FOR YOUR SAFETY
Shut off gas supply to appliance.
Extinguish any open flame.
Open lid or remove storage cover(s).
If odour continues, immediately call your Fire Department.
DO NOT store or use gasoline or other flammable vapours and liquids in the
vicinity of this or any other appliance.
CAUTION! Steam can cause severe burns, use caution when operating the
Pro Steamer, Wear protective gloves, never stand directly in front of the
Pro Steamer when opening the lid, allow water to cool completely before
draining Read all warnings and instructions before operating the ProSteamer.
CAUTION! When lighting the burner, always hold a lit match or extended
lighter next to the burner head before opening the control regulator. Open
the control regulator slowly until the burner ignites, then slowly and
gradually increase the pressure to the desired heat setting. If ignition does
not immediately occur, turn control regulator to closed position, close L.P
cylinder valve and wait 5 minutes before attemping to re-light. Keep persons
and combustibles such as clothing well away form burner access hole.
WARNING!
• An LP cylinder not connected for use shall not be stored in the vicinity of this or any
other appliance.
• This appliance shall only be used in a well ventilated space and shall not be used in a
building, garage, or any other enclosed area.
WARNING! Keep any electrical supply cord and fuel supply hose(s) away
from any hot surfaces.
DO NOT use your steamer if there is evidence of damage (cuts, cracks,
burns) or excessive wear to the gas hose.
DO NOT obstruct the flow of combustion and ventilation air to the burner.
DO NOT place combustibles on the under shelf. Do not stand on the under shelf as it
could result in injury or irreparable damage.
NOT leave Pro Steamer unattended while in operation.
NOT allow children to play on or near this appliance.
NOT use this appliance under the influence of alcohol or drugs.
NOT use this appliance until you have read and understood all of the information in
this manual.
DO
DO
DO
DO
2
INSTALLATION
THE INSTALLATION OF THIS APPLIANCE MUST BE IN ACCORDANCE WITH:
1) All applicable local codes, or in the absence of local codes;
2) i) Canada: must conform to current National Standard CAN/CGA B149.1&.2
natural gas/propane installation code.
ii) U.S.A.: must conform to national Fuel Gas Code, ANSI Z223.1, 1988 or latest
edition.
WARNING!
DO NOT operate this appliance under overhead, combustible construction. This
appliance shall be used only in a well-ventilated space and shall not be used in a
building, garage, or any other enclosed area.
MINIMUM CLEARANCE TO COMBUSTIBLE MATERIALS:
•
18 inches from all sides
• Always keep the surrounding area clear of all combustible materials, gasoline, or other
flammable liquids
• This appliance is suitable for use on combustible floors.
• Always level your Pro Steamer front to back & side to side. .
• Use your Pro Steamer OUTDOORS in a well-ventilated space, 10 ft. from dwellings or
outbuildings.
• Casters must be locked when appliance is in operation.
ALWAYS PLACE THE PRO STEAMER ON A FIRM, LEVEL SURFACE
WHEN OPERATING
Certified for use in Canada and the United States of America.
Certified to / a.: CSA 1.8 2004, CSA 1.18 2004
Conforms to / Conforme a: ANSI std Z21.89 2004 / ANSI std
Z83.112004
This outdoor cooking gas appliance is not for installation in or on recreational vehicles
and/ or boats.
CROWN VERITY INC., 37 ADAMS BLVD., BRANTFORD, ON. CAN. N3S 7V8
FAX: (519) 751-1802
TEL: (519) 751-1800
www.crownverity.com
Email: [email protected]
3
PRIOR TO USE AND LIGHTING INSTRUCTIONS
WARNING!
Steam can cause severe burns, use caution when operating the Pro
Steamer, Wear protective gloves, never stand directly in front of the
Pro Steamer when opening the lid, and read all warnings and
instructions before operating the Pro- Steamer.
WARNING!
Fill the water tank to the fill line and maintain this level at all times.
• Steam can cause severe burns, use caution, and stand away and to the side when
opening the lid.
• Do not use your Pro Steamer until you have read and understood all the information in
this manual, and you are assured:
• There are no leaks in the gas supply system (see “Leak Testing” section).
• The burner is properly assembled
• That any electrical supply cords and/or gas supply hoses are kept away from all hot
surfaces.
• Your Pro Steamer is positioned in a safe location (see “Installation” section).
CAUTION!
• Use caution when lighting. Keep face and body away from burner. Open regulator valve
slowly and use a long lighter.
• Make sure regulator valve is OFF to start, then slowly open LP cylinder valve.
Do not snap open.
• Hold a lit BBQ lighter next to the burner cup and slowly open the control regulator
until the burner lights.
If ignition does not immediately occur, turn control regulator to closed
position, close L.P cylinder valve and wait 5 minutes before attempting
to re-light
CROWN VERITY INC., 37 ADAMS BLVD., BRANTFORD, ON. CAN. N3S 7V8
TEL: (519) 751-1800
FAX: (519) 751-1802
www.crownverity.com
Email: [email protected]
4
LIGHTING AND OPERATION INSTRUCTIONS
CAUTION! Steam can cause severe burns, use caution when
operating the Pro Steamer, Wear protective gloves, never stand
directly in front of the Pro Steamer when opening the lid, allow water
to cool completely before draining. Read all warnings and
instructions before operating the Pro-Steamer.
CAUTION! When lighting the burner, always hold a lit match or
extended lighter next to the burner head before opening the control
regulator. Open the control regulator slowly until the burner lgnites,
then slowly and gradually increase the pressure to the desired heat
setting. If ignition does not immediately occur, turn control regulator
to closed position, close L.P cylinder valve and wait 5 minutes before
attempting to re-light. Keep persons and combustibles such as
clothing well away from burner access hole
1) FILL WATER TANK TO FILL LINE, MAINTAIN WATER LEVEL AT ALL TIMES
2) GAS CYLINDER AND REGULATOR MUST BE IN OFF POSITION
3) OPEN GAS CYLINDER VALVE, AND PLACE A LIT MATCH TO THE BURNER HEAD.
4) SLOWLY OPEN THE CONTROL REGULATOR UNTIL THE BURNER IGNITES
5) OPERATE BURNER AT HIGH SETTING UNTIL WATER BOILS THEN ADJUST TO LOWER
SETTING
• IF IGNITION DOES NOT TAKE PLACE IMMEDIATELY, TURN OFF CONTROL
REGULATOR AND L.P. CYLINDER VALVE, WAIT 5 MINUTES AND REPEAT
LIGHTING PROCEDURE.
• Do not force the CONTROLS; damage to the Regulator valve may result.
• Visually check the flame every time you light your Pro Steamer. A good flame
should be mostly blue. If the flame is abnormally small or mostly yellow: shut off
the Pro Steamer and check the burner for blockage.
SHUT DOWN INSTRUCTIONS:
To prepare your charbroiler for long term storage, follow these steps:
1) Turn the control regulator to the OFF position.
2) Turn the LP cylinder valve to the OFF position.
3) Ensure all burners are extinguished.
4) Disconnect LP CYLINDER (s) from the Pro Steamer when not in use.
6) Take care; your Pro Steamer is still hot
7) Drain your Pro Steamer appropriately only after is allowed to cool
5
TIPS AND TECHNIQUES
BREAK-IN Before cooking in your Crown Verity Inc. Pro Steamer for the first time; we suggest a
thorough wash-down and boil-off. Fill the Pro Steamer to the fill line, operate the ProSteamer on high setting and bring to a boil for 10 minutes, allow the Pro-Steamer to
cool, then drain and rinse the tank and basket. This will remove all dirt particles and
protective oils. You are now ready to put the Pro Steamer to work.
COOKING TECHNIQUES:
Always bring the water in the tank to a full, rolling, boil before inserting the basket. Fill a
clean basket with food, in a manner that allows maximum circulation of hot steam
throughout the food. Place foods with longer cook times near the center and foods that
cook faster on the outer edges of the basket. Once the Pro steamer is at a full boil,
carefully lift the lid, place the basket into the tank, close the lid and begin timing your
food. Hint: Placing a full basket of cold food into a hot Pro Steamer will reduce the
interior temperature; keep the burner on high setting until the pro Steamer resumes a
full boil.
Food Product Suggestions
Ideal for seafood including lobster, oysters, shrimp and clams. Also perfect for hot
dogs, vegetables including corn on the cob, potatoes, asparagus, broccoli and virtually
anything that can be steamed!
Note: Times vary depending on quantity, starting temperature, density, cook ability etc…
Example cooking times
Lobster - - - - - - - - - - - - - - - - - - - - - - - - - - - - - - - - - - - - -10 -12
Corn - - - - - - - - - - - - - - - - - - - - - - - - - - - - - - - - - - - - - -12 - 15
Potatoes (whole) - - - - - - - - - - - - - - - - - - - - - - - - - - - - - -45 - 60
Asparagus - - - - - - - - - - - - - - - - - - - - - - - - - - - - - - - - - - - -5 - 6
Small shellfish - - - - - - - - - - - - - - - - - - - - - - - - - - - - - - - - -4 – 7
Hot dogs (loose) - - - - - - - - - - - - - - - - - - - - - - - - - - - - - -10 to 15
minutes
minutes
minutes
minutes
minutes
minutes
Cooking times will increase/decrease with the amount of food placed in the basket.
Tips:
• Allow space between each food item in the basket to promote the hot steam to
circulate freely
• Stir product occasionally if possible.
• Always check internal food temperatures with an appropriate thermometer and/or
taste test before removing the basket or serving.
6
CLEANING AND STORAGE
Crown Verity Inc. Pro Steamers are easily cleaned because of their all stainless steel
construction.
For routine cleaning:
Mix hot water and white vinegar into steamer tank. Let sit for an hour or over night if
convenient. Drain; and rinse with hot water.
For heavy mineral build-up,
we suggest calcium and lime remover that is safe for use on stainless steel, “C.L.R.” is a
good choice for this. Follow the manufacturer’s instructions and always wash and rinse
thoroughly.
In all cases, only use cleaning agents that are safe for use on stainless steel. Wash with
mild detergent and rinse thoroughly with plenty of clean, fresh water.
Pro steamers can be thoroughly cleaned inside and out with the use of a pressure
washer. Do not expose regulators, control valves, or decals to high-pressure spray.
STORAGE
DAY-TO-DAY STORAGE:
• Disconnect L.P gas cylinders and leave outdoors
• Drain and rinse the Steamer thoroughly for storage
LONG TERM STORAGE:
To prepare your Pro Steamer for long-term storage, follow these steps:
• Clean the inside of your Pro Steamer (see cleaning and maintenance section).
• Store LP cylinders outdoors out of reach of children, away from sources of heat, and
sources of ignition.
• Cover the Pro Steamer if left outdoors.
• Cover the supply hose connection(s) with cap(s) or plastic bag and elastic.
7
CYLINDERS AND REGULATORS
The Pro Steamer’s self-contained propane system is designed for use with a 9.1 kg. (20
lb.) Propane cylinder, equipped with a Type I cylinder valve. This appliance cannot be
connected to a standard Type II valve (with internal left-hand threads only).
DO NOT CONNECT TO A PROPANE GAS CYLINDER EXCEEDING THIS
CAPACITY, OR USE A CYLINDER WITH ANY OTHER TYPE OF VALVE.
The Type I (Q.C.C.1) valve is recognizable by the large external thread on the outlet part
of the valve. Standard valves do not have these exterior threads. Any attempt to fit the
regulator(s) with anything other than the mating Type I (Q.C.C.1) connector, (recognized
by the large plastic coupling nut) will negate the important safety features designed into
the Type I (Q.C.C.1) system. Fitting a standard #510 P.O.L connector, will not provide the
excess flow control or temperature shut-off safety features built into the complete Type I
(Q.C.C.1) system.
The cylinder should not exceed 472 mm (18-1/2”) in height and 317 mm (12-1/2”) in
diameter. When purchasing a cylinder for your Pro Steamer, it must be constructed and
marked in accordance with the specifications of:
a) Canada - The Canadian Transport Commission
b) U.S.A. - The U.S. Department of Transportation
The cylinder must also be equipped with:
a) A shut-off valve terminating in a proper cylinder valve outlet specified in current
standards:
1) Canada: CAN/CGA - 1.6 - M88 - Outdoor Gas Grills - Amend. 1.
2) U.S.A.: ANSI/CGA-V-1-1977: Compressed gas cylinder valve outlet and inlet
connections.
b) A safety relief valve having direct communication with the vapor space of the cylinder.
c) A collar to protect the cylinder shut-off valve.
d) An arrangement for vapor withdrawal.
e) A bottom ring for securing to the cylinder support assembly.
WARNING!
• Always turn off the cylinder valve when your Pro Steamer is not in use.
• Handle cylinder valves with care.
• Never connect an unregulated LP gas cylinder to the Pro Steamer.
• Never store a spare cylinder under or near your Pro Steamer, or subject any cylinder
to excessive heat.
• Always keep cylinder(s) securely fastened in an upright position.
8
TRANSPORTATION AND STORAGE OF LP CYLINDERS
Although safe to use when properly handled, careless handling of a propane gas cylinder
could result in fire, explosion, and/or serious injury.
THEREFORE:
• Always use the protective cap provided with your cylinder whenever it is not connected
to your Pro Steamer.
• Do not store in a building, garage or any other enclosed area. Store only in a well
ventilated area.
• Do not store in the vicinity of any heating apparatus or in any high heat area such as a
closed car or trunk.
• Do not smoke while transporting a cylinder in your vehicle.
• Do transport and store cylinder(s) in an upright position. Do not tip on its side.
• Do store out of reach of children.
FILLING L.P. GAS CYLINDERS:
• Allow only qualified LP gas dealer to fill or repair cylinder(s).
• Do not allow the cylinder to be over filled.
• Make sure the LP gas dealer checks the cylinder for leaks after filling.
CROWN VERITY INC., 37 ADAMS BLVD., BRANTFORD, ON. CAN. N3S 7V8
TEL: (519) 751-1800
FAX: (519) 751-1802
www.crownverity.com
Email: [email protected]
9
WARNING!
HOSES AND REGULATORS
Your Pro Steamer is designed to operate on L.P. (propane) vapor gas at a pressure
regulated at 0 to 10 psi. The regulator(s) supplied with the Pro Steamer is/are set to
this pressure and must be used.
This regulator is equipped with the Type I (Q.C.C.1), quick closing connection system,
which incorporates the following features:
1) Will not allow gas to flow until a positive seal has been made.
2) Has a thermal element that will shut off the flow of gas if subjected to temperatures
between 115° and 150°C (240° & 300°F).
3) Has a flow limiting device which, when activated, will restrict the flow of gas to 10
cubic feet per hour.
TYPE I CYLINDER CONNECTIONS:
If the large plastic thermally sensitive coupling nut is exposed to temperatures above
115° - 150°C, it will soften and allow the regulator probe to disengage from the cylinder
valve, thereby shutting off the flow of gas. Should this occur: do not attempt to reconnect
the nut. Remove the entire hose and regulator assembly and replace it with a new one
(see parts list).
The cause of the excessive heat should be determined and corrected before operating
your Pro Steamer again. The regulator probe also contains a flow-sensing element, which
will limit the flow of gas to the regulator to a manageable amount (10 cubic feet per
hour) in the event of a hose or regulator failure, or a severe leak.
If it is evident that the flow-limiting device has activated, the cause of the excessive flow
must be determined and corrected before using your Pro Steamer again.
NOTE: Improper lighting procedures can cause the flow-limiting device to activate,
resulting in reduced heat output. If this is suspected, shut off the burner control and
cylinder valve, and carefully repeat lighting instructions step by step. Do not remove the
nut and probe and do not attempt to connect to anything other than a mating Type I
(Q.C.C.1) cylinder valve.
• Never connect the Pro Steamer to an unregulated propane gas supply or other gas.
• Do not attempt to alter the hose or regulator in any way.
• Do not allow the hose to come in contact with any hot surfaces of the Pro Steamer.
• Visually inspect the entire length of the hose assembly before each use for any
evidence of damage (cuts, cracks, burns) or excessive wear. If found, replace the
assembly before using your Pro Steamer. Only a hose assembly as specified in the
parts list for your Pro Steamer can be used.
• The connection fitting must be protected when disconnected from the propane
cylinder. If the fitting is allowed to drag on the ground, damage to the fitting may occur
resulting in leaks or an incomplete connection. Dirt could also enter the small inlet
hole, blocking gas flow completely. parts list for your Pro Steamer can be used.
10
LEAK TESTING
• Never check for leaks with a match or open flame.
Leak testing must be performed:
• Before lighting your Pro Steamer for the first time.
• Every time the propane cylinder is refilled, replaced, or any gas component is replaced.
(or)
• At least once per year.
Perform the leak test outdoors in a well-ventilated area, away from any open flame, heat
or ignition sources. DO NOT SMOKE! Use only a 50/50 mixture of liquid soap and water
for leak testing. Do not use a match or open flame.
THE FOLLOWING MUST BE CHECKED:
• Cylinder valve including threads into tank.
• All cylinder welds.
• Control Regulator fitting(s) and cylinder connection.
• All hose and manifold connections.
1) Open LP cylinder valve to the Pro Steamer
2) Brush soap solution on all connections and components listed above.
3) Observe each place for growing bubbles, which indicate a leak, is present.
4) Tighten any leaking connection until a repeat test shows no evidence of leakage
(shut off gas supply while correcting any leaks).
DO NOT USE THE Pro Steamer IF ANY LEAKS CANNOT BE STOPPED. TURN
OFF THE GAS SUPPLY VALVE, REMOVE THE GAS CYLINDER, AND CALL A
QUALIFIED GAS APPLIANCE SERVICE PERSON FOR REPAIRS.
WARNING! - NATURAL HAZARD - Spiders and other insects are attracted by the smell of
gas and could make webs or nests in the burner. This could partially or completely block
the flow of gas through the burner and is indicated by a sooty, yellow flame, and/or a
burner that is difficult or impossible to light. Ultimately, it may cause the gas to burn
inside the burner or at the air inlet, which can seriously damage your Pro Steamer. If this
happens: immediately shut off the propane at the cylinder, valve
To prevent and/or correct this occurrence, periodically check the burner for
obstructions by inserting a pipe cleaner or flexible wire through the air inlet of the burner,
and twisting it.
CROWN VERITY INC., 37 ADAMS BLVD., BRANTFORD, ON. CAN. N3S 7V8
TEL: (519) 751-1800
FAX: (519) 751-1802
www.crownverity.com
Email: [email protected]
11
TROUBLESHOOTING GUIDE
WHAT HAPPENS
1) Burners will not light
2) Burner is not hot enough
3) Pro Steamer goes out
WHAT TO LOOK FOR
Propane tank is empty. Incorrect lighting procedures. Is
the cylinder valve turned on? Regulator assembly not
fully tightened to cylinder valve? Large plastic nut on
cylinder connector may be cracked or has been
overheated, may be wobbling and is not making a gas
tight seal inside cylinder valve. Remedy: Replace
regulator and hose assembly.
Control valve left open before
opening cylinder valve or leak in system causing flow
control device to activate. -Follow proper lighting
sequence or correct leak in system. Inspect burner for
obstructions
Slowly and gradually increase the gas supply from the
control regulator. The cylinder pressure has dropped
below operating pressure due to freeze-up. Long
periods of full- open operation will cause this. Remedy:
exchange L.P cylinder with a full one
techniques page 11.
12
GAS COMPONENTS REFERENCE
13
PARTS AND COMPONENTS
DESCRIPTION
PART #
QTY
STEAMER BODY ASSY.
9010
1
STEAMER LID (INCLUDED WITH TANK)
9011
1
UNDER SHELF
8071
1
STEAMER BASKET
9020
1
HOSE & REG ASSY.
2300
1
OPERATOR FRONT LEFT LEG
2217
1
OPERATOR FRONT RIGHT LEG
2213
1
OPERATOR BACK LEFT LEG
2218
1
OPERATOR BACK RIGHT LEG
2212
1
BURNER W/ ORIFICE
9060
1
14” WHEELS
2141
2
5” CASTER
2216
2
STAINLESS STEEL AXLE
2215
1
BRONZE NAME PLATE
2003
1
HANDLE 9”
2219
2
LIGHTING INSTRUCTIONS DECAL
2205-S
1
RATING PLATE DECAL
2206-S
1
1/4”-20x5/8” HEX BOLT
2026
4
1/4” FENDER WASHER 1.25” O.D.
2019
4
5/16” INT. TOOTH LOCK WASHER
2013
22
5/16”-18 FULL HEX NUT
2014
22
5/16”-18x5/8” RSLMS
2142
22
1/2” FLAT WASHER
2146
5
1/8”x1 COTTER PIN
2148
2
1/2”-13x5/8” HEX BOLT ZINC
2031
2
CAUTION HOT STEAM DECAL KIT
9040
4
CASTER BRACKET
2220
2
CASTER MOUNT
2211
2
3/4” BALL VALVE
9050
1
3/8” FEM FLR x 1/4” MPT
9051
1
1/4” x 3/8” ELBOW
9052
1
3/8” FPT x 3/8” FLR
9053
1
3/8” x 8” BRASS NIPPLE
9054
1
Due to a
continuous
program of
product
improvement
Crown Verity
Inc. reserves
the right to
make
changes in
design.
TO ORDER PARTS PLEASE CONTACT
CROWN VERITY INC., 37 ADAMS BLVD., BRANTFORD, ON. CAN. N3S 7V8
TEL: (519) 751-1800 FAX: (519) 751-1802 www.crownverity.com Email: [email protected]