1
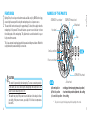
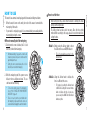
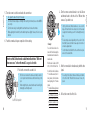
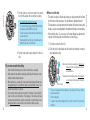
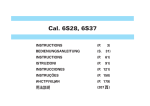
Cal. 5R86 INSTRUCTIONS (P. BEDIENUNGSANLEITUNG (S. 31) 3) INSTRUCTIONS (P. 59) ISTRUZIONI (P. 87) INSTRUCCIONES (P. 115) INSTRUÇÕES (P. 143) (171 ) Sie sind jetzt stolzer Besitzer einer „Spring Drive-Uhr” Kal. 5R86. Lesen Sie diese Bedienungsanleitung vor der Verwendung aufmerksam durch, um ihre optimale Nutzung zu gewährleisten. Heben Sie diese Bedienungsanleitung gut auf, um jederzeit wieder nachlesen zu können. Vous êtes maintenant l’heureux propriétaire d’une Montre Spring Drive Cal. 5R86. Pour en obtenir des performances optimales, veuillez lire attentivement cette brochure avant d'utiliser la montre. Conservez ce manuel pour vous y référer en cas de besoin. Congratulazioni per l’acquisto di questo nuovo orologio con trascinamento a molla (“ Spring Drive”), Cal. 5R86. Per poter utilizzare l’orologio al massimo delle sue prestazioni leggere attentamente questo manuale di istruzioni prima di passare all’uso dell’orologio stesso, e conservarlo poi per qualsiasi eventuale futura consultazione. Usted es ahora un orgulloso propietario de un Reloj Spring Drive Cal. 5R86. Para asegurar el óptimo rendimiento de su reloj, sírvase leer cuidadosamente las instrucciones contenidas en este manual antes de su uso. Guarde este manual en un lugar muy accesible para la rápida referencia. Você pode agora sentir-se orgulhoso de possuir um Relógio Spring Drive Cal. 5R86. Para garantir o seu excelente movimento, leia atentamente as instruções contidas neste opúsculo antes de usá-lo. Conserve este manual para consultas futuras. CONTENTS Page FEATURES................................................................................................................... NAMES OF THE PARTS ............................................................................................. HOW TO USE.............................................................................................................. How to manually wind the mainspring................................................................... How to set the time............................................................................................... How to set the date............................................................................................... How to adjust the time difference......................................................................... Time difference table.............................................................................................. How to use the stopwatch..................................................................................... HOW TO READ THE POWER RESERVE INDICATOR................................................ TO PRESERVE THE QUALITY OF YOUR WATCH....................................................... PLACES TO KEEP YOUR WATCH............................................................................... PERIODIC CHECKS..................................................................................................... TROUBLESHOOTING.................................................................................................. SPECIFICATIONS........................................................................................................ ENGLISH You are now the proud owner of a Spring Drive Watch Cal. 5R86. For the best results, please read the instructions in this booklet carefully before using it. Please keep this manual handy for ready reference. 4 5 6 6 7 13 14 16 18 20 22 26 27 28 30 STOPWATCH minute hand Minute hand TACH STOPWATCH second hand Hour hand 70 YME TE R 1 23 A 50 3 1 Date 40 2 65 6 7 85 3 9 18 90 95 10 9 1 5 0 13 110 CAUTION • This watch is powered by the mainspring. To ensure constant operation of the watch, be sure to wind up the mainspring sufficiently before the power reserve indicator points to “ 0.” • The watch may stop if the power reserve indicator is showing less than one-sixth of the power reserve, especially if it is left at a temperature below 0ºC. CROWN a b c 0 6 20 0 19 5 10 12 17 Power reserve indicator 20 SPRING DRIVE 0 0 25 30 75 0 Small second hand 30 80 English NAMES OF THE PARTS 0 Spring Drive, the unique mechanism made available only by SEIKO technology, ensures high accuracy while using the mainspring as its sole power source. The watch will work continuously for approximately 72 hours (three days) when the mainspring is fully wound. The watch features a power reserve indicator to show the winding state of the mainspring. The glide-motion second hand works in a perfectly smooth movement. This is an automatic watch equipped with a manual winding mechanism. When first using the watch, manual winding is convenient. English FEATURES 11 120 130 01 14 50 B STOPWATCH hour hand 24-hour hand CROWN a) Normal position : winding up the mainspring (manual operation) b) First click position : hour-hand independent adjustment, date setting c)Second click position : time setting * The position or design of the displays may differ depending on the model. 70 2 7 18 0 20 0 80 75 19 9 13 110 70 2 23 01 14 50 TACHY ME TE R 1 50 3 1 0 10 6 12 7 85 3 9 18 90 0 6 20 0 5 20 SPRING DRIVE 0 0 25 30 30 17 5 95 10 9 1 • For instance, by setting the 24-hour hand to GMT while setting the hour and minute hands to indicate the time in your area, you can easily check GMT with the 24-hour hand at any time. 65 11 130 120 40 <Mode 2> Using the 24-hour hand to indicate the time in a different time zone. 75 7 20 0 0 18 0 0 9 10 19 2 70 75 19 80 5 130 50 0 0 25 30 120 01 14 0 110 11 6 3 5 95 13 10 12 1 95 0 20 9 90 5 5 10 50 3 30 6 0 0 25 30 3 9 TACHY ME TE R 1 SPRING DRIVE 85 0 6 23 17 40 10 12 1 20 6 90 * To check the winding state of the mainspring, refer to "HOW TO READ THE POWER RESERVE INDICATOR" on page 20. There is no need to turn the crown further when the mainspring is fully wound. But the crown can be turned without damaging the watch mechanism. 30 SPRING DRIVE 85 * 50 3 17 2. Wind the mainspring until the power reserve indicator shows a fully-wound state. The second hand will start moving. 23 1 • This is the standard usage type for the 24-hour hand. 0 * With manual winding, if you give the crown five full rotations, it provides the power to run the watch for approximately ten hours. Turning the crown counterclockwise (the 6 o’clock direction) does not wind the mainspring. TACHY ME TE R 1 65 1 40 * 65 <Mode 1> Simply using the 24-hour hand to show the 24-hour time as an AM/PM indicator. 0 1. Slowly turn the crown clockwise (the 12 o’clock direction) to wind the mainspring. • When setting the time, ensure that the watch is working: the main spring is sufficiently wound. • The 24-hour hand can be used in two ways. Since the time setting method differs according to the usage, please choose the mode before setting the time. 80 English ● How to manually wind the mainspring ● How to set the time English HOW TO USE This watch is an automatic watch equipped with a manual winding mechanism. • When the watch is worn on the wrist, the motion of the wearer's arm winds the mainspring of the watch. • If your watch is completely stopped, it is recommended that you manually wind the mainspring by turning the crown. 0 13 110 11 120 130 01 14 50 7 20 0 0 18 9 1 95 0 13 110 11 120 130 01 14 50 Second click position 70 2 7 18 0 20 0 19 80 75 10 9 70 2 19 80 90 10 6 5 95 6 5 * 6 3 1 85 17 3 Pull the crown out when the small second hand is at the 12 o’clock position and the small second hand will stop on the spot. When setting the time, ensure that the watch is working: the mainspring is sufficiently wound. 90 5 6 12 9 0 0 25 30 75 0 SPRING DRIVE 10 10 12 9 0 13 110 11 120 130 01 14 50 <Example> To set to 6:00 P.M., adjust the 24-hour hand to indicate “18” on the 24-hour scale (9 o’clock position), and the minute hand to the “0” minute position. * Only the 24-hour and minute hands are to be set at this stage. The hour hand is to be set later so it is not necessary to adjust the hour hand yet, even if it is indicating the wrong time. * The date may be altered depending on the position of the hour hand, however it should not cause any concern since it can also be adjusted later. * Set the minute hand slightly behind the time you wish to set, and then slowly advance it to the desired time. English 40 30 20 85 * 0 3 1 20 SPRING DRIVE 17 50 5 1. Pull out the crown to the second click. TACHY ME TE R 1 2. Turn the crown counterclockwise to set the 24-hour and minute hands to the current time. 50 3 30 0 0 25 30 23 TACHY ME TE R 1 0 65 23 40 English 65 1 0 How to set the 24-hour hand as a regular 24-hour indicator <When the mode 1 usage is selected> 3. Push the crown back in simultaneously with the time signal. * The setting of the 24-hour, minute and small second hands to the current time is now completed. 4. Pull out the crown to the first click. 70 2 7 85 17 3 * Pull the crown out when the small second hand is at the 12 o’clock position and the small second hand will stop on the spot. When setting the time, ensure that the watch is working: the mainspring is sufficiently wound. 18 90 0 6 20 0 19 80 5 6 12 9 0 0 25 30 75 0 SPRING DRIVE 10 95 10 9 1 5 0 13 110 11 120 130 01 14 50 Second click position 10 2 70 7 18 0 20 0 75 19 80 7 3 5 10 9 0 13 110 11 120 130 01 14 50 <Example> To set the 24-hour hand to the time in New York while setting the hour/minute hands to indicate the time in London. When the time in London is 10:00 A.M., it is 5:00 A.M. in New York. Set the 24-hour hand to indicate “5” on the 24-hour scale (the 2.5 o’ clock position), while the minute hand is pointing at the “0” minute position. * The time difference adjustment function serves only for a time in a “different time zone area” where the time difference from the time in London is represented in one-hour increments. 2. Turn the crown counterclockwise to set the 24-hour and minute hands to the time in the “different time zone area” you wish to set. * Only the 24-hour and minute hands are to be set at this stage. The hour hand is to be set later so it is not necessary to adjust the hour hand yet, even if it is indicating the wrong time. * The date may be altered depending on the position of the hour hand, however it should not cause any concern since it can also be adjusted later. * Set the minute hand behind the time and then slowly advance it to the desired time. English 40 30 20 5 0 3 1 * 50 10 12 0 0 25 30 1. Pull out the crown to the second click. TACHY ME TE R 1 0 23 20 9 6 95 65 50 3 1 How to set the 24-hour hand as a dual time indicator for a “different time zone area” <when the mode 2 usage is selected> TACHY ME TE R 1 30 90 6. Push the crown back in upon completion of time setting. 23 SPRING DRIVE 85 * * 65 1 17 Also, adjust the date at this point if necessary. The moment the date changes is midnight. When setting the hour hand, be sure that AM/PM is set correctly. Turn the crown slowly, checking that the hour hand moves in one-hour increments. When adjusting the hour hand, the other hands may move slightly. However, this is not a malfunction. 40 * * 0 English 5. Turn the crown to set the hour hand to the current hour. 3. Push the crown back in simultaneously with the time signal. * The setting of the 24-hour, minute and small second hands to the time in the “ different time zone area” is now completed. 4. Pull out the crown to the first click. 11 * 6. Push the crown back in upon completion of time setting. TACHY ME TE R 1 50 40 3 0 5 20 10 6 12 3 9 6 0 0 25 30 30 SPRING DRIVE 85 90 5 1 95 12 23 17 • Keep in mind the following points in order to set the time more accurately. 1. Before setting the time, wind the mainspring sufficiently until the power reserve indicator shows the fully-wound state. 2. When starting to use a watch after it stops, wind the mainspring sufficiently and wait approximately 30 seconds after the small second hand starts to move, then pull the crown out to the second click. 3. Do not stop the small second hand movement for 30 minutes or longer while the crown is at the second click position. If the stoppage of the small second hand movement exceeds 30 minutes, push the crown back in to restart the small second hand, wait at least 30 seconds, and then carry out the time setting once again. 65 1 0 Tips on more accurate time setting 1. Pull out the crown to the first click. 2. Each time the hour hand makes two full rotations by turning the crown, the date is adjusted one day. 7 * 50 20 0 01 14 0 130 18 11 120 10 9 95 13 110 70 9 1 0 2 0 18 90 5 10 • This watch is designed so that the date changes one day by turning the hour hand two full rotations in the same way as “ the time difference adjustment function”. • The date advances one day by turning the hour hand two full rotations clockwise, while the date is set back one day by turning the hour hand two full rotations counterclockwise. • After setting the time, it is necessary to set the date. Manual date adjustment is required on the first day after a month that has less than 31 days. 75 7 85 17 3 6 Also, adjust the date at this point if necessary. The moment the date changes is midnight. When setting the hour hand, be sure that AM/PM is set correctly. Turn the crown slowly, checking that the hour hand moves in one-hour increments. When adjusting the hour hand, the other hands may move slightly. However, this is not a malfunction. 19 6 12 9 * * 20 0 19 80 5 SPRING DRIVE 10 0 0 25 30 75 0 20 ● How to set the date 80 5. Turn the crown to set the hour hand to the current hour. (In this example, the current hour in London.) 50 3 30 English 70 TACHY ME TE R 1 40 2 23 0 English 65 1 0 13 110 11 120 01 14 130 50 Clockwise: the hour hand turns counterclockwise. The date is set back one day when the hour hand makes two full rotations counterclockwise. Counterclockwise: the hour hand turns clockwise. The date advances one day when the hour hand makes two full rotations clockwise. First click position * The date can be adjusted either by advancing it or by setting it back. Choose whichever requires fewer rotations. * Turn the crown gently. * To adjust the date without changing the time, turn the hour hand in two-full rotation increments. 13 When adjusting the hour hand, the other hands may move slightly. However, this is not a malfunction. 3. After completing the date setting, check the position of the hour hand once again and push the crown back in. * * * * ● How to adjust the time difference * • While staying in a place in a different time zone area from where you live, you can conveniently set the watch to indicate the local time in the place where you are staying without stopping the watch. • The time difference adjustment function is interrelated with the date display. If the time difference is correctly adjusted, the watch displays the correct date of the place where you are staying. Turn the crown slowly, checking that the hour hand moves in one-hour increments. Refer to “ ● Time difference table” for time differences from GMT (UTC). When adjusting the time difference, make sure that AM/PM and the date are correctly set. When adjusting the hour hand, the other hands may move slightly. However, this is not a malfunction. When turning the crown clockwise to set the hour hand to indicate any time between 9:00 P.M. and midnight, keep turning until the hour hand points 8:00 P.M., and then advance it to the desired time. English English * 3. After completing the time difference adjustment, check the position of the hour hand once again and push the crown back in. 1. Pull out the crown to the first click. 2. Turn the crown to set the hour hand to indicate the time of the place where you are staying. The hour hand is independently set to the current hour. TACHY ME TE R 1 50 3 40 70 23 0 2 65 1 10 6 12 7 85 17 3 9 18 90 0 6 9 1 5 95 10 0 13 110 14 20 0 19 80 SPRING DRIVE 5 20 0 0 25 30 75 0 30 11 120 130 01 14 50 Clockwise: Setting the time back (The hour hand turns counterclockwise.) Counterclockwise: Advancing the time (The hour hand turns clockwise.) First click position 15 16 * Refer to the table below for time differences from GMT (UTC) in major cities in the world. Paris , Rome Cairo , Athens Moscow , Amsterdam +1 hour , Istanbul +2 hours , Mecca, Nairobi +3 hours Dubai +4 hours Karachi, Tashkent +5 hours Dacca +6 hours Bangkok, Jakarta +7 hours Hong Kong, Manila, Beijing, Singapore +8 hours Tokyo, Seoul, Pyongyang +9 hours Sydney +10 hours , Guam, Khabarovsk Nouméa, Solomon Islands +11 hours Wellington +12 hours , Fiji islands, Auckland * Cities marked with “★” use daylight saving time. * The time differences and use of daylight saving time in each city are subject to change according to the governments of the respective countries or regions. English English ● Time difference table 17 1. If the STOPWATCH hands are moving, press button A to stop the measurement, and then press button B to reset the STOPWATCH hands to the “0” position. 2. While the STOPWATCH hands are stopped, press button B to reset the STOPWATCH hands to the “0” position. 65 70 12 7 85 17 3 9 18 90 95 10 9 0 13 110 * 18 11 120 01 14 130 50 t t t t t A STOP B RESET * Restart and stop of the stopwatch can be repeated by pressing button A. Tips on reading the STOPWATCH hands The STOPWATCH minute hand turns a full circle in 30 minutes. The STOPWATCH minute hand should be read depending on the position of the STOPWATCH hour hand. 30 30 10 20 12 B Please note that if the crown is pulled out while the stopwatch is performing a measurement, the stopwatch stops. A RESTART 1 5 A STOP STOPWATCH hour hand 0 6 A START 20 20 0 75 19 80 5 6 B RESET Accumulated elapsed time measurement 0 0 25 30 SPRING DRIVE 10 A STOP STOPWATCH minute hand 0 30 20 A START • A 50 3 40 2 23 1 0 STOPWATCH second hand TACHY ME TE R 1 Standard measurement t • The stopwatch can consecutively measure up to 12 hours. • Before using the stopwatch, wind the mainspring sufficiently until the power reserve indicator shows the fully-wound state. Make sure that the watch is operating when you use the stopwatch. • Before using the stopwatch, be sure to reset the STOPWATCH hands to the “0” position. English English ● How to use the stopwatch 12 3 9 6 Ex. 10 6 hours and 20 minutes 3 9 6 6 hours and 50 minutes 19 English • The power reserve indicator lets you know the winding state of the mainspring. • Before removing the watch from your wrist, observe the power reserve indicator to check if the watch has enough power stored to keep running until the next time you wear it. If necessary, wind the mainspring. (To prevent the watch from stopping, wind the mainspring to store the excess power that will allow the watch to run for extra time.) Power Reserve Indicator * When the mainspring is fully wound, the crown can be turned further, or the mainspring may wind without damaging the mainspring itself. The mainspring of the watch employs a slipping mechanism, an automatic watch specific mechanism, to prevent the mainspring from overwinding. English HOW TO READ THE POWER RESERVE INDICATOR ● Remarks on the automatic mechanism of the mainspring The mainspring of the watch becomes fully wound when it is worn for twelve hours for three to five consecutive days. However, the winding state of the mainspring may vary depending on actual use conditions, such as the number of hours you wear the watch or the extent of your movement while wearing it. It is recommended that you observe the power reserve indicator to check the level of remaining power of your watch. * In a case where you wear the watch for a short period of time each day, observe the power reserve indicator to check the level of the remaining power. If necessary, manually wind the mainspring. Winding state of the mainspring Fully wound Number of hours the watch can run Approximately 72 hours (3 days) Half wound Approximately 36 hours (1.5 days) Unwound The watch either stops or is running down. * The position or design of the displays may differ depending on the model. 20 21 English CAUTION CAUTION ● CARE OF YOUR WATCH • In normal circumstances, your watch will not require any special care, and will deliver many years of trouble-free use. To ensure its longevity and to avoid any problem of skin irritations, please wipe off moisture, sweat or soil with a soft dry cloth as soon as possible. <Leather strap> • Gently blot off any moisture using a soft dry cloth. Do not rub the leather, as this may cause abrasions or discoloration. <Metal bracelet> • Clean the metal bracelet with a soft toothbrush dipped in clean or soapy water. Be careful not to get water on the case. 22 ● RASH AND ALLERGIC REACTION English TO PRESERVE THE QUALITY OF YOUR WATCH • Adjust the band to allow a little clearance with your wrist to ensure proper airflow. • For a small number of people, the close contact of the watch with the skin may cause skin irritation or an allergic reaction. • Possible causes of dermatitis • Allergic reaction to metals or leathers • Rust, contamination or perspiration accumulated on the watch case or band. • If you should develop any allergic symptoms or skin irritation, immediately stop wearing the watch and seek medical attention. ● WATER RESISTANCE ● Non-water resistance If “WATER RESISTANT” is not inscribed on the case back, your watch is not water resistant, and care should be taken not to get it wet as water may damage the movement. If the watch becomes wet, we suggest that you have it checked by the retailer from whom the watch was purchased or your SERVICE CENTER. 23 English 5 bar WR ● Water resistance (5 bar)* If “WATER RESISTANT 5 BAR” is inscribed on the case back, your watch is designed and manufactured to withstand up to 5 bar and is suitable for wearing while swimming, yachting and taking a shower. ● Water resistance (10 bar/15 bar/20 bar)* 10/15/0 bar WR If “WATER RESISTANT 10 BAR”, “WATER RESISTANT 15 BAR” or “WATER RESISTANT 20 BAR” is inscribed on the case back, your watch is designed and manufactured to withstand up to 10 bar/15 bar/20 bar, respectively, and is suitable for wearing while taking a bath or shallow diving, but not for scuba diving. We recommend that you wear a SEIKO Diver’s watch while scuba diving. * Before using a water resistant 5, 10, 15 or 20 bar watch in water, make sure the crown is pushed in completely. Do not operate the crown when the watch is wet or in water. If used in sea water, rinse the watch in fresh water and dry it completely. 24 * When taking a shower while wearing a water resistant 5 bar watch, or taking a bath while wearing a water resistant 10, 15 or 20 bar watch, make sure to observe the following: • Do not operate the crown when the watch is wet with soapy water or shampoo. • If the watch is left in warm water, a slight time loss or gain may be caused. This condition, however, will be corrected when the watch returns to normal temperature. NOTE: Pressure in bar is a test pressure and should not be considered as corresponding to an actual diving depth since swimming movements tend to increase the pressure at a given depth. Care should also be taken when wearing and diving into water. English ● Water resistance (3 bar) If “WATER RESISTANT” is inscribed on the case back, your watch is designed and manufactured to withstand up to 3 bar, such as accidental contact with splashes of water or rain, but it is not designed for wearing while swimming or diving. PRECAUTIONS ON WEARING YOUR WATCH • There is a possibility of injury caused by wearing the watch on your wrist, especially if you fall down or bump into other people or objects. • Exercise care when you hold an infant or small child while wearing the watch on your wrist, as the infant or child may be injured or develop an allergic reaction caused by direct contact with the watch. • Avoid undue shocks such as dropping or scratching against hard surfaces or playing active sports, which may cause temporary malfunctions. 25 English PERIODIC CHECKS ● Avoid storing the watch in temperatures outside the normal range (below –10 ºC or above +60 ºC), as the electronic components may cease to function normally or the watch may stop. ● Inspection and overhaul of the watch will be performed by SEIKO. When you take your watch to the retailer from whom the watch was purchased, make sure that the watch will be serviced by SEIKO. ● We suggest that you have your watch checked once every three or four years to inspect whether the watch needs lubrication, or if there are any oil contaminated parts that need to be replaced to prevent malfunction. If the gasket is worn out, perspiration or water may penetrate the case, which damages the water resistant quality. ● Specify use of SEIKO genuine parts if parts replacement is required. ● Make sure to have the gasket and pushpin replaced when the watch is checked. ● Do not leave the watch in a place where it will be subjected to strong magnetism (for example, near television sets, loudspeakers or magnetic necklaces). ● Do not leave the watch where there is strong vibration. ● Do not leave the watch in dusty places. ● Do not expose the watch to chemical substances or gases. (Ex.: Organic solvents such as benzine and thinner, gasoline, nail polish, cosmetic sprays, detergents, adhesives, mercury, and iodine antiseptic solution.) English PLACES TO KEEP YOUR WATCH ● Do not leave the watch in close contact with hot spring water. 26 27 English Trouble Possible causes Solutions The watch stops operating. The power supplied by the mainspring has been consumed. Refer to “HOW TO USE” section of this booklet to wind the mainspring and reset the time. While you are wearing the watch or when you take it off, check the remaining power shown by the power reserve indicator and wind the mainspring if necessary. Even though you wear the watch every day, the power reserve indicator does not move up. The watch is worn on your wrist only for a short period of time, or the amount of arm movement is small. The watch has been left or worn in extremely high or low temperatures. Wear the watch for an extended period of time, or when taking off the watch, turn the crown to wind the mainspring if the remaining power shown by the power reserve indicator is not sufficient for the next use. Return the watch to a normal temperature so that it works accurately as usual, and then reset the time. The watch has been adjusted so that it works accurately when it is worn on your wrist under a normal temperature range between 5 ºC and 5 ºC. The watch has been left close to an object with a strong magnetic field. Correct this condition by moving and keeping the watch away from the magnetic source. If this action does not correct the condition, contact the retailer from whom the watch was purchased. You drop the watch, hit it against a hard surface, or wear it while playing active sports. The watch is exposed to strong vibrations. Reset the time. If the watch does not return to its normal accuracy after resetting the time, contact the retailer from whom the watch was purchased. The inner surface of the glass is clouded. Moisture has entered the watch because the gasket has deteriorated. Contact the retailer from whom the watch was purchased. The watch stops even though the power reserve indicator is not showing “0.” The watch has been left at a temperature below 0ºC. If the watch is left at a temperature below 0 ºC, it may stop if the power reserve indicator is showing less than one-sixth of the power reserve. In such a case, turn the crown to wind the mainspring. Right after starting the watch, it seems that the small second hand moves more quickly than usual when setting the time. When starting the watch, it takes a little time before the adjustment function starts working (this is not a malfunction). It takes several seconds before the adjustment function starts working. Set the time after the small second hand moves for approximately 0 seconds to set the time correctly. The date changes at 1 o’clock noon. AM/PM is not properly set. The watch temporarily gains or loses time. 28 English TROUBLESHOOTING Advance the hour hands for 1 hours to correctly set the time and date. * In the event of any other problem, please contact the retailer from whom the watch was purchased. 29 English SPECIFICATIONS 1 Features............................................ Hour hand, Minute hand, Small second hand, 24-hour h a n d , C a l e n d a r d i s p l a y, P o w e r r e s e r v e i n d i c a t o r. Stopwatch: Hour hand, Minute hand, Second hand 2 Frequency of crystal oscillator.......... 32,768 Hz (Hz = Hertz … Cycles per second) 3 Loss/gain ......................................... Within ±15 seconds per month (equivalent to ±1 second per day) (If the watch is worn on your wrist within normal temperature range between 5 ºC and 35 ºC.) 4 Operational temperature range......... Between –10 ºC and +60 ºC Under a low-temperature condition (below 0 ºC), always keep at least one-sixth of the watch power shown by the power reserve indicator. 5 Driving system.................................. Spring Drive (Automatic type with manual winding function) 6 Continuous operating time............... Approx. 72 hours (Approx. 3 days) *If the power reserve indicator shows the power supplied by the mainspring is full before starting the watch. 7 IC (Integrated Circuit) . ..................... Oscillator, frequency divider, and spring drive control circuit. (C-MOS-IC: 1 piece) 8 Jewels ............................................. 50 jewels * The specifications are subject to change without prior notice for product improvements. 30