1
Chapter
16
Technical Reference
This section contains technical information about the PV Unit.
Date Formats
The following describes the date formats that can be set for the system (page 168).
Format
Description
M/D/Y
Month/Day/Year. Example: Jan/31/2001
D/M/Y
Day/Month/Year. Example: 31/Jan/2001
Y/M/D
Year/Month/Day. Example: 2001/1/31
Time Formats
The following describes the time formats that can be set for the system (page 168).
Format
Description
12-hour
Represents time in two blocks, from midnight to 11:59am,
and from noon to 11:59pm.
24-hour
Represents time as a single block, from 0:00 to 23:59. This
format is often referred to as “military time.”
172
Chapter 16 Technical Reference
Tool Bars
The PV Unit uses standard tool bars for data input and display. The following
shows typical examples of these toolbars, and describes the items that can appear
in each.
Data Input Tool Bar
Mode icon
Button
Mode icon
Description
Indicates the mode you are currently in.
Clears all characters in the entry (field) where the cursor
is located. In the Contacts Mode, pressing this button clears
the data from all the input fields for the data item (record)
you are inputting.
Pastes the current date and time as being kept by the main
clock at the current cursor location.
Displays a calculator.
Advances to the next screen.
Returns to the previous screen.
Saves input data and closes the input screen.
In the Quick-Memo Mode, tapping this button changes to
the list view.
Displays the pop up tool screen.
•
The above table shows all the buttons that can possibly appear in a data
input tool bar. Depending on mode and other factors, some of the tools
shown above may not be included in a data input tool bar.
16
173
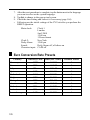
Data Display Tool Bar
Mode icon
Button
Mode icon
Description
Indicates the mode you are currently in.
Displays a menu of other views that can be used to display
data.
In the Scheduler and Expense Manager modes, jumps to
today’s date as kept by the PV Unit’s built-in clock.
Advances to the next item.
Returns to the previous item.
Displays the new data input screen.
Returns to the list screen from a Contacts, Memo,
Expense Manager, and Quick-Memo mode data screen.
Changes to the data editing screen for the current data
item.
Displays the pop up tool screen.
•
174
The above table shows all the buttons that can possibly appear in a data
display tool bar. Depending on mode and other factors, some of the
tools shown above may not be included in a data display tool bar.
Chapter 16 Technical Reference
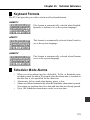
Keyboard Formats
The PV Unit provides you with a selection of keyboard formats.
QWERTY
This format is automatically selected when English,
Spanish, or Italian is set as the system language.
AZERTY
This format is automatically selected when French is
set as the system language.
QWERTZ
This format is automatically selected when German
is set as the system language.
Scheduler Mode Alarms
•
•
•
•
When you set an alarm time for a Schedule, To Do, or Reminder item,
an alarm sounds for about 20 seconds when the alarm time is reached on
the date that is also specified for the data item.
Alarms may fail to sound when battery power is low.
Alarms are deleted automatically after the Scheduler alarm time is passed.
You cannot set an alarm time for a date and time that are already passed.
Up to 100 Scheduler alarm times can be set at one time.
175
Input Limits
The following table shows the maximum number of characters that can be input
into various fields.
Mode
Entry (Field)
Schedule
To Do
Description
Description
Category
Description
–
Category
Item
Description
Amount
Payment Type
Expense Type
Description
–
–
–
Reminder
Contacts
Memo
Expense
Manager
Search
Password
Clipboard
Maximum Number of Characters
2,046
2,046
14
2,046
2,036
14
12
2,048
8
14
14
2,008
12
12
2,048
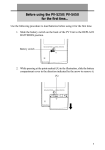
Resetting the PV Unit
Warning!
The following procedure erases all data stored in the memory of the PV Unit.
Perform this operation only when you want to delete all data and initialize the
settings of the PV Unit.
Remember - you should always keep copies of important data by writing it down,
or by transferring it to a personal computer.
176
Chapter 16 Technical Reference
1. Open the cover and touch the screen with the stylus to turn on power.
2. Use the stylus to press the RESET button on the back of the PV Unit.
RESET
button
•
RESET
➜
If the above does not appear on the display when you press the RESET
button, slide the battery switch to the REPLACE BATTERIES position
and remove the battery compartment cover. Use the stylus to press the P
button and then replace the battery compartment cover. Slide the battery
switch back to the NORMAL OPERATION position and then press the
RESET button.
3. Tap the center of each of the four cross marks as they appear on the
screen.
• The contrast adjustment screen appears next.
4. Tap H or J to adjust the contrast of the display, and then tap OK.
5. In response to the message that appears, tap Yes to reset the PV Unit and
clear all memory contents, or No to abort the reset procedure without
doing anything.
6. If you tapped Yes in the above step, a second confirmation message
appears. Tap Yes to reset the PV Unit and clear all memory contents, or
No to abort the reset procedure without doing anything.
• Tapping Yes in the above step starts the actual reset procedure.
177
7. After the reset procedure is complete, tap the button next to the language
you want to select as the system language.
8. Tap Set to change to the pop up tool screen.
9. Check the time setting and correct it if necessary (page 166).
• Following are the initial settings of the PV Unit after you perform the
RESET operation.
Main clock:
Clock 1
London
Jan/1/2001
12:00 am
12-hour format
Clock 2:
New York
Daily Alarm:
12:00 pm
Sound:
Daily Alarm off, all others on
Character input: CAPS off
Euro Conversion Rate Presets
Country
Germany
France
Italy
Spain
Netherlands
Belgium
Portugal
Austria
Finland
Ireland
Luxembourg
178
Currency Code
Rate (for 1 euro)
Decimal Places
DEM
FRF
ITL
ESP
NLG
BEF
PTE
ATS
FIM
IEP
LUF
1.95583
6.55957
1936.27
166.386
2.20371
40.3399
200.482
13.7603
5.94573
0.787564
40.3399
2
2
0
0
2
0
0
2
2
2
0
Chapter 16 Technical Reference
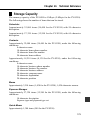
Storage Capacity
The memory capacity of the PV-S450 is 4-Mbyte (2-Mbyte for the PV-S250).
The following shows the number of items that can be stored.
Scheduler
Approximately 32,000 items (24,400 for the PV-S250) with 20-character
description.
Approximately 27,320 items (12,200 for the PV-S250) with 60-character
description.
Contacts
Approximately 32,000 items (24,400 for the PV-S250), under the following
conditions.
8-character name
10-character home phone number
10-character home fax number
20-character home address
Approximately 18,210 items (8,130 for the PV-S250), under the following
conditions.
8-character name
10-character business phone number
10-character business fax number
40-character business address
20-character company name
20-character department
20-character position
Memo
Approximately 3,210 items (1,430 for the PV-S250), 1,024-character memos.
Expense Manager
Approximately 27,320 items (12,200 for the PV-S250), under the following
conditions.
10-character description
Expense type and payment type set
Quick-Memo
Approximately 1,300 items (580 for the PV-S250).
179
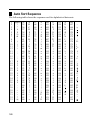
Auto Sort Sequence
The following table shows the sequence used for alphabetical data sorts.
180
A
B
C
D
E
F
G
H
I
J
K
L
M
N
O
P
Q
R
S
T
U
V
W
X
Y
Z
[
\
]
ˆ
—
`
a
67
68
69
70
71
72
73
74
75
76
77
78
79
80
81
82
83
84
85
86
87
88
89
90
91
92
93
94
95
96
97
98
99
b
c
d
e
f
g
h
i
j
k
l
m
n
o
p
q
r
s
t
u
v
w
x
y
z
{
1
}
~
Á
É
Í
Ó
100
101
102
103
104
105
106
107
108
109
110
111
112
113
114
115
116
117
118
119
120
121
122
123
124
125
126
127
128
129
130
131
132
Ú
À
È
Ì
Ò
Ù
Â
Ê
Î
Ô
Û
¡
á
é
í
ó
ú
à
è
ì
ò
ù
â
ê
î
ô
û
¿
Ä
Ë
Ï
Ö
Ü
133
134
135
136
137
138
139
140
141
142
143
144
145
146
147
148
149
150
151
152
153
154
155
156
157
158
159
160
161
162
163
164
165
Ã
Õ
Ñ
IJ
Æ
Ç
Å
F
ß
¶
¢
ä
ë
ï
ö
ü
ã
õ
ñ
ij
æ
ç
å
f
£
¥
W
ª
º
#
$
–
166
167
168
169
170
171
172
173
174
175
176
177
178
179
180
181
182
183
184
185
186
187
188
189
190
191
192
193
194
195
196
197
198
2
3
m
1
2
1
4
3
4
ƒ
|
Fr
‹
fi
`
§
›
«
1 (space) 34
2
35
!
”
3
36
#
4
37
$
5
38
%
6
39
&
7
40
’
8
41
(
9
42
)
10
43
11
*
44
+
12
45
,
13
46
14
–
47
15
.
48
16
/
49
17
0
50
18
1
51
19
2
52
20
3
53
21
4
54
22
5
55
6
23
56
7
24
57
8
25
58
9
26
59
:
27
60
;
28
61
29
<
62
30
63
=
31
64
>
32
65
?
33
66
@
fl
ÿ
®
©
¤
¶
D
ı
P
p
y
Y
•
1
Chapter 16 Technical Reference
City Name List
City Name
Time
Difference
Abidjan
Abu Dhabi
Acapulco
Accra
Addis Ababa
Adelaide
Aden
Al Manamah
Algiers
Alice Springs
Amman
Amsterdam
Anchorage
Andorra
Ankara
Antananarivo
Asuncion
Athens
Atlanta
Auckland
Azores
– 0:00
+ 4:00
– 6:00
– 0:00
+ 3:00
+ 9:30
+ 3:00
+ 3:00
+ 1:00
+ 9:30
+ 2:00
+ 1:00
– 9:00
+ 1:00
+ 2:00
+ 3:00
– 4:00
+ 2:00
– 5:00
+12:00
– 1:00
Baghdad
Baltimore
Bangkok
Barcelona
Basel
Beirut
Belgrade
Bergen
Berlin
Birmingham
Bismarck
Bogota
Boise
Bonn
Boston
Brasilia
Brazzaville
+
–
+
+
+
+
+
+
+
–
–
–
–
+
–
–
+
3:00
5:00
7:00
1:00
1:00
2:00
1:00
1:00
1:00
6:00
6:00
5:00
7:00
1:00
5:00
3:00
1:00
City Name
Time
Difference
Brisbane
Broken Hill
Brussels
Bucharest
Budapest
Buenos Aires
+10:00
+ 9:30
+ 1:00
+ 2:00
+ 1:00
– 3:00
Cairo
Calcutta
Canberra
Cape Town
Caracas
Casablanca
Cayenne
Chatham Island
Cheyenne
Chicago
Cincinnati
Cleveland
Colombo
Conakry
Copenhagen
+ 2:00
+ 5:30
+10:00
+ 2:00
– 4:00
– 0:00
– 3:00
+12:45
– 7:00
– 6:00
– 5:00
– 5:00
+ 6:00
– 0:00
+ 1:00
Dakar
Dallas
Damascus
Dar es Salaam
Darwin
Delhi
Denver
Detroit
Dhaka
Dubai
Dublin
Dusseldorf
–
–
+
+
+
+
–
–
+
+
–
+
Edmonton
– 7:00
Fernando de
Noronha
Fort Worth
– 2:00
0:00
6:00
2:00
3:00
9:30
5:30
7:00
5:00
6:00
4:00
0:00
1:00
– 6:00
City Name
Time
Difference
Frankfurt
Freetown
+ 1:00
– 0:00
G.M.T.
Geneva
Georgetown
Guam
Guatemala City
– 0:00
+ 1:00
– 4:00
+10:00
– 6:00
Hamburg
Hannover
Hanoi
Havana
Helena
Helsinki
Hermosillo
Hong Kong
Honolulu
Houston
+ 1:00
+ 1:00
+ 7:00
– 5:00
– 7:00
+ 2:00
– 7:00
+ 8:00
–10:00
– 6:00
Indianapolis
Istanbul
– 5:00
+ 2:00
Jacksonville
Jakarta
Jeddah
Jerusalem
Johannesburg
–
+
+
+
+
Kabul
Kampala
Kansas City
Karachi
Kathmandu
Khabarovsk
Khartoum
Kingston
Kinshasa
Kuala Lumpur
Kuwait
+ 4:30
+ 3:00
– 6:00
+ 5:00
+ 5:45
+10:00
+ 2:00
– 5:00
+ 1:00
+ 8:00
+ 3:00
La Paz
– 4:00
5:00
7:00
3:00
2:00
2:00
181
City Name
Time
Difference
Lagos
Las Palmas
Lilongwe
Lima
Lisbon
Lome
London
Los Angeles
Luanda
Lusaka
Luxembourg
+
–
+
–
–
–
–
–
+
+
+
Madrid
Managua
Manaus
Manila
Maputo
Marseille
Melbourne
Memphis
Mexico City
Miami
Midway Is.
Milan
Milwaukee
Minneapolis
Mogadishu
Monrovia
Montevideo
Montreal
Moscow
Mumbai
Munich
Muscat
+ 1:00
– 6:00
– 4:00
+ 8:00
+ 2:00
+ 1:00
+10:00
– 6:00
– 6:00
– 5:00
–11:00
+ 1:00
– 6:00
– 6:00
+ 3:00
– 0:00
– 3:00
– 5:00
+ 3:00
+ 5:30
+ 1:00
+ 4:00
Nadi
Nairobi
Nashville
Nassau
New Orleans
+12:00
+ 3:00
– 6:00
– 5:00
– 6:00
182
1:00
0:00
2:00
5:00
0:00
0:00
0:00
8:00
1:00
2:00
1:00
City Name
Time
Difference
City Name
Time
Difference
New York
Niamey
Norfolk
Norfolk Island
Noumea
– 5:00
+ 1:00
– 5:00
+11:30
+11:00
Oklahoma City
Omaha
Oslo
Ottawa
–
–
+
–
Panama City
Papeete
Paramaribo
Paris
Peking (Beijing)
Perth
Philadelphia
Phnom Penh
Phoenix
Pittsburgh
Port Louis
Port Moresby
Port au Prince
Port of Spain
Portland
Prague
– 5:00
–10:00
– 3:00
+ 1:00
+ 8:00
+ 8:00
– 5:00
+ 7:00
– 7:00
– 5:00
+ 4:00
+10:00
– 5:00
– 4:00
– 8:00
+ 1:00
San Jose
San Juan
San Salvador
Sanaa
Santa Fe
Santiago
Santo Domingo
Sao Paulo
Seattle
Seoul
Shanghai
Singapore
Sofia
St Petersburg
Stockholm
Sydney
– 6:00
– 4:00
– 6:00
+ 3:00
– 7:00
– 4:00
– 4:00
– 3:00
– 8:00
+ 9:00
+ 8:00
+ 8:00
+ 2:00
+ 3:00
+ 1:00
+10:00
Taipei
Tampa
Tegucigalpa
Tehran
Tijuana
Tokyo
Toronto
Tripoli
Tunis
+
–
–
+
–
+
–
+
+
Quito
– 5:00
Reykjavik
Rio de Janeiro
Riyadh
Rome
–
–
+
+
0:00
3:00
3:00
1:00
Vancouver
Vienna
Vientiane
– 8:00
+ 1:00
+ 7:00
Saint Louis
Salt Lake City
Salzburg
San Antonio
San Diego
San Francisco
–
–
+
–
–
–
6:00
7:00
1:00
6:00
8:00
8:00
Warsaw
Washington,D.C.
Wellington
Winnipeg
+ 1:00
– 5:00
+12:00
– 6:00
Yangon
Yaounde
+ 6:30
+ 1:00
Zurich
+ 1:00
6:00
6:00
1:00
5:00
8:00
5:00
6:00
3:30
8:00
9:00
5:00
2:00
1:00
Chapter 16 Technical Reference
Message Table
100 alarms are already set!
Cause: The maximum allowable
limit of 100 alarms are already set.
Action: Wait until some of the
existing alarms are used, or delete
alarms you do not need to make
room for new ones.
All dates you select must be within the same year.
Cause: You are trying to highlight
dates for a period that spans multiple
years.
Action: The range of dates when
specifying highlights must be within
one single year. Change your date
range specification so it is within the
same year.
Batteries are getting weak! Replace them as instructed in the User’s Guide.
Cause: Battery power is getting
weak.
Action: Replace batteries as explained
on page 19 of this User’s Guide.
Cells in the range you are deleting contain data.
Delete them anyway?
Cause: Some of the cells in a range
you are deleting in the Pocket Sheet
Mode contain data.
Action: Press Yes to delete the cells
and the data they contain, or press
No to close the dialog box without
deleting anything.
Check the secret memory area!
Cause: An alarm time has been
reached for secret memory area data.
Action: Enter the secret memory
area to view details about the alarm.
Check your home time setting and correct it if necessary!
Cause: This message appears after
an operation that can affect your
time settings.
Action: Since all alarms and other
timekeeping related operations are
based on your time setting, be sure
to check it and make corrections as
necessary whenever this message
appears.
183
Communication error!
Cause: An error occurred during
data communication.
Action: Correct the cause of the
error and try again.
Data error! Consult your User’s Guide for correct procedure.
Cause: An internal data error has
corrupted memory data.
Action: See page 15 of this User’s
Guide for the correct procedure.
Data error! Do you want to view data before resetting?
Cause: A data error requires that
you perform the RESET operation,
which deletes all data stored in
memory and returns all settings to
their initial defaults.
Action: Tap Yes to close the dialog
box. You can then recall data stored
in memory to make written copies
before it is cleared by the RESET
operation. Tap No to go immediately
into to the RESET operation, which
will delete all data stored in memory.
Data item not found!
Cause: None of the data in memory
matches the characters you specified
for a search operation.
Action: Check the characters you
specified to make sure you did not
make a mistake, or try searching for
different characters.
Input all required data.
Cause: You did not input all of the
minimum data required to store the
data item.
184
Action: Input the minimum required
entries for the mode where you are
inputting new data. Check the
minimum requirements and input the
required data.
Chapter 16 Technical Reference
Make sure you are inputting the date correctly.
Cause: You are trying to use invalid
values for a date.
Action: Input the date correctly.
Make sure you are inputting the time correctly.
Cause: You are inputting invalid
values for a time setting.
Action: Input proper values for the
time.
Memory is full!
Cause: You are trying to input data
or receive data while memory is
already full.
Action: First try performing the
memory management operation to
see if more memory can be made
available. If this message still
appears, it means that memory is
really full. Delete data you no longer
need to make room for more data.
Sheet is too big!
Cause: The sheet you are working
with in the Pocket Sheet Mode is
larger than the allowable maximum.
Action: Reduce the amount of data
contained in the sheet or divide the
data between two or more sheets.
That alarm time is already passed!
Cause: The time you are trying to
set for an alarm is already passed.
Action: This is merely a warning
message that appears for about one
second. After that, the dialog box
closes and the data is stored without
the alarm.
That alarm time is already used!
Cause: The time you are setting for
an alarm is already used.
Action: Change the alarm time to
one that is not yet used.
185
That date is outside of the specified period.
Cause: You are specifying a
Reminder date that is outside the
period specified by the start date and
end date.
Action: Check the specified period
and set the date correctly.
That name is already used!
Cause: You are trying to assign a
name that is already used when
naming a payment type or expense
type.
Action: Use a different name.
The next step starts data deletion and unit reset!
Do you want to continue?
Cause: This is the final warning
before execution of the RESET
operation, which deletes all data
stored in memory and returns all
settings to their initial defaults.
Action: Tap Yes to execute the
RESET operation and delete all data,
or No to close the dialog box
without deleting anything.
The reset operation deletes all data in memory!
Do you want to continue?
Cause: You are about to perform the
RESET operation, which deletes all
data stored in memory and returns
all settings to their initial defaults.
Action: Tap Yes to perform the
RESET operation and delete all data,
or No to close the dialog box
without deleting anything.
This operation will push some data outside the sheet.
Continue?
Cause: The Pocket Sheet Mode
operation you are performing will
cause some of the cells of the sheet
to be pushed outside the range of the
sheet. This causes the data in the
cells to be deleted.
186
Action: Press Yes to go ahead with
the operation, or No to close the
dialog box without doing anything.
Chapter 16 Technical Reference
You cannot specify more than 60 repeats!
Cause: You specified more than 60
repeats for a Reminder data item.
Action: Shorten the specified period
of the Reminder item to reduce the
number of repeats.
Wrong password!
Cause: The password you input
while trying to enter the secret
memory area does not match the
password that is registered.
Action: Input the correct password.
187
Troubleshooting
Power Supply
Problem: The PV Unit does not operate normally after batteries are replaced.
Possible Cause
Problem with PV Unit operational
settings
Recommended Action
Perform the following procedure.
1. Slide the battery switch to the
REPLACE BATTERIES position, and
remove the battery compartment
cover.
2. Use the stylus to press the P button
inside the battery compartment.
REPLACE BATTERIES
NORMAL OPERATION
P
3. Replace the battery compartment
cover, and then slide the battery switch
back to NORMAL OPERATION.
4. Use the stylus to press the RESET
button on the back of the unit. See
“To reset the PV Unit” for details on
the reset procedure.
5. In response to the message that appears
after you calibrate the touch screen and
adjust the display contrast, tap No.
• Make sure you do not tap Yes. Doing
so deletes all data stored in memory
and returns all settings to their initial
defaults.
188
Chapter 16 Technical Reference
Problem: Nothing appears on the display when power is turned on.
Possible Causes
1. The battery switch on the back of the
unit is set to REPLACE BATTERIES.
2. Battery power is low.
3. Display contrast is too light.
4. Screen tap power on feature is turned
off.
Recommended Actions
1. Slide the battery switch to NORMAL
OPERATION.
2. Replace batteries (page 19).
3. Adjust display contrast (page 169).
4. Press Action control to turn on power
or turn on the screen tap power on
feature.
Display Contrast
Problem: Display is totally black.
Possible Cause
Display contrast is too dark.
Recommended Action
Adjust display contrast (page 169).
Key Tone
Problem: The PV unit does not beep when you perform an operation.
Possible Cause
The key tone is turned off.
Recommended Action
Turn on the key tone (page 167).
189
Operation
Problem: Nothing happens when you tap the screen.
Possible Causes
1. Battery power is low.
2. Exposure of the PV Unit to some
external condition is interfering with
proper operation.
3. The touch screen is damaged.
Recommended Actions
1. Replace batteries (page 19).
2. Press the P button and then the
RESET button. See procedure above.
3. The touch screen must be replaced.
Contact your nearest CASIO dealer
to have the touch screen replaced.
You will be charged for this
replacement.
Problem: Power suddenly turns off or contrast adjustment screen suddenly appears.
Possible Cause
Battery power is low.
Recommended Action
Replace batteries (page 19).
Problem: The functions or cursor movement performed does not match the
location where you tap on the screen.
Possible Cause
The touch screen needs to be calibrated.
190
Recommended Action
Perform the procedure under
“Calibrating the Touch Screen” on page
170.
Chapter 16 Technical Reference
Data Communication
Problem: You are having problems performing data communication.
Possible Causes
1. Equipment is not connected correctly.
2. Cradle contacts are dirty.
•
Recommended Actions
1. Carefully follow the procedures on
page 127 and connect the equipment
correctly.
2. Clean the contacts on the bottom of
the PV Unit and inside the cradle by
wiping them with a cotton swab.
If any of the above does not restore your PV Unit to normal operation, contact
your nearest CASIO dealer for servicing.
191
Specifications
Model: PV-S250/PV-S450
Main Modes:
Scheduler (Schedule, To Do, Reminder); Contacts; Memo; Expense Manager;
Currency Converter; Quick-Memo; Pocket Sheet; Pop Up Tools (Clock, Calendar,
Calculator); Game
Data storage:
Storage and recall of Schedule, To Do, Reminder, Contacts, Memo, Expense, QuickMemo, Pocket Sheet data; calendar display; secret memory area; editing; memory
status display
Clock:
World Time; Schedule alarm; To Do alarm; Reminder alarm; Daily alarm; accuracy
under normal temperatures: –3 seconds per day
Calculations:
12-digit arithmetic calculations; arithmetic constants (+/–/·/‚); independent
memory; percentages; square roots; 24-digit approximations; other mixed
calculations
General:
Display: 160 · 160 dots
Memory capacity: 2MB (PV-S250)/4MB (PV-S450)
Main component: LSI
Power supply: Two AAA-size alkaline batteries (Type: LR03 (AM4))
Battery life: (Ambient Temperature: 20 C (68 F))
• Approximately 180 hours of continuous display only in the Contacts Mode
• Approximately 120 hours with 55 minutes of continuous display only and
5 minutes of processing operation per hour in the Contacts Mode
• Approximately 80 hours with 55 minutes of continuous display only and 5
minutes of processing operation per hour in the Contacts Mode, plus 3 minutes
of backlight operation per hour during continuous display only period
Power consumption: 0.3W
Auto power off: Selectable, approximately 6, 3, or 1 minute after last key operation
Operating temperature: 0 C ~ 40 C (32 F ~ 104 F)
Dimensions: Unfolded: 10.7H · 82W · 125D mm (3/8"H · 31/4"W · 47/8"D)
Folded: 11.9H · 82W · 126.5D mm (1/2"H · 31/4"W · 5"D)
Weight: Approximately 130 g (4.6 oz) including batteries
192