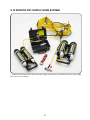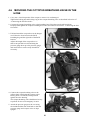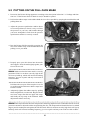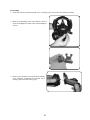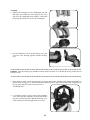
1
99885C01
User Manual
DIVATOR MKIII
© 2011 Interspiro AB, Sweden. This publication contains and refers to propriety material that is copyright
protected. All rights reserved. Interspiro® and Divator® are registered trademarks belonging to
Interspiro.
The publication may not be copied, photocopied, reproduced, translated or converted into electronic or machinereadable format, in part or in its entirety, without written consent from Interspiro.
Changes or updates in this publication may take place with prior notification.
Table of Contents
1 Approvals........................................................................5
2 Safety note.....................................................................6
2.1 Risk indicators..................................................................................................... 6
2.2 Responsibility of the owner and user....................................................... 6
3 Technical description................................................8
3.1 Scope....................................................................................................................... 8
3.2 Divator MKIII System Diagram.......................................................................... 9
3.3 Divator MKIII System......................................................................................... 10
3.4 Cylinder pack..................................................................................................... 11
3.5 MKIII Regulator Unit......................................................................................... 12
3.6 Breathing valve................................................................................................. 15
3.7 Full-face mask and breathing valve.......................................................... 18
3.8 Divator BCW Vest (Buoyancy Compensating Wing)................................. 19
3.9 Divator Harness................................................................................................ 20
3.10 Divator DP1 Supply Hose System ................................................................ 21
4 Preparations before use.........................................22
4.1 Anti-freezing caps............................................................................................ 22
4.2 Mounting an MKIII regulator unit and cylinder pack......................... 23
4.3 Securing the BCW or harness .................................................................... 24
4.4 Securing the BCW hose.................................................................................. 24
4.5 Securing the breathing hose in the BCW................................................. 25
4.6 Securing the octopus breathing valve in thehose............................ 26
4.7 Connecting the full-face mask.................................................................. 27
4.8 Cylinder weight................................................................................................ 29
5 Preparations before diving....................................30
5.1 Leakage and function test........................................................................... 30
5.2 Putting on the apparatus.............................................................................. 31
5.3 Putting on the full-face mask.................................................................... 32
5.4 Checking reserve valve handle position................................................. 34
5.5 Attaching weights............................................................................................ 35
6 Diving...............................................................................36
6.1 Checks during an ongoing dive.................................................................. 36
6.2 Diving in cold water......................................................................................... 36
7 after diving...................................................................39
7.1 Removing Divator.............................................................................................. 39
7.2 Disassembly........................................................................................................ 39
8 Filling..............................................................................41
8.1 Filling Interspiro fully composite cylinders....................................... 41
8.2 Filling adapter.................................................................................................. 41
9 Check list......................................................................43
9.1 Before diving...................................................................................................... 43
9.2 During diving...................................................................................................... 43
9.3 After diving . ...................................................................................................... 43
10 Measures in the event of an emergency...........44
10.1 Draining water from full-face mask during an ongoing dive........ 44
10.2 Octopus measures........................................................................................... 44
10.3 Free flow in the full-face mask's breathing valve............................. 45
10.4 Free flow in octopus breathing valve..................................................... 45
10.5 Pressure drop................................................................................................... 45
10.6 Draining of breathing valve with mouthpiece....................................... 46
11 Service and testing schedule...............................47
12 Maintenance.................................................................48
12.1 Cleaning............................................................................................................... 48
12.2 Monthly cleaning . .......................................................................................... 49
12.3 Periodic checking and inspection.............................................................. 54
12.4 Repairs.................................................................................................................. 58
13 Transport and storage...........................................61
13.1 Storage................................................................................................................ 61
1Approvals
The Interspiro Divator MKIII apparatus has been tested in accordance with EN 250 for types of use specified
by DEKRA EXAM GmbH, Dinnendahlstr. 9; 44809 Bochum, Germany. EC Type-examination (Directive
89/686/EEC) by SGS Yarsley ICS Ltd (Notified Body No 0120).
Divator MKIII has been approved for a range of 0–50 meters (0-164 feet) depth and for cold water temperatures down to 4±2°C (39.2 ± 3.6°F) in accordance with EN 250.
2 Safety note
WARNING!
BEFORE THE DIVATOR MKIII SYSTEM IS USED FOR THE FIRST TIME, THE USER MUST HAVE
BEEN TRAINED IN ITS OPERATION, READ THIS USER MANUAL AND TAKEN A PROFICIENCY
TEST IN THE PRESENCE OF A RESPONSIBLE TRAINER OR DIVING SUPERVISOR. IF THIS DOES
NOT TAKE PLACE, THE USER MAY BE AFFLICTED WITH PERSONAL INJURY OR DEATH,
WHICH CAN HAVE SERIOUS CONSEQUENCES FOR PEOPLE OR PROPERTY THAT ARE TO BE
RESCUED.
2.1Risk indicators
This user manual contains warning information specified as DANGER! WARNING! and CAUTION! to
indicate risks and dangers that are associated with the use of the Divator system. The degree of danger that
can arise is indicated with these warning symbols:
DANGER!
Indicates an imminent risk situation, which, if not avoided, will result in death or a serious personal injury.
WARNING!
Indicates a potential risk situation, which, if not avoided, can result in death or a serious personal injury.
CAUTION!
Indicates a potential risk situation, which, if not avoided, can result in a minor or moderately severe personal
injury. It is also used as a warning for hazardous procedures.
Not adhering to the instructions associated with these warning symbols can result in the equipment not
working as intended, a major personal injury or death.
2.2Responsibility of the owner and user
DANGER! All users of the Divator system must be certified by a nationally or internationally recognized diver
training organization. The users must also be adequately trained in use of the Divator system by a certified
diving instructor with exhaustive knowledge and practical experience of the Divator system.
WARNING! High-pressure systems for gas should be handled carefully. Damage to pressurized components
can result in personal injury or death. Interspiro disclaims all responsibility for injuries that occur as result
of the instructions in this user manual not being adhered to.
WARNING! Before the Divator system is used, the user must make sure that the system has been correctly
inspected and maintained. (see Chapter 11 “Maintenance and testing schedule” and Chapter 12
“Maintenance”).
WARNING! All users of the Divator system must be regularly trained in shallow water on emergency procedures
so that their readiness capacity is maintained in the event of a real emergency situation.
WARNING! SCUBA complying with EN 250 are not intended for more than one user to breathe from at the
same time.
WARNING! If SCUBA are configured and used by more than one diver at the same time, then the cold water
and breathing performance may not fulfil the requirements of EN 250.
Comment: Divator MKIII has been tested with two simultaneous divers and passed the cold water performance
requirements according to EN 250:2000.
3 Technical description
3.1Scope
• The Interspiro Divator system encompasses the Divator MKIII SCUBA (Self Contained Underwater
Breathing Apparatus) diving apparatus and the Divator DP1 Supply Hose System.
This user manual applies to the following components of the Divator MKIII diving apparatus:
- Divator Full-Face Mask.
- Divator MKIII Regulator.
- PED and DOT approved Divator cylinders.
- Divator BCW Vest (see Divator BCW User Manual).
- Divator Harness.
- Divator Breathing Valve with safety pressure.
- Divator Breathing Valve without safety pressure.
- Divator Octopus breathing valve.
- Divator Hatch (see Divator Hatch User Manual).
- Divator HUD, Heads Up Display (see Divator HUD User Manual).
- Divator Spectacles.
- Divator Mask Weights.
- Divator DP1 Supply Hose System for one or two divers (see Divator DP1 Supply Hose System User
Manual).
3.2Divator MKIII System Diagram
DIVATOR MKIII
Secondary
(Octopus)
Breathing
valve
Cylinder pack
300 bar
(4350 psi)
Primary
Breathing
valve
(full-face
mask)
Inflow
for DP1
Pressure gauge
BCW
Dry-suit
Regulator
Regulator
CDR-handle
CDR = Closed-Diving-Reserve
3.3Divator MKIII System
• The components in Divator MKIII
10
3.4 Cylinder pack
1
2
4
7
6
3
5
1 Weight bracket
5 Carry handle with connecting pipe
2 Cylinder cover
6 Cylinder ring
3 Cylinder valve
7 Quick coupling for BCW/harness
4 Safety plug (23 mm open-ended wrench)
• The PED and DOT approved Divator Lite cylinder packs are available in two configurations. Divator
Lite 323.4 is a two-cylinder pack with two times 3.4 liters and 300 bar (75 cubic feet, 4350 psi) and Divator
Lite 326.7 is a two-cylinder pack with two times 6.7 liters and 300 bar (140 cubic feet, 4350 psi).
The cylinder pack consists of two cylinders assembled with two stainless steel tension ties. The cylinders
have a common valve mounted on one of the cylinders; the cylinders are then coupled via the connection
pipe that is protected by the carrying handle.
The Divator Lite cylinders are fully composite cylinders with plastic inserts that are wound with carbon
fiber and fiber glass.
To close the cylinder valve, the knob on the cylinder must be pressed in and subsequently turned. This
prevents unintentional closing of the valve.
The cylinder pack's safety disc is designed to break at a pressure of 450 ±50 bar (6525±725 psi).
Impacts against the cylinder pack can cause skewing and/or damage that weakens the unit. Skewing and
damage must be checked and rectified. Negligence when handling the cylinder with its weight fitted may
result in deformation of the retaining pin or weight bracket.
Information about filling the cylinders can be found in Chapter 8 “Filling”.
11
3.5 MKIII Regulator Unit
5
7
10
1
2
3
9
6
8
4
1 External coupling for supply hose diving with DP1.
2 Pressure gauge
3 Reserve valve handle (CDR)
4 Primary breathing hose (two parts)
5 Secondary breathing hose (octopus), with octopus breathing valve
6 Dry-suit hose (optional)
7 BCW hose (optional)
8 Clamp for secondary breathing valve
9 Holder (one or two depending on model)
10Regulator block with anti-freezing caps
• The air from the cylinder pack is fed to the pressure regulators that reduce the high pressure to an
intermediate pressure. The air is then led through the intermediate pressure hoses to the breathing valves.
The regulator unit comprises two pressure regulators in a connecting pipe with a reserve valve. The primary
pressure regulator has two hoses connected. One of them feeds the primary breathing hose with its primary
breathing valve regardless of whether it is connected to a full-face mask or a mouthpiece. There is a quick
coupling on the hose that interacts with the external surface air supply. The other hose is intended for
inflating dry-suits (Optional).
The secondary pressure regulator has two hoses connected. One of them feeds the secondary breathing hose
(the octopus hose) with its octopus breathing valve. The other hose is intended for Divator BCW, buoyancy
compensating vest (Optional).
The regulator unit is connected to the cylinder valve with a coupling that is tightened by hand. The regulator
unit cannot be loosened without the air first being ventilated from the system. The pressure regulator is a
piston-type with extremely high air flow capacity. To make the regulator small and light, the piston has been
balanced, which also guarantees stable and even intermediate pressure. The pressure in the air cylinders can
be controlled on the pressure gauge, which is connected to the regulator with a high-pressure hose.
12
3.5.1 Working principle
• The pressure regulator is a pressure-balanced, piston-equipped counter-flow regulator. The result of
balancing is firmly reduced pressure (intermediate pressure) that is not affected by pressure fluctuations in
the air supply (high-pressure).
The regulator opens at corresponding gas pressure. The principle is called downstream regulation. Thanks
to this, the regulator can regulate pressure from the maximum flow rate to a minimum supply pressure of
approximately 15 bar (218 psi).
The regulator reduces the highest pressure to 8.5 bar (123 psi) dynamic pressure. The constant pressure
regulation results in a sharp temperature drop. If the air is humid, ice crystals can form thereby risking
blockage to the air supply. This is called “internal freezing” and can cause total air stoppage. For this reason,
dry and clean air must always be used. Information about quality requirements for the air can be found in
chapter 8 "Filling".
3.5.2 High-pressure hose
• The high-pressure hose consists of a plastic inner hose (sealing layer) clad in metal and aramid (pressure
load absorption) with an outer black plastic jacket of polyurethane (wear protection). Airflow to the highpressure hose is limited by an orifice. This minimizes a rapid pressure drop in the event of a hose rupture,
and protects the pressure gauge from pressure impacts.
3.5.3 Reserve valve handle (CDR)
• The reserve valve handle is used to switch between different air supply units. Air is added either from
the DP1 Supply Hose System, from the diver's cylinder pack or from the cylinder pack's backup volume.
The reserve valve handle is sometimes called the “CDR handle”, whereby CDR represents the handle's
3 positions: Closed - Diving - Reserve.
When diving with surface air, e.g. DP1, the reserve valve handle should be in closed (C) position in order
to ensure that only air from the surface is used. If for some reason the surface air supply is interrupted,
the diver will receive a warning since air is not being supplied from the cylinder pack. If the surface air
supply is interrupted, the diver can simply pull the reserve valve handle to activate the air supply from the
cylinder pack.
For independent diving when only air supply from the cylinder pack is used, the reserve pressure handle
must be opened by pulling it out to diving position (D) so that the air supply from the cylinder pack is
activated.
When the cylinder pressure falls to about 65 bar (943 psi), the air supply warning is activated (which is
indicated by increased breathing resistance). In this case, the diver should pull out the reserve valve handle
to the reserve position (R) in order to subsequently utilize the cylinder pack's reserve air volume.
Pull for air in all diving positions!
C D R
(Closed Diving Reserve)
13
3.5.4 Redundant breathing system
• The regulator unit comprises two pressure regulators. The primary regulator provides the primary breathing
valve or the full-face mask valve with intermediate pressure air, and the secondary regulator provides the
octopus breathing valve with intermediate pressure air.
The primary regulator receives air via the reserve valve handle, while the secondary regulator is always directly
supplied with air from the air cylinders. Thus the system has a backup system. The diver can always obtain
respiratory air in three different ways:
·If the surface air supply from the DP1 Supply Hose System is interrupted - Pull out the reserve valve handle
to switch to air supply from the cylinder pack.
·If only a limited cylinder capacity (volume) remains - Pull out the reserve valve handle to switch to the
reserve air volume.
·If the primary breathing valve or the full-mask valve does not work – Press in the reserve valve handle to
the closed position and use the octopus breathing valve. Alternatively, if possible, pull the CDR handle,
take a breath and close the CDR handle. Repeat this while ascending to the surface. If this does not work,
go over to the octopus breathing valve permanently!
Surface air supply does not work
If the air supply from the DP1 Supply Hose System is interrupted, the diver will receive an insufficient amount
of air or no air at all. In emergency situations, the diver should simply pull the reserve valve handle to activate
the air supply from the cylinder pack.
Air supply warning
If cylinder pressure drops to approximately 65 bar (943 psi), the air supply warning will be activated. This
will result in a reduction in air flow from the primary breathing valve or full-face mask valve, which the diver
will perceive as a respiratory resistance.
In this case, the diver must pull out the reserve valve handle to the reserve position (R) in order to utilize the
remaining reserve air volume of the cylinder pack.
Malfunction in primary breathing valves
If the primary breathing valve does not work (e.g. as a result of freezing) resulting in insufficient air or no
air, the diver should depress the reserve air handle (to close the air-flow) and change to the octopus breathing
valve. Always check the pressure on the pressure gauge after changing the air supply. Start your ascent to the
surface.
Normal diving (primary regulator use)
Autonomous diving -> Reserve valve handle in position D
Hose diving with DP1 -> Reserve valve handle in position C
Fault case A
Fault case B
No air
Free airflow
Action A
Action B
(incl. respiratory resistance as a
consequence of a warning)
(incl. all free flow faults in
the primary regulator)
Pull handle for air
Press handle for
cut-off airflow
Pull reserve valve handle (this
changes automatically to position R
if the cylinder pressure is lower than
100 bar (1450 psi) or D if the cylinder
pressure exceeds 100 bar/1450 psi)
Press reserve valve handle for position C
(cuts off the free airflow). Change to
reserve regulator use (octopus), or open
and close the reserve valve handle at
each breath.
14
3.5.5 Pressure gauge
• Pressure in the cylinder pack can be read from the pressure gauge. The pressure gauge is connected to
the regulator's connecting pipe via a high-pressure hose. The air pressure affects a Bourdon tube (a pipeshaped spring) in the pressure gauge, which in turn affects the indicator. The safety valve (behind the rubber
covering) on the rear of the pressure gauge opens if the pressure in the pressure gauge casing rises too much.
The rubber covering protects the pressure gauge from impact damage and dirt.
3.6Breathing valve
• The Divator breathing valve is available in three designs:
(1) Primary with safety pressure
(2) Primary without safety pressure
(3) Secondary (octopus) with locking handle and without safety pressure
The primary breathing valves are available in black or gray. The octopus breathing valve in only available
in black with a yellow protective ring.
The primary breathing valves are mounted in the face mask using a bayonet coupling. All breathing valves
are demand valves that supply the diver with air only during inhalation.
The Divator breathing valve is balanced and maintains an extremely low respiratory resistance at all diving
depths, even if secondary pressure varies.
The breathing valve is also designed to function as a safety valve for the first-stage regulator. If secondary
pressure from the first-stage regulator increases to approximately 14 bar (203 psi), the overpressure valve
on the breathing valve opens. This prevents overpressure in the secondary system components.
As an additional safety feature, there is a check valve in the inhalation channel to prevent water from
penetrating the valve mechanism where it can freeze and cause the valve to stick in open position.
15
3.6.1Primary breathing valve components
(safety pressure)
7
6
5
9
10 1
8
4
3
2
1 Connection nipple
6 Locking ring
2 Check valve, inhalation channel 7 Protective ring
3 Bayonet coupling
8 Vent button
4 Diaphragm housing
9 Knob for safety pressure (only versions with safety pressure)
5 O-ring (not used with mouthpieces)
10 Locknut
• Interspiro recommends the use of a Divator breathing valve with safety pressure when diving in
contaminated water.
A Divator breathing valve is designed to maintain a safety pressure of an approximately 35 mm (1.5 inch)
water column in a full-face mask in atmospheric air. The safety pressure is activated automatically when
the diver takes his or her first breath in the mask. The safety pressure reduces the risk of water leaking in
(or contaminated air leaking in at the surface), which is very important when diving in contaminated water.
Safety pressure in the mask is maintained regardless of the diver's air consumption.
If water enters the mask, it can simply be drained by pressing the vent button on the breathing valve. When
the mask is removed, the safety pressure knob on the breathing valve must be pressed in (closed) against
the valve housing.
DANGER! The Divator breathing valve with safety pressure must not be combined with a Divator mouthpiece
due to the risk for uncontrolled airflow if the valve is dropped.
16
3.6.2Primary breathing valve without safety
pressure.
• The Divator breathing valve without safety pressure has no extra safety pressure in the full-face mask at
atmospheric pressure, but is ideal with regard to diving conditions as it still provides a weak overpressure.
Otherwise, its functionality is identical to the Divator breathing valve with safety pressure.
A rubber sealing plug replaces the safety pressure knob, and there are also a number of different inner
components.
3.6.3Secondary octopus breathing valve
1
2
1 Locking handle
3
3 Protective ring
2 Clamp
• A Divator Octopus breathing valve is recognizable by its yellow protective ring and clamp. The octopus
breathing valve is the type that does not have any safety pressure but is equipped with a locking lever. The
locking lever locks the valve against unintentional free airflow.
17
3.7Full-face mask and breathing valve
The mask has an inner mask with separate inhalation and exhalation channels that match corresponding
channels in the breathing valve. This ensures that inhalation and exhalation air is never mixed. During
inhalation, air flows from the breathing valve up through the mist protection openings, over the inside of
the visor and continues through the check valves in the inner mask. During exhalation, the exhaled air exits
into the surrounding water via the exhalation valve.
1 Diaphragm assembly
2 Lever arm
3 Sealing spring
4 Sealing cone
5 Connection nipple
6 Check valve (two)
7 Exhalation channel
8 Exhalation valve
9 Cover
10 Sealing disc
11 Overpressure valve piston
12 Overpressure valve spring
13 Balance diaphragm
The following text describes usage of the breathing valve. See figure above.
When the diver inhales, the diaphragm unit (1) is drawn inwards and presses against the lever arm (2). The
lever arm lifts the sealing cone (4) from the valve seat on the connection nipple (5). Then air flows through
the inhalation channel into the inner mask through the check valves (6). When the diver stops inhaling,
the diaphragm unit (1), the lever arm (2) and the sealing cone (4) return to their starting positions and the
inflow is closed by the sealing spring (3). When the diver exhales, exhalation air flows from the inner mask
through the exhalation channel (7) and the exhalation valve (8), and lifts the sealing disc (10). Then the
exhalation air flows out into the surrounding water through the gaps in the cover (9). The overpressure
valve mechanism functions as a safety valve for the first-stage regulator by automatically opening the
sealing cone if the secondary pressure increases to between 14 and 20 bar (203-290 psi). For example, this
can happen when the regulator is leaking. When this happens, the overpressure valve spring (12) can no
longer withstand the pressure against the central section of the balance diaphragm (13). The back-pressure
piston is then pressed inwards so that the valve mechanism is lifted and pulls the sealing cone off the valve
seating. Air then flows out until the pressure drops to approximately 10 bar (145 psi). The breathing valve
has a check valve in the inhalation channel (not shown in the figure) that prevents water penetration, thereby
minimizing the risk of freezing.
Regulations specify that breathing valves and face masks must regularly be cleaned and disinfected. In
addition, breathing valves and face masks used by several persons must be cleaned and disinfected after
each use. Interspiro recommends personal breathing valves and face masks as the most hygienic solution.
18
3.8Divator BCW Vest
(Buoyancy Compensating Wing)
Bungee cord to the
Octopus hose
Inflation hose with
venting valve
Quick release of
weights
Weight pocket
Tool pocket
FRONT
Vent valve
Anchor point for
crotch strap
Quick release fastener
BACK
Interspiro Divator BCW is a buoyancy compensator that combines high quality, durable design, weight
integration and buoyancy. It is placed on the back of the diver.
Divator BCW's modular design enables switching between dry-suit and wet-suit diving. It is made of heavily
reinforced 1050 denier ballistic nylon. Divator BCW has been adapted for a number of different options and
accessories such as separate emergency filling cylinder, breathing bags, pockets and adapted equipment
attachments.
Divator BCW is available in four sizes: Small, Medium, Large and Extra Large.
Additional information is available in the Divator BCW User Manual.
19
3.9Divator Harness
The Divator harness is used instead of the Divator BCW when diving with the front-mounted buoyancy
vest or with a dry-suit and there is no need for extra buoyancy, e.g. when underwater work is being carried
out in an upright body position with connection to surface air. There are several different versions of the
Divator harness.
Harness buckles
with locking device
Waist buckle
20
3.10Divator DP1 Supply Hose System
• Additional information about the Divator DP1 Supply Hose System is available in the Divator DP1 Supply
Hose System User Manual.
21
4Preparations before use
CAUTION! It is of great importance that the measures stipulated in Section “12.3 Control and inspection”
have been carried out before the equipment is prepared for use.
4.1Anti-freezing caps
The diver must carry out a visual inspection of the anti-freezing unit before beginning a dive.
The inspection should ensure that anti-freezing cover is mounted in the correct position, that screws are
tightened and that the anti-freezing caps are correctly mounted and not kinked.
Examples of incorrectly mounted anti-freezing units and a correctly mounted one are shown below.
Kinked anti-freezing cap
- Not acceptable for diving!
Incorrectly mounted anti-freezing cap.
The white base is visible.
- Not acceptable for diving!
Incorrectly mounted anti-freezing cover.
There is a gap between the regulator block and the cover.
- Not acceptable for diving!
Correctly mounted anti-freezing unit
with unkinked anti-freezing caps.
22
WARNING! The anti-freezing cap should only be disassembled if there is reason to suspect that the functionality or mounting of the anti-freezing unit is incorrect. If this is the case, see Section 12.3.5.
It is also very important to make sure that the anti-freezing unit is not exposed to water or dirt during
disassembly and assembly. Always repeat the visual inspection described in Section 4.1 before diving.
4.2Mounting an MKIII regulator unit and cylinder
pack
• Mount the components in the following manner:
1. Place the cylinder pack on a flat surface with the
cylinder valve facing you. Unscrew the safety
plug from the threaded inflow. Make sure that
the O-ring is not still in the opening.
2. Unscrew the yellow protective sleeve from the
regulator unit's high pressure coupling. Check
the O-ring. Connect the regulator unit between
the cylinders and the carrying handle so that the
anti-freezing cover is facing the cylinders.
3. Screw the knob coupling carefully into the cylinder valve and only tighten by hand. Arrange the
hoses as illustrated in the figure below.
23
4.3 Securing the BCW or harness
1. Align the quick coupling's rail with holes on the
BCW or harness with the quick coupling pins on
the cylinder pack.
2. Attach the BCW or harness in the cylinder pack
by moving the rail with holes into place against
the quick coupling's pins until it locks. Check that
the quick coupling has locked by pulling on the
BCW or harness.
4.4 Securing the BCW hose
1. Place the BCW inflator hose between the rear of
the BCW unit and the cylinder pack. Allow the
BCW inflator hose to pass through on the inside
of the BCW's inflator connection.
2. Thread the BCW inflator hose through the eye
of the Velcro strip.
3. Connect the BCW inflator hose to the BCW connection.
24
4.5Securing the breathing hose in the BCW
1.Place the breathing hose between the rear of
the BCW unit and the cylinder pack.
2. Move the hose up over the right shoulder strap
on the BCW and attach the Velcro strip over the
breathing hose
3. Attach the Velcro holders on the breathing hose
around the right shoulder strap as illustrated in
the figure. If necessary, adjust the length of the
breathing hose to a suitable position.
25
4.6Securing the octopus breathing valve in the
hose
1. Carry out a visual inspection of the octopus to ensure it is not damaged.
Tighten the locking nut and locking ring on the octopus breathing valve as described in Section 4.7
“Connecting the full-face mask”.
2. Connect the octopus breathing valve to the breathing hose if this has not already been done.
Properly hand tighten the octopus breathing hose nut as described in Section 4.7 “Connecting the fullface mask”.
3. Fold and attach the octopus hose in the bungee
cord. Place the hose between the BCW
breathing bag and the right side of the BCW
harness.
Adjust the length of the octopus hose so
that it runs parallel to itself and along the
pressure gauge hose up to the pressure gauge,
and ensure that it can be easily detached if
necessary.
4. Connect the octopus breathing valve to the
yellow clamp. Check that the octopus valve's
locking lever is in locked (closed) position
against the valve housing.
The octopus breathing valve should now be easy
to pull out for use as an emergency air unit.
5. Attach the pressure gauge on the vest using
the included rubber line with hook so that the
pressure gauge and octopus valve are kept
upright.
26
4.7 Connecting the full-face mask
1. Carry out a visual inspection of all plastic, rubber and metal parts and ensure that there is no damage.
Make sure that the rubber components do not exhibit signs of wear or cracking.
2. Ensure that the check valves in the inner mask
are even and secured.
3. Make sure that the pressure equalization cushion
is correctly placed and adjusted.
4. Check that the connection on the breathing valve is free from dirt and that the O-ring is in place in the
breathing valve.
5. Connect the breathing valve to the mask by
pressing it into the coupling device and turn
counterclockwise so that it fastens in the bayonet
joint.
6. If communication equipment is used, it should be connected at this point.
27
7. Mount the fixing cover to secure the position of
the breathing valve and tighten the screws by
hand. Do not overly tighten the screws as this may
pull out the thread insert thereby damaging the
mask.
Make sure that the O-ring is in place and undamaged.
8. Check that the locknut on the breathing valve is
properly tightened.
9. Check that the locking ring on the breathing valve
is properly tightened.
10.Connect the full-face mask with the mounted
breathing valve to the breathing hose. Securely
hand-tighten the breathing hose nut. Close the
safety pressure knob if that type of full-face mask
is used.
28
4.8 Cylinder weight
1. Check that the weight screws are tightened.
2. If the underlying weights are exchanged for another
weight combination, an 8 mm Allen key should be used.
CAUTION! If any of the underlying brass weights are removed in order to reduce the total weight, each of
these must be switched out with plastic replacement weights in order to retain weight strength and performance.
29
5Preparations before diving
5.1Leakage and function test
5.1.1Leakage and function test for MKIII Regulator
Quick check of reserve valve
1. C
lose the reserve valve handle (position C) by pressing it in as far as possible.
2. Open the cylinder valve.
Check that the pressure is > 270 bar (3916 psi).
3. Close the cylinder valve.
Wait one minute.
Pressure drop < 10 bar/minute (145 psi/min) = OK
4. Open the cylinder valve.
5. Vent the octopus breathing valve by pressing the air discharge button.
Airflow? Yes = OK
6. Vent the primary breathing valve by pressing the air discharge button.
Airflow? No = OK
7. Reset the lever on the primary breathing valve if an overpressure version is being used.
8. Pull out the reserve valve handle as far as possible.
Is the reserve valve handle in middle position (D)? Yes = OK
9. Close the cylinder valve.
10.Release the pressure from the primary breathing valve by breathing slowly until the reserve position
is triggered (the respiratory resistance increases until the air supply stops completely). Check that the
air supply stops at an acceptable level above zero bar (or psi). (That is, the pressure gauge's red area.)
Yes = OK
11.Pull out the reserve valve handle.
Does the needle of the pressure gauge drop to approximately 0 bar (0 psi)? Yes = OK
12.Reset the lever on the primary breathing valve if an overpressure version is being used.
13. Open the cylinder valve before diving.
30
5.1.2Leakage and function test for BCW.
1. Inspect the BCW vest so that it does not show any signs of material deterioration or wear.
2. If the primary breathing valve with safety pressure is used, it is important to ensure that the breathing
valve knob is in the closed position. If the primary breathing valve without safety pressure is used, this
step can be skipped.
2. Carefully open the cylinder valve completely if this has not yet been done. Close the valve a quarter of
a turn!
3. Fill the vest's breathing bag with air until the overpressure valve opens.
4. Wait one minute and check that the breathing bag remains inflated and that no leaks can be observed.
CAUTION! If leakage is heard or observed, the BCW must be taken out of operation and repaired by an Interspiro-certified service technician.
5. Close the cylinder valve if the Divator diving apparatus is not to be used right away.
Additional information is available in the Divator BCW User Manual.
5.2Putting on the apparatus
5.2.1BCW
1. Pull out the shoulder straps and waist buckles and don the apparatus with the cylinder valve facing
downwards.
2. Adjust the shoulder straps by grasping the free ends and pulling them until the apparatus fits well and
comfortably.
3. Tighten the belly-band and fasten it. Secure the waist buckle and pull the loose ends to tighten and
secure.
4. Check that the reserve valve handle is accessible and not blocked by other equipment.
5. If a dry-suit is being used, the suit hose should be connected to the dry-suit's inflow valve.
5.2.2
Harness
1. Pull out each waist buckle to the end of each waist strap. Open both side buckles and pull out the shoulder
straps. Don the apparatus with the breathing valve facing downwards.
2. Adjust the shoulder straps by pulling the waist straps until the apparatus fits well and comfortably. Close
the harness's side buckles.
3. Secure the waist buckle and pull the loose ends to tighten and secure.
4. Check that the reserve valve handle is accessible to both hands and not blocked by other equipment.
5. If a dry-suit is being used, the suit hose should be connected to the dry-suit's inflow valve.
31
5.3Putting on the full-face mask
1. Pressurize the Divator diving apparatus according to the description in Section 5.1 “Leakage and function test”. If the Divator fresh air hatch is used, it should be opened.
2. Pull out the rubber straps on the rubber-band device as far as possible by grasping the metal buckles and
pulling them out.
3. Adjust the pressure equalization cushion (there
are several positions) so that it is easy to reduce
the pressure in your ears and breathe through
your nose unimpeded. Check that the pressure
equalization cushion is correctly secured.
4. Don the Divator full-face mask by grasping the
two lower rubber straps of the head harness and
pulling it over your head.
5. Properly press your chin down into the mask's
chin support. Press the mask tightly against your
face to form a seal.
WARNING! Make sure that the inner mask is correctly
positioned. If this is not done correctly, high levels
of CO2 may build up, which will increase breathing
frequency, give rise to panic and may even result in
a fatal accident.
Pull down the rear part of the strap device as far
as possible and check that no rubber straps have
become twisted.
6. Adequately tighten the rubber straps by pulling
them straight back, not outwards. Begin with the
two lower straps, then the two upper side straps
and finally the top strap at the forehead. Make
adjustments where necessary.
WARNING!Some neoprene hoods become compressed as the diving depth increases. When these hoods are used,
you must continue to adjust the rubber straps during the dive. The neoprene hood should also have a smooth
edge to provide an adequate seal against the full-face mask. If this is not done correctly, high levels of CO2may
build up, which will increase breathing frequency, give rise to panic and may even result in a fatal accident.
32
Comment: Only tighten the top strap at the forehead to prevent if from being loose. If the top strap and the
upper rubber straps are excessively tightened, the mask will press tightly against the diver's chin resulting
in chin fatigue with accompanying headache and/or jaw pain.
7. Read the pressure gauge. Breathe in deeply to automatically activate the safety pressure (if this is used),
or alternatively press lightly on the vent button. Stop breathing and listen for signs of leakage.
Comment: If there is leakage when a dry-suit is used, you must check that the dry-suit's face seal has an
appropriately smooth surface design to fit against and provide a good seal with a full-face mask.
8. Check the overpressure function (if this is used)
by holding your breath and placing two fingers
between the edge of the seal and your face; you
should hear a strong airflow sound.
9. Check that you can equalize pressure (ease the pressure
in your ears) by pressing the breathing valve upwards
so that the pressure equalization cushion reaches your
nose.
33
10.Check the pressure gauge to ensure that the pressure is sufficient for diving.
5.4 Checking reserve valve handle position
5.4.1Diving with Divator diving apparatus.
Check that the reserve valve handle is in the diving position (D), or move the handle to the D position when
the Divator diving apparatus is pressurized.
5.4.2Diving with a supply hose system
Check that the reserve valve handle is in the closed position (C), or move the handle to the S position when
the Divator diving apparatus is pressurized.
Additional information is available in the Divator DP1 Supply Hose System User Manual.
34
5.5Attaching weights
When the Divator diving apparatus is ready for use, the
diver's assistant mounts the weight on the weight bracket
for the Divator Lite cylinder pack, and secures it with the
spring pin with the open end facing downwards.
Comment: When the spring pin has been inserted to secure the weight, it must be turned a quarter turn around
its own axis in order for it to lock. The twisted thread on
the securing spring pin should point upwards to facilitate
easy access for the assistant after diving.
The Divator diving apparatus is now ready for use.
35
6Diving
6.1 Checks during an ongoing dive
• Read the pressure gauge regularly.
• Make sure that other equipment does not block usage or access to necessary controls and components.
• Check for leaks.
Important: The dive must be terminated when the diver activates the reserve valve. The dive should be
planned with the aim of not using reserve air.
6.2Diving in cold water
Diving in cold water is full of risk and requires special planning and special preparations.
Below is information about the effects cold water can have on the components in the Divator system.
6.2.1
The regulator unit
Internal freezing
First-stage regulators reduce cylinder pressure to approximately 8 bar (116 psi). The air expands with an
accompanying pressure drop and a significant drop in temperature. If the air is humid, ice crystals can form
thereby risking blockage to the air supply. “Internal freezing” of this kind can also cause a total stoppage
of air. Therefore, always use dry and clean air. Information about quality requirements for the air can be
found in Chapter 8 “Filling”.
Internal freeing can result if the water and/or temperature is low and the regulator's anti-freezing unit is
damaged, when this occurs in combination with the cooling brought about by the pressure drop in the
regulator. If this happens, water will force its way into the regulator and solid ice will form in the spring
housing, resulting in the regulator's mechanism getting stuck in open position. Secondary pressure will rise
to above normal level and open the breathing valve's safety valve. The excess air will then flow through
the face mask (the mouthpiece) and out into the surrounding water. To prevent this, the anti-freezing unit
should be checked before diving.
External freezing
Under extreme conditions, i.e. diving in ice-cold water, it can be difficult, or in the worst case impossible
to operate the reserve valve handle due to ice formation on the outside of the reserve valve handle. If this
occurs, the octopus breathing valve can be used as an emergency air system.
External freezing as described above is very unusual and only occurs in very cold water.
36
6.2.2Breathing valve
All breathing valves from Interspiro provide air during inhalation. When the diver inhales, air flows from
the breathing hose through the breathing valve into the diver's lungs. Expansion of the supplied air causes
the air at the valve inflow to be cooled to approximately -10°C (14°F) at a water temperature of 0°C (32°F).
Any moisture in the inflow section of the breathing valve can then be transformed to ice and thereby increase
friction between the valve mechanism's moving parts to such a degree that the return spring does not close
the valve when inhalation is concluded. If this happens, the breathing valve will flow freely. To minimize the
risk of this occurring, the breathing valve is equipped with a check valve in the inflow section of the breathing valve. Moisture can force its way into the breathing valve's inflow section for the following reasons:
a) The breathing valve is cleaned in water and not allowed to dry properly.
b) The breathing valve's check valve is leaking. Information about the leakage test can be found in Chapter
12 “Maintenance”.
c) The breathing valve is initially submerged in water and then exposed to air with a temperature under
zero degrees prior to diving. To prevent this, the breathing valve should not be submerged in water before
use. If the breathing valve has already been submerged in water, it should be adequately vented.
6.2.3Full-face mask
The Divator Full-Face Mask protects the diver's face from being exposed to ice-cold water. The Divator FullFace Mask separates inhalation air from exhalation air. This means that moisture in the diver's exhalation
air cannot reach the inhalation valve's inflow section through the mask's air channels or through the valve
mechanism. This significantly reduces the risk of freezing.
6.2.4Octopus
Octopus has separate channels for inhalation and exhalation. The breathing valve's inhalation opening is
protected against water by a check valve that minimizes the risk of the valve freezing.
37
6.2.5
Routines during repeated dives in ice-cold water and/or at low air temperature
1. Prepare the next diving occasion by shaking out the water from the full-face mask and the breathing valves.
Disassemble the equipment's components as quickly as possible to prevent them from freezing solid to
each other.
2. Press the full-face mask against your face at the same time as you depress the breathing valve's vent
button for a few seconds. This removes any water that has fastened in the mask's air channels and in the
breathing valve.
3. Press the octopus breathing valve's vent button. This will remove any trapped water from the breathing
valve.
4. Shake the lower section of the cylinder with its branch pipe and regulators in order to remove any trapped
water. This will counteract the risk of freezing.
5. Place the full-face mask on a dry surface with the visor turned upwards to prevent water and snow from
finding its way into the mask.
6. If possible, the Divator diving apparatus should be stored in a warm and dry area between diving occasions.
7. If ice has formed on the equipment or if its components have frozen to each other, e.g. if the Divator
cylinder weights cannot be detached from the cylinder pack, the regulator unit cannot be detached from
the cylinder valve or the reserve valve handle has frozen solid - then the ice can be thawed and removed
with hot water.
8. In the event of repeated dives, we recommend that a used breathing valve be replaced with a dry one.
38
7 after diving
7.1Removing Divator
1. The assistant should loosen the spring pin and remove the weight, preferably while the diver is still in
the water.
2. Loosen the full-face mask's rubber-band device. If the primary breathing valve with safety pressure is
used, the safety pressure is closed by pressing the breathing valve knob in towards the valve housing.
Remove the full-face mask.
3. Release the dry-suit's quick coupling.
4. Open the waist buckle and belly-belt if the BCW is used.
5. Loosen the left shoulder buckle or loosen the shoulder strap. If a harness is used, loosen the left side
buckle and shoulder strap.
6. Remove the diving apparatus and swing it to the right.
7.2Disassembly
The diving apparatus should be cleaned in accordance with the description in Section 12.1 “Cleaning”,
before the following steps are carried out:
1. Close the cylinder valve by pressing in and turning the cylinder valve knob clockwise until it reaches
its stop position.
2. Vent the system by pressing in the breathing valve's vent button at the same time as the reserve valve
handle is moved to the R position (Reserve).
Comment: Venting can take up to 30 seconds. The first-stage regulator's O-ring can be damaged if it is
removed when the system is still pressurized.
3. If the Divator diving apparatus is used with the Divator DP1 Supply Hose System, there is information
about loosening and venting the system in the User Manual for Divator DP1 Supply Hose System.
4. Disconnect the breathing hose from the right shoulder strap on the Divator BCW. Disconnect the pressure
gauge.
5 Detach the octopus breathing valve from the yellow clamp and pull the octopus hose from the spring
line.
39
6. Detach the BCW hose and remove the Divator BCW or harness from the cylinder pack by pressing in
the locking mechanism on the upper part of the Divator BCW or harness.
Maintain pressure and pull the carrying handle to loosen the quick coupling.
7. Remove the regulator from the cylinder pack.
8. When the regulator unit is not connected, the cylinder valve must be provided with a safety plug that is
tightened by hand. The regulator connection nipple must be protected with the yellow protective cap.
9. If the equipment is defective or damaged, it must be repaired or returned to a maintenance shop approved
by Interspiro. Parts that the user can repair personally are described in the repairs section in this user
manual.
10.Moist equipment should be properly dried if it is meant to be stored in a bag or sack for a period longer
than a few days.
11.Fill the air cylinders in accordance with the description in Chapter 8 “Filling”.
40
8Filling
8.1Filling Interspiro fully composite cylinders
The following measures must be performed when filling Divator Lite cylinders with an initial pressure
less than 30 bar (435 psi).
• The filling rate must be limited to no more than 30 bar (435 psi) a minute. Using an Interspiro Filling Adapter is recommended.
• The cylinder pack must always be filled in an upright position with the valves pointing upwards.
• When filling cylinders or cylinder packs having an initial pressure exceeding 30 bar (435 psi), a
normal filling rate can be used.
• As a minimum, the air with which the cylinders are filled should comply with the requirements in
European standard EN 12021 or the purity Standard for US FED SPEC BB-A-1034 Grade A.
8.2Filling adapter
The filling adapter (item no. 99369-01) connects the cylinder valve to the filling hose.
The adapter is designed for filling Divator Lite cylinder packs 323.4 and 326.7.
The adapter has a built-in nozzle that limits the filling rate to approximately 30 bar (435 psi) a
minute.
41
Using the filling adapter
1. Detach the pressure regulator or the plug from
the cylinder valve and connect the filling adapter
to the cylinder valve. Tighten the knob on the
adapter by hand to prevent leakage.
2. Connect the filling hose to the filling adapter and
tighten the coupling by hand to prevent leakage.
3. Open the cylinder valve and fill the cylinder
pack.
42
9 Check list
9.1Before diving
• Clean the cylinder valve.
See 4.1
• Check the anti-freezing unit.
See 4.1
• Install the regulator.
See 4.2
• Mount the BCW or harness.
See 4.3 - 4.5
• Mount full-face mask and octopus.
See 4.6 - 4.7
• Check the full-face mask, check valves and pressure equalizer.
See 4.7
• Check cylinder pressure.
See 5.1
• Perform a leakage test, including BCW.
See 5.1
9.2During diving
• Check the pressure gauge regularly.
9.3After diving
• Rinse and clean the equipment.
• Close the cylinder valve.
• Disassemble, dry and store the equipment.
43
10Measures in the event of an emergency
The following measures constitute examples of how the equipment can be handled in the event of an emergency situation. Organizations that carry out diving training with Interspiro equipment are responsible for
developing adequate routines and measures for emergency situation training with Interspiro equipment.
10.1Draining water from full-face mask during an
ongoing dive
If water finds its way into the full-face mask during diving and fills it completely or partially, it is most
conveniently drained by pressing the vent button on the breathing valve.
If the mask falls off during the dive, the first step is to find it again. If the breathing valve with safety pressure is used, the safety pressure knob should be pressed in to its closed position to prevent free airflow and
loss of respiratory air from the cylinders. Pull out the rubber straps on the strap device and don the mask.
Hold the mask against your face with your left hand.
With your face in an upright (vertical) position, press
the vent button until the mask is sufficiently drained of
water so that you can breathe again.
After a few breaths, repeat the draining procedure if
necessary. There will always be some water left in the
mask after this procedure.
Alternatively, if you have just taken a deep breath, you
can hold the mask against your face and then breathe
out to drain the mask of water.
When you have made sure that the mask is drained of
water, tighten the strap device using the lower positioned
straps first. Consider terminating the dive.
10.2Octopus measures
Divator Octopus is designed for use in emergency and rescue situations in order to provide divers who have
lost air supply with respiratory air.
Divator Octopus is released by pulling it out of the clamp.
The hose to Divator Octopus can be detached and pulled out to a length of 1.7 meters (5.6 feet). This allows
the afflicted person to swim freely behind or at the side of the diver.
In any event, the dive must be cancelled.
44
10.3Free flow in the full-face mask's breathing
valve
In the event of free airflow in the full-face mask, the following measures are recommended:
1. Continue breathing.
2. Terminate the dive and start your ascent to the surface.
3. If there is a pressure drop, see Section 10.5 “Pressure drop”.
In any event, the dive must be cancelled.
10.4Free flow in octopus breathing valve
In the event of free airflow in the octopus breathing valve, the following measures are recommended:
1. Continue breathing. If the octopus valve is not used, close the safety pressure knob; if this does not help,
try limiting the outflow of air by closing the mouthpiece hole with your thumb.
2. Terminate the dive and start your ascent to the surface.
3. If there is a pressure drop, see Section 10.5 “Pressure drop”.
In any event, the dive must be cancelled.
10.5Pressure drop
In the event of a pressure drop, the following measures are recommended:
1. Check the pressure gauge.
2. Activate the handle of the reserve valve or the bailout valve.
3. Check that the cylinder valve is fully open.
4. Terminate the dive and start your ascent to the surface.
5. If the pressure drop persists, use your diving buddy's octopus, if available.
6. If the diving buddy does not have an octopus, use your own octopus instead.
In any event, the dive must be cancelled.
45
10.6Draining of breathing valve with mouthpiece
1. Grasp the breathing valve and put it in your mouth.
2a.Drain the breathing valve by exhaling and turning your head at the same time so that the exhalation
segment of the breathing valve is at the lowest position.
2b.Drain the breathing valve by pressing the vent button and turning your head at the same time so that the
exhalation segment of the breathing valve is at the lowest position.
46
11Service and testing schedule
Service and testing shall be performed according to Service and testing schedule 30500.
Visit www.interspiro.com for latest revision.
47
12Maintenance
12.1Cleaning
12.1.1After each dive
1. If the equipment is very dirty or in need of disinfection, see Section 12.2 “Monthly cleaning”.
2. Pressurize the Divator diving apparatus by opening the cylinder valve.
4. Rinse the face mask and the breathing valve carefully in clean water. Remove water and dirt by pressing
the vent button and blowing air through the valve. Repeat the measure a couple of times until the valve
is completely clean.
5. Rinse all other parts of the Divator diving apparatus including the BCW or harness with clean water.
Allow the Divator BCW to be partly inflated when it dries.
6. Close the cylinder valve. Vent the regulator by pressing in the breathing valve's vent button at the same
time as the reserve valve handle is moved to the R position.Remove the regulator from the cylinder pack.
Allow all regulator components to dry.
7. Blow out moisture from the cylinder valve by opening it and letting air flow out for 1 to 2 seconds.
WARNING! The sound from blow cleaning and pressure impacts can cause hearing impairment. Always use
ear protectors when filling or emptying cylinder packs.
8. Close the cylinder valve and screw in the sealing plug by hand.
9. Remove the cylinder cover and allow the cylinder pack to dry.
10.Fill the cylinder pack. Inform the air filling site if the cylinder pack has been subjected to exceptional
stress or if the pressure in the cylinder falls below 30 bar (435 psi).
Comment: The cylinder pack should not be completely emptied. There must always be a residual pressure
of at least 10 bar (145 psi) in the air cylinder to prevent moisture from finding its way through the valve.
48
12.2Monthly cleaning
1. Assemble the air cylinder pack, regulator and full-face mask/breathing valve.
2. Open the cylinder pack and check the pressure on the pressure gauge before cleaning begins. To prevent
water from entering the regulator and to detect leakage, there should always be pressure in the cylinder
pack. Replace the cylinder pack if the pressure gauge indicates less than 270 bar (3915 psi).
3. If the full-face mask is used, the fixing lock should be removed by loosening the screws. Hold the lower
part of the full-face mask (where the valve is located) with the visor facing upwards. Turn the breathing
valve clockwise to loosen the breathing valve bayonet coupling.
4. Fill a container with clean water (preferably lukewarm and no hotter than 40°C (100°F)). Use a liquid,
colorless, non-perfumed soap solution.
5. Wash the face mask and the breathing valve carefully; use a brush if necessary. Remove water and dirt
by pressing the vent button and blowing air through the valve. Repeat until the valve is clean and dry.
6. Remove the cylinder cover and place the cylinder pack and regulator in the cleaning container. Clean
these parts; use a brush where necessary. Remember that the system must still be pressurized. If there
are leaks, it should be possible to localize these by observing air bubbles. Outflowing air will also
prevent water from entering.
Comment: Air bubbles can also come from cavities in the equipment. In order to determine whether or not
a leak is involved, the apparatus should be held underwater at different angles. Try to drain all air pockets
by hand.
7. Remove all parts from the container. Clean the BCW and harness in the container. Use a brush where
necessary.
8. Fill the container with new clean water and rinse the soapy solution off all parts. Begin with the full-face
mask/breathing valve, continue with the cylinder pack/regulator and finally the BCW or harness.
WARNING! If water accidentally enters and is subsequently not removed from the inhalation side while
cleaning the full-face mask and breathing valve, there is a risk of the valve freezing, which may result
in a continuous airflow (valve with free airflow). There is a risk of freezing because expanding air can
reduce the temperature to below 0°C (32°F) on the valve's inhalation side when the equipment is used at
low temperatures.
9. Vent the system by pressing in the breathing valve's vent button at the same time that the reserve valve
handle is pulled out to the R position.
Comment: Venting can take up to 30 seconds. The first-stage regulator's O-ring can be damaged if it is
removed when the system is still pressurized.
10.Blow out moisture from the cylinder valve by opening it and letting air flow out for 1 to 2 seconds.
Comment: The sound from blow cleaning and pressure impacts can cause hearing impairment. Always use
ear protectors when filling or emptying cylinder packs.
49
11.Close the cylinder and screw in the sealing plug by hand. The sealing plug should only be tightened by
hand on a cylinder pack that is to be filled.
12.Allow the cylinder packs to dry.
13.Shake off the water from the other parts and allow them to air dry. Dry thoroughly.
14.Fit the breathing valve into the full-face mask. Turn the breathing valve counterclockwise to attach the
breathing valve bayonet coupling. Attach the fixing cover.
15.Remove the cylinder pack for filling. Inform the air filling site if the cylinder pack has been subjected
to exceptional stress or if the pressure in the cylinder falls below 30 bar (435 psi). On a filled cylinder
pack, the sealing plug should be tightened with an open-ended wrench (23 mm).
Comment: The cylinder pack should not be completely emptied. There must always be a residual pressure
of at least 10 bar (145 psi) in the air cylinder to prevent moisture from finding its way through the valve.
Check the check valve's tightness.
The tightness of the check valve must be checked during the monthly cleaning routine.
1. Connect the breathing valve to the intermediate pressure hose on the regulator.
2. Remove the breathing valve from the full-face mask, alternatively, remove the mouthpiece from the
octopus breathing valve (see “Replace mouthpiece” in Section 12.4.4 “Breathing valve”).
3. Open the cylinder valve.
4. Fill the space at the check valve disc with water.
5. Ensure that water is not leaking into the breathing valve. The water level over the check valve must not
decrease. If there is a leak, the check valve must be cleaned or replaced.
6. Blow the valve dry using the vent button. Check that the check valve disc is even after dry-blowing.
7. Close the cylinder valve and insert the breathing valve in the full-face mask or replace the mouthpiece.
Disinfecting the full-face mask/breathing valve
The full-face mask/breathing valve must be disinfected during the monthly cleaning procedure or when
the need arises.
Interspiro recommends that full-face masks and breathing valves used by several persons be cleaned and
disinfected after each use.
50
Disassembly
1. Clean the full-face mask/breathing valve according to the instructions for monthly cleaning.
2. Remove the breathing valve if the full-face mask is
used. If a mouthpiece is used, remove the mouthpiece
section.
3. Remove the exhalation unit from the breathing
valve. Hold the exhalation unit and the valve
housing and loosen the locking ring.
51
4. When the exhalation unit has been removed,
press the threads to remove the diaphragm unit
from the exhalation unit. Place your hand over the
diaphragm unit to prevent it from getting lost.
5. Clean the spring, cover, diaphragm unit and
mouthpiece in water. Carefully pull the diaphragm unit so that the diaphragm is stretched
and the dirt on the surface can be removed. Make
sure that the diaphragm unit and the loose parts
are not damaged.
6. There is a white plastic sealing disc on the diaphragm
unit. The sealing disc must be removed and cleaned.
Clean the inner parts of the diaphragm unit. Clean
the inside of the diaphragm unit's black sealing flange
that is in contact with the sealing disc. Make sure that
the diaphragm does not have any holes or damage
from wear. If the diaphragm needs to be replaced,
this must be done by a certified service technician.
7. After washing and rinsing, the parts are disinfected by submerging them in a solution consisting of 0.1 %
chlorhexidine and the rest water for one hour.
8. Clean the parts carefully in clean water and allow them to air dry.
52
Assembly
1. Replace the sealing disc in the diaphragm unit and
then place the sealing disc with spring in the cover
and press the diaphragm unit together. Check that
the spring fits into the recess for the sealing disc.
2. Set the inhalation unit in the breathing valve and
screw the valve housing together with the locking
ring.
Comment: Only the locking ring should be turned. Otherwise there is a risk that the O-ring will be moved
causing a leak.
3. If the full-face mask is used, check that the O-ring in the bayonet coupling is not damaged and that it is
placed in the O-ring groove. Information about replacing the O-ring can be found under “Replacing an
O-ring (only full-face mask) in Section 12.4.4
”Breathing valve”.
4. If a full-face mask is used, connect the breathing
valve in the bayonet coupling by turning the breathing valve counterclockwise. Mount the fixing cover
on the full-face mask and tighten the two screws.
53
If the mouthpiece is used, make sure that there is no
O-ring in the O-ring groove; mount the mouthpiece in
the breathing valve and check that the rubber flange on
the inside of the mouthpiece runs in the O-ring groove.
Fix the mouthpiece with the hose clamp.
12.3Periodic checking and inspection
The checks described in this section must be regularly carried out between dives (after one diving occasion
and before the next one).
12.3.1
Check the reserve valve handle
1. Install the Divator diving apparatus in accordance with the mounting instructions.
Pressurize the unit.
2. Check the following:
–The handle functions unimpaired and remains in position (C, D or R).
(The air pressure must be reduced to check position R.)
–There are no deposits in or around the reserve air handle.
–No parts show signs of wear or damage.
3. Perform a function test; see Section 5.1 “Leakage and function test”.
If the equipment is defective or damaged, it must be repaired by an Interspiro-approved service technician.
12.3.2Check the movement of the pressure gauge
indicator.
The first-stage regulator has a throttle opening in the high-pressure connection that limits airflow to the
pressure gauge hose and the pressure gauge. This limitation protects the user and equipment if the highpressure hose or pressure gauge malfunctions.
1. Install the diving apparatus in accordance with the mounting instructions.
2. Open the cylinder valve and study the pressure gauge result at the same time. Check that the movements
of the indicator are even and normal. If the indicator moves unevenly or not at all, the pressure gauge is
defective.
3. Close the cylinder valve, press the vent button on the breathing valve to vent the Divator diving apparatus
and move the reserve valve handle to position R.
If the equipment is defective or damaged, it must be repaired by an Interspiro-approved service technician.
54
12.3.3
Checking hoses
Check all hoses by bending and pulling them, and by making a note of any damage, cracks, discoloring
and changes in hardness.
If the equipment is defective or damaged, it must be repaired by a service technician approved by
Interspiro.
WARNING! A pressure drop caused by a rupture on a dry-suit hose is just as great as any caused by a rupture
in the breathing hose. For this reason, be careful when carrying out the inspection!
12.3.4
Checking O-rings
O-rings that have been exposed to sunlight, salt water, chemicals (including mild detergents) and ozone will
age and subsequently become defective.
1. Check all visible O-rings.
2. Cracked and damaged O-rings must be replaced.
3. All O-rings in this user manual should be lubricated with Interspiro's special lubricant 331 900 269.
The user may only personally replace the O-rings described in Section 12.4 “Repairs” in this user manual.
Other defective or damaged parts must be repaired by a service technician approved by Interspiro.
12.3.5
Checking the anti-freezing caps
A leaking anti-freezing cap increases the risk of freezing and causes the regulator to function less
effectively.
WARNING! Oxide layers and salt deposits in the regulator can stop the air supply. If the regulator has been
exposed to water inside the regulator housing for a long time, the regulator piston can jam or stick. If a fault
of this type is suspected, the regulator must be repaired a service technician approved by Interspiro.
It is important to make sure that the anti-freezing caps are internally free of water. If they contain water, the
unit must be inspected and, if necessary, serviced by a service technician approved by Interspiro.
Regular inspection should be carried out on a dry, clean apparatus in a dry, clean and, to the extent possible, cold-resistant environment. Inspection should always be carried out before the equipment is placed
in storage, but it can also be carried out during air filling, and at least once a week.
During regular inspection, the anti-freezing unit must be disassembled and the anti-freezing caps must be
checked for internal occurrence of water, dirt and damage; the O-rings must also be checked for dirt and
damage. Dirty parts must be cleaned and wet parts must be dried. All parts must be dry before they are
assembled again.
Always rinse with fresh water. The anti-freezing unit should not be disassembled when the apparatus is
used regularly and does not have time to dry.
55
1. Remove the anti-freezing cover. The antifreezing caps are mounted inside.
2. Make sure that the anti-freezing caps are
internally free of water.
3. If they contain water, the unit must be
inspected and, if necessary, serviced by a
service technician approved by Interspiro.
4. Check that the anti-freezing caps have not been damaged. If damage is detected or suspected, the
anti-freezing caps must be replaced. Make sure that the anti-freezing caps are not deformed when
installing them in the base.
5. Replace the anti-freezing caps in the anti-freezing cover.
6. Replace the anti-freezing cover in the regulator unit.
12.3.6
Controlling the visor
Inspect the visor of the full-face mask and look for cracks in the plastic. If there are cracks in the visor, it
must be replaced by a service technician approved by Interspiro.
12.3.7
Checking rubber and plastic parts
Inspect the rubber parts of the full-face mask by stretching and bending them.
Check the connection points around the buckles and metal bands. Check all plastic parts (sealing surfaces,
bayonet couplings, fixing cover and screws) If there are cracks or other damage, the part in question must
be replaced.
56
12.3.8
Controlling the angle of the cylinder valve
The cylinder valve must not be angled in relation to the intersection between the two halves of the handle.
If the angle of the cylinder valve is incorrect, the cylinder pack must be returned to a service technician
approved by Interspiro.
12.3.9
Checking the cylinder pack
If the cylinder pack is filled, it must be equipped with a safety plug that has been tightened with a wrench.
Only a full air cylinder pack may be equipped with a wrench-tightened safety plug. Check that the cylinder
pack does not have any mechanical damage or other defects. If the equipment is defective or damaged, it
must be repaired by a maintenance shop approved by Interspiro.
Additional information about checking air cylinders is available in the Divator Lite User Manual.
12.3.10
Checking cylinder weight
Oxidation changes the color of the weight's surface layer. The oxide forms a hard layer that protects the
underlying material. The only check that needs to be carried out on the weight is to make sure that the
handles, twisted thread and spring pin are not damaged or deformed.
57
12.4Repairs
12.4.1
General
This section describes the repairs that users may carry out personally. Repairs other than those described
here must be carried out by a service technician approved by Interspiro.
12.4.2Regulator
Replacing the O-ring for the high-pressure connection
This O-ring is placed in the connecting nipple on the regulator's high-pressure connection. Normally there
is no need to replace or repair the O-ring between annual inspections, but it can be moved or damaged if
the regulator is removed from the cylinder pack without prior venting of the Divator diving apparatus.
1. Unscrew the high-pressure connection's nipple using
a 5 mm hexagon wrench. The nipple also functions
as a seal and holder for the regulator filter. Thus,
the nipple must always point downwards during
the removal and assembly procedure. Otherwise
there is a risk of dirt from the filter ending up in
the regulator.
2. Unscrew the nipple a couple of turns using a 5 mm hexagon wrench to release the O-ring flange so that
a new O-ring can be placed there.
3. Where necessary, remove the old O-ring and replace with a new one. Do not use any tools when removing or installing the O-ring as these can damage the sealing surfaces.
4. Screw the nipple back in place with a 5 mm hexagon wrench.
Comment: Tighten the nipple a moderate amount. However, the nipple must be tightened sufficiently as it
may become too loose during use.
5. Check that the O-ring is correctly placed in the groove.
58
12.4.3Harness
Replacing a belt buckle
There are two belt buckles - one on the left and one on the right. When a hip belt is correctly positioned, the
free ends of the belt will be on the outside of the hip belt to facilitate easy tightening.
1. Make sure that the outward-bent parts of the buckles are facing away from the user (“the outside”). Pull
the hip belt from the inside through the slot nearest the buckle.
2. Thread the belt through the second slot from the outside of the buckle.
3. Make sure that the belt has not become kinked.
12.4.4Breathing valve
Replacing a protective ring
1. Lift the protective ring over the flanges one at a time until the ring comes away. Lift the protective ring
over a flange by pressing it together slightly and then carefully lift it over the flange.
2. Installing a new ring: The ribbed edge of the protective ring must be facing away from the diaphragm
bracket. Place the protective ring over the two or three wing flanges and press the ring down over the
remaining flanges.
Replace O-ring (only full-face mask)
The O-ring is located in the breathing valve's bayonet coupling.
WARNING!: This O-ring must not be installed in a breathing valve with a mouthpiece as it can subsequently
cause the mouthpiece to come loose.
1. Remove the breathing valve from the full-face mask.
2. Where necessary, remove the old O-ring. Press the old O-ring out using your thumb and index finger. Do
not use sharp objects as these can damage the O-ring groove.
3. Place a new O-ring in the groove.
Check that the O-ring is correctly positioned and has not become twisted.
Replacing a mouthpiece
1. Loosen the hose clamps, keeping the mouthpiece in place using a screwdriver. Loosen the hose clamp
until it is released from the wide groove in the mouthpiece.
2. Install a new mouthpiece and clamp it in the breathing valve. Place the clamping screw in the area between
the diaphragm bracket and the mouthpiece.
3. Tighten the clamping screw with sufficient force. Check that the hose clamp is correctly positioned by
holding the valve housing and pulling the mouthpiece.
4. Connect the breathing hose to the breathing valve and tighten the connecting nipple by hand.
59
WARNING! The full-face mask's O-ring must not be used when the breathing valve is used together with a
mouthpiece. Otherwise, there is a risk that the mouthpiece will come loose.
12.4.5Full-face mask
Replacing a strap device
Begin with the strap device's upper strap. Thread the strap through the buckle from the inside of the fullface mask. The IS logo in the middle of the strap device must be visible after installation. Thread the main
strap through the lower part of the buckle under the roller and then back over the roller and through the
upper part of the buckle. Repeat the procedure for the other straps.
Replacing a valve disc
The valve disc is located in the inner mask.
1. Grip the valve disc with your fingers and pull it upwards. Discard the old valve disc.
2. Insert a new valve disc by first threading the hole
of the valve disc over the short side of the valve
seat pin. Carefully stretch the valve disc so that
the hole can be threaded over the entire pin.
3. Check that the valve disc is positioned on the pin
in an unimpeded manner.
4. Check that the rubber in the inner mask is not
deformed and that it is tightly positioned around the valve seat.
Replacing a fixing lock
Check that the O-ring is in place (replace the O-ring if necessary) in the fixing cover and that the locks are
correctly positioned around the screws.
Attach the fixing cover. The round part must be facing the visor. Tighten the two screws.
Comment: Carefully tighten the screws by hand.
Replacing a pressure equalization cushion
The pressure equalizer is held in place by a wire holder.
1. Check that the wire holder is not deformed.
2. The pressure equalizer has three grooves for connecting the wire holder. When replacing the pressure
equalizer, the wire holder must be returned to the same groove. Check that the wire holder is in place in
the groove so that the pressure equalizer will not come loose or move.
60
13Transport and storage
13.1Storage
13.1.1Air cylinders
• Before long-term storage, the air cylinders must be filled and equipped with safety plugs. Make sure that
necessary warning notifications have been posted at the door of the storage area in accordance with all
current and applicable regulations.
13.1.2Harness or BCW
• When being stored, the harness or BCW should be cleaned and dried and subsequently stored in a dry
place.
13.1.3Regulator unit and full-face mask or
mouthpiece with breathing valve
• All parts made of rubber should be stored in sealed plastic bags in a dry place where they are protected
against direct sunlight and external temperatures.
During transport, the equipment must be stored so that it cannot be damaged and people cannot be injured.
Cylinder packs must be transported with tightened safety plugs and, if possible, in packing boxes.
The equipment must not be stored in places where temperatures may exceed 70º C. The equipment must be
completely dry before being placed in storage.
Before the cylinder packs are transported, applicable transport regulations must be complied with.
The air cylinders must be emptied for certain types of transport. Use Interspiro drainage plug 460 190 770,
which provide a residual pressure of approximately 2 bar (30 psi) in the cylinder. During long-term storage,
the storage area should be dark, dry and cold with minimum temperature variations. This is because the
equipment is sensitive to UV radiation and ozone.
Important: When air is released from a cylinder pack, a drainage plug must be used. Uncontrolled emptying
of air can give rise to moisture build-up in the cylinders.
61
AUSTRIA
INTERSPIRO GesmbH www.interspiro.de
Feldbacher Str. 3 A-8200 GLEISDORF AUSTRIA
TEL +43 (0)311 236 133 FAX +43 (0)311 236 133 22 E-MAIL [email protected]
GERMANY
INTERSPIRO GmbH www.interspiro.de
Postfach 1220 D-76691 FORST/BADEN GERMANY
TEL +49 (0)7251 8030 FAX +49 (0)7251 2298 E-MAIL [email protected]
SWITZERLAND
NORTH & SOUTH AMERICA
INTERSPIRO Inc. www.interspiro-us.com
10225 82nd Avenue PLEASANT PRAIRIE WI 53158-5801 USA
TEL +1 262 947 9901 FAX +1 262 947 9902 E-MAIL [email protected]
UNITED KINGDOM & IRELAND
INTERSPIRO Ltd. www.interspiro.com
7 Hawksworth Road Central Park TELFORD Shropshire TF2 9TU UNITED KINGDOM
TEL +44 (0)1952 200 190 FAX +44 (0)1952 299 805 E-MAIL [email protected]
SCANDINAVIA, ASIA/PACIFIC & MIDDLE EAST
SWEDEN
INTERSPIRO AG www.interspiro.de
Güterstraße 47 CH-4133 PRATTELN SWITZERLAND
TEL +41 61 827 99 77 FAX +41 61 827 99 70 E-MAIL [email protected]
NORDIC & EXPORT SALES DIVISION www.interspiro.com
Box 10060 S-181 10 LIDINGÖ SWEDEN
TEL +46 8 636 51 00 FAX +46 8 636 51 99 E-MAIL [email protected]
THE NETHERLANDS & BELGIUM
MALAYSIA
INTERSPIRO BV www.interspiro.nl
Operetteweg 35 NL-1323 VK ALMERE NETHERLANDS
TEL +31 (0)36 5363103 FAX +31 (0)36 5384809 E-MAIL [email protected]
NORDIC & EXPORT SALES DIVISION www.interspiro.com
305 & 305A Lorong Perak Taman Melawati 53100 KUALA LUMPUR MALAYSIA
TEL +60 3 4105 8122 FAX +60 3 4105 3122 E-MAIL [email protected]
PART NO. 99885C01
CENTRAL EUROPE