1
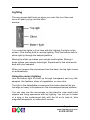
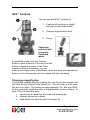
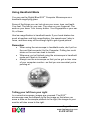
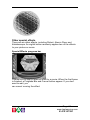
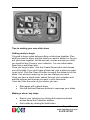
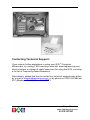
Digital Blue QX5 Computer Microscope Installation and Quick Start Guide www.taglearning.com 01474 357350 Digital Blue QX5 Computer Microscope Installation and Quick Start Guide ™ The QX5 mi cr oscopel et sy out odomanyt hi ngsy oucan’ tdowi t h an ordinary microscope: See tiny things on your computer. Take the microscope off its base stand for magnified viewing. Combine and create new things using computer tools. Build a collection of your discoveries and creations. Produce your own movies and slide shows. Contents Pg 2-3 Pg 4-8 Pg 9-10 Pg 11-12 Pg 13-14 Pg 15-17 Pg 18-22 Pg 23-24 Pg 25-26 Pg 27-32 Pg 33-35 Pg 36-40 Pg 41-42 Pg 42 Installation and minimum system Requirement Buttons lights and controls Collecting and viewing Magnifying Using handheld mode Making Movies Making time-lapse movies Main Screen Measuring tool 01474 357350 Paint tools Adding Special Effect Making a slide show Printing Contacting Technical Support Page 1 www.taglearning.com 01474 357350 Installation Minimum System requirements PC with USB port (most computers made after June 1998 have a USB port) Microsoft Windows 98SE 200MHz processor (Special effects enhanced for Intel® Pentium® 4 processor) 32MB RAM 150 MB free hard disk space 4x CD-ROM drive SVGA 800x600 resolution video support, 16-bit colour 16 – bit Windows –compatible sound device Video and sound compatible with DirectX8 (included at install) Installation NB: do not plug in the microscope until you have installed the software. Insert the Digital Blue QX5 Wait for auto play to start Click the install button TM TM Software CD-ROM If auto play does not start automatically, go to the desktop and double-click on My Computer. Double-click the icon for the CD-ROM/DVD drive that contains the CD. Open the set-up folder, double-click on set-up.exe and follow the on screen instructions. Restart the computer Plug in the microscope to the USB port Page 2 www.taglearning.com 01474 357350 Launch the Digital Blue QX5 Software from the Start menu If things go wrong: Unplug the microscope Restart the computer Repeat the setup procedure It is advisable to close all other running applications on the computer before using the microscope and its software. TM TM Page 3 www.taglearning.com 01474 357350 Basic Buttons Live View Button –Go to Live View from Main to view and add samples to your collection. Main Button –Go to main screen which allows you to edit and use your images taken with the microscope. OK Button - Continue with the action you have selected. This button usually appears with the cancel button. Cancel Button –Cancel the action you have selected. This usually appears when you enter special scenes such as the show-editing window or when quitting the software. ™ Quit Button –Quits the QX5 software from the Main window. Audio Help button –Pause over buttons to hear the name of the button and what it does. For additional text based help press F1. Page 4 www.taglearning.com 01474 357350 Lighting The microscope light turns on when you enter the Live View and turns off when you go into the Main window. You control the lights in Live View with the Lighting Controls on the screen. Click the top bulb to use top lighting. Click the bottom bulb to shine light up through the sample platform. Moving the slider up makes your sample look brighter. Moving it down makes your sample less bright. Experiment to find what works best with your samples. When you remove the microscope from the base, the top light comes on automatically. Using the correct lighting Use the bottom light to shine up through transparent and very thin samples, like feathers, slices of vegetables, or onion skin. The light in the detachable microscope illuminates objects that are too large or heavy to be placed on the microscopes sample platform. You can also use the microscope on the stand to view small solid objects and living specimens with top lighting. You can put a insect or a slug in the containment dish with the lid on to look at, take magnified snapshots, or make short movies. Page 5 www.taglearning.com 01474 357350 Adding light ™ One of the new features of the QX5 microscope are the much brighter LED lights, but if you do need to supplement this light source then you may want to place a high-intensity desk lamp near the microscope to add to top lighting, particularly when using medium or high magnification. Recording your time lapse Oncey ou’ v esety ourt i mel apse,y oucl i ckont heRecor dbut t ont o start it. This puts a Minimize button in the upper right corner of the screen. A display under the Record button shows the total time since you started the time lapse. The Settings control display now functions as a countdown timer to show you the length of time between snapshots. The display below the countdown tracks the total number of snapshots taken. See pages 18 and 19 for full details on how to use the Time Lapse feature. Page 6 www.taglearning.com 01474 357350 QX5™ Controls ™ You can use the QX5 controls to: 1. Capture still pictures or digital movies (in hand held mode) 2. Change magnification level 3. Focus Capturing pictures and movies in handheld mode. In handheld mode, click the Capture button to take a picture. Click and hold the button to capture a movie. If the Time Lapse controls are showing, you can make a time lapse video in handheld mode, but once you release the button on the microscope your time lapse will stop recording. Changing magnification Choose the magnification by rotating the ring on the microscope until the label for the desired level faces you. You will hear a click when the lens is in place. The levels are approximately 10x, 60x and 200X. In this quick start guide we refer to magnification as low, medium, or high. Think of sizes this way: Low shows an area like the head of a drawing pin. Medium shows a pin head. High shows an area the size of a pencil tip. Page 7 www.taglearning.com 01474 357350 These magnification levels are approximate and have been measured using a 15 in. (38 cm.) monitor. Actual magnification will vary according to size of your monitor. Focusing Adjust the control knob until the image is clear. Focusing may take a little practice. On some computers, there may be a delay between your moving the knob and the image changing on the screen. Try making small adjustments and wait for the screen to catch up. Hint Use low magnification and top lighting to look at t hi ngsy oucan’ tsee through, like coins, hair or paper. Medium or high magnification may make the image too big. Or you may need extra light. Page 8 www.taglearning.com 01474 357350 Collecting and viewing ™ Your QX5 Computer Microscope comes with accessories to get you started. 1 x Tweezers to handle items such as insects, muddyobj ect sorany t hi ngy ouwoul dn’ tnor mal l y want to handle. Sample specimen slide –see magnifying (next section) [Matt] –this slide shot isn’ tver ycl ear . 2 x Sample Jars 2 x Containment dishes [Matt] –t hi sshoti sn’ tver y clear either. 1 x Pipette Page 9 www.taglearning.com 01474 357350 1 x Slide clip –use the slide clip to make sure your specimen stays in place on the mircoscope stage. . Attach the slide clip to the microscope by placing the slide clip on top of the stage and snapping into place. Place your specimen slide on the stage and slide it underneath the clip arm to keep it still. Page 10 www.taglearning.com 01474 357350 Magnifying ™ The QX5 contains a sample slide to help you learn to use the controls on the Microscope. This slide contains four specimens; a plant louse, pheasant feather, a honeybee leg and a honeybee wing. Live View Buttons Snapshot button Click this button to capture a picture of your sample. Clicking the Capture button on the microscope in handheld mode has the same effect. Record button Click this button to record a movie of your sample. Holding the Capture button on the microscope in handheld mode has the same effect. Trash can button Click this button to remove the last capture, shown in the preview window, from your collection. Time lapse button Click this button to see the time lapse controls. Low magnification (10X) At low magnification, you can watch a insect in the containment dish and see how it eats and behaves. And when you have finished watching and recording the insect, release it back where it was found. Medium magnification (60X) Her e’ sacoi natmedi um magni f i cat i on.Lookatcommoncoi nswi t h the microscope still on the stand to get a close up view. Paper ™ money looks very different when you see it with your QX5 microscope. Page 11 www.taglearning.com 01474 357350 High magnification (200X) Did you know that various hair colours and textures look different up close? There are lots of hair types: Brown, brunette, or auburn Curly Gray, silver, or white Red Pr ocessedor“ per med” See how many types of hair you can collect from your family and school friends. Using high magnification and bottom lighting look at the hairs with your microscope. You may be surprised by what you see. TIP: Don’ tputy ourspeci mensdi r ect l yont hemi cr osc ope’ ssampl e plat f or m.Useoneoft hecont ai nmentdi shes.I fasampl ewon’ tf i ti na containment dish, you can always look at it in handheld mode. Page 12 www.taglearning.com 01474 357350 Using Handheld Mode ™ You can use the Digital Blue QX5 Computer Microscope as a handheld magnifying glass. Some of the things you can look at are your nose, toes, and teeth. Your feet. The hair on your arm. The moon on your fingernail. The scab on your knee. Your tummy button. Your fingerprints or your ear. Or, a flower. Use low magnification in handheld mode. If your hand shakes too much at medium and high magnification, the sample won’ t stay in focus, and there may not be enough light to get a good picture. Remember When using the microscopei nhandhel dmode,don’ tpul l on the cord that connects it to the Computer. Putting too much strain on the cord can lead to trouble. Whenev ery ou’ r ef i ni shedusi ngt hemi cr oscopei nhandhel d mode put it back in its cradle. Always use the microscope so t haty ou’ v egotacl earv i ew of your computer monitor—sot haty oucanseewhaty ou’ r e pointing at. Telling your left from your right ™ In a normal microscope, images are reversed. The QX5 microscope uses the software to flip the image so that when you move a slide on the sample platform to the right, the image on your monitor will also move to the right. Page 13 www.taglearning.com 01474 357350 To have this software feature work correctly in handheld mode, remember these three things: Hold the microscope with the magnification number facing you. Moving the microscope to the right is the same as moving a slide on the sample platform to the left. Moving the microscope toward you is the same as moving a slide on the sample platform away from you. Page 14 www.taglearning.com 01474 357350 Making Movies Choosing your specimens ™ Your Digital Blue QX5 Computer Microscope came with two cont ai nmentdi shes.Whatcany ouputi nt hem?Wel l ,i fy ou’ vegotan aquarium, how about fish food? Live fish food. You can view and take movies of tubifex worms and brine shrimp, which are examples of live fish foods. And, how about some of that green stuff gr owi ngont hegl ass?I t ’ s called algae and is a simple plant. Eveni fy oudon’ thav ef i sht of eed,y oucangr owbr i neshr i mpj ustf or fun. Or you can buy some at a pet shop. Once you’ v egotsomel i vi ngbr i neshr i mp,usey ourey edr oppert o suck up a few of the tiny shrimp and put them into a containment dish to watch and record them. Use low magnification with bottom light. I t ’ si mpor t antt opr epar ey oursampl ei nanot herr oom,awayf rom the comput er .Br i ngt hesampl et ot hemi cr oscopeaf t eri t ’ sr eady .Thi s prevents accidents that could damage the microscope or your computer. Magnification The size of your specimen is important. To get the most out of your ™ QX5 microscope remember this simple guide: Atl owmagni f i cat i on,y ou’ r eseei nganar eaaboutt hesi z e of a drawing pin or a pencil rubber. Page 15 www.taglearning.com 01474 357350 Atmedi um magni f i cat i on,y ou’ r el ooki ngatt heheadofa pin. Athi ghmagni f i cat i on,y ou’ r evi ewi nganar eat hesi z eofa pencil tip. It takes a lot of patience and a little good luck to capture a good i mageofsomet hi ngt hat ’ smov i ngar ound. The higher the magnification, the more light you need to see clearly andt hemor ecar ef uly ou’ l lhavet obewhenf ocusi ngandmov i ng your specimen. This fly eye was captured at medium magnification with top light with brightness set all the way to the top. Recording indicator Wheny ou’ r ecapt ur i ngamovi e,t hebari nt heRecor di ngi ndi cat or fills up to show progress, and a counter under the Record button shows how long you have been recording. You can stop recording by clicking the Stop button. Recording will stop automatically when the status bar is full or there is no more available disk space. Page 16 www.taglearning.com 01474 357350 Movie playback controls Oncey ou’ v ecaptured a movie, the Recording indicator changes into Playback controls. You preview your movie in the small window by clicking the arrow on the left side of the control. Clicking the forward or backward arrows on the right side. You can move through your movie one frame at a time by movie in a bigger window, go to Main and use the Playback controls. Page 17 www.taglearning.com 01474 357350 Making time lapse movies You set up a time lapse in Live View. When you click the Time-Lapse button, a panel opens on the bottom right side of the screen. Time-lapse controls The slider controls the rate at which snapshots are taken during time-lapse experiments. As you move the slider from left to right, you can see the rate change in the display under the slider. You can set it from one picture every second to one picture every hour. Oncey ou’ v esety ourt i me-lapse, you click on the Record button to start it. Page 18 www.taglearning.com 01474 357350 A display under the Record button shows the total time since you started the time lapse. The Settings control display now functions as a countdown timer to show you the length of time between snapshots. The display below the countdown tracks the total number of snapshots taken. Page 19 www.taglearning.com 01474 357350 Example of an overnight time lapse of water from a garden pond: 2 hours Condensation clouds the top cover. 4 hours Droplets start to form, but we could still see the critters in the background. 6 hours Large droplets make a pretty and interesting pattern on the screen. 8 hours The water drops continue to grow larger and the midges cavort! 10 hours A sparkling water world takes shape with shadowy blobs behind it. 12 hours Eventually the screen looks like giant glistening blisters! Page 20 www.taglearning.com 01474 357350 Doing this yourself 1. Whi l ey ou’ r eout si de,l ookf orst andi ngwat erwi t hl i t t l e creatures swimming and twitching in it. 2. Put some in your sample jar or other small container. 3. Before going to your computer, put some of the water in a containment dish. 4. Carefully place the uncovered containment dish on the sample platform. 5. Set the magnification to low. 6. Select bottom lighting 7. Focus on the smallest creature you can see. 8. Adjust the brightness until the image is as clear and bright as possible. 9. To make the time-lapse movie, click the Time Lapse button. 10. Set the timer to take one snapshot every 30 seconds. Then click Record. 11. Set the timer to take one snapshot every 30 seconds. Then click Record. 12. Let it run overnight 13. To end the time lapse, click on the stop button. TIP Wheny ou’ r emaki ngt i me-lapse movies of things in water, prevent condensation by leaving the lid off the containment dish. This way you can actually see the creatures moving around. Other good subjects Mix some yeast, sugar and water and put a few drops in the containment dish. A slug or snail. Keep the lid on! A piece of mouldy bread. A ripe strawberry or other piece of rotten fruit. A sprouting seed. A worm. Page 21 www.taglearning.com 01474 357350 Making the best of your time If you do a time-l apsemov i et hatwi l lr ecor dwhi l ey ou’ r enotatt he computer, make sure nobody shuts off the computer Use the Paint tools available in the Main screen to make a warning sign. Print your warning sign and hang it on your monitor. Page 22 www.taglearning.com 01474 357350 The Main Screen Nowt haty ou’ v egat her edy ourspeci mensandcapt ur edpi ct ur esand mov i es,l et ’ sexpl or eMai nt of i ndoutwhatel sey oucandowi t h things you’ v ef oundi nt hemi c r oscopi cwor l d. From Main you can: View the pictures and movies in your collection. Go to the Paint screen. Go to the Special Effects screen. Go to the Show screen. Go to the Print screen. Return to Live View. Import pictures. Export pictures and movies. Delete pictures and movies from your collection. Quit the software. Main Screen Buttons Paint button Goes to Paint where you can modify your pictures with cool tools. Special Effects button Takes you to a screen where you can give special effects to pictures and movies Show button Opensoneoft hesof t war e’ smostpopul arf eat ur eswher ey oucan assemble slide shows with music! Page 23 www.taglearning.com 01474 357350 Print button Print your pictures on a single page, on four pages to make a poster, or on stickers. Collection button View your collection and choose a picture or movie to look at or use i noneoft hemai nact i vi t yscr eens.See“ col l ect i onwi ndow”bel ow. Recycle Bin button Delete pictures and movies you no longer want. You can change your mind by clicking the Cancel button. Collection window Look through the pictures and movies in your collection, nine at a time, by using the forward and back arrows. Movies have filmstrip borders. Once you have chosen something to work on, click OK to return to Mai n.You’ l l seey oursel ect i oni nt hevi ewi ngar ea.Fr om Mai ny ou can: Go to Paint, Special Effects, Show or Print with your picture. Go to Special Effects or Show with your picture or movie. Page 24 www.taglearning.com 01474 357350 Measuring tool The QX5 features a measuring tool that allows you to approximate distances between points on your specimen. Within the live view a vertical and horizontal measurement guide will appear on two side of the your live image. To measure the distance between two points carefully place the specimen on the microscope stage. Move the object that you wish to measure so that one end appears at the bottom left hand corner of the live view screen. You can use the measurement guides to get an approximate size of your specimen. The units of measurement change depending on which level of magnification that you use. For low (10X) magnification measurements are displayed in centimetres. For medium (60X) magnification measurements are displayed in millimetres. For high (200X) magnification measurements are displayed in micrometers (one millionth of a metre) Page 25 www.taglearning.com 01474 357350 Coffee granules at 10X magnification with measuring guides Coffee granules at 60X magnification with measuring guides Coffee granules at 200X magnification with measuring guides Page 26 www.taglearning.com 01474 357350 Paint tools Paint lets you change pictures in your collection using fun tools. On Main, click the Paint button. This brings you to the Paint screen. What is a selection? A selection is the portion of a picture you are working with. If you don’ tuse the Selection tool to pick an area of the picture, the entire picture is selected. Paint tools Use Paint tools to change your picture. Click on a tool and its options appear on the right side of the screen. Scissors Select portions of your picture to work on. Paint Brush Control transparency, colour, shape and size of Brush Tip. Page 27 www.taglearning.com 01474 357350 Paint Bucket Fill areas with colours and patterns. You can control whether the fill is solid or see through. Eyedropper Grab a colour from anywhere on your picture or the Colour Palette to make it your current Colour. Text Choose the size and style BEFORE you type your text. Then click the OK button and move your text around your picture. When you use the Text tool, you can modify your words using the Paint Brush, Stamp tool, or Eraser tools. Eraser The Eraser has four options: Erase to Original, Erase Area To Original, Erase to White and Erase Area to White. Page 28 www.taglearning.com 01474 357350 Stamp Choose from stamp sets on the Stamp Palette. Click once on your picture to place a single random stamp from the chosen set. Click and hold while moving the mouse to spray the stamps everywhere. Palettes, options and other controls. Scissors Palette Select parts of your picture with the rectangle or freef or m Lasso.Wheny ou’ v emadey ourselection, other tools work only inside that area. To work somewhere else, make a new selection. To work on the whole picture, click the De-select button. Brush Tips Click a Brush Tip shape to use it with your chosen colour and pattern. Click on the up and down arrows to see more shapes and sizes. These tips can also be used with two of the erasers. Colour Palette Click anywhere on one of the colour bars. Your selection is shown in the Tool Preview. You can only choose a colour or a pattern, not both. Choose colours from this palette with the Eyedropper too. Page 29 www.taglearning.com 01474 357350 Patterns Click a pattern to use it. Click on the up and down arrows to see more patterns. Use the Transparency control to give your patterns unusual effects. Tool Preview This box appears when you choose any tool, except Scissors or Eraser. It shows the current Colour, Pattern, or Stamp set and how solid each is. The clearer the checkerboard shows, the more see through your tool will be. Transparency Control Use this slider to adjust how solid or see-through your tool will be. You can also use this control with Text and one of the Eraser options. Stamp Palette Click the up and down arrows to see all the stamps you can use. Use the Transparency slider with stamps to change how see-through they are. You can even fill your words with stamps. Page 30 www.taglearning.com 01474 357350 Picture Controls The Flip, Rotate, and Scale controls work on your current selection. Click Flip to turn your selection left to right. Move the green knob around the circle to rotate your selection. Slide the green knob on the Scale tool to make your sel ect i onbi ggerorsmal l er .I fy oudon’ thavea special area selected, these tools work on your whole picture. Page 31 www.taglearning.com 01474 357350 Put your friends head on a lady bird 1.Tobegi n,y ouneedy ourf r i end’ shead. From Main, click the Collection button and f i ndapi ct ur eofy ourf r i end.I fy oudon’ t have her picture use handheld mode to capture a photograph. Use low magnification. 2. Now that her head is in the large viewing area in Main, click the Paint button. 3. Use Scissors with the freeform Lasso to sel ecty ourf r i end’ sf ace.Cl i c kt heCopy button and the face will appear in the current selection window. 4. Go to Main and click the Collection button. Scroll until you find a ladybird or other bug you like. Select it and click the OK button. 5. Go to Paint. Click the Paste button and use the mouse to move the face just where you want it. Page 32 www.taglearning.com 01474 357350 Adding Special Effects You can add cool special effects to pictures and movies. On Main View, click Special Effects. This takes you to a screen where you can give special effects to pictures and movies. Special effects change the way your picture or movie looks. Here are some pictures and movie frames with special effects applied. Frunobulax, the make-believe fly Frunobulax, the fly that walks on two legs,i spr et t yi nt er est i ng… …buti tl ooksev enmore interesting wheny ouappl yt heFl y ’ sEy e special effect. Andher e’ st hesameef f ectappl i edonce again to the same picture. Page 33 www.taglearning.com 01474 357350 Other special effects There are six other effects, including Distort, Atomic Glow, and Kaleidoscope. An eighth button randomly applies two of the effects to your picture or movie. Special Effects progress bar It takes time to apply a special effect to a movie. When the first frame is finished,aPr ogr essBarandCancel but t onappear .I fy oudon’ t want to wait, you can cancel running the effect. Page 34 www.taglearning.com 01474 357350 Brine shrimp look good by themselves but you can make them even better with the Kaleidoscope special effect. Here are two frames from our Kaleidoscopic brine shrimp movie. Remember you can hear what each special effect does by using Audio Help. Page 35 www.taglearning.com 01474 357350 Making a slide show ™ One of the really fun things you can do with the Digital Blue QX5 Computer Microscope is to make slide shows friends, teachers and family. On Main View, click the Show button. This brings you to the Show screen. The viewing area shows the first slide in the current show. You can have four different shows. A black window means you have opened a show with no slides in it yet. The Play Show button is also greyed if there are no slides in your current show. Each slide show can include any combination of up to 50 pictures and movies. You can even add music to your shows! Create show Click here to bring up the Show Editing window. The four tabs on the right side, above the filmstrip, represent your four slide shows. Using the show editing window This window acts like the Collection Page 36 www.taglearning.com 01474 357350 window. You look through your collection, nine samples at a time, by clicking on the forward and back arrows on the left side of the window. On the right side is a film strip with three slides from the current show. The blank green slide is always the beginning of the show, and the red slide is always the end of the show. This show is currently empty. The Add button places your selection in the middle and shifts the current slide up. The Remove button always cuts the middle slide and shifts the slide from above down. The Cancel button returns you to the Show screen without saving any changes you made to the current show. The OK button saves your changes and returns you to Show with the first slide in the viewing area. Page 37 www.taglearning.com 01474 357350 Tips to making your own slide show Getting ready to begin I t ’ sgood to have a plan before putting a slide show together. Plan what you want to show, and the order you want to show it in. As you put your show together, list the pictures, movies and text you think y ouneedbutdon’ thavei ny ourcol l ect i on. You can either make them first or add them later. Oncey ou’ v egotapl an,cl i ckt heCr eat eShowbut t onandchoose oneoft het abs.I fy oudon’ thav eabl ankt ab,pi ckashowy ouwant to get rid of. Click the Clear All button to empty the slides out of this show. You will see a warning, so you can change your mind. Once you have a blank show, search through your collection and add the pictures and movies you want in your new show. I fy oudon’ tl i ket heor derofy oursl i des,y oucan: Start again with a blank show. Use the Add and Remove buttons to rearrange your slides. Making a show: key steps Search your collection by clicking the forward and back arrows below the Collection window. Add a slide by clicking the Add button. Page 38 www.taglearning.com 01474 357350 Remove a slide by moving it to the middle of the filmstrip and clicking the Remove button. Look through the slides in your show by using the up and down arrows. Click the Cancel button to leave the slide show the way it was. Click the OK button to return to the Slide Show window with your changes. Click the Clear button to completely erase the currently selected slide show. Adding music There are five kinds of music you can play while watching your show. To add or change music: Click the buttons to hear short examples of the music. The last button you click before starting your show picks the music that will play with your show. To change the music during your show, j ustcl i ckanot herbut t on.I fy oudon’ twantanymusi c,cl i ckt heNo Music button. It is the top button, and turns off all music. Running your show Once you are satisfied wi t hy ourshow,cl i ckt heOKbut t on.You’ l l see the Show screen with your first slide showing. Click the Play Show button and your show will start with the first picture or movie and play over and over until you click the Pause Show button. Page 39 www.taglearning.com 01474 357350 Page 40 www.taglearning.com 01474 357350 Printing You can print out the pictures you create in a number of ways! Make a poster, create stickers, or share your artwork with friends and family. On Main, click the Print button. This takes you to the Print screen. Printing options The Print screen displays a preview of three ways to print your picture. Click the button under the upper left display to print a single page. You can print a four-page poster by clicking the button below the biggest display. You can tape the pages together and hang them on your door. To print a sheet of nine stickers, use special sticker paper and click the button below the display in the lower left corner of the screen. Fun printing ideas Here are some suggestions for how to use your printer to have even more fun with the pictures you create. Make your own custom badges and tee-shirts by using special paper in your printer. You can make iron-on shoulder patches using the sticker format. Take your print-outs and cut them up to make collages by pasting them onto cardboard. Use the poster option to create wrapping paper or book covers. Print a picture to use in découpage, a craft that uses paper cutouts to decorate all kinds of surfaces. Page 41 www.taglearning.com 01474 357350 Contacting Technical Support: ™ If you require further assistance in using your QX5 Computer Microscope, try visiting TAG Learning’ swebsi t e,www.taglearning.com, which contains a number of useful resources for using the QX5, including a full list of Frequently Asked Questions. Alternatively, please feel free to contact our technical support team either by e-mail to [email protected], or by phone on 01474-537886 ext 227 (Monday –Friday 9am –5pm GMT). Page 42 www.taglearning.com 01474 357350