1
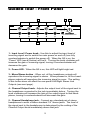
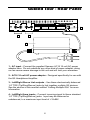
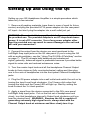
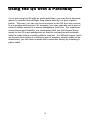
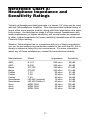
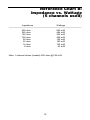
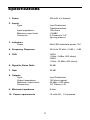
H E A D P H O N E
AMPLIFIER
SAMSON
Q5
®
Introduction 3
System Features 4
Guided Tour 5
Front Panel 5
Rear Panel 6
Setting Up and Using the Q5 7
Using the Q5 with a Patchbay 9
Linking Multiple Q5s 10
Reference Chart A:
Headphone Impedance and
Sensitivity Ratings 11
Reference Chart B:
Impedance vs. Wattage 12
Specifications 13
Introduction
Congratulations on purchasing the Samson Q5 Headphone Amplifier!
Although this unit is designed for easy operation, we suggest you take
some time out first to go through these pages so you can fully understand how we’ve implemented a number of unique features.
The Q5 is a compact, high-quality device that allows you to monitor any
stereo or monophonic source signal (balanced or unbalanced) over as
many as five separate headphones. Providing unusually high power
levels and superb audio fidelity, the Q5 is compatible with virtually all
popular headphone models. Front panel controls include a master input
level control and stereo/mono switch, and each headphone output has
its own individual level control. Special output jacks on the rear panel
allow any number of Q5 units to be linked together with no loss of signal.
The Q5 can be used in a wide variety of applications, including recording studios, teaching labs, broadcast environments, and for live performance.
In this manual, you’ll find a more detailed description of the features of
the Q5, as well as a guided tour through the front and rear panels, stepby-step instructions for using the Q5, a reference chart that gives impedance and sensitivity ratings for a number of popular headphone models,
and full specifications. You’ll also find a warrantee card enclosed—
please don’t forget to fill it out and mail it so that you can receive online
technical support and so we can send you updated information about
other Samson products in the future.
3
System Features
The Samson Q5 Headphone Amplifier utilizes state-of-the-art
technology. Here are some of its main features:
• Special voltage doubler circuitry allows the Q5 to deliver unusually
high output levels while maintaining excellent audio fidelity regardless of the number or type of headphones connected.
• Individual level controls for each headphone output allow customized gain settings for each user, no matter what type of headphone is used. This enables each user to connect the headphone
model of his or her choice, with no audible effect on other users.
• Electronically balanced input connectors (these also accept unbalanced input signal) that enable the Q5 to be used with a wide
variety of audio equipment, from professional-level mixing consoles
to home hi-fi devices.
• Need more than five headphones? No problem—a unique
electronically balanced Stereo Link output allows any number of
Q5s to be linked together with no loss of audio fidelity or output
level.
• A master input level control that allows optimum input level to be
set, maximizing signal-to-noise ratio in all applications.
• A master mono/stereo button allows instant switching between the
two modes and also allows an incoming stereo mix to instantly be
checked for mono compatibility.
4
Guided Tour - Front Panel
4
0
−∞
CHANNEL 3
CHANNEL 2
CHANNEL 1
+10
0
−∞
+10
CHANNEL 4
0
−∞
+10
CHANNEL 5
+10
1
POWER
INPUT
0
0
−∞
2
−∞
+10
MONO STEREO
OFF
10
®
Q5 HEADPHONE AMPLIFIER
5
3
1: Input Level / Power knob - Use this to adjust the input level of
incoming signal and to switch the main power on and off (turn fully
counterclockwise to switch the power off). When the Q5 is on, the
“Power” LED (see #2 below) will be lit. Turning the knob clockwise will
increase the gain of incoming signal; turning it counterclockwise will
decrease the gain.
2: Power LED - When the Q5 is on, this LED will light bright red.
3: Mono/Stereo button - When out, all five headphone outputs will
reproduce the incoming signal in stereo. When pressed in, all five headphone outputs will reproduce the incoming signal in mono. The setting
of this button does not affect the rear panel Left/Right Stereo Link
Outputs (see next page).
4: Channel Output knob - Adjusts the output level of the signal sent to
the headphone connected to the jack immediately below. Turning the
knob clockwise will increase the gain of the output signal to that headphone; turning it counterclockwise will decrease the gain.
5: Channel Headphone jack - Connect any standard pair of stereo
headphones to each of these standard 1/4” stereo jacks. The level of
the signal sent to the headphones is determined by the setting of the
Channel Output knob immediately above that jack.
5
Guided Tour - Rear Panel
STEREO LINK
BALANCED
+14dB MAX. INPUT
BALANCED
Q5 HEADPHONE AMPLIFIER
DISTRIBUTION
LEFT AMP
INPUT
RIGHT AMP
INPUT
LEFT
4
LINK
RIGHT
AMPLIFIER 500mW
600 Ω
TRS WIRING
LINK WIRING
PHONES WIRING
TIP +
RING SLEEVE GROUND
TIP +
RING SLEEVE GROUND
TIP LEFT
RING RIGHT
SLEEVE GROUND
SERIAL NUMBER
SAMSON TECHNOLOGIES CORP., HICKSVILLE, NEW YORK
1
16VAC
ASSEMBLED IN R.O.K.
3
2
1: AC input - Connect the supplied Samson AC16 16-volt AC power
adapter here. Do not substitute any other kind of power adapter; doing
so can cause severe damage to the unit and will void your warrantee.
2: AC16 16-volt AC power adapter - Designed specifically for use with
the Q5 Headphone Amplifier.
3: Left/Right Stereo Link outputs - Use these electronically balanced
1/4” TRS (Tip/Ring/Sleeve) jacks to link together multiple Q5 devices.
See the section in this manual entitled “Linking Multiple Q5s” for more
information.
4: Left/Right Amp inputs - Connect incoming signal to these standard
1/4” TRS (Tip/Ring/Sleeve) jacks. Input may be balanced or
unbalanced, to a maximum input level of +18 dBV.
6
Setting Up and Using the Q5
Setting up your Q5 Headphone Amplifier is a simple procedure which
takes only a few minutes:
1. Remove all packing materials (save them in case of need for future
service) and plug the provided AC16 power adapter into the rear panel
AC input—but don’t plug the adapter into a wall outlet just yet.
WARNING: Do not substitute any other kind of power adapter for
the provided one. The provided adapter is an AC step-down transformer; it is not a DC converter. Use of any power adapter other
than the provided one can result in severe damage to the unit and
will void your warrantee!!
2. Connect the output from the device you want monitored to the
Left/Right Amp input jacks on the Q5 rear panel (if you’re using the Q5
with an audio patchbay, see the “Using The Q5 With A Patchbay” section
on page 7). The Q5 accepts both balanced and unbalanced
signal; generally, balanced signal is preferable because it provides better
signal-to-noise ratio and reduced extraneous noise.
3. Turn the master Input knob and all five headphone Channel Output
knobs to their minimum (fully counterclockwise) setting and then plug
one to five sets of headphones into the front-panel Channel Headphone
jacks.
4. Plug the Q5 power adapter into a wall outlet and switch the unit on by
turning the Input Level knob clockwise. You’ll hear a click when first
turning the knob and the Power LED will light up. Start by setting the
knob to about the 3 o’clock position.
5. Apply a signal from the device connected to the Q5’s rear-panel
Left/Right Amp input jacks. Put on the first set of headphones and
slowly turn that headphone channel’s Output knob clockwise until you
hear the desired level. WARNING: Because the Q5 is capable of
generating extremely high signal levels, always start with the
Channel Output knob at minimum and then slowly turn it up.
7
Setting Up and Using the Q5
6. Repeat step 5 for all connected headphones, making sure to start
with the Channel Output knob completely counterclockwise and then
slowly raising it until the desired level is achieved. If you have
connected different models of headphones to the various Channel
Headphone jacks, you may find that some require more gain than others to achieve the same volume. This kind of disparity will occur if the
various headphones have different impedances. The lower the impedance, the louder the headphone will sound compared to another, higher
impedance headphone at the same Channel Output setting. Another
factor affecting headphone loudness is called sensitivity. This is generally measured by determining the decibel (dB) level generated by 1 mW
of power input. The higher the dB rating, the louder the headphone.
See the Reference chart on page 9 of this manual for more details.
7. To achieve optimum signal-to-noise ratio, the master Input Level
should generally be set as high as possible, short of audible distortion.
However, if this results in your getting blasted with signal even though a
Channel’s Output is near minimum, you’ll need to decrease the master
Input Level while raising one or more Channel Output levels.
Conversely, if you find that you have to raise one or more headphone
Channel Output knobs to maximum or near maximum to achieve the
desired level, try increasing the master Input Level while decreasing the
Channel Output(s).
8. To check mono compatibility of a stereo signal being input to the Q5,
press the Stereo/Mono button so that it is down—all five headphone
Channels will then receive the incoming signal in mono.
If you have followed all the steps above and are experiencing
difficulties, call Samson Technical Support (516-932-1062) between
9 AM and 5 PM EST.
8
Using the Q5 with a Patchbay
If you are using the Q5 with an audio patchbay, you may find it advantageous to connect its Left/Right Amp Inputs directly to a pair of patch
points. This way, you can opt to route signal to the Q5 from any source.
In a recording environment, for example, you may typically use a pair of
mixer Auxiliary sends for a stereo headphone (cue) mix. For maximum
convenience and flexibility, we recommend that you half-normal those
sends to the Q5 input patchpoints so that the connection will automatically be made unless a patch cable is inserted. If a different signal (such
as a stereo bus output or a different pair of auxiliary sends) needs to be
substituted, you can then override this connection simply by inserting a
patch cable.
9
Linking Multiple Q5s
Any number of Q5s can be linked together (“daisy-chained”), allowing
you to monitor an input signal over more than five sets of headphones.
To do this, simply make a connection between one Q5’s Left/Right
Stereo Link outputs and the next one’s Left/Right Amp inputs, and insert
open-ended “dummy” 1/4" TRS plugs into the Left/Right Stereo Link
Outputs of the last Q5 in the chain, as shown in the illustration below*:
+14dB MAX. INPUT
BALANCED
STEREO LINK
BALANCED
Q5 HEADPHONE AMPLIFIER
DISTRIBUTION
LEFT AMP
INPUT
RIGHT AMP
INPUT
+14dB MAX. INPUT
BALANCED
LEFT
LINK
PHONES WIRING
TIP LEFT
RING RIGHT
SLEEVE GROUND
RIGHT AMP
INPUT
LEFT
LINK
RIGHT
SERIAL NUMBER
SAMSON TECHNOLOGIES CORP., HICKSVILLE, NEW YORK
16VAC
ASSEMBLED IN R.O.K.
16VAC
ASSEMBLED IN R.O.K.
Q5 HEADPHONE AMPLIFIER
DISTRIBUTION
LEFT AMP
INPUT
600 Ω
LINK WIRING
TIP +
RING SLEEVE GROUND
RIGHT
STEREO LINK
BALANCED
AMPLIFIER 500mW
TRS WIRING
TIP +
RING SLEEVE GROUND
AMPLIFIER 500mW
600 Ω
TRS WIRING
LINK WIRING
PHONES WIRING
TIP +
RING SLEEVE GROUND
TIP +
RING SLEEVE GROUND
TIP LEFT
RING RIGHT
SLEEVE GROUND
SERIAL NUMBER
SAMSON TECHNOLOGIES CORP., HICKSVILLE, NEW YORK
“DUMMY”
OPEN-ENDED
1/4" TRS PLUGS
Because the Q5 Stereo Link output jacks are electronically balanced,
we recommend the use of 3-conductor cable and 1/4" TRS (Tip/Ring/
Sleeve) connectors. Even when several Q5s are linked together this
way, there is no loss of power or audio fidelity—every Channel on every
Q5 will sound just as loud and clear as if it were the only unit connected.
The status of the front-panel Stereo/Mono button affects only that unit
and has no effect on any subsequent linked units.
* Note: The AC power adapter in this illustration is not shown to scale.
10
Reference Chart A:
Headphone Impedance and
Sensitivity Ratings
Virtually all headphones that terminate in a stereo 1/4” plug can be used
with the Q5 Headphone Amplifier. This chart provides a partial listing of
some of the more popular models, along with their impedance and sensitivity ratings. As described on page 6 of this manual, headphones with
lower impedances (or higher sensitivity) will sound louder as compared
to other, higher impedance (or lower sensitivity) headphones at the same
Channel Output setting.
Samson Technologies has no connection with any of these manufacturers, nor do we endorse any particular models for use with the Q5; this is
simply a reference listing for your convenience. For more information
about any of these headphones, contact the manufacturer directly.
Manufacturer
Model
Impedance
Sensitivity
————————————————————————————————
AKG
K-141
600 ohm
98 dB
AKG
K-240
600 ohm
88 dB
Beyer
DT-150
250 ohm
114 dB
Beyer
DT-801
250 ohm
114 dB
Fostex
T-10
50 ohm
91 dB
Fostex
T-20
50 ohm
96 dB
Fostex
T-40
50 ohm
98 dB
Sennheiser
HD-450 (original)
70 ohm
94 dB
Sennheiser
HD-450 Series II
60 ohm
94 dB
Sony
MDR-7502
45 ohm
100 dB
Sony
MDR-7504
45 ohm
103 dB
Sony
MDR-7506
63 ohm
106 dB
11
Reference Chart B:
Impedance vs. Wattage
(5 channels used)
Impedance
Wattage
————————————————————————————————
600 ohm
500 mW
250 ohm
484 mW
150 ohm
426 mW
100 ohm
409 mW
50 ohm
192 mW
32 ohm
180 mW
16 ohm
122 mW
8 ohm
42 mW
Note: 1 channel driven (loaded) 600 ohm @ 530 mW
10
Specifications
1. Power
500 mW x 5 channel
2. Inputs
Type:
Low-Z balanced
Transformerless
10K ohms
+18dBV
3-Conductor 1/4”
(tip-ring-sleeve)
Input impedance:
Maximum input level:
Connector:
3. Indicators
Power
Red LED indicators power “On”
4. Frequency Response
20 Hz to 20 kHz, +0 dB > -1 dB
5. THD
.003%
(1 kHz, 0 dBm, 600 ohms)
.006%
(1 kHz, 24 dBm, 600 ohms)
6. Signal to Noise Ratio
95 dB
7. Gain
20 dB
8. Outputs
Type:
Output impedance:
Maximum output level:
Connectors:
Low-Z balanced
160 ohms typical
24 dBm / 600 ohms
1/4” Stereo (x 5)
9. Minimum impedance
8 ohm
10. Power requirements
16 volts AC, 1.2 amperes
11