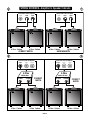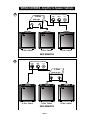
1
Owner’s Manual
Greetings from the Home of Tone
...You, smart player and intuitive human, have put your trust in us to be your amplifier
company. This is something we do not take lightly. By choosing this instrument to be a
part of your musical voice, you have become part of the Mesa family...WELCOME!
Our goal is to never let you down. Your reward is that you are the new owner of an amp,
bred of fine all-tube heritage...benefiting from the many pioneering and patented Mesa
circuits that led to the refinement of your new model. We feel confident this amp will inspire many hours of musical satisfaction and lasting enjoyment. It was built with you in
mind, by players who know the value of a fine musical instrument and the commitment it
takes to make great music. The same commitment to quality, value and support we make
to you...our new friend.
TABLE OF CONTENTS
Precautions
Overview__________________________________________________________________________________________ 1-3
Instant Gratification, Helpful Hints_____________________________________________________________________ 4-5
FRONT PANEL:
INSTRUMENT INPUT__________________________________________________________________________________ 6
BRIGHT / NORMAL / ACTIVE SWITCH____________________________________________________________________ 6
CONTROLS:
GAIN, BASS_________________________________________________________________________________________ 7
MID______________________________________________________________________________________________ 7-8
TREBLE____________________________________________________________________________________________ 8
VOICE____________________________________________________________________________________________ 8-9
MASTER____________________________________________________________________________________________ 9
EQ IN / EQ OFF / EQ FS SWITCH_____________________________________________________________________ 9-10
FULL / HALF / LOW PWR SWITCH______________________________________________________________________ 10
MUTE / PLAY / SIL REC SWITCH_______________________________________________________________________ 11
PRE / POST: D.I. OUTPUT SELECT SWITCH______________________________________________________________ 11
DI LEVEL__________________________________________________________________________________________ 11
SOLO CONTROL____________________________________________________________________________________ 12
POWER SWITCH____________________________________________________________________________________ 12
STANDBY SWITCH__________________________________________________________________________________ 13
REAR PANEL:
FUSE______________________________________________________________________________________________ 14
POWER CABLE__________________________________________________________________________________ 14-15
EXT SWITCHING____________________________________________________________________________________ 15
FOOTSWITCH (OPTIONAL)____________________________________________________________________________ 15
SPEAKER OUTPUTS_________________________________________________________________________________ 16
MULTI-WATT and SPEAKER OUTPUT CHOICES_______________________________________________________ 16-17
SPEAKER OUTPUT AUTO-MUTE FUNCTION_____________________________________________________________ 17
D.I. OUTPUT________________________________________________________________________________________ 17
D.I. LIFT / GROUND SWITCH___________________________________________________________________________ 18
FX LOOP___________________________________________________________________________________________ 18
LOOP EXT. SWITCH_______________________________________________________________________________ 18-19
SLAVE, SLAVE LEVEL________________________________________________________________________________ 19
TUNER____________________________________________________________________________________________ 19
FACTORY SAMPLE SETTINGS_________________________________________________________________________ 21
PERSONAL SETTINGS_______________________________________________________________________________ 22
BIASING THE KT-88 POWER TUBES____________________________________________________________________ 23
SPEAKER IMPEDANCE MATCHING, CABINET HOOKUP GUIDE__________________________________________ 25-30
DIAGNOSING PRE-AMP TUBE PROBLEMS___________________________________________________________ 31-32
TUBE TASK CHART__________________________________________________________________________________ 33
PARTS SHEET______________________________________________________________________________________ 35
Important Safety Instructions
Read these instructions.
Keep these instructions.
Heed all warnings.
Follow all instructions.
Do not use this apparatus near water.
Clean only with dry cloth.
Do not block any ventilation openings. Install in accordance with the manufacturer’s instructions.
Do not install near any heat sources such as radiators, heat registers, stoves, or other apparatus (including amplifiers)
that produce heat.
Do not defeat the safety purpose of the polarized or grounding-type plug. A polarized plug has two blades with one
wider than the other. A grounding type plug has two blades and a third grounding prong. The wide blade or the third
prong are provided for your safety. If the provided plug does not fit into your outlet, consult an electrician for replacement of the obsolete outlet.
Protect the power cord from being walked on or pinched, particularly at plugs, convenience receptacles, and the point
where they exit from the apparatus.
Only use attachments/accessories specified by the manufacturer.
Unplug this apparatus during lightning storms or when unused for long periods of time.
Refer all servicing to qualified service personnel. Servicing is required when the apparatus has been damaged in any
way, such as power-supply cord or plug is damaged, liquid has been spilled or objects have fallen into the apparatus, the
apparatus has been exposed to rain or moisture, does not operate normally, or has been dropped.
To insure proper ventilation always make sure there is at minimum four inches (101.6mm) of space behind the rear of
the apparatus. The ventilation should not be impeded by covering the ventilation openings with items, such as newspapers, tablecloths, curtains, etc. Do not impede ventilation by placing objects on top of the apparatus which extend past
the rear edge of its cabinet.
No naked flame sources, such as lighted candles, should be placed on the apparatus.
The apparatus shall not be exposed to dripping or splashing and no objects filled with liquids, such as vases, shall be
placed on the apparatus.
READ AND FOLLOW INSTRUCTIONS OF PROPER USAGE
Important Safety Instructions
WARNING: To reduce the risk of fire or electric shock, do not expose this apparatus to rain or moisture.
The AC plug is the mains disconnect. The plug should remain accessible after installation.
WARNING: EU: permission from the Supply Authority is needed before connection.
WARNING: Always make sure proper load is connected before operating the amplifier. Failure to do so could pose a
shock hazard and may result in damage to the amplifier.
Do not expose amplifier to direct sunlight or extremely high temperatures.
Always insure the amplifier is properly grounded. Always unplug AC power cord before changing fuse, tubes or removing chassis. Use only same type and rating when replacing fuse.
Avoid direct contact with heated tubes. Keep amplifier away from children.
To avoid damaging your speakers and other playback equipment, turn off the power of all related equipment before making the connections.
Do not use excessive force when handling buttons, switches and controls. Do not use solvents such as benzene or
paint thinner to clean the unit.
Always connect to an AC power supply that meets the power supply specifications listed on the rear of the unit. Export
models: always insure unit is wired for proper voltage. Make certain grounding conforms with local standards.
Your amplifier is LOUD! Exposure to high sound volumes may cause permanent hearing damage!
When Rack Mounting this unit proper ventilation space must be maintained. Do Not cover or block Front and Rear and
allow at least 2” of open “breathing” space on both sides of the unit. Allow 2 Rack Units of open space above the unit to
allow heat to escape the upper rear vents.
Your Mesa/Boogie Amplifier is a professional instrument. Please treat it with respect and operate it properly.
READ AND FOLLOW INSTRUCTIONS OF PROPER USAGE
Operating Instructions
Congratulations on your choice of the BASS STRATEGY Eight:88™ and welcome to the MESA/Boogie® Family! First, we would
like to thank you for choosing us as your amplifier company and trusting us to help create your musical voice. This is something we
never take for granted and you’ll find that we are here and ready to assist you should you ever need help. Our goal is to help you sound
your best at all times! We feel confident that your new amplifier will bring you many years of reliable service, rewarding inspiration and
create for you a newfound freedom to express your music.
You have chosen an amplifier bred of a fine all-tube heritage and this model is our testament to Tube Bass Tone. Its forefathers can
be traced back to the very first MESA amplifier ever built, the MESA 450 Bass Head. In fact, the first 5 MESA amplifiers built in the
Lagunitas mountain shack were Bass amps…a piece of trivia little known and overshadowed by our overwhelming notoriety for guitar
amplification. But we’ve always loved the Bass, and have—since day one—been committed to elevating its stature through our art
form. The bloodline for MESA bass continued with the first rack-mount chassis bass amplifier in 1980, the D-180. The mid-eighties
saw the introduction of the BASS 400 and later in 1988, the BASS 400+ with its stunning Pitch, Punch and Power delivered by an
additional 6 x 6L6s to bring the total to twelve 6L6s in the mighty power section.
The 400+ went on to become a classic used by the world’s most talented Bassists for two decades. Paul McCartney, Mark King,
Stanley Clark, Jack Blades, Michael Anthony, Blasko and Bootsy Collins, are but a few of the international stars that put the 400+
center stage to anchor the band during its 20 year build cycle. Those iconic amps still bring top dollar when you can find one changing
hands on the pre-owned market. While MESA has since pioneered an entire line of tube-driven mosfet amplifiers that shored up our
place in the Bass market, the discontinuation of the 400+ left a gaping hole in the world of tube Bass amp offerings.
Tone Freaks Rejoice! The BASS STRATEGY Eight:88 is the next step in the MESA All-Tube Bass Amp Bloodline. Vastly improved
Tone, features, dial-ability, portability, packaging and control over the entire spectrum make the STRATEGY—and its little brother the
PRODIGY Four:88—an iconic step forward in Bass amplification. With an all-new tube preamp, a 5-position Rotary VOICE Selector,
our 9-Band Graphic Equalizer, patented Multi-Watt 3-Way Selectable Power, Footswitchable SOLO and VOICE control, Rear Tuner
Output, and an all new, high output power section utilizing eight KT-88s—the STRATEGY is THE big horsepower, big venue tube
Bass Amp for the new millennium.
FRONT VIEW: BASS STRATEGY
3
EQ
4
1
PLAY
ACTIVE
BRIGHT
EQ IN
2
0
EQ FS
5
MUTE
ON
™
SIL. REC.
NORMAL
POWER
INPUT
STANDBY
FULL PWR
D.I. PRE
HALF
GAIN
BASS
MID
TREBLE
VOICE
MASTER
LOW PWR
33Hz
80
150
300
600
900
2K
5K
8K
POST
D.I. LEVEL
SOLO
ON
Eight:88
™
REAR VIEW: BASS STRATEGY
USE
WITH
TWO
4Ω
CABS
2 OHM
CAUTION!
FOOT
SWITCH
HOME OF TONE ®
BASS STRATEGY
VACUUM TUBE
AMPLIFIER
®
PAGE 1
GROUND
WARNING!
HAND BUILT
IN PETALUMA,
CALIFORNIA U.S.A.
SLAVE
LEVEL
-
D.I. LIFT
D.I. OUT
PATENTED
6,724,897
RETURN
MUTE
2 OHM
EQ
EXT
SWITCHING
h
8 OHM
+
OUTPUT
MUTE ON UNLESS SPKR IN
4 OHM
SLAVE
USE
WITH
TWO
8Ω
CABS
SEND
4 OHM
LOOP
EXT
SWITCH
TUNER
SPEAKER
TUBE GUIDE
3 x 12AX7 8 x KT-88
10 A
SLO
BLO
VOICE
120 V~
60 Hz
10 A
SOLO
MAINS
FUSE
Overview
The STRATEGY begins with BRIGHT, NORMAL and ACTIVE INPUT Select choices feeding an all-new tube
preamp that borrows subsections from our CARBINE hybrid architecture. This preamp design allows increased control over a broad
spectrum of frequencies and incorporates active BASS and TREBLE controls with increased shaping power—while retaining the
sweet, musical blend of our traditional passive MID control. In addition to these we’ve included a reworked-for-tubes version of the
CARBINE’s 5-position rotary VOICE feature that allows notching or enhancement of specific midrange regions in addition to bass
and treble frequency boosting. The VOICE feature puts you instantly in iconic stylistic realms—from elastic, mid-scooped Thumbing to
articulate, mid-flat Fingerstyle, to the Classic metallic, scooped American Pick sound—with a flick of a switch. The ability to jump right
to these classic “curves” makes re-voicing on the fly in performance situations a snap, is also footswitchable, and adds immensely to
the STRATEGY’s versatility.
In addition to the effective and superbly musical shaping power of the STRATEGY preamp, the 9-Band Graphic Equalizer is included
for accurate fine-tuning once you’ve dialed in a sound style with the Tone Controls and VOICE Feature. This inductor-based circuit is
a tried and true, yet expanded carry-over from the BASS 400+ and has been an integral part of both our Guitar and Bass amplifiers
for well over 40 years. The EQ is controlled by a mini toggle on the Front Panel and allows you to bring it on-line manually, via the EQ
button of the optional STRATEGY Footswitch, or a single-button footswitch in the EQ ON/OFF Switchjack on the back of the amp.
Control over the Tone would be incomplete—at least in our minds—without control over the power as well. So the STRATEGY gives
you three choices as to how to utilize the power section. As wattage ratings are often misleading and irrelevant to volume when it
comes to describing tube power, the STRATEGY offers FULL, HALF and LOW power settings on the MULTI-WATT™ switch. Each
of these choices has a distinct tonal color and persona, with FULL delivering the maximum punch, authority and headroom. HALF
can deliver some valuable and surprising mid to lower power applications for tube-driven Bass while still offering plenty of volume for
a lot of live situations. LOW opens up many stylistic possibilities in the recording domain and may also work for some lower volume
gigs. An important collection of vintage-inspired sounds await you here in HALF and LOW POWER ranging from round and warm,
to edgy, to clipped and growling—depending how you dish it out from the MASTER. All the sounds in HALF and LOW POWER beg
to be recorded.
A MUTE/PLAY/SILENT RECORD switch allows convenient Front Panel muting for instrument changes, silent tuning or recording, or
any time where signal muting is needed. An AUTO-MUTE circuit is fitted to the Speaker Jacks to protect the transformer and power
tubes if no speaker is connected and is indicated by the same Front Panel LED triggered by the mini-toggle MUTE/PLAY/SILENT
RECORD switch (Red LED ON = MUTE). The SILENT RECORD setting allows you to safely mute the signal at the Power Amp and
use the STRATEGY preamp (including processing in the FX LOOP) to record using the D.I. OUTPUT without sound from the speaker.
The Rear Panel D.I. OUTPUT signal can be derived from either PRE (your instrument) or POST (the entire preamp) with the Front
Panel D.I. Switch. The D.I. OUTPUT signal strength is controlled by the Front Panel D.I. LEVEL located at the far right side of the
Chassis next to the SOLO™ Control
The STRATEGY incorporates our SOLO™ feature that has become so popular on our guitar amplifiers, which gives you a pre-settable
and footswitchable boost for any time you want to feature a specific part or featured solo in a song. The SOLO control can also be
used to compensate for EQ settings where several frequencies are cut creating a drop in overall volume or for an instrument with a
lower output due to weaker pickups.
Jumping to the Rear Panel you are greeted with the AC Receptacle. Use the supplied IEC removable 3 prong AC Cable and connect
the female end here.
The four EXTERNAL SWITCH jacks make the STRATEGY compatible with virtually any switching system’s architecture. These provide for external control of the MUTE, SOLO™, EQ and VOICE features with a master (usually midi) switcher or with any separate
“tip to ground” latching-type switch logic.
Up next is the 8-Pin DIN jack that accepts the 8-Pin Cable from the optional STRATEGY Footswitch. This optional footswitch allows
remote control of the VOICE, MUTE (TUNE), EQ, FX (LOOP) and SOLO. Make sure the cable is oriented correctly—with the pins
lining up with the sleeves in their jacks and then be sure it is properly seated (all the way in) when inserting the cable into the 8-Pin
DIN receptacle and the receptacle on the footswitch.
PAGE 2
To handle virtually any speaker cabinet scenario the STRATEGY is fitted with 5 SPEAKER OUTPUTS capable of handling a variety
of impedance loads. 2 x 4 OHM, 1 x 8 OHM and 2 x 2 OHM Outputs ensure that you can always find an impedance-correct match
regardless of your cabinet choices.
Next up is the D.I. OUTPUT, which provides a standard XLR interface to mixing consoles for both live and recording environments.
The signal here is derived from either your unaffected Bass (PRE) or the culmination of all your settings in the STRATEGY preamp
(POST) depending on your selection at the Front Panel PRE/POST switch. The valuable D.I. LIFT switch next door allows you to “float”
the Circuit Ground from Chassis Ground to reduce noise into a Console when the Ground references are different.
From there we find the buffered Series FX LOOP that allows seamless interfacing of your high quality outboard processing. Try to use
outboard processing of the same caliber as your amplifier. Ignoring this advice will likely result in compromised sound. The Loop is
a critical junction/impedance crossroads point between preamp and power and to put inferior foreign objects in the signal path here
will produce Tone of the lowest common denominator.
Directly adjacent to the LOOP jacks is the LOOP EXT. SWITCH jack which provides a standard ¼” interface to a master (usually midi)
switcher or a single button tip-to-ground footswitch and allows for remote on/off control of the LOOP feature. This switchjack is handy if
you don’t have or don’t want the optional STRATEGY Footswitch as it allows control of just the 9-Band Graphic with a single latching
footswitch. Some players may want only this feature on a small pedal board and this jack accommodates that mindset.
Next you’ll find a pair of jacks for the SLAVE and TUNER Outputs. The SLAVE jack provides a 1/4” output for capturing the sound of
both preamp and power section tonality right off the SPEAKER OUTPUTS to send on to additional power sections and cabinets for
truly coliseum grade rigs.
The SLAVE LEVEL control is located on the upper Tube Deck, just above and to the right of the Rear Panel LOOP jacks. Always begin
with the SLAVE LEVEL on “0” (off) to avoid overloading of the destination amplifier - and your ears! Remember, once a signal has
been taken from the SLAVE it cannot be re-inserted back in to the same STRATEGY or a feedback loop (producing an unpleasant
squeal) will occur. Also, the SLAVE IS NOT recommended for connection to Consoles as its level may be too hot and its Tone will most
surely not. There is no speaker emulation here! The SLAVE is for Power Reinforcement to drive additional speaker cabinets for large
venues. It is not intended for Live PA or Recording applications. Use the D.I. OUTPUT for all Console interfacing needs.
The buffered TUNER output captures your instrument and preps it for the long journey to the front of the stage or just upstairs to the
top of your amp. The optional STRATEGY Footswitch has a buffered TUNER OUTPUT jack routed through it’s cable from the built-in
DIN jack so you can place your Tuner at the front of the stage and not need to run another cable down to your pedalboard or stage/
microphone location.
Finally, a MESA first—a pair of two-position SET BIAS switches and adjacent recessed trim pots reside on the rear Tube Deck labeled
OPERATE and SET BIAS. The SET-BIAS position allows you to check and set the correct bias yourself for each half of the power
section quickly and easily when replacing power tubes. There’s no need to take the amp to a technician when it’s time to change
tubes as this bias method is completely user-serviceable and it’s easy to dial in the important bias setting on these big KT-88s just
right—by yourself!
PAGE 3
INSTANT GRATIFICATION
The STRATEGY is about the easiest amp on the planet to get a great sound from quickly—and with the VOICE Control and the
Graphic EQ—unlimited great sounds. Just set most of the controls at noon…and enjoy! From those settings, may we recommend you
sweep the VOICE Control from position 1 to 5 and experience what a difference the various mid voicings combined with bass and
treble enhancements can provide. You’ll have plenty of time later to craft your unique sounds with the 9-Band EQ, but for now just get
familiar with the extreme variations available on the standard Tone controls and 5 Modes of the handy VOICE Feature.
3
1
EQ
4
PLAY
ACTIVE
BRIGHT
EQ IN
2
0
MUTE
ON
™
EQ FS
SIL. REC.
FULL PWR
D.I. PRE
5
NORMAL
POWER
INPUT
STANDBY
HALF
GAIN
BASS
MID
TREBLE
VOICE
MASTER
LOW PWR
33Hz
80
150
300
600
900
2K
5K
8K
POST
D.I. LEVEL
SOLO
ON
Eight:88
™
NOTE: COLD START PROCEDURE: When powering up your STRATEGY from cold, ALWAYS follow this Start Up Procedure: We
have found the currently available KT-88s require substantially more time than 6L6s or EL34s to warm up to full operating temperature. If you hit them with high voltage with the STANDBY sooner than three minutes, you may hear some crackling as well as a slow
volume increase as they get up to full temperature. This subsides once they are fully warm, and while it might not hurt the tubes per
se, it is better to warm them up for at least three minutes (or longer) whenever you can.
NOTE: IMPORTANT!—Do Not flip the STANDBY SWITCH in and out of STANDBY mode (on and off) while the amplifier is being
played or with any type of signal being amplified. The large amount of current involved in this scenario can damage the STANDBY
SWITCH.
1.Begin with STANDBY in the STANDBY Position.
2.Switch POWER to ON and WAIT at least three minutes or longer for the tubes to “warm up”. (With STANDBY OFF and POWER
ON, the tubes internal components are allowed to warm up slowly before hitting them with the high voltage controlled by the
STANDBY being switched to ON).
3.Flip STANDBY to ON.
4.PLAY!
Following this startup procedure will lengthen the musical life of your power tubes and decrease the chances of untimely power tube
failures.
HELPFUL HINTS
IMPORTANT! The SPEAKER OUTPUT Jack’s AUTO-MUTE function is triggered anytime there is no Speaker Cabinet (Load) plugged
into one of the Speaker Jacks. The amp “knows” if a cabinet is not plugged into a speaker jack and mutes to protect itself from damage. If there is no sound when you turn STANDBY to “ON”—ALWAYS and IMMEDIATELY—STOP PLAYING—and check to make
sure there is a Speaker Cabinet plugged in both to the amp and cabinet ends of the cable. The Front Panel MUTE LED will be illuminated red when either the MUTE/PLAY/SILENT RECORD switch is set to MUTE or SILENT RECORD—OR—when there is no
Speaker Cabinet connected to the Speaker Jacks. AUTO-MUTE is also ON when the Set Bias switch is set to “SET BIAS”.
NOTE: IMPORTANT! MAKE SURE YOU HAVE A SPEAKER CONNECTED TO THE SPEAKER OUTPUT JACKS AT ALL TIMES!
EVEN THOUGH THE STRATEGY HAS BUILT-IN PROTECTION, DON’T RELY ON THIS ALONE—IT IS A HIGH POWER AMPLIFIER AND NEEDS A LOAD CONNECTED AT ALL TIMES!
NOTE: IMPORTANT! NEVER UNPLUG THE SPEAKER LOAD (Cabinet) WHILE THE AMPLIFIER IS IN USE (BEING PLAYED)!
NOTE: IMPORTANT!—Do Not flip the STANDBY SWITCH in and out of STANDBY mode (on and off) while the amplifier is being
played or with any type of signal being amplified. The large amount of current involved in this scenario can damage the STANDBY
SWITCH.
PAGE 4
Though it goes without saying, FULL POWER on the POWER SELECT mini toggle delivers the maximum headroom, punch and
perceived “speed” and control over the notes.
The VOICE Control is the most powerful, single control on the STRATEGY and delivers many of the characteristics of several different
manufacturer’s iconic amplifiers in one simple-to-use control. Use the VOICE Control to take a “broad aim” at the sound/playing style
you are pursuing and then focus in and fine-tune with the rotary Tone Controls.
The VOICE Feature “preset sounds” are assembled with these stylistic applications in mind:
1 = Slight Mid Scoop/Huge Low End: Funk/Thumbing/Slap
2 = Subtle Wide “Q” Bass Boost-Approximately 20Hz – 180Hz: Smooth R&B/Fingerstyle
3 = Flat: Articulate Rock Punch/Fingerstyle
4 = Mid Scoop/Bass Boost/High Boost: Classic Rock/Pick, Fingerstyle, Thumbing
5 = Radical Mid Scoop/Bass Boost/High Boost: Aggressive Rock/Pick, Hyper Slap/Thumbing
Sometimes less is more. Don’t fall prey to the classic Tone Trap… EQ HANGOVER. With or without the 9-Band Graphic employed,
don’t chase great Tone around in circles. Instead use your IQ and constantly reference a “less altered state of play” when experimenting with the Controls, VOICE and EQ. By going back and forth to a more “flat” or “conservatively voiced” setting you will avoid ear
fatigue and end up with a more balanced sound.
The SOLO Feature can be used to not only boost your level for featured parts, but as an additional MASTER VOLUME to compensate
for different footswitchable VOICE and/or Graphic EQ settings as well.
The D.I. OUTPUT will have signal present when in the PRE selection even when STANDBY is used to mute the signal to the power
section (STANDBY position) as this is the direct signal straight from your instrument before it goes through the amplifier.
The Cooling Fan is equipped with a thermostat that allows for different speeds depending on the operating conditions (temperature)
of the output transformer and tubes. Don’t be alarmed if the fan speed (and associated noise) increases while you are playing. This
is normal and essential to your amplifier’s wellbeing and reliability.
Now that you have an overview of your STRATEGY and some hints to achieve a great sound fast, let’s take a deeper look at the
controls and features of this mighty Bass powerhouse.
PAGE 5
FRONT PANEL: (CONTROLS & FEATURES)
INPUT:
This jack is the instrument INPUT and it feeds the first tube stage in the tube preamp of the STRATEGY. Both passive
as well as active instruments are provided for with a specific setting on the 3-position INPUT SELECT switch.
ACTIVE
BRIGHT
NORMAL
INPUT
GAIN
INPUT SELECT: BRIGHT/NORMAL/ACTIVE
This 3-position switch allows selection of three different Input configurations, two of which are voicing options and a third that offers an Input Pad for Active Instruments. Select the option that best suits your
tonal/stylistic needs and impedance/headroom requirements.
BRIGHT This is the normal INPUT (to us, anyway)—and while “normal” is a relative term—this setting would usually be the first
choice for most Passive instruments. As you might imagine, the BRIGHT selection offers a brighter, more detailed Tone and can also
give the impression of a more responsive or faster feel—which Passive Instruments might benefit from. This Input Mode would be
the choice anytime you’re looking for a more present or forward sound with enhanced top end characteristics and a more detailed
spectrum of upper harmonics. While the name suggests that this position might be better suited to traditional or passive instruments,
don’t be afraid to try BRIGHT for an exciting sound with Active Basses as well. Just keep in mind that the range of usable, unclipped
headroom on the GAIN control will be lower if you use BRIGHT with an active instrument. BRIGHT provides a snappy, alive sound
that has more bounce and clarity for vintage style basses that is really fun to play. The impression of headroom and more full-range
EQ curve of the BRIGHT Input creates a crisp, superbly clean sound with these more traditional instruments that will likely take them
down some new avenues. You may also want to use BRIGHT if the cabinets you’re using don’t offer high frequency horns or tweeters
and you’re looking for more detail in the high end.
NORMAL provides a purposeful “Low-Fi” sounding alternative to the crisp and detailed sound of the BRIGHT Input setting. The
NORMAL input is also a great choice if your bass or cabinet (or both) leans toward being a little on the bright side or if you find the
STRATEGY to sound bright with other elements of your rig. A quick flip of the switch here and the STRATEGY is tuned to your playing
style or other aspects of your rig. NORMAL features a rounder, warmer Tone that is perfect for old school sounds and classic passive Basses. This setting may also be preferable for overdriven or clipped sounds as the less prominent top end will produce a more
musical clip and help avoid ratty or buzzy distortion characteristics. NORMAL can also provide a warmer sound for modern Basses
with higher output pickups, but will probably start to run out of headroom and break up sooner - possibly before you want them to. It
will not hurt the amplifier to run active instruments in the NORMAL Input and in fact, you may want to use this to your advantage in
certain musical scenarios. However, if you are looking for the most Hi-Fi tonal response and greatest headroom you will likely find
better performance by using the ACTIVE Input with modern Active Basses.
ACTIVE provides the proper padded Input sensitivity for instruments that incorporate an on-board preamp and/or pickups that utilize
active electronics. This jack can receive the highest signal level of the three INPUT choices before clipping begins in the preamp and
therefore provides the greatest headroom for these higher output instruments. EQ-wise, ACTIVE is voiced much like the BRIGHT
setting and provides the full spectrum of upper harmonics. This clarity and detail nicely reinforces the higher headroom nature of this
Input setting. While there is more headroom—and therefore ACTIVE requires a hotter signal to bring the whole amp to full power—
don’t be afraid to try it for a different sound with passive Basses as well. One thing is for sure, you won’t be running out of clean
headroom at the INPUT if you run your passive instrument in the ACTIVE setting. You can use this to your advantage when looking
for the cleanest possible sound with traditional Basses. Just keep in mind you may see higher settings on both GAIN and MASTER
than you’re accustomed to in order to achieve the volume you want for this hyper-clean Tone.
PAGE 6
THE CONTROLS
GAIN
ACTIVE
BRIGHT
This control determines the overall character of the sound along with input gain and sensitivity. The lower regions of the
control (below 12:00) offer the cleanest sounds and greater headroom with a scooped, brighter personality. The upper harmonics
come through more prominently in this area of the control making the top end sound more transparent
and crisp. This region is especially useful for funkier stuff when thumbing is in order. It keeps the rubberband feel intact in the lows and mids while voicing the snap just high enough to avoid harshness, or the
dreaded “gak” when the G string is plucked.
NORMAL
INPUT
GAIN
As the GAIN control is increased past 12:00 a richer, “well-rounded” and more blooming voice becomes
dominant. Headroom starts to diminish in increments until eventually, a tube overdrive sound appears
as the 12AX7 input preamp tube is driven into saturation.
The region between 12:00 and 2:30 is where classic, warm tube sounds reside. Within this narrow
band, you will discover a world of old-school tones. Tiny increments here produce subtle, but important differences in the attack
characteristic, which in turn, can feel like changes in the time domain.
By experimenting with the setting of the GAIN control, you can actually voice the amp to feel as if it bounces just ahead of the groove
(10:30 – 12:00)—or lays back a little deeper to produce a more ‘Fatback’ feel with tube drive (12:30 – 2:00). The difference in attack
and sustain produces striking results as to how the bassist - and in fact the whole band - perceives things in the time domain.
BASS This control is responsible for the basic mix of low frequencies in the tube pre-amp. The BASS control is an “active” control
- as opposed to a “passive” style control. This means that a center “Q” point has been chosen for this control that allows you to either
boost or cut a range of low end centered on that frequency. While there is a specific frequency that the
Bass control “centers on”, the frequencies and harmonics on either side of this center Q point are affected in a diminishing “bell shaped” curve as you sweep it one direction or another.
The BASS control is actually a gain and frequency control all rolled into one with the “Q” center at
55Hz. As mentioned above, though it is centered here, frequencies (harmonics) in both low and high
directions are affected because of its broader-band nature. Twelve o’clock (NOON) on the BASS conBASS
MID
trol delivers a basically “flat” response (no boost/no cut). As the BASS control is increased past 12:00
(NOON), it produces a 6db per octave boost in gain starting at the center point of 55Hz and tapering
gradually to the edges of the broad Q’s bell-shaped curve from 20Hz on the low side, all the way up to 321Hz on the high side. At
5:30 on the bass control a +6db increase in gain is possible. As the BASS control is dialed below 12:00, 55Hz and all associated
harmonics are reduced and eventually notched almost completely out of the signal path. This lower range of the control delivers a 6db
per octave “cut” centered at 55Hz going down to 20Hz with an overall “cut gain” of -10db possible as the control reaches 7:30 (off).
This type of active rotary control makes it possible to achieve bass control and characteristics far beyond that of a conventional passive type control. It can increase the low end to an almost absurd level and then, with a flick of the wrist, dip it to near transistor radio
skinniness. Needless to say, with any control this powerful a certain amount of finesse must be applied to achieve musical results.
MID This is the only passive style control in the string of rotary tone controls. This scheme was chosen for its inherently musical
blend and for the way the passive style midrange control—with its wide footprint and smooth taper—fills in the “holes”. Unlike the
BASS, this control is a cut only, and while it can competently remove this broad spectrum of midrange
from the mix, it cannot provide the extreme focused attenuation of an active style control.
BASS
MID
You will find that this passive, broad-band control works really well for shaping the midrange frequencies and imparting a natural earthiness and character that is the perfect counterpart to its active style
neighbors. It’s hard to dial wrong with this more forgiving approach as it gives you the ability to punch
through a mix or sweeten and smooth out the sound by adjusting just one control.
Another useful property of the Passive MID when used above 12:00 is that it starts to impart a furry,
PAGE 7
tube growl as it is increased and actually pushes things toward the threshold of clip at higher settings… especially in the #3 “Flat”
VOICE Position. Use this to your advantage when searching for aggressive Rock sounds with an edge or R&B Tones that have just a
hint of tube saturation. This is easier to showcase and sounds more authentic in the HALF and LOW Power Modes.
For radical and specific scooping of the midrange frequencies in modern R&B and Funk styles, there is plenty of notching power that
is infinitely more accurate stylistically to be found in the VOICE Control and/or Graphic EQ. Because of this, we opted for the tried and
true passive style midrange control that has been working great in all of our amplifiers for decades. It’s hard to improve on a classic.
TREBLE The TREBLE is also an active-style control like that found in the BASS and it was chosen for its ability to radically shape
the upper harmonic region. Like the BASS, it also has a center Q point with frequencies (harmonics) above and below, responding in
harmony in a bell-shaped curve as it is dialed for either cut or boost.
As the TREBLE control is increased past 12:00 (NOON), it produces a 6db per octave boost in gain
starting at the center point of 3.2 KHz and tapering gradually to the edges of the broad Q’s bell-shaped
1
5
curve from 723 Hz on the low side and all the way up to 6KHz on the high side. The maximum boost
available from 12:00 (Flat) is 5db. Dialing the TREBLE below 12:00 produces a 6db per octave cut
centered at 3.2KHz and decreasing in strength down to 723Hz and out to 6KHz. The maximum “cut” atTREBLE
VOICE
tenuation of -10db is reached at the bottom of the control (7:30/off). The ability to cut these frequencies
more radically makes it possible to obtain incredibly rich and warm old-school R&B and Jazz sounds
that rival any of the classic recordings of the day. This broad Q scheme lends a sweetness of sound
when boosted while retaining all the focus and simple usability associated with a traditional passive TREBLE control.
2
3
4
The active TREBLE control completes the rotary tone control string to create a powerful and extremely accurate network to use as
your fundamental tools for Tone shaping. It’s no wonder many first-time STRATEGY players make the comment that just these three
controls (even set at noon)—combined with the GAIN—create the best tone they have ever heard!
NOTE: As with the BASS control, may we remind you that a control of this type with its increased power, should be used with finesse
(in the TREBLE’s case almost more so, because higher frequencies seem louder to the ear and are generally more painful when set
to extremes). Another reason to use care is that high frequencies tend to increase the ambient noise floor when set too high. This is
then exacerbated if the MID control is combined for added top end boost. Dial with care and music in mind.
VOICE This simple to use feature puts the shaping power of a parametric EQ at your fingertips (without the learning curve) and
allows you to access some of the world’s most iconic bass sounds instantly either via the rotary switch or optional footswitch. The
5-position rotary allows you to select from four distinct and different voices aimed at all the classic Bass
3
sounds. Most of the dramatic changes occur in the midrange where the basic character of a sound is
2
4
1
5
determined right away. There are three positions that feature scooped midrange of different frequencies
(Positions 1,4 & 5)—two with increased lows (Positions 1 & 2) and two positions that utilize scooped
higher mids with boosted lows and boosted highs to achieve their curve (Positions 4 & 5). Position 3 is
basically a “Flat” sound with no midrange cut or boost—so you can think of that as a “BYPASS” for the
TREBLE
VOICE
VOICE feature.
Below is a synopsis of the 5 voicing choices (Modes) found on the VOICE control:
1.Midrange scoop (centered around 400 – 500Hz) accompanied by a boost in low end. Excellent for dramatic thumbing/slapping
styles or smooth chording.
2.Subtle Bass Boost from 20Hz – 180Hz. Great for R&B and anytime you want to widen a sound.
3.Voice Feature Bypassed—“Flat” with Tone controls set at 12:00.
4.Gentle Midrange scoop (centered around 600Hz) and low end boost with increased high end. Good choice for articulate Rock
styles with Fingers or Pick. Tracks your playing with articulation and enhanced definition.
5.Radical Mid Scoop (centered around 600Hz) and low end boost with increased high end. ‘Piano String’ clarity, great for aggressive Rock Styles played with Fingers or Pick or Hyper-Funk Slap or Thumbing Styles.
PAGE 8
Keep in mind these positions use a medium Q width to avoid a notchy sound and retain an organic quality. There will be some cut or
boost on the adjacent frequencies. Once you have selected a VOICE mode to use, consider fine-tuning the sound with the standard
tone controls.
Remember that the rotary tone controls might seem to react differently than they do when the VOICE feature is BYPASSED (set to
position 3)—as the basic character of the sound is altered substantially in positions 1, 2, 4 & 5. The Tone controls are still centered
in their respective regions, but the way they interact within the landscape of different frequencies being cut or boosted by the VOICE
mode causes a perceived shift in their response.
MASTER
The MASTER control is the feed to the power section and determines the overall playing volume of the STRATEGY
as well as determining the FX SEND Level. An optimum setting will be partially determined by the setting of the GAIN control as well
as the entire Tone Control network—and how loud you want the amp. All these controls affect the signal
strength at the end of the preamp and can make the MASTER control very sensitive. The MASTER
allows you to set the preamp’s GAIN control across a wide range of input headroom possibilities—from
completely clean to tube overdrive—and compensate for these extremes, giving you independent control
over the playing volume.
EQ IN
EQ
0
EQ FS
FULL PWR
HALF
MASTER
LOW PWR
NOTE: Remember to use caution with the MASTER as it is the gas pedal for the significant power available with the STRATEGY. We suggest a zero setting at each power up to avoid surprise damage to speakers and ears.
EQ IN/EQ OFF/EQ FS
This three-position mini-toggle controls whether the 9 BAND Graphic Equalizer is active in the signal
path, and if so, how it will be engaged. The setting of this switch controls the illumination of the EQ STATUS LED located directly
below the switch.
EQ IN
EQ
0
EQ FS
NOTE: A quick word of caution is in order here. The 9 Band EQ—while easy to dial, understand and apply - can also be a “dangerous” sonic tool in the wrong hands.
We make this plea for your benefit and that of your audiences; Use the 9 Band EQ with taste, a musical ear and a tempered hand. It is easy to “Over-EQ” your sound with this kind of shaping power at your
MASTER
disposal. Make SUBTLE adjustments with the Graphic EQ AFTER you have dialed up the best sound you
can with the Rotary Tone controls and/or the VOICE Feature. They are powerful and will get you “right in
the zone” of almost any sound you can think of. It’s much easier to create a balanced sound this way—and
then use the Graphic for subtle enhancement.
FULL PWR
HALF
LOW PWR
HINT: When dialing sounds with the Graphic, do short tests frequently and A/B the changes with a “flat” sound by toggling the Graphic
EQ IN and OUT of the signal path with the EQ Control switch. In other words—check your sound against a “flatter” or less-altered
reference.
It’s really easy to get “out there” with settings that are too extreme because you’ve given yourself an EQ Hangover and your ears
can’t be objective in that state. Take frequent breaks or pauses. We suggest coming back later with fresh ears to check your work.
Again, use this powerful tool with taste and musicality. Your bandmates and audience will be grateful.
EQ IN (upper position) manually engages the 9-Band EQ and it cannot be disengaged until you take it out of this position. This setting
will illuminate the EQ STATUS LED notifying you the EQ is engaged.
EQ “O” (middle position) bypasses the 9-Band EQ and in this position the sliders are removed from the signal path. The EQ STATUS
LED will remain off.
EQ FS (lower position) allows the EQ to be controlled via the optional STRATEGY Footswitch or “tip-to-ground” on/off footswitch
(using the EQ EXT. SWITCH jack) and taken in and out of the signal path on command during performance. The EQ STATUS LED
PAGE 9
will be illuminated on the front panel, on the optional STRATEGY footswitch and our optional single button switch with LED indicating
your EQ is on.
NOTE: The setting of the EQ mini-toggle overrides the buttons on the STRATEGY Footswitch. If the switch is set to “EQ IN”, you
cannot take it out of the signal path with the Footswitch. If the mini toggle is set to “EQ O”, you cannot engage the SLIDERS via the
Footswitch.
MULTI-WATT™ Switchable Power: FULL/HALF/LOW PWR As you might have guessed, this switch allows you to select
between two distinct ranges of power, enabling you to better tailor the output response of the STRATEGY to the preamp sounds
you have dialed up and/or the venue you’re playing in. In some cases you will want to use it to create an
appropriate volume level, while in other scenarios to further authenticate a certain sound, style or vibe.
EQ IN
EQ
0
EQ FS
FULL PWR
HALF
MASTER
While the three settings—FULL, HALF and LOW—refer to both power rating and available headroom,
each of these also has an effect on the Tone and personality of the sound. You’ll quickly learn to use
these choices as part of your Tone palette along with the rotary Tone Controls and VOICE Feature to craft
sounds that are appropriate in volume and clarity as well as authentic in shape and feel.
LOW PWR
FULL incorporates all eight KT-88 power tubes to create the maximum power and headroom—approximately 465 watts RMS of tube power—that sounds and feels more like 900. This is the choice any time
you need the maximum clean transient attack, clarity and headroom. FULL will also track complex rhythmic passages with the most
accuracy as it has the quickest recovery time between notes. Tone-wise, FULL has the best balance of punch and authority, sparkle
and detail and creates a “Hi-Fi” experience, particularly when used with the BRIGHT input selection. Tight delivery and tracking in the
low mids and bottom end is beautifully integrated with top end detail and angelic sounding upper harmonics. Up here the air is fresh
and inspiring as only an all-tube circuit can create. FULL also has the girth and big-iron transformer push that the other two choices
just can’t muster. Here you have a truly impressive power supply shoveling big current at the eight KT-88s resulting in a massive
amount of power and headroom. You’ll be hard pressed to find an equal in the small circle of Tube Bass Heads produced anywhere—
now or in the past—that can move air and affect your physiology like the STRATEGY can in the FULL power setting.
HALF PWR utilizes four of the eight KT-88s to provide approximately 250 watts of sweet, tube power. This option has a less shimmering top end, warmer attack and a little less emphasis on midrange punch. HALF can be pushed into a furry clip in medium size
venues for added Rock attitude or for an old school R&B sound that can meet lower to medium headroom requirements. HALF is the
perfect Studio power mode. Clean enough, but not too clean. It makes up, in personality and color, what it lacks in brute power. It also
can save you money on tube replacement costs. By using the HALF position for your applications that don’t require maximum output
and headroom, you can lengthen the interval between re-tubing if you employ power tube rotation (swapping the ones used in HALF
Power with the ones that remain in STANDBY during HALF Power operation). If you do end up using HALF for much of your playing,
you can rotate the “unused” tubes and get twice the Tone-full life out of a set of output tubes. (See the TUBE TASK CHART in the Rear
Section of this Manual to identify the tubes in use during HALF Power Operating Mode).
NOTE: When using the HALF power setting, to obtain the maximum headroom and power and retain tight, punchy attack characteristics, move an 8 Ohm speaker cabinet to the 4 Ohm SPEAKER OUTPUT on the Rear Panel. (See the SPEAKER OUTPUT section
later in the manual for more details and options on speaker connections in HALF Power.)
LOW brings the classic vintage power range to a soulful new plateau and will likely redefine your idea of what a lower wattage Bass
amp can be. Here, two of the power tubes are used to deliver approximately 100 watts of old-school magic that has a nice shine of
harmonic brightness on the top and tons of tube bloom in the bottom end. LOW presents a really usable clip threshold and allows
subtle mixing of the natural tube overdrive at volume levels that are perfect for recording or rehearsing. We’ve had great results
bouncing between our POWERHOUSE™ 1x12 cabinet for a portable coffeehouse live rig or sweet recording setup and a 4x10
POWERHOUSE or even 8x10 Traditional Cab showcase just how powerful 100 Tube watts can sound.
However you decide to utilize the STRATEGY’S Multi-Watt™ Switchable Power, it adds a level of versatility that’s hard to beat in Tone,
adaptability and authenticity. Be sure to experiment enough to learn the personalities, applications and boundaries of these classic
and very different power choices so that you can apply them quickly and appropriately to your style and your musical endeavors.
PAGE 10
MUTE/PLAY/SILENT RECORD
PLAY
This mini toggle provides a MUTE Mode for silent tuning, cable swapping or any time you
need to mute the sound without powering down. The SILENT RECORD Mode allows for silent (no live speaker) recording when using
the D.I. OUTPUT interfaced to a console. This function mutes the signal at the input of the Driver stage and also
(for protection of the transformer and power tubes) at the SPEAKER OUTPUT jacks. The FX LOOP signal is
ON
™
derived and returned before this mute point, so all your processing will be intact at the D.I. OUTPUT when using
POWER
the SILENT
RECORD feature. Use the SILENT RECORD position to shut off the signal to the power amp and
STANDBY
speakers and PLAY to use the STRATEGY in a normal (live) scenario. There is an LED indicator just below the
toggle
switch that
illuminates when the MUTE or SILENT RECORD Modes are engaged.
D.I. LEVEL
SOLO
ON
MUTE
SIL. REC.
D.I. PRE
POST
Eight:88
™
The MUTE Mode can also be engaged from the optional STRATEGY Footswitch by hitting the MUTE button located there.
A dedicated trigger jack for the MUTE Mode is located on the Rear Panel in the EXTERNAL SWITCH section. The MUTE Mode can
be triggered from there via a remote switcher such as any standard ¼” tip-to-ground latching-type switch. This type of control logic is
standard on nearly all master switching units on the market.
PRE/POST: D.I. OUTPUT SELECT
PLAY
This switch toggles the signal at the D.I. OUTPUT between a POST signal—where
the entire preamp and control settings affect the sound—and a PRE signal—where the instrument signal is fed directly to the D.I.
OUTPUT, bypassing the preamp and tone controls.
MUTE
PRE™ is the directONsound of your instrument before it goes through the preamp. In this setting, the controls will not
affect thePOWER
signal at the DIRECT OUTPUT. The PRE setting is useful for large venues when the sound you have
STANDBY
dialed up for your optimum stage tone might have too much low end for the front of house engineer to balance
through
a large PA where there are subs employed.
SOLO
SIL. REC.
D.I. PRE
POST
D.I. LEVEL
ON
Eight:88
POST gives you the entire preamp signal including INPUT SELECT, Tone Controls, the VOICE Mode selection
™
and processing in the FX Loop. POST is appropriate for recording situations where you want to capture the
closest thing to what you are hearing when you play, or live situations where the sound engineer requests your “stage sound” as a
Direct feed to the front of house.
NOTE: The D.I. OUTPUT will have signal present when in the PRE selection even when STANDBY is used to mute the signal to the
power section (STANDBY position) as this is the direct signal straight from your instrument before it goes through the amplifier.
NOTE: POST does not capture and include the power section of your amplifier.
D.I. LEVEL
PLAY
This Control determines the signal strength at the Rear Panel XLR D.I. OUTPUT Jack. We have located the D.I.
LEVEL on the Front Panel to offer you easy adjustment of the D.I. Level at Sound Check or even during a performance. The D.I.
OUTPUT on the Rear Panel is optimized for use directly into mixing consoles and the D.I. LEVEL Control will
allow for more than adequate signal level and plenty of room for adjustment within that window.
ON
™
MUTE
NOTE: IMPORTANT! It is a wise practice whenever interfacing with Consoles—whether Recording or Live
Sound—to ALWAYS begin your set-up regimen by zeroing out the D.I. LEVEL control BEFORE flipping the
POWER
switch to the ON position. This will prevent damage to the Console, Speakers or bystanders’ ears
ON
should the D.I. LEVEL accidentally be set too high. This practice allows you to bring up the D.I. LEVEL slowly
while the Engineer monitors the incoming signal strength and safely reaches an optimum level.
POWER
STANDBY
D.I. PRE
POST
D.I. LEVEL
SOLO
Eight:88
™
It is also wise to follow this regimen in reverse. Make it habit to zero out the D.I. LEVEL at the end of each performance or session. If
you are in a hurry when you set-up to use the STRATEGY you’ll avoid an embarrassing and sonically unpleasant mistake.
PAGE 11
SOLO CONTROL™
PLAY
MUTE
Your STRATEGY is equipped with our patented SOLO™ Feature that provides you with a pre-settable,
footswitchable boost for when it’s time to step out and showcase important parts during a performance. You can use the (optional)
STRATEGY Footswitch to engage this feature or you can trigger the SOLO LEVEL via a tip-to-ground latching switch connected to the Rear Panel jack labeled SOLO in the EXT. (external) SWITCHING jacks section
ON
™
(left rear).
POWER
This feature can be used to increase the playing volume to the amount set by the SOLO control when
engaged.
To use SOLO, simply connect your Footswitch or external trigger, set your playing volume with
ON
the MASTER control, hit the SOLO button on the Footswitch, and set the desired amount of boost with the
SOLO control. Now you have the added flexibility of a second “MASTER” control that you can call up at any
time from the Footswitch.
STANDBY
D.I. PRE
POST
D.I. LEVEL
SOLO
Eight:88
™
NOTE: The SOLO may not be used to achieve a volume level lower than that set by the MASTER control… it is a boost only feature.
NOTE: The SOLO control is optimized for performance level operation and therefore provides the best functionality in the middle
range of the MASTER control. It is normal to experience decreased effectiveness of the SOLO Feature at both the lowest and highest
regions of the MASTER control.
POWER
This switch controls the incoming AC Line power to the STRATEGY. Make sure you are connecting the STRATEGY to
a grounded outlet with the proper voltage rating present (120V / 60Hz AC for US Models).
ON
™
Never Alter your power cable! This will void your warranty and put you at risk of damaging your amplifier and
increasing your risk of electrical shock.
POWER
NOTE: COLD START PROCEDURE: When powering up your STRATEGY from cold, ALWAYS follow this
Start Up Procedure: We have found the currently available KT-88s to require substantially more time than
D.I. LEVEL
SOLO
ON
6L6s or EL34s to warm up to full operating temperature. If you hit them with high voltage sooner than three
Eight:88
minutes you may hear some crackling as well as a slow volume increase as they get up to full temperature.
This subsides once they are fully warm, and while it might not hurt the tubes per se—it is better to warm
them up for at least three minutes whenever you can.
STANDBY
™
1.Always begin with the STANDBY switch set to STANDBY.
2.Switch POWER to ON and WAIT at least three minutes or longer for the tubes to warm up. With STANDBY OFF and POWER
ON, the tube’s internal components are allowed to warm up slowly before hitting them with the high voltage controlled by the
STANDBY being switched to ON.
3.Move STANDBY to the ON Position
4.Play (your butt off)!
Following this startup procedure will lengthen the musical life of your power tubes and decrease the chances of untimely power tube
failures.
You may leave the POWER set to ON and use the STANDBY to cool your amp down and put it in an “idle state” during set breaks.
This is actually easier on the tubes than turning the POWER completely off, only to fire it back up again 15 minutes later. The shock
of in-rush current at the instant of POWER ON puts more stress on them than staying at idle (in STANDBY) once they are warm. This
scheme will ensure the longest tube life and best reliability from your STRATEGY.
PAGE 12
STANDBY
This switch controls the high voltage on the tubes. When set to OFF, this switch puts the STRATEGY in an “idle”
mode that is essential at “cold power up” and very handy—even frugal—during breaks in performance. Be sure to follow the coldstart procedure outlined in the previous section on POWER to get the best tube life and reliability from your
STRATEGY.
ON
™
POWER
STANDBY
D.I. LEVEL
SOLO
Eight:88
™
ON
Use the STANDBY to mute the signal anytime you take a break or want to do something other than play for a
short time but know you will return soon… like a few minutes or a ½ hour or so. If you know you won’t resume
using the amplifier within a reasonably short time, go ahead and turn the POWER switch off and save the
electricity and your tubes. Just be sure to follow the Cold Start procedure every time you wish to play. It will
save your Tone and your money.
NOTE: IMPORTANT!—Do Not flip the STANDBY SWITCH in and out of STANDBY mode (on and off) while the amplifier is being
played or with any type of signal being amplified. The large amount of current involved in this scenario can damage the STANDBY
SWITCH.
Well that about wraps it up for the Front Panel Features and controls. Now let’s review the Rear Panel and get familiar with those
features.
REST AREA
PAGE 13
3
EQ
4
1
PLAY
ACTIVE
0
EQ FS
5
MUTE
POWER
REAR PANEL CONTROLS
INPUT
STANDBY
FULL PWR
D.I. PRE
HALF
MID
TREBLE
VOICE
MASTER
LOW PWR
REAR VIEW: BASS STRATEGY EIGHT:88
USE
WITH
TWO
8Ω
CABS
4 OHM
4 OHM
150
300
600
900
2K
5K
8K
POST
8 OHM
2 OHM
USE
WITH
TWO
4Ω
CABS
2 OHM
ON
™
SLAVE
LEVEL
-
D.I. LIFT
EQ
EQ IN
VOICE
SOLO
Eight:88
+
BASS STRATEGY
VACUUM TUBE
AMPLIFIER
2
3
EQ
4
1
GROUND
HOME OF TONE ®
CAUTION!
FOOT
SWITCH
WARNING!
0
HAND BUILT
IN PETALUMA,
CALIFORNIA U.S.A.
EQ
® FS
5
PATENTED
6,724,897
D.I. OUT
PLAY
MUTE
D.I. LEVEL
OUTPUT
MUTE ON UNLESS SPKR IN
EXT
SWITCHING
ACTIVE
BRIGHT
h
SPEAKER
TUBE GUIDE
3 x 12AX7 8 x KT-88
10 A
SLO
BLO
SOLO
120 V~
60 Hz
10 A
80
SEND
MAINS
FUSE
33Hz
SLAVE
BASS
MUTE
LOOP
EXT
SWITCH
RETURN
GAIN
ON
™
SIL. REC.
NORMAL
TUNER
BRIGHT
EQ IN
2
™
SIL. REC.
NORMAL
ON
POWER
INPUT
STANDBY
FULL PWR
GAIN FUSEBASS
TREBLE
VOICE
AC MAINS
(ABOVEMID
REAR PANEL
ON
TUBEMASTER
DECK)
HALF
LOW PWR
D.I. PRE
D.I. LEVEL
SOLO
ON
Eight:88
Should your Fuse ever blow from either
a surge in the line
33Hz
80
150
300
600
900
2K
5K
8K
POST
™
voltage or from a faulty power tube, REPLACE IT ONLY WITH A SLO-BLO TYPE FUSE OF THE PROPER RATING AS LISTED
NEAR THE FUSE-HOLDER. THIS IS EXTREMELY IMPORTANT AS THE STRATEGY DRAWS A SUBSTANOUTPUT
TIAL AMOUNT OF CURRENT.
MUTE
USE
WITH
TWO
4Ω
CABS
2 OHM
CAUTION!
FOOT
SWITCH
HOME OF TONE ®
BASS STRATEGY
VACUUM TUBE
AMPLIFIER
®
-
D.I. LIFT
GROUND
WARNING!
HAND BUILT
IN PETALUMA,
CALIFORNIA U.S.A.
SLAVE
LEVEL
SLAVE
2 OHM
SEND
8 OHM
FUSE Rating for Domestic (USA) Models - 10A S.B.
EXT
SWITCHING
h
+
MUTE ON UNLESS SPKR IN
4 OHM
D.I. OUT
PATENTED
6,724,897
RETURN
USE
WITH
TWO
8Ω
CABS
EQ
4 OHM
LOOP
EXT
SWITCH
TUNER
SPEAKER
TUBE GUIDE
3 x 12AX7 8 x KT-88
10 A
SLO
BLO
VOICE
120 V~
60 Hz
10 A
SOLO
MAINS
FUSE
FUSE RATING AND REPLACEMENT A little known fact is that slo-blo fuses, as used in tube amplifiers, are rated for 135%
of stated value for one full hour of operation. This means a 5 amp rated fuse will carry almost 7 amps for one hour before blowing.
In order to comply with UL “fault condition testing” we have furnished a fuse value that will provide trouble free operation while at
the same time being low enough to protect your power transformer from over heating should it ever get too hot (extremely unlikely).
In addition, the high voltage plate of each KT-88 is protected via a special fusing type resistor to remove that tube from the circuit
should it experience a hard short-circuit type failure. This will limit damage and likely allow the amp to continue functioning, getting
you through the gig, though “on one less cylinder”. A hard tube short may occasionally damage the ceramic tube socket and your amp
should be serviced right away by a competent Authorized Mesa technician in the unlikely event this ever occurs.
During two years of prototype development and overall amp torture, the ONLY tube failures occurred when the amp was hit with a
big bass note… and no speaker was connected. To protect against such accidental misuse, we have added internal switches to the
speaker jacks that trigger the MUTE circuit until a plug is inserted into any one of the speaker jacks. For this system to be totally effective, you must insure that the plug is FULLY inserted into the amplifier and that the other end of the speaker cable is also connected
to your cabinet (duh!). Failures resulting from “no load” misuse will not be covered under warranty as they constitute gross user error.
NOTE: We cannot overemphasize the importance of making sure you have a speaker properly connected to your STRATEGY AT ALL
TIMES. The higher plate voltages of KT-88 power tubes creates potential for expensive repair bills and premature tube failures with
no speaker load connected. Never play loud or long if you hear no sound from your amp and always check the speaker connection
first in any no sound situation.
NOTE: Remember—the Front Panel MUTE LED Indicator will illuminate as a safeguard against a no load condition when there is no
speaker jack connected to the SPEAKER OUTPUT! If you see this light on—CHECK YOUR SPEAKER OUTPUT and PUT A LOAD
(cabinet) ON ONE if necessary BEFORE TURNING STANDBY ON!
POWER CABLE The IEC Removable AC cord that is supplied with the STRATEGY makes set-ups and tear-downs after the gig
a snap. Make sure the AC cord is firmly in its socket (receptacle) before powering up the amplifier. Also, make sure the AC wall outlet
you are connecting to is a reliable source of 120 (117) volt AC power. Additional heavy-duty cords are available from MESA should
you ever need one... simply call us and we can send one directly to you for a nominal charge (plus shipping).
PAGE 14
NOTE: The STRATEGY draws a substantial amount of AC current due to its high power and robust power transformer. Having
multiple amplifiers connected to the same AC source (power strip or even the same 15 amp Circuit), using long extension cords or
playing at extreme volumes can increase the likelihood of a circuit breaker tripping. If a breaker does trip, check to see what else may
be on that same circuit (refrigerator, fans in use, other amplifiers, etc.) and remove any “unconditioned” power strips, extension cords
and amplifiers and try to plug the STRATEGY directly into the wall Outlet—preferably one with only the STRATEGY or very little else
on that circuit.
3
EQ
4
PLAY
ACTIVE
EQ IN
2
0
MUTE
ON
™
NOTE: NEVER ALTER THE 3-PRONG POWER CORD IN ANY WAY. Doing so will void your warranty and increase the risk of electrical shock.
1
EQ FS
5
SIL. REC.
POWER
STANDBY
FULL PWR
D.I. PRE
D.I. LEVEL
HALF
ON
Eight:88
EXT (EXTERNAL) SWITCHING These four ¼” phone jacks allow external, remote switching of the MUTE, SOLO, EQ and
GAIN
BASS
MID
TREBLE
VOICE
MASTER
LOW PWR
33Hz
80
150
300
600
900
2K
5K
8K
POST
™
VOICE Features for easy interfacing with a master (usually MIDI) switching system. Most MIDI controllers and switching interfaces
utilize simple tip-to-ground latching-type switch logic, which is industry standard and provided for on virtually all
OUTPUT
brands 4and
of master8 OHM
switching2 OHM
systems2 OHM
on the market.
OHM types
4 OHM
SPEAKER
+
MUTE ON UNLESS SPKR IN
USE
WITH
TWO
4Ω
CABS
SLAVE
LEVEL
-
D.I. LIFT
EQ
SEND
USE
WITH
TWO
8Ω
CABS
SLAVE
TUBE GUIDE
3 x 12AX7 8 x KT-88
10 A
SLO
BLO
SOLO
120 V~
60 Hz
10 A
SOLO
BASS STRATEGY
VACUUM TUBE
AMPLIFIER
WARNING!
HAND BUILT
IN PETALUMA,
CALIFORNIA U.S.A.
®
NOTE: Use unshielded cables for the EXT. SWITCHING functions.
3
1
EQ
4
PLAY
EQ IN
2
0
EQ FS
5
D.I. OUT
LOOP
EXT
SWITCH
RETURN
VOICE
MUTE
GROUND
HOME OF TONE ®
CAUTION!
FOOT
SWITCH
PATENTED
6,724,897
TUNER
These jacks may also be used with single button tip-to-ground latching-type footswitches to isolate any of the four
features for individual control. This allows those who don’t need all four features to be footswitchable to just use
single or smaller boxes on their pedal board for just the features they need to control. There are common individual
Control Footswitches offered by many manufacturers and Mesa also sells single button tip-to-ground footswitches
for these functions as well. You can purchase Mesa single button footswitches from your local Mesa Authorized dealer or direct from
the factory.
EXT
SWITCHING
MUTE
ON
™
SIL. REC.
NOTE: The EXT SWITCHING Features are controlled by standard tip-to-ground latching-type logic.
POWER
STANDBY
FULL PWR
HALF
TREBLE
VOICE
MASTER
FOOTSWITCH
(OPTIONAL)
MID
SOLO
80
150
300
600
900
2K
5K
8K
POST
ON
™
MUTE/TUNE, EQ, FX(LOOP) and SOLO features. It also features a ¼” TUNER OUT jack on the left side that provides for connection of a tuner at the location of the Footswitch. When MUTE is selected on the Footswitch the signal at the SPEAKER
OUTPUT
OUTPUTS4 OHM
will be silenced
but
the
signal
at the TUNER jack on the Footswitch will still be active so you can tune your
4 OHM
8 OHM
2 OHM
2 OHM
instrument silently without having to run a cable back to your amplifier. The VOICE button allows you to toggle the VOICE
feature from Mode (position) 1, 2, 4 and 5 back to the “Bypassed/Flat” setting of Mode #3.
+
MUTE ON UNLESS SPKR IN
USE
WITH
TWO
4Ω
CABS
CAUTION!
FOOT
SWITCH
BASS STRATEGY
VACUUM TUBE
AMPLIFIER
HOME OF TONE ®
SLAVE
LEVEL
-
SLAVE
D.I. LIFT
SEND
USE
WITH
TWO
8Ω
CABS
GROUND
WARNING!
HAND BUILT
IN PETALUMA,
CALIFORNIA U.S.A.
D.I. OUT
PATENTED
6,724,897
LOOP
EXT
SWITCH
TUNER
SPEAKER
VOICE
EXT
SWITCHING
D.I. LEVEL
An optional STRATEGY Footswitch isEight:88
available that provides remote control of the VOICE,
33Hz
EQ
TUBE GUIDE
3 x 12AX7 8 x KT-88
LOW PWR
RETURN
SS
D.I. PRE
The female 8-Pin DIN receptacle on the Rear Panel just to the right of the EXTERNAL SWITCH JACKS is for the optional
STRATEGY Footswitch. Connect the 8-Pin DIN cable to this receptacle when the STRATEGY Footswitch is to be used to
control the VOICE, MUTE (TUNE), EQ, FX (LOOP) and SOLO. Make sure the cable is oriented correctly—with the pins lining up with
the sleeves in their jacks and then be sure it is properly seated (all the way in) when inserting the cable into the 8-Pin DIN receptacle
and the footswitch.
®
NOTE: NEVER force an improperly aligned cable! It can be connected easily when properly aligned.
NOTE: It is good practice to secure the Footswitch cable so that it will not be stressed should someone step on, trip over or pull the
cable sideways in some manner. This could cause damage to the pins on the male end of the cable or even possibly the sleeves within
the DIN jack. The simple, time tested gaffer’s (duct) tape is a good idea even if you and your band mates don’t move around much
during performance—someone else might.
PAGE 15
3
EQ
4
AY
2
1
0
EQ FS
5
ON
™
SIL. REC.
POWER
STANDBY
FULL PWR
D.I. PRE
D.I. LEVEL
SOLO
ON
HALF
VOICE
MASTER
Eight:88
SPEAKER
OUTPUT
(WITH AUTO-MUTE PROTECTION)
These five jacks are the ¼” SPEAKER OUTPUTS for the
MID
TREBLE
LOW PWR
80
150
300
600
900
2K
5K
8K
POST
™
STRATEGY and they are responsible for delivering it’s massive Tone and Power to your cabinets of choice. Two 4 OHM, one 8 Ohm
and two 2 Ohm jacks allow interfacing of almost any speaker set up and ensures
OUTPUT
proper loading of the Output Transformer and Tubes. For more ideas and instruction
4 OHM
4 OHM
8 OHM
2 OHM
2 OHM
on connecting your cabinets properly, see the diagrams in the Rear of this Manual
on SPEAKER CONNECTION. But first, this IMPORTANT note:
+
MUTE ON UNLESS SPKR IN
USE
WITH
TWO
4Ω
CABS
BASS STRATEGY
VACUUM TUBE
AMPLIFIER
HOME OF TONE ®
GROUND
WARNING!
HAND BUILT
IN PETALUMA,
CALIFORNIA U.S.A.
D.I. OUT
PATENTED
6,724,897
RETURN
-
SLAVE
EQ
CAUTION!
FOOT
SWITCH
SLAVE
LEVEL
D.I. LIFT
SEND
USE
WITH
TWO
8Ω
CABS
LOOP
EXT
SWITCH
TUNER
SPEAKER
VOICE
33Hz
NOTE: IMPORTANT! MAKE SURE YOU HAVE A SPEAKER CONNECTED TO
THE SPEAKER OUTPUT JACKS AT ALL TIMES! EVEN THOUGH THE STRATEGY HAS BUILT-IN PROTECTION, DON’T RELY ON THIS ALONE—IT IS A HIGH POWER AMPLIFIER AND MUST HAVE A LOAD
CONNECTED AT ALL TIMES!
®
NOTE: IMPORTANT! NEVER UNPLUG THE SPEAKER LOAD (Cabinet) WHILE THE AMPLIFIER IS IN USE AND BEING PLAYED!
The following are some basic Speaker Cabinet setup guidelines to follow for the proper loading, highest power headroom and tight,
punchy Tone.
One 8 Ohm Cabinet should be connected to the 8 OHM SPEAKER OUTPUT.
Two 8 Ohm Cabinets should be connected to the two 4 OHM SPEAKER OUTPUTS.
One 4 Ohm Cabinet should be connected to one of the 4 OHM SPEAKER OUTPUTS.
Two 4 Ohm Cabinets should be connected to the two 2 Ohm Outputs.
The four wiring schemes above cover 90% of the Cabinet load scenarios you will encounter. If you are attempting to connect cabinets
in a configuration not listed above, please consult the SPEAKER IMPEDANCE MATCHING AND HOOK-UP GUIDE toward the end
of this manual.
MULTI-WATT™ and SPEAKER OUTPUT CHOICES
NOTE: When switching between LOW, HALF and FULL POWER of the STRATEGY’s MULTI-WATT™ options, the impedance changes slightly at the SPEAKER OUTPUT jacks. While you can’t really damage the amplifier with an impedance mismatch, the sound
and feel of the amp can be either optimized or compromised (sometimes purposefully) by the intentional matching or mismatching
of the Speaker Load.
When the STRATEGY is being used in the MULTI-WATT position of HALF or LOW POWER, the impedance of the SPEAKER OUTPUTS (as labeled on the rear panel) changes. Loosely, the SPEAKER OUTPUT impedances double—the 4 OHM jacks become 8
OHM each and the 8 OHM jack becomes a 16 OHM.
For example, if you have an 8 OHM cabinet, while in HALF or LOW POWER, try plugging it into one of the 4 OHM jacks for a proper
impedance match. This will maximize the punch and output of the HALF POWER setting. However, if you leave the 8 OHM cabinet in
the 8 OHM SPEAKER OUTPUT in HALF or LOW POWER, a slight roll-off of top end frequencies occurs as well as softening of the
attack and a general warmer sound overall, due to the mismatch.
PAGE 16
Each of the MULTI-WATT Power Choices can be shaped, colored and even placed “strategically” in the time domain by matching the
Speaker Cabinet with the proper SPEAKER OUTPUT. While there really isn’t a “wrong” combination, there are some Load combinations that sound better to most players (tighter, more focused and bolder)—than others. You will want to experiment with your Cabinets
and the SPEAKER OUTPUTS to find what suits your style and sound the best. Below are some scenarios we like best:
FULL POWER—Follow the Guidelines above
HALF or LOW POWER - 8 Ohm Cabinet into one 4 OHM SPEAKER OUTPUT
4 Ohm Cabinet into the 4 OHM SPEAKER OUTPUT
SPEAKER OUTPUT AUTO-MUTE FUNCTION
Your STRATEGY has built-in Output Transformer protection against a
No-Load scenario in the form of an AUTO-MUTE Circuit via switching built right into the SPEAKER OUTPUT jacks.
When the Speaker Cable is inserted to any one of the five SPEAKER OUTPUT jacks, the AUTO-MUTE circuit is bypassed and audio
signal is allowed to pass and power your speakers. However, this does not mean that you should throw common sense to the wind
and depend solely on this circuit to care for your amplifier as you still need to make sure the other end of your cable is plugged into
the cabinet (the AUTO-MUTE circuit does NOT protect against this scenario). As with any amplifier with an all-tube Output Section—
ALWAYS MAKE SURE THERE IS A SPEAKER CONNECTED TO YOUR SPEAKER OUTPUTS.
The STRATEGY is a high power amplifier with very high current running through the Power Tubes and Output Transformer. Sending
a signal through it without a Load (Speaker Cabinet or other adequate Load) connected would almost certainly damage the Output
Transformer and Power Tubes and is NOT covered under warranty.
The AUTO-MUTE Circuit was designed primarily to avoid accidental no-load conditions but it is VERY IMPORTANT for YOU to be
vigilant and get in the habit of checking your SPEAKER OUTPUTS every time you play and anytime you hear no sound when you
expect you should. BEFORE you flip the POWER—and definitely the STANDBY switches—always confirm that a speaker load is
present by confirming the connection at your cabinet AND the amp.
NOTE: When there is nothing plugged into the SPEAKER OUTPUTS the front panel MUTE LED will be ON. This is an indicator that
there is No Load connected.
PLAY
NOTE: IMPORTANT! MAKE SURE YOU HAVE A SPEAKER CONNECTED TO THE SPEAKER OUTPUT JACKS AT ALL TIMES!
MUTE
ON
™
SIL. REC.
POWER
NOTE: IMPORTANT! NEVER UNPLUG THE SPEAKER LOAD (Cabinet) WHILE THE AMPLIFIER IS IN USE (being played)
STANDBY
D.I. PRE
300
900
2K
5K
8K
SOLO
POST
to Live Consoles or Recording Devices. Depending on the setting of the Front Panel D.I. SELECT mini toggle, the D.I. OUTPUT captures either the unaffected, direct sound of your instrument when PRE is selected—or—when POST is selected,
the signal consists of the instrument AND the all-tube preamp, Tone Controls, VOICE selections and Processing in
the FX LOOP. Both PRE and POST D.I. selections produce a “balanced” signal at the XLR D.I. OUTPUT, so longer
cable lengths will not affect your sound due to increased cable capacitance.
SLAVE
LEVEL
-
SLAVE
D.I. LIFT
SEND
2 OHM
ON
™
+
OUTPUT
USE
WITH
TWO
4Ω
CABS
D.I. LEVEL
Eight:88
D.I. OUTPUT This
3-pin male XLR handles the interface connection between the D.I. OUTPUT (Direct Out) of the STRATEGY
600
HAND BUILT
IN PETALUMA,
CALIFORNIA U.S.A.
D.I. OUT
PATENTED
6,724,897
RETURN
GROUND
RNING!
LOOP
EXT
SWITCH
TUNER
150
The signal strength present at the D.I. OUTPUT is affected by all the settings on your preamp (in the D.I. POST Position). However, the final output level that appears at the D.I. OUTPUT jack is set by the D.I. OUTPUT control on the
Front Panel. The overall range of signal available is optimized for Console interfacing and you will likely find a setting of 12:00 noon
provides a good nominal signal strength that is in the ball park for most Consoles. It’s a good habit to ZERO your D.I. OUPUT control
before plugging into a console or recording device and roll the D.I. LEVEL up slowly once signal can be monitored. Should you need
more or less signal, the range of the Front Panel D.I. LEVEL offers increments in both directions.
NOTE: The D.I. OUTPUT will have signal present when in the PRE selection even when STANDBY is used to mute the signal to the
power section (STANDBY position) as this is the direct signal straight from your instrument before it goes through the amplifier.
PAGE 17
D.I. LIFT / GROUND This 2-position mini toggle offers the ability to lift the Circuit Ground from the Chassis Ground, effectively
isolating the path to Ground for the STRATEGY circuit. This can be very helpful in live sound front of house or Monitor applications
as well as in Recording environments.
LIFT isolates the Circuit to Chassis Ground, preventing these types of ground loops when interfacing to consoles.
GROUND connects the Circuit Ground to the Chassis and should be used whenever possible. Use this position at all times when you
are NOT connecting the D.I. OUTPUT to a console.
PLAY
Sometimes—not always—this will help you isolate and remove unwanted hum or buzz from the equation. Remember that there are
a myriad of noises and hums that can be caused from many sources, including things beyond your control elsewhere on the AC Line
you are connected to (outside your house, studio or venue). The D.I. LIFT/GROUND switch can’t cure those other outside factors, but
it can relieve one of the more common sources of hum found when interfacing to Consoles that arises when the amplifier’s Ground
and the Console Ground create a loop.
MUTE
ON
™
SIL. REC.
POWER
STANDBY
D.I. PRE
2K
5K
8K
D.I. LEVEL
SOLO
ON
Eight:88
SEND
/ RETURN (FX LOOP)
POST
™
NOTE: To avoid any loud and potentially dangerous pops and noises, set the amp to Standby before connecting or disconnecting any
effects to the Send or Return jacks. This will prevent any potential damage to speakers, console inputs or ears.
+
-
SLAVE
These two ¼” jacks provide the interface for outboard effects devices and pedals and offers a way to use these processors
with the least amount of degradation to your Tone. The LOOP is a critical Tone path in the STRATEGY and is best used for
time-based effects (delay, chorus, flange, etc). Effects like overdrive, distortion, wah, envelope or compression often offer
substantial gain increase potential beyond UNITY GAIN if used at extremes. Use of these types of effects in the LOOP
can be a cause of issues ranging from microphonics, squealing, breakup, unwanted distortion or reduced headroom, just
to name a few, if UNITY GAIN is exceeded via your effect(s) output into the FX RETURN. That said, many players successfully use
compression (or for that matter, any of these devices) in the LOOP to control the dynamics there instead of between the Bass and the
INPUT, although usually very sparingly. There is no right way to apply compression (or the other effects mentioned above), so where
you place them in your signal path is up to you. Typically though, the devices mentioned above sound better and are more widely
usable when used on the “Front End” and not in the LOOP.
SEND
D.I. LIFT
SLAVE
LEVEL
LOOP
EXT
SWITCH
TUNER
OUT
RETURN
GROUND
PATENTED
6,724,897
The FX LOOP is a junction point between the end of the preamp and the driver stage to the power section and these jacks are wired
in SERIES with the signal. This means that the entire signal goes through the LOOP. The SEND jack will feed the signal out of the
preamp without interrupting it. The RETURN jack will break the path and interrupt the signal.
When nothing is plugged in to the SEND and RETURN jacks the FX LOOP is effectively bypassed and the signal is unaffected by
any loop circuitry.
PLAY
MUTE
NOTE: DON’T COMPROMISE YOUR TONE! The FX LOOP is wired in SERIES with the dry signal. Use the best quality processors
and pedal effects possible in the FX LOOP to ensure a good impedance match and minimal signal degradation. Also use the best
quality (low capacitance) cable possible of the shortest length to minimize the loss of high end or punch (TONE). We suggest 1 – 3
feet of FX related cabling, at most, to preserve tonal integrity. Everything you put in your signal path affects your sound—so use the
best!
ON
™
SIL. REC.
POWER
STANDBY
D.I. PRE
8K
POST
D.I. LEVEL
SOLO
ON
LOOP EXT. SWITCH
Eight:88
This jack provides the same function for the FX LOOP that the four EXT. SWITCH jacks located on the
left side of the Rear Panel do for their individual features. It is located here on the right side next to the LOOP jacks as it makes for
a cleaner internal layout and also so that if you don’t have to—or don’t want to carry—the larger optional Footswitch, you
can use a single footswitch connected here to trigger the LOOP on and off.
™
+
SLAVE
LEVEL
-
PATENTED
6,724,897
RETURN
GROUND
LOOP
EXT
SWITCH
This jack is controlled by the same tip-to-ground latching-type logic that the other four EXT. SWITCH jacks use and
again, this logic is standard on most external master switching units. It is also a common individual Control (grounding)
Footswitch offered by many brands and of course, we offer a rugged Bud Box type that’s perfect for smaller pedal boards
TUNER
SEND
SLAVE
D.I. LIFT
PAGE 18
for a nominal fee and you can call us Direct and order one. You may also order one through your local MESA Dealer.
TE
NOTE: Use an unshielded cable for the LOOP EXT. SWITCH function.
STANDBY
D.I. LEVEL
SOLO
Eight:88SLAVE
This jack is the output for the SLAVE circuit. Its signal is derived from the SPEAKER OUTPUT and then padded down
substantially to optimize it for driving additional amplifiers such as an additional STRATEGY or other power amp for large venues
SLAVE
-
LOOP
EXT
SWITCH
The primary application for the SLAVE is to add additional power while using just the one STRATEGY preamp. It is common practice to use the SLAVE jack to feed the FX LOOP RETURN jack of other STRATEGY amplifiers and bypass their
preamps. This scheme provides minimal “tweaking” when you want to add power and also allows for a backup preamp
should you ever need one (tube failure, etc.).
While it is possible to feed Mixing Consoles with the SLAVE, it is not recommended as it is not voiced accordingly and the
signal level is on the hot side. Use the D.I. OUTPUT whenever possible for interfacing to Consoles as you will achieve better results.
NOTE: IMPORTANT! Always begin using the SLAVE by setting the Front Panel MASTER to 7:30 (OFF) and increase it slowly as this
approach will help protect INPUT Stages, Speakers and most importantly... Ears!
NOTE: Once a signal is taken out of the SLAVE OUT it can not be inserted back into the amplifier anywhere as a feedback loop will
occur, producing a loud squeal akin to holding a microphone up to the PA Speaker.
NOTE: Use only shielded high quality (low capacitance) audio cable when taking a signal from the SLAVE OUT to other power amplifiers or effects..
SLAVE LEVEL (ABOVE REAR PANEL ON TUBE DECK) This control determines the signal level at the SLAVE Jack. The
SLAVE captures the entire sound of the amplifier from the SPEAKER OUTPUT jacks and is padded down to create an optimum
signal level for insertion into the INPUT of other Power Amps. .This allows additional STRATEGY “slave” amps to be used as support
power for larger Concert venues by connecting to their FX LOOP RETURN and using only the power section leaving you with just
one preamp to navigate.
The SLAVE may be used to feed consoles as well—but the signal is hotter than that of the DI OUTPUT and not voiced with any speaker simulation. We suggest using the DI OUTPUT for Console interfacing whenever possible as it is better suited for this application.
NOTE: IMPORTANT! No matter what application you intend to use the SLAVE OUTPUT for—begin with the SLAVE LEVEL all
the way down—and increase the SLAVE LEVEL SLOWLY to reach an appropriate signal level for your needs. Failure to follow this
scheme could result in damage to surrounding equipment and your ears!
NOTE: The SLAVE is NOT a DI OUTPUT. Use the DI OUTPUT for all Console interfacing needs whenever possible as the SLAVE is
not optimized for this application.
ON
™
EC.
POWER
STANDBY
TUNER
D.I. LEVEL
SOLO
ON
This jack captures the sound of your Instrument right off the INPUT jack—before it enters the preamp—and sends it
directly to the TUNER output providing a feed for tuning devices. It is a buffered signal so longer cable lengths are not an issue.
Eight:88
™
+
SLAVE
LEVEL
-
SLAVE
ST
SLAVE
LEVEL
+
TE
RE
ON
™
TUNER
ST
POWER
LOOP
EXT
SWITCH
TUNER
RE
ON
™
EC.
You may mute the audio signal at the SPEAKER OUTPUTS by using the TUNER MUTE function on the optional STRATEGY Footswitch or, by triggering the MUTE feature via the EXT. SWITCHING jacks with an external master switching
device or a single tip-to-ground on/off latching footswitch.
NOTE: Use shielded audio cable for connecting the TUNER Output to an external tuner.
PAGE 19
NOTES
PAGE 20
FACTORY SAMPLE SETTINGS
SAMPLE #1: Warm R&B
3
EQ
4
1
PLAY
ACTIVE
BRIGHT
EQ IN
2
0
EQ FS
5
MUTE
ON
™
SIL. REC.
NORMAL
POWER
INPUT
STANDBY
FULL PWR
D.I. PRE
HALF
GAIN
BASS
MID
TREBLE
VOICE
MASTER
LOW PWR
33Hz
80
150
SAMPLE #2: Motown Round
300
600
900
2K
5K
8K
POST
D.I. LEVEL
SOLO
ON
Eight:88
™
EQ Optional
2
3
EQ
4
1
PLAY
ACTIVE
BRIGHT
EQ IN
0
EQ FS
5
MUTE
ON
™
SIL. REC.
NORMAL
POWER
INPUT
STANDBY
FULL PWR
D.I. PRE
HALF
GAIN
BASS
MID
TREBLE
VOICE
MASTER
LOW PWR
33Hz
80
150
300
600
900
2K
5K
8K
POST
D.I. LEVEL
SOLO
ON
Eight:88
™
SAMPLE #3: Classic Rock Bass
3
EQ
4
1
PLAY
ACTIVE
BRIGHT
EQ IN
2
0
EQ FS
5
MUTE
ON
™
SIL. REC.
NORMAL
POWER
INPUT
STANDBY
FULL PWR
D.I. PRE
HALF
GAIN
BASS
MID
TREBLE
VOICE
MASTER
LOW PWR
33Hz
80
150
300
600
900
2K
5K
8K
POST
D.I. LEVEL
SOLO
ON
Eight:88
™
SAMPLE #4: Rock Growl
3
EQ
4
1
PLAY
ACTIVE
BRIGHT
EQ IN
2
0
EQ FS
5
MUTE
ON
™
SIL. REC.
NORMAL
POWER
INPUT
STANDBY
FULL PWR
D.I. PRE
HALF
GAIN
BASS
MID
TREBLE
VOICE
MASTER
LOW PWR
33Hz
80
150
SAMPLE #5: Fat Thumb
300
600
900
2K
5K
8K
POST
D.I. LEVEL
SOLO
ON
Eight:88
™
EQ Optional
2
3
EQ
4
1
PLAY
ACTIVE
BRIGHT
EQ IN
0
EQ FS
5
MUTE
ON
™
SIL. REC.
NORMAL
POWER
INPUT
STANDBY
FULL PWR
D.I. PRE
HALF
GAIN
BASS
MID
TREBLE
VOICE
MASTER
LOW PWR
33Hz
80
150
SAMPLE #6: Mid Staccato
300
600
900
2K
5K
8K
POST
D.I. LEVEL
SOLO
ON
Eight:88
™
EQ Optional
2
3
1
EQ
4
PLAY
ACTIVE
BRIGHT
EQ IN
0
EQ FS
5
MUTE
ON
™
SIL. REC.
NORMAL
POWER
INPUT
STANDBY
FULL PWR
D.I. PRE
HALF
GAIN
BASS
MID
TREBLE
VOICE
MASTER
LOW PWR
PAGE 21
33Hz
80
150
300
600
900
2K
5K
8K
POST
D.I. LEVEL
SOLO
Eight:88
™
ON
PERSONAL SETTINGS SHEET
ACTIVE
NORMAL
EQ IN
2
3
1
PLAY
EQ
4
0
ON
™
EQ FS
5
MUTE
VINTAGE
POWER
INPUT
STANDBY
FULL PWR
D.I. PRE
HALF
GAIN
BASS
MID
TREBLE
VOICE
MASTER
LOW PWR
33Hz
80
150
300
600
900
2K
5K
8K
ACTIVE
NORMAL
EQ IN
2
3
1
D.I. LEVEL
SOLO
ON
Eight:88
™
PLAY
EQ
4
POST
0
ON
™
EQ FS
5
MUTE
VINTAGE
POWER
INPUT
STANDBY
FULL PWR
D.I. PRE
HALF
GAIN
BASS
MID
TREBLE
VOICE
MASTER
LOW PWR
33Hz
80
150
300
600
900
2K
5K
8K
ACTIVE
NORMAL
EQ IN
2
3
1
SOLO
ON
Eight:88
™
PLAY
EQ
4
POST
D.I. LEVEL
0
ON
™
EQ FS
5
MUTE
VINTAGE
POWER
INPUT
STANDBY
FULL PWR
D.I. PRE
HALF
GAIN
BASS
MID
TREBLE
VOICE
MASTER
LOW PWR
33Hz
80
150
300
600
900
2K
5K
8K
ACTIVE
NORMAL
EQ IN
2
3
1
SOLO
ON
Eight:88
™
PLAY
EQ
4
POST
D.I. LEVEL
0
ON
™
EQ FS
MUTE
FULL PWR
D.I. PRE
5
VINTAGE
POWER
INPUT
STANDBY
HALF
GAIN
BASS
MID
TREBLE
VOICE
MASTER
LOW PWR
33Hz
80
150
300
600
900
2K
5K
8K
ACTIVE
NORMAL
EQ IN
2
3
1
SOLO
ON
Eight:88
™
PLAY
EQ
4
POST
D.I. LEVEL
0
ON
™
EQ FS
5
MUTE
VINTAGE
POWER
INPUT
STANDBY
FULL PWR
D.I. PRE
HALF
GAIN
BASS
MID
TREBLE
VOICE
MASTER
LOW PWR
33Hz
80
150
300
600
900
2K
5K
8K
ACTIVE
NORMAL
EQ IN
2
3
1
EQ
4
POST
D.I. LEVEL
SOLO
ON
Eight:88
™
PLAY
0
ON
™
EQ FS
5
MUTE
VINTAGE
POWER
INPUT
STANDBY
FULL PWR
D.I. PRE
HALF
GAIN
BASS
MID
TREBLE
VOICE
MASTER
LOW PWR
PAGE 22
33Hz
80
150
300
600
900
2K
5K
8K
POST
D.I. LEVEL
SOLO
Eight:88
™
ON
BIASING THE KT-88 POWER TUBES – by Designer Randall Smith
First and foremost: Bias adjustment is only required when replacing power tubes. Checking bias as routine maintenance or if a
tube problem is suspected is quick and easy but shouldn’t often be necessary. And since those big KT-88s in your amplifier are only
running about half their maximum rated dissipation, they should last for years.
Nevertheless, we have provided a simple and effective bias adjust system that you can use yourself with only a little care and a small
screwdriver. This deviates from our standard practice for 6L6s over the last 40 years where the bias is fixed to the “sweet spot” as
each amp is built. Why this difference?
First, a little history: Traditional Fender 6L6 amp schematics show the bias setting to be -52 volts. What ISN’T specified are some
important factors, such as the AC mains voltage which can vary up to 14% and affects the bias setting equally.
But most important is: What is the desired Plate Current that the power tubes should be biased to draw? Because getting that current
set right is the whole point of adjusting the bias. And here’s where the going gets tougher. Fender offered no spec for plate current,
probably because measuring current (the “amount” of electricity flowing) is difficult. Properly done, it requires cutting the wire leading
to the output transformer and inserting an amp meter in series with that current path. And plate current in a tube amplifier runs at high
voltage, around 400 to 500 volts for 6L6s and much higher for our KT-88s. Unless you’re a technician and REALLY know what you’re
doing inside an amplifier... you don’t want to mess with that.
Obviously Fender’s adjustable system and our individually hard-wired systems both work—though in my many years of servicing
Fenders, the bias settings were often found to be far from “correct”. And with the wide availability of quality 6L6 tubes, especially our
own selected MESA tubes, adjustments outside our designer’s “sweet spot” are unnecessary and usually undesirable (unless you
like paying a tech to re-set your amp’s bias voltage.)
But KT-88s are different and sampling them from various suppliers revealed a far greater variation in plate current for any given bias
voltage compared to 6L6s. And with the 88’s greater size and capacity, the current draw varied from 15mA (milli-amperes) to 50 mA
whereas our “sweet spot” was 30 mA. So… we’ve provided a simple, safe system for bias adjustment that actually measures the current flowing through the tubes, not just some standard bias voltage. Use MESA Matched Tubes whenever possible in your amplifier
and you will find they are far closer to the specified range than those available elsewhere. Because of this you will save yourself time
and ensure your amplifier’s Tone will stay intact as the BIAS setting is a critical element in its performance.
BIAS ADJUST: OPERATE/SET BIAS
NOTE: The optimum BIAS SETTING was arrived at through EXTENSIVE scrutiny during the development of your amplifier. We
STRONGLY RECOMMEND adhering to the Suggested Optimum Factory Setting for both Tonal and Reliability reasons. MESA has
historically avoided Adjustable Bias Controls on our amplifiers for one important reason; the average musician has neither the training
nor equipment to properly adjust the Bias in their amplifier. We see too many examples of this in our Authorized Repair Stations in
the field and in our Repair Department here at the Factory to believe otherwise. The Internet is full of people espousing the virtues of
a (too) high Bias Setting. Don’t Be Fooled!
The Recommended Bias Setting your amplifier was shipped with delivers the absolute best blend of Tone and Reliability. This has
been confirmed time and again throughout the entire course of its development. Please—Do Yourself A Favor—Don’t Mess With The
Bias Looking For “Better Tone”. It’s not there.
NOTE: IMPORTANT! Adjust the Bias only when replacing Power Tubes and Adhere to the Owner Achievable Bias Setting Described!
FAILURE TO ADHERE TO THE RECOMMENDED FACTORY BIAS SETTING WILL VOID YOUR WARRANTY, WEAR YOUR POWER
TUBES FASTER AND COULD CAUSE DAMAGE TO YOUR AMPLIFIER!
PAGE 23
Owners - it is not necessary to remove the Bottom Cover on your PRODIGY to set the BIAS when replacing Power Tubes. Located
on top of the chassis are two 2-position mini-toggle switches, one for each quartet of KT-88s, along side two precision Trim Pots and
two LEDs. The BIAS ADJUST circuit allows for precise setting of the Bias for the Technician using a Current Meter—or—a “near
perfect” setting of the Bias for the not-so-technically-minded Musician/Owner with a very small “flathead” screwdriver. Owners and
non-technicians can adjust their Bias when re-tubing by setting the BIAS ADJUST Switch to SET BIAS and following the Bias Adjustment Instructions below.
Like some other amplifiers, this system measures current at the cathodes which, with no signal running through the amp, is the same
as plate current (plus the minute screen current). But unlike other systems, the BIAS ADJUST switch entirely removes the adjustment
circuit and its cathode resistors from the audio chain when adjustment is complete and it is set back to OPERATE.
OPERATE: This position is for playing your amplifier. The BIAS ADJUST switch should be set here at all times unless you are adjusting the BIAS after replacing a worn set of power tubes.
Technicians—you know what to do. Set BIAS ADJUST SWITCH to SET BIAS Position—Check and Adjust Cathode Current: Set
both rows to 120 – 125 mA.
This Bias Adjust Mode also allows for a near-perfect Owner Achievable Bias Setting with nothing more than a small jewelers flat-head
screwdriver. Again—adhere to the directions below and adjust your Bias ONLY after replacing worn power tubes with a new set.
NOTE: When the Bias switch is in the Set Bias position, the Mute LED will be on and the amp will be muted. This is to prevent the
amp from passing signal while the Bias circuit is engaged.
Owners—the following simple procedure is also printed on the chassis top (Tube Deck) and consists of the following steps:
SET BIAS (For Non-Technicians)
1.Set both BIAS SWITCHES (located on the upper Rear Tube Deck) to OPERATE. Make sure the amp is set to FULL POWER—
setting the Bias while in HALF POWER will give an incorrect measurement.
2.Follow the Cold-Start Procedure under POWER in the Front Panel Section of this manual and Switch the PRODIGY to STANDBY ON after three minutes. Then allow the amp to warm up for another 5 minutes (POWER and STANDBY ON).
3.Set one row’s BIAS SWITCH to SET BIAS (leave other row set to operate). The MUTE circuit is activated by this setting and you
may proceed with the procedure with no load connected to the SPEAKER OUTPUTS. BUT DON’T FORGET TO CONNECT A
LOAD when you are finished with the BIAS setting procedure!
4.Using a small flat screwdriver, twist the trimmer pot for that row counter-clockwise until the LED just goes dark... then:
5.Twist the trimmer EXACTLY ONE HALF turn clockwise toward greater brightness—Stop there. You’re Done!
6.Repeat the SET BIAS procedure for the second row of KT-88s.
7.Set the BIAS ADJUST switch back to OPERATE and Play! Your BIAS is set for optimum performance and Tone. CHECK YOUR
SPEAKER OUTPUTS! Don’t forget to connect a load (cabinet) BEFORE playing!
NOTE: IMPORTANT! It is important when re-tubing your STRATEGY, to make sure that all the power tubes are matched to each
other. This is critical to achieving a proper Bias Setting and also for obtaining the best performance from your amplifier. If your local
dealer doesn’t have a complete set of identically matched KT-88s (Preferably MESA Tubes), you may order perfectly matched sets
direct from us at www.mesaboogie.com or, by calling 707-778-6565 and asking for a Product Specialist - who will be happy to assist
you with your purchase of these matched sets of KT-88 Power Tubes.
NOTE! Original STRATEGY OWNERS! MESA offers a HALF-PRICE DISCOUNT on your FIRST SET of Replacement Power Tubes.
This can be obtained by ORDERING DIRECT FROM THE FACTORY ONLY and the order must be accompanied by your ORIGINAL
SALES RECEIPT as proof of ownership.
PAGE 24
SPEAKER IMPEDANCE MATCHING & HOOK-UP GUIDE:
IMPEDANCE:
Wiring up speakers to provide the most effective load and making sure that all of them are in phase will help in
creating the best sound possible. This is not too difficult, as long as you understand a few things about loading and how to connect
your speakers to provide an optimal resistive load.
MESA/Boogie amplifiers can handle 4 and 8 ohms effectively. Never run below 4 ohms in a tube amplifier unless you are absolutely
certain that the system can handle it properly; this can cause damage to the Output transformer. A few amplifiers can handle 2 ohms
effectively without damaging them (for example the MESA’S STRATEGY Eight:88). You can always have a higher resistance (16
ohms, for example) without damaging results, but too low of a resistance will likely cause problems.
MIS-MATCHING:
When running a higher resistance (for example: 8 ohm output into 16 ohm cabinet), a slightly different feel
and response will be created. A slight mismatch can provide a darker smoother tone with a little less output and attack. This response
is a result of the amplifier running a bit cooler. Sometimes when using more than one cabinet a mismatch will be the only option.
WHAT IS MY CABINETS IMPEDANCE: If you have only a single speaker, you just match that single speakers impedance
to the amplifier, and you are done. In many cases, you will have a number of speakers, and then you must calculate the “load” that the
amplifier will need to support. There are generally three ways to wire multiple speakers together. They are as follows:
SERIES:
When you wire (hook-up) speakers in Series, the speakers resistance (as measured in ohms) is additive - i.e. putting
two 8 ohm speakers in Series results in a 16 ohm load.
PAGE 25
PARALLEL: When wiring in parallel, the resistance of the speakers decreases. Two 8 ohm speakers wired in (hooked-up) Parallel
results in a 4 ohm load. It’s easy to calculate the effect of a resistive load when all the speakers are all the same resistance. It is really
not suggested to wire different resistive load values in Parallel (8 and 4, 16 and 8 etc.) The formula for figuring the total impedance in
Parallel is the multiplication of the two loads divided by the sum of the two loads - i.e. putting two 8 ohm speakers in Parallel results
in a 4 ohm load. Connect the Positive side of Speaker A to the Positive side of Speaker B - Connect the Negative side of Speaker
A to the Negative side of Speaker B.
COMBINATION OF SERIES & PARALLEL: This is really just two sets of Series wired speakers connected in Parallel. This
is how you maintain a consistent load with multiple speakers. The importance of this is more evident when you have more than one
cabinet to connect to your amplifier. This is when you need to figure out the loads and how to wire them up without applying too low
of a resistance on the amplifier.
Simply connect the Positive side of Speaker A to the Positive
side of Speaker C.
Connect the Negative side of Speaker A to the Positive side of
Speaker B. Next, connect the Negative side of Speaker C to
the Positive side of Speaker D.
And lastly, connect the Negative side of Speaker B to the Negative side of Speaker D.
4 Eight (8) Ohm speakers wired in Series Parallel = a Total
Load of 8 Ohms.
PAGE 26
WIRING SCHEMES...Amplifier to Speaker Cabinets
1
Partial back view of amplifier
8 OHM
4 OHM
2
Partial back view of amplifier
4 OHM
8 OHM
4 OHM
4 OHM
8 Ohm Cabinet
3
Partial back view of
some Mesa amp
84Ohm
Ohm Cabinet
Cabinet
8 OHM
4 OHM
4 OHM
4 Ohm Cabinet
4
5
Partial back view of amplifier
4 OHM
8 OHM
16 OHM
Partial back view of amplifier
8 Ohm Cabinet
4 OHM
8 OHM
16 OHM
SAFE MISMATCH
16 Ohm Cabinet
16 Ohm Cabinet
SAFE MISMATCH
PAGE 27
6
WIRING SCHEMES...Amplifier to Speaker Cabinets
Partial back view of amplifier
Partial back view of amplifier
8 OHM
4 OHM
4 OHM
4 OHM
4 OHM
8 OHM
16 Ohm Cabinet
8 Ohm Cabinet
8 Ohm Cabinet
8 Ohm Cabinet
7
SAFE MISMATCH
CORRECT MATCH
8
9
Partial back view of amplifier
8 OHM
4 OHM
Partial back view of amplifier
4 OHM
8 OHM
8 Ohm
4 Ohm Cabinet
4 OHM
8 Ohm
SERIES BOX
4 Ohm
4 OHM
PARALLEL BOX
4 Ohm
CORRECT
MATCH
16 Ohm
4 Ohm Cabinet
16 Ohm Cabinet
PAGE 28
16 Ohm
CORRECT
MATCH
16 Ohm Cabinet
WIRING SCHEMES...Amplifier to Speaker Cabinets
10
Partial back view of amplifier
4 OHM
4 OHM
16 Ohm
8 OHM
SERIES BOX
8 Ohm
8 Ohm
8 Ohm Cabinet
8 Ohm Cabinet
8 Ohm Cabinet
SAFE MISMATCH
11
12
Partial back view of amplifier
4 OHM
4 OHM
CORRECT MATCH
8 OHM
Partial back view of amp
8 OHM
4 OHM
4 OHM
8 Ohm
PARALLEL BOX
16 Ohm
16 Ohm
8 Ohm Cabinet
16 Ohm Cabinet
16 Ohm Cabinet
SAFE MISMATCH
16 Ohm Cabinet
PAGE 29
16 Ohm Cabinet
WIRING SCHEMES...Amplifier to Speaker Cabinets
13
Partial back view of amplifier
16 Ohm
4 OHM
4 OHM
8 OHM
SERIES BOX
8 Ohm
8 Ohm
8 Ohm Cabinet
8 Ohm Cabinet
16 Ohm Cabinet
SAFE MISMATCH
14
Partial back view of amplifier
8 OHM
4 OHM
4 OHM
8 Ohm
PARALLEL BOX
16 Ohm
16 Ohm Cabinet
16 Ohm Cabinet
SAFE MISMATCH
PAGE 30
16 Ohm
16 Ohm Cabinet
TUBE NOISE & MICROPHONICS:
You may occasionally experience some form of tube noise or microphonics. Certainly
no cause for alarm, this quirky behavior comes with the territory and the Tone. Much like changing a light bulb, you don’t need a
technician to cure these types of minor user serviceable annoyances and in fact, you’ll be amazed at how easy it is to cure tube
problems...by simply swapping out a pre-amp or power tube!
First may we suggest that you set the amplifier up on something so that you can get to the tubes comfortably without having to bend
down. It also helps to have adequate lighting as you will need to see the tube sockets clearly to swap tubes. Use caution and common
sense when touching the tubes after the amplifier has been on as they may be extremely hot! If they are hot and you don’t want to
wait for them to cool off, try grasping them with a rag and also note that the glass down around the bulbous silvery tip is considerably
less hot which makes it easier to handle. Gently rock the tube back and forth as you pull it away from its socket.
TUBE NOISE: Often caused by contamination within in a tube, the culprit can usually be identified, and by lightly tapping on
the glass, you will probably hear the noise change. Hearing some noise through the speakers while tapping on the 12AX7’s is normal
however. And the one nearer the INPUT will always sound louder because its output is being further amplified by the second 12AX7.
The power tubes should be all but quiet when they are tapped. If crackling or hissing changes with the tapping, you have probably
found the problem. To confirm a noisy power tube, merely put the amplifier on Standby, remove it from its socket and turn it back on.
It will cause no damage to run the amplifier briefly with one power tube missing. You may notice a slight background hum, however,
as the push-pull becomes unbalanced. Whenever you are trying to diagnose a suspect tube, keep your other hand on the POWER
and STANDBY switches ready to shut them off instantly in the unlikely case you provoke a major short.
If you think you’ve located a problem tube but aren’t sure, we recommend substituting the suspect with a new one just to be sure of
your diagnoses. You will be doing yourself and us a big favor by just following the simple guidelines previously mentioned regarding
tube replacement. You’ll probably be successful with much less effort than is required to disconnect everything and haul the unit to a
technician who will basically perform the same simple tests. If the tubes are still within their six-month warranty period, we will happily
send you a replacement. Just note the color designation on the tube label so that we can send you the appropriate match.
DIAGNOSING PRE-AMP TUBE PROBLEMS: Because your amplifier is an all tube design, it is quite possible that you will
at some point experience minor pre-amp tube noise. Rest assured - this is no cause for alarm and you can take care of the problem
yourself in a matter of minutes by simply swapping tubes.
Let us begin by saying; It is a “very good” idea to keep at least a couple of spare pre-amp tubes on hand at all times to insure uninterrupted performance. These minor pre-amp tube problems can take many forms but can generally be described in two categories:
Noise and Microphonics. Noise can be in the form of crackling, sputtering, white noise/hiss and/or hum. Microphonic problems
usually appear in the form of a ringing or high pitched squealing that gets worse as the gain or volume is increased thus are more
noticeable in the higher gain “HI” modes. Microphonic problems are easily identified because the problem is still present even with
the instruments’ volume off or unplugged altogether - unlike pick-up feedback which ceases as the instrument is turned down.
Microphonic noise is caused by mechanical vibration and shock: think of banging a microphone around and you’ll understand where
the word came from.
The best way to approach a pre-amp tube problem is to see if it occurs only in one specific mode or channel. This should lead you to
the tube needing replacement. Then all that remains is to swap the suspect tube for a known good performer. If you cannot narrow
down the trouble to a specific mode or channel, the problem may be the small tube that drives the power tubes which is operational
in all modes and channels. Though rare, a problem with the driver tube would show up in all aspects of performance - so if you can’t
narrow the problem down to being mode or channel specific, you may want to try replacing the driver tube. Driver problems generally
show themselves in the form of crackling or hum in all modes of performance and/or weak overall output from the amplifier. Occasionally an anemic driver tube will cause the amplifier to sound flat and lifeless, but this is somewhat uncommon, as worn power tubes
are a more likely suspect for this type of problem.
PAGE 31
Sometimes making the diagnosis is more trouble than it’s worth and it’s faster and easier to merely replace the small pre-amp tubes
ONE AT A TIME with a replacement known to be good. But MAKE SURE you keep returning the tubes to their original socket until
you hit the one that cures the problem. You’ll notice that tubes located nearer to the INPUT jack always sound noisier...but this is
because they are at the start of the chain and their noise gets amplified over and over by the tubes that follow. The tube that goes
into this “input socket” (usually labeled V1) needs to be the least noisy of the bunch. The tube that goes at the end of the preamp
chain - just ahead of the power tubes - can be quite noisy without causing any problem at all. The tubes in your amp have already
been located in the most appropriate sockets and this is why you should NEVER pull them all out at once and ALWAYS swap them
one at a time. ALWAYS return a perfectly good tube to its original socket. Also it’s a good idea to put the amp on STANDBY when
swapping tubes to reduce the heat build up in the tubes themselves and to prevent explosive noises (which can still occur even if you
are pulling the tubes away from their sockets gently) from coming through the speaker.
Remember, take your time, be patient and chances are real good that you can fix your amp yourself by finding and replacing the bad
tube. It kills us to see someone who has shipped their amp back to us...and all it needed was a simple tube replacement! If you must
send back your amp, remove the chassis from the cabinet by unscrewing the four mounting bolts on the bottom top. The chassis then
slides back like a drawer and comes out from the back. Remove the big power tubes and mark them according to their location from
left to right 1, 2 etc. They need to be wrapped separately with plenty of wadded up newspaper around them and put in a smaller box
within the larger carton. Remove the Rectifier tubes and wrap them also. You can leave the preamp tubes in or remove them and wrap
them separately being sure to label their location. (See Tube Task Chart.)
To wrap the chassis, use plenty of tightly wadded up newspaper so there is at least six inches of “crush space” between the chassis
and the cardboard box. Bubble wrap also works well, but please DON’T use styrene peanuts - they will shift during transit and get
lodged inside your electronics as well as allowing your amp to end up at the bottom of the box unprotected and possibly damaged.
Pre-amp tubes don’t normally wear out as a rule. Therefore, it is not a good idea to change them just for the sake of changing them.
If there isn’t a problem - don’t fix it. If there is no result from your substitutions, it may be possible that you have more than one
problematic tube. Though rare, this does happen and though it makes the troubleshooting process a little more intimidating, it is still
possible to cure the problem yourself.
NOTE: It is normal to hear a slight metallic ringing sound when tapping on the preamp tubes. As long as the tube does not break into
oscillation or start crackling or any other form of bizarre noise, it is considered normal and functional.
DIAGNOSING POWER TUBE FAILURE:
There are two main types of tube faults: shorts and noise. Both large and small
tubes may fall prey to either of these problems but diagnosis and remedy is usually simple.
If a fuse blows, the problem is most likely a shorted power tube and shorts can either be mild or severe. In a mildly shorted tube the
electron flow has overcome the control grid and excess current flows to the plate. You will usually hear the amp become distorted
and begin to hum slightly. If this occurs, quickly look at the power tubes as you switch the amp to STANDBY and try to identify one
as glowing red hot. It is likely that two of a pair will be glowing since the “shorted” tube will pull down the bias for its adjacent mates,
but one tube may be glowing hotter—and that one is the culprit. The other two are often fine—unless they’ve been glowing bright red
for several minutes.
Because there is no physical short inside the tube (just electrons rioting out of control) merely switching to STANDBY for a few moments then back to ON will usually cure the problem...at least temporarily. Watch the tubes carefully now. Should the problem recur,
the intermittent tube will visibly start to over heat before the others and thus it can be identified. It should be replaced with one from
the same color batch, shown on its label. Call us and we will send one out to you.
The severe short is not nearly so benign. In the worst cases, a major arcing short occurs between the plate and the cathode with
visible lightning inside the glass and a major noise through the speaker. If this is seen to happen, IMMEDIATELY turn the amp to
STANDBY. By this time the fuse probably will have blown. Such a short is usually caused by a physical breakdown inside the tube
including contaminate coming loose or physical contact (or near contact) between the elements. Replace it and the fuse with the
proper slo-blo type and power up the amp using the power up procedure as we described earlier in this manual.
PAGE 32
V2
12AX7
KT-88
V6
V1
12AX7
V3
12AX7
FULL = V4 - V11
HALF = V4,V5, V8, V9
LOW = V4, V8
KT-88
V11
POWER TUBES
KT-88
V10
KT-88
V7
INPUT JACK
BEFORE CHANGING TUBES FLIP POWER & STANDBY SWITCH TO OFF
KT-88
V9
KT-88
V5
FRONT OF CHASSIS
Bass Strategy Eight:88
KT-88
V8
KT-88
V4
TUBE REPLACEMENT
OPERATE
SET BIAS
PREAMP TUBES
V1A- 2nd Gain Stage
V1B- 1st Gain Stage
V2A&B- Driver/Phase Inverter
V3A&B- Driver 2nd Stages
TO MAINTAIN WARRANTY, USE MESA/BOOGIE TUBES WHEN REPLACEMENT IS NECESSARY
FOR CUSTOMER SUPPORT, PLEASE CALL 707-778-6565 MONDAY-THURSDAY 9-5 PST, OR EMAIL US AT [email protected]
PAGE 33
STRATEGY Lid Removal Instructions
Please read these instructions all the way through before proceeding. It is not necessary to remove the trim bars in order to remove
the lid.
1.Remove 4 screws from each side of the lid:
2.Remove two screws from the back panel:
8 OHM
+
OUTPUT
MUTE ON UNLESS SPKR IN
4 OHM
2 OHM
USE
WITH
TWO
4Ω
CABS
2 OHM
VOICE
MUTE
-
D.I. LIFT
EQ
EXT
SWITCHING
h
SLAVE
LEVEL
SLAVE
USE
WITH
TWO
8Ω
CABS
SEND
4 OHM
CAUTION!
FOOT
SWITCH
GROUND
HOME OF TONE ®
BASS STRATEGY
VACUUM TUBE
AMPLIFIER
WARNING!
HAND BUILT
IN PETALUMA,
CALIFORNIA U.S.A.
®
D.I. OUT
PATENTED
6,724,897
LOOP
EXT
SWITCH
3.Lift the lid half way up by lifting with one hand in one rear opening and one hand under the front edge, at opposite corners. The
weight of the amp will allow the lid to come up.
4.With the lid half way up, lift the display LED connector from the EQ circuit board:
WHITE WIRE
RED WIRE
LED CONNECTOR
EQ
PLAY
EQ IN
0
EQ FS
MUTE
SIL. REC.
FULL PWR
5.Remove the lid completely.
D.I. PRE
Replace the lid inHALF
reverse order. Be sure to reinstall the LED connector in the same position. Installing it incorrectly may damage the
LOW PWRwhen
33Hz
80
150 top 300
600
2K
5K lid—DO
8K
POSTforce the screws in.
display LEDs. Use caution
reinstalling
the
two screws
on900each side
of the
NOT
PAGE 34
TUNER
SPEAKER
TUBE GUIDE
3 x 12AX7 8 x KT-88
8A
SLO
BLO
RETURN
120 V~
60 Hz
8A
SOLO
MAINS
FUSE
598794
BRIGHT
ACTIVE
590051
TREBLE
1
1
4 OHM
BASS STRATEGY
VACUUM TUBE
AMPLIFIER
ACTIVE
2
3
608320
4
4
5
5
4 OHM
VOICE
3
USE
WITH
TWO
8Ω
CABS
SPEAKER
2
CAUTION!
VOICE
4 OHM
EQ IN
EQ FS
0
LOW PWR
HALF
FULL PWR
EQ
2 x SWITCH
pt# 607233
590379
MASTER
EQ IN
0
MUTE ON UNLESS SPKR IN
8 OHM
EQ
EQ FS
LOW PWR
HALF
® PWR
FULL
HOME OF TONE ®
MASTER
MUTE ON UNLESS SPKR IN
8 OHM
HOME OF TONE ®
®
33Hz
80
150
OUTPUT
USE
WITH
TWO
4Ω
CABS
600
600
HAND BUILT
IN PETALUMA,
CALIFORNIA U.S.A.
2 OHM
300
HAND BUILT
IN PETALUMA,
CALIFORNIA U.S.A.
2 OHM
300
2K
2K
5K
5K
POST
D.I. PRE
SIL. REC.
MUTE
SWITCH
pt# 607233
8K
MUTE
SWITCH
pt# 607233
D.I. LIFT
GROUND
PATENTED
6,724,897
8K
PATENTED
6,724,897
GROUND
D.I. LIFT
SWITCH
pt# 607200
D.I. OUT
900
D.I. OUT
900
EQ KNOBS - 408604
EQ SLIDER POT - 588536
150
USE
WITH
TWO
4Ω
CABS
OUTPUT
80
WARNING!
2 OHM
33Hz
2 OHM
WARNING!
JACK
pt# 620551
POST
D.I. PRE
SIL. REC.
PLAY
TREBLE
SPEAKER
USE
WITH
TWO
8Ω
CABS
CAUTION!
5 x JACKS
pt# 619391
PLAY
BRIGHT
MID
4 OHM
BASS STRATEGY
VACUUM TUBE
AMPLIFIER
JACK
pt# 614608
FOOT
SWITCH
FOOT
SWITCH
6 x KNOBS
PT# 408600
MID
590037
TUBE GUIDE
3 x 12AX7 8 x KT-88
BASS
590051
FRONT PANEL: Bass Strategy
SWITCH
pt# 607204
INPUT
NORMAL
GAIN
10 A
SLO
BLO
EXT
SWITCHING
TUBE GUIDE
3 x 12AX7 8 x KT-88
EXT
SWITCHING
2 x DUAL JACKS
pt# 619357
590148
™
SLAVE
LEVEL
™
STANDBY
-
POWER
STANDBY
-
ON
ON
ON
POT: 590736ON
KNOB: 408601
SLAVE
LEVEL
™
POWER
2 x SWITCH
pt# 600626
590737
SOLO
™
D.I. LEVEL
+
Eight:88
LOOP
EXT
SWITCH
SOLO
2 x KNOBS
pt# 408601
D.I. LEVEL
+
Eight:88
JACK
pt# 619356
LOOP
EXT
SWITCH
2 x DUAL JACKS
pt# 619357
PAGE 35
JACK
pt# 619112
MAINS
FUSE
120 V~
60 Hz
10 A
10 A
SLO
BLO
BASS
REAR PANEL: Bass Strategy
h
NORMAL
120 V~
60 Hz
10 A
FUSE
INPUT
DOM:790110
EXP:795505
FUSE HOLDERGAIN
DOM:790347
EXP:790346
MAINS
FUSE
h
JACK
pt# 613713
SLAVE
TUNER
SLAVE
TUNER
SEND
RETURN
SEND
RETURN
EQ
VOICE
EQ
VOICE
SOLO
MUTE
SOLO
MUTE
®
™
®
™
®
13/12/10