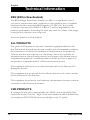
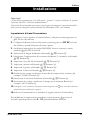
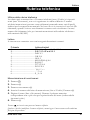
1
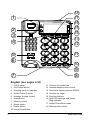
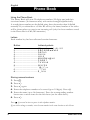
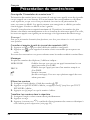
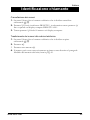
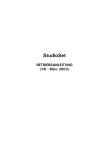
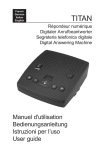
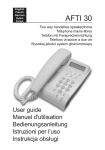
Manual
doro 313C
18
17
16
15
14
1
2
3
4
13
12
11
5
6
10
9
8
7
English (see pages 4-16)
1
2
3
4
5
6
7
8
9
10
2
Call Number
OK/Cancel button
Hanging Hook for Handset
Select Caller ID mode
Handset Volume Control
Store Button
Memory button
Recall button
Redial button
Hands Free Button
11 Controls for hands free
12 Handset earpiece tone control
13 One-touch memory buttons M1/M2
14 Controls for ringer
15 Scrolling Buttons
16 New CID message and Visual
Ring Indicator
17 Select Phone Book mode
18 Warning tone control
www.doro.com
Français (voir pages 17-26)
1
2
3
4
5
6
7
8
9
10
Touche de prise de ligne
Touche pour confirmer/effacer
Languette de support du combiné
Touche du journal des appelants
Réglage du volume du combiné
Touche d’enregistrement
Touche de mémoire
Touche R
Touche Bis
Touche mains-libres avec LED
12 Réglage de la réponse en
fréquence du combiné
13 Touches de mémoire directe M1
et M2
14 Curseur de réglage des sonneries
15 Touches de défilement
16 Témoin de nouvel appel et de
sonnerie
17 Répertoire
18 Réglage du bip d’avertissement
11 Curseur de réglage volume
mains-libres
Deutsch (siehe Seite 27-36)
1
2
3
4
5
6
7
8
9
10
Anrufen
Bestätigen/Löschen
Höreraufhängung
Rufnummeranzeige
Hörerlautstärkeregler
Nummern speichern
Kurzwahltaste
R-Taste
Wahlwiederholung
Taste für Lautsprecher und
Anzeige
11 Regler für Lautsprecher
12 Regler für das Lautbild/
Frequenzumfang des Hörers
13 Kurzwahltasten M1/M2
14 Regler für die Rufsignallautstärke
15 Blätter-Tasten
16 Anzeige für neue Nummer und
Rufsignal
17 Telefonbuch
18 Regler für Warnungsalarm
Italiano (vedere pagine 37-46)
1
Numero di chiamata
11 Comandi per vivavoce
2
Pulsante OK/Annulla
3
Supporto di aggancio per il
microtelefono
12 Controllo risposta in frequenza
del microtelefono
4
Selezione modalità ID chiamante
13 Tasti memoria “one-touch”
M1 e M2.
5
Controllo volume del
microtelefono
14 Comandi per suoneria
15 Pulsanti di scorrimento
6
Pulsante memorizzazione
7
Pulsante chiamata abbreviata
8
Pulsante Recall
16 Indicatore nuovo messaggio ID
chiamante e indicatore visivo di
chiamata
9
Pulsante Ripetizione numero
10 Pulsante “mani libere” (vivavoce)
www.doro.com
17 Selezione modalità rubrica
18 Controllo tono di avviso
3
English
Installation
Important!
Please note when programming all references to press = to press once and then immediately
release the button.
The earpiece of the handset may attract small ferromagnetic objects such as staples and pins,
care should be taken when placing the handset near these items.
Connection/Basic setting
1. Connect the curly cord to the handset and to the socket marked Q on the
side of the telephone.
2. Connect the mains adapter to the socket marked DC 9V on the back of the
telephone and then to an electrical wall socket.
3. The display should flash the word ENGLISH. If not press and hold v for
approximately 4 seconds.
4. Select the desired language using v /V. Press 0.
5. Select the desired contrast setting (3=normal) using v /V. Press 0.
6. Set the hour (00-24) using v /V. Press 0.
7. Set the minute using v /V. Press 0.
8. Set the day using v /V. Press 0.
9. Set the month using v /V. Press 0.
10. Ensure the correct dialling method is displayed (ie: TONE). Press 0.
11. Select the required ringer melody using v /V. Press 0.
12. Ensure the correct Recall time is displayed (ie: 100). Press 0.
13. Connect the telephone line cord to the socket marked T on the back of the
telephone, and then to a network wall socket.
14. Lift the handset and listen for the dial tone.
To change any of the above settings, press and hold v for approximately 4
seconds and repeat steps 4. - 12. above.
4
www.doro.com
Installation
English
Batteries
Four good quality AA alkaline batteries can be installed to protect the memory
during prolonged power failure. When the batteries are running low
will be
displayed.
1. Disconnect the telephone line cord.
2. On the underside of the telephone carefully remove the battery cover.
3. Insert the backup batteries ensuring correct battery polarity is observed.
4. Replace the battery cover.
5. Reconnect the telephone line cord.
Wall mounting
The telephone can be wall mounted by using the included wall mount bracket. It
can also be fitted to a standard wall plate without using screws in Australia.
1. Secure two screws, vertically positioned 83 mm apart.
2. The screws should locate into the two keyholes on the back of the telephone.
3. Remove the hanging peg (located by the hook switch) by pushing it upwards.
4. Rotate the hanging peg 180 degrees, and then replace it.
The display
When the telephone is not in use the date and time, number of new and total
number of calls stored in the Caller ID memory will be shown in the display.
The display will illuminate during ringing, when accessing memory functions
and dialling out.
www.doro.com
5
English
Operation
Making a call
Normal Dialling
1. Lift the handset.
2. Dial the desired telephone number.
Pre-Dialling
This allows you to enter and change a telephone number before it is dialled.
1. Enter the required telephone number. Mistakes can be erased by pressing 0.
2. You can now either lift the handset, press
OR s, the displayed
telephone number will now be dialled.
Please note!
During a conversation, you can switch from the handset to hands free mode at any time by
pressing s. Press s again to terminate the call.
Redial function
If the number dialled is engaged or you wish to redial the last number called
simply lift the handset (or press s) and press r.
Volume control
The handset earpiece volume may be adjusted during a call using
/Q.
The audible response within the earpiece may be adjusted using ♫
located on the side of the unit.
To adjust the speaker volume (hands free), use
located on the side of the
telephone.
Warning!
Do NOT select the maximum handset volume unless you already
having hearing difficulties.
6
www.doro.com
Operation
English
Timer
Immediately after dialling a telephone number a call timer will be shown on the
display. The timer is a simple way to help you keep track of how long the call
lasts.
Hands free function
1. Press s. The speaker will be activated and the Hands free indicator light
will illuminate.
2. Dial the required telephone number. The speaker volume can be adjusted
using
located on the side of the telephone.
3. Speak towards the microphone located on the front edge of the telephone.
4. Press s to terminate the call.
Please note!
During a conversation, you can switch from the hands free to handset mode at any time by
picking up the handset. Replace the handset to terminate the call.
Please remember that in hands free speaker mode it is only possible for one person at a time
to talk. The switch over between speaker and microphone is automatic and dependent on the
sound level of the incoming call and the microphone respectively. It is therefore essential that
there are no loud noises, e.g. music, in the immediate vicinity of the telephone, as this will
disrupt the speaker function.
Warning tone
A warning tone can be selected using the switch located on the back of the
unit, if the handset is then not replaced correctly an alarm will sound after 20
minutes.
www.doro.com
7
English
Phone Book
Using the Phone Book
The Phone Book will store 32 telephone numbers (22 digits max)and their
associated names (16 characters max) with entries arranged alphabetically.
A stored phone number can be dialled using fewer keystrokes than if dialled
manually. If you subscribe to a Caller ID service, the name/number of the caller
will be shown when you receive an incoming call (only for those numbers stored
in the Phone Book or M1/M2 memories).
Letters
Each number key has been allocated certain characters.
Button
Letters/symbols
1.......................................... [Space character] + & - / X 1
2.......................................... A B C Å Ä Æ æ å ä ß 2
3.......................................... D E F ë 3
4.......................................... G H I ï 4
5.......................................... J K L 5
6.......................................... M N O Ñ ñ ö @ ö 6
7.......................................... P Q R S 7
8.......................................... T U V Ü ü 8
9.......................................... W X Y Z 9
* .......................................... ` @ ( ) * < >
0.......................................... , . : ? = 0
#.......................................... $ _ % ! #
Storing names/numbers
1. Press b .
2. Press P.
3. Press P again.
4. Enter the telephone number to be stored (up to 22 digits). Press P.
5. Enter the name (up to 16 characters). Press the corresponding number
button one or more times for the first letter (see the table above).
6. Press P.
Press r if you need to insert a pause in the telephone number.
If you wish to change a number, store the new number in the same location as the old one.
8
www.doro.com
Phone Book
English
Dialling from the Phone Book
1. Press b .
2. Scroll to the required memory location using v /V. To quick-search in the
Phone Book press the corresponding number button one or more times for
the first letter (refer to the table on the previous page).
3. Press
to dial the displayed number. If you do nothing the phone will
return to standby mode.
Please note!
During a conversation, you can switch from the handset to hands free mode at any time by
pressing s. Press s again to terminate the call.
Changing phone numbers/names
1. Press b .
2. Scroll to the required memory location using v /V.
3. Press and hold P until EDIT? is displayed. Press P.
4. Changes to the displayed telephone number can be made using 0 and v /V.
Press P.
5. Changes to the displayed name can be made using 0 and v /V.
6. Press P to confirm the changes.
Deleting a phone book entry
1. Press b .
2. Scroll to the required memory location using v /V.
3. Press 0. DELETE? will be displayed.
4. Press and hold 0 until the displayed telephone number disappears.
Deleting all entries in the Phone Book
1. Press b .
2. Scroll to the required memory location using v /V.
3. Press and hold 0 until the display shows DELETE ALL?
4. Press and hold 0 until the displayed telephone number disappears.
www.doro.com
9
English
Phone Book
Memory
The telephone also has 2 one-touch and 10 two-touch memories for frequently
dialled telephone numbers.
When a number is stored into memory you only press one or two buttons
dependent on location to make a call.
The one-touch memories are M1-M2, the two-touch memories are accessed
using the telephone keypad digits 0-9.
Storing One-touch Memories
1. Press P.
2. Enter the telephone number to be stored (up to 22 digits). Press P.
3. Enter the name (up to 16 characters). Press the corresponding number
button one or more times for the first letter (see the table for the Phone
Book). Press P.
4. Press either M1-M2 to store the number.
Dialling using One-touch Memories
1. Lift the handset (or press s) and wait for a dialling tone.
2. Press either M1-M2, the stored telephone number will now be dialled.
Storing Two-touch Memories
1. Press P.
2. Enter the telephone number to be stored (up to 22 digits). Press P.
3. Enter the name (up to 16 characters). Press the corresponding number
button one or more times for the first letter (see the table for the Phone
Book). Press P.
4. Press either 0 - 9 to store the number.
Dialling using Two-touch Memories
1. Lift the handset (or press s) and wait for a dialling tone.
2. Press m.
3. Select a memory location by pressing the relevant keypad digit 0 - 9 .
Press r if you need to insert a pause in the telephone number.
If you wish to change a stored telephone number, store the new number in the same location as
the old one.
10
www.doro.com
Caller Identification
English
Explanation of Caller ID
Caller ID allows you to see who is calling before you answer a call and to see
who has called in your absence. If the number is stored in the Phone Book, the
callers name will be shown instead. Received calls are stored chronologically
with the sequential number shown in the top right hand side of the display.
When the Caller ID log is full, the oldest number will be deleted automatically
as the new call is logged. New calls are indicated by text in the display and
flashing of the red ring indicator light.
Please note!
In order for numbers to be shown, the Caller ID service must be provided by your network
operator and a current subscription in place. Contact you operator for more information.
Retrieving and dialling CID numbers
1. Press
to select caller-id mode.
2. Press either v or V to review the numbers stored in the Caller ID memory.
3. To dial a displayed telephone number either press
OR s, the displayed
telephone number will now be dialled. If you do nothing the phone will
return to standby mode.
Please note!
During a conversation, you can switch from the handset to hands free mode at any time by
pressing s. Press s again to terminate the call.
Messages
Besides showing telephone numbers, the display can show a number of text
messages or symbols:
It is an International call or a call from a PBX (no
OUT OF AREA
information received).
Information on the number is blocked. The call could
PRIVATE
also be from a PBX.
q
New number not previously recorded or logged.
Z
Several calls have been received from the same caller.
www.doro.com
11
English
Caller Identification
Deleting Numbers
1. Scroll to the telephone number you wish to erase using v /V.
2. Press 0: DELETE? will be displayed, alternatively press and hold 0 until
the display shows DELETE ALL?
3. Press and hold 0 until the number disappears.
Transferring Numbers to the Phone Book
1. Scroll to the telephone number you wish to copy using v /V.
2. Press P.
3. Press P again.
4. Name can later be added according to the chapter Changing phone
numbers/names on page 9.
Set up for New Zealand CID operation
1. Set recall time to 600 ms (page 4, Connection/Basic setting).
The unit is now set up to insert 0/00 when using the dial back feature from the
CID log in accordance with Telecom NZ requirements.
If a charge for local calls is unacceptable the dial back feature should not be
used, refer to page 16.
12
www.doro.com
Other
English
Recall Time (Australia and New Zealand only)
Access to additional network services such as “Call Waiting” can be gained by
using the recall button R . Example: when the call waiting tones are heard, press
R , listen for the dial tone, then press 2. Please note that some networks require
only the R button to be pressed, contact your network operator for more services
information.
If this product is connected to a business PBX system, press the recall button R
followed by the extension number to transfer a call. The standard setting is 100 ms.
Troubleshooting
Check that the telephone cord is undamaged and properly plugged in. Disconnect
any additional equipment, extension cords and other telephones. If the problem is
resolved, the fault is with the other equipment.
Test the equipment on a known working line. If the product works, then the fault
is probably with the line. Please inform your local telephone company.
No number shown in display when ringing
- In order for this feature to function, you must subscribe to the Caller
Identification service from your network provider.
- If a text message is shown on the display, the call may be an international call
(no data received), or from a private or withheld number.
- It may not be possible to receive Caller ID information if the phone operates
in a PBX system.
If the telephone still does not work, contact Doro or the place of purchase. Don’t
forget the receipt or copy of the invoice will be required for guarantee purposes.
www.doro.com
13
English
Other
UK
If you cannot resolve the fault using the faultfinder section, technical support is
available on the Premium Rate Number: 0906 302 0114.
Calls cost 50 pence per minute (prices correct at the time of going to press),
and is operational between 9AM - 5PM Monday-Friday excluding Bank
Holidays. Alternatively,
E-mail on: [email protected]
You can contact us in writing: Consumer Support Group, Doro UK Ltd.,
22 Walkers Road, North Moons Moat, Redditch, Worcestershire, B98 9HE,
(regarding any Spares or Technical query), or
Telephoning (Spares only): 01527 584377
Web site: www.doro-uk.com
Guarantee
This product is guaranteed for a period of 12 months from the date of purchase.
Proof of purchase is required for any service or support required during the
guarantee period.
This guarantee shall not apply to a fault caused by an accident or a similar
incident or damage, liquid ingress, negligence, abnormal usage, not reasonably
maintained or any other circumstances on the purchaser’s part. Furthermore,
this guarantee shall not apply to a fault caused by a thunderstorm or any other
voltage fluctuations.
This guarantee does not in any way affect your statutory rights. (As a matter of
precaution, we recommend disconnecting the telephone during a thunderstorm.
Declaration of conformity
Doro declares that the apparatus Doro 313C complies with the essential
requirements and other relevant positions of Directive 1999/5/EC. A copy of
the Declaration of Conformity can be found at www.doro.com/dofc
14
www.doro.com
Other
English
Australia and New Zealand
Products permitted for connection to the telephone network are marked with
in New Zealand. These marks indicate the
in Australia and
products comply with the regulations and can be used without concern in the
country of purchase.
If you believe this product is malfunctioning, please refer to the relevant section
and/or consult the troubleshooting guide in this manual to ensure that you have
followed the instructions carefully. As an alternative you can visit our web site
for FAQ’s or send an e-mail for a prompt reply.
Guarantee
This product is guaranteed for a period of 12 months from the date of purchase.
Should you experience difficulties with the product, please contact us for
assistance. If the product is then found to be faulty you will be asked to return
it directly to us with a copy of the purchase receipt. This guarantee shall not
apply to a fault caused by an accident or a similar incident or damage, liquid
ingress negligence, abnormal usage, not reasonably maintained or any other
circumstances on the purchaser’s part. Furthermore, this guarantee shall not
apply to a fault caused by a thunderstorm or lightning, excessive or any other
voltage fluctuations or faults on the telephone line. (As a matter of precaution,
we recommend disconnecting the telephone during a thunderstorm).
This guarantee does not affect your statutory rights.
AUSTRALIA
DORO Australia Pty Ltd
PO Box 6760
Baulkham Hills BC NSW 2153
Australia
Consumer Support
Ph:
Ph: 1300 885 023
Fax: (02) 8853-8489
Email: [email protected]
Web site: www.doro.com.au
www.doro.com
NEW ZEALAND
Atlas Gentech (NZ) Limited
Private Bag 14927
Panmure
Auckland
New Zealand
Consumer Support
Ph: 0900-500-25 (Toll Call)
Fax: (09) 574-2722
Email: [email protected]
15
English
Technical information
REN (RN for New Zealand)
The REN (Ringer Equivalence Number) or (RN) is of significance only if
you wish to connect more than 1 telephone to your telephone line. A standard
telephone line has a maximum REN capacity of 3 (RN of 5). It is possible
to connect 3 devices with a REN of 1 (RN of 1) with no degradation to the
product’s performance. Exceeding this limit may cause the volume of the ringer
in any phone to decrease or not ring at all.
Notes for operation in New Zealand
ALL PRODUCTS
The grant of a Telepermit for any item of terminal equipment indicates only
that Telecom has accepted that the item complies with the minimum conditions
for connection to its network. It indicates no endorsement of the product by
Telecom, nor does it provide any sort of warranty. Above all, it provides no
assurance that any item will work correctly in all respects with another item of
Telepermitted equipment of a different make or model, nor does it imply that
any product is compatible with all of Telecom’s network services.
This equipment shall not be set to make automatic calls to the Telecom “111“
Emergency Service.
This equipment may not provide for the effective hand-over of a call to another
device connected to the same line.
This equipment should not be used under any circumstances that may constitute
a nuisance to other Telecom Customers.
CND PRODUCTS
If a charge for local calls is unacceptable, the “DIAL“ button should NOT be
used for local calls. Only the 7 digits of the local number should be dialled from
your telephone. DO NOT dial the area code digit or the “0“ prefix.
16
www.doro.com
Installation
Français
Raccordement/Réglages de base
1. Reliez le cordon spiralé au combiné et au connecteur du téléphone marqué Q.
2. Reliez le bloc d’alimentation à la prise du téléphone marquée 9V 200mA et à
la prise de courant.
3. FRANCAIS clignote sur l’afficheur. Sinon, appuyez pendant environ 4
secondes sur la touche v.
4. Atteignez la langue désirée avec les touches v /V. Appuyez sur 0.
5. Atteignez le contraste désiré(3=normal) avec les touches v /V. Appuyez sur 0.
6. Atteignez l’heure désirée (00 à 24 ) avec les touches v /V. Appuyez sur 0.
7. Atteignez la minute désirée avec les touches v /V. Appuyez sur 0.
8. Atteignez le jour désiré avec les touches v /V. Appuyez sur 0.
9. Atteignez le mois désiré avec les touches v /V. Appuyez sur 0.
10. Assurez-vous que l’écran affiche la méthode correcte de numérotation (=FV).
Appuyez sur la touche 0.
11. Choisissez la mélodie de sonnerie à l’aide des touches v /V. Appuyez sur 0.
12. Assurez-vous que l’écran affiche le temps correct de flash (=300). Appuyez sur
la touche 0.
13. Reliez le câble téléphonique fourni à la prise téléphonique et au connecteur du
téléphone marqué T.
14. Prenez le combiné : vous devez entendre la tonalité.
Si vous souhaitez changer les réglages ci-dessus, vous pourrez toujours le faire
ultérieurement, appuyez pendant environ 4 secondes sur la touche v et répétez
les étapes 4. à 9. mentionnées ci-dessus.
Piles
Pour que la présentation du numéro, les mémoires etc. puissent fonctionner en cas
de coupure de courant, l’appareil a besoin de quatre piles AA de 1,5V.
Le symbole
s’allume lorsque les piles doivent être changées.
N’utilisez que des piles de qualité.
1. Débranchez le câble du téléphone et retirez la trappe.
2. Insérez les piles en observant les marques de polarité (+ et -).
3. Remettez la trappe des piles en place.
www.doro.com
17
Français
Installation
Position murale
1. Installez le support mural en l’insérant sous le téléphone et faites le glisser
vers le haut.
2. Montez deux vis espacées verticalement de 83 mm d’entre-axe.
3. Encastrez les têtes des deux vis dans les trous correspondants et faites-le
glisser le vers le bas pour le mettre en place.
4. Retirez la languette de support du combiné située à côté de la pédale de
raccroché en la tirant vers le haut.
5. Tournez la languette de support du combiné de 180 degrés et remettez-la en
place.
L’afficheur
En veille, la date et l’heure sont affichées ainsi que le nombre total de numéros
de téléphone enregistrés dans le JAP (journal des appelants).
18
www.doro.com
Utilisation
Français
Appeler
Appel normal
1. Prenez le combiné.
2. Composez le numéro désiré.
Appeler en utilisant la pré-numérotation
La pré-numérotation s’effectue avec le combiné raccroché. Son intérêt est de
pouvoir corriger le numéro.
1. Composez le numéro de votre correspondant. En cas d’erreur, effacez avec
la touche 0.
2. Prenez le combiné OU appuyez sur
OU appuyez sur s, pour appeler
votre correspondant.
En cours de conversation vous pouvez alterner entre les modes combiné et
mains-libres.
Touche Bis
Lorsque la ligne de votre correspondant est occupée ou si vous désirez rappeler
le dernier numéro composé, prenez le combiné (ou appuyez sur s) et appuyez
sur la touche Bis r.
Réglage du volume
Utilisez la touche
/Q pour ajuster le volume d’écoute du combiné en
cours de conversation.
La réponse en fréquence du combiné peut-être réglée à l’aide du bouton ♫
(situé sur le côté).
Utilisez le bouton
situé sur le coté du téléphone pour régler le volume du
haut-parleur.
Attention
Le volume du combiné peut être réglé sur un niveau très fort.
Ce réglage est destinné uniquement aux personnes ayant des
difficultés d’audition.
www.doro.com
19
Français
Utilisation
Chronométrage des appels
Lorsque la communication est établie, un chronomètre s’affiche. Ce
chronomètre vous permet de contrôler la durée des appels.
Fonction Mains-libres
1. Appuyez sur s. Le haut-parleur est activé et la LED s ’allume.
2. Composez le numéro de téléphone. Réglez éventuellement le volume à l’aide
du bouton situé sur le côté du téléphone.
3. Parlez face au téléphone.
4. Appuyez sur s pour mettre fin à la communication.
En cours de conversation vous pouvez alterner entre les modes combiné et
mains-libres.
Remarque !
Notez qu’en position mains-libres les deux correspondants ne peuvent pas parler
simultanément, mais uniquement un à la fois. L’alternance entre celui qui parle et celui qui
écoute se fait automatiquement, et elle est gérée par le niveau du son de la ligne téléphonique
(votre correspondant) et celui du micro (votre discours). C ’est pourquoi il est important qu’il
n’y ait pas trop de bruit dans l’entourage du téléphone, comme par exemple de la musique à
haut volume.
Bip d’avertissement
Le bip d’avertissement peut être activé si quelqun ne raccroche pas le combiné
correctement. Ce bip s’active au bout de 20 secondes sauf si un appel est en
cours.
20
www.doro.com
Répertoire
Français
Utilisation du répertoire
Le répertoire permet d’enregistrer les noms et numéros de téléphone. Il est plus
rapide d’appeler un numéro en mémoire que de le composer manuellement. Si
vous êtes abonné à la présentation du numéro, le nom/numéro du correspondant
s’affiche à la réception d’un l’appel provenant d’un numéro enregistré dans le
répertoire ou en mémoire).
Le répertoire enregistre 32 jeux de noms et numéros de téléphone. Le répertoire
est présenté par ordre alphabétique. Les noms ont 16 caractères maximum et les
numéros de téléphone jusqu’à 22 chiffres.
Lettres
Vous pouvez saisir les noms dans votre répertoire grâce aux touches numériques
du téléphone y compris certains caractères spéciaux.
Touche
Lettres/symboles
1.......................................... [Espace] + & - / X 1
2.......................................... A B C Å Ä Æ æ å ä ß 2
3.......................................... D E F ë 3
4.......................................... G H I ï 4
5.......................................... J K L 5
6.......................................... M N O Ñ ñ ö @ ö 6
7.......................................... P Q R S 7
8.......................................... T U V Ü ü 8
9.......................................... W X Y Z 9
* .......................................... ` @ ( ) * < >
0.......................................... , . : ? = 0
#.......................................... $ _ % ! #
Enregistrer les noms et numéros de téléphone
1. Appuyez sur b .
2. Appuyez sur P.
3. Appuyez à nouveau sur P.
4. Composez le numéro de téléphone souhaité (22 chiffres maximum).
Appuyez sur P.
5. Entrez le nom. Appuyez une ou plusieurs fois sur la touche numérotée
correspondant à la première lettre (voir le tableau ci-dessus).
Appuyez sur P.
Insérez une pause en appuyant sur r.
En cas de changement de numéro, remplacez l’ancien par le nouveau.
www.doro.com
21
Français
Répertoire
Appeler un numéro du répertoire
1. Appuyez sur b .
2. Faites défiler les noms/numéros avec les touches v /V. Vous pouvez aussi
faire une recherche rapide en appuyant une ou plusieurs fois sur la touche
numérotée correspondant à la première lettre du nom recherché (voir le
tableau de la page précédente).
3. Appuyez sur
pour appeler le numéro ou attendez pour repasser en veille.
En cours de conversation vous pouvez alterner entre les modes combiné et
mains-libres.
Modifier les noms/numéros de téléphone
1. Appuyez sur b .
2. Atteignez le numéro/nom désiré comme indiqué ci-dessus.
3. Appuyez sur P jusqu’à ce que EDITER? s’affiche. Appuyez sur P.
4. Corrigez/changez le numéro avec les touches 0 et v /V. Appuyez sur P.
5. Corrigez/changez le nom. Appuyez sur P.
Effacer un correspondant du répertoire
1. Appuyez sur b .
2. Atteignez le numéro/nom désiré comme indiqué ci-dessus.
3. Appuyez sur 0. EFFACER? s’affiche.
4. Appuyez sur 0 jusqu’à ce que le numéro s’efface.
Effacer la totalité du répertoire
1. Appuyez sur b .
2. Atteignez n’importe quel numéro/nom comme indiqué ci-dessus.
3. Appuyez sur 0 jusqu’à ce que TOUT EFFACER? s’affiche.
4. Appuyez sur 0 jusqu’à ce que le contenu du répertoire s’efface.
22
www.doro.com
Répertoire
Français
Mémoires
Le téléphone est doté de 2 touches de mémoire directe et 10 touches de mémoire
abrégée pour les numéros que vous appelez le plus souvent.
Une fois un numéro de téléphone enregistré, vous le composez en pressant
simplement une ou deux touches. Les touches de mémoire directe sont M1 et
M2 ; vous enregistrez les touches de mémoire abrégée avec les touches 0-9 du
téléphone.
Enregistrer des numéros en mémoire directe
1. Appuyez sur P.
2. Composez le numéro de téléphone souhaité (22 chiffres maximum).
Appuyez sur P.
3. Entrez le nom. Appuyez une ou plusieurs fois sur la touche numérotée
correspondant à la première lettre (voir le tableau du répertoire).
Appuyez sur P.
4. Sélectionnez M1 ou M2 en appuyant sur la touche correspondante.
Composer un numéro en mémoire directe.
1. Prenez le combiné (ou appuyez sur s) et attendez la tonalité.
2. Sélectionnez M1 ou M2 en appuyant sur la touche correspondante.
Enregistrement d’un numéro en mémoire abrégée
1. Appuyez sur P.
2. Composez le numéro de téléphone souhaité (22 chiffres maximum).
Appuyez sur P.
3. Entrez le nom. Appuyez une ou plusieurs fois sur la touche numérotée
correspondant à la première lettre (voir le tableau du répertoire).
Appuyez sur P.
4. Sélectionnez une plage de mémoire en appuyant sur une des touches 0-9 du
clavier.
Composer un numéro enregistré en mémoire abrégée
1. Prenez le combiné (ou appuyez sur s) et attendez la tonalité.
2. Appuyez sur m.
3. Sélectionnez le numéro en appuyant sur la touche numérotée correspondante
0- 9.
Insérez une pause en appuyant sur r.
En cas de changement de numéro, remplacez l’ancien par le nouveau.
www.doro.com
23
Français
Présentation du numéro/nom
Que signifie ’Présentation du numéro/nom’ ?
Présentation du numéro/nom vous permet de voir qui vous appelle avant de répondre
ou qui a appelé en votre absence. Si le nom/numéro du correspondant est déjà dans
votre répertoire, et que vous n’êtes pas abonné à un service de présentation du
nom, son nom est affiché. Les appels entrants sont enregistrés et affichés par ordre
chronologique. L’ordre est affiché en bas à gauche.
Quand le journal atteint sa capacité maximum de 32 positions, les numéros les plus
anciens sont effacés automatiquement au fur et à mesure des nouveaux appels. En veille,
les nouveaux appels sont signalés par un message et le clignotement du témoin rouge.
Remarque !
Pour que la présentation du numéro/nom fonctionne, vous devez vous abonner à ce service auprès de
votre opérateur.
Consulter et appeler à partir du journal des appelants (JAP).
1. Appuyez sur v et V pour faire défiler les numéros enregistrés.
2. Appuyez sur
pour rappeler le numéro choisi ou attendez pour repasser en
veille.
En cours de conversation vous pouvez alterner entre les modes combiné et mains-libres.
Messages
En plus des numéros de téléphone, l’afficheur indique :
S’affiche lorsque vous recevez un appel international ou un
HORS ZONE
appel provenant d’un PABX.
S’affiche lorsque l’appel provient d’un numéro masqué ou
PRIVE
d’un PABX.
q
Numéro inconnu.
Z
(double enveloppe) Vous avez reçu plusieurs appels de cette
même personne.
Effacer les numéros
1. Atteignez l’entrée désirée à l’aide des touches v /V.
2. Appuyez sur 0. EFFACER? s’affiche, ou appuyez sur 0 jusqu’à ce que TOUT
EFFACER? s’affiche
3. Appuyez sur 0 jusqu’à ce que le numéro s’efface.
Transférer les numéros dans le répertoire
1. Atteignez l’entrée voulue comme décrit précédemment.
2. Appuyez sur P.
3. Appuyez à nouveau sur P. La méthode d’enregistrement des noms est identique à
celle utilisée pour le répertoire (voir page 22).
24
www.doro.com
Autres
Français
Numérotation fréquences vocales/décimales (Pologne
et France uniquement)
Sélectionnez le réglage désiré, fréquences vocales (♫) ou numérotation décimale
(...) à l ’aide du curseur ♫/... situé derrière le téléphone.
En cas de pannes
Vérifiez que le câble téléphonique soit en bon état et qu’il soit branché
correctement. Débranchez tout autre matériel, rallonges et téléphones. Si
l’appareil fonctionne alors normalement, la panne est causée par le matériel
additionnel.
Testez le matériel sur une autre ligne. S’il fonctionne, cela signifie que votre
propre raccordement téléphonique est défectueux. Signalez la panne à votre
opérateur.
Pas de présentation du numéro/nom à la réception d’un appel
- Pour que la présentation du numéro/nom fonctionne, vous devez vous
abonner à ce service auprès de votre opérateur.
- Si un message s’affiche, il peut s’agir d’un appel international (pas
d’informations disponibles), ou provenant d’un numéro masqué ou hors
annuaire.
- Il est possible que la présentation du numéro ne fonctionne pas si le
téléphone est derrière un PABX.
Si le téléphone ne fonctionne toujours pas, contactez votre revendeur. N’oubliez
pas de vous munir de la facture de votre appareil.
www.doro.com
25
Français
Autres
Garantie et S.A.V.
Cet appareil est garanti un an à partir de sa date d’achat, la facture faisant foi.
La réparation dans le cadre de cette garantie sera effectuée gratuitement.
La garantie est valable pour un usage normal de l’appareil tel qu’il est défini
dans la notice d’utilisation.
Les fournitures utilisées avec l’appareil ne sont pas couvertes par la garantie.
Sont exclues de cette garantie les détériorations dues à une cause étrangère à
l’appareil.
Les dommages dûs à des manipulations ou à un emploi non conformes, à un
montage ou entreposage dans de mauvaises conditions, à un branchement ou
une installation non conformes ne sont pas pris en charge par la garantie.
Par ailleurs, la garantie ne s’appliquera pas si l’appareil a été endommagé à la
suite d’un choc ou d’une chute, d’une fausse manoeuvre, d’un branchement
non conforme aux instructions mentionnées dans la notice ou aux prescriptions
de l’ART (Autorité de Régulation des Télécommunications), de l’effet de
la foudre, de surtensions électriques ou électrostatiques, d’une protection
insuffisante contre l’humidité, la chaleur ou le gel.
En cas de panne, adressez-vous au S.A.V. de votre revendeur ou installateur.
Pour la France
En tout état de cause, la garantie légale pour vices cachés s’appliquera
conformément aux articles 1641 et suivants du Code Civil.
Si vous avez des soucis d’utilisation, contactez notre Service d’Assistance
Téléphonique au 08 92 68 90 18 ( N° Audiotel - 0,34€/min.).
Declaration de conformité
Doro certifie que cet appareil Doro 313C est compatible avec l’essentiel
des spécifications requises et autres points de la directive 1999/5/EC. Une
copie de la déclaration de conformité est disponible à l’adresse suivante:
www.doro.com/dofc
26
www.doro.com
Installation
Deutsch
Anschluss/Grundeinstellung
1. Schliessen Sie das Spiralkabel an den Hörer und an den Anschluss q am
Telefon an.
2. Legen Sie den Hörer auf.
3. Schliessen Sie den Netzadapter an die Steckdose, und an den Anschluss DC
9V am Telefon an.
4. Auf dem Display blinkt ENGLISH. Wenn dies nicht angezeigt wird, halten
Sie v ca. 4 Sekunden gedrückt.
5. Blättern Sie mit v /V bis zur gewünschten Sprache. Drücken Sie 0.
6. Blättern Sie mit v /V bis zur gewünschten Kontrasteinstellung (3=normal).
Drücken Sie 0.
7. Blättern Sie mit v /V bis zur gewünschten Stunde (00-24). Drücken Sie 0.
8. Blättern Sie mit v /V bis zur gewünschten Minute. Drücken Sie 0.
9. Blättern Sie mit v /V bis zum gewünschten Tag. Drücken Sie 0.
10. Blättern Sie mit v /V bis zum gewünschten Monat. Drücken Sie 0.
11. Stellen Sie sicher, dass das Display die korrekte Rufmethode anzeigt
(=TON). Drücken Sie 0.
12. Blättern Sie mit v /V bis zum gewünschten Rufsignal. Drücken Sie 0.
13. Stellen Sie sicher, dass das Display die korrekte R-Tastenzeit anzeigt (=100).
Drücken Sie 0.
14. Schliessen Sie das Telefonkabel an die Telefondose und an den Anschluss
T am Telefon an.
15. Heben Sie den Hörer ab und vergewissern Sie sich, dass ein Freizeichen zu
hören ist.
Wenn Sie später eine der Einstellungen ändern möchten, halten Sie v ca. 4
Sekunden gedrückt und wiederholen die Schritte 4. - 13. oben.
Batterien
Damit die Rufnummeranzeige, der Speicher usw. während eines Stromausfalls
funktioniert, benötigen Sie drei 1,5V-Batterien vom Typ AAA.
Wenn die Leistung der Batterien zu schwach wird, wird im Display
angezeigt.
Benutzen Sie nur Batterien von guter Qualität.
1. Ziehen Sie die Telefonleitung ab und nehmen Sie die Andeckung ab.
2. Setzen Sie die Batterien, wie auf den Markierungen gezeigt, ein.
3. Setzen Sie die Batterieabdeckung wieder auf.
www.doro.com
27
Deutsch
Installation
Wandmontage
1. Montieren Sie die Wandbefestigung an der Unterseite des Telefons sowie
zwei Schrauben waagerecht mit 83 mm Abstand.
2. Platzieren Sie das Telefon über den Schrauben und drücken sie es herunter.
3. Nehmen Sie die Höreraufhängung an der Gabel ab, indem sie diese nach
oben führen.
4. Drehen Sie die Aufhängung eine halbe Umdrehung und setzen sie diese
wieder ein.
Das Display
Im Standby-Modus werden Datum und Zeit angezeigt. Weiterhin wird
die Anzahl der Telefonnummern angezeigt, die sich im Speicher der
Rufnummeranzeige befinden.
28
www.doro.com
Bedienung
Deutsch
Anrufen
Normaler Anruf
1. Heben Sie den Hörer ab.
2. Geben Sie die gewünschte Telefonnummer ein.
Anruf mit Korrekturfunktion
Bevor Sie den Anruf tätigen, kann die Telefonnummer bei Bedarf geändert
werden.
1. Geben Sie die gewünschte Telefonnummer ein. Eine fehlerhafte Eingabe
kann mit 0 gelöscht werden.
2. Heben Sie den Hörer ab ODER drücken Sie
ODER drücken Sie s.
Die Nummer wird gewählt.
Während des Gesprächs können Sie zwischen Hörer und Freisprecheinrichtung
wechseln.
Wahlwiederholung
Wenn die angerufene Nummer besetzt war, oder wenn Sie die zuletzt gewählte
Nummer noch einmal wählen möchten, heben Sie den Hörer ab(oder drücken
Sie s) und drücken Sie die Wahlwiederholungs-Taste r
Lautstärke
Die Hörerlautstärke kann während des Gesprächs mit
/Q justiert
werden.
Das Lautbild des Hörers kann mit ♫
justiert werden (an der Seite).
Die Lautstärke des Lautsprechers kann mit
justiert werden (an der Seite).
Warnung!
Die Hörerlautstärke kann sehr hoch aufgedreht werden. Die
höchste Lautstärke sollte nur von Personen mit sehr schlechtem
Gehör angewendet werden.
www.doro.com
29
Deutsch
Bedienung
Timer
Kurz nach Beginn eines Gesprächs wird ein Timer im Display angezeigt. Hier
können Sie sehen, wie lange das Gespräch andauert.
Lautsprecherfunktion
1. Drücken Sie s. Der Lautsprecher wird eingeschaltet und der Indikator an
der Taste leuchtet.
2. Wählen Sie die gewünschte Telefonnummer. Stellen Sie die Lautstärke mit
den Reglern an der Seite ein.
3. Sprechen Sie in das Mikrofon an der Vorderseite des Telefons.
4. Drücken Sie s um das Gespräch zu beenden.
Während des Gesprächs können Sie zwischen Hörer und Freisprecheinrichtung
wechseln.
Achtung!
Bei eingeschalteter Freisprecheinrichtung können nicht beide Teilnehmer gleichzeitig sprechen.
Die Umschaltung geschieht automatisch und ist sprachgesteuert. Solange Sie sprechen, kann
also der andere Teilnehmer nur hören und umgekehrt. Achten Sie deshalb darauf, dass in der
Umgebung keine lauten Geräusche sind, wie z.B. laute Musik.
30
www.doro.com
Telefonbuch
Deutsch
Benutzung des Telefonbuchs
Im Telefonbuch können Namen und Telefonnummern gespeichert werden.
Wenn eine Telefonnummer gespeichert ist, kann der Anruf mit wenigen Tasten
getätigt werden. Wenn der Dienst „Rufnummeranzeige” möglich ist, wird
der Name des Teilnehmers bei ankommenden Anrufen angezeigt, wenn die
Nummer im Telefonbuch oder im Speicher gespeichert ist.
Im Telefonbuch können 32 Namen mit Telefonnummer gespeichert werden.
Das Telefonbuch wird alphabetisch sortiert. Jeder Name darf bis zu 16 Zeichen
lang sein. Jede Telefonnummer darf bis zu 22 Ziffern enthalten.
Buchstaben
Auf jeder Zifferntaste befinden sich mehrere Buchstaben.
Taste
Buchstabe/Zeichen
1.......................................... [Leerzeichen] + & - / X 1
2.......................................... A B C Å Ä Æ æ å ä ß 2
3.......................................... D E F ë 3
4.......................................... G H I ï 4
5.......................................... J K L 5
6.......................................... M N O Ñ ñ ö @ ö 6
7.......................................... P Q R S 7
8.......................................... T U V Ü ü 8
9.......................................... W X Y Z 9
* .......................................... ` @ ( ) * < >
0.......................................... , . : ? = 0
#.......................................... $ _ % ! #
Name/Nummer speichern
1. Drücken Sie b .
2. Drücken Sie P.
3. Drücken Sie P nochmals.
4. Geben Sie die Telefonnummer mit den Zifferntasten ein (max. 22 Zeichen).
Drücken Sie P.
5. Geben Sie den Namen ein. Drücken Sie die entsprechende Zifferntaste
einmal oder mehrmals bis der gewünschte Buchstabe erscheint. Siehe
Tabelle oben. Drücken Sie P.
Wenn Sie eine Pause während der Anwahl möchten, drücken Sie die Taste r.
Wenn eine Nummer geändert werden soll, speichern Sie die Neue über der alten Nummer.
www.doro.com
31
Deutsch
Telefonbuch
Anruf mit Telefonbuch
1. Drücken Sie b .
2. Blättern Sie zwischen den Positionen mit v /V. Sie können den ersten
Buchstaben auch eingeben, indem Sie ein- oder mehrere Male die
entsprechende Zifferntaste drücken. Siehe Tabelle auf der vorhergehenden
Seite.
3. Drücken Sie
. Die Nummer wird angerufen. Oder warten Sie, bis der
Apparat wieder in den Standby-Modus zurückgeht.
Während des Gesprächs können Sie zwischen Hörer und Freisprecheinrichtung
wechseln.
Telefonnummer/Name ändern
1. Drücken Sie b .
2. Blättern Sie, wie oben beschrieben, bis zur gewünschten Position.
3. Halten Sie P gedrückt, bis auf dem Display ÄNDERN? angezeigt wird.
Drücken Sie P.
4. Korrigieren bzw. ändern Sie die Nummer mit 0 und v /V. Drücken Sie P.
5. Korrigieren bzw. ändern Sie den Namen. Drücken Sie P.
Eintrag im Telefonbuch löschen
1. Drücken Sie b .
2. Blättern Sie, wie oben beschrieben, bis zur gewünschten Position.
3. Drücken Sie 0, LÖSCHEN ? wird angezeigt.
4. Halten Sie 0 gedrückt, bis die Nummer verschwindet.
Alle Einträge im Telefonbuch löschen
1. Drücken Sie b .
2. Blättern Sie bis zu einer Position.
3. Halten Sie 0 gedrückt, bis das Display ALLE LÖSCHEN ? anzeigt.
4. Halten Sie 0 gedrückt, bis die Nummer verschwindet.
32
www.doro.com
Telefonbuch
Deutsch
Speicher
Im Telefon können 2 Schnellwahltasten und 10 Kurzwahlnummern gespeichert
werden.
Wenn eine Telefonnummer gespeichert ist, kann Sie einfach mit einer bzw. Tasten
angerufen werden. Die Schnellwahltasten haben die Bezeichnung M1-M2. Die
Kurzwahlnummern werden mit 0-9 nummeriert.
Schnellwahl speichern
1. Drücken Sie P.
2. Geben Sie die Telefonnummer mit den Zifferntasten ein (max. 22 Zeichen).
Drücken Sie P.
3. Geben Sie den Namen ein. Drücken Sie die entsprechende Zifferntaste einmal
oder mehrmals bis der gewünschte Buchstabe erscheint. Siehe Tabelle für das
Telefonbuch. Drücken Sie P.
4. Wählen Sie den Speicherplatz (M1-M2) indem Sie die jeweilige Taste drücken.
Wählen mit Schnellwahl
1. Hörer abheben (oder drücken Sie s) und warten Sie auf das Freizeichen.
2. Wählen Sie den Speicherplatz (M1-M2) indem Sie die jeweilige Taste drücken.
Kurzwahlnummer speichern
1. Drücken Sie P.
2. Geben Sie die Telefonnummer mit den Zifferntasten ein (max. 22 Zeichen).
Drücken Sie P.
3. Geben Sie den Namen ein. Drücken Sie die entsprechende Zifferntaste einmal
oder mehrmals bis der gewünschte Buchstabe erscheint. Siehe Tabelle für das
Telefonbuch. Drücken Sie P.
4. Wählen Sie den gewünschten Speicherplatz mit den Tasten 0 - 9 .
Anruf mit Kurzwahl
1. Hörer abheben (oder drücken Sie s) und warten Sie auf das Freizeichen.
2. Drücken Sie m.
3. Wählen Sie die gewünschte Kurzwahlnummer mit den Tasten 0 - 9 .
Wenn Sie eine Pause während der Anwahl möchten, drücken Sie die Taste r.
Wenn eine Nummer geändert werden soll, speichern Sie die Neue über der alten Nummer.
www.doro.com
33
Deutsch
Deutsch
Rufnummeranzeige
So funktioniert die Rufnummeranzeige
Sie können auf dem Display sehen wer anruft, bevor Sie den Anruf annehmen oder
sehen, wer angerufen hat, wenn Sie nicht zu Hause sind. Wenn die Nummer im
Telefonbuch gespeichert ist, wird der Name angezeigt.
Die Anrufe werden nach Uhrzeit gespeichert, die Reihenfolge wird rechts oben angezeigt.
Wenn der Speicher voll ist, ersetzt jeder neue Anruf die älteste Telefonnummer im
Speicher. Neue Nummern werden angezeigt und der rote Indikator blinkt im StandbyModus.
Achtung!
Dieser Dienst muss bei ihrer Telefongesellschaft abonniert werden.
Ablesen und anrufen
1. Drücken Sie v und V um zwischen den Telefonnummern zu blättern.
2. Drücken Sie
. Die Nummer wird angerufen. Oder warten Sie, bis der Apparat
wieder in den Standby-Modus zurückgeht.
Nachrichten
Ausser der Telefonnummer kann das Display folgende Informationen anzeigen:
Keine Information vorhanden, z.B. bei Anrufen aus dem
UNBEKANNT
Ausland.
Geheime Nummer, Anonym oder Anruf über Vermittlung.
ANONYM
q
Nummer nicht bekannt.
Z
(doppelter Anruf). Dieser Anrufer hat mehr als einmal
angerufen.
Telefonnummer löschen
1. Blättern Sie mit v oder V bis zur gewünschten Position.
2. Drücken Sie 0, LÖSCHEN ? wird angezeigt. Oder halten Sie 0 gedrückt, bis
ALLE LÖSCHEN ? angezeigt wird.
3. Halten Sie 0 gedrückt, bis die Nummer verschwindet.
Nummer in das Telefonbuch übertragen
1. Blättern Sie, wie oben beschrieben, bis zur gewünschten Position.
2. Drücken Sie P.
3. Drücken Sie P nochmals. Die Eingabe des Namens geschieht auf die gleiche Art
und Weise wie bei einer Änderung im Telefonbuch, siehe Seite 32.
34
www.doro.com
Allgemeines
Deutsch
Wenn das Telefon nicht funktioniert
Vergewissern Sie sich, dass das Telefonkabel unbeschädigt und korrekt
eingesteckt ist. Entfernen Sie eventuelle Zusatzausrüstung, Verlängerungskabel
und andere Telefone. Wenn das Gerät jetzt funktioniert, liegt der Fehler
woanders.
Versuchen Sie, das Telefon z.B. bei einem Nachbarn anzuschließen. Wenn das
Gerät dort funktioniert, ist Ihr Telefonanschluss vielleicht gestört. Rufen Sie die
Störungsstelle an.
Wenn es klingelt, wird keine Nummer angezeigt
- Die Rufnummeranzeige muss von Ihrem Netzbetreiber unterstützt werden.
- Wenn im Display eine Textnachricht angezeigt ist, wurde entweder keine
Nummerinformation gesendet oder der Teilnehmer hat eine geheime
Telefonnummer.
- Die Rufnummeranzeige funktioniert normalerweise nicht, wenn das Telefon
an eine Vermittlung angeschlossen ist.
Sollte das Telefon trotz der oben stehenden Massnahmen nicht funktionieren,
bringen Sie das Telefon zu Ihrem Händler. Vergessen Sie nicht die
Einkaufsquittung/Rechnung.
www.doro.com
35
Deutsch
Allgemeines
Garantie
Dieses Gerät hat die Warengarantiezeit von einem Jahr. Bei eventuellen
Reklamationen wenden Sie sich bitte an Ihren Händler. Der Garantieservice
wird nur mit gültiger Kaufquittung bzw. Rechnungskopie ausgeführt.
Die Garantie gilt nicht, wenn der Fehler aufgrund eines Unglücks
oder ähnlichem entstanden ist. Weiterhin gilt die Garantie nicht bei
Gewaltanwendung, eingedrungenen Flüssigkeiten, schlechter Wartung,
Missbrauch oder anderer Fehler des Käufers. Die Garantie verfällt auch, wenn
die Seriennummer des Telefons vernichtet wurde sowie bei Schäden die durch
Gewitter oder andere Spannungsvariationen entstanden sind.
Bei Gewitter sollte das Telefon zur Sicherheit von der Steckdose getrennt
werden.
Declaration of Conformity
Doro erklärt hiermit, dass das Produkt Doro 313C mit den wesentlichen
Anforderungen und anderen relevanten Bestimmungen in der Richtlinie
1999/5/EC übereinstimmt. Eine Kopie der Herstellerdeklaration finden Sie auf
www.doro.com/dofc.
36
www.doro.com
Installazione
Italiano
Importante!
Ai fini della programmazione, l’uso della parola “premere” si riferisce all’azione di “premere
il pulsante una volta e rilasciarlo immediatamente”.
L’auricolare del microtelefono può attrarre piccoli oggetti ferromagnetici come punti metallici e
spilli; prestare attenzione al posizionamento del microtelefono vicino a tali elementi.
Impostazioni di base/Connessione
1. Collegare il cavo spiralato al microtelefono e alla presa contrassegnata con
Q sul lato del telefono.
2. Collegare l’adattatore di rete alla presa contrassegnata con DC 9V sul retro
del telefono, quindi alla presa elettrica a parete.
3. Sul display lampeggerà la parola ENGLISH. In caso contrario, tenere
premuto v per circa 4 secondi.
4. Selezionare la lingua desiderata utilizzando v /V. Premere 0.
5. Selezionare l’impostazione di contrasto desiderata (3=normale) utilizzando
v /V. Premere 0.
6. Impostare l’ora (00-24) utilizzando v /V. Premere 0.
7. Impostare i minuti utilizzando v /V. Premere 0.
8. Impostare il giorno utilizzando v /V. Premere 0.
9. Impostare il mese utilizzando v /V. Premere 0.
10. Verificare che venga visualizzato il metodo di composizione corretto (ad
esempio, TONE). Premere 0.
11. Selezionare la suoneria desiderata utilizzando v /V. Premere 0.
12. Assicurarsi che venga visualizzato il tempo per la funzione Recall (ad
esempio, 100). Premere 0.
13. Collegare il cavo telefonico alla presa contrassegnata con T sul retro del telefono e
quindi alla presa telefonica a parete.
14. Sollevare il microtelefono e attendere il segnale acustico di linea libera.
Per modificare le impostazioni precedenti, tenere premuto v per circa 4
secondi, quindi ripetere le fasi 4. - 12. precedentemente descritte.
www.doro.com
37
Italiano
Installazione
Batterie
Per proteggere la memoria da periodi prolungati di mancanza di corrente,
installare quattro batterie alcaline tipo AA di buona qualità. Quando le batterie
si stanno scaricando, verrà visualizzato il simbolo
.
1. Scollegare il cavo della linea telefonica.
2. Sul lato inferiore del telefono, rimuovere con attenzione il coperchio della
batteria.
3. Inserire le batterie di backup, facendo attenzione alla polarità corretta delle
batterie.
4. Riposizionare il coperchio delle batterie.
5. Ricollegare il cavo della linea telefonica.
Montaggio a parete
Il telefono può essere montato a parete utilizzando la staffa di fissaggio a parete
fornita. In Australia, può essere anche fissato ad una piastra di fissaggio a muro
standard senza usare le viti.
1. I fori per le due viti devono trovarsi uno a 83 mm di distanza dall’altro, in
verticale.
2. Inserire le viti nei due fori sul retro del telefono.
3. Rimuovere la spina di aggancio (situato sul supporto a gancio) spingendola
verso l’alto.
4. Ruotare il supporto di aggancio di 180 gradi e riposizionarlo.
Il display
Quando il telefono non è utilizzato, verranno visualizzati sul display la data,
l’ora e il numero delle chiamate nuove e totali salvate nella memoria ID
chiamante.
Il display si illumina quando il telefono suona, quando si accede alle funzioni di
memoria e durante la composizione dei numeri.
38
www.doro.com
Funzionamento
Italiano
Esecuzione di una chiamata
Composizione normale
1. Sollevare il microtelefono.
2. Comporre il numero telefonico desiderato.
Preselezione
Consente di digitare un numero telefonico e modificarlo prima della
composizione.
1. Digitare il numero telefonico desiderato. È possibile eliminare gli errori
utilizzando 0.
2. Sollevare il microtelefono, premere
o s. Verrà composto il numero
telefonico visualizzato.
Attenzione!
Durante la conversazione, è possibile passare in qualsiasi momento dal microtelefono alla
modalità vivavoce premendo s. Premere nuovamente s per concludere la chiamata.
Funzione ricomponi
Se il numero composto è occupato o se si desidera richiamare l’ultimo numero
composto, sollevare il microtelefono (o premere s) e premere il pulsante r.
Regolazione del volume
Per regolare il volume dell’auricolare del microtelefono durante una chiamata,
premere
/Q.
La risposta in frequenza è regolabile utilizzando ♫
situato sul lato
dell’unità.
Per regolare il volume dell’altoparlante (vivavoce), utilizzare
situato sul
lato del telefono.
Avvertenza!
NON selezionare il massimo volume del microtelefono, a meno di
non avere già difficoltà uditive.
www.doro.com
39
Italiano
Funzionamento
Timer
Subito dopo aver composto un numero, viene visualizzato un timer sul display.
Il timer vi permette di conoscere la durata della chiamata.
Funzione vivavoce
1. Premere s. Verrà attivato il vivavoce e il relativo indicatore si accenderà.
2. Comporre il numero telefonico richiesto. Il volume del vivavoce è regolabile
utilizzando
situato sul lato del telefono.
3. Parlare nel microfono posto sul bordo anteriore del telefono.
4. Premere s per concludere la chiamata.
Attenzione!
Nel corso della conversazione, è possibile passare dalla modalità vivavoce al microtelefono
in qualsiasi momento, sollevando il microtelefono stesso. Riagganciando il microtelefono si
concluderà la chiamata.
Occorre ricordare che in modalità vivavoce “mani libere”, è consentito parlare solo ad una
persona alla volta. Il passaggio tra vivavoce e microfono è automatico e dipende rispettivamente
dal livello acustico della chiamata in entrata e dal microfono. È quindi essenziale che non
vengano emessi suoni forti nelle immediate vicinanze del telefono in quanto disturberebbero la
funzione vivavoce.
Toni di avviso
Utilizzando l’interruttore sul retro dell’unità è possibile selezionare un tono di
avviso. Se il microtelefono non viene riposto correttamente, verrà emesso un
segnale acustico dopo 20 minuti.
40
www.doro.com
Rubrica telefonica
Italiano
Utilizzo della rubrica telefonica
La rubrica può contenere fino a 32 numeri telefonici (max. 22 cifre) e i rispettivi
nomi (max. 16 caratteri), con voci organizzate in ordine alfabetico. I numeri
telefonici memorizzati possono essere richiamati premendo meno tasti di quelli
richiesti per la composizione manuale. Nel caso in cui si sottoscriva il servizio ID
chiamante, quando si riceve una chiamata in entrata verrà visualizzato il nome/
numero del chiamante (solo per i numeri memorizzati nella rubrica telefonica o
nelle memorie M1/M2).
Lettere
A ciascun tasto numerico sono stati assegnati determinati caratteri.
Pulsante
Lettere/simboli
1.......................................... [Carattere Spazio] + & - / X 1
2.......................................... A B C Å Ä Æ æ å ä ß 2
3 ............................................... D E F ë 3
4 ............................................... G H I ï 4
5 ............................................... J K L 5
6 ............................................... M N O Ñ ñ ö @ ö 6
7 ............................................... P Q R S 7
8 ............................................... T U V Ü ü 8
9 ............................................... W X Y Z 9
* ............................................... ` @ ( ) * < >
0 ............................................... , . : ? = 0
# ............................................... $ _ % ! #
Memorizzazione di nomi/numeri
1. Premere b .
2. Premere P.
3. Premere nuovamente P.
4. Inserire il numero telefonico da memorizzare (fino a 22 cifre). Premere P.
5. Digitare il nome (fino a 16 caratteri). Premere il pulsante numerico
corrispondente una o più volte per la prima lettera del nome (vedere tabella
riportata in alto).
6. Premere P.
Premere r per inserire una pausa nel numero telefonico.
Qualora si desideri modificare il numero telefonico, memorizzare il nuovo numero nella medesima
posizione del precedente.
www.doro.com
41
Italiano
Rubrica telefonica
Composizione di un numero dalla rubrica telefonica
1. Premere b .
2. Utilizzando i pulsanti v /V. scorrere l’elenco fino alla posizione di
memoria desiderata. Per effettuare una ricerca veloce, premere una o più
volte il tasto numerico corrispondente alla prima lettera del nome (vedere la
tabella riportata alla pagina precedente).
3. Premere
per comporre il numero visualizzato. Se non si preme alcun
tasto, il telefono tornerà in modalità standby.
Attenzione!
Durante la conversazione, è possibile passare in qualsiasi momento dal microtelefono alla
modalità vivavoce premendo s. Premere nuovamente s per concludere la chiamata.
Modifica dei numeri telefonici/nomi
1. Premere b .
2. Scorrere l’elenco fino alla posizione di memoria desiderata utilizzando v /V.
3. Tenere premuto P fino a quando viene visualizzato EDIT? sul display.
Premere P.
4. I pulsanti 0 and v /V consentono di modificare il numero visualizzato.
Premere P.
5. I pulsanti 0 and v /V consentono di modificare il nome visualizzato.
6. Premere P per confermare.
Cancellazione di una voce dalla rubrica telefonica
1. Premere b .
2. Scorrere l’elenco fino alla posizione di memoria desiderata utilizzando v /V.
3. Premere 0. Il display visualizzerà DELETE?.
4. Tenere premuto il tasto 0 finché dal display scompare il numero telefonico.
Cancellare tutte le voci della rubrica
1. Premere b .
2. Scorrere l’elenco fino alla posizione di memoria desiderata utilizzando v /V.
3. Tenere premuto 0 finché sul display non compare DELETE ALL?
4. Tenere premuto il tasto 0 finché dal display scompare il numero telefonico.
42
www.doro.com
Rubrica telefonica
Italiano
Memoria
Il telefono è dotato di 2 memorie one-touch e 10 memorie two-touch da associare ai
numeri telefonici chiamati con maggiore frequenza.
Quando il numero è memorizzato, è sufficiente premere rispettivamente uno o due
pulsanti per eseguire la chiamata.
Le memorie one-touch corrispondono ai tasti M1 ed M2, mentre le memorie twotouch utilizzano le cifre da 0 a 9 sulla tastiera del telefono.
Memorizzazione dei numeri one-touch
1. Premere P.
2. Inserire il numero telefonico da memorizzare (fino a 22 cifre). Premere P.
3. Digitare il nome (fino a 16 caratteri). Per memorizzare la prima lettera premere
una o più volte il pulsante del numero corrispondente (vedere la tabella riportata
al paragrafo relativo alla Rubrica). Premere P.
4. Premere M1o M2 per memorizzare il numero.
Chiamate ai numeri nelle memorie one-touch
1. Sollevare il microtelefono (o premere s) e attendere il segnale acustico di linea
libera.
2. Premendo M1 o M2 verrà composto il numero telefonico corrispondente.
Memorizzazione dei numeri two-touch
1. Premere P.
2. Inserire il numero telefonico da memorizzare (fino a 22 cifre). Premere P.
3. Digitare il nome (fino a 16 caratteri). Per memorizzare la prima lettera premere
una o più volte il pulsante del numero corrispondente (vedere la tabella riportata
al paragrafo relativo alla Rubrica). Premere P.
4. Premere un tasto 0 - 9 per memorizzare il numero.
Chiamate ai numeri nelle memorie two-touch
1. Sollevare il microtelefono (o premere s) e attendere il segnale acustico di linea
libera.
2. Premere m.
3. Selezionare la posizione della memoria premendo i tasti numerici della tastiera
0- 9.
Premere r per inserire una pausa nel numero telefonico.
Per modificare il numero telefonico, memorizzare il nuovo numero nella medesima posizione del
precedente.
www.doro.com
43
Italiano
Identificazione chiamante
Descrizione della funzione ID chiamante
L’ID chiamante consente di visualizzare il nome del chiamante prima di rispondere,
nonché di visualizzare i nomi di coloro che hanno chiamato in vostra assenza.
Se il numero è memorizzato nella rubrica telefonica, verrà visualizzato il nome
corrispondente e non il numero telefonico. Le chiamate ricevute verranno
memorizzate in ordine cronologico con il numero sequenziale indicato in alto a
destra sul display.
Se il registro ID chiamante è pieno, il numero più vecchio viene cancellato
automaticamente al ricevimento di una nuova chiamata. La presenza di nuove
chiamate è indicata dall’apposito messaggio di testo sul display e dalla spia di
controllo rossa lampeggiante.
Attenzione!
Per visualizzare i numeri, è necessario che il vostro operatore di rete fornisca il servizio ID chiamante
e avere sottoscritto il servizio. Per ulteriori informazioni, contattare il vostro operatore di rete.
Recupero e composizione di numeri ID chiamante
1. Premere
per selezionare la modalità ID chiamante.
v
V
2. Press o per scorrere l’elenco dei numeri nella memoria ID chiamante.
3. Per comporre il numero telefonico visualizzato, premere
o s. Verrà
composto il numero telefonico visualizzato. Se non si preme alcun tasto, il
telefono tornerà in modalità standby.
Attenzione!
Durante la conversazione, è possibile passare in qualsiasi momento dal microtelefono alla modalità
vivavoce premendo s. Premere nuovamente s per concludere la chiamata.
Messaggi
Oltre ai numeri telefonici, il display può visualizzare anche diversi messaggi di testo
o simboli:
OUT OF AREA
Si tratta di una chiamata internazionale o proveniente da un
centralino (nessuna informazione ricevuta).
PRIVATE
Le informazioni sul numero sono nascoste. La chiamata
potrebbe provenire da un centralino telefonico anche in
questo caso.
q
Nuovo numero non precedentemente registrato o
memorizzato.
Z
Sono giunte numerose chiamate dallo stesso numero
telefonico.
44
www.doro.com
Identificazione chiamante
Italiano
Cancellazione dei numeri
1. Scorrere l’elenco fino al numero telefonico che si desidera cancellare
utilizzando v /V.
2. Premere 0: Verrà visualizzato DELETE? , in alternativa tenere premuto 0
fino a quando sul display compare DELETE ALL?
3. Tenere premuto 0 finché il numero sul display scompare.
Trasferimento dei numeri alla rubrica telefonica
1. Scorrere l’elenco fino al numero telefonico che si desidera copiare
utilizzando v /V.
2. Premere P.
3. Premere nuovamente P.
4. Il numero può essere successivamente aggiunto come descritto al paragrafo
Modifica dei numeri telefonici/nomi a pag. 42.
www.doro.com
45
Italiano
Varie
Nessun numero visualizzato sul display quando l’apparecchio squilla
- Perché questa funzione sia attiva, è necessario sottoscrivere il servizio ID
Chiamante presso il proprio operatore di rete.
- Se sul display viene visualizzato un messaggio di testo, può trattarsi di una
chiamata internazionale (nessun dato ricevuto), oppure di un numero privato
o nascosto.
- Se il telefono è collegato ad un centralino, potrebbe non essere possibile
ricevere informazioni sull’ID chiamante.
Se il telefono continua a non funzionare, contattare Doro o il rivenditore presso
il quale si è acquistato il prodotto. Sarà necessario presentare la ricevuta o la
copia della fattura per attivare la garanzia.
Garanzia
Il presente prodotto è garantito per un periodo di 12 mesi a decorrere dalla data
di acquisto. Qualora il Vostro telefono dovesse mostrare un difetto durante
il periodo di validità della garanzia, riportare l'apparecchio al rivenditore
presentando inoltre una copia della ricevuta d'acquisto. Per avere diritto a
qualsiasi servizio o assistenza durante il periodo di garanzia è necessario
presentare il relativo documento di acquisto.
La presente garanzia non verrà applicata ad eventuali guasti causati da incidenti
o infortuni o danni simili, penetrazione di liquidi, negligenza, uso anomalo o
qualsiasi altra circostanza simile da parte dell'acquirente. Inoltre, la presente
garanzia non verrà applicata ad eventuali guasti causati da temporali o da
qualsiasi altra variazione della tensione.
La presente garanzia non influisce in alcun modo sui diritti legali del
proprietario. (Come misura precauzionale, si consiglia di scollegare il telefono
durante i temporali).
Dichiarazione di conformità
Doro dichiara che l’apparecchio Doro 313C è conforme ai requisiti essenziali
e ad altre disposizioni importanti, previsti Direttiva 1999/5/EC. Una copia della
Dichiarazione di Conformità può essere reperita al sito www.doro.com/dofc
46
www.doro.com
English
French
German
Italian
Version 1.0