1
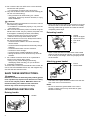
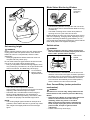
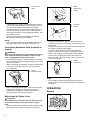
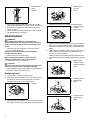
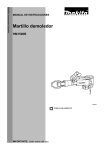
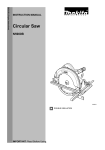
ENGLISH (Original instructions)
Electric Lawn Mower
LM2300
DOUBLE INSULATION
INSTRUCTION MANUAL
IMPORTANT: Read Before Using.
ENGLISH (Original instructions)
SPECIFICATIONS
Model
LM2300
No load speed
8,000 min-1
Height of cut
10 mm, 15 mm, 20 mm, 25 mm, 30 mm, 40 mm
Width of cut
Dimensions
230 mm
at work (with grass basket)
833 mm x 256 mm x 661 - 900 mm
at storage (without grass
basket)
208 mm x 340 mm x 770 mm
Weight (with grass basket)
6.9 kg
Safety class
/II
• Due to our continuing programme of research and development, the specifications herein are subject to change without
notice.
• Specifications may differ from country to country.
• Weight according to EPTA-Procedure 01/2003
Symbols
END226-1
The following show the symbols used for the equipment.
Be sure that you understand their meaning before use.
... Read instruction manual.
............. DOUBLE INSULATION
Power supply
ENF002-2
The tool should be connected only to a power supply of
the same voltage as indicated on the nameplate, and can
only be operated on single-phase AC supply. They are
double-insulated and can, therefore, also be used from
sockets without earth wire.
General Power Tool Safety
Warnings
GEA005-3
WARNING Read all safety warnings and all
instructions. Failure to follow the warnings and
instructions may result in electric shock, fire and/or
serious injury.
Save all warnings and
instructions for future reference.
The term “power tool” in the warnings refers to your
mains-operated (corded) power tool or battery-operated
(cordless) power tool.
Work area safety
1. Keep work area clean and well lit. Cluttered or dark
areas invite accidents.
2. Do not operate power tools in explosive
atmospheres, such as in the presence of
flammable liquids, gases or dust. Power tools
create sparks which may ignite the dust or fumes.
3. Keep children and bystanders away while
operating a power tool. Distractions can cause you
to lose control.
2
Electrical safety
4. Power tool plugs must match the outlet. Never
modify the plug in any way. Do not use any
adapter plugs with earthed (grounded) power
tools. Unmodified plugs and matching outlets will
reduce risk of electric shock.
5. Avoid body contact with earthed or grounded
surfaces such as pipes, radiators, ranges and
refrigerators. There is an increased risk of electric
shock if your body is earthed or grounded.
6. Do not expose power tools to rain or wet
conditions. Water entering a power tool will increase
the risk of electric shock.
7. Do not abuse the cord. Never use the cord for
carrying, pulling or unplugging the power tool.
Keep cord away from heat, oil, sharp edges or
moving parts. Damaged or entangled cords increase
the risk of electric shock.
8. When operating a power tool outdoors, use an
extension cord suitable for outdoor use. Use of a
cord suitable for outdoor use reduces the risk of
electric shock.
9. If operating a power tool in a damp location is
unavoidable, use a residual current device (RCD)
protected supply. Use of an RCD reduces the risk of
electric shock.
10. Use of power supply via a RCD with a rated
residual current of 30 mA or less is always
recommended.
Personal safety
11. Stay alert, watch what you are doing and use
common sense when operating a power tool. Do
not use a power tool while you are tired or under
the influence of drugs, alcohol or medication. A
moment of inattention while operating power tools
may result in serious personal injury.
12. Use personal protective equipment. Always wear
eye protection. Protective equipment such as dust
mask, non-skid safety shoes, hard hat, or hearing
protection used for appropriate conditions will reduce
personal injuries.
13. Prevent unintentional starting. Ensure the switch
is in the off-position before connecting to power
source and/or battery pack, picking up or carrying
the tool. Carrying power tools with your finger on the
switch or energising power tools that have the switch
on invites accidents.
14. Remove any adjusting key or wrench before
turning the power tool on. A wrench or a key left
attached to a rotating part of the power tool may result
in personal injury.
15. Do not overreach. Keep proper footing and
balance at all times. This enables better control of
the power tool in unexpected situations.
16. Dress properly. Do not wear loose clothing or
jewellery. Keep your hair, clothing, and gloves
away from moving parts. Loose clothes, jewellery or
long hair can be caught in moving parts.
17. If devices are provided for the connection of dust
extraction and collection facilities, ensure these
are connected and properly used. Use of dust
collection can reduce dust-related hazards.
Power tool use and care
18. Do not force the power tool. Use the correct power
tool for your application. The correct power tool will
do the job better and safer at the rate for which it was
designed.
19. Do not use the power tool if the switch does not
turn it on and off. Any power tool that cannot be
controlled with the switch is dangerous and must be
repaired.
20. Disconnect the plug from the power source and/or
the battery pack from the power tool before
making any adjustments, changing accessories,
or storing power tools. Such preventive safety
measures reduce the risk of starting the power tool
accidentally.
21. Store idle power tools out of the reach of children
and do not allow persons unfamiliar with the
power tool or these instructions to operate the
power tool. Power tools are dangerous in the hands
of untrained users.
22. Maintain power tools. Check for misalignment or
binding of moving parts, breakage of parts and
any other condition that may affect the power
tool’s operation. If damaged, have the power tool
repaired before use. Many accidents are caused by
poorly maintained power tools.
23. Keep cutting tools sharp and clean. Properly
maintained cutting tools with sharp cutting edges are
less likely to bind and are easier to control.
24. Use the power tool, accessories and tool bits etc.
in accordance with these instructions, taking into
account the working conditions and the work to
be performed. Use of the power tool for operations
different from those intended could result in a
hazardous situation.
Service
25. Have your power tool serviced by a qualified
repair person using only identical replacement
parts. This will ensure that the safety of the power tool
is maintained.
26. Follow instruction for lubricating and changing
accessories.
27. Keep handles dry, clean and free from oil and
grease.
ELECTRICAL LAWN MOWER
SAFETY WARNINGS
WARNING:
1. Power source: Use device at the voltage displayed on
the rating plate.
• If used at a voltage in excess of displayed voltage,
blade rotation speed will become extremely fast, and
may cause injury.
2. Do not use or leave the electric lawn mower in the rain
or damp conditions.
• Doing so may cause a short circuit and/or electric
shock.
3. Always wear long trousers and substantial footwear
such as sports shoes when using the electric lawn
mower.
• This is necessary because small objects like stones
are sent flying by the blade, and these may cause
injury.
4. Do not use the electric lawn mower near small
children and/or pets. Furthermore, never allow small
children to use the electric lawn mower.
• Doing so may cause an accident.
5. Before using the electric lawn mower, be sure to clear
away debris such as small stones and sticks from the
area to be cut.
• If debris such as small stones hit the blade, they
may cause injury.
6. While the blade is rotating, do not put body parts
(hands, feet, face etc.) near blade or mown grass
discharge vent.
• Doing so may cause injury.
7. The blade will not stop immediately even if the device
is switched OFF. Always make sure the blade has
stopped completely and the power cord is unplugged
from the power socket before moving, inspecting or
handling the electric lawn mower.
• Failure to do so may cause injury.
8. Do not use the electric lawn mower with the grass
basket detached.
• Doing so may cause injury.
9. When the electric lawn mower is mistakenly dropped
or thrust into an object, be sure to inspect device for
breakages, cracks and/or misshaping.
• If there are any breakages, cracks and/or
misshaping, continued use may cause injury.
10. When the blade has an abnormality like a crack or
chip, replace it with a new one.
• Abnormalities not only reduce the cutting
effectiveness of the blade they also may cause
injury.
11. Be sure to hold the electric lawn mower firmly when in
use.
• Failure to hold the device firmly will cause it to
vibrate, which may cause injury.
12. Do not plug in/unplug power cord with wet hands.
• Doing so may cause electric shock.
3
13. Do not secure the Lock OFF Lever once it has been
slid into lock OFF position.
• An unforeseen movement may cause injury.
14. Only use the electric lawn mower for lawn mowing (do
not use it for weed cutting).
• Using the device for weed cutting, etc. causes
overloading, which may cause an accident, or injury
and/or breakdown.
CAUTION:
1. Be sure to follow the instructions in the user’s manual
when attaching a blade.
• If the blade is not attached properly, it may come off
and cause injury.
2. Take care not to sever the power cord while using the
electric lawn mower. If by any chance, the power cord
is damaged or mistakenly severed, immediately
remove the power plug from the power socket.
• Failure to do so may cause electric shock.
3. When the device is not in use, always store indoors,
but avoid the following locations.
• Locations where children can reach and easily
remove device.
• Locations where temperature and humidity change
suddenly.
• Locations where there is a lot of moisture.
• Locations in direct sunlight.
• Locations where volatile materials are stored.
• Storing the device in such locations may cause an
accident.
4. Do not allow chemicals such as oil or pesticide to
remain on the electric lawn mower.
• Doing so may cause damage (discoloring,
misshaping and/or cracking, etc.) to the device.
5. Inspecting screws/bolts
To ensure safe, correct use of the electric lawn mower, be
sure to check screws/bolts before use, and retighten any
of those that have become loose.
SAVE THESE INSTRUCTIONS.
WARNING:
DO NOT let comfort or familiarity with product (gained
from repeated use) replace strict adherence to safety
rules for the subject product. MISUSE or failure to
follow the safety rules stated in this instruction
manual may cause serious personal injury.
OPERATING INSTRUCION
Raising handle
1. Handle
1
4
• Place one hand on the main unit of the device, and use
the other hand to raise the handle. There is a midway
securing position but ignore this and raise the handle
completely until it stops.
Extending handle
1
5
2
1.
2.
3.
4.
5.
Handle
Extend out pipes
Open lock levers
Lock lever
Pipe
3
4
• Open out the lock levers on both sides of the handle
and then pull the handle to extend it out. Once handle
is at an easy-to-use height, close and properly secure
the lock levers.
Attaching grass basket
1. Frame
2. Grass basket
1
2
• The frame of the grass basket is hooked onto the rear
end of the main unit of the device.
NOTE:
• Be sure to attach the grass basket in the correct
position. Failure to do so may cause loss of grass
basket functionality.
Blade Status Monitoring Window
1. Blade status
monitoring
window
1
• The Monitoring Window on top of the main unit of the
device enables user to check whether blade is moving
or stationary.
• The blade is rotating when a red & white pattern is
spinning round or a pink color can be seen.
Before handling the main unit of the device when moving
after use, inspecting, changing blade, adjusting mowing
height or attaching/un-attaching grass basket, etc., be
sure to look into the Monitoring Window to confirm that the
red & white pattern has stopped completely.
Switch action
Set mowing height
WARNING:
Before adjusting mowing height, turn OFF Power Switch,
unplug power cord from power socket, check that the
blade has come to a complete halt, and then make
adjustment.
• Attempting adjustment before blade has come to a
complete halt may cause injury.
Do not insert hands into gaps between wheels and main
unit cover or any other narrow spaces (gaps).
• Doing so may lead to hands becoming trapped, which
may cause injury. Furthermore, do not put hands under
main unit of device. The blade may cause injury.
1
2
1. Lock off button
2. Mowing height
adjustment lever
• There are six lawn height levels between
approximately 10 mm and 40 mm to choose from when
adjusting. Select desired height and adjust.
• Hold down the Lock OFF Button while moving the
Mowing Height Adjustment Lever backwards or
forwards to desired height setting. At this time, make
sure lever fits properly into selected height notch.
NOTE:
• The mowing height figures should be used just as a
guideline, as the state of the lawn or ground may cause
lawn height to be slightly different to the set height
figure.
WARNING:
• Before plugging in the tool, always check to see
that the switch lever actuates properly and returns
to the “OFF” position when released.
1. Switch lever
2. Handle
3. Lock off lever
1
2
3
• To start the device, first slide the lock-off lever in the
direction of the arrow in the figure, and then squeeze in
the switch lever. To stop the device, release the switch
lever. When the switch lever is released, the lock-off
lever will return automatically to the locked position,
and the switch lever cannot be turned ON.
Over Current Relay (motor protection
mechanism)
WARNING:
To restore over current relay, always make sure the
Power Switch is OFF, and then press the Recovery
Button.
• If the Recovery Button is pressed while the Power
Switch is ON, the device will start moving
suddenly, which may cause an accident.
When removing an object that is jamming the
blade, always unplug the power cord from the
power socket, and put on gloves, before
unblocking.
• Failure to do so may cause injury.
5
1. Over current
relay
1. Hook
2. Waist hook
3. Holder
1
2
3
1
• If the electric lawn mower is used while grass cuttings
and other dirt are blocking the inside of the main unit,
the over current relay will operate, automatically
stopping the device. In such cases, unplug the power
cord from the power socket, clean out the material
causing the blockage, press the Recovery Button, and
then restart mowing.
• Be sure to press the Recovery Button at least ten
seconds after the device has stopped.
NOTE:
• The over current relay may be activated when wet or
long grass gets caught up inside of the main unit.
Connecting Extension Cord (available in
market)
WARNING:
When connecting extension cord to the power supply
cord, make sure the Power Switch is OFF and the
cord is unplugged from the power socket.
• If the power connection is made with the Power Switch
ON, the device will start operating suddenly, which may
cause an accident.
• When connecting the extension cord to the power plug
of the main unit of the device, be sure to insert the
cord’s plug fully.
1
1
2
• Using the waist hook for power cord helps prevent
careless severing of the extension cord due to the cord
being loose.
• Hook the hook section of the waist hook for power cord
into clothing or belt at waist height.
• To use the Waist Hook for Power Cord, place the
holder in your hand, and hook the hooked section (A
section) into clothing or belt at waist height, and then
clip the power cord into the holder with one touch.
• Be sure to clip in and clip out the power cord from the
mouth of the holder.
1
1. Holder
2. Power cord
1. Hook
2. Extension cord
2
• When connecting the extension cord, hook it over the
support hook as shown in the figure, to prevent
inadvertent unplugging, but make sure there is no
excessive strain on the plug connection.
Waist Hook for Power Cord
CAUTION:
Do not attach any item other than the extension cord
to the holder section of the waist hook for power
cord.
• Using the waist hook for power cord for purposes other
than intended may cause an accident and/or injury.
6
1. A section
2. Holder
2
NOTE:
• Do not apply excessive strength to the mouth of the
holder. Doing so may cause misshaping or damage to
the holder.
OPERATION
Mowing
WARNING:
Before mowing, clear away sticks and stones from
mowing area. Furthermore, clear away any weeds
from mowing area in advance.
1. Handle
1
• Change the mowing angle (direction) to prevent the
grass grain pattern from forming in just one direction.
As the figure shows, changing the mowing angle
(direction) each time the electric lawn mower is passed
over the lawn will give a beautiful finish to the lawn.
• Periodically check the level of the grass basket, and
empty before it becomes full.
NOTE:
• Using the electric lawn mower with the grass basket full
prevents smooth blade rotation and places an extra
load on the motor, which may cause breakdown.
Mowing a long-grass lawn
• Firmly hold the electric lawn mower handle with both
hands when mowing.
• The mowing speed guideline is approximately one
meter per four seconds.
• Start mowing from a point near to the power socket to
ensure that the power cord does not become an
obstacle.
• Do not try to cut long grass all in one go. Instead, mow
the lawn in stages, leaving it for a day or two between
mows, until the lawn is evenly short.
1. Grass
1
1. Power socket
2. Power cord
1
NOTE:
• Mowing long grass to a short length all in one go may
cause the grass to die and/or block up the inside of the
main unit.
2
Transporting
• Do not let the extension cord pass under or become
entangled beneath the main unit of the device.
1
1. Mowing width
labels
2. One third
3. Mowing width
CAUTION:
When carrying the electric lawn mower, make sure the
blade is on the outside (away from your body).
• Failure to do so may cause injury.
• To carry the electric lawn mower, secure the handle,
and carry as shown in the figure.
1
1. Handle
2. Blade is on the
outside
2
3
• The mowing width labels on either side of the front end
of the main unit provide a guideline to mowing width.
Using the width labels as a guideline, mow in strips,
overlapping by one half to one third the previous strip,
to mow the lawn evenly.
2
Storing
WARNING:
Be careful not to trap fingers between handle and lock
lever when storing away the electric lawn mower.
• If fingers do become trapped, it may cause injury.
Make sure that the handle is properly secured into the
handle stoppers on both sides of the top of the main
unit.
• Failure to do so may cause injury.
7
2
1
1. Grass basket
2. Hook
3. Handle
1
1. Bottom plate
2. Lock pin
3. Hole
2
3
3
1. Remove the grass basket and shorten the handle.
(See the section titled “Extending handle” for details.)
2. Fold down the handle and stand up the device as
shown in figure.
3. Use the hook on the grass basket to hook it onto the
handle as shown in the figure.
4. Use the hex wrench to loosen the hexagonal bolt.
1. Hexagonal bolt
2. Loosen
3. Hex wrench
1
2
MAINTENANCE
WARNING:
When changing the blade or inspecting and
maintaining the device, always turn OFF the Power
Switch, and unplug the power cord from the power
socket.
• Leaving the device plugged in may cause electric
shock or other accidents.
Always check that the blade has halted before
conducting above work.
• Failure to do so may cause injury.
When changing the blade or inspecting and
maintaining the device, always wear gloves.
• Failure to do so may cause injury.
CAUTION:
Do not use any wrench other than the provided hex
wrench (accessory) when changing the blade.
• Using a different wrench may lead to over-tightening or
looseness, which may cause injury.
3
5. Loosen the two hexagonal bolts securing the bottom
plate, and remove the bottom plate, hexagonal bolts
and then outer flange (in that order), and replace the
blade.
6. When attaching a blade, make sure the arrow on the
bottom plate and the arrow on the blade are both
facing in the same direction.
Attach the blade, outer flange and hexagonal bolt (in
that order), and then temporarily tighten the hexagonal
bolt.
1
1. Bottom plate
2. Hexagonal bolt
(securing bottom
plate)
2
Replacing blade
1. Unplug power cord from power socket.
2. Fold down the handle and turn over the main unit of
the device. (The device cannot be put in a stable
position if the handle is not folded down.)
1
1. Hexagonal bolt
2. Outer flange
3. Blade
2
1. Handle
3
1
1
3. Pass the lock pin through the hole in the bottom plate
and insert it into the hole in the main unit of the device.
8
2
3
1. Hexagonal bolt
2. Outer flange
3. Blade
7. Attach the bottom plate in the (1) (2), (3) order shown
in the figure, and then tighten the two bottom plate
hexagonal bolts.
1. Bottom plate
1
(1)
• Lawn mower blade
• Waist cord hook
NOTE:
• Some items in the list may be included in the tool
package as standard accessories. They may differ from
country to country.
(2)
(3)
NOTE:
• Be sure to fully clip in the notches on the bottom plate,
because if the securing hexagonal bolts are misaligned
and come off during mowing, this error may cause
injury.
8. Insert the lock pin, and securely tighten the hexagonal
bolt using the hex wrench, to secure the blade.
2
1
3
1.
2.
3.
4.
5.
Notches
Hex wrench
Lock pin
Tighten
Hexagonal bolt
4
5
9. Remove the lock pin.
Electric lawn mower upkeep
• After mowing, use a dry cloth or cloth dipped in soapy
water to wipe clean the electric lawn mower. Also, use
a soft brush or other such tool to brush off grass
cuttings and dirt from blade.
CAUTION:
Never use gasoline, benzine, thinner, alcohol or the like.
Discoloration, deformation or cracks may result.
NOTE:
To maintain product SAFETY and RELIABILITY, repairs,
carbon brush inspection and replacement, any other
maintenance or adjustment should be performed by
Makita Authorized Service Centers, always using Makita
replacement parts.
• After mowing, clean away grass and dirt from locations
such as intake duct. Failure to do so may cause loss of
grass collecting efficiency and cooling capability.
OPTIONAL ACCESSORIES
CAUTION:
• These accessories or attachments are recommended
for use with your Makita tool specified in this manual.
The use of any other accessories or attachments might
present a risk of injury to persons. Only use accessory
or attachment for its stated purpose.
If you need any assistance for more details regarding
these accessories, ask your local Makita Service Center.
9
10
11
Makita Corporation
885006-7
ALA
www.makita.com