1
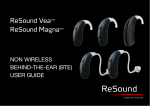
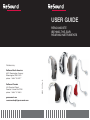
USER GUIDE
RESOUND BTE
(BEHIND-THE-EAR)
HEARING INSTRUMENTS
Distributed by:
ReSound Canada
303 Supertest Road
Toronto, Ontario M3J 2M4
phone: 1-888-737-6863
gnresound.com
[email protected]
MK602040 Rev.B
ReSound North America
8001 Bloomington Freeway
Bloomington, MN 55420
phone: 1-888-735-4327
RESOUND BTE (BEHIND-THE-EAR)
HEARING INSTRUMENTS
Congratulations on the purchase of your new fully
digital ReSound hearing instruments!
ReSound’s state-of-the-art hearing instrument technology and the customized set-up selected by your
hearing healthcare professional will bring outstanding
sound quality to your family, social and professional
lives.
Your ReSound hearing instruments have been
adjusted to your individual hearing loss. Please familiarize yourself with the information in this booklet.
Proper understanding and use of your new ReSound
hearing instruments will allow you to derive maximum
hearing benefit.
Please refer to the accompanying Quick Reference
or User Instructions for Tinnitus Sound Generators
for illustrations of your specific instrument model,
technical information as well as additional information
related to the proper use of your hearing instruments.
Note: Since this booklet covers multiple models of
hearing instruments, the illustrations may vary slightly
from your particular model.
2
ReSound BTEs
CONTENTS
Adjusting to a world of new sounds
Turning your hearing instrument on and off
SmartStart™
Inserting the hearing instrument
— with standard earmold and tubing
— with Thin Tube/Flex-Tube™/receiver
tube and dome
Removing the hearing instrument
Volume control
Program selector
Your program environments
Stand-by mode
Telephone use
Cell phone
Using assistive listening systems
Direct audio input (DAI)
Low battery warning
Changing the battery
Battery warning information
Daily maintenance
Maintaining the earmold and tubing
Maintaining the Thin Tube/Flex-Tube™
and dome
Receiver tube
Maintaining the receiver tube and dome
Changing the dome
HF3 wax protection system
General precautions
General warnings
Important notice for prospective
hearing aid users
Children with hearing loss
Warning to hearing aid dispensers
Troubleshooting guide
Warranty and repairs
PAGE
4
5
5
6
9
10
11
12
12
14
14
15
15
16
17
18
19
20
20
21
24
26
27
28
30
31
32
34
3
ADJUSTING TO A WORLD
OF NEW SOUNDS
TURNING YOUR HEARING INSTRUMENT
ON AND OFF
A hearing loss is typically acquired gradually over
many years. You may have become accustomed to
an everyday life with fewer sounds, which also means
hearing less noise than people with normal hearing.
Your ReSound BTE hearing instrument is equipped
with an on/off switch integrated into the battery
compartment.
With your new hearing instruments you will experience many sounds that you may not have heard for
years, such as:
• Clocks ticking
• Newspaper crinkling
• Children’s voices
• Whispers and soft speech
• Car noises
• Bird songs
• Footsteps on the floor
It can take several months for your brain to become
accustomed to all the “new” sounds around you.
Your hearing healthcare professional will advise you
how to best adapt to all of these sounds while using
your new hearing instruments.
4
ReSound BTEs
1. When the battery compartment is fully closed,
the instrument is turned on and Program 1 is
activated.
2. To turn the instrument off, open the battery door
by lifting the tab at the base of the battery door.
Once the battery door opens, the instrument will
be turned off.
3. Whenever you are not using the instrument,
remember to turn it off to reduce battery consumption.
SMARTSTART™ (SELECT MODELS)
Generally, people prefer to turn on the hearing instrument once it is fully inserted in the ear. To facilitate
this, your hearing healthcare professional can activate
the SmartStart™ function.
SmartStart™ allows you to insert the instrument
into the ear without annoying squealing sounds by
delaying activation of the device by ten seconds
after closing the battery door. During this 10-second
period you will hear soft beeps.
5
INSERTING THE HEARING INSTRUMENT
—WITH EARMOLD AND TUBING
To insert the hearing instrument into your ear:
• Take the earmold between your thumb and index
finger and position the tip of the earmold in your ear
canal. Now, slide the earmold all the way into your
ear with a gentle, twisting movement. Insertion can
be made easier if you gently pull your ear toward
the back of your head with your other hand.
• Place the hearing instrument behind your ear.
Move the earmold up and down and press gently
to ensure it is positioned correctly in the ear.
Note: Opening and closing your mouth can ease
insertion.
• Turn the top part of the earmold gently back and
forth until it fits comfortably behind the fold of skin
above your ear canal.
6
ReSound BTEs
7
INSERTING THE HEARING INSTRUMENT
—WITH THIN TUBE/FLEX-TUBE™/
RECEIVER TUBE AND DOME
To insert the hearing instrument in your ear:
When the dome is placed correctly, you should not
see the tube sticking out when looking directly into
a mirror.
• If your hearing instrument has a Sports Lock, position it into the indentation above the earlobe.
• Hang the instrument over the top of your ear.
• Grasp the Thin Tube, Flex-Tube™ or receiver tube
where it bends and push the dome into your ear
canal. The dome should be placed far enough into
the ear so that the tube lies flush against your head.
8
ReSound BTEs
REMOVING THE HEARING INSTRUMENT
To remove the hearing instrument from your ear,
simply pull the earmold or tube out of your ear with
your thumb and index finger. Consult your hearing
healthcare professional if you have difficulty removing
the hearing instrument.
9
VOLUME CONTROL (“V” MODELS ONLY)
Learning volume control (select models)
Some ReSound BTE hearing instruments offer a
volume control. Please refer to the diagram of your
hearing instrument in the accompanying insert for
the location of your volume control. When wearing
an instrument with a volume control you can increase
the volume by pushing the volume control toggle or
wheel up, and reduce volume by pushing or turning
it down.
On select models, your hearing healthcare professional may activate a learning volume control. This
feature enables your hearing instrument to learn how
you adjust the volume control in different listening
environments. As it learns your volume preferences,
the instrument eventually changes the volume for you
automatically. This feature can be turned off or reset
by your hearing healthcare professional.
For some models, you will hear a
beep with each change in volume.
The loudness of the beep will
increase as you turn the volume up
and decrease as you turn the volume down. If you reach the upper
or lower limit of the volume range, you will hear a
beep that is lower in pitch. For these models, the volume control will continue to move even after you hear
the lower pitched beep, but no additional changes in
volume will be heard.
For other models, the volume
control wheel is numbered
from “1” (lowest volume
setting) to “4” (maximum
volume setting). As you turn
the wheel up or down, the volume will increase or
decrease but no beeps will be heard. When the wheel
no longer moves in one direction or the other, you
have reached the upper or lower limit of the volume
range. Your hearing healthcare professional will help
you to identify your optimal volume setting.
10
ReSound BTEs
PROGRAM SELECTOR
(SELECT MODELS)
Your ReSound BTE hearing instrument may feature
multiple programs. The selection of programs can be
changed by your hearing healthcare professional.
Please refer to the diagram of your hearing instrument
on the accompanying insert for the location of the
program selector.
1. You can switch between programs by pushing
the program selector once.
2. You will hear one or more beeps. The number
of beeps indicates which program you have
selected.
3. You can always return to Program 1 by turning
your instrument off and then on again, or by
placing it in stand-by mode (as described in the
following section) and then returning to its standard mode.
Note: You and your hearing healthcare professional
may wish to record the various listening programs
that have been programmed into your hearing instrument on the accompanying insert.
11
STAND-BY MODE (SELECT MODELS)
In stand-by mode, your hearing instrument is muted.
Because there is a small drain on the battery while in
stand-by mode, this is not equivalent to turning off
the instrument.
Hold the phone close to the front microphone of the
hearing instrument, but not directly on it. If there is
feedback, it may take a few seconds for the instrument
to adapt.
Using the telephone, while wearing your hearing
instrument, may require some practice.
To put your instrument in stand-by mode, press and
hold the program selector for five seconds. You will
hear a series of beeps and stand-by mode will be
activated. To return to standard mode, press the
program selector once. Always allow at least five seconds before reactivating the hearing instrument once
stand-by mode has been engaged.
TELEPHONE USE (TELECOIL OPTIONAL)
Your ReSound BTE hearing instrument may be
equipped with an induction coil (telecoil), which picks
up magnetic signals from a Hearing Aid Compatible
telephone. If you have a telecoil, your hearing healthcare professional can activate it. By selecting the
telecoil program, the hearing instrument will only pick
up the sounds coming from the telephone.
When using the telecoil program, the receiver of the
telephone should be held as shown in the accompanying illustration. You may need to reposition the
handset slightly to find the best reception.
If you do not have or do not wish to use a telecoil
program, you may still use the phone while wearing
your hearing instrument. Many hearing instruments
will whistle (feedback) when in close proximity to a
telephone. To reduce the potential for this problem,
your hearing instrument is equipped with an adaptive
digital feedback suppression system which greatly
reduces the chance of feedback in this scenario.
12
ReSound BTEs
Cell phone
If you use a cell phone you may experience a buzzing
or clicking noise. This is caused by a strong signal
generated by the cell phone. Consult with your hearing healthcare professional to see if there are options
to improve the sound quality.
13
USING ASSISTIVE LISTENING
(TELE-LOOP) SYSTEMS
Many gathering places are equipped with assistive
listening (tele-loop) systems, for example, schools,
theaters and houses of worship. To take advantage
of a tele-loop system, select the telecoil program.
When the telecoil program has been selected, you
will be able to hear a clean sound signal via the teleloop system. If your are unable to hear the signal from
the tele-loop while in the telecoil program, check to
determine that the loop system is working properly.
LOW BATTERY WARNING
A low battery warning is automatically triggered
whenever the battery voltage/power drops below a
critical level. When this happens, the hearing instrument will emit soft beeps. These beeps will continue
every five minutes until the instrument automatically
switches off. The beeps can vary when using different
battery brands. We recommend that you keep spare
batteries on hand.
CHANGING THE BATTERY
If a school, theater or house of worship does not
have a tele-loop system, try to sit as close as possible to the speaker and use one of the microphone
programs.
The batteries for the hearing instrument are quite
small, which may cause difficulty in seeing the battery
and battery door markings. A magnifying glass and
good lighting may be helpful.
DIRECT AUDIO INPUT (DAI)
(SELECT MODELS)
Open the battery
door
completely
by lifting the tab on
the battery door.
After removing the
old battery, insert
the new one with
the “+” (flat) side
facing the “+” on
the battery door.
Your ReSound BTE hearing instruments may have
the possibility of direct, undisturbed connection to
devices such as television, radio and remote microphone via the Programming/DAI Interface. Often, this
will improve sound quality.
To listen to a sound source using DAI, a cable or
a wireless FM system is attached to your hearing
instrument through an audio shoe.
Please refer to the accompanying insert for additional
information regarding use of the audio shoe.
“+”
It should fit in like a puzzle piece. The battery door
should close very easily. Never use force to close the
door as this may damage your hearing instrument.
Always use the correct battery size. (Refer to the
accompanying insert to identify the correct battery
size for your hearing instrument model.)
14
ReSound BTEs
15
Please note that a weak battery will affect the performance of your hearing instrument. Removing the
battery when you are not wearing the instrument will
help prevent corrosion of the battery contacts and
reduce battery consumption.
DAILY MAINTENANCE
Keep your hearing instrument clean and dry. Wipe
the case with a soft cloth or tissue after use to remove
debris or moisture.
BATTERY WARNING INFORMATION
Batteries contain dangerous substances and should
be disposed of carefully in the interest of your safety
and for the environment.
• Do NOT attempt to recharge batteries which are
not specifically designated rechargeable as they
may leak or explode.
• Do NOT attempt to dispose of batteries by burning
them.
• Keep batteries away from small children, mentally
challenged persons and pets.
• Do NOT place batteries in your mouth. If
swallowed, see a physician immediately or call
the National Button Battery Hotline collect at
(202) 625-3333.
If the instrument has been exposed to high humidity
or perspiration, enclose it (with the earmold or dome)
in a ReSound ReStore® drying unit or a sealed
container together with a drying agent (desiccant)
overnight. Consult your hearing healthcare professional concerning which drying options are available
for your use.
To avoid the need for unwarranted repairs:
• Never immerse your instrument in water or other
liquids since this may cause permanent damage to
the circuitry.
• Protect your hearing instrument from rough handling, and avoid dropping it on hard surfaces such
as floors.
• Do not leave your instrument in or near direct heat
or sunlight since excessive heat can damage the
instrument or deform the casing.
16
ReSound BTEs
17
MAINTAINING THE EARMOLD
AND TUBING
The earmold feeds amplified sound from the hearing
instrument into your ear. It is important that your earmold fits correctly into your ear. If the earmold irritates
your ear in any way and prevents you from wearing
your hearing instrument, please contact your hearing
healthcare professional to have your earmold modified. You should never attempt to modify the shape of
the earmold yourself.
The earmold should be cleaned regularly using lukewarm water. Remove the earmold, along with the
silicone tubing, from the hearing instrument before
cleaning it. If earwax or other debris becomes lodged
in the earmold, the cleaning loop, provided with your
hearing instrument, can be used to remove this material. Alternatively, a syringe with lukewarm water can
be used to flush debris out of the earmold. Your hearing healthcare professional can instruct you on how
to properly use such cleaning tools.
The silicone tubing connecting your earmold to your
hearing instrument should be changed if it becomes
stiff or brittle. Contact your hearing healthcare professional to change the tubing when needed.
MAINTAINING THE THIN TUBE/
FLEX-TUBE AND DOME
The Thin Tube or Flex-Tube and the dome feed the
amplified sound from the hearing instrument into
the ear. It is important that the tube and the dome fit
correctly in your ear. If the tube or the dome irritates
your ear in any way and prevents you from wearing
your hearing instrument, please contact your hearing
healthcare professional. You should never attempt to
modify the shape of the tube yourself.
The tube and the dome should be cleaned regularly.
Remove the tube from the instrument before cleaning
it. Use a damp cloth to clean the tube and dome on
the outside and use the black cleaning rod to push
any debris out of the tube. The cleaning rod should
be inserted where the tube attaches to the instrument
and pushed all the way through the tube and out
through the dome.
Flex-Tube
Thin Tube
Be sure to thoroughly dry your earmold and its tubing before reconnecting it to your hearing instrument.
Sometimes it is helpful to blow gently through the
tubing to remove moisture trapped inside.
18
ReSound BTEs
19
It is not recommended to submerge or rinse the tube
and dome with water, as there is a risk that a water
drop may become lodged in the tube. If this should
occur, it will prevent sound from passing through
the tube, and may be harmful to the instrument’s
electronics.
The Thin Tube or Flex-Tube should be changed every
3–6 months or sooner if it becomes stiff or brittle.
RECEIVER TUBE (RIE MODELS ONLY)
There are several types of receiver tubes,
including: Normal Power (NP), Low Power
(LP) and High Power (HP). Your hearing NP/LP
healthcare professional will determine
which tube is most appropriate for your
hearing loss.
HP
The receiver tube contains the wiring to
the receiver, which delivers the sound
directly into your ear canal. It is important
that the receiver tube and dome fit correctly in your
ear. If the receiver tube or the dome irritates your ear in
any way and prevents you from wearing your hearing
instrument, please contact your hearing healthcare
professional. You should never attempt to modify the
shape of the receiver tube yourself.
MAINTAINING THE RECEIVER TUBE
AND DOME (RIE MODELS ONLY)
• Do not immerse your hearing instrument in water
when you are cleaning the receiver tube and dome.
• Do not use alcohol or other chemical agents to
clean the receiver tube and dome.
For NP/LP receiver tubes only, refer to pages 24–25
for instructions on changing the HF3 wax filter.
CHANGING THE DOME
Changing the HP receiver tube power dome
(HP RIE models only)
Contact your hearing healthcare professional to have
the power dome on the HP receiver tube changed.
Your hearing healthcare professional will use a specialized tool in order to ensure it is mounted correctly.
Changing the Open Dome or Tulip-Dome on an
NP/LP receiver tube or Thin Tube/Flex-Tube
The Open Dome or Tulip-Dome should also be
changed every 3–6 months or sooner if it becomes
stiff or brittle. We recommend that you have your
hearing healthcare professional change the dome for
you. If your hearing healthcare professional instructs
you to change the dome yourself, make sure that it is
securely fastened to the tube before inserting it into
your ear. Failure to change the dome in accordance
with the instructions that follow could result in injury.
The receiver tube and dome should be cleaned regularly. Use a damp cloth to clean the outside of the
receiver tube and dome.
20
ReSound BTEs
21
Mounting an Open dome or Tulip-Dome
onto an NP/LP receiver tube
A dome is mounted onto the NP/LP receiver tube by
pushing it gently over the receiver at the end of the
tube. Make sure that it is securely fastened.
Open dome with
NP/LP receiver tube
Preparing a Tulip-Dome for insertion
The Tulip-Dome consists of two “leaves” and it is
important that the largest “leaf” is the outermost “leaf”
(figure 3).
This can easily be done by pushing the “leaves” away
from the tube with your finger (figure 1) to make the
large “leaf” bend forward. Then push the large “leaf”
back and it will be placed on top of the smaller “leaf”
(figure 2). Now the Tulip-Dome is ready for insertion
(figure 3).
Tulip-Dome with
NP/LP receiver tube
1
2
Mounting an Open dome or Tulip-Dome
onto a Thin Tube or Flex-Tube
A dome is mounted onto the Thin Tube or Flex-Tube
by pushing it over the grooves on the tube. Make sure
that it is securely fastened.
3
22
ReSound BTEs
23
HF3 WAX PROTECTION SYSTEM
(RIE MODELS ONLY)
An HF3 wax filter is mounted in front of the receiver
tube for protection against wax and moisture. Use
the small cleaning brush to gently brush away loose
wax and debris from the tip of the
receiver of the hearing instrument.
This should be done on a regular
basis to ensure that the sound
outlet does not become blocked.
To dispose of the used wax filter:
1. With the used wax filter attached to the HF3
tool, insert the tool into the center slot of the filter
package.
2. Slide the tool to the side. The used wax filter
will remain in the slot when you lift the HF3 tool
straight out.
1
2
If the HF3 wax filter becomes blocked, it will need to
be replaced.
• For HP receiver tubes, contact your hearing healthcare professional.
• For NP/LP receiver tubes, contact your hearing
healthcare professional or use the following instructions if you have been instructed to change the HF3
wax filter on the NP/LP receiver tube yourself.
To install a new wax filter:
1. Press down on a new wax filter in the package
with the plastic end of the HF3 tool.
2. Lift straight up. A new wax filter will cling to the
end of the HF3 tool.
1
2
Changing the HF3 wax filter (NP/LP receiver tube)
To remove the used wax filter:
1. Twist the metal end of the blue HF3 tool into the
wax filter on the hearing instrument approximately one and a half turns.
2. Pull the HF3 tool out and away from the receiver
tube. The wax filter should pull out with the tool.
If not, repeat Step #1, with an additional twist of
the tool.
1a
1b
3. Press the new wax filter straight into the tip of the
receiver.
4. Gently move the HF3 tool side to side while pulling it away from the hearing instrument. The new
wax filter is now installed.
2
3
24
ReSound BTEs
4
25
GENERAL PRECAUTIONS
GENERAL WARNINGS
• Do not leave your hearing instrument in the sun,
near an open fire or in a hot, parked car.
• Consult a your hearing healthcare professional
if you discover a foreign object in your ear canal,
you experience skin irritation or excessive earwax
accumulates with the use of the hearing instrument.
• Do not wear your instrument while showering,
swimming, in heavy rain or in a moist atmosphere
such as a steam bath or sauna.
• Should your hearing instrument become wet or
moist, use the drying kit that your hearing healthcare professional has recommended. Do not place
the hearing instrument in a very warm place to
remove moisture (for example, the oven) or use
a hair dryer. Excessive direct or indirect heat can
damage the instrument.
• Remove your hearing instrument when applying
such things as cosmetics, perfume, aftershave,
hair spray, and suntan lotion. These might get into
the instrument and cause damage.
• Different types of radiation, for example, from
NMR, MRI or CT scanners, may damage the hearing instrument. Therefore, do not wear the hearing
instrument during these or other corresponding
scanning procedures. Other types of radiation
(burglar alarms, room surveillance systems, radio
equipment, mobile telephones, etc.) contain less
energy and will not damage the hearing instrument.
They could, however, momentarily affect the sound
quality or create strange sounds from the hearing
instruments.
• Do not wear the hearing instrument in mines or
other explosive areas, unless those areas are certified for hearing instrument use.
• Keep the instruments away from children under
the age of three. Hearing instruments contain small
parts that may present a choking hazard.
26
ReSound BTEs
27
IMPORTANT NOTICE FOR
PROSPECTIVE HEARING AID USERS
Good health practice requires that a person with a
hearing loss have a medical evaluation by a licensed
physician (preferably a physician who specializes in
diseases of the ear) before purchasing a hearing aid.
Licensed physicians who specialize in diseases of the
ear are often referred to as otolaryngologists, otologists, or otorhinolaryngologists. The purpose of the
medical evaluation is to assure that all medically treatable conditions that may affect hearing are identified
and treated before the hearing aid is purchased.
Following the medical evaluation, the physician will
give you a written statement that states that your
hearing loss has been medically evaluated and that
you may be considered a candidate for a hearing
aid. The physician will refer you to an audiologist or
a hearing aid dispenser, as appropriate, for a hearing
aid evaluation.
US Federal law restricts the sale of hearing aids
to those individuals who have obtained a medical
evaluation from a licensed physician. US Federal law
permits a fully informed adult to sign a waiver statement declining the medical evaluation for religious
or personal beliefs that preclude consultation with
a physician. The exercise of such a waiver is not
in your best health interest and its use is strongly
discouraged.
A hearing aid will not restore normal hearing and will
not prevent or improve a hearing impairment resulting
from organic conditions.
The use of a hearing aid is only part of hearing rehabilitation and may need to be supplemented by auditory
training and instructions in lipreading. Consistent use
of the aid is recommended. In most cases, infrequent
use does not permit you to attain full benefit from it.
The audiologist or hearing aid dispenser will conduct
a hearing aid evaluation to assess your ability to hear
with and without a hearing aid. The hearing aid evaluation will enable the audiologist or dispenser to select
and fit a hearing aid to your individual needs.
If you have reservations about your ability to adapt
to amplification, you should inquire about the availability of a trial-rental or purchase-option program.
Many hearing aid dispensers now offer programs that
permit you to wear a hearing aid for a period of time
for a nominal fee after which you may decide if you
want to purchase the hearing aid.
28
ReSound BTEs
29
CHILDREN WITH HEARING LOSS
In addition to seeing a physician for a medical evaluation, a child with a hearing loss should be directed
to an audiologist for evaluation and rehabilitation
since hearing loss may cause problems in language
development and the educational and social growth
of a child. An audiologist is qualified by training and
experience to assist in the evaluation and rehabilitation of a child with a hearing loss.
WARNING TO HEARING AID
DISPENSERS
A hearing aid dispenser should advise a prospective
hearing aid user to consult promptly with a licensed
physician (preferably an ear specialist) before dispensing a hearing aid if the hearing aid dispenser
determines through inquiry, actual observation, or
review of any other available information concerning
the prospective user, that the prospective user has
any of the following conditions:
(i) Visible congenital or traumatic deformity of the
ear.
(ii) History of active drainage from the ear within
the previous 90 days.
(iii) History of sudden or rapidly progressive hearing loss within the previous 90 days.
(iv) Acute or chronic dizziness.
(v) Unilateral hearing loss of sudden or recent
onset within the previous 90 days.
(vi) Audiometric air-bone gap equal to or greater
than 15 decibels at 500 Hertz (Hz), 1,000 Hz
and 2,000 Hz.
(vii) Visible evidence of significant cerumen accumulation or a foreign body in the ear canal.
(viii) Pain or discomfort in the ear.
30
ReSound BTEs
31
TROUBLESHOOTING GUIDE
SYMPTOM
CAUSE
POSSIBLE REMEDY
No sound
•
•
•
•
•
•
Not turned on
Battery low/dead
Battery improperly inserted
Blocked earmold or tube
Blocked sound inlet or outlet
Blocked microphone filter or wax filter
•
•
•
•
•
•
Not loud
enough
•
•
•
•
•
Loose earmold or dome
Blocked earmold or dome
Earmold or dome improperly inserted
Change in hearing
Volume set too low
•
•
•
•
•
• Excessive earwax
• Blocked sound inlet or outlet
• Blocked microphone filter or wax filter
Turn on by closing the battery door
Replace battery
Insert battery properly
Clean earmold or tube
Consult your hearing healthcare professional
Consult your hearing healthcare professional, or
change the dome and/or filter if you have been
instructed to do so
Reinsert carefully
Clean earmold or dome
Remove and reinsert
Consult your hearing healthcare professional
Adjust the volume control and/or consult
your hearing healthcare professional
• Consult your hearing healthcare professional
• Use the tools provided to clean the sound inlet
or outlet, and/or consult your hearing healthcare
professional
• Consult your hearing healthcare professional, or
change the dome and/or filter if you have been
instructed to do so
Whistles
•
•
•
•
Earmold or dome improperly inserted
Poorly fitting earmold
Tube connection loose
Build-up of earwax
•
•
•
•
Remove and reinsert
Consult your hearing healthcare professional
Consult your hearing healthcare professional
Consult your hearing healthcare professional
Distorted
or not clear
•
•
•
•
Battery low
Poorly fitting earmold or dome
Hearing instrument damaged
Hearing instrument settings not
optimal
•
•
•
•
Replace battery
Consult your hearing healthcare professional
Consult your hearing healthcare professional
Consult your hearing healthcare professional
If there are any other problems not mentioned in
this guide, please contact your hearing healthcare
professional.
32
ReSound BTEs
33
WARRANTY AND REPAIRS
ReSound grants you a comprehensive warranty
on your hearing instrument from the date of original purchase. We will repair or replace the hearing
instrument, at our discretion, when examination
during the warranty period proves it to be defective
in workmanship or materials.
For repair or replacement, return the hearing instrument to your hearing instrument dispenser first. If this
is not possible, send the instrument to ReSound North
America, 8001 Bloomington Freeway, Bloomington,
Minnesota 55420, or any other authorized service
center. Proof of purchase may be required. Do not
attempt to open the case of the hearing instrument
since this will invalidate the warranty. Instruments
not purchased from an authorized dispenser are
not covered by this or any other warranty. This limited warranty does not apply to products damaged
because of misuse, abuse, normal wear and tear, or
repairs attempted or made by other than ReSound or
an authorized service center.
The warranty period for your hearing instrument is
designated on your warranty card, which is provided
by your hearing instrument dispenser.
Assembled in China of imported components.
Final pack-out and inspection conducted in the U.S.A.
34
ReSound BTEs
35