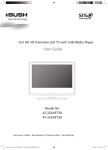
1
Hearing Instrument Supplement This supplement details the “how-to” aspects of your newly purchased hearing instruments. Please refer to the ReSound Vea User Guide that came with your hearing instruments for important information including warnings and precautions. __________________________________________ Model information: Your hearing instrument model designation is Distributed by: GN ReSound North America 8001 Bloomington Freeway, Bloomington, MN 55420 1-888-735-4327 MK603449 Rev. A 2012.02 __________________. Battery information: Your hearing instrument uses battery size __________________. Your program environments: Program Description 1 GN ReSound Canada 303 Supertest Road, Toronto, Ontario M3J 2M4 1-888-737-6863 2 gnresound.com [email protected] 4 3 ve 60,70,80 ReSound Vea™ Mini, standard and power behind-the-ear (BTE) hearing instruments Contents page Getting started Illustration of the hearing instrument������������������������� 2 How to use the hearing instrument��������������������������� 4 On/Off function SmartStart™ Changing the battery Inserting the hearing instrument —with Thin Tube and dome . . . . . . . . . . . . . . . . 5 —with standard earmold and tubing . . . . . . . . . . 7 Removing the hearing instrument . . . . . . . . . . . . . . . 8 Controls and features Volume control Program selector . . . . . . . . . . . . . . . . . . . . . . . . . . . 9 Your program environments . . . . . . . . . . . . . . . 10 Telephone use Telecoil program . . . . . . . . . . . . . . . . . . . . . . . . 11 Acoustic phone program PhoneNow™ Cell phone . . . . . . . . . . . . . . . . . . . . . . . . . . . . . 13 Listening to the radio or TV Using assistive listening (tele-loop) systems . . . . . . 14 Direct Audio Input Low battery indicator . . . . . . . . . . . . . . . . . . . . . . . 15 Maintenance Proper handling . . . . . . . . . . . . . . . . . . . . . . . . . . . Daily maintenance Cleaning the earmold and tubing . . . . . . . . . . . Cleaning the Thin Tube and dome . . . . . . . . . . . Changing the dome . . . . . . . . . . . . . . . . . . . . . . . . Troubleshooting guide . . . . . . . . . . . . . . . . . . . . . . ReSound Vea™ supplement—BTEs 16 17 18 19 22 1 Getting started Illustration of the Hearing InstrumenT 1.Program selector 2.Battery door and on/off switch 3.Sound outlet 4.Front microphone sound inlet 5.Back microphone sound inlet 6.Volume control 7.Direct Audio Input (DAI) contact 8. Left/Right indicator (left=blue, right=red) 9. Battery door locking mechanism (optional) 8/9 4 5 7 3 3 1 6 2 2 ReSound Vea™ supplement—BTEs 2 3 How to Use the Hearing Instrument On/Off function Your ReSound Vea hearing instrument is equipped with an on/off switch integrated into the battery door. •When the battery door is fully closed, the instrument is turned on and Program 1 will be activated. On Off •To turn the instrument off, open the battery door. TIP: Whenever you are not using the instrument, remember to turn it off to reduce battery consumption. Generally, people prefer to turn on the hearing instrument after it is placed behind the ear and the dome or earmold is inserted into the ear. If you would like to turn on the instrument before placing it on your ear, your hearing healthcare professional can activate the SmartStart™ function. SmartStart™ SmartStart™ allows you to insert the instrument into the ear without annoying, squealing sounds. Starting when the battery door is closed, it delays the activation of the hearing instrument for ten seconds. During this 10-second period you will hear a series of single beeps. Changing the battery The batteries for the hearing instrument are quite small, which may cause difficulty in seeing the bat4 ReSound Vea™ supplement—BTEs tery and battery door markings. A magnifying glass and good lighting may be helpful. Open the battery compartment by pulling down on the battery door with your fingernail. Remove the old battery, and insert a new one with the “+” (flat) side facing the “+” marking on the battery door. It should fit in like a puzzle piece. The battery door should close very easily. Never use force to close the door as this may damage your hearing instrument. Always use the correct battery size. (It should be listed in your user guide.) Please note that if the battery is weak, the hearing instrument performance will be reduced. TIP: Removing the battery when you are not wearing the instrument will reduce battery consumption and extend battery life. Inserting the Hearing Instrument —with Thin Tube and Dome To insert the hearing instrument into your ear: 1.Hang the instrument over the top of your ear. 5 2.Grasp the Thin Tube where it bends and push the dome into your ear canal (toward your nose). The dome should be placed far enough into the ear so that the Thin Tube lies flush against your head. When the dome is placed correctly, you should not see the Thin Tube sticking out when looking directly into a mirror. If using a sports lock, ensure that it is properly placed into the bowl of the ear. By experimenting, you may find a method that is easier for you. When properly inserted, the inSports strument should fit comlock fortably in and behind your ear. If the hearing instrument irritates your ear in any way and prevents you from wearing the instrument, please contact your hearing healthcare professional. Inserting the Hearing Instrument —with Standard Earmold and Tubing To insert the hearing instrument into your ear: 1.Take the earmold between your thumb and forefinger and position the tip in your ear canal. Now, slide the earmold all the way into your ear with a gentle, twisting movement. 2.Turn the top part of the earmold gently back and forth until it fits behind the fold of skin above your ear canal. Insertion can be easier if you gently pull your ear back with your other hand. NOTE: Never attempt to modify the shape of the hearing instrument, earmold or tubing yourself. 6 ReSound Vea™ supplement—BTEs 7 3.Place the hearing instrument behind your ear. 4.Move the earmold up and down and press gently to ensure it is positioned correctly in your ear. Opening and closing your mouth can ease insertion. You will feel when the earmold is positioned correctly. By experimenting, you may find a method that is easier for you. When properly inserted, the instrument should fit comfortably in and behind your ear. If the hearing instrument irritates your ear in any way and prevents you from wearing the instrument, please contact your hearing healthcare professional. NOTE: Never attempt to modify the shape of the hearing instrument, earmold or tubing yourself. Removing the Hearing Instrument To remove the hearing instrument from your ear, with your thumb and forefinger, simply pull the earmold or Thin Tube out and away from your ear. Consult your hearing healthcare professional if you have difficulty removing the hearing instrument. Controls and features Volume Control BTE hearing instruments that have a volume control enable you to adjust the volume on the hearing instrument according to your preferences. The volume wheel has 8 ReSound Vea™ supplement—BTEs numbers on it from 1 to 4, with 4 being the maximum volume setting. 1.To increase the volume with the instrument fit to your ear, turn the volume control wheel up. 2.To reduce the volume, turn the wheel down. Program Selector The number of listening programs in your hearing instrument will be determined by your hearing healthcare professional based upon your individual needs. For instruments with multiple listening programs, you can switch between programs with short presses of the program selector. With each press of the program selector, you will then hear one or more beeps. The number of beeps corresponds to the program you have selected. For example, you will hear one beep for Program 1 and two beeps for Program 2. Opening and closing the battery door will always reset your hearing instrument to Program 1. 9 Your program environments: (To be completed together with your hearing healthcare professional) Program Description 1 2 3 4 Telephone Use Telephone use may require some practice in order to maximize your performance. Experimenting with various hearing instrument features and proper positioning of the telephone will help you optimize the signal you hear on the telephone. All ReSound hearing instruments are equipped with an adaptive digital feedback suppression system that is designed to reduce whistling (feedback) when an object, such as a telephone, is placed close to your hearing instrument. When using the telephone, we recommend that you hold it close to the microphone of the hearing instrument without laying it directly on the hearing instrument. If feedback occurs, hold the telephone still as the digital feedback suppression system adapts to suppress the whistle. 10 ReSound Vea™ supplement—BTEs Additional features that can facilitate telephone use, are described below. Consult your hearing healthcare professional to identify which options are available in your hearing instrument and are most appropriate for your needs. Telecoil program Your ReSound hearing instrument is equipped with a telecoil which picks up magnetic signals from a Hearing Aid Compatible telephone. You can access the telecoil program by using the program selector. When you do so, the hearing instrument will pick up sounds coming from the telephone without creating feedback. While using the telecoil program, the receiver of the telephone should be held as shown in the diagram under “Telephone Use.” You may need to reposition the telephone handset slightly to find the best reception. Acoustic phone program An acoustic phone program is a listening program that is specially designed for telephone use. It works in combination with the digital feedback suppression system and does not utilize a telecoil. You can access it by using the program selector to choose the acoustic phone program. Once the program is selected, hold the telephone close to the microphone of the hearing instrument. You may need to reposition the telephone handset slightly to find the best reception. PhoneNow™ The PhoneNow™ function allows your hearing instrument to automatically switch to your telephone program when a telephone receiver is raised to the ear. When the telephone receiver is removed from the ear, the hearing instrument automatically returns to the 11 previous listening program. In most instances, it is necessary to mount a magnet on the phone in order to enhance your hearing instrument’s ability to detect the phone signal. Placement of PhoneNow magnet In order to place PhoneNow magnet properly: 1.Clean the telephone receiver thoroughly. 2.Hold the telephone as you typically would when making a telephone call. 3.Place the magnet just below the sound port on the telephone receiver. If necessary, move the magnet to another position to improve ease of use and comfort while speaking. NOTE: PhoneNow precautions: •Keep magnets out of the reach of pets, children and people with mental disabilities. If a magnet is swallowed, please seek advice from a medical practitioner. •The magnet is used to strengthen the magnetic field of a telephone receiver and may affect functionality of some medical devices or electronic systems. Always keep the magnet or a telephone equipped with the magnet at least 30 cm (12”) away from pacemakers, credit cards and other magnetically sensitive devices. •High distortion during dialing or phoning may mean that the magnet is not in the optimal position relative to the telephone receiver. To avoid the issue, please move the magnet to another place on the telephone receiver. •Only use magnets supplied by GN ReSound. Cell phone NOTE: Only use a recommended cleaning agent to clean the telephone prior to placing the magnet on the phone. PhoneNow usage PhoneNow enables those who wear hearing instrument to use telephones in a normal manner. The hearing instrument will generate a short melody of beeps to indicate that the PhoneNow feature has automatically switched the hearing instrument to your telephone program. Initially, you may need to move the telephone receiver slightly to find the best position for reliable PhoneNow activation and good hearing on the telephone. 12 ReSound Vea™ supplement—BTEs If you use a cell phone you may experience a buzzing or clicking noise. This is caused by a strong signal generated by the cell phone. Consult with your hearing healthcare professional to see if there are options to improve the sound quality. Listening to THE radio or TV When listening to the TV or the radio, start out by listening to news commentators since they usually speak clearly, then try other programs. If you find it difficult to listen to TV or radio, your hearing healthcare professional will be able to give you advice on available accessories to enhance your listening capabilities for TV and radio. 13 Using Assistive Listening (Tele-Loop) Systems Many gathering places are equipped with assistive listening (tele-loop) systems, for example, schools, theaters and houses of worship. To take advantage of a tele-loop system, select the telecoil program. When the telecoil program has been selected, you will be able to hear a clean sound signal via the tele-loop system. If you are unable to hear the signal from the teleloop while in the telecoil program, check to determine that the loop system is working properly. 2.Once in place, move the boot in the direction of the battery compartment. 3.Gently click the audio boot onto the hearing instrument. 1 3 2 If a school, theater or house of worship does not have a tele-loop system, try to sit as close as possible to the speaker and use one of the microphone programs. Disconnecting an audio boot Direct audio input 4.Press and hold the button on the front side of the audio boot. Use of Direct Audio Input (DAI), which enables a direct connection of the hearing instrument to items such as television, radio, and remote microphones, may increase speech understanding for some individuals in noisy situations or when speech is at a distance. The sound source is transmitted to the hearing instrument by means of a cable that connects to an audio boot which attaches to the bottom of the hearing instrument. Alternatively, the signal can be transmitted wirelessly to an FM receiver that couples to the audio boot. 5.Swing the boot in an arcing motion away from the hearing instrument and gently remove the audio boot. 4 5 When the audio boot is properly connected, the hearing instrument automatically switches to the DAI program. Connecting an audio boot 1.Align the tip of the audio boot with the groove just above the battery compartment and below the model number. The boot should be held at a 45° angle. 14 ReSound Vea™ supplement—BTEs Low battery indicator Your hearing healthcare professional can activate a low battery indicator in your hearing instrument. The 15 hearing instrument will reduce amplification and play a melody of beeps if the battery voltage drops below a critical threshold. This signal will recur every five minutes until the hearing instrument automatically switches off. case with a soft cloth or tissue after use to remove skin oils or moisture. The timing of the low battery indicator can vary slightly, depending on the type of battery used. It is recommended that you keep spare batteries on hand. Maintenance Proper handling Cleaning the earmold and tubing Your hearing instrument is protected by a layer of protective, hydrophobic nanocoat material. However, please follow these instructions to further prolong the durability of your hearing instrument. The earmold directs the amplified sound from the hearing instrument into the ear. It is important that the earmold fits correctly in your ear. If the earmold irritates your ear in any way and/or prevents you from wearing your hearing instrument, please contact your hearing healthcare professional to have the earmold modified. TIP: To avoid the need for unwanted repairs: • Never immerse the instrument in water or other liquids as this may cause permanent damage to the circuitry. • Protect your hearing instrument from rough handling, and avoid dropping it on hard surfaces or floors. • Do not leave the instrument in or near direct heat or sunlight as excessive heat can damage the instrument or deform the casing. NOTE: You should never attempt to modify the shape of the earmold yourself. The earmold should be cleaned regularly. Remove the earmold and the silicone tubing from the hearing instrument before you clean it. Wash the earmold in luke- •To avoid damage, hearing instruments should be removed prior to the application of hairspray, make-up or other cosmetics. Daily maintenance Keep your hearing instrument clean and dry. Wipe the 16 ReSound Vea™ supplement—BTEs 17 warm water and mild detergent. If earwax is lodged in the sound canal of the earmold, the cleaning loop or a syringe with lukewarm water can easily be used to “push” the earwax out. the black cleaning rod to “push” any debris out of the Thin Tube. The cleaning rod should be inserted where the tube attaches to the instrument and pushed all the way through the Thin Tube and out through the dome. NOTE: Be sure to thoroughly dry the earmold and its tubing before reconnecting it to the hearing instrument. Blow gently through the tubing to remove moisture trapped inside. NOTE: Do not submerge or rinse the Thin Tube and dome with water, as there is a risk that a water drop may become lodged in the Thin Tube. If this should occur, it will prevent sound coming through the Thin Tube, and may be harmful to the instrument’s electronics. The silicone tubing connecting the earmold to the hearing instrument should be changed if it becomes stiff or brittle. Contact your hearing healthcare professional to change the tubing when needed. The Thin Tube should be changed every 3–6 months or sooner if it becomes stiff or brittle. Cleaning the Thin Tube and dome Changing the Dome The Thin Tube directs the amplified sound from the hearing instrument into the ear. It is important that the Thin Tube and the dome fit correctly in your ear. If the Thin Tube or the dome irritates your ear in any way and/or prevents you from wearing your hearing instrument, please contact your hearing healthcare professional. We recommend that you have your hearing healthcare professional change the domes for you every 3–6 months or sooner if the dome becomes stiff or brittle. If your hearing healthcare professional instructs you to change the domes yourself, make sure that they are securely fastened to the Thin Tube before inserting them in your ear. NOTE: You should never attempt to modify the shape of the Thin Tube yourself. NOTE: Failure to change the domes in accordance with the instructions that follow could result in injury. The Thin Tube and the dome should be cleaned regularly. Remove the Thin Tube from the instrument before cleaning by unscrewing it. Use a damp cloth to clean the Thin Tube and dome on the outside and use 18 ReSound Vea™ supplement—BTEs Mounting an Open Dome/Tulip-Dome Mount the dome on the Thin Tube by pushing it over the grooves on the Thin Tube as demonstrated in the illustration below. Make sure that it is securely fastened. 19 Preparing a Tulip-Dome for insertion NOTES: The Tulip-Dome consists of two “petals” and it is important that the largest “petal” is the outermost “petal” (figure 3). ______________________________________________ This can easily be done by pushing the “petals” away from the sound tube with your finger (figure 1). This will make the large “petal” bend forward. Then you push it back and it will be placed on top of the smaller “petal ” (figure 2). Now the Tulip-Dome is ready to be mounted on the Thin Tube. Mount the Tulip-Dome on the Thin Tube by pushing it over the groves on the Thin Tube. Make sure it is securely fastened (figure 3). 1 2 ______________________________________________ ______________________________________________ ______________________________________________ ______________________________________________ ______________________________________________ ______________________________________________ ______________________________________________ ______________________________________________ ______________________________________________ 3 ______________________________________________ ______________________________________________ ______________________________________________ ______________________________________________ Important: Please refer to the documentation provided with your hearing instrument for important precautions and warnings. ______________________________________________ ______________________________________________ ______________________________________________ 20 ReSound Vea™ supplement—BTEs 21 Troubleshooting Guide SYMPTOMCAUSE POSSIBLE REMEDY No sound • • • • • Not turned on Battery low/dead Battery improperly inserted Blocked earmold, tubing or dome Blocked sound inlet or outlet • Turn on by closing the battery door • Replace battery • Insert battery properly • Clean earmold, tubing or dome • Use the tools provided to clean the sound inlet or outlet, and/or consult your hearing healthcare professional Not loud enough • • • • • Loose earmold or dome Blocked earmold or dome Earmold or dome improperly inserted Change in hearing Volume set too low • Excessive earwax • Blocked sound inlet or outlet • Carefully reinsert in your ear • Clean earmold, tubing or dome • Remove and reinsert • Consult your hearing healthcare professional • Adjust the volume control and/or consult your hearing healthcare professional • Consult your hearing healthcare professional • Use the tools provided to clean the sound inlet or outlet, and/or consult your hearing healthcare professional Whistles • • • • Earmold or dome improperly inserted Poorly fitting earmold Tube connection loose Build-up of earwax • Remove and reinsert • Consult your hearing healthcare professional • Consult your hearing healthcare professional • Consult your hearing healthcare professional Distorted or not clear • • • • Battery low Poorly fitting earmold or dome Hearing instrument damaged Hearing instrument settings not optimal • Replace battery • Consult your hearing healthcare professional • Consult your hearing healthcare professional • Consult your hearing healthcare professional If there are any other problems not mentioned in this guide, please contact your hearing healthcare professional. 22 ReSound Vea™ supplement—BTEs 23 24 ReSound Vea™ supplement—BTEs