1
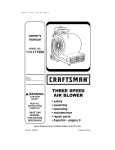
perator's
I:RnFrSMAN°
T1200 LAWN TRACTOR
420cc, Variation
42" Deck
Speed
Model No. 247.203721
• Espanol,
P. 36
This product has a low emission engine which operates differently
from previously built engines. Before you start the engine, read and
understand this Operator's
Manual.
For answers to your questions
this product, call:
Before using this equipment,
read this manual and follow
1-888-331-4569
all safety rules and operating
instructions.
Sears Brands
Management
about
Craftsman Tractor Help Line
7 am = 7 pm CT, Mort. =Sun.
Corporation,
Visit our website:
Hoffman
www.craftsman.com
Estates,
IL 60179 U.S.A.
FormNo.769-09448A
(January
21,2014)
Warranty Statement ..........................................................
Safety Instructions ............................................................
Slope Gauge .....................................................................
Assembly ...........................................................................
Operation ........................................................................
CRAFTSMAN
2
3
8
9
11
FULL WARRANTY
FORTWO YEARSfrom the dateof purchase,all non-expendableparts of this ridingequipmentare warrantedagainstany defectsin materialor
workmanship.A defectivenon-expendablepart will receivefree in-homerepairor replacementif repairis unavailable.
BATTERYLIMITEDWARRANTY
FOR90 DAYSfrom the dateof purchase,the battery(an expendablepart)of this ridingequipmentis warrantedagainstany defectsin materialor
workmanship.A newbatterywill be suppliedfree of charge.Youare responsibleforthe laborcost of batteryinstallation.
ADDITIONALLIMITEDWARRANTIES
in the followingadditionalwarranties,youare responsiblefor the laborcost of part installationafter the secondyearfromthe dateof purchase.
FOR FiVEYEARSfrom thedate of purchase,the frameof this ridingequipmentiswarrantedagainstany defectsin materialor workmanship.A
newframe willbe suppfiedfreeof charge.
FORTEN YEARSfrom the dateof purchase,thefront axle of this riding equipmentis warrantedagainstany defectsin materialor workmanship.
A newfront axlewill be suppliedfreeof charge.
FORAS LONGAS IT iSUSEDbytheoriginalownerafterthetenthyearfromthedateofpurchase,thecastironfrontaxle(if equipped)of thisriding
equipmentis warrantedagainstanydefectsin materialorworkmanship.
Withproofofpurchase,a newcastironfrontaxlewillbe suppliedfreeofcharge.
WARRANTYSERVICE
Forwarrantycoveragedetails to obtainfree repairor replacement,carl 1-800-659-5917or visitthe web site:www.craftsman.com
in all casesabove, if part repairor replacementis impossible,the riding equipmentwill be replacedfreeof chargewith the sameor an equivalent
model.
All ofthe abovewarrantycoverageis void if this ridingequipmentis everusedwhileprovidingcommercialservicesor if rentedto anotherperson.
This warrantycoversONLYdefectsin materialand workmanship.Warrantycoveragedoes NOTinclude:
•
Expendableparts (exceptbattery)that can wearoutfrom normalusewithin thewarrantyperiod,includingbut not limitedto blades,spark
plugs,air cleaners,belts,and oil filters.
•
Standardmaintenanceservicing,oil changes,or tune-ups.
Tire replacementor repaircausedby puncturesfrom outsideobjects,such as nails,thorns,stumps,or glass.
•
Tireor wheelreplacementor repairresultingfrom normalwear,accident,or improperoperationor maintenance.
Repairsnecessarybecauseof operatorabuse,includingbut notlimitedto damagecaused bytowingobjectsbeyondthe capabilityof the
riding equipment,impactingobjectsthat bendthe frame,axle assemblyor crankshaft,or over-speedingthe engine.
Repairsnecessarybecauseof operatornegligence,includingbutnot limitedto, electricaland mechanicaldamagecausedby improper
storage,failureto usethe propergradeand amountof engine oil,failureto keepthe deck clearof flammabledebris, or failureto maintainthe
riding equipmentaccordingto the instructionscontainedin the operator'smanual.
•
Engine(fuel system)cleaningor repairscausedbyfuel determinedto be contaminatedor oxidized(stale). ingeneral,fuel shouldbe used
within30 daysof its purchasedate.
•
Normaldeteriorationand wearof the exteriorfinishes,or productlabelreplacement.
This warrantygivesyou specificlegalrights,and youmay alsohaveotherrights whichvary from stateto state.
Sears Brands ManagementCor _oration, Hoffman Estates, IL 60179
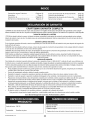
Engine Oil:
SAE 30
Fuel:
Unleaded Gasoline
© SearsBrands,LLC
Model Number:
Serial Number:
Dateof Purchase:
Recordthe modelnumber,serialnumber,
and dateof purchaseabove.
2
This
symbol
points
outimportantsafety instructionswhich,if not
followed, could endangerthe personalsafetyand/orproperty of
yourselfandothers. Readandfollow all instructionsin this manual
beforeattempting to operate this machine.Failureto complywith these
instructionsmay resultin personalinjury.Whenyouseethis symbol,HEED
ITSWARNING!
CALiFORNiA
PROPOSITION
65
EngineExhaust,someof itsconstituents, andcertain vehidecomponents
contain or emit chemicalsknownto Stateof Californiato causecancerand
birth defectsor other reproductiveharm.
Battery posts,terminals,and relatedaccessories
contain leadand lead
compounds,chemicalsknownto the Stateof Californiatocausecancerand
reproductive harm.Washhandsafter handling.
GENERAL
OPERATION
Read,understand,andfollowall instructions
onthe machineandinthe
manual(s)beforeattemptingto assembleandoperate.Keepthismanualin
asafeplaceforfutureandregularreferenceandfor orderingreplacement
parts.
Thismachinewasbuilt to beoperatedaccording
to the safeoperation
practicesin this manual.Aswith anytype of powerequipment,
carelessnessor error on the part of the operatorcanresultin seriousinjury.
Thismachineiscapableof amputating fingers, hands,toesandfeet and
throwingdebris. Failureto observethe following safety instructions
could
resultin seriousinjuryor death.
Your Responsibility--Restrict the useof this powermachineto
persons
who read,understandandfollow the warningsand instructionsin
thismanualandon the machine.
SAVETHESE
INSTRUCTIONS!
Beawareof the mowerandattachmentdischargedirectionanddonot point
it at anyone.Donot operatethe mowerwithoutthe dischargecoveror entire
grasscatcherin itsproperplace.
Donot put handsor feetnearrotatingpartsor underthe cuttingdeck.
Contactwiththe blade(s)canamputatehandsandfeet.
Befamiliarwith all controlsandtheir properoperation.Knowhowto stop
the machineanddisengagethemquickly.
Amissingor damageddischargecovercancausebladecontactorthrown
objectinjuries.
Neverallowchildrenunder14yearsold to operatethismachine.Children14
yearsold andovershouldreadandunderstandthe operationinstructions
andsafetyrulesinthismanualandshouldbetrainedandsupervisedbya
parent.
Stopthe blade(s)whencrossinggraveldrives,walks,or roadsandwhilenot
cuttinggrass.
Neverallowadultsto operatethismachinewithout properinstruction.
Tohelpavoidbladecontactor a thrownobjectinjury,keepbystanders,
helpers,childrenandpetsat least75feetfrom the machinewhileit isin
operation.Stopmachineif anyoneentersthe area.
Watchfortrafficwhenoperatingnearor crossingroadways.Thismachineis
not intendedforuseon anypublicroadway.
Donot operatethe machinewhileunderthe influenceofalcoholor drugs.
Mowonly indaylightor goodartificial light.
Nevercarrypassengers.
Thoroughlyinspect
the areawherethe equipmentisto beused.Remove
all stones,sticks,wire, bones,toys,andotherforeignobjectswhichcould
bepickedupandthrownbythe blade(s).Thrownobjectscancauseserious
personalinjury.
Disengage
blade(s)beforeshiftinginto reverse.Backupslowly.Alwayslook
downandbehindbeforeandwhilebackingto avoidaback-overaccident.
Planyourmowingpatterntoavoiddischargeof materialtowardroads,
sidewalks,bystanders
andthe like.Also,avoiddischargingmaterialagainst
awall or obstructionwhichmaycausedischargedmaterialto ricochetback
towardthe operator.
Disengage
blade(s),setparkingbrake,stopengineandwait until the
blade(s)cometo acompletestop beforeremovinggrasscatcher,emptying
grass,uncloggingchute,removinganygrassor debris,or makingany
adjustments.
Alwayswearsafetyglasses
or safetygogglesduringoperationandwhile
performinganadjustmentor repairto protectyoureyes.Thrownobjects
whichricochetcancauseseriousinjuryto the eyes.
Neverleavea runningmachineunattended.Alwaysturn off blade(s),set
parkingbrake,stopengineandremovekeybeforedismounting.
Wearsturdy,rough-soledworkshoesandclose-fittingslacksandshirts.
Loosefitting clothesandjewelrycanbecaughtin movableparts.Never
operatethis machineinbarefeetor sandals.
Slowdownbeforeturning.Operatethe machinesmoothly.Avoiderratic
operationandexcessive
speed.
Useextracarewhen loadingor unloadingthe machineintoa traileror truck.
Thismachineshouldnot bedrivenup or downramp(s),becausethe machine
couldtip over,causingseriouspersonalinjury.Themachinemustbepushed
manuallyonramp(s)to loador unloadproperly.
Mufflerandenginebecomehot andcancausea burn.Donot touch.
Check
overhead
clearances
carefully
before
driving
under
lowhanging
tree Do Not:
branches,
wires,
door
openings
etc.,
where
theoperator
may
bestruck
or
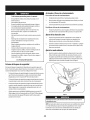
Donot turn on slopesunlessnecessary;
then,turn slowlyandgradually
pulled
from
themachine,
which
could
result
inserious
injury.
downhill,if possible.
Disengage
allattachment
clutches
and
depress
thebrake
pedal
completely
Donot mow neardrop-offs,ditchesor embankments.
Themowercould
before
attempting
tostart
engine.
suddenlyturn overira wheelisoverthe edgeof acliff,ditch, or if anedge
cavesin.
Your
machine
isdesigned
tocutnormal
residential
grass
ofaheight
nomore
than
10".
Do
notattempt
tomow
through
unusually
tall,drygrass
(e.g.,
Donot try to stabilizethe machinebyputting yourfoot onthe ground.
pasture)
orpiles
ofdryleaves.
Dry
grass
orleaves
may
contact
theengine
Donot usea grasscatcheron steepslopes.
exhaust
and/or
build
uponthemower
deck
presenting
apotential
fire
Donot mowon wetgrass.Reduced
tractioncouldcausesliding.
hazard.
Donot attemptto coastdownhill.Over-speeding
maycausethe operatorto
Use
only
accessories
and
attachments
approved
forthismachine
bythe
lose
controlofthe
machine
resultinginserious
injuryor
death.
machine
manufacturer.
Read,
understand
and
follow
allinstructions
provided
withtheapproved
accessory
orattachment.
For
alistofapproved
Donot tow heavypullbehindattachments(e.g.loadeddumpcart,lawn
accessories
and
attachments,
call1-800-659-5917.
roller,etc.)onslopesgreaterthan5 degrees.Whengoingdown hill, the
extraweighttendsto
pushthe tractorandmaycauseyouto loosecontrol
Data
indicates
that
operators,
age
60years
and
above,
areinvolved
ina
(e.g.
t
ractormayspeed
up,brakingandsteeringabilityarereduced,
large
percentage
ofriding
mower-related
injuries.
These
operators
should
attachment
m
ayjack-knife
andcausetractorto overturn).
evaluate
their
ability
tooperate
theriding
mower
safely
enough
toprotect
themselves
and
others
from
serious
injury.
CHILDREN
Ifsituations
occur
which
arenotcovered
inthismanual,
use
care
and
good Tragicaccidentscanoccurif the operatorisnotalertto the presenceofchildren.
judgment.
Childrenareoftenattractedto the machineandthe mowingactivity.Theydo not
understandthe dangers.Neverassumethatchildrenwill remainwhereyoulastsaw
them.
SLOPE OPERATION
Slopesareamajorfactorrelatedto lossof controlandtip-overaccidentswhichcan
resultinsevereinjuryor death.All slopesrequireextracaution.Ifyoucannotback
upthe slopeor if youfeeluneasyon it, do not mowit.
Keepchildrenout of the mowingareaandin watchfulcareof aresponsible
adultotherthanthe operator.
Bealertandturn machineoff ifachildentersthe area.
Foryoursafety,usethe SlopeGuideincludedaspartof thismanualto measure
slopesbeforeoperatingthis machineon aslopedor hilly area.If the slopeisgreater
than15degreesasshownonthe SlopeGuide,donot operatethis machineonthat
areaor seriousinjury couldresult.
Beforeandwhilebacking,lookbehindanddown forsmallchildren.
Nevercarrychildren,evenwith the blade(s)shutoff. Theymayfall offand be
seriouslyinjuredor interferewith safemachineoperation.
Do:
Useextremecarewhenapproachingblindcorners,doorways,shrubs,trees
or otherobjectsthat mayblockyourvisionofa childwho mayrunintothe
machine.
Mowupanddownslopes,not across.Exercise
extremecautionwhen
changingdirectiononslopes.
Watchfor holes,ruts,bumps,rocks,or otherhiddenobjects.Uneventerrain
couldoverturnthe machine.Tallgrasscanhideobstacles.
Toavoidback-overaccidents,alwaysdisengagethe cuttingblade(s)before
shiftinginto Reverse.
Ifequipped,the"ReverseCautionMode"(blades
operatewhilemachineridesinreverse)shouldnot be usedwhenchildrenor
othersarearound.
Useslowspeed.Choosea lowenoughspeedsettingsothat youwill not have
to stopor shiftwhileonthe slope.Tiresmaylosetractionon slopeseven
thoughthe brakesarefunctioningproperly.Alwayskeepmachineingear
whengoingdownslopesto takeadvantageof enginebrakingaction.
Keepchildrenawayfrom hot or runningengines.Theycansufferburnsfrom
a hot muffler.
Followthe manufacturer'srecommendations
for wheelweightsor
counterweightsto improvestability.
Removekeywhenmachineis unattendedto preventunauthorized
operation.
Useextracarewith grasscatchersor otherattachments.Thesecanchange
the stabilityof the machine.
Neverallowchildrenunder14yearsofageto operatethismachine.Children14and
overshouldreadandunderstandthe instructionsandsafeoperationpracticesin
thismanualandonthe machineandshouldbetrainedandsupervisedbyan adult.
Keepall movementonthe slopesslowandgradual.Donot makesudden
changesinspeedor direction.Rapidengagementor brakingcouldcause
the front ofthe machineto lift andrapidlyflip overbackwardswhichcould
causeseriousinjury.
TOWING
Towonlywith a machinethathasa hitchdesignedfor towing.Donotattach
towedequipmentexceptat the hitchpoint.
Avoidstartingor stoppingona slope.Iftires losetraction,disengagethe
blade(s)andproceedslowlystraightdownthe slope.
Followthe manufacturers
recommendation
forweightlimitsfortowed
equipmentandtowing onslopes.
Neverallowchildrenor othersinor ontowedequipment.
4
Onslopes,the weightof the towedequipmentmaycauselossof tractionand
lossof control.
Alwaysuseextracautionwhentowing with amachinecapableof making
tight turns(e.g."zero-turn"ride-onmower).Makewideturnsto avoid
jack-knifing.
Travelslowlyandallowextradistanceto stop.
Donot coastdownhill.
SERVICE
Safe Handling
of Gasoline:
Toavoid personalinjuryor property damageuseextreme carein handling
gasoline.Gasolineisextremely flammable andthe vaporsareexplosive.
Seriouspersonalinjurycanoccurwhen gasolineisspilled on yourself or your
clotheswhich canignite. Washyourskinand changeclothesimmediately.
Useonlyan approvedgasolinecontainer.
Neverfill containersinsideavehicleor on atruckor trailer bedwith aplastic
liner.Alwaysplacecontainerson the groundawayfrom yourvehiclebefore
filling.
Whenpractical,removegas-powered
equipmentfromthe truckor
trailerandrefuelit on the ground.If thisisnot possible,thenrefuelsuch
equipmenton atrailer witha portablecontainer,ratherthanfroma gasoline
dispensernozzle.
Keepthe nozzlein contactwith the rim of the fueltank or containeropening
at all timesuntil fuelingiscomplete.Donot useanozzlelock-opendevice.
Extinguishall cigarettes,cigars,pipesandothersources
of ignition.
Neverfuel machineindoors.
Neverremovegascapor addfuelwhilethe engineishot or running.Allow
engineto coolat leasttwo minutesbeforerefueling.
Periodicallycheckto makesurethe bladescometo completestopwithin
approximately(5)fivesecondsafter operatingthe bladedisengagement
control.If the bladesdo not stopwithin thethistime frame,yourmachine
shouldbeservicedprofessionallybya Searsor otherqualifiedservicedealer.
Checkbrakeoperationfrequentlyasit issubjectedto wearduringnormal
operation.Adjustandserviceasrequired.
Checkthe blade(s)andenginemountingboltsat frequentintervalsfor
propertightness.Also,visuallyinspectblade(s)for damage(e.g.,excessive
wear,bent,cracked).Replacethe blade(s)with the originalequipment
manufacturer's(O.E.M.)
blade(s)only,listedinthismanual.Useof parts
whichdonot meetthe originalequipmentspecifications
mayleadto
improperperformanceandcompromisesafety!
Mowerbladesaresharp.Wrapthe bladeor weargloves,anduseextra
cautionwhenservicingthem.
Keepall nuts,bolts,andscrewstight to besurethe equipmentisinsafe
workingcondition.
Nevertamperwith the safetyinterlocksystemor othersafetydevices.Check
their properoperationregularly.
Afterstrikingaforeignobject,stopthe engine,disconnectthe sparkplug
wire(s)andgroundagainstthe engine.Thoroughlyinspectthe machinefor
anydamage.Repairthe damagebeforestartingandoperating.
Neverattemptto makeadjustmentsor repairsto the machinewhilethe
engineis running.
Grasscatchercomponentsandthe dischargecoveraresubjectto wear
anddamagewhichcouldexposemovingpartsor allowobjectsto be
thrown.Forsafetyprotection,frequentlycheckcomponentsandreplace
immediatelywith originalequipmentmanufacturer's(O.E.M.)
partsonly,
listedinthis manual.Useof partswhichdonot meetthe originalequipment
specifications
mayleadto improperperformanceandcompromisesafety!
Neveroverfill fuel tank.Filltankto no morethan1/2inchbelowbottomof
filler neckto allowspaceforfuel expansion.
Replace
gasolinecapandtighten securely.
If gasolineisspilled,wipeit off the engineandequipment.Movemachineto
anotherarea.Wait5minutesbeforestartingthe engine.
Toreducefire hazards,keepmachinefreeof grass,leaves,or otherdebris
build-up.Cleanupoil or fuel spillageandremoveanyfuel soakeddebris.
Neverstorethe machineorfuel containerinsidewherethereisan open
flame,sparkor pilotlight ason awaterheater,spaceheater,furnace,clothes
dryeror othergasappliances.
Allowamachineto coolat leastfiveminutesbeforestoring.
General Service
Neverrunan engineindoorsor inapoorlyventilatedarea.Engineexhaust
containscarbonmonoxide,anodorless,anddeadlygas.
Beforecleaning,repairing,or inspecting,makecertainthe blade(s)andall
movingpartshavestopped.Disconnect
the sparkplugwireandground
againstthe engineto preventunintendedstarting.
Donot changethe enginegovernorsettingsor over-speed
the engine.The
governorcontrolsthe maximumsafeoperatingspeedof the engine.
Maintainor replacesafetyandinstructionlabels,asnecessary.
Observeproperdisposallawsandregulationsforgas,oil,etc.to protectthe
environment.
Accordingtothe ConsumerProductsSafetyCommission
(CPSC)
andthe U.S.
Environmental
ProtectionAgency(EPA),
thisproducthasan AverageUseful
Lifeof seven(7) years,or 270hoursof operation.Atthe endof the Average
UsefulLife,buya newmachineor havethe machineinspectedannuallyby
a Searsor otherqualifiedservicedealerto ensurethat all mechanicaland
safetysystemsareworkingproperlyandnot wornexcessively.
Failureto do
socanresultin accidents,injuriesordeath.
DO NOT MODIFY
ENGINE
Toavoid seriousinjuryor death,do not modify engine in any way.Tampering
with the governorsetting canlead to a runawayengine andcauseit to
operateat unsafespeeds.Nevertamperwith factory setting of engine
governor.
NOTICE
REGARDING
EMiSSiONS
Engines
which arecertified to complywith Californiaandfederal EPA
emissionregulationsfor SORE(SmallOff RoadEquipment)arecertified
tooperate on regularunleadedgasoline,andmay includethe following
emissioncontrol systems:EngineModification (EM),OxidizingCatalyst(0C),
SecondaryAir injection(SAI)andThreeWayCatalyst(TWC)if soequipped.
SPARK ARRESTOR
Thismachineisequippedwith an internalcombustionengineand should
not beusedon or near any unimprovedforest-covered,brushcoveredor
grass-coveredland unlessthe engine'sexhaust systemisequipped with a
sparkarrestor meetingapplicable localor state laws (if any).
If a sparkarrestor isused,it shouldbe maintained in effective working order
bythe operator. In the Stateof Californiathe aboveisrequiredbylaw (Section
4442of the CaliforniaPublicResourcesCode).Other statesmay havesimilar
laws.Federallaws apply on federal lands.
Asparkarrestorfor the muffler is availablethrough your nearestSearsParts
andRepairServiceCenter.
WARNING:
Your Responsibility--Restrict
the warnings
and instructions
in this manual
the use of this power machine
to persons
and on the machine.
SAVETHESEINSTRUCTIONS!
6
who read, understand
and follow
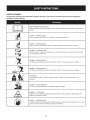
SAFETY SYMBOLS
This page depicts and describes safety symbols that may appear on this product. Read, understand, and follow all instructions on the machine before
attempting
to assemble and operate.
P
I
I
I
READ THE OPERATOR'S MANUAL(S)
Read, understand,
and follow
all instructions
in the manual(s)
before attempting
to assemble
and
operate
DANGER--
ROTATING BLADES
Never carry passengers.
Never carry children,
even with the blades off.
0
DANGER--
ROTATING BLADES
Always look down and behind
WARNING--
before and while
backing to avoid a back-over
accident.
ROTATING BLADES
Do not put hands or feet near rotating
can amputate
parts or under the cutting
deck. Contact
with the blade(s)
hands and feet.
WARNING--THROWN
This machine
OBJECTS
may pick up and throw
and objects
which
can cause serious personal
injury.
and objects
which
can cause serious personal
injury.
...............j
WARNING--THROWN
This machine
•
®
BYSTANDERS
Keep bystanders,
operation.
|i
WARNING--
WARNING--
helpers,
children
and pets at least 75 feet from the machine
this machine
on a slope greater than 15 degrees.
HOT SURFACE
Engine parts, especially the muffler, become
muffler to cool before touching.
DANGER-
while it is in
SLOPE OPERATION
Do not operate
A
OBJECTS
may pick up and throw
extremely
hot during operation.
Allow engine and
ROTATING BLADES
To reduce the risk of injury, keep hands and feet away. Do not operate
catcher is in its proper place. If damaged, replace immediately.
unless discharge
cover or grass
X
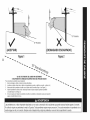
15° Slope
(OK)
15° Slope
(TOO STEEP)
'_. _
Figure 1
Figure 2
15°
dashed line
USETHISSLOPEGAUGETODETERMINE
IF A SLOPEIS TOOSTEEPFORSAFEOPERATION!
To checkthe slope, proceedas follows:
1. Removethis pageand fold along the dashedline.
2. Locatea verticalobject on or behindthe slope (e.g. a pole, building,fence, tree, etc.)
3. Align eitherside of the slope gaugewith the object (See Figure1 and Figure2 ).
4. Adjust gaugeup or down until the left cornertouchesthe slope (SeeFigure1 and Figure2).
5. If there is a gap belowthe gauge,the slope is too steepfor safeoperation(SeeFigure2 above).
Slopes are a major factor
related to tip-over
on slopes in excess of 15 degrees.
mow it. Always
mow
up and down
and roll-over
accidents
All slopes require extra caution.
which can result in severe injury or death.
If you cannot
Do not operate
machine
back up the slope or if you feel uneasy on it, do not
the face of slopes, never mow across the face of slopes.
IMPORTANT:
Yourtractorisshippedwith motoroffin the engine.However,you
MUSTcheckthe oil levelbeforeoperating.Referto the Service& Maintenance
sectionforinstructionson checkingthe oil level.
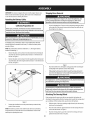
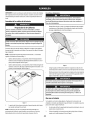
Shipping BraceRemoval
Attaching the Battery Cables
Makesurethe riding mower'sengineisoff, removethe ignitionkey,and
set the parkingbrake before removingthe shipping brace.Referto the
jOperaton sect on for nstruct ons on howto set the park ng brake.
Locatethe shippingbrace,if present,andaccompanying
warningtag found
on the rightsideof the mower,betweenthe dischargechutedeflectorand
the cuttingdeck.SeeFigure2.
California Preposition 65
Batteryposts,terminals, andrelatedaccessoriescontain leadandlead
compounds,chemicalsknown to the Stateof Californiato causecancerand
reproductive
harm.Washhandsafter handling.
Whenattaching battery cables,alwaysconnect the POSITIVE
(Red)wire to its
terminal first, followed bythe NEGATIVE
(Black)wire.
Forshippingreasons,bothbatterycableson yourequipmenthavebeenleft
disconnected
from the terminalsat thefactory.Toconnectthe batterycables,
proceedasfollows:
fie?E:ThepositivebatteryterminalismarkedPos.(+).Thenegativebattery
terminalismarkedNeg.(-).
1.
Removethe plasticcover,if present,from the positivebatteryterminaland
attachthe redcableto the positivebatteryterminal(+) with the bolt and
hexnut.SeeFigure1.
2.
Removethe plasticcover,if present,from the negativebatteryterminaland
attachthe blackcableto the negativebatteryterminal(-) with the bolt and
hexnut.SeeFigure1.
Figure2
Placethe decklift leverin the highestcutting position.Referto Settingthe
CuttingHeightinthe Operationsectionof thismanual.
Whilepushing
thedischarge
chutedeflectortowardsthemachine
withyourleft
hand,remove
theshippingbrace
withyourrighthandbygrasping
itbetween
your
thumbandindexfingerandrotatingitclockwise.
Theshipping brace,usedfor packagingpurposes
only,must be removedand
discardedbefore operatingyour riding mower.
J
J
J
J
Themowing deckiscapableof throwing objects.Failureto operate the
riding mower without the dischargecoverin the properoperating position
lcou d resut nser ous persona njury and/or property damage.
J
J
J
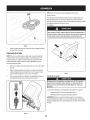
AttachingThe SteeringWheel
Ifthe steeringwheelforyourtractordid notcomeattached,the hardwarefor
attachingit hasbeenpackedwithin the steeringwheel,beneaththe steeringwheel
cap.Carefullypryoffthe steeringwheelcapandremovethe hardware.
.J
Figure1
3.
Positionthe redrubberbootoverthe positivebatteryterminalto help
protectit from corrosion.
NOTE:Ifthe batteryisput intoserviceafter the dateshownon top of battery,
chargethe batteryasinstructedin the Service& Maintenancesectionof this
manualpriorto operatingthe tractor.
9
1.
With the wheelsof the tractorpointingstraightforward,placethesteering
wheeloverthe steeringshaft.
2.
Placethe washer(with the cuppedsidedown)overthe steeringwheeland
securewith the hexbolt. SeeFigure3.
3.
Placethe steeringwheelcapoverthe centerof the steeringwheel and
pushdownwarduntil it "clicks"intoplace.
F
Adjustingthe Seat
Toadjustthe positionof the seat,pull upandholdthe seatadjustmentlever.Slide
the seatforwardor rearwardto the desiredposition;thenreleasethe adjustment
lever.Makesureseatislockedintopositioninaseat-stopbeforeoperatingthe
tractor.SeeFigure5.
Beforeoperatingthe tractor, makesurethe seat isengaged ina seat-stop.
Engagethe parkingbrake.Stand behindthe machineand pull backon seat
until it clicksintoplace.
\
Figure3
AttachingTheSeat
NOTE:Forshippingreasons,
the seatiseitherfastenedto the tractorseat'spivot
bracketwith a plastictie, or mountedbackwardto the pivotbracket.Ineithercase,
freethe seatfrom itsshippingpositionbeingcarefulnot to bendor kinkthe wiring
harnessandfollowthe instructions
belowto attachit.
1.
Removethe two hexscrewsandnutsfromthe seatpivotbracket.
2.
Alignthe front holesofthe seatmountingbracketwith the holesinthe seat
pivotbracketonyourtractorandsecurewith previouslyremovedhexscrews
andnuts. SeeAinFigure4.
3.
Plugthe wiring harnessintothe seatsafetyswitchinthe bottomof the seat,
asshownin Bof Figure4.
Figure5
Tire Pressure
flO?E:Thetractorwill not operatewiththe wiring harnessdisconnected.
Maximum tire pressureunder anycircumstances
is30 psi.Equaltire pressure
shouldbe maintained at all times. Neverexceedthe maximum inflation
)ressureshown on the sidewallof the tire.
Therecommended
operatingtire pressureis:
Approximately10psiforthe reartires
Approximately14psiforthe front tires
IMPORTANT:
Referto the tire sidewallforexacttire manufacturer's
recommended
or maximumpsi.Donot overinflate.Uneventire pressurecouldcausethe cutting
deckto mow unevenly.
Figure4
10
B
A
C
.I
D
©
H
F
G
Rgure6
A
ParkingBrakeLever
F
PTOLever(BladeEngage)
B
Throttle/ChokeControlLever
G
CupHolder
C
IgnitionSwitchModule
H
ShiftLever
D
Auto-drivePedal
I
SeatAdjustmentLever
E
DeckLift Lever
J
BrakePedal
NOTE:
Anyreference
inthismanual
totheRIGHT
or LEFT
sideofthetractorisobserved
fromoperator's
seatposition
facingforward
towards
thefrontoftractor.
Meets ANSiSafetyStandards
CraftsmanTractorsconformto the safetystandardof the AmericanNationalStandardsInstitute (ANSI).
11
ParkingBrakeLever
Seat AdjustmentLever
Tosetthe parkingbrake:Fullydepressthe brakepedal.Movethe
parkingbrakeleverinto the parkingbrakeposition.Release
the
brakepedalto allowthe parkingbraketo engage.
Theseatadjustmentleverislocatedbelowthe front/left of theseat.Thelever
allowsforadjustmentof the foreandaft positionof the seat.Referto the Assembly
sectionof the manualformoredetailedinstructionsforadjustingthe seatposition.
Toreleasethe parkingbrake:Depressthe brakepedalandmove
the parkingbrakeleverout ofthe ONpositionandinto the OFF
position.Theparkingbrakewill thenbereleased.Release
the
brakepedal.
Auto-drivepedal
Thedrivepedalislocatedonthe right sideof the tractor,alongthe runningboard.
Depress
the drivepedalforwardandthe tractorwill moveinthe directionthatthe
shift leverisengagedin.Tocausethetractorto travelforward,whileata complete
stop,movethe shift leverinto the Forwardposition.Graduallysteponthe drive
pedalandthe tractorwill beginto moveforward.TomoveinReverse,
follow the
sameprocedure
onlymovethe shift leverinto the reverseposition.
NOTE:
Theparkingbrakemustbesetif the operatorleavesthe seat
with the enginerunningorthe enginewill automaticallyshut off.
Throttle/chokeControlLever
Thegroundspeediscontrolledwith thedrivepedal.Thefurther forwardthat the
pedalis pivoted,thefasterthetractorwill travel.Thepedalwill returnto its original
positionwhenit'snot depressed.Referto the Operationsectionofthis manualfor
detailedinstructions
regardingthe drivepedal.
Thethrottle/chokecontrolleveris locatedonthe
m
m
left sideof the tractor'sdashpanel.Thislever
controlsthe speedof theengineandwhenpushed
all the wayforward,the chokecontrolalso.When
setinagivenposition,thethrottle will maintaina
uniformenginespeed.
IMPORTAflT:
Always set the parking brake when leaving the tractor
unattended.
DeckLift Lever
IMPORTANT:When
operating the tractor with the cutting
deck engaged, the throttle/choke control lever must
always be in the FAST (rabbit) position.
Foundon yourtractor'srightfender,the decklift leverisusedto
changethe heightof the cuttingdeck.Touse,movethe levertothe
left, thenplaceinthe notchbestsuitedfor yourapplication.
Ignition Switch Module
mmmmmmm
Tostartthe engine,insertthe keyinto the ignitionswitchandturn
clockwiseto the START
position.Release
the keyinto the NORMAL
MOWING
MODE
positiononcethe enginehasfired.
PTO(Blade Engage)Lever
Foundon the tractor'srightfender,the PTO(bladeengage)lever
isusedto engagepowertothe cuttingdeckorother(separately
available)attachments.Tooperate,movethe leverall the way
forward.Movingthe leverall the wayrearwardintothe PTOOFF
positiondisengagespowerto thecutting deck/attachment.
Tostopthe engine,turn the ignitionkeycounterclockwise
to the
STOP
position.
SLOW
flOTE:The PTO (blade engage) lever must be in the
disengaged (PTO OFF) position when starting the engine.
IM PORTANT: Priortooperatingthe
tractor,referto boththe "SafetyInterlock
System"and"StartingTheEngine"laterinthis
sectionofthis manualfor detailedinstructions
CupHolder
Thetractor'scupholderislocatedon the fendertothe left of theseat.
regardingthe IgnitionSwitchModule.
Shift Lever
Theshift leverislocatedon the left side
of the fenderandhasthreepositions,
FORWARD,
NEUTRAL
andREVERSE.
The
brakepedalmustbedepressed
andthe
tractormustnot beinmotionwhenthe
Neverleavea running machineunattended.AlwaysdisengagePTO(Blade
EngageLever),moveshiftleverintoneutralposition, set parking brake,
stop engineand removekeyto prevent unintendedstarting.
movingshift lever.
IMPORTANT:
Neverforcethe shift lever.
Doingsomayresultinseriousdamageto
the tractor'stransmission.
REVERSE
Brake Pedal
Thebrakepedalislocatedonthe left sideofthe lawntractor,alongthe running
board.Depress
the brakepedalto engagethe discbrakeandbringthe tractorto a
completestop.
NOTE:Thepedalmustbedepressedtostart the engine.Referto SafetyInterlock
Switcheslaterin thissectionof thismanual.
12
Gasand Oil Fill-up
Oil
iMPORTANT:
Yourtractorisshippedwith motoroil intheengine.However,you
MUSTcheckthe oil levelbeforeoperating.Becarefulnotto overfill.
Forinstructionsonhowto checkthe engineoil,referto CheckingTheEngineOilin
the ServiceandMaintenance
sectionof thismanual.
Gasoline
Thegasolinetank islocatedunderthe hood.Donotoverfill.
Useextreme carewhen handling gasoline.Gasolineisextremelyflammable
andthe vaporsareexplosive.Neverfuel machineindoorsor while the
engine ishotor running. Extinguishcigarettes,cigars,pipes,andother
sourcesof gn t on.
NOTE:Purchase
gasolinein smallquantities.Donot usegasolineleft overfromthe
previousseason,
to minimizegumdepositsin thefuel system.
Figure7
Thisengineiscertifiedto operateon unleadedgasoline.Forbestresults,fill
the fueltank with onlyclean,fresh,unleadedgasolinewith apumpsticker
octaneratingof 87or higher.
Gasohol(upto 10%ethyl alcohol,90%unleadedgasolinebyvolume)isan
approvedfuel. Othergasoline/alcohol
blends,suchasE85,arenotapproved.
MethylTertiaryButylEther(MTBE)
andunleadedgasolineblends(upto a
maximumof 15%MTBEbyvolume)areapprovedfuels.Othergasoline/ether
blendsarenotapproved.
or Death
Avoidsuddenturns.
Donot operatethe unitwhereit couldslipor tip.
If machinestopsgoinguphill,stopbladesandbackdownhillslowly.
Fillfueltank outdoorsor inwell-ventilatedarea.
Donot mowwhenchildrenor othersarearound.
Donot overfillfuel tank.Filltankto nomorethan1/2 inchbelowbottomof
Nevercarrychildren,evenwith bladesoff.
filler neckto allowspaceforfuel expansion.
Lookdown andbehindbeforeandwhilebacking.
Neverremovegascapor addfuelwhilethe engineishot or running.Allow
engineto coolat leasttwo minutesbeforerefueling.
Keepsafetydevices(guards,shields,andswitches)inplaceandworking.
If gasolineisspilled,wipeit offthe engineandequipment.Movemachineto
anotherarea.Wait5minutesbeforestartingthe engine.
Knowlocationandfunctionof all controls.
Removeobjectsthat couldbethrown bythe blades.
Besurebladesandenginearestoppedbeforeplacinghandsor feet near
blades.
ToAdd Gasoline
1.
Turnthe engineoff andletenginecoolat least2minutesbeforeremoving
the fuelcap.Thegasolinetank islocatedunderthe hood.Removethefuel
capbyturningit counterclockwise.
2.
Fillthefuel tankwith gasoline.Useonlyclean,fresh(nomorethan30days
old),unleadedgasoline.Filltank to nomorethan1/2 inchbelowbottomof
filler neckto allowspaceforfuel expansion.
3.
Avoid Serious Injury
Goupanddownslopes,not across.
Beforeleavingoperator'sposition,stoptractor,disengageblades,engage
parkingbrake,shutengineoff, andremovekey.
Read Operator's Manual
Safety Interlock System
Reinstallthe fuel cap.
Thesafetyinterlock
systemisdesignedfor safeoperationof the tractor.Ifthis
systemshouldevermalfunction,do not operatethe tractor,Immediatelycontact
1-800-659-5917
to havethe systemserviced.
IMPORTAN_
Donot overfillthe tank.Filltankto no morethan 1/2inchbelow
bottomoffiller neckto allowspaceforfuel expansion.SeeFigure7.
Thesafetyinterlock
systempreventsthe enginefrom startingunless
the parkingbrakeisengagedandthe PTO(BladeEngage)leverisinthe
disengaged(OFF)position.
Thesafetyinterlocksystemwill automaticallyshutoffthe engineif the
operatorleavesthe seatbeforeengagingthe parkingbrake.
Thesafetyinterlocksystemwill automaticallyshutoffthe engineif the
operatorleavesthe tractor'sseatwiththe PTO(BladeEngage)
leverengaged,
regardlessofwhetherthe parkingbrakeisengaged.
13
Withthe ignitionkeyinthe NORMAL
MOWING
position,the electricPTO
(BladeEngage)
clutchwill automaticallyshutoff if the PTO(BladeEngage)
knobis movedinto the engaged(ON)positionwiththe drivepedalin
positionfor reversetravel.
NOTE:Thedeckwheelsareananti-scalpfeatureof the deckandarenot designed
to supportthe weightof the cuttingdeck.Referto Levelinginthe Maintenance
and
Servicesectionof thismanualformoredetailedinstructionsregardingvariousdeck
adjustments.
Starting the Engine
Donot operate the tractor if the interlocksystemismalfunctioning. This
systemwasdesignedfor your safetyandprotection.
Donot operatethe tractor if the interlocksystemismalfunctioning. This
systemwasdesignedfor your safetyand protection.
Engaging the ParkingBrake
NOTE:Referto the GasolineandOilfill-up instructionsearlierinthissection.
Toengage the parkingbrake:
1.
Fullydepressthe brakepedalandholdit downwith yourfoot.
2.
Movethe speedcontrolleverall the waydown andinto the parkingbrake
position.
3.
Release
the brakepedalto allowthe parkingbraketo engage.
1.
Insertthe tractorkeyintothe ignitionswitch.
2.
Placethe PTO(BladeEngage)leverinthe disengaged(OFF)
position.
3.
Engagethe tractor'sparkingbrake.
4.
Activatethe chokecontrolbymovingthe throttle/chokeleverall the wayup
intothe chokeposition.
5.
Turnthe ignitionkeyclockwiseto the START
position.Afterthe enginestarts,
releasethe key.It will returnto the ON(orNormalMowing)position.
Toreleasethe parkingbrake:
1.
Depressthe brakepedalandmovethe speedcontrolleverout of the parking
brakepositionandinto adesiredspeed.
Setting the Cutting Height
1.
Selectthe heightpositionof the cuttingdeckbyplacingthe decklift leverin
anyof the differentcuttingheightnotchesonthe rightsideof thefender.
2.
Adjustthe deckwheelssothat theyarebetween1A-inch
andY2-inchabove
the groundwhenthe tractorisonasmooth,flat surfacesuchasadriveway.
DoNOTholdthe key in the STARTposition for longer than ten seconds
at a time. Doing so may cause damage to your engine's electric
starter.
6.
To adjust Deck Wheels:
1.
Removethe flangelocknut onthe shoulderbolt securingthedeckwheel.
2.
Positionthe wheelto the desiredheightaslistedabove.SeeFigure8.
Afterthe enginestarts,deactivatethe chokecontrolandplacethethrottle
controlinthe FAST
position.
NOTE:DoNOTleavethe chokecontrolonwhileoperatingthe tractor.Doingsowill
resultina"rich"fuel mixtureandcausethe engineto run poorly.
Stoppingthe Engine
f
If you strike a foreign object, stop the engine, disconnect the spark
plug wire(s) and ground against the engine. Thoroughly inspectthe
machine for any damage. Repairthe damage before restarting and
operating
1.
Ifthe bladesareengaged,placethe PTO(BladeEngage)leverin the
disengaged(OFF)position.
2.
Turnthe ignitionkeycounterclockwise
to the STOP
position.
3.
Removethe keyfromthe ignitionswitchto preventunintendedstarting.
Driving TheTractor
Avoidsuddenstarts, excessivespeedand suddenstops.
Figure8
Donot leavethe seatof the tractor without first placingthe PTO(Blade
Engage)leverin the disengaged(OFF)position, depressingthe brakepedal
andengaging the parkingbrake.If leavingthe tractor unattended,also
turn the ignitionkeyoff and removethe key.
Securethe shoulderboltwith the flangelocknut.
Keephandsandfeet away from the dischargeopening of the cutting
deck.
14
Light
"v,,"_
1.
Depressthe brakepedalto releasethe parkingbrakeandthen letthe pedal
up.
Reverse
2.
Movethe throttle leverintothe FAST
(rabbit)position.
3.
Placethe shift leverineitherthe FORWARD
or REVERSE
position.
Mode
Position
5.
z_
G
R
F
Caution
IMPORTANT;
DoNOTusethe shift levertochangethe directionof travelwhenthe
tractorisinmotion.Alwaysusethe brakepedalto bringthe tractorto acomplete
stopbeforeshifting.
4.
Reverse
Push
Button
Indicator_, ;
Alwayslookdown and behind beforeandwhile backingup to avoid a backoveraccident.
Driving
Mode
Stop
position
Graduallybeginto applypressureto the drivepedal.Thefurther downthe
pedalispushed,the fasterthetractorwill travelin the desireddirection
basedonthe positionof theshift lever.
position
Thelawntractoris broughtto astopbyreleasingthe drivepedalandthen
depressing
the brakepedal.
J
Figure 9
Beforeleavingthe operator'sposition for any reason,disengagethe blades,
placethe shift leverin neutral, engagethe parkingbrake,shut engineoff
andremovethe key.
When stopping the tractor for any reasonwhile on a grasssurface,
always:
4.
Onceactivated(indicatorlight ON),the tractorcanbedrivenin reversewith
the cuttingblades(PTO)engaged.
5.
Alwayslookdownandbehindbeforeandwhilebackingto makesureno
childrenarearound.After resumingforwardmotion,returnthe keyto the
NORMAL
MOWING
position.
TheREVERSE
CAUTION
MODEwill remainactivateduntil:
I.
Placethe shift leverinneutral,
2.
Engagethe parkingbrake,
a.
3.
Shutengineoff andremovethe key.Doingsowill minimizethe possibility
of havingyourlawn"browned"byhot exhaustfrom yourtractor'srunning
engine.
Thekeyisplacedin eitherthe NORMAL
MOWING
positionor STOP
positionor
b.
Theoperatorleavesthe seat.
DrivingOn Slopes
ReverseCaution Mode
Referto the SLOPE
GAUGE
in the SafetyInstructionssectionof the manualto help
determineslopeswhereyoumayoperatethistractorsafely.
TheREVERSE
CAUTION
MODE
positionofthe keyswitchmoduleallowsthe tractorto
maneuverinreversewith the blades(PTO)engaged.
NOTE:Mowinginreverseis not recommended.
Donot mow on inclineswith aslope in excessof 15degrees(a riseof
approximately 2-112feet every10feet). Thetractor could overturn and
causeseriousinjury.
Useextreme caution whileoperating the tractor in the REVERSE
CAUTION
MODE.Alwayslook down and behind beforeandwhile backing.Donot
operatethe tractor when children or othersare around. Stopthe tractor
immediatelyif someoneentersthe area.
Mow upanddownslopes,NEVER
across.
Exercise
extremecautionwhenchangingdirectiononslopes.
Watchforholes,ruts,bumps,rocks,or otherhiddenobjects.Uneventerrain
couldoverturnthe machine.Tallgrasscanhideobstacles.
Touse the REVERSE
CAUTION
MODE:
Avoidturnswhendrivingonaslope.Ifa turn mustbemade,turndown the
slope.Turningupaslopegreatlyincreases
thechanceof a rollover.
NOTE:TheoperatorMUSTbeseatedinthetractorseat.
1.
Starttheengineaspreviouslyinstructedon the previouspage.
2.
Turnthe keyfrom the NORMAL
MOWING
(Green)positionto the REVERSE
CAUTION
MODE(Yellow)positionofthe keyswitchmodule.SeeFigure9.
3.
Pressthe REVERSE
PUSHBUTTON
(Orange,TriangularButton)at the top,
right cornerofthe keyswitchmodule.Theredindicatorlightat the top,left
cornerof the keyswitchmodulewill beONwhileactivated.SeeFigure9.
Avoidstoppingwhendrivingupa slope.If it isnecessary
to stopwhile
drivingupa slope,start upsmoothlyandcarefullyto reducethe possibility
of flippingthe tractoroverbackward.
15
Engaging the Blades
Mowing
Engagingthe PTO(BladeEngage)
transferspowertothe cuttingdeckor other
(separatelyavailable)attachments.Toengagethe blades,proceedasfollows:
Tohelp avoid bladecontactor athrown object injury,keepbystanders,
helpers,children andpets at least 75feet from the machinewhile it is in
operation. Stopmachineif anyoneentersthe area.
I.
Movethe throttle/chokecontrolleverto the FAST
(rabbit)position.
2.
Graspthe PTO(BladeEngage)leverandpivotit all the wayforwardintothe
engaged(ON)position.
3.
Keepthe throttleleverinthe FAST
(rabbit)positionfor the mostefficientuse
of thecutting deckor other(separatelyavailable)attachments.
NOTE:
Theenginewill automaticallyshutoff if the PTOisengagedwith
the shiftleverin positionfor reversetravelwith the ignitionkeyinthe ON
position.
Thefollowing informationwill behelpfulwhenusingthe cuttingdeckwith your
tractor:
Planyour mowing pattern to avoiddischargeof materialstoward roads,
sidewalks,bystandersandthe like.Also,avoiddischargingmaterial against
awall or obstruction which may causedischargedmaterialto ricochet back
toward the operator.
Mulching
Amulchkit isavailableasanattachment.Mulchingisa process
of recirculating
grassclippingsrepeatedlybeneaththe cuttingdeck.Theultra-fineclippingsare
thenforcedbackintothe lawnwherethey actasanaturalfertilizer.
Donot mowat highgroundspeed,especiallyira mulchkit or grasscollector
isinstalled.
Forbestresultsit isrecommended
thatthe first two lapsbe cutwith the
dischargethrowntowardsthe center.Afterthe first two laps,reversethe
directionto throwthe dischargeto the outsideforthe balanceof cutting.
Thiswill giveabetterappearance
to the lawn.
Amulchkit canbepurchased
throughthe retaillocationinwhichyou purchased
thistractor.Formoreinformation,simplycontactSearsat 1-800-659-5917.
Usingthe DeckLift Lever
Donot cutthe grasstoo short.Shortgrassinvitesweedgrowth andyellows
quicklyindry weather.
Toraisethe cuttingdeck,movethe decklift leverto the left, then placeit inthe
notchbestsuitedfor yourapplication.Referto SettingTheCuttingHeightearlierin
thissection.
Mowingshouldalwaysbedonewith the engineatfull throttle.
Underheavierconditionsit maybenecessary
to gobackoverthe cutareaa
secondtimeto get acleancut.
DoNOTattemptto mowheavybrushandweedsandextremelytall grass.
Yourtractorisdesignedto mowlawns,NOTclearbrush.
Keepthe bladessharpandreplacethe bladeswhen worn.Referto Cutting
Bladesin the Servicesectionof thismanualforproperbladesharpening
instructions.
Headlights
ThelampsareONwheneverthe tractor'sengineisrunning.
Thelampsturn OFFwhenthe ignitionkeyis movedto the STOP
position.
16
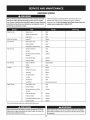
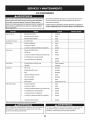
MAINTENANCE
SCHEDULE
Beforeperforminganytype of maintenance/service,disengageall controls
andstop the engine.Wait until all moving partshavecometo a complete
stop.Disconnect
sparkplug wire andgroundit againstthe engine to prevent
unintendedstarting. Alwayswearsafety glassesduring operationor while
performing anyadjustments or repairs.
BeforeEachUse
Followthe maintenance
schedulegivenbelow.Thischartdescribes
service
guidelinesonly.Usethe ServiceLogcolumnto keeptrackofcompleted
maintenance
tasks.Tolocate the nearest Parts & RepairServiceCenter or to
schedule service,simply contact1-800-659-5917.
1.
Engineoil level
1.
Check
2.
Mufflerareaandcontrols
2.
Clean
3.
Fingerguard
3.
Clean
Inthe FirstFiveHours
I.
EngineOil
1.
Change
Every10Hours
I.
Hood/Dashair vents
1.
Clean
2.
Batteryterminals
2.
Clean
3.
Deckspindlesandidler bracket
3.
Lubricate
I.
Airfilter'sprecleaner*
1.
Clean
2.
Airfilter*
2.
Clean
3.
Midsteeringarms,pivotshafts,
andaxles
3.
Lubricate
4.
Frontwheelbearings
4.
Lubricate
5.
Frontdeckwheels
5.
Lubricate
1.
Engineoil/Oil filter
1.
Change/Replace
2.
Muffler
2.
Check
1.
Airfilter
1.
Replace
2.
Airfilter'spre-cleaner
2.
Replace
3.
Every25 hours
Every
50hours
Annually
BeforeStorage
Sparkplug
3.
Replace
4.
Aircoolingsystem*
4.
Clean
5.
Fuelfilter
5.
Replace
6.
SteeringGears
6.
Clean
7.
RearWheels
7.
Remove
andgreaseaxles
1.
Hood/Dashair vents
1.
Clean
2.
Batteryterminals
2.
Clean
3.
Midsteeringarms,pivotshafts,
andaxles
3.
Lubricate
4.
Frontwheelbearings
4.
Lubricate
5.
Frontdeckwheels
5.
Lubricate
6.
Deckspindlesandidler bracket
6.
Lubricate
7.
Pedalpivotpoints
7.
Lubricate
*Servicemorefrequentlyunderdustyconditions.Engine
Maintenance
Beforeperformingany maintenanceor repairs,disengagethe PTO(Blade
EngageLever),engagethe parkingbrake,stop the engine andremovethe
keyto prevent unintendedstarting.
If the engine hasbeen recentlyrun,the engine,muffler and surrounding
metal surfaceswill behot andcan causeburnsto the skin. Exercisecaution
to avoid burns.
17
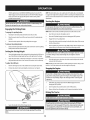
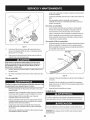
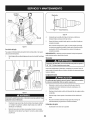
Checkingthe Engine Oil
Changing the Engine Oil and Filter
Onlyusehighqualitydetergentoil ratedwith APIserviceclassification
SF,SG,
SH,or SJ.Selectthe oil'sSAEviscositygradeaccordingto the expectedoperating
temperature.Followthechartbelow.Althoughmulti-viscosityoils (5W20,10W30,
etc.)improvestartingin coldweather,theywill resultinincreasedoil consumption
whenusedabove32°I.Checkyourengineoil levelmorefrequentlyto avoidpossible
enginedamagefrom runninglowon oil.
Colder _
32°F
Oil Viscosity Chart
Tocheckthe engineoil,proceedasfollows:
Ensurethatthe tractorisona levelsurface.
Cleanthe oil fill areaofanydebris.
Removethe dipstick,seeFigure10,andwipewith acleancloth.
9.
Reinsertdipstickandpresscompletelydown.
10.
Removethe dipstickandcheckthe oil level.Itshouldbeat the Fullmarkon
the dipstick.
NOTE:Theoil filter shouldbechangedat everyoil changeinterval.
Theengineoil shouldbechangedin the first 5hoursandthenevery50 hoursor
onceaseason.
Tochangethe engineoil,proceedasfollows:
_Warmer
8.
If the engine hasbeenrecentlyrun,the engine,muffler andsurrounding
metal surfaceswill be hot andcancauseburnsto the skin, Exercisecaution
to avoid burns,
1.
Runthe engineforafew minutesto allowthe oil inthe crankcase
to warm
up.Warmoil will flow morefreelyandcarryawaymoreof the engine
sedimentwhichmayhavesettledatthe bottomof the crankcase.
Usecareto
avoidburnsfrom hot oil.
2.
Openthetractor'shoodandlocatetheoil drainportontherightsideof the
engine.SeeFigure11.
3.
Disconnect
sparkplug wireandkeepit awayfromsparkplug.
4.
Removetheoil fill cap/dipstkkfromthe oil fill tube.SeeFigure10.
5.
Turnthe steeringwheelall the wayto the right to betterexposethe drain
plug.
6.
Sujeteel manguitodedrenajede aceite(empaquetada
conestemanual)en
el puertodedrenajecomosemuestraen laFigure10.Coloqueelextremo
opuestodelmanguitoenun redpientede recolecd6ndeaceiteadecuado
conunacapaddaddeno menosde64oz.
f
Di
OilDrain
Figure10
11.
If low,addoil slowlyinto the engineoil fill. Donot overfill.Afteraddingoil,
waitoneminuteandthenrecheckthe oil level.
Donotoverfill. Overfilling with oil maycausethe engine to notstart, hard
starting, orengine smoking. If overthe FULLmark onthe dipstick, drain oil
to reduceoil levelto FULLmark on dipstick.
12.
Replace
dipstick,andtighten.
18
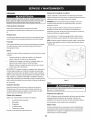
7.
Figure11
Removeoil drainpluganddrainthe oil.
8.
Removetheoil drainsleeveandstoreinasafelocationfor lateruse.
9.
Replace
the oil drainplug.
10.
Removetheoil filter,seeFigure11,and disposeof it properly.
11.
Partiallyfill the newoil filter approximately3/4of the wayfull with clean,
freshoil.Beforeyou installthe new oil filter, lightly lubricatethe oil filter
gasketwith someof the oil bysimplydippingyourfingerinthe oil and
runningitaroundthe gasket.
f
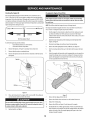
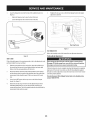
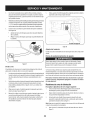
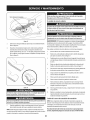
Beforereplacingthe fuel filter,drainthe fuel tank.Otherwise,fuelcanleak
out andcauseafire orexplosion.
ToDrainthe fuel:
Locatethe fuelfilter,seeFigure11,whichisroutedonthe left sideof the
enginebetweenthe fueltankandthecarburetor,andmaybeattachedto the
enginewithatie strap.Cutthetiestrap,if present,thenpinchthe tabsonthe
in-lineclamponthefuel filterwith apairof pliers,slidethe clampupthe fuel
line.Pullthe fuellinefreefrom thefilter andplacethe openendof thelineinto
anapprovedcontainertodrainthe fuel.
Tochangethe fuel filter:
1.
Usepliersto squeezethe tabsonthe otherclamp(theout-linesideof the
fuelfilter), thenslidethe clampawayfrom the fuelfilter. Twistandpullthe
fuel lineoffof thefuel filter.SeeFigure13.
Oil Filter
Figure12
12.
Installtheoil filter byhanduntil the gasketcontactsthe oil filter adapter,
thentightenthe oil filter 1/2 to 3/4turns.
13.
Refillthe enginewith newmotoroil until the oil levelon thedipstickreads
FULL.Replace
the oil fill cap/dipstick.
Fuel Line
Usedoilisahazardous
waste product.Dispose
of usedoil properly.Donot
discardwith household
waste. Checkwith your localauthorities or or contact
1-800-659-5917for a list of safedisposal/recycling
facilities.
_J
14.
Startandrunthe engine.Asthe enginewarmsup,checkforoil leaks.
15.
Stopthe engineandchecktheoil level.It shouldbeat the FULLmarkonthe
dipstick.
Figure13
Fuel Filter
Gasolineanditsvaporsareextremely flammable andexplosive.Fireor
explosioncancausesevereburnsor death.
Keepgasolineawayfrom sparks,openflames,pilot lights,heat,andother
ignitionsources.
Checkfuellines,tank,cap,andfittings frequentlyforcracksor leaks.Replace
if necessary.
2.
Checkthe fuel linesforcracksor leaks.Replace
if necessary.
3.
Replace
the fuel filter withan originalequipmentreplacement
filter. Call
1-800-659-5917
to purchasethe originalequipmentreplacement
filter.
4.
Securethe fuel lineswith the clamps.
If filters, or coversarenot installedcorrectlyseriousinjuryor death could
resultfrom backfire.Donot attempt to start the engine with them removed
Beforereplacingthe fuelfilter, drainthe fuel tank asperthe instructions
below.
Donot drainfuel whenthe engineishot.Allowthe engineadequatetime to
cool.Drainfuel into anapprovedcontaineroutdoors,awayfromopenflame.
Donot usepressurized
air or solventsto cleanthe air cleanercartridge.
Drainanylargevolumeoffuel from thetank bydisconnectingthe fuel line
fromthe in-linefuel filter nearthe engine.
Removethe fuel linefromthe In-lineside(sidetowardsthe fuel tank)ofthe
fuelfilter.
Replacement
partsmustbethe sameandinstalledinthe samepositionas
the originalparts.
If fuelspills,wait until it evaporatesbeforestartingengine.
19
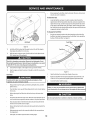
Air Cleaner
Removethefoampre-filterfrom aroundthe paperairfilter. SeeFigure
16.Replace
paperelementwhendirty or damaged.Cleanfoamelementor
replacewhendamaged.
Paperfilters cannotbecleanedandshouldbe replacedevery100operatinghours;
moreoftenif usedin extremelydustyconditions.
Neverusegasolineor low flash point solventsfor cleaningthe air filter
element.A fire or explosioncould result.
IMPORTAfl#
Neverruntheenginewithouttheairfilter.Rapid
enginewearwill
result.
1.
Unscrewthe thumbscrewsandremovethe airfilter cover.SeeFigure14.
Air Filter
Thumb
Screw
Air Filter
Figure16
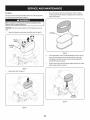
Tocleanfoamelement,washinamild liquiddetergentandwater.Squeeze
or pressthe foamelementto rinseout dirt andwater.Donot twist;this
coulddamageor tearthe foamelement.Allowto dry thoroughlybefore
using.DONOToil the foamelement.
Attachthe newair filter with foamelement,aligningthe hole intheair filter
with the intakemanifold.SeeFigure17.
5.
f
Figure14
2.
Removethe airfilter. SeeFigure15.
/
Manifold
J
Figure
17
Figure15
20
6.
Attachthe airfilter cover,makingsureto alignplasticrib featuresonthe
shroudto the plasticfeatureson the airfilter cover.SeeFigure18.Turn
thumbscrewsclockwiseuntilsnug.Checkfor anymisalignment.
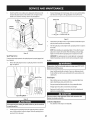
Measurethe plug gapwith afeelergauge.Correctasnecessary
bybending
sideelectrode.SeeFigure20.Thegapshouldbesetto 0.024-0.031in.
Electrode
Air
Filter
Cover
Plastic
Feature
Figure20
4.
Checkthatthe sparkplugwasherisingoodconditionandthreadthe spark
plug inby handto preventcross-threading.
5.
Afterthe sparkplugis seated,tightenwith asparkplug wrenchto compress
the washer.
Shroud
k,_
flOrE:Wheninstallinga newsparkplug,tighten 1/2turn after the spark
plug seatsto compressthe washer.Whenreinstallinga usedsparkplug,
tighten 1/8-1/4turn afterthe sparkplug seatsto compressthe washer.
Feature
Figure18
SparkPlug Service
IMPORTANT:
Thesparkplugmustbesecurelytightened.Animproperly
tightenedsparkplugcanbecomeveryhot andmaydamagethe engine.
Toensureproperengineoperation,thesparkplugmustbeproperlygappedand
freeofdeposits.
I.
Muffler
Removethe sparkplugbootandusea sparkplugwrenchto removethe
plug.SeeFigure19.
Temperatureof muffler and nearbyengineareasmayexceed150° F(65°C).
Avoidcontactwith theseareas.
Inspectmufflerperiodically,andreplaceif necessary.
Replacement
parts
forthe mufflermustbethe sameandinstalledinthe samepositionasthe
originalparts.
Spark Plug
CleanEngine
Dailyor beforeeveryuse,cleangrass,chafforaccumulateddebrisfrom
engine.Keeplinkage,spring,andcontrolsclean.
Keepareaaroundandbehindmufflerfreeofanycombustibledebris.
Keepingenginecleanallowsair movementaroundengine.
Enginepartsshouldbe keptcleanto reducethe riskof overheatingand
ignitionof accumulated
debris.
Spark Plug Boot
Donot usewater to clean engine parts.Watercould contaminatefuel
system.Usea brushor dry cloth.
Figure 19
CarburetorAdjustment
Thecarburetoron thisengineisnot adjustable.
If the engine hasbeenrunning,the muffler will bevery hot.Becareful not
to touchthe muffler.
2.
Visuallyinspectthe sparkplug.Discardthe sparkplugif thereisapparent
wear,or if the insulatoriscrackedor chipped.Cleanthe sparkplugwith a
wirebrushif it isto be reused.
21
Lubrication
Beforelubricating,repairing,or inspecting,alwaysdisengagePTO(Blade
IMPORTANT: Theuseofa pressure
washerto cleanyourtractorisNOT
recommended.
It maycausedamageto electricalcomponents,spindles,pulleys,
bearingsorthe engine.
I
EngageLever),moveshift leverintoneutral position,set parkingbrake,stop I
eng ne andremovekeytopreventun ntendedstart ng.
l
|
Pivot Points & Linkage
Ascrewanddeckplug canbefoundonyourtractor'sdecksurfaceasseenin Figure
21.Thisplug canbereplacedwith awaterport to beusedaspart of aseparatelyavailabledeckwashsystem.
TheDeckWashSystem isusedto rinsegrassclippingsfrom the deck'sunderside
andpreventthe buildupof corrosivechemicals.
TM
NOTE:Adeckwashsystemcanbepurchasedthroughthe retaillocationinwhich
youpurchasedthistractor.Formoreinformation,
call1-800-659-5917.
Lubricateall the pivot pointsonthe drivesystem,parkingbrakeandlift linkageat
leastonceaseasonwith light oil.
f-
RearWheels
Therearwheelsshouldberemovedfromthe axlesonceaseason.Lubricatethe
axlesandthe rimswell with anall-purposegreasebeforere-installingthem.
/
Front Axles
Eachendof the tractor'sfront pivotbarmaybeequippedwith agreasefitting.
Lubricatewith agreasegunafterevery25 hoursof tractoroperation.
Battery
Thebatteryissealedandis maintenance-free.
Acidlevelscannotbechecked.
Alwayskeepthe batterycablesandterminalscleanandfreeof corrosive
build-up.
Aftercleaningthe batteryandterminals,applya lightcoatof petroleumjelly
or greaseto bothterminals.
Alwayskeepthe rubberbootpositionedoverthe positiveterminalto prevent
shorting.
J
IM PORTANT: If removingthe batteryforanyreason,disconnectthe NEGATIVE
Figure21
(Black)wirefrom itsterminalfirst, followedbythe POSITIVE
(Red)wire.When
re-installingthe battery,alwaysconnectthe POSITIVE
(Red)wireto its terminal
Adjustments
first, followedbythe NEGATIVE
(Black)wire. Becertainthatthe wiresareconnected
to the correctterminals;reversingthemcouldchangethe polarityandresultin
damageto yourengine'salternatingsystem.
Neverattempt to makeanyadjustments while the engine isrunning,except
where specifiedin the operator'smanual.
CleaningBattery
Cleanthe batterybyremovingit from the tractorandwashingwith a bakingsoda
andwatersolution.Ifnecessary,
scrapethe batteryterminalswitha wirebrushto
removedeposits.Coatterminalsandexposedwiring with greaseor petroleumjelly
to preventcorrosion.
Levelingthe Deck
NOTE:
Check
thetractor's
tirepressure
beforeperforming
anydeckleveling
adjustments.
Refer
toTiresintheService
section
ofthismanual
formore
information
regarding
tirepressure.
Battery Failures
Front To Rear
Somecommoncausesforbatteryfailureare:
Incorrectinitialactivation
Thefront of the cuttingdeckissupportedbyastabilizerbarthat canbeadjustedto
levelthe deckfrom front to rear.Thefront of the deckshouldbe between1g-inch
Overcharging
and3/8-inchlowerthanthe rearofthe deck.Adjustif necessary
asfollows:
Freezing
1.
Undercharging
Corrodedconnections
ThesefailuresareNOTcoveredbyyourtractor'swarranty.
With the tractorparkedon afirm, levelsurface,placethe leverfor lifting the
platformon the secondto the top notch(secondhighestposition)androtate
the bladeascloseaspossibleto the dischargechannelthatisparallelto the
tractor.
Measure
the distancefromthe front of the bladetip to thegroundandthe
rearof the bladetip to theground.Thefirst measurement
takenshould
bebetweenlg" and3/8"lessthanthe secondmeasurement.
Determine
Cleaning the EngineAndDeck
Anyfuel or oil spilledonthe machineshouldbewipedoff promptly.DoNOTallow
debristo accumulatearoundthe coolingfinsof the engineor onanyotherpart of
the machine.
the approximatedistancenecessary
forproperadjustmentandproceed,if
necessary,
to the nextstep.
22
3.
Locate
theflangelocknutonthefrontsideofthestabilizer
bracket.
See
Figure
22.
Retightenthe hexcapscrewon the left deckhangerbracketwhenproper
adjustmentisachieved.
Tighten
theflangelocknuttoraisethefrontofthedeck;
Loosen
theflangelocknuttolowerthefrontofthedeck.
r !
Hex Cap Screw
Figure23
SeatAdjustment
Referto the Assemblysectionof thismanualforseatadjustmentinstructions.
Parking BrakeAdjustment
Figure22
Sideto Side
If the cuttingdeckappearsto bemowingunevenly,asideto sideadjustmentcanbe
performed.Adjustif necessary
asfollows:
1.
2.
With thetractorparkedona firm, levelsurface,placethe decklift leverin
the secondfrom thetop notch(secondhighestposition)androtateboth
bladessothatthey areperpendicularwith thetractor.
Ifthe tractordoesnot cometo acompletestopwhenthe brakepedaliscompletely
depressed,
or if the tractor'srearwheelscanroll withthe parkingbrakeapplied,
the brakeis inneedof adjustment.Contactthe nearestSearsServiceCenterto have
yourbrakesproperlyadjusted.
Measurethe distancefrom the outsideof the left bladetip to the ground
andthe distancefromthe outsideofthe right bladetip to the ground.Both
measurements
takenshouldbeequal.If they'renot,proceedto the next
step.
3.
Loosen,but do NOTremove,the hexcapscrewon the left deckhanger
bracket.SeeFigure23.
4.
Balancethe deckby usingawrenchto turnthe adjustmentgear(found
immediatelybehindthe hexcapscrewjust loosened)clockwise/upor
counterclockwise/down.
Thedeckisproperlybalancedwhenbothbladetip
measurements
takenearlierareequal.
Neverattempt to adjust the brakeswhile the engine is running. Always
disengagePTO(bladeengage)lever,moveshift leverinto neutral position,
stop engine and removekeyto preventunintended starting.
Tolocatethe nearest Parts& RepairServiceCenteror to scheduleservice,
contact1-800-659-5917.
23
f
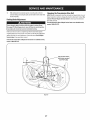
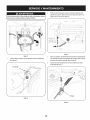
Cutting Deck Removal
///
To remove the cutting deck, proceed as follows:
1.
Placethe PTO(BladeEngage)leverinthe disengaged(OFF)positionand
engagethe parkingbrake.
2.
Lowerthe deckbymovingthe decklift leverinto the bottomnotchon the
rightfender.
3.
Removethe self-tappingscrew(A)thatsecuresthe belt-keeperrodfrom
aroundthe tractor'sPTOpulley,thenremovethe belt keeperrod(B).See.
Note: Makeamentalnotewhat holethe otherendof the belt-keeperrodis
insertedinfor reinstallationpurposes.
4.
Removethe belt (C)from aroundthe tractor'sPTOpulley.SeeFigure24.
Avoidpinching injuries.Neverplaceyour fingers on the idler spring or
betweenthe belt anda pulley while removing the belt.
\
J
Figure25
Removethe bow-tiecotterpinsecuringthe deckstabilizerrodto the deck.
Slidethe decklift rodfrom the mountingbracketonthe deckasshownin
Figure26.
f
...................
_:,@_..................................
_,:
_ / .......................................
....../
i
..................
4_1 0
Figure24
5.
Looking
at the cuttingdeckfrom the left sideofthe tractor,locatethe bowtie pinthatsecuresthe decksupportrodonthe rearleft sideof the deck.See
Figure25.Removethe bow-tie pinthatsecuresthedecksupportrod,and
carefullyremovethe decksupportfromthe decklift arm.
6.
Repeatthe abovestepsonthe tractor'srightside.
J
Figure26
NOTE:The
bow-tieclipsshouldbe re-installedfromthe top down.
7.
9.
Movethe decklift leverintothe top notchon the rightfenderto raisethe
decklift armsupandout of the way.
24
Carefullyremovethe PTO
cablefrom the rearof the cuttingdeckby
removingthe bow-tiecotter pinwhichsecuresit. Removethe springfrom
the deckidler bracket.SeeFigure27.
3.
4.
Connectthe secondcable(negative-) to the otherpostof thejumper
battery.
Connectthe otherendof the negativecableto theengineblockof the
tractor,awayfrom the battery.Attachto anunpaintedpartto assureagood
connection.
If the jumperbattery isinstalledon avehicle(i.e. car,truck),do NOTstart
the vehicle'senginewhen jump starting your tractor.
5.
Startthe tractor(asinstructedearlierinthissectionof thismanual).
6.
Setthe tractor'sparkingbrakebeforeremovingthe jumpercables,inreverse
orderof connection.
Charging
Batteries give off an explosive gaswhile charging. Chargethe battery in I
a well ventilated area and keepaway from an open flame or pilot light
as on a water heater, spaceheater, furnace, clothes dryer or other gas
lapp antes.
Figure27
10.
Gentlyslidethe cuttingdeck(fromthe left side)out from underneaththe
tractor.
Tires
[
I
J
Whenchargingyourtractor'sbattery, useonlyachargerdesignedfor 12Vlead[acidbatteries.Readyour batterycharger'sOwner'sManualprior to charging
[your tractor's battery.Alwaysfollow its instructionsandheedits warnings.
Neverexceedthe maximum inflation pressureshown on the sidewall of
tire.
Ifyourtractorhasnot beenput into useforanextendedperiodof time,chargethe
batteryasfollows:
I.
Setyourbatterychargerto delivera maxof1Oamperes.
Therecommendedoperating tire pressureis:
2.
Approximately10psifor the reartires
Approximately14psifor thefront tires
IMPORTANT:
Referto the tire sidewallforexacttire manufacturer's
Ifyourbatterychargerisautomatic,chargethe batteryuntilthe charger
indicatesthatchargingiscomplete.If thechargerisnot automatic,charge
for nofewerthaneighthours.
Fuse
recommended
or maximumpsi.Donot overinflate.Uneventire pressurecould
causethe cuttingdeckto mowunevenly.
One20AMPfuseis installedinyourtractor'swiring harness
to protectthe tractor's
electricalsystemfromdamagecausedbyexcessive
amperage.
Battery
Ifthe electricalsystemdoesnot function,or yourtractor'senginewill not crank,
first checkto becertainthatthe fusehasnot blown.It canbefoundat the rearof
CaliforniaProposition
65WARNING!
Batteryposts,terminals,andrelated
accessories
containleadandleadcompounds,chemicalsknownto the Stateof
Californiato causecancerandreproductiveharm.Washhandsafter handling.
the unit, underneaththe fenderlocatedbythe battery.
Alwaysusea fusewith the sameamperagecapacityfor replacement.
If removingthe battery, disconnectthe NEGATIVE
(Black)wire from its
terminal first, followed by the POSITIVE
(Red)wire. Whenre-installing
the battery, alwaysconnectthe POSITIVE
(Red)wire to its terminal first,
followed bythe NEGATIVE
(Black)wire.
JumpStartiag
Neverjump start a damaged or frozen battery. Becertain the vehicles
do not touch, and ignitionsare off. Donot allow cable clamps to
touch.
1.
2.
Connectpositive(+) cableto positivepost(+) ofyourtractor'sdischarged
battery.
Connecttheotherendofthecabletothe(positive+)postofthejumperbattery.
25
CuttingBlades
If the cutting edge of the bladehaspreviouslybeensharpened,or if any
metalseparationispresent,replacethe bladeswith newones.
Shutthe engine off andremoveignitionkeybefore removingthecutting
blade(s)for sharpeningor replacement.Protectyour handsby using heavy
[g oveswhen grasp ngthe bade.
A poorlybalancedbladewill causeexcessivevibration, maycausedamageto
the tractorand/or resultin personalinjury.
Periodicallyinspectthe bladeand/or spindlefor cracksor damage,
5.
Iespeciallyafter you've struckaforeign object. Donot operate the machine
[until damagedcomponentsare replaced.
Toremovethe blades,proceedasfollows:
1.
Removethedeckfrombeneaththe tractor,(referto CuttingDeckRemoval
earlierinthissection)thengentlyflip thedeckoverto exposeitsunderside.
2.
Placeablockof woodbetweenthe centerdeckhousingbaffleandthe
cutting bladeto actasastabilizer.SeeFigure28.
3.
Removethe hexflangenut thatsecuresthe bladeto the spindleassembly.
Testthe blade'sbalanceusingabladebalancer.Grindmetalfrom the
heavysideuntil it balances
evenly.
NOTE:Whenreplacingthe blade,besureto installthe bladewith the sideof the
blademarked"Bottom" (orwitha part numberstampedinit)facingthe ground
whenthe mowerisinthe operatingposition.
Useatorque wrench totightenthe bladespindlehex flange nut to between
70[bs-ft and 90 [bs-ft.
Changing the DeckBelt
HexFlangeNut
Besureto shut the engine off, removeignitionkey,disconnectthe spark
plugwire(s)and groundagainst the engine topreventunintendedstarting
beforeremovingthe belt.
Ai[ belts on yourtractor aresubjectto wear andshouldbe replacedif any
signsof wearare present.
iMPORTANT: TheV-beltfoundon yourtractorisspeciallydesignedto engage
anddisengagesafely.A substitute(non-OEM)V-beltcanbedangerousbynot
disengagingcompletely.Fora properworkingmachine,useidentical
equipment
beltsaslistedinthe partspagesofthis Operator's
Manual
J
Figure28
4.
Tochangeor replacethe deckbelt onyourtractor,proceedasfollows:
Toproperlysharpenthe cuttingblades,removeequalamountsof metal
from bothendsof the bladesalongthe cuttingedges,paraIMtothe trailing
edge,at a25°- to 30°angle.Alwaysgrindeachcutting bladeedgeequallyto
maintainproperbladebalance.SeeFigure29.
Removethe deckasinstructed
earlierinthissection.
Figure29
26
1.
Removethe beltcoversfrom the spindlepulleysbyremovingthe hexscrews
that fastenthe coversto the deck.SeeFigure30.
2.
It mayalsobe necessary
to loosen
the hexnut on the left deckidlerpulleyto
get the belt off the pulleyandaroundthe beltguard.
3.
Carefullyremovethe deckbelt fromaroundthe two spindlepulleysandthe
two deckidlerpulleys.SeeFigure30.
4.
Toplacethe newbelt,beginbyroutingthe belt aroundthe two outer
spindlepulleysasshownin Figure30.
5.
Thenroutethe beltaroundthe twodeckidlerpulleysasshownin Figure30.
6.
Retightenthe beltkeeperrodloosenedearlier.
7.
Remountthe beltguardsremovedearlier.
8.
Re-installthedeck,makingsurethe belt remainsroutedaroundthe pulleys
asinstructed.
Thecompletebelt routingisshownin Figure30.
9.
Pullthe rightsideof the belt,andplacethe narrowVsideof the belt intothe
PTOpulley.
10.
Whileholdingthe belt andpulleytogether,rotatethe pulleyto the left.
Continueholdingandrotatingthe pulleyandbeltuntil the belt isfully rolled
into the PTOpulley.
ParkingBrakeAdjustment
Changingthe Transmission
Drive Belt
NOTE:Several components must be removed and special tools (ie air/
impactwrench) in order to change the tractor's drive belt. Contact the
nearest Parts & Repair Service Center to have your transmission
drive belt serviced.
Tolocatethe nearestParts& RepairServiceCenteror to scheduleservice,
contact1-800-659-5917.
Neverattempt to adjustthe brakeswhile the engine isrunning. Always
disengagePTO(BladeEngageLever),moveshift leverintoneutralposition,
stopengine andremovekeyto preventunintendedstarting.
If thetractordoesnotcometoa completestopwhenthe clutch-brakepedalis
completelydepressed,
or if the tractor'srearwheelscanrollwith the parkingbrake
applied,the brakeis inneedof adjustment.Contactthe nearestParts& Repair
ServiceCenterto haveyourbrakesserviced.
Tolocate the nearestParts& RepairServiceCenter or to schedule service,
contact1-800-659-5917.
J
Figure30
27
Neverstore lawn tractor with fuel in tankindoorsor in poorlyventilated
areaswhere fuel fumes may reachanopen flame, spark,or pilot light ason
a furnace,water heater, clothesdryer,or gasappliance.
PreparingTheEngine
DrainingThe Fuel
IM PORTANT: Fuelleft inthe fueltank duringwarmweatherdeterioratesand
will causeseriousstartingproblems.
1.
Locatethe fuel filter,whichis locatedonthe left sideofthe engine,andmay
beattachedto the enginewith a tiestrap.
Topreventgumdepositsfromforminginsidethe engine'scarburetorandcausing
possiblemalfunctionofthe engine,the fuel systemmustbeeithercompletely
emptied,or the gasolinemustbetreatedwith astabilizerto preventdeterioration.
2.
Cutthe tie strap,if present,thenpinchthe in-lineclamponthe fuel filter
with a pairof pliers,slidethe clampupthe fuel line.
3.
Pullthefuel linefreefrom the filter andplacethe openendof the lineinto
an approvedcontainerto drainthe fuel.
I.
Ifusingafuelstabilizer:
a.
Readthe productmanufacturer'sinstructionsand
recommendations.
b.
Addto clean,freshgasolinethe correctamountofstabilizerfor the
capadtyofthe fuel system.
c.
2.
Cleanandlubricatetractorthoroughlyasdescribedinthe lubrication
instructions.
Fillthe fueltank with treatedfuel andrunthe enginefor2-3minutesto
get stabilizedfuel intothe carburetor.
Ifemptyingthefuelsystem:
a.
Donot drainfuel whenthe engineishot.Allowthe engineadequate
time to cool.Drainfuel intoanapprovedcontaineroutdoors,awayfrom
openflame.
b.
Drainanylargevolumeof fuelfrom the tankbydisconnectingthe
fuel linefromthe in-linefuel filter nearthe engine.Seethe complete
instructionsforDrainingTheFuellaterin thissection.
Gasolineisextremely flammable and canbe explosiveundercertain
conditions. Draingasolinebeforestoring the equipment for extended
periods.Drainfuel only into an approvedcontaineroutdoors,awayfrom
an open flame. Allow engine to cool.Extinguishcigarettes, cigars,pipes,
and othersourcesof ignitionprior to draining fuel. Storegasolineinan
approvedcontainer in safe location.
c.
d.
Reconnect
the fuel lineandrunthe engineuntil it startsto falter,then
usethe choketo keepthe enginerunninguntilall fuel inthe carburetor
hasbeenexhausted.
Disconnect
the fuellineanddrainanyremaininggasolinefrom the
system.
Gasolineisa toxic substance.Dispose
of gasolineproperly.Contactyour
localauthorities for approveddisposalmethods.
3.
Preparin9Thelawn tractor
Removethesparkplugandpourone(1)ounceofengineoil throughthe spark
plug holeinto the cylinder.Crankthe engineseveraltimesto distributethe
oil. Replace
the sparkplug.
28
2.
Donot usea pressure
washeror gardenhoseto cleanyourunit.
3.
Storemowerinadry,cleanarea.Donotstorenextto corrosivematerials,
suchasfertilizer.
Enginefails to start
1.
2.
PTO/BladeEngageleverengaged.
Parkingbrakenotengaged.
1.
2.
Placeleverin disengaged(OFF) position.
Engageparkingbrake.
3.
4.
3.
4.
Connectwire(s) to sparkplug(s).
PlaceThrottle/Chokeleverintothe FASTposition.
5.
Sparkplugwire(s) disconnected.
Throttle/Chokecontrollevernot in correct
startingposition.
Chokenotactivated
5.
MovetheThrottle/Chokeleverintothe Choke
position.
6.
7.
Fueltank empty,or stale fuel.
Blockedfuel line.
6.
7.
Filltank with clean,fresh (less than 30 days old) gas.
Replacethe fuel line and replacefuel filter.
8.
9.
Faultysparkplug(s).
Engineflooded.
8.
9.
Clean,adjustgap or replaceplug(s).
Crankenginewith throttlein FASTposition.
10. BlownFuse(s)
10. ReplaceFuse(s)See "Fuse"in Serviceand
Maintenancesection.
1.
Unit runningwith CHOKEactivated.
1.
Deactivatethe CHOKE.
2.
3.
Sparkplugwire(s) loose.
Blockedfuel line or stalefuel.
2.
3.
Connectsparkplug wire(s).
Replacethe fuel line;fill tank with clean,fresh
gasolineand replacefuel filter.
4.
5.
Ventin gas cap plugged.
Wateror dirt in fuel system.
4.
5.
Clearvent or replacecap if damaged.
Drainfuel tank. Refillwith clean,fresh gasoline.
6.
Dirtyair cleaner.
6.
Replaceair cleanerpaper elementor cleanfoam
pre-cleaner,if equipped.
1.
2.
Engineoil levellow.
Air flow restricted.
1.
2.
Fillcrankcasewith properamountand weightof oil.
Enginehesitatesat high RPM
1.
Sparkpluggaptoo close.
1.
Removespark plug and resetthe gap.
Engineidles rough
1.
Sparkplugfouled,faultyor gap too wide.
1.
Replacespark plug.Set pluggap.
2.
Dirtyair cleaner.
2.
Replaceair cleanerelementand/orcleanprecleaner.
1.
Cuttingblade looseor unbalanced.
1.
Tighten bladeand spindle.
2.
Damagedor bent cuttingblade.
2.
Replaceblade.
1.
2.
Enginespeedtoo low.
Wetgrass.
1.
2.
Placethrottlein FAST(rabbit)position.
Do notmulchwhen grassis wet.
3.
Excessivelyhigh grass.
3.
4.
Dullblade.
4.
Mowonceat a highcuttingheight,then mowagain
at desiredheightor makea narrowercuttingswath.
Sharpenor replaceblade.
1.
2.
Decknot leveledproperly.
Dullblade.
1.
2.
Performside-to-sidedeck adjustment.
Sharpenor replaceblade.
3.
Uneventire pressure.
3.
Checktire pressurein all four tires.
Enginerunserratically
Engineoverheats
Excessivevibration
Mowerwill not mulchgrass
Unevencut
NEED MORE HELP?
Find this and a[[ your other product manuals online.
Get answers from our team of home experts.
Get a personalized maintenance
Find information
ptan for your home.
and tools to help with home projects.
29
Cleangrass clippingsand debrisfrom aroundthe
engine'scoolingfins and housing.
This page intentionally
left blank. Use this page to make any notes regarding
3O
your tractor.
31
32
FEDERAL
and/or
CALIFORNIA
EMISSIONCONTROL
WARRANTYSTATEMENT
YOURWARRANTYRIGHTSANDOBLIGATIONS
MTD Consumer Group Inc, the United States Environmental
Protection Agency (EPA), and for those products
California, the California Air Resources Board (CARB) are pleased to explain the emission (evaporative and/or
warranty
on your 2013 and later small off-road
spark-ignited
engine and equipment
(outdoor
equipment
engines
must be designed,
built and equipped
to meet the State's stringent
equipment
engines
must be designed,
built, and equipped
to meet the U.S. EPA small off-road
equipment
anti-smog
certified
exhaust)
engine).
standards
engine
diagnosis,
condition
exists, MTD Consumer
Group Inc will repair your outdoor
equipment
new outdoor
regulations).
of time listed below, provided
Your ECS may include parts such as the carburetor, fuel-injection
system, ignition system, catalytic converter,
valves, canisters, filters, vapor hoses, clamps, connectors,
and other associated emission-related
components.
Where a warrantable
In California,
(in other states, outdoor
spark ignition
Consumer Group Inc must warrant the ECSon your outdoor equipment
engine for the period
abuse, neglect, or improper maintenance
of the outdoor equipment
engine.
for sale in the state of
control system (ECS)
MTD
there has been no
fuel tanks, fuel lines, fuel caps,
engine at no cost to you including
parts, and labor.
MANUFACTURER'S
WARRANTYCOVERAGE:
This emission
control system is warranted
for two years. If any emission-related
part on your outdoor
part will be repaired or replaced by MTD Consumer Group Inc. In the event that a component
Manufacturer's
equipment warranty, the longer coverage period will apply.
equipment
is covered
engine
for longer
is defective,
the
than two years by the
/
OWNERSWARRANTY
RESPONSIBILITIES:
As the outdoor equipment
engine
Consumer Group Inc recommends
Group Inc cannot deny warranty
As the outdoor
your outdoor
equipment
equipment
owner, you are responsible
that you retain all receipts
for performance
of the required maintenance
listed in your owner's manual. MTD
covering maintenance
on your outdoor equipment
engine, but MTD Consumer
solely for the lack of receipts.
engine
owner, you should
however
be aware that MTD Consumer
engine or a part has failed due to abuse, neglect,
improper
Group Inc may deny you warranty
maintenance,
or unapproved
coverage
if
modifications.
You are responsible for presenting your outdoor equipment
engine to MTD Consumer Group Inc's distribution
center or service center as soon
as the problem exists. The warranty repairs should be completed
in a reasonable amount of time, not to exceed 30 days. If you have a question
regarding
http://su
your warranty
pport.mtd
coverage,
you should contact
the MTD Consumer
Group Inc Service Department
at 1-800-800-7310
or at
prod ucts.com.
GENERALEMISSIONS
WARRANTYCOVERAGE:
MTD Consumer
designed,
Group Inc warrants
built, and equipped
cause the failure of a warranted
The warranty
period
Subject to certain
1.
to the ultimate
so as to conform
part for a period
Any warranted
and exclusions
regulations;
equipment
Group Inc according
remainder
of the period.
for replacement
to subsection
as required
Any warranted
part that is scheduled
stated above. Any such part repaired
only for regular inspection
or replaced under warranty
3.
Any warranted
for replacement
part that is scheduled
replacement
as required
to an ultimate
maintenance
(4) below. Any such part repaired
2.
of time before the first scheduled
that the outdoor
on emission-related
stated above. If the part fails during the period of warranty
Consumer
period
purchaser
and (2) free from defects
engine is delivered
as stated below, the warranty
part that is not scheduled
period
and each subsequent
equipment
in materials
engine
is: (1)
and workmanship
purchaser
or first placed into service.
parts is as follows:
in the written
coverage,
instructions
supplied
the part will be repaired
or replaced
under warranty
is warranted
or replaced
will be warranted
for the
in the written instructions
supplied is warranted for the warranty
will be warranted for the remaining warranty period.
maintenance
in the written
instructions
supplied
date for that part. If the part fails before the first scheduled
Repair or replacement
to the owner.
5.
Notwithstanding
of any warranted
the provisions
service the subject engines
6.
The outdoor
equipment
emission-related
7.
MTD Consumer
warranty
8.
Throughout
warranted
9.
herein, warranty
part, provided
the off-road
herein must be performed
services or repairs will be provided
for diagnostic
that such diagnostic
Group Inc is liable for damages
parts sufficient
provisions
is warranted
replacement,
at a warranty
at all of our distribution
period
station
for the
the part
under
at no charge
centers that are franchised
or equipment.
engine owner will not be charged
warranted
of any warranted
Any replacement
part under the warranty
for
by MTD
will be repaired or replaced by MTD Consumer Group Inc according to subsection (4) below. Any such part repaired or replaced
warranty will be warranted for the remainder of the period prior to the first scheduled replacement
point for the part.
4.
that
of two years.
begins on the date the outdoor
conditions
the warranty
purchaser
with all applicable
to other engine
labor that is directly
work is performed
or equipment
associated
at a warranty
components
with diagnosis
of a defective,
station.
proximately
caused by a failure under
part.
engine
and equipment
warranty
to meet the expected
demand
part may be used in the performance
the owner. Such use will not reduce the warranty
period
stated above, MTD Consumer
Group Inc will maintain
a supply of
for such parts.
of any warranty
obligations
maintenance
of MTD Consumer
or repairs and must be provided
Group Inc.
without
charge to
to
10. Add-on
ormodified
partsthatarenotexempted
bytheAirResources
Board
maynotbeused.
Theuseofanynon-exempted
add-on
or
modified
partsbytheultimate
purchaser
willbegrounds
fordisallowing
awarranty
claims.
MTDConsumer
Group
Incwillnotbeliable
to
warrant
failures
ofwarranted
partscaused
bytheuseofanon-exempted
add-on
ormodified
part.
WARRANTED
PARTS:
The repair or replacement
of any warranted
part otherwise eligible for warranty coverage may be excluded from such warranty coverage if
MTD Consumer Group Inc demonstrates
that the outdoor equipment
engine has been abused, neglected, or improperly
maintained, and that
such abuse, neglect,
any adjustment
coverage.
Further, the coverage
The following
1.
or improper
of a component
emission
Fuel Metering
warranty
maintenance
was the direct cause of the need for repair or replacement
that has a factory
under this warranty
parts are covered
installed,
extends
and properly
operating,
adjustment
limiting
of the part. That notwithstanding,
device is still eligible
only to parts that were present on the off-road
for warranty
engine and equipment
purchased.
(if applicable):
System
Cold start enrichment
Carburetor
system (soft choke)
and internal
parts (or fuel injection
system)
Fuel pump
Fuel tank
2.
Air Induction
System
Air cleaner
Intake manifold
3.
Ignition
System
Spark plug(s)
Magneto
4.
ignition
system
Exhaust System
Catalytic
converter
SAI (Reed valve)
5.
Miscellaneous
Items Used in Above System
Vacuum, temperature,
Connectors
6.
Evaporative
position,
time sensitive valves and switches
and assemblies
Control
Fuel hose
Fuel hose clamps
Tethered
Carbon
fuel cap
canister
Vapor lines
050790 Rev.A
Congratulations
on making a smart purchase.
Your new Craftsman®
product is designed and
manufactured
for years of dependable operation. But like all products, it may require repair
from time to time. That's when having a Repair Protection Agreement can save you money and
aggravation.
Here's
[]
[]
[]
[]
[]
what
the
Repair
Protection
Agreement*
includes:
Expert service by our 10,000 professional repair specialists
Unlimited
service and no charge for parts and labor on all covered repairs
Product replacement
up to $1500 if your covered product can't be fixed
Discount
of 25% from regular price of service and related installed parts not covered by the
agreement; also, 25% off regular price of preventive maintenance check
Fast help by phone - we call it Rapid Resolution - phone support from a Sears representative.
Think of us as a "talking owner's manual."
Once you purchase the Repair Protection
to schedule service. You can call anytime
Agreement, a simple phone call is all that it takes for you
day or night, or schedule a service appointment
online.
The Repair Protection Agreement is a risk-free purchase. If you cancel for any reason during the
product warranty period, we will provide a full refund. Or, a prorated refund anytime after the
product warranty period expires. Purchase your Repair Protection Agreement today!
Some limitations
and exclusions
call 1=800=827=6655.
*Coverage
6665.
in Canada
Sears Installation
apply.
varies on some
For prices and additional
items. For full details
information
call Sears Canada
in the U.S.A.
at 1=800=361=
Service
For Sears professional
installation
of home appliances, garage door openers,
other major home items, in the U.S.A. or Canada call 1=800=4=MY=HOME®.
35
water heaters,
and
Operaci6n segura Pr,_cticas ..........
Asamblea ...........................
Operacion de ......................
De Servicio y Mantenimiento de .......
Paginas
Page
Paginas
Paginas
CRAFTSMAN
35
41
43
47
Fuera de temporada de almacenamiento
.. Page 55
Soluci6n de problemas ................
Page 56
Reparaci6n de Acuerdo de Protecci6n .... Page 59
Servicio de nOmeros ............
atrasados Page
GARANTiA
COMPLETA
DURANTEdosa_osdesdela fechadecornpra,todaslaspartesde nofungiblesdeesteequipode equitaci6nestangarantizadas
contracualquier
defectode materialo rnanode obra.Unaparteno fungiblesdefectuosarecibir_a dornicilioreparaci6no la sustituci6nsila reparaci6nnoest_disponible.
GARANTiA LIMITADADE LA BATERiA
POR90 diasdesde la fecha de cornpra,la bateria(una piezaconsurnible)de este equipode conducci6nesta garantizadacontra cualquier
defectode materialo rnanode obra. Unabaterianuevase surninistrarAgratuitarnente.Ustedes responsablepor el costode rnanode obra de
instalaci6nde la bateria.
GARANTiALIMITADAADIClONAL
En las siguientesgaranfiasadicionales,ustedes responsablepor el costode rnanode obrade instalaci6nde la partedespu_sdel segundoa_o
desdela fecha de cornpra.
DURANTEcinco a_osdesdela fecha de cornpra,el marcode este equipode conducci6nest_ garantizadocontra cualquierdefectode material
o rnanode obra.Se surninistrar_un nuevomarcode forrnagratuita.
DURANTEdieza_osdesde la fecha de cornpra,el eje delanterode este equipode conducci6nest_ garantizadocontracualquierdefectode
materialo rnanode obra. Se surninistrar_un nuevoeje delanterogratuitarnente.
PARArnientrases utilizadopor el propietariooriginaldespuesdel d_cirnoa_o de la fecha de cornpra,el eje hierrofundidofrontal (si esta
equipado)de este equipo de conducci6nest_ garantizadocontracualquierdefectode materialo rnanode obra.Concornprobantede cornpra,
se surninistrar_un nuevoeje delanterode fundici6nde hierrode forrnagratuita.
SERVIClODEGARANTiA
Paradetallesde la coberturade garanfiaobtenerla reparaci6no reernplazo,Ilarneal 1-800-659-5917o visite el sitio web: www.craftsrnan.corn
Entodosloscasos,sisepartede la reparaci6n
o reernplazo
esirnposible,
el equipode equitaci6nsereernplazar_
gratuitarnente
conelmisrnoo equivalente.
Todoslosde la anteriorgarantiaesnulasiseutilizaesteequipode conducci6n
rnientrasqueproporciona
servicioscornerciales
o Sialquilaa otrapersona.
Estagaranfiacubresolarnentedefectosen materialy rnanode obra. Coberturade la garanfiano incluye:
•
Piezasfungibles(exceptola bateria)que puedengastarsepor el uso normaldentrodel periodode garanfia,incluyendoperono lirnitadoa
cuchillas,bujias, filtrosde aire,correasy filtros de aceite.
•
Serviciode rnantenirnientoestandar,carnbiosde aceiteo puestasa punto.
•
Neurn_ticode repuestoo reparaci6ncausadaspor pinchazosde objetosexternos,tales cornoclavos,espinas,toconeso vidrio.
•
NeurnAticoo ruedade repuestoo reparaci6nresultantesdel desgastenormal,accidente,o funcionarnientoincorrectoo rnantenirniento.
•
Reparacionesnecesariasdebidoa abusodel operador,incluyendopero no lirnitadoa da_oscausadosporobjetosrn_sall_ de la capacidad
de losequiposde conducci6nde rernolque,afectarobjetosque doblanel marco,el eje o el cig(Je_alo over-speedingel motor.
•
Reparacionesnecesariasdebidoa la negligenciadel operador,incluyendopero no lirnitadoa, da_osel_ctricosy rnecanicoscausados
pot alrnacenarnientoinadecuado,no usarel grado adecuadoy la cantidadde aceitede motor,no rnantenerla cubiertalibre de residuos
inflarnables,o falta de rnantenirnientodel equipode equitaci6nsegQnlas instruccionescontenidasen el manualdel operador.
•
Motor(sisternade combustible)lirnpiezao reparacionesocasionadospot el combustibledeterrninadoestarcontarninadosu oxidan
(obsoletos).En general,el combustibledebe utilizarsedentrode 30 diasde la fechade cornpra.
•
El deterioronormaly el desgastede los acabadosexteriores,o reernplazode la etiquetadel producto.
Estagaranfiale otorgaderechoslegalesespecificos,y ustedtarnbi_npuedetenet otrosderechosque variande estadoa estado.
Sears Brands Management Cm _oration, Hoffman Estates, IL 60179
N_rnero de rnodelo ..........................................................
N_mero de serie ..............................................................
Aceitedel motor: SAE 30
Fechade compra .............................................................
Combustible:
© Sears Brands,LLC
Gasolinasinplorno
Registre
arribaeln_mero
delmodelo,
eln_mero
deserieylafechadecompra
36
Esta rn_.quina
rue construidapara seroperadade acuerdocon
las reglasde seguridadcontenidasen este manual.AI igualque
concualquiertipo de equipo rnotorizado,un descuidoo error por
partedel operadorpuedeproducirlesionesgraves.Esta rn_.quina
es capazde arnputarrnanosy piesy de arrojarobjetoscon gran
fuerza.Deno respetarlas instruccionesde seguridadsiguientesse
puedenproducirlesionesgraveso la rnuerte.
La presenciade este sirnboloindicaque setrata de instrucciones
irnportantesde seguridadque se deben respetarpara evitar
poner en peligrosu seguridadpersonaly/o materialy la de otras
personas.Lea y siga todaslas instruccionesde este manualantes
de poneren funcionarnientoesta rn_.quina.Si no respetaestas
instruccionespodria provocarlesionespersonales.Cuandoveaeste
sirnbolo,i presteatenci6na la advertencia!
PROPOSICION
Su responsabilidad--Restrinja
el usode esta rn_.quina
rnotorizadaalas personasque lean,cornprendany respetenlas
advertenciase instruccionesque aparecenen este manualyen la
rn_.quina.
65 DE CALIFORNIA
El escapedel motorde este producto,algunosde suscornponentes
y algunoscornponentesdel vehiculocontieneno liberan sustancias
quirnicasque el estado de Californiaconsideraque puedenproducir
c_.ncer,defectosde nacirnientou otros problernasreproductivos.
Losbornesde la bateriay los accesoriosalinescontienenplornoy
cornpuestosde plorno,sustanciasquirnicasque segOnIo establecido pot el Estadode Californiacausanc_.ncery da_osen el sisterna
reproductivo.Ldveselas manos despu_sde estar en contacto
con estoscomponentes.
FUNCIONAMIENTO
•
•
•
•
•
•
•
•
iGUARDE
ESTAS
INSTRUCCIONES!
GENERAL
•
Lea,entienday curnplatodas las instruccionesincluidasen
la rn_.quina
yen los rnanualesantes de rnontarlay utilizarla.
Guardeeste manualen un lugarseguroparaconsultasfuturasy
peri6dicas,asi cornopara solicitarrepuestos.
Farniliaricesecontodos los controlesy con el usoadecuado
de los rnisrnos.Sepa c6rnodetenerla rn_.quinay desactivarlos
controlesr_.pidarnente.
No perrnitanuncaque los ni_osrnenoresde 14a_osutilicen
esta rn_.quina.Los ni_osde 14a_osen adelantedeben leer y
entenderlas instruccionesde operaci6ny norrnasde seguridad
contenidasen este manual,y en la rn_.quina
y debenser
entrenadosy supervisadospor un adulto.
Nuncaperrnitaque los adultosoperenesta rn_.quinasin recibir
antesla instrucci6napropiada.
Paraayudara evitar el contactocon las cuchillaso una lesi6npor
algOnobjetoque sea arrojado,rnantengaa los observadores,a
los ayudantes,ni_osy rnascotasalejadosal rnenos25 metrosde
la rn_.quinarnientrasest,. en funcionarniento.Detengala rn_.quina
si alguienentraen la zona.
Inspeccionerninuciosarnente
el Areadonde utilizar_,el equipo.
Retiretodas las piedras,palos,cables,huesos,juguetesy otros
objetosextra_osque podrianser recogidosy arrojadospor la
acci6nde las cuchillas.Losobjetosarrojadospor la rn_.quina
puedenproducirlesionesgraves.
Planifiqueel patr6nde corte del c_spedque ha de seguirpara
evitarla descargade materialhacialoscarninos,las veredas,los
observadores,etc.Eviteadern_.sdescargarmaterialcontralas
paredesy obstruccionesque podrianprovocarque el material
descargadorebotecontrael operador.
Para protegerselos ojos utilicesiernpreanteojoso antiparras
de seguridadrnientrasopera la rn_.quinao rnientrasla ajusta
o repara.Losobjetosarrojadosque rebotanpuedenproducir
lesionesocularesgraves.
37
•
•
•
•
•
•
•
•
•
•
•
Utilicezapatosde trabajoresistentes,de suelafuerte,asi corno
pantalonesy carnisasajustados.Las prendassueltaso las
alhajaspuedenquedaratrapadasen las piezasrnovibles.Nunca
opere la rn_.quina
descalzoo con sandalias.
Est_atentoa la cortadoray a la direcci6nde la descargade
losaditarnentosy no apuntea nadie.Nuncaopere la cortadora
de c_spedsin que est_nen su lugarapropiadola cubiertade
descargao el colectorde recortesde cesped.
Noponga lasrnanoso lospies cercade las piezasrotatoriaso
debajode la plataforrnade corte. El contactocon las cuchillas
puedeproducirla arnputaci6nde rnanosy pies.
Unacubiertade descargafaltanteo da_adapuedeprovocarel
contactocon la cuchillao lesionespot objetosarrojados.
Detengala(s)cuchilla(s)cuandoatraviesesenderos,sendaso
carninosde gravay cuandono est_cortandoel cesped.
Vigileel tr_.nsitovehicularcuandoest_operandocercade o en
crucesde carninos.Estarn_.quina
nodebe utilizarseen la via
pOblica.
Noopereestarn_.quina
bajo losefectosdel alcoholo de drogas.
Corteel cespedsolarnentecon luzde dia o conuna buenaluz
artificial.
Nuncatransportepasajeros.
Desenganche
la(s)cuchilla(s)antesde colocarla rnarchaatr_.s.
Retrocedalentarnente.
Siernpremirehaciaabajoy haciaatr_.santes
y rnientrasretrocede,paraevitaraccidentes.
Reduzcala velocidadantesde dar la vuelta.Operela rn_.quina
suavernente.Evitela operaci6nerr_.ticay la velocidadexcesiva.
Desenganchela(s)cuchilla(s),coloqueel frenode estacionarniento,detengael motory esperehastaque la(s)cuchilla(s)se
detenga(n)por cornpletoantesde retirarel colectorde c_sped,
vaciarlos recortes,destaparel canal,retirarrestosde cespedo
desechos,o hacercualquierajuste.
•
•
•
•
•
•
•
•
Nuncadeje la rn_.quina
en funcionarniento
sinvigilancia.Apague
siernprelascuchillas,coloqueel frenode rnano,detengael motory
retirela Ilaveantesde bajarsedel vehiculo.
Tengasurnocuidadoal cargaro descargarla rn_.quina
en un
rernolqueo carni6n.Estaunidadno debeconducirseen ascensoo
descensode rarnpas,porquepodrialadearsey provocarlesiones
personalesgraves.En las rarnpasla rn_.quina
sedebe ernpujar
rnanualrnente
paracargarlao descargarlacorrectarnente.
El silenciadory el motorse calientany puedencausarquernaduras.
Nolos toque.
Reviseel espaciolibrepot encirnade la cabezaantesde conducir
bajolas rarnasbajasde _.rboles,cables,cerrarnientosde puertas,
etc.en loscualesel operadorpodriaatorarseo serernpujadofuera
de la rn_.quina,
Ioque podriaresultaren lesionesgraves.
Desenganchetodoslosernbraguesde los accesoriosy presione
totalrnenteel pedaldel frenoantesde intentararrancarel motor.
La rn_.quina
est,.diseSadaparacortarc_spedresidencialnormal,
conuna alturano mayora 10".Nointentecortarcespeddernasiado
crecido,seco (porej., pastura)ni pilasde hojassecas.El c_sped
y las hojassecaspuedenentraren contactoconel escapedel
motory/o acurnularseen la plataforrnade la cortadorade cesped,
convirti_ndoseen un peligrode incendio
Utilicesolarnenteaccesoriosy aditarnentosaprobadosparaesta
rn_.quina
pot el fabricantede la rnisrna.Lea,cornprenday siga
todaslasinstruccionesproporcionadasconlosaccesorioso
aditarnentosaprobados.Paraobteneruna listade losaccesorios
aprobadosy losarchivosadjuntos,Ilarne1-800-659-5917.
Losdatosestadsticosrnuestranque losoperadoresde 60 aSos
y rnayoresseven involucradosen un altoporcentajede lesiones
relacionadascontractorescorta cesped.Estosoperadoresdeben
evaluarsu capacidadparaoperarel tractorcortac_speden forrna
suficienternente
segurapara protegersea ellosrnisrnosy a los
dern_.scontralesionesgraves.
Si se presentansituacionesque no est_.nprevistasen este
manualsea cuidadosoy use el sentidocornOn.
FUNCIONAiVIIENTO
EN PENDIENTES
Las pendientesson un factorirnportanterelacionadoconaccidentes
por derrapey vuelcosque puedenproducirlesionesgravese incluso
la rnuerte.La operaci6nen pendientesrequieremayorprecauci6n.
Si no puede retrocederen la pendienteo si no se sienteseguro,no
realiceningunaoperaci6nde corte.
Parasu seguridad,use el indicadorde pendientesque se incluye
cornopartede este manualpara rnedirla pendienteantes de operarla
rn_.quinaen una zonainclinada.Si la pendientees mayorde 15 grados
segOnel rnedidor,no opereesta rn_.quinaen ese sector,puespodria
causarlesionesgraves.
Haga Io siguiente:
•
Podehaciaarribay abajode las pendientes,no de forrnatransversal.Tengacuidadocuandocarnbiede direcci6nal operaren
pendiente.
•
Est_atentoa loshoyos,surcos,baches,rocas,u otrosobjetos
ocultos.El terrenodesniveladopuedevoltearla rn_.quina.
El cesped
altopuedeocultarobst_.culos.
38
•
Vayaa bajavelocidad.ElijaunavelocidadIosuficienternente
baja,
de rnodoque no tengaque detenerseo hacercarnbiosrnientras
est,. sobrela pendiente.Losneurn_.ticos
podrianperdertracci6n
sobrelaspendientesaQncuandolosfrenosfuncionaranapropiadarnente.Siernprernantengala rn_.quina
en carnbiornientras
desciendelaspendientes,parapoderfrenarconel motor.
•
Siga las recornendaciones
del fabricanteparalos pesoso contrapesosde las ruedas,pararnejorarla estabilidadde la rn_.quina.
•
Tengaespecialcuidadocon loscolectoresde cespedu otros
aditarnentos.Losrnisrnospuedenrnodificarla estabilidadde la
rn_.quina.
•
Hagaquetodoslos rnovirnientos
en laspendientesseanlentosy
graduales.Nocarnbierepentinarnente
la velocidadni la direcci6n.
Unfrenadoo carnbiode velocidadrepentinospuedencausarque
el frentede la rn_.quina
se levantey d_ unavolteretahaciaatr_.s,Io
que podriaproducirlesionesgraves.
•
Evitearrancaro detenerseen una pendiente.Si losneurn_.ticos
pierdenla tracci6n,desenganchelascuchillasy descienda
lentarnentela pendiente.
No haga Io siguiente:
•
Nogire sobrelas pendientesa rnenosqueseanecesario.Sies
posible,gire lentarnente
y gradualrnente
duranteel descenso.
•
Nocorteel c_spedcercade pozos,hundirnientos
o terraplenes.La
cortadorade c_spedpuedevolcarserepentinarnente
siunade las
ruedasestersobreel hordede unacantilado,zanjao siun hordese
desrnorona.
•
Nointenteestabilizarla rn_.quina
poniendoel pie enel suelo.
•
Noutiliceuncolectorde c_speden pendientesernpinadas.
•
Nopodeel cespedhOrnedo.
Unarnenortracci6npodriacausar
derrapes.
•
Noparadescender.El excesode velocidadpuedehacerqueel
operadorpierdael controlde la rn_.quina,
ocasionandolesiones
gravese inclusola rnuerte.
•
Norernolquecargaspesadasdetr_.sde losaditarnentos
(carritode
basuracargado,podadorade rodillos,etc)en pendientesrnayores
de 5 grados.Cuandosedesplazapendienteabajo,el pesoadicional
tiendea ernpujarel tractory puedehacerquese pierdael control
del rnisrno(porejernplo,el tractorsepuedeacelerar,se reducela
capacidadparafrenary rnaniobrar,
losaccesoriospuedenplegarse
cornoun cortaplurnas
y hacerqueel tractorvuelque).
NINOS
Puedenocurriraccidentestr_.gicossi el operadorno est,. atentoa la
presenciade niSos.PotIo general,los niSosse sientenatraidospor
este tipo de rn_.quinas
y su funcionarniento.Noentiendenlos riesgos
ni los peligros.Nuncaasurnaque los niSosperrnanecer_.n
en el rnisrno
lugar donde losvio pot Qltirnavez.
•
Mantengaa losniSosfueradel_.reade trabajoy bajoestricta
vigilanciade unadultoresponsableadern_.s
del propiooperador.
Est_alertay apaguela rn_.quina
siun niSoingresaal _.rea.
•
Antesy rnientrasest,. retrocediendo,
mirehaciaatr_.sy cuidequeno
hayaniSos.
NuncatransporteniSos,aQnconla cuchillaapagada.Podriancaerse
y resultarseverarnente
heridoso interferirconla operaci6nsegurade
la m_.quina.
•
Tengaextrernaprecauci6ncuandoseaproxirnea esquinasciegas,
portales,arbustos,_.rbolesu otrosobjetosquepuedanirnpedirlever
a un niSoquesecruceenel recorridode la rn_.quina.
•
Paraevitaraccidentesal operaren rnarchaatr_.s,siernpredesenganchelascuchillasantesde colocarrnarchaatr_.s.Siest,. instalado,
el "ModoPrecaucidnMarchaAtr_.s"(hojasde operarla rn_.quina,
rnientrasquelospaseosa la inversa)no debeutilizarsecuandohay
ni_osu otraspersonaspresentes.
•
Mantengaa losni_osalejadosde losrnotoresen rnarchao calientes.
Puedensufrirquernaduras
conun silenciadorcaliente.
•
Retirela Ilavecuandodeje la rn_.quina
sinvigilancia,evitequeuna
personasinautorizaci6nla rnaneje.
No perrnitanuncaque los ni_osrnenoresde 14a_osutilicenesta
rn_.quina.Losni_osde 14a_osen adelantedeben leer y entenderlas
instruccionesde operaci6ny norrnasde seguridadcontenidasen este
manual,yen la rn_.quinay deben serentrenadosy supervisadospor
un adulto.
REIVIOLQUE
•
•
Rernolque_nicarnenteconunarn_.quina
quecuenteconun
enganchediseSadopararernolcar.Noacopleequiporernolcado
exceptoen el puntode enganche.
Sigalasrecornendaciones
del fabricanteen Ioque respectaa los
lirnitesde pesode losequiposa rernolcary al rernolqueen pendien-
•
Apaguetodos loscigarrillos,cigarros,pipasy otrasfuentesde
cornbustidn.
•
Nuncacarguecombustibleen la rn_.quinaen un espaciocerrado.
•
Nuncasaquela tapadel combustibleni agreguecombustible
rnientrasel motorest,. calienteo en rnarcha.Dejequeel motor
seenfrie por Iornenosdos rninutosantesde volvera cargar
combustible.
•
NuncaIleneen excesoel dep6sitode combustible.Lleneel
tanqueno rn_.sde 1/2pulgadapor debajode la basedel cuello
del tap6nde carga, paradejar espaciopara la expansi6ndel
combustible.
•
•
Vuelvaa colocar la tapa de la gasolinay ajQstelabien.
Lirnpieel combustibleque se hayaderrarnadosobreel motory el
equipo.Trasladela rn_.quinaa otrazona. Espere5 rninutosantes
de encenderel motor.
•
Parareducirel riesgode incendio,rnantengala rn_.quinalirnpia
de pasto,hojasy de acurnulacidnde otros residuos.Lirnpielos
derrarnesde aceiteo combustibley saquetodos los residuos
ernbebidosde combustible.
•
Nuncaguarde la rn_.quinao el recipientede combustibleen un
espaciocerradodondehayafuego,chispaso luz piloto,corno
porejernplode calentadoresde agua,calefactoresde arnbientes,
hornos,secadoresde ropau otrosaparatosa gas.
Dejeque la rn_.quinase enfriecinco rninutospor Iornenosantes
de guardarla.
tes.
•
•
•
•
•
Nuncaperrnitala presenciade niSosu otraspersonasdentroo sobre
losequiposrernolcados.
En laspendientes,
el pesodel equiporernolcadopuedecausar
p_rdidade traccidny perdidade controlde la rn_.quina.
Siernpreuseextrala precauci6nrernolcando
conunarn_.quina
capazde hacervueltasapretadas(p.ejpaseo"devueltacero"- en el
cortacesped).Hagaarnpliasvueltasparaevitaral gato-knifing.
Despl_.cese
lentarnentey dejedistanciaadicionalparafrenado.
Noparadescender.
SERVIClO
Manejo seguro de la gasolina
Paraevitar lesionespersonaleso daSosrnaterialessea surnarnente
cuidadosoal rnanipularla gasolina.La gasolinaes surnarnente
infiarnabley sus vaporespuedencausarexplosiones.Se puede
lesionargravernentesi derrarnagasolinasobreustedo sobrela ropa,
ya que _sta se puedeincendiar. L_.vesela piely c_.rnbiesede ropade
inrnediato.
•
Utilices61olos recipientesparagasolinaautorizados.
•
NuncaIlenelos recipientesen el interiorde un vehiculoo carnidn
o cajade rernolquecon recubrirnientopl_.stico.Coloquesiernpre
los recipientesen el piso y lejosdel vehiculoantes de realizarla
carga.
Cuandoseafactible, retireel equipoa gasolinadel carni6no
rernolquey II_neloen el suelo. Si esto no es posible,Ileneel
equipoen un rernolqueconun contenedorport_.til,en vez de
hacerlocon una boquilladispensadorade gasolina.
Mantengala boquillade Ilenadoen contactoconel horde del
dep6sitode combustibleo con la aberturadel recipienteen todo
rnornento,hastaterrninarla carga. No utiliceun dispositivode
boquillade apertura/cierre.
•
•
39
•
Servicio general
•
Nuncaenciendael motoren espacioscerradoso en una zona
con pocaventilacidn.El escapedel motorcontienernondxidode
carbono,un gas inodoroy letal.
•
Antes de lirnpiar,repararo inspeccionarla rn_.quina,cornpruebe
que la(s)cuchilla(s)y todas las partesen rnovirnientose hayan
detenido.Desconecteel cablede la bujfay p6ngalohaciendo
rnasacontrael motorpara evitarque se enciendaaccidentalrnente.
•
Reviseperi6dicarnenteparaasegurarseque las cuchillasse
detenganpor cornpletoen aproxirnadarnentecinco(5) segundos
despu_sde accionarel controlde desenganchede la(s)
cuchilla(s).Si las cuchillasno se detienendentrode este lapso
de tiernpo,su unidaddeber_,ser reparadapor su distribuidorde
servicioautorizadoMTD.
Reviseconfrecuenciael funcionarnientodel sisternade frenos
ya que est,. sujetoa desgastepor la operaci6nnormal.Ajuste y
efectQernantenirnientosegQnse requiera.
•
•
•
•
NO MODIFIQUE
Reviselos pernosde montajede la(s) cuchilla(s)y del motora
intervalosfrecuentespara verificarque est6n bien apretados.
Adem_.s,inspeccionevisualmentela(s) cuchilla(s)en buscade
daSos(por ejemplo,desgasteexcesivo,abolladuras,rajaduras,
etc.). Reemplacela(s) cuchilla(s)Qnicamentecon lascuchillas
de fabricantesde equiposoriginales(O.E.M.)listadasen este
manual.El usode piezasque no cumplencon las especificacionesdel equipooriginal podriatenercomo resultadoun
rendimientoincorrectoy adem_.sponeren riesgola seguridad.
Lascuchillasde las podadorassonmuy afiladas.Envuelvala
cuchillao utiliceguantesy extremelasprecaucionescuando
efectQemantenimiento.
Paraevitarlesionesgraveso la muerte,no modifiqueel motorbajo
ningunacircunstancia.Si cambiala configuraci6ndel reguladordel
motorel motor puededescontrolarsey operara velocidadesinseguras. Nuncacambie la configuraci6nde f_.bricadel reguladordel motor.
AVlSO
Mantengatodoslos pernos,tuercasy tornillosbienajustados
paraasegurarsede que la m_.quinase encuentraen condiciones
segurasde operaci6n.
Nuncaaltereel sistemade enclavamientode seguridadni
otros mecanismosde seguridad.Controleperiddicamenteque
funcionencorrectamente.
Despu6sde golpearcon algQnobjetoextraSo,detengael motor,
desconecteel cablede la bujfay conecteel motora masa.
Inspeccioneminuciosamentela m_.quinaparaver si est,. daSada.
Repareel daSoantes de arrancary ufilizarla m_.quina.
Nuncatrate de hacerajusteso reparacionesa la m&quina
mientrasel motorest&en marcha.
•
•
•
Loscomponentesdel colectorde c6spedy la cubiertade
descarga,estansujetosa desgastey daSosque podriandejar
expuestaspartesen movimientoo permitirque searrojenobjetos.
Paraprotegersuseguridad,verifiquefrecuentementetodos los
componentesy reempl_.celos
inmediatamentes61ocon piezasde
los fabricantesdel equipooriginal,listadosen este manual.El uso
de piezasque no cumplencon las especificacionesdel equipo
originalpodriatenercomo resultadoun rendimientoincorrectoy
adem_.sponeren riesgola seguridad.
Nocambie la configuraci6ndel reguladordel motorni Ioopere
a sobrevelocidad.El reguladordel motorcontrolala velocidad
m_.ximasegurade funcionamientodel motor.
Mantengao reemplacelasefiquetasde seguridade instrucciones
segQnseanecesario.
Respetelas normasreferentesa la disposicidncorrectay las
reglamentacionessobregasolina,aceite,etc. para protegerel
medicambiente.
•
EL MOTOR
SegQnla Comisi6nde Seguridadde Productospara el Consumidor de los EstadosUnidos(CPSC)y la Agenciade Protecci6n
Ambientalde los EstadosUnidos(EPA),este productotieneuna
vida Qtilmediade siete(7) aSos,6 270 horasde funcionamiento.
AIfinalizarla vidaQtilmedia,adquierauna m_.quinanuevao haga
inspeccionaranualmente6sta Searspor uno u otrodistribuidorde
serviciosparacerciorarsede que todos los sistemasmec_.nicos
y de seguridadfuncionancorrectamentey no tienenexcesivo
desgaste.Si no Io hace,puedenproducirseaccidentes,lesiones
o muerte.
40
REFERIDO
A EMISlONES
Losmotoresque estAncertificadosy cumplencon las regulaciones
de emisionesfederalesEPAy de CaliforniaparaSORE(Equipos
pequeSostodoterreno)estAncertificadosparaoperar congasolina
comQnsin plomoy puedenincluirlos siguientessistemasde control
de emisiones:Modificacidnde motor(EM) y catalizadorde tres vias
(TWC) siest_.nequipadosde esa manera.
GUARDACHISPAS
EstamAquinaest,. equipadacon un motorde combusti6ninternay
no debeser ufilizadaen o cercade un terrenoagrestecubierto por
bosque,malezaso hierbaexceptosi el sistemade escapedel motor
est&equipadocon un amortiguadorde chispasque cumplaconlas
leyes localeso estatalescorrespondientes,en caso de haberlas.
Si se utiliza un amortiguadorde chispasel operadorIo debe mantener
en condicionesde usoadecuadas.Enel Estadode California las
medidasanteriormentemencionadassonexigidaspor Icy (Arficulo
4442 del C6digode RecursosPOblicosde California).Esposible
que existanleyessimilaresen otros estados.Lasleyesfederalesse
aplicanen territoriosfederales.
Puedeconseguirel amortiguadorde chispasparael silenciadora
travesde su distribuidorautorizadode motoreso poni6ndoseen
contactoconel centrode servicioSears.
SJlVlBOLOS DE SEGURIDAD
Esta p&ginarepresentay describela seguridadlos simbolosque puedenpareceren este producto.Lea,comprenda,y sigatodas instrucciones
en la m_quinaantesprocurarpara reuniry operar.
LEA EL MANUAL(S) DEL OPERADOR
leido, entienda,
PELIGRO--
y siga todas las instrucciones
en el manual(s) antes de procurar montar
y funcionar
DE EL CORTE DE PIE
Nunca transporte
pasajeros.
Nunca transporte
ni_os, aun con la cuchilla
apagada.
0
PELIGRO--
DE EL CORTE DE PIE
Retroceda lentamente.
accidentes.
PELIGRO--
Siempre mire hacia abajo y hacia atr_is antes y mientras retrocede,
para evitar
DE EL CORTE DE PIE
Guarde manos y pies lejos de hacer girar partes.
PELIGRO--
ESCOMBROS LANZADOS
Quite objetos
que pueden
ser lanzados pot la I_imina en cualquier
direcci6n.
Lleve gafas de
direcci6n.
Lleve gafas de
seguridad..
PELIGRO--
ESCOMBROS LANZADOS
Quite objetos
que pueden
ser lanzados pot la I_imina en cualquier
seguridad.
ERSONAS PRESENTES
Guarde a las personas presentes, a los ayudantes
y a ni_os pot Io menos 75 pies lejos.
PELIGRO-- CUESTAS
Use extra la precauci6n
AL
ADVERTENCIA
--
en cuestas. No siegue cuestas mayores
SUPERFICIE
que 15°.
CALIENTE
Las partes del motor, especialmente
el silenciador, Ilega a set muy caliente durante
Permita motor y silenciador para ponerse frio antes de tocar.
la operaci6n.
PELIGRO-- GIRANDO HOJAS
Para reducir el riesgo de herida, guarde manos y pies lejos. No funcione
de descarga o el receptor
inmediatamente.
de hierba est_n en su lugar apropiado.
41
a menos que la tapa
De ser dahado, sustituya
X
I5 ° Pendiente
(DEMASIADO ESCARPADO)
(ACEPTAR)
•
15° Pendiente
Figura1
Figura 2
4_
"'"
USO DE ESTE PENDiENTE DE CALIBRE PARA DETERrvIINAR
SlUNA PENDIENTEES DEIVlASIADO
ESCARPADO PARA UNA OPEBACION SEGURA!
Para comprobar la pendiente, haga Io siguiente:
1. Borrar esta p_gina y doble a Io largo de la linea discontinua.
2. Localizar un objeto vertical sobre o detr_.sde la pendiente (un poste, un edificio, una valla, un _.rbol,etc.)
3. Alinee cada lado de pendiente de calibre con el objeto vertical (consultar Figura 1 and Figura 2 ).
4. Ajuste el pendiente de calibre arriba o hacia abajo hasta los toques esquina izquierda el pendiente
(consultar Figura 1 and Figura 2).
5,
Si hay un espacio por debajo de la pendiente de calibre, el pendiente es demasiado escarpa por operaci6n
segura (consultar Figura 2 above).
Las pendientes son un factor importante relacionado con un vuelco y renovaci6n de los accidentes que pueden provocar lesiones graves o la muerte.
No utilice la ma.quinaen pendientes de ma.sde 15 grados. Todos pendientes requiere mayor precauci6n. Si no puede retroceder en la pendiente o si se
siente inseguro en ella, no la recorte. Siemprecorte el cesped arriba y abajo las pendientes, nunca en toda la superficie de la cuesta.
EnvioBraceeliminad6n
IMPORTANTE:
Sutractorseentregaconaceitede motorenel motor.Sinembargo,
debecomprobarel niveldeaceiteantesdeoperar.Consultelasecci6ndeServicio
y Mantenimientoparaobtenerinstrucciones
sobrelacomprobaci6n
delnivelde
aceite.
Aseguresede clueel motor del tractor cortacdspedes,retire laflare de
encendido,y porterel freno antesde quitarlaflare deenvio.Consultela
secci6nde Operad6npara obtener instrucdonessobrec6moestablecerel
freno de estadonamientoo
Conexi6nde loscablesde ia bateria
Busque
lallavedeenvio,siexiste,y laetiquetadeadvertencia
queacompa_a
aencontrarse
enelladoderechode lacortadoradec_sped,
entrelatolvade
descargay laplataformadecorte.VdaselaFigure2.
Proposici6n65 de California
Postesde la bateria, terminalesy accesoriosrelacionados,contienen
plomoy compuestosde plomo, sustanciasclueen el Estadode California
pot causarc_ncery daffosreproductivos.L_veselasmanosdespudsde
manipular.
Cuandoconecteloscablesde la bateria, siempreconecteelpositivo (rojo)de
alambrea suterminal en primer lugar,seguidopor el negativo(Negro)de
alambre.
Potrazonesdeenvio,tanto decablesde labateriadesuequiposehanquedado
desconectado
de losterminalesen laf_brica.Paraconectarloscablesde labateria,
hagaIosiguiente:
NOTA:LaterminaldePospositivode labateriaest_marcada.(+). Elterminal
negativodelabateriaest_marcadaNeg.(-).
I.
Quitelacubiertade pl_stico,siest_presente,
desdeelterminalpositivode
labateriay conectarelcablerojoalterminalpositivodelabateria(+) conel
pernoy tuercahexagonal.
V_aselaFigureI.
2.
Quitelacubiertade pl_stico,siest_presente,desdeelterminalnegativode
labateriay conectarelcablenegroalterminalnegativodelabateria(-)con
elpernoy tuercahexagonal.V_aselaFigureI.
Figure2
Coloque
lapalancadeelevad6ndecubiertaenlaposid6nm_saltadecorte.
Consulte
Ajustedelaalturadecorteenlasecd6ndeOperad6ndeestemanual.
Mientraspresionalatolvadedescarga
hadalam_quinaconlamanoizquierda,
retirelaIlavedetransportemaritimoconlamanoderechaagarrandoentreel
pulgary eldedoinditey girandoensentidohorario.
Elenvio llave,usadopara losprop6sitosunicamenteelenvasado,debeset
removidoy desecbadoantesde operarsu cortac_sped.
Lacubierta de la siegaescapazde lanzarobjetos. Lafalta de operar
J
J
el cortac_spedsinla cubiertade descargaen laposki6n apropiadade
operaci6npodria resultaren lesionespersonalesgravesy I odaffosa la
Iprop edad.
J
J
Queuneel volante
J
SielvolantedesutractornoIleg6adjunta,el hardwaredelacolocad6nseha
embaladoenelvolante,pordebajode latapadel volante.Concuidadolatapadela
palancadelvolantey quitarel hardware.
Figure1
3.
Laposicidndelabotadegomarojasobreel terminalpositivodelabateria
paraayudara protegerdelacorrosi6n.
NOTA:Silabateriaseponeenservidodespudsde lafechaindicadaenla
partesuperiordela bateria,carguela bateriacomoseindicaenel Servicioy
Mantenimientode laseccidndeestemanualantesdeoperareltractor.
43
1.
Conlasruedasdeltractor,apuntandodirectamentehadadelante,colocarel
volantesobreel ejede direcci6n.
2.
Coloquelaarandela(conlaparteahuecada
haciaabajo)sobreelvolantey
seguraconeltornillo hexagonal.WaselaFigure3.
f
NOTA:
Eltractornofundonaconelcabledealimentaci6n
desconectado.
Ajustedelasiento
Paraajustarlaposici6ndelasiento,tirelohadaarribay sostengalapalancade
ajustedel asiento.Desliceelasientohadaadelanteo haciaatr_salaposid6n
deseada;luegosueltelapalancade ajuste.Asegurese
de queelasientoest#trabado
en untopedeasientoantesde operareltractor.
Veala Figura5.
J
J!
......
/f
Antesdeoperar eltractor, aseguresede queel asientoest_ enganchadoen
el tope del asiento.Coloqueelfreno de mano.P_resedetr_sde la m_quinay
tire del asiento haciaatr_shasta queencajeen sulugar hadendo clic.
Figure
3
3.
Coloque[atapadelvolantesobreel centrodelvolantey empujehaciaabajo
hastaque"dics"ensulugar.
Colocaci6nde la Sede
NOTA:
Porrazonesde env[o,elasientoest_biensujetoalsoportedepivotedel
asientodeltractorconunaabrazaderadepl_stico,o montadoshadaatr_sen
elsoportede pivote.Encualquiercaso,libreelasientodesuposici6ndeenv[o
teniendocuidadode nodobleni retuerzaelcabledealimentaci6ny sigalas
instruccionesabajo
parafijarla.
1.
Retirelosdostornillosdecabezahexagonaly lastuercasdelasedesoporte
depivote.
2.
Alinearlosagujerosdelanterosdelasientoconelsoportede montajelos
orificiosdelsoportede pivotedelasientodesutractory seguroconque
quit6lostornilloshexagonales
y tuercas.Vea
lasAen Figure4.
3.
Figura5
Presi6nde lasLlantas
Conecteel mazodecablesenel interruptordeseguridaddelasientoen la
parteinferiordelasiento,comosemuestraen BdelaFigure4.
f
M_xima presi6nde losneum_ticos,en ningun casoesde30 psi. Igualdad
de presi6nde losneum_ticosdebenmantenerseen todo momento. No
[sobrepasarnuncala presi6nm_xima de inflado figuran en el flancodel
[neum_tico.
Lapresi6ndelosneum_ticosrecomendada
de fundonamientoeselsiguiente:
Aproximadamente
el 10psiparalosneum_ticostraseros
Aproximadamente
el 14psiparalosneum_ticosdelanteros
IMPORTANTE:
Refi_rase
a lapareddelneum_ticoparalaISPrecomendados
o
m_ximosfabricantede neum_ticosesexacto.Noinflardemasiado.Lapresi6ndel
neum_ticodesigualpodriacausarquelaplataformadecorteparacortarde manera
desigual.
Figure4
44
A
C
J
D
©
E
H
F
G
J
Figura6
A
Palancadelfrenodeestacionamiento
F
Tomadefuerzadepalanca(BladeEngage)
B
Aceleradory palancadecontrolde Choke
G
Portavasos
C
IgnitionSwitchModule
H
DeVelocidad
D
Auto-discopedal
I
Palancade ajustedelasiento
Levantelapalancadelacubierta
J
Pedalde freno
E
NOTA:
CualquierreferenciahechaenestemanualalladoDERECH0
o IZQUIERD0
deltractordebeentendersetal comoseobservadesde
laposici6ndeloperador.
Cumple conlosest_ndaresde seguridadde ANSi
Lasm_quinasquitanievedeCraftsman
cumplenconlosest_ndares
deseguridaddel institutoestadounidense
deest_ndares
nadonales
(ANSI).
45
Freno de estacionarniento
Palancade ajuste dei asiento
Paraajustarelfrenodeestacionamiento:
completamenteelpedal
de freno.Moverlapaiancadelfrenodeestacionamiento
en la
posid6ndel frenodeestadonamiento.
Sueiteelpedalde[freno
paraqueelfrenode estadonamientoa participar.
Lapalancadeajustedelasientoseencuentradebajode lapartefrontal/izquierda
delasiento.Lapalancapermiteelajustede lapartedelanteray laposid6n
longitudinaldelasiento.Consultelasecd6nde laAsambleadelmanualpara
obtenerinstrucdonesm_sdetalladasparaajustarlaposid6ndelasiento.
Parasoltarelfrenode mano:Presioneelpedaldelfrenoy mueva
la palancadefrenode estacionamiento
fueradelaposid6nONy
en laposici6nOFEElfrenodeestadonamientoy luegopuestoen
libertad.Sueltee[ pedaldel freno.
Auto-unidadde pedal
Launidadde pedalseencuentraen elladoderechodel tractor,a1olargodelestribo.
Presioneelpedalhaciadelantelaunidady eltractorsemueveen ladirecdbnquela
palancadecambiosest_comprometidopulgadasa causarqueeltractorparaviajar
haciaadelante,mientrasqueaunaparadacompleta,muevalapalancadecambios
en laposid6ndelantera.Pocoa poco,pasoenlaunidadde pedaly el tractor
comenzar_aavanzar.Paramoverseenreversa,sigaelmismoprocedimiento,
s61o
moverlapalancadecambiosenlaposid6ninversa.
NO@:Elfrenodeestacionamiento
sedebeestablecersiel
operadordejaelasientoconelmotoren marchao elmotorse
apagar_autom_ticamente.
Aceleradory palanca de controlde
Laveloddaddetierrasecontrolaconlaunidaddepedal.Lom_sadelanteque
el pedalsegir6,el m_sr_pido,elvehiculodeviaje.Elpedalvolver_asuposid6n
originalcuandonoest_deprimido.Consultelasecdbnde Operad6ndeestemanual
parainstrucdonesdetalladassobrelaunidaddepedal.
estrangulador
/
m
u
m
SLOW
Elacelerador/ cebadorpalancadecontrol
seencuentraen elladoderechodel panelde
instrumentosdeltractor.Estapalancacontrolala
velocidaddel motory,cuandoseempujatodoel
caminoaseguir,elcontroldelestranguladortambi_n.Cuando
se
poneen unaposid6ndeterminada,elaceleradorser_mantener
unavelocidaduniforme.
IMPOI?TANTE:
Siemprepongaelfrenodeestadonamientoalsalirdeltractorsin
vigilancia.
Levanteia palanca de ia cubierta
Encontrado
enelguardabarros
derechodesutractor,lapalancadelevantarla
IMPORTANTE:
Cuando
opereeltractorconlaplataformadecorte
cubiertaseusaparacambiarlaalturade laplataformadecorte.Para
comprometido,estarsegurosdequelapalancadel aceleradorest_ utilizar,moverlapalancaala izquierda,secolocar_enla primera
siempreenel FAST
(conejo)laposid6n.
categoriam_sadecuadaparasuaplicad6n.
M6dulodei interruptorde encendido
PTO(BladeEngage)Palanca
Paraarrancarelmotor,insertela Ilaveen elinterruptorde
encendidoy girar[asagujasdelreloj hastalaposid6nSTART.
SueltelaIlaveen laposid6nMODONORMAL
DECORTE
unavezque
hayaarrancado
el motor.
Encontrado
enelguardabarros
derechodeltractor,latomadefuerza
(hojadepartidpar)lapalancaseutilizaparapoderdedicarsea la
plataformade corteode otrotipo (disponibleporseparado)losarchivos
adjuntos.Paraoperar,muevala palancadetodoelcaminoaseguir.
Moviendolapalancahaciaatr_s,todoelcaminohaciala posid6nOFFPTO
desconectadealimentad6na laplataformadecorte/ archivoadjunto.
Paradetenerel motor,girela Ilavede encendidoen sentido
contrarioalaposid6nSTOP.
Precauci6n:Antesdeoperareltractor,
referirseaambosinterruptoresdebloqueo
deseguridadyArranquedelmotorenla
secci6nFuncionamiento
deestemanualpara
verinstrucciones
detalladas
delM6dulodel
F
NO@:Latomadefuerza(hojade partidpar)de lapalancadebeestaren
ladesembragar
(PTOOFF)cuandolaposid6ndearrancarelmotor.
Portavasos
Titulardelatazadeltractorseencuentraenelguardabarros
a la
izquierda
delasiento.
Interruptordeencendidoy funcionamiento
del
tractorenMODODEPRECAUCION
ENMARCHA
ATRAS.
Nuncadeje aun equipoqueejecuta sinsupervisi6n.Siempredesconecte
tomade fuerza, palancade cambiosepongaen posici6nneutral, elfreno de
mano,apagueel motor y quite lallave paraevitar elarranque no deseado.
4G
Nuncalleneenexcesoeldep6sitodecombustible.Lleneeltanqueno m_s
de I/2pulgadapordebajodelabasedelcuellodeltap6ndecarga,paradejar
espadoparalaexpansi6ndelcombustible.
La palanca de cambio
Lapalancade cambiosest4situadaenel
ladoizquierdode ladefensay tienetres
posiciones,
FORWARD,
neutraly REVERSE.
Elembrague-pedal
defrenodebeestar
deprimidoy eltractornodebeestar
enmovimientocuandolapalancade
cambiosen movimiento.
IMPORTAIVTE:
fuercelapalanca
decamblos.
S[INunca
o hace,
puederesultaren
gravesdaffosalatransmlsi6ndeltractor.
Nuncasaquelatapadelcombustiblen[ agreguecombustiblemientrasel
motorest_calienteo enmarcha.Dejequeel motorseenfrieporIo menos
dosmlnutosantesdevolveracargarcombustible.
Limpieelcombustiblequesehayaderramadosobreelmotory elequlpo.
Trasladelam_quinaaotrazona.Espere
5 mlnutosantesdeencenderel
motor.
R
II_
Paraagregar gasolina
1.
Apagueelmotory dejequeel motorseenfrieporIomenos2minutosantes
de removerlatapadel combustible.Eltanquedegasolinaseencuentra
debajodelcapri.Retirelatapadelcombustiblegirandohadala[zquierda.
2.
Lleneeltanquedecombustiblecongasolina.Utilices61olimpiay fresca(no
m_sde30diasdeedad),[agasolinasinplomo.Lleneeltanqueno pulgada
m_sde1/ 2debajodelabasedelcuellode Ilenadoparadejarespadoparala
expansi6ndelcombustible.
3.
Vuelvaacolocarlatapadelcombustible.
pedalde freno
Elpedaldelfrenoest_situadoenelladoizquierdodeltractordec_sped,
aIo largodel
estribo.Pisarelembrague-pedal
defrenoparalaparticipaci6ndeldiscodefrenoy
Ilevareltractora unaparadacompleta.
NO@:Elpedaldebeserpresionadaparaencenderelmotor.ConsulteInterruptores
deenclavamiento
deseguridadm_sadelanteenestasecci6ndeestemanual.
Cargade aceite y gasolina
IMPORTANTE:
NoIlenedemasiado
eltanque.Lleneeltanquenopulgadam_sde1
/ 2debajodelabasedelcuellodeIlenadoparadejarespadoparalaexpansi6n
del
combustible.V_aselaFigura7.
Aceite
IMPORTANTE:
Sutractorseenviaconaceiteenelmotor.Sinembargo,ustedDEBE
controlarel nlveldeacelteantesdeoperar.Tengaculdadode noIlenaren exceso.
Paraobtenerinstrucdonessobrec6mocomprobarelaceitedelmotor,refi_rasea
larevisi6ndelaceltedelmotoren lasecd6nde Servldoy Mantenlmlentodeeste
manual.
Gasolina
Eltanquedegasolinaest_ubicado
debajodelcap6.NoIlenedemasiado.
Tengamuchocuidadoal trabajar congasolina.Lagasolinaessumamente
inflamabley susvaporespuedencausarexplosiones.Nuncacargue
combustibleen lam_quinaen un espaciocerradoo cuandoelmotor est_
calienteoen marcha.Apaguedgarrillos, dgarros, pipasy otras fuentesde
combusti6n.
NOTA:Compregasolinaen pequeffas
cantidades.Nousegasolinaquehaya
quedadodelatemporadaanterior,paramlnlmlzarlaformad6nde dep6sitosde
gomaenelsistemadecombustible.
Estemotorest_habilitadoparafundonarcongasolinasinplomo.Para
obtenerelmejorresultado,lleneeldep6sitode combustiblet_nlcamente
con
gasolinasinplomollmpiay fresca,en unsurtidorquelndlqueunoctanaje
lguala87o m_s.
Elgasohol(hasta10%dealcoholetilico,90%degasollnasinplomopor
volumen)esun combustibleaprobado.Noseapruebaelusode otras
mezclasdegasollna/alcohol,
comoE85.
El_termetillcoterdarlo-butillco(MTBE)y lasmezclasdegasolinasin
plomo(hastaunm_ximode 15%de MTBEporvolumen)soncombustibles
aprobados.
Noseapruebael usodeotrasmezclasdegasollna/_ter.
Llenareldep6sitodecombustiblealairelibreoen lugarbien ventilado.
47
Figura7
Acdonadoel freno de estacionamiento
Paraactivar el freno de estadonamiento:
Evitelesionespersonales graveso la muerte
Enlaspendientesconduzcahadaarribay hadaabajo,node
formatransversal.
Evitemaniobrasdegirobruscas.
Nooperela unldaden _reasdondepuedederraparo ladearse.
S[lam_qulnadejadesubirlapedientedetengalascuchlllasy
retrocedalentamentebajandolapendlente.
Nocorteelc#spedcuandohayaniffosu otraspersonascerca.
Nuncatransportenlffos,n[siquierasl lascuchlllasest_n
desconectadas.
I.
Completamente
elpedaldefrenoymantengahadaabajoconelpie.
2.
Moverla palancadelfrenodeestadonamlentohastael rondoyen elfreno
deestadonamiento(ON)laposid6n.
3.
Suelteel pedaldelfrenoparaqueelfrenodeestadonamlentoa partidpar.
Paraliberar el freno de estadonamiento:
I.
Preslone
el pedaldefrenoy moverlapalancadelfrenodeestadonamlento
fueradelfrenodeestadonamlento(ON)laposid6nyen laposid6nOFF.
Ajustede la altura de torte
Mirehadaabajoy hadaatr_santesy mlentrasoperaenmarcha
atr_s.
1.
Selecdonelaposid6ndealturadelaplataformade torte mediantela
colocad6nde lapalancade levantarlacubiertaencualquierade los
diferentesmuescas
alturade corteenel ladoderechodeladefensa.
2.
Ajustede lasruedasdecubiertaparaqueseentrelg pulgadasy 1/2pulgada
potendmadel suelocuandoeltractorseencuentraenunasuperficielisa,
planacomounaentrada.
Mantengatodoslosdispositivosdeseguridad(protecdones,
escudose interruptores)ensulugaryen correcto
fundonamiento.
Retirelosobjetosquepuedanserarrojadosporlascuchlllasen
cualquierdlrecd6n.
Conozca
laubicad6ny fund6ndetodosloscontroles.
Asegt_rese
de quelascuchillasy elmotorsedetenganantesde
colocarlasmanosolospiescercadelascuchlllas.
Antesdeabandonarla posici6ndeloperafor,dejardetractor,
desenganche
lascuchlllas,coloqueelfrenodemano,apagueel
motory retirelallave.
Ajustela ruedacubierta
Ajustarlasruedasde cubJertamedJante
laelimJnad6ndelatuercade la
bdday torn[lloquesujetaelhombrodecadarueday Ilevarlosa unode
losagujerosquepermitequelasruedasparaestarentrelgpulgadasy 1/2
pulgadaporendmadelsuelocuandoel tractorseencuentraen unsuave,
superfideplana,comouncaminodeentrada.V_aselaFigura8.
Leael manual del operador
Sislema de bloqueo de seguridad
Elsistemade bloqueode seguddadest_diseffadoparalaoperad6nseguradel
tractor.S[estesistemanuncadejadefundonarcorrectamente,noopereeltractor,
contacteinmediatamenteconsuSearsParts& RepairServiceCenter.
Elsistemade bloqueode seguddad[mpideelarranquedelvehiculoamenos
queelfrenode estadonamientoy sededkaalatomadefuerza(Blade
Engage)palancaest_enlaposid6nOFFdesconectado
posid6nO.
Elsistemade bloqueode seguddadseapagar_autom_ticamente
elmotorsi
eloperadordejael asientoantesde[nlclarelfrenodeestadonamlento.
Elsistemade bloqueode segurldadseapagar_autom_ticamente
elmotor
cuandoeloperadorabandonasuasientodeltractorconlatomadefuerza
(BladeEngage)
palancacomprometido,[ndependientemente
desiest_
activadoelfrenodeestadonamlento.
Withthe ignitionkeyinthe NORMAL
MOWING
position,the electricPTO
(BladeEngage)
clutchwill automaticallyshutoff if the PTO(BladeEngage)
knobis movedinto the engaged(ON)positionwiththe drivepedalin
positionfor reversetravel.
J
Figura8
Mantengalasmanosy piesde distanda de laabertura de descargade la
plataforma de torte.
NOTA:Lasruedasdelacubiertasonunafund6nanti-cuerocabelludodelacubierta
y no est_ndiseffadosparasoportarel pesodelaplataformadecorte.Consulte
la nivelad6nen lasecd6ndeServldoy Mantenimientodeestemanualpara
[nstrucdonesm_sdetalladassobrelosajustesdecubiertadiferentes.
48
Arranquedei motor
2.
Moverlapalancadelaceleradorenel FAST
(conejo)laposici6n.
3.
Coloquelapalancadecambiostantoen laposici6ninversa
o FORWARD.
IMPORTANTE:
NOintentecambiarladirecci6ndelamarchacuandoeltractorest_
Nohagafuncionar el tractor, si el sistemade bloqueono funciona
correctamente.Estesistemafue diseffadoparasuseguridady protecci6n.
en movimiento.SiempreIleveeltractora unaparadacompletaantesde moverla
palancadecontroldeveloddadhaciaadelanteaatr_soviceversa.Elno hacerlo
podr[aresultarenseriosdaffosa latransmisi6nde sutractor.
NOTA:
Refi_rase
a lagasollnay elaceltehastacompletarlaslnstrucdones
anterlormenteen estasecd6n.
1.
InsertelaIlavedeltractorenelinterruptordeencendido.
2.
Colocarlatomadefuerza(BladeEngage)palancaen laposid6nOFF
desconectado
posid6n.
4.
Pocoa pococomienzana ejercerpresi6nen launidaddepedal.Cuantom_s
abajoelpedalseempuja,m_sr_pidoqueeltractorsedesplazar_
en la
direcci6ndeseadasobrelabasedelaposid6nde lapalancadecambios.
5.
Eltractordec_spedesIlevadoa unaparadapot laliberaci6ndela unidadde
pedaly luegooprimirelpedaldefreno.
3.
Elfrenodeestadonamientodeltractor.
4.
Activeel controldelestrangulador.
5.
GirealaizquierdalaIlavede encendidoalaposici6ninicial.Despu_s
deque
elmotorarranque,sueltelatecla.Sevolver_alaON(Normalo cortarel
c_sped)poski6n.
Antesdeabandonarlaposki6n del operador pot cualquierraz6n,separar
lashojas,ponerla palancade control de veloddad en neutral, pongael
freno de estadonamiento, paradamotorapagadoy quitarlallave.
NOtienen laflare en la posici6ninicial durante m_sde diezsegundosala
vez.Si Io hacepuedecausardaffosal motor de arranqueel_ctricodel motor.
AI pararel tractor, percualquier motive, mientras queen unasuperfide
de hierba,siempre:
6.
Despu_s
dequeelmotorarranque,desactivarelcontroldelestranguladory
coloqueelcontroldelaceleradoren laposki6nde FAST.
flOTA:NOdejeel controldelestranguladoren duranteelfuncionamientodel
tractor.SiIo hace,dar_lugaraunamezcla"rka" de combustibley causarqueel
motorfundonemal.
1.
Coloquelapalancadecambiosen puntomuerto,
2.
Apliqueelfrenodeestadonamiento,
3.
Apagueelmotory quitar laIlave.SiIohate,redudr_alminimolaposibilidad
de quesuc_spedsedore'"'porelescapecalientedelmotordesutractor.
Conducci6nen iasiaderas
Paredel motor
Reflerenalanchodelapendienteenlaseguridaddelaspr_cticasde operaci6n
importantesecd6ndel manualparaayudaradeterminarzonasdeladeradonde
puedeoperareltractorcontotal seguridad.
Sisegolpea un objeto extraffo, detengael motor, desconecteel cable de la
bujia (s)y tierra contrael motor. Inspeccionarcuidadosamenteel equipo de
losdaffos.Reparad6nde losdaffosantesde reinidar y de fundonamiento.
Sisededicanalashojas,colocarlatomadefuerza(BladeEngage)
palancaen
laposki6nOFFdesconectado
poski6n.
Nocorteel c_speden pendientesconunainclinaci6nde m_sde 15 grados
(un aumento deaproximadamente2-112piescada10 pies).Eltractor puede
volcary causarlesionesgraves.
2.
@e alaizquierdalaIlavede encendidoalaposici6nSTOP.
Corteel c_spedy laspendientes,nuncatransversal.
3.
RetirelaIlavedelaIlavedeencendidoparaevitarelarranquenodeseado.
Tengaextremaprecaud6nal camblardedlrecd6nen laspendlentes.
Watchparalosagujeros,grletas,baches,pledrasuotrosobjetosocultos.
Terrenoirregularpuederevertirlam_qulna.Elc_spedalto puedeocultar
obst_culos.
Laconducci6n dei tractor
Evitecomienzapronto, el excesodeveloddady paradasbruscas.
Evitegirarcuandosedrcula porunapendiente.Siunavez,debehacerse,a
suvezporlapendiente.Elregresode unapendienteaumentalaposibilidad
de unroll over.
Nodeje el asientodel tractor, sin colocarlatoma de fuerza(BladeEngage)
palancaen laposici6nOFFdesembragar0 posici6n,presionandoel pedalde
frenoy acdonadoelfreno de estadonamiento. Sino puedesalir deltractor
sinvigilancia, tambi_n asuvezla llavede encendidoapagadoy quitarla
flare.
Evitedetenersecuandoseconduceporunapendiente.Siesnecesario
detenermientrasseconduceporunapendiente,puestaen marchasin
problemasy concuidadopararedudrlaposibilidaddevolteareltractor
hadaatr_s.
Siempremire baciaabajoy detr_santesydurante lacopia deseguridad
paraevitar lacopia de m_sde un acddente.
Pisarelembrague-pedal
defrenoparaliberarelfrenodeestacionamiento
y
dejarqueel pedal.
49
Involucrara losBlades
PartJdpad6n
delatomadefuerza(BladeEngage)
lastransferendas
deenergiaala
plataformadecorteo deotrotipo(dJsponible
porseparado)
losarcNvosadjuntos.Para
partkiparde lashojas,hagaIosiguiente:
1.
Moverlapalancade controldelaceleradora lar_pida(conejo)laposid6n.
2.
Sujetelatomadefuerza(BladeEngage)
y girar lapalancade todoel camino
aseguiralosnovios(ON)laposki6n.
3.
Mantengalapalancadelaceleradorenel FAST
(conejo)laposid6nparael
usom_sefidentede laplataformadetorte o deotrotipo (disponiblepor
separado)
losarcNvosadjuntos.
flO@:Elmotorseapagar_autom_ticamente
sJlatomadefuerzaest_
comprometidoconlapalancade camNosenlaposid6nde marchaatr_sconlaIlave
deencendidoenla posid6nON.
geverseMode Precauci6n
ElATENCION
INVERSOR
mododeposid6ndel m6dulode interruptordeIlavepermite
queeltractorparaoperarensentidoinversoconlascuchillas(PTO)haejerddo.
IMPORTAflTE:
Cortaralainversanoesrecomendable.
Tengamuchocuidado aloperar eltractor en el modo de PRECAUCION
INVERSA.
Siempremirar haciaabajoy hadaatr_santesde dar marchaatr_s.
Nohagafundonar el tractor cuandolosniffos uotras personasalrededor.
[Parare tractor rimed atamentes a gu enentraene _rea.
Parautillzarel modoPRECAUCION
REVERSO:
IMPORTANTE:
Eloperador
debeestarsentadoenelasientodeltractor.
1.
Arrancarelmotorcomose[ndkaen elep[grafedearrancarelmotor.
2.
@e laIlavedelasiegaNORMAL
(verde)laposki6nen elmodode
PRECAUCION
INVERSOR
(Amarillo)laposid6ndelm6dulode interruptorde
Ilave.VerFigura9.
3.
Presioneelbot6n PUSH
INVERSOR
(Orange,bot6ntriangular)en laesquina
superiorderechadelateda dem6dulodeconmutad6n.Laluz[ndkadora
decolorrojoen lapartesuperiorizquierdadel m6dulodeconmutad6nclave
ser_ONmientrasactivado.VerFigura9.
f
/
Luz
indicadora
3osici6n
demode
deprecauci6n
er
marcnaatr#,s
R
F
Modode
Normal
Posici6n
de detenci6n
Figura9
4.
UnavezactivadoOndicadorluminosoencendido),eltractorsepueden
condudrensentldocontradoconlascuchillasdecorte(PTO)ha ejerddo.
5.
Slempremlrarhadaabajoy hadaatr_santesde darmarchaatr_spara
asegurarse
dequeno hayniffoscerca.
6.
Despu_s
dereanudarelmovlmlentohadaadelante,devolverla llavea la
posid6nnormalde siega.
IMPORTANTE:
ElmodoPRECAUCION
INVERSOR
permanecer_
actlvadahastaque:
Laclaveseencuentraen laposid6ndelaslegao posid6nnormalSTOP.
Eloperadorsecomprometeel frenodeestadonamientototalmente
depdmenteelpedaldefrenoy mantenerlapresionadamlentrassemuevela
palancadecontroldeveloddaden laposid6ndefrenodeestadonamlento.
Mukhing
Faros
Unkit paraabonoest4disponiblecomoun archivoadjunto.Mulchingesun proceso
derecirculad6nhlerbacortadavariasvecespordebajode laplataformadecorte.
Losultra-finasrecortessevenobllgadosde nuevoenelc_speddondeactuancomo
unfertillzantenatural.
Unkit paraabonosepuedecompraratrav_sdel puntodeventaenelqueadquH6
estetractor.Paraobtenerm&sinformaddn,s61otienequeponerseen contactocon
Searsal 1-800-659-5917.
Usode la palanca de elevaci6nde la plataforma
Paraelevarlaplataformadecorte,muevalapalancadeelevad6ndelaplataforma
alaizquierda,luegocol6quelaenlamuescaquemejorseadaptea[aaplicad6n.
ConsulteAjustedelaalturadecorteanteriormenteenestasecd6n.
Cortar
Paraayudara evitar elcontactoconla cuchillao unalesi6n en elobjeto
lanzado,Mantengaa losespectadores,losayudantes,losniffosy las
mascotaspot Io menos75 piesde distanciade la m_quinamientrasest_ en
funcionamiento.Paradade lam_quina, sialguien entra en el_rea.
Lasiguienteinformad6nser_it_tilcuandoseutilizalaplataformadecorteconsu
tractor:
Plande supatr6n de corte paraevitar ladescargade materialeshada las
carreteras,aceras,transeuntes,etc.Adem_is,evite material quesedescarga
contraunaparedo unaobstrucd6n quepuedecausaralta material a
rebotarhada eloperador.
Nocorteelc_speda laveloddaddeterrenoelevado,espedalmenteslseha
[nstaladoun kit de mantilloo colectordec_sped.
Paraobtenerlosmejoresresultadosserecomiendaquelasdosprimeras
vueltassecortar_conlaaprobad6ndelagesti6narrojadohadaelcentro.
Traslasdosprimerasvueltas,invert[relsentidodelanzarladescargahadael
exteriordelabalanzadecorte.Estoledar_unamejorapariendaalc_sped.
Nocorteelc_speddemasiadocorto.Pastocorto[nvitacredmientodemalas
hierbasy losamarillosconrapidezeneltiemposeco.
Cortarel c_spedsiempresedebehacerconelmotoratodogas.
Bajolascondiciones
m_spesadas,
puedesernecesario
volversobrelazonadel
corteporsegunda
vezparaobteneruncortelimpio.
NOintentecortarespesa
maleza
y malashierbas
yelpastomuyalto.Sutractorest_
diseffado
paracortarelc_sped,
uncepillonoest_daro.
Mantengalascuchillasaflladasy sustituirlascucHIlasencasode desgaste.
ConsulteHojasdecorteenelservk[oy lasecd6nMantenimientodeeste
manualde[nstrucdonesde afilarla hojaadecuada.
51
LasI_mparasest_nONcuandoelmotordeltractorseest_ejecutando.
LaslucesseapagacuandolaIlavedecontactosemuevea laposicidnSTOP.
LISTADEMANTENIMIENTO
Antesderealizarcualquiertipo del mantenimiento/servicio,sueitetodoslos
mandosypare el motor. Esperehastaquetodaslaspartesde movimiento
hayanvenido a unaparadacompleta.Desconecteel alambrede bujia y
b_selocontrael motor para prevenirel comienzoinvoluntario.
Siemprelleve
puestoscristalesinastillablesdurante la operaci6no realizandocualquier
ajusteo reparaciones.
Antesdecadauso
Sigalalistademantenimientodadaabajo.Estacartadescribepautasdeservicio
s61o.Uselacolumnade Tronco
deServicioparaguardarlapistadetareasde
mantenimientocompletadas.
Localizarel m_scercanoChamuscael Centro de Servicioo programar el
servido, simplemente ponerse en contacto Chamuscaen 1-800-659-5917.
I.
Niveldel aceltedemotor
I.
Comprobar
2.
Silendadorzonay loscontroles
2.
Limpie
3.
Dedode lamanodeguardia
3.
Limpie
Losprimeroscincohoras
I.
Elaceltedel motor
I.
Cambie
Cada10horas
I.
Elcap6/losrespiraderos
I.
Limpie
2.
Losbornesdela bateria
2.
Limpie
3.
Loshuslllosy la m#nsulalntermedlade laplataforma
3.
Lubrique
I.
Eldepuradordel filtro dealre*
1.
Limpie
2.
Flltrode ake*
2.
Limpie
3.
Lubrique
4.
Lubrique
5.
Lubrique
Cada25horas
Cada50 horas
Anualmente
AntesdeAlmacenaje
3.
Losbrazosdemandointermedios,ejesdelpivotey ejes
4.
Losrodamlentosdelasruedasdelanteras
5.
Lasruedasdelanterasdelaplataforma
1.
Elaceitedel motor/el filtro deaceite
1.
Cambie/reemplace
2.
S[lendador
2.
Comprobar
1.
Filtrode aire
1.
Reemplace
2.
Eldepuradordel filtro deaire
2.
Reemplace
3.
Bujia
3.
Reemplace
4.
Sistemaderefrigeraci6nporaire_
4.
Limpie
5.
Flltrode combustible
5.
Reemplace
6.
DirectivoEngranajes
6.
Limpie
7.
Ruedas
traseras
Z
Quitelagrasay losejes
1.
Elcap6/Iosrespiraderos
1.
Limpie
2.
Losbornesdela bateria
2.
Limpie
3.
Losbrazosdemando[ntermedios,
ejesdelpivotey ejes
3.
Lubrique
4.
Losrodamientosdelasruedasdelanteras
4.
Lubrique
5.
Lasruedasdelanterasdelaplataforma
5.
Lubrique
6.
Loshusillosy la m_nsula[ntermediade laplataforma
6.
Lubrique
7.
Lospuntosde pivotedel pedal
7.
Lubrique
Realkeelservkiom_sfrecuentemente
cuandohayamuchopolvo.
o
reparadones,
potenda
Siel motorseha puestoenfundonamientoredentemente,elmotor,silendador
y lassuperficiesmet_licasdrcundantesestar_ncalientesy puedencausar
de arranque(PTO),
coloqueelfrenodemano,apagueelmotory retirelaIlave,
LpAntes
derealizartareasdemantenimlento
araevltarel encendidoaccidentaldelmotor.
desconecte
la
quemadurasa apie. Tengaprecaud6nparaevitarquemaduras.
52
Mantenimiento del motor
Comprobar
el aceite
Cambio de aceite motor y filtro
del motor
561oelusodeaceitede altadetergenteseevalu6lacalidadconlaclasificaci6n
deservicioAPI,5F,5G,5H,o SJ.5eleccione
elaceitedegradodeviscosidadSAEde
acuerdocondelatemperaturadefuncionamiento.5igalatabladeabajo.Aunque
variosdelosaceitesdeviscosidad(5W20,IOW30,etc)mejorarlapartidaenclima
frio,quesetraducir_ienelconsumodepetr61eoaumentacuandoutilizadopor
encimade32oF.Reviseelniveldeaceitedelmotorconm_isfrecuenciaparaevitar
laposiblesda_osenelmotordeagotarseelpetr61eo.
f'_older _
32°F
Nora: Elfiltro deaceitesedebecambiarencadaintervalodecambiode aceite.
Debecambiarseelaceitedel motorenlasprimeras5 horasy luegocada50 horaso
unavezportemporada.Paracamblarelaceltedel motor,procedacomoslgue:
_Warmer_
1.
Hagafundonarelmotorduranteunosminutospermitirqueelaceiteen
elc_rtercallente.Aceltecalientefluyam_sIlbrementey Ilevarm_sdel
sedlmentodelmotorquesehanasentadoen laparteinferiordel c_rter.
Tengaculdadoparaevltarquemadurasconelaceltecallente.
2.
Abralacubiertadeltractory Iocalkeelorlfido dedrenajedeacelteenel lado
derechodelmotor.Veala Figure38.
Oil Viscosity Chart
J
Paracomprobarelaceitedelmotor,procedacomosigue:
AsegOrese
de queeltractorest_sobreunasuperfidenivelada.
Limpieel_readeIlenadode aceitedecualquierescombro.
3.
Desconecte
elcablede labujiay mant_ngaloalejadodelabujia.
4.
Retireel tapadeaceltedesdeeltubode Ilenadodeacelte.Veala Figure38.
5.
Gireel volantehadaladerechaparaexponermejoreltap6nde drenaje.
1.
Retirelavarilla,yealaFigure37y limpieconunpaffolimpio.
6.
2.
Vuelvaacolocarlavarillay pulsecompletamente.
3.
Retirelavarillay compruebe
elniveldeaceite.Sedebealaplenamarcade
lavarilla.
Sujetelamangadedrenajedeacelte(embaladaconestemanual)elorlfido de
drenajedeaceltecomosemuestraen laFigure38.Coloqueelextremo
opuestodelamangaen un redplentederecolecd6ndeaceiteapropiadocon
unacapacidad
tan grandepararecogerelaceiteusado.
4.
Siest_bajo,agregueaceitelentamenteenelIlenadodeaceitedelmotor.
NoIleneenexceso.Despu_s
deagregarelaceite,espereun minutoy luego
vuelvaacomprobarel niveldeaceite.
5.
Vuelvaacolocarlavarillay apriete.
7.
Figure37
Nollene demasiado.Llenadoexcesivode aceitepuedeprovocarqueel motor
no empezar,difidl de partida, o fumar motor. Sim_isde lamarcaFULLen la
varilla, elaceitede drenajepara redudr el nivel de aceiteen FULLmarcaen la
varilla de medid6n.
53
Figure38
Retireel tap6nde drenajedeaceltey dreneelacelte.
8.
Extralgaelmangultodedrenajedeaceltey gu_rdeloen unlugarseguropara
suusoposterior.
9.
Vuelvaacolocareltap6nde drenajedeacelte.
10.
Quiteel filtro de acelte,v_asela Flgura11,y dlsponerdeellaadecuadamente.
11.
Llenepardalmenteelnuevofiltro deaceltedeaproximadamente
3/4de la
maneraporcompletoconaceitefrescoy Ilmplo.Antesde [nstalarel nuevo
filtro de aceite,lubriqueIlgeramentelajuntadelfiltro de aceiteconun poco
de aceltecons61omojareldedoenel aceltey correralrededordelajunta.
Laspiezasde recambiodebeserlamismaeinstalados
en lamismaposici6n
quelaspiezasoriginales.
Sisederramacombustible,esperehastaqueseevaporaantesdearrancarel
motor.
Antesde reemplazar
el filtro decombustible,vaciareltanquede
combustible.DeIocontrario,elcombustiblepuedefiltrarsey provocarun
incendio
o unaexplosi6n.
Para drenar el combustible:
1.
Para cambiar el filtro de combustible:
Oil Filter
1.
Figure 39
12.
13.
Localice
elfiltro de combustible,quesetransfierenenelladoizquierdo
del motorentreeltanquedecombustibley elcarburador,y puedeser
conectadoalmotorconunacorreade empate.Cortarlacorreade la
corbata,siest_presente,entoncesemergenteenlaabrazadera
en lineaen
elfiltro de combustibleconun parde alicates,deslicelaabrazadera
de la
I[neadecombustible.Quitelalineadecombustibleen laI[neay lafugade
combustibleen unredpienteaprobado.
Instaleel newfiltro de aceiteconlamanohastaquelaJuntaentraen
contactoconeladaptadordel filtro deaceitey,acontinuad6n,apdeteel
filtro deaceite1/2 a3/4vueltas.
Usepinzasparaapretariaspestaffasdeiaabrazadera(eliadodeiaiineadefuera
delfiltro de combustible),
a continuad6n,deslicelaabrazadera
lejosdel
filtro decombustible.Twisty tirar delalineadecombustiblefueradelfiltro
decombustible.V_aselaFigure40.
Fuel Filter
Llenarel motorconaceitenuevohastaelniveldeaceiteenlavarillaLee
Tab
\
completo.Vuelvaacolocareltapade aceite.
Fuel Line
Aceiteusadoesun productode residuos
peiigrosos.Deseche
el aceite
usadocorrectamente.Desecharcon la basuradom_stica.Consultecon
lasautoridadeslocalesu o 1-800-65%5917paraobtener una listade
instaladonesde recklajeseguro.
14.
Arranquey hagafundonarel motor.Mientrassecalientaelmotor,revisesi
hayfugasdeaceite.
15.
Pareelmotory compruebeelniveldeaceite.Sedebealaplenamarcadela
varilla.
Figure40
Compruebe
[as[ineasde combustiblepara[asgrietasofugas.Reemplazar
si
esnecesado.
Filtro de combustible
3.
Reemplace
elfiltro decombustibleconunoriginalfiltro de reemplazode
equipo.ContactoSear'sal 1-800-659-5917
paracomprareloriginaldefiltro
de reemplazodelequipo.
4.
AsegurelasI[neasdecombustibleconlaspinzas.
Gasolinaysusvaporessonextremadamenteinflamablesy e×plosivos.Fuego
oexplosi6npuedecausarquemaduras
graveso lamuerte.
Mantengalagasolinalejosde chispas,llamas,lucespiloto,elcalor,y otras
fuentesdeignid6n.
Limpiador de ake
Compruebe
lasI[neasdecombustible,eltanque,latapay losaccesorios
con
frecuendaparadetectarrajaduraso escapes.
Reemplazar
si esnecesario.
Antesdereemplazarelfiltro decombustible,vadareltanquede
combustiblesegtinlasinstrucdonesde abajo.
Silosfiltros,o cubiertasnoest_ninstaladoscorrectamente
lesionesgraveso la
muertepodiadeberseafracasar.Notratede encenderelmotorconlasretiren.
Nofugadecombustiblecuandoelmotorest_caliente.Dejequeelmotor
detiempoadecuadoparaenfriar.Evacuar
elcombustibleen unredpiente
aprobadoalaireIibre,lejosdellamasabiertas.
Cualquierfugade granvolumendecombustibledesdeeldep6sitode
desconectar
laI[neadecombustibledelfiltro enlaI[neadecombustible
cercadel motor.
Nouseairecompdmidoodisolventesparalimpiarelcartuchodelfiltro deaire.
QuitelaI[neadecombustibledela LN-ladode laI[nea([adohaciaeltanque
decombustible)delfiltro decombustible.
IMPOR@NTE:
Nuncaarranqueelmotorsinelfiltro deaire.Resultar_
elr@ido
desgastedel motor.
54
1.
Desatornillelostornillosy retirelacubiertadelfiltro deaire.Yeala Figure41.
Air Filter,
Air Filter
Figure43
4.
Tocleanfoamelement,washina mildliquiddetergentandwater.Squeeze
or pressthe foamelementto rinseout dirt andwater.Donot twist;this
coulddamageor tearthe foamelement.Allowto dry thoroughlybefore
using.DONOToil thefoamelement.
5.
Attachthe newair filter with foamelement,aligningthe holein the airfilter
with the intakemanifold.SeeFigure44.
Figure41
2.
Retireelfiltro deaire.Veala Figure42.
Figure42
3.
Retireelfiltro deespumade alrededordelfiltro deairedepapel.Yeala
Figure43.Reemplace
elelementodepapelcuandoest_sucioodafiado.
Limpiarelelementodeespumaoreemplazardafiado.
Manifold
Figure
44
(oloquelatapadelfiltro deaire,asegur_ndose
dealinearlascaracteristicas
de lacostilladepl_sticodelacubiertaalas funcionesde pl_sticasenla
cubiertadelfiltro deaire.VealaFigure45.Girelostornilloshacialaderecha
hastaquequedeajustado.Sicualquierdesalineaci6n.
55
Electrode
Air
Cover
Filter
Plastic
Feature
Figure
47
4.
Compruebe
quelaarandeladelabujiaest_en buenascondidonesy
enrosquelabujiaamanoparaevitarquelarosca.
5.
Despu_s
dehaberseasentadalabujia,aprieteconunaIlavede buj[apara
comprimirlaarandela.
Nota:AIinstalar
unabujianueva,apriete1/2vueltadespu_squela bujia
seasientaparacomprimirlaarandela.Cuando
vuelvaa instalar
unabuj[a
usada,apriete1/8-1/4vueltadespu_s
de losasientosdela buj[apara
comprimirlaarandela.
Figure45
Servido de la bujia
Paraasegurarelfuncionamientoadecuado
del motor,labujiadebeserunespacio
adecuado
y librededep6sitos.
1.
Retirelabuj[ayutiliceunallavedebuj[a
paradesconectarelenchufe.Veala
Figure
46.
IMPORTANTE: Labujiadebeestarbienapretada.Unabuj[amalapretada
puedecalentarsemuchoy puededaffarel motor.
Silenciador
f
Temperaturadel silenciador
y_reascercanasdel motor podr_ser superiora
150° F(65° C).Eviteel contactocon estas_reas.
Inspeccione
peri6dJcamente
elsilenciador,
yreemplazar
siesnecesario.
Piezas
de
repuesto
paraelsilenciador
debeserel mismoeinstalado
enlamismaposici6n
que
laspiezas
originales.
__Spark Plug
Limpieza del motor
Noutilice aguapara limpiar laspiezasdel motor. Elagua puedecontaminar
el sistemade combustible. Utilke un cepillo oun paffoseco.
Figure46
Siel motor haestadofuncionando,elsilenciadorestar_muy caliente. Tenga
cuidadodeno tocarel silenciador.
2.
3.
Visualmente
inspecdonelabujia.Deseche
labujiasi haydesgasteevidente,
osiel aisladorest_agrietadooastillado.Limpielabuj[aconuncepillode
alambreparaserreutilizado.
1.
Diariamente
o antesdecadauso,limpiardehierba,pajao desechos
acumulados
en elmotor.Mantenerlavinculacidn,laprimavera,y los
controlesde limpieza.
2.
Mantengael _reaalrededory detr_sdelsilenciadorlibredecualquierresiduo
combustible.
Mantener
limpioel motorpermiteel movimiento
delairealrededor
del
motor.
Piezas
de motordebenmantenerselimpiasparareducirelriesgode
sobrecalentamiento
y laignici6n
de losresiduosacumulados.
Carburador de ajuste
Elcarburador
enestemotornoesajustable.
Midaladistandaentreelectrodosconunagalga.Corregirsi esnecesario,
doblandoelelectrodolateral.Yeala Figure47.Labrechasedebeestablecer
a0.024-0.031.
56
Lubrkad6n
kimpieza de las m_quinas y la cubierta
CualquJer
combustibleoaceJtederramadoen lam_quJna
debeserborradode
JnmedJato.
NOpermJtaquelosdesechos
queseacumulanalrededordelasaletasde
refrJgeraddn
delmotoroencualquJer
otra partedelam_quJna.
Antesde lubricantes,reparaci6no inspecci6n,
siempredesconectartoma de
fuerza,palancadecambiosepongaen poski6n neutral, el freno demano,
apagueel motor y quitelaIlave paraevitar elarranque nodeseado.
IMPORTAIVTE:
Elusodeunalavadoradepresi6nparalimpiarsutractornose
recomJenda.
Puedecausarda_osaloscomponentes
el_ctrJcos,
ejes,poleas,
rodamJentos
oel motor.
Puntosde pivotey Vinculaci6n
Untornillo y eltap6ndecubiertasepuedenencontrarenlasuperfidede la
plataformade sutractorcomoseveen laFigure48.Estetap6npuedeset
reemplazado
conun puertodeaguaparaser usadocomopartede unsJstema
de
lavadode laplataformaporseparado-disponible.
Lubricartodoslospuntosdegiroenelsistemade tracci6n,frenode
estacionamiento
y lavinculaci6nlevantaralmenosunavezal afroconaceitede la
luz.
Ruedastraseras
TheDeckWashSystem seutilizaparaenjuagarlahierbacortadadelaparte
inferiordelacublertay evltarlaacumulad6ndesustandasqu[mlcascorrosivas.
TM
Lasruedastraserasdebenretirarsedelosejesde unavezportemporada.Lubricar
losejesy lasIlantasy todoconunobjetivodegrasaantesdevolverainstalarlos.
flON: Unslstemade lavadode laplataformasepuedecomprara trav_sdelpunto
deventaen elqueadqulrl6estetractor.Paraobtenerm_slnformacl6n,Ilameal
1-800-659-591_
FrenteEjes
(adaextremode delantedeltractor,labarradearticuladdnpuedeestarequipado
conunajustede lagrasa.Lubricarconunapistoladegrasacada25horasde
funcionamientodeltractor.
f
Bateria
/
Labatefiaest_selladayeslibre demantenimiento.Losnivelesde_cidonosepuede
comprobar.
•
/
Siernpre rnantenga los cables de la bater[a y los terrninales
lirnpios y libres de corrosi6n en los contenedores.
•
Despu6s de la lirnpieza de la bater[a y terrninales, aplicar una
ligera capa de vaselina o grasa a arnbas terrninales.
•
Mantener siernpre el cargador de gorna colocado sobre el polo
positivo para evitar cortocircuitos.
\
IMPORTANTE: Sial quitar la bater[a por cualquier raz6n, desconecte
el cable negativo (Negro) es el cable de la terminal en primer lugar,
seguido por el positivo (rojo) de alarnbre. Cuando vuelva a instalar la
bater[a, conecte el positivo (rojo) de alarnbre de su terminal en primer
lugar, seguido por el negativo (cable Negro). AsegOrese de que los
cables estfin conectados a los terrninales correctos, inversi6n de ellos
podr[a carnbiar la polaridad y provocar daSos al sisterna de alternanda
Figure48
de su motor.
Ajustes
kimpieza de la bateda
LimpJeza
de labatefiaalsacarlodeltractory ellavadoconunasolud6nde
bicarbonatoy agua.SJfueranecesarJo,
raspelastermJnales
de labater[acon
uncepillodealambreparaquJtarlosdep6sitos.EscudotermJnales
y loscables
expuestoscongrasaovaselJna
paraevJtarlacorrosidn.
Faltas
Nuncatrate dehaterlosajustesmientrasel motorest6en marcha,exceptosise
espedficaen elmanualdeloperador.
Nivelaci6nde la cubiertade
de la bateria
NOTA:Verifiquela presidndel neurnfiticodel tractorantesde realizar
cualquierpaquetede nivelacidnde los ajustes.Consultea los
neurnfiticosen la seccidnde serviciosde este manualparaobtener
Algunas
causas
comunes
defallasenlabatefiasonlossiguientes:
•
La activacidninicialincorrecta
•
•
Sobrecarga
Congelaci6n
La subfacturaci6n
mils inforrnacidn
sobrela presbn de los neurnfiticos.
I)elante a atr_s
Elfrentedelaplataformadecorteesapoyadoporunabarraestabilizadora
que
sepuedeajustaral nlvelde lacublertadedelanteaatr_s.Lapartefrontaldela
cubiertadebesetde 14pulgadasy 3/8-pulgadainferiora lapartetraserade la
cubierta.Ajustesl esnecesafioIoslguiente:
Conexionescorroidas
Estos
fallosnosoncubJertos
porlagarantia
deltractor.
57
1.
Coneltractorestadonadoenunasuperfidefirme y nivelada,coloquela
palancadeelevaci6ndelaplataformaen lasegundaa laprimeracategoffa
(segundaposici6nm_salta),y girelahojaIom_scercadelcanaldedescarga
queesparaleloaltractor.
2.
Medirladistanciadesdela
partefrontaldela
puntadela
palaenelsueloylapartetrasera
delapuntadelapalaenelsuelo.Laprimeramedidatomadadebeestarentre
1A"y3/ 8"menosdelasegunda
medici6n.Determinar
ladistandaaproximada
necesaria
paraunbuenajustey proceder,
sifueranecesario,
elsiguiente
paso.
3.
Localicelatuercaconbridaen lapartedelanteradelsoporteestabilizador.
Vealafigura48.
•
Apretar la tuerca de bloqueo para elevar la parte delantera
de la cubierta;
•
Aflojar la tuerca de bloqueo para bajar la parte delantera de
la cubierta.
Vuelvaaapretareltornillo hexagonalde la[zquierdasoportede lacubierta
suspensi6n
cuandoseIograelajusteadecuado.
Tom!,o
go,a!
j
Figure50
Ajuste
del asiento
Consulte
lasecci6n
delaAsamblea
deestemanual
parainstrucciones
deajustedel
asiento.
Freno de estacionamiento
de ajuste
Nuncaintenteajustarlosfrenoscuandoelmotorest_fundonando.Siempre
desconectetomadefuerza,palancadecambiosepongaenposici6nneutral,
apagueelmotory quitela Ilaveparaevitarelarranqueno deseado.
Figure49
Un lado a otto
Silaplataformadecortepareceserlasiegade formadesigual,un ladoaladode
ajustepuedeserrealizado.AjustesiesnecesarioIosiguiente:
1.
SieltractornoIlegaadetenerse
porcompleto
cuando
elpedaldelfrenoest_
totalmente
deprimido,
osilasruedas
traseras
deltractorpuederodarconelfreno
Coneltractorestacionadoenunasuperficiefirmeynivelada,
coloquelapalancade deestacionamiento
aplicado,
elfrenoest_enlanecesidad
deajuste.Comuniquese
levantarlacubiertaen lasegundadelaprimeracategoria(segundaposici6n conelCentro
deServicio
m_scercano
Sears
quelosfrenoscorrectamente
ajustado.
m_salta)y girarambashojasdemodoqueseanperpendiculares
conel
tractor.
2.
Paraubiear el Centrode Servieio m_s eereanoSears o para programarel servicio,simplementep6ngase en eontactocon Sears
Mediriadistanciadesdeelexteriordela
puntadeiapaiaalaizquierdaenelsuelo al 1-800-659-5917.
y ladistandadesdeelexteriorde lapuntadelapaladerechoa latierra.
Ambasmedidasadoptadasdebenseriguales.Sinoesasi,contintieconel
pasosiguiente.
Piataformade torte de eliminad6n
Paraquitar la plataforma de corte, haga Iosiguiente:
3.
Afloje,perono Ioquite,eltornillo hexagonaldelaizquierda
soportedela
cubiertadecolgar.V_asela Figure50.
I.
Colocarlatomade fuerza(BladeEngage)
palancaenlaposici6nOFF
desembragar
laposici6ny pongaelfrenode estacionamiento.
4.
BalancedelacubiertaconunaIlaveparaencenderelequipodeajuste(quese
encuentrainmediatamentedetr_sdeltornillo hexagonals61oaflojar)
hacialaderecha/ arribao hacialaizquierda
o haciaabajo.Lacubiertaest_
bienequilibradocuandolasmedicionesdeambashojapuntaadoptada
anteriormentesoniguales.
2.
Bajolacubiertamoviendolapalancade elevaci6nde cubiertaenla muesca
en laparteinferiordelguardabarros
derecho.
3.
Extracd6ndelaauto-Tornillo(A)queaseguraelcintur6n-Roddetodo
poseedordelapoleadelmotordel tractor,acontinuaci6n,
quitar lavarilla
poseedordelcintur6n(B).V_asela Figure51.
Nora:Hagaunanotamentalde Ioagujeroalotro extremodelacinta-Rodposeedor
seinsertaenlosprop6sitosde reinstalaci6n.
4.
58
Retirelacorrea(C)de alrededorde lapoleadel motordeltractor.V_asela
Figure51.
Retiree[ pasadorde[apajarita,asegurar[avari[[adeestabi[izadorde[a
p[ataformaa [acubierta.Des[icee[tiradorde[acubiertade[soporteen[a
cubiertacomosemuestraenla Figure53.
Evite[as[esionespellizcos.Nuncacoloquesusdedosen [a primaveraociosoo
entre [acorreay unapolea, mientrassequitae[ cintur6n.
f
Z
ZZZZ_ C
cZZZZZ_ LZZLZ
.........
I .....
J
Figure53
Figure51
5.
7.
Retireconcuidadoel cablede[PTOde [aparteposteriorde [aplataformade
torte quitandoel pasadordecorbatade lazoqueIoasegura.Quiteel resorte
de[soportedelacubJertaintermedio.V_aselaFigure54.
8.
SuavementeDeslice[aplataformade torte (a [aJzquierda)
haciaafuera
desdedebajodeltractor.+
Localicelatuercaconbridaen lapartedelanteradelsoporteestabilizador.
VealaFigure52.
F
J
/
/
/
/
/
PTOCable
Figure52
Figure54
59
Neum_tkos
Carga
Nosobrepasarnuncala presi6nm_xima deinfladoqueapareceen la pared
lateraldela Ilanta.
Bateriasemiten un gasexplosivodurante lacarga.Cargade la bateriaen
un _reabien ventilada y mantenerselejosde unallama abierta o piloto
comoen un calentadordeagua, estufa, homo,secadorade ropao de otros
aparatosde gas.
Lapresi6n de los neum_tkosrecomendadade fundonamiento es
el siguiente:
Aproximadamente
el 10psiparalosneum_ticos
traseros
AIcargar labateriade sutractor, utilice s61oun cargadorde 12Vdiseffado
Aproximadamente
el 14psiparalosneum_ticos
delanteros
parabateriasde plomo-_cido.Leasucargadorde bateriamanualdel
IMPORTANTE: Refi_rase
alapareddelneum_tico
paralaiSPrecomendados
I propietafio antesdecargarla bateriade sutractor. Sigasiemprelas
om_ximos
fabricante
deneum_ticos
esexacto.
Nosobreinflar.Lapresi6n
del
l instruccionesy presteatend6n a suADVERTENClAS.
neum_tico
desigual
podfiacausar
quelaplataforma
detorteparacortardemanera
Sieltractorno sehapuestoenusoduranteunperiodode tiempoprolongado,
desigual.
carguelabatefiade lasigulentemanera:
Batefia
1.
Proposki6n65 deCaliforniaiADVERTENCIA!
Postesde labatefia,terminalesy
accesorlos
reladonados,
contienenplomoy compuestos
deplomo,sustandasque
enel EstadodeCaliforniaporcausarc_ncery daffosreproductivos.
L_veselasmanos
despu_sdemanipular.
Fijesucargadordebatefiaparaofrecerunm_ximode 10ampefios.
S[elcargadorde labatefiaesautom_tica,carguelabateriahastaelcargador[ndica
quelacargaest_completa.Sielcargadornoest_autom_tica,cargoporno menos
de ochohoras.
Fusible
Unfusiblede20AMPest_instaladoen losjuegosdecablesdesutractorpara
protegerelslstemael_ctrlcodeltractordedaffoscausados
porelamperajeexcesivo.
Sia[ quitarla bateria,desconecteel cablenegativo(Negro)esel cablede [a
terminal en primer[ugar,seguidopor el positivo(rojo)de aiambre. Cuando
Sielsistemael_ctriconofundona,oel motordesutractorno arranca,compruebe
prlmeroquetenerlacertezadequeelfusiblenosehaquemado.Sepuede
encontrarenlapartetraseradelaunldad,debajodelguardabarros
situadaporla
batefia.
[vueivaa instaiar[abatefia, conectee[ positivo (rojo)de aiambre de su
[terminal en primer [ugar,seguidopor e[ negativo(cableNegro).
E[arranque
Siempreuseun fusible con [acapacidadde potenciaequivaientepara [a
sustitud6n.
Nuncasaite iniciarunabatefia daffadaocongeiados.Est_segurode
losvehicuiosno setocan,y est_nfuerade ignM6n. Nopermita que[as
abrazaderasde cableal tacto.
1.
Conectarpositivo(+) paraenviarporcablepositivo(+) de labateria
descargada
desutractor.
2.
Conecteelotro extremodelcableala(positivo+) despu_sde labateriade
puente.
3.
Cuchiiiasde corte
Apagueel motor y quite laIlave deencendidoantesde retirarlacuchilla
de torte (s)para afilar o de sustitud6n. Protejasusmanosusandoguantes
lgrues°s a sujetar a hoja.
Conecteelsegundocable(negativo-)paraelotropuestodela batefiadel
puente.
4.
Haterlaconexi6nfinal enel bloquedel motordeltractor,lejosde labatefia.
Adjuntara unapartesinpintar,paraasegurarunabuenaconexi6n.
Inspeccioneperi6dicamentela hojay / o husil[o de grietas odaffos,sobre
todo despu_sde haberIlegadoa unobjeto extraffo. Nohagafundonar la
m_guinahastaquesesustituir_n loselementosdaffados.
S[[a bateria puenteest_ instaiado en un vehku[o (coche,esdecir,camiones),
no arranquee[ motor de[ vehicu[ocuandoe[arranque desutractor.
Paraquitarlashojas,hagaIosiguiente:
1.
5.
Inidodeltractor(comoseindicaantefiormente
enestasecd6n
deeste
manual).
6.
Elfrenodemanodeltractorantesderetirarloscables
depuente,enelorden
2.
inverso
delaconexi6n.
6O
Quitelacubiertadedebajodeltractor,(verplataformadecortede
eliminad6nantefiormenteenestasecd6n)y luegosetira suavemente
de la
cubiertaparaexponerlaparteinferior.
Coloqueun bloquedemaderaentreelcentroy eldeflectordelavivienda
cubiertadelacuchilladecorteparaactuarcomoun estabilizador.
Wasela
Figure55.
Utiliceuna flare de parpara apretar latuercade husillo de la hoja brida
hexagonalaentre 70 libras-piey 90 libras-pie.
Decambiar la correade cubierta
Aseguresede queapagueel motor, quitarlaflare deencendido,desconecte
[el cablede la buj[a (s)y tierra contrael motor paraevitar involuntaria de
LPartidaantesde quitarel dntur6n.
Todoslosdnturones en sutractor est_nsujetosadesgastey debenset
reemp azadosen casode cua quer s gnode desgasteest_npresentes.
Figure55
IM POFITANTE: ElV-cintur6nseencuentraensutractorest_espedalmente
diseffadoparaconectary desconectar
deformasegura.Unsustituto(no0EM)
V-correapuedeserpeligrosoal nodesvlncularse
completamente.Paraunam_qulna
de buenfundonamlento,laf_brlcadednturonesdeusoaprobado.
3.
QuitelatuercahexagonalbridaquesujetalahojaalaAsambleadelhusillo.
V_asela Figure55.
4.
Paraafinarcorrectamente
lashojasdecorte,retirelamlsmacantidadde
metalde ambosextremosdelashojasa Iolargode losbordesdecorte,
paraleloalbordede fuga,en un25°- 30° de_ngulo.Slempremolercadafilo
delacuchllladecorteporlgualamantenerelequlllbrlode lahojaadecuada.
V_asela Figure56.
Paracambiaro sustituirlacintadelacubiertaen sutractor,hagaIosiguiente:
I.
2.
Quitelacublertacomoselndlcaanterlormenteenestasecd6n.
Retireladnta cubremediantelaeliminaci6nde lostornilloshexagonales
quesujetanalacubierta.WaselaFigure57.
Tambi_npuedesernecesarioaflojarlatuercahexagonaldela poleatensora
a laizquierdaparaobtenereldntur6n alrededordelapoleay elprotectorde
lacorrea.
4.
Retireconcuidadoladnta decubiertade alrededorde lasdospoleasdel
husilloy lasdospoleaspoleatensoradelacubierta.V#asela Figure57.
5.
Paracolocarlacorreanueva,empiezahadendoqueel cintur6nalrededorde
lasdospoleasexteriordel huso,comosemuestraenla Figure57.
6.
Luego,ladnta derutaalrededordelasdospolinespoleasde lacubierta
comosemuestraen laFigure57.
7.
Volveraapretarlabarraposeedordeldntur6n aflojadoantes.
8.
Volvera montarladnta delosguardiasderetirarseantes.
9.
Vuelvaainstalarlacubierta,asegur_indose
dequeladnta siguesiendo
derrotadosenlaspoleasconlasinstrucdones.Elenrutamientodebanda
completasemuestraen laFigure57.
Figure56
10.
Tiredelapartederechade ladnta,y coloqueelladoVestrechade lacorrea
en lapoleaPTO.
Siel filo de lahojahasido previamenteafilado, o si cualquierseparaci6nde
metal est_ presente,sustituir lashojas pot otras nuevas.
11.
Mlentrassemantienelacorreay lapoleajuntos,girar lapoleaa laizqulerda.
Seguirmanteniendoy rotad6ndela poleay lacorreahastaquelacorreaes
totalmenteenrolladoenlapoleaPTO.
Cambiode la correa de transmisi6n de transmisi6n
Unahojarealequilibrada causar_excesivavibraci6n,puedecausardaffosen
eltractor y I o resultaren lesionespersonales.
5.
NOTA:
Varioscomponentes
debenserretiradosy herramientas
espedales(es
dedr aire/ Llavede [mpacto)a fin decambiarlacorreadetransmisi6ndeltractor.
Comun[quese
conel CentrodeServidom_scercanoSearsquesucorreade
transmisi6nde transmisi6ndelosservidos.
Pruebade equilibriodelahojaconun balanceador
delahoja.Grindmetal
desdeelladom_ispesadohastaqueseequilibrede manerauniforme.
NOTA:Cuandotengaquereemplazarlahoja,asegurese
de instalarlahojaconla
carade lahojamarcada"fondo"(o
conunnumeroestampadoen 51)frentealatierra
cuandoelcortac_sped
seencuentraen laposid6ndefundonamiento.
GI
Paraubicarel Centro de Serviciom_s cercanoSearso paraprogramarel
servido,simplementep6ngaseen contacto conSearsal 1-800-G59-5917.
Cubierta de
la correa
Figure57
62
Nuncaalmacenetractor de c_spedcon combustibleenel tanque en un
espaciocerradooen _reasconpocaventilaci6n, dondelosgasesdel
combustiblepuedanakanzar elfuego, chispaso una luzpiloto comola que
tienen algunoshornos,calentadoresde agua,secadoresde ropa oalgun
otro dispositivoagas.
Extraigalabujiay viertauna(1)onzadeaceiteparamotorporelorificio
delabujiaenelcilindro.Hagagirarel motorvariasvecesparadistribuirel
aceite.Vuelvaacolocarlabuj[a.
Preparaci6ndei motor
IM PORTANTE: Elcombustiblequequedaen eltanquecuandohacecalorse
detefioray ocasiona
gravesproblemasdeencendido.
Eldrenaje de loscombustibles
Paraevitarqueseformendep6sitosdegomadentrodel carburadordel motor
y posiblesdesperfectos
enel motor,elsistemadecombustibledebeservadado
completamente,
o sedebetratarlagasolinaconunestabilizadorparaevitarel
deterioro.
I.
I.
Localiceelfiltro decombustible,queseencuentraenel ladoizquierdodel
motor,y puedeserconectadoalmotorconunacorreade empate.
2.
Cortarlacorreade lacorbata,si est_presente,entoncesemergenteenla
abrazadera
enl[neaenelfiltro decombustibleconun pardealicates,deslice
laabrazadera
dela l[neadecombustible.
SiutilizaunestabJlJzador
decombustible:
a.
Lealasinstrucciones
y recomendadones
delfabricantedel producto.
b.
Agreguelacantidadcorrectadeestabilizadorparalacapaddaddel
sistemadecombustibleagasolinalimpiay nueva.
c.
Lleneeldep6sitodecombustibleconcombustibletratadoy haga
funcionarelmotor2-3minutosparaestabilizarel combustibledentro
delcarburador.
Quitelalineadecombustibleen laI[neay lafugade combustibleen un
redpienteaprobado.
Preparad6nde ia tractor de c sped
1.
Limpiey lubriquelatractorcomosedescribeenlasinstrucdonesde
lubricaci6n.
2.
Noutilke unalavadoraapresi6nniunamangueradejard[nparalimpiarsu
unidad.
3.
Almacenelatractoren unazonalimpiay seca.Nolaalmacenecercade
matefialescorrosivos
comoporejemplofertilizantes.
Cuandovacieelsistemade combustible:
a.
Nodreneelcombustiblecuandoelmotorest_caliente.Permitaque
elmotorseenfriebien.Dreneel combustibledentrodeun redpiente
aprobadoy alaireIJbre,lejosdecualquierllamaexpuesta.
b.
Dreneungranvolumendecombustibledesdeeldep6sito,desconectandolaI[neade combustibledel filtro decombustibleenI[neaque
seencuentracercadel motor.
Lagasolinaessumamenteinflamabley puedesetexplosivaendertas
condidones.Vadela antesdealmacenarelequipoduranteperiodos
prolongados.Dreneel combustibleunicamentedentro de un recipiente
aprobadoy al airefibre, lejosde cualguierllama expuesta.Dejeque
el motor seenffie. Antesde drenar el combustible,apaguecigarrillos,
dgarros, pipasy otras fuentesde combusti6n.Vadelagasolinaen un _rea
bienventilada,lejosdecualquierfuentede llamaochispas,incluidocualquier
artefactoconluzpiloto.Almacenelagasolinaen un recipienteaprobado,en un
lugarseguro.
c.
VuelvaacontectarlaI[neadecombustibley hagafuncJonar
el motor
hastaquecomience
a fallar,useentoncesel cebadorparamantenerel
motoren marchahastaagotartodoelcombustibledelcarburador.
d.
VuelvaadesconectarlaI[neadecombustibley drenelagasolina
restanteenelsistema.
Lagasolinaesunasustanciat6xica. Eliminelagasolinaadecuadamente.
Comuniqueseconlasautoridadeslocalespara averiguarcuries sonlos
_todosadecuadospara eliminar la gasolina.
63
El motor
El motor
err_fitica
El motor
El motor
no arranca
funciona
de manera
recalienta
vacila a altas
1.
Perilla de potencia
conectada.
2.
No est_ficolocado
3.
Se ha desconectado
4.
La palanca de control del regulador no
est,1 en la posici6n de arranque correcta.
5.
No se ha activado
5.
Tire el control
6.
El dep6sito de combustible
combustible
se ha echado
6.
Llene el dep6sito con gasolina
menos de 30 dias).
7.
La linea del combustible
est_fi bloqueada.
7.
Limpie la linea de combustible y reemplace el filtro de
combustible.
8.
Las bujias no funcionan
correctamente.
8.
Limpie o cambie
9.
Motor
9.
Arranque el motor con el regulador en posici6n FAST
(r_ipido).
10.
Fusible fundido
10.
Reemplace el fusible (s)
1.
La unidad est,1 funcionando
CEBADOR activado.
1.
Presione el control
2.
Se han aflojado
2.
Conecte
3.
La linea del combustible
est,1 tapada
combustible
se ha echado a perder.
3.
Limpie la linea de combustible;
Ilene el tanque
con gasolina limpia y nueva y reemplace el filtro
de combustible.
4.
La ventilaci6n
en la tapa del combustible
est_fiobstruida.
4.
Destape la ventilaci6n
dahada.
5.
Agua o suciedad
combustible.
5.
Vacie el tanque de combustible.
con gasolina limpia y nueva.
6.
El filtro de aire est_fisucio.
6.
Reemplace el elemento de papel del filtro de aire
o limpie el depurador de espuma.
1.
El nivel de aceite del motor
1.
Llene el c_firter con la adecuada
aceite.
2.
Flujo de aire restringido.
2.
Limpie los recortes de pasto y la suciedad
acumulados alrededor de las aletas de refrigeraci6n
del motor y del alojamiento del soplador.
1.
La separaci6n
de las bujias es muy
1.
Retire las bujias y reajuste
averiada
1.
Reemplace
la bujia.
2.
Reemplace el elemento
el depurador.
revoluciones
el freno
de mano.
el cable de las bujias.
el cebador
est,1 vacio o el
a perder.
ahogado.
(s)
con el
los cables de la bujia.
o el
en el sistema del
est_fi bajo.
1.
Coloque
(OFF).
la perilla en la posici6n
2.
Coloque
el freno
3.
Conecte el cable alas bujias.
4.
Mueva la palanca del regulador
(r_fipido).
de desconexi6n
de mano.
a la posici6n
FAST
del CEBADOR hacia afuera.
limpia y nueva (de
las bujias o ajuste la separaci6n.
del CEBADOR.
los cables de la bujia.
o reemplace
la tapa si est_fi
Llene el tanque
cantidad
y peso de
la separaci6n
pequeha.
El motor funciona con
dificultad en ralenti
Demasiada
de arranque (PTO)
vibraci6n
La cortadora de c6sped no
regresa el recorte de c6sped
como abono
1.
Bujia atorada,
separaci6n.
2.
El filtro de aire est_fisucio.
1.
Cuchilla
de corte floja o descentrada.
1.
Apriete
2.
Cuchilla
dahada o curvada
2.
Reemplace
1.
La velocidad
lenta.
1.
Coloque el control del regulador en la posici6n
FAST (velocidad r_fipida, representada
pot una
liebre).
2.
C6sped humedo.
2.
No realice abono
3.
C6sped demasiado
3.
Corte una vez a una altura de corte elevada
del motor
o exceso de
es demasiado
alto.
las bujias. Configure
la separaci6n
del filtro de aire y/o limpie
la cuchilla y el husillo.
la cuchilla.
cuando
el c_sped est_fi humedo.
y luego vuelva a cortar el c_sped a la altura
deseada, o haga una pasada de corte m_fis
angosta.
Corte desigual
4.
La cuchilla
de la cortadora
1.
2.
4.
Afile o cambie
La plataforma no est,1 correctamente nivelada.
1.
Realice un ajuste de la plataforma
La cuchilla
2.
Afile o cambie
3.
Presi6n de neum_iticos
3.
Verifique
de la cortadora
no est_fiafilada.
no est_fiafilada.
desigual.
{}4
de
la cuchilla.
lado a lado.
la cuchilla.
la presi6n
de los cuatro neum_fiticos.
DECLARACI6N
FEDERAL
y/o DECALiFORNiA
SOBREGARANTiASENELCONTROL
DEEMISIONES
SUSDERECHOS
Y OBLIGACIONES
ENCUANTOA LAGARANTiA
MTD Consumer
Group Inc, la Agencia
venta en el estado de California,
de Proteccidn
el Departamento
al sistema de control (ECS) de emisiones
chispa para todo terreno,
peque_o,
encendido
(evaporativas
de exteriores
deben estar dise_ados, construidos
del aho 1997 y modelos posteriores
m_is abajo, siempre
y/o de escape) de su equipo
del a_o 2013 y ahos posteriores
peque_os
el sistema de control
y cuando
de los Estados Unidos (EPA), y para aquellos
(CARB) se complacen
y motor
(motor de equipos
En California,
productos
en explicar
de exteriores)
los nuevos motores
Donde
conectores
de la Agencia
de emisiones
no exista uso incorrecto,
y otros componentes
exista una condicidn
incluyendo
el diagn6stico,
para su
que cubre
de encendido
de equipos
de Proteccidn
Medioambiental
(ECS) de su motor
negligencia
de equipos
por
de exteriores
o mantenimiento
de los Estados Unidos, (EPA). MTD Consumer
de exteriores
inadecuado
por el periodo
cubierta
afines relacionados
por la garantia,
de tiempo
indicado
de dicho motor.
Su ECS puede incluir piezas tales como el carburador, el sistema de inyeccidn de combustible,
el sistema de encendido,
los depdsitos de combustible,
las lineas de combustible,
los tapones de combustible,
las wilvulas, contenedores,
filtros,
abrazaderas,
certificados
la garantia
y equipados
para cumplir con las estrictas normas antipolucidn
del Estado (en otros estados, los equipos
deben ser estar dise_ados, construidos y equipados para cumplir con las regulaciones de motores de
por chispa para todo terreno
Group Inc. debe garantizar
Medioambiental
de los Recursos del Aire de California
el convertidor
catalitico,
mangueras de vapor,
con las emisiones.
MTD Consumer
Group Inc. reparar_i su motor
de equipos
de exteriores
sin costo alguno
las piezas y la mano de obra.
COBERTURA
DELA GARANTiADELFABRICANTE:
Este sistema de control
de emisiones
es defectuosa,
se garantiza
equipos
de exteriores
cubierto
pot m_is de dos ahos pot la garantia
por el t_rmino
de dos a_os. Si alguna
pieza relacionada
MTD CONSUMER GROUP INC. reparar_i o sustituir_i
del equipo
del fabricante,
el periodo
con las emisiones
de su motor
dicha pieza. En caso de que un componente
de cobertura
de
est,1
ya no se aplicar_i.
RESPONSAI31LIDADES
DELPROPIETARiO
SEGUNLAGARANTiA:
En su car_icter de propietario
del motor
de equipos
de exteriores,
usted es responsable
del mantenimiento
requerido
que se especifica
en el
manual del propietario.
MTD Consumer Group Inc le recomienda
que conserve todos los recibos que cubren el mantenimiento
de su motor,
obstante Io cual MTD Consumer Group Inc no podr_i denegar el cumplimiento
de la garantia 0nicamente
pot la falta de los recibos.
Como propietario
la garantia
del motor
si su motor
de equipos
de exteriores,
usted debe saber que MTD Consumer
o una pieza del mismo fallan debido
a uso incorrecto,
negligencia,
Group
Inc. puede denegar
mantenimiento
indebido
la cobertura
no
de
o a modificaciones
no
aprobadas.
Usted es responsable
de presentar
su motor
al centro de distribuci6n
o servicio
aparezca el problema. Las reparaciones cubiertas
Si tiene alguna pregunta respecto de la cobertura
por la garantia
de la garantia,
Consumer
o pot correo electr6nico
Group Inc. al tel_fono
1-800-800-7310
t_cnico
de MTD Consumer
Group Inc. tan pronto
como
se deben Ilevar a cabo en un lapso razonable que no exceda de 30 dias.
p6ngase en contacto con el Departamento
del Servicio T_cnico de MTD
en http://support.mtdproducts.com
COBERTURA
DELAGARANTiADEEMISIONES
GENERALES:
MTD Consumer
Group Inc garantiza
construido
y equipado
fabricaci6n
que pudieren
de certificacidn
El periodo
de garantia
comienza
pot primera
Sujeto a ciertas condiciones
Cualquier
final y a cada comprador
con todas las regulaciones
causar la falla de una pieza garantizada
de MTD Consumer
funcionamiento
1.
al comprador
de modo de cumplir
id_ntica,
que el motor
y que se encuentra
en todos los aspectos
de equipos
de exteriores:
libre de defectos
materiales
est,1 dise_ado,
de materiales
a la pieza descripta
y de
en la solicitud
Group Inc.
en la fecha de entrega
vez. El periodo
y exclusiones
pieza garantizada
subsiguiente
aplicables
del motor
al comprador
de garantia
es de dos ahos.
que se indican
a continuaci6n,
que no est_ programada
final o en la fecha en que la m_iquina se pone en
la garantia
para set reemplazada
de las piezas relacionadas
con las emisiones
como parte del mantenimiento
requerido
es la siguiente:
en las instrucciones
escritas suministradas
se garantiza pot el periodo de garantia arriba mencionado.
Si la pieza falla durante el periodo de cobertura de la
garantia, la misma ser_i reparada o reemplazada
pot MTD Consumer Group Inc. de acuerdo con el p_irrafo (4) a continuaci6n.
Cualquier
pieza reparada
2.
o reemplazada
Cualquier
pieza garantizada
garantiza
pot el periodo
seg0n la garantia
se garantizar_i
que est_ programada
de garantia
arriba
solamente
mencionado.
por el resto del periodo
para inspecci6n
Cualquier
regular
de garantia.
en las instrucciones
pieza reparada o reemplazada
escritas suministradas
seg0n la garantia
se garantizar_i
se
pot el
resto del periodo.
3.
4.
Cualquier pieza garantizada que est_ programada
instrucciones
escritas suministradas,
se garantiza
para reemplazo seg0n el mantenimiento
requerido de conformidad
con las
pot el periodo de tiempo anterior a la primera fecha de reemplazo programada
pieza. Si la pieza falla antes del primer
programado,
acuerdo
con el p_irrafo (4) a continuaci6n.
Cualquier
anterior
al primer
puntual
La reparaci6n
deben
5.
reemplazo
reemplazo
o el reemplazo
programado
de cualquier
realizar en un centro de garantia
No obstante
de distribuci6n
las disposiciones
bajo franquicia
pieza reparada
pieza garantizada
de mantenimiento
o reemplazada
bajo garantia
pot MTD Consumer
se garantizar_i
para esa
Group Inc. de
pot el resto del periodo
para esa pieza.
sin costo alguno
que aqui se estipulan,
la misma ser_i reparada o reemplazada
de conformidad
con las disposiciones
de la garantia
que aqui se estipula
se
para el propietario.
los servicios o reparaciones
para los motores
o equipos
bajo garantia
en cuesti6n.
se suministrar_in
en todos nuestros
centros
6. Elpropietario
delmotordeequipos
deexteriores
nodeber_
pagar
eltrabajo
dediagndstico
directamente
asociado
conunapieza
garantizada
defectuosa
enrelaci6n
conlasemisiones,
siempre
ycuando
dichotrabajo
dediagn6stico
serealice
enuncentro
cubierto
pot
lagarantia.
7. MTDConsumer
Group
Incesresponsable
potdahos
causados
aotroscomponentes
demotores
oequipos
derivados
delafallabajo
garantia
decualquier
pieza
garantizada.
8. Durante
latotalidad
delperiodo
degarantia
delmotor
yequipo
para
todoterreno
arribamencionado,
MTDConsumer
Group
Inc
mantendr_
unsuministro
depiezas
bajogarantia
suficiente
para
satisfacer
lademanda
esperada
detalespiezas.
9. Cualquier
piezadereemplazo
sepodr_usarpara
elcumplimiento
delmantenimiento
o lasreparaciones
bajogarantia
ysesuministraran
sincargo
para
elpropietario.
Dicho
usonoreducir_
lasobligaciones
degarantia
deMTDConsumer
Group
Inc.
]0. Nosepodr_n
usarpiezas
adicionales
nimodificadas
quenoest_n
exentas
deacuerdo
conelDepartamento
delosRecursos
delAire
(AirResources
Board).
Elusodecualquier
pieza
adicional
omodificada
noexenta
potelcomprador
finalser_causal
deinvalidez
delos
reclamos
bajogarantia.
MTDConsumer
Group
Incnotendr_
responsabilidad
potlagarantia
defallas
depiezas
garantizadas
quefueren
causadas
potelusodeunapieza
adicional
noexenta
omodificada.
PI EZAS GARANTIZAi)AS:
La reparaci6n
o el reemplazo
tal cobertura
de garantia
inadecuado,
y que tal uso incorrecto,
dicha pieza. No obstante
funcione adecuadamente,
la cobertura
las siguientes
Sistema de medici6n
que de otro modo pudiese
Group Inc demuestra
negligencia
o mantenimiento
que el motor
inadecuado
se extiende
solo a piezas que estuvieron
piezas con garantia
para emisiones
estar cubierta
por la garantia
es objeto de uso incorrecto,
negligencia
rue causa directa de la necesidad
con un dispositivo
presentes
de limitaci6n
en el motor y equipo
podr_ ser excluida
de reparaci6n
de ajuste instalado
todo terreno
de
o mantenimiento
o reemplazo
de
en f_brica y que
adquiridos.
(de corresponder):
de combustible
Sistema de mejora
Carburador
pieza garantizada
Io antedicho, cualquier ajuste de un componente
podr_ set cubierto pot la garantia. Adem_s,
bajo esta garantia
Est_n cubiertas
1.
de cualquier
si MTD Consumer
para inicio
y piezas internas
en frfo (cebado suave)
(o sistema de inyecci6n
pot combustible)
Bomba de combustible
Dep6sito
2.
de combustible
Sistema de inducci6n
Purificador
Colector
3.
de aire
de aire
de admisi6n
Sistema de encendido
Bujia(s) de encendido
Sistema de encendido
4.
pot magneto
Sistema de encendido
Convertidor
catalitico
SAI (v_lvula Reed)
5.
Componentes
Wlvulas
varios utilizados
e interruptores
Conectores
6.
Control
en el sistema anterior
de vacio, temperatura,
posici6n
sensibles al tiempo
y montajes
evaporativo
Manguera
Abrazaderas
de combustible
de la manguera
Tap6n del combustible
de combustible
atado pot correa
Caja de carbono
Lineas de vapor
050790 Rev.A
Felicitaciones
por haber realizado una adquisici6n
inteligente.
El producto Craftsman®
que ha
adquirido esta diseSado y fabricado para brindar muchos aSos de funcionamiento
confiable. Pero
como todos los productos a veces puede requerir de reparaciones.
Es en ese momento cuando el
disponer de un Acuerdo de protecci6n para reparaciones
le puede ahorrar dinero y problemas.
A continuaci6n se detallan los puntos incluidos en el Acuerdo:
[] Servicio experto prestado por nuestros 10,000 especialistas en reparaciones profesionales
[]
[]
Servicio ilirnitado sin cargo para las piezas y la mano de obra en todas las reparacionescubiertas
Reernplazo del producto hasta 1500 d61aressi no es posible reparar el producto cubierto
[]
Descuento de 25% del precio normal del servicio y de las piezas relacionadas con el mismo que no esten cubiertas
por el acuerdo; ademas, 25% del precio normal de la verificaci6n de mantenimientopreventivo
[]
Ayuda r_pida pot tel_fono - Io IlamamosResoluci6n RApida- el apoyo telef6nico de un Chamusca al representante.
Piense en nosotros como el manual "de un dueSo hablador."
Una vez adquirido el Acuerdo, puede programar el servicio con tan s61orealizar una Ilamadatelef6nica. Puede Ilamar en
cualquier momento del dia o de la noche o programar un servicio en linea.
El Acuerdo de Protecci6nde Reparaci6nes una compra sin riesgo. Si usted anula por alguna raz6n durante el periodo de
garantia de producto, proporcionaremos un reembolso Ileno.O, un reembolso prorrateado en cualquier momento despues
del periodo de garantia de producto expira, iAdquiera hoy su acuerdode protecci6n para reparaciones!
Se aplican determinadas limitaciones y exclusiones. Para obtener informaciTn adicional y precios en los Estados
Unidos Ilame al 1-800-827-6655.
El *Coverage en Canad_ivaria en algunos articulos. Para detalles Ilenos la Ilamada Chamusca Canad_ien 1-800361-8885.
Servicio de instalaci6n de Sears
Si desea solicitar la instalaci6n profesional de Sears de aparatos domesticos, dispositivos paraabrir portones, calentadores de agua y otros articulos domesticos importantes, en los Estados Unidos o Canada flame al 1-800-4-MY-HOME®.
67
Riding Equipment
questions or problems?
Satisfaction with your purchase
is our number one concern!
To troubleshoot problems,
get answers to questions, order parts,
or schedule repair service for your
Riding Equipment, call the number below.
Para respuestas a preguntas o problemas,
y ordenar piezas o pedir servicio para la
reparacibn de su equipo, Ilame el nt_mero abajo.
1-800-659-5917
Craftsman Help Line
www.craftsman.com
TM
® Registered Trademark /
Trademark of KCD IP, LLC in the United States, or Sears Brands, LLC in other countries
® Marca Registrada / TMMarca de Fabrica de KCD IP, LLC en Estados Unidos, o Sears Brands, LLC in otros paises