1
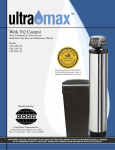
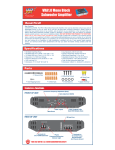
Installation, Operation and Maintenance Manual US Water Matrixx Water Softener Hardness and Scale Prevention System. Matrixx MX-100 Matrixx MX-150 Matrixx MX-200 & HTO Systems US Water Systems, Inc. 1209 Country Club Road Indianapolis, IN 46234 1-800-608-8792 [email protected] www.uswatersystems.com Installation, Operation and Maintenance Manual Matrixx MX-100, MX-150, MX-200 System Table of Contents System Specifications ............................................................................. 3 How Your Water Conditioner Works ....................................................... 4 Main Valve Functions .............................................................................. 5 Tank Installation……………………………………………………………….7 General Installations ............................................................................... 8 Start-up Instructions………………………………………………………....10 Level 1 User Programming.....................................................................11 Level 2 User Programming………………………………………………….13 Level 2 Programming Flow Chart……………………………………….….14 Diagnostic Mode & Vacation Setting.......................................................15 Valve Cycle Settings...............................................................................16 Maintenance……………..…………………………………………………...18 Valve Drive Assembly Exploded View……………………………...……..20 Control Valve Assembly Exploded View………………………..…………21 Troubleshooting………………….…………………………………………..22 Warranty……………………….……………………………………………...23 2 Installation, Operation and Maintenance Manual Matrixx MX-100, MX-150, MX-200 System System Specifications Figure 1. Specifications US Water Systems classifies each softener according to the actual resin capacity. However, this is not the regeneration capacity. The regeneration capacity will be lower than the actual resin capacity. This is due to the resin ’ s regeneration salt curve. For example: A 53,000 grain unit would require 30 lbs of salt during regeneration if the capacity was set to the actual resin capacity ( 53,000 grains ) . If the unit is set at 37,000 grains it can be regenerated using only 10 lbs of salt. The unit is much more efficient when it is set using the proper salt curve capacity and salt dosage levels. So you can see that to get the final 16,000 grains from a 53,000 grain unit the salt usage will more than double. Please use the chart below when setting you softener. This will ensure efficiency and longevity of your unit. Maximum Water Temperature = 110°F (43°C) Maximum Operating Pressure = 100 PSIG (689 kPa) Voltage = 110 volts standard Pipe Size = 3/4” Model # System Capacity Grains @ 10 lbs/cu ft @6 lbs/ cu ft @ 3 lbs/ cu ft Flow Rate Service USGPM (Factory Settings) At the stated service flow rates, the pres- sure drop through these devices will not exceed 15 psig. Changing salt settings from factory setting may require changing injector sizes to achieve stated capacities. The manufacturer reserves the right to make product improvements which may deviate from the specifications and descriptions stated herein, without obligation to change previously manufac- tured products or to note the change. Regeneration Water Back- wash USGPM Clean Water Problem Water Mineral Tank Size Resin Cu. Ft. Brine Tank/ Salt Cabinet Capacity Size Inches (Lbs) Ship Weight (Lbs) (Factory Setting) 085-MX-100 25,000 20,000 13,000 10.0 2.0 38.0 48.0 9 X 48 1.00 15 X 15 X 34.7 230 122 085-MX-150 37,000 30,000 18,000 12.0 2.4 48.5 60.5 10 X 54 1.50 15 X 15 X 34.7 230 155 085-MX-200 50,000 40,000 25,000 15.0 3.5 80.5 95.5 12 X 52 2.00 20.3 X 37.4 385 158 For the HTO systems use the following chart. 24,000 37,000 4.7 7.1 3 44,000 9.5 Installation, Operation and Maintenance Manual Matrixx MX-100, MX-150, MX-200 System How Your Water Conditioner Works The principle behind water softening is simple chemistry. A water softener contains resin beads which hold electrically charged ions. When hard water passes through the softener, calcium and magnesium ions are attracted to the charged resin beads. It's the resulting removal of calcium and magnesium ions that produces soft water. This valve is controlled with simple, user-friendly electronics displayed on a large LCD screen. The main page displays the current date and time. In addition, the main page also shows key valve information and statistics including: current capacity setting, volume remaining, date of last regeneration, current flow rate, and peak flow rate. Figure 2. Main Page Displays MAY 8, 2012 2:30 PM CAPACITY 1,545 GAL VOLUME REMAING 1,295 GAL REGEN DAYS 7 DAYS REMAINING DAYS 5 DAYS REGENERATION TIME 2:00 AM LAST REGEN MAY 2, 2012 CURRENT FLOW 15 GPM PEAK FLOW 5.8 GPM NOTE:REGEN DAYS and REMAINING DAYS are only shown in the CALENDAR CLOCK mode or METER OVERRIDE mode. Figure 3. Key Pad Configuration 4 Installation, Operation and Maintenance Manual Matrixx MX-100, MX-150, MX-200 System MENU BUTTON The function of this key is to enter level one programming mode where the valve settings can be adjusted. This button has two functions. The first is to initiate a manual regeneration by holding the button for 3 or more seconds. The second function is while in programming mode, pressing this key allows the user to change the value of each setting. These buttons are used to increase or decrease the value of the settings while in the programming mode. SET / REGEN BUTTON UP / DOWN ARROWS System Initialization When power is first supplied, the valve may take up to two minutes to initialize the valve. During this time the valve will show “INTIALIZING WAIT PLEASE”. Do not touch any buttons at this time. When the valve reaches the service posi- tion, it will display the current date and time. Figure 4. System Initialization Display Main Valve Functions VALVE OPERATION MODE: SOFTENER: FILTER: IRON FILTER: Standard water softener operation. Automatic back washing filters such as Multi-Media Depth Filter or Carbon Filter. This mode is typically used with Manganese Green Sand Filters. REGENERATION MODE: 1. METER DELAYED 2. METER IMMEDIATE 3. CALENDAR CLOCK 4. METER OVERRIDE CAPACITY CALCULATION: 1. AUTOMATIC ADJUSTABLE CYCLES: NOTE: 2. MANUAL All of the valve cycles are fully adjustable. 1. BACKWASH 2. BRINE / RINSE 3.RINSE 4. REFILL Refer to Level II User Programming for description of each mode. 5 Installation, Operation and Maintenance Manual Matrixx MX-100, MX-150, MX-200 System During a regeneration cycle, the valve will display what position it is advancing to. Once in the correct position, the valve will display the current position along with the time remaining for that cycle. On the bottom row, the time remaining is also graphically displayed. BACKWASH REMAINING 6 MIN Figure 4. Regeneration Cycle Valve Display “MENU BUTTON”: The func on of this key is to enter the level one programming mode where the valve set tings can be adjusted. “SET / REGEN BUTTON”: This bu on has two func ons. The first is to initiate a manual regeneration by holding the button for 3 or more seconds. The second function is while in programming mode, pressing this key allows the user to change the value of each setting. “UP / DOWN”: These bu ons are used to increase or decrease the value of the settings while in the programming mode. Manual Regeneration (Delayed or Immediate) If screen is locked, press “MENU” for 3 seconds to unlock. To ini ate an immediate regeneration, press the SET / REGEN button for 3 seconds, an option for delayed or immediate regeneration will appear. Press the SET / REGEN button again and delayed will begin flashing, press the down arrow button to have immediate flash, press the SET / REGEN button and then press the menu button and the valve will immediately start into manual regeneration. To initiate a delayed regeneration, press the SET / REGEN button for 3 seconds, then press the menu button and a regeneration will be queued to the next pre-set regeneration time (2:00 a.m.). Control Operation During A Power Failure In the event of power failure, the valve will keep track of the time and day for 48 hours. The programmed settings are stored in a non-volatile memory and will not be lost during a power failure. If power fails while the unit is in regeneration, the valve will move to the service position from the point it is at once power is restored. However, since the unit did not complete its regeneration, it will queue another regeneration at the next scheduled regeneration time. If the valve misses a scheduled regeneration due to a power failure, it will queue a regeneration at the next regeneration time once power is restored. 6 Installation, Operation and Maintenance Manual Matrixx MX-100, MX-150, MX-200 System Matrixx Tank Installation Instructions WATER PRESSURE: A minimum of 20 pounds of water pressure is required for regeneration valve to operate effectively. ELECTRICAL FACILITIES: An uninterrupted alternating current (A/C) supply is required. Note: Other voltages are availa- ble. Please make sure your voltage supply is compatible with your unit before installation. EXISTING PLUMBING: Condition of existing plumbing should be free from lime and iron buildup. Piping that is built up heavily with lime and/or iron should be replaced. LOCATION OF MATRIXX TANK AND DRAIN: The Infusion tank should be located close to a drain to prevent air breaks and back flow. CAUTION: Water pressure is not to exceed 80 psi, water temperature is not to exceed 110°F (43°C), and the unit cannot be subjected to freezing conditions. Media Installation Assembly Instructions Media Installation (for HTO systems please refer to the Quick Start Guide) 1) Remove the tank from carton. 2) Verify the riser tube is centered in the bottom center of the tank. A flashlight may be necessary. 3) Place a piece of duct tape over the riser tube so no media enters the riser while filling. 4) Make sure the riser is centered to facilitate the valve in- stallation after installation of the media. 5) Use the Blue Funnel provided, to pour the media into the tank. Pour it evenly around the hole to ensure it is well dis- tributed in the tank and pour slow enough, to keep from plugging the hole. 6) When media is installed move tank side to side to settle the media. 7 Installation, Operation and Maintenance Manual Matrixx MX-100, MX-150, MX-200 System Assembly Instructions Valve Installation 1) Remove the tape from the riser and discard. 2) Lubricate the two o-rings with a light coat of Silicone. 3) Install the Upper Basket to the valve, twisting it to lock it in place (if not already installed). 4) Slip the Upper Basket over the Riser sliding it down into place and screw the valve on and tighten. 5) Follow the installation procedures in this manual and program accordingly. General Installation Water Pressure Minimum 25 PSI Electrical Supply Uninterrupted AC Existing Plumbing Free of any deposits or build-ups inside pipes. Unit Location Locate close to drain and connect according to plumbing codes Bypass Valves Always provide for bypass valve if unit is not equipped with one. Softener and or other water treatment equipment should be installed to local plumbing codes Plumbing CAUTION Do not exceed 120 psi water pressure. Do not exceed 110°F water temperature. Do not subject unit to freezing conditions. Figure 5. Piping Diagram 1. Locate the softener tank and brine tank close to a drain where the system will be installed. The surface should be clean a nd level. 8 Installation, Operation and Maintenance Manual Matrixx MX-100, MX-150, MX-200 System 2. Perform all plumbing according to local plumbing codes. Use a 1/2” minimum pipe or tubing size for the drain line Use a 3/4” pipe or tubing for backwash flow rates that exceed 7 gpm or length that exceeds 20ft (6 m) 3. Any solder joints near the valve must be done before connecting any piping to the valve. Always leave at least 6" (152 mm) between the valve and joints when soldering pipes that are connected to the valve. Failure to do this could cause damage to the valve. 4. Chose the plumbing connectors and install them in the bypass valve. Remove the red clip and insert the connector. Re install the red clip to secure the connector. 4. Connect the drain line to the valve. Hose barb fitting for drain Hose barb fitting for drain line. line. Be sure to use a holes lamp Be sureto secure the line. to use a hose clamp to secure the line. 5. Connect the brine line from the valve to the air check / safety elbow. Double check to make sure all connections are as- sembled correctly and the plastic nut is tight and secure to prevent leaks. Remove the clip from the brine connection on the valve and push the brine line in the connector. Be sure the line is pushed in completely. Pull on the line to make sure it is secure. Re-install the clip to lock the fitting. 6. Add water until there is approximately 2" (25 mm) of water above the grid plate. If the tank does not have a grid, add wa- ter until it is above the air check in the brine tank. Add (2) 50 lb. bags of salt to the brine tank. 9 Installation, Operation and Maintenance Manual Matrixx MX-100, MX-150, MX-200 System 7. Place the unit in the bypass position. The unit is in bypass when both red handles are pointing to each other (bisecting the plumbing connections). 8. Slowly turn on the main water supply. 9. At the nearest cold treated water tap nearby remove the faucet screen, open the faucet and let water run a few minutes or until the system is free of any air or foreign material resulting from the plumbing work. Close the water tap when water runs clean, then proceed to start up instructions. Start-Up Instructions 1. Plug the valve into an approved power source. 2. When power is supplied to the control, the screen will display “INITIALIZING WAIT PLEASE” while it finds the ser- vice position. 3. Press “SET/REGEN” and hold for 3 seconds to initiate a manual regeneration and advance the valve to the Backwash position. Open the inlet on the bypass valve slowly and allow water to enter the unit. Allow all air to escape from the unit before turning the water on fully then allow water to run to drain for 3-4 minutes or until all media fines are washed out of the softener. 4. Press any button to advance to the BRINE position. Check the water level in the brine tank to insure the valve is draw- ing brine properly. 5. Press any button to advance to the RINSE position. Check the drain line flow. Allow the water to run for 3-4 minutes or until the water is clear. 6. Press any button to advance to the REFILL position. Check that the valve is filling water into the brine tank. Allow the valve to refill for the correct amount of time as displayed on the screen to insure a proper brine solution for the next regeneration. 7. Press any button to advance to the SERVICE position. Open the outlet valve on the bypass, then open the nearest treated water faucet and allow the water to run until clear, close the tap and replace the faucet screen. 8. Add salt into the brine tank. 9. Program hardness and people into controller using Level One Programming Instructions. 10 Installation, Operation and Maintenance Manual Matrixx MX-100, MX-150, MX-200 System Level I User Programming Setting Current Time 1. If screen is locked, press MENU for 3 seconds to unlock. Press MENU again to enter level one programming mode and adjust CURRENT TIME. 2. Press SET/REGEN to adjust hours. When you have entered the change value mode, the curser will blink. Press UP OR DOWN arrows to change the hour values. Press SET/REGEN again to accept the hour value and advance to change the minutes value. Press UP OR DOWN arrows to change the minute values. Press SET/REGEN again to accept the minute values and advance to adjust the AM/PM values. Press UP OR DOWN to change the AM/PM value. Press SET/REGEN again to accept the AM/PM value and exit. When you have exited the change value mode, the curser will stop flashing. Setting Current Date Press DOWN to advance to CURRENT DATE. Using the same procedure as setting the time, press SET/REGEN to enter value change mode. Setting Number of People Press DOWN to advance to NUMBER PEOPLE. Press the SET/REGEN to change the value. Press up or down arrows to change the values. Setting Water Hardness Press DOWN to advance to WATER HARDNESS. Press the SET/REGEN to change the value. Press UP OR DOWN to change the values. 11 Installation, Operation and Maintenance Manual Matrixx MX-100, MX-150, MX-200 System NOTE: When valve is in manual mode disregard setting the NUMBER PEOPLE and WATER HARDESS. (see level II User Programming). The Level I menu will still display NUMBER PEOPLE and WATER HARDNESS but cal- culations are disabled in manual mode. The capacity and refill time must be manually adjusted. Setting Vacation Mode Press DOWN to advance to VACATION MODE. Press the SET/REGEN to change the value. Press UP OR DOWN to change the values. Exiting Level One User Program Mode At any time, press the “MENU” to accept all changes and return to main page display. Level I User Program Mode PARAMETER 1 CURRENT TIME 2 CURRENT DATE 3 NUMBER PEOPLE 4 WATER HARDNESS OPTIONS DESCRIPTION This option is the current time of day. This option is the current date. The date is used to track the last time the system regenerated. This value is the number of people living in the home. It is used to calculate the amount of water needed for daily use and the reserve capacity of the system. calculate the system capacity. Yes 5 This function may be activated by the user during a prolonged absence such as vacation. The system VACATION MODE No water fresh in the softener tank and plumbing system. Figure 7. Level I Program Options Level l User Programming Flow Chart CURRENT TIME 12:01 PM CURRENT TIME 12:01 PM CURRENT TIME 12:01 PM CURRENT DATE JAN/01/2012 CURRENT DATE JAN/01/2012 CURRENT DATE JAN/01/2012 NUMBER PEOPLE 4 NUMBER PEOPLE 4 WATER HARDNESS 25 GPG FEED WATER IRON 5 PPM VACATION MODE YES NO 12 Installation, Operation and Maintenance Manual Matrixx MX-100, MX-150, MX-200 System Level II User Programming When the Level Two Master Programming Mode is entered, all available option setting displays may be viewed and set as needed. Depending on current option settings, some parameters cannot be viewed or set. If you have a HTO system refer to the Quick Start Guide for programming parameters. 1. If screen is locked, press MENU for 3 seconds to unlock. 2. Press and hold UP & DOWN arrows for three seconds to enter Level Two Master Programming. 13 Installation, Operation and Maintenance Manual Matrixx MX-100, MX-150, MX-200 System Level II User Programming Softener Flow Chart 14 Installation, Operation and Maintenance Manual Matrixx MX-100, MX-150, MX-200 System Diagnostics Mode 1. If screen is locked, press “MENU” for 3 seconds to unlock. 2. Press and hold the UP and DOWN buttons for three seconds to enter Level Diagnostics Mode. In this mode, key diagnostics can be viewed for trouble shooting and problem solving. In addition, the val- ues can be reset to zero individually by pressing “SET/REGEN” for 3 seconds PARAMETER DESCRIPTION LAST REGEN This value is the date the valve last performed a regeneration cycle. TOTAL REGENS Total performed. METER TOTAL This value is the total number of gallons the system has treated. CURRENT FLOW RATE This is the current flow rate of the unit. CURRENT REFILL This is the current value of the REFILL calculation. CAPACITY This is the current value of the CAPACITY calculation. REGEN. DAYS This is the current value of the REGEN. DAYS calculation. PEAK FLOW RATE This is the highest flow rate (in GPM) recorded by the valves flow meter in the past 48hours. SOFTWARE VER. This is the current version of software. Vacation Settings Mode 1. If screen is locked, press “ MENU ” for 3 seconds to unlock. 2. Press the DOWN arrow for 3 seconds to enter the Vacation Settings Mode. In this mode the length of time for backwash and rinse along with the frequency are set while the valve is in vacation mode. PARAMETER REGEN. DAYS DESCRIPTION This value is the frequency of how often the unit should perform a brief backwash and rinse. This option controls the length of time in minutes for the unit to briefly clean the bed by reversing the flow of water BACKWASH upwards through the bed and out to the drain. This option controls the length of time to give the tank a brief rinse from the top to the bottom in order to remove any RINSE stale or stagnant water from the tank. 15 Installation, Operation and Maintenance Manual Matrixx MX-100, MX-150, MX-200 System Valve Cycle Settings for Softeners VALVE CYCLE SETTINGS (MINUTES) CLEAN WATER BRINE LINE PROBLEM WATER DRAIN LINE INJECTOR MODEL BACKWASH BRINE/RINSE RINSE BACKWASH BRINE/RINSE RINSE SIZE FLOW CONTROL (GPM) FLOW CONTROL (GPM) IWT565-75 5.0 50.0 5.0 10.0 50.0 5.0 #00 #1 (1.5) 0.70 IWT565-100 5.0 50.0 5.0 10.0 50.0 5.0 #0 #2 (2.0) 0.70 IWT565-150 5.0 50.0 5.0 10.0 50.0 5.0 #1 #3 (2.4) 0.70 IWT565-200 5.0 50.0 5.0 10.0 50.0 5.0 #2 #4 (3.5) 0.70 IWT565-250 5.0 50.0 5.0 10.0 50.0 5.0 #2 #6 (4.0) 0.70 IWT565-300 5.0 50.0 5.0 10.0 50.0 5.0 #3 #7 (5.0) 0.70 IWT565-75C 5.0 50.0 5.0 10.0 50.0 5.0 #00 #2 (2.0) 0.70 IWT565-100C 5.0 50.0 5.0 10.0 50.0 5.0 #0 #3 (2.4) 0.70 Figure 13. Valve Cycle Settings Changing Valve Cycle Settings 1. 2. 3. 4. 5. Press the “MENU” for three seconds to unlock screen. Press and hold “UP and DOWN” for three seconds to enter Level Two Master Programming. Press the “DOWN” and advance to the BACKWASH menu option. Press “SET/REGEN” to edit the BACKWASH minutes. Press “UP or DOWN” arrows to change the BACKWASH minute values. Press “SET/REGEN” again to ac- cept the new value. Press the “DOWN” twice to advance to the RINSE menu option. Press ”SET/REGEN” to edit the RINSE minutes. Press ”UP or DOWN” arrow to change the RINSE minute values. Press ”SET/REGEN” again to accept the new value. Press “MENU” to exit programming mode. 16 Installation, Operation and Maintenance Manual Matrixx MX-100, MX-150, MX-200 System Automatic Bypass The regeneration cycle lasts approximately 75 minutes, after which soft water service will be re- stored. During regeneration, hard water is automatically bypassed for use in the household. Hot water should be used as little as possible during this time to prevent hard water from filling the wa- ter heater. This is why automatic regeneration is set for sometime during the night and manual re- generations should be performed when little or no water will be used in the household. Safety Float The brine tank is equipped with a safety float which prevents your brine tank from overfilling as a result of a malfunction such as a power failure. New Sounds You may notice new sounds as your water softener operates. The regeneration cycle lasts approxi- mately 2-1/2 hours. During this time, you may hear water running intermittently to the drain. Manual Bypass In the case of emergency, such as an overflowing brine tank, you can isolate your water softener from the water supply using the bypass valve located at the back of the control. In normal operation the bypass is open with the on/off knobs in line with the inlet and outlet pipes. To isolate the soften- er, simply rotate the knobs counter clockwise until they lock. You can use your water related fix- tures and appliances as the water supply is bypassing the softener. However, the water you use will be hard. To resume soft water service, open bypass valve by rotating the knobs clockwise. Figure 15. Bypass Installation View 17 Installation, Operation and Maintenance Manual Matrixx MX-100, MX-150, MX-200 System Maintenance Adding Salt Use only crystal water softener salt. Check the salt level monthly. It is important to maintain the salt level above the water level. To add salt, simply lift the salt lid and add the salt directly into the brine tank. Be sure the brine well cover is on and fill only to the height of the brine well. Bridging Humidity or wrong type of salt may create a cavity between the water and the salt. This action, known as “bridging”, prevents the brine solution from being made, leading to your water supply being hard. If you suspect salt bridging, carefully pound on the outside of the brine tank or pour some warm water over the salt to break up the bridge. This should always be followed up by allowing the unit to use up any remaining salt and then thoroughly cleaning out the brine tank. Allow four hours to produce a brine solution, then manually regenerate the softener. Care of Your Softener To retain the attractive appearance of your new water softener, clean occasionally with mild soap solution. Do not use abrasive cleaners, ammonia or solvents. Never subject your softener to freezing or to temperatures above 120°F. Cleaning the Injector Assembly Sediment, salt and silt will restrict or clog the injector. A clean water supply and pure salt will prevent this from happening. The injector assembly is located on the right side of the control valve. This assembly is easy to clean. 18 Installation, Operation and Maintenance Manual Matrixx MX-100, MX-150, MX-200 System Shut off the water supply to your softener and reduce the pressure by opening a cold soft water faucet. Using a screwdriver, remove the two screws holding the injector cover to the control valve body. Carefully remove the assembly and disassemble as shown in Figure 6. The injector orifice is removed from the valve body by carefully turning it out with a large screwdriv- er. Remove the injector throat the same way. Carefully flush all parts including the screen. Use a mild acid such as vinegar or Pro-Rust Out to clean the small holes in the orifice and throat. Reassemble using the reverse procedure. Resin Cleaner An approved resin cleaner must be used on a regular basis if your water supply contains iron. The amount of resin cleaner and frequency of use is determined by the quantity of iron in your water (consult your local representative or follow the directions on the resin cleaner package). 19 Installation, Operation and Maintenance Manual Matrixx MX-100, MX-150, MX-200 System 20 Installation, Operation and Maintenance Manual Matrixx MX-100, MX-150, MX-200 System 21 Installation, Operation and Maintenance Manual Matrixx MX-100, MX-150, MX-200 System 22 Limited Lifetime Warranty For the lifetime of the original purchaser, at the original residential place of installation of this Matrixx Water Conditioning System, US WATER SYSTEMS, INC. warrants the following: GENERAL PROVISIONS This warranty does not apply to any commercial or industrial installations or to any part of the water conditioner which has been subjected to misuse, neglect, alteration or accident;; or to any damage caused by fire, flood, freezing, Acts of God, or any other casualty, or if the original serial numbers have been removed. Fouling or damage to the media caused by iron, sulfur, bacterial iron, silt, sand, tannins, organics, hot water or chlorine voids the warranty on media. LIFETIME COVERAGE Media Tank Free of all costs to you except transportation and labor charges, we warrant that we will replace or repair the fiberglass media tank, if for any reason it is found to be defective, because of faulty materials or workmanship. These warranties are in lieu of all other warranties expressed. or implied, and we do not authorize any person to assume for us any other obligation on the sale of this water conditioner. No responsibility is assumed for delays or failure to meet these warranties caused by strike, government regulations or other circumstances beyond the control of US WATER SYSTEMS, INC.. Brine Tank Free of all costs to you except transportation and labor charges, we warrant that we will replace or repair the plastic brine tank, if for any reason it is found to be defective, because of faulty materials or workmanship. TO OBTAIN WARRANTY SERVICE, CALL OR WRITE: US WATER SYSTEMS, INC. 1209 COUNTRY CLUB ROAD INDIANAPOLIS, IN 46234 (800) 608-USWA(8792). SEVEN YEAR COVERAGE Valve & Electronics ANY IMPLIED WARRANTIES OF FITNESS OR MERCHANTABILITY ARE LIMITED TO THE TERMS OF THIS EXPRESSED WARRANTY AND THERE ARE NO WARRANTIES WHICH EXTEND BEYOND THOSE HEREIN. US WATER SHALL NOT BE LIABLE FOR ANY INCIDENTIAL OR CONSEQUENTIAL DAMAGES. We warrant that for seven (7) years from the date of purchase, we will replace or repair the valve and electronics , if for any reason it is found to be defective, because of faulty materials or workmanship at no charge to you except for transportation and standard labor charges. SOME STATES DO NOT ALLOW THE EXCLUSION OR LIMITATIONS OF INCIDENTAL OR CONSEQUENTIAL DAMAGES SO THE ABOVE LIMITATION MAY NOT APPLY TO YOU. THIS WARRANTY GIVES YOU SPECIFIC LEGAL RIGHTS, AND YOU MAY ALSO HAVE OTHER RIGHTS WHICH VARY FROM STATE TO STATE. Resin We warrant that for seven (7) years from the date of purchase, we will replace the softening resin that has failed at no charge to you except for transportation and standard labor charges. Resin damage caused by water conditions prohibited in this manual will not be covered (see General Provisions). THIS WARRANTY MAY BE TRANSFRRED TO A SUBSEQUENT OWNER WITH WRITTEN APPROVAL OF US WATER AND PAYMENT OF STANDARD TRANSFER FEE. 23