1
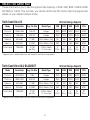
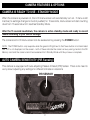
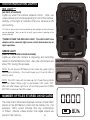
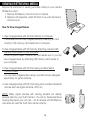
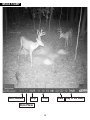
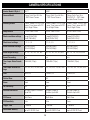
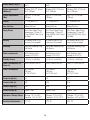
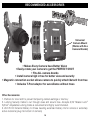
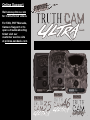
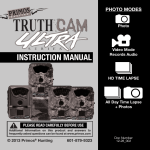
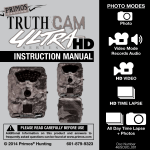
PHOTO MODES
Photo
Video
INSTRUCTION MANUAL
All Day Time Lapse
All Day Time Lapse
+ Photos
!
PLEASE READ CAREFULLY BEFORE USE
Additional Information on this product and
answers to frequently asked questions can
be found at www.primos.com
© 2012 Primos® Hunting
601-879-9323
Doc Number
04-12_001
IMPORTANT
For your protection, please carefully read these warnings, precautions and safety/operating instructions completely
before operating this product. Follow these instructions closely and keep this manual for future reference.
WARNING
To reduce the risk of fire, electrical shock or product damage/failure,
- Do not expose unit with the battery door open to rain, moisture, dripping or splashing. Do not open or close the battery
door with wet hand. Completely wipe off water on unit and door before opening.
- Do not lay product on moist ground or submerge in water (this unit is designed for upright outdoor use).
- DO NOT OPEN CASE HOUSING. UNINSULATED, ‘DANGEROUS VOLTAGE’ WITHIN PRODUCTS ENCLOSURE. DO
NOT REMOVE HOUSING COVER. THERE ARE NO USER - SERVICEABLE PARTS INSIDE, REFER SERVICING TO
PRIMOS® CUSTOMER SERVICE.
- Only use batteries as specified in this user manual and install according to correct polarization. Failure to follow may
result in leaking or exploding batteries, damage to product, fire or personal injury. Do not handle damaged or leaking
batteries.
- Do not expose to extreme heat. Do not leave product and/or batteries exposed in direct sunlight inside a vehicle, or
other contained environment for a long period of time.
- Only use accessories as recommended in this manual
CARE & CAUTION
- Transport and handle with care. Do not strongly shake, bump, hit, drop or otherwise cause impact to the product
– can result in product malfunction or damage to key components. Additionally, damage to the case could result in
imperfections to water-resistant properties.
- Take extra care when handling or using product in places with sand and dust. Sand, dust and foreign substances
exposed to product, especially in extreme proportions, may result in poor speaker quality, damage to the external
jacks or internal components and could cause malfunction of the product. If exposed to any of these elements, please
carefully wipe off completely before continued use.
MODIFICATION WARNING
You are cautioned that any changes or modifications not expressly approved in this manual could void your warranty
of this equipment.
OPERATING TEMPERATURE
- Recommended storage temperature range -10°F to 140°F
- Recommended operating temperature range 20°F to 120°F
WARNING
To avoid possible product damage and/or injury, NEVER INSTALL DIFFERENT TYPES OF BATTERIES in the product at
the same time. Failure to follow may result in leaking or exploding batteries, damage to product, fire or personal injury.
Do not handle damaged or leaking batteries.
QUESTIONS??
Feel free to contact Primos® Customer Service Team with any comments, questions, problems or return requests. Call
(601) 879-9323 or e-mail [email protected].
INTRODUCTION
Thank you for choosing a Primos® TRUTH® Cam Ultra, we know you have choices
and we appreciate you choosing us. Our goal at Primos® is to provide products for
hunters that are reliable and “Simple to Use”. This past year we have been honored
by getting so much feedback from you our customers. The TRUTH® Cams are some
of the most highly rated products within the Game Camera category. We appreciate
the positive feedback as well as input on how to make our products even better.
This year we have made some major improvements to our TRUTH® Cams. All
TRUTH® Cam Ultras utilize sliding switches that make setting up simple as possible.
We, like you, are always pushing to make our time afield more productive and fun.
The TRUTH® Cam has all the features you want in a game camera that is “ Ultra
Simple To Use”.
It’s
SIMPLE TO USE THIS CAMERA
Install Batteries
Install SD Memory Card
Simply Set The Date & Time
Slide Switches To Desired Setting
The Camera Will Automatially Enter
Active Standby Mode After 15
Seconds!
TABLE OF CONTENTS
BEFORE OPERATION . . . . . . . . . . . . . . . . . . . . . . . . . . . . . . . . . . . . . . . . . . . . . . . . . . . . . . . . 1
Needed To Operate . . . . . . . . . . . . . . . . . . . . . . . . . . . . . . . . . . . . . . . . . . . . . . . . . . 1
Select SD Card Size . . . . . . . . . . . . . . . . . . . . . . . . . . . . . . . . . . . . . . . . . . . . . . . . . 2
CAMERA OPERATION . . . . . . . . . . . . . . . . . . . . . . . . . . . . . . . . . . . . . . . . . . . . . . . . . . . . . . . . 3
Date & Time. . . . . . . . . . . . . . . . . . . . . . . . . . . . . . . . . . . . . . . . . . . . . . . . . . . . . . . . . 3
Switch Settings [MODE, SETTINGS & DELAY] . . . . . . . . . . . . . . . . . . . . . . . . . . . . 4
CAMERA FEATURES & OPTIONS . . . . . . . . . . . . . . . . . . . . . . . . . . . . . . . . . . . . . . . . . . . . . 7
Camera Is Ready To Use - Standby Mode . . . . . . . . . . . . . . . . . . . . . . . . . . . . . . 7
Auto Camera Sensitivity . . . . . . . . . . . . . . . . . . . . . . . . . . . . . . . . . . . . . . . . . . . . . . . 7
Status Indication Lights. . . . . . . . . . . . . . . . . . . . . . . . . . . . . . . . . . . . . . . . . . . . . . . . 8
Number of Files Stored on SD Card. . . . . . . . . . . . . . . . . . . . . . . . . . . . . . . . . . . . . . 8
Battery Life . . . . . . . . . . . . . . . . . . . . . . . . . . . . . . . . . . . . . . . . . . . . . . . . . . . . . . . . . 9
Formatting / Clearing SD Memory Card . . . . . . . . . . . . . . . . . . . . . . . . . . . . . . . . . . 9
Viewing/Retrieving Media . . . . . . . . . . . . . . . . . . . . . . . . . . . . . . . . . . . . . . . . . . . . . 10
USB Port . . . . . . . . . . . . . . . . . . . . . . . . . . . . . . . . . . . . . . . . . . . . . . . . . . . . . . . . . . . 11
External Power Port . . . . . . . . . . . . . . . . . . . . . . . . . . . . . . . . . . . . . . . . . . . . . . . . . 11
Image Stamp . . . . . . . . . . . . . . . . . . . . . . . . . . . . . . . . . . . . . . . . . . . . . . . . . . . . . . . 12
CAMERA SPECIFICATIONS . . . . . . . . . . . . . . . . . . . . . . . . . . . . . . . . . . . . . . . . . . . . . . . . . . . 13
OPERATING TIPS . . . . . . . . . . . . . . . . . . . . . . . . . . . . . . . . . . . . . . . . . . . . . . . . . . . . . . . . . . . . 15
RECOMMENDED ACCESSORIES . . . . . . . . . . . . . . . . . . . . . . . . . . . . . . . . . . . . . . . . . . . . . . . 18
CUSTOMER SERVICE & WARRANTY . . . . . . . . . . . . . . . . . . . . . . . . . . . . . . . . . . . . . . . . . . . . 19
BEFORE OPERATION
INCLUDED PARTS
1. Truth® Cam ULTRA™ – (1)
2. 72” Tree Mounting Strap – (1)
3. Instruction Manual – (1)
4. Quick Reference Guide – (1) NEEDED TO OPERATE
1. Eight (8) “AA” Alkaline, Lithium or Rechargeable Batteries
2. One or more SD Memory Cards
(Camera will support up to 32GB SD or SDHC Cards)
NOTE: If no SD Card is installed ‘Add SD’ will display on the initial menu screen
3. SD Memory Card Reader or other device to download media
from SD Memory Card to Computer. (Many computers have
SD Memory Card slot built-in)
1
SELECT SD CARD SIZE
These charts allow you to see the approximate capacity of 2GB, 4GB, 8GB, 16GB & 32GB
SD Memory Cards. This will help you decide which size SD Cards might be appropriate
based on your desired camera mode.
Truth Cam Ultra 35
SD Card Storage Capacity
Mode
Resolution
Avg. File Size
Media Type
2GB
4GB
8GB
16GB
32G
Photo Hi
2048x1536
750 KB
Images
2500
5000
10000
20000
40000
Photo Lo
1280x960
600 KB
Images
3500
7000
14000
28000
56000
Video Hi
640x480
21 MB
Short Videos (15s)
95
190
380
760
1520
Video Lo
320x340
5.3 MB
Short Videos (15s)
380
720
1440
2880
5760
Time Lapse
1280x960
1.0 GB
per Day
All Day Videos
2
Days
4
Days
8
Days
16
Days
32
Days
10s Time Lapse
* Approximation - photo/video sizes are based on individual image details
Truth Cam Ultra 46 & BLACKOUT
Mode
Resolution
SD Card Storage Capacity
Avg. File Size
Media Type
2GB
4GB
8GB
16GB
32G
Photo Hi
3072x2304
1 MB
Images
2000
4000
8000
16000
32000
Photo Lo
2592x1944
800 KB
Images
2500
5000
10000
20000
40000
Video Hi
640x480
21 MB
Short Videos (15s)
95
190
380
760
1520
Video Lo
320x340
5.3 MB
Short Videos (15s)
380
720
1440
2880
5760
Time Lapse
1280x960
1.0 GB
per Day
All Day Videos
2
Days
4
Days
8
Days
16
Days
32
Days
10s Time Lapse
* Approximation - photo/video sizes are based on individual image details
2
CAMERA OPERATION
SETTING DATE & TIME
View Date or Time
With camera LCD screen ON, push ▲ or ▼arrows to display date or time setting in the camera.
To Change Date or Time
With Date or Time setting on the LCD screen, press OK button to enter edit mode (setting should
start to blink). Use▲ or ▼arrows to change the setting, pressing OK button to save.
NOTE: This Truth® Cam Ultra™ is equipped with an internal rechargeable backup battery that is dedicated to
saving the date and time settings when the main AA-cell batteries are removed. This internal backup battery
can preserve your settings for up to 6 months when fully charged.
(The Internal Backup Battery obtains its charge from the main ‘AA’ batteries. With first use or after a long period
of time without camera use, internal battery may take up to 30 hours to fully charge - charges only when “AA”
batteries are installed when camera is turned ON.)
3
SWITCH SETTINGS [MODE, SETTINGS & DELAY]
2
1. MODE SWITCH
1
Decide Which Capture Mode To Use
3
Photo
Captures high (HI) or standard (LO) resolution
photos with motion detection. Your camera’s
photo capture resolution can be found in the
Camera Specifications chart in the back of
this manual. Photo is the most popular capture
mode. Media Saved: JPEG Photos
Video
Captures high (HI) or standard (LO) resolution video clips with motion detection. Your camera’s
video capture resolution can be found in the Camera Specifications chart in the back of this
manual. Video mode is less popular (night videos drain a lot of power resulting in shorter battery
life). Media Saved: AVI Video Clips
All Day Time Lapse
Captures time lapse photography automatically all day and saves footage in a video file. This
mode has gained popularity for scouting further distances, such as big open areas (food plots,
fields, etc) where you will capture footage automatically whether there is motion or not. However,
with the camera constantly taking pictures all day, the battery life will be limited (see Battery Life
in manual). Media Saved: All Day AVI Videos
All Day Time Lapse Day + Photos
Same as Time Lapse above, but ALSO will simultaneously capture photos (with default photo
setting - see below) during Day or Night when motion is detected. This mode allows the long
range surveillance but also with the convenience of quickly seeing what walking directly in front
of the camera [without having to watch the entire day time lapse video] . However, with the
camera constantly taking pictures all day, the battery life will be limited.
Default Photo Setting: Photo Lo, 3 Burst, Delay according to Delay setting.
Media Saved: All Day AVI Video and JPEG Photos
4
SWITCH SETTINGS [MODE, SETTINGS & DELAY] CONT.
2. SETTING SWITCH
The sliding switches are color coded to match the SETTINGS with the corresponding MODE setting.
2
3
1
Photo Burst
Number of pictures taken each time motion is detected (triggering event)
Video Length
The length (seconds) of each video clip recorded each time motion is detected (triggering event)
Time Lapse Interval
The pre-set amount of time (seconds or minutes) you desire between each time lapse photo.
Short intervals offer more constant surveillance but your AVI video file will be larger. Longer
intervals will reduce the video file size and save battery life.
5
SWITCH SETTINGS [MODE, SETTINGS & DELAY] CONT.
3. DELAY SWITCH
The pre-set amount of time you desire between photo & video recordings. The delay switch
setting also applies to delay between photo recordings in Time Lapse + Photo mode.
30
SEC
CAMERA IS READY TO USE!
AFTER SETTING DATE & TIME and SIMPLY SLIDING
SWITCHES TO DESIRED SETTING, THE CAMERA WILL
AUTOMATICALLY START A 15 SECOND COUNTDOWN.
After the countdown, the camera is active standby mode
and will record media according to the switch settings.
6
CAMERA FEATURES & OPTIONS
CAMERA IS READY TO USE - STANDBY MODE
When the camera is powered on, the LCD menu screen will automatically turn on. If menu is left
inactive (no settings changed or button pushed) for 10 seconds, menu screen will start counting
down from 15 seconds until it reaches Standby Mode.
After the 15 second countdown, the camera is active standby mode and ready to record
media according to your switch settings.
The camera and LCD menu screen can be awakened by pressing the POWER button.
NOTE: The POWER button only responds when the green LED light next to the Power button in not illuminated
and ‘PIC’ is not displayed on the screen – both of these indicate the camera is busy saving media to the SD
Memory card and the camera cannot be awakened from Standby Mode until this process is complete.
AUTO CAMERA SENSITIVITY (PIR Sensing)
This camera is equipped with auto-adjusting Passive Infrared (PIR) Sensor. There is no need to
worry about adjusting any settings for different climates or situations
PIR SENSOR
7
STATUS INDICATION LIGHTS
RED LIGHT ***
(on front of camera)
Lights up when the camera detects motion. After you
close camera door and are standing in front of the camera,
visibility of this light is indication that your camera is ON
and working.
TIP: Walk in front of the camera and look for the red light to illuminate when
you are detected. You can do this to verify your camera is pointing in the
correct direction.
**NEVER COVER THE RED LED LIGHT. This LED LIGHT also
doubles as the camera’s light sensor, which determines day or
night operation.
GREEN LIGHT
(next to PWR button inside camera)
Lights up when the camera is capturing and recording
media on the SD Memory Card. Also, the LCD screen will
show ‘PIC’ during this process.
NOTE: Do not remove SD Memory Card when the green light is
illuminated or blinking – this could cause you to lose all data on
memory card!
NOTE: The LCD menu will not wake up from Power Saving Mode
while the Green Status Light is illuminated/ LCD reads ‘PIC’.
Wait until after Green Light turns off and then press the POWER
BUTTON to wake up the LCD screen.
NUMBER OF FILES STORED ON SD CARD
The initial main LCD screen displays number of files ‘0000’
stored on the SD Memory Card and the battery life. For
example, ‘0015’ would indicate that any combination
of ‘fifteen’ photos, videos and/or time lapse videos are
stored in the memory.
8
BATTERY LIFE
Long battery life is one of the most important requirements for convenient and enjoyable game
camera use. There are several variables that will determine the battery life including type of
batteries, temperature outside, recording settings, frequency of camera activity, etc. Colder
temperatures, more advanced settings, night photos and high photo frequency (low camera
delay) will result in shorter battery life. Different brands of batteries may also perform better than
others, so please experiment to find what works best for you. (NOTE: Capturing video clips
and time lapse videos uses more power and will result in shorter battery life then capture motion
detected photos.)
EXAMPLES:
- Camera in standby mode with limited record activity may produce up to 1 year battery life.
- Camera with a lot of day activity in mild climate may produce tens of thousands of photos
on one set of AA batteries.
- Time Lapse 10s Interval mode may only result in 5 to 7 day battery life using 8 AA batteries
and 10 to 14 day battery life for Time Lapse 20s Interval mode.
FORMATTING/CLEANING SD MEMORY CARD
If SD Memory Card has been used in any other devices, we recommend formatting before use
in the Truth Cam. We also recommend reformatting the card every time the card is cleared of
pictures. It only takes a few seconds and can avoid inconvenient corruption and compatibility
issues that can result in loss of game pictures.
Formatting The SD Card Erases All images and Data.
To Proceed With Formatting
1. Hold ▲ and ▼arrow buttons together for 2 seconds
2. Format is complete when the display shows photo/video count “0000”
CAUTION: NO WARNING IS DISPLAYED WHEN HOLDING DOWN BOTH
ARROW BUTTONS IN FORMATTING SD CARD PROCESS. THIS DELETES
ALL PHOTOS, VIDEOS, AND ANY OTHER DATA ON THE SD CARD.
9
VIEWING/RETRIEVING MEDIA
Explore the methods for viewing recorded media on your camera
SD Memory Card:
1. Remove SD Memory Card from slot in camera
2. Replace with separate, clean SD Card if you want camera to
continue work.
How To View Images/Videos
SD
1. View images/videos with SD Card directly in computer.
If available you can view images/videos by inserting SD Card
directly in SD memory card reader slot in computer
2. View images/videos with SD Card by attaching external USB
memory card reader to your computer.
If your computer doesn’t have an SD Card reader built in, you can
view images/videos by attaching USB memory card reader to
your computer.
SD
SD
GAME CAMERA VIEWER
4. View images/videos with SD Card using other portable handheld
devices such as digital cameras, GPS, etc.
NOTE: Many digital devices with viewing screens will display
pictures taken by your Truth Camera. You can try these alternative
viewing devices at your own risk – not all devices with SD Memory
card slots will read the Truth Cam media correctly.
10
SD
3. View images/videos with SD Card using portable Game
Camera Viewer
You can view images/videos using a portable device designed
specifically for game cameras
USB PORTS
At this time, the USB port offers the following functions (USB cable not included):
1. PC CAMERA – Power on camera and then plug USB cable from camera into the computer
2. USB DRIVER – With camera power OFF plug USB cable from camera into the computer, then
power the camera ON. In USB Driver mode you can review, copy and delete the media files/
data stored on the SD Memory Card in the camera.
NOTE: Keep rubber weather resistant cover/plug in place when the port is not in use to avoid damage.
EXTERNAL POWER PORTS
The Truth® Cam Ultra™ comes standard with an external power port. This is a DC JACK/2.0mm
and will accept 6-12V power sources.
Recommended:
Primos® 6V Steroid Trail and Game Camera Battery Pack
NOTE: Keep rubber weather
resistant cover/plug in place
when the port is not in use to
avoid damage
11
IMAGE STAMP
Burst Number
Temp
Time
Moon Phase
12
Date
Day of the Week
CAMERA SPECIFICATIONS
Vendor Model #/Style #
63011
63021
63036
Camera Model
Primos Truth Cam 35 Ultra
-- 3MP Game Camera
Primos Truth Cam 46 Ultra
-- 7MP Game Camera
Primos Truth Cam Ultra
BLACKOUT -- 7MP Undetectable Game Camera
Shooting modes
Photos, Videos, All-Day Time
Lapse, Time Lapse with PIR
Day & Night Photos
Photos, Videos, All-Day Time
Lapse, Time Lapse with PIR
Day & Night Photos
Photos, Videos, All-Day Time
Lapse, Time Lapse with PIR
Day & Night Photos
Image sensor
1.3 MP Color COMS
5.0 MP Color COMS
5.0 MP Color COMS
Photo resolution settings
Large(2048x1536),
Small(1280x960)
Large(3072x2304),
Small(2592x1944)
Large(3072x2304),
Small(2592x1944)
Photo burst settings
1, 2, 3, 4, 5
1, 2, 3, 4, 5
1, 2, 3, 4, 5
Video resolution settings
640x480(30fps),
320x240(30fps)
640x480(30fps),
320x240(30fps)
640x480(30fps),
320x240(30fps)
Video length settings
5s, 10s, 15s, 20s, 30s, 60s
5s, 10s, 15s, 20s, 30s, 60s
5s, 10s, 15s, 20s, 30s, 60s
Sound Recording
n/a
n/a
n/a
Time Lapse Video Resolution
1280x960 (10fps)
1280x960 (10fps)
1280x960 (10fps)
Time Lapse interval settings
10s, 20s, 30s, 1m, 5m, 30m
10s, 20s, 30s, 1m, 5m, 30m
10s, 20s, 30s, 1m, 5m, 30m
Lens
6mm f/2.4
7.5mm f/3.0
7.5mm f/3.0
Field of View
50°
55°
55°
Zoom
fixed
fixed
fixed
ISO sensitivity
100
100
100
Infrared Illumination
35 High-Output IR Emitters;
Up to 40ft
46 High-Output IR
Emitters;Up to 55ft
60 High-Output IR
Emitters;Up to 50ft
PIR Sensor
Multi Zone
Multi Zone
Multi Zone
PIR Sensitivity
Auto
Auto
Auto
Trigger Time
1 Second
1 Second
1 Second
Removable Memory
up to 32 GB SD Card
up to 32 GB SD Card
up to 32 GB SD Card
13
Vendor Model #/Style #
63011
63021
63036
System requirements
(Windows)
Windows 2000, XP, Vista or
Win7; USB port
Windows 2000, XP, Vista or
Win7; USB port
Windows 2000, XP, Vista or
Win7; USB port
System requirements
(Mac)
Mac OS X 10.3 or later;
USB port
Mac OS X 10.3 or later;
USB port
Mac OS X 10.3 or later;
USB port
Display
1.1" Character LCD
1.1" Character LCD
1.1" Character LCD
User Interface
Sliding Switches
Sliding Switches
Sliding Switches
Image Stamp
Burst Count, Moon Phase,
Temperature, 12 Hour US
Time (AM/PM), Date, Day of
the Week
Burst Count, Moon Phase,
Temperature, 12 Hour US
Time (AM/PM), Date, Day of
the Week
Burst Count, Moon Phase,
Temperature, 12 Hour US
Time (AM/PM), Date, Day of
the Week
Memory
SD Memory up to 32 GB
card size (not included)
SD Memory up to 32 GB
card size (not included)
SD Memory up to 32 GB
card size (not included)
Mounting
Adjustable Webbing Strap
with Buckle
Adjustable Webbing Strap
with Buckle
Adjustable Webbing Strap
with Buckle
Power requirements
8xAA Batteries (not included); 6-12V DC in
8xAA Batteries (not included); 6-12V DC in
8xAA Batteries (not included); 6-12V DC in
Standby Current
< 0.25 mA (<mAh/Day)
< 0.25 mA (<mAh/Day)
< 0.25 mA (<mAh/Day)
Power Consumption (12v
Power in)
90mA (+800mA with IR)
90mA (+960mA with IR)
90mA (+1100mA with IR)
Power Consumption
"SD Card Slot
USB Jack
6V-12V DC Jack"
"SD Card Slot
USB Jack
6V-12V DC Jack"
"SD Card Slot
USB Jack
6V-12V DC Jack"
Product height (in.)
2.5
2.5
2.5
Product width (in.)
4.25
4.25
4.25
Product length (in.)
5.25
5.25
5.25
Product weight (lb)
Approx 1.5lbs
Approx 1.5lbs
Approx 1.5lbs
Operation / Storage Temps
"Storage: -10°F to 140°F
Operation: 20°F to 120°F"
"Storage: -10°F to 140°F
Operation: 20°F to 120°F"
"Storage: -10°F to 140°F
Operation: 20°F to 120°F"
Security Authentication
FCC, CE
FCC, CE
FCC, CE
14
OPERATION TIPS
Learning to use your TRUTH Cam
Visiting www.primos.com and watching our Instructional Video Clips is the ‘easiest way’ to learn
‘how to use’ your TRUTH® Camera!
®
Troubleshooting or Questions
Before calling customer service, visit primos.zendesk.com to find troubleshooting tips, frequently
asked questions and answers, as well as any updates
Waking Up LCD Menu
The LCD menu will not wake up while the Green Status Light is illuminated (LCD screen also
reads ‘PIC’ at this time). Wait until after Green Light turns off / PIC disappears to WAKE up LCD
screen by pressing the POWER button.
Camera Mounting Direction
The red status light illuminates when camera detects motion. To verify your camera is pointing
in the correct direction, you can walk in front of the camera after it is setup and look for the red
light to illuminate when you are detected – the camera will take pictures/videos when motion is
detected according to your settings. The Truth® Cam 20/20 Mount makes mounting easier and
allows photo capture from the angle of your choice (versus relying on the tree).
Camera Mounting Height
Generally 3ft from ground is normally good height to mount the camera, but depends on type of
game and ground terrain. The Truth® Cam 20/20 Mount makes mounting easier and allows photo
capture from the angle of your choice (versus relying on the tree).
15
Blurry Images
Primos® takes pride in the quality of images captured by the Truth® Cam. However, this is an
outdoor product that will be constantly exposed to different/changing conditions that can affect
the quality level. Blurry images typically result from objects causing interference between the
camera and the intended focal point (game too close, brush, trees, etc). Blurry images may also
be the result of direct sunlight, fog, condensation (dew), water droplets, snow/ice, dirt, dust or
other debris on the camera lens. Carefully cleaning the camera lens window, making sure there
are no scratches and/ or placing the camera in a different location may solve this type of problem.
Blurry Image Quality – Motion
Primos® takes pride in the quality of images captured by the Truth®Cam. Primos has improved the
ANTI-BLUR for this product; however there is currently no way to eliminate the potential of photos
with blur caused by game moving (motion) too quickly. We have optimized the Truth®Cam to
limit the number of motion blurred images and provide as many clear, quality photos as possible.
Dark or Light Image Quality
Primos® takes pride in the quality of images captured by the Truth®Cam. As daylight transitions
back-and-forth between light and dark, the camera changes settings to optimize the picture.
Some ‘lighter’ or ‘darker’ photos may be captured during the camera transition process – this
should be a limited amount of photos with the optimization of our software. Also, please try to
avoid setting up the camera in situations where the sunlight will shine directly into camera lens.
With any photo capturing, taking pictures directly into sunlight produces less than desirable
results.
Empty Photos/False Triggers
If there are a large number of photos taken with no game present in the frame, first make sure
your camera is mounted the correct height and in the right direction. If there are limited, random
photos with no game present, the following scenarios are most likely 1) an animal ran through the
picture extremely fast or 2) a smaller animal/bird is around the camera/sensor but is not in the
camera field of view or 3) the sunlight or heat in combination with moving elements (trees, brush,
shadows) is causing a false trigger. The first two scenarios are hard to prevent, but the sunlight/
heat should not cause many false triggers as the camera has been optimized to sense and
distinguish for correct triggering. To prevent potential false triggers, try not to setup the camera
directly in the sunlight.
16
Camera Doesn’t Save Photos/Video
The SD Memory Card may be locked. Please look closely at the card and make sure the card is
in the ‘unlocked’ position. If photos/ videos are still not saved by camera activity, the SD Memory
Card may be corrupt or damaged. You can try to reformat the card on a computer and try it again,
or simply try replacing it with a different/new SD Memory Card.
Storing Camera
Do not store in extreme heat, cold, moist or humid conditions. Remove batteries when storing for
periods for longer than one week without use.
Inside Camera Operation
The camera is designed for outdoor use. It is ok to test the camera indoors for operation, but
please note the indoor lighting and reflection may not be optimal for correct photo exposure and
video recording.
Watching All Day Time Lapse Videos
Time Lapse recordings are meant to be saved as an all day video file - one video file per day.
However, with interruptions, sometimes a few video files can be saved per day. Regardless, the
video is saved in a standard AVI video format which can played in almost all video players. The
most common video player is Windows Media Player. If using Windows Media Player, you may
enjoy the ability to ‘speed up’ or ‘slow down’ the video playback. To do this, with the video file
open in playback mode:
Right Click on Video --> Select Enchancements --> Select Play Speed Settings.
If you want more advanced playback features, feel free to visit www.primos.com for other video
player recommendations.
17
RECOMMENDED ACCESSORIES
Universal
Camera Mount
(Works with ALL
Camera Brands)
• Makes Every Camera have Better Vision
• Easily rotate your camera to get the PERFECT SHOT
• Fits ALL camera brands
• Install camera high in tree for better view and security
• Magnetic connection socket allows camera to quickly attach/detach from tree
• Includes T-Post adaptor for surveillance without trees
Other Accessories
1. Padlock for door latch to prevent tampering camera settings or memory
2. Locking Security Cable to run through case and around tree. Accepts 5/16” Master Lock®
Python™ Adjustable Locking Cable is convenient and highly recommended.
3. 6V-12V DC External Battery for those needing extended battery life for remote or extremely
active locations (plug into bottom of camera)
18
CUSTOMER SERVICE & WARRANTY
WARRANTY
You MUST register your Truth® Cam online within (30) days of receipt to receive
the 1 Year warranty AND present a “Proof of Purchase” to receive warranty
protection. If neither of these are presentable, we will not replace your item.
Up to 1 YEAR LIMITED WARRANTY
Primos® Hunting (“Primos”) warrants the TRUTH®Cam to be free from defects in workmanship and
materials, under normal use and conditions, for the time periods and terms as set forth below. According
to this Limited Warranty Primos® will, at its discretion, (a) repair the production using new or refurbished
parts or (b) replace the product with a new or refurbished product (product that has been returned to
its original specifications). In the event of a defect, these are the exclusive remedies available to the
original consumer purchaser only and is not assignable or transferable.
Terms: You must register your TRUTH® Cam and keep the “Proof of Purchase” receive warranty protection. on
your Camera.
**Go online to www.primos.com/registration and complete the Online Registration. You have 1 month
from date of purchase to register your TRUTH® Cam online.
** visit primos.zendesk.com for FAQ, PDF manuals, camera support or to open a troubleshooting ticket.
Limitations: This warranty is valid only if the product is used for the purpose for which it was designed.
It does not cover: 1) products which have been damaged by negligence/misuse (including, but not
limited to, improper storage, battery leakage and water damage caused by submersion), accident or
which have been modified or repaired by unauthorized persons; 2) cracked or broken housing of units
damaged by excess heat or impact/force; 3) damage caused by wild animals 4) the cost of shipping
this product to the factory for service and its return to you.
Instructions:
In the event warranty service is needed, please contact Primos® Customer Service ([email protected]) to
obtain a Return Merchandise Authorization (RMA) number. Once you have secured a RMA number, you will
be required to:
1. Write RMA number in large/visible print on outside of package.
2. Remove SD memory card and batteries from product and pack in well-padded or highly protective
box. Primos® Hunting will NOT be responsible for damage incurred in returning product for repair.
3. Include Return Form and “Proof of Purchase” in with return.
4. Send product prepaid to: Primos Hunting
604 First St
Flora, MS 39071
19
FCC STATEMENT
This equipment has been tested and found to comply with the limits for a Class B digital device,
pursuant to part 15 of the FCC Rules. These limits are designed to provide reasonable protection
against harmful interference in a residential installation. This equipment generates, uses and can
radiate radio frequency energy and, if not installed and used in accordance with the instructions, may
cause harmful interference to radio communications. However, there is no guarantee that interference
will not occur in a particular installation. If this equipment does cause harmful interference to radio
or television reception, which can be determined by turning the equipment off and on, the user is
encouraged to try to correct the interference by one or more of the following measures:
Reorient or relocate the receiving antenna.
Increase the separation between the equipment and receiver.
Connect the equipment into an outlet on a circuit different from that to which the receiver is connected.
Consult the dealer or an experienced radio/TV technician for help
DISCLAIMERS
Primos® makes no representations or warranties, either expressed or implied, by or concerning any
content of these written materials or software, or for damages resulting from the use of the information
contained therein. Primos® reserves the right to alter the features and contents of this publication,
hardware or software without obligation or advance notice.
Warranty does not extend to any accessories used with the camera.
Primos® is not responsible if you use the TRUTH® Cam for illegal purposes.
Primos® shall not be obligated to perform preventative maintenance, installation, deinstallation, or maintenance.
The illustrations in this manual are for instructional purposes only and may not represent actual product exactly.
20
Online Support
Visit www.primos.com
for instructional videos
For FAQ, PDF Manuals,
Camera Support or to
open a troubleshooting
ticket visit our
customer service site
at primos.zendesk.com