1
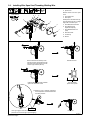
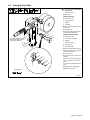
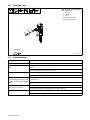
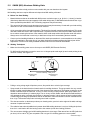
OM-241 877D 2012−05 Processes MIG (GMAW) Welding Description Wire Feeder Spool Gun Spool Gun DP 3545-20 File: Wire Feeder www.HobartWelders.com TABLE OF CONTENTS SECTION 1 −SAFETY PRECAUTIONS FOR GMAW WELDING GUNS − READ BEFORE USING . . . . . . 1 1-1. Symbol Usage . . . . . . . . . . . . . . . . . . . . . . . . . . . . . . . . . . . . . . . . . . . . . . . . . . . . . . . . . . . . . . . . . 1 1-2. Arc Welding Hazards . . . . . . . . . . . . . . . . . . . . . . . . . . . . . . . . . . . . . . . . . . . . . . . . . . . . . . . . . . . . 1 1-3. Proposition 65 Warnings . . . . . . . . . . . . . . . . . . . . . . . . . . . . . . . . . . . . . . . . . . . . . . . . . . . . . . . . . 2 1-4. Principal Safety Standards . . . . . . . . . . . . . . . . . . . . . . . . . . . . . . . . . . . . . . . . . . . . . . . . . . . . . . . 2 1-5. EMF Information . . . . . . . . . . . . . . . . . . . . . . . . . . . . . . . . . . . . . . . . . . . . . . . . . . . . . . . . . . . . . . . . 2 SECTION 2 − MESURES DE SÉCURITÉ VISANT LES PISTOLETS DE SOUDAGE GMAW − À LIRE AVANT UTILISATION . . . . . . . . . . . . . . . . . . . . . . . . . . . . . . . . . . . . . . . . . . . . . . . . . . . . . . . . . . . . . . . . . 3 2-1. Signification des symboles . . . . . . . . . . . . . . . . . . . . . . . . . . . . . . . . . . . . . . . . . . . . . . . . . . . . . . . 3 2-2. Dangers relatifs au soudage à l’arc . . . . . . . . . . . . . . . . . . . . . . . . . . . . . . . . . . . . . . . . . . . . . . . . 3 2-3. Proposition californienne 65 Avertissements . . . . . . . . . . . . . . . . . . . . . . . . . . . . . . . . . . . . . . . . . 4 2-4. Principales normes de sécurité . . . . . . . . . . . . . . . . . . . . . . . . . . . . . . . . . . . . . . . . . . . . . . . . . . . . 4 2-5. Informations relatives aux CEM . . . . . . . . . . . . . . . . . . . . . . . . . . . . . . . . . . . . . . . . . . . . . . . . . . . 4 SECTION 3 − INSTALLATION . . . . . . . . . . . . . . . . . . . . . . . . . . . . . . . . . . . . . . . . . . . . . . . . . . . . . . . . . . . . . . . . 5 3-1. Specifications . . . . . . . . . . . . . . . . . . . . . . . . . . . . . . . . . . . . . . . . . . . . . . . . . . . . . . . . . . . . . . . . . . 5 3-2. Installing Optional DP 3545 Spool Gun To Welding Power Source . . . . . . . . . . . . . . . . . . . . . . . 5 3-3. Installing Wire Spool And Threading Welding Wire . . . . . . . . . . . . . . . . . . . . . . . . . . . . . . . . . . . . 6 SECTION 4 − OPERATION . . . . . . . . . . . . . . . . . . . . . . . . . . . . . . . . . . . . . . . . . . . . . . . . . . . . . . . . . . . . . . . . . . 7 4-1. Controls . . . . . . . . . . . . . . . . . . . . . . . . . . . . . . . . . . . . . . . . . . . . . . . . . . . . . . . . . . . . . . . . . . . . . . . 7 SECTION 5 − MAINTENANCE & TROUBLESHOOTING . . . . . . . . . . . . . . . . . . . . . . . . . . . . . . . . . . . . . . . . . 8 5-1. Routine Maintenance . . . . . . . . . . . . . . . . . . . . . . . . . . . . . . . . . . . . . . . . . . . . . . . . . . . . . . . . . . . . 8 5-2. Changing Drive Rolls . . . . . . . . . . . . . . . . . . . . . . . . . . . . . . . . . . . . . . . . . . . . . . . . . . . . . . . . . . . . 9 5-3. Changing Liner . . . . . . . . . . . . . . . . . . . . . . . . . . . . . . . . . . . . . . . . . . . . . . . . . . . . . . . . . . . . . . . . . 10 5-4. Troubleshooting . . . . . . . . . . . . . . . . . . . . . . . . . . . . . . . . . . . . . . . . . . . . . . . . . . . . . . . . . . . . . . . . 10 5-5. GMAW (MIG) Aluminum Welding Hints . . . . . . . . . . . . . . . . . . . . . . . . . . . . . . . . . . . . . . . . . . . . . 11 SECTION 6 − ELECTRICAL DIAGRAMS . . . . . . . . . . . . . . . . . . . . . . . . . . . . . . . . . . . . . . . . . . . . . . . . . . . . . . 13 SECTION 7 − PARTS LIST . . . . . . . . . . . . . . . . . . . . . . . . . . . . . . . . . . . . . . . . . . . . . . . . . . . . . . . . . . . . . . . . . . . 14 WARRANTY Hobart is registered to the ISO 9001 Quality System Standard. SECTION 1 −SAFETY PRECAUTIONS FOR GMAW WELDING GUNS − READ BEFORE USING SR7 (MIG) 2011-10 Protect yourself and others from injury — read, follow, and save these important safety precautions and operating instructions. 1-1. Symbol Usage DANGER! − Indicates a hazardous situation which, if not avoided, will result in death or serious injury. The possible hazards are shown in the adjoining symbols or explained in the text. Indicates a hazardous situation which, if not avoided, could result in death or serious injury. The possible hazards are shown in the adjoining symbols or explained in the text. NOTICE − Indicates statements not related to personal injury. . Indicates special instructions. This group of symbols means Warning! Watch Out! ELECTRIC SHOCK, MOVING PARTS, and HOT PARTS hazards. Consult symbols and related instructions below for necessary actions to avoid the hazards. 1-2. Arc Welding Hazards The symbols shown below are used throughout this manual to call attention to and identify possible hazards. When you see the symbol, watch out, and follow the related instructions to avoid the hazard. The safety information given below is only a summary of the more complete safety information found in the welding power source Owner’s Manual. Read and follow all Safety Standards. Only qualified persons should install, operate, maintain, and repair this unit. During operation, keep everybody, especially children, away. ELECTRIC SHOCK can kill. D Always wear dry insulating gloves. D Insulate yourself from work and ground. D Do not touch live electrode or electrical parts. D Repair or replace worn, damaged, or cracked gun or cable insulation. D Turn off welding power source before changing contact tip or gun parts. D Keep all covers and handle securely in place. FUMES AND GASES can be hazardous. D Keep your head out of the fumes. D Ventilate area, or use breathing device. D Read Material Safety Data Sheets (MSDSs) and manufacturer’s instructions for material used. WELDING can cause fire or explosion. D Do not weld near flammable material. D Do not weld on containers that have held combustibles, or on closed containers such as tanks, drums, or pipes unless they are properly prepared according to AWS F4.1 and AWS A6.0 (see Safety Standards). D Watch for fire; keep extinguisher nearby. BUILDUP OF GAS can injure or kill. D Shut off compressed gas supply when not in use. D Always ventilate confined spaces or use approved air-supplied respirator. MOVING PARTS can injure. D Keep away from moving parts. D Keep away from pinch points such as drive rolls. ARC RAYS can burn eyes and skin. D Wear welding helmet with correct shade of filter. D Wear correct eye and body protection. D Cover exposed skin with spatter-resistant clothing. HOT PARTS can burn. D Allow gun to cool before touching. D Do not touch hot metal. D Protect hot metal from contact by others. NOISE can damage hearing. Noise from some processes or equipment can damage hearing. D Check for noise level limits exceeding those specified by OSHA. D Use approved ear plugs or ear muffs if noise level is high. D Warn others nearby about noise hazard. WELDING WIRE can injure. D Keep hands and body away from gun tip when trigger is pressed. READ INSTRUCTIONS. D Read and follow all labels and the Owner’s Manual carefully before installing, operating, or servicing unit. Read the safety information at the beginning of the manual and in each section. D Use only genuine replacement parts from the manufacturer. D Perform maintenance and service according to the Owner’s Manuals, industry standards, and national, state, and local codes. OM-241 877 Page 1 1-3. Proposition 65 Warnings Welding or cutting equipment produces fumes or gases which contain chemicals known to the State of California to cause birth defects and, in some cases, cancer. (California Health & Safety Code Section 25249.5 et seq.) This product contains chemicals, including lead, known to the state of California to cause cancer, birth defects, or other reproductive harm. Wash hands after use. 1-4. Principal Safety Standards Safety in Welding, Cutting, and Allied Processes, ANSI Standard Z49.1, is available as a free download from the American Welding Society at http://www.aws.org or purchased from Global Engineering Documents (phone: 1-877-413-5184, website: www.global.ihs.com). Safe Practice For Occupational And Educational Eye And Face Protection, ANSI Standard Z87.1, from American National Standards Institute, 25 West 43rd Street, New York, NY 10036 (phone: 212-642-4900, website: www.ansi.org). Safe Practices for the Preparation of Containers and Piping for Welding and Cutting, American Welding Society Standard AWS F4.1, from Global Engineering Documents (phone: 1-877-413-5184, website: www.global.ihs.com). Safe Practices for Welding and Cutting Containers that have Held Combustibles, American Welding Society Standard AWS A6.0, from Global Engineering Documents (phone: 1-877-413-5184, website: www.global.ihs.com). National Electrical Code, NFPA Standard 70, from National Fire Protection Association, Quincy, MA 02269 (phone: 1-800-344-3555, website: www.nfpa.org and www. sparky.org). Safe Handling of Compressed Gases in Cylinders, CGA Pamphlet P-1, from Compressed Gas Association, 14501 George Carter Way, Suite 103, Chantilly, VA 20151 (phone: 703-788-2700, website: www.cganet.com). Safety in Welding, Cutting, and Allied Processes, CSA Standard W117.2, from Canadian Standards Association, Standards Sales, 5060 Spectrum Way, Suite 100, Ontario, Canada L4W 5NS (phone: 800-463-6727, website: www.csa-international.org). Safe Practice For Occupational And Educational Eye And Face Protection, ANSI Standard Z87.1, from American National Standards Institute, 25 West 43rd Street, New York, NY 10036 (phone: 212-642-4900, website: www.ansi.org). Standard for Fire Prevention During Welding, Cutting, and Other Hot Work, NFPA Standard 51B, from National Fire Protection Association, Quincy, MA 02269 (phone: 1-800-344-3555, website: www.nfpa.org. OSHA, Occupational Safety and Health Standards for General Industry, Title 29, Code of Federal Regulations (CFR), Part 1910, Subpart Q, and Part 1926, Subpart J, from U.S. Government Printing Office, Superintendent of Documents, P.O. Box 371954, Pittsburgh, PA 15250-7954 (phone: 1-866-512-1800) (there are 10 OSHA Regional Offices— phone for Region 5, Chicago, is 312-353-2220, website: www.osha.gov). 1-5. EMF Information Electric current flowing through any conductor causes localized electric and magnetic fields (EMF). Welding current creates an EMF field around the welding circuit and welding equipment. EMF fields may interfere with some medical implants, e.g. pacemakers. Protective measures for persons wearing medical implants have to be taken. For example, restrict access for passers−by or conduct individual risk assessment for welders. All welders should use the following procedures in order to minimize exposure to EMF fields from the welding circuit: 1. Keep cables close together by twisting or taping them, or using a cable cover. 2. Do not place your body between welding cables. Arrange cables to one side and away from the operator. 3. Do not coil or drape cables around your body. OM-241 877 Page 2 4. Keep head and trunk as far away from the equipment in the welding circuit as possible. 5. Connect work clamp to workpiece as close to the weld as possible. 6. Do not work next to, sit or lean on the welding power source. 7. Do not weld whilst carrying the welding power source or wire feeder. About Implanted Medical Devices: Implanted Medical Device wearers should consult their doctor and the device manufacturer before performing or going near arc welding, spot welding, gouging, plasma arc cutting, or induction heating operations. If cleared by your doctor, then following the above procedures is recommended. SECTION 2 − MESURES DE SÉCURITÉ VISANT LES PISTOLETS DE SOUDAGE GMAW − À LIRE AVANT UTILISATION SR7(MIG)_2011−10fre Pour écarter les risques de blessure pour vous−même et pour autrui — lire, appliquer et ranger en lieu sûr ces consignes relatives aux précautions de sécurité et au mode opératoire. 2-1. Signification des symboles DANGER! − Indique une situation dangereuse qui si on l’évite pas peut donner la mort ou des blessures graves. Les dangers possibles sont montrés par les symboles joints ou sont expliqués dans le texte. Indique une situation dangereuse qui si on l’évite pas peut donner la mort ou des blessures graves. Les dangers possibles sont montrés par les symboles joints ou sont expliqués dans le texte. NOTE − Indique des déclarations pas en relation avec des blessures personnelles. . Indique des instructions spécifiques. Ce groupe de symboles veut dire Avertissement! Attention! DANGER DE CHOC ELECTRIQUE, PIECES EN MOUVEMENT, et PIECES CHAUDES. Consulter les symboles et les instructions ci-dessous y afférant pour les actions nécessaires afin d’éviter le danger. 2-2. Dangers relatifs au soudage à l’arc Les symboles présentés ci-après sont utilisés tout au long du présent manuel pour attirer votre attention et identifier les risques de danger. Lorsque vous voyez un symbole, soyez vigilant et suivez les directives mentionnées afin d’éviter tout danger. Les consignes de sécurité présentées ci-après ne font que résumer l’information contenue dans les normes de sécurité énumérées dans le manuel d’utilisation du poste de soudage. Veuillez lire et respecter toutes ces normes de sécurité. L’installation, l’utilisation, l’entretien et les réparations ne doivent être confiés qu’à des personnes qualifiées. Au cours de l’utilisation, tenir toute personne à l’écart et plus particulièrement les enfants. UN CHOC ÉLECTRIQUE peut tuer. D Porter toujours des gants secs et isolants. D S’isoler de la pièce et de la terre. D Ne jamais toucher une électrode ou des pièces électriques sous tension. D Réparer ou remplacer un pistolet ou la gaine d’isolement d’un câble usée, endommagée ou fissurée. D Mettre la soudeuse hors tension avant de remplacer un bec contact ou des pièces de pistolet. D S’assurer que tous les couvercles et poignées sont fermement assujettis. LE SOUDAGE peut causer un incendie ou une explosion. D Ne pas souder à proximité de matériaux inflammables. D Ne pas effectuer le soudage sur des conteneurs fermés tels que des réservoirs, tambours, ou conduites, à moins qu’ils n’aient été préparés correctement conformément à AWS F4.1 et AWS A6.0 (voir les Normes de Sécurité). D Prendre garde aux incendies et toujours avoir un extincteur à proximité. L’ACCUMULATION DE VAPEURS peut causer des lésions ou la mort. D Quand on n’utilise pas le gaz comprimé de protection, fermer le robinet de la bouteille. D Assurer toujours la ventilation des zones fermées ou utiliser un appareil respiratoire avec alimentation en air. Les PIÈCES MOBILES peuvent causer des blessures. D Ne pas s’approcher des organes mobiles. D Ne pas s’approcher des points de coincement tels que des rouleaux de commande. LES VAPEURS ET LES FUMÉES peuvent être nocives. LE RAYONNEMENT DE L’ARC peut brûler les yeux et la peau. D Éloigner sa tête des endroits renfermant des vapeurs. D Aérer la zone de travail ou porter un appareil respiratoire. D Consulter les fiches toxicologiques (MSDS) et les notices du fabricant de chaque matériel utilisé. D Porter un casque de soudage muni d’un filtre de protection oculaire approprié. D Porter une protection oculaire et des vêtements de protection appropriés. D Protéger la peau nue en portant des vêtements anti-éclaboussures. OM-241 877 Page 3 LES PIÈCES CHAUDES peuvent provoquer des brûlures. LES FILS DE SOUDAGE peuvent provoquer des blessures. D Laisser refroidir le pistolet avant de le toucher. D Ne pas toucher d’objets métalliques chauds. D Abriter les objets métalliques contre tout contact par les personnes à proximité. D Éloigner les mains et le corps de la buse du pistolet après avoir appuyé sur la gâchette. LIRE LES INSTRUCTIONS. Le BRUIT peut endommager l’ouie. D Lire et appliquer les instructions sur les étiquettes et le Mode d’emploi avant l’installation, l’utilisation ou l’entretien de l’appareil. Lire les informations de sécurité au début du manuel et dans chaque section. D N’utiliser que les pièces de rechange recommandées par le constructeur. D Effectuer l’entretien en respectant les manuels d’utilisation, les normes industrielles et les codes nationaux, d’état et locaux. Le bruit des processus et des équipements peut affecter l’ouïe. D Vérifier si les niveaux de bruit excèdent les limites spécifiées par l’OSHA. D Utiliser des bouche-oreilles ou des serre-tête antibruit approuvés si le niveau de bruit est élevé. D Avertir les personnes à proximité au sujet du danger inhérent au bruit. 2-3. Proposition californienne 65 Avertissements Les équipements de soudage et de coupage produisent des fumées et des gaz qui contiennent des produits chimiques dont l’État de Californie reconnaît qu’ils provoquent des malformations congénitales et, dans certains cas, des cancers. (Code de santé et de sécurité de Californie, chapitre 25249.5 et suivants) Ce produit contient des éléments chimiques, dont le plomb, reconnus par l’État de Californie pour leur caractère cancérogène ainsi que provoquant des malformations congénitales ou autres problèmes de procréation. Se laver les mains après toute manipulation. 2-4. Principales normes de sécurité Safety in Welding, Cutting, and Allied Processes, ANSI Standard Z49.1, is available as a free download from the American Welding Society at http://www.aws.org or purchased from Global Engineering Documents (phone: 1-877-413-5184, website: www.global.ihs.com). Safe Practice For Occupational And Educational Eye And Face Protection, ANSI Standard Z87.1, from American National Standards Institute, 25 West 43rd Street, New York, NY 10036 (phone: 212-642-4900, website: www.ansi.org). Safe Practices for the Preparation of Containers and Piping for Welding and Cutting, American Welding Society Standard AWS F4.1, from Global Engineering Documents (phone: 1-877-413-5184, website: www.global.ihs.com). Safe Practices for Welding and Cutting Containers that have Held Combustibles, American Welding Society Standard AWS A6.0, from Global Engineering Documents (phone: 1-877-413-5184, website: www.global.ihs.com). National Electrical Code, NFPA Standard 70, from National Fire Protection Association, Quincy, MA 02269 (phone: 1-800-344-3555, website: www.nfpa.org and www. sparky.org). Safe Handling of Compressed Gases in Cylinders, CGA Pamphlet P-1, from Compressed Gas Association, 14501 George Carter Way, Suite 103, Chantilly, VA 20151 (phone: 703-788-2700, website: www.cganet.com). Safety in Welding, Cutting, and Allied Processes, CSA Standard W117.2, from Canadian Standards Association, Standards Sales, 5060 Spectrum Way, Suite 100, Ontario, Canada L4W 5NS (phone: 800-463-6727, website: www.csa-international.org). Safe Practice For Occupational And Educational Eye And Face Protection, ANSI Standard Z87.1, from American National Standards Institute, 25 West 43rd Street, New York, NY 10036 (phone: 212-642-4900, website: www.ansi.org). Standard for Fire Prevention During Welding, Cutting, and Other Hot Work, NFPA Standard 51B, from National Fire Protection Association, Quincy, MA 02269 (phone: 1-800-344-3555, website: www.nfpa.org. OSHA, Occupational Safety and Health Standards for General Industry, Title 29, Code of Federal Regulations (CFR), Part 1910, Subpart Q, and Part 1926, Subpart J, from U.S. Government Printing Office, Superintendent of Documents, P.O. Box 371954, Pittsburgh, PA 15250-7954 (phone: 1-866-512-1800) (there are 10 OSHA Regional Offices— phone for Region 5, Chicago, is 312-353-2220, website: www.osha.gov). 2-5. Informations relatives aux CEM Le courant électrique qui traverse tout conducteur génère des champs électromagnétiques (CEM) à certains endroits. Le courant de soudage crée un CEM autour du circuit et du matériel de soudage. Les CEM peuvent créer des interférences avec certains implants médicaux comme des stimulateurs cardiaques. Des mesures de protection pour les porteurs d’implants médicaux doivent être prises: Limiter par exemple tout accès aux passants ou procéder à une évaluation des risques individuels pour les soudeurs. Tous les soudeurs doivent appliquer les procédures suivantes pour minimiser l’exposition aux CEM provenant du circuit de soudage: 4 Maintenir la tête et le torse aussi loin que possible du matériel du circuit de soudage. 5 Connecter la pince sur la pièce aussi près que possible de la soudure. 6 Ne pas travailler à proximité d’une source de soudage, ni s’asseoir ou se pencher dessus. 7 Ne pas souder tout en portant la source de soudage ou le dévidoir. 1 Rassembler les câbles en les torsadant ou en les attachant avec du ruban adhésif ou avec une housse. En ce qui concerne les implants médicaux : 2 Ne pas se tenir au milieu des câbles de soudage. Disposer les câbles d’un côté et à distance de l’opérateur. 3 Ne pas courber et ne pas entourer les câbles autour de votre corps. OM-241 877 Page 4 Les porteurs d’implants doivent d’abord consulter leur médecin avant de s’approcher des opérations de soudage à l’arc, de soudage par points, de gougeage, du coupage plasma ou de chauffage par induction. Si le médecin approuve, il est recommandé de suivre les procédures précédentes. SECTION 3 − INSTALLATION 3-1. Specifications Approximate Wire Feed Range Wire Diameter Range .030 Thru .047 in. (0.8 Thru 1.2 mm) Aluminum Wire .030 Thru 047 in. (0.8 Thru 1.2 mm) Hard Wire Or Cored Wire 0 To 1200 ipm (0 To 30.5 mpm) Cooling Method Air Cooled Maximum Spool Size Weld Circuit Rating Overall Dimensions Weight 4 in. (102 mm) Diameter 100 Volts, 200 Amperes, 60% Duty Cycle Using Argon Shielding Gas Length: 11-1/2 in. (291 mm) Width: 2-1/4 in. (57 mm) Height: 8 in. (203 mm) 8 lb (3.6 kg) Gun With Cable 3-2. Installing Optional DP 3545 Spool Gun To Welding Power Source SPOOL GUN 6 SPOOL GUN CB2 MIG GUN CB1 ! Turn off and disconnect input power. 1 2 3 4 Drive Assembly Spool Gun Gun Securing Thumbscrew Gun End Loosen thumbscrew. Insert gun end through opening until it bottoms against drive assembly. Tighten thumbscrew. 4 MIG GUN . Spool gun must be inserted completely to prevent leakage of shielding gas. 5 Gun Trigger Plug Insert plug into receptacle, and tighten threaded collar. 6 Spool Gun/MIG Gun Switch Place switch in Spool Gun position. 7 7 2 1 3 5 Polarity Change Over Terminal Block To make proper polarity connection see welding power source Owner’s Manual. Close door. 8 10 8 Wire Feed Speed Control Wire feed speed is controlled by welding power source Wire Feed Speed control (see welding power source Owner’s Manual or door chart for appropriate setting). 9 Voltage Control Arc voltage is controlled by welding power source Voltage control (see welding power source Owner’s Manual or door chart for appropriate setting). 10 Trigger 9 Press trigger to energize welding power source contactor, start shielding gas flow, and begin wire feed. 242 143-A / 242 154-A OM-241 877 Page 5 3-3. Installing Wire Spool And Threading Welding Wire Tools Needed: 6 7 1 Thumb Screw 2 Spool Cover Remove thumb screw and spool cover. 8 3 4 5 Install spool so wire feeds from top. Turn hub tension nut just so a slight drag is felt on the wire spool. 4 2 1 3 9 10 Hub Tension Nut Wire Spool 5 Push Roll/Lower Drive Roll 6 Drive Roll Pressure Adjustment Opening 7 Drive Roll Release Lever (Red) 8 Wire Inlet Guide 9 Contact Tip 10 Nozzle Remove nozzle and contact tip. Push and hold red lever. Thread wire through inlet guide, past push roll/drive roll, and out end of gun 2 inches (50 mm). Release red lever. Install contact tip and nozzle. Reinstall spool cover and thumb screw. Turn On welding power source power. . Rotating screw clockwise decreases drive roll pressure and counterclockwise increases pressure. Wood Press gun trigger to feed wire to check drive roll pressure. Turn screw enough to prevent slipping. OM-241 877 Page 6 Cut off wire. 804 697-A SECTION 4 − OPERATION 4-1. Controls . Spool Gun/MIG Gun switch must be in Spool Gun position for spool gun to operate. 1 2 1 Shielding Gas Cylinder For shielding gas connections, see welding power source Owner’s Manual. 2 Valve Open valve on cylinder just before welding. Close valve on cylinder when finished welding. 3 Spool Gun/MIG Gun Switch . Switch must be set in Spool Gun position for spool gun to operate. 4 SPOOL GUN 3 MIG GUN SPOOL GUN CB2 MIG GUN CB1 Trigger Press trigger to energize welding power source contactor, start shielding gas flow, and begin wire feed. 5 Wire Feed Speed Control Wire feed speed is controlled by welding power source Wire Speed control (see welding power source Owner’s Manual or door chart for appropriate setting). 6 Voltage Control Arc voltage is controlled by welding power source Voltage control (see welding power source Owner’s Manual or door chart for appropriate setting). . To purge shielding gas line, set 4 5 gun selection switch (item 3) to the MIG Gun position. Press spool gun trigger to energize gas valve. Shielding gas will flow, but spool gun will not feed wire. Hold trigger in for several seconds to purge gas line. Return gun selection switch to the Spool Gun position before welding. 6 S-621-C / 242 154-A / 242 143-A OM-241 877 Page 7 SECTION 5 − MAINTENANCE & TROUBLESHOOTING 5-1. Routine Maintenance ! n = Check Z = Change ~ = Clean * To be done by Factory Authorized Service Agent Every 3 Months l Unreadable Labels ~ Weld Terminals nl Cords nl Gun Cables Every 6 Months OR ~ Drive Rolls OM-241 877 Page 8 ~ Inside Unit Disconnect power before maintaining. . Maintain more often during severe conditions. l = Replace l Damaged Gas Hose Reference nl Weld Cables 5-2. Changing Drive Rolls ! Turn off and disconnect input power. 1 Drive Roll Cover Remove cover. Changing Push Roll: To remove push roll: 2 Push Roll Screw 3 Washer 4 Push Roll Remove screw and washer, and lift out drive roll. To install drive roll: 4 Slide drive roll onto shaft and secure with washer and screw. 3 2 It may be necessary to remove drive roll side of gun case to change lower drive roll. Changing Lower Drive Roll: 1 To remove drive roll: 5 Lower Drive Roll Screw 6 Washer 7 Lower Drive Roll 8 Drive Roll Key 9 Drive Roll Shaft Remove screw and washer, and lift out drive roll. Note: drive roll key will come out with drive roll. To install drive roll: Place drive roll key in slot in drive roll shaft. 8 7 6 5 9 Line slot in drive roll up with drive roll key, and slide drive roll onto shaft. Secure drive roll with washer and screw. Reinstall gun case, if applicable. Tools Needed: Reinstall drive roll cover. 804 698-A OM-241 877 Page 9 5-3. Changing Liner ! Turn off and disconnect input power. 1 2 3 Nozzle Contact Tip Liner Remove and replace liner. Reinstall parts as shown. 3 2 1 Tools Needed: Ref. 804 687-A 5-4. Troubleshooting Trouble Gun tube assembly loose. Remedy Tighten nut at base of gun tube assembly. No weld output; gun/feeder does not Place Power switch on welding power source in the On position (see welding power source Owner’s work. Manual). Check Spool Gun/MIG Gun switch for correct position. Erratic weld output. Tighten and clean all connections. Check for proper weld output polarity connections (see Section 3-2). Pressing gun/feeder trigger does not Secure plug from gun/feeder trigger cord into 4-socket receptacle on welding power source energize welding power source; welding (see Section 3-2). wire is not energized; shielding gas does Place Spool Gun/MIG Gun switch in Spool Gun position (see Section 3-2). not flow. Wire feeds, shielding gas flows, but Secure spool gun cable connector to wire drive assembly inside welding power source (see Section 3-2). welding wire is not energized. See Troubleshooting section in welding power source Owner’s Manual. Wire feeds erratically. Check and correct drive roll pressure (see Section 3-3). Clean or replace drive roll; clean or replace liner (see Sections 5-2 and 5-3). OM-241 877 Page 10 5-5. GMAW (MIG) Aluminum Welding Hints Here are several hints to help you be more successful with your new aluminum feed system. MIG welding aluminum requires different techniques than MIG welding mild steel. A. Before You Start Welding S Material thickness that can be welded with MIG process or aluminum are 14 ga. [0.074 in. (1.9 mm)] or heavier. (How heavy depends on the output capacity of the welder being used.) To MIG weld aluminum thinner than 14 ga. either specialized pulsed MIG or AC TIG welding equipment may be necessary. S The removal of lubricants from the aluminum base material may be necessary. Consult with your local welding distributor for their recommendation on aluminum cleaners. S Oxide removal should be done after degreasing. This should be done with a stainless steel wire brush. This can be done with a hand wire brush or with a cup wire brush. If a power wire brush is used, keep the RPM’s and pressures low to reduce smearing the surface of the material, which could entrap oxides and impurities under the surface. Always use a wire brush that is used only on aluminum to keep from contaminating the base material. S Contact you local welding distributor or aluminum filler metal representative for recommendations on wire alloys that fit your application. Know the alloy of your base aluminum and what conditions the finished part will be subjected to. The two most readily available aluminum filler wires are ER4043 and ER5356. B. Welding Techniques S Make sure the welding power source is set up to weld DCEP (DC Electrode Positive). S For MIG welding aluminum you need to use a 10 to 15 degree push travel angle (tip and nozzle pointing in the direction of travel). See Figure 5-1. Side View Of Gun Tip Angle 10-15 10-15 Direction Of Welding Forehand (Push) Technique Backhand (Drag) Technique Figure 5-1. Gun Tip Angle S Pulling or using a drag angle will produce porous, dirty welds due to a lack of gas coverage. S Spray transfer is the desired mode of metal transfer for welding aluminum. The spray transfer is a very smooth transfer of molten metal droplets from the end of the electrode to the molten pool. The droplets crossing the arc are smaller in diameter than the electrode. There is no short-circuiting in spray transfer. With spray transfer, the deposition rate and efficiency is relatively high. The arc is very smooth, stable, and stiff and the weld bead has a nice appearance and a good wash into the sides. In the spray transfer, a large amount of heat is involved which creates a large pool with good penetration that can be difficult to control and cannot be used on materials thinner than 14 ga. This transfer will produce a hissing sound and no spatter. S The short arc transfer on aluminum produces poor cleaning action, poor tie-in at the edges of the weld, and large amounts of spatter and smoke. S The reflective heat and weld puddle that is present when MIG welding aluminum is very hot. Holding the tip closer than 3/4 in. could lead to the wire burning back to the contact tip and other feeding problems. S The most common shielding gas for MIG welding aluminum is 100% argon. Flow rates of 20 to 30 CFH [cubic feet per hour (0.57 to 0.85 m3/hr)] are acceptable. C25 or argon CO2 shielding gases are not acceptable. OM-241 877 Page 11 S Maintain a 3/4 in. (19 mm) tip-to-work distance, and have the contact tip recessed approximately 1/8 in. inside the nozzle if possible. See Figure 5-2. Gas Nozzle Contact Tube Recessed 1/8 in. (3.2 mm) Inside The Nozzle ÇÇÇÇ ÇÇÇÇ ÇÇÇÇ ÇÇÇÇ ÇÇÇÇ ÇÇÇÇ ÉÉÉ ÉÉÉ Contact Tip To Work Distance 3/4 in. (19 mm) Figure 5-2. Contact Tube Position And Tip-To-Work Distance S Avoid large weave beads on aluminum. If larger fillet welds are needed, multiple pass straight beads will provide better appearance and have less chance of cold lapping, burn through, and other weld defects. S It will be necessary to increase torch travel speed as the base material becomes heated during the welding process. S The skill level of the operator, joint types, fit up, and positions, as well as the welding power supply will all have a great influence on the weldability of the aluminum and your success. C. Common Problems/Troubleshooting S S S S Burn through (melt through) caused by over heating the base material. 1. Increase travel speed. Make shorter welds. 2. Move around on part, spreading out the heat. 3. Use thicker material, change joint design or welding process to AC TIG. 4. Eliminate or reduce gaps. Dirty welds. 1. Use push angle instead of drag technique. 2. Increase voltage to get into spray transfer. 3. Use proper base metal cleaning techniques (stainless steel brush). 4. Check for proper shielding gas and wire alloy type. Wire burns back to contact tip during or at the end of the weld. 1. Maintain a 3/4 in. (19 mm) tip-to-work distance. 2. Check to make sure the contact tip size, drive rolls and gun liner match the wire diameter that you are using. (Sometimes an oversized tip can be used. The ID should only be one size larger than the wire diameter.) Wire “bird nests” (piles up) in front of inlet guide on gun. 1. Check and adjust drive roll tension. 2. Check to make sure drive rolls match wire diameter. 3. Replace contact tip if fouled or plugged.(Sometimes an oversized tip can be used. The ID should only be one size larger than the wire diameter.) OM-241 877 Page 12 SECTION 6 − ELECTRICAL DIAGRAMS Figure 6-1. Circuit Diagram 186 451 OM-241 877 Page 13 SECTION 7 − PARTS LIST . Hardware is common and not 20 13 12 14 28 41 40 39 38 37 35 34 36 33 1 2 32 31 44 30 29 27 15 26 16 4 22 5 21 6 17 18 7 19 23 8 2 3 24 25 42 11 9 43 4 10 available unless listed. 804 699-A Figure 7-1. Complete Assembly OM-241 877 Page 14 Item No. Dia. Mkgs. Part No. Description Quantity Figure 7-1. Complete Assembly ... ... ... ... ... ... ... ... ... ... ... ... ... ... ... ... ... ... ... ... ... ... ... ... ... ... ... ... ... ... ... ... ... ... ... ... ... ... ... ... ... ... ... ... ... ... ... ... 1 2 3 4 5 6 7 8 9 10 11 12 13 14 15 16 17 18 19 20 21 18 21 22 23 24 25 26 27 28 29 30 31 32 33 34 35 36 37 38 39 39 39 40 41 42 43 44 . . . PB1 . . . . . 186 416 . . Trigger Switch . . . . . . . . . . . . . . . . . . . . . . . . . . . . . . . . . . . . . . . . . . . . . . . . . . . . . . . . . . . . . . . 226 855 . . Plastic Handle . . . . . . . . . . . . . . . . . . . . . . . . . . . . . . . . . . . . . . . . . . . . . . . . . . . . . . . . . . . . . . . 226 853 . . Spool Cover Assy (Consisting Of) . . . . . . . . . . . . . . . . . . . . . . . . . . . . . . . . . . . . . . . . . . . . . . 226 854 . . . . Spool Defence Shell . . . . . . . . . . . . . . . . . . . . . . . . . . . . . . . . . . . . . . . . . . . . . . . . . . . . . . . . 194 623 . . . . Spool Shaft . . . . . . . . . . . . . . . . . . . . . . . . . . . . . . . . . . . . . . . . . . . . . . . . . . . . . . . . . . . . . . . . 194 624 . . . . Bushing Resistance Rubber . . . . . . . . . . . . . . . . . . . . . . . . . . . . . . . . . . . . . . . . . . . . . . . . . . 194 625 . . . . Location Bushing . . . . . . . . . . . . . . . . . . . . . . . . . . . . . . . . . . . . . . . . . . . . . . . . . . . . . . . . . . . 194 626 . . . . Adjusting Nut . . . . . . . . . . . . . . . . . . . . . . . . . . . . . . . . . . . . . . . . . . . . . . . . . . . . . . . . . . . . . . . . . . . . . . . . . . . Ring, Rtng C-Clip .140 Shaft X .015 Thick . . . . . . . . . . . . . . . . . . . . . . . . . . . . . . . . . . . . . . 194 627 . . . . Locking Screw . . . . . . . . . . . . . . . . . . . . . . . . . . . . . . . . . . . . . . . . . . . . . . . . . . . . . . . . . . . . . 187 239 . . Cover, Drive Roll . . . . . . . . . . . . . . . . . . . . . . . . . . . . . . . . . . . . . . . . . . . . . . . . . . . . . . . . . . . . . 231 107 . . Strain Relief, Cable . . . . . . . . . . . . . . . . . . . . . . . . . . . . . . . . . . . . . . . . . . . . . . . . . . . . . . . . . . . 231 108 . . Spring, Cable . . . . . . . . . . . . . . . . . . . . . . . . . . . . . . . . . . . . . . . . . . . . . . . . . . . . . . . . . . . . . . . . 226 615 . . Nut, Handle Plastic . . . . . . . . . . . . . . . . . . . . . . . . . . . . . . . . . . . . . . . . . . . . . . . . . . . . . . . . . . . 193 999 . . Spring, Cprsn .310 Od X .040 Wire X 1.380 . . . . . . . . . . . . . . . . . . . . . . . . . . . . . . . . . . . . . . 186 415 . . Press Arm W/Shaft, C-Clip Washer . . . . . . . . . . . . . . . . . . . . . . . . . . . . . . . . . . . . . . . . . . . . . 187 238 . . Bearing . . . . . . . . . . . . . . . . . . . . . . . . . . . . . . . . . . . . . . . . . . . . . . . . . . . . . . . . . . . . . . . . . . . . . 186 414 . . Push Roll .030/.035 (0.8/0.9 mm) . . . . . . . . . . . . . . . . . . . . . . . . . . . . . . . . . . . . . . . . . . . . . . . 209 079 . . Screw M4 X 0.7 X 16 . . . . . . . . . . . . . . . . . . . . . . . . . . . . . . . . . . . . . . . . . . . . . . . . . . . . . . . . . 209 080 . . Screw M4 X 0.7 X 6 . . . . . . . . . . . . . . . . . . . . . . . . . . . . . . . . . . . . . . . . . . . . . . . . . . . . . . . . . . 186 413 . . Drive Roll .030/.035 (0.8/0.9 mm) . . . . . . . . . . . . . . . . . . . . . . . . . . . . . . . . . . . . . . . . . . . . . . 199 397 . . Push Roll .047 (1.2 mm) . . . . . . . . . . . . . . . . . . . . . . . . . . . . . . . . . . . . . . . . . . . . . . . . . . . . . . 199 396 . . Drive Roll .047 (1.2 mm) . . . . . . . . . . . . . . . . . . . . . . . . . . . . . . . . . . . . . . . . . . . . . . . . . . . . . . 186 488 . . Key, Drive Roll 2 mm x 7 mm . . . . . . . . . . . . . . . . . . . . . . . . . . . . . . . . . . . . . . . . . . . . . . . . . . 186 410 . . Inlet Guide . . . . . . . . . . . . . . . . . . . . . . . . . . . . . . . . . . . . . . . . . . . . . . . . . . . . . . . . . . . . . . . . . . 048 834 . . Clamp, Circ . . . . . . . . . . . . . . . . . . . . . . . . . . . . . . . . . . . . . . . . . . . . . . . . . . . . . . . . . . . . . . . . . . 079 878 . . Connector W/Sockets . . . . . . . . . . . . . . . . . . . . . . . . . . . . . . . . . . . . . . . . . . . . . . . . . . . . . . . . . 194 631 . . Nut, Brass . . . . . . . . . . . . . . . . . . . . . . . . . . . . . . . . . . . . . . . . . . . . . . . . . . . . . . . . . . . . . . . . . . . 199 395 . . Gearbox Assembly . . . . . . . . . . . . . . . . . . . . . . . . . . . . . . . . . . . . . . . . . . . . . . . . . . B2 . . . . . 186 417 . . Motor . . . . . . . . . . . . . . . . . . . . . . . . . . . . . . . . . . . . . . . . . . . . . . . . . . . . . . . . . . . . . . . . . . . . . . . 199 384 . . Buss Bar, Interconnecting . . . . . . . . . . . . . . . . . . . . . . . . . . . . . . . . . . . . . . . . . . . . . . . . . . . . . 197 570 . . Anti-Rotation Pin . . . . . . . . . . . . . . . . . . . . . . . . . . . . . . . . . . . . . . . . . . . . . . . . . . . . . . . . . . . . . 196 848 . . Contact Adapter . . . . . . . . . . . . . . . . . . . . . . . . . . . . . . . . . . . . . . . . . . . . . . . . . . . . . . . . . . . . . . 199 394 . . Head Tube Assy . . . . . . . . . . . . . . . . . . . . . . . . . . . . . . . . . . . . . . . . . . . . . . . . . . . . . . . . . . . . . 206 363 . . Liner Kit . . . . . . . . . . . . . . . . . . . . . . . . . . . . . . . . . . . . . . . . . . . . . . . . . . . . . . . . . . . . . . . . . . . . . 196 847 . . Locking Nut . . . . . . . . . . . . . . . . . . . . . . . . . . . . . . . . . . . . . . . . . . . . . . . . . . . . . . . . . . . . . . . . . . 199 393 . . Barrel . . . . . . . . . . . . . . . . . . . . . . . . . . . . . . . . . . . . . . . . . . . . . . . . . . . . . . . . . . . . . . . . . . . . . . . 209 080 . . Screw, M4 x 0.7 x 6 mm . . . . . . . . . . . . . . . . . . . . . . . . . . . . . . . . . . . . . . . . . . . . . . . . . . . . . . . 199 391 . . Gas Nipple . . . . . . . . . . . . . . . . . . . . . . . . . . . . . . . . . . . . . . . . . . . . . . . . . . . . . . . . . . . . . . . . . . 199 390 . . Gas Diffuser . . . . . . . . . . . . . . . . . . . . . . . . . . . . . . . . . . . . . . . . . . . . . . . . . . . . . . . . . . . . . . . . . 199 387 . . Contact Tip .030 . . . . . . . . . . . . . . . . . . . . . . . . . . . . . . . . . . . . . . . . . . . . . . . . . . . . . . . . . . . . . 199 388 . . Contact Tip .035 . . . . . . . . . . . . . . . . . . . . . . . . . . . . . . . . . . . . . . . . . . . . . . . . . . . . . . . . . . . . 199 389 . . Contact Tip .047 . . . . . . . . . . . . . . . . . . . . . . . . . . . . . . . . . . . . . . . . . . . . . . . . . . . . . . . . . . . . . 199 386 . . Nozzle . . . . . . . . . . . . . . . . . . . . . . . . . . . . . . . . . . . . . . . . . . . . . . . . . . . . . . . . . . . . . . . . . . . . . . . 111 400 . . Hose, Sae .187 Id X .410 Od X 8.000 . . . . . . . . . . . . . . . . . . . . . . . . . . . . . . . . . . . . . . . . . . 079 974 . . O−Ring, .500 ID X .103 cs rbr . . . . . . . . . . . . . . . . . . . . . . . . . . . . . . . . . . . . . . . . . . . . . . . . . 234 236 . . Connector, Plug Dp Spool Gun . . . . . . . . . . . . . . . . . . . . . . . . . . . . . . . . . . . . . . . . . . . . . . . . . 241 879 . . Cable Assembly 20Ft W/Connector Plug . . . . . . . . . . . . . . . . . . . . . . . . . . . 1 1 1 1 1 1 1 1 1 1 1 1 1 1 1 1 1 1 1 1 1 1 1 1 1 1 1 1 1 1 1 1 1 1 1 1 1 1 1 1 1 1 1 1 1 2 1 1 OPTIONAL To maintain the factory original performance of your equipment, use only Manufacturer’s Suggested Replacement Parts. Model and serial number required when ordering parts from your local distributor. OM-241 877 Page 15 Notes Effective January 1, 2012 5/3/1 WARRANTY applies to all Hobart welding equipment, plasma cutters and spot welders with a serial number preface of MC or newer. Warranty Questions? Call 1-800-332-3281 7 AM − 5 PM EST Service You always get the fast, reliable response you need. Most replacement parts can be in your hands in 24 hours. Support Need fast answers to the tough welding questions? Contact your distributor or call 1-800-332-3281. The expertise of the distributor and Hobart is there to help you, every step of the way. Assistance Visit the Hobart website: www.HobartWelders.com This limited warranty supersedes all previous Hobart warranties and is exclusive with no other guarantees or warranties expressed or implied. Hobart products are serviced by Hobart or Miller Authorized Service Agencies. LIMITED WARRANTY − Subject to the terms and conditions below, Hobart Brothers Co., Troy, Ohio, and Miller Electric Mfg. Co., Appleton, Wisconsin, warrants to its original retail purchaser that new Hobart equipment sold after the effective date of this limited warranty is free of defects in material and workmanship at the time it is shipped by Hobart. THIS WARRANTY IS EXPRESSLY IN LIEU OF ALL OTHER WARRANTIES, EXPRESS OR IMPLIED, INCLUDING THE WARRANTIES OF MERCHANTABILITY AND FITNESS. Within the warranty periods listed below, Hobart/Miller will repair or replace any warranted parts or components that fail due to such defects in material or workmanship. Hobart/Miller must be notified in writing within thirty (30) days of such defect or failure, at which time Hobart/Miller will provide instructions on the warranty claim procedures to be followed. Hobart/Miller shall honor warranty claims on warranted equipment listed below in the event of such a failure within the warranty time periods. All warranty time periods start on the delivery date of the equipment to the original retail purchaser, and not to exceed one year after the equipment is shipped to a North American distributor or eighteen months after the equipment is shipped to an International distributor. 1. 5 Years — Parts and Labor * Original Main Power Rectifiers only to include SCRs, diodes, and discrete rectifier modules * Reactors * * 2. 3. 4. Stabilizers Transformers 3 Years — Parts and Labor * Drive Systems * * * Idle Module PC Boards Rotors, Stators and Brushes * * Solenoid Valves Spot Welder Transformer * Switches and Controls 1 Year — Parts and Labor Unless Specified (90 days for industrial use) * Accessories * * Batteries (Trek 180 Only) Contactors * Field Options (NOTE: Field options are covered for the remaining warranty period of the product they are installed in, or for a minimum of one year — whichever is greater.) * * * * Flowgauge and Flowmeter Regulators (No Labor) HF Units MIG Guns/TIG Torches Motor-Driven Guns * * Plasma Cutting Torches Regulators * * Relays Remote Controls * * Replacement Parts (No labor) − 90 days Running Gear/Trailers * Water Coolant Systems Engines, batteries (except Trek 180) and tires are warranted separately by the manufacturer. Hobart’s 5/3/1 Limited Warranty shall not apply to: 1. Consumable components; such as contact tips, cutting nozzles, contactors, brushes, relays, work station table tops and welding curtains, or parts that fail due to normal wear. (Exception: brushes and relays are covered on all engine-driven products.) 2. Items furnished by Hobart/Miller, but manufactured by others, such as engines or trade accessories. These items are covered by the manufacturer’s warranty, if any. 3. Equipment that has been modified by any party other than Hobart/Miller, or equipment that has been improperly installed, improperly operated or misused based upon industry standards, or equipment which has not had reasonable and necessary maintenance, or equipment which has been used for operation outside of the specifications for the equipment. HOBART PRODUCTS ARE INTENDED FOR PURCHASE AND USE BY COMMERCIAL/INDUSTRIAL USERS AND PERSONS TRAINED AND EXPERIENCED IN THE USE AND MAINTENANCE OF WELDING EQUIPMENT. In the event of a warranty claim covered by this warranty, the exclusive remedies shall be, at Hobart’s/Miller’s option: (1) repair; or (2) replacement; or, where authorized in writing by Hobart/Miller in appropriate cases, (3) the reasonable cost of repair or replacement at an authorized Hobart/Miller service station; or (4) payment of or credit for the purchase price (less reasonable depreciation based upon actual use) upon return of the goods at customer’s risk and expense. Hobart’s/Miller’s option of repair or replacement will be F.O.B., Factory at Appleton, Wisconsin, or F.O.B. at a Hobart/Miller authorized service facility as determined by Hobart/Miller. Therefore no compensation or reimbursement for transportation costs of any kind will be allowed. TO THE EXTENT PERMITTED BY LAW, THE REMEDIES PROVIDED HEREIN ARE THE SOLE AND EXCLUSIVE REMEDIES. IN NO EVENT SHALL HOBART/MILLER BE LIABLE FOR DIRECT, INDIRECT, SPECIAL, INCIDENTAL OR CONSEQUENTIAL DAMAGES (INCLUDING LOSS OF PROFIT), WHETHER BASED ON CONTRACT, TORT OR ANY OTHER LEGAL THEORY. ANY EXPRESS WARRANTY NOT PROVIDED HEREIN AND ANY IMPLIED WARRANTY, GUARANTY OR REPRESENTATION AS TO PERFORMANCE, AND ANY REMEDY FOR BREACH OF CONTRACT TORT OR ANY OTHER LEGAL THEORY WHICH, BUT FOR THIS PROVISION, MIGHT ARISE BY IMPLICATION, OPERATION OF LAW, CUSTOM OF TRADE OR COURSE OF DEALING, INCLUDING ANY IMPLIED WARRANTY OF MERCHANTABILITY OR FITNESS FOR PARTICULAR PURPOSE, WITH RESPECT TO ANY AND ALL EQUIPMENT FURNISHED BY HOBART/MILLER IS EXCLUDED AND DISCLAIMED BY Hobart/Miller. Some states in the U.S.A. do not allow limitations of how long an implied warranty lasts, or the exclusion of incidental, indirect, special or consequential damages, so the above limitation or exclusion may not apply to you. This warranty provides specific legal rights, and other rights may be available, but may vary from state to state. In Canada, legislation in some provinces provides for certain additional warranties or remedies other than as stated herein, and to the extent that they may not be waived, the limitations and exclusions set out above may not apply. This Limited Warranty provides specific legal rights, and other rights may be available, but may vary from province to province. hobart_warr 2012-03 Thank you for purchasing Hobart. Our trained technical support team is dedicated to your satisfaction. For questions regarding performance, operation, or service, contact us! Resources Available Always provide Model Name and Serial/Style Number. To locate a Service Center: Call 1-800-332-3281 or visit our website at www.HobartWelders.com/wheretobuy For Technical Assistance: Call 1-800-332-3281 7 AM to 5 PM EST − Monday through Friday Owner’s Record Please complete and retain with your personal records. Model Name Purchase Date Hobart Brothers Co. Serial/Style Number An Illinois Tool Works Company 600 West Main Street Troy, OH 45373 USA (Date which equipment was delivered to original customer.) For Assistance: Call1-800-332-3281 Distributor Address City State ORIGINAL INSTRUCTIONS − PRINTED IN USA Zip 2012 Hobart Brothers Co.. 2012-03