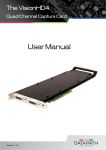
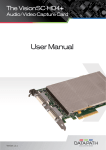
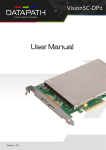
1
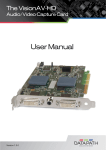
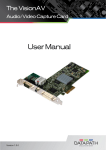
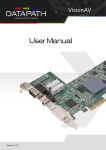
The VisionAV-SDI
Audio/Video Capture Card
User Manual
Version 1.0.0
Contents
Introduction........................................................................................................................1
Triple Channel Video...........................................................................................................2
Flexible Audio Capture........................................................................................................2
Datapath Unified Vision Driver............................................................................................2
Models................................................................................................................................2
Optional Accessories...........................................................................................................2
Specification.......................................................................................................................3
Unpacking..........................................................................................................................4
Installing the Capture Card..................................................................................................5
Using the Optional Audio Module (AM2).............................................................................7
DirectShow.........................................................................................................................9
Software Installation...........................................................................................................9
Application Overview........................................................................................................10
Using the card with other Datapath products....................................................................10
Datapath Limited...............................................................................................................11
Index.................................................................................................................................12
Introduction
The VisionAV-SDI has three independent video capture channels – one supporting HD capture, a
second decoding Standard Definition composite video and the third, a HD-SDI
capture supporting SD-SDI, HD-SDI and 3G-SDI, all channels can be captured simultaneously. The
VisionAV-SDI also adds HDMI audio capture which can be perfectly synchronised with either video capture
channel. Analog audio is available by using the optional Audio Module (AM2)
•
A single card solution for distance learning, lecture capture and web casting
•
Viewing sources from a wide range of PCs, MACs, Industrial/Medical equipment, cameras and other
video equipment
•
Videoconferencing
•
Multi-display presentation software
•
Broadcasting
•
Digital Signage
DirectShow drivers for WDM Streaming driver supports the following applications to encode, record and
stream video over networks or the Internet:
•
Windows Media Encoder®
•
VLC
•
StreamPix
•
VirtualDub
•
Adobe Flash Encoder
•
AMCap
•
Any other DirectShow encoding software
1
Hardware Overview
Triple Channel Video
•
•
•
Channel 1: Digital or Analog HD Video
Channel 2: Singel SD/Composite Video
Channel 3: SDI
Flexible Audio Capture
•
HDMI audio through HD Video Channel
Analog Audio
•
Through optional Audio Module AM2
Datapath Unified Vision Driver
•
•
•
•
Multiple cards per system
Frame sync and time stamping
Direct Show interface
Datapath RGBEasy API
Models:
VisionAV-SDI
Optional Accessories:
Audio Module
2
Specification
Board Format
Connectors
HDMI Capture
PCI-Express x4 half length, full height card
DVI-I , RCA and 2 x BNC connectors (Input (Green LED) and Loop through
output (Blue LED)
• Supports HDMI 1.3 to 225MHz (including deep colour modes). For HDCP
support, contact the Sales Dept at Datapath for more information
•
HDMI audio can be selected as source for audio streaming
DVI Capture
• Incorporates TMDS equalizer to support up to 20m cables
Supports DVI 1.0 RGB 24bit capture to 165MHz
VGA / YPbPr Capture
Incorporates TMDS equalizer to support up to 20m cables
Triple ADCs sampling up to 170Msps. Full 4:4:4 sampling, 8 bits per colour
5-wire, 4-wire or sync-on-green signal formats
DVI-I Modes
1920x1200/60fps. 32 bit colour, up to 4096x4096 resolution
Composite Video Capture CCIR601 sampling. PAL, NTSC, SECAM formats automatically detected
SDI Capture
• SD-SDI (480i/576i), HD-SDI to 1080i, 3G-SDI up to 1080p and 2K Digital
cinema modes
Analog Audio Capture
Video Capture Memory
Video Processing
• SDI audio can be selected as source for audio streaming
Balanced and unbalanced analog Audio Capture (through optional Audio
Module)
256MB high bandwidth frame buffer supports triple buffering of HD and SD
video
Local storage of complex scatter-gather tables for DMA engine (eliminates
read overhead)
Polyphase FIR scaling engine (7x5) for hardware downscaling and upscaling
Colour space conversion allows captured data to be transferred in any
format:
DMA Engine
•
RGB16 bit (5-5-5, 5-6-5), 24 bit (8-8-8) or 32 bit (8-8-8-alpha)
•
YUV16 bit (4:2:2)
• Mono: 8bit
Direct DMA to physical or virtual memory buffers with full scatter-gather
support
DMA bandwidth : up to 800MB/s
16 independent DMA streams:
•
Operating System
Support
Any mix of HD and SD sources, colour space, cropping and scaling
parameters
Windows XP, Windows Server 2003, Windows Vista, Windows Server 2008,
Windows Server 2012, Windows 7, Windows 8 and Linux support (not audio)
See www.datapath.co.uk for updates
We are continuously developing the technology used within our product ranges delivering outstanding innovative solutions, therefore the
specification may change from time to time.
3
Power Requirements
Max current at 12V – 0.5A
Max current at 3.3V – 0.8A
Operating Temperature
Storage Temperature
Relative Humidity
Warranty
Thermal dissipation – 6.5W (typical)
0 to 35 ºC ( 32 to 96ºF)
-20 to 70 ºC ( -4 to 158ºF)
5% to 90% non-condensing
3 years
We are continuously developing the technology used within our product ranges delivering outstanding
innovative solutions, therefore the specification may change from time to time.
Unpacking
Your packing box should contain the following items:
1 x DVI/VGA Adapter
1 x DVI/Component Adapter
1 x DVI/HDMI Adapter
Installation CD
VisionAV-SDI
√
√
√
√
Note:
All plug-in cards are static sensitive and are packed in anti-static material. Please keep the card in its
packaging until you are ready to install.
It is recommended that you do not discard the packing box until you are completely satisfied with the
VisionAV-SDI capture card and it is fully installed and working correctly. We also recommend that you
make a note of the serial number of the card in a prominent place before the card is plugged into the
computer. This should hasten any query should you need to contact our Technical Support
Department. The serial number is displayed on the card itself and the box label.
Installing the Capture Card
You are likely to need a flat blade and/or a cross head screwdriver for the installation of the
VisionAV-SDI card; it would be useful to have these to hand before you begin.
•
•
•
•
•
•
•
Power down the PC (including peripherals), switch off at the mains and disconnect all the cables
connected to the computer, noting the positions for accurate reconnection
Remove the PC cover
Locate a vacant PCI Express slot (x4 or higher) on the motherboard and remove the blanking plate
(retain all screws)
If you are in doubt consult your motherboard documentation to correctly identify a PCI Express slot. If
the card is forced into a 32 or 64 bit PCI or PCI-X slot it will be irreparably damaged when the system is
powered up and the warranty will be void
Reconnect all cables to the PC then connect a DVI cable (not supplied) distributing the DVI source
signal to the connector on the VisionAV-SDI capture card
A standard definition signal can be connected to the RCA connector on the VisionAV-SDI
An SDI signal can be connected to the BNC connector
Power up the PC and commence the software installation
How to Connect Input Sources
The VisionAV-SDI card has one DVI-I, one RCA (female) connector and one BNC (Green LED) connector.
The DVI-I connector supports DVI, HDMI, Component and RGB (VGA) inputs using the supplied adapters
where required.
A DVI input is connected directly into the DVI-I connector which accepts DVI-D (digital) or DVI-A (analog)
inputs:
An HDMI input is connected to the DVI-I connector using the supplied DVI-HDMI Adapter:
5
A Component input is connected to the DVI-I connector using the supplied DVI-Component Adapter:
An RGB (VGA) input is connected to the DVI-I connector using the supplied DVI-VGA Adapter:
A Standard Definition input is connected directly into the RCA (female) connector on the VisionAV-SDI
card:
SDI input is connected to the VisionAV-SDI using the BNC connector (cable not supplied):
Cable Length
The VisionAV-SDI supports cable lengths
of up to 150m. for 3G-SDI. This figure
is based on using low loss co-ax cable
(Belden 1694A).
6
Using the Optional Audio Module (AM2)
Audio is connected to the AM2 using the Audio Break Out cable provided with the AM2:
1
2
3
4
5
6
Balanced (XLR) Input Left
Balanced (XLR) Input Right
Unbalanced Input Left
Unbalanced Input Right
Audio Out Left
Audio Out Right
7
Installing Multiple Cards
Multiple cards can be installed in a system providing a large number capture channels. Combinations of
Vision capture cards in the same machine are supported by the Vision driver.
In order to control the order in which the driver uses the cards, it is recommended when installing multiple
cards that the J6 links on the VisionAV-SDI are configured. The example below shows the jumper link
settings for up to 32 cards in a single system. When two cards share the same link settings, their order is
determined by the PCIe bus.
8
DirectShow
If you change the link ordering after installation you must run dplinks.exe. This program will update the
existing input names used by the windows DirectShow interface.
To run the dplinks program open the Run by clicking on Start/Run and type dplinks and then press Enter.
The program will run, however no notifications are displayed.
Firmware Upgrades
The VisionAV-SDI cards allow firmware upgrade to be completed on site rather than returning the card to
Datapath. Whenever a firmware upgrade is performed, the J8 Link MUST BE FITTED on the
VisionAV-SDI. To perform the upgrade, follow the step-by-step instructions provided by the upgrade
application.
In the unlikely event that something goes wrong during the upgrade process (e.g. System power outage) it
is possible to revert to the factory settings by powering down the system, temporarily removing the J8 link
then powering up the system with the link removed. Once the system has rebooted, replace the J8 link
link (whilst the system is powered up) and restart the firmware upgrade process.
It should be noted that the latest driver installation program includes an automatic firmware update, if
required. Therefore, prior to installing the application and driver, ensure that J8 link is fitted.
Software Installation
The Vision software (driver and application) is installed by inserting the CD that was shipped with your
card into your CD ROM drive. The installation process should start automatically.
Should the CD fail to autorun use Explorer to browse the CD, locate then double click on install.exe
file e.g. d:/install.exe and click on Install Software… and follow the installation wizard instructions as
prompted.
Regular software updates are available from our website: www.datapath.co.uk
Also available on the Datapath CD:
•
The Release Notes - The release notes contain the latest information on the VisionAV-SDI
•
Installation instructions
•
Release history
•
Known problems
•
Troubleshooting
•
The application Help File - Instructions on how to use the application. The help file is in d:/software/
vision.chm. The help file must be located on the local machine to view its content
9
Application Overview
The application displays the connected source in a window; it has the following features:
•
Scales the data to fit in the window
•
Ability to set up sources accurately (settings automatically saved)
•
Save a single frame to a file in one of the following formats:
BMP, JPEG, GIF, TIFF, PNG
•
Print a single frame
•
Maintain the aspect ratio of the displayed captured data
•
Cropping
•
Display text over the data (on-screen display)
•
Command line interface
•
Help file documenting all features
Note:
The supplied drivers and software require that you are using:
• Windows® XP, Windows® Vista, Windows® Server 2003, Windows® Server 2008 or Windows® 7
(x86 and x64 Operating Systems) or Linux (audio not supported)
• CD / DVD ROM Drive
Using the card with other Datapath products
The VisionAV-SDI captures data and stores it in an on-board video buffer. This data is then copied using
DMA to the host system for display, storage or streaming.
When a Datapath graphics card is used, VisionAV-SDI transfers the data directly to the graphics card
thereby increasing performance. The VisionAV-SDI sends the relevant portions of each captured image
to each display channel and instructs each channel to use its graphics engine to render the data. This fully
utilises the hardware and dramatically increases performance.
When a Direct3D compatible graphics card is used the data can be transferred direct to the graphics card
in a similar manner to the Datapath graphics card with the same benefit of non-tearing captures.
When the data is displayed on a non Datapath graphics card, the VisionAV-SDI sends the data to system
memory or direct to the graphics card, dependant on the software used for display.
10
Datapath Limited
Datapath has a long and very successful history in the computer graphics industry. Datapath has been
designing and supplying high performance, high quality graphics display systems to the world’s largest and most demanding companies and institutions since 1982. Datapath was one of the founding
companies of multi-screen Windows acceleration using single and multi board solutions. Now using
the very latest display technology Datapath offers some of the world’s leading multi screen graphics
accelerators for the most demanding applications.
As new technology advances, so we at Datapath improve the performance and functionality of both
our hardware and software to give our customers more. Following a continuous development program, we pride ourselves on our support and responsive nature towards all our customers and their
changing needs. As more sophisticated equipment and techniques become readily available, so we
are there to exploit the power and potential that this technology presents.
Technical Support
Registered Users can access our technical support line using, email, and the Support page on the
Datapath Web Site, usually with a response within 24 hours (excluding weekends).
Via Email
Send an email to [email protected] with as much information about your system as possible.
To enable a swift response we need to know the following details:
•
Specification of the PC - including processor speed
•
Operating System
•
Application Software
•
Datapath Hardware / Software
•
The exact nature of the problem - and please be as specific as possible
Please quote version and revision numbers of hardware and software in use wherever possible.
Copyright Statement
© Datapath Ltd, England, 2013
Datapath Limited claims copyright on this documentation. No part of this documentation may be
reproduced, released, disclosed, stored in any electronic format, or used in whole or in part for any
purpose other than stated herein without the express permission of Datapath Limited.
Whilst every effort is made to ensure that the information contained in this User Manual is correct,
Datapath Limited make no representations or warranties with respect to the contents thereof, and
do not accept liability for any errors or omissions. Datapath reserves the right to change specification
without prior notice and cannot assume responsibility for the use made of the information supplied.
All registered trademarks used within this documentation are acknowledged by Datapath Limited.
11
Index
A
I
application 10
Input Sources 5
Audio 7
Installing the Capture Card 5
Audio Break Out cable 7
J
Audio feed 5
J8 link 9
B
M
Balanced XLR 2
Multiple cards 8
C
Multiple Cards 8
Component input 6
P
Copyright Statement 11
packing box 4
D
R
Datapath 11
RGBEasy API 2
Datapath CD 9
RGB (VGA) input 6
Datapath Limited 11
S
Direct3D 10
software 9
DirectShow 9
Standard Definition 6
DirectShow interface 9
Standard Definition input 6
dplinks program 9
T
DVI input 5
Technical Support 11
F
U
Firmware Upgrades 9
Unpacking
H
V
HDMI 5
video buffer 10
HDMI input 6
Help File 9
12