1
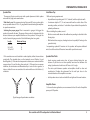
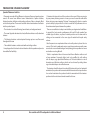
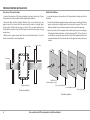
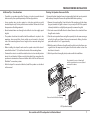
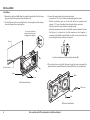
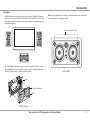
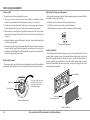
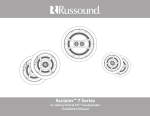
Acclaim™ 7 Series
In-wall Iso-Mount™ LCR Loudspeaker
Installation Manual
Introduction
Introduction
Thank you for selecting the Russound Acclaim 7 Series In-wall LCR Speaker.
Like all Russound speakers, they combine acoustic technology with durability
and will provide years of musical enjoyment. The Acclaim line provides
solutions for background music, dedicated music listening and home theater.
The 7 Series combines premium acoustic materials, with our most advanced
drivers to deliver exceptional performance in every application. From
background music to spectacular surround sound, Acclaim speakers offer the
finest sound around.
Although intended primarily for use as front speakers, the LCR models can
also be used as surround speakers in a multichannel audio system. As an
alternative, any Russound in-wall or in-ceiling speaker would work well for the
surround channels.
Iso-Mount technology takes the Acclaim 7 Series beyond ordinary In-wall
speakers by reducing undesirable wall vibrations with a unique thermopolymer
isolation mounting gasket. Where typical In-wall speakers lack clarity due to
speaker-induced wall vibrations, Iso-Mount speakers offer dramatic sonic
improvement by letting the music come only from the speakers, not from the
wall. In addition, the innovative Twist & Lock mounting system incorporated in
Iso-Mount models provides exceptionally easy and secure installation.
Iso-Mount speakers have a molded-in IR receiver opening that allows
mounting an infrared remote receiver through the speaker baffle. The polymer
plug is designed to pop out for screw-in installation of an IR receiver such as
the Russound SaphIR™ Eye without damaging the speaker baffle.
In addition to Iso-Mount and Twist & Lock features, Russound Acclaim 7 Series
speakers feature high quality drivers, sophisticated crossover networks, and
advanced designs to ensure optimum reproduction.
The Treble frequency adjustment switch allows you to tailor the sound of
Acclaim speakers to better match the listening environment. The switch offers
three settings: +3 dB, -3 dB, or 0 dB. It is located on the front baffle.
In a home theater, the LCR is intended for use in the front left, center, and
right positions adjacent to the video display. In stereo audio applications, a
pair of LCR speakers can be used for the left and right channels.
The benefit is that one speaker model can be used for the three front channels
in a home theater. This provides identical voicing in all three positions, which
improves clarity and imaging.
Because the LCR is magnetically shielded, it can be used next to CRT televisions
without causing picture distortion. A separate subwoofer is recommended to
reproduce the lowest frequencies.
2
Russound In-wall LCR Loudspeaker Installation Manual
Preparation / Wiring INfo
Installation Tips
Speaker Wire
Wall and spacing requirements:
The amount of wire needed varies with speaker placement. Label speaker
wires with left, right, and room location.
• Any wallboard or paneling and 2" x 4" stud wall, or lath and plaster walls.
What kind to use: We recommend using Russound AW series speaker cable
or any reputable brand of 16 to 12 gauge multi-stranded wiring for amplifierto-speaker connections.
• A minimum depth of 4" (10 cm) measured from the outside face of the
mounting surface, and at least 1 cubic foot of space behind the speaker for
optimal performance.
Selecting the proper gauge: Wire is measured in gauges: the bigger the
number, the smaller the wire. The gauge of wire needed is determined by the
distance between your amplifier/receiver and the speakers. The longer the
run, the heavier the gauge needed. Use the following chart as a guide:
Length
0' to 100'
50' to 150'
100' to 200'
Minimum Gauge
16
14
12
When installing the speakers, avoid:
• Brick or concrete walls where the wallboard or paneling is attached to thin
furring strips.
• Walls where there are pipes, heating ducts and especially AC wiring in the
general vicinity.
Incorporating optional IR receivers in the speakers will require additional
wire. Consult the selected IR receiver's manual for specific wire needs.
If the conductors are not sheathed in colored jackets, utilize the conductors
consistently. The standard colors on the terminals are red Positive (+) and
black Negative (-). If the wire has transparent insulation, one conductor will be
copper-colored (+) and the other silver-colored (-). If the wire has an opaque
insulation, the conductors are differentiated by a series of ribs or grooves, a
stripe, or dotted line on one conductor. Use and mark these as the Positive (+)
conductor.
Speaker Wire Paths
• Avoid running speaker wires close to house electrical wiring for any
distance. If you have to run them parallel, leave two feet between the
wiring. Speaker wires should cross AC lines at a 90° angle.
• The entire path between speakers and amplifier should be clear and
unobstructed. Confirm the placement for the wall port close to the
intended location of the amplifier or receiver.
• Label speaker wires at each end with left and right and the room location.
-
+
-
+
Amplifier Power
For home theater applications, we recommend at least 30 watts of amplifier
power per LCR speaker.
Typical usage of speaker wire conductors
Russound In-wall LCR Loudspeaker Installation Manual
3
Preparation / Speaker Placement
Speaker Placement and Use
Placement can make all the difference in how your Russound speaker system
sounds. All rooms have different sound characteristics. Speaker location,
listening location, reflective and absorbing surfaces all have a dramatic effect
on the sound you hear. There are at least four related considerations that factor
into the speaker layout:
• The intended use: critical listening, home theater, or background music
• The room’s physical characteristics: hard, reflective surfaces or soft, absorbent
textures
• The listening locations: a desired prime listening spot or a need for sound
throughout the room
• The available locations: unobstructed wall and ceiling surfaces
It may happen that the ideal or desired locations for the speakers may have to
be modified for feasibility.
Determine the intended use of the speakers in the room. If they are going to
be your primary listening source in a room, you need to consider some other
factors to insure proper imaging. The term "stereo imaging" refers to a speaker
system’s ability to project music so that it sounds like the performers are in a
three-dimensional space between the speakers.
There are several factors to keep in mind before you begin actual installation.
In general, the best acoustic performance will result if both speakers face
a similar type of surface, are placed in similar positions on the same wall or
ceiling, and are mounted to the same type of material with equal cavity
volume.
Bass frequencies are emphasized when an In-wall speaker is placed close to
a corner. This tends to make male voices sound deeper and may muddy some
sounds such as sound track dialogue. Avoid placing just one speaker in a corner
and another on a long flat wall.
Treble is emphasized when it bounces back from reflective surfaces such
as large windows. Conversely, highs tend to be muffled by soft surfaces
such as drapes, rugs, upholstered furniture, etc. The best situation is a mix of
absorptive and reflective surfaces, which can be achieved by adding throw
rugs or insulated drapes to a reflective room.
The tweeters should be placed at ear level of the intended user. In a horizontal
orientation, the speaker can be mounted with the tweeter at the top or bottom.
In a vertical orientation the speakers should be mounted with the tweeters
positioned to the outside and aimed toward the listener.
4
Russound In-wall LCR Loudspeaker Installation Manual
Preparation / Speaker Placement
Home Theater
For home theater, wall or LCR speakers for the front three channels create the
illusion that the sound is coming from the screen, which makes the viewing
experience more involving and believable. In a multichannel audio system for
a home theater, one LCR should be installed horizontally above or below the
video display for the center channel, and two should be installed vertically to
the left and right of the display for the main front channels.
The center-channel speaker should be as close to ear level as possible; thus, if
the video display is mounted high, the speaker should be below it. If the display
is low, the speaker should be above it. The tweeter should then be angled up
or down as needed so that its axis points toward the ear level of the listeners.
Surround
Left
Front
Left
Subwoofer
Surround
Back Left
LCR
The left and right speakers should be about 3' or 4' to either side of the screen.
Left and right speakers placed too close together or too far apart dissipate the
illusion of being "in the action" on the screen. For best results the tweeters
should be positioned on the outside, away from the video display.
Front Center
LCR
Placement near corners
Placing a speaker near a corner of a room can cause sonic reflections off the
side wall. This can result in a loss of clarity and poor imaging. Accordingly,
we do not recommend placing the LCR near a corner unless the side wall is
covered with sound-absorptive material.
LCR
Surround
Back Right
Front
Right
Surround
Right
Generally, the best acoustic performance will result if the left and right
speakers are placed in similar positions on the same type of wall surface.
Typical front wall LCR speaker placement
(Place tweeters at approximate ear level and aim at intended listener position)
Russound In-wall LCR Loudspeaker Installation Manual
5
Preparation For Installation
Pre-wire or Pre-construction
Retrofit Installation
Locate all obstructions (AC wiring, plumbing, duct work, and studs). Route
the speaker wire to the speaker location avoiding all obstacles.
Locate existing pipes, duct work, and AC wiring before cutting any holes in
the walls.
Russound offers Speaker Rough-In Brackets that can be fastened to the
adjacent studs. Use a small level to make sure the bracket is straight. Once
the dry wall is installed, the opening is cut out. There are holes molded into
the bracket for speaker wire tie-off to keep the wire from being lost during
construction.
1. Center the cardboard template between adjacent joists, avoiding all wiring,
pipes, duct work, and lightly mark the corners with a pencil. Then use a
keyhole/drywall saw or motorized spiral-cut tool to make the opening.
Make sure the speaker cutout (hole) doesn't extend further than 1/4" (0.6 cm)
from the inside of the mounting bracket.
Speaker Cable
2. Score the outline of the template with a utility knife to prevent chipping.
If dealing with lath and plaster or thick paneling, drill 1" (2.5 cm) holes in
several places around the pencil outline. Use a fine-toothed keyhole saw
or hacksaw blade with slow strokes to saw through and remove the inner
surface.
Stud / Joist
Fasteners
Rough-in Bracket
Drill Pilot Hole
Mark template corners
Test for stud clearance
Score template outline
Bracket Installation
Retrofit Installation
6
Russound In-wall LCR Loudspeaker Installation Manual
Cut out opening
Preparation for Installation
Additional Tips / Considerations
Painting the Speaker Frame and Grille
• If possible, run speaker wires after AC wiring is in place to avoid induced
hum caused by close parallel proximity of the two types of wire.
Russound Acclaim Speakers have a designer white finish that can be painted
with ordinary latex paint. Remove the speaker baffle before painting.
• Secure speaker wires in place against a stud along vertical runs with
insulated staples only. Do not pierce the wire insulation. Allow a bit of slack
for expansion of building materials.
1. Remove the speaker grilles. From the back of the speaker, push the clamp
(dog-ear) towards the grille to loosen it so you can pull it off. If the speaker
is already installed use a slightly bent paperclip to remove the grille.
• Route horizontal wire runs through holes drilled in studs at roughly equal
heights.
2. Twist and remove the baffle from the frame. Remove the scrim cloth from
the grille and set aside.
• The speakers should not be installed until the wallboard is in place. In the
meantime, leave several feet of wire coiled up and secured to the back
side of the mounting frame. Excess length can be removed during final
assembly.
3. Paint the outer speaker frame and grille separately. Use the same coverage
on both the grille and frame. Russound recommends diluting the latex
paint with water 4:1 or 5:1 proportionally.
• When installing the drywall, make sure the speaker cutout hole doesn’t
extend farther than 1/4" (0.6 cm) from the inside of the mounting frame.
• Terminate the wires in an outlet box attached to a stud or retrofit junction
box at the exit location. Utilize an outlet plate which has connections for
speaker wire terminations. Russound dealers offer a full line of Russound
PlateMate™ connection systems.
4. While the paint is still wet on the grille, and the grille is not in the frame, use
a gentle burst of compressed air against the outside surface to clear the
fine holes in the mesh.
5. After the paint has thoroughly dried, continue with the installation.
Do not attach the scrim cloth and grill
until the speaker has been connected and
mounted in the frame.
• After the drywall is secured and finished, install the speakers as described
in this manual.
Frame
Baffle
ble
Tre
Grille
Scrim Cloth
Remove from Grille before Painting
LCR Speaker Assembly
Russound In-wall LCR Loudspeaker Installation Manual
7
installation
Installation
1. Remove the grille and baffle from the speaker, if applicable. Use the clamp
(dog-ear) to push the grille out from the back side.
2. Center the frame in the cutout. Tighten the screws equally until the clamps
secure the frame. Do not overtighten.
As screws are tightened
clamp will rotate out and
snug against the drywall.
3. Connect the speaker wire to the speaker terminals:
• Leave about 1' (30.5 cm) of wire extending through the cutout.
• Pull the conductors apart so the last two inches are separated and
remove 1/2" (1.3 cm) of insulation from the end of each conductor.
• Twist the strands in each conductor into tight spirals.
• Attach the speaker wires to the red and black speaker terminals. Connect
the Positive (+) conductor to the Red terminal and the Negative (-)
conductor to the Black terminal. Make sure that no stray strands of wire
are touching the other conductor or terminal.
Cutout
(+)
(-)
Insertion of speaker wire on back of speaker baffle
4. The speakers have a plug (the Russound Logo) that can be removed for
placement of an remote IR receiver (Russound 862 Eye). See detail below.
Speaker Cable
Frame
Baffle
Screws
Install Speaker Frame
IR Receiver
Treb
le
Plug
IR Receiver Installation
8
Russound In-wall LCR Loudspeaker Installation Manual
installation
Installation
5. Decide whether the tweeter placement is more at ear level with the tweeter
positioned at the top or bottom of the frame. When the LCR's are mounted
vertically, position the tweeter to the outside. Refer to the typical front wall
configuration below.
Note: If audio equipment is available to perform a listening and functional
test, do that before installing the grille.
Fasteners turned and locked
6. Place the baffle in the frame and turn the Twist & Lock fasteners a quarter
turn clockwise to secure the baffle. Some force will be needed to compress
the gasket. Make sure the gasket is properly seated.
Installed Baffle
Frame
Twist & Lock fastener
Baffle
Baffle Installation
Russound In-wall LCR Loudspeaker Installation Manual
9
Tests and Adjustments
Listening Test
Adjusting the Frequency Response
It’s a good idea to test everything at this point.
1. Turn on your stereo system or music source. Make sure that the volume
control is turned down and that the balance control is set to center.
2. Gently turn up the volume. You should hear music coming out of your new
Russound Speakers! (If you don’t, refer to the troubleshooting guide.)
3. Now rotate the stereo’s balance control all the way to the left. Sound should
only come out of your left speaker. If it comes out of the right speaker, skip
to Step 5.
Both models are equipped with a Treble frequency adjustment switch. Move
the switch to change the setting.
+3 dB: Increases the loudness of the selected frequency
-3 dB: Reduces the loudness of the selected frequency
0 dB: The frequency remains neutral (recommended start setting)
4. Rotate the balance control all the way to the right. Sound should only come
out of the right speaker.
5. If sound comes from the right speaker when the stereo’s balance control is
turned to the left, you’ll need to change the connections on the back of the
amplifier/receiver. Note: Turn off the amplifier. Swap the wires attached to
the left and right speaker terminals.
Tweeter Adjustment
The tweeters pivot and should be aimed toward the intended listener. Before
installing the grille, gently press on the outside of the tweeter ring as shown.
Frequency Adjustment
Grille Installation
After all adjustments and listening tests are made install the grille. Insert the
speaker grille by placing it over the speaker baffle and aligning its edges in the
frame. Press gently into place, taking care not to scratch the frame finish or
bend the grille. In most installations, the grilles will fit tightly without causing
vibration. If any audible vibration does occur, use the pre-cut lengths of special
damping/adhesive material.
Installed Baffle
Press only on the outer ring
of the tweeter. Pressing on
the interior of the tweeter
dome will damage it!
Outer Ring
Tweeter Dome
Tweeter Adjustment
ble
Tre
Scrim Cloth
Smooth into the Grille
Grille
Grille Installation
10
Russound In-wall LCR Loudspeaker Installation Manual
Troubleshooting Guide
Configuring Your Receiver
Troubleshooting Guide
Your home theater receiver or surround processor most likely has a choice of
settings for different types of speakers. If your receiver or processor has an auto
setup procedure, you will probably get the best results using the auto setup.
If you use a manual speaker setup procedure, you will get the best results by
setting the LCR speakers to the "Small" setting if you are using a subwoofer, or
the "Large" setting if you are not using a subwoofer.
Before returning your Russound speakers for service, try these simple
remedies first.
No sound from either speaker:
• Incorrect source selected on receiver or preamplifier.
• Mute button pressed on receiver.
• Wrong speaker output selected; many receivers have an "A" and "B" speaker
switch. Make sure it is in the correct position.
• In-wall Volume control not turned up or wired incorrectly.
• If using a speaker selector, room/station not turned on or improperly
connected.
No sound from one speaker:
• Unsecured connection at either the speaker or amplifier - double-check all
connections.
• Balance control turned all the way left or right - return it to center.
• Bad connecting cable between sound source and amplifier - try a new
cable.
• Check for stray wire strands crossing the speaker terminals.
• Defective speaker - contact your Russound dealer or call Russound Tech
Support at 603.659.5170.
• Any other problems not listed, discuss with your dealer or call Russound.
Russound In-wall LCR Loudspeaker Installation Manual
11
Technical Specifications
Model:
Description:
Woofers (2):
Tweeter:
Terminals:
Grille:
Cutout:
Depth: Dimensions:
Recommended Power:
Sensitivity: Frequency Response:
Frequency Range:
Frequency Adjustment: Nominal Impedance: Unit Weight: 7W55LCR
Passive 2 way LCR Iso-Mount Loudspeaker
5.25" (13.3 cm) Aluminum
Pivoting 1” (25 mm) Teteron
Nickel Plated binding posts
Aluminum
7.25" x 14.25” (18.4 x 36.2 cm)
3.9” (9.9 cm)
9" x 15.75" (22.9 x 40 cm)
10 - 100 watts 90 dB SPL (2.83V @ 1m)
58 Hz - 20 kHz ± 3 dB
44 Hz - 20 kHz -6/+3 dB
Treble switch
4/5/6 ohms
6.77 lbs (3.1 kg)
Model:
Description:
Woofers (2):
Tweeter:
Terminals:
Grille:
Basket:
Cutout:
Depth: Dimensions:
Recommended Power:
Sensitivity: Frequency Response:
Frequency Range:
Frequency Adjustment: Nominal Impedance: Unit Weight: 7W57LCR
Passive 2 way LCR Iso-Mount Loudspeaker
5.25" (13.3 cm) Woven Black Kevlar
Pivoting 1” (25 mm) Aluminum/Magnesium Alloy
Gold Plated binding posts
Aluminum
Cast Aluminum
7.25" x 14.25” (18.4 x 36.2 cm)
3.9” (9.9 cm)
9" x 15.75" (22.9 x 40 cm)
10 - 150 watts 90 dB SPL (2.83V @ 1m)
52 Hz - 27 kHz ± 3 dB
41 Hz - 27 kHz -6/+3 dB
Treble switch
4/5/6 ohms
7.56 lbs (3.4 kg)
12
Russound In-wall LCR Loudspeaker Installation Manual
WARRANTY
All Russound Acclaim 7 Series Speaker products have a Limited Lifetime
Warranty against defects in materials and workmanship. Proof of Purchase
must accompany all claims. During the warranty period Russound will replace
any defective part and correct any defect in workmanship without charge for
either parts or labor.
This Warranty Does Not Cover:
• Damage caused by abuse, accident, misuse, negligence, or improper
operation (installation).
• Products that have been altered or modified.
Russound may replace returned speakers with a product of equal value and
performance. In such cases, some modifications to the mounting may be
necessary and are not Russound’s responsibility.
• Any product whose identifying number or decal, serial #, etc. has been
altered, defaced or removed.
For this warranty to apply, the unit must be installed and used according to
its written instructions. If necessary, repairs must be performed by Russound.
The unit must be returned to Russound at the owner’s expense and with
prior written permission. Accidental damage and shipping damage are not
considered defects, nor is damage resulting from abuse or from servicing
performed by an agency or person not specifically authorized in writing by
Russound.
Due to our continual efforts to improve product quality as new technology
and techniques become available, Russound/FMP, Inc. reserves the right to
revise speaker systems specifications without notice.
• Normal wear and maintenance.
Russound products are sold only through authorized Dealers and Distributors
to ensure that customers obtain proper support and service. Russound reserves
the right to limit the warranty of products purchased from an unauthorized
dealer or other source, including retailers, mail order sellers, and online sellers,
to ninety (90) days from the date of purchase.
Damage to or destruction of components due to application of excessive
power voids the warranty on those parts. In these cases, repairs will be made
on the basis of the retail value of the parts and labor. To return for repairs, the
unit must be shipped to Russound at the owner’s expense, along with a note
explaining the nature of service required. Be sure to pack the speaker(s) in a
corrugated container with at least 3" (7.6 cm) of resilient material to protect the
unit from damage in transit.
Before returning the unit for repair, call Russound at 603.659.5170 for a Return
Authorization number. Write this number on the shipping label and ship to:
Russound
ATTN: Service
5 Forbes Road
Newmarket, NH 03857
Russound In-wall LCR Loudspeaker Installation Manual
13
Notes
14
Russound In-wall LCR Loudspeaker Installation Manual
Notes
Russound In-wall LCR Loudspeaker Installation Manual
15
Acclaim™ 7 Series
In-wall Iso-Mount™ LCR Loudspeaker
Installation Manual
Models: 7W55LCR - 7W57LCR
©2009 Russound. All rights reserved.
All trademarks are the property of their respective owners.
Specifications are subject to change without notice.
Russound is not responsible for typographical errors or omissions.
Russound, Inc.
5 Forbes Road, Newmarket, NH 03857
tel 603.659.5170 • fax 603.659.5388
email: [email protected] www.russound.com
28-1309 Rev. 1 04/01/09