1
Printer/Scanner Unit
Type 2045e
Operating Instructions
Scanner Reference
1
Network Scanner
2
Preparations for Use as a Network Scanner
3
Setting Originals
4
Sending Scan File by E-mail
5
Sending Scan File by Scan to Folder
6
Using the Document Server Function
7
Using the Network Delivery Scanner Function
8
Using the Network TWAIN Scanner Function
9
Appendix
For safe and correct use of this machine, please be sure to read the Safety Information in the
General Settings Guide before you use it.
Printer/Scanner Unit Type 2045e Operating Instructions
Scanner Reference
EN USA B654-8707
Introduction
This manual describes detailed instructions on the operation and notes about the use of this machine.
To get maximum versatility from this machine all operators are requested to read this manual carefully
and follow the instructions. Please keep this manual in a handy place near the machine.
Scanner function is available when Printer/Scanner option is installed to your machine.
Warning:
Use of controls or adjustment or performance of procedures other than those specified in this manual
might result in hazardous radiation exposure.
Two kinds of size notation are employed in this manual. With this machine refer to the inch version.
Trademarks
Adobe and Acrobat are trademarks of Adobe Systems Incorporated.
Ethernet is a registered trademark of Fuji Xerox Corporation.
Pentium is a registered trademark of Intel Corporation.
MS, Microsoft and Windows are registered trademarks of Microsoft Corporation.
Other product names used herein are for identification purposes only and might be trademarks of their
respective companies. We disclaim any and all right in those marks.
•
The product name of Windows®95 is Microsoft® Windows® 95.
•
The product name of Windows®98 is Microsoft® Windows® 98.
•
The product name of Windows® Me is Microsoft® Windows® Millennium Edition (Windows Me).
•
The product names of Windows XP are as follows:
Microsoft® Windows® XP Professional
Microsoft® Windows® XP Home Edition
•
The product names of Windows® 2000 are as follows.
Microsoft® Windows® 2000 Professional
Microsoft® Windows® 2000 Server
•
The product names of Windows ServerTM 2003 are as follows:
Microsoft® Windows ServerTM 2003 Standard Edition
Microsoft® Windows ServerTM 2003 Enterprise Edition
Microsoft® Windows ServerTM 2003 Web Edition
•
The product names of Windows NT® are as follows.
Microsoft® Windows NT® Server 4.0
Microsoft® Windows NT® Workstation 4.0
In accordance with IEC 60417, this machine uses the following symbols for the main power switch:
a means POWER ON.
c means STAND BY.
Note to users in the United States of America
Notice:
This equipment has been tested and found to comply with the limits for a Class B digital device, pursuant to Part 15 of the FCC Rules. These limits are designed to provide reasonable protection against
harmful interference in a residential installation. This equipment generates, uses and can radiate radio
frequency energy and, if not installed and used in accordance with the instructions, may cause harmful
interference to radio communications. However, there is no guarantee that interference will not occur
in a particular installation. If this equipment does cause harmful interference to radio or television reception, which can be determined by turning the equipment off and on, the user is encouraged to try to
correct the interference by one more of the following measures:
Reorient or relocate the receiving antenna.
Increase the separation between the equipment and receiver.
Connect the equipment into an outlet on a circuit different from that to which the receiver is
connected.
Consult the dealer or an experienced radio /TV technician for help.
Warning
Changes or modifications not expressly approved by the party responsible for compliance could void
the user’s authority to operate the equipment.
Note to users in Canada
Warning:
This Class B digital apparatus complies with Canadian ICES-003.
Remarque concernant les utilisateurs au Canada
Avertissement:
Cet appareil numérique de la classe B est conforme à la norme NMB-003 du Canada.
Caution (in case of 100BASE-TX environment):
Network interface cable with ferrite core must be used for RF interference suppression.
Declaration of Conformity
Product Name: Printer/Scanner Controller
Model Number: Printer/Scanner Unit Type 2045e
Responsible party: Ricoh Corporation
Address: 5 Dedrick Place, West Caldwell, NJ 07006
Telephone number: 973-882-2000
This device complies with part 15 of FCC Rules.
Operation is subject to the following two conditions:
1. This device may not cause harmful interference, and
2. this device must accept any interference received,
including interference that may cause undesired operation.
Copyright © 2003
Manuals for This Machine
The following manuals describe the operational procedures of this machine. For
particular functions, see the relevant parts of the manual.
Note
r The manuals provided are specific to machine type.
r Adobe Acrobat Reader is necessary to view the PDF file manuals.
r Two CD-ROMs are provided:
• CD-ROM 1 "Operating Instructions for Printer / Scanner"
• CD-ROM 2 "Scanner Driver & Document Management Utilities"
v General Settings Guide
Provides an overview of the machine and describes System Settings (paper
trays, Key Operator Tools, etc.), Document Server functions, and troubleshooting.
Refer to this manual for Address Book procedures such as registering fax
numbers, e-mail addresses, and user codes.
v Network Guide (PDF file - CD-ROM1)
Describes procedures for configuring the machine and computers in a network environment.
v Copy Reference
Describes operations, functions, and troubleshooting for the machine's copier
function.
v Facsimile Reference <Basic Features>
Describes operations, functions, and troubleshooting for the machine's facsimile function.
v Facsimile Reference <Advanced Features>
Describes advanced functions and settings for key operators.
v Printer Reference 1
Describes system settings and operations for the machine's printer function.
v Printer Reference 2 (PDF file - CD-ROM1)
Describes operations, functions, and troubleshooting for the machine's printer function.
v Scanner Reference (this manual) (PDF file - CD-ROM1)
Describes operations, functions, and troubleshooting for the machine's scanner function.
i
v Manuals for DeskTopBinder V2 Lite
DeskTopBinder V2 Lite is a utility included on the CD-ROM labeled "Scanner
Driver & Document Management Utilities".
• DeskTopBinder V2 Lite Setup Guide (PDF file - CD-ROM2)
Describes the installation of DeskTopBinder V2 Lite, and the operating environment for DeskTopBinder V2 Lite in detail. This guide can be displayed from the [Setup] dialog box when DeskTopBinder V2 Lite is
installed.
• DeskTopBinder V2 Lite Introduction Guide (PDF file - CD-ROM2)
Describes operations with DeskTopBinder V2 Lite and provides an overview of its functions. This guide is added to the [Start] menu when DeskTopBinder V2 Lite is installed.
• Auto Document Link Guide (PDF file - CD-ROM2)
Describes operations and functions of Auto Document Link installed with
DeskTopBinder V2 Lite. This guide is added to the [Start] menu when
DeskTopBinder V2 Lite is installed.
v Manuals for ScanRouter V2 Lite
ScanRouter V2 Lite is a utility included on the CD-ROM labeled "Scanner
Driver & Document Management Utilities".
• ScanRouter V2 Lite Setup Guide (PDF file - CD-ROM2)
Describes the installation of ScanRouter V2 Lite, settings, and the operating environment for ScanRouter V2 Lite in detail. This guide can be displayed from the [Setup] dialog box when ScanRouter V2 Lite is installed.
• ScanRouter V2 Lite Management Guide (PDF file - CD-ROM2)
Describes delivery server management and operations, and provides an
overview of ScanRouter V2 Lite functions. This guide is added to the [Start]
menu when ScanRouter V2 Lite is installed.
v Other manuals
• PS3 Supplement (PDF file - CD-ROM1)
• UNIX Supplement (available from an authorized dealer or as a PDF file on
our Web site)
ii
TABLE OF CONTENTS
Manuals for This Machine ......................................................................................i
How to Read This Manual .....................................................................................1
Symbols .....................................................................................................................1
Names of Major Options ............................................................................................1
1. Network Scanner
Outline.....................................................................................................................3
E-mail .........................................................................................................................3
Scan to Folder............................................................................................................4
Document Server .......................................................................................................5
Network Delivery Scanner..........................................................................................6
Network TWAIN Scanner ...........................................................................................7
Control Panel..........................................................................................................8
Display Contents ......................................................................................................10
2. Preparations for Use as a Network Scanner
Initial Scanner Setup ...........................................................................................13
Scanner Features.....................................................................................................13
Scan Settings ...........................................................................................................16
Destination List Settings...........................................................................................20
Send Settings...........................................................................................................21
Programs ..............................................................................................................23
Storing a Program ....................................................................................................23
Recalling a Program.................................................................................................24
Changing a Stored Program ....................................................................................24
Deleting a Program ..................................................................................................24
Changing the program name ...................................................................................24
Installing Software ...............................................................................................25
Auto Run Program ...................................................................................................25
Software for Using a Network TWAIN Scanner .......................................................27
Software for Using the Network Delivery Scanner Function ....................................28
DeskTopBinder V2 Lite ............................................................................................29
Software Supplied on CD-ROM ...............................................................................29
3. Setting Originals
Placing Originals..................................................................................................35
Placing on the Exposure Glass ................................................................................36
Placing in the Auto Document Feeder .....................................................................37
Original Orientation and Scan Area ...................................................................39
For E-mail, Scan to Folder, and a Network Delivery Scanner..................................40
For a Network TWAIN Scanner................................................................................41
Scanning Originals in Several Times .......................................................................42
iii
4. Sending Scan File by E-mail
Preparation for Sending by E-mail .....................................................................45
E-mail Screen...........................................................................................................46
Sending Scan File by E-mail ...............................................................................47
Procedure for Sending E-mail ..................................................................................47
Simultaneous Storage and Sending by E-mail.........................................................57
Checking the Status of E-mail ............................................................................58
5. Sending Scan File by Scan to Folder
Preparation for Sending by Scan to Folder.......................................................59
Scan to Folder Screen .............................................................................................60
Sending Scan File by Scan to Folder.................................................................61
Procedure for Sending by Scan to Folder ................................................................61
Simultaneous Storage and Sending by Scan to Folder ...........................................70
Checking the Status of Scan to Folder ..............................................................71
6. Using the Document Server Function
Storing Files .........................................................................................................73
Storage Procedure ...................................................................................................74
Viewing a List of Stored Files .............................................................................77
Viewing the List ........................................................................................................78
Searching for Files ...................................................................................................80
Sending Stored Files by E-mail or Scan to Folder, or Delivering .............................81
Managing Stored Files.........................................................................................82
Deleting Files ...........................................................................................................82
Changing File Information ........................................................................................83
7. Using the Network Delivery Scanner Function
Preparation for Delivering...................................................................................85
Network Delivery Scanner Screen ...........................................................................86
Delivering Scan File.............................................................................................87
Delivery Procedure...................................................................................................87
Simultaneous Storage and Delivery.........................................................................93
Checking the Status of Delivery .........................................................................94
8. Using the Network TWAIN Scanner Function
Preparation for Using the Network TWAIN Scanner.........................................95
Scanning Originals ..............................................................................................96
Functions of the TWAIN Driver ................................................................................98
iv
9. Appendix
Relationship between Resolution and File Size................................................99
When Using as E-mail, Scan to Folder, Document Server or Network Delivery Scanner...99
When Using as a Network TWAIN Scanner...........................................................100
Relationship between File Type Specified and File Type Used When Sending E-mail...102
Max. Number of Addresses Which Can Be Specified and Files Which Can Be Stored ...103
Troubleshooting.................................................................................................104
When Scanning Is Not Performed as Expected .....................................................104
When the Delivery Function Does Not Work..........................................................104
When Stored Files Cannot Be Accessed ...............................................................104
When an Error Message Appears on the Control Panel ........................................105
When an Error Message Appears on the Client Computer....................................110
Specifications..................................................................................................... 113
INDEX....................................................................................................... 114
v
vi
How to Read This Manual
Symbols
In this manual, the following symbols are used:
Important
If this instruction is not followed, paper might be misfed, originals might be
damaged, or files might be lost. Be sure to read this.
Preparation
This symbol indicates the prior knowledge or preparations required before operating.
Note
This symbol indicates precautions for operation or actions to take after misoperation.
Limitation
This symbol indicates numerical limits, functions that cannot be used together,
or conditions in which a particular function cannot be used.
Reference
This symbol indicates a reference.
[
]
Keys that appear on the machine's display panel.
[
]
Keys and buttons that appear on the computer's display.
{
}
Keys built into the machine's control panel.
{
}
Keys on the computer's keyboard.
Names of Major Options
Major options of this machine are referred to as follows in this manual:
• Printer/Scanner Unit Type 2045e → printer/scanner controller
The following software products are referred to using a general name:
• DeskTopBinder V2 Lite and DeskTopBinder V2 Professional → DeskTopBinder V2 Lite/Professional
• ScanRouter V2 Lite and ScanRouter V2 Professional (optional) → ScanRouter
V2 Lite/Professional
1
2
1. Network Scanner
Outline
By installing the printer/scanner controller, the machine can be used as a network scanner.
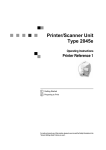
As a network scanner, the machine can send e-mail, send files to the FTP server
or the shared folders of client computers, store scan files in the Document Server,
operate as a network delivery scanner, and operate as a network TWAIN scanner.
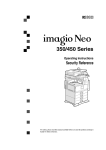
E-mail
Scan file that is attached to an e-mail can be sent using the e-mail system through
a LAN or the Internet.
Reference
p.45 “Sending Scan File by E-mail”
ZHSX040N
1. This machine
2. E-mail server
Scan file that is attached to an e-mail can
be sent to an e-mail server. In combination with the file storage function, scan
files from multiple originals that have
been temporarily stored can be sent all at
once.
An e-mail server is the SMTP server used
for an e-mail system. It transfers a received e-mail to a specified destination
through a LAN or the Internet.
3
Network Scanner
1
3. Client computer
4. LDAP server
An e-mail with scan file attached is received from the e-mail server using email software.
Check the content of the file using an application appropriate for the file type.
LDAP server provides a directory service
corresponding to the inquiry or reference
operation from the client computer on
the same network.
E-mail address information can be
searched for from the machine when you
use LDAP server as a data base of the
user authentication and the e-mail account management.
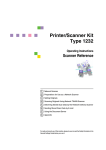
Scan to Folder
Scan file can be sent to the folders of the FTP server or the shared folders of Windows on the same network.
Reference
p.59 “Sending Scan File by Scan to Folder”
ZHSX050N.eps
ZHSX050N
4
1. This machine
2. FTP server
Scan file can be sent to the folders of the
FTP server using FTP protocol or the
shared folders of Windows using SMB
protocol. In combination with the file
storage function, scan files from multiple
originals that have been temporarily
stored can be sent all at once.
The FTP server is a server that provides
file transfer services among client computers on the same network. Scan file that
is sent to the FTP server can be stored,
and the stored file can be downloaded by
a client computer that logs onto the FTP
server.
Outline
3. Client computer
Scan file that is sent from the machine is
received in the shared folders of Windows.
Check the content of the file using an application appropriate for the file type.
1
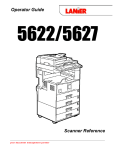
Document Server
Scan file from the originals is stored as a file on the hard disk of the machine and
can be viewed, copied, deleted, or retrieving using DeskTopBinder V2 Lite/Professional from a client computer via a network. A file can be searched for using
the user name or the file name. Also, others can be kept from viewing a file by
setting a password for the file.
Reference
p.73 “Using the Document Server Function”
ZHSX030N.eps
ZHSX030N
1. This machine
2. Client computer
Scan file from the originals scanned by
the scanner is stored.
A stored file can be viewed, copied, or
deleted by connecting to the machine using DeskTopBinder V2 Lite/Professional.
Also, a file stored in the machine using a
Web browser can be viewed, downloaded or deleted.
Reference
For more information about DeskTopBinder V2 Lite, see the DeskTopBinder
V2 Lite manuals. See p.i “Manuals for This Machine”.
5
Network Scanner
Network Delivery Scanner
The machine is used as a delivery scanner with ScanRouter V2 Lite/Professional. Scan file from the originals scanned by the machine is stored in the delivery
server and delivered to the folders of client computers on the same network.
1
Reference
p.85 “Using the Network Delivery Scanner Function”
Note
r When the optional ScanRouter V2 Professional is used, the machine can also
deliver scan file using e-mail, and the file can be viewed from a client computer using a Web browser.
ZHSH010N.eps
ZHSH010N
1. This machine
3. Client computer
Scan file from the originals scanned by
the scanner is sent to the delivery server.
In combination with the file storage function, scan files from multiple originals
that have been temporarily stored can be
delivered all at once.
The contents of stored file can be checked
in the following ways:
2. Delivery server
ScanRouter V2 Lite/Professional is installed in this computer which is used as
a delivery server.
Received file is delivered to the in-tray of
the specified destination (A in the figure). According to the settings of the intray, the file is stored in the in-tray or in a
Windows folder (B in the figure).
6
• View the file in the in-tray using DeskTopBinder V2 Lite to check the contents. (C in the figure)
• Use Auto Document Link to receive
the file stored in the in-tray, and check
the contents with an application corresponding to the file format. (D in the
figure)
• Access the Windows folder where the
file is stored via the network, and
check the contents with an application
corresponding to the file format. (E in
the figure)
Outline
Reference
For more information about ScanRouter V2 Lite, DeskTopBinder V2 Lite, or
Auto Document Link, see the respective documentation. See p.i “Manuals for
This Machine”.
1
Network TWAIN Scanner
The scanning function of this machine can be used from a client computer via a
network (Ethernet, IEEE 1394 (IP over 1394) [optional], or IEEE 802.11b (Wireless LAN) [optional]). Originals can be scanned with the same operation used for
SCSI- and USB-connected scanners.
Reference
p.95 “Using the Network TWAIN Scanner Function”
ZHSX020N.eps
ZHSX020N
1. This machine
2. Client computer
The scanning function of the machine can
be used from a client computer via a network.
Originals are scanned using the TWAIN
driver for the machine from an application.
7
Network Scanner
Control Panel
This illustration shows the control panel when options are installed.
1
ZHSS011N.eps
ZHSS011N
1. {User Tools/Counter} key
7. {Interrupt} key
Use to change default or operation parameters according to the operating conditions.
Press this key to interrupt the scanner
mode and to activate the copy mode.
2. Display panel
indicator
Displays the operation status and messages.
3. {Check Modes} key
Press to check the destinations which are
currently selected.
The main power indicator lights up when
the main power switch is set to on. The
power indicator lights up when the machine is on.
Use to register settings used frequently as
a program or to recall the registered program.
Important
r Do not turn off the main power
while the power indicator is lit or
blinking. Doing so may cause a
failure of the hard disk.
5. {Clear Modes} key
9. Operation switch
4. {Program} key
Press to clear the current settings.
6. {Energy Saver} key
Press this key to begin warm-up.
Pressing this key again while in warm-up
mode cancels warm-up.
Note
r This key is inactive while scanning or
setting scanner defaults.
8
8. Main power indicator and power
Press this switch to turn the machine on.
The power indicator lights up. To turn
the machine off, press this switch again.
Note
r This key is inactive while scanning or
setting scanner defaults.
Control Panel
10. Indicators
Display errors and the machine status.
d: Add Staple indicator
D: Add Toner indicator
B: Add Paper indicator
L: Service Call indicator
M: Open Cover indicator
x: Misfeed indicator
1
Reference
For more information, see General
Settings Guide.
11. Function status indicators
• When lit green, the corresponding
function is active.
• When lit red, the corresponding function is interrupted. Press the respective key, and then follow the
instructions that appear on the screen.
12. Function keys
Press the {Copy}, {Document Server}, {Facsimile}, {Printer}, or {Scanner} key to activate the respective function. The display
content changes accordingly.
The indicator for the selected function
lights up.
13. Number keys
Use to enter numeric values.
14. {#} key (Enter key)
Use to enter a numeric value.
15. {Clear/Stop} key
• Clear: Clears an entered numeric value
• Stop: Stops scanning
16. {Start} key
Use to begin scanning, file storing, or delivery.
9
Network Scanner
Display Contents
This section explains the normal screen configuration.
The display's contents differ depending on the function.
1
Note
r The Copy screen is set as the default screen when the machine is turned on.
You can change this setting in the System Settings. See General Settings Guide.
Using e-mail
Press the {Scanner} key to display the e-mail screen (when [E-mail/ Folder] has
been selected in [Destination List Display Priority 1] and [E-mail Address] has been selected in [Destination List Display Priority 2]). If the Network TWAIN Scanner screen
appears, press [Exit].
***Scan-001.tif***
Reference
For information about Destination List Display Priority, see p.20 “Destination
List Settings”.
Using Scan to Folder
Press the {Scanner} key to display the Scan to Folder screen (When [E-mail/ Folder]
has been selected in [Destination List Display Priority 1] and [Folder] has been selected in [Destination List Display Priority 2]). If the Network TWAIN Scanner screen
appears, press [Exit].
For information about Destination List Display Priority, see p.20 “Destination
List Settings”.
10
Control Panel
Using as a network delivery scanner
Press the {Scanner} key to display the Network Delivery Scanner screen (when
[Delivery Server] has been selected in [Destination List Display Priority 1]). If the Network TWAIN Scanner screen appears, press [Exit].
1
Reference
For information about Destination List Priority, see p.20 “Destination List Settings”.
Using as a network TWAIN scanner
When using the machine as a network TWAIN scanner, it is not necessary to
press the {Scanner} key on the control panel. When the TWAIN driver becomes
active on a client computer, the display automatically switches to the following
screen.
Press [Exit] to use functions other than the network TWAIN scanner function.
11
Network Scanner
1
12
2. Preparations for Use as a
Network Scanner
To use the machine as a network scanner, you must make settings required for
use as a scanner as well as basic settings for use in a network.
Reference
First, see General Settings Guide for details about how to make basic settings,
and then make scanner settings.
For more information about settings for sending by e-mail, see Network Guide.
Initial Scanner Setup
This section explains all required settings and procedures for using the machine
as a network scanner.
Scanner Features
The settings for using the network scanner functions of the machine are listed
below. Make the necessary settings.
Note
r Making settings for the items marked with m if necessary.
v Scan Settings
For explanations of settings, see p.16 “Scan Settings”.
Settings
Default
E-mail
Scan to
Folder
Store
Scan Type
Text (Print)
m
m
m
m
Resolution
200 dpi
m
m
m
m
Auto
Image
Density
(Medium)
m
m
m
m
Auto Detect
m
m
m
m
Wait Time for Next Orig.:
Exposure Glass
Set Wait
Time (60)
m
m
m
m
Wait Time for Next Original(s): SADF
Set Wait
Time (60)
m
m
m
m
1 sided
original
m
m
m
m
Original Feed Type Priority
Off
m
m
m
m
Mixed Original Sizes Priority
Off
m
m
m
m
Default Scan
Settings
Image
Density
Scan Size
Original Setting
Delivery TWAIN
13
Preparations for Use as a Network Scanner
Settings
Default
Original Orientation Priority
Change Initial Mode
Standard
Delivery TWAIN
E-mail
Scan to
Folder
Store
m
m
m
m
m
m
m
m
v Destination List Settings
For explanations of settings, see p.20 “Destination List Settings”.
2
Settings
Default
E-mail
Scan to
Folder
Destination List Display
Priority 1
Delivery
Server
m
m
Destination List Display
Priority 2
E-mail
Address
m
m
Title 1
m
m
Select Title
Update Delivery Server
Destination List
Store
Delivery TWAIN
m
m
m
-
Note
r [Destination List Display Priority 1] and [Update Delivery Server Destination List]
will not be displayed when [OFF] is selected for [Delivery Option] in [File
Transfer] of System Settings. See Network Guide.
v Send Settings
For explanations of settings, see p.21 “Send Settings”.
Settings
E-mail
Scan to
Folder
Store
10 sec.
m
m
m
m
Multi-page:
TIFF
m
m
On
m
m
m
m
Compression (Gray Scale)
Standard
m
m
m
m
Print & Delete Scanner Journal
Delete
All after
Printing
m
m
Max. E-mail Size
2048KB
m
Divide & Send E-mail
Yes (per
max. size)
m
E-mail Information Language
American
English
m
Sender's Name Default
No
m
TWAIN Standby Time
File Type Priority
Compression (Black &
White)
14
Delivery TWAIN
Default
m
m
Initial Scanner Setup
Setting procedure
A Press the {User Tools/Counter} key.
B Press [Scanner Features].
C Press [Send Settings].
D Press the item to be set.
2
Example: TWAIN Standby Time setting
E Change the setting.
• To select an item, touch its key on the screen. The item is highlighted.
• To enter numbers, use the number keys.
Note
r To cancel changing a setting, press [Cancel]. The setting returns to the previous condition.
F Press [OK].
G Repeat steps D to F to make other settings.
H Press [Exit].
The main menu reappears.
15
Preparations for Use as a Network Scanner
Scan Settings
This section explains how to set the
defaults for scan settings.
The scan settings consist of the following. For the list about settings and
defaults, see p.13 “Scanner Features”.
2
v Default Scan Settings
Various basic settings (scan type,
resolution, image density, scan
size) can be set.
• Scan Type
Select the scan type from the following:
• Text (Print)
For standard originals containing mainly text (for print)
• Text (OCR)
For standard originals containing mainly text (for OCR)
• Text/ Photo
For originals containing a mixture of text and photographs
• Photo
For originals containing photographs and other pictures (twovalue)
• Gray Scale
For originals containing photographs and other pictures (multi-value)
Note
r Printer printing is best scanned
with Text (Print). Text (OCR) is
suitable for higher OCR accuracy.
r An image is scanned in black &
white with Photo, and in grayscale with Gray Scale. As a general rule, scanning for the
purpose of printing is best done
with Photo and scanning for
viewing on the computer screen
with Gray Scale.
16
• Resolution
Select the resolution from 100 dpi,
200 dpi, 300 dpi, 400 dpi, or 600
dpi.
• Image Density
Select the image density in seven
steps from Lighter (1) to Darker (7)
or use Auto Image Density.
• Scan Size
Select the size of the original to be
scanned.
When [Auto Detect] is selected, the
auto detect function of the machine is used to set the original
size.
When the size is specified, scanning is performed for that size, regardless of the actual size of the
original. The following sizes can be
selected:
A3S, A4R, A4S, A5R, A5S, 11
x 17S, 81/2 x 14S, 81/2 x 13S,
8 1 / 2 x 11R, 8 1 / 2 x 11S, 51 / 2 x
81/2R, 51/2 x 81/2S, B4 JISS (Japanese Industrial Standard), B5
JISR, B5 JISS, Custom size
Note
r When [Custom size] is selected,
the dimensions of the scan area
(width and height) can be specified.
r When selecting [Custom size] for
[Scan Size], see p.19 “Selecting a
custom size”.
v Wait Time for Next Orig.: Exposure
Glass
When dividing originals and scanning them individually with the
exposure glass to form a single file,
select [OFF], [Set Wait Time], or [Continuous Wait] for the waiting status.
Initial Scanner Setup
Note
r If either [SADF] or [Batch] is
specified when scanning, this
setting is invalid.
r If [Off] is selected, sending will
start automatically after one
page of original is scanned.
r If [Set Wait Time] is selected, enter the waiting time in seconds
(3-999) for placing additional
originals with the number keys.
Scanning will start when additional originals are placed and
the {Start} key is pressed within
this time. You can end scanning
and begin sending by pressing
the {#} key within this time. If
the specified time has passed,
sending starts automatically
and you do not need to press the
{#} key.
r If [Continuous Wait] is selected,
the machine will wait for additional originals until the {#} key
is pressed. Scanning will start
when additional originals are
placed and the {Start} key is
pressed. You can end scanning
and begin sending by pressing
the {#} key.
r If originals are placed in the
ADF, sending will start without
waiting for additional originals
after all originals in the ADF
have been scanned even if you
select [Continuous Wait].
r If a paper jam occurs or any of
the following operation is performed while the machine is
waiting for additional originals,
the countdown stops and does
not start again until the {#} key
is pressed.
• Changing the settings such
as the scan settings
• Opening the upper cover of
the ADF
• Pressing the {Interrupt} key to
activate the copy mode
v Wait Time for Next Original(s): SADF
When dividing originals and scanning them separately with the
ADF to form a single file, select [Set
Wait Time] or [Continuous Wait] for
the waiting status.
2
Note
r If [SADF] is specified when scanning, this setting is valid.
r If [Set Wait Time] is selected, enter the waiting time in seconds
(3-999) for placing additional
originals with the number keys.
Scanning will start automatically when additional originals are
placed within this time. You can
end scanning and begin sending
by pressing the {#} key within
this time. If the specified time
has passed, sending starts automatically and you do not need
to press the {#} key.
r If [Continuous Wait] is selected,
the machine will wait for the additional originals until the {#}
key is pressed. Scanning will
start when additional originals
are placed and the {Start} key is
pressed. You can end scanning
and begin sending by pressing
the {#} key.
r Even if originals are placed on
the exposure glass, the machine
will function as the settings.
However, every time originals
are placed, you must press the
{Start} key to start scanning.
17
Preparations for Use as a Network Scanner
r If a paper jam occurs or any of
the following operation is performed while the machine is
waiting for additional originals,
the countdown stops and does
not start again until the {#} key
is pressed.
• Changing the settings such
as the scan settings
• Opening the upper cover of
the ADF
• Pressing the {Interrupt} key to
activate the copy mode
2
v Original Setting
Set the default for whether originals are one-sided or two-sided
and if two-sided, the relationship
between those sides. When the
originals are always the same, set
this for the default to make operation easier. You can select [1 Sided
Original], [2 Sided Orig.:T to T] (Top to
Top), or [2 Sided Orig.:T to B] (Top to
Bottom).
Reference
p.39 “Original Orientation and
Scan Area”
v Original Feed Type Priority
Multiple originals can be divided
and scanned separately using the
exposure glass or ADF to form a
single file. In this case, the waiting
time for placing additional originals to scan can be specified.
If [SADF] is selected, the [Wait Time
for Next Original(s): SADF] setting
will be valid when scanning.
If [Batch] is selected, scanning will
start when the additional originals
are placed and the {Start} key is
pressed regardless of the setting
for [Wait Time for Next Orig.: Exposure
Glass] or [Wait Time for Next Original(s): SADF].
18
If [Off] is selected, the [Wait Time for
Next Orig.: Exposure Glass] setting is
valid when scanning.
Note
r The countdown for scanning
additional originals stops when
scanning conditions are
changed. The machine keeps
waiting for restarting the countdown until the {#} key is
pressed.
v Mixed Original Sizes Priority
This setting determines whether
the original size is to be automatically detected when originals of
different sizes are inserted in the
ADF. You can select [On] or [Off].
Note
r If the original size is specified
when scanning, this setting is
ignored.
r When [Off] is selected and [Auto
Detect] is selected for scan size, if
originals of different sizes are
placed in the ADF, the maximum size will be detected as the
scan size.
v Original Orientation Priority
Select the default for original
placement orientation. When originals are always positioned the
same way, select that orientation
as the default to make operation
easier.
Reference
p.39 “Original Orientation and
Scan Area”
Initial Scanner Setup
When selecting [Custom size] as the
scan size, follow the procedure below.
A Press
[Custom size] on the Scan
Size Setting screen.
B Enter
the original size with the
number keys.
Select and enter values for [X1] and
[Y1], and then press the {#} key.
number keys.
Select and enter values for [X3] and
[Y3], and then press the {#} key.
2
Depending on how the original is
positioned, the scan area will be as
follows:
Original orientation
Original orientation
When placed on the exposure glass
Selecting a custom size
D Enter the scan size (area) with the
X2 X3
X3
X2
Y2
Y3
Y3
Y1
Y1
Y2
X1
X1
X3 X2
X3
X2
Y2
Y2
Y3
Y1
Y1
Y3
X1
X1
X2 X3
X2 X3
Y2
Y2
When placed in the ADF
v Change Initial Mode
If you use the settings which are
displayed when modes are cleared,
reset, or immediately after the operation switch is turned on as the
initial mode, select [Standard].
Select [Program No.10] when you
use the settings stored in Program
No.10 as the initial mode.
Y3
Y3
Y1
Y1
X1
X1
C Enter the scan starting point in re-
lation to the standard scan starting point.
Select and enter values for [X2] and
[Y2], and then press the {#} key.
ZHSY055N
shows the face of the original.
shows the back of the original.
shows the feeding direction.
The range of possible original sizes
and scan sizes is as follows:
• Original Size
X1: 140 - 432 mm (5.5” - 17.0”)
Y1: 140 - 297 mm (5.5” - 11.7”)
19
Preparations for Use as a Network Scanner
• Scan Size
X3: 10 - 432 mm (0.4” - 17.0”)
Y3: 10 - 297 mm (0.4” - 11.7”)
Keep the scan area settings within
these range.
E When all dimensions are entered,
press [OK].
2
F Make sure that the area specified
in step D (X3 and Y3) is shown in
the [Custom size] field, and then
press [OK].
G Press [Exit].
The main menu reappears.
Destination List Settings
This section explains how to set the
defaults for the destination list and titles displayed.
The destination list settings consist of
the following. For the list about settings and defaults, see p.13 “Scanner
Features”.
v Destination List Display Priority 1
Select a destination list to be displayed when the machine is in the
initial state. You can select either
[E-mail/ Folder] or [Delivery Server].
v Destination List Display Priority 2
This function is available when [Email/ Folder] is selected for [Destination List Display Priority 1].
Select a destination list of the machine to be displayed when the
machine is in the initial state.
You can select either [E-mail Address] or [Folder].
v Select Title
Select what titles are displayed on
the screen. Selecting a title on the
screen will display the destinations programed for that title. This
allows for easy selection of destinations including e-mail destinations and Scan to Folder
destinations. Select either [Title 1]
(ten titles), [Title 2] (ten titles), or [Title 3] (five titles).
v Update Delivery Server Destination
List
To update the Delivery Server Destination List, press [Update Delivery
Server Destination List].
Ordinarily, the Delivery Server
Destination List is automatically
updated. This function allows updating at any time.
20
Initial Scanner Setup
Send Settings
This section explains how to set the
defaults for sending settings such as
the compression level for scan file
and how the machine switches to the
network TWAIN scanner function.
The send settings consist of the following. For the list about settings and
defaults, see p.13 “Scanner Features”.
v TWAIN Standby Time
When the machine is being used to
send e-mail or a file, or functioning
as Document Server or a network
delivery scanner, a scanning request to the machine as a TWAIN
scanner will switch the machine to
the network TWAIN scanner function. This setting determines the delay until the machine switches to the
network TWAIN scanner function.
• When [Off] is selected, the machine will switch to the network
TWAIN scanner function at
once.
• When [On] is selected, you can
enter the delay time with the
number keys (3 - 30 seconds).
The machine will switch to the
network TWAIN scanner function when the time set here
passes after the last key operation.
v File Type Priority
Select whether to send the file of
scanned originals using a single
page or multiple pages.
When sending using multiple pages, select either TIFF or PDF.
Note
r If you specify multi-page TIFF
for file in a JPEG format, the format is automatically changed to
PDF.
v Compression (Black & White)
This setting determines whether
scan file for the black and white
setting is to be compressed.
Note
r The actual time required for file
transfer will vary depending on
the file size and network load.
r Compression reduces the time
required for transferring the
scan file.
2
v Compression (Gray Scale)
This setting determines to what extent scan file for the grayscale setting is to be compressed. You can
select [High], [Standard], [Low], or
[Off].
Note
r The compression ratio decreases in the order [High], [Standard],
[Low], and [Off], and the time required for file transfer increases
accordingly.
r The actual time required for file
transfer will vary depending on
the file size and network load.
v Print & Delete Scanner Journal
Select whether to print the Scanner
Journal automatically when the
number of delivered e-mails reaches 100.
Note
r When printed, all records are
deleted after printing. When not
printed, records over the limit
are automatically deleted in
succession from the oldest
record.
r While the journal is being printed, the file whose status is waiting cannot be sent.
21
Preparations for Use as a Network Scanner
v Max. E-mail Size
Select whether the size of an e-mail
is limited or not.
When [On] is selected, enter the
size limit (64 - 102400 KB) with the
number keys.
Note
r When the SMTP limits the size,
match that setting.
2
v Divide & Send E-mail
This function is effective only
when [On] is selected for [Max. Email Size].
Select whether or not an image exceeding the size specified in [Max.
E-mail Size] should be divided and
sent using more than one e-mail.
Select either [No], [Yes (per Page)], or
[Yes (per Max. Size)]. When [Yes (per
Max. Size)] is selected, enter the
Max. Number of Divisions (2-500)
with the number keys.
Note
r When [Multi-page: TIFF] or [Multipage: PDF] is selected for [File
Type Priority], the image will not
be divided even if [Yes (per
Page)] is selected.
r When [Yes (per Max. Size)] is selected, some received files may
not be able to be restored, depending on the type of e-mail
software.
r When [No] is selected, the e-mail
is not sent if its size exceeds the
limit, and an error message appears. The scan file is discarded.
r Set the maximum e-mail size
within the capacity of the SMTP
server.
22
v E-mail Information Language
Select a language for E-mail Information Language with which Title,
Document name, Sender's name
and others are sent.
Select one of the following 20 languages: British English, American
English, German, French, Italian,
Spanish, Dutch, Portuguese,
Polish, Czech, Swedish, Finnish,
Hungarian, Norwegian, Danish,
Japanese, Simplified Chinese, Traditional Chinese, Russian, and
Hangul.
Note
r The e-mail text which is a template cannot be changed.
v Sender's Name Default
Select whether an administrator is
registered as a sender or a sender is
specified each time an e-mail is
sent. If the access code has been
set, enter the code with the number
keys, and then press the {#} key.
• Select [No] when a sender is to
be specified each time.
• Select [Yes] when an administrator is to be the sender.
Important
r It is recommended that protection code be set to prevent the
sender's name from being misused.
r When [On] is selected for [Key
Operator Code] in [Key Operator
Tools] of System Settings and
[Partial] is set for the range, enter
the access code when [Sender's
Name Default] is selected. For
more information about the
System Settings, see “User
Tools (System Settings)”, General Settings Guide.
Programs
Programs
You can store frequently used settings in the machine memory and recall them for future use.
C Press [Register].
Note
r You can store up to 10 programs
for the scanner mode.
r You can use the settings stored in
program No.10 as the initial mode
by selecting [Program No.10] in
[Change Initial Mode] in [Scanner Features].
r Programs are not deleted by turning the power off or by pressing
the {Clear Modes} key. They are deleted only when you delete or
overwrite them with another program.
r The items which can be stored as a
program are as follows: the scan
settings, 1 sided/2 sided original,
Top to Top/Top to Bottom, Last
Page, Original Feed Type, File
Type, and Batch/SADF.
Storing a Program
A Edit the settings so all functions
you want to store in this program
are selected.
B Make sure the {Scanner} key is selected, press the {Program} key.
2
D Press
the program number you
want to use.
Note
r Program numbers with m already have settings in them.
E Enter the program name with the
letter keys on the display panel.
You can enter up to 40 characters.
Reference
For details about entering characters, see “Entering Text”, General Settings Guide.
Note
r If it is not necessary to enter the
program name, proceed to step
F.
F Press [OK].
When the settings are successfully
stored, m appears on the left side
of the registered program number
and the program name appears on
the right side. The display returns
to the initial display after a moment.
23
Preparations for Use as a Network Scanner
Recalling a Program
Deleting a Program
A Make sure the {Scanner} key is se-
A Make sure the {Scanner} key is se-
B Press [Recall].
B Press [Delete].
C Press the number of the program
C Press the number of the program
lected, press the {Program} key.
lected, press the {Program} key.
2
you want to recall.
The stored settings are displayed.
Note
r Program numbers with m already have settings in them.
D Place the originals, and then press
the {Start} key.
you want to delete.
D Press [Yes].
The program is deleted, and the
display returns to the initial display after a moment.
Changing the program name
Changing a Stored Program
A Make sure the {Scanner} key is se-
A Make sure the {Scanner} key is se-
B Press [Change Name].
lected, press the {Program} key.
lected, press the {Program} key.
B Press [Recall].
C Press the number of the program
you want to change.
D Change settings of the program.
E Press the {Program} key.
F Press [Register].
G Press the number of the program
you changed the setting.
H Press [Register] to accept the confirmation message.
24
I Enter a program name.
J Press [OK].
C Press the number of the program
you want to change name.
D Enter a new program name.
A program name can be entered
up to 40 characters.
For details about entering characters, see “Entering Text”, General
Settings Guide.
E Press [OK].
The display returns to the initial
display after a moment.
Installing Software
Installing Software
The machine comes with two CD-ROMs containing various software.
The CD-ROM labeled “Scanner Driver & Document Management Utilities” contains the necessary software to use the machine as a network scanner. The CDROM labeled “Printer Driver & Utilities” contains the necessary software to use
the machine as a printer.
This section explains the software to use the machine as a network scanner.
2
Auto Run Program
When the CD-ROM is inserted into a client computer in Windows 95/98/Me,
Windows XP, Windows 2000, or Windows NT 4.0, the installer starts automatically (Auto Run) to install the TWAIN driver and various software.
Note
r Auto Run might not automatically work with certain operating system settings. In this case, launch “Set up.exe” located in the CD-ROM root directory.
r If you want to install the software without using Auto Run, hold down the
{Shift} key while inserting the CD-ROM. Keep the {Shift} key held down until
the client computer has finished accessing the CD-ROM.
r If [Cancel] is pressed during installation, the installation will be stopped and
all the remaining software will not be installed. If [Cancel] has been pressed,
reinstall the remaining software after restarting the client computer.
Limitation
r For installation in Windows 2000, Windows XP, or Windows NT 4.0, log in as
a member of the administrators group.
25
Preparations for Use as a Network Scanner
The installing sequence using Auto Run is as follows:
Installation Sequence
Insert the
CD-ROM.
2
TWAIN Driver Ver.3
TWAIN
Driver
The installer
starts up.
ScanRouter V2 Lite
Select
the software.
ScanRouter
V2 Lite
ScanRouter V2
Administration
Utility
Install all at once, or select and install individually.
DeskTopBinder V2 Lite
The
installation
complete
message is
displayed.
DeskTopBinder
V2 Lite
Acrobat Reader
Restart
your PC.
Acrobat
Reader
ZHSY070N
For information about the software that can be installed by Auto Run, see p.29
“Software Supplied on CD-ROM”.
26
Installing Software
Software for Using a Network TWAIN Scanner
To use the machine as a network TWAIN scanner, it is essential to install the
TWAIN driver.
If you do not have applications that work with TWAIN, it is necessary to also
install DeskTopBinder V2 Lite. For information about the installation of DeskTopBinder V2 Lite, see p.29 “DeskTopBinder V2 Lite”.
2
Preparation
Before installation, check the operating environment for the TWAIN driver.
See p.30 “Type2045e TWAIN Driver”.
Using Windows 95/98/Me, Windows XP,
Windows 2000, or Windows NT 4.0
Install the TWAIN driver using Auto
Run.
A Start
Windows, and then insert
the supplied CD-ROM labeled
“Scanner Driver & Document
Management Utilities” into the
CD-ROM drive of the client computer.
Th e C ho o se S et up La ng ua ge
screen appears.
Reference
If the installer does not start automatically, see p.25 “Auto Run
Program”.
B Select a setup language, and then
D The installer of the TWAIN driv-
er starts. Follow the instructions
on the screen.
Note
r When the installation is complete, a message to prompt you
to restart the client computer
may appear. In this case, restart
the client computer.
r After the installation is complete, the “Type2045e TWAIN
V3” folder is in the “Program”
folder on the Start menu. Help
can be displayed from here.
r Notes on using the network
TWAIN scanner are provided in
“Readme.txt”. Be sure to read
them before use.
click [OK].
The CD-ROM Launcher screen appears.
C Click [TWAIN Driver].
The Software Setup screen appears.
27
Preparations for Use as a Network Scanner
Software for Using the Network Delivery Scanner Function
To use the machine as a network delivery scanner, it is essential to install ScanRouter V2 Lite on the delivery server. To check an in-tray or retrieve file, it is necessary to install TWAIN Driver on the client computer.
Use Auto Run for installation.
2
Preparation
Before installation, check the system requirements for the software. See p.29
“Software Supplied on CD-ROM”.
A Start Windows, and then insert the supplied CD-ROM labeled “Scanner
Driver & Document Management Utilities” into the CD-ROM drive of the
client computer.
The Choose Setup Language screen appears.
B Select a setup language, and then click [OK].
The CD-ROM Launcher screen appears.
C Click the key of the software to be installed.
• The ScanRouter V2 Lite installer starts by clicking [ScanRouter V2 Lite].
• The DeskTopBinder V2 Lite installer starts by clicking [DeskTopBinder V2
Lite].
The Change The Language screen appears.
D Select a language, and then click [OK].
The Software Setup screen appears.
Reference
For information about the subsequent installation procedure, see Setup
Guide that can be displayed from the Setup screen of the respective software.
28
Installing Software
DeskTopBinder V2 Lite
Use Auto Run for installation.
Preparation
Before installation, check the system requirements for DeskTopBinder V2
Lite. See p.31 “DeskTopBinder V2 Lite”.
2
A Start Windows, and then insert the supplied CD-ROM labeled “Scanner
Driver & Document Management Utilities” into the CD-ROM drive of the
client computer.
The Choose Setup Language screen appears.
B Select a language, and then click [OK].
The CD-ROM Launcher screen appears.
C Click [DeskTopBinder V2 Lite].
The Change The Language screen appears.
D Select a language, and then click [OK].
The Software Setup screen appears.
Reference
For information about the subsequent installation procedure, see Setup
Guide that can be displayed from the Setup screen of DeskTopBinder V2
Lite.
Software Supplied on CD-ROM
List of files
CD-ROM
Drive
Wizard for the TWAIN driver and utilities
Drivers
Twain
TWAIN driver for Windows 95/98/Me,
Windows XP, Windows 2000, Windows NT
4.0
Utility
RouterV2
ScanRouter V2 Lite ,
ministration Utility
DeskV2
Acroread
ScanRouter V2 Ad-
DeskTopBinder V2 Lite
Acrobat Reader
29
Preparations for Use as a Network Scanner
Type2045e TWAIN Driver
This driver is required to scan an original on the machine.
To use the machine as a network TWAIN scanner, this driver must be installed.
v File storage folder
The files are stored in the following folder on the CD-ROM provided with this
machine:
\DRIVERS\TWAIN
2
v System requirements
Limitation
r Under Windows NT with RISC-based processors (MIPS R series, Alpha
AXP, or PowerPC), this driver is not available.
• Hardware
PC/AT compatible
• CPU
Pentium or faster (Pentium 150 MHz or faster recommended)
• Operating system
Microsoft Windows 95 (OSR 2 or later)
Microsoft Windows 98
Microsoft Windows Millennium Edition
Microsoft Windows XP Professional
Microsoft Windows XP Home Edition
Microsoft Windows 2000 Server
Microsoft Windows 2000 Professional
Microsoft Windows NT Server 4.0 (Service Pack 5 or later)
Microsoft Windows NT Workstation 4.0 (Service Pack 5 or later)
• Memory
Operating system min. operation memory + 8 MB (64 MB or more recommended)
• Hard disk space
100 MB or more
• Display resolution
800 × 600 pixels, 256 colors or higher
• Network protocol
TCP/IP
30
Installing Software
DeskTopBinder V2 Lite
DeskTopBinder V2 Lite is to be installed on the client computers for integration
and management of various kinds of file such as scan file, files created with applications, and existing scan files. This software allows you to use various functions for scan files stored in the Document Server, e.g., viewing stored files. Also,
with ScanRouter V2 Lite, you can view the files stored in in-trays of the delivery
server or use other functions for stored files.
2
Reference
See DeskTopBinder V2 Lite Help or the manuals for DeskTopBinder V2 Lite.
v File storage folder
The files are stored in the following folder on the CD-ROM provided with this
machine:
\UTILITY\DESKV2
v System requirements
• Hardware
PC/AT compatible
• CPU
Pentium 133 MHz or faster (Pentium II 266 MHz or faster recommended)
• Operating system
Microsoft Windows 95 (OSR 2 or later)
Microsoft Windows 98
Microsoft Windows Millennium Edition
Microsoft Windows XP Professional
Microsoft Windows XP Home Edition
Microsoft Windows 2000 Server (Service Pack 1 or later)
Microsoft Windows 2000 Professional (Service Pack 1 or later)
Microsoft Windows Server 2003 Standard Edition
Microsoft Windows Server 2003 Enterprise Edition
Microsoft Windows Server 2003 Web Edition
Microsoft Windows NT Server 4.0 (Service Pack 5 or later)
Microsoft Windows NT Workstation 4.0 (Service Pack 5 or later)
• Memory
48 MB or more (128 MB or more recommended)
• Hard disk space
50 MB or more (200 MB or more recommended)
• Display resolution
800 × 600 pixels, 64K colors or higher
• Network protocol
TCP/IP
31
Preparations for Use as a Network Scanner
v Software installed with DeskTopBinder V2 Lite
• Auto Document Link
Auto Document Link on the client computer monitors in-trays of the delivery server. In addition, the file delivered to in-trays can be retrieved or the
arrival of file can be received at the client computer with this software.
• Function Palette
Function Palette allows you to use functions such as the network TWAIN
scanner, printing, printing preview, sending files by e-mail or sending faxes without starting DeskTopBinder V2 Lite. You must make settings in advance in the [Extended Features] to use Function Palette. Refer to manuals
related to DeskTopBinder V2/Lt for the details.
• Extended Features Wizard
You can make settings equal to [Extended Features] of the [Tools] menu with
Extended Features Wizard. Refer to manuals related to DeskTopBinder
V2/Lt for the details.
2
ScanRouter V2 Lite
ScanRouter V2 Lite is to be installed on the delivery server. The scan file can be
sorted in the delivery server, stored in specified in-trays, or saved in folders of
client computers on the same network.
Reference
See the manuals for ScanRouter V2 Lite or ScanRouter V2 Lite Help.
v File storage folder
The files are stored in the following folder on the CD-ROM provided with this
machine:
\UTILITY\ROUTERV2
v System requirements
Limitation
r When installing the software in Windows NT Server or Windows 2000
Server, a stand-alone server must be used. Do not use the primary domain
controller or backup domain controller.
r If you install this software in an operating system, such as Windows NT
Workstation and Windows 2000 Professional, in which a client server is
not permitted to be used in a network, you may violate the license agreement of Microsoft Corporation.
• Hardware
PC/AT compatible
• CPU
Pentium 200 MHz or faster (Pentium II 350 MHz or faster recommended)
32
Installing Software
• Operating system
Microsoft Windows 95 (OSR 2 or later)
Microsoft Windows 98
Microsoft Windows Millennium Edition
Microsoft Windows XP Professional
Microsoft Windows XP Home Edition
Microsoft Windows 2000 Server (Service Pack 1 or later)
Microsoft Windows 2000 Professional (Service Pack 1 or later)
Microsoft Windows NT Server 4.0 (Service Pack 5 or later)
Microsoft Windows NT Workstation 4.0 (Service Pack 5 or later)
• Memory
64 MB or more (128 MB or more recommended)
• Hard disk space
Minimum free space required for installing: 200 MB
2
Note
r In addition to the space required for installation, the hard disk should
have at least 500 MB of free space for files.
• Network protocol
TCP/IP
v Software installed with ScanRouter V2 Lite
• ScanRouter V2 Administration Utility
ScanRouter V2 Administration Utility manages the delivery system run by
ScanRouter V2 Lite.
You can register destination and sender information for the scanned documents in the delivery server. In addition, you can perform maintenance
for free disk space monitoring, error log recording, and other features of
the delivery server.
Note
r ScanRouter V2 Administration Utility can be installed not only on the
delivery server but also on client computers. To install it, click [ScanRouter V2 Administration Utility] on the ScanRouter V2 Lite Setup screen.
33
Preparations for Use as a Network Scanner
2
34
3. Setting Originals
This chapter explains the procedure for placing originals on the exposure glass
and in the ADF, and setting the original scan area and orientation according to
the placement method.
To correctly display the top/bottom orientation of the scanned original on a client computer, the placement of the original and the settings made on the control
panel and scanner driver must match.
Placing Originals
There are two orientations for placing the original. See the table below.
Note
r Normally, an original is or , but in the table below, a square original is
used to make original orientation easy to understand. If the actual shape of
the original is different, the combination of original orientation and the orientation specified on the control panel or scanner driver does not change.
v Specifying original orientation and setting originals
Org.eps
An original to be scanned
Exposure glass
ADF
Place the
original so
that the top
edge touches
the top left of
the exposure glass.
Place the top Place the
edge of the
original so
original first. that the top
edge touches
the back of
the ADF.
Decide the placement method.
Place the original.
(There are two original orientations.)
Place the
original so
that the top
edge touches
the rear of
the exposure
glass.
35
Setting Originals
When scanning using
the e-mail function,
Speci- the Scan to Folder
fy the function, the Docuorien- ment Server function,
tation. or the delivery scanner function.
(Specified on the control panel screen)
When scanning using
the TWAIN scanner
function
3
(Specified in the Scanner Control dialog
box)
The original displayed on a
computer
Placing on the Exposure Glass
Originals which do not fit into the
ADF, such as sheets with glued-on
parts, books, etc., can be placed directly on the exposure glass for scanning.
Note
r For information about the originals which can be placed on the exposure glass, see Copy Reference.
B Place the original on the exposure
glass with the side to be scanned
facing down. Align the original
with the back left corner mark.
There are two original orientations.
v When placing the original so that
the top edge touches the rear of
the exposure glass
A Lift
the exposure glass cover or
the ADF.
Note
r Lift the exposure glass cover or
ADF more than 30 degrees. The
opening/closing action triggers
the automatic original size detection process.
36
ZHSY030N
1. Positioning mark
Placing Originals
v When placing the original so that
the top edge touches the top left of
the exposure glass
When using the machine as a
network TWAIN scanner, this
orientation is the standard setting for the TWAIN driver. Normally, use this orientation for
placing originals.
Placing in the Auto Document
Feeder
The ADF allows you to place multiple
originals at one time. Originals placed
in the ADF can be scanned on one
side or both sides.
v Originals that can and cannot be
placed in the ADF
For information about the originals that can and cannot be placed
in the ADF, see Copy Reference.
Attempting to use unsuitable originals in the ADF can lead to a misfeed and damage to the originals.
Place such originals directly on the
exposure glass.
3
ZHSY040N
1. Positioning mark
C Lower the exposure glass cover or
the ADF.
D Select the original orientation ac-
cording to the orientation of the
placed original.
Reference
p.35 “Specifying original orientation and setting originals”
Proceed to p.39 “Original Orientation and Scan Area”.
Important
r For information about which
original sizes can be detected
automatically and notes on
placing originals in the ADF,
see Copy Reference.
A Adjust
the original guide to
match the size of the originals.
B Place the originals with the side
to be scanned facing up. (For originals which are to be scanned on
both sides, the first side should
face up.)
There are two orientations.
37
Setting Originals
v When placing the originals so that
the top edges touch the back of the
ADF
Note
r Originals with different sizes
can be placed at the same time.
Place the originals as shown:
3
ZHSY080N
ZHSY010N
v When placing the top edges of the
originals first
When using the machine as a
network TWAIN scanner, this
orientation is the standard setting for the TWAIN driver. Normally, use this orientation for
placement.
1. ADF placement orientation
2. Height
r Originals are scanned in the inserted order, starting with the
topmost page.
C Select the original orientation ac-
cording to the orientation of the
placed originals.
Reference
p.35 “Specifying original orientation and setting originals”
Proceed to p.39 “Original Orientation and Scan Area”.
ZHSY020N
38
Original Orientation and Scan Area
Original Orientation and Scan Area
Auto Detect Non-Mixed Original Sizes
Note
r The difference between scanning
with the TWAIN scanner function
and the e-mail function, the Scan to
Folder function, the Document
Server function, or the network delivery scanner function is shown in
the following table:
TWAIN Scanner
E-mail/Scan to
Folder/Document Server/
Network Delivery Scanner
A whole batch
of originals is
scanned using
the size of the
first original.
Auto detection
is used to determine the size of
each original
placed on the
exposure glass.
TWAIN Scanner
Size Specification Auto Detect Mixed Original Sizes
To correctly display the top/bottom
orientation of a scanned original on a
client computer, original orientation
and page flow must be set when placing the original.
When using the e-mail function, the
Scan to Folder function, the Document Server function, and the network delivery scanner function,
settings are made on the control panel
of the machine. When using the machine as a network TWAIN scanner,
settings are made with the TWAIN
driver.
E-mail/Scan to
Folder/Document Server/
Network Delivery Scanner
Auto detection is used to determine the size of each original.
3
When an original is smaller than
the specified size, a blank space appears in the resulting image.
A whole batch
of originals set
in the ADF will
be scanned by
the maximum
size original.
39
Setting Originals
For E-mail, Scan to Folder, and
a Network Delivery Scanner
A Make settings for one-sided/twosided combination, Batch/SADF,
mixed original sizes, and original
orientation.
3
Note
r The defaults can be changed using the initial scan settings [Original Setting], [Original Feed Type
Priority], [Mixed Original Sizes Priority], and [Original Orientation Priority]. See p.16 “Scan Settings”.
C When the last page of two-sided originals is blank, select [1
Side] to skip that side and finish
scanning, or select [2 Sides] to
scan that side as a blank page.
Note
r When [1 Side] is selected for
[Last Page], file size will be
bigger than the one for the
originals, and the e-mail cannot be sent beyond the limit
of Max. E-mail Size. In this
case, change the setting of
[Max. E-mail Size] of [Scanner
Features].
D Press [OK].
B Make
settings for Batch/SADF,
mixed original sizes, and original
orientation, and then press [Original Feed Type].
One-sided original/Two-sided
original selection
A When scanning one-sided originals, make sure that [1 Sided
Orig.] is selected.
B When scanning two-sided
originals, press [2 Sided Orig.] to
select [2 sided orig.: T to T] or [2
sided orig.: T to B] according to
the binding orientation of the
original.
Top to top
original:
RS
Top to bottom original:
R
S
40
R S
R
S
Batch/SADF selection
A When scanning a large number
of originals by dividing the
originals and scanning them
individually or in batches,
check that either [Batch] or
[SADF] is selected.
Note
r Select [SADF], and the setting
of [Wait Time for Next Original(s): SADF] of [Scan Settings]
of [Scanner Features] is available. Or select [Batch], and the
machine waits until additional originals are set. See
p.42 “Scanning Originals in
Several Times”.
Original Orientation and Scan Area
Mixed size selection
For a Network TWAIN Scanner
A When originals of different
sizes are placed, select [Mixed
Size].
A Open the Scanner Properties dia-
Note
r If [Mixed Size] is selected and
[Auto Detect] is selected for
scan size, the maximum size
detected is set as the scan
size. For originals smaller
than this size, a blank space
will appear in the resulting
image.
r Originals of different width
may be sometimes scanned a
little slantways because the
guide of the original cannot
be fitted to the size of the
small original.
Orientation selection
A Press the key for the same orientation as the actual orientation of the original, or .
Reference
p.35 “Specifying original orientation and setting originals”
C Press [OK].
Note
r The current settings are displayed.
log box.
Reference
p.96 “Scanning Originals”
B Select the position from the [Document:] list in the [Document] area.
C Select [
/
] or [
the [Orientation:] list.
/
3
] from
Reference
p.35 “Specifying original orientation and setting originals”
D When the originals are placed in
the ADF, select [Simplex] or [Duplex] in the [Side:] list.
Note
r If originals of different sizes are
placed in the ADF, specify the
document size or detection
method in the [Size:] box. If [Auto detection (Uni-size)] is selected,
all originals are scanned using
the size of the first page. If [Auto
detection (Multi-size)] is selected,
all originals are scanned according to their own width. For both
Uni-size and Multi-size, all originals are scanned using their
own length.
41
Setting Originals
Scanning Originals in Several
Times
Multiple originals can be scanned as a
single file by dividing them and scanning them using the exposure glass or
the ADF. When scanning originals dividing in several times, there are two
waiting status for setting additional
originals: the machine waits for a designated time, or keeps waiting until
an additional original is set.
3
Specifying a time limit for additional
originals
In advance, specify the waiting time
in seconds for placing the additional
originals.
• Scanning using the exposure glass
Select [Set Wait Time] for [Wait Time
for Next Orig.: Exposure Glass].
• Scanning using the ADF
Select [Set Wait Time] for [Wait Time
for Next Original(s): SADF].
Reference
p.16 “Wait Time for Next Orig.: Exposure Glass” or “Wait Time for
Next Original(s): SADF”
A Place the originals.
B Make settings for scanning area
and original orientation.
Reference
p.39 “Original Orientation and
Scan Area”
C Make settings for sending by email, Scan to Folder, storing, or
delivering.
Reference
p.47 “Procedure for Sending Email”
p.61 “Procedure for Sending by
Scan to Folder”
p.74 “Storage Procedure”
p.87 “Delivery Procedure”
When using the exposure glass
A Press the {Start} key.
When scanning is finished, the
remainder time until the additional original is placed is displayed.
Reference
p.35 “Placing Originals”
Note
r Originals are scanned in order.
Place them from the first page.
42
B When there are additional
originals, place them within
the specified time, and them
press the {Start} key.
Repeat this procedure until the
last original is scanned.
Original Orientation and Scan Area
Note
r When the scan settings are
changed while performing
the procedure, the countdown for additional originals is stopped. Press the
{Start} key to restart the
countdown.
When using the ADF
A Select [SADF] in [Original Feed
Type].
B Press the {Start} key.
When scanning is finished, the
remainder time until the additional original is placed is displayed.
D When all originals are scanned
and the countdown is finished,
the machine starts storing or
sending automatically.
Note
r You can also press the {#}
key to restart storing or sending.
Not specifying a time limit for additional
originals
3
A Place the originals.
Reference
See p.35 “Placing Originals”.
Note
r Originals are scanned in order.
Place them from the first page.
B Make settings for scanning area
and original orientation.
C When there are additional
originals, repeat placing them
within the specified time.
The machine starts scanning automatically.
Note
r When the scan settings are
changed while performing
the procedure, the countdown for additional originals is stopped. Press the
{Start} key to restart the
countdown.
r You can also use the exposure glass instead of the
ADF. In this case, you must
press the {Start} key to start
scanning.
Reference
p.39 “Original Orientation and
Scan Area”
C Select
[Batch] for [Original Feed
Type].
D Make settings for sending by email, or Scan to Folder, storing, or
delivering.
Reference
p.47 “Procedure for Sending Email”
p.61 “Procedure for Sending by
Scan to Folder”
p.74 “Storage Procedure”
p.87 “Delivery Procedure”
43
Setting Originals
E Press the {Start} key.
F When there are additional originals to scan, place them and press
the {Start} key.
Repeat this step until all originals
are scanned.
3
G After
all originals are scanned,
press the {#} key.
Storing or sending will start.
44
4. Sending Scan File by E-mail
Scan file can be sent from this machine to a specified destination using e-mail
system. This chapter explains the preparation for sending file by e-mail system,
various display screens, procedures for sending, and how to check the sending
result when this function is used.
Preparation for Sending by E-mail
To send by e-mail system, the preparation described below is required.
Note
r Set up an e-mail server on the network in advance. For information about setting up an e-mail server, see the instruction manuals of the e-mail server to be
used and the software to be installed.
1
Connect to Network
2
Make System Settings
Connect the machine to the network with an Ethernet cable or
IEEE 1394 (optional) cable, or use Wireless LAN (optional).
See Network Guide.
Make the network settings, settings for sending e-mail such as
for the SMTP server and TCP/IP, or the destination (sender) settings in System Settings.
See Network Guide and General Settings Guide.
3
Make Scanner
Settings
Make settings for sending e-mail such as file type priority and
sender's default.
See p.21 “Send Settings”.
45
Sending Scan File by E-mail
E-mail Screen
The screen when using the machine for e-mail is as shown.
1 2 3
4
5
6
7
4
8
1. Destination field
The selected destination is shown here. If
multiple destinations are selected, the
destinations are displayed in the order
they were selected by pressing [U Prev.]
or [T Next].
Note
r Pressing the {Check Modes} key lets
you check the selected destinations.
2. [ ] E-mail/Scan to Folder
Press to switch the e-mail function to the
Scan to Folder function. You can send file
to the destinations for both e-mail and
Scan to Folder at the same time.
3. E-mail icon ( )
Shows that the screen for sending e-mail
is displayed.
4. [Registration No.]
Press to specify a destination using a fivedigit registration number.
5. [Manual Input]
When specifying a destination that is not
listed, press [Manual Input], and then enter
the destination with the soft keyboard.
46
6. [Attach Sender's Name] [Subject/Message] [File Type]
Set the sender, subject, and message of
the e-mail to be sent.
If necessary, set the file type and file
name of the scan file attached to the email.
7. [ ] Switch Destination List/
Search/Switch Title
Press to switch a destination from the delivery server list to the destination list of
this machine, to search for an e-mail destination, or to switch the titles.
8. Destination List
Displays the destinations programed in
the delivery server or this machine.
Note
r When the entire list does not fit on one
screen, [U] or [T] can be used to scroll
through the display.
r Group destinations are denoted by
this symbol ( ).
Sending Scan File by E-mail
Sending Scan File by E-mail
Procedure for Sending E-mail
Recalling stored scan settings
Scan file is sent after specifying scan
settings and destinations.
A Press the {Program} key.
B Select a program of scan settings.
A Press the {Scanner} key.
4
The settings of the selected program are applied.
ZHSS020N
B If user codes are set, enter a user
code with the number keys, and
then press the {#} key.
The Scanner Function screen appears.
Making the settings individually
A Press [Scan Settings].
B Select items such as resolution
and original size, and then
change their settings.
Reference
For information about user
codes, see General Settings
Guide.
C Make sure that no previous settings remain.
Note
r If a previous setting remains,
press the {Clear Modes} key.
D Place the original in the machine,
Scan settings can be made in the
same way as Default Scan Settings. See p.16 “Default Scan
Settings”.
C Press [OK].
and then adjust the scan settings
and settings for orientation and
pageflow if necessary.
To make the scan settings, recall
stored settings or make the settings
individually.
Reference
p.16 “Scan Settings”
p.35 “Setting Originals”
47
Sending Scan File by E-mail
E If
the network delivery scanner
screen appears, switch to the
screen for sending e-mail.
A Press [ ].
B Press [Switch Destination List].
When selecting a destination
from the list
A Press the title for the destination. The destinations for that
title are displayed.
If the destination is not displayed, press [U] or [T] to display the destination.
C Press [E-mail].
4
B Select the destination to which
the scan file is to be sent.
D Press [Exit].
The E-mail screen appears.
F Specify the destination.
To specify a destination, you can
select it from the list, select it by
specifying a registration number,
enter the e-mail address directly,
search for the destination from the
Destination List and selecting it, or
search for the destination from the
LDAP server and selecting it.
Note
r Before selecting the destination,
be sure to select [To]. If necessary, select [Cc] or [Bcc] and the
respective destinations. More
than 500 destinations cannot be
specified for [To], [Cc], and
[Bcc].
Reference
See p.103 “Max. Number of Addresses Which Can Be Specified
and Files Which Can Be
Stored”.
48
The selected destination is highlighted and also displayed in
the destination field at the top of
the screen.
C To select more destinations, repeat step B.
Note
r To deselect a destination,
press the destination once
more, or press [U Prev.] or
[T Next] to display the destination in the destination
field, and then press the
{Clear/Stop} key.
Sending Scan File by E-mail
Using a registration number to
select a destination
A Press [Registration No.].
B Use the number keys to enter
the five-digit registration
number that has been assigned
to a destination.
If the entered number is less
than five digits long, press the
{#} key after the last number.
Example: To enter 00005
Press the {5} key, and then
press the {#} key.
C To select more destinations, repeat step B.
Note
r To deselect a destination,
press [U Prev.] or [T Next] to
display the destination in the
destination field, and then
press the {Clear/Stop} key.
Manual entry of an e-mail
address
A Press [Manual Input].
The soft keyboard is displayed
for entering the e-mail address.
B Enter the e-mail address.
Reference
For information about how
to enter characters, see General Settings Guide.
C Press [OK].
Note
r An e-mail address entered
manually can be registered in
the list. Press [ProgDest], and
a screen for entering the address appears. For information about registering
destinations, see General Settings Guide.
4
r To change an e-mail address
that has been entered, press
[Change] located on the left
side of the destination field.
A soft keyboard for entering
the e-mail address is displayed. Make any changes,
and then press [OK].
r Pressing the {Check Modes}
key on the control panel lets
you check the list of selected
destinations.
D To enter more destinations, repeat steps A to C.
Note
r To deselect a destination,
press [U Prev.] or [T Next] to
display the destination in the
destination field, and then
press the {Clear/Stop} key.
Note
r It is possible to use letters,
numbers, and periods. The
symbols ()\,;:” cannot be
used.
49
Sending Scan File by E-mail
Searching to select a destination
from the Destination List
A Press [
E Select a destination.
].
F Press [Exit].
B Press [Search by Dest. Name].
Searching to select a destination
from the LDAP server
A Press [
].
4
Note
r To search using e-mail addresses, press [E-mail Address].
B Press [Search LDAP].
The soft keyboard is displayed
for entering a user name.
C Enter part of the destination
name.
Note
r Enter the first character or
characters of the destination
name.
r It is also possible to perform
a combined search using
[Search by Dest. Name] and [Email Address].
r It is necessary to differentiate
between capital and small
letters.
Reference
For information about how
to enter characters, see General Settings Guide.
D Press [OK].
50
C Press [Advanced Search].
D Enter information for each
item of the destination.
Sending Scan File by E-mail
Note
r Press the item, and the soft
keyboard is displayed for entering information appears.
Enter the first character or
characters of the item.
r One reference item of Advanced Search can be added
when [Search Options] is specified in [Program/ Change LDAP
Server] of [Key Operator Tools]
of [System Settings]. For more
information, see “User Tools
(System Settings)”, General
Settings Guide.
r It is necessary to differentiate
between capital and small
letters.
Reference
For information about how
to enter characters, see General Settings Guide.
E Press [Search Criteria] corresponding to each item and then
select criteria from the list to be
displayed.
Note
r You can select criteria from
the following list:
• [Search Beginning Word]:
The name located in front
of an entered character is
looked up.
• [Search End Word]: The
name located at the back
of an entered character is
looked up.
• [Exact Match]: The name
which corresponds to an
entered character is
looked up.
• [Include One of Words]: The
name which contains an
entered character is
looked up.
• [Exclude Words]: The name
which does not contain an
entered character is
looked up.
• [Fuzzy Search]: a vague reference (The function of the
vague reference depends
on the system supported
by the LDAP server.)
F Press [OK].
4
Note
r If a user name and password
for the LDAP authentication
are not set, a screen for entering a user name and password will appear. Enter
them to log on.
r A destination cannot be specified as a proper address
when the number of characters of the e-mail address
searched from the LDAP
server exceeds 128 characters.
r Some e-mail addresses can
be registered for one person,
but only one e-mail address
can be hit by searching. Depending on the system supported by the LDAP server,
generally, the address which
was registered for first is hit.
G Select a destination.
51
Sending Scan File by E-mail
H Press [Exit].
Note
r A searched e-mail address
can be registered in the list.
Press [ProgDest], and a screen
for entering the address appears. For information about
registering destinations, see
General Settings Guide.
Checking selected destinations
A Use the destination field at the
top of the screen to check
which destinations are selected.
4
Note
r When multiple destinations
are selected, the selected destinations are displayed in the
order they were selected by
pressing [U Prev.] or [T Next].
r Pressing the {Check Modes}
key on the control panel lets
you check the list of selected
destinations.
G Select the file type if necessary.
A Press [File Type].
B Select the file type of the file to
be attached to the e-mail from
the displayed types.
C Press [OK].
52
H Specify the file name of the file to
be sent if necessary.
A Press [File Type].
B Press [File Name].
The soft keyboard is displayed
for entering a file name.
C Enter a file name.
D Press [OK] twice.
I Specify the e-mail sender.
To specify a sender, you can select
the sender from the list, enter the
five-digit registration number of
the sender with the number keys,
and search for the sender and selecting it.
Note
r The operation of step I is unnecessary when [Key Operator's
E-mail Address] is specified for
[Sender's Name Default] in [Send
Settings] of [Scanner Features].
Proceed to step J.
r When a sender is selected, the
sender name is automatically
placed in the From field of the email so that the sender can be
identified when the e-mail is received.
r To prevent misuse of a sender
name, we recommend you set
protection code for that sender
name.
r Be sure to select or enter a sender name. Otherwise [Key Operator's E-mail Address] is used as the
sender name. See General Settings Guide.
Sending Scan File by E-mail
When selecting a sender from the
list
A Press [Attach Sender's Name].
D Press [OK].
Using a registration number to
specify a sender name
A Press [Attach Sender's Name].
B Select the sender.
Note
r When a protection code has
been set, a screen for entering
the protection code appears
after selecting the sender. Enter the protection code, and
then press [OK]. When the
protection code you entered
is correct, the sender name is
displayed.
C For a reception confirmation email, press [Return Receipt].
Note
r When [Return Receipt] is selected, an e-mail notifying that the
e-mail has been read by the
destination party is sent to the
sender selected here. However, if the mailing software
used by the destination party
does not support MDN (Message Disposition Notification),
the e-mail may not be sent.
B Use the number keys to enter
the five-digit registration
number that has been assigned
to a sender.
If the entered number is less
than five digits long, press the
{#} key after the last number.
Example: To enter 00008
Press the {8} key, and then
press the {#} key.
4
Note
r When a protection code has
been set, a screen for entering
the protection code appears
after selecting the sender. Enter the protection code, and
then press [OK]. When the
protection code you entered
is correct, the sender name is
displayed.
C For a reception confirmation email, press [Return Receipt].
53
Sending Scan File by E-mail
Note
r When [Return Receipt] is selected, an e-mail notifying
that the e-mail has been read
by the destination party is
sent to the sender selected
here. However, if the mailing
software used by the destination party does not support
MDN (Message Disposition
Notification), the e-mail may
not be sent.
D Press [OK].
4
Searching to select a sender
A Press [Attach Sender's Name].
D Enter part of the sender name.
Note
r Enter the first character or
characters of the sender
name.
r It is also possible to perform
a combined search using [User (Dest.) Name] and [E-mail Address].
r It is necessary to differentiate
between capital and small
letters.
Reference
For information about how
to enter characters, see General Settings Guide.
E Press [OK].
F Select the sender.
B Press [
].
C Press [User (Dest.) Name].
To search using e-mail addresses, press [E-mail Address].
Note
r When a protection code has
been set, a screen for entering
the protection code appears
after selecting the sender. Enter the protection code, and
then press [OK]. When the
protection code you entered
is correct, the sender name is
displayed.
G Press [Exit].
H For a reception confirmation email, press [Return Receipt].
The soft keyboard is displayed
for entering a user name.
54
Sending Scan File by E-mail
Note
r When [Return Receipt] is selected, an e-mail notifying that
the e-mail has been read by
the destination party is sent to
the sender selected here.
However, if the mailing software used by the destination
party does not support MDN
(Message Disposition Notification), the setting in [Return
Receipt] becomes invalid.
I Press [OK].
J Specify a subject if necessary.
Note
r When a subject has been set, this
information is added to the scan
file. The subject name is automatically placed in the Subject
field of the e-mail.
r To specify a subject name, you
can select it from the list, enter it
directly, or combine selecting
and entering it.
r Subject name to select from the
list must be registered in System
Settings in advance. See Network
Guide.
r Subject name can be entered up
to 64 characters including characters of the name selected from
the list.
The operation to specify a subject
name “[Urgent] New product appearance” is explained as an example here.
A Press [Subject/Message].
B Press [Attach Subject].
C Select a subject [Urgent].
D Press [Manual Input].
The soft keyboard is displayed
for entering a subject.
E Enter the subject “New product appearance”.
Reference
For information about how
to enter characters, see General Settings Guide.
4
F Press [OK].
G Press [OK].
K Enter a messsage if necessary.
Note
r When a message has been entered, this information is added
to the scan file.
r Message to select from the list
must be registered in System
Settings in advance. See Network
Guide.
r Message can be entered to up to
80 characters.
r To specify a message, you can
select it from the list, or enter it
directly.
55
Sending Scan File by E-mail
When selecting a message from
the list
A Press [Subject/Message].
B Press [E-mail Message].
D Enter the message “Thank you
for what you did yesterday”.
Reference
For information about how
to enter characters, see General Settings Guide.
Note
r Message can be entered to up
to 80 characters.
E Press [OK] three times.
C Select a message.
4
D Press [OK] twice.
Manual entry of a message
The operation to specify a message
“Thank you for what you did yesterday.” is explained as an example here.
A Press [Subject/Message].
B Press [E-mail Message].
C Press [Manual Input].
The soft keyboard is displayed
for entering a message.
56
L Press the {Start} key.
Note
r To interrupt scanning, press the
{Clear/Stop} key or press [Stop]
on the screen.
r When using the Batch function
or the SADF function, place the
next original after the others
have been scanned. See p.42
“Scanning Originals in Several
Times”.
r Regardless of the divide e-mail
size setting, it is not possible to
send e-mail with over 725.3MB
of data. It is also not possible to
send over 1,000 pages of file.
Sending Scan File by E-mail
Simultaneous Storage and
Sending by E-mail
You can use e-mail with the Document Server.
Scan file is stored in the Document
Server at the same time the file is sent
by e-mail.
Note
r This section explains mainly the
operation for simultaneous storage
and sending of e-mail. For more information, see p.47 “Procedure for
Sending E-mail”.
r The file stored when simultaneously storing file and sending file
by e-mail cannot be resent in the Email screen. To resend the file, select the file in the Select Stored File
screen and send it. See p.81 “Sending Stored Files by E-mail or Scan
to Folder, or Delivering”.
F Make sure [Send & Store] is selected.
G Set file information if necessary.
Reference
p.75 “Specifying file information”
4
H Press [OK].
I Press the {Start} key.
A Place the original, and then adjust
the settings for original size and
orientation if required.
Reference
p.35 “Setting Originals”
B Make the scan settings.
C Select the destination.
D Specify the sender and a subject if
necessary.
E Press [Store File].
57
Sending Scan File by E-mail
Checking the Status of E-mail
The status of the last 100 sendings can
be checked. For every new sending
record after 100, the oldest record is
deleted.
Note
r When [Print & Delete Scanner Journal] is set to [Delete all after printing],
the whole journal is printed when
the number of records reaches 100.
v Items that can be checked
• Date/Time
The date and time the e-mail
was sent or the date which “Error” or “Canceled” is confirmed
is displayed.
• Destination
A used sending function (email, Scan to Folder, or delivery
function) is displayed with an
icon.
When multiple destinations
were selected, the first selected
destination is displayed.
• Sender
• File Name
The file name is displayed only
when storing a file and sending
e-mail are performed at the
same time.
• Status
Either of the following status is
displayed: “Done”, “Sending”,
“Waiting”, “Error”, or “Canceled”.
4
58
A Press [Scanned Files Status] on the
screen for sending e-mail.
B Check the displayed records.
Note
r One screen shows the records
for five sending operations. Use
[U Prev.] or [T Next] to scroll
through the screen.
r When the status of a file is waiting, the sending can be stopped
by selecting that file, and then
pressing [Cancel].
r Press [Print], and the whole journal is printed.
C Press [Exit].
The display returns to the screen
for sending e-mail.
5. Sending Scan File by Scan
to Folder
Scan file can be sent to the folders of the FTP server or the shared folders of Windows. This chapter explains the preparation for sending file by Scan to Folder,
various display screens, procedures for sending, and how to check the sending
result when this function is used.
Preparation for Sending by Scan to Folder
To send by Scan to Folder, the preparation described below is required.
1
Connect to Network
Connect the machine to the network with an Ethernet cable or
IEEE 1394 (optional) cable, or use Wireless LAN (optional).
See Network Guide.
2
Make System Settings
Make the network settings, settings for sending by Scan to Folder such as for protocols, or the destination (sender) settings in
System Settings.
See Network Guide and General Settings Guide.
3
Make Scan Settings
Make settings for sending such as compression and file type priority.
See p.21 “Send Settings”.
Sending files using SMB protocol is available only under the environment of
NetBIOS over TCP/IP. Sending files using SMB protocol is not available under
the NetBEUI environment.
59
Sending Scan File by Scan to Folder
Scan to Folder Screen
The screen when using the machine for Scan to Folder is as shown.
1 2 3
4
5
6
7
8
1. Destination field
5
The selected destination is shown here. If
multiple destinations are selected, the
destinations are displayed in the order
they were selected by pressing [U Prev.]
or [T Next].
Note
r Pressing the {Check Modes} key lets
you check the selected destinations.
2. [ ] E-mail/Scan to Folder
Press to switch the Scan to Folder function to the e-mail function. You can send
file to the destinations for both Scan to
Folder and e-mail at the same time.
3. Scan to Folder icon ( )
Shows that the screen for sending by
Scan to Folder is displayed.
4. [Registration No.]
Press to specify a destination using a fivedigit registration number.
5. [Enter Destination]
When specifying a destination that is not
listed, press [Enter Destination], and then
enter the destination with the soft keyboard.
60
6. [Attach Sender's Name] [Subject/Message] [File Type]
Set the sender, subject, and message of
the scan file to be sent.
Set the file type and file name of the scan
file to be sent.
Important
r When the scan file is sent to the
destinations for both e-mail and
Scan to Folder at the same time, the
subject and message are sent to the
destination for e-mail only.
7. [ ] Switch Destination List/
Search/Switch Title
Press to switch a destination from the delivery server list to the destination list of
this machine, to search for a destination,
or to switch the titles.
8. Destination List
Displays the destinations programed in
the delivery server or this machine.
Note
r When the entire list does not fit on one
screen, [U] or [T] can be used to scroll
through the display.
r Group destinations are denoted by
this symbol ( ).
Sending Scan File by Scan to Folder
Sending Scan File by Scan to Folder
Reference
p.16 “Scan Settings”
Procedure for Sending by
Scan to Folder
p.35 “Setting Originals”
Scan file is sent after specifying scan
settings and destinations.
A Press the {Scanner} key.
Recalling stored scan settings
A Press the {Program} key.
B Select a program of scan settings.
5
ZHSS020N
B If user codes are set, enter a user
code with the number keys, and
then press the {#} key.
The Scanner Function screen appears.
Reference
For information about user
codes, see General Settings
Guide.
The settings of the selected program are applied.
Making the settings individually
A Press [Scan Settings].
B Select items such as resolution
and original size, and then
change their settings.
C Make sure that no previous settings remain.
Note
r If a previous setting remains,
press the {Clear Modes} key.
D Place the original in the machine,
and then adjust the scan settings
and settings for orientation and
pageflow if necessary.
To make the scan settings, recall
stored settings or make the settings
individually.
Scan settings can be made in the
same way as Default Scan Settings. See p.16 “Default Scan
Settings”.
C Press [OK].
61
Sending Scan File by Scan to Folder
E If
the network delivery scanner
screen appears, switch to the
screen for Scan to Folder.
A Press [ ].
B Press [Switch Destination List].
When selecting a destination
folder from the list
A Press the title for the destination folder. The destination
folders for that title are displayed.
If the folder is not displayed,
press [U] or [T] to display the
other folders.
C Press [E-mail].
B Select the destination folder to
which the scan file is to be sent.
5
D Press [Exit].
The E-mail screen appears.
E Press [ ].
The Scan to Folder screen appears.
F Specify the destination folder.
To specify the destination folder,
you can select it from the list, select
it by specifying a registration
number, enter the path for the
folder of the client computers on
the same network directly, specify
the folder in the FTP server, or select the destination from the client
computers on the same network.
The selected folder is highlighted and also is displayed in the
destination field at the top of the
screen.
Note
r If a protection code has been
set for the folder, a screen for
entering the protection code
appears.
C To select more destination
folders, repeat step B.
Note
r To deselect a destination,
press the destination once
more, or press [U Prev.] or
[T Next] to display the destination in the destination
field, and then press the
{Clear/Stop} key.
62
Sending Scan File by Scan to Folder
Using a registration number to
select a destination folder
A Press [Registration No.].
B Use the number keys to enter
the five-digit registration
number that has been assigned
to a destination folder.
If the entered number is less
than five digits long, press the
{#} key after the last number.
Example: To enter 00003
Press the {3} key, and then
press the {#} key.
Note
r If a protection code has been
set for the folder, a screen for
entering the protection code
appears.
C To select more destination
folders, repeat step B.
Note
r To deselect a destination,
press [U Prev.] or [T Next] to
display the destination in the
destination field, and then
press the {Clear/Stop} key.
Manual entry of a path for the
destination folder of the client
computers on the same network
A Press [Enter Destination].
B Press [SMB].
C Press [Manual Input] on the right
side of the path field.
The soft keyboard is displayed
for entering the path for the
folder.
D Enter the path for the folder.
5
Note
r This is an example of entering a pass to send to the folder “user” of the computer
“desk01”. \\desk01\user
r An IP address can be also entered if you use the following
operating systems are available: Windows 98/Me, Windows XP, Windows 2000,
Windows NT 4.0.
Reference
For information about how
to enter characters, see General Settings Guide.
E Press [OK].
F If entering a user name to log
on is required, press [Manual Input] on the right side of the user
name field.
The soft keyboard is displayed
for entering the user name field.
G Enter the user name.
H Press [OK].
63
Sending Scan File by Scan to Folder
I If entering a password to log
on is required, press [Manual Input] on the right side of the
password field.
The soft keyboard is displayed
for entering a password.
J Enter a password.
K Press [OK].
L Press [Connection Test].
M To enter more destinations, repeat steps A to L.
Note
r To deselect a destination,
press [U Prev.] or [T Next] to
display the destination in the
destination field, and then
press the {Clear/Stop} key.
N Press [OK].
Specifying a folder in the FTP
server
A connection test is performed
to check whether the specified
folder exists.
5
Note
r To change the path for the
folder that has been entered,
press [Change] located on the
left side of the destination
field. Enter a path for the
folder properly, and then
press [OK].
r Pressing the {Check Modes}
key on the control panel lets
you check the list of selected
destinations.
r The connection test sometimes takes time.
r [Connection Test] can not be
pressed right after [Cancel]
was pressed during the connection test.
r Though the connection test is
succeeded, the machine
sometimes fails in the file
transfer, when the shared
folder lacks writing authority or when there is no space
in the hard disk.
64
A Press [Enter Destination].
B Press [FTP].
A confirmation message for
changing the protocol appears.
C Press [Yes].
D Press [Manual Input] on the right
side of the server name field.
The soft keyboard is displayed
for entering the server name.
E Enter a server name.
Note
r An IP address can be also entered.
F Press [OK].
Sending Scan File by Scan to Folder
G Press [Manual Input] on the right
side of the path field.
The soft keyboard is displayed
for entering the path for the
folder.
H Enter the path for the folder.
Note
r This is an example of entering a pass to send to the subfolder “lib” in the folder “user”. user\lib
Reference
For information about how
to enter characters, see General Settings Guide.
I Press [OK].
J If entering a user name to log
on is required, press [Manual Input] on the right side of the user
name.
The soft keyboard is displayed
for entering the user name.
K Enter the user name.
L Press [OK].
M If entering a password to log
on is required, press [Manual Input] for password.
The soft keyboard is displayed
for entering a password.
N Enter a password.
O Press [OK].
P To change the port number
which is set in the initial scan
setting, press [Change] on the
right side of the Port No. field.
Enter a port number using the
number keys, and then press
[#].
Q Press [Connection Test].
A connection test is performed
to check whether the specified
folder exists.
Note
r To change a path for the folder that has been entered,
press [Change] located on the
left side of the destination
field. Enter a path for the
folder properly, and then
press [OK].
r Pressing the {Check Modes}
key on the control panel lets
you check the list of selected
destinations.
r The connection test sometimes takes time.
r [Connection Test] can not be
pressed right after [Cancel]
was pressed during the connection test.
R To enter more destinations, repeat steps A to Q.
5
Note
r To deselect a destination,
press [U Prev.] or [T Next] to
display the destination in the
destination field, and then
press the {Clear/Stop} key.
S Press [OK].
65
Sending Scan File by Scan to Folder
Searching to select a destination
folder from the network
D Select the client computer that
has the destination folder.
A Press [Enter Destination].
B Press [SMB].
5
C Press [Browse Network] on the
right side of the path field.
The client computers list on the
same network appears.
Note
r Workgroup names or domain names must be set
properly to browse the network.
r If the client computer you
want to select is not displayed, press [Up One Level]
to select other workgroups,
and then you can search for
the client computer.
r The maximum number of client computers and shared
folders displayed is 100.
66
The log on screen is displayed
when the machine is required to
authenticate the selected computer. Enter the user name and
password correctly.
The folders list of the selected
computer appears.
E Select the destination folder.
Note
r When the selected folder has
sub-folders, the sub-folders
list appears.
F Press [OK].
G If entering a user name to log
on is required, press [Manual Input] on the right side of the user
name field.
The soft keyboard is displayed
for entering a user name.
H Enter a user name.
I Press [OK].
J If entering a password to log
on is required, press [Manual Input] on the right side of the
password field.
The soft keyboard is displayed
for entering a password.
K Enter a password.
L Press [OK] twice.
Sending Scan File by Scan to Folder
Searching to select a destination
folder from the Destination List
A Press [
].
B Press [Search by Dest. Name].
The soft keyboard is displayed
for entering a user name.
C Enter part of the destination
folder name.
Note
r Enter the first character or
characters of the destination
name.
r It is necessary to differentiate
between capital and small
letters.
Reference
For information about how
to enter characters, see General Settings Guide.
D Press [OK].
E Select a destination folder.
Checking selected destinations
A Use the destination field at the
top of the screen to check
which destinations are selected.
Note
r When multiple destinations
are selected, the selected destinations are displayed in the
order they were selected by
pressing [U Prev.] or [T Next].
r Pressing the {Check Modes}
key on the control panel lets
you check the list of selected
destinations.
5
G Select the file type if necessary.
A Press [File Type].
B Select the file type of the file to
be sent from the displayed
types.
C Press [OK].
H Specify the file name of the file to
be sent if necessary.
A Press [File Type].
B Press [File Name].
The soft keyboard is displayed
for entering a file name.
C Enter a file name.
F Press [Exit].
67
Sending Scan File by Scan to Folder
Note
r The scan file is given a 21-digit (except the extension) file
name which combines the
time and date of scanning
originals with a 4-digit page
number. (Example : When
one page is scanned in TIFF at
15.10 seconds, 3.30 p.m., 31
December, 2003, the file name
is 200312311530150100001.tif)
D Press [OK].
When selecting a sender from the
list
A Press [Attach Sender's Name].
B Select the sender.
5
E Press [OK].
I Select a sender if necessary.
To specify a sender, you can select
the sender from the list, enter the
five-digit registration number of
the sender with the number keys,
and search for the sender and selecting it.
Note
r When the sender name is specified in this step, it is displayed
in the whole journal.
r To prevent misuse of a sender
name, we recommend you set a
protection code for that sender
name.
r Be sure to select or enter a sender name. Otherwise [Key Operator's E-mail Address] is used as the
sender name. See General Settings Guide.
68
Note
r When a protection code has
been set, a screen for entering
the protection code appears
after selecting the sender. Enter the protection code, and
then press [OK]. When the
protection code you entered
is correct, the sender name is
displayed.
C Press [OK].
Using a registration number to
specify a sender name
A Press [Attach Sender's Name].
B Use the number keys to enter
the five-digit registration
number that has been assigned
to a sender.
Sending Scan File by Scan to Folder
If the entered number is less
than five digits long, press the
{#} key after the last number.
Example: To enter 00002
Press the {2} key, and then
press the {#} key.
C Press [User (Dest.) Name].
The soft keyboard is displayed
for entering a sender name.
D Enter part of the sender name.
Note
r When a protection code has
been set, a screen for entering
the protection code appears
after selecting the sender. Enter the protection code, and
then press [OK]. When the
protection code you entered
is correct, the sender name is
displayed.
C Press [OK].
Note
r Enter the first character or
characters of the sender
name.
r It is necessary to differentiate
between capital and small
letters.
5
Reference
For information about how
to enter characters, see General Settings Guide.
E Press [OK].
F Select the sender.
Searching to select a sender
A Press [Attach Sender's Name].
B Press [
].
Note
r When a protection code has
been set, a screen for entering
the protection code appears
after selecting the sender. Enter the protection code, and
then press [OK]. When the
protection code you entered
is correct, the sender name is
displayed.
G Press [Exit].
H Press [OK].
69
Sending Scan File by Scan to Folder
J Press the {Start} key.
Note
r To interrupt scanning, press the
{Clear/Stop} key or press [Stop]
on the screen.
r When using the Batch function
or the SADF function, place the
next original after the others
have been scanned. See p.42
“Scanning Originals in Several
Times”.
r A file beyond 2000 MB cannot
be sent.
Simultaneous Storage and
Sending by Scan to Folder
5
You can use Scan to Folder with the
Document Server.
Scan file is stored in the Document
Server at the same time the file is sent
by Scan to Folder.
Note
r This section explains mainly the
operation for simultaneous storage
and sending by Scan to Folder. For
more information, see p.61 “Procedure for Sending by Scan to Folder”.
r The file stored when simultaneously storing file and sending file
by Scan to Folder cannot be resent
in the Scan to Folder screen. To resend the file, select the file in the
Select Stored File screen and send
it. See p.81 “Sending Stored Files
by E-mail or Scan to Folder, or Delivering”.
70
A Place the original, and then adjust
the settings for original size and
orientation if required.
Reference
p.35 “Setting Originals”
B Make the scan settings.
C Select the destination.
D Specify the sender name, subject,
and message when storing a file
and sending e-mail are performed
at the same time.
E Press [Store File].
F Make sure [Send & Store] is selected.
G Set file information if necessary.
Reference
p.75 “Specifying file information”
H Press [OK].
I Press the {Start} key.
Checking the Status of Scan to Folder
Checking the Status of Scan to Folder
The status of the last 100 sendings can
be checked. For every new sending
record after 100, the oldest record is
deleted.
Note
r When [Print & Delete Scanner Journal] is set to [Delete all after printing],
the whole journal is printed when
the number of records reaches 100.
v Items that can be checked
• Date/Time
The date and time the sending
was requested or the date which
“Error” or “Canceled” is confirmed is displayed.
• Destination
A used sending function (email, Scan to Folder, or delivery
function) is displayed with an
icon.
When multiple destinations
were selected, the destinations
are displayed individually.
• Sender
The file name is displayed only
when storing a file and sending
e-mail are performed at the
same time.
• File Name
• Status
Either of the following status is
displayed: “Done”, “Sending”,
“Waiting”, “Error”, or “Canceled”.
A Press [Scanned Files Status] on the
screen for Scan to Folder.
B Check the displayed records.
5
Note
r One screen shows the records
for five sending operations. Use
[U Prev.] or [T Next] to scroll
through the screen.
r When the status of a document
is waiting, the sending can be
stopped by selecting that document, and then pressing [Cancel].
r Press [Print], and the whole journal is printed.
C Press [Exit].
The display returns to the screen
for sending by Scan to Folder.
71
Sending Scan File by Scan to Folder
5
72
6. Using the Document Server
Function
Scan file obtained by scanning originals can be stored in the hard disk of the machine using the Document Server, and the stored file can be used later. Using
DeskTopBinder V2 Lite/Professional, stored file can be viewed, retrieved, or deleted with a client computer.
The stored file can also be viewed, downloaded, printed, or deleted using Web
browser from a client computer.
Reference
For more information about using the Document Server, see General Settings
Guide.
Important
r A password can be set for every stored file in the Document Server. There is
a fear that stored files with no password can be accessed by the user who uses
DeskTopBinder. We recommend you should consider a security system such
as setting a password that protects illegal accesses.
r Scan file stored in the machine might be lost if some kind of failure occurs.
The supplier shall not be responsible for any damage that might result from
the loss of file. For long-term storage of files, we recommend the use of DeskTopBinder V2 Lite or DeskTopBinder V2 Professional (optional). For more information, please contact your local dealer.
Note
r When a delivery server is added to the network, files stored in the Document
Server can be delivered. You can store scan files in the Document Server and
simultaneously deliver it with the network delivery scanner function, send it
by e-mail, or send it by Scan to Folder. See p.81 “Sending Stored Files by Email or Scan to Folder, or Delivering”.
Storing Files
This section describes how to store files in the Document Server and how to
specify file information for stored files.
Note
r The files stored in the Document Server are deleted automatically after a certain number of days have passed. For information about making settings and
changes, see General Settings Guide.
r The theoretical maximum number of files that can be stored is 3,000 (1,000
pages per file). However, the actual maximum may be less depending on the
space used by the copier function and other functions of the machine.
r Stored file scanned using the scanner function cannot be printed from the
control panel. Print the file after retrieving them, using DeskTopBinder V2
Lite/Professional.
73
Using the Document Server Function
Storage Procedure
Recalling stored scan settings
Scan and store the file in the Document Server.
A Press the {Program} key.
B Select a user program of scan
settings.
A Press the {Scanner} key.
The selected user program settings are applied.
ZHSS020N
B If the user codes are set, enter a
user code with the number keys,
and then press the {#} key.
The Scanner Function screen appears.
6
Making settings individually
A Press [Scan Settings].
B Select items such as resolution
and original size and change
their settings.
Reference
For information about the user
codes, see General Settings
Guide.
C Make sure that no previous settings remain.
Note
r If a previous setting remains,
press the {Clear Modes} key.
D Place the original in the machine,
and then adjust the settings for
original size and orientation if required.
Reference
p.35 “Setting Originals”
E Make the scan settings.
To make the scan settings, recall
the stored settings or make the settings individually.
Reference
p.16 “Scan Settings”
74
Scan settings can be made in the
same way as Default Scan Settings. See p.16 “Default Scan
Settings”.
C Press [OK].
F Make the settings for storing scan
files.
A Press [Store File].
Storing Files
B Press [Store Only].
Note
r To store and deliver scan
files, press [Send & Store]. See
p.57 “Simultaneous Storage
and Sending by E-mail”, p.70
“Simultaneous Storage and
Sending by Scan to Folder”,
or p.93 “Simultaneous Storage and Delivery”.
r [Store Only] cannot be pressed
if even a single destination or
sender is selected.
G Specify file information.
Specifying file information
You can specify a user name, file name,
and password for a stored scan file.
According to the settings made, you
can search for files by user name or file
name and you can prevent unauthorized persons from accessing the files.
Note
r The file name can be up to 64 characters long. The user name can be
up to 20 characters long. The first
16 characters are shown on the
control panel. From a client computer with DeskTopBinder V2
Lite/Professional installed, you
can view all the characters entered.
A Press [Store File].
6
Specify a user name, file name, and
password for the file to be stored.
Reference
For more information about
how to specify file information,
see p.75 “Specifying file information”.
The File Information screen appears.
A Press [OK] twice.
H Press the {Start} key.
Note
r To abort the scanning process,
press the {Clear/Stop} key or
press [Stop] on the screen.
r When using the SADF function,
place the next original after the
others have been scanned. See
p.42 “Scanning Originals in Several Times”.
B Specify file information.
Specifying a user name
A Press [User Name].
Note
r If no user code is programed
on the Key Operator Tools
tab in System Settings, the
User Code screen does not
appear. Instead, the Nonprogramed Name screen appears. Enter any user name.
75
Using the Document Server Function
B Select the user name.
Note
r The user names shown here
are names that were programed on the Key Operator
Tools tab in System Settings.
To enter a name not shown
here, press [Non-programed
Name], and then enter the
user name.
C Press [OK].
6
Specifying a file name
Scan files are automatically named
SCAN0001, SCAN0002, etc. If necessary, you can change the file
name.
A Press [File Name].
The soft keyboard is displayed
for entering a file name.
B Enter the file name.
Reference
For information about how
to enter characters, see General Settings Guide.
C Press [OK].
76
Specifying a password
When a password is specified,
only a person who knows the password can view the file.
A Press [Password].
B Enter a four-digit password
with the number keys.
C Press the {#} key.
Note
r To change the password,
press [Change], and then enter a new one.
D Enter the same number as you
entered in step B to verify.
E Press the {#} key.
F Press [OK].
Important
r Do not forget the password.
If you forget it, consult the
system administrator of the
machine.
C Press [OK] to return to the previous screen.
Viewing a List of Stored Files
Viewing a List of Stored Files
From the list of stored files, you can
delete the files stored in the Document Server or change the file information. To show the list of stored
files, perform the following steps:
A Press the {Scanner} key.
ZHSS020N
B If user codes are set, enter a user
code using the number keys, and
then press the {#} key.
The Scanner Function screen appears.
6
Reference
For information about the user
codes, see General Settings
Guide.
C The
list of stored files is displayed.
A Press [Select Stored File].
B Press [Manage/Delete File].
77
Using the Document Server Function
Viewing the List
The list of stored files has the following elements.
v When using the network delivery scanner function, e-mail, or Scan to Folder
2
3
4
1
7
5
6
v When displaying information of a selected stored file
2
6
1
7
1. Keys for searching files
Switch to the screens for searching for
a file by user name or file name, or to
the screen for displaying all files.
2. Keys to switch to the information
display
Use to switch between the stored file
list and the detailed information of the
selected file.
3. Keys for sorting files
Sort the files using the selected item.
Select the same item once more for a
reverse sort. However, the files cannot
be sorted in reverse delivery order.
78
8
4. Keys for changing file information
Use for deleting the selected file or
changing the user name, file name, or
password.
5. List of stored files
The list of stored files is displayed.
Note
r Stored files cannot be shown when
a function other than the scanning
function is being used.
r If the file is not displayed, use [U
Prev.] or [T Next] to scroll through
the list.
r For files which are password protected, a key symbol( ) is shown to
the left of the file name.
Viewing a List of Stored Files
6. [Manage/Delete File]
Press to manage or delete files stored
in the Document Server or to change
file information etc..
7. [Send]
8. Information of a selected stored
file
Press [Detail] to display the information of a file after selecting the file
from the file list.
Press to send or deliver files stored in
the Document Server. For more information, see p.81 “Sending Stored Files
by E-mail or Scan to Folder, or Delivering”.
-Viewing a list of stored files in DeskTopBinder V2 Lite
The files stored in the Document Server are shown below using DeskTopBinder
V2 Lite.
1
2
6
4
3
1. Connected device name
3. All Users
The files stored in the connected device
are displayed on the desk tree divided
into User name and All Users folders.
All files stored in the connected device
are displayed.
2. User name
The files in the selected folder are displayed.
Only the files stored with the same user
name specified in the connected device
properties are displayed. The files stored
from the scanner are shown in the Scanner folder.
4. Folder contents display
79
Using the Document Server Function
Searching for Files
You can search for files from the
stored files using the user name or file
name.
Searching by user name
A On
the screen with the list of
stored files, press [Search by User
Name].
B Select the user name to be used
for the search.
Searching by file name
A On
the screen with the list of
stored files, press [Search by File
Name].
The soft keyboard is displayed for
searching by file name.
B Enter the file name to search for.
Note
r It is necessary to differentiate
between capital and small letters.
Reference
For information about how to
enter characters, see General Settings Guide.
C Press [OK].
6
Note
r The user names shown here are
names that were registered on
the Key Operator Tools tab in
System Settings. To enter a user
name not shown here, press
[Non-programed Name], and then
enter the name.
C Press [OK].
The search starts, and files whose
user name starts with the entered
string are displayed.
80
The search starts, and files whose
name starts with the entered string
are displayed.
Viewing a List of Stored Files
Sending Stored Files by E-mail
or Scan to Folder, or Delivering
Files stored in the Document Server
can be sent by e-mail or Scan to Folder, or delivered to the delivery server.
Note
r This section explains how to select
files to be sent or delivered. For
more information about sending
by e-mail, see p.47 “Procedure for
Sending E-mail”. For more information about sending by Scan to
Folder, see p.61 “Procedure for
Sending by Scan to Folder”. For
more information about delivering
stored files, see p.87 “Delivering
Scan File”.
r When sending or delivering stored
files, scan settings cannot be
changed. The files are sent or delivered with the scan settings specified when they were stored in the
Document Server.
A Display the list of stored files by
pressing [Select Stored File].
Reference
p.77 “Viewing a List of Stored
Files”.
B Select a file to be sent or delivered.
Note
r When you select a password
protected file, the Password
screen appears. After you have
entered the correct password
and pressed [OK], the file will be
selected.
C To
select multiple files, repeat
step B.
Note
r You can select up to 30 files for
one operation.
r If you select multiple files, the
files will be sent or delivered in
the order they were selected.
r If you press [Display Selection],
the selected files will be shown
in the order of delivery.
6
D Press [OK].
The screen for sending or delivering appears.
E Switch the Destination List if necessary.
F Specify a destination to be sent or
delivered.
G Select
the sender, subject, and
message if necessary.
H Press the {Start} key.
81
Using the Document Server Function
Managing Stored Files
A Display the list of stored files by
-Displaying and Downloading
Stored Files Using a Web
Browser
Using a Web browser in a client computer, you can display or download
the files in the Document Server.
When http:// (machine IP address) /
is entered in the address bar of the
Web browser in a client computer, the
Stored Files List screen for the Document Server is displayed.
pressing [Select Stored File].
Reference
p.77 “Viewing a List of Stored
Files”
B Press [Manage/Delete File].
The Manage/Delete File screen appears.
C Select the file to be deleted.
Reference
For displaying or downloading
stored files using a Web browser,
see General Settings Guide.
6
For more information about making set tings fo r u si ng a Web
browser, see Network Guide.
For more information about functions for managing stored files using a Web browser, click [Help] on
the upper-right corner of the displayed screen.
Deleting Files
Note
r Up to 30 files can be selected.
r When you select a password
protected file, the Password
screen appears. Enter the correct password, and then press
[OK]. When more than one file is
selected, the Password screen
appears each time a password
protected file is selected.
D Press [Delete File].
You can delete files that are no longer
needed.
Limitation
r Files waiting for delivery cannot
be deleted.
Reference
Using a Web browser (See General
Settings Guide) from a client computer, you can also delete the files
stored in the Document Server.
82
A confirmation message for file deleting appears.
E Press [Delete].
F Press [Exit].
Managing Stored Files
Changing File Information
The information about files stored in
the Document Server (user name, file
name, and password) can be
changed.
D Change the file information.
Changing the user name
A Press [Change User Name].
Limitation
r Information about files waiting for
delivery cannot be changed.
Reference
Using a Web browser (See General
Settings Guide) from a client computer, you can change the information of files stored in the Document
Server.
B Select the new user name.
A Display the list of stored files by
pressing [Select Stored File].
Reference
p.77 “Viewing a List of Stored
Files”
B Press [Manage/Delete File].
C Select the file for which you want
to change the file information.
Note
r The user names shown here
are names that were registered on the Key Operator
Tools tab in System Settings.
To enter a user name not
shown here, press [Non-programed Name], and then enter
the user name.
6
C Press [OK].
Note
r When you select a password
protected file, the Password
screen appears. Enter the correct password, and then press
[OK].
83
Using the Document Server Function
Changing the file name
A Press [Change File Name].
F Press [OK].
Important
r Do not forget the password.
If you forget it, consult the
system administrator of the
machine.
E Make sure that the file informaThe soft keyboard is displayed
for changing the file name.
B Enter the new file name.
Reference
For information about how
to enter characters, see General Settings Guide.
C Press [OK].
6
Changing the password
A Press [Change Password].
B Enter a new four-digit password using the number keys.
C Press the {#} key.
Note
r To change the password,
press [Change], and then enter a new one.
D Enter the same number as you
entered in step B to verify.
E Press the {#} key.
84
tion was changed as necessary,
and press [Exit].
7. Using the Network Delivery
Scanner Function
Scan file can be sent to a specified destination using the network delivery scanner function. This chapter explains the preparation sequence, various display
screens, delivery procedures, and how to check the delivery result when this
function is used.
Important
r A delivery server in which ScanRouter V2 Lite/Professional is installed is
necessary to use the network delivery scanner function. Information about
delivery destinations and senders must be registered first into the delivery
server. Also, configure connected devices in [Set I/O Device] of ScanRouter V2
Administration Utility. For more information, see ScanRouter V2 Administration Utility Help.
Preparation for Delivering
To use the machine as a network delivery scanner, the preparation described below is required.
1
Connect to Network
2
Make System Settings
3
4
Make Scanner
Settings
Install Delivery
Software
Connect the machine to the network with an Ethernet cable,
IEEE 1394 (optional) cable, or use Wireless LAN (optional).
See Network Guide.
Check the network settings in System Settings, and change if required.
See Network Guide.
Make settings for the network delivery scanner function, such as
Destination List Settings and Subject Settings.
See p.13 “Initial Scanner Setup”.
Install the software required for using the network delivery
scanner functions, such as ScanRouter V2 Lite, on the delivery
server. After installing the software, make the required settings
for server maintenance and delivery service.
See p.32 “ScanRouter V2 Lite”.
5
6
Set Destination, Sender Information,
and connected devices
Install Client Computer
Software
Use ScanRouter V2 Administration Utility to set the destination,
sender information, and connected devices.
On the client computers, install the software required for viewing or retrieving file by connecting to the delivery server, such
as DeskTopBinder V2 Lite.
See p.29 “DeskTopBinder V2 Lite”.
85
Using the Network Delivery Scanner Function
Network Delivery Scanner Screen
The screen when using the machine as a network delivery scanner is as shown.
1
2
3
4
5
6
7
7
1. Network delivery scanner icon
( )
5. [Attach Sender's Name] [Subject/Message]
Shows that the screen for network delivery scanner function is displayed.
Set the sender, subject, and message of
the document to be delivered.
2. Destination field
6. [ ] Switch Destination List/
The selected destination is shown here. If
multiple destinations are selected, the
destinations are displayed in the order
they were selected by pressing [U Prev.]
or [T Next].
Search
Note
r Pressing the {Check Modes} key lets
you check the selected destinations.
Displays the destinations programed in
the delivery server or this machine.
3. [Registration No.]
Press to specify a destination using a fivedigit registration number.
4. [Manual Input]
When specifying a destination that is not
listed, press [Manual Input], and then enter
the destination with the soft keyboard
that is displayed. For information about
sending e-mail from the delivery server,
see the manual for ScanRouter V2. See p.i
“Manuals for This Machine”.
86
Press to switch a destination list from the
delivery server to the destination list of
this machine or to search by user name.
7. Destination list
Note
r When the entire list does not fit on one
screen, [U] or [T] can be used to scroll
through the display.
r Group destinations are denoted by
this symbol ( ).
Delivering Scan File
Delivering Scan File
Delivery Procedure
Reference
p.16 “Scan Settings”
Scan file is delivered after scan settings and destinations are specified. If
necessary, you can select a sender and
a subject.
p.35 “Setting Originals”
Recalling stored scan settings
A Press the {Program} key.
B Select a program of scan settings.
A Press the {Scanner} key.
ZHSS020N
The settings of the selected program are applied.
B If user codes are set, enter a user
code with the number keys, and
then press the {#} key.
The Scanner Function screen appears.
Reference
For information about the user
codes, see General Settings
Guide.
Making settings individually
7
A Press [Scan Settings].
B Select items such as resolution
and original size, and then
change their settings.
C Make sure that no previous settings remain.
Note
r If a previous setting remains,
press the {Clear Modes} key.
D Place the original in the machine,
and then adjust the scan settings
and settings for orientation and
pageflow if necessary.
To make the scan settings, recall
stored settings or make the settings
individually.
Scan settings can be made in the
same way as Default Scan Settings. See p.16 “Default Scan
Settings”.
C Press [OK].
E If
the E-mail screen appears,
switch to the screen for network
delivery scanner.
A Press [ ].
87
Using the Network Delivery Scanner Function
B Press [Switch Destination List].
Note
r The destination titles are programed in the delivery server.
B Select the destination to which
the scan file is to be delivered.
C Press [Delivery Server].
D Press [Exit].
The Network Delivery Scanner
screen appears.
F Specify the destination.
To specify a destination, you can
select it from the list, specifying a
registration number, select it after
search for it, or directly enter the email address.
7
Note
r When using ScanRouter V2
Lite/Professional , the destination list is updated automatically.
When selecting a destination
from the list
A Press the title for the destination. The destinations for that
title are displayed.
If the destination is not displayed, press [U] or [T] to display the destination.
88
The selected destination is highlighted and also is displayed in
the destination field at the top of
the screen.
C To select more destinations, repeat step B.
Note
r To deselect a destination,
press the destination once
more, or press [U Prev.] or
[T Next] to display the destination in the destination
field, and then press the
{Clear/Stop} key.
Using a registration number to
select a destination
A Press [Registration No.].
B Use the number keys to enter
the five-digit registration
number that has been assigned
to a destination.
If the entered number is less
than five digits long, press the
{#} key after the last number.
Delivering Scan File
Example: To enter 00009
Press the {9} key, and then
press the {#} key.
C To select more destinations, repeat step B.
Note
r To deselect a destination,
press [U Prev.] or [T Next] to
display the destination in the
destination field, and then
press the {Clear/Stop} key.
D Enter part of the destination
name.
Note
r Enter the first character or
characters of the destination
name.
r It is necessary to differentiate
between capital and small
letters.
Reference
For information about how
to enter characters, see General Settings Guide.
E Press [OK].
F Select a destination.
Searching to select a destination
A Press [
].
7
G Press [Exit].
H Press [OK].
Manual entry of a destination
B Press [Search Address Book].
C Press [Search by Dest. Name].
Note
r When using ScanRouter V2
Professional, it is possible to
search by comments.
The soft keyboard is displayed
for entering a name.
Note
r When using ScanRouter V2 Professional, it is possible to enter
the destination e-mail address
directly. In advance, you must
make settings for sending email with ScanRouter V2 Professional.
A Press [Manual Input].
The soft keyboard is displayed
for entering a destination (email address).
89
Using the Network Delivery Scanner Function
B Enter the destination.
Note
r Enter the e-mail address of
the destination when sending via the delivery server.
r It is possible to use letters,
numbers, and periods. The
symbols ()\,;:” cannot be
used.
Reference
For information about how
to enter characters, see General Settings Guide.
C Press [OK].
D To enter more destinations, repeat steps A to C.
Note
r To deselect a destination,
press [U Prev.] or [T Next] to
display the destination in the
destination field, and then
press the {Clear/Stop} key.
7
r Pressing the {Check Modes}
key on the control panel lets
you check the list of selected
destinations.
G Specify the sender (scan file de-
livery source) if necessary.
To specify a sender, you can select
the sender from the list, enter the
five-digit registration number of
the sender with the number keys,
and search for the sender and selecting it.
Note
r When a sender has been specified, this information is added
to the scan file. Select a sender
from the senders programed in
the delivery server.
When selecting a sender from the
list
A Press [Attach Sender's Name].
B Select the sender.
Checking selected destinations
A Use the destination field at the
top of the screen to check
which destinations are selected.
Note
r When multiple destinations
are selected, the selected destinations are displayed in the
order they were selected by
pressing [U Prev.] or [T Next].
r Pressing the {Check Modes}
key on the control panel lets
you check the list of selected
destinations.
90
The selected sender and its registration number are displayed.
Note
r When using ScanRouter V2
Professional, [Return Receipt]
is displayed when a sender is
selected.
Delivering Scan File
r When [Return Receipt] is selected, an e-mail notifying
that the file has been read by
the destination party is sent
to the sender selected here.
To use [Return Receipt], it is
necessary to make settings
such as the e-mail address in
advance in ScanRouter V2
Professional.
Note
r When using ScanRouter V2
Professional, [Return Receipt]
is displayed when a sender is
selected.
r When [Return Receipt] is selected, an e-mail notifying
that the file has been read by
the destination party is sent
to the sender selected here.
To use [Return Receipt], it is
necessary to make settings
such as the e-mail address in
advance in ScanRouter V2
Professional.
C Press [OK].
Using a registration number to
specify a sender name
A Press [Attach Sender's Name].
C Press [OK].
7
Searching to select a sender
A Press [Attach Sender's Name].
B Use the number keys to enter
the five-digit registration
number that has been assigned
to a sender.
Example: To enter 00007
Press the {7} key, and then
press the {#} key.
B Press [
].
91
Using the Network Delivery Scanner Function
C Press [User (Dest.) Name].
The soft keyboard is displayed
for entering a sender name.
D Enter part of the sender name.
Note
r Enter the first character or
characters of the sender
name.
r It is necessary to differentiate
between capital and small
letters.
Reference
For information about how
to enter characters, see General Settings Guide.
7
r To specify a subject name, you
can select it from the list, enter it
directly, or combine selecting
and entering it.
r Subject name to select from the
list must be registered in System
Settings in advance. See Network
Guide.
r Subject name can be entered up
to 64 characters.
The operation to specify a subject
name “[Urgent] New product appearance” is explained as an example here.
A Press [Attach Subject].
B Press a subject [Urgent].
E Press [OK].
F Select a sender.
G Press [Exit].
H Press [OK].
H Specify a subject if necessary.
Note
r When a subject has been specified, this information is added
to the scan file.
r When ScanRouter V2 Professional is used to send documents using e-mail, the subject
is automatically entered as the
message subject.
92
C Press [Manual Input].
The soft keyboard is displayed
for entering a subject.
D Enter the subject “New product appearance”.
Reference
For information about how
to enter characters, see General Settings Guide.
E Press [OK] twice.
Delivering Scan File
I Press the {Start} key.
E Press [Store File].
Note
r To interrupt scanning, press the
{Clear/Stop} key or [Stop] on the
screen.
r When using the SADF or Batch
function, place the next original
after the others have been
scanned. See p.42 “Scanning
Originals in Several Times”.
F Make sure [Send & Store] is selected.
Simultaneous Storage and
Delivery
You can use the network delivery
scanner function with the Document
Server.
Scan file is stored in the Document
Server at the same time the file is delivered.
Note
r This section explains mainly the
operation for simultaneous delivery and storage. For more information, see p.87 “Delivering Scan
File”.
G Set file information if necessary.
Reference
p.75 “Specifying file information”
H Press [OK].
I Press the {Start} key.
7
A Place the original, and then adjust
the settings for original size and
orientation if required.
Reference
p.35 “Setting Originals”
B Make the scan settings.
C Select the destination.
D Specify the sender name
and a
subject if necessary.
93
Using the Network Delivery Scanner Function
Checking the Status of Delivery
The status of the last 100 deliveries
can be checked. For every new delivery record after 100, the oldest record
is deleted.
Note
r When [Print & Delete Scanner Journal] is set to [Delete all after printing],
the whole journal is printed when
the number of records reaches 100.
v Items that can be checked
• Date/Time
The date and time the delivery
was requested or the date which
“Error” or “Canceled” is confirmed is displayed.
• Destination
A used sending function (email, Scan to Folder, or delivery
function) is displayed with an
icon.
When multiple destinations
were selected, the first selected
destination is displayed.
• Sender
• File Name
The file name is displayed only
when storing a file and sending
e-mail are performed at the
same time.
• Status
Either of the following status is
displayed: “Done”, “Sending”,
“Waiting”, “Error”, or “Canceled”.
7
94
A Press [Scanned Files Status] on the
Network Delivery Scanner
screen.
B Check the displayed records.
Note
r One screen shows the records
for five delivery operations. Use
[U Prev.] or [T Next] to scroll
through the screen.
r When the status of a file is waiting, the delivery can be stopped
by selecting that file, and then
pressing [Cancel].
r Press [Print], and the whole journal is printed.
C Press [Exit].
The display returns to the Network Delivery Scanner screen.
8. Using the Network TWAIN
Scanner Function
This chapter describes the operations for scanning originals with the network
TWAIN scanner using DeskTopBinder V2 Lite. In addition, the preparation for
using the network TWAIN scanner and some functions of the TWAIN driver are
introduced.
Preparation for Using the Network TWAIN
Scanner
To use the machine as a network TWAIN scanner, the preparation described below is required.
1
Connect to Network
2
Make System Settings
3
Install Software
Connect the machine to the network with an Ethernet cable,
IEEE 1394 (optional) cable, or use Wireless LAN (optional).
See Network Guide.
Check the network settings in System Settings, and change if required.
See Network Guide.
On the client computers, install the software required for using
the network TWAIN scanner functions, such as a TWAIN driver
and DeskTopBinder V2 Lite.
See p.27 “Software for Using a Network TWAIN Scanner”.
95
Using the Network TWAIN Scanner Function
Scanning Originals
This section explains how to scan
originals using the network TWAIN
scanner function.
A Start DeskTopBinder V2 Lite, and
then select the scanner driver.
A On the [Start] menu, point to
[Program], point to [DeskTopBinder V2], and then click [DeskTopBinder V2].
B Click [Scanner Settings] on the
[Tools] menu.
If the scanner is already selected, no scanner settings are necessary. Check the settings in the
[File format for scanned image(s)]
area, and then proceed to step
E.
C Click [Select Scanner Driver...].
D Select the name of the machine
you want to use in the list, and
then click [Select...].
E Click [OK].
8
B Place the original in the scanner.
Reference
p.35 “Setting Originals”
C Make the scan settings.
A On the [File] menu, point to
[Add Document], and then click
[Scan].
The TWAIN driver starts.
After a short while, the dialog
box of the TWAIN driver that
operates the scanner appears.
This dialog box is called the
Scanner Properties dialog box.
96
Note
r The name of the scanner currently being used is shown
on the title bar of the dialog
box. When multiple machines are connected, make
sure that the indicated machine is the machine you
want to use. If it is different,
click [Select Scanner] to select
the scanner again.
r If the machine you want to
use is not displayed in the
list, make sure that the IP address is configured and that
the machine is correctly connected to the network. If the
machine is still not displayed
in the list after confirming
the above, consult with your
network administrator.
B Depending on the type of original or the objective for scanning, click the appropriate
button in [Mode].
• [Standard] is suitable for scanning standard originals that
are comprised of mainly text.
• [Photo] is suitable for scanning originals that include
photos, shaded illustrations,
etc.
• [OCR] is suitable for conversion processing with an OCR
(Optical Character Reading)
application after scanning
the original.
• [Filing] is suitable for use with
filing applications, etc.
Scanning Originals
Note
r For advanced settings, click
[Detail] to display the Detail
window. For information
about the Detail window, see
TWAIN driver Help.
C According to the settings of
[Document:] and [Orientation:],
change the other setting of the
[Document] group.
Reference
p.41 “For a Network TWAIN
Scanner”
For information about making settings for the [Document] group, see TWAIN
driver Help.
When you want to configure the
scanning area
When you do not configure the
scanning area, the area scanned is
the size specified in the [Size:] box.
A Click [Preview].
The original that was placed is
scanned and the [Preview] dialog
box appears. The scanning area
in the preview is displayed
within the broken lines.
B Configure the scanning area by
dragging a border or a corner.
When reconfiguring the area,
click
and drag one corner of
the area towards or away from
its opposite corner.
C Click [Close].
Note
r When an original placed in
the ADF is previewed, place
that original again.
D Click [Scan].
When there are additional originals to scan, place the original, and
then click [Continue]. When there
are no more originals, click [Complete].
E Save
the scan file in DeskTopBinder V2 Lite.
A On the [File] menu, click [Exit].
B Enter the file name, and then
click [OK].
The image is stored in DeskTopBinder V2 Lite, and DeskTopBinder Viewer closes.
-Editing and printing scan files
With DeskTopBinder V2 Lite, it is
possible to edit and print scan files.
For more information about how to
edit and print, see DeskTopBinder V2
Lite Help.
8
Note
r Depending on the scanning
resolution, the area to be
scanned may be subject to restrictions.
97
Using the Network TWAIN Scanner Function
Functions of the TWAIN Driver
The following is an introduction to
the various functions of the TWAIN
driver:
Reference
For more information about these
functions or other functions, see
TWAIN driver Help.
v Automatic Tilt Correction
This function automatically corrects character strings that were
scanned slanted.
v Printing to the Image
This function allows you to imprint dates, page numbers, or your
favorite characters on a scan file.
You can also change the fonts of
the imprints as well as change the
ascending order of images to a descending order.
v Scanning Mode Registration
This function allows you to register other scanning configurations
that are often used as scanning
modes besides the already pre-installed ones. After registration,
you can quickly scan with these
scanning configurations.
8
98
9. Appendix
Relationship between Resolution and File
Size
Resolution and scan area are inversely related. The higher the resolution is set,
the smaller the area that can be scanned. Conversely, the larger the scan area, the
lower the resolution that can be set.
The relationship between the scanning resolution and the file size is shown below. If the file size is too large, the message “Exceeded max. data capacity. Check
the scanning resolution.” appears on the control panel of the machine. Specify
the scan size and resolution again.
Limitation
r Depending on the image compression level, the maximum image size will be
limited.
When Using as E-mail, Scan to Folder, Document Server or
Network Delivery Scanner
v When Text, Text/ Photo, or Photo is selected as the Scan Type
All combinations up to A3/297 × 432 mm (11 × 17 inches) and 600 dpi are possible.
v When Gray Scale is selected as the Scan Type
The originals can be scanned using combinations marked with m in the table.
100 dpi
200 dpi
300 dpi
400 dpi
600 dpi
A3
m
m
m
B4
m
m
m
m
A4
m
m
m
m
B5
m
m
m
m
m
A5
m
m
m
m
m
B6 *1
m
m
m
m
m
A6 *1
m
m
m
m
m
A7 *1
m
m
m
m
m
11 x 17
m
m
m
Legal (81/2 x 14)
m
m
m
m
81/2 x 13
m
m
m
m
99
Appendix
100 dpi
200 dpi
300 dpi
400 dpi
Letter (81/2 x 11)
m
m
m
m
51/2 x 81/2
m
m
m
m
*1
600 dpi
m
The scanning size must be manually entered.
When Using as a Network TWAIN Scanner
Reference
To specify the scanning area or resolution when using the machine as a network TWAIN scanner, see TWAIN driver Help.
v When Binary or Halftone is selected as the Colors/ Gradations
The originals can be scanned using combinations marked with m in the table
(Original orientation: S).
9
100
dpi
200
dpi
300
dpi
400
dpi
500
dpi
600
dpi
700
dpi
800
dpi
A3
m
m
m
m
m
m
B4
m
m
m
m
m
m
A4
m
m
m
m
m
B5
m
m
m
m
A5
m
m
m
B6
m
m
A6
m
A7 *1
m
m
m
m
m
m
m
m
m
m
m
m
m
m
m
m
m
m
m
m
m
m
m
m
m
m
m
m
m
m
m
m
m
m
m
m
m
m
m
m
m
m
m
m
m
m
m
m
m
m
11x17
m
m
m
m
m
m
Legal
(81/2x14)
m
m
m
m
m
m
m
81/2x13
m
m
m
m
m
m
m
Letter
(81/2x11)
m
m
m
m
m
m
m
m
51/2x81/2
m
m
m
m
m
m
m
m
m
m
m
m
*1
100
The scanning size must be manually entered.
900
dpi
1000 1100 1200
dpi dpi dpi
Relationship between Resolution and File Size
v When Gray Scale is selected as the Colors/ Gradations
The originals can be scanned using combinations marked with m in the table
(Original orientation: S).
100
dpi
200
dpi
300
dpi
600
dpi
700
dpi
A3
m
m
m
B4
m
m
m
m
A4
m
m
m
m
B5
m
m
m
m
m
A5
m
m
m
m
m
m
m
B6
m
m
m
m
m
m
m
m
A6
m
m
m
m
m
m
m
m
m
A7 *1
m
m
m
m
m
m
m
m
m
11x17
m
m
m
Legal
(81/2x14)
m
m
m
m
81/2x13
m
m
m
m
Letter
(81/2x11)
m
m
m
m
m
51/2x81/2
m
m
m
m
m
m
m
*1
400
dpi
500
dpi
800
dpi
900
dpi
1000 1100 1200
dpi dpi dpi
m
m
m
The scanning size must be manually entered.
9
101
Appendix
Relationship between File Type Specified
and File Type Used When Sending E-mail
The relationship between the file type specified when scanning originals and the
file type converted into when sending e-mail or storing files is shown below by
scan type.
File type specified
Single page
Multi page
Scan type
TIFF/JPEG
TIFF
TIFF
Multi-page TIFF
PDF
Text (Print)
Text (OCR)
Text/ Photo
PDF
Photo
Gray Scale
*1
TIFF (Non-compression) / JPEG (Compression) *1
Multi-page TIFF
(Non-compression) /
PDF
When Gray Scale is used, the file format is converted to JPEG when [Standard], [High],
or [Low] is selected for [Compression (Gray Scale)] in [Scan Settings], and TIFF when [Off]
is selected.
Note
r Files are stored in single-page style. When sending files by e-mail, you can select single-page style or multi-page style.
r When multi-page TIFF is specified for the files saved in JPEG format, they are
automatically changed to PDF.
9
102
Max. Number of Addresses Which Can Be Specified and Files Which Can Be Stored
Max. Number of Addresses Which Can Be
Specified and Files Which Can Be Stored
E-mail
The number of addresses which can be
specified at a time
when sending
The number of addresses which can be
registered in the list
500 *1
Scan to Folder
*2
50 *1
When sending e-mail and sending by Scan to
Folder at the same time: 550 *1 *3
3000 *4
The max. number of
pages which can be
stored
9000 *4
The max. number of
pages which can be
stored as a single file
1000
*2
*3
*4
*5
500 *5
See the manuals for
ScanRouter V2
Lite/Professional.
2000
The max. number of
files which can be
stored
*1
Delivery Server
There is a limitation to the number of addresses to specify in the following 1-4 case.
A The number of addresses to enter directly for sending e-mail: 65
B The number of addresses to enter directly for sending by Scan to Folder: 50
C The number of addresses to search and specify from the LDAP server: 65
D The number of addresses to specify combining with above 1, 2, and 3: 65
When specifying 65 addresses to enter directly, the remainder of address should be
specified from the registered ones within 435 addresses.
When sending e-mail and sending by Scan to Folder at the same time, the address of
e-mail cannot be specified over 500, and the address for Scan to Folder cannot be
specified over 50.
It is the number including the files which is stored using not only the Scanner function, but the copy function, the facsimile function, the Document Server function,
and the printer function.
The maximum number of addresses which can be specified varies depending on the
software you use, ScanRouter V2 Lite/Professional. For more information, see the
manuals for ScanRouter V2 Lite/Professional.
9
Note
r Sometimes the machine cannot store or send files to the maximum number
depending on the files and originals.
103
Appendix
Troubleshooting
This section contains advice on what to do if you have problems scanning an
original, or if the network delivery scanner or e-mail function does not work.
Various messages that may appear on the control panel or client computer are
listed, along with causes and solutions.
When Scanning Is Not Performed as Expected
Problems
Causes and solutions
No image results from scanning.
The original was placed with the front and back reversed.
When the original is placed directly on the exposure glass, the
side to be scanned must face down. When the original is fed via
the ADF, the side to be scanned must face up. See p.35 “Setting
Originals”.
The image is distorted or out
of position.
• The original was moved during scanning. Do not move the
original during scanning.
• The original was not pressed flat against the exposure glass.
Make sure that the original is pressed flat against the exposure glass.
The scanned image is dirty.
The exposure glass or the exposure glass cover is dirty. Clean
these parts. See General Settings Guide.
The scanned image is upside
down.
The original was placed upside down. Place the original in the
correct orientation.
See p.35 “Setting Originals”.
When the Delivery Function Does Not Work
9
Problems
Causes and solutions
The delivery scanner function screen is not displayed.
• If the network TWAIN scanner screen appears when the machine is switched to scanner mode, press [Exit] to switch to
the network delivery scanner screen.
• If the display does not switch from network TWAIN scanner
to network delivery scanner, the delivery scanner settings
are not correct. See p.13 “Scanner Features”, and then make
the appropriate settings.
When Stored Files Cannot Be Accessed
104
Problems
Causes and solutions
The stored file is locked and
is not accessible.
The stored file with the protecting function is locked because the
wrong password was entered ten times. For information about
how to unlock the file, see “8. Security” General Settings Guide.
Troubleshooting
When an Error Message Appears on the Control Panel
Note
r If an error message that is not included in this section appears, turn off the
main power switch of the machine, and then turn it on again. If the message
still appears, note the content of the message and the error number (if listed
in the table), and contact your service representative. For information about
how to turn off the main power switch, see General Settings Guide.
Message
Causes and solutions
Cannot cancel sending certain
file(s). To confirm the result, check
[Scanned Files Status].
Only files in waiting can be canceled.
Files with a delivery status of successful or other result cannot be canceled.
Cannot detect original size. Select
scan size.
• Place the original correctly.
• Specify the scan size.
• When placing an original directly
on the exposure glass, the lifting/lowering action of the ADF
triggers the automatic original
size detection process. Lift the
ADF by more than 30 degrees.
Cannot enter manually more than nnn
destinations at the same time.
Note
When there are nnn or more destinations for a delivery or an e-mail, split
the destinations into two or more
groups.
r “nnn” in the message represents changeable
number.
Cannot find the specified path. Please
check the settings.
Check whether the computer name
and the folder name for the destination are correct.
Cannot log on with the entered user
name or password.
Make settings correctly for the user
name and the password for the authentication.
Cannot select over 30 files at the
same time.
To deliver more than 31 stored files,
divide the files and perform the operation several times.
9
Cannot specify more than 500 destina- When there are 500 or more destinations for a delivery or an e-mail, split
tions at the same time.
the destinations into two or more
groups.
Cannot specify more than 50 folders at
the same time.
When there are 50 or more destinations for Scan to Folder, split the destinations into two or more groups.
105
Appendix
Message
Causes and solutions
Captured file exceeded max. number of
pages per file. Cannot send the
scanned data.
The maximum number of pages
which can be stored as a single file is
1000. Reduce the number of pages
and send them again.
Connection with LDAP server has
failed. Check the server status.
A network error has occurred and
connection has failed. Try the operation once more. If the message is still
shown, the network may be crowded. Check the information of System
Settings.
Entered protection code for destination is incorrect. Please re-enter.
Make sure the protection code is correct, and then enter it again.
Exceeded max. data capacity. Check the
scanning resolution, then press Start
again.
Specify the scan size and resolution
again. Note that it may not be possible to scan very large originals at a
high resolution. See p.99 “Relationship between Resolution and File
Size”.
Exceeded max. data capacity. Check the
scanning resolution, then reset nnn
original(s).
Specify the scan size and resolution
again. Note that it may not be possible to scan very large originals at a
high resolution. See p.99 “Relationship between Resolution and File
Size”.
Note
r “nnn” in the message represents changeable
number.
Exceeded max. E-mail size. Sending E- • Increase the size of [Max. E-mail
Size].
mail has been cancelled. Check [Max.
E-mail Size] in Scanner Features.
• Set [Divide & Send E-mail] to [Yes
(per Page)] or [Yes (per Max. Size)].
9
Exceeded max. file capacity. Delete
the unnecessary stored files.
The maximum number of files that
can be stored is 3000. Reduce the
number of files or delete unneeded
files.
Exceeded max. No. of search results
which can be displayed.
Search again after changing the
search conditions.
Max.: nnn
Note
r “nnn” in the message represents changeable
number.
Exceeded max. number of alphanumeric
characters.
106
Make sure the maximum number of
characters which can be entered, and
then enter it again.
Troubleshooting
Message
Causes and solutions
Exceeded max. number of alphanumeric
characters for the path.
The maximum number of characters
which can be entered for path is 128.
Check the number of character you
entered, and then enter it again.
Exceeded max. number of files which
can be sent at the same time. Reduce
the number of the selected files.
The number of files exceeded the
maximum number possible. Reduce
the number of files and send them
again.
Exceeded max. number of files which
can be used in Document Server at the
same time.
Make sure the files stored by the other functions, and then delete unneeded files.
Exceeded max. number of pages per
file. Do you want to store the scanned
pages as 1 file?
The maximum number of pages per
file is 1000. Specify whether to use
the data or not. Scan the pages that
were not scanned and store them as
a new file.
Exceeded max. number of standby files.
Try again after the current file is
sent.
There are 100 files waiting in the
sending queue for e-mail, Scan to
Folder, or delivery function. Wait
until files have been sent.
Exceeded max. number of stored files.
Cannot send the scanned data as capturing files is unavailable.
The maximum number of files that
can be stored in Document Server is
3000. Reduce the number of files or
delete unneeded files.
Exceeded max. page capacity per file.
Press [Send] to send the scanned data,
or press [Cancel] to delete.
Because the number of pages has
reached the maximum number that
can be sent, the data up to this point
is sent. Scan the remaining pages after transmission.
Exceeded time limit for LDAP server
search. Check the server status.
A network error has occurred and
connection has failed. Try the operation once more. If the message is still
shown, the network may be crowded.
9
Check the information of System Settings.
LDAP server authentication has
failed. Check the settings.
Make settings correctly for the user
name and the password for LDAP
server authentication.
Load paper of the following sizes.Re- Load paper of the sizes listed in the
message.
quired: 11 x 17S 81/2 x 14S 81/2 x
11R 81/2 x 11S
107
Appendix
Message
Causes and solutions
Memory is full. Cannot scan. The
scanned data will be deleted.
Because of insufficient hard disk
space, the first page could not be
scanned. Try one of the following
measures:
• Wait for a while, and then retry
the scan operation.
• Reduce the scan area or scanning
resolution.
• Delete unneeded stored files.
Memory is full. Press [Send] to send
the current scanned data, or press
[Cancel] to delete.
Because there is not enough free
hard disk space in the machine for
delivering or sending by e-mail
while storing into the Document
Server, only some of the pages could
be scanned. Specify whether to use
the data or not.
Memory is full. Scanning has been can- Because there is not enough free
hard disk space in the machine for
celled. Do you want to store the
storing into the Document Server,
scanned data?
only some of the pages could be
scanned. Specify whether to use the
data or not.
9
108
No HDD is available for this function.
Cannot store. Set original and select
the TWAIN settings from the PC.
Files can be stored with TWAIN by
switching to the network TWAIN
scanner function.
Original is being scanned by another
function.
The machine is using another function such as copying. Retry scanning
after the operation with the other
function is completed.
Out of paper in.... Load paper of the
following size.
Load paper in the tray indicated.
Output buffer is full. Sending the
data has been cancelled. Please try
again later.
Too many files are waiting to be delivered. Please try again after they
have been delivered.
Selected file is currently in use.
Cannot change file name.
The name of a file that is being edited
with DeskTopBinder V2 Lite/Professional or that is waiting for delivery cannot be changed. Try the
operation again after editing is finished or delivery is canceled.
Selected file is currently in use.
Cannot change password.
The password of a file that is being
edited with DeskTopBinder V2
Lite/Professional or that is waiting
for delivery cannot be changed. Try
the operation again after editing is
finished or delivery is canceled.
Troubleshooting
Message
Causes and solutions
Selected file is currently in use.
Cannot change user name.
The user name of a file that is being
edited with DeskTopBinder V2
Lite/Professional or that is waiting
for delivery cannot be changed. Try
the operation again after editing is
finished or delivery is canceled.
Selected file is currently in use.
Cannot delete it.
A file that is being edited with DeskTopBinder V2 Lite/Professional or
that is waiting for delivery cannot be
deleted. Try the operation again after
editing is finished or delivery is canceled.
Sender's name is not selected. Please
specify sender's name.
A sender's name should be specified
before sending e-mail. Send e-mail
after specifying the sender's name.
Sending the data has failed. The data
will be resent later.
A network error has occurred and a
file was not sent correctly. Wait until
sending is retried automatically after
the preset interval. If the sending
fails again, consult the network administrator.
Sending the data has failed. To confirm the result, check [Scanned Files
Status].
While a file was being sent, a network error occurred and the file
could not be sent correctly. Try the
operation once more.
If the message is still shown, the network may be crowded. Consult the
network administrator.
If multiple files were sent, use the
Scanned Files Status screen to check
for which file the problem occurred.
See p.58 “Checking the Status of Email”, p.71 “Checking the Status of
Scan to Folder”, or p.94 “Checking
the Status of Delivery”.
9
If there is not enough free hard disk
space in the client computer, gain the
enough free hard disk space.
The destination list has been updated.
Specified destination(s) or sender's
name has been cleared.
A specified destination or sender's
name was cleared when the destination list in the delivery server was
updated. Specify the destination or
sender's name again.
The E-mail address entered is not cor- Make sure the e-mail address is correct, and then enter it again.
rect. Please re-enter.
109
Appendix
Message
Causes and solutions
The entered path is not correct.
Please re-enter.
Make sure the computer for destination and the path, and then enter if
again.
The specified group contains some
invalid destination(s).
Do you want to select only valid destination(s)?
The specified group contains some
destinations for sending by e-mail
and sending by Scan to Folder. To select destinations for sending by email, press [Select] for the warning
displayed on the e-mail screen. To
select destination for sending by
Scan to Folder, press [Select] for the
warning displayed on the Scan to
Folder screen.
Updating the destination list. Please
wait. Specified destination(s) or
sender's name has been cleared.
If a destination or sender's name was
already selected, re-select it after this
message disappeared.
Updating the destination list has
failed. Try again?
Check whether the server is connected.
When an Error Message Appears on the Client Computer
This section describes the main possible causes and actions for error messages
displayed on the client computer when the TWAIN driver is used.
Note
r If an error message that is not contained in this section appears, turn off the
main power switch of the machine, and then turn it on again. If the message
is still shown after scanning is performed again, note the content of the message and the error number (if listed in the table), and contact your service representative. For information about how to turn off the main power switch, see
General Settings Guide.
9
Message
Causes and solutions
[Cannot add any more scanning mode.]
The maximum number of modes that can
be stored is 99. Delete unneeded modes.
[Cannot connect to the scanner. Check the network Ac- The access mask is set. Consult the network
cess Mask settings in User Tools.]
or scanner administrator.
[Cannot detect the paper size of the original. Specify the
scanning size.]
• Place the original correctly.
• Specify the scan size.
• When placing an original directly on the
exposure glass, the lifting/lowering action of the ADF triggers the automatic
original size detection process. Lift the
ADF by more than 30 degrees.
110
Troubleshooting
Message
Causes and solutions
[Cannot find the scanner. Check if the scanner main
power is on.]
• Check whether the main power switch
of the machine is turned off.
• Check whether the machine is connected to the network correctly.
• Deselect the personal firewall function
of the client computers.
[Cannot specify any more scanning area.]
The maximum number of scanning areas
that can be stored is 99. Delete unneeded
scanning area.
[Clear Misfeed(s) in ADF.]
Remove the originals jamming. When the
originals are misfed, place them again.
Check whether the originals are proper to
be scanned by the machine.
[Cannot add any more scanning mode.]
Check whether the client computer can use
the TCP/IP protocol.
[Error has occurred in the scanner.]
Check whether the scanning settings made
with the application exceed the setting
range of the machine.
[Error has occurred in the scanner driver.]
• Check whether the network cable is
connected correctly to the client computer.
• Check whether the Ethernet board of
the client computer is recognized correctly by Windows.
• Check whether the client computer can
use the TCP/IP protocol.
[Fatal error has occurred in the scanner.]
An recoverable error has occurred in the
machine. Call your service representative.
[Insufficient memory. Close all other applications, then
restart scanning.]
Close all the unnecessary applications running on the client computer.
[Insufficient memory. Reduce the scanning area.]
• Reset the scan size.
9
• Lower the resolution.
• Set with no compression. See p.21
“Send Settings”.
Note
r “The Relationship between the Resolution and the Scanning Area” chart in
Help for halftone scanning might not always apply. Scanning cannot be performed if large values are set for
brightness when using halftone or high
resolution.
r When a paper misfeed occurs in the machine during printing, scanning cannot
be performed. In this case, after the misfed paper has been removed, proceed
with scanning.
111
Appendix
Message
Causes and solutions
[Invalid Winsock version. Please use version 1.1 or high- Install the operating system of the compuer.]
ter or copy Winsock from the operating
system CD-ROM.
[No response from the scanner.]
• Check whether the machine is connected to the network correctly.
• The network is crowded. Wait for a
while, and then try to reconnect.
[No User Code is registered. Consult your system administrator.]
Access is restricted with user codes. Consult the system administrator of the machine.
[Please call your service representative.]
An unrecoverable error has occurred in the
machine. Call your service representative.
[Scanner is in use for other function. Please wait.]
A function of the machine other than the
scanner function is being used such as the
copier function. Wait for a while and reconnect.
[Scanner is not available. Check the scanner connection
status.]
• Check whether the main power switch
of the machine is turned off.
• Check whether the machine is connected to the network correctly.
• Deselect the personal firewall function
of the client computers.
9
112
[Scanner is not ready. Check the scanner and the options.]
Check whether the ADF cover is closed.
[The name is already in use. Check the registered
names.]
You tried to register a name that is already
in use. Use another name.
Specifications
Specifications
Scan method
Flatbed scanning
Scan speed
• E-mail/Scan to Folder/Network Delivery Scanner
51 pages/minute [Scan size: A4R, Scan type: Text
(Print), Resolution: 200 dpi, Compression (Black &
White): On (MH)]
• TWAIN Scanner
46 pages/minute [Size: A4R, Mode: Standard, Resolution: 200 dpi, Compression (Binary/Halftone): Data
compression (MMR)]
Maximum power consumption
1440 W
Image sensor type
CCD Image Sensor
Scan type
Sheet, book
Interface
Ethernet interface (10BASE-T or 100BASE-TX), IEEE 1394
(IP over 1394) [optional], and IEEE 802.11b (Wireless LAN)
[optional]
Maximum scan size
A3/297 × 432 mm, 11 × 17 inches
Scan size that can be detected au- • Exposure glass
tomatically
11” × 17”S, 8.5” × 14”S, 8.5” × 11”RS
• ADF
11” × 17”S, 8.5” × 14”S, 8.5” × 11”RS, A4R, 5.5” ×
8.5”RS
Resolution
600 dpi (8-bit grayscale)
Variable range of scan resolution
• E-mail/Scan to Folder/Network Delivery Scanner
Setting range: 100 dpi, 200 dpi, 300 dpi, 400 dpi, and 600
dpi
• TWAIN Scanner
Setting range: 100 dpi - 1200 dpi
9
File formats that can be sent by e- TIFF, JPEG, PDF
mail
Compression method
Binary: TIFF (MH, MR, MMR)
Grayscale: JPEG
Protocol
Network: TCP/IP
Sending e-mail: SMTP
Scan to Folder: SMB, FTP
113
INDEX
A
Automatic Tilt Correction, 98
Auto run program, 25
C
Checking the status of delivery, 94
{Check Modes} key, 8
{Clear Modes} key, 8
{Clear/Stop} key, 9
Compression (Black & White), 21
Compression (Gray Scale), 21
D
Default Scan Settings, 16
DeskTopBinder V2 Lite, 29, 31, 95
Destination List Display Priority 1, 20
Destination List Display Priority 2, 20
Destination List Settings, 14, 20
Display Contents
E-mail, 10
Network delivery scanner, 11
Network TWAIN scanner, 11
Scan to Folder, 10
Display panel, 8
Divide & Send E-mail, 22
Document Server, 5, 73
E
E-mail, 3, 45
E-mail Information Language, 22
{Energy Saver} key, 8
{#} Enter key, 9
F
File Type Priority, 21
FTP server, 4, 64
Function keys, 9
Function status indicators, 9
114
I
Image density, 16
Indicators, 9
Initial scanner setup, 13
Installing software, 25
{Interrupt} key, 8
L
LDAP server, 4
M
Main power indicator and power
indicator, 8
Max. E-mail Size, 22
Max. Number of Addresses Which Can Be
Specified and Files Which Can Be Stored, 103
Mixed Original Sizes Priority, 18
Mode, 96
N
Network delivery scanner, 6, 85
Network TWAIN scanner, 7, 95
Not specifying a time limit for additional
originals, 43
Number keys, 9
O
Operation switch, 8
Original Feed Type Priority, 18
Original orientation and scan area, 39
Original Orientation Priority, 18
Original Setting, 18
P
Placing on the exposure glass, 36
Placing original in the Auto Document
Feeder (ADF), 37
Preview, 97
Print & Delete Scanner Journal, 21
Printing to the image, 98
{Program} key, 8
Programs, 23
R
Relationship between File Type Specified and
File Type Used When Sending E-mail, 102
Relationship between resolution and file size, 99
Resolution, 16
S
V
Viewing a list of stored files in
DeskTopBinder V2 Lite, 79
W
Wait Time for Next Orig.: Exposure Glass, 16
Wait Time for Next Original(s): SADF, 17
Save, 97
Scanner Features, 13
Scanning mode registration, 98
Scanning originals, 96
Scanning Originals in Several Times, 42
ScanRouter V2 Lite, 32
Scan Settings, 13, 16
Scan size, 16
Scan to Folder, 4, 59
Scan type, 16
Selecting a custom size, 19
Select Title, 20
Sender's Name Default, 22
Send Settings, 14, 21
Simultaneous Storage and Delivery, 93
Simultaneous Storage and Sending by
E-mail, 57
Simultaneous Storage and Sending by
Scan to Folder, 70
SMB, 4, 63
SMTP server, 3
Software supplied on CD-ROM, 29
{Start} key, 9
Storing Files, 73
T
Troubleshooting, 104
TWAIN Standby Time, 21
Type2045e TWAIN Driver, 30
U
Update delivery server destination list, 20
{User Tools/Counter} key, 8
115
116
EN
USA
B654-8707